

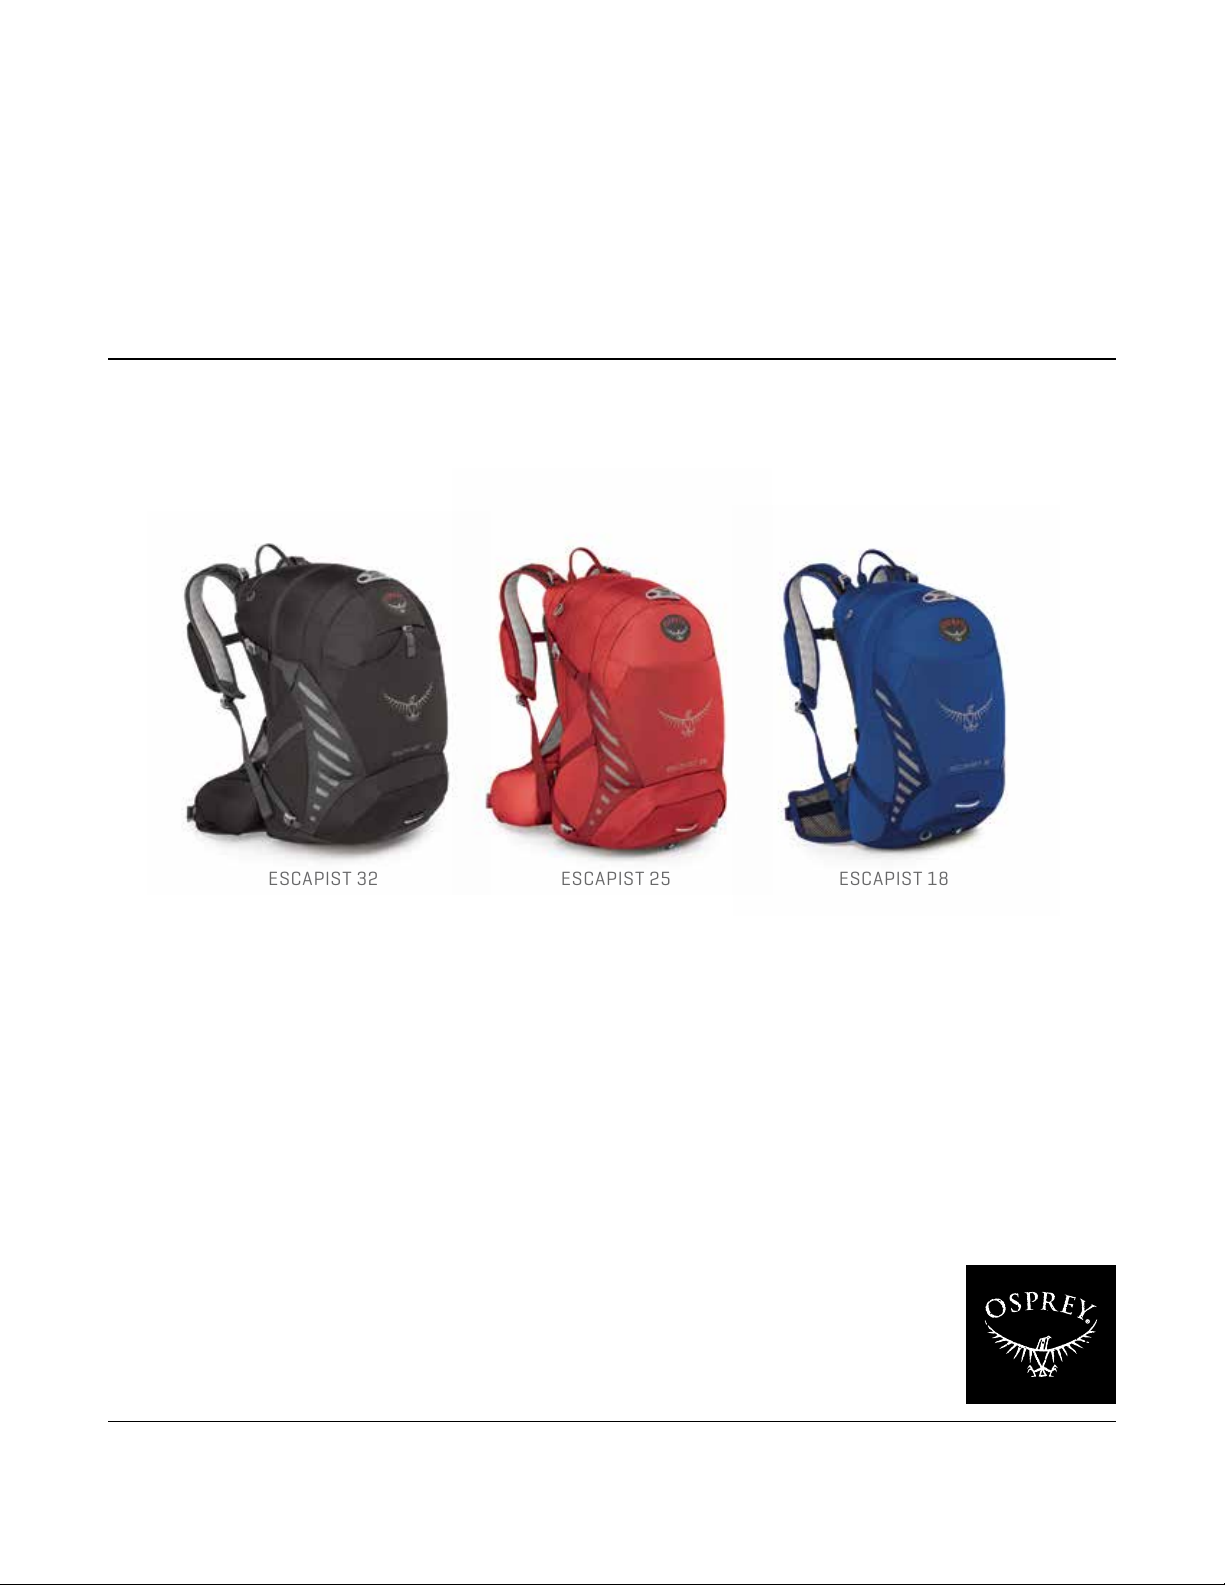
ESCAPIST SERIES
ESCAPIST 32 ESCAPIST 25 ESCAPIST 18
These highly versatile packs are full featured and equipped for a variety of
adventures. Loaded with organizational options, well ventilated and weatherproof,
the Escapist is the go-to every day, every activity technical daypack.
OWNER'S MANUAL
ospreypacks.com
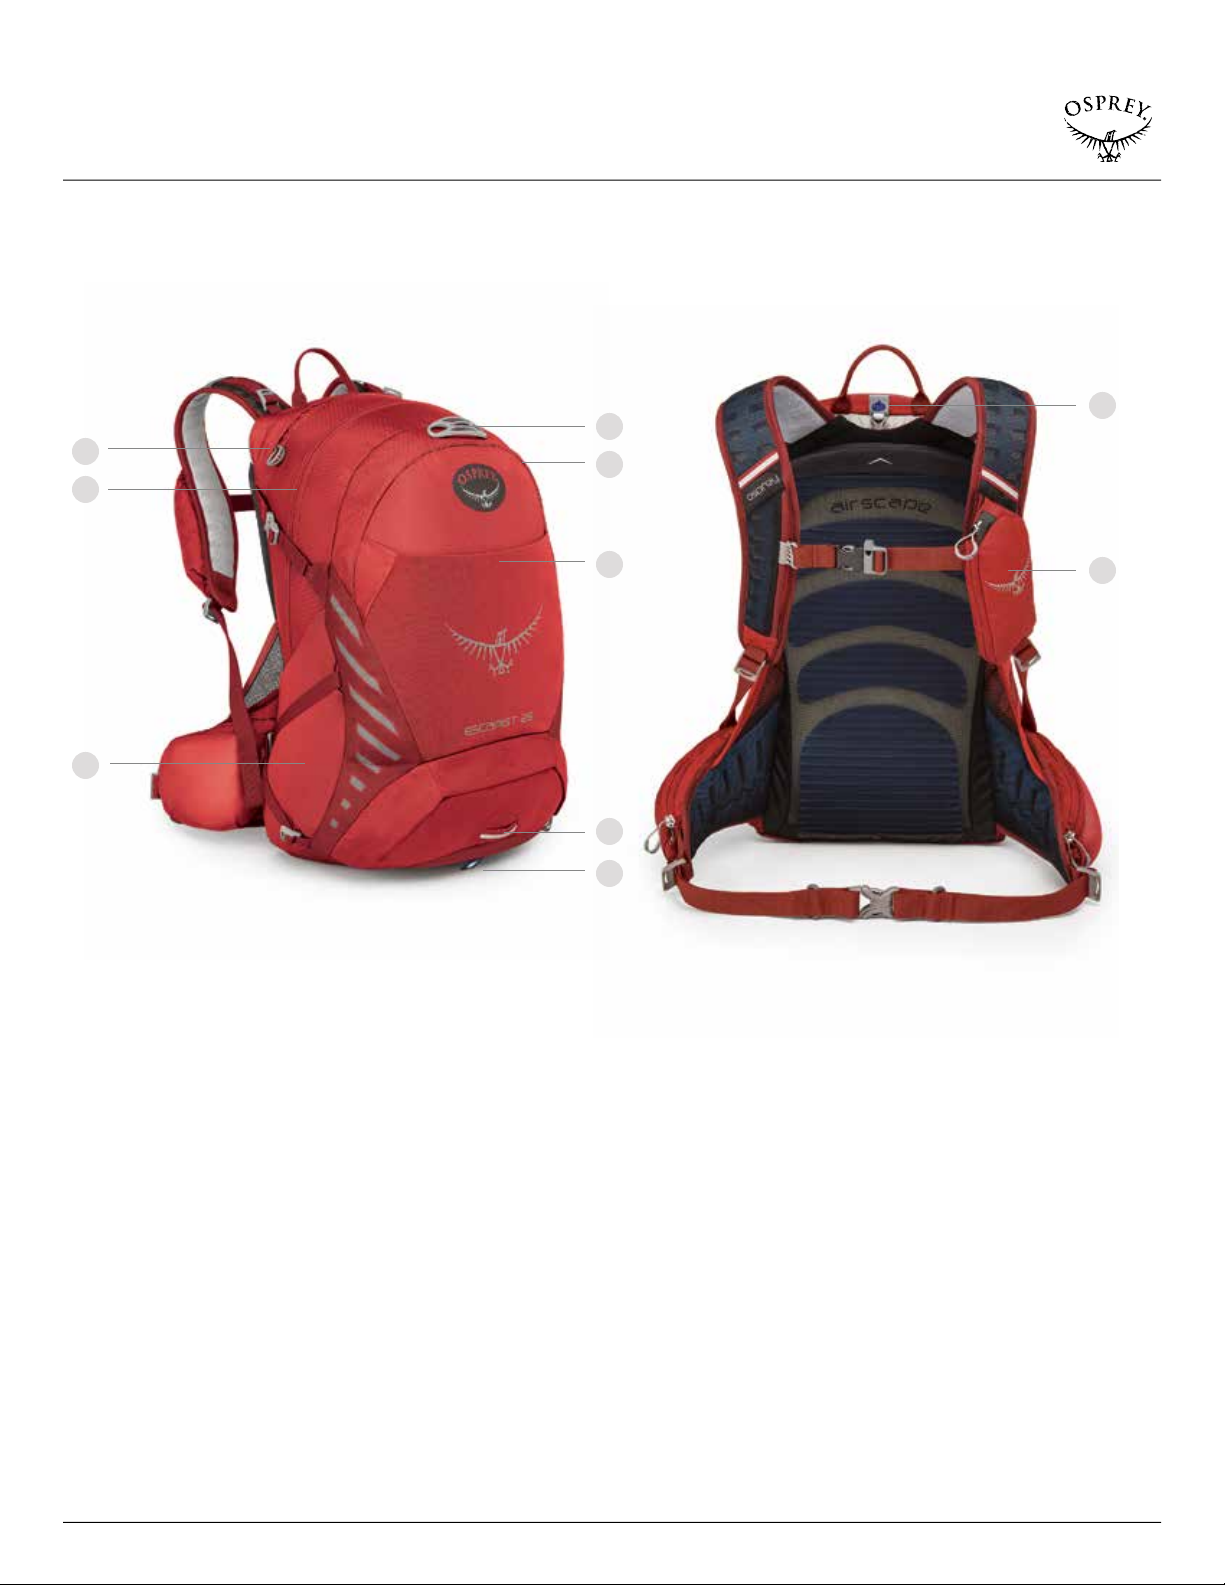
OVERVIEW
1
2
9
4
5
3
SHARED FEATURES
1 Exter nal zippered non-scra tch pocket
2 Fron t panel access t o main c ompart ment
3 Dual stretch mesh side pockets
4 LidL ock
5 Fron t organizer pocket
6 Large st retch mesh fron t pocket
7 Blink er light at tachmen t
8 Integrated raincover
9 Exter nal reserv oir sleeve
10 Zippered fabr ic pocket on lef t shoulder s trap
TM
bike helmet attachment
6
7
8
10
FABRIC
MAI N 210D Nylon Hex Coupling
ACCENT 420HD Nylon Packcloth
BOTTOM 420HD Nylon Packcloth
ESCAPIST SERIES
2
OVERVIEW
ESCAPIST 32
SPEC S S/M M/ L
Cubic Inches 1831 1953
Lit ers 30 32
Lbs/Ounces 2/4 2 /6
Kilograms 1.0 1 1.07
Inches 20h x 13w x 12d
Centime ters 51h x 32w x 31d
LOAD RANGE 15-30 lbs
ESCAPIST 25
SPEC S S/M M/ L
Cubic Inches 1404 1526
Lit ers 23 25
Lbs/Ounces 2/2 2/4
Kilograms 0.96 1.02
Inches 20h x 11w x 12d
Centime ters 50h x 27w x 31d
LOAD RANGE 10-25 Lbs
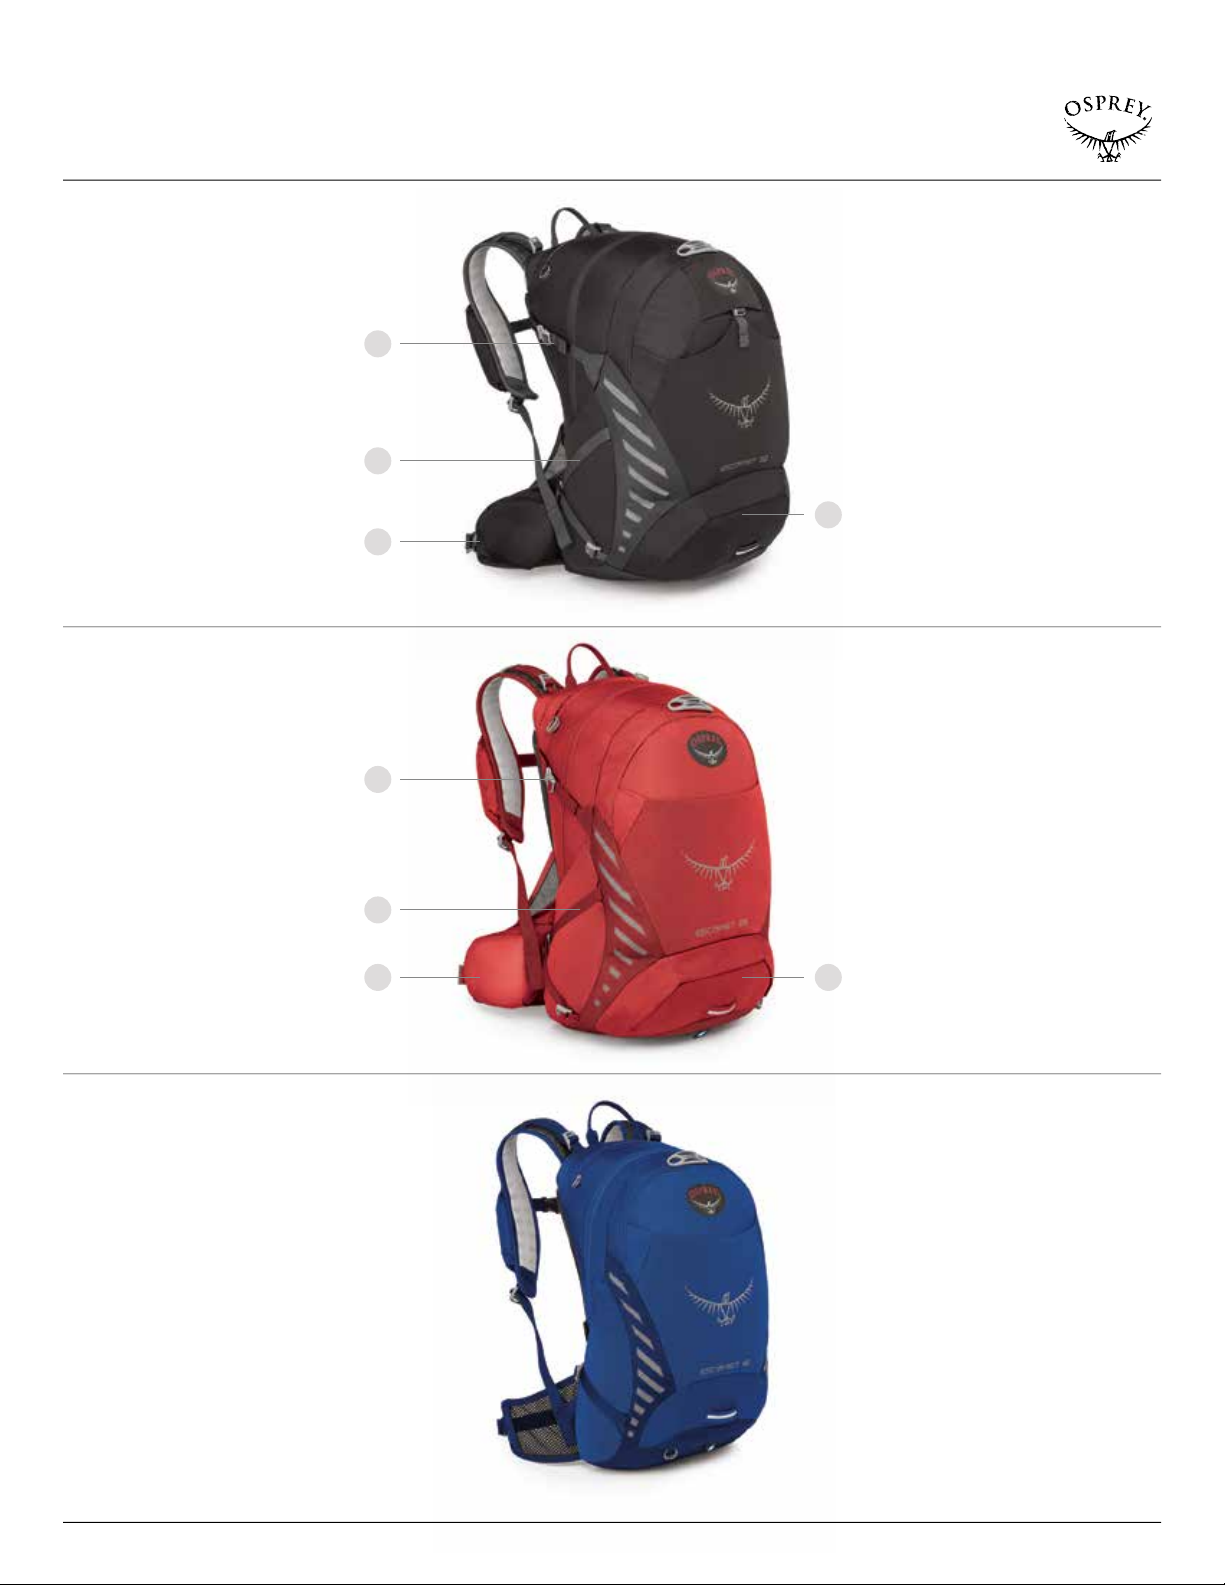
UNIQUE FEATURES
1
2
3
1 Upper s ide relea se buckle compression straps
2 InsideOut
3 Dual zippered hipbelt pockets
4 Low er compar tment with zip div ider
4
TM
lower compression straps
1
2
UNIQUE FEATURES
1 Upper s ide relea se buckle compression straps
2 InsideOut
3 Dual zippered hipbelt pockets
4 Low er compar tment with zip div ider
TM
lower compression straps
ESCAPIST 18
SPEC S S/M M/ L
Cubic Inches 976 1098
Liters 16 18
Lbs/Ounces 1/10 1/12
Kilograms 0.75 0.79
Inches 19h x 9 w x 11d
Centime ters 48h x 2 3w x 28d
LOAD RANGE 10-25 Lbs
ESCAPIST SERIES
43
3

SUSPENSION
1 AIRSCAPE™ BACKPANEL
+ Ridge molded f oam crea tes a light weight , supportiv e and
ventilated backpanel
+ Low-profile design keeps pack riding close f or excellent balance
2 BIOSTRETCH™ VENTILATED HARNESS
+ EVA foam is per forated wi th large holes for enhanced
breathabili ty, comf ort and stre tch
+ Breathable spacer mesh w rap s up ov er edges of foam t o create
soft, irritation free contact surface
3 BIOSTRETCH™ VENTILATED HIPBELT
32L / 25L only
+ EVA foam is per forated wi th large holes for enhanced
breathabili ty, comf ort and stre tch
+ Ext ende d mesh hipbelt wings f or enhanced pac k stability
SIZING / FIT
2
1
3
UNISE X TORSO SI ZING
32L / 25L
S/M 1 6-20" / 43 -51 cm
M/L 1 9-23 " / 48- 59 cm
18L
S/M 1 6-20" / 43 -51 cm
M/L 1 9-22 " / 48- 56 cm
ESCAPIST SERIES
ADJUSTABLE HARNESS
32L / 25L
The harne ss is adjus table up to 5"/13cm, pr oviding a s table and
comfor table carry for a variety of users . To adjus t the harne ss:
A Complet ely loosen the load lifters and har nes s straps.
B Disengage the hook and loop closure between the backpanel
and harness.
C Slide the har ness into place using the mark ings a s a guide.
D Reengage hook and loop closure .
4

FEATURE DETAILS
LIDLOCK™ HELMET ATTACHMENT
32L / 25L / 18L
Ospr ey’s LidLock™ easily and se curely carries bicycle helmets.
A Pull the LidLock™ at tachmen t away from the pack .
B Twist the LidLock™ and pass i t through the bottom of the helm et vent.
Turn the L idLock™ back to its horizontal pos ition to lock the helmet in
place.
C Adjust the LidLock™ tension w ith the cord loop on the right outside panel
of the pack .
D Reverse t o remove helmet.
BLINKER LIGHT ATTACHMENT
32L / 25L / 18L
The blinker light attachmen t strap found ne ar the base
of the front panel of t he pack allo ws for quick light
att achment s o you can be se en in the dark.
INTEGRATED RAINCOVER
32L / 25L / 18L
The in tegrat ed, removable high visibilit y raincover prov ides pack prot ection in
adverse conditions.
A Loca te the raincov er icon near the ba se of the pack and un zip the raincover
compartment.
B Pull t he rainco ver from the compar tment and slip it over the top and bottom
of pac k using the peripheral elastic to hold it in place.
C Re verse this process to r eturn raincover to compar tment.
D To remove the raincov er altoge ther, unfasten the t oggle from the cord lo op
and remove.
Note: To pr event m ildew allo w the rain cover to d ry enti rely bef ore sto ring.
ESCAPIST SERIES
SLASH POCKET
32L / 25L / 18L
A zippered top slash pocket lined with scratch free,
heat embossed fabric pr ovides ideal s torage for
optics and electronic devices.
EXTERNAL RESERVOIR SLEEVE
32L / 25L / 18L
An ex ternal r eservoir sleev e and sewn-in re servoir hanger, located bet ween
the backpanel and main body of the pack, allow s for easy loading/unloading of
hydration reservoirs and protect s internal conten ts of your pack from spills .
The sleeve is compatible with most 3L r eservoirs.
FOR INF ORMATION O N OSPREY 'S FULL LIN E OF RESERV OIRS VISI T
OSPREYPACKS.COM.
5

FEATURE DETAILS
1
2
FRON T ORGANI ZER POCK ET
32L / 25L / 18L
The du al zippered fr ont pocke t featur es organizat ional mesh pockets, a pump slee ve
and ke y clip prov iding easy access to essentials.
LOW ER COMPAR TMENT / DI VIDER
32L / 25L only
A lower zippere d compartment wi th a drop dow n, zipper ed fabric divider pr ovides the
option to have gear stor age separate f rom the pac k's main compar tment.
1 DUA L SIDE COMP RESSION S TRAPS
32L / 25L only
Dual upper side compression/c arry straps with a quick re lease buckle aid in
compres sing and stabilizing loads for op timal car ry.
TM
2 INSIDEOUT
32L / 25L only
Ospr ey’s InsideOut™ Compres sion straps allow you to create tension and easil y
secure loads in t he dual str etch mesh side pockets. To rou te the InsideOu t™
compression straps:
A Locate t he duckbill buckle to the top and side of each side pocke t and
B Route the webbing b y positioning t he slider buckle inside or outside of the
COMPRESSION STR APS
unthread the webbing.
side pocket and r everse the pr ocess above .
ESCAPIST SERIES
6

PACK / RESERVOIR MAINTENANCE
Your Osprey pack is an extremely durable product and is built for years of use.
However, some basic pack maintenance will help ensure your pack lasts a lifetime.
OSPREY PACKS
STANDARD MAINTENANCE
+ Af ter each trip be sure to cle an out your p ack thoroughly.
+ Clean th e zippers r egularly using mild soap, w arm w ater and sof t bru sh. T his will
help keep them in proper working condition.
+ If y our pa ck is wet , hang it to dry ou t of direct sunlight .
+ Loosen all the straps .
+ Wash your pack if dir t, swea t, salt and stains have work ed th eir way into fabric s,
webbing or mesh.
(Do no t immers e travel p acks in wa ter wit h our HighRo ad™ Wheeled Ch assis.)
WASHIN G YOUR PACK
A Empt y the pack including any food, dir t or spilled content s.
B If yo ur pack has a r emovable harn ess and hipbelt , remov e them from the pack bod y.
C Do NOT wash your pack in a washing machine. Clean your pack and components
in a bat htub or lar ge sink using a mild de ter gent and warm wa ter.
D Agi tate the pack gent ly. Scrub t he inside and outside o f all compartments
including the poc kets with a sof t bru sh.
E Clean the zipper s using a mild soap, w arm w ater and a sof t bru sh. F lush water
and soap thr ough the buckle s. Keeping dir t and debris out of the zipper s and
buckles will help keep them in proper working condition.
F Drain t he dirty w ater from the bath tub or sink and refill with cool clean non-
soap y water. Rinse the pack thor oughly. Repeat t his s tep a s necces sar y.
G Hang your pack to dr y out side or in a well ventila ted area, out o f direct sunlight.
WHEELED TRAVEL LUGGAGE
(Do no t immers e travel p acks in wa ter wit h our HighRo ad™ Wheeled Ch assis.)
A After each tr ip, empty the pack including any f ood, dirt or spilled contents.
B Clean the zippers r egularl y using mild soap, w arm w ater and soft brush. T his w ill
help keep them in proper working condition.
C W ipe the ex ter ior of the chassis wi th a damp clo th or sponge.
D Clean the pack f abric by scrubbing s tains and dirt w ith warm wat er, mild
detergent and a sof t brush or sponge.
E Use a wet to wel w ith clean n on-s oapy water to w ipe away any soap residue on
the pack.
F Hang your pack to dr y outside or in a well ventilated area, out of direc t sunlight .
RECOMMENDED CLEA NING PRODUCTS
Ospr ey recommends Nik wax® pro ducts for pack care. Be s ure t o read
label directions carefully befor e appl ying any produc t to your pack.
Tech Wash® - Use this with warm water for w ashing and cleaning your
packs or luggage.
Tent & Gear Solar P roof® - Use this spray-on product to prote ct your packs f rom
UV ex posure and to improve wa ter r epellenc y.
OSPREY RESERVOIRS
RESERVOIR STANDARD MAINTENANCE
+ Our reser voir’s anti-microbial f ormula prevents most mold and bac teria grow th.
+ Rin sing out your re ser voir after each us e should keep your reservoir fresh,
espe cially when using sugar y drink mixe s.
+ Periodically use Osprey's Hydraulics™ Cleaning Tablets to clean your reservoir.
+ Iodine or other puri fying tablets us ed in your reservoir will not affe ct the qualit y
of your reser voir. However these tablets may s tain the r eserv oir over time.
+ Freezing your re ser voir will not effec t the qualit y of the reser voir. However if the
reservoir is filled with water, be a war e that wat er ex pands when it freezes and
can damage y our reservoir if it is over filled.
+ Do NO T pour boiling wat er into the r eservoir. This can damage the reserv oir and
will void your warranty.
+ Watch “Cleaning an Ospr ey Hydraulic s™ Reserv oir” video on Ospre y Pac ks
YouTube® page.
(
CLE ANING YOUR RESE RVOIR
A Fill reserv oir with w arm water. Do not use bleach or boiling water.
B Add one cleaning tablet t o reser voir and clo se th e cap.
C Let tablet dissolve for 5 minutes w ith the re ser voir lay ing on i ts back.
D Shake the reservoir f or 30 seconds to mix and s pre ad the solu tion.
E Pinch the bi te valve and squeeze the reservoir t o remove air and fill the
reservoir hose and bite val ve with solut ion.
F Let the re ser voir sit for 15 minut es and then pour ou t solution.
G Rinse the reser voir and tube with clean cool wa ter.
H Hang your reservoir to dry in a well v entilat ed ar ea.
DEEP C LEANIN G YOUR RESER VOIR
1 Rinse out the reser voir and fill it with warm wa ter and a mild dish detergent.
Do not use bleach or boiling water.
2 W ith the lar ge cleaning brush from Osprey's Hydraulics™ Cleaning K it scrub t he
interior of the reservoir.
3 Remove the hose from the reserv oir and the bite v alv e from the hose and use
the sm all br ush from Osprey's Hydraulics™ Cleaning Kit to scrub t he interior of
the hose.
4 Remove the silic one bite valve cover and clean i t and the bite valve with w arm
soapy water.
5 Rinse t he interior and e xt erior of the reser voir, hose and bit e val ve parts wit h
cool clean w ater.
6 L et the hos e and bite valv e dry in a well-ventilat ed ar ea.
7 Inser t Osprey's Hydraulic s™ Cleaning Kit dr ying rack into t he reser voir and
hang to dry in a well ventila ted area.
For comple te instruc tions on cleaning your Osprey r eservoir w atch,
“Cleaning an Osprey Hydraulics™ Reser voir” at youtube.com/ospreypacks.
WITH OSPREY HYDRAULICS™ CLEANING TABLETS
(
WITH OSPREY HYDRAULICS™ CLEANING KIT
)
)
For comple te instruc tions on cleaning your Osprey p ack ,
visit: ospreypacks.com/PackTech/PackCare.
ESCAPIST SERIES
7

OSPREY ACCESSORIES
Customize and protec t your pack with Ospr ey ’s full line of acces sor ies .
For the full lineup, please v isi t your local Osprey r etailer or visit:
ospreypacks.com.
PACK YOUR PACK
Loading your pack cor rectl y optimizes comfort while
you ar e car rying i t. For complete informat ion visit:
ospreypacks.com/PackTech/HowToPackYourPack
GUARANTEE
At Osprey, sustain ability is designed into our packs , which are built to
last a lifetime and backed by a superb guar ant ee, no mat ter how har d
you ar e on your gear. Visi t ospreypacks.com for details.
QUESTIONS?
Contac t Osprey Customer Ser vice. Re al help from real people.
Scroll ov er the cus tomer service t ab at ospreypacks.com.
OSPR EY PACKS, I NC.
115 PR OGRESS CI RCLE
COR TEZ, CO 8 1321 USA
866-284-7830
ospreypacks.com/PackTech/OwnersManuals
www.ospreypacks.com/PackTech/OwnersManuals
KR
에서 사용자 설명 서를다운로드하세요
OWNER'S MANUAL
S15 - UP DATED 11 /14
ospreypacks.com
 Loading...