


ATMOS/AURA AGTM SERIES
ATMOS AG™ 65 ATMOS AG™ 50 AURA AG™ 65 AURA AG™ 50
The fourth generation of Osprey's Atmos and Aura ventilated backpack series
features the Anti-Gravity
unrestricted movement while wearing the pack. Combined with custom fit
capability and a full feature set, the Atmos AG
standard in ventilated backpacking.
TM
Suspension. This 3D contoured suspension allows
TM
/Aura AGTM Series sets a new
OWNER'S MANUAL
ospreypacks.com
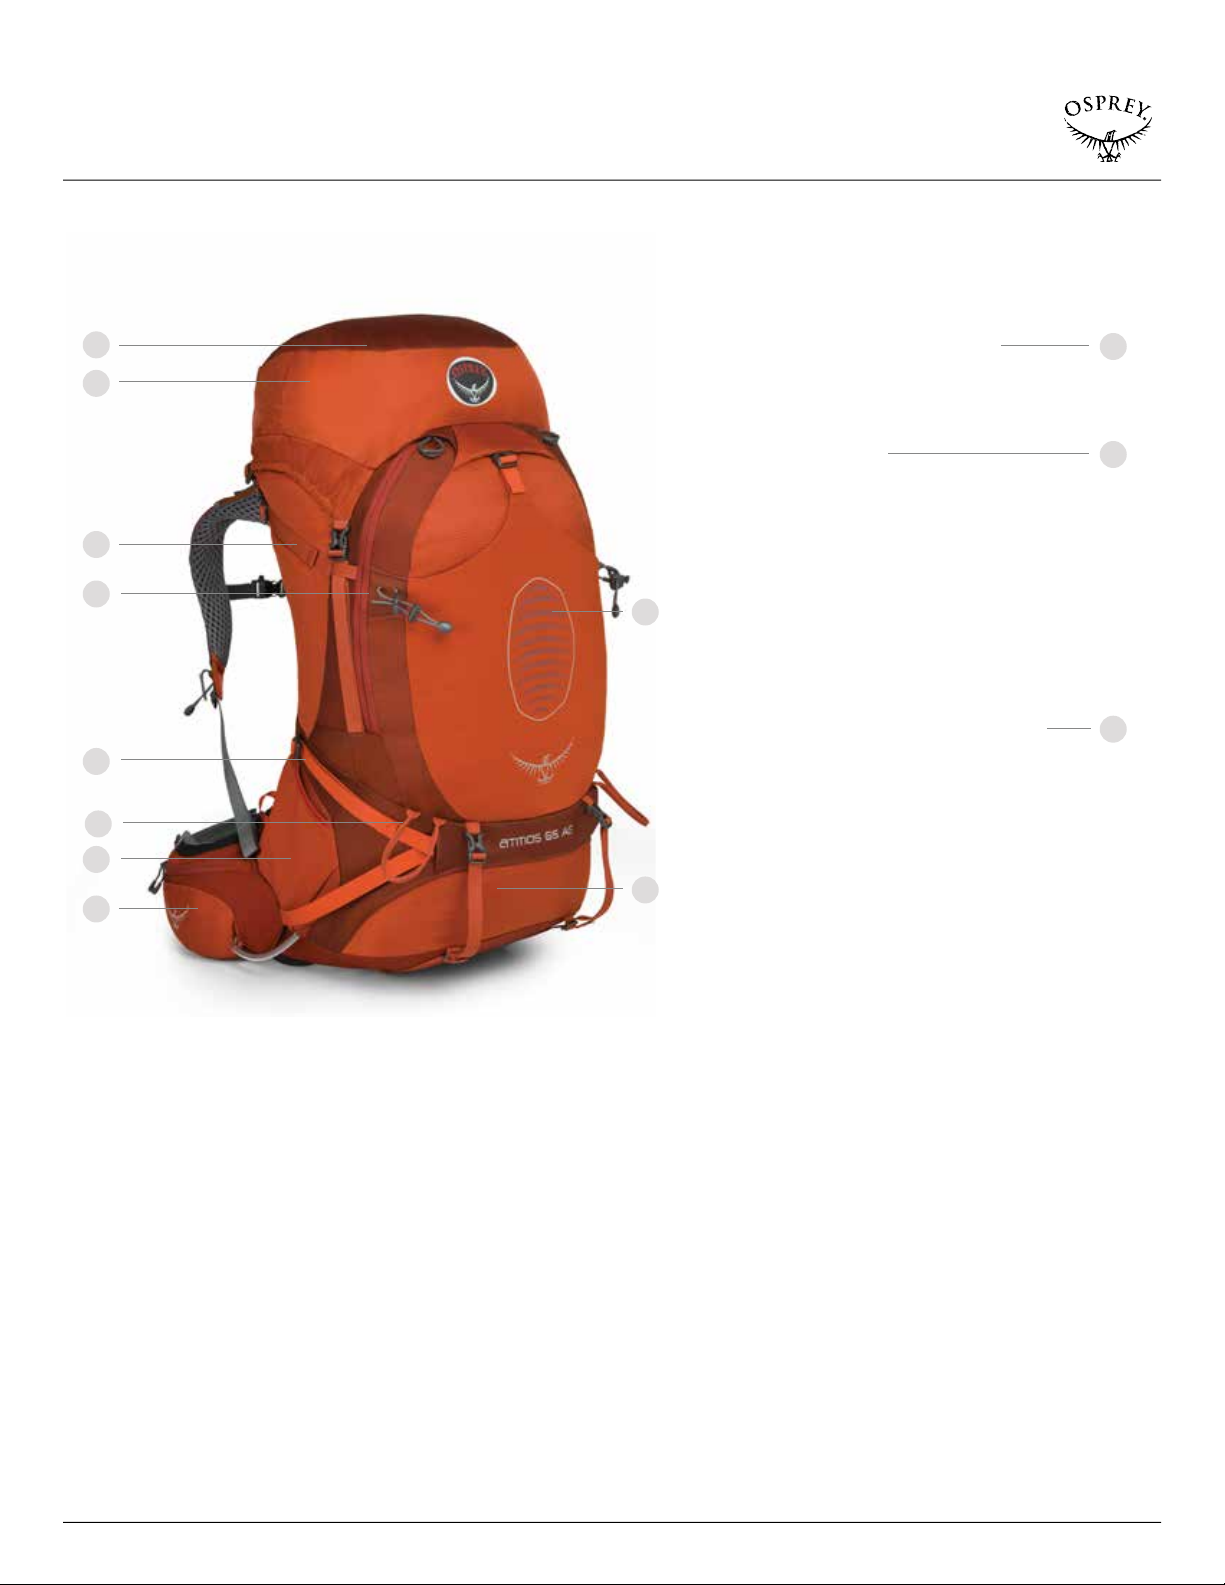
OVERVIEW
1
10
2
11
3
7
8
12
4
7
5
9
6
SHARED FEATURES
1 Top load ac cess to main compar tment
2 Remo vable flo ating top lid
3 Upper s ide compression s traps
4 Low er side compression straps
5 Dual stretch mesh side pockets
6 Dual zippered hipbelt pockets
7 Dual ic e tool loops with bungee tie-o ff s
8 Large st retch mesh fron t pocket
9 Lower zippered sleeping bag compartment
10 Dual zippered top lid pock ets
11 Internal reservoir sleeve
12 Stow-on-the-Go
+ Inter nal top compre ssion st rap
+ Intergrated FlapJacket
ATMOS / AURA SERIES
TM
trekking pole attachment
TM
for weather pr otected lidless u se
FA BR IC
MAI N 100D x 630 D Nylon Dobby
ACCENT 210D High Tenacit y Nylon
BOTTOM 420HD Nylon Packcloth
2

OVERVIEW
ATMOS AG™ 65
SPEC S S M L
Cubic Inches 3783 3967 4150
Lit ers 62 65 68
Lbs/Ounces 4/4 4/6 4/8
Kilograms 1. 92 1.98 2.04
Inches 33h x 15w x 15d
Centime ters 84h x 38w x 3 9d
LOAD RANGE 30 - 50lb
UNIQUE FEATURES
1 Dual zippered front panel pocke ts
2 Removable sleeping pad straps
AURA AG™ 65
SPEC S WXS WS WM
Cubic Inches 3661 3783 3967
Lit ers 60 62 65
Lbs/Ounces 4/0 4/2 4/4
Kilograms 1.81 1.87 1 .93
Inches 31h x 15w x 15d
Centime ters 79h x 38w x 3 9d
LOAD RANGE 30 - 50lb
UNIQUE FEATURES
1 Dual zippered front panel pocke ts
2 Removable sleeping pad straps
11
2
2
ATMOS AG™ 50
SPEC S S M L
Cubic Inches 2868 3051 3234
Lit ers 47 50 53
Lbs/Ounces 3/15 4/0 4/1
Kilograms 1.7 9 1.82 1.85
Inches 31h x 14w x 16d
Centime ters 80h x 35w x 40d
LOAD RANGE 25 - 40lb
AURA AG™ 50
SPEC S WXS WS WM
Cubic Inches 2746 2868 3051
Lit ers 45 47 50
Lbs/Ounces 3/11 3/12 3/13
Kilograms 1.67 1.70 1 .73
Inches 30h x 14w x 13d
Centime ters 75h x 35w x 32d
LOAD RANGE 25 - 40lb
ATMOS / AURA SERIES
3

SUSPENSION
SUSPENSION
1 ANTI-GRAVITYTM SUSPENSION
+ L ightWire
2 ANTI-GRAVITY
+ Top-to-bottom suspended mesh wr aps
3 ANTI-GRAVITY
+ Adjustable suspended harn ess wit h
+ Adjustable s ter num strap
+ Die cut foam low er and mesh E xoForm
+ Gender specific
4 ANTI-GRAVITY
+ Suspended mes h hip wrap for load transf er
+ Adjustable Fit-on-the-Fly
+ Gender specific
TM
tensioned full peripheral frame
comfor tably trans fers pack load
TM
BACKPANEL
shoulders, back and hips for a fully
integrated backpanel fit
TM
HARNESS
str uctural load li fter bar f or load transfer
and comfort
TM
wrap upper harness provide brea thabilit y
and comfort
TM
HIPBELT
and comfort
TM
hipbelt
3
LOAD LIFTERS
3
HARNESS
3
STERNUM STRAP
4
HIPBELT
FRAME
BACKPANEL
1
2
TM
OSPREY ANTI-GRAVITY
A continuous panel of light weight me sh extends fr om the top of the backpane l
to the hipbelt. The seamless s tructure contours automat ically to t he body,
providing outstanding fit and unrestricted movement when wearing the pack.
)
(AG™
TM
MODIFIED ERGOPULL
65L / 50L
Osprey's ErgoPull
cinching down the hipbelt.
A Loosen the hipbel t webbing so the hipbel t is large
enough to be buckled ar ound the waist .
B Grab t he loose ends of the webbing on bot h side s and
pull in and acr oss the body ev enly wit h both hands at
the same time.
HIPBELT
TM
design creates ex tra leverage when
ATMOS / AURA SERIES
4

SIZING / FIT
ATMOS A G™ - MEN'S SIZ ING
S 1 6-1 9 " / 40 -48 cm
M 18-2 1" / 46-5 3 cm
L 20-2 3" / 51-5 8 cm
WOMEN'S SPECIFIC FIT
+ The unique suspended me sh locat ed on the shoulders, b ack panel, lumbar and
hipbelt contour to a wide varie ty of body shapes and s izes to cr eate a cus tom f it
to your body.
+ The pack shape is narrowe r and de eper allowing grea ter f reedom of movement
and increasing stabilization by lowering the position o f the load to a w oman's
center of gravity.
+ The shoulder har nes s is designed wi th di ff erent curv es to create an anatomical
fit f or a woman's neck , shoulder s and chest.
+ Women's hips ar e conicall y shaped with a larger dif ference bet ween the waist
and hip measurement s. The hipbelt s are shape d and angled t o acc ommo dat e
this difference whic h allo ws a more comfort able load tr ansfer and support.
AUR A AG™ - WOMEN' S SIZING
XS 14 -17 " / 35 -43 cm
S 1 6-1 9 " / 40 -48 cm
M 18-2 1" / 46-5 3 cm
HARNESS SIZING
A Comple tel y loosen the pack's hipbelt str aps, harness str aps and load lif ter s.
B Load the pa ck with 10-20lbs/4-9kg of gear.
C Put on the pack en suring the hipbelt is centered and r esting over the user's
hipbones. The hipbelt padding should sit half above and hal f belo w the hipbone.
Buck le the hipbelt and t ighten the hipbelt straps.
D Tight en the shoulder harness straps by pulling them down and back. A djust and
buck le the sternum strap 2"/5cm below t he collar bone. T ighten the load lif ts to
transf er the weight off of the shoulders .
HARNESS FIT
The harne ss straps should w rap f ully around your shoulders wi th no gaps
bet ween the p ack and back. The padded part o f the harness s traps should
end 1"/2.5cm- 2"/5cm below t he ar mpits and the ster num strap adjusted to
approxim ately 2"/5cm below t he collarbone .
ILIA C CRESTC7 VERTEBRA
E Find the harne ss yoke or w here the harne ss straps come together near the user 's
neck . The yoke s hould be 2"/5cm below the C7 vertebr a. The C7 vert ebra can be
loca ted b y tilting t he head down and f inding the bone that pr otrude s at the base
of the neck .
F Make no te of how far the yoke is from the C7 vertebra. Based on this
meas urement, the tor so can be adju sted to the desired 2"/5cm.
ATMOS / AURA SERIES
5

SIZING / FIT
ADJUSTING HARNESS
65L / 50L
A C ompletely lo osen the pack's load lifter s and harne ss straps.
B Locate t he harness adjust ment cams on the le ft and right side behind the fabr ic wing where the
yoke wraps around the edges of t he backpanel.
C Push both cams down at t he same time wit h your thumbs fr om the top of the harne ss attachment
point to open and relea se th e cams. While pushing down on the cam with y our thumbs, use your
index and middle finger s to grab the lower por tion of the fabr ic wing in front of the c ams.
D Wit h the c ams r eleased simul taneously, slide both sides of the harne ss up or down to your desired
loca tion based on your torso f it needs and rele ase t he cams.
E Ensur e the cams ar e lined up at the same heigh t by compar ing each side’s position using the line
mark ings printed on the ba ckpanel behind the suspended mesh. If they are une ven, release and
adjus t one side’s cam t o mat ch the other.
F Follow "Torso Fit" instr uctions t o determine if t he torso f it is corr ect.
ATMOS / AURA SERIES
FIT-ON-THE-FLY™ HIPBELT
65L / 50L
The-Fit-on-the-Fly™ hipbelt pad extends up to 5"/15cm to accommodate different
hip sizes pr oviding a cust om fit. To adjus t the hipbelt:
A Locate the adjustment icon on t he hipbelt and slide a hand bet ween the fixed
hipbelt and the adjustable pad to separate the hook and loop closure.
B Slide t he hipbelt insert pa d into posi tion so tha t it wraps around your hipbones .
C Press firml y to reengage the hook and loop clos ure.
D Extend t he pads the same distance on both hipbelt wings s o the pack weight is
distributed evenly.
6

FEATURE DETAILS
1
2
COMPRESSION STR APS
65L / 50L
Dual upper side compression straps stabilize loads while lower, cross functional
compres sion straps also serv e as exter nal gear carr y straps . To adjus t, slide the nylon
str ap through the slider buckle and cinch i t to compress/car ry.
1 RE MOVABLE FL OATING TO P LID
65L / 50L
The floating top lid can extend to accept oversized loads or can be r emoved
from the pack body for weight saving lidless use.
A Release th e top lid ret ention strap buck les on the front side o f the pack .
B Unthread the webbing through the duck bill buckles located on the bac k
side of the top lid.
C Re verse to r eattach.
TM
2 FLAPJACKE T
65L / 50L
Osprey's FlapJacket
elements for the main pack c ompartment when the top lid is r emoved.
A Remove the top lid.
B Pull t he FlapJacket
the top of the pack.
C Using the pack's fr ont retention straps, cinch t he FlapJa cket
place.
TM
provide s compression and pr otection fr om the
TM
out from the pac k's main compar tment cover ing
TM
into
INTERNAL COMPRESSION STRAP
65L / 50L
Once y our pack is loaded , clip and tighten the red
inte rnal compres sion strap to stabilize the load.
SLEEPING BAG COMPARTMENT
65L / 50L
A lower zippere d sleeping bag compar tment wi th a drop
down divider prov ides easy access t o internal con tents
and allows y ou to use your pack wit h one compar tment or
two. To drop down t he internal divider, thread the nylon
connection straps through the sewn-in slider buckles.
ATMOS / AURA SERIES
7

FEATURE DETAILS
INTERNAL RESERVOIR SLEEVE
65L / 50L
An internal reservoir sleev e is located in the main body of the pack allowing easy
loading/unloading of a hydrat ion reservoir. Placing y our reser voir inside the slee ve
helps provide proper weight distribution when carrying your pack.
TOOL ATTACHMENT
65L / 50L
The du al ice tool loops and clo ve hitch s tyle bungee tie-o ffs provide secure tool
attachment and transport.
STOW-ON-THE-GO™ TREKKING POLE ATTACHMENT
65L / 50L
Ospr ey 's St ow-on the-Go™ trek king pole a tt achment i s designed to
quick ly attach and carry trek king poles while wearing a p ack .
A Adjust the trek king pole s to their minimum length.
B Locate th e elasticized loop on the lower lef t side of pac k. W hile
pullin g the loop ou t from the p ack , insert the ba ske t end of the
trekking poles into the loop.
C On the lef t harness strap locat e the trek kin g pole icon. Pull up on the
cord to open, place pole handles in the loop and t ighten with t he cord
lock to secure.
D Reverse t hes e steps to remove t he tr ekking poles.
A Slide the tool shaf t through the top of the ice tool loop and flip the shaft up
towards the top of the pack.
B Loosen the bungee cord lock and r oute the tool handle through the bungee.
Tigh ten the cord loc k nesting i t into the Y-Clip to s ecure the tool into place .
C Reverse to r emove.
REMO VABL E SLEEPIN G PAD STRA PS
65L
Sleeping pad straps allow for quick , secure external gear attachmen t. They can be
full y removed to sa ve weight .
ATMOS / AURA SERIES
8

PACK / RESERVOIR MAINTENANCE
Your Osprey pack is an extremely durable product and is built for years of use.
However, some basic pack maintenance will help ensure your pack lasts a lifetime.
OSPREY PACKS
STANDARD MAINTENANCE
+ Af ter each trip be sure t o clean out your pack thoroughly.
+ Clean the zippers regularl y usin g mild soap, warm wat er and s of t brush. This will
help keep them in proper working condition.
+ If your pack is wet, hang i t to dr y out of direct s unlight.
+ Loosen all the s traps.
+ Wash your p ack if dir t, s weat, salt and stains have w orked their wa y int o fabrics,
webbing or mesh.
(Do no t immers e travel p acks in wa ter wit h our HighRo ad™ Wheeled Ch assis.)
WASHIN G YOUR PACK
A Empty the pack including any food, dirt or spilled contents.
B If your pack has a r emovable har ness and hip belt, remov e them from the p ack bod y.
C Do NOT wa sh yo ur pac k in a washing machine. C lean your pack and components
in a bat htub or lar ge sink using a mild de ter gent and warm wa ter.
D Agitat e the p ack gently. Scrub the ins ide and out side of all compartments
including the poc kets with a sof t bru sh.
E Clean the zippers using a mild soap , war m water an d a sof t brush. F lush water
and soap thr ough the buckle s. Keeping dir t and debris out of the zipper s and
buckles will help keep them in proper working condition.
F Drain t he dir ty water from the bathtub or sink and re fill with cool clean non-
soap y water. Rinse the pack thor oughly. Repeat t his s tep a s necces sar y.
G Hang your p ack to dry out side or in a well ven tilated area, ou t of direc t sunlight .
WHEELED TRAVEL LUGGAGE
(Do no t immers e travel p acks in wa ter wit h our HighRo ad™ Wheeled Ch assis.)
A A ft er each trip, emp ty t he pack including any food, dirt or spilled content s.
B Clean the zippers regularly using mild soap, w arm water and soft brush. This will
help keep them in proper working condition.
C Wipe the exterior of the ch ass is with a damp clo th or sponge.
D Clean th e pack fabr ic by scrubbing s tains and dirt w ith warm wat er, mild
detergent and a sof t brush or sponge.
E Use a wet to wel with clean non-soap y water to w ipe away any soap residue on
the pack.
F Hang your pack to dr y outside or in a well ventilated are a, ou t of direct sunlight .
RECOMMENDED CLEA NING PRODUCTS
Ospr ey recommends Nik wax® pro ducts for pack care. Be s ure t o read
label directions carefully befor e appl ying any produc t to your pack.
Tech Wash® - Use this with warm water for w ashing and cleaning your
packs or luggage.
Tent & Gear Solar P roof® - Use this spray-on product to prote ct your packs f rom
UV ex posure and to improve wa ter r epellenc y.
OSPREY RESERVOIRS
RESERVOIR STANDARD MAINTENANCE
+ Our res ervoir ’s anti-microbial formula prevents most mold and bac teria growth.
+ Rinsing out your reser voir after ea ch use should keep your res ervoir f resh,
espe cially when using sugar y drink mixe s.
+ Periodically use Osprey's Hydraulics™ Cleaning Tablets to clean your reser voir.
+ Iodine or other purify ing tablets used in your re ser voir will not affec t the quality
of your reser voir. However these tablets may s tain the r eserv oir over time.
+ Freezing your reser voir will no t effect t he qualit y of the res er voir. Howe ver i f the
reservoir is filled with water, be a war e that wat er ex pands when it freezes and
can damage y our reservoir if it is over filled.
+ Do NO T pour boiling water in to the reser voir. This can damage the res er voir and
will void your warranty.
+ Wat ch “C leaning an Osprey Hydraulic s™ R ese rv oir” vide o on Ospre y Pac ks
YouTube® page.
(
CLE ANING YOUR RESE RVOIR
A F ill reser voir wit h war m water. Do not use bleach or boiling water.
B Add one cle aning tablet to res er voir and close the cap .
C Let tablet diss olv e for 5 minutes with the reservoir laying on its back.
D Shak e the r eservoir f or 30 seconds to mix and spread the solution.
E Pinch the bite valv e and squeeze the res er voir to remove air and fill the
reservoir hose and bite val ve with solut ion.
F L et the reser voir sit for 15 minutes and then pour ou t solution.
G Rinse the reser voir and tube with cle an cool water.
H Hang your reservoir t o dry in a well ventila ted area .
DEEP C LEANIN G YOUR RESER VOIR
1 Rinse out the res er voir and fill i t with war m water and a mild dish detergent.
Do not use bleach or boiling water.
2 With t he large cle aning brush fr om Ospre y's H ydr aulics™ Cleaning Kit s crub the
interior of the reservoir.
3 Re mov e the hose f rom t he reser voir and the bite valve fr om the hose and use
the sm all br ush from Osprey's Hydraulics™ Cleaning Kit to scrub t he interior of
the hose.
4 Re mov e the s ilicone bi te valve cov er and clean it and t he bite val ve with warm
soapy water.
5 Rinse t he interior and exterior of the reservoir, hos e and bite valv e par ts with
cool clean w ater.
6 Let the hose and bi te valve dry in a well-ventilated area.
7 Inser t Osprey 's Hydraulics™ Cleaning Ki t dr ying rack into the reserv oir and
hang to dry in a well ventila ted area.
For comple te instruc tions on cleaning your Osprey r eservoir w atch,
“Cleaning an Osprey Hydraulics™ Reser voir” at youtube.com/ospreypacks.
WITH OSPREY HYDRAULICS™ CLEANING TABLETS
(
WITH OSPREY HYDRAULICS™ CLEANING KIT
)
)
For comple te instruc tions on cleaning your Osprey p ack ,
visit: ospreypacks.com/PackTech/PackCare.
ATMOS / AURA SERIES
9

OSPREY ACCESSORIES
Customize and protec t your pack with Ospr ey ’s f ull line of ac cessories.
For the full lineup, please v isi t your local Osprey r etailer or visit:
ospreypacks.com.
PACK YOUR PACK
Loading your pack cor rectl y optimizes comfort while
you ar e car rying i t. For complete informat ion visit:
ospreypacks.com/PackTech/HowToPackYourPack
GUARANTEE
At Osprey, sustain ability is designed into our packs , which are built to
last a lifetime and backed by a superb guar ant ee, no mat ter how har d
you ar e on your gear. Visi t ospreypacks.com for details.
QUESTIONS?
Contac t Osprey Customer Ser vice. Re al help from real people.
Scroll ov er the cus tomer service t ab at ospreypacks.com.
OSPR EY PACKS, I NC.
115 PR OGRESS CI RCLE
COR TEZ, CO 8 1321 USA
866-284-7830
ospreypacks.com/PackTech/OwnersManuals
www.ospreypacks.com/PackTech/OwnersManuals
KR
에서 사용자 설명 서를다운로드하세요
OWNER'S MANUAL
S15 - UP DATED 11 /14
ospreypacks.com
 Loading...