


Osprey® 800e Series User Guide

© 2014 Osprey by Variosystems, LLC. All rights reserved.
Osprey® and SimulStream® are registered trademarks of Osprey by Variosystems, LLC. Microsoft®,
Windows® 7, Windows Server® 2003, AVStream®, DirectShow®, Intel® CoreDuo®, and Windows
Media® Encoder are trademarks or registered trademarks of Microsoft Corporation. Any other
product names, trademarks, trade names, service marks, or service names owned or registered by
any other company and mentioned herein are the property of their respective companies.
No part of this specification may be reproduced, transcribed, transmitted or stored in a retrieval system in any part or by any means without
the express written consent of Osprey by Variosystems, LLC. Osprey by Variosystems, LLC reserves the right to change any products herein at
any time and without notice. Osprey by Variosystems, LLC makes no representations or warranties regarding the content of this document, and
assumes no responsibility for any errors contained herein.
UL Statement
Underwriters Laboratories Inc. has not tested the performance or reliability of the security or signaling aspects of this product. UL has only
tested for fire, shock and casualty hazards as outlined in UL’s Standard for Safety UL 60950-1. UL Certification does not cover the performance
or reliability of the security or signaling aspects of this product. UL MAKES NO REPRESENTATIONS, WARRANTIES OR CERTIFICATIONS
WHATSOEVER REGARDING THE PERFORMANCE OR RELIABILITY OF ANY SECURITY OR SIGNALING RELATED FUNCTIONS OF THIS PRODUCT.
To maintain UL compliance, this product is to be used only with UL Listed computers that include instructions for user-installed accessories.
FCC Notice
WARNING: Connections between this device and peripherals must be made using shielded cables in order to maintain compliance with FCC
radio emission limits.
WARNING: Modifications to this device not approved by Osprey by Variosystems, LLC could void the authority granted to the user by the FCC to
operate the device.
The Osprey 800e Series video capture device has been tested and found to comply with the limits for a Class B digital device, pursuant to Part
15 of the FCC Rules. These limits are designed to provide reasonable protection against harmful interference in a residential installation. This
equipment generates, uses and can radiate radio frequency energy and, if not installed and used in accordance with the instructions, may cause
harmful interference to radio communications. However, there is no guarantee that interference will not occur in a particular installation. If this
device does cause harmful interference to radio or television reception, the user is encouraged to try to correct the interference by one or
more of the following measures:
Reorient or relocate the receiving antenna.
Increase the separation between the equipment and receiver.
Connect the computer into an outlet on a circuit different from that to which the
receiver is connected.
Consult the dealer or an experienced radio/TV technician for help.
If the above measures are unsuccessful, please consult the dealer or manufacturer of your radio or television receiver, or speak with an
experienced radio/TV technician.
Note: This reminder is provided to call to the CATV installer’s attention Section 820-40 of the NEC, which provides guidelines for proper
grounding and, in particular, specifies that the cable ground shall be connected to the grounding system of the building, as close to the point of
cable entry as practical.
Shielded Cables: Connections between this device and peripherals must be made using shielded cables in order to maintain compliance with
FCC radio emission limits.
Modifications: Modifications to this device not approved by Osprey by Variosystems, LLC could void the authority granted to the user by the
FCC to operate the device.
Note to CATV Installer: This reminder is provided to call to the CATV installer’s attention Section 820-40 of the NEC, which provides guidelines for
proper grounding and, in particular, specifies that the cable ground shall be connected to the grounding system of the building, as close to the
point of cable entry as practical.
Product Disposal Information
Dispose of this product in accordance with local and national disposal regulations (if any), including those governing the recovery and
recycling of waste electrical and electronic equipment (WEEE).
RoHS Compliant: Osprey by Variosystems, LLC is committed to compliance with the European directive on the Restriction of the Use of Certain
Hazardous Substances in Electrical and Electronic Equipment, Directive 2011/65/EC, the RoHS directive.
For current RoHS statement, visit www.ospreyvideo.com
Osprey by Variosystems, LLC 901 S. Kimball Ave., Southlake, TX 76092 USA

Osprey 800e Series User Guide
Contents
Overview .............................................................................................................................. 1
Warranties ....................................................................................................................................... 1
System requirements ....................................................................................................................... 2
Audience .......................................................................................................................................... 3
Installation Steps ................................................................................................................ 5
Installing the driver via the Multimedia CD ..................................................................................... 5
Installing the hardware .................................................................................................................... 9
Installing the video capture card ................................................................................................... 12
Multiple board types ...................................................................................................................... 13
Adding or moving boards ........................................................................................................ 13
Using the video capture card ......................................................................................................... 15
Designed for live/instant video-on-demand adaptive features .............................................. 16
Capture and preview pins ....................................................................................................... 16
Common buttons ..................................................................................................................... 17
Setting Driver Properties .................................................................................................. 19
Properties window ......................................................................................................................... 19
Video Proc Amp tab ................................................................................................................. 22
Video Decoder tab ................................................................................................................... 24
Crossbar tab............................................................................................................................. 26
Trace tab .................................................................................................................................. 27
Performance tab ...................................................................................................................... 28
Diagnostics tab ........................................................................................................................ 30
Resource Monitor tab ............................................................................................................. 31
Device tab ................................................................................................................................ 33
Input Detect tab ...................................................................................................................... 34
Deinterlace tab ........................................................................................................................ 35
Watermark tab ........................................................................................................................ 37
Loss Of Signal tab..................................................................................................................... 40
Cropping tab ............................................................................................................................ 42
Closed Caption tab .................................................................................................................. 45
VGA Settings tab ...................................................................................................................... 47
Osprey by Variosystems iii

Contents
Understanding Audio Input Properties ............................................................................ 49
Audio Properties page ................................................................................................................... 49
Audio Configurator tab ............................................................................................................ 50
Audio Input Mixer tab ............................................................................................................. 51
Selecting the Audio Source and Input Volume ............................................................... 53
Osprey mixer driver interface ........................................................................................................ 53
Osprey 800a audio input card ........................................................................................................ 57
Using the DVB-ASI Feature .............................................................................................. 61
Activating the DVB-ASI Feature ..................................................................................................... 62
Changing the Input Setting ............................................................................................................ 64
Appendix: Osprey Hardware Specifications ................................................................... 65
Osprey 800a audio input card ........................................................................................................ 65
Osprey 815e video capture card .................................................................................................... 66
Osprey 820e video capture card .................................................................................................... 68
Osprey 821e video capture card .................................................................................................... 70
Osprey 825e video capture card .................................................................................................... 71
Osprey 845e video capture card .................................................................................................... 72
Index .................................................................................................................................. 73
iv Osprey by Variosystems

Osprey 800e Series User Guide
Limited Warranty
Osprey by Variosystems warrants its hardware products
against defects in material and workmanship under
normal use for the period of one year (12 months) from
date of sale. Where specific Osprey by Variosystems,
LLC warranties exist that provide more substantial
coverage, notwithstanding the warranty provisions
herein, such product warranties control and preempt or
supersede the warranty provisions herein.
Reseller Pass Through of
Standard Limited Warranties
Resellers pass the Osprey by Variosystems standard
limited warranties for the products through to the
customer without modification. Any modification of a
product voids the Osprey by Variosystems or any other
existing or available warranty.
Overview
Thank you for purchasing the Osprey® 800 series video capture card from Osprey by Variosystems,
LLC. This user guide provides step-by-step instructions for installing and using your new video
capture card. For the latest Osprey product information and news, visit our website at
www.ospreyvideo.com.
Warranties
For complete warranty details, refer to the specific warranty included with each product. General
warranty information includes the following:
Osprey by Variosystems 1

Overview
System requirements
The Osprey high definition (HD) video capture cards require intense bandwidth across the system
bus, CPU, and memory. The host computer system capabilities (CPU, RAM, and motherboard) must
be capable of processing this amount of data. The following system requirements are required to
achieve desired HD performance.
Install the Osprey video capture card in a PCI Express® (PCIe®) slot with direct lanes to the CPU or a
Northbridge or IOH.
The selection of the CPU is critical. To process full HD video, a six-core processor per HD input is a
good benchmark.
Please refer to the website for the latest supported operating systems. Other important guidelines
include:
On the BIOS screen:
o Always disable C-States
o Only enable hyper threading if the CPUs have 6 cores or more
Set Power Options as follows:
o Power Scheme to Presentation
o Turn off Monitor to Never
o Turn off hard disks to Never
o System Standby to Never
Configure Performance Options as follows:
o Visual Effects adjusted for best performance
o Memory Usage to System Cache (for Windows XP only)
2 Osprey by Variosystems

Osprey 800e Series User Guide
Audience
The audience for this user guide includes anyone who uses or administers the Osprey 800 series.
Users should have a basic technical understanding of streaming media. This user guide provides
information on the Osprey 800 series only.
Osprey by Variosystems 3


Osprey 800e Series User Guide
1.
Insert the Osprey software CD in the CDRom drive of the computer. If autoplay is
enabled, the main menu for the Osprey software CD automatically appears.
Note: Autoplay should be enabled by default. If the main menu does not automatically appear, click on
Start Computer. Double-click on the DVD in the window.
2.
Follow the directions in the CD menu. The InstallShield Wizard appears and guides you
through the installation process.
3.
The Remove Previous Installations window displays.
Figure 1. Remove Previous Installations window
Click OK.
The End User License Agreement displays.
Installation Steps
The most efficient and complete installation method is to run the Setup.exe program or msi
installation file in the web package that you download. The installation program automates the
steps required to install the driver and ensures you perform the steps correctly. The driver is unique
to the Osprey 800 series in the same operating system; it will not automatically configure other
Osprey models. You will need to configure other cards separately.
These installation steps are the steps Osprey by Variosystems, LLC recommends if you install an
Osprey video capture card on a system for the first time. After the install is run, the card is detected
and its drivers automatically start.
Note: Before you install Osprey software updates, uninstall the driver software and reboot the computer.
Installing the driver via the Multimedia CD
Osprey by Variosystems 5

Installation Steps
4.
Select I accept the terms in the license agreement.
Figure 2. End-User License Agreement
5.
Click Next. A Destination Folder window appears indicating the folder in which the
driver will be installed by default.
To change the location of the destination folder, click Change to browse for a different
location. If this destination folder is okay, click Next.
Figure 3. Destination Folder window
The Setup Type window appears.
6 Osprey by Variosystems

Osprey 800e Series User Guide
6.
Click Install.
Figure 4. Ready to Install the Program window
The Installing Osprey 800e window appears.
Note: This window shows the progress of the installation. If during the installation, warning windows
appear regarding Windows Logo Testing, the user should click Continue Anyway to proceed
with the installation.
Figure 5. Installing Osprey 800e HDx86 window
Figure 6. Software Installation window
Osprey by Variosystems 7

Installation Steps
Note: This window does not display with a Windows 7 installation.
7.
Click Finish when the InstallShield Wizard Completed window appears.
8.
When the installation is complete, completely shut down the computer on which the
driver has been installed.
8 Osprey by Variosystems

Osprey 800e Series User Guide
1.
A Welcome window appears. Click No, not this time.
Figure 7. Welcome window
2.
Click Next.
3.
On the next window, click Install the software automatically (Recommended).
Figure 8. Install Software Automatically window
Note: The device name will vary depending on which card you are installing.
Installing the hardware
After you install the Osprey 800 series driver, physically install the video capture card into the
computer. The appropriate InstallShield Wizard appears and guides you through the installation
process.
Osprey by Variosystems 9

Installation Steps
4.
Click Next. The installation begins and the Found New Hardware Wizard window
appears.
Figure 9. Found New Hardware Wizard window
A warning window appears regarding Windows Logo Testing.
5.
Click Continue Anyway.
Figure 10. Warning window
The Found New Hardware Wizard window remains on the computer screen while the
installation continues.
Note: This window does not display with a Windows 7 installation.
Figure 11. Found New Hardware Wizard window
10 Osprey by Variosystems

Osprey 800e Series User Guide
6.
The Completing the Found New Hardware Wizard appears. Click Finish.
Figure 12. Completing the Found New Hardware Wizard window
Osprey by Variosystems 11

Installation Steps
1.
Power down and unplug your computer.
2.
Remove the computer’s cover and locate an empty PCI Express slot.
WARNING! Be sure to install the card in the PCI Express slot. This slot is usually black. Refer to the
following diagram as a guide. Placing the card in the wrong slot can damage the card.
Figure 13. Typical PCI Express Slot diagram
3.
Remove the cover screw from the empty PCI Express slot’s cover, set the screw aside.
4.
Remove the slot cover.
5.
Remove the Osprey video capture card from its anti-static bag.
6.
Insert the Osprey card into the desired PCI Express slot and make sure it is seated
evenly.
Note: The slot must be x4 or higher.
7.
Secure the back panel of the card with the slot’s cover screw.
8.
Replace the computer cover.
9.
Plug the power cord into an electrical outlet and turn the computer on.
Installing the video capture card
All computer cards are sensitive to electrostatic discharge. Slight electrostatic discharges from
clothing or from the normal work environment can adversely affect these cards. By following these
simple guidelines, however, you can minimize the chance of damaging the Osprey video capture
card.
Handle cards only by the non-conducting edges.
Do not touch the card components or any other metal parts.
Wear a grounding strap while handling the cards (especially when located in a high static area).
Properly ground your computer to avoid static discharge.
Ensure the workstation is powered off before installing any components.
If you are not familiar with how to install a PCI Express bus card, refer to the system’s documentation
for more complete, step-by-step instructions.
Install the card only in UL Listed computers that include instructions for user-installed accessories.
12 Osprey by Variosystems

Osprey 800e Series User Guide
1.
The New Hardware Wizard runs and the Found New Hardware window appears
followed by the Digital Signature Not Found window.
2.
Click Continue Anyway. (The Digital Signature Not Found window will only
display on drivers that have not been WHQL certified. WHQL-certified drivers
skip this step.)
3.
The Controller Installing window appears, and the text inside this window
changes to Osprey Video Capture Device, Installing … Then the Digital Signature
Not Found window appears.
4.
Click Continue Anyway. (Again, the Digital Signature Not Found window will only
display on drivers that have not been WHQL-certified. WHQL-certified drivers
skip this step. The Completing the Found New Hardware window displays.
5.
Click Finish. The Digital Signature Not Found window appears.
6.
The Digital Signature Not Found window appears once for each Osprey board
you install.
7.
The Systems Setting Change window appears.
Multiple board types
All Osprey video capture cards are designed to co-exist with other Osprey cards within practical
limits of slot placement, available power, and the upper limits of system and CPU performance.
There are eight classes of Osprey devices. Each class requires its own Windows driver.
class 1: o100, o200, o210, o220, o230
class 2: o300
class 3: o440
class 4: o530, o540, o560
class 5: o700e HD and 0710e HD
class 6: o240e, o450e
class 7: o100e, o260e, o460e
class 8: o815e, o820e, o821e, o825e, o845e
This user guide applies only to class 8.
For example, if you install an Osprey 240e and an Osprey 845e series in the same computer, you
must install separate drivers for each board.
Adding or moving boards
When you add or move boards after you install the Osprey 845e driver, the following two scenarios
exist.
A. You added a board of a different class to a computer that already contains another board. For
example, an Osprey 240e is already installed with its current driver on the computer. You want to
add an Osprey 845e card. You must install the driver installation package for the new board to
work.
B. You moved a board from one slot to another, or added another board of the same type. For
example, an Osprey 240e card is installed in the computer, and you want to install another Osprey
240e card. In this case, the following sequence takes place.
Osprey by Variosystems 13

Installation Steps
8.
Click Finish to restart the computer.
9.
The Osprey 800 series card is now ready for use.
14 Osprey by Variosystems

Osprey 800e Series User Guide
VGA Settings (Osprey 820e only)
Device
Video Proc Amp
Input Detect
Video Decoder
Deinterlace
Crossbar
Watermark
Trace
Loss Of Signal
Performance
Cropping
Diagnostics
Closed Caption
Resource Monitor
Using the video capture card
The Osprey 800 series is a high-definition (HD) video capture card. The card has significant
operational differences from other cards that fall under the standard-definition Osprey card family
including advanced features to accommodate the many input video standards that are part of the
HD experience and to adapt automatically to input signal types dynamically, a common need in the
HD environment. The card has the following controls:
The Osprey 800e series includes a special version of Osprey SimulStream that allows you to
“virtualize” the entire feature set of the card. That is, the card can simultaneously feed more than
one capture/encode application or multiple instances of the same application, from the same
controls can be set separately for each capture stream below:
Crop
Logo
Captions
With the Osprey 800 series, all of the above features can be set individually. Each application
receives its own full set of identical Property settings tabs. Another significant operational difference
of the Osprey 800 series and other Osprey cards is that in the Osprey 800e series each stream is
configured separately. As a result, the second and subsequent streams may appear to have
randomly changing defaults.
For example, if you originate Instance 1 of Windows Media® Encoder (WME) rather than from a
previously named and saved settings file, and you configure the encoder for a 720P WME stream
with a watermark (for example, a logo) in the lower-right corner of the screen. When you originate a
second instance of WME, WME adopts the same settings, including the same watermark in the
same position, as the stream created before it. This situation occurs because, in the second instance,
the WME was not started from a saved settings file. Therefore, the WME was forced to assign
default settings, and adopted the most recently configured stream. If, in the second instance, you
need to create different configuration settings, you should modify the settings, save the WME, and
name it something other than in Instance 1 – a unique file with a different name.
Osprey by Variosystems 15

Installation Steps
Designed for live/instant video-on-demand adaptive features
An important feature of the Osprey digital HD capture cards is the ability to adapt automatically to
input signal format changes without having to stop, to reconfigure, and to restart the video
application run by the card. The “designed for live” feature distinguishes the Osprey digital HD
capture cards from cards used for ingesting video into video editing systems or other applications.
With the Osprey digital HD capture cards, you can create the following events:
Switch on-the-fly between SD and HD – The Osprey 820e accepts SD and HD analog video, VGA,
DVI and HDMI standards and automatically re-syncs while the Osprey 845e accepts SD and HD digital
video and automatically re-syncs; without interruption, when the signal formats change between any of
the supported SD and HD modes.
Reduce and eradicate post-production work – Minimize or eliminate post-production work to make a
live broadcast available as Instant VODTM (Instant Video-on-Demand) at the end of the broadcast by
encoding a Save-to-File version of the live stream. The stream can be configured with its own
watermark if desired.
Create anything-in something-out video – One of the most popular applications of the Osprey digital
HD capture cards is to accept SD and HD input for live Internet video streaming. Generally, the
expected viewing experience is for the viewing window to have fixed dimensions regardless of the
aspect ratio or pixel count of the incoming video. Most of the popular video encoders require that these
parameters not change during the encoding session. The Osprey 800 series cards can automatically
adapt, through size and scale, the incoming video to match the selected output parameters. For
example, a broadcaster can freely switch sequences between a live HD studio feed, and SD promo clip
form a payout server and then return to live HD 24 hours a day, 7 days a week.
Capture and preview pins
Some applications use DirectShow Pin Properties with Osprey cards. For Capture and Preview pins,
these properties are always per pin.
At the top of several Osprey 800 series Property tabs is the Pin Type field with a drop-down list. The
drop-down list in Figure 14 has Capture, Preview, and Both. This selection works similarly to other
Osprey models, which typically enable these selections using radio buttons.
Figure 14. Pin type list box
The three choices, Capture, Preview, and Both, provide the opportunity to determine whether the
changes you make on the Property tab should apply to both the capture and preview pins
associated with the other controls on the page, or just the desired pin – Capture or Preview.
Decide what type of pin to select based on several criteria. Software applications that use Osprey
video capture cards and AV stream drivers communicate with the hardware via a Microsoftdeveloped software layer named DirectShow®.
DirectShow is a collection of software objects, or object library, for working with video, audio, and
other multimedia data. The object library primarily consists of filters – objects that process video
and audio data and are connected or chained together into filter graphs.
16 Osprey by Variosystems

Osprey 800e Series User Guide
OK
Commits the changes you have made on the currently displayed
page, and exits the dialog.
Cancel
Exits the window without committing the changes you have made
on the currently displayed page. Changes made before the most
recent click of Apply are not cancelled.
Apply
Commits the changes you have made on the currently displayed
page, without exiting the dialog.
For example, Osprey designs filters that are included in all Osprey AV stream drivers and interface
with the capture hardware to grab-digitized frames of video. These filters then process video
streams and pass them to target software applications like Windows Media Encoder. Other filters
are associated with previewing or displaying video that decode video and render video to the
screen.
Filters usually have inputs and outputs and are interconnected programmatically as needed. The
input and output connections are referred to as pins. The pins most important to you are the
Capture Output pin and the Preview Output pin. Generally, captured audio and video to be fed to
the encoder is taken from the Capture pin, while video for local preview, such as the Input Video
window in the Windows Media Controller dashboard, will usually use the Preview pin.
In most cases, the Preview pin has a lower priority in the video processing engine. If the host PC is
nearing its upper performance margin where video quality could be compromised, it is preferable to
sacrifice quality or drop frames in the Preview output in favor of sustaining quality of the Capture
pin’s output. Exposing these pins separately in Osprey drivers allows you to balance your needs with
the host computer’s performance and the video application’s features. You may apply a low-effort
de-interlacing process to a preview window to save CPU cycle, and apply a more CPU intensive
Advanced Motion Adaptive De-interlacing process to the captured stream for maximum video
quality.
Like other Osprey cards, the Osprey 800 series enables you to define various setups for the two pins.
For example, you can choose to include a logo in the capture pin’s video, but not in the Preview
output. When you click Capture, the current logo settings for the Capture pin are loaded, and the
changes you make apply only to the Capture pin, not to the Preview pin. The Preview button works
in the same manner.
Common buttons
The following information applies to controls that are not interactive.
Some controls are interactive – changes you make are immediately updated on the video. Examples
are the brightness, contrast, hue, saturation, and sharpness controls, the graphical gamma control;
and the graphical sizing and positioning controls for logos. OK, Cancel, and Apply have no effect on
these controls.
In all cases, Help accesses the help module.
Note: OK and Apply commit only the changes on the currently displayed page. To set changes on three different pages, you
need to click Apply twice and OK once.
Osprey by Variosystems 17


Osprey 800e Series User Guide
Setting Driver Properties
After you have installed the Osprey 800 series card and driver, you will be able to access the
properties for the card through most major DirectShow applications (such as Windows Media
Encoder and Flash Media Encoder). For detailed information on how to select the Osprey card and
access its Video Properties window from third-party applications, refer to the documentation for the
encoding application.
Note: Most of these encoding applications expose the drivers’ Property tabs without modification, so the examples set forth
below will probably appear as shown. However, some applications expose the Property tabs slightly differently.
Therefore, the examples below may differ somewhat.
Properties window
When your video application, such as WME, is invited to expose the Osprey 800 series card’s video-
related property pages—usually by navigating to the Properties page—a window appears entitled
Properties (Figure 15). Other applications display the same window, but it is entitled Osprey
820e/845e Video Capture Device(x) Properties. The “x” is the target installed Osprey 815e, 820e,
821e, 825e, or 845e card. This number is always 1 if only one Osprey 815e, 820e, 821e, 825e, or
845e card is installed.
Osprey by Variosystems 19

Setting Driver Properties
Video Proc Amp
The Video Process Amplifier (Video Proc Amp) tab lets you control
Gamma, Brightness, Contrast, Hue, and Saturation.
Video Decoder
This tab is a Microsoft DirectShow standard control for setting the video
standard.
Crossbar
The Crossbar tab lets you select from multiple inputs.
Trace
Sets error logging controls.
Performance
Sets the pin centric settings.
Diagnostics
Sets Osprey 800 series internal test controls. The user should only use
these controls when instructed by Osprey support. Doing so without
proper instructions might result in system instability or in the system
crashing.
Resource Monitor
Displays PCIe states and buffer activity.
Device
Displays product information.
Input Detect
Describes the signal coming into the card.
Figure 15. Osprey 800 Series Video Properties
The tabs are as follows:
20 Osprey by Variosystems

Osprey 800e Series User Guide
Deinterlace
Sets de-interlacing properties.
Watermark
Sets up on video logos.
Loss Of Signal
Enables video overlay.
Cropping
Enables cropping, sets the cropping rectangle.
Closed Caption
Sets closed caption rendering.
VGA Settings
This tab is only on the Osprey 820e. The VGA Settings tab lets you enter
the video graphics adapter (VGA) entry information.
In some applications, additional tabs other than those listed above may appear. The additional tabs
are application- or system-supplied, and are intended for information only. The additional tabs
generally contain no controls that can be changed.
Note: Some controls are interactive. For example, changes you make are updated immediately in the captured video. Such
examples are the Brightness, Contract, Hue, and Saturation, controls, graphical Gamma control, and graphical sizing
and positioning controls for watermarks/logos. The OK, Cancel, and Apply buttons have no effect on these controls.
The OK and Apply buttons pertain only to changes on the currently displayed tab.
Osprey by Variosystems 21

Setting Driver Properties
Video Proc Amp tab
Video Proc Amp stands for Video Process Amplifier. Use the Video Proc Amp tab (Figure 16) to
control various characteristics of streaming output.
Figure 16. Video Proc Amp tab
22 Osprey by Variosystems

Osprey 800e Series User Guide
Pin Type
The drop-down list has three choices. See Capture and preview pins for
information on how this selection works.
Gamma
correction
controls
The slider controls are used to set Gamma, Brightness, Contrast, Hue, and
Saturation. (The Hue slider is disabled when PAL is selected.) All slider values
are applied real time. For example, if Preview or real-time capture-to-screen
video is running when you access the Preview tab, you can see adjustments as
you make changes.
Individual Restore buttons return the respective slider to the settings as set
when the dialog box is opened. An adjustment scale is also included to identify
each slider’s relative position.
Note: If you change the video standard or video input you will not see any changes in the
slider controls until the driver properties dialog is closed and re-opened.
Reset Values
Click this button to reset all slide controls simultaneously to the state they were
in when the dialog box was opened.
Neutral
Click this button to reset all slide controls simultaneously to the original factory
default settings. These defaults are considered neutral, that is, the controls are
set to positions that pass through the incoming video without modification.
Start Preview
Click to view the gamma settings in real time. You can see adjustments as you
make changes.
Stop Preview
Stops the preview.
Vector Scope
Click this button to view the vector scope.
Luma Scope
Click this button to view the luma scope.
Gamma correction controls
The Gamma slider and control adjusts the gamma of the incoming video. Gamma refers to the
response curve of video cameras and CRTs. When video is captured through a camera, the response
of the camera is deliberately nonlinear—low lumen values are boosted, and high lumen values are
compressed. This process is done for two reasons.
It increases the effective bandwidth in the low lumen range, where it is needed, at the expense of the
high lumen range, where it is needed less.
It matches the response characteristics of TV sets and monitors.
The calibration specified in video standards matches the requirements of cameras and television
sets in broadcast use, but generally does not match the needs of computer-based applications or
the response curves of computer monitors. Therefore, a correction inverse to the original bias is
often needed, and you may want to adjust the gamma for the characteristics of a particular monitor.
Note: When gamma correction is disabled, either by setting the Gamma to Neutral or by setting the Gamma correction
value to exactly 100, the software-based Gamma filter works in passthrough mode with no effect on the video and
without using processing bandwidth.
When Gamma correction is enabled, the factor applied is as shown in the slider text box and in the graphic. If you are
running preview video while adjusting the filter, you will see the effects of your adjustments as you make the
adjustments.
The Video Proc Amp tab also has the following controls.
Osprey by Variosystems 23
Setting Driver Properties
Osprey 800 series
Osprey 820e only
NTSC
HD 1035
PAL
483
HD 720
VGA
HD 1080
SECAM
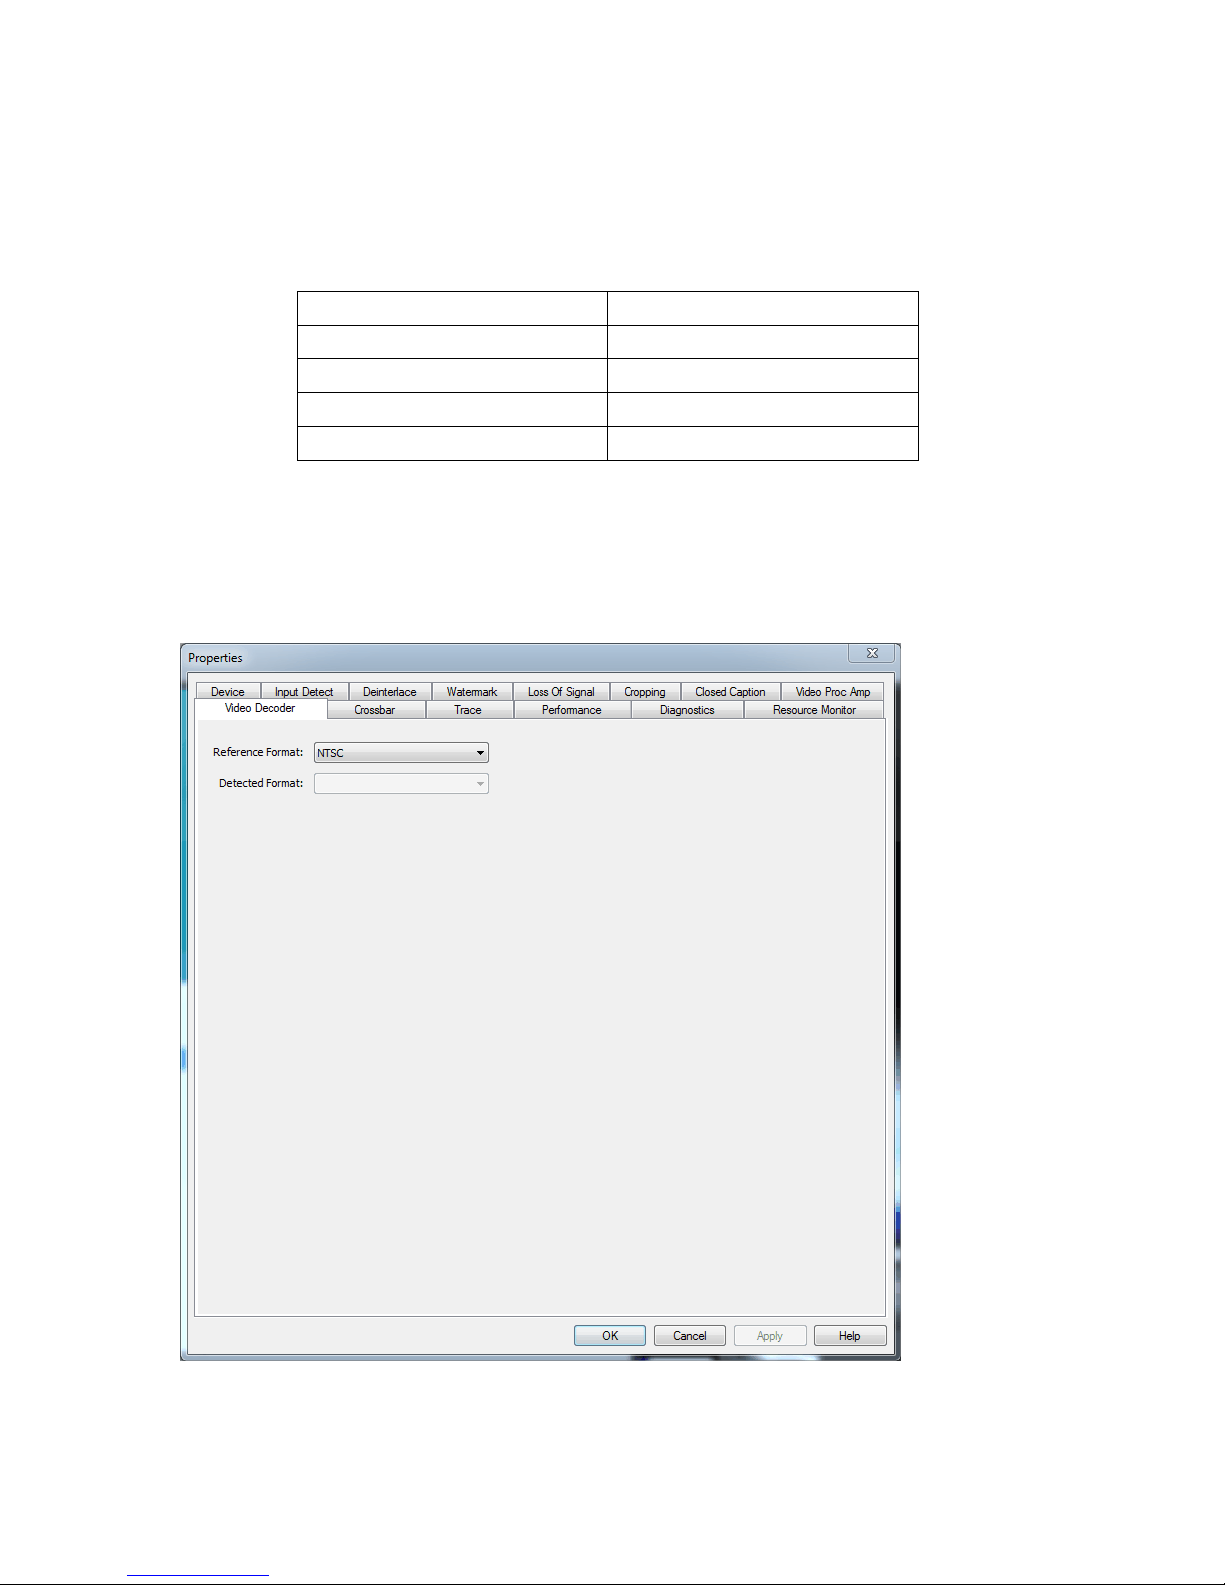
Video Decoder tab
The Video Decoder tab exposes the incoming video signal format. PAL and SECAM are standards
used in Europe and other parts of the world. Osprey cards can function in computers in various
countries with different standards.
The selection should be set to match the incoming signal’s primary mode. Although the Osprey 800
series board automatically senses and adjusts to incoming signals, including switching between SD
and HD modes, setting the incoming signal’s primary mode is advisable to avoid the slight delay that
results from evaluating and re-syncing to changes of input signal timing.
Figure 17. Video Decoder tab
The Video Decoder tab has the following controls.
24 Osprey by Variosystems

Osprey 800e Series User Guide
Reference
Format
The value selected in Reference Format is what you should expect the input
video to be. Whatever you select here displays on other tabs in the Reference
Size text boxes. Once you make the selection on the Video Decoder tab, you
must go to the other tabs (Watermark or Cropping) and click the Reset
Reference button so the Reference Size text box is updated to the size
corresponding to that chosen on the Video Decoder tab.
Detected Format
This field lists the detected format.
Osprey by Variosystems 25

Setting Driver Properties
Input
Click on the input source from the drop-down list.
Output
Click on the output source from the drop-down list.
Crossbar tab
Use the Crossbar tab (Figure 18) to set the input and output settings.
Figure 18. Crossbar tab
The Crossbar tab has the following controls.
26 Osprey by Variosystems

Osprey 800e Series User Guide
Trace tab
Use the Trace tab (Figure 19) to create trace events for diagnostic debugging and subsequent
logging to file. These settings are normally disabled. An authorized Osprey support representative
may ask you to change these settings should you experience problems using the Osprey 800 series
with a video application. The selection that is enabled is added to the time log.
Figure 19. Trace tab
WARNING! Leaving the Log file enabled can result in a large file that consumes all available disk space.
Osprey by Variosystems 27

Setting Driver Properties
Pin Type
The drop-down list has three choices (see Capture and preview pins).
Video Scaling
Algorithm
Select the video scaling algorithm from the drop-down menu.
Note: Cubic and Lanczos are CPU intensive and are not recommended for high definition.
Default Video
Input Size
Select the default video input size from the drop-down menu to scale the
incoming video.
Note: These values are only used if the application does not explicitly request a specific
resolution.
Width
Select the width of the input from the drop-down list.
Performance tab
Use the Performance tab (Figure 20) to set the pin centric settings. These properties are global for
all devices. Changes made on this window will not take effect until the video capture filter is
recreated in the supporting application.
Figure 20. Performance tab
The Performance tab has the following controls.
28 Osprey by Variosystems

Osprey 800e Series User Guide
Height
Select the height of the input from the drop-down list.
Video Buffers
Select the number of buffers to pass to the DirectShow filter from the dropdown list.
Default Frame
Rate
This field is only on the Osprey 845e. It displays the frame rate sent to the
application. You can change the frame rate if needed.
Note: These values are only used if the application does not explicitly request a specific
resolution.
Input pin mode
Displays the input port setting.
Remove VBI lines
from video
Indicate the number of VBI lines that are passed through after the start of the
video.
Enable 3G SDI
support
This field is only on the Osprey 845e. Select this check box to enable 3G SDI
support. Enabling this feature will disable SDI inputs C and D.
Osprey 845e: When using the Remove VBI lines from video and Enable 3G SDI support fields, you need to restart the
driver for changes to take effect.
Osprey by Variosystems 29

Setting Driver Properties
Diagnostics tab
Use the Diagnostics tab (Figure 21) to run certain internal self-tests for diagnostic debugging
purposes. These settings are normally disabled. An authorized Osprey support representative may
ask you to change these settings should you experience problems using the Osprey 800 series with a
video application.
Figure 21. Diagnostics tab
WARNING! You should not enable these settings without specific instructions from Osprey support. Doing so without
proper instructions might result in system instability or in the system crashing.
30 Osprey by Variosystems

Osprey 800e Series User Guide
PCIe Packet Size
The packet size of the PCIe.
Video FIFO size
The size of the first in, first out (FIFO) video.
Threshold
The threshold for the video.
Audio FIFO size
The size of the FIFO audio.
Threshold
The threshold of the audio.
Interrupt Count
The number of interruptions.
Interrupts Per
Second
The number of interruptions per second.
MFI-X or SDI-X
The video and audio FIFO activity for the particular input. The activity displays
as current and what it peaked at.
External Audio 1
This field is only on the Osprey 800a. The FIFO activity on the analog unbalanced
Resource Monitor tab
Use the Resource Monitor tab (Figure 22) to view PCIe states and buffer activity.
Figure 22. Resource Monitor tab
The Resource Monitor tab has the following fields.
Osprey by Variosystems 31

Setting Driver Properties
pair 1. The activity displays as current and what it peaked at.
Note: Since the external audio is an analog sample, it may always show activity.
External Audio 1, External Audio 2, External Audio 3, and External Audio 4 apply only
for the Osprey 800a audio input card and all fields are shown.
32 Osprey by Variosystems

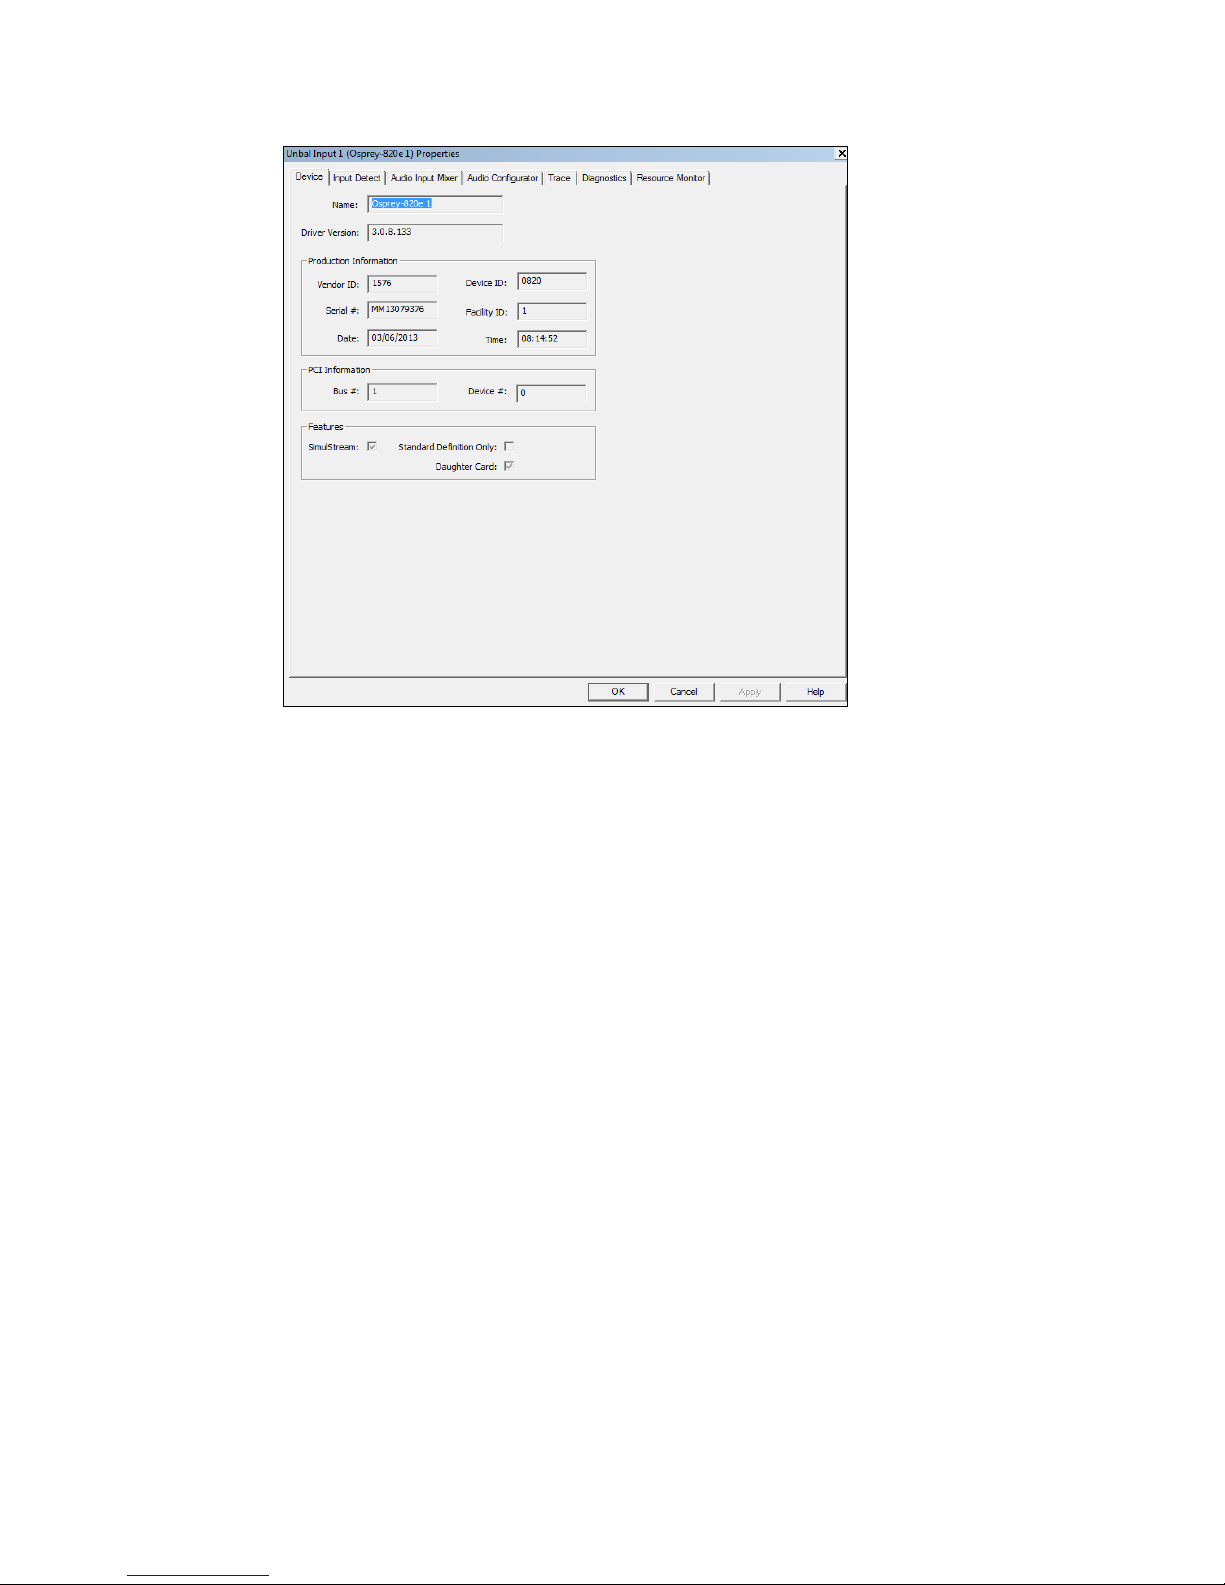
Osprey 800e Series User Guide
Name
Product name
Driver Version
Indicates the version of the driver.
Product
Information
Displays the vendor ID, device ID, serial number, facility ID, date and time.
PCI Information
Displays the bus and device number.
Features
Displays the features available on the driver.
Device tab
The Device tab (Figure 23) tab displays product information.
Figure 23. Device tab
The Device tab has the following fields.
Osprey by Variosystems 33
Setting Driver Properties
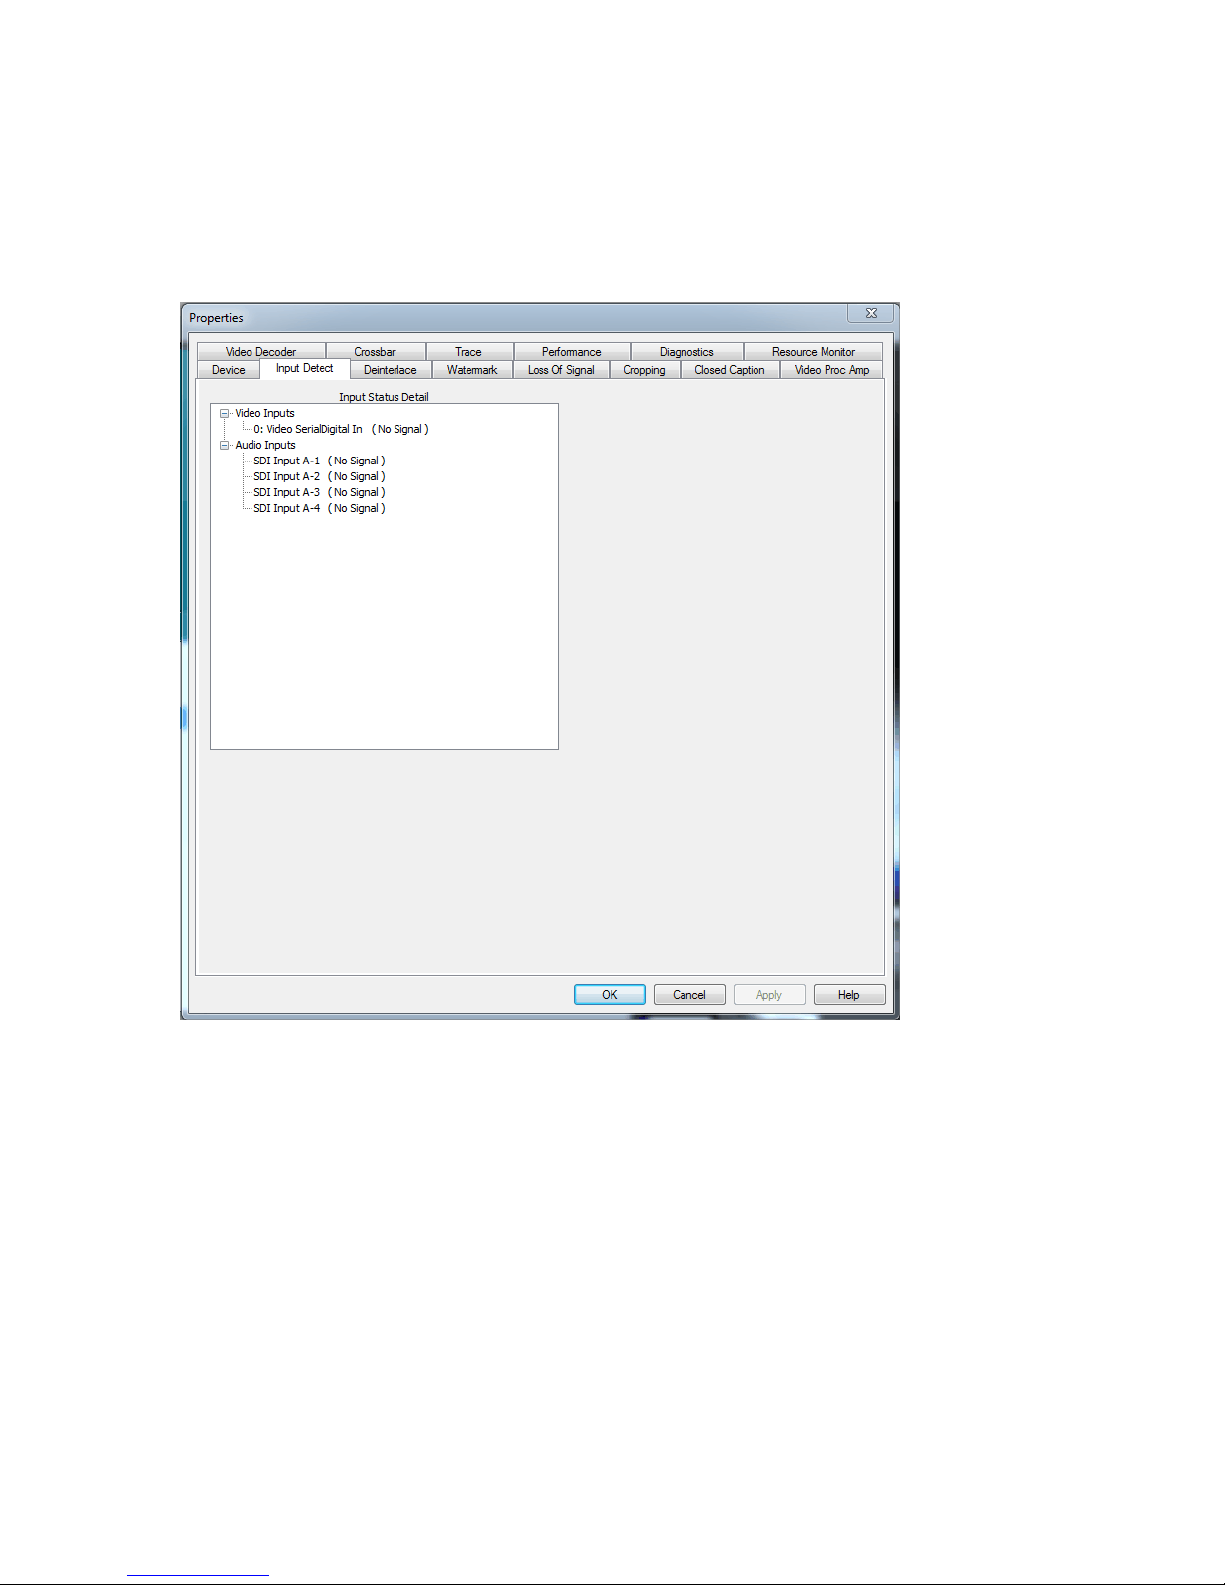
Input Detect tab
The Input Detect tab (Figure 24) displays the signal properties of what the card detects as the input
signal.
Figure 24. Input Detect tab
34 Osprey by Variosystems

Osprey 800e Series User Guide
Deinterlace tab
Use the Deinterlace tab (Figure 25) to turn deinterlacing on or off, select a desired operating mode,
and instruct the card to detect telecined content, and apply appropriate compensation.
Figure 25. Deinterlace tab
Advanced motion adaptive deinterlace
Motion adaptive deinterlace is an algorithm for deinterlacing pure video (non-telecine) content.
Motion adaptive deinterlace detects which portions of the image are still, and which portions are in
motion, and applies different processing to each. This can be somewhat CPU-intensive but is helpful
when the video consists of high-motion content. Simpler Bob and Weave algorithms can be
employed when video is relatively stationary, with a slight loss of sharpness. In some cases, such as
when the desired output frame vertical dimension is exactly half of the incoming dimensions, it may
be unnecessary to select deinterlacing—the scaling algorithm simply drops odd or even frames, that
is, drops the odd or even lines altogether to achieve the scaling.
Once you enable deinterlacing via the check box, you may select which algorithm to use:
Bob 0
Bob 1
Osprey by Variosystems 35

Setting Driver Properties
Pin Type
The drop-down list has three choices (see Capture and preview pins).
De-Interlace
Enable deinterlacing and select:
Bob 0
Bob 1
Advanced
Inverse Telecine
Enable inverse telecine and select:
Auto-detect Telecine Source
Enable Frame Resync
Start Preview
Click to view the preview.
Stop Preview
Click to stop the preview.
Advanced
There are two fields per interlaced frame, odd and even. Bob 0 is for Field 0 (even) and Bob 1 is for
Field 1 (odd). If the signal coming in is progressive, these settings have no effect.
Clicking Advanced forces the advanced motion-adaptive algorithm to deinterlace incoming video.
Telecine and inverse telecine
The dialog box allows you to enable or disable Inverse Telecine. When Inverse Telecine is enabled,
the following options are available:
Auto-detect Telecine Source
Enable Frame Resync
Resync Interval
Telecine video is NTSC video originally created on movie film at the industry-standard 24 framesper-second rate. Since standard NTSC video has a near-30 frame-per-second rate, in the telecine
conversion process from 24 frames to 30 frames-per-second, certain fields are repeated in a regular,
recurring sequence. If a telecined sequence is viewed directly on a progressive screen, as is usually
the case, and you stream video to a computer screen, interlacing artifacts will be visible.
The process called Inverse Telecine is the reverse of Telecine. Telecine drops the redundant fields
and reassembles the video into a 24 frames-per-second progressive format. Interlacing artifacts are
100 percent removed. If the video is viewed at 24 frames-per-second, you will see the exact timing
and sequencing that was on the original film. If you view the video at 30 frames-per-second, every
fifth frame is repeated; however, no deinterlacing artifacts exist.
Telecine and inverse telecine are not used for PAL video. The Auto and Inverse Telecine buttons will
be ignored when PAL or any HD mode is selected as the video standard.
The Deinterlace tab has the following controls:
36 Osprey by Variosystems

Osprey 800e Series User Guide
Watermark tab
Use the Watermark tab (Figure 26) to enable, disable, and position a graphic anywhere in the video
capture window. A watermark might be any properly formatted bitmap of appropriate size.
Typically, the graphic is a network / affiliate logo, an advertisement, or some promotional bitmap
positioned near the lower-right corner of the screen. You can also use the Watermark tab to select
the desired bitmap file and adjust transparency.
Figure 26. Watermark tab
Watermarks are often used as logos, and have the following characteristics:
Any RGB-24 bitmap (.bmp) can be used.
A selectable key color can be specified; all parts of the Watermark graphic with that color are not drawn
on the video.
A transparency control can be used to blend the Watermark graphic with the background video.
The Watermark appears on both captured and previewed video. If the capture and preview video are
different sizes, the logo is scaled to look the same on the preview video when the Pin type of both has
been selected and the user has set different properties for Capture and for Preview.
The Watermark property controls work best when the preview video is running and is viewed using
the Start Preview button. With preview video running, you can preview your changes dynamically. If
your application displays capture video in real time, capture video can be used instead.
Osprey by Variosystems 37

Setting Driver Properties
Pin Type
The drop-down list has three choices (see Capture and preview pins).
When you select Both in the Pin Type drop-down box, changes you make to the
Watermark setup apply to both the Capture and Preview pins. You can enable
different setups for the pins. For example, you can enable the logo on the
Capture pin but not on the Preview pin, and thereby save CPU time. When you
select Capture in the Pin Type drop-down list, the current logo settings for the
Capture pin are loaded, and changes you make apply only to the Capture pin,
not to the Preview pin. The Preview button works analogously.
Enable
Watermark
Enable or disable logos. If you disable logos, all of your other Watermark
settings are retained for when you re-enable logos.
Watermark File
Click the browse button at the end of the field to browse for a file. Watermark
files must be in (1) .bmp format with a .bmp filename extension and (2) RGB-24
format.
Note: If you have a graphic that is in another format, you will need to edit the graphic with a
drawing or photo edit program, such as Windows Paint, and save the graphic in a RGB24 format.
Top, Left, Height,
Width
The Watermark Position and Size controls allow you to position and scale the
watermark, similar to the process on the Cropping tab. Osprey by Variosystems,
LLC strongly recommends you have live or preview video running when you use
these controls.
The background/preview window represents the video area where you can
position the logo. The selected bitmap graphic appears when the Enable
Watermark checkbox is checked and a suitable bitmap has been loaded. To
position the logo, you must click on the logo rectangle and drag it to the new
position.
The four “nudge” spin-buttons, Top, Left, Height, and Width, position the logo
exactly one pixel at a time on the output video to help you position the
watermark precisely after a drag-and-drop operation. The Up and Down
buttons change the position and the size of the watermark.
Enable Key Color
The key color is the color that disappears from the graphic so the underlying
video shows through unchanged.
If Enable Key Color is disabled, all colors display.
Alternatively, if Enable Key Color is enabled, key coloring is activated. The user
can adjust the three edit boxes, Red, Green, and Blue, to enter any RGB color
value into these boxes.
You control the key color and the transparency effects of the watermark. If
preview video is running, you will dynamically see your changes.
The Watermark properties are organized into four areas:
File
Position
Color
Transparency
The Watermark tab has the following controls.
38 Osprey by Variosystems

Osprey 800e Series User Guide
Reference Size
Display Size
Granularity
These fields refer to the size of the video.
Reset Reference
The Reference Size text box displays whatever you have selected on the Video
Decoder tab as the expected input. After making the selection on the Video
Decoder tab, click the Reset Reference button to update the value in the Reset
Reference text box.
Transparency
The degree of transparency of the watermark is variable through use of a zero
to 100 percent scale. If the setting is zero, the logo is opaque. If the setting
nears 100 percent, the watermark is completely transparent. If you set a
keycolor, the transparency value is applied only to pixels that do not match the
keycolor and, therefore, are completely transparent.
2x Watermark
1x Watermark
These buttons adjust the size of the bitmap graphic. The quality of a scaled
image will not be as exceptional as the quality of the 1X image. Osprey by
Variosystems, LLC recommends that, wherever possible for production work,
you should prepare the artwork to the exact size at which it will be used.
Start Preview
Preview the Watermark as it is positioned and scaled.
Stop Preview
If you press Stop Preview while in Preview mode, the original background
graphic in the Crop window is restored.
Note: When incoming video modes switch on-the-fly, such as when you switch from SD to HD and back, the watermark size
and position is recalculated automatically and, if necessary, is scaled to force the watermark to remain in the same
position relative to the lower-right corner. This function is exclusive to the Designed-for-Live feature of the Osprey
digital HD capture cards.
Osprey by Variosystems 39

Setting Driver Properties
Loss Of Signal tab
When the incoming video signal is lost, the Osprey 800 series capture card detects the signal loss.
Use the Loss Of Signal tab (Figure 27) to overlay a video that can replace the incoming signal when it
is lost.
This feature allows you to continue streaming video to an encoder without interruption. It also can
be helpful to identify your source when using multiple systems.
Figure 27. Loss Of Signal tab
40 Osprey by Variosystems

Osprey 800e Series User Guide
Generated Audio
Select the audio generated on the odd and even channels from the drop-down
list.
Generated Video
Select the video overlay that will appear if the signal is lost.
Enable Video
Overlay
Enable the video overlay that replaces the incoming signal when it is lost.
Font
Click Font to enter the font, the style of the font, and the point size.
Caption
Enter a caption.
Top, Left, Height,
Width
Use the up and down arrows to position the overlay.
Text Color
Enable a text color.
Reference Size
Display Size
Granularity
These fields refer to the size of the overlay.
Reset Reference
The Reference Size text box displays whatever you have selected on the Video
Decoder tab as whatever their expected input is. After making the selection on
the Video Decoder tab, you then click the Reset Reference button to update the
value in the Reset Reference text box.
Start Preview
Click to view the video overlay.
Stop Preview
Click to stop the preview.
The Loss Of Signal tab has the following controls.
Osprey by Variosystems 41

Setting Driver Properties
Cropping tab
Use the Cropping tab (Figure 28) to enable and disable cropping and set the desired cropping
rectangle. Cropping means removal of unwanted video around the edges of the incoming image. For
example, if the incoming video is letterboxed, with an aspect ratio wider than 4:3, you can crop
away video at the top and bottom of the image and capture just the active portion. The Left and
Width controls are used to crop the left and right sides of the video.
Note: This type of cropping is different from the final desired Display size that is usually set by the application software that
negotiates with the driver to deliver the desired output.
The Display size is the size of the Osprey graphic in the dialog box. It is used to understand the size
ratios versus the video appearance between the Reference size (incoming signal), what you see in
the dialog box (Display size), and what appears at the client, i.e., such as Windows Media Encoder.
Figure 28. Cropping tab
42 Osprey by Variosystems

Osprey 800e Series User Guide
Pin Type
The drop-down list has three choices:
Capture
Preview
Both
Changes made on this page separately apply to Video Preview and Capture Pins
on the currently selected device, as determined by the Pin Type drop-down list.
When you select Both from the drop-down list, changes you make to the crop
setup apply to the Capture and Preview pins.
For example, you may need to create different setups for the Capture and
Preview pins. To do this, you would enable cropping with both pins, and then
create different settings for each pin.
Enable Cropping
Enables the ability to crop borders from the incoming video. When you enable
this field, the crop sizing controls are enabled. When this field is disabled, the
incoming video is unchanged.
Top, Left, Height,
Width
Use the up and down arrows to set how many pixels in each of the four borders
should be cropped. You can also enter the desired values.
Click ‘n drag
cropping
This control is available when you want to size and position the Crop window to
set the cropping margins. If the Enable box is checked and no crop positions
have been set, you can use the left mouse button to grab any corner, side, top,
or bottom of the video preview window and drag the borders to the desired
position. The entire crop window can also be positioned by clicking and
dragging it to the necessary position.
At any time, the crop window is smaller than the underlying preview window,
the crop area is displayed as normal video and the video in the preview window
is displayed as inverse video. This allows for easy determination of what portion
of the incoming video should be ignored.
Click your cursor on the video and hold down the mouse button. Move the
video until the video is placed where you want. Release the mouse button to fix
the video in this position.
Reference Size
Indicates the signal format selected in the Video Decoder tab.
Display size
Indicates the size of the preview graphic within the dialog box.
Granularity
Different video color space definitions impose pixel count and window
dimension restrictions that must be considered when cropping. The Granularity
box lets you know the number of pixels that will be cropped or added each time
you increment or decrement the crop size by one pixel. In the above example (2
X 1), the crop border will always change in multiples of two pixels horizontally
and one pixel vertically. Some color space modes force the granularity to
16 pixels or more in one or both dimensions.
Reset Reference
button
The Reference Size text box displays whatever you have selected on the Video
Decoder tab as whatever their expected input is. After making the selection on
the Video Decoder tab, click Reset Reference to update the value in the Reset
Reference text box.
The Cropping tab has the following controls:
Osprey by Variosystems 43

Setting Driver Properties
Start Preview
Sample frames of live video can replace the background graphic in the Crop
window. This helps you pinpoint the desired crop border settings. If you do not
have a valid input signal, internally generated SMPTE colorbars will be
substituted for the background graphic.
Stop Preview
If you click Stop Preview while in Preview mode, the original background
graphic in the Crop window is restored.
44 Osprey by Variosystems

Osprey 800e Series User Guide
Pin Type
The drop-down list has three choices (see Capture and preview pins).
Changes made on this page separately apply to Video Preview and Capture Pins
on the currently selected device, as determined by the Pin Type drop-down list.
When you select Both from the drop-down list, changes you make to the crop
setup apply to the Capture and Preview pins.
For example, you may need to create different setups for the Capture and
Preview pins. To do this, you would enable cropping with both pins, and then
create different settings for each pin.
CC field
Select whether the closed caption is from field 1 or field 2 of the video.
CC channel
Select which closed caption to use.
Note: CC1 is commonly used.
Closed Caption tab
Use the Closed Caption tab (Figure 29) to set closed caption rendering. CEA-608B and CEA-708B are
the supported closed caption standards.
Figure 29. Closed Caption tab
The Closed Caption tab has the following controls.
Osprey by Variosystems 45

Setting Driver Properties
Overlay CC on
video
Enables the closed caption to appear on the video.
Font
Select the font for the closed caption.
Size
Select the size of the font.
Top, Left, Height,
Width
Use the up and down arrows to set the pixel size of the caption area. You can
also enter the desired values.
Text Color
Select the color of the text.
Background
Color
Select the background color.
Transparent
Select the Transparent check box if you want the closed caption text to be
transparent.
Reference Size
This field represents the signal format selected on the Video Decoder tab.
Display Size
This field refers to the size of the preview graphic within the dialog box.
Granularity
Different video color space definitions impose pixel count and window
dimension restrictions that must be considered when cropping. The Granularity
box lets you know the number of pixels that will be cropped or added each time
you increment or decrement the crop size by one pixel. In the above example (2
X 1), the crop border will always change in multiples of two pixels horizontally
and one pixel vertically. Some color space modes force the granularity to
16 pixels or more in one or both dimensions.
Reset Reference
Click to update the value displayed in the Reference Size text box to the new
signal format dimensions set in the reference format on the Video Decoder tab.
Start Preview
Click to preview the closed caption on the video.
Stop Preview
If you press Stop Preview while in Preview mode, the original background
graphic in the Crop window is restored.
46 Osprey by Variosystems

Osprey 800e Series User Guide
Active VGA Entry
Information
Enter the Resolution, Frequency, Index, Top Margin, Left Margin, and Mode for
the video graphics adapter.
Top Margin
Left Margin
Click on the top margin from the drop-down list. The Top and Left Margins
allows the adjustments of the VGA input signal supplied on either MFI-X or
SDI-X channels of the Osprey 820e.
Note: These values are only applied when you have selected the VGA Input from the crossbar.
Permanent
Select the Permanent check box to make the margin sizes permanent. Any
margins changes you apply will cause the input signal to be reacquired.
Start Preview
Click to view the margin settings in real time.
Stop Preview
Stops the preview.
VGA Settings tab
This tab is only for the Osprey 820e. Use the VGA Settings tab (Figure 30) to set the video graphics
adapter (VGA). This tab does not display for an SDI or HDMI only input.
Figure 30. VGA Settings tab
The VGA Settings tab has the following controls:
Osprey by Variosystems 47

Setting Driver Properties
The Top Margin menu box lets you adjust the top margin of the VGA input signal supplied on either
MFI-X or SDI-X channels of the Osprey 800 series. The default is 0. You cannot manually enter
values.
The Left Margin input menu box lets you adjust the Left margin of the VGA input signal. The default
is 0. You cannot manually enter values.
48 Osprey by Variosystems

Osprey 800e Series User Guide
Understanding Audio Input Properties
This section explains the audio input properties for the Osprey 800 series capture cards. You can
change the default values according to the audio input you select.
Audio Properties page
The Audio Properties page displays all of the available tabs that Osprey Preview displays.
Note: Windows Media Encoder and Flash Media Live Encoder applications do not support these tabs.
Figure 31. Audio Properties page
Osprey by Variosystems 49

Understanding Audio Input Properties
Connector Type
Change the input connector type to either AES, SPDIF, or Unbalanced when
using the Osprey 800a audio card.
Enable Bypass
Mode
Prevents the driver from applying any audio volume changes to the input signal.
Gain
Apply a software audio gain from a -4dB to +15dB. This gain is applied in
addition to any volume adjustments specified on the Audio Input Mixer tab.
Master Clock
Select which video input to slave the audio input clock to, in the event that the
selected video input has no signal connected to the on board 27MHz clock.
Audio Configurator tab
The Audio Configurator tab enables you to set global properties for a given audio input channel.
Figure 32. Audio Configurator tab
The Audio Configurator tab has the following controls:
50 Osprey by Variosystems

Osprey 800e Series User Guide
Left and Right
volume sliders
Select the amount of audio gain applied to an audio input channel by the driver.
The amount of gain the driver can apply has a range of -25dB to +6dB.
Wave Form
Monitor
Displays a sine wave representation of the audio input on the selected channel.
Pause
Stops the sine wave rendering process so you can more closely examine the
audio input detail.
Details
Brings up the Sample View dialog box that displays the last 10 minutes worth of
audio data that is being rendered.
Audio Input Mixer tab
The audio input mixer tab lets you change the amount of audio gain applied to an audio channel on
a per-instance basis.
Figure 33. Audio Input Mixer tabFigure 33
The Audio Input Mixer tab has the following controls:
Osprey by Variosystems 51


Osprey 800e Series User Guide
Selecting the Audio Source and Input
Volume
You can adjust the audio source using the Osprey mixer driver interface. If you purchase the Osprey
800a audio input card, you can increase the audio flexibility with up to four stereo channels.
Osprey mixer driver interface
Most applications, including the Windows Media Encoder (WME) applications, interface to the mixer
driver directly and expose the look and feel of specific applications. One example is WME, which has
the built-in ability to expose the Osprey 800 series Audio Properties.
Figure 34. Audio Properties
In the WME Session properties box, select the audio, such as Unbal Input 1 (Osprey-820e 1 in this
example), and then click Configure. The following screen appears.
Osprey by Variosystems 53

Selecting the Audio Source and Input Volume
1.
The easiest method for accessing this interface is for you to right-click the speaker symbol
on the taskbar (typically, the speaker symbol is located on the lower right-hand side of the
screen). Then, you should select the Recording devices option. To make this icon appear,
you can click the checkbox in Control Panel Sounds and Audio Devices.
Figure 36. Audio control menu
2.
If you do not see the speaker symbol, you can click Start on the Start Menu, and select Start
All Programs Accessories Entertainment Volume Control.
Figure 35. Audio Input Mixer Properties
You can adjust the audio by dragging the Pin Line Input Mix slider.
However, you can use the default Windows interface to the mixer driver. There are two simple
methods for getting to the mixer source and volume control dialog box.
Either of these two methods allows the audio mixer interface for the audio playback device to
appear. The Sound window (Figure 37) on the Osprey 800 series displays.
54 Osprey by Variosystems

Osprey 800e Series User Guide
Figure 37. Sound window
Click on the Recording tab to see the list of audio input and output devices. When you have chosen
the device, click Properties. The Properties window for that device displays. Click the Levels tab
(Figure 38).
Osprey by Variosystems 55

Selecting the Audio Source and Input Volume
Figure 38. Levels tab
You can drag the slider or enter a value to adjust the volume. To adjust the left and right balance,
click Balance. The Balance window displays (Figure 39).
Figure 39. Balance window
Drag the slider or enter a value to adjust the volume.
56 Osprey by Variosystems

Osprey 800e Series User Guide
1.
Connect a monitor, keyboard and mouse to the system that has the Osprey 800e series card
with the Osprey 800a audio input card installed.
2.
Power on the system.
3.
Right click on the Osprey Preview icon (Figure 40) in the System bar and select Open Osprey
Preview.
Figure 40. Osprey Preview icon
The Osprey Preview window displays.
4.
Click View and select Audio Devices from the drop-down list.
5.
Select either Unbalanced Input 1 or Unbalanced Input 2.
Note: After you make this change the next time you open Osprey Preview, the selection you made in step 2 is
now the default.
6.
On the Osprey Preview window, click Edit and then Audio Properties from the drop-down list.
The properties window displays for the audio input you selected in step 3.
Figure 41. Unbalanced Input Properties window
Osprey 800a audio input card
With up to four stereo pairs of audio, the audio input card provides greater flexibility for input audio
signals. Two stereo channels of balanced audio are always available. Plus, you can configure the
remaining channels as either unbalanced, AES, or SPDIF.
First you must configure the additional audio inputs through Osprey Preview.
To configure additional audio inputs:
Osprey by Variosystems 57
Selecting the Audio Source and Input Volume
58 Osprey by Variosystems

Osprey 800e Series User Guide
7.
Select the Audio Configurator tab.
Figure 42. Audio Configurator tab
8.
Select the audio input in the Input 1 Connector Type field (Figure 43).
Figure 43. Input 1 Connector Type field
9.
The Master Clock field should correspond to the video connectors on the back of the card. If
you change the connector on the card, you need to change the Master Clock field as well.
10.
Click Apply and then OK.
11.
Reboot the system so your changes can take effect.
After you configure the inputs for the audio input card, any encoders that you create will display the
additional audio inputs on the Audio tab. If you configure the inputs after you create encoders, the
additional audio inputs will display on the Audio tab. However, if you change the audio connector on
the card and in Osprey Preview, you need to manually change the audio settings on each encoder in
the web interface.
Osprey by Variosystems 59

Selecting the Audio Source and Input Volume
60 Osprey by Variosystems

Osprey 800e Series User Guide
Using the DVB-ASI Feature
DVB-ASI capture capability is used for satellite, program distribution, telco and cable scenarios. The
Osprey DVB-ASI feature is available for the Osprey 815e/825e/845e capture cards. DVB-ASI
transports MPEG-2 video streams, primarily for television applications over coaxial cable, at up to
270 Mbps. The ASI carrier transport can contain different bit-rate single program transport streams
(SPTS) or multi-program transport streams (MPTS) simultaneously up to the payload capacity of the
link. These streams can include private data, control, and other media information, formatted in an
MPEG-compliant structure.
Note: The Osprey capture card must be branded to support this feature. Cards purchased after July1, 2014 will be delivered
already branded.
Figure 44. Osprey Card Branded With DVB-ASI Feature
Osprey by Variosystems 61

Using the DVB-ASI Feature
Activating the DVB-ASI Feature
You activate the DVB-ASI feature from the Performance tab.
To activate the DVB-ASI feature:
1. Select the Performance tab.
2. In the Input Port Settings section, select DVB-ASI from the drop-down list. (Figure 45)
Figure 45. Input Port Settings
3. Click OK.
4. Restart the driver.
5. Repeat these steps for each input that you want to use for the DVB ASI feature. Inputs that are
not selected are still available as SDI inputs.
When you enable the DVB-ASI feature, the property pages only show tabs for DVB-ASI functions
(Figure 46).
Figure 46. DVB-ASI feature enabled
The Input Detect tab displays either Single Program Transport Streams (SPTS) (Figure 47) or Multi
Program Transport Streams (MPTS) (Figure 48).
62 Osprey by Variosystems

Osprey 800e Series User Guide
Figure 47. Single Program Transport Streams
Figure 48. Multi-Program Transport Stream
Osprey by Variosystems 63

Using the DVB-ASI Feature
Changing the Input Setting
To change the input to SDI:
1. Access the Properties page
2. In the Input Port Settings section, select SMPTE as the pin mode setting (Figure 49).
3. Restart the card.
Figure 49. Pin Mode Setting
64 Osprey by Variosystems

Osprey 800e Series User Guide
Operating temperature range
0° to 40° C
Non-operating temperature range
-40° to +75° C
Operating humidity range
Between 5 % and 80 % (noncondensing) @ 40° C
Non-operating humidity range
95 % RH (non-condensing); gradient
30 % per hour
Operating altitude range
0 to 3,048 meters (10,000 feet)
Non-operating altitude range
0 to 15,240 meters (50,000 feet)
Appendix: Osprey Hardware Specifications
Osprey 800a audio input card
Figure 50. Osprey 800a audio input card
Environmental specifications
PCI Express or PCI (x 1) for mechanical stability only (slots x 1, x 4, x 8, or x 16)
Approximate weight:
Osprey 800a = 65 grams
Osprey by Variosystems 65

Using the DVB-ASI Feature
Operating temperature range
0° to 40° C
Non-operating temperature range
-40° to +75° C
Operating humidity range
Between 5 % and 80 % (noncondensing) @ 40° C
Non-operating humidity range
95 % RH (non-condensing); gradient
30 % per hour
Operating altitude range
0 to 3,048 meters (10,000 feet)
Non-operating altitude range
0 to 15,240 meters (50,000 feet)
Osprey 815e video capture card
Figure 51. Osprey 815e video capture card
Environmental specifications
PCI Express or PCI (x 1) for mechanical stability only (slots x 1)
Approximate weight:
Osprey 815e = 70 grams
66 Osprey by Variosystems

Osprey 800e Series User Guide
Figure 52. Osprey 815e backplate
Osprey by Variosystems 67

Using the DVB-ASI Feature
Operating temperature range
0° to 40° C
Non-operating temperature range
-40° to +75° C
Operating humidity range
Between 5 % and 80 % (noncondensing) @ 40° C
Non-operating humidity range
95 % RH (non-condensing); gradient
30 % per hour
Operating altitude range
0 to 3,048 meters (10,000 feet)
Non-operating altitude range
0 to 15,240 meters (50,000 feet)
Osprey 820e video capture card
Figure 53. Osprey 820e video capture card
Environmental specifications
PCI Express (x4) card compliant
Approximate weight:
Osprey 820e = 113 grams
68 Osprey by Variosystems

Osprey 800e Series User Guide
Figure 54. Osprey 820e backplate
The Osprey 820e has two multifunction video/audio ports and an unbalanced audio input.
Osprey by Variosystems 69
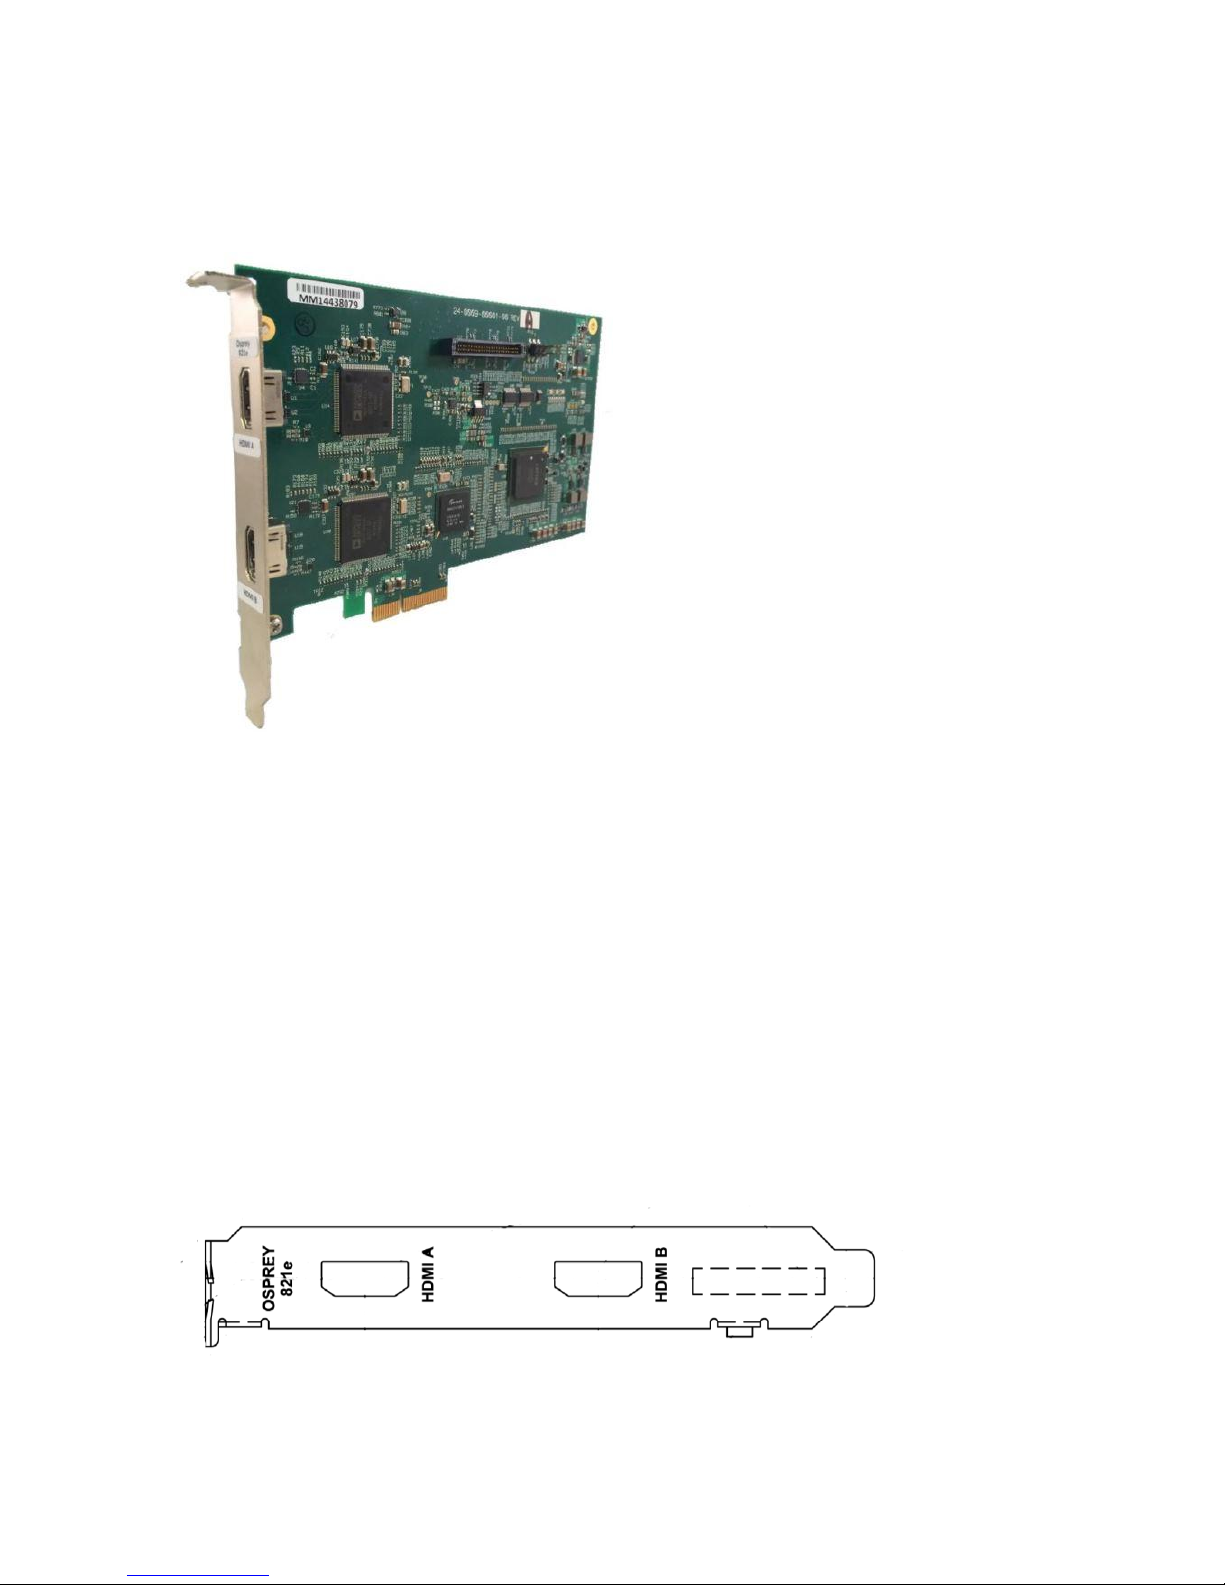
Using the DVB-ASI Feature
Operating temperature range
0° to 40° C
Non-operating temperature range
-40° to +75° C
Operating humidity range
Between 5 % and 80 % (noncondensing) @ 40° C
Non-operating humidity range
95 % RH (non-condensing); gradient
30 % per hour
Operating altitude range
0 to 3,048 meters (10,000 feet)
Non-operating altitude range
0 to 15,240 meters (50,000 feet)
Osprey 821e video capture card
Figure 55. Osprey 821e video capture card
Environmental specifications
PCI Express (x4) card compliant
Approximate weight:
Osprey 821e = 113 grams
Figure 56. Osprey 821e backplate
70 Osprey by Variosystems

Osprey 800e Series User Guide
Operating temperature range
0° to 40° C
Non-operating temperature range
-40° to +75° C
Operating humidity range
Between 5 % and 80 % (noncondensing) @ 40° C
Non-operating humidity range
95 % RH (non-condensing); gradient
30 % per hour
Operating altitude range
0 to 3,048 meters (10,000 feet)
Non-operating altitude range
0 to 15,240 meters (50,000 feet)
Osprey 825e video capture card
Environmental specifications
PCI Express (x4) card compliant
Approximate weight:
Osprey 825e = 70 grams
Figure 57. Osprey 825e full-height backplate
Figure 58. Osprey 825e half-height backplate
Osprey by Variosystems 71

Using the DVB-ASI Feature
Operating temperature range
0° to 40° C
Non-operating temperature range
-40° to +75° C
Operating humidity range
Between 5 % and 80 % (noncondensing) @ 40° C
Non-operating humidity range
95 % RH (non-condensing); gradient
30 % per hour
Operating altitude range
0 to 3,048 meters (10,000 feet)
Non-operating altitude range
0 to 15,240 meters (50,000 feet)
Osprey 845e video capture card
Figure 59. Osprey 845e video capture card
Environmental specifications
PCI Express (x4) card compliant
Approximate weight:
Osprey 845e = 122 grams
Figure 60. Osprey 845e backplate
72 Osprey by Variosystems

Osprey 800e Series User Guide
Index
A
Activate the DVB-ASI feature, 62
Audio Configurator, 59
Audio Configurator tab, 50, 59
Audio control menu, 54
Audio daughter card, 57, 65
Audio Input Mixer Properties, 54
Audio Input Mixer tab, 51
Audio Properties, 53
Audio Properties page, 49
C
Change the input to SDI, 64
Closed Caption, 21
Closed Caption tab, 45
Completing the Found New Hardware Wizard
window, 11
Configuring
Audio Input Card
additional audio inputs, 57
Cropping, 21
Cropping tab, 42
Crossbar, 20
Crossbar tab, 26
D
Deinterlace, 21
Deinterlace tab, 35
Destination Folder window, 6
Device, 20
Device tab, 33
Diagnostics, 20
Diagnostics tab, 30
DVB-ASI capture capability, 61
E
End-User License Agreement, 6
Environmental specifications, 65, 66, 68, 70, 71,
72
F
Found New Hardware Wizard window, 10
I
Input 1 Connector Type field, 59
Input Detect, 20
Input Detect tab, 34
Install Software Automatically window, 9
Installing Osprey 800eHD window, 7
L
Loss Of Signal, 21
Loss Of Signal tab, 40
O
Osprey 800 Series Video Properties, 20
Osprey 800a audio daughter card, 57
Osprey 800a audio input card, 65
Osprey 815e backplate, 67
Osprey 815e video capture card, 66
Osprey 820e backplate, 69
Osprey 820e video capture card, 68
Osprey 821e backplate, 70
Osprey 821e video capture card, 70
Osprey 825e full-height backplate, 71
Osprey 825e half-height backplate, 71
Osprey 845e backplate, 72
Osprey Preview icon, 57
Osprey by Variosystems 73

Index
P
Performance, 20
Performance tab, 28
Pin type list box, 16
R
Ready to Install window, 7
Remove Previous Installations window, 5
S
Software Installation window, 7
Sound window, 55
T
Trace, 20
Trace tab, 27
Typical PCI Express Slot diagram, 12
U
Unbalanced Input Properties window, 57
V
VGA Settings tab, 47
Video Decoder, 20
Video Decoder tab, 24
Video Proc Amp, 20
Video Proc Amp tab, 22
W
Warning window, 10
Warranties, 1
Watermark, 21
Watermark tab, 37
Welcome window, 9
74 Osprey by Variosystems


Osprey 800e Series User Guide
www.ospreyvideo.com
© 2014 Osprey by Variosystems, LLC. Osprey® and SimulStream® are registered trademarks of Osprey by Variosystems, LLC. All other trademarks are the property of their respective
owners. Product specifications and availability may change without notice. 40-05324-08-A
 Loading...