

Page 1
EUKFC
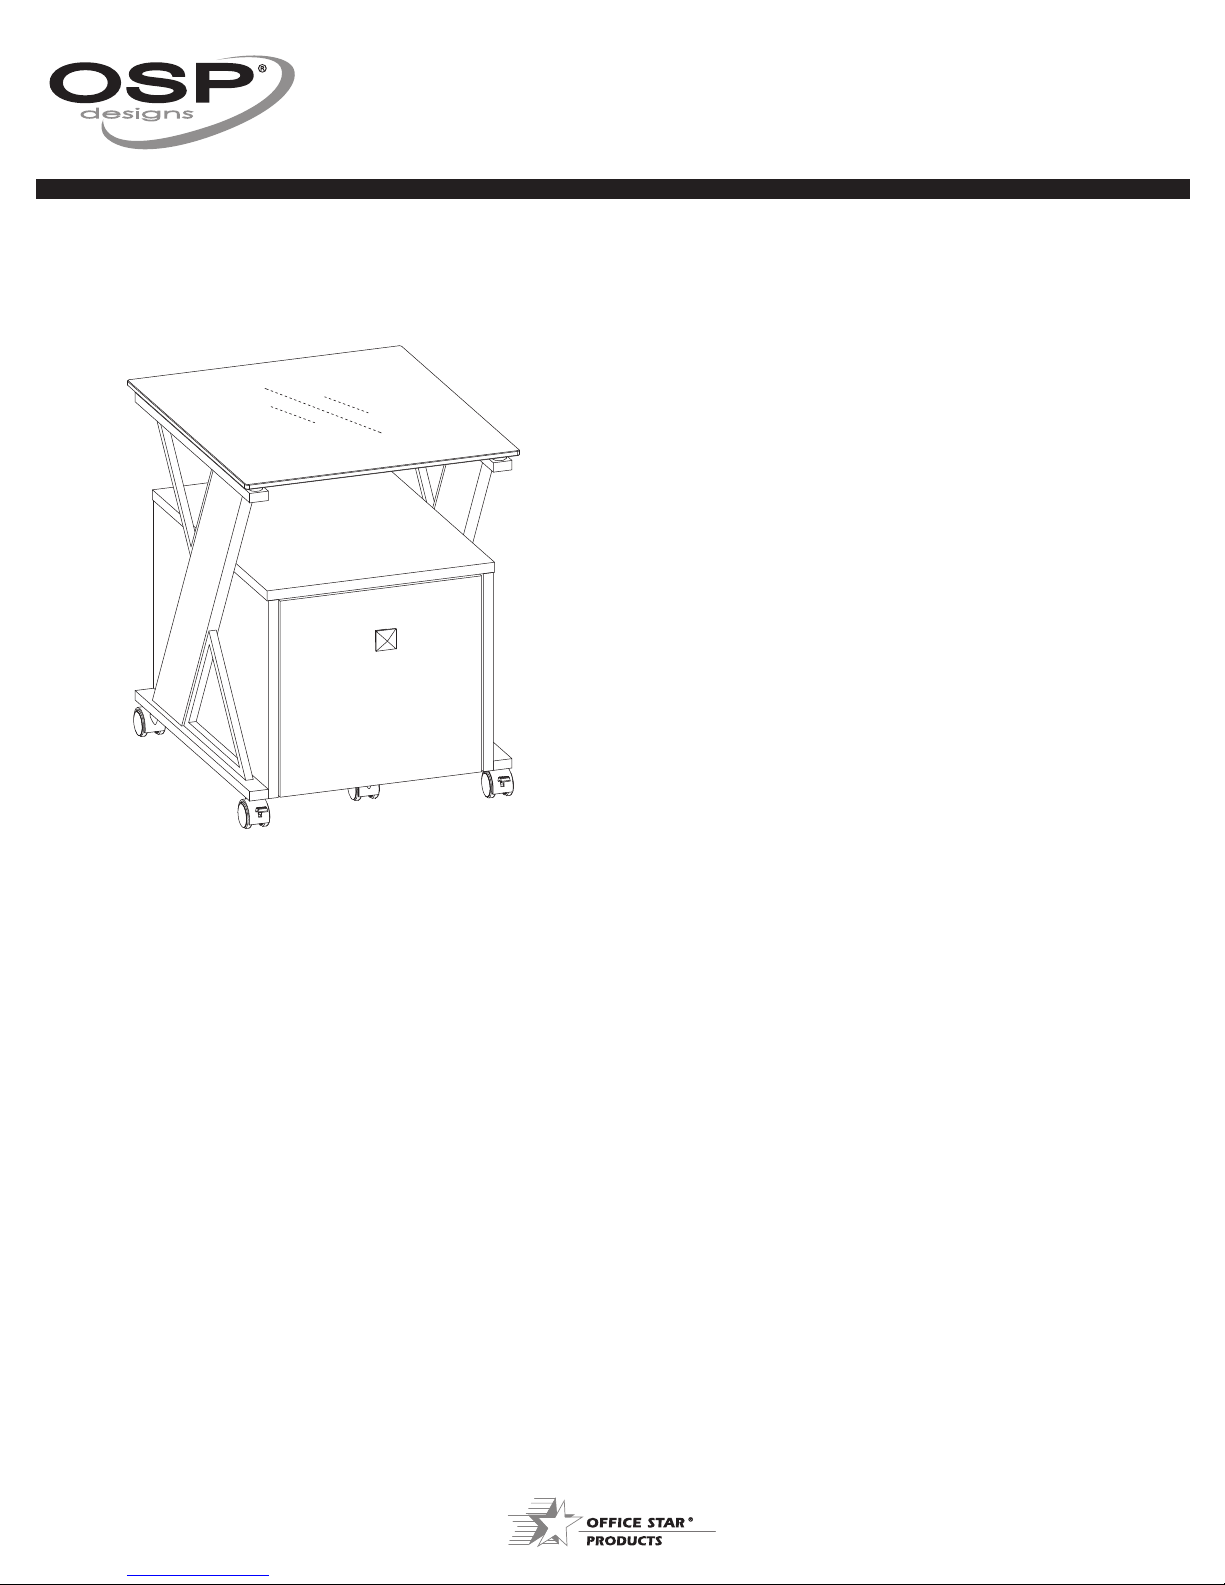
EUREKA FILE CABINET
ASSEMBLY INSTRUCTIONS
WARNING
1. Do not use this product unless all screws and bolts are securely
tightened.
2. Check that all screws and bolts are tight every three months or as
needed.
3. Dispose of packing material properly. Do not use plastic cover as
head covering. It may cause suffocation.
4. Do not use this product as a stepladder.
5. Use this product for its intended purpose only.
6. Intended for residential use only.
OSP DESIGNS LIMITED WARRANTY
OSP Designs Warrants, to the original purchaser its products to be free from defects in material and workmanship for a period of 90 days. Defects and damage
from misuse, abuse, negligence, alteration, accident, vandalism, rusting, acts of nature or any other event beyond the control of OSP Designs is not covered.
The warranty does not cover cosmetic damage that may result from normal use. Liability for incidental or consequential damages is excluded. The user
assumes all risk of injury resulting from use of this product. This warranty gives you specific legal rights, and you may also have other rights which vary from
state to state.
To make a warranty claim, contact Parts Department. Provide model number, proof of purchase, description of the problem and obtain return authorization.
At it’s option Office Star Products will:
(a) Supply compatible components of current manufacture.
(b) Repair the customer’s component. The customer must prepay freight on any components returned to the factory. Return freight on components
still in warranty will be paid by Office Star Products.
Our quality standards are among the highest in the industry. Sometimes, no matter how hard we try, there are times when parts are damaged or missing. Our
Parts Department will do everything possible to promptly remedy the problem. Contact us via e-mail parts@officestar.net, by Fax 1-909-930-5629, or toll free
parts number 1-800-950-7262, Monday through Friday 8:00 a.m. - 5:00 p.m. Pacific Time.
Page 2
DRAWER INSTALLATION
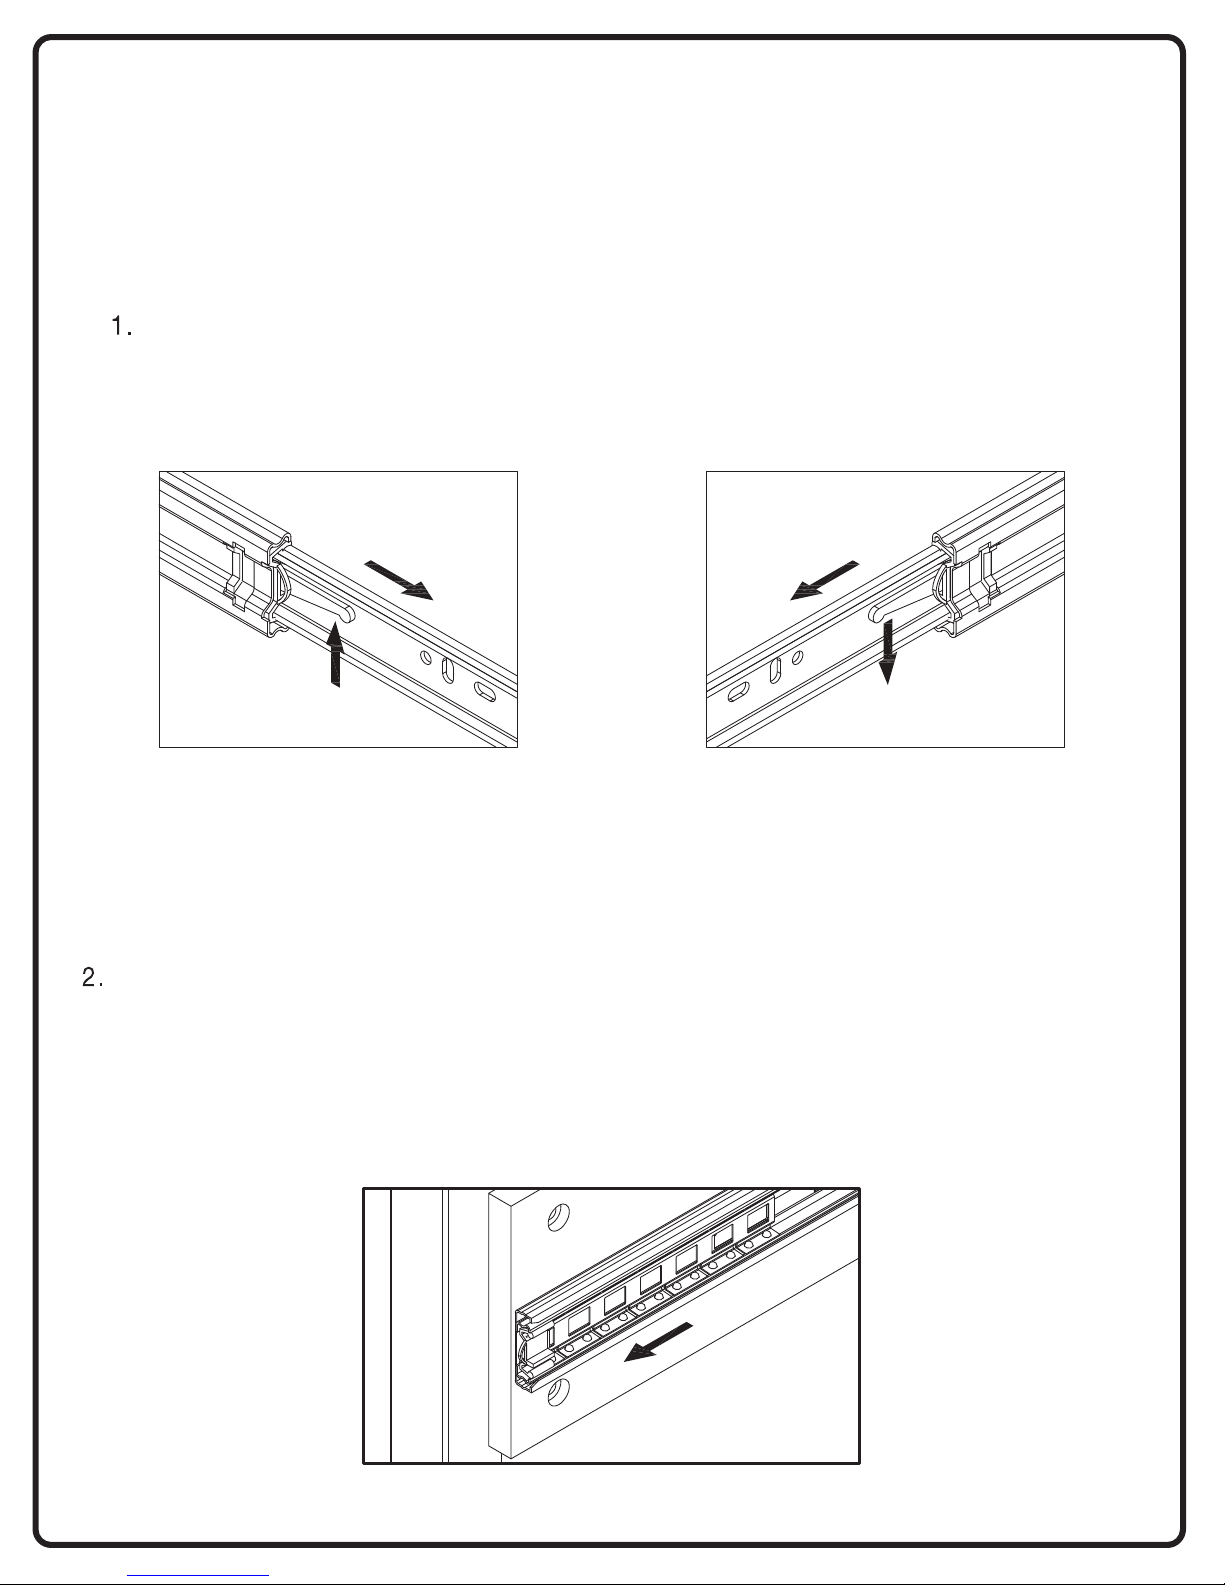
If you need to remove the drawer with ball bearing slides from the unit, follow the
steps below to prevent any damage to the slides or the drawer.
If you need to remove the drawer, please pull the drawer all the way out, then push the plastic release
lever of the ball bearing slide up on one side and down on the other side, and then pull the drawer
completely out. See detail #A.
Detail #A
To place the drawer back, simply push the ball bearing cart all the way to the end of the slide (in both sides),
and align the slide runners on the drawer with the slide tracks on the unit and push it carefully inside until
it stops. See detail #B.
Note: If they do not align properly, remove and repeat step 2
Detail #B
Page 3
PARTS LIST
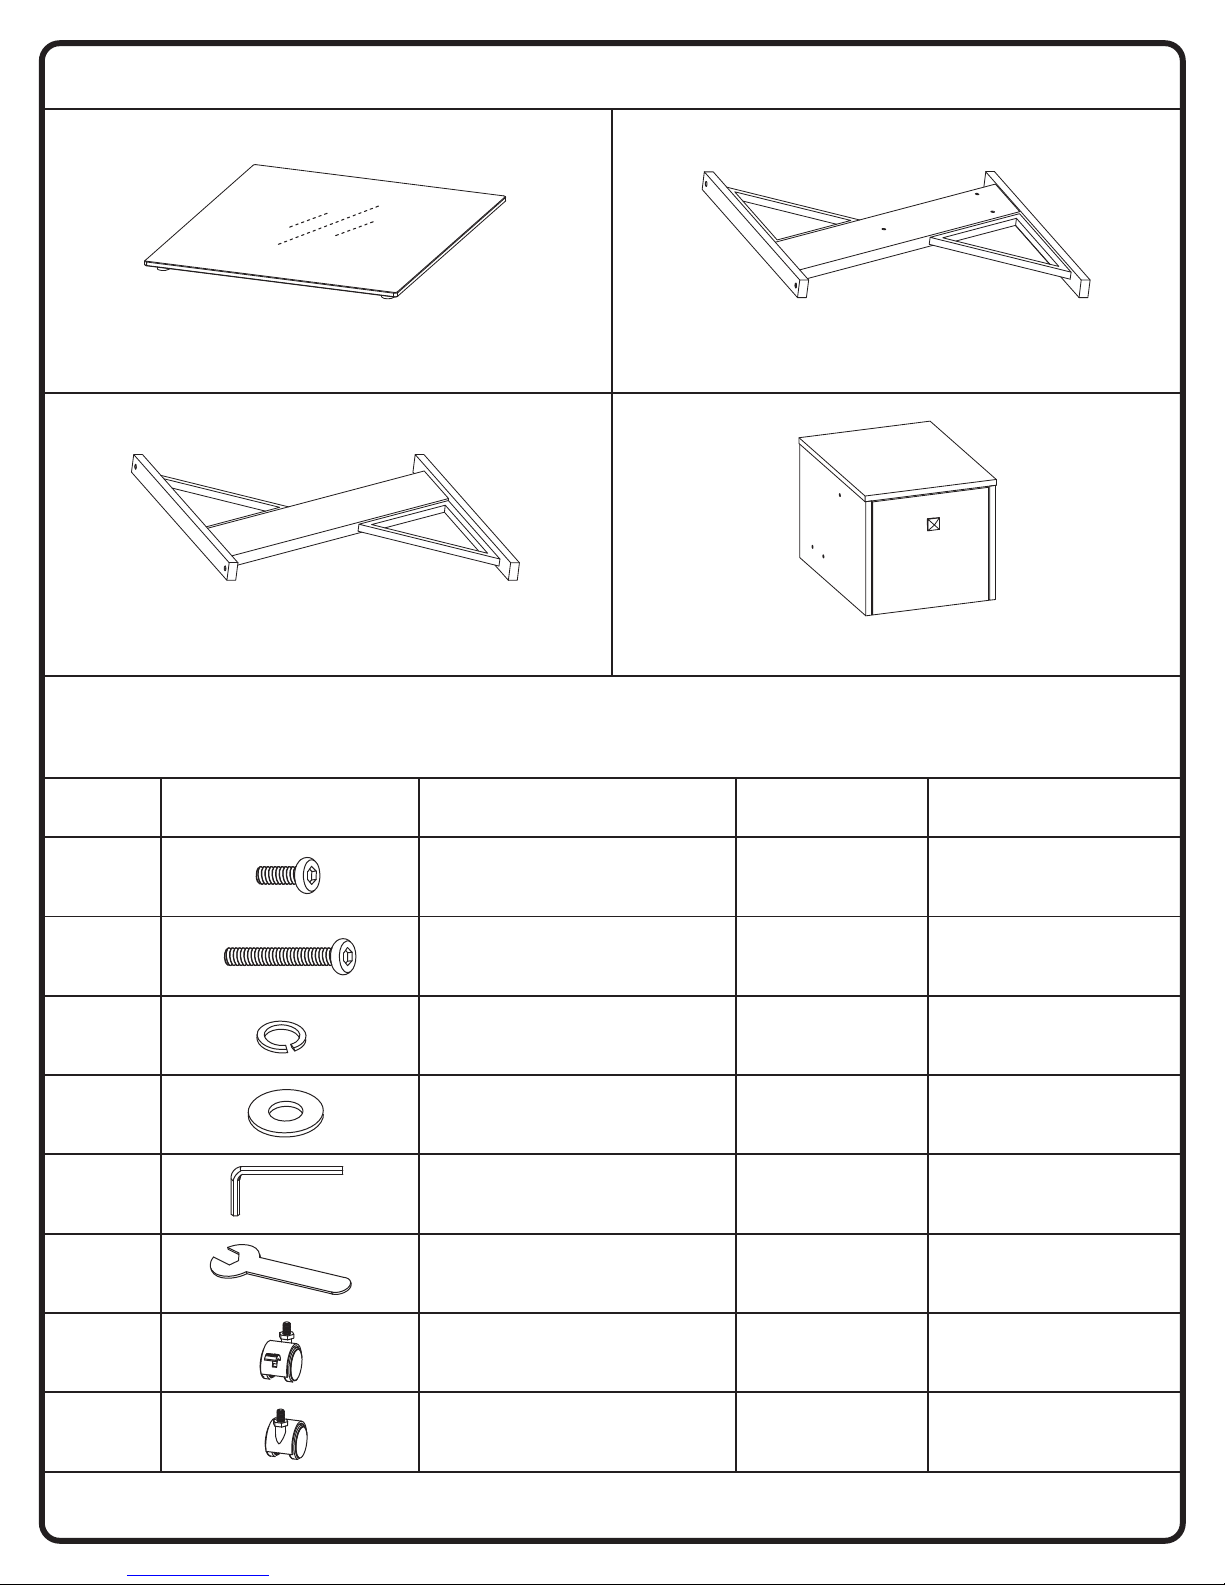
(A) Glass Top (1 PC) (B) Left Side Frame (1 PC)
(D) Pedestal (1 PC)(C) Right Side Frame (1 PC)
HARDWARE LIST
DRAWINGNO DESCRIPTION SIZE QUANTITY
1
2
3
4
5
6
Short Bolt ¼’’ x 19mm
Long Bolt
Lock Washer
Flat Washer
Allen Wrench
¼’’ x 28mm
¼’’
¼’’ x 19mm
4mm
Key Wrench
4 PCS + 1 Extra
6 PCS + 1 Extra
6 PCS + 1 Extra
6 PCS + 1 Extra
1 PC
1 PC
7
8
Locking Caster
Caster
2 PCS
3 PCS
Page 4
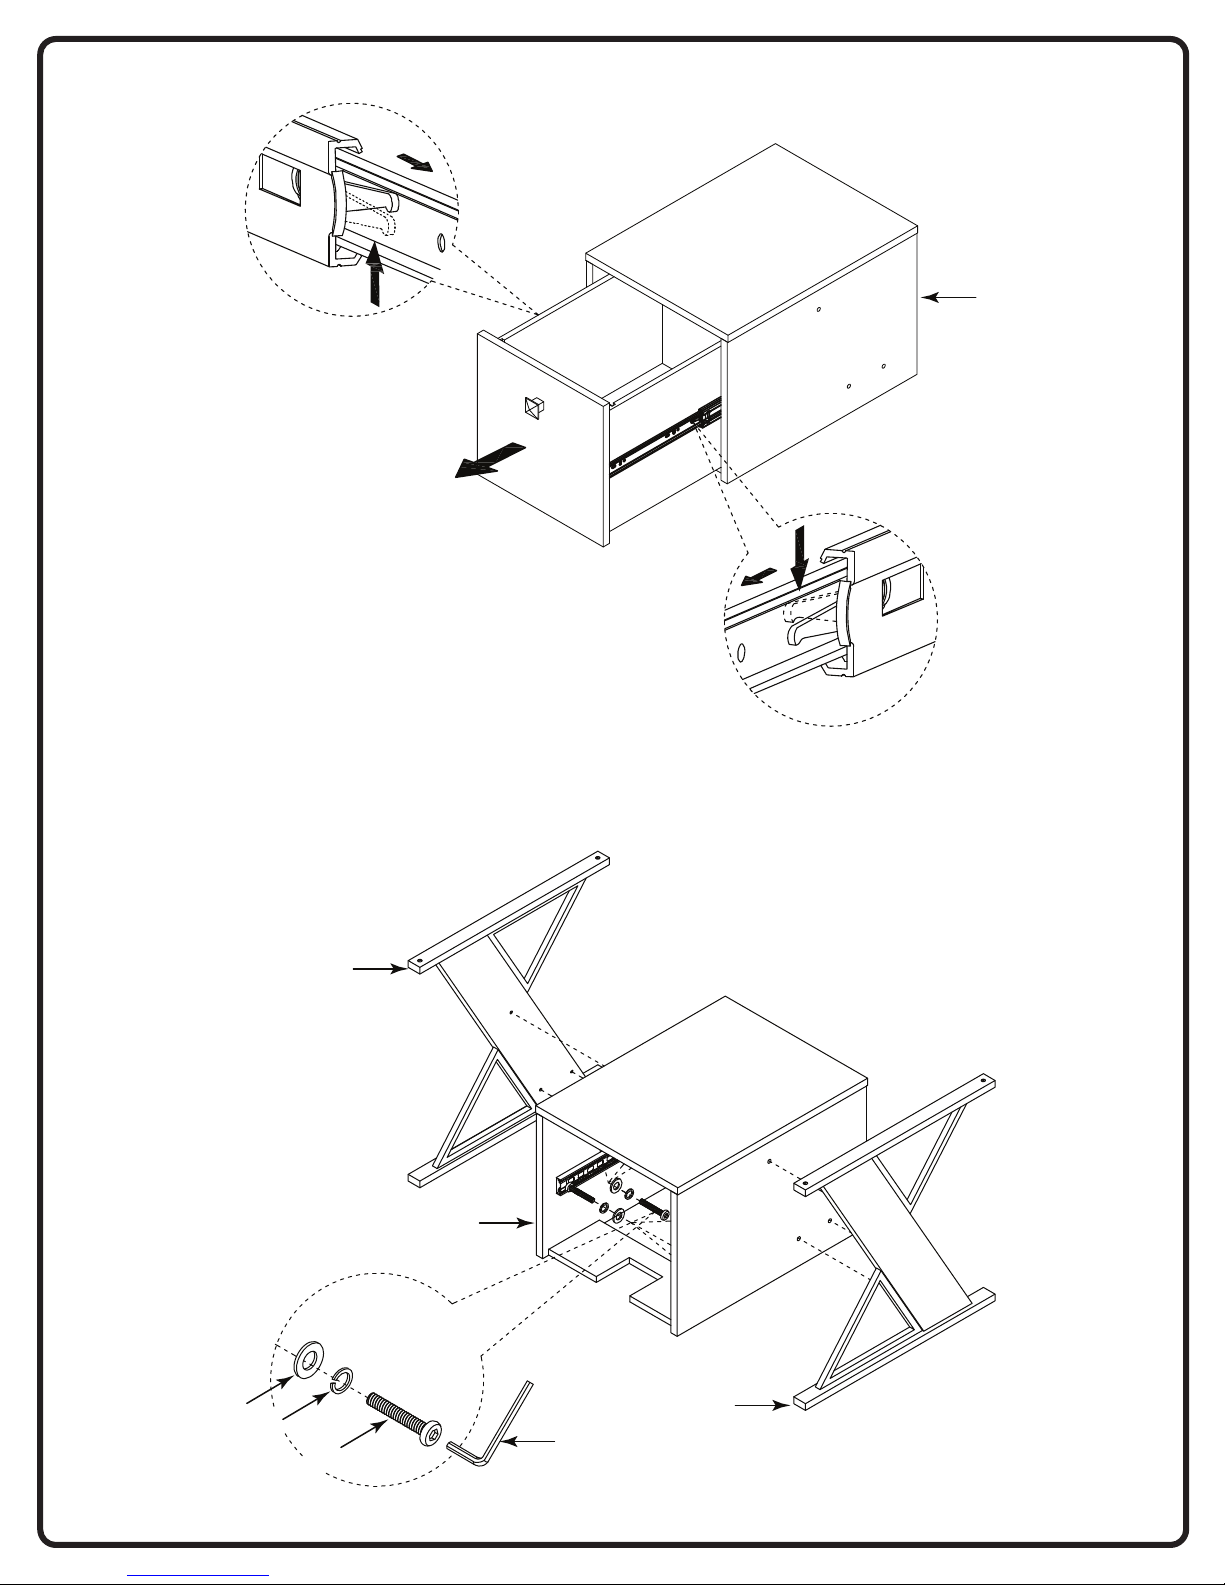
STEP 1
(D)
STEP 2
REMOVE DRAWER FROM PEDESTAL (D).
(B)
(D)
(4)
(3)
(2)
(C)
(5)
DO NOT FULLY TIGHTEN BOLTS.
Page 5
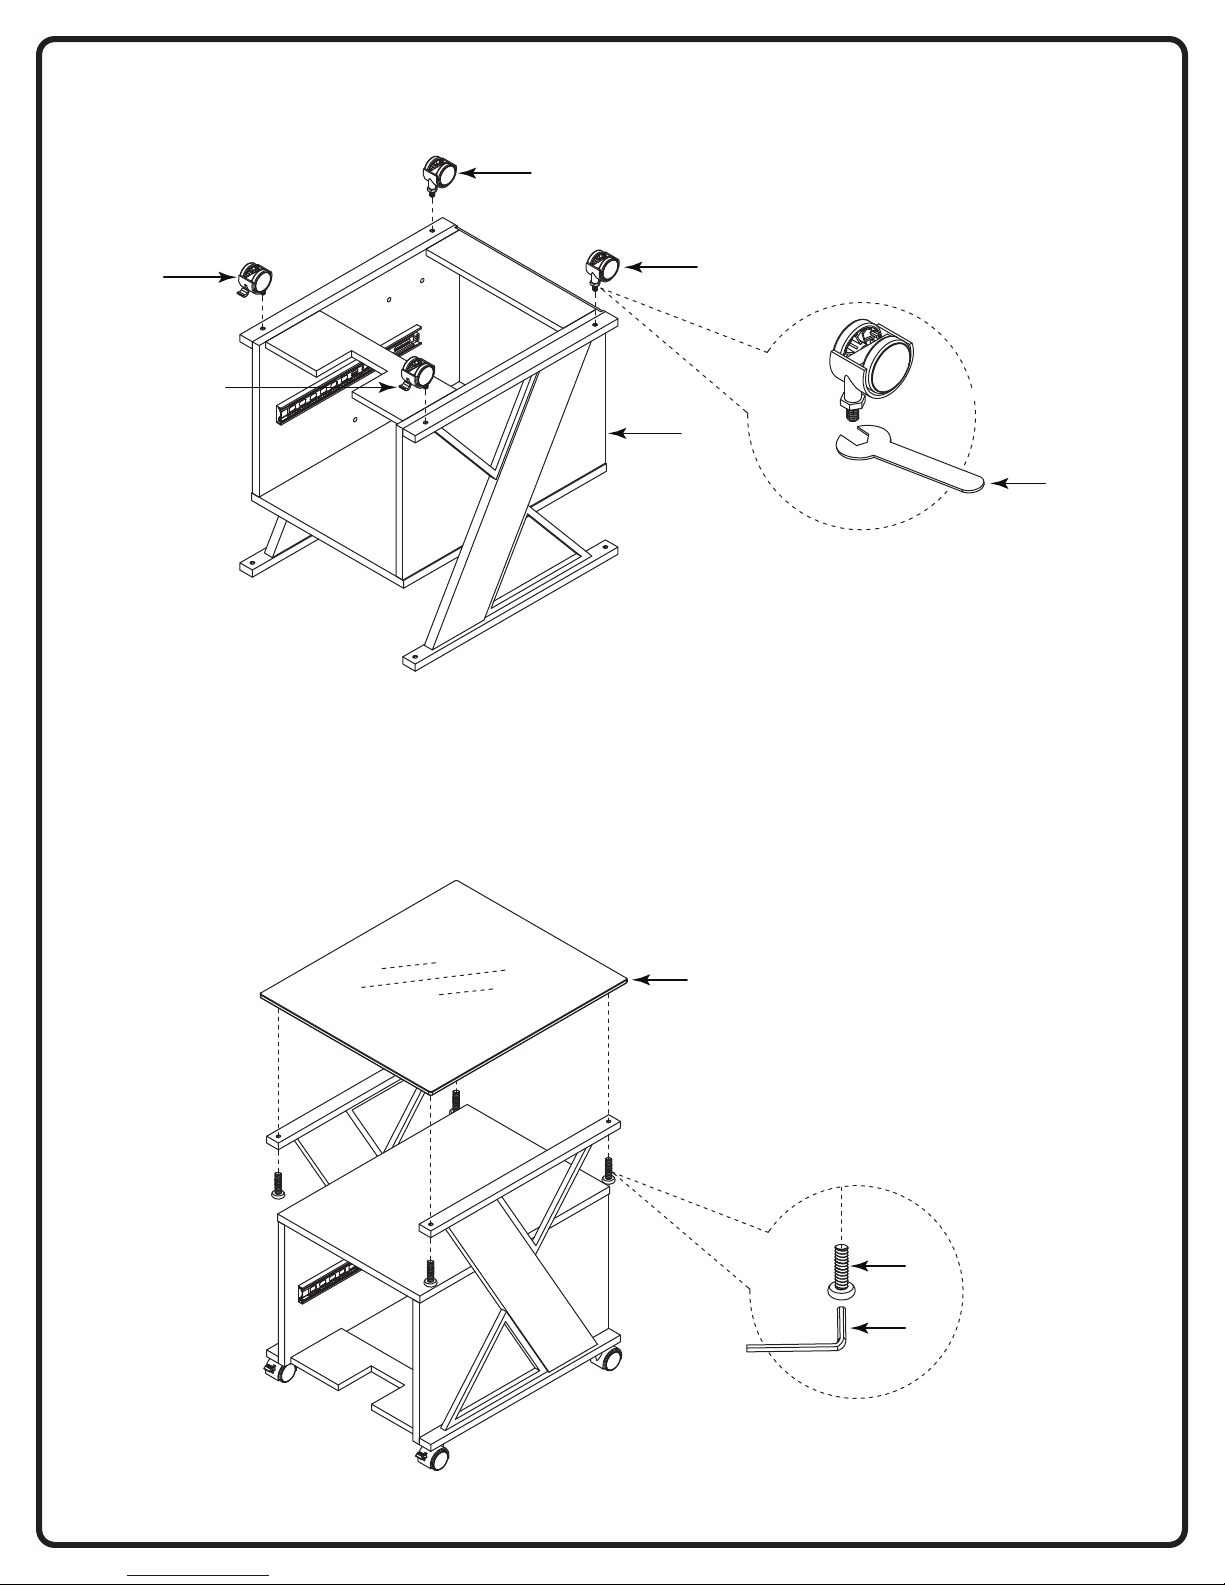
STEP 3
(8)
(7)
(8)
(7)
(D)
(6)
FULLY TIGHTEN CASTERS USING KEY WRENCH (6).
STEP 4
(A)
(1)
(5)
APPLY FIRM PRESSURE TO ALIGN & FULLY TIGHTEN ALL BOLTS USING ALLEN WRENCH (5).
Page 6
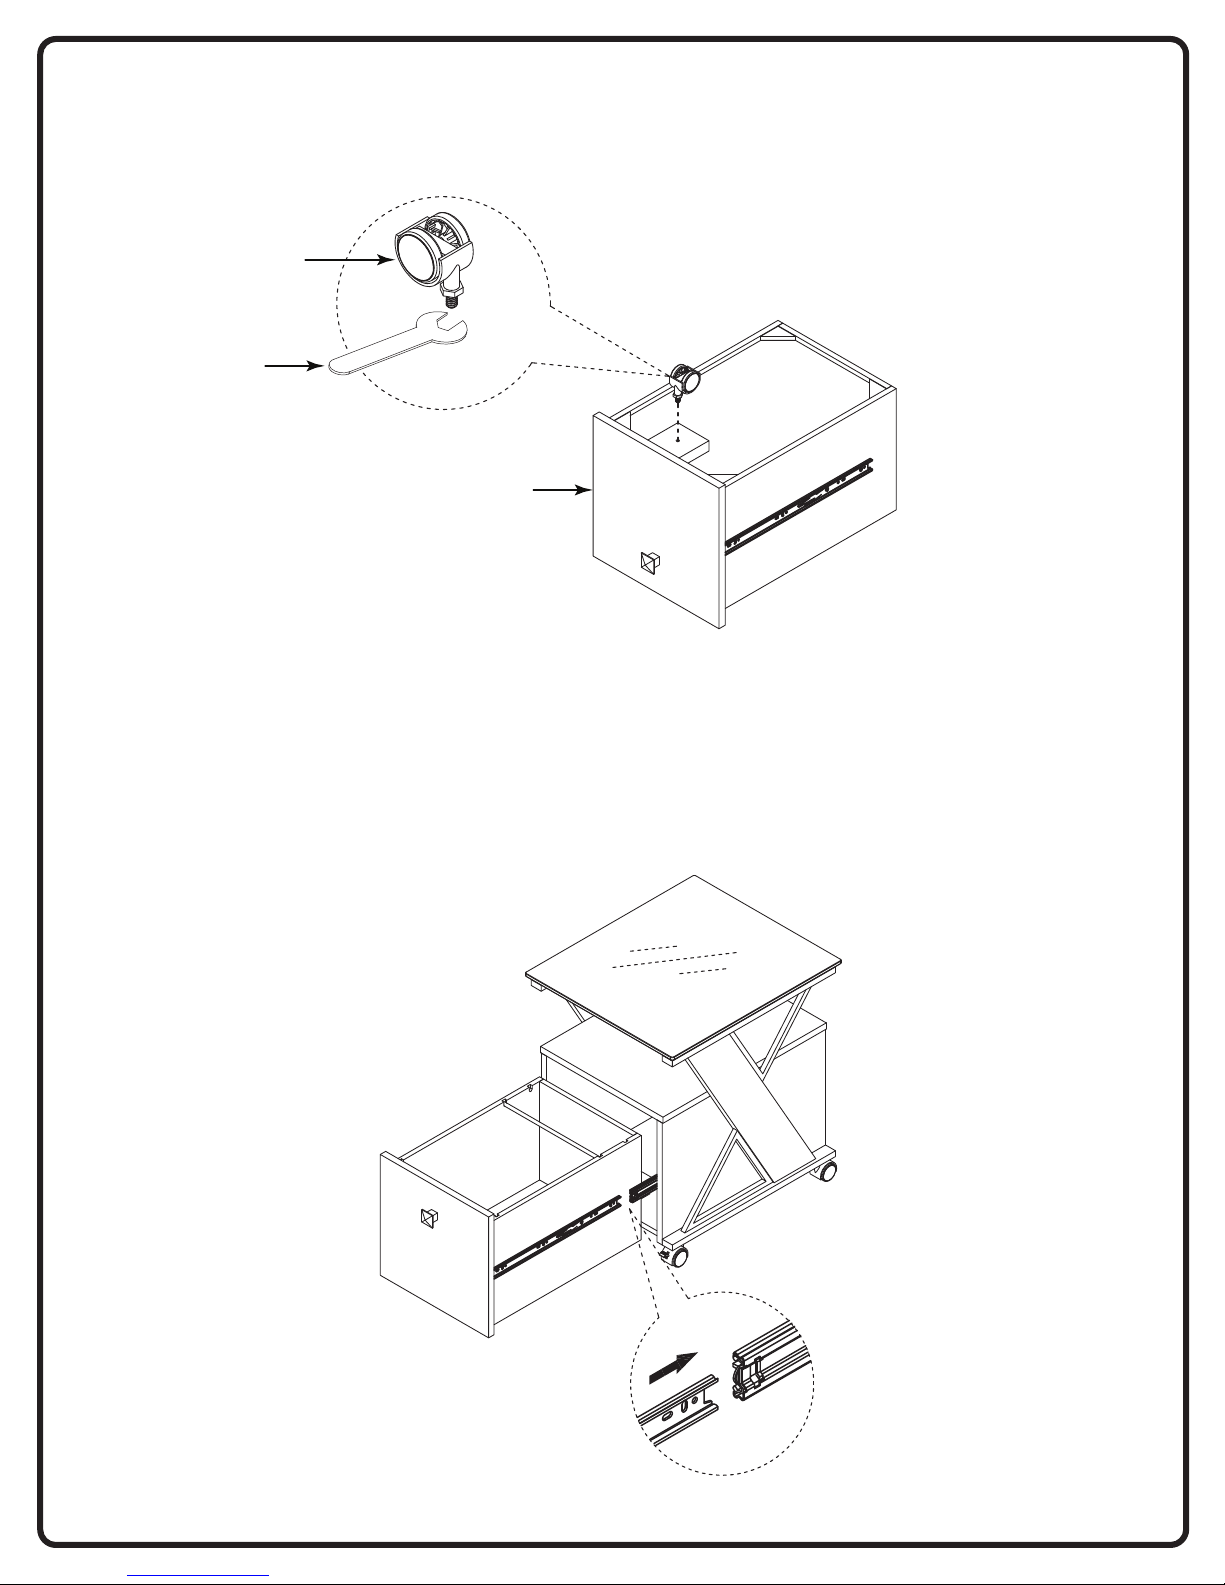
STEP 5
(8)
(6)
drawer
STEP 6
FULLY TIGHTEN CASTER (8) USING KEY WRENCH (6).
INSERT DRAWER INTO PEDESTAL (D).
 Loading...