

Page 1
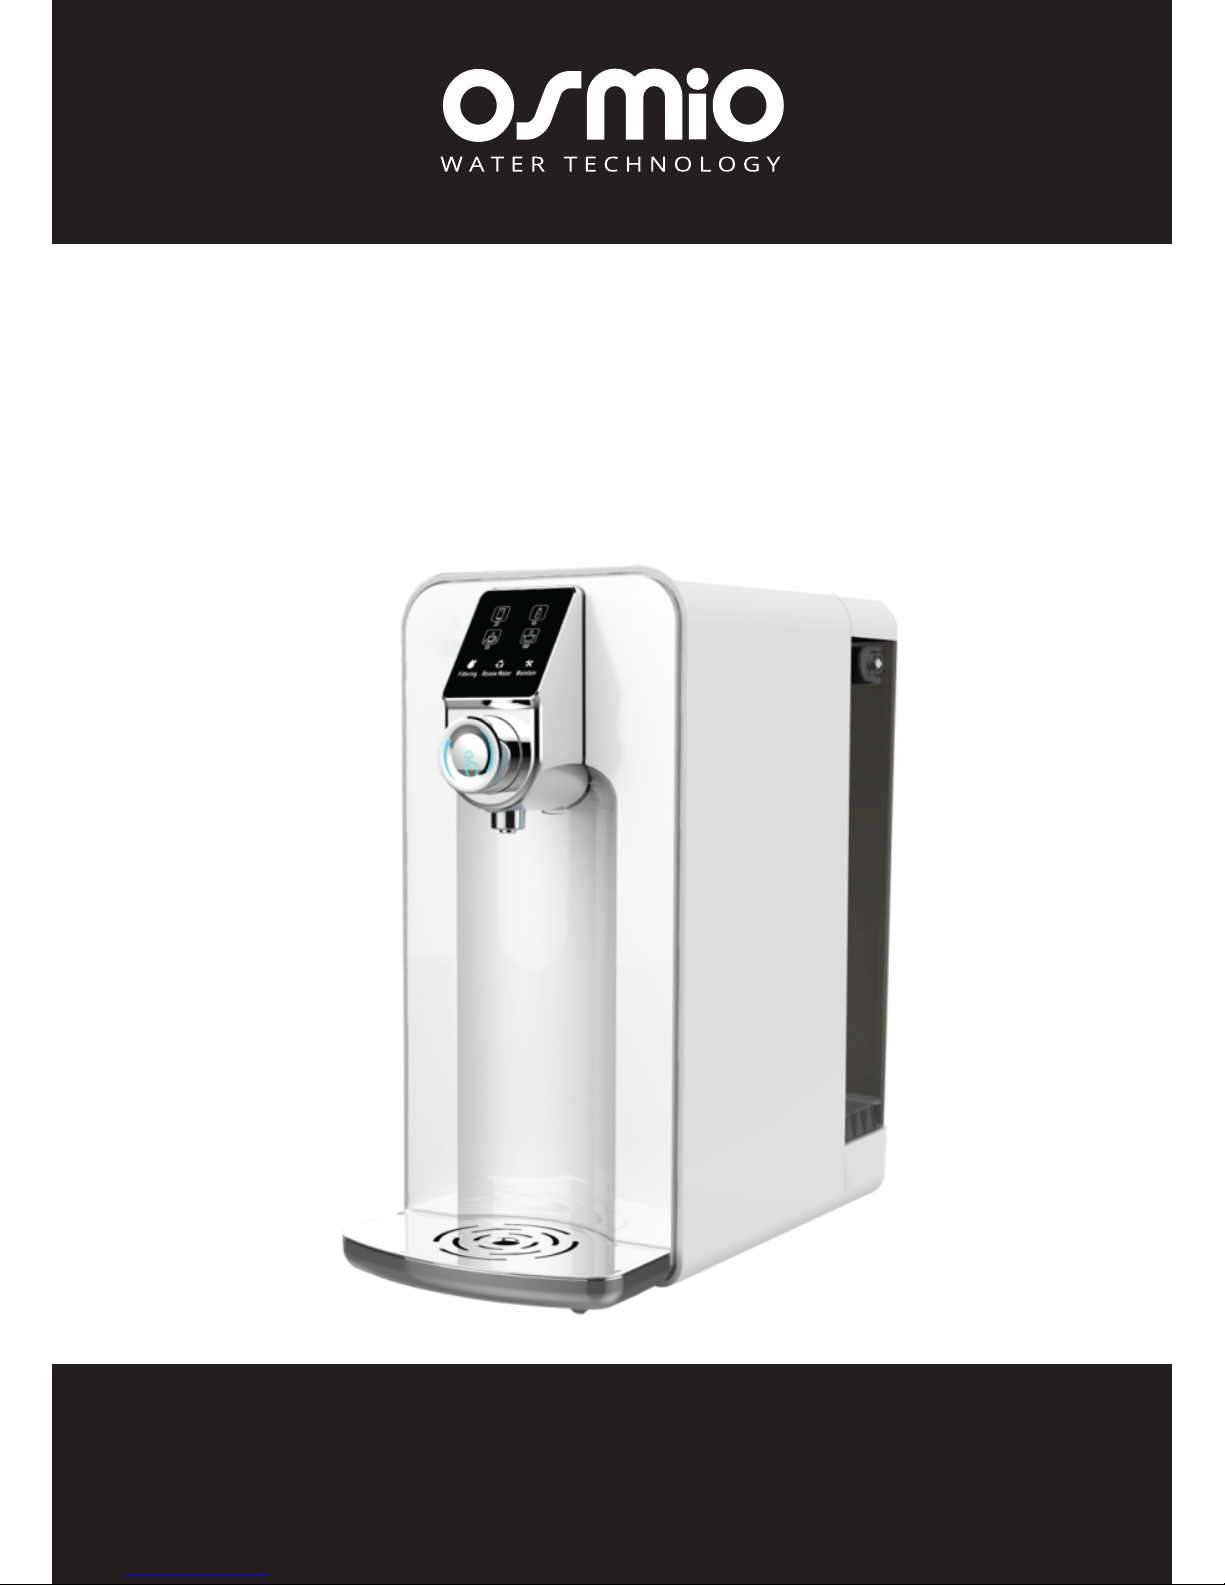
Osmio Zero Installation
Reverse Osmosis System
User Manual
WhatsApp +447852323666
Telephone: 0800 002 9533
Email: [email protected]
Page 2

Contents
1 Safety Precautions
1.1 Power Safety Precautions
1.2 Setup Precautions
1.3 Usage Precautions
2 Product Description
2.1 Appearance Sketch Map
2.2 Display and Operation Interface
2.3 Product Specifications
3 Start Up
3.1 Introduction
3.2 Filling the Supply Pitcher
3.3 Power Connection
4 Use
4.1 Introduction
4.2 Flushing
4.3 Purification
4.4 Renew Water
4.5 Dispensing Water
4.6 Sleeping State
4.7 Power Off
5 Filters` Maintenance
5.1 Introduction
5.2 Filter Replacement
5.3 Failure State
6 Common Usage Problem
7 Quality Assurance
8 After-Sale Service
9 Electrical Schematic Diagram
Page 3

1 Safety Precautions
1.1 Power Safety Precautions
• The system should be plugged into a normal UK 3 pin plug at your home
or workplace and not be used in addition to AC 220-240V, 220V.
• Should be used in a grounding socket with rated current above 10A.
• Should only be used on an electrical circuit with RCD.
• Please do not use this product if the power cord or plug is damaged or
when the plug is loose.
• If there is dust or water and other foreign matter on the power plug,
please wipe it clean before use.
1.2 Setup Precautions
• The system should not be installed near heating equipment, electric
heating products or other high-temperature places.
• The system should not be installed in a place of possible leakage of
combustible gases or near any flammable substances.
• The system should only be used indoors and positioned on a stable flat
surface avoiding direct sunlight and moisture.
Thank you for purchasing this product, please read this manual carefully
before using the system, and keep it for future reference. If you have any
questions about this machine, please call our customer service centre on
0800 002 9533.
Take Note: Boiling water is potentially dangerous.
It is the responsibility of the owner to take sensible precautions when operating
the boiling water function of the system and to instruct other family members
and other new users to operate it safely.
KEEP OUT OF REACH OF CHILDREN
Page 4

1.3 Usage Precautions
• On first use or if the unit has been idle for more than 2 days, run a
complete cycle and discard the first batch of water produced. Fill your supply
pitcher with water and then allow the machine to run until it fills the internal
tanks. Dispense both ambient and hot water to ensure both hot and cold
internal tanks are flushed.
• Unknown liquids or foreign objects are prohibited.
• If there is any water leakage from the machine, please disconnect the power
and contact the customer service centre. Please ensure the Supply
Water Pitcher and the filters have been inserted correctly and fully into the
system.
• If there is any abnormal sound, smell, or smoke, etc., please disconnect the
power and contact the customer service centre.
• Do not disassemble or modify the system without professional guidance, please
contact the customer service centre if you need support.
• Do not move this product when it is in use.
• Do not use any detergent or alcohol based cleaner to clean the product, please
wipe the machine with a soft dry cloth.
• Do not grasp the water nozzle or the knob to move the machine.
• This product cannot be used by people who are physically or mentally disabled or
children unless supervised. Please keep it out of reach of children.
The filters on the system need to be changed every 6 months. We offer a 1 year
warranty for customers in medium hard up to 200 ppm Calcium Carbonate Hardness and TDS of 250 ppm. For customers with harder or water with higher TDS, we
do not recommend this product unless you are happy to make be more frequent
membrane filter changes. The system is designed to shut off if there is blockage in
the membrane or prefilters. As the system recirculates the rejected water from the
membrane, the TDS level continually rises of the water entering the membrane
filter. Therefore, for those with water of higher TDS, more frequent membrane
changes are required.
IMPORTANT NOTE: You must empty the Supply Pitcher before
refilling it with fresh water as this can block your filters
Page 5
2 Product Description
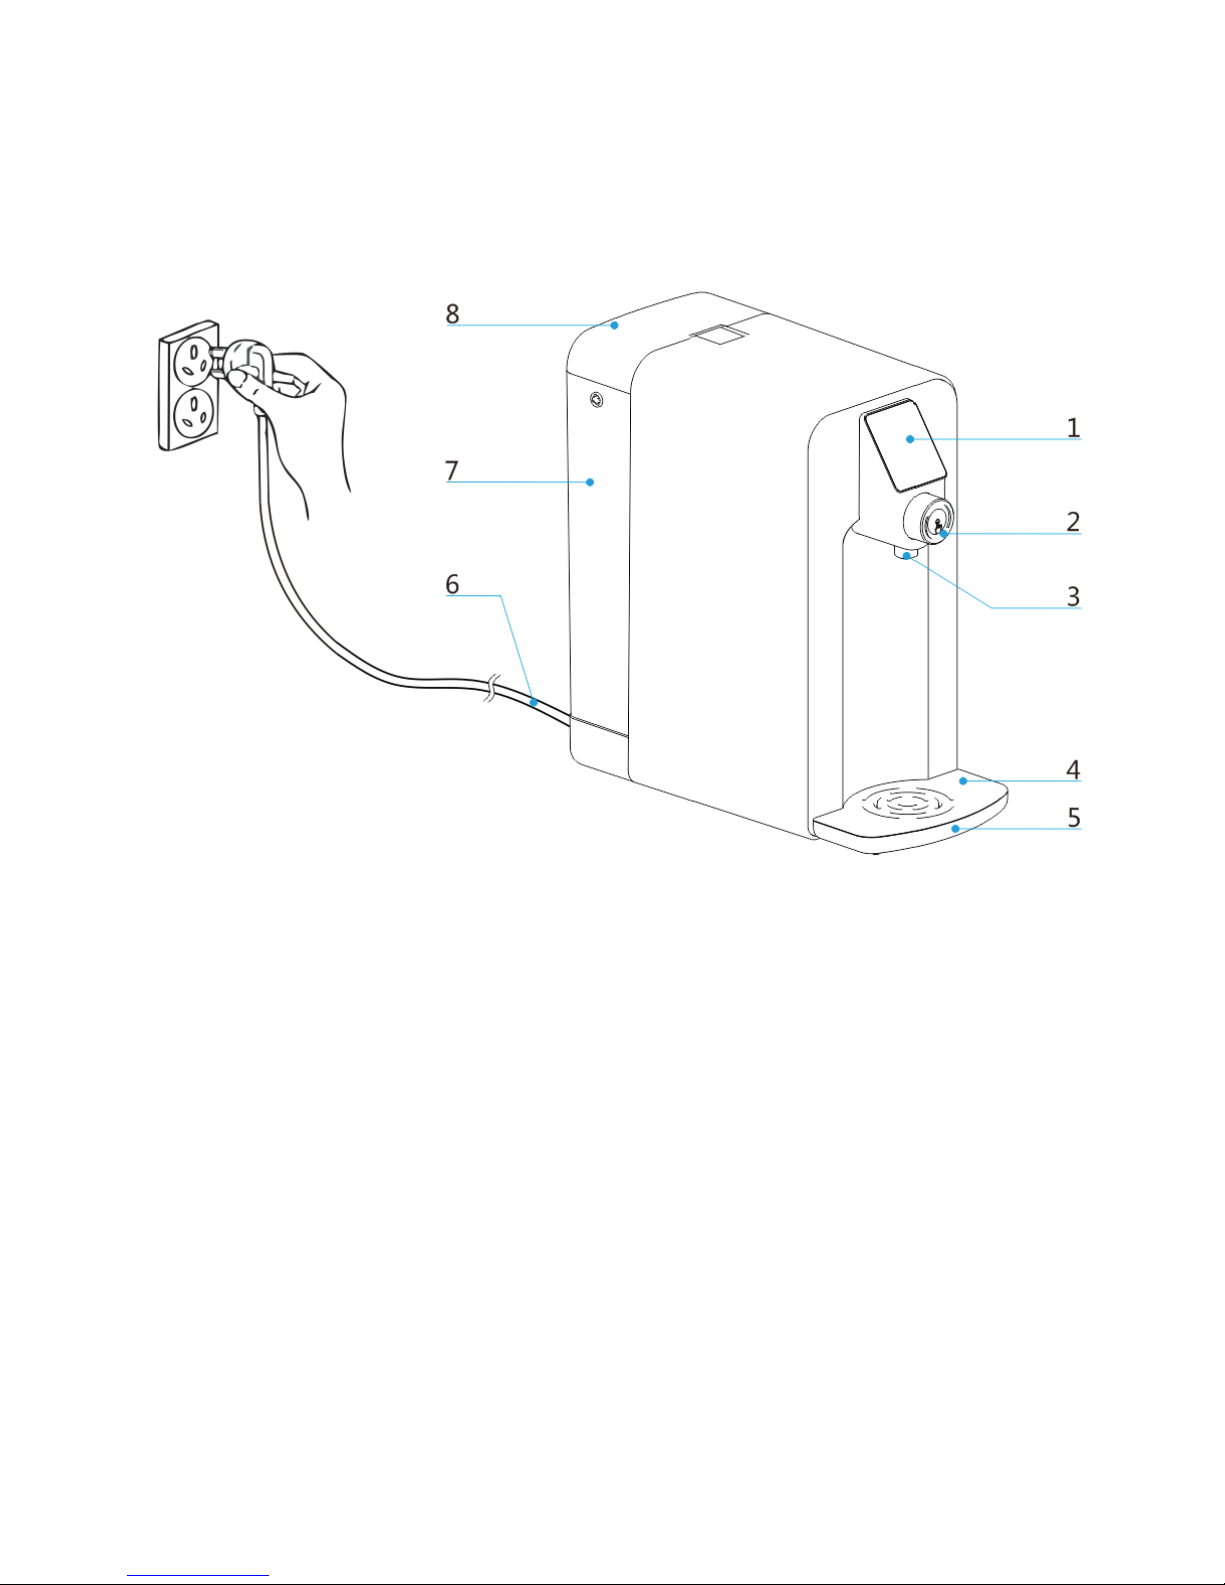
2.1 Appearance
1 Display Panel
2 Control Button (Rotate & Press)
3 Nozzle
4 Drip Tray Cover
5 Drip Tray
6 Power Plug
7 Supply Pitcher
8 Supply Pitcher Lid
FIGURE 1
Page 6
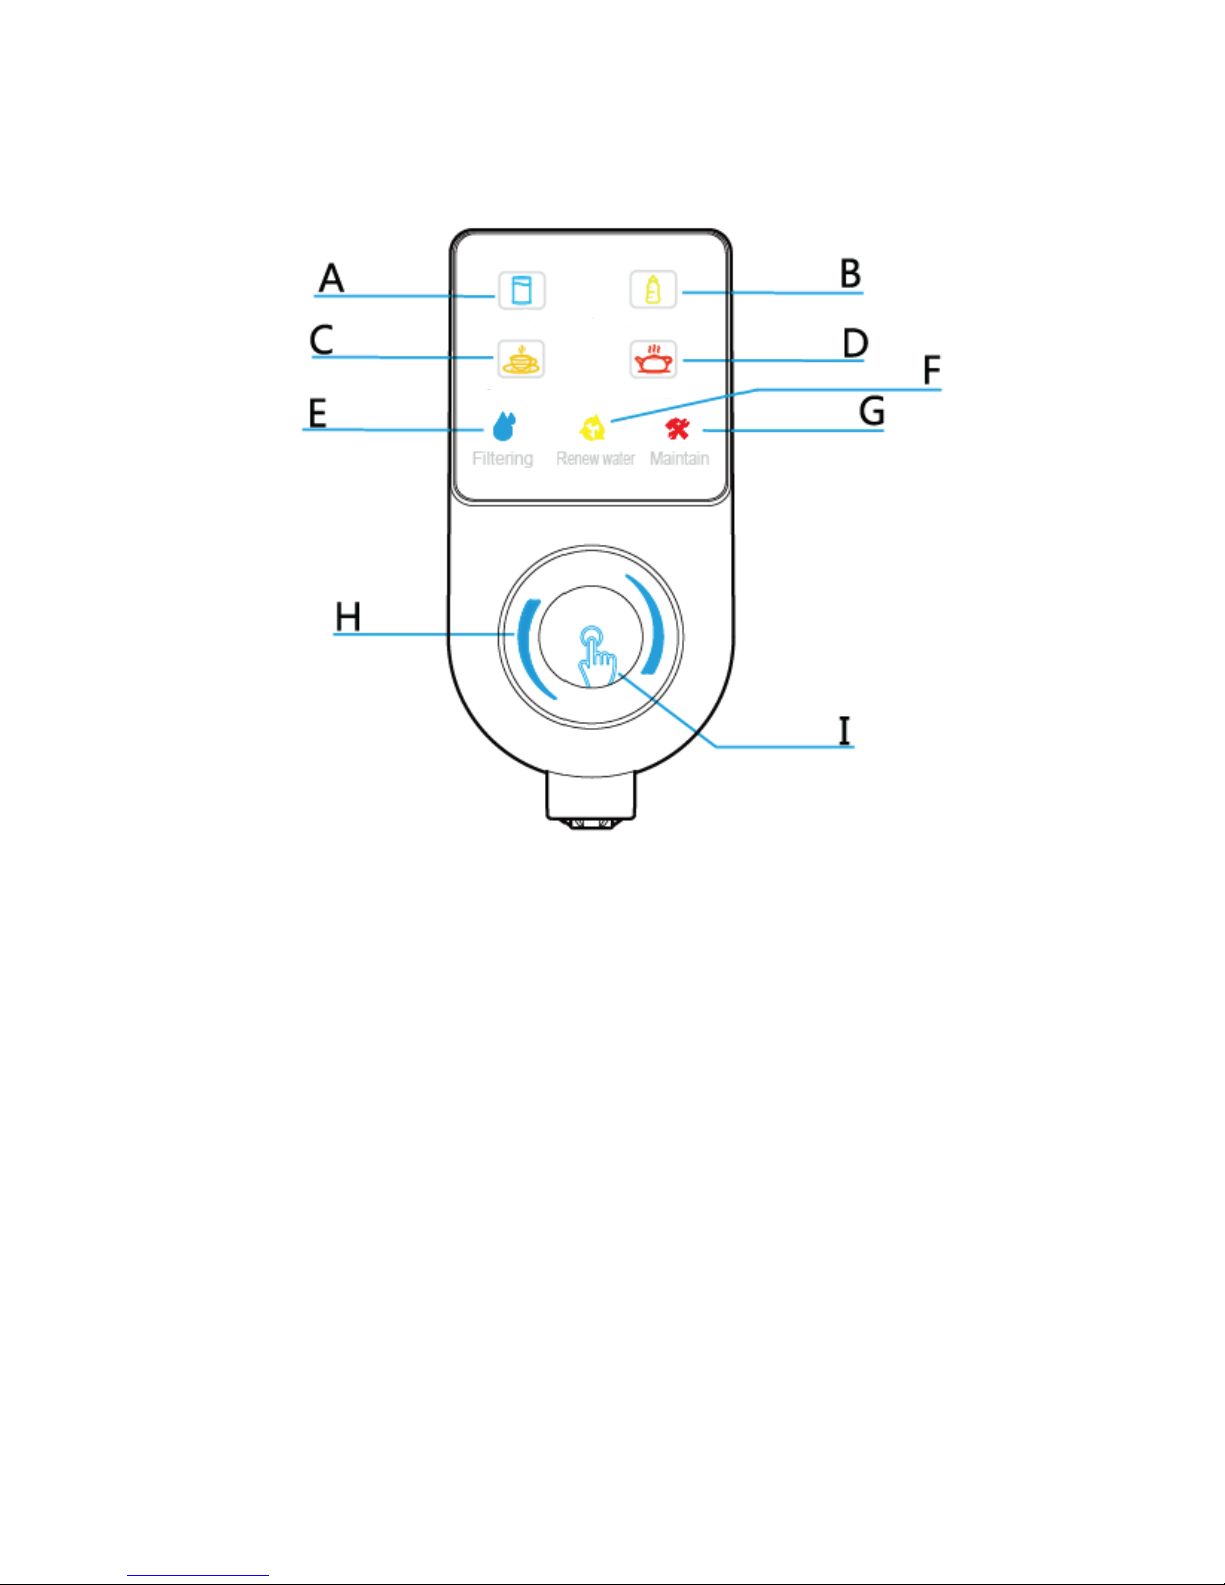
2.2 Display and Operation Interface
A. Normal Water
B. Warm Water(40℃-50℃)
C. Hot Water(80℃-88℃)
D. Boiled Water (90℃-98℃)
E. Filtering Water
F. Renew Water
G. Filter Maintenance
H. Rotate (Choose the Water Temp)
I. Press to Get Water
FIGURE 2
Page 7

2.3 Product Specifications
Electrical Properties
Rated Voltage : 220 - 240 V
Rated Frequency : 50 Hz
Rated Power: 2200W-2600W
Heating System
Rated Heating Power: 2180W-2580W
Hot Water Capacity: 30 l/h (≥ 90°C)
Filter Stages
1 - Quick-Change Sediment Filter 5μm: removes coarse particles, e.g.
Sand, rust, chlorine, lime
2 - Quick-Change activated carbon filter: removes chlorine and organic impurities
3 - Quick-Change Membrane 50GPD: removes all pollutants and
flavours to almost 100%
4 - Quick-Change Insertion Filters: Hygiene post filter antibacterial:
removes 99% of the bacteria and viruses and improves the taste.
Volume
Supply Pitcher 5 Litres
Pure Water Tank 1.5 L
Hot Water Tank 0.5 L
Dimensions:
405mm Length (Depth)
183mm Wide
388mm Height
Weight’: 7.1 kg
Page 8
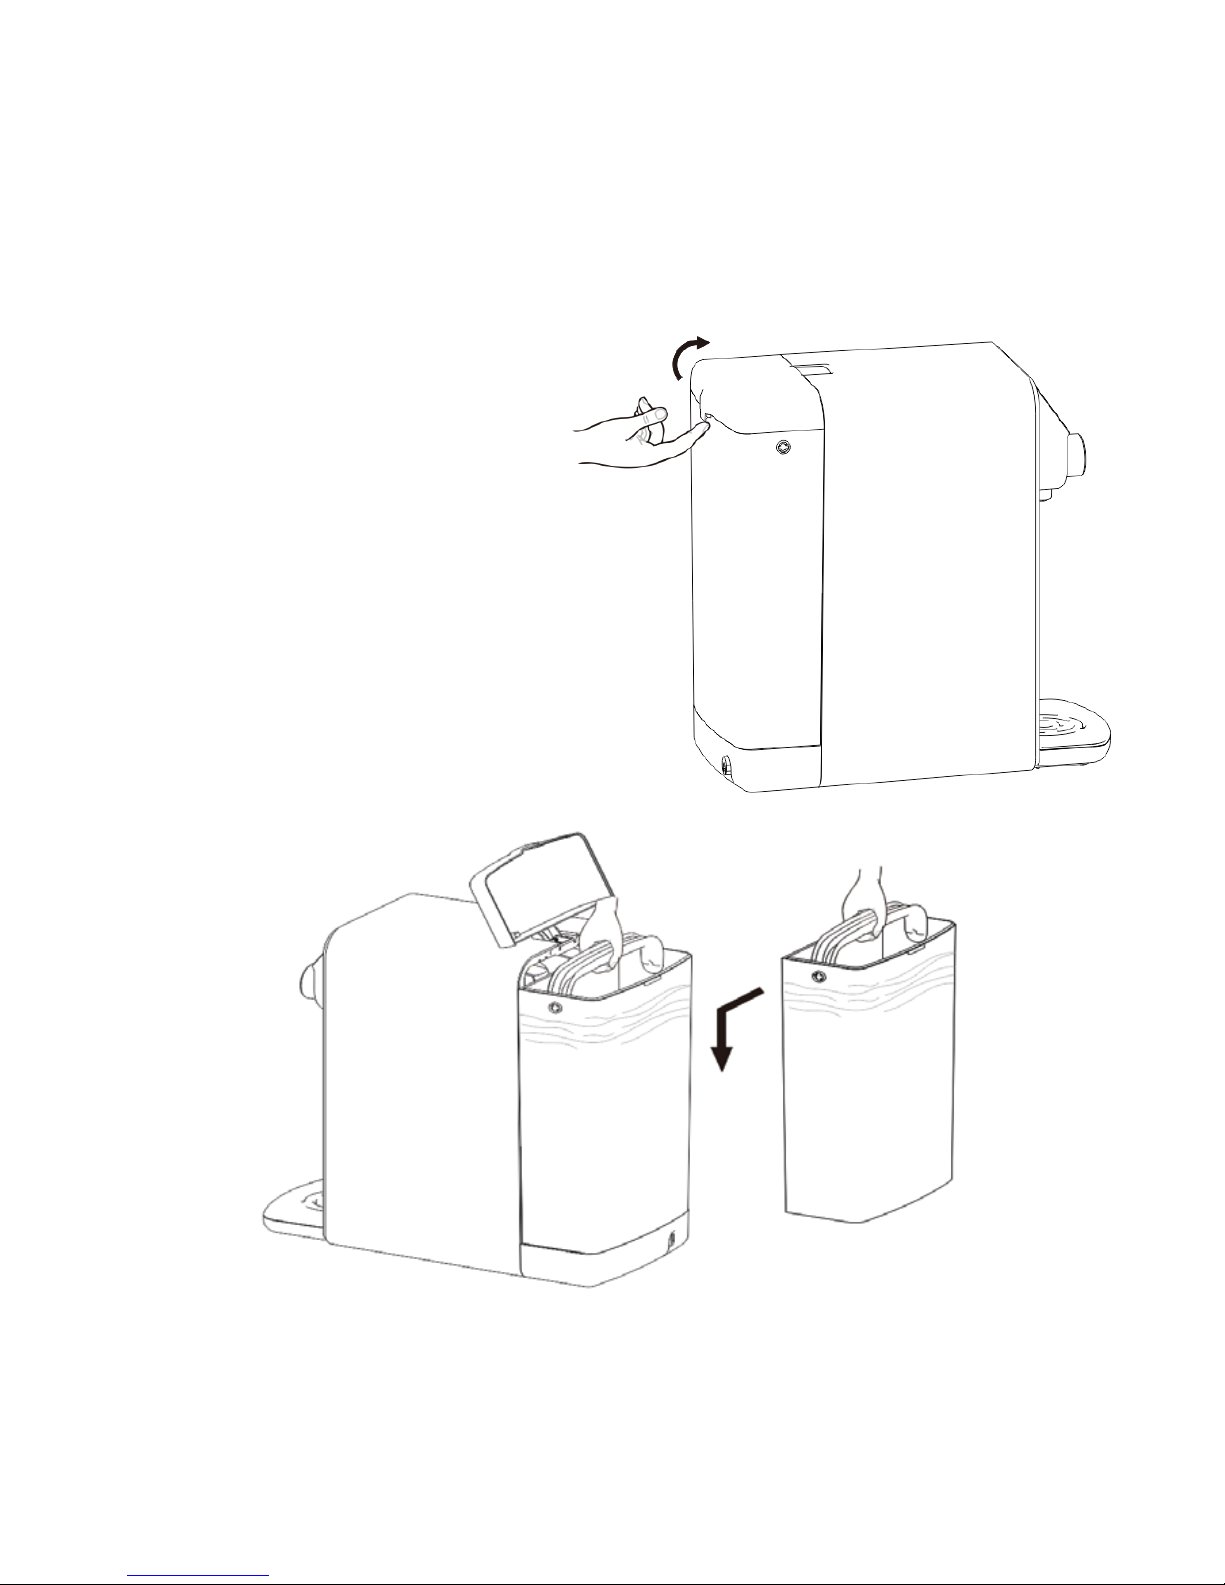
FIGURE 3
FIGURE 4
3 Start Up
3.1 Introduction
• Please place the system in a cool, ventilated, solid horizontal surface, away
from any heat source. The system comes ready installed with the filters so you can
right away fill the Supply Pitcher.
3.2 Filling the Supply Pitcher
• Open the tank lid (Figure 3).
• Lift the Supply Pitcher out.
• Fill the Supply Pitcher with fresh water
and put it back on to the base (Figure 4)
and close the lid.
• Note: machine will not run without the
Supply Pitcher Lid clipped on.
.
3.3 Power Connection
• Insert the power plug into the socket (see Figure 1). The system will beep and light
up which indicates the machine is ready to use.
Note: This product is only suitable for AC 220-240V, 220V power supply, and
should be used alone or over rated 10A with a earthed socket.
Page 9

4 Usage
4.1 Introduction
• At first, produce and dispense 5 litres of water which you then dispose of
by dispensing all the cold and hot water. This will flush out any loose filter
media. It is normal to see black water when using new filters.
• If there is water leakage from the machine, please disconnect the power
and contact the customer service centre. If there is any abnormal or
unexpected sound, smell, or smoke, etc., please disconnect the power and
contact the customer service centre.
4.2 Flushing
• After the setup, the machine automatically enters the flushing state and
works for 120 seconds. In the flushing state, the filtering symbol of the
display interface light will be on (see Figure 2) .
4.3 Purification
• After flushing, the machine automatically enters the filtering state. The
filtering symbol on the display interface light will be on (see Figure 2).
4.4 Replace Water
• The system will detect the source water quality in normal operation. If
the water level is lower than the set level, the user will be prompted to
replace the source water. You must empty the Supply Pitcher every time it
is refilled. The renew water symbol of the display interface
will light on at this time (see Figure 2).
IMPORTANT NOTE: You must empty
the Supply Pitcher before refilling it
with fresh water as this can block
your filters
Page 10
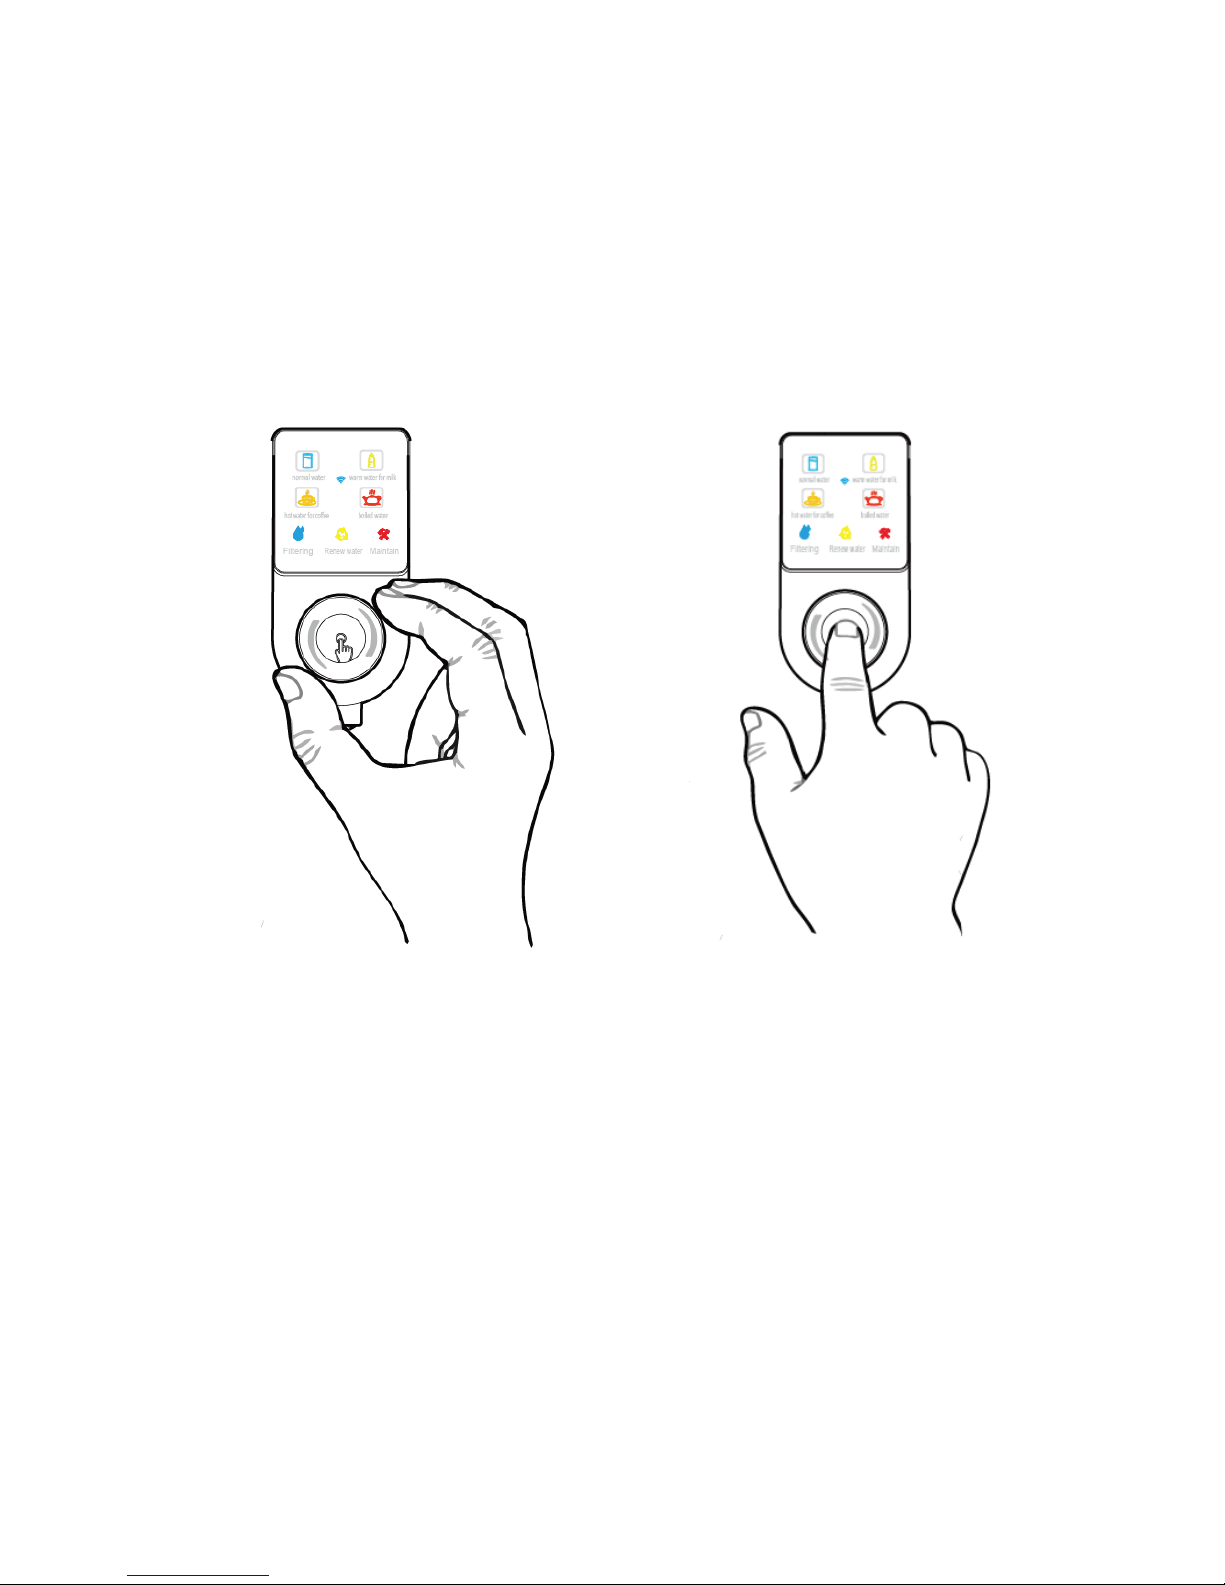
4.5 Dispense Water
• Place the water container on the tray (see Figure 1). Rotate the knob to
select the desired water temperature (Figure 5), and then click on (or push
on for 3 second) the middle part of the knob (see Figure 6) to dispense one
cup (or bottle) of water. Click the knob again if you want to stop getting
water. Note: the system will automatically stop water after 30 seconds if
you do not click the knob and will automatically stop after 60 seconds if you
hold the button for 3 seconds.
4.6 Sleeping state
• The system will automatically enter sleeping state when it is idle for more
than 1 hour. If there is any knob or button operation, it will immediately
return to service and then flush for 20 seconds.
4.7 Power off
• The system will automatically power off if the machine stays in sleeping
mode for 1 hour. If there is any knob or button operation, it will power on
automatically.
http://www.osmiowater.co.uk/manuals/MiniDUE%20Instruction%20Booklet.pdf
FIGURE 5 FIGURE 6
Page 11
5 Filter maintenance
5.1 Introduction
• Use the company's certified filters. Disconnect the power. Do not
disassemble or attempt to modify this product.
5.2 Filter replacement
5.2.1 Replacing the Pre Filter
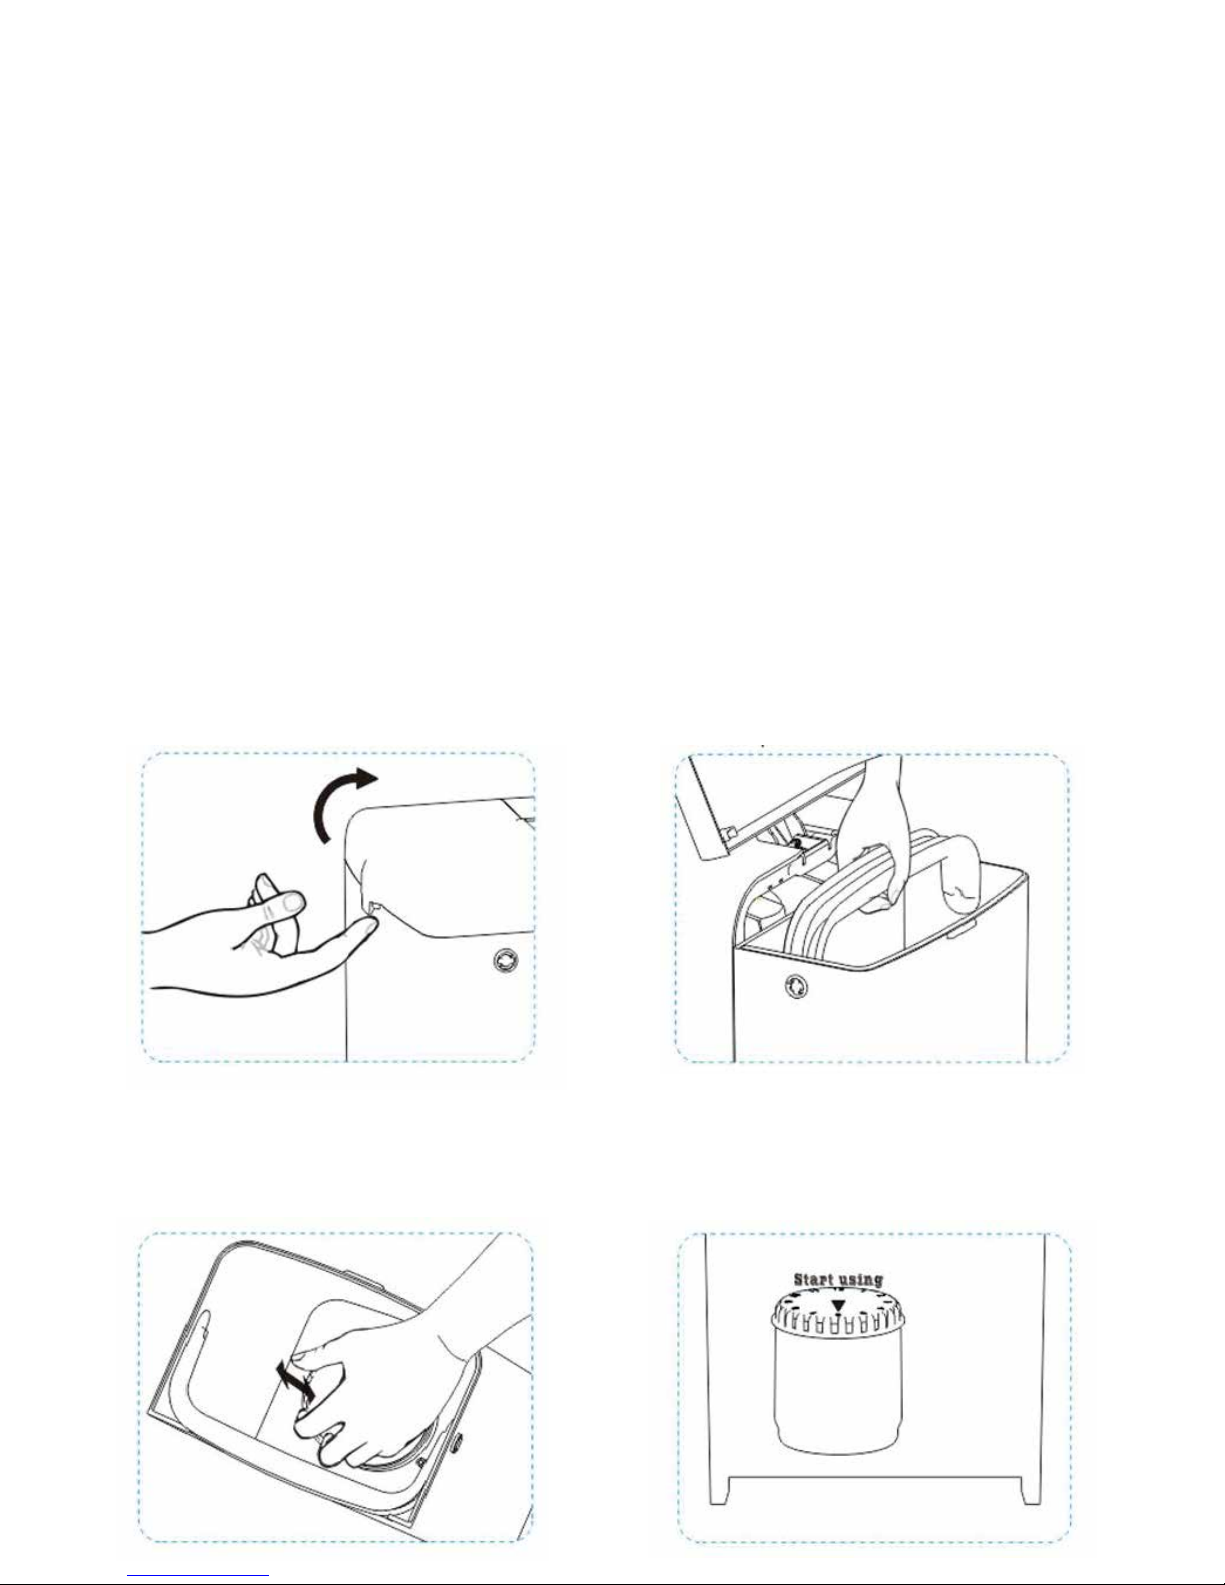
• The pre-filter (PP) screwed in inside the Supply Pitcher should be changed
every 6 months. or when needed (e.g. if blocked by poor source water
quality).
STEP 3 Unscrew the used pre filter
and screw in the new one
STEP 2 Lift the Supply Pitcher
vertically up and out out keeping
it flat
STEP 4 Swivel the filter to align the
current month number to the
Replacement Mark indicator
STEP 1 Open the lid of the Supply
Pitcher and wait for 5 seconds
Lorem ipsum
Page 12
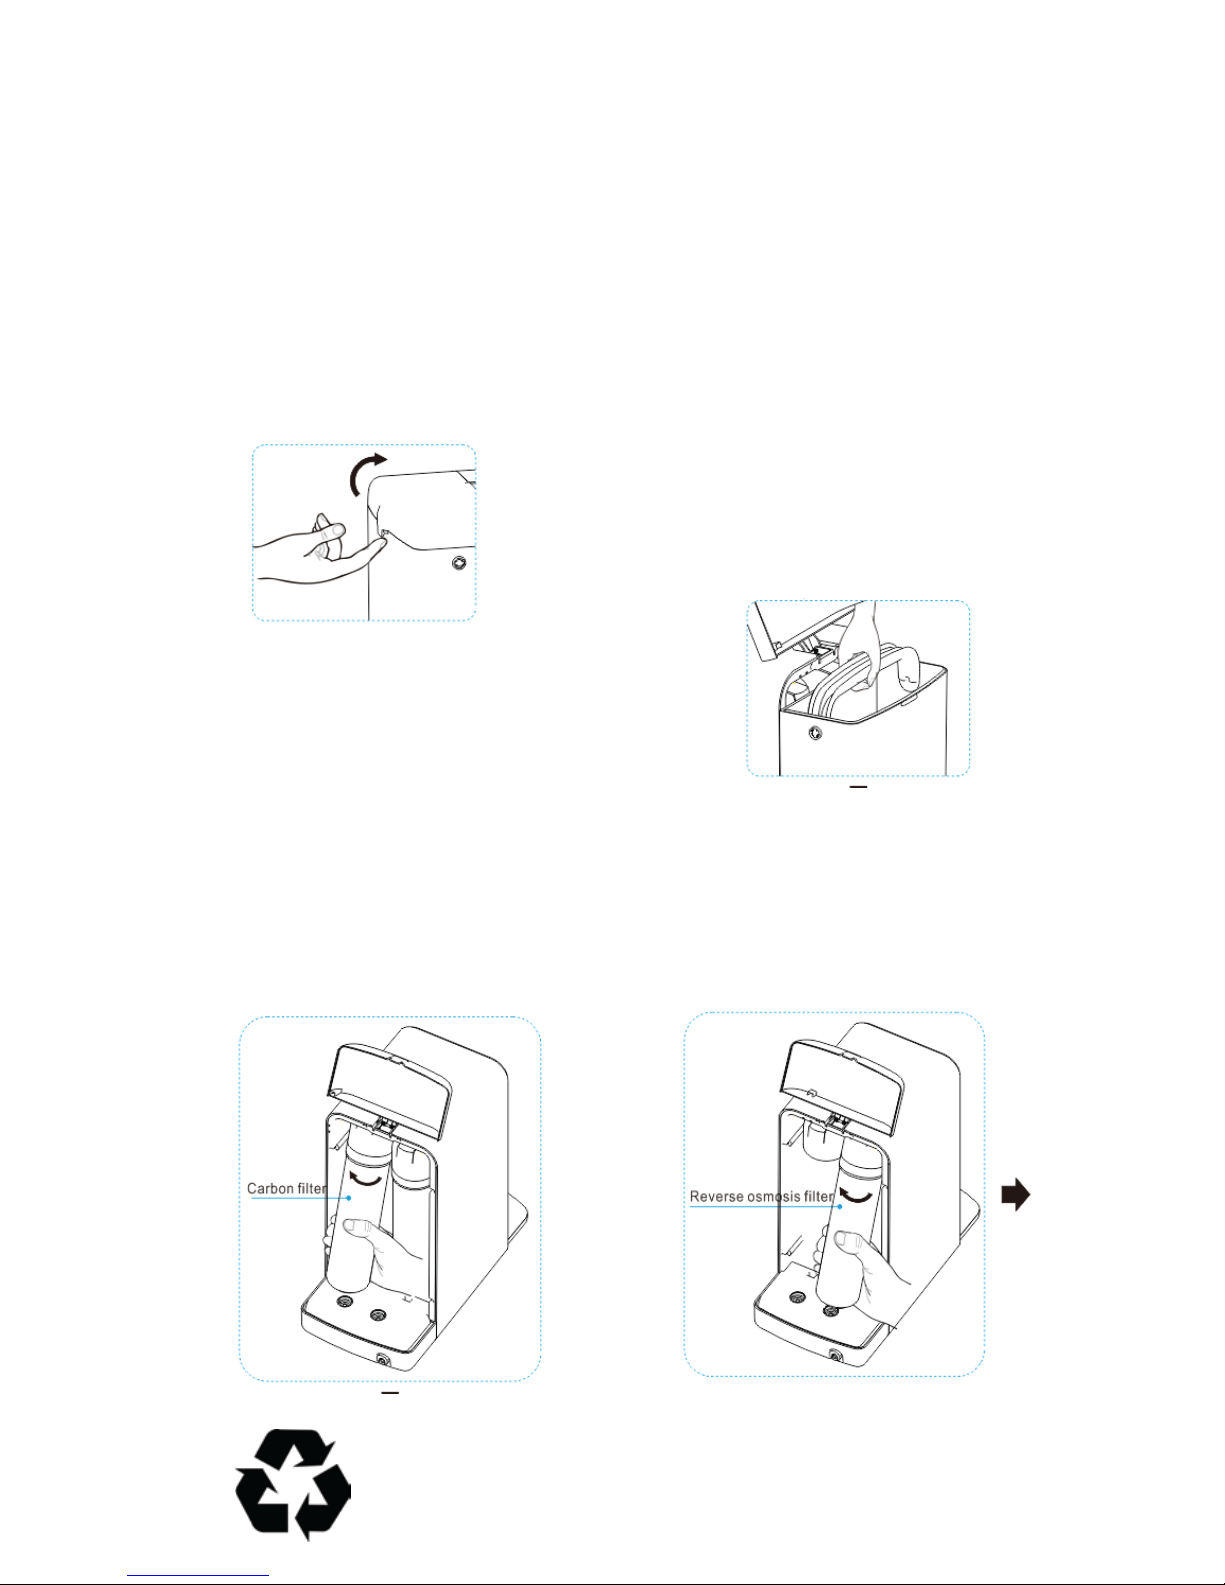
5.2.2 Replacement of the carbon filter, reverse osmosis filter and
post filter
- These filters need to be changed every 6 months or when the red
maintenance light comes up. Turn the power off and replace the filters by
following the steps below.
STEP 1 Open the lid of the Supply
Pitcher and wait 5 seconds
STEP 2 Lift the Supply Pitcher up and
out vertically, keeping it flat
STEP 3 Starting at the base of the filter, tilt the filter towards you
slightly and rotate the Carbon Filter and Membrane filter clockwise
and remove them from the head.
Help your environment and put all used filters
in recycled plastic waste
Page 13
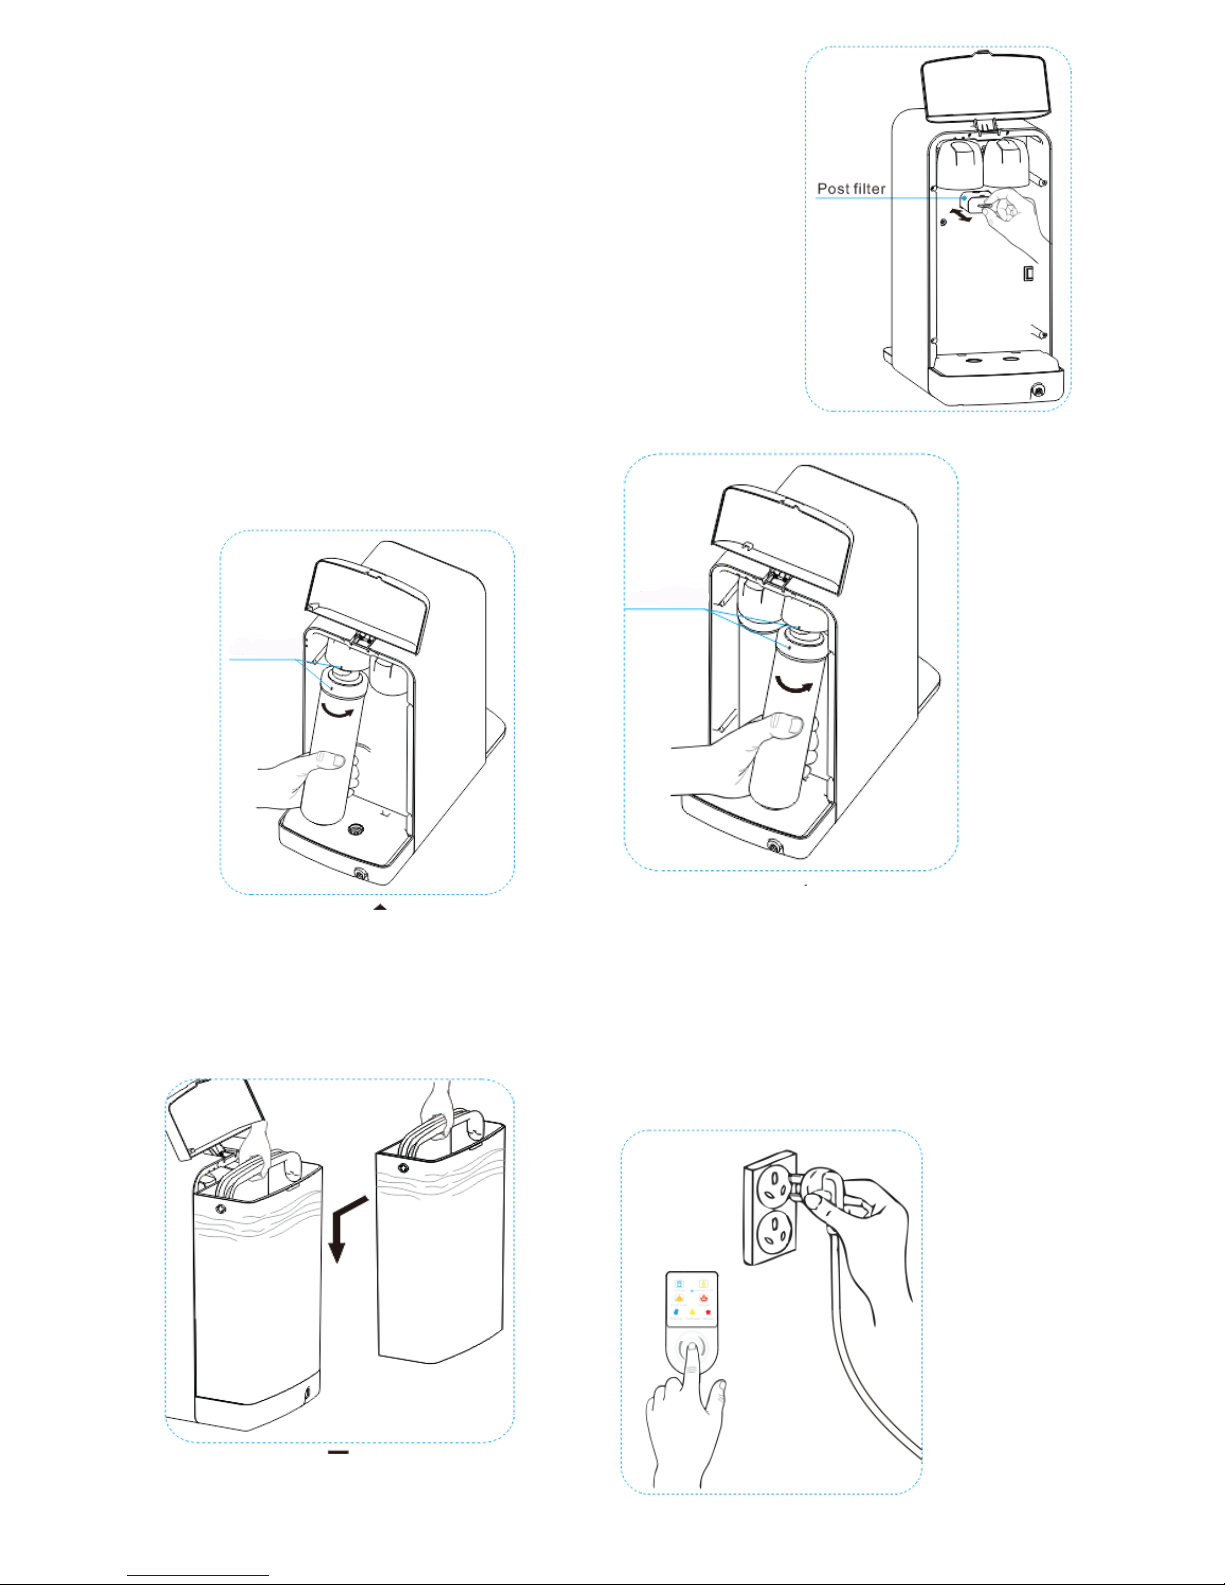
STEP 4 Pull out the Post Filter slowly
with your finger and insert a new
one fully.
STEP 5 Start with the new Carbon
Filter so the label is on the left hand side
twist the filter on anticlockwise.
Repeat the same with the
Membrane Filter.
STEP 6 Fill the Supply Pitcher
and place on the base and
close the lid.
STEP 7 Press and hold the button
and at the same time connect
the power plug to the socket.
The beep sound indicates the
filter reset has completed.
Page 14

5.2.3 Resetting the system after filter change
1) Disconnect the system from power supply
2) Lift up the rear tank cover
3) Press and hold the water dispensing button with one hand while connecting
the unit to a power supply, keep holding the button until you hear 4 beeps
4) Disconnect the system again from the power supply
5) Close the rear tank cover
6) Open the rear tank cover again
7) Connect the unit to a power supply
8) Close the rear tank cover
If properly done, maintenance light should disappear and the system goes to
normal filtering mode.
5.3 Failure state
5.3.1 Purification exception
• The system will show the purification exception state if the machine purifies
water for a long time and cannot stop, all the four temperature icons on the
display will flash. Solution: disconnect power plug and connect power plug
again, check if the purification exception disappears. If not, please remove
and reconnect and carbon and membrane filter. Please contact our helpdesk
if the purification exception persists.
5.3.2 Burning alarm
- The system enters the dry state if the heater works without water or the
temperature exceed the safe setting, the icon for hot water(80°C-88°C)will
blink, the machine can only dispense normal temperature water but cannot
dispense any kind of hot water. Solution: please contact our helpdesk.
WhatsApp +447852323666
Telephone: 0800 002 9533
Email: [email protected]
Page 15

6 Common usage problems
If you have some problems during the usage, please check the problems by
following the guide below.
Usage Problems
Likely Cause Suggested Solution
Power is disconnected.
Not pressing on the right
place.
Water shortage in
purified water tank,
“filtering” icon blinking.
Cannot dispense
ambient temperature
water
Check the power plug is
loose or not in place.
Press the button again.
If the “renew water” icon
is blinking in the display,
empty the supply pitcher
and refill and recheck
Cannot dispense hot
water
Power has only just been
connected and the
system needs time to
warm up
The machine is in the
state of "burn alarm".
Purified Water shortage
“filtering ”icon blinking.
Dispense a little bit of the
normal temp water first
then wait for 15 minutes
and then dispense hot
water.
Dispense ambient temperature water several times
then retry dispensing hot
water.
Wait for moment until the“
filtering ”icon light is on all
the time then dispense hot
water.
Machine does not filter
Supply Pitcher lid not
fully closed
Water level in the Supply
Pitcher is lower than
setting level line and
“renew water” icon is
blinking.
Supply Pitcher has not
been correctly installed
in place.
Push the lid of supply pitcher
onto the tank properly.
Pour out the water and refill
with fresh water to the 5 litre
line. Allow the system to begin
filtering.
Put the Supply Pitcher tank in
place correctly.
Page 16

Brand new system
Unused for more
than 5 days
Filters over 6 months old
-
Usage Problems
Likely Cause Suggested Solution
Water level in the Supply
Pitcher is too low.
Air blocked in the water
system.
Filters are blocked and
need replacement.
Abnormal sound during
the filtering.
Remove any water in the
Supply Pitcher and refill
to the 5 litre level and try
again.
Open and close the lid of
source water tank several
times to try to flush air
from the system.
Change to the RO
Membrane Filter first and
if this does not solve the
problem then a do a
complete filter change. If
the system was run in
this state permanent
damage can be made to
the pump.
Water leakage.
Drip Tray is full of water.
Foreign matter stuck in
the one way valve of the
Supply Pitcher base.
Foreign matter stuck on
the seal spacer of the
Supply Pitcher.
Internal water leakage.
Empty the tray.
Clean the one way valve
Clean the seal spacer
Power off and empty the
Supply Pitcher and contact customer service.
Odour in the
water
Dispense 5 litres of water
before using the system.
Dispense 5 litres of water
before using the system.
Change all the filters
Page 17

7 Quality assurance
The guarantee is valid for the UK and Republic of Ireland.
The guarantee becomes effective at the date of purchase or at the date of
delivery if this is later.
Proof of purchase is required under the terms of the guarantee.
The guarantee provides benefits in addition to your statutory consumer rights.
Our 1 Year Warranty covers the repair or replacement of all or part of your
system if your system is found to be defective due to faulty materials or
manufacture within 1 year of purchase. If any part is no longer available, or
out of manufacture, Osmio reserve the right to replace it with a suitable
alternative.
Do not disassemble the system yourself. as this will void your warranty and the
company will not assume any responsibility for the resulting quality problems or
accidents.
The system is BPA-free and made to top manufacturing specifications and is CE
certified.
The company will charge the parts and maintenance properly if it exceeds the
guarantee period or the machine breaks down due to damage.
Please keep your sales invoice as proof of purchase.
Osmio does not guarantee the repair or replacement of a product that has failed
for any of the following reasons:
• Faulty installation, repairs or alterations not in accordance with the installation
guide.
• Normal wear and tear. We suggest the system should be replaced after 5 years.
• Accidental damage or faults caused by negligent use or care; misuse; neglect;
careless operation and failure to use the system in accordance with the
operating guidelines.
• Failure to maintain the water filters in accordance with the instructions.
• The use of anything other than genuine Osmio replacement parts, including the
water filter cartridges.
• The use of the filter system for anything other than normal domestic household
purposes.
• Failures of, or failures caused by, parts not supplied as part of the genuine
Osmio system.
Page 18
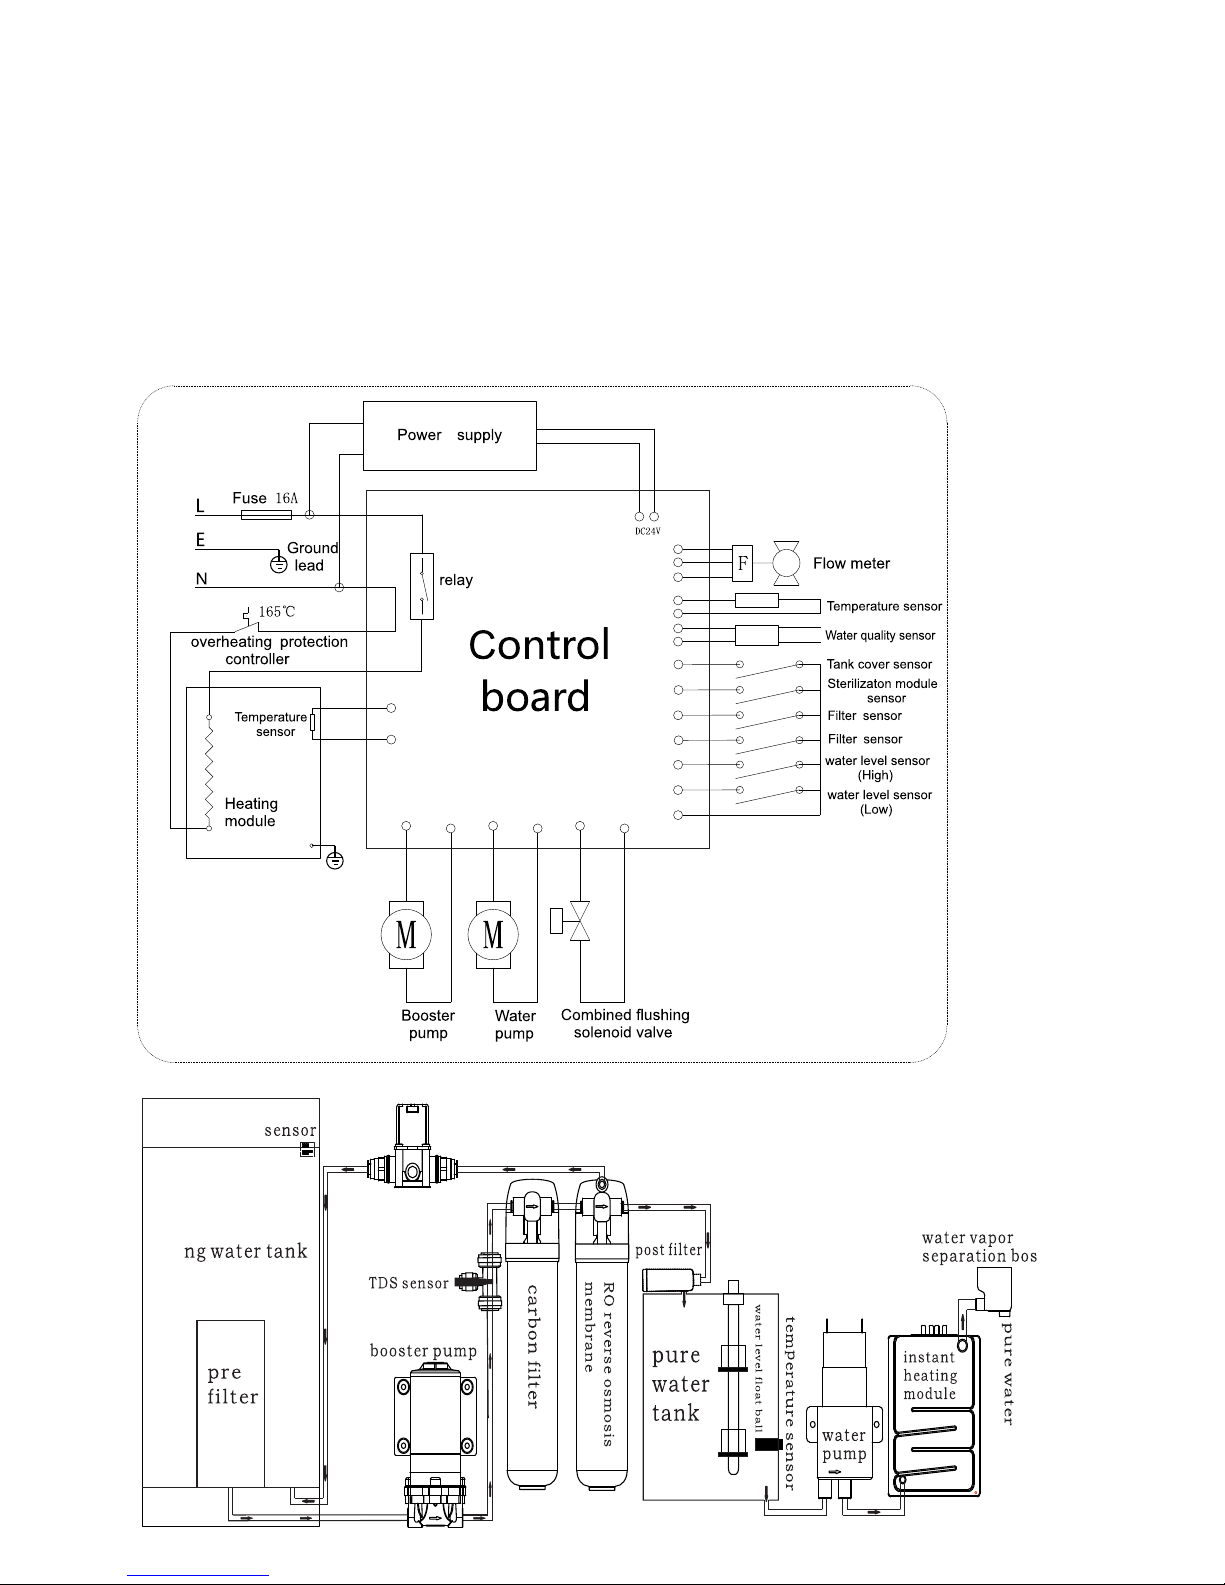
9 Electrical & Schematic Diagram
8 After-sale service
Our products have 1 year guarantee (for repair, replacement or compensation
of faulty products). If the product you bought has any quality problem, please
bring your invoice and to the dealer’s shop, exchange or refund service will be
offered within 30 days, maintenance service will be offered within 3 years.
Customer service hotline: 0800 002 9533
Page 19
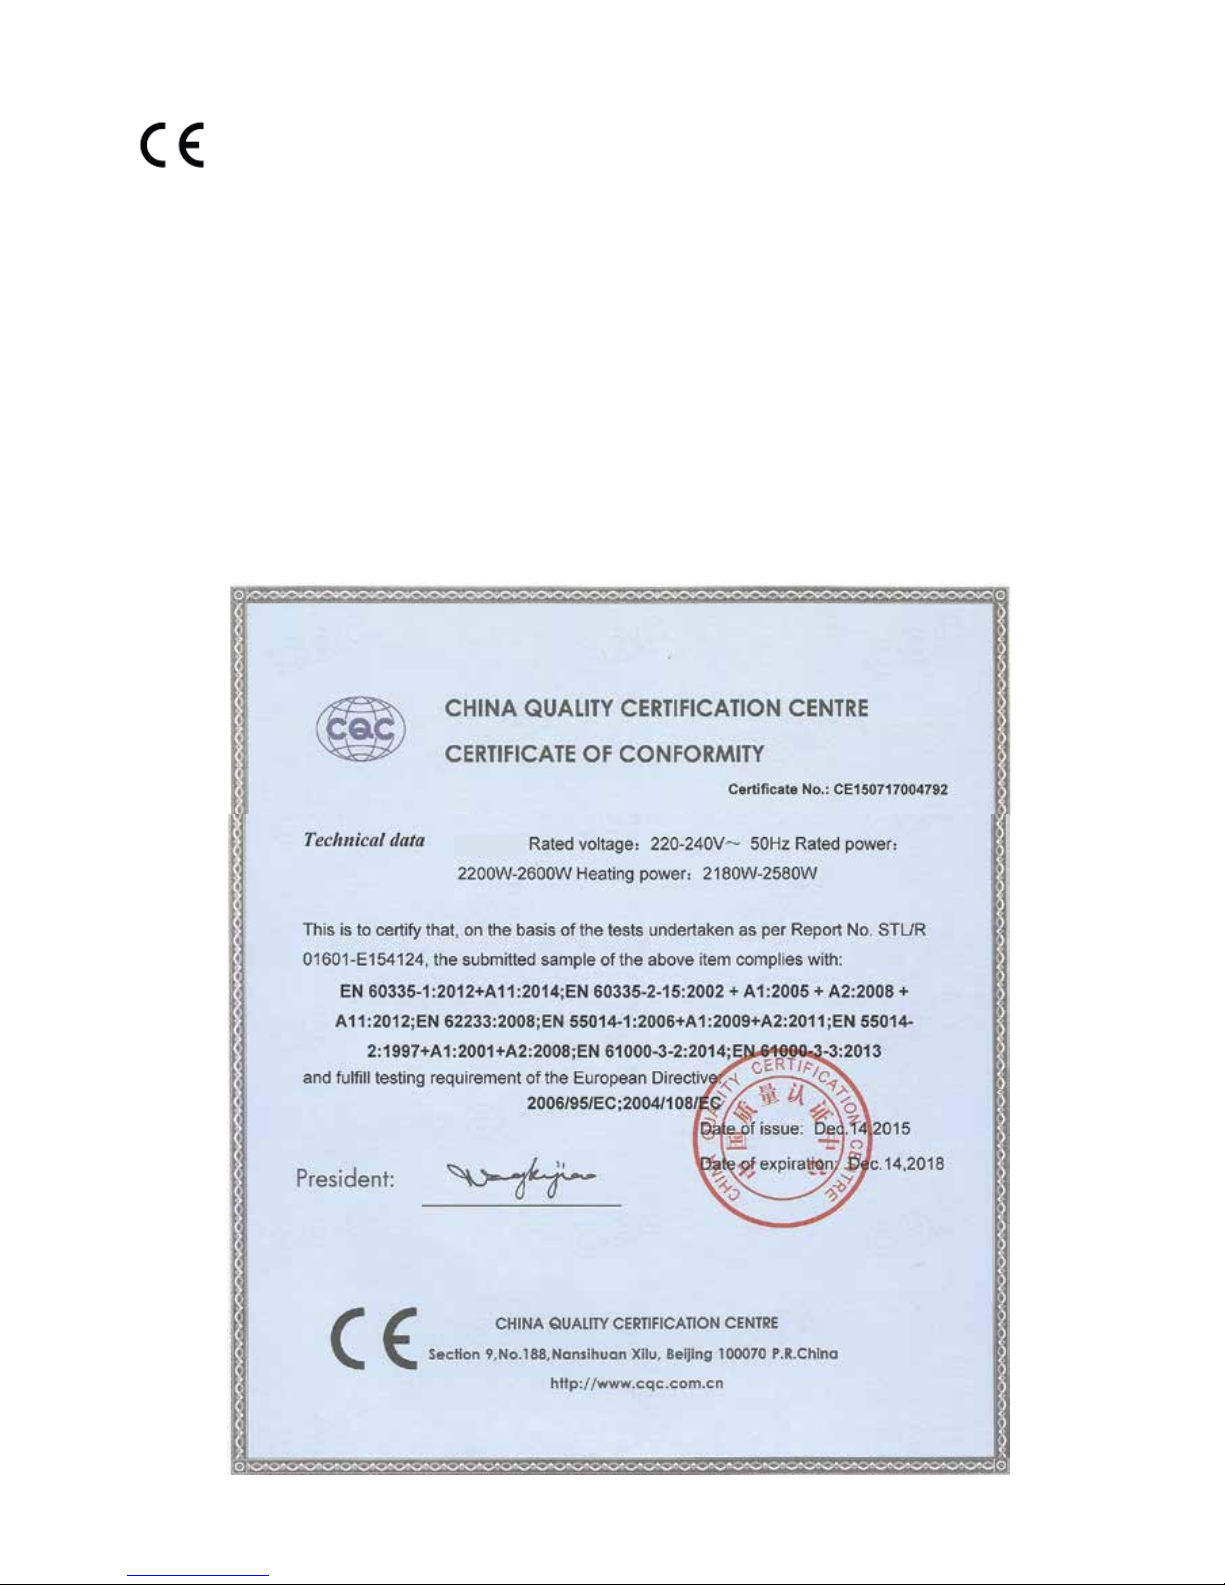
Declaration of conformity
This product may not be treated as household waste. Instead it shall be handed over to
the applicable collection point for the recycling of electrical and electronic equipment.
By ensuring this product is disposed of correctly, you will help prevent potential negative
consequences for the environment and human health, which could otherwise be caused
by inappropriate waste handling of this product.
For more detailed information about recycling of this product,
please contact your local city office, your household waste disposal service or the shop
where you purchased the product.
The Osmio Zero Installation Reverse Osmosis System © Osmio Solutions Ltd. All Rights
Reserved
 Loading...