

O.S. engine FS-40S-C, FS-40S-CX Owner's Manual
It is of vital importance, before attempting to
operate your engine, to read the general
'SAFETY INSTRUCTIONS AND WARNINGS'
section on pages 2-5 of this booklet and to strictly
adhere to the advice contained therein.
●
Also, please study the entire contents of this
instruction manual, so as to familiarize yourself
with the controls and other features of the
engine.
Keep these instructions in a safe place so that
you may readily refer to them whenever
necessary.
It is suggested that any instructions supplied
with the vehicle, radio control equipment, etc.,
are accessible for checking at the same time.
●
●

SAFETY INSTRUCTIONS AND WARNINGS
ABOUT YOUR O.S. ENGINE
INTRODUCTION, BASIC ENGINE PARTS
INSTALLATION OF THE CARBURETOR
ENGINE INSTALLATION
SUPER AIR CLEANER TYPE 102S
NOTES CONCERNING THE RECOIL STARTER
GLOWPLUG
TOOLS, ACCESSORIES, etc.
PRESSURIZED FUEL SYSTEM
STARTING,
RUNNING AND ADJUSTMENT
IF THE ENGINE FAILS TO START
V AL VE ADJUSTING
CARE & MAINTENANCE
PARTS REPLACEMENT
GENUINE PARTS & ACCESSORIES
FS-40S-C EXPLODED VIEW
& PARTS LIST
FS-40S-CX EXPLODED VIEW
& PARTS LIST
CARBURETTOR EXPLODED
VIEW & PARTS LIST
THREE VIEW DRAWING
2~5
6
7
~
8
8~9
9
~
10
10~11
11
~
12
13
13~16
21
20
27~28
20
17~19
22
~
23
24~25
26
CONTENTS
17
1
Remember that your engine is not a "toy", but a highly efficient internalcombustion machine whose power is capable of harming you, or others, if it is
misused.
As owner, you, alone, are responsible for the safe operation of your engine, so act
with discretion and care at all times.
If at some future date, your O.S. engine is acquired by another person, we would
respectfully request that these instructions are also passed on to its new owner.
SAFETY INSTRUCTIONS AND WARNINGS ABOUT YOUR O.S. ENGINE
The advice which follows applies basically to ALL MODEL ENGINES and is
grouped under two headings according to the degree of damage or danger
which might arise through misuse or neglect.
WARNINGS
NOTES
These cover events which
might involve serious (in
extreme circumstances, even
fatal) injury.
These cover the many other
possibilities, generally less obvious
sources of danger, but which, under
certain circumstances, may also
cause damage or injury.
2

WARNINGS
Model engine fuel is
poisonous. Do not allow it
to come into contact with
the eyes or mouth. Always
store it in a clearly marked
container and out of the
reach of children.
Model engine fuel is also
highly flammable. Keep it
away from open flame,
excessive heat, sources of
sparks, or anything else
which might ignite it. Do not
smoke or allow anyone else
to smoke, near to it.
Never operate your engine in an
enclosed space. Model engines, like
automobile engines, exhaust deadly
carbon-monoxide. Run your engine
only in an open area.
Model engines generate
considerable heat. Do not
touch any part of your
engine until it has cooled.
Contact with the muffler
(silencer), cylinder head
or exhaust header pipe, in
particular, may result in a
serious burn.
•
•
•
•
3
This engine is intended for model cars.
Do not attempt to use it for any other
purpose.
Mount the engine in your model
securely, following the manufacturers'
recommendations, using appropriate
screws and locknuts.
Fit an effective silencer (muffler).
Frequent close exposure to a noisy
exhaust (especially in the case of the
most powerful highspeed engines)
may eventually impair your hearing
and such noise is also likely to cause
annoyance to others over a wide area.
The wearing of safety glasses is also
strongly recommended.
Take care that the glowplug clip or
battery leads do not come into contact
with rotating parts. Also check that the
linkage to the throttle arm is secure.
For their safety, keep all onlookers
(especially small children) well back
(at least 20 feet or 6 meters) when
preparing your model for running.
NOTES
•
•
•
•
•
•
4
NOTES
To stop the engine, fully retard the
throttle stick and trim lever on the
trans-mitter, or, in an emergency, cut
off the fuel supply by pinching the fuel
delivery tube from the tank.
•
Warning! Immediately after a glowplugignition engine has been run and is still
warm, conditions sometimes exist
whereby it is just possible for the engine
to abruptly restart if it is rotated over
compression WITHOUT the glowplug
battery being reconnected.
•
Do not attempt to disassemble the
recoil starter of the 40S-CX.
If you do so, the very strong spring
inside will be suddenly ejected. This
can be very dangerous.
Do not extend the starter cord more
than 40cm (16"). Do not abruptly
release the operating handle. Allow
the cord to rewind smoothly while
still holding the handle.
•
•
Pull the operating handle straight out
when starting the engine, so that the
cord does not rub against the vehicle
body or engine. This will help prevent
the cord from being damaged by
abrasion or engine heat.
•
5
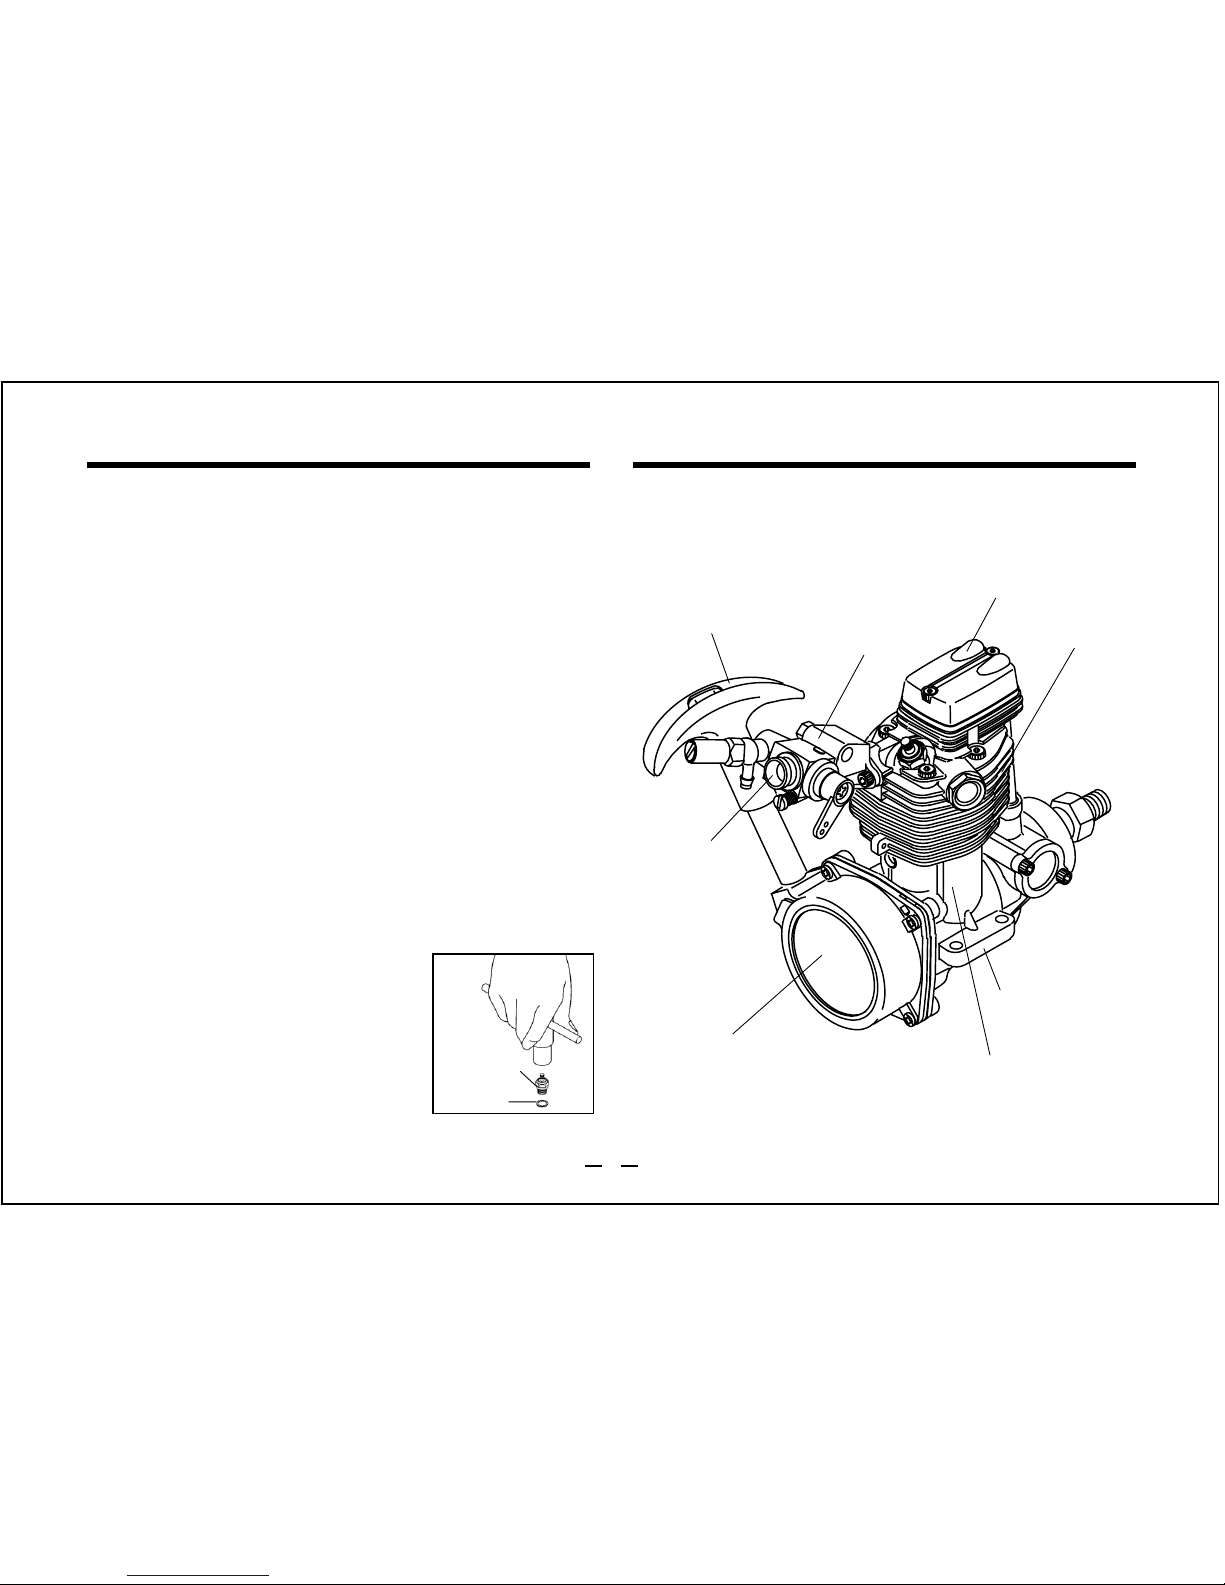
These are overhead-valve four-strokecycle engines designed for 1/8 scale
radio-controlled model cars.
The engine is distinguished by a blackanodized crankcase and rocker-cover
and is supplied complete with an O.S.
Super Air Cleaner as standard.
The FS-40S-CX is equipped with a built
in recoil starter system which eliminates
the need for a separate electric starter
and starter battery.
INTRODUCTION
Rocker Cover
Intake Pipe
Cylinder Head
Recoil Starter
Assembly
Crankcase
Beam Mount
Carburettor
BASIC ENGINE PARTS
Starter Handle
FS-40S-CX
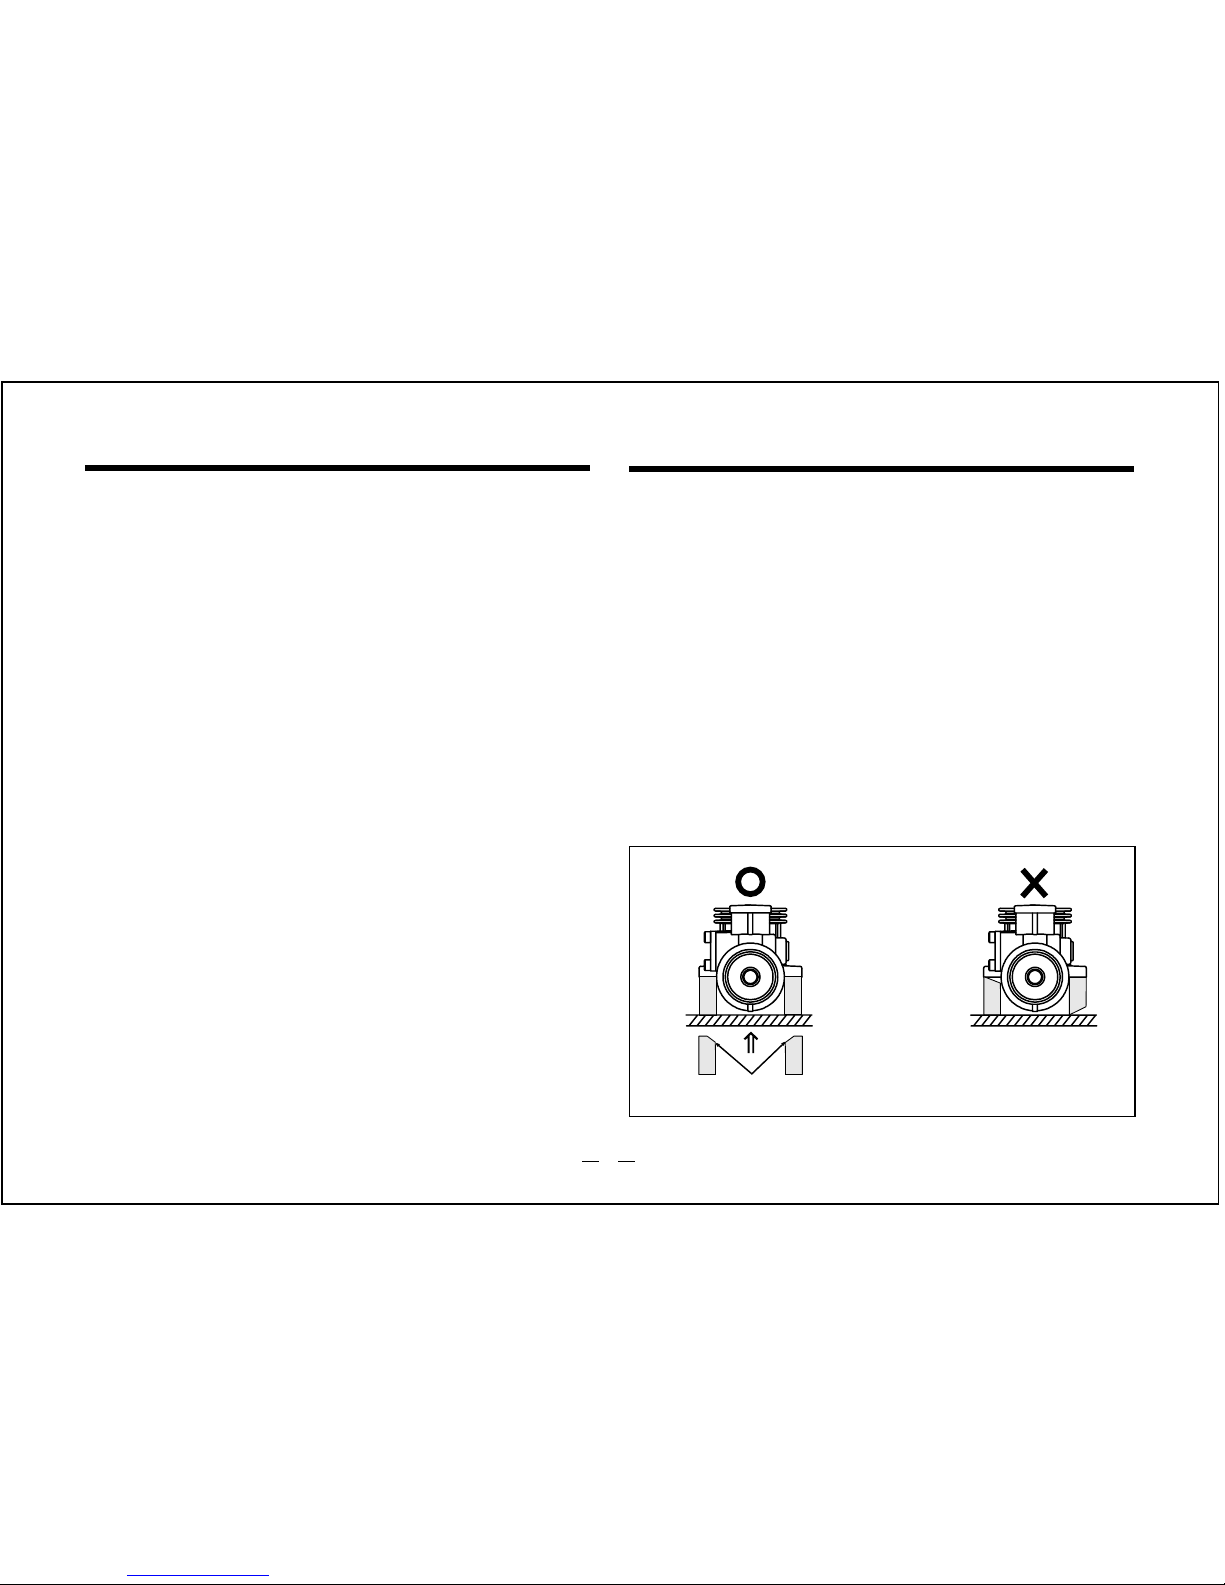
INSTALLING THE GLOWPLUG
Install the washer on the
glowplug and insert carefully into
cylinder-head, making sure that
it is not cross-threaded before
tightening firmly.
Glow plug
Washer
6
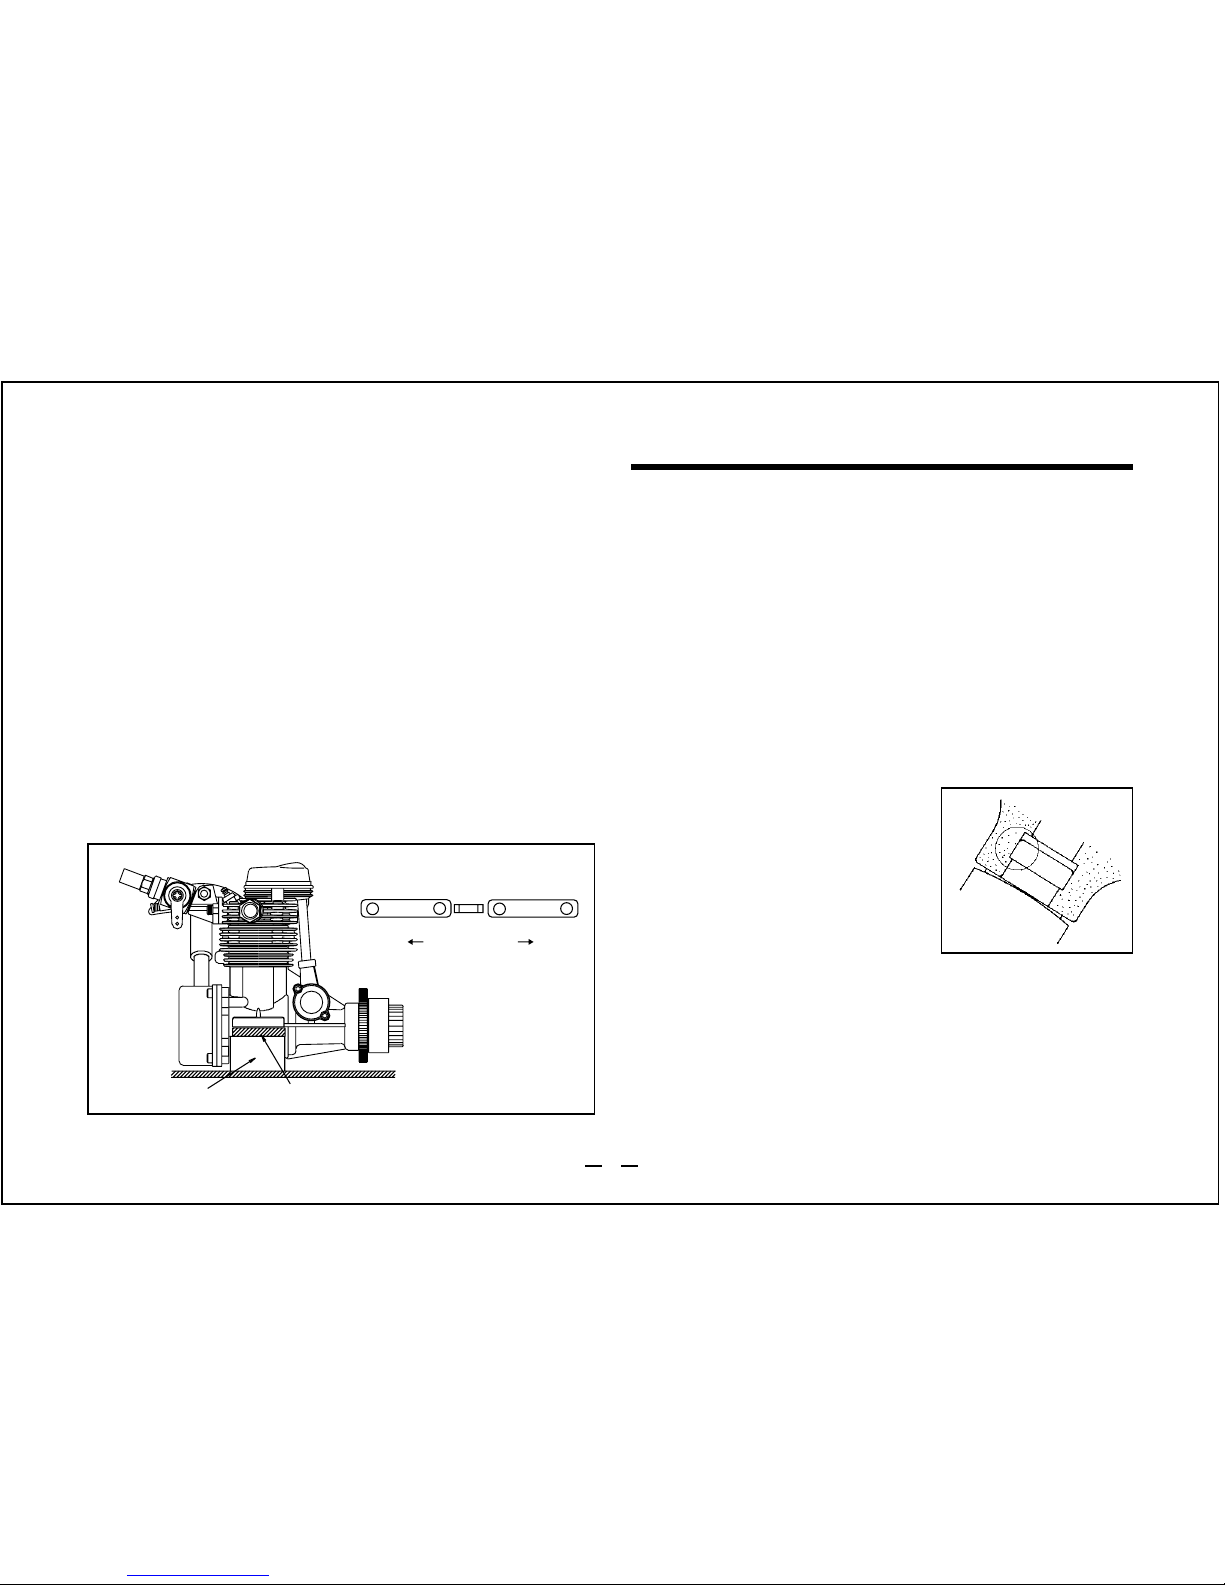
ENGINE INSTALLATION
Make sure that the vehicle's engine mounting
surfaces are level and in the same plane. Poor
installation may cause distortion of the crankcase,
bearings, etc., resulting in erratic running and loss
of performance. The recommended screws for
securing the engine are 3.5mm or 4-40 steel Allen
hexagon socket type. If existing holes in the
engine mount do not align perfectly with engine
Chassis
Chamfer inside edges of bearers.
mounting lugs, enlarge them slightly with a needlefile so that screws enter vertically.Avoid forcing the
screws.
INSTALLATION OF THE CARBURETOR
As delivered, the engine has its carburetor lightly
fit into the intake boss. Secure it as follows.
Loosen the retainer screw,and remove the
carburetor. Place the rubber gasket at bottom
of the intake boss, and rotate the carburettor
to its correct position and make sure that it is
pressed well down into the intake boss,
compressing the rubber gasket, before
retightening screw.
Rotate the retainer screw gently until it stops,
then tighten a further 60-90˚.
Do not overtighten the screw as this will
damage the carburettor body.
1.
2.
7
AIR CLEANER TYPE 102S
INSTALLATION OF AIR CLEANER
Carefully clean the
carburettor, removing any
old adhesive or sealant
that may have been
previously used on the
outside of the air intake.
•
Press the air cleaner body firmly over the
carburettor air intake. Make sure that the outer
rim of the air intake engages the internal
annular groove in the air cleaner: failure to do
so may result in the air cleaner falling off.
•
It has a single filter element and is intended
primarily for circuit racing, where conditions are
less damaging than the very dusty , loose surfaces
of off-road operation for which the double-element
Type 101 and 102 Air Cleaners are recommended.
The lower height of the Super Air-Cleaner 102S
also facilitates easier installation in cars where
available space may be restricted.
NOTE:
Where spacers are supplied joined in pairs
(see sketch), separate them as shown.
Either face may be placed downwards.
Secure with locknuts. If the bottom of the recoil
starter housing would otherwise touch the car
chassis, install the engine mount spacers
(supplied) between the engine's mounting lugs and
the engine mount. Use the M3.5x15 screws
provided. With some vehicles, it may be necessary
to make minor trimming modifications to chassis or
body when fitting the engine.
Mount Spacer
Separate
Engine Mount
Engine Mount Spacer
8
 Loading...