

Page 1

LS2
IN-DOOR/OUT-DOOR SPEAKER
INSTALL GUIDE
Page 2
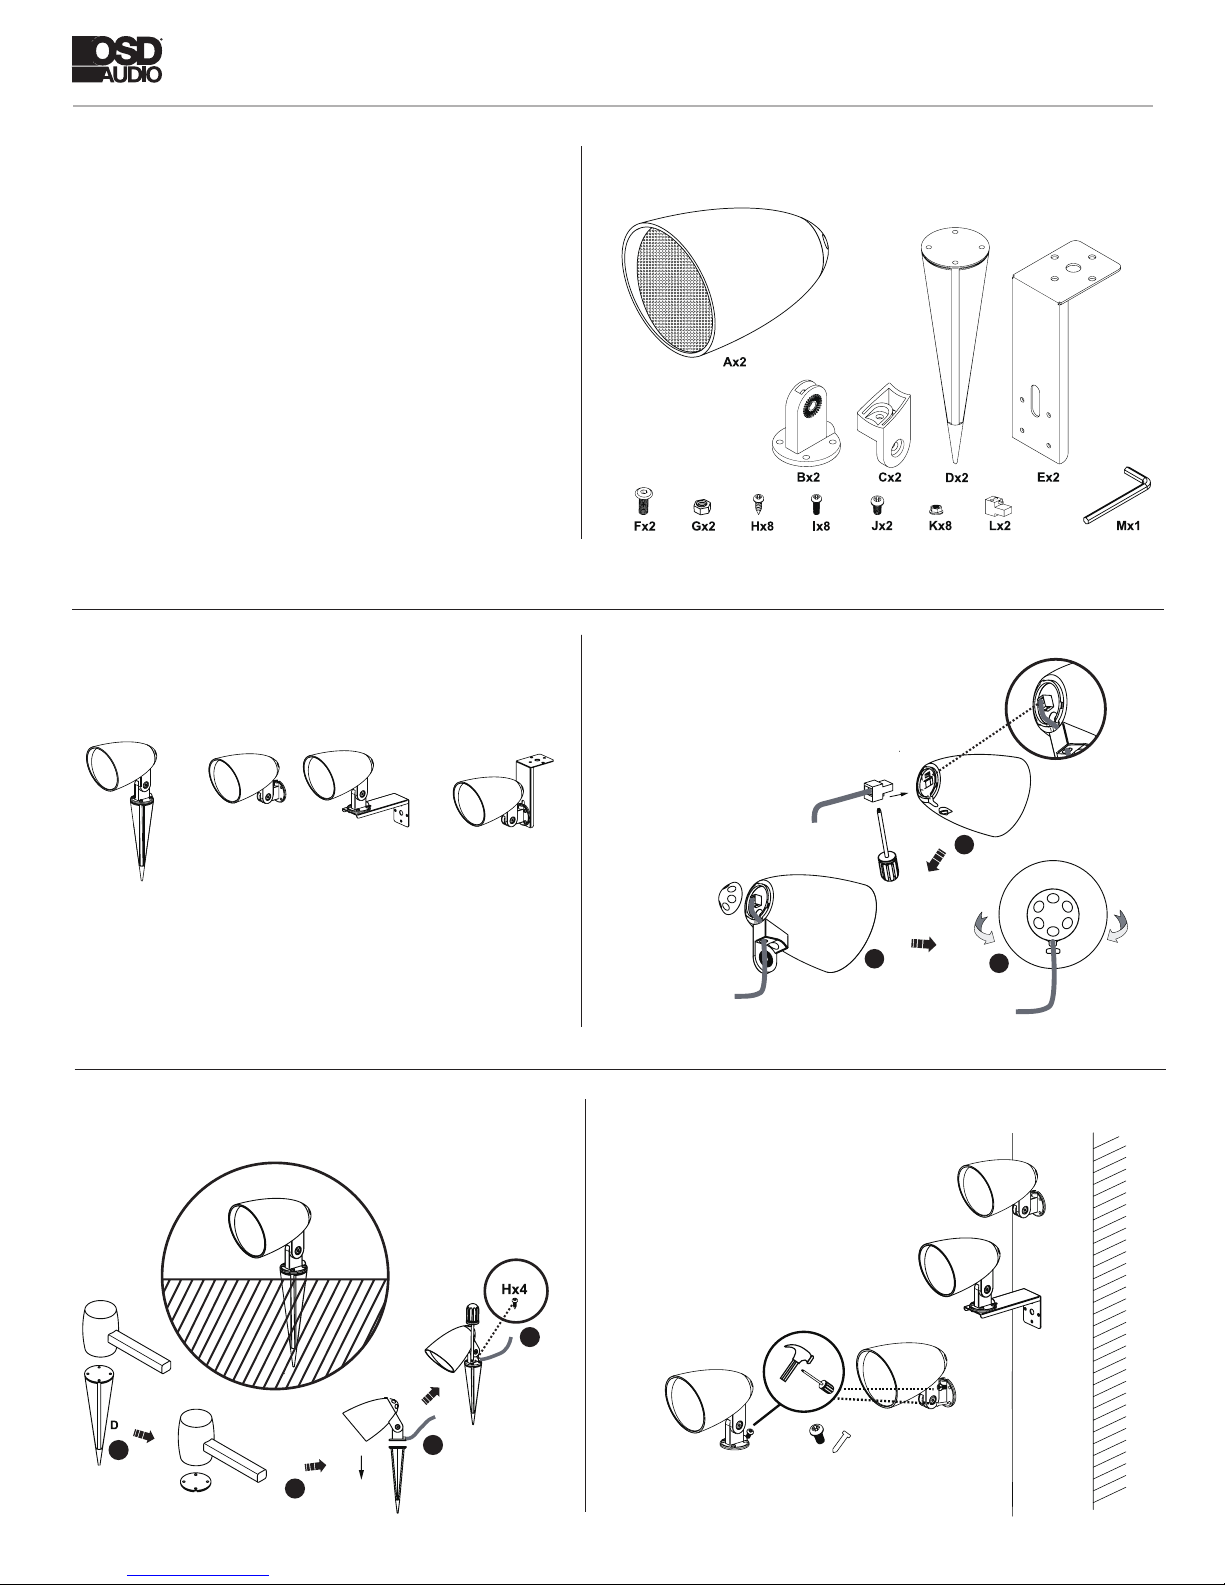
LS 2 INSTALL GUIDE
Tools Needed Parts List
- Drill
- Hammer/Mallet
- Knife
- Phillips Screwdriver
- Wire Cutter
- Measuring Tape
- Volume Control (Optional)
- Silicon Cable Connectors (Optional)
- Speaker Wire/ Direct Burial Wire
18 AWG minimum - for distances up to ….…………………… 10 ft
16 AWG - from ……………………………………………. 10 to 50 ft
14 AWG - from …………………………………………… 50 to 100ft
Mounting Options Speaker Assembly
On-Ground On-Wall On-Ceiling
C
On-Ground On-Wall
L
1
2
3
Floor
1
2
4
3
Wall
Page 3

LS 2 INSTALL GUIDE
On-Ceiling
E
C
J
5
B
B
2
C
F
M
6
G
B
3 4
Placement
Designate the general listening area where the speakers would be most ideal.
The speakers should face the listening area and be placed with in 20 feet of
the general listening area for optimum performance. Use this method for both
indoor and outdoor applications. (See Diagram1)
L
C
E
B
7
FL
Listening Area Center Reference
15’ - 20’
15’ - 20’
B
8
G
FR
15’ - 20’
RL
15’ - 20’
RR
Diagram 1
Connection
Using a stereo receiver or multi-channel Amplier such as the OSD MX1260 connect the speakers. Please note, the red lead indicates
positive signal (+) and the black indicates negative signal (-). Connecting the positive and negative leads incorrectly will cause it to be
out of phase and will result in weak performance. (See Diagram 2)
RECEIVER/AMPLIFIER
Speaker Wire
Negative -
_
+
Positive +
Diagram 2
Page 4

LS 2 INSTALL GUIDE
System Diagrams
For optimum performance & sound quality we recommend combining the LS2 with our GLS8 In-Ground Subwoofer. Create an
unobtrusive stealthy outdoor sound system with the following system diagrams. Additional system congurations can be created for up
to 8 pairs of speakers using multichannel ampliers and or series parallel wiring using the following System Diagrams.
Note: Please consult your electronics manual for Impedance and Power Rating before wiring a multi speaker system.
Diagram 3 shows a simple 2.1 system using 2 channel Receiver/Amp with a Mono Amp & Subwoofer
Positive +
Speaker Wire
Negative -
_
+
RECEIVER/AMPLIFIER
SMP250 MONO AMP
Diagram 4 shows a 2 pair system using the A/B stereo outputs along with a Mono Amp & Subwoofer
Speaker Wire
Positive +
Negative -
_
RECEIVER/AMPLIFIER
SMP250 MONO AMP
GLS8 SUBWOOFER
Diagram 3
+
Positive +
Negative -
_
+
GLS8 SUBWOOFER
Diagram 4
Page 5

LS 2 INSTALL GUIDE
System Diagrams
Diagram 5 shows 4 pair wired in series parallel on a 2 channel amp with a Subwoofer
XMP100 AMPLIFIER
LEFT Channel RIGHT Channel
Positive + Positive +
__
_
Negative
+ +
SMP250 MONO AMP
_
Negative
GLS8 SUBWOOFER
__
+ +
_ _
+ +
Diagram 5
Page 6

LS 2 INSTALL GUIDE
System Diagrams
Diagram 6 shows 8 pair wired in series parallel on a High Power (OSD AMP200) 2 channel amp with a Subwoofer
Positive +
AMP200 AMPLIFIER
LEFT Channel RIGHT Channel
_
_
+
+
+
_
Negative
_
Positive +
_
_
+
SMP250 MONO AMP
_
Negative
+
_
+
GLS8 SUBWOOFER
Positive +
_
_
+
+
+
_
Negative
_
Positive +
_
+
_
Negative
Diagram 6
_
+
_
+
Page 7

LS 2 INSTALL GUIDE
System Diagrams
Diagram 7 shows 8 pair wired to a High Power (OSD AMP200) 2 channel amp with the addition of a OSD TSM8 Speaker Selector.
Adding a speaker selector will allow turn specic areas or zones on or off depending on your needs.
AMP200 AMPLIFIER
TSM8 SPKR SELECTOR
LEFT LEFT
ZONE 1
RIGHT RIGHT
SMP250 MONO AMP
GLS8 SUBWOOFER
ZONE 2
ZONE 3
ZONE 5
ZONE 7
ZONE 4
ZONE 6
ZONE 8
Diagram 7
Page 8

Specications
Driver 2.5” Full Range
Power 30 Watts Max
Freq Response 200Hz - 20kHz
Sensitivity 88 dB
Impedance 8 Ohm
LS 2 INSTALL GUIDE
Warranty Information
All OSD AUDIO outdoor speakers have (1) year Limited Warranty against defects in materials and workmanship. Proof of purchase must accompany
all claims. During the warranty period OSD AUDIO will replace any defective part and correct any defect in workmanship without charge for either
parts or labor
OSD AUDIO may replace returned speakers with a product of equal value and performance. In such cases, some modications to the mounting may
be necessary and are not OSD AUDIO’s responsibility.
For this warranty to apply, the unit must be installed and used according to its written instructions. If necessary, repairs must be performed by OSD
AUDIO. The unit must be returned to OSD AUDIO at the owner’s expense and with prior written permission. Accidental damage and shipping damage
are not considered defects, nor is damaged resulting from abuse or from servicing performed by an agency or person not specically authorized in
writing by OSD Audio
OSD AUDIO sells products only through authorized dealers and distributors to ensure that customers obtain proper support and service. Any OSD
AUDIO product purchased from an unauthorized dealer or other source, including retailers, mail order dealers and online sellers will not be honored or
serviced under existing OSD AUDIO warranty policy. Any sale of product by an unauthorized source or other manner not authorized by OSD AUDIO
shall void the warranty on the applicable product.
Damage to or destruction of components due to application of excessive power voids the warranty on those parts. In these cases, repairs will be
made on the basis of the retail value of the parts and labor. To return for repairs, you must email customer service at RMA@audiogeargroup.com for a
Returned Merchandise Authorization (RMA) number then the unit must be shipped to OSD AUDIO at the owner’s expense, along with a note explaining
the nature of service required. Be sure to pack the product(s) in a corrugated container with at least 3 inches of resilient material to protect the unit from
damage in transit.
This Warranty Does Not Cover: Damage caused by abuse, accident, misuse, negligence, or improper operation (installation) • Any products that have
been altered or modied • Any product whose identifying number of decal, serial #, etc. has been altered, defaced or removed • Normal wear and
maintenance.
OSD Audio | Brea, CA | osdaudio.com
LS 2 Manual 7/17
 Loading...