

Page 1

Turai360 SL
ECE R129/03, 40–105 cm
DE
NL
SK
EN FR IT
ES CZ PL
Page 2

DE
Vielen Dank, dass Sie sich für unseren Kinderautositz Turai360 SL entschieden
haben. Wenn Sie Hilfe zu diesem Produkt benötigen, wenden Sie sich bitte an
unseren Kundendienst.
- 2 -
ANWENDUNG
• Dieses Produkt ist geeignet für Kinder mit einer Körpergröße von 40 bis
105 cm und max. 19 kg Körpergewicht.
• Einbau rückwärtsgerichtet von 40 bis 105 cm Körpergröße erfolgt mit-
hilfe der Isox-Konnektoren und dem Standfuß. Das Kind wird mit dem
5-Punkt-Gurt des Kinderautositzes angeschnallt.
• Einbau vorwärtsgerichtet von 76 bis 105 cm Körpergröße und einem
Mindestalter von 15 Monaten erfolgt mithilfe der Isox-Konnektoren und
dem Standfuß. Das Kind wird mit dem 5-Punkt-Gurt des Kinderautositzes
angeschnallt.
WICHTIG
VERWENDEN SIE DEN KINDERAUTOSITZ NICHT IN FAHRTRICHTUNG, BEVOR
DAS ALTER DES KINDES 15 MONATE NICHT ÜBERSCHRITTEN HAT.
EXTREME GEFAHR
Es wird empfohlen, den Kinderautositz auf dem Rücksitz des Fahrzeugs zu
installieren. Befestigen Sie den Kinderautositz für die rückwärtsgerichtete
Nutzung in der Größenklasse 40 bis 105 cm NICHT auf dem Vordersitz, wo
sich ein Airbag bendet. Es sei denn, der Airbag kann deaktiviert werden.
Lesen Sie diesbezüglich in der Betriebsanleitung des Fahrzeugs nach.
WARNUNG
• Es handelt sich um ein Kinderrückhaltesystem der Kategorie „i-Size“. Dieses
ist nach der ECE-Regelung Nr. 129 für die Verwendung in i-Size kompatiblen
Fahrzeugsitz-Positionen gemäß den Angaben der Fahrzeughersteller in der
Bedienungsanleitung des Fahrzeugs genehmigt.
• Dieser Kinderautositz ist nur für Fahrzeuge geeignet, die mit Isox-Halte
rungen gemäß ECE R16 oder vergleichbaren Normen ausgestattet sind.
Im Zweifelsfall wenden Sie sich bitte an den Autositzhersteller oder den
Händler.
-
Page 3
- 3 -
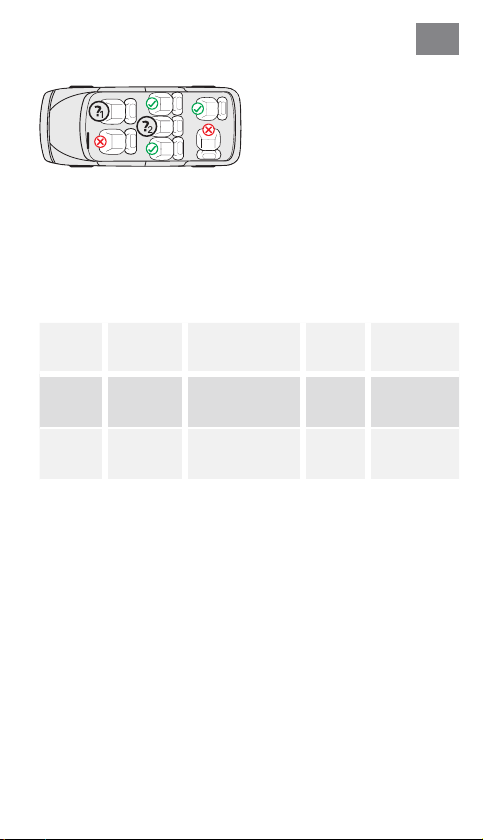
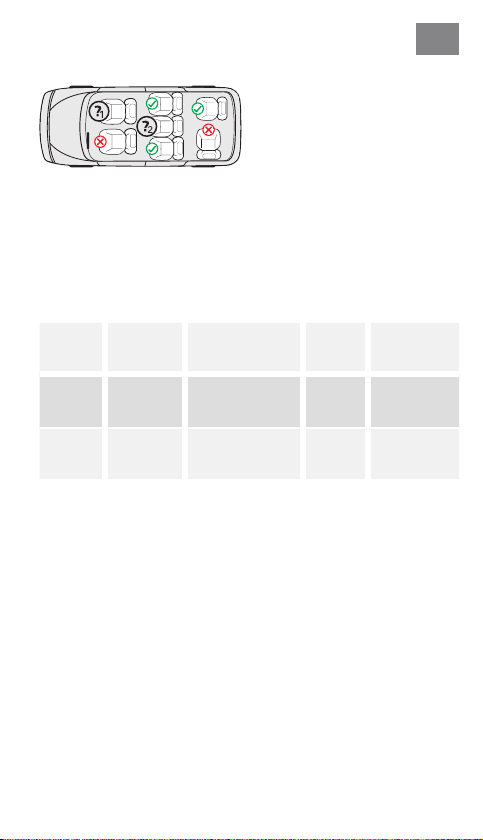
1. Nur, wenn der Airbag deaktiviert
werden kann, Isox-Konnektoren
vorhanden sind und der Sitzplatz
im Pkw-Handbuch als i-Size kom
patibel anerkannt ist.
2. Nur, wenn Isox-Konnektoren vor
handen sind und der Sitzplatz im
Pkw-Handbuch als i-Size kompa
tibel anerkannt ist.
Die folgende Tabelle enthält Informationen über die Befestigungsvorrichtungen
und -methoden:
DE
-
-
-
Größenklasse
40–105 cmRückwärts-
76–105 cmVorwärts-
Einbaurichtung
gerichtet
gerichtet
Installation Typ
Isox-Konnektoren
& Standfuß
Isox-Konnektoren
& Standfuß
i-Size
Universal
Isox
i-Size
Universal
Isox
Sicherung
des Kindes
5-Punkt-Gurt
des Kinder
autositzes
5-Punkt-Gurt
des Kinder
autositzes
-
-
Page 4

DE
- 4 -
WARNUNG
• Bitte lesen Sie diese Anleitung vor der Verwendung sorgfältig durch, um
die Sicherheit Ihres Kindes zu gewährleisten. Bewahren Sie die Anleitung
auf. Die Nichtbeachtung der Anweisungen in diesem Handbuch kann zu
schweren Verletzungen Ihres Kindes führen.
• Der Kindersitz kann mit dem eigenen 5-Punkt-Gurtsystem nur für Kinder
unter einem Körpergewicht von 19 kg und einer Körpergröße bis 105 cm
verwendet werden.
• Der Kindersitz kann NICHT mit dem 5-Punkt-Gurtsystem für Kinder über
einem Körpergewicht von 19 kg und einer Körpergröße von über 105 cm
verwendet werden.
• Der Kindersitz kann mit den Isox-Konnektoren und dem Standfuß rückwärts-
und vorwärtsgerichtet eingebaut werden. Wichtig: Nicht vorwärtsgerichtet
einbauen, bevor das Alter des Kindes 15 Monate nicht überschritten hat.
• Für den Isox-Einbau: Achten Sie darauf, das Handbuch des Autoherstellers
zu lesen.
• Verwenden Sie keine anderen tragenden Berührungspunkte als diejenigen,
die in der Anleitung beschrieben und in dem Kinderrückhaltesystem gekennzeichnet sind.
• Verwenden Sie diesen Kinderautositz nicht zu Hause. Er wurde ausschließlich
für den Gebrauch in einem Auto konzipiert.
• Lassen Sie Ihr Kind zu keiner Zeit unbeaufsichtigt in dem Sitz.
• Stellen Sie den rückwärtsgerichteten Kinderautositz nicht auf einen Vordersitz
mit aktiviertem Airbag. Dies kann zu schweren Verletzungen oder Tod führen.
• Der Kindersitz muss ausgetauscht werden, wenn er bei einem Unfall starken
Belastungen ausgesetzt war.
• Aus Sicherheitsgründen muss der Kinderautositz auch dann im Fahrzeug
befestigt sein, wenn sich kein Kind im Kinderautositz bendet.
• Stellen Sie immer sicher, dass alle Gurte, die den Kinderautositz am Fahrzeug halten, festsitzen und alle Gurte, die das Kind zurückhalten, an den
Körper des Kindes angepasst sind. Stellen Sie zudem sicher, dass die Gurte
nicht verdreht sind.
• Gepäckstücke oder andere Gegenstände, die im Falle eines Zusammenstoßes
Verletzungen verursachen können, müssen ordnungsgemäß gesichert werden.
• Steife Gegenstände und Kunststoffteile eines Kinderrückhaltesystems müssen so platziert und installiert sein, dass sie nicht von einem beweglichen
Sitz oder einer Fahrzeugtür eingeklemmt werden können.
• Es ist wichtig, dass tiefsitzende Gurte das Becken des Kindes fest xieren.
Um das Sturzrisiko zu vermeiden, sollte Ihr Kind immer angeschnallt sein.
• Es ist gefährlich, ohne Zustimmung der zuständigen Instanz Änderungen
oder Ergänzungen am Produkt vorzunehmen. Die Nichtbeachtung der Installationsanweisungen des Herstellers des Kinderrückhaltesystems birgt
ebenfalls Gefahren für die Sicherheit Ihres Kindes.
• Dieser Kindersitz wurde für Kinder mit einem Gewicht bis zu 19 kg konzipiert. Überlasten Sie niemals den Kindersitz, indem Sie mehr als ein Kind
oder zusätzliche Lasten darin transportieren.
• Die Kinderrückhalteeinrichtung darf nicht ohne den Sitzbezug verwendet
werden.
• Der Sitzbezug darf nicht durch einen anderen als den vom Hersteller empfohlenen ersetzt werden, da dieser Sitzbezug ein fester Bestandteil der
Rückhalteleistung ist.
Page 5
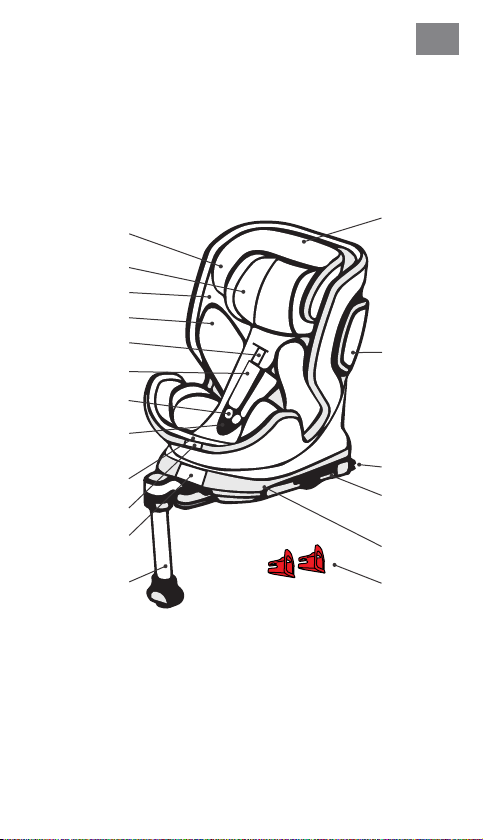
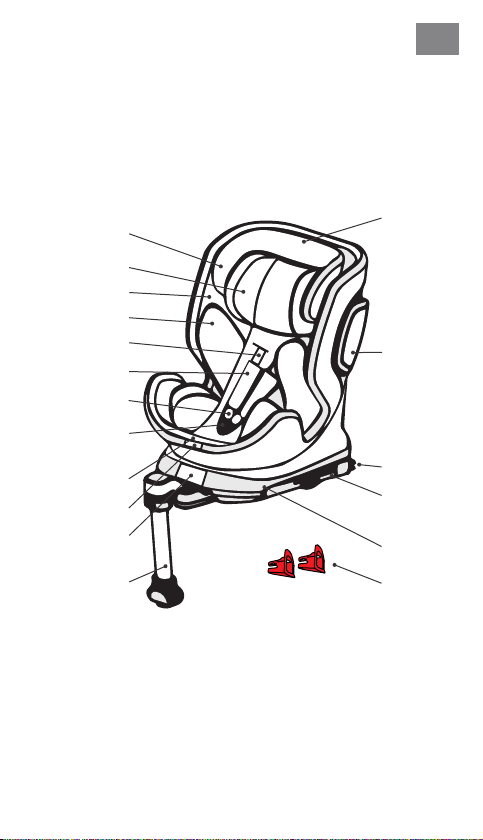
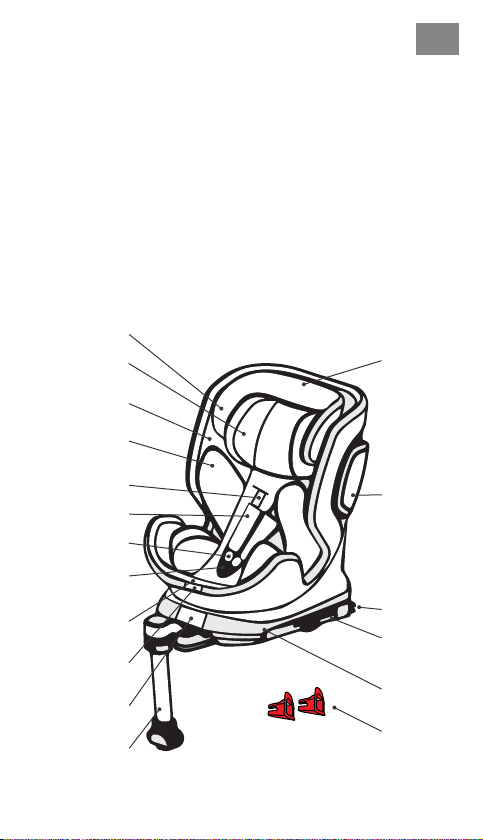
SITZTEILE
Vorderansicht
Kopfstütze
Kopfpolster
Sitzschale
Komforteinlage
Schultergurt
Schulterpolster
Gurtschloss
Gurtschloss-
polster
Zentrale
Gurteinstellung
Positionshebel
Rotationshebel
Standfuß
- 5 -
DE
Kopfstützeneinstellung
SeitenaufprallschutzProtektor
Isox-
Konnektor
Isox-
Konnektorerweiterung
Isox-Station
Isox-Ein-
führhilfen
Page 6
DE
- 6 -
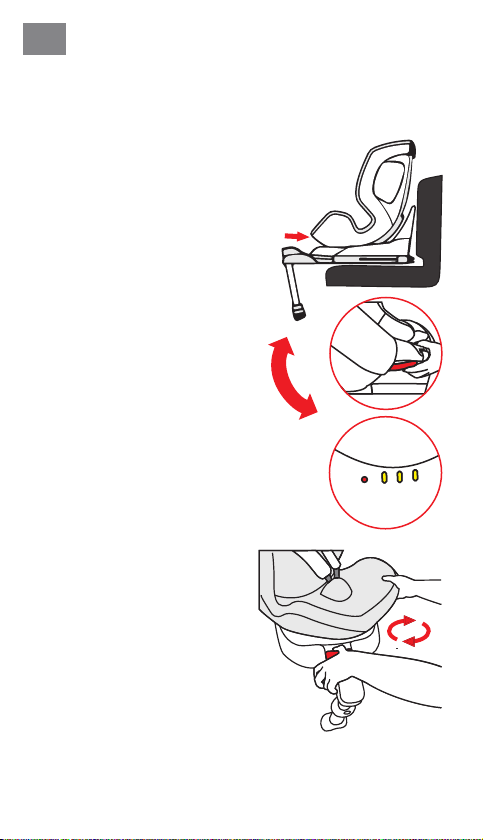
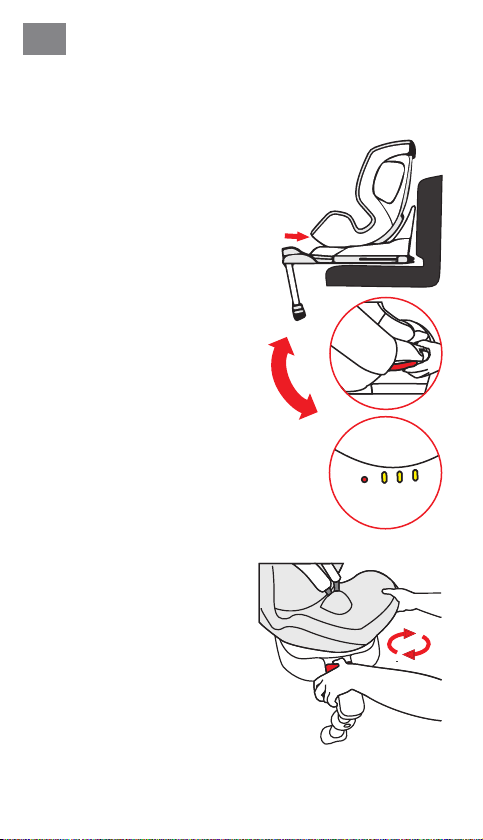
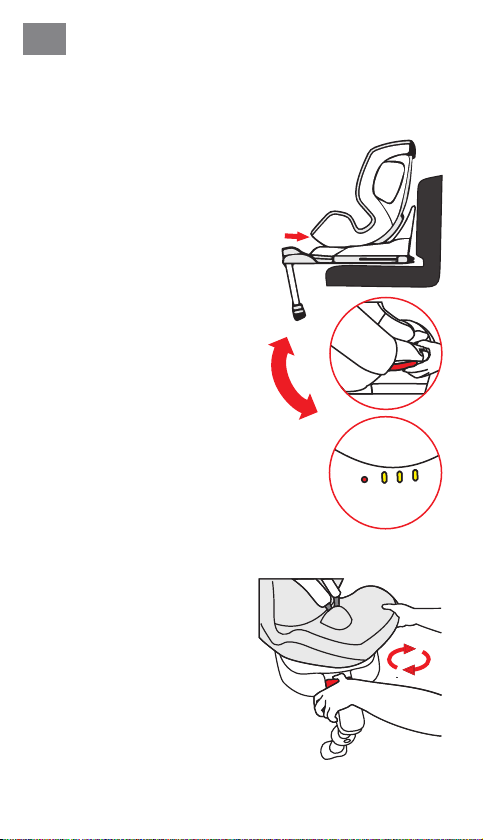
VERWENDUNG DES KINDERAUTOSITZES
Einstellen des Neigungswinkels
des Kinderautositzes
• Betätigen Sie mit einer Hand den
Positionshebel an der unteren Vorderseite der Sitzschale.
• Halten Sie mit der anderen Hand die
Sitzschale und stellen Sie den Winkel
ein.
Folgende Sitzpositionen sind möglich:
(Bitte Label am Kindersitz beachten)
Rückwärtsgerichtet,
Körpergröße 40–105 cm,
1 Position (R)
Vorwärtsgerichtet,
Körpergröße 76–105 cm,
mind. 15 Monate alt,
3 Positionen (1–3)
Drehung des Kinderautositzes
• Um den Kinderautositz im eingebauten
Zustand zu rotieren, betätigen Sie den
Rotationshebel vorne an der Basissta
tion und drehen Sie den Kinderautositz
in die rückwärts- bzw. vorwärtsgerich
tete Position.
• Die vorwärtsgerichtete Position ist nur
für Kinder mit einem Mindestalter von
15 Monaten und einer Mindestgröße
von 76 cm geeignet. Die rückwärtsge
richtete Position ist für Kinder von 40
bis 105 cm Körpergröße und einem
Maximalgewicht von 19 kg ausgelegt.
• Die seitliche Position ist nur für den
erleichterten Einstieg des Kindes
vorgesehen. Diese Position darf nicht
während der Fahrt verwendet werden.
-
-
-
123R
Page 7
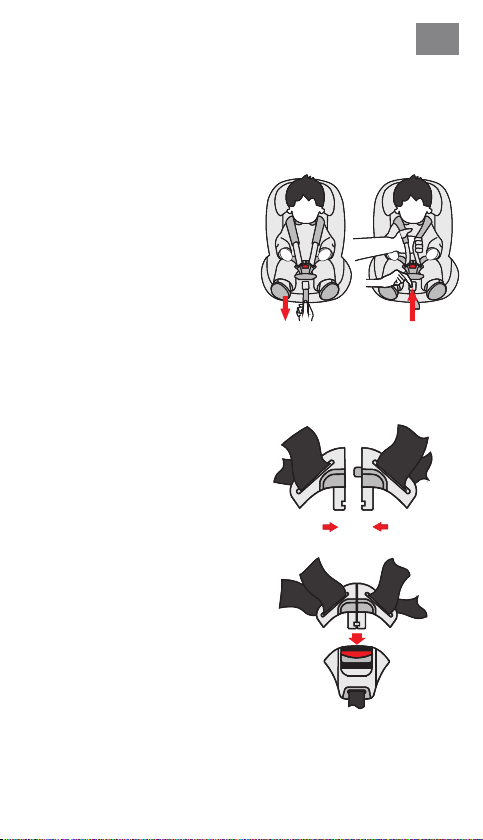
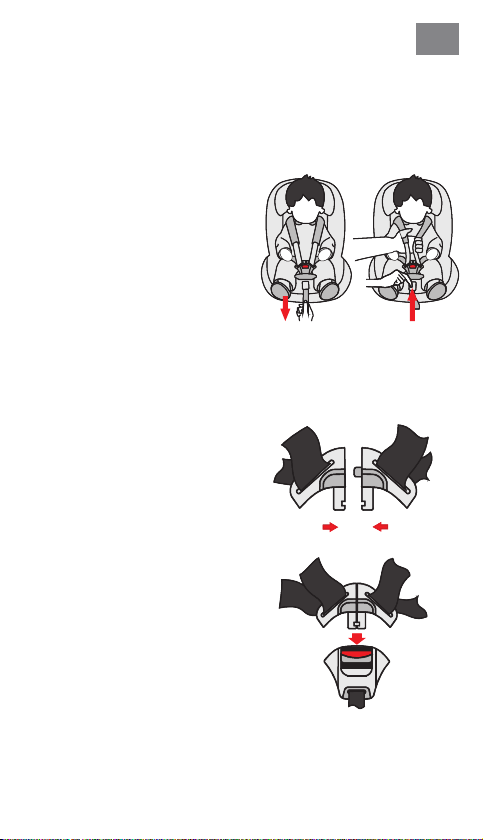
Einstellung des Gurts
• Um den Gurt zu lösen, drücken Sie
mit einer Hand den Knopf zur Gurt
verstellung im Sitzbereich. Halten
Sie das Gurtschloss mit der ande
ren Hand und lockern Sie die angebrachten Gurte vorsichtig.
• Ziehen Sie an der vorderen Einstelllasche, um die Gurte straffzuziehen.
Achten Sie darauf, dass die Riemen
nicht verdreht sind.
Öffnen/Schließen des Gurts
• Um den Gurt zu entriegeln, drücken
Sie den Knopf des Gurtschlosses,
ziehen Sie die Schnallenzungen he
raus und trennen Sie diese.
• Um den Gurt zu verriegeln, verbinden Sie zuerst die beiden Schnallenzungen und stecken Sie diese
zusammen in das Gurtschloss.
- 7 -
DE
-
-
-
Page 8
DE
- 8 -
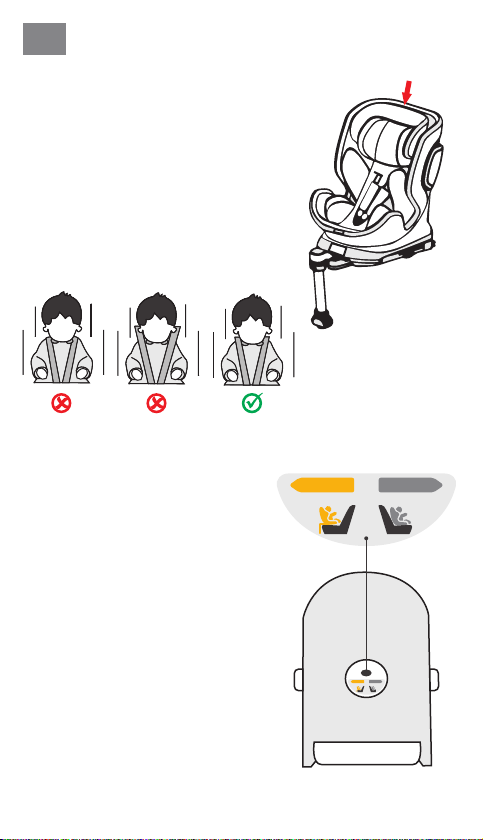
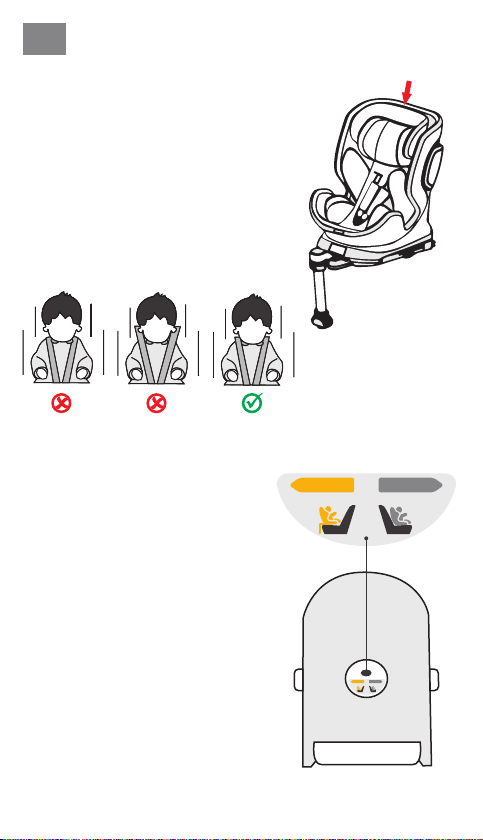
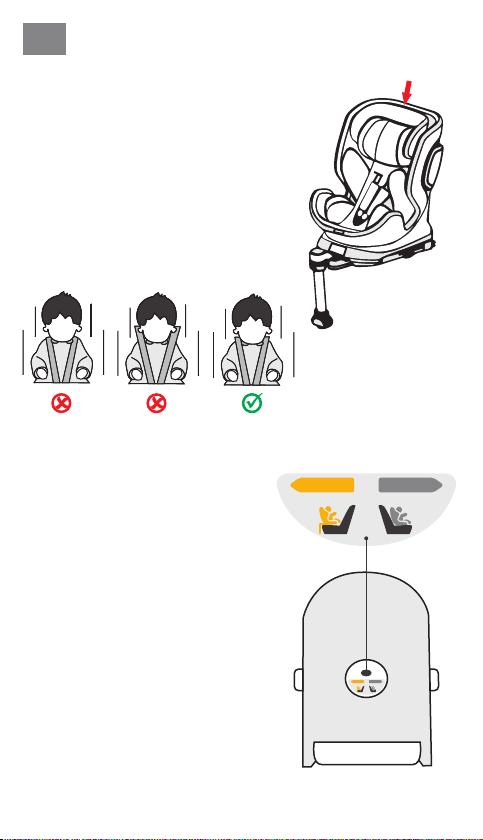
Einstellung der Kopfstütze
• Lösen Sie den Gurt und ziehen Sie den
Hebel zur Einstellung der Kopfstütze auf
der Rückseite des Kinderautositzes. Bewegen Sie die Kopfstütze, bis sie in der
richtigen Höhe einrastet.
• Achten Sie darauf, dass die Schultergurte
knapp über den Schultern Ihres Kindes
aus dem Kinderautositz geführt werden.
• Lassen Sie den Hebel los und stellen Sie
sicher, dass die Kopfstütze eingerastet
ist.
RotationControl
• Der RotationControl Knopf dient als Kontrollhilfe und soll eine frühzeitige vorwärtsgerichtete Nutzung des Kinderautositzes
verhindern.
• Bitte geben Sie am RotationControl Knopf
(Unterseite des Kinderautositzes) an, ob
das Alter Ihres Kindes unter oder über 15
Monaten liegt.
• Liegt das Alter unter 15 Monaten, können
Sie den Kinderautositz ausschließlich in
die rückwärtsgerichtete sowie seitliche
Position drehen. Die vorwärtsgerichtete
Position ist verriegelt und kann für Kinder
unter 15 Monaten nicht genutzt werden.
• Liegt das Alter über 15 Monaten und
die Körpergröße über 76 cm, kann der
Kinderautositz auch in der vorwärtsgerichteten Position genutzt werden. Stellen Sie hierzu bitte den RotationControl
Knopf um.
• Wir empfehlen, den Kinderautositz so
lange wie möglich, mindestens jedoch
bis zu einem Alter von 15 Monaten so
wie einer Körpergröße von mindestens
76 cm, rückwärtsgerichtet zu nutzen.
-
< 15 M
40–105 cm
Beispielabbildung
Unterseite Kindersitz
> 15 M
76–105 cm
< 15 M
> 15 M
40–105 cm
76–105 cm
Page 9
- 9 -
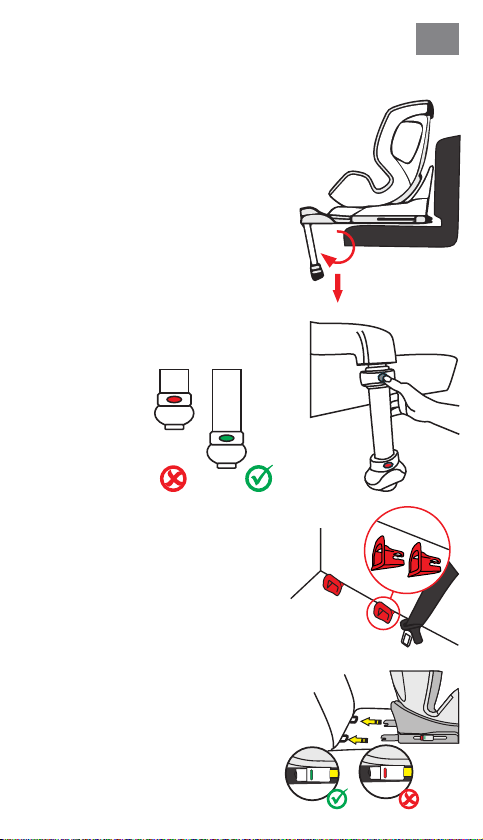
Standfuß
• Klappen Sie den Standfuß unterhalb des
Kinderautositzes heraus. Für Kinder bis
zu einer Körpergröße von 105 cm darf der
Kinderautositz ausschließlich mit ausge
klapptem Isox-Standfuß zusammen mit
den Isox-Konnektoren genutzt werden.
Eine Nutzung des Kinderautositzes nur
mit Isox-Konnektoren ist nicht erlaubt.
• Drücken Sie den Knopf zur Höhenverstellung des Standfußes und fahren Sie
den Teleskop-Standfuß aus. Achten Sie
darauf, dass dieser vollständig im Fuß-
raum Ihres Pkws auiegt.
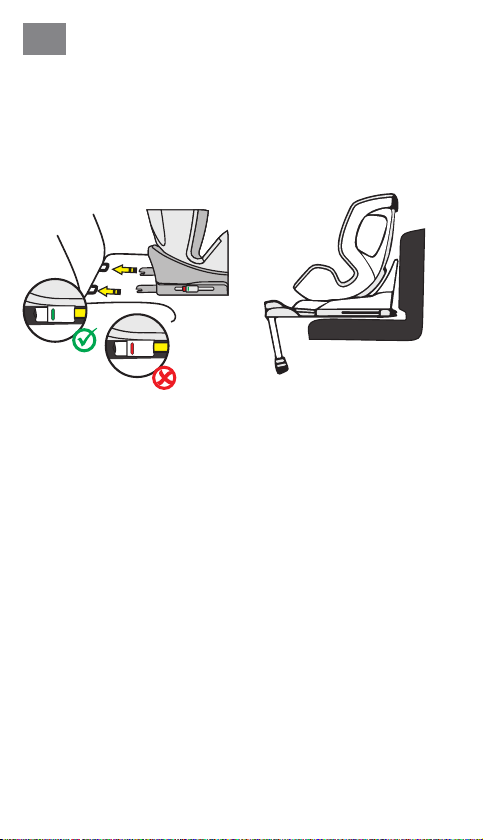
• Achten Sie darauf, dass die Anzeige am
Standfuß Grün anzeigt.
Isox-Konnektoren
• Schieben Sie die Einführhilfen durch den
Schlitz zwischen Rückenlehne und Sitz in
der Polsterung des Autositzes in die Iso-
x-Halterungen.
• Die ache Seite der Einführhilfen muss
dabei nach unten zeigen. Dieser Schritt
ist nicht erforderlich, falls das Fahrzeug
über fest installierte Einführhilfen verfügt.
• Drücken Sie beide seitlichen Isox-Kon-
nektorknöpfe, um die Isox-Konnektoren
in der Länge auszufahren.
• Schieben Sie die Isox-Konnektoren in
die Einführhilfen, bis sie hörbar einrasten.
• Schieben Sie den Kinderautositz fest an
die Rückenlehne des Autositzes. Achten
Sie darauf, dass beide Isox-Anzeigen
auf Grün umschalten.
DE
-
Page 10
DE
- 10 -
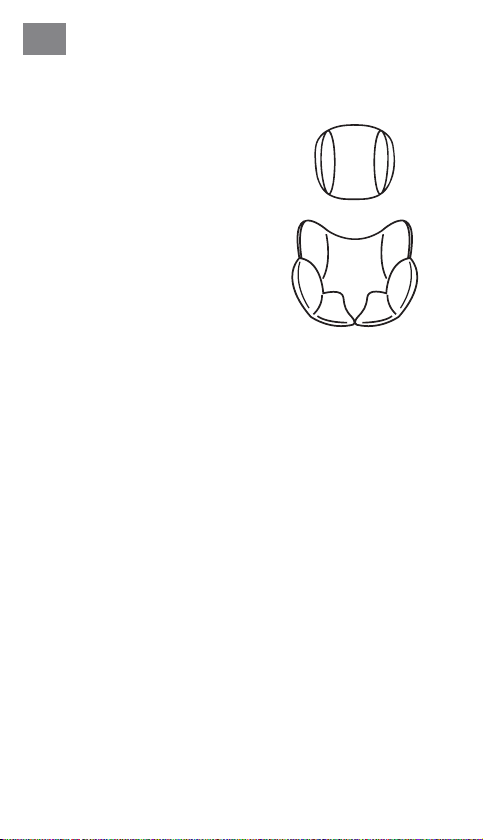
Kopfpolster & Komforteinlage
• Das Kopfpolster und die Komforteinlage sind für Babys mit einer Körpergröße von 40–60 cm vorgesehen.
• Bitte entnehmen Sie beide Einlagen,
sobald Ihr Kind die genannte Körpergröße überschritten hat.
Page 11
- 11 -
DE
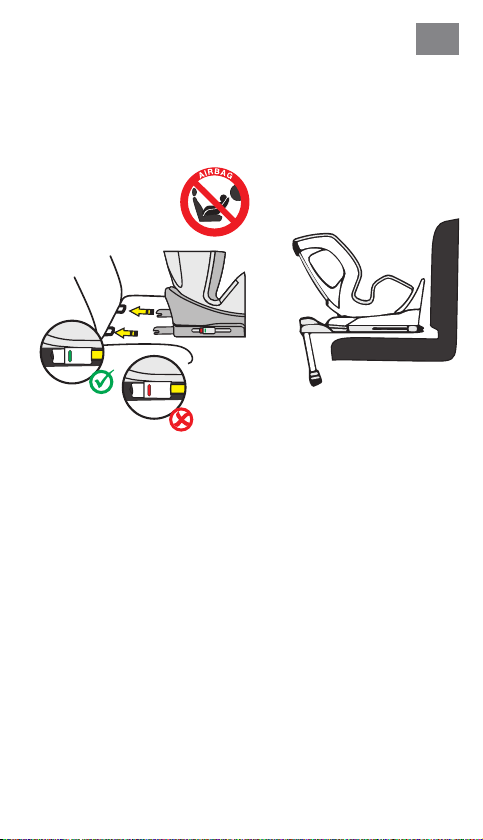
EINBAU DES KINDERAUTOSITZES
1) Größenklasse 40–105 cm, max. 19 kg, rückwärtsgerichtet
1 . Stellen Sie am RotationControl Knopf das Alter Ihres Kindes ein.
2 . Stellen Sie den Kinderautositz auf die maximale Liegeposition ein und
drehen Sie ihn, sodass er in rückwärtsgerichteter Ausrichtung auf die
kreisrunde Sitzposition (R) zeigt.
3 . Drücken Sie beide seitlichen Isox-Konnektorknöpfe, um die Isox-Konnek-
toren in der Länge auszufahren.
4 . Klappen Sie den Standfuß wie zuvorgehend beschrieben heraus.
5 . Führen Sie die Isox-Konnektoren zu den Isox-Halterungen am Pkw-Auto-
sitz und lassen Sie diese einrasten.
6 . Schieben Sie den Kinderautositz fest an die Rückenlehne des Autositzes.
Achten Sie darauf, dass beide Isox-Anzeigen auf Grün sind.
7 . Stellen Sie die Höhe des Standfußes ein und achten Sie darauf, dass dieser
vollständig im Fußraum Ihres Pkws auiegt.
8 . Achten Sie darauf, dass die Anzeige am Standfuß auf Grün umschaltet.
9 . Zum bequemen Einsetzen Ihres Kindes drehen Sie den Kinderautositz zur
Autotür.
10 . Lösen Sie die Gurtschnalle des Kinderautositzes und legen Sie die Gurte
auf die Außenseite des Sitzes.
11 . Setzen Sie Ihr Kind in den Kinderautositz.
12 . Stellen Sie die Höhe der Kopfstütze wie zuvorgehend beschrieben ein.
13 . Schließen Sie die Gurtschnalle wieder, bis ein Klicken zu hören ist.
14 . Ziehen Sie an der vorderen Einstelllasche, um die Gurte straffzuziehen.
Achten Sie darauf, dass die Riemen nicht verdreht sind.
15 . Drehen Sie den Sitz in die rückwärtsgerichtete Position. Überprüfen Sie,
ob der Kinderautositz in dieser Position eingerastet ist.
Page 12
DE
- 12 -
EINBAU DES KINDERAUTOSITZES
2) Größenklasse 76–105 cm, mind. 15 Monate, max. 19 kg,
vorwärtsgerichtet
WICHTIG: VERWENDEN SIE DEN KINDERAUTOSITZ NICHT IN FAHRTRICHTUNG,
BEVOR DAS ALTER DES KINDES 15 MONATE NICHT ÜBERSCHRITTEN HAT.
1 . Stellen Sie am RotationControl Knopf das Alter Ihres Kindes ein.
2 . Drücken Sie beide seitlichen Isox-Konnektorknöpfe, um die Isox-Konnek-
toren in der Länge auszufahren.
3 . Klappen Sie den Standfuß wie zuvorgehend beschrieben heraus.
4 . Führen Sie die Isox-Konnektoren zu den Isox-Halterungen am Pkw-Auto-
sitz und lassen Sie diese einrasten.
5 . Schieben Sie den Kinderautositz fest an die Rückenlehne des Autositzes.
Achten Sie darauf, dass beide Isox-Anzeigen auf Grün umschalten.
6 . Stellen Sie die Höhe des Standfußes ein und achten Sie darauf, dass dieser
vollständig im Fußraum Ihres Pkws auiegt.
7 . Achten Sie darauf, dass die Anzeige am Standfuß Grün anzeigt.
8 . Der Kinderautositz verfügt in Fahrtrichtung über drei einstellbare Sitzpo-
sitionen.
9 . Zum bequemen Einsetzen Ihres Kindes drehen Sie den Kinderautositz zur
Autotür.
10 . Lösen Sie die Gurtschnalle des Kinderautositzes und legen Sie die Gurte
auf die Außenseite des Sitzes.
11 . Setzen Sie Ihr Kind in den Kinderautositz.
12 . Stellen Sie die Höhe der Kopfstütze wie zuvorgehend beschrieben ein.
13 . Schließen Sie die Gurtschnalle wieder, bis ein Klicken zu hören ist.
14 . Ziehen Sie an der vorderen Einstelllasche, um die Gurte straffzuziehen.
Achten Sie darauf, dass die Riemen nicht verdreht sind.
15 . Drehen Sie den Sitz in die vorwärtsgerichtete Position. Überprüfen Sie, ob
der Kinderautositz in dieser Position eingerastet ist.
Page 13

- 13 -
DE
REINIGUNG
Um eine lange Nutzungsdauer Ihres Kinderautositzes zu gewährleisten, verwenden Sie keine Lösungs mittel, Scheuermittel oder aggressive Reinigungsmittel
zur Reinigung des Kinderautositzes. Überprüfen Sie nach jedem Waschgang die
Beständigkeit des Stoffes und der Nähte. Beim Waschen des Stoffs sind die
Anweisungen auf dem Etikett (siehe unten) sorgfältig zu befolgen.
Waschen bei 30 °C,
e
Schonwaschgang
NICHT
o
bleichen
Trommeltrocknen bei
s
niedriger Temperatur
m
U
NICHT
bügeln
NICHT
chemisch reinigen
INSTANDHALTUNG
Überprüfen Sie regelmäßig den Zustand des Produkts auf mögliche Schäden.
Im Schadensfall darf der Kinderautositz nicht mehr verwendet werden und ist
außerhalb der Reichweite von Kindern aufzubewahren.
Bei Fragen und Problemen wenden Sie sich bitte an den
Osann Kundendienst unter +49 (0)7731 970077.
Page 14

EN
Thank you for choosing our Turai360 SL child car seat. If you need help with
this product, please contact our customer service.
- 14 -
USE
• This product is suitable for children with a height of between 40 and 105
cm and weighing a maximum of 19 kg.
• Rear-facing installation for children between 40 to 105 cm in height
takes place with the help of the Isox connectors and the support leg.
The child is strapped in with the child car seat’s 5-point belt.
• Forward-facing installation for children between 76 and 105 cm in height
and a minimum age of 15 months takes place with the help of the Isox
connectors and the support leg. The child is strapped in with the child car
seat’s 5-point belt.
IMPORTANT
DO NOT USE THE CHILD CAR SEAT FACING IN THE DIRECTION OF TRAVEL UNTIL
THE CHILD HAS REACHED THE AGE OF 15 MONTHS.
EXTREME DANGER
We recommend installing the child car seat on the rear seat of the vehicle.
DO NOT attach the child car seat for rear-facing use in the 40 to 105 cm
height class to the front seat, where there is an airbag. It may be used on the
front seat if the airbag can be deactivated. Please refer to the vehicle manual
for more information on this.
WARNING
• This is a child restraint system in the “i-Size” category. This is approved
in accordance with ECE Regulation No. 129 for use in i-Size-compatible
vehicle seat positions according to the information provided by the vehicle
manufacturer in the vehicle user manual.
• This child car seat is only suitable for vehicles that feature Isox holders in
accordance with ECE R16 or other equivalent standards.
If you have any doubts, please contact the car seat manufacturer or the
retailer.
Page 15
- 15 -
1. This only applies if the airbag
can be deactivated, Isox anchor
points are available and the seat is
recognised as i-Size-compatible
in the vehicle manual.
2. This only applies if Isox connec-
tors are available and the seat is
recognised as i-Size-compatible in
the vehicle manual.
The following table provides information about the fastening devices and
methods:
EN
Size
class
40-105 cmRear-
76-105 cmForward-
Installation
direction
facing
facing
Installation Type
Isox connectors
& support leg
Isox connectors
& support leg
i-Size
Universal
Isox
i-Size
Universal
Isox
Child safety
device
5-point seatbelt for the
child seat
5-point seatbelt for the
child seat
Page 16

EN
- 16 -
WARNING
• Please read through these instructions carefully before use in order to
guarantee the safety of your child. Retain the manual. Non-compliance
with the instructions in this manual may result in serious injuries to your
child.
• The child seat can only be used with its own 5-point belt system for children
who weigh under 19 kg and are less than 105 cm in height.
• The child seat CANNOT be used with its own 5-point belt system for children
who weigh over 19 kg and are taller than 105 cm.
• The child seat can be installed rear-facing and forward-facing with the
Isox connectors and the stand. Important: Do not install the child car seat
in a forward-facing position until the child is at least 15 months old.
• For Isox installation: Be sure to read the car manufacturer’s manual.
• Do not use load-bearing contact points other than those described in the
instructions and marked in the child restraint system.
• Do not use this child car seat at home. It has been designed exclusively
for use in a car.
• Do not leave your child unsupervised in the seat at any time.
• Do not place the rear-facing child car seat on the front seat with an activated
airbag. This could lead to serious injuries or death.
• The child seat must be replaced if it is exposed to heavy impact in an
accident.
• For safety reasons, the child car seat must be secured in the vehicle even
when there is no child sitting in the child car seat.
• Always make sure that all belts that attach the child car seat to the vehicle
are secure and that all belts that restrain the child are adjusted to t the
child’s body. Ensure that the belts are not twisted.
• Items of luggage or other objects that could cause injury in the event of a
collision must be properly secured.
• The rigid items and plastic parts of a child restraint system must be positioned and installed so that they cannot get caught by a movable seat or
a vehicle door.
• It is important that belts that sit low hold the child’s pelvis rmly in place.
To avoid the risk of falling, your child should always be strapped in.
• It is dangerous to make changes or additions to the product without approval from the responsible authority. Non-compliance with the installation
instructions provided by the manufacturer of the child restraint system is
also associated with risks to the safety of your child.
• This child seat is designed for children weighing up to 19 kg. Never overload
the child seat by transporting more than one child or additional loads in it.
• The child restraint system must not be used without the seat cover.
• The seat cover must not be replaced by a cover other than that recommended by the manufacturer, as this seat cover is an important component
of the restraint performance.
Page 17
SEAT PARTS
Front view
Headrest
Head cushion
Seat bucket
Comfort insole
Shoulder belt
Shoulder pad
Seatbelt
Seatbelt
buckle pads
Central
Belt adjustment
Position lever
Rotation lever
Support
leg
- 17 -
EN
Headrest
setting
Side impact
protector
Isox
connector
Isox
connector
extension
Isox station
Isox
insertion aid
Page 18
EN
- 18 -
USE OF THE CHILD CAR SEAT
Setting the child car seat tilt
angle
• Operate the position lever on the lower
front of the seat bucket with one hand.
• Hold the seat bucket with your other
hand and adjust the angle.
The following seat positions are pos-
sible: (Please see the label on the child
car seat)
Rear-facing,
Body height 40-105 cm,
1 position (R)
Forward-facing,
Height 76-105 cm,
at least 15 months old,
3 positions (1-3)
Turning the child car seat
• To rotate the child car seat when installed, operate the rotation lever at
the front of the base station and rotate
the child car seat to the rear-facing or
forward-facing position.
• The forward-facing position is only
suitable for children with a minimum
age of 15 months and a minimum
height of 76 cm. The rear-facing position is designed for children from 40
to 105 cm tall and a maximum weight
of 19 kg.
• The side position is only intended to
facilitate the child’s entry. This position
must not be used while driving.
123R
Page 19
- 19 -
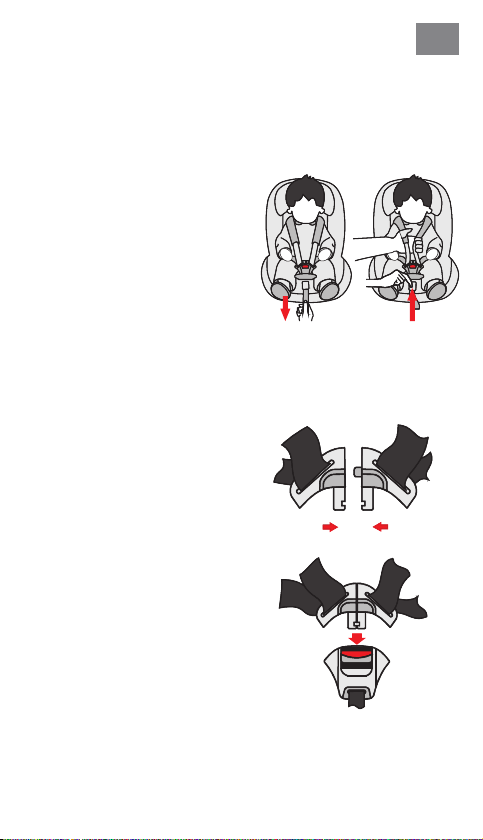
Adjusting the belt
• To loosen the belt, press the belt
adjustment button in the seat area
with one hand. Hold the belt buckle
with the other hand and carefully
loosen the attached straps.
• Pull the front adjustment strap to
tighten the belts. Ensure that the
straps are not twisted.
Opening/closing the belt
• To unlock the belt, press the button on the belt buckle, pull out the
buckle tongues and separate them.
• To lock the belt, rst, connect both
tongues of the buckle and then insert them together into the belt
buckle.
EN
Page 20
EN
- 20 -
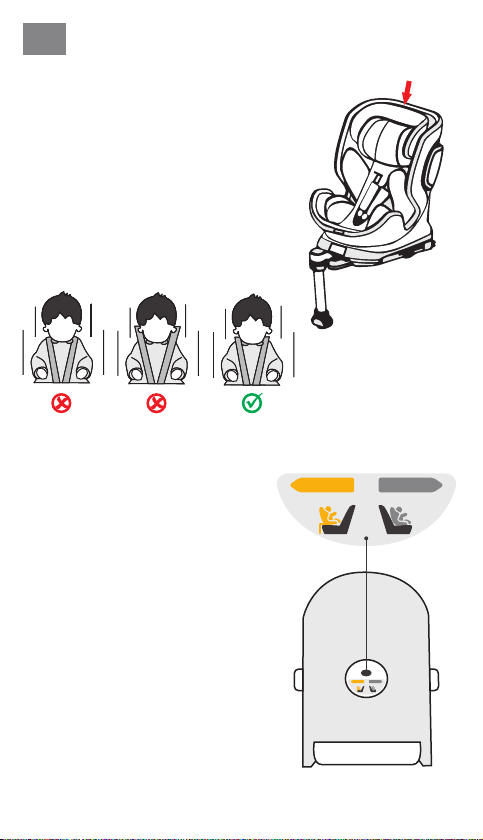
Adjusting the head support
• Release the belt and pull the lever to
adjust the headrest on the back of the
child car seat. Move the headrest until it
engages at the correct height.
• Make sure the shoulder straps are positioned just above your child’s shoulders
when they come out of the child car seat.
• Release the lever and ensure that the
head support is engaged.
RotationControl
• The RotationControl knob is a control aid
and is intended to prevent premature
forward-facing use of the child car seat.
• Please indicate on the RotationControl
button (bottom of the child car seat)
whether your child’s age is below or
above 15 months.
• If your child is under 15 months old,
you can only rotate the car seat to the
rear-facing and side-facing positions.
The forward-facing position is locked
and cannot be used for children under
15 months.
• If your child is over 15 months old and
over 76 cm tall, the car seat can also be
used in the forward-facing position. The
RotationControl knob must be turned
for this to be possible.
• We recommend using the child car seat
rear-facing for as long as possible, but
at least until the child is 15 months old
and 76 cm tall.
< 15 M
40–105 cm
Example illustration
Underside of child seat
> 15 M
76–105 cm
< 15 M
> 15 M
40–105 cm
76–105 cm
Page 21
- 21 -
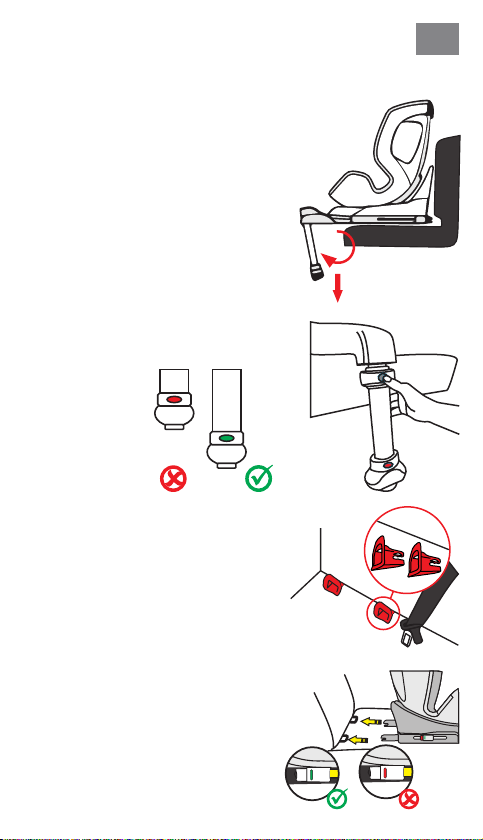
Support leg
• Fold out the support leg underneath the
child car seat. For children under 105cm
in height, the child car seat may only be
used with the Isox support leg folded
out together with the Isox connectors.
Using the child car seat only with Isox
connectors is not permitted.
• Press the button to adjust the height
of the stand and extend the telescopic
stand. Make sure that this is fully in contact with the footwell of your vehicle.
• Ensure that the indicator on the support
leg is showing green.
Isox connectors
• Push the insertion aids through the slot
in the cushion between the backrest and
seat into the Isox anchor points.
• When doing this, the at side of the in-
sertion aids must be facing downwards.
This step is not necessary if the vehicle
already has xed insertion aids.
• Press the two lateral Isox connector
buttons in order to extend the length of
the Isox connectors.
• Push the Isox connectors into the in-
sertion aids until you hear them click
into place.
• Push the child car seat in until it rests
securely against the backrest of the car
seat. Ensure that both Isox indicators
are switched to green.
EN
Page 22
EN
- 22 -
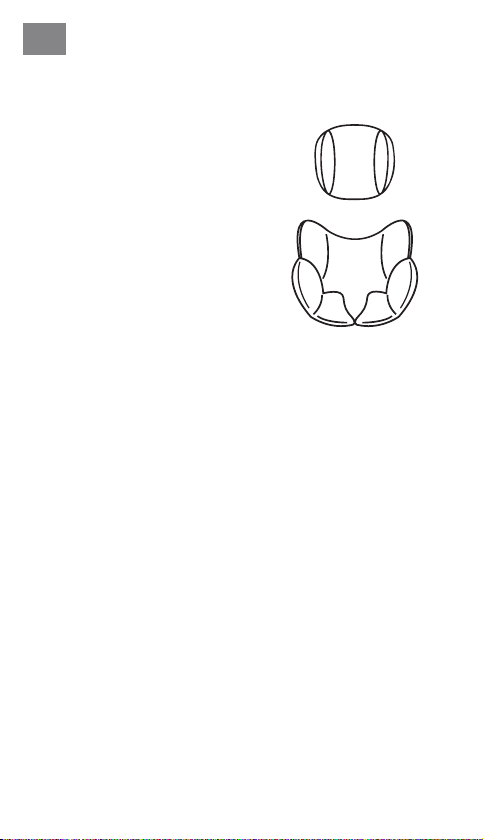
Head cushion & comfort insert
• The head cushion and comfort insert
are designed for babies of a height of
40-60 cm.
• Please remove both inserts as soon as
your child has exceeded the specied
body size.
Page 23
- 23 -
EN
INSTALLATION OF THE CHILD CAR SEAT
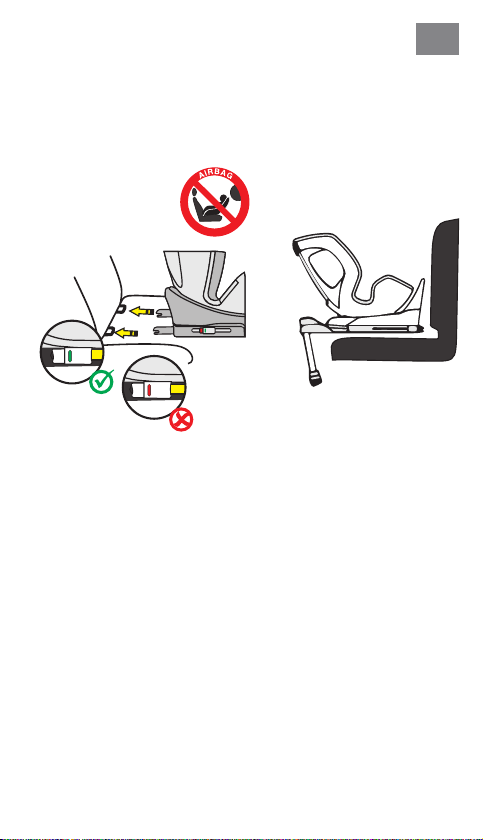
1) Height class 40-105 cm, max. 19 kg, rear-facing
1 . Set the age of your child on the RotationControl knob.
2 . Adjust the child car seat to the maximum reclining position and turn it
so that it points to the circular seating position (R) in rearward facing
orientation.
3 . Press the two lateral Isox connector buttons in order to extend the
length of the Isox connectors.
4 . Fold out the support leg as described above.
5 . Guide the Isox connectors onto the Isox anchor points on the seat of
the vehicle and ensure that they lock into position.
6 . Push the child car seat in until it rests securely against the backrest of the
seat of the vehicle. Ensure that both Isox indicators are showing green.
7 . Adjust the height of the support leg and ensure that this is fully in contact
with the footwell of your vehicle.
8 . Ensure that the indicator on the support leg is switched to green.
9 . When placing your child in the child car seat, turn the car seat towards
the car door for convenience.
10 . Unfasten the belt buckle on the child car seat and place the belts on the
outside of the seat.
11 . Put your child in the child car seat.
12 . Adjust the height of the headrest as described above.
13 . Fasten the belt buckle again until you hear a click.
14 . Pull the front adjustment strap to tighten the belts. Ensure that the straps
are not twisted.
15 . Turn the seat into the rear-facing position. Check that the child car seat
is locked in this position.
Page 24
EN
- 24 -
INSTALLATION OF THE CHILD CAR SEAT
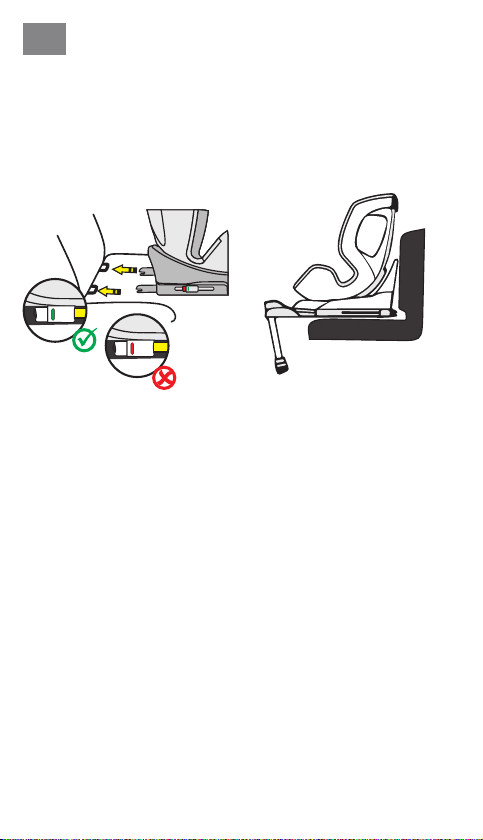
2) Height class 76-105 cm, min. 15 months, max. 19 kg,
forward facing
IMPORTANT: DO NOT USE THE CHILD CAR SEAT IN THE DIRECTION OF
TRAVEL UNTIL THE CHILD’S AGE IS GREATER THAN 15 MONTHS.
1 . Set the age of your child on the RotationControl knob.
2 . Press the two lateral Isox connector buttons in order to extend the
length of the Isox connectors.
3 . Fold out the support leg as described above.
4 . Guide the Isox connectors onto the Isox anchor points on the seat of
the vehicle and ensure that they lock into position.
5 . Push the child car seat in until it rests securely against the backrest of
the seat of the vehicle. Ensure that both Isox indicators are switched
to green.
6 . Adjust the height of the support leg and ensure that this is fully in contact
with the footwell of your vehicle.
7 . Ensure that the indicator on the support leg is showing green.
8 . When facing in the direction of travel, the child car seat offers three
adjustable seat positions.
9 . When placing your child in the child car seat, turn the car seat towards
the car door for convenience.
10 . Unfasten the belt buckle on the child car seat and place the belts on the
outside of the seat.
11 . Put your child in the child car seat.
12 . Adjust the height of the headrest as described above.
13 . Fasten the belt buckle again until you hear a click.
14 . Pull the front adjustment strap to tighten the belts. Ensure that the straps
are not twisted.
15 . Turn the seat into the forward-facing position. Check that the child car
seat is locked in this position.
Page 25

- 25 -
EN
CLEANING
To guarantee the long-term usage of your child car seat, do not use any solvents, abrasives or aggressive cleaning agents to clean the car seat. Check
the stability of the fabric and of the seams after each wash. When washing
the fabric, carefully follow the instructions on the label (see below).
e
o
s
Wash at 30 °C,
delicate cycle
DO NOT
bleach
Tumble dry at low
temperature
m
U
DO NOT
iron
DO NOT
dry clean
MAINTENANCE
Regularly check the condition of the product for any damage. In the event
of damage, do not use the product and keep it out of the reach of children.
In case of any issues, please contact
Osann customer service on +49 (0)7731 970077.
Page 26

FR
Merci d’avoir choisi notre siège auto pour enfant Turai360 SL. Si vous avez
besoin d’aide avec ce produit, veuillez contacter notre service clientèle.
- 26 -
UTILISATION
• Ce siège auto a été conçu pour des enfants d'une taille de 40 à 105cm et
un poids maximal de 19kg.
• L’installation orientée vers l’arrière de 40 à 105 cm de hauteur est réalisée à l’aide des connecteurs Isox et du support. L'enfant est attaché à
l'aide de la ceinture à 5 points du siège auto pour enfant.
• L’installation orientée vers l’avant de 76 à 105 cm de hauteur et un âge
minimum de 15 mois est effectuée à l’aide des connecteurs Isox et du
support. L’enfant est attaché avec la ceinture à 5 points du siège auto
pour enfant.
IMPORTANT
N'UTILISEZ PAS LE SIÈGE AUTO POUR ENFANT DANS LE SENS DE LA MARCHE
AVANT QUE L'ENFANT AIT PLUS DE 15 MOIS.
DANGER EXTRÊME
Il est recommandé d'installer le siège auto pour enfant sur le siège arrière
du véhicule. Ne xez PAS le siège d’auto pour enfant orienté vers l’arrière
dans la classe de taille 40 à 105 cm au siège avant où se trouve un airbag.
Sauf si vous désactivez l'airbag. Lisez attentivement le manuel d'utilisation
du véhicule à ce sujet.
AVERTISSEMENT
• Il s'agit d'un système de retenue pour enfant de catégorie «i-Size». Il est
homologué en vertu du règlement CEE n° 129 pour une utilisation dans les
positions de siège de véhicule compatibles i-Size, comme spécié par le
constructeur du véhicule dans le manuel d'utilisation du véhicule.
• Ce siège auto pour enfant convient uniquement aux véhicules équipés de
xations Isox conformément à la norme ECE R16 ou à des normes comparables.
En cas de doute, veuillez vous adresser au fabricant du siège auto ou au
distributeur.
Page 27
- 27 -
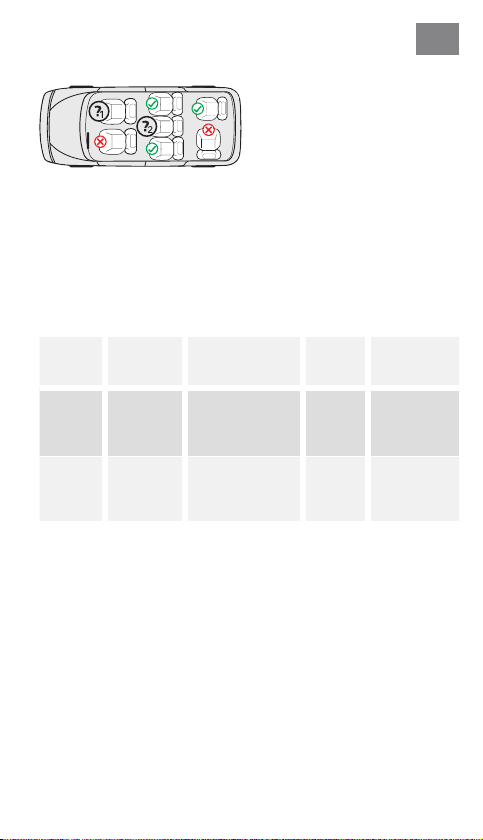
1. Uniquement si l'airbag peut être
désactivé, si des connecteurs
ISOFIX sont présents et si le siège
est reconnu comme compatible
« i-Size » dans le manuel de la
voiture.
2. Uniquement si des connecteurs
Isox sont présents et si le siège
est reconnu comme compatible
i-Size dans le manuel de la voiture.
Le tableau suivant contient des informations sur les dispositifs et les méthodes
de xation:
FR
Classe
de taille
40–105 cmDos
76–
105cm
Sens de
montage
à la route
Face
à la route
Installation Type
Connecteurs et
béquille Isox
Connecteurs et
béquille Isox
i-Size
Universal
Isox
i-Size
Universal
Isox
Protection de
l'enfant
Ceinture à
5points du
siège auto
pour enfant
Ceinture à
5points du
siège auto
pour enfant
Page 28

FR
- 28 -
AVERTISSEMENT
• Veuillez lire attentivement ces instructions avant utilisation an de garantir
la sécurité de votre enfant. Conservez les instructions. Le non-respect des
instructions de ce guide peut entraîner des blessures graves pour votre
enfant.
• Avec son propre système de harnais à 5 points, le siège enfant ne peut
être utilisé que pour les enfants pesant moins de 19 kg et mesurant jusqu’à
105 cm.
• Le siège enfant ne peut PAS être utilisé avec le système de harnais à 5
points pour les enfants pesant plus de 19 kg et d’une hauteur supérieure
à 105 cm.
• Le siège enfant peut être installé dos à la route et face à la route avec les
connecteurs Isox et la béquille. Important: Ne pas installer le siège face à
la route avant que l'enfant n'ait dépassé l'âge de 15 mois.
• Pour l'installation Isox: Veillez à lire le manuel du constructeur automobile.
• Ne pas utiliser de points de contact porteurs autres que ceux décrits dans
les instructions et marqués dans le système de retenue pour enfants.
• N'utilisez pas ce siège auto pour enfant à la maison. Il a été conçu exclusivement pour être utilisé dans une voiture.
• Ne laissez jamais votre enfant sur le siège auto sans surveillance.
• Ne placez pas le siège auto pour enfant dos à la route sur un siège avant
dont l'airbag est activé. Cela peut entraîner des blessures graves ou la
mort.
• Le siège auto pour enfant doit être remplacé s'il a été soumis à de fortes
contraintes lors d'un accident.
• Pour des raisons de sécurité, le siège auto pour enfant doit être xé dans
le véhicule même si aucun enfant n'y est installé.
• Assurez-vous toujours que toutes les sangles qui maintiennent le siège
auto pour enfant au véhicule sont bien serrées et que toutes les sangles
qui retiennent l'enfant sont ajustées au corps de l'enfant. Veillez également
à ce que les sangles ne soient pas en torsion.
• Les bagages ou autres objets susceptibles de causer des blessures en cas
de collision doivent être correctement xés.
• Les objets rigides et les pièces en plastique d'un dispositif de retenue pour
enfants doivent être placés et installés de manière à ce qu'ils ne puissent
pas être coincés par un siège ou une porte de véhicule en mouvement.
• Il est important que les sangles du bas maintiennent fermement le bassin
de l'enfant. Pour éviter le risque de chute, votre enfant doit toujours être
attaché.
• Il est dangereux d'apporter des modications ou des ajouts au produit sans
l'approbation de l'autorité compétente. Le non-respect des instructions
d'installation du fabricant du dispositif de retenue pour enfant présente
également des risques pour la sécurité de votre enfant.
• Ce siège enfant est conçu pour les enfants pesant jusqu’à 19 kg. Ne surchargez jamais le siège enfant en transportant plus d’un enfant ou des charges
supplémentaires à l’intérieur.
• Le dispositif de retenue pour enfant ne doit pas être utilisé sans la housse
de siège.
• La housse du siège ne doit pas être remplacée par une autre que celle
recommandée par le fabricant, car cette housse fait partie intégrante des
performances du dispositif de retenue.
Page 29
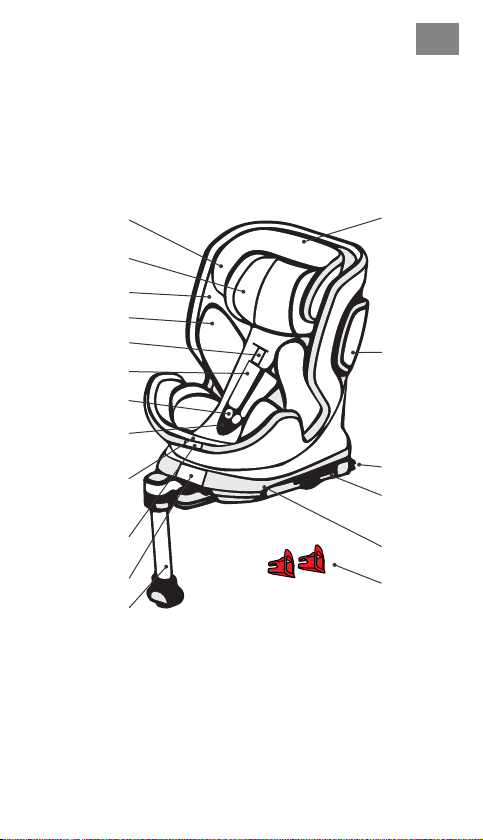
ÉLÉMENTS DU SIÈGE
Vue frontale
- 29 -
FR
Repose-tête
Coussinets de
tête
Coque du
siège
Pads de confort
Sangle d'épaule
Épaulière
Boucle de
ceinture
Coussinets
de boucle de
ceinture
Réglage central
Réglage de la
courroie
Levier de
position
Levier de
rotation
Piédestal
Repose-tête
attitude
Protection
contre
les chocs
latéraux
Protecteur
Isox
Connecteur
Isox
Connecteur
extension
Base Isox
Aides à
l'insertion
Isox
Page 30
FR
- 30 -
UTILISATION DU SIÈGE AUTO ENFANT
Réglage de l’angle d’inclinaison
du siège auto pour enfant
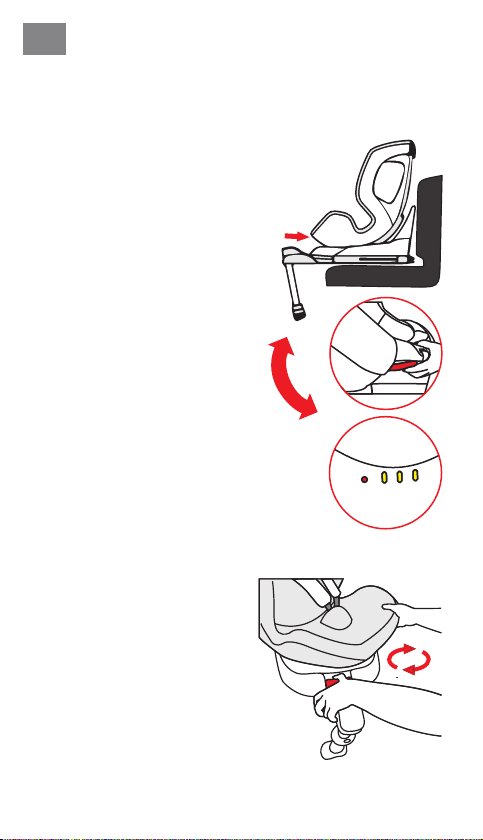
• Actionnez le levier de position sur le
bas avant de la coque du siège d’une
seule main.
• Tenez la coque du siège avec l'autre
main et réglez l'angle.
Les positions d'assise suivantes sont
possibles:
(Respectez l'étiquette sur le siège pour
enfant)
orienté vers l’arrière,
Hauteur 40–105 cm,
1 Position (R)
Face à la route,
Taille de l'enfant 76–105cm,
âgé d’au moins 15 mois,
3 postes (1–3)
Rotation du siège auto pour
enfant
• Pour faire pivoter le siège d’auto pour
enfant lorsqu’il est installé, actionnez le
levier de rotation à l’avant de la station
de base et tournez le siège d’auto pour
enfant en position arrière ou avant.
• La position face à la route ne convient
qu'aux enfants âgés d'au moins 15 mois
et d'une taille minimale de 76 cm. La
position arrière est conçue pour les
enfants de 40 à 105 cm de haut et un
poids maximum de 19 kg.
• La position latérale est destinée uniquement à faciliter l’entrée de l’enfant.
Cette position ne doit pas être utilisée
pendant la conduite.
123R
Page 31
- 31 -
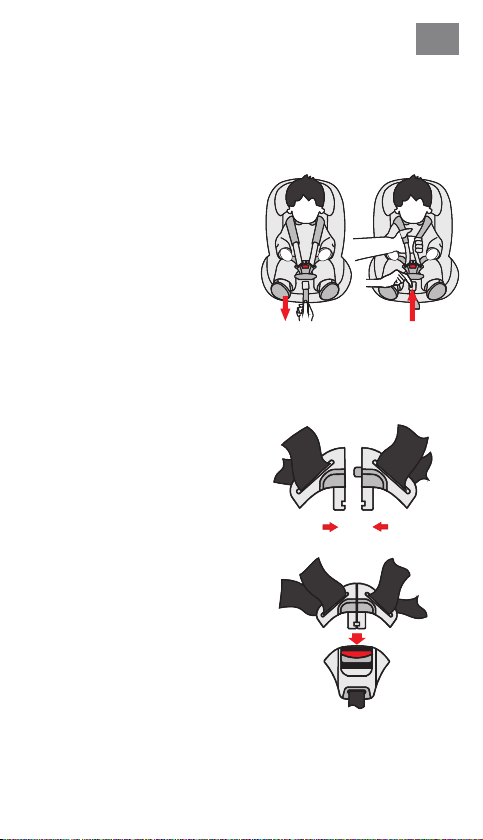
Réglage de la ceinture
• Pour détacher la ceinture, appuyez
d'une main sur le bouton de réglage
de la ceinture situé dans la zone du
siège. Tenez la boucle du harnais
de l'autre main et détachez soi
gneusement les sangles qui y sont
attachées.
• Tirez sur la languette de réglage
avant pour tendre la ceinture. Veillez à ce que les sangles ne soient
pas en torsion.
Ouverture/fermeture de la
ceinture
• Pour déverrouiller la ceinture, appuyez sur le bouton de la boucle de
la ceinture, tirez sur les languettes
de la boucle et séparez-les.
• Pour verrouiller la ceinture, rappro
chez d'abord les deux languettes de
la boucle et insérez-les ensemble
dans la boucle de la ceinture.
FR
-
-
Page 32
FR
- 32 -
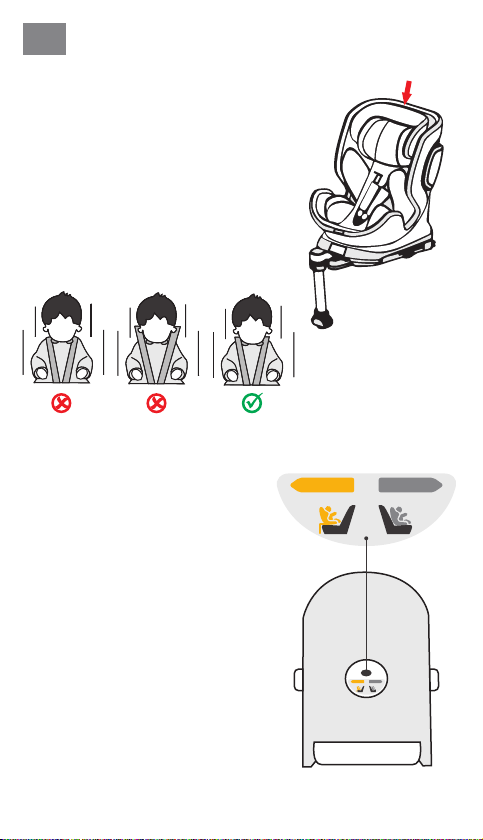
Réglage de l'appuie-tête
• Desserrez la ceinture et tirez sur le levier
de réglage de l'appui-tête situé à l'arrière
du siège auto pour enfant. Déplacez l'ap
pui-tête jusqu'à ce qu'il se verrouille à la
bonne hauteur.
• Assurez-vous que les sangles d'épaule
sortent du siège auto pour enfant juste
au-dessus des épaules de votre enfant.
• Relâchez le levier et assurez-vous que
l'appui-tête est engagé.
RotationControl
• Le bouton RotationControl sert d'aide au
contrôle et a pour but d'empêcher l'utilisation prématurée du siège auto pour
enfant face à la route.
• Veuillez indiquer sur le bouton RotationControl (en bas du siège d’auto pour enfant) si l’âge de votre enfant est inférieur
ou supérieur à 15 mois.
• Si l'enfant est âgé de moins de 15 mois,
vous ne pouvez faire pivoter le siège
auto pour enfant qu'en position dos à la
route ou en position sur le côté. La position face à la route est verrouillée et ne
peut pas être utilisée pour les enfants
de moins de 15 mois.
• Si l'âge est supérieur à 15 mois et la taille
supérieure à 76 cm, le siège auto pour
enfant peut également être utilisé en po
sition face à la route. Pour ce faire, veuillez activer le bouton RotationControl.
• Nous recommandons d'utiliser le siège
auto pour enfant dos à la route aussi
longtemps que possible, mais au moins
jusqu'à ce que l'enfant ait 15 mois et mesure au moins 76 cm.
-
< 15 M
40–105 cm
-
Exemple d’illustration
dessous du siège enfant
> 15 M
76–105 cm
< 15 M
> 15 M
40–105 cm
76–105 cm
Page 33
- 33 -
Piédestal
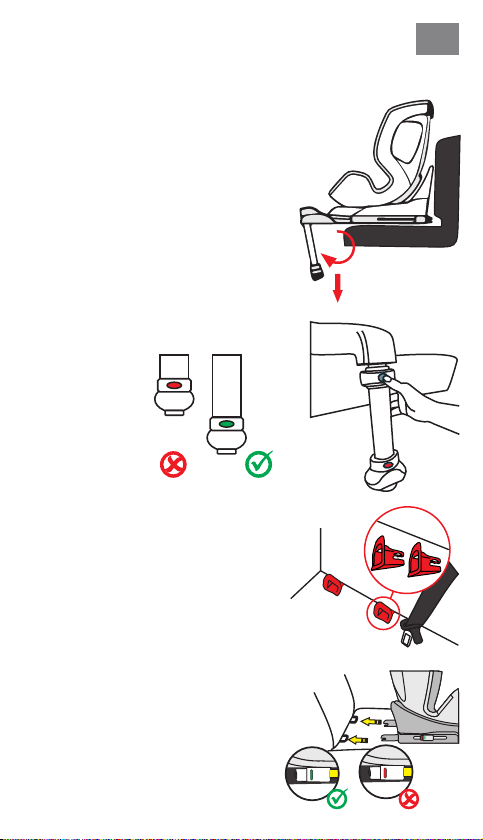
• Dépliez le pied de support sous le siège
auto pour enfant. Pour les enfants d'une
taille maximale de 105 cm, le siège auto
pour enfant ne peut être utilisé avec
les connecteurs Isox que si la béquille
Isox est dépliée. L'utilisation du siège
auto pour enfant uniquement avec les
connecteurs Isox n'est pas autorisée.
• Appuyez sur le bouton pour régler la
hauteur du support et étendre le sup
port télescopique. Assurez-vous qu'elle
repose complètement dans l'espace
pour les pieds de votre voiture.
• Assurez-vous que l'indicateur de la béquille est vert.
Connecteurs Isox
• Poussez les aides à l'insertion dans les
supports Isox à travers la fente située
entre le dossier et le siège dans le rembourrage du siège auto.
• Le côté plat des aides à l'insertion doit
être dirigé vers le bas. Cette étape n'est
pas nécessaire si le véhicule est équipé
d'aides à l'insertion installées de façon
permanente.
• Appuyez sur les deux boutons latéraux
des connecteurs Isox pour étendre les
connecteurs Isox dans le sens de la
longueur.
• Poussez les connecteurs Isox dans les
aides à l'insertion jusqu'à ce que vous
entendiez un clic.
• Poussez fermement le siège auto pour
enfant fermement contre le dossier du
siège de la voiture. Veillez à ce que les
deux afchages Isox soient verts.
FR
-
Page 34
FR
- 34 -
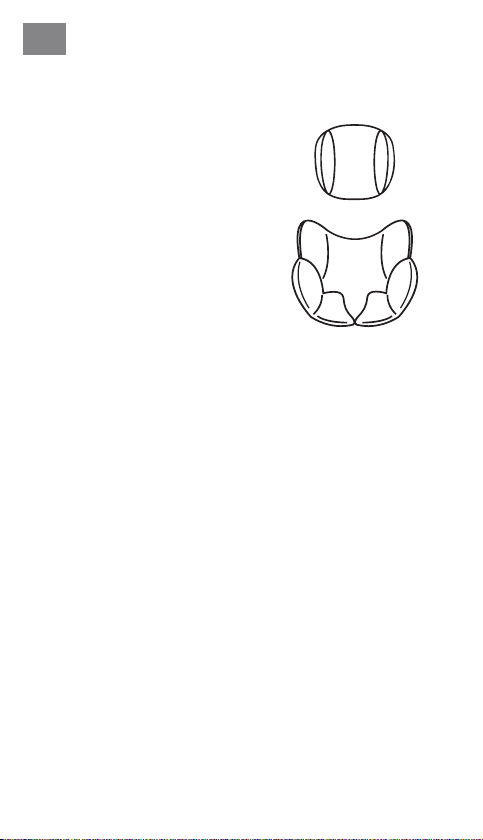
Coussin pour la tête et garniture
de confort
• Le coussin de tête et le coussinet de
confort sont prévus pour les bébés d'une
taille comprise entre 40 et 60 cm.
• Veuillez retirer les deux protections dès
que votre enfant a dépassé la taille indiquée.
Page 35
- 35 -
FR
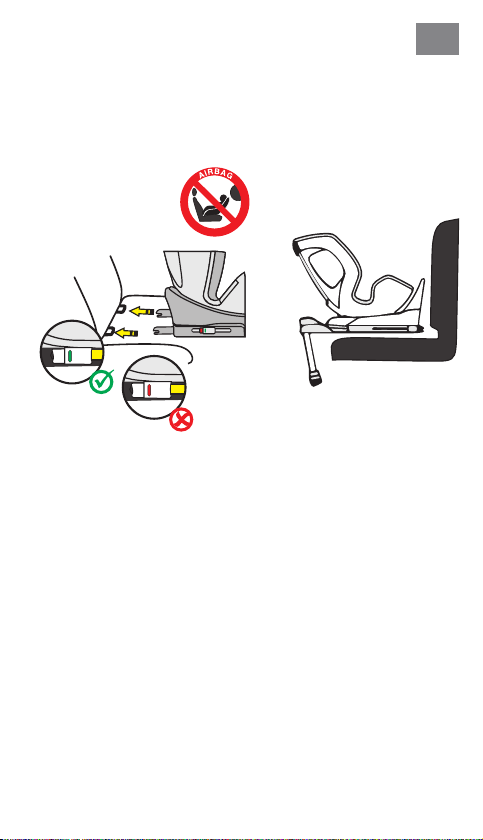
INSTALLATION DU SIÈGE AUTO ENFANT
1) Classe de taille 40–105 cm, max. 19 kg, orientée vers l’arrière
1 . Réglez l'âge de votre enfant sur le bouton RotationControl.
2 . Réglez le siège d’auto pour enfant à la position couchée maximale et
faites-le pivoter de sorte qu’il pointe vers la position assise circulaire (R)
dans une orientation orientée vers l’arrière.
3 . Appuyez sur les deux boutons du connecteur latéral Isox pour étendre la
longueur des connecteurs Isox.
4 . Déployez la béquille comme décrit ci-dessus.
5 . Guidez les connecteurs Isox vers les supports Isox du siège de la voiture
jusqu'à ce qu'ils se clipsent.
6 . Poussez le siège auto pour enfant fermement contre le dossier du siège
de la voiture. Veillez à ce que les deux afchages Isox soient verts.
7 . Réglez la hauteur de la béquille et assurez-vous qu'elle repose complète-
ment dans l'espace pour les pieds de votre voiture.
8 . Assurez-vous que l'indicateur de la béquille passe au vert.
9 . Pour asseoir confortablement votre enfant, tournez le siège auto pour
enfant vers la portière de la voiture.
10 . Déverrouillez la boucle de ceinture du siège auto pour enfant et placez les
sangles sur la partie extérieure du siège.
11 . Asseyez votre enfant dans le siège auto pour enfant.
12 . Réglez la hauteur de l'appui-tête comme décrit précédemment.
13 . Refermez la boucle de la ceinture jusqu'à ce que vous entendiez un clic.
14 . Tirez sur la languette de réglage avant pour tendre la ceinture. Veillez à ce
que les sangles ne soient pas en torsion.
15 . Tournez le siège en position dos à la route. Vériez que le siège auto pour
enfant est verrouillé dans cette position.
Page 36
FR
- 36 -
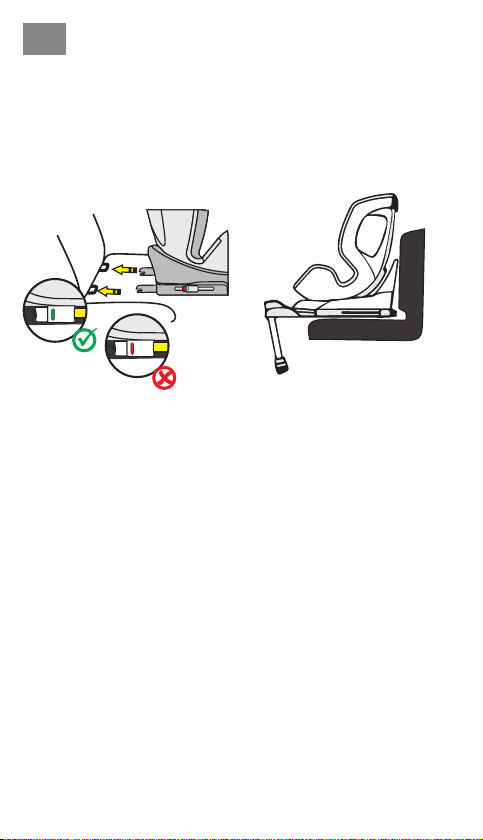
INSTALLATION DU SIÈGE AUTO ENFANT
2) Classe de taille 76–105 cm, min. 15 mois, max. 19 kg,
orientée vers l’avant
IMPORTANT: N'UTILISEZ PAS LE SIÈGE AUTO POUR ENFANT DANS LE SENS
DE LA MARCHE, AVANT QUE L'ÂGE DE L'ENFANT N'AIT DÉPASSÉ 15 MOIS.
1 . Réglez l'âge de votre enfant sur le bouton RotationControl.
2 . Appuyez sur les deux boutons du connecteur latéral Isox pour étendre la
longueur des connecteurs Isox.
3 . Déployez la béquille comme décrit ci-dessus.
4 . Guidez les connecteurs Isox vers les supports Isox du siège de la voiture
jusqu'à ce qu'ils se clipsent.
5 . Poussez le siège auto pour enfant fermement contre le dossier du siège
de la voiture. Veillez à ce que les deux afchages Isox soient verts.
6 . Réglez la hauteur de la béquille et assurez-vous qu'elle repose complète-
ment dans l'espace pour les pieds de votre voiture.
7 . Assurez-vous que l’indicateur sur le support afche le vert.
8 . Le siège auto enfant dispose de trois positions réglables dans le sens
de circulation.
9 . Pour asseoir confortablement votre enfant, tournez le siège auto pour en-
fant vers la portière de la voiture.
10 . Déverrouillez la boucle de ceinture du siège auto pour enfant et placez les
sangles sur la partie extérieure du siège.
11 . Asseyez votre enfant dans le siège auto pour enfant.
12 . Réglez la hauteur de l'appui-tête comme décrit précédemment.
13 . Refermez la boucle de la ceinture jusqu'à ce que vous entendiez un clic.
14 . Tirez sur la languette de réglage avant pour tendre la ceinture. Veillez à ce
que les sangles ne soient pas en torsion.
15 . Tournez le siège en position face à la route. Vériez que le siège auto pour
enfant est verrouillé dans cette position.
Page 37

- 37 -
FR
NETTOYAGE
Pour assurer une longue durée de vie à votre siège auto pour enfant, n'utilisez
pas de solvants, de produits de nettoyage abrasifs ou agressifs pour nettoyer le
siège auto pour enfant. Après chaque nettoyage, vériez la résistance du tissu
et des coutures. Lors du lavage du tissu, suivez attentivement les instructions
sur l'étiquette (voir ci-dessous).
e
o
s
Lavage à 30°C,
lavage délicat
NE PAS
utiliser d'eau de javel
Sèche-linge à basse
température
NE PAS
m
repasser
NE PAS
U
nettoyer chimiquement
ENTRETIEN
Vériez régulièrement l'état du produit pour déceler d'éventuels dommages.
En cas de dommage, le siège auto pour enfant ne doit plus être utilisé et doit
être placé hors de portée des enfants.
Si vous avez des questions ou des problèmes, veuillez vous adresser au
Service client Osann au +49 (0)7731 970077.
Page 38

IT
Grazie per aver scelto il nostro seggiolino per bambini Turai360 SL. Se ha
bisogno di aiuto per questo prodotto, si rivolga al nostro servizio clienti.
- 38 -
UTILIZZO
• Questo prodotto è progettato per bambini da 40 a 105 cm di altezza, con
un peso massimo di 19 kg.
• Installazione con orientamento all’indietro per altezze da 40 a 105 cm
per mezzo dei connettori Isox e della base di sostegno. Il bambino viene
allacciato con la cintura a 5 punti del seggiolino auto per bambini.
• Installazione con orientamento in avanti per altezze da 76 a 105 cm e
un’età minima di 15 mesi per mezzo dei connettori Isox e della base di
sostegno. Il bambino viene allacciato con la cintura a 5 punti del seggiolino
auto per bambini.
IMPORTANTE
NON UTILIZZARE IL SEGGIOLINO AUTO PER BAMBINI NELLA DIREZIONE DI
MARCIA FINO A QUANDO IL BAMBINO NON ABBIA RAGGIUNTO I 15 MESI DI
ETÀ.
PERICOLO ESTREMO
Si consiglia di installare il seggiolino auto per bambini sul sedile posteriore
del veicolo. Per l’utilizzo orientato all’indietro per altezze da 40 a 105 cm, NON
ssare il seggiolino auto per bambini sul sedile anteriore dove si trova un
airbag, a meno che non si disattivi l’airbag. A tale scopo leggere le istruzioni
d’uso del veicolo.
AVVERTENZA
• Si tratta di un sistema di ritenuta per bambini della categoria “i-Size”. È
omologato ai sensi del regolamento ECE n. 129 per l’utilizzo su posti a sedere del veicolo compatibili con “i-Size”, come indicato dal costruttore del
veicolo nelle istruzioni per l’uso del veicolo.
• Questo seggiolino auto per bambini è adatto esclusivamente a veicoli do-
tati di attacchi Isox conformemente alla norma ECE R16 o ad altre norme
equivalenti.
In caso di dubbio rivolgersi al costruttore del seggiolino auto o al rivenditore.
Page 39
- 39 -
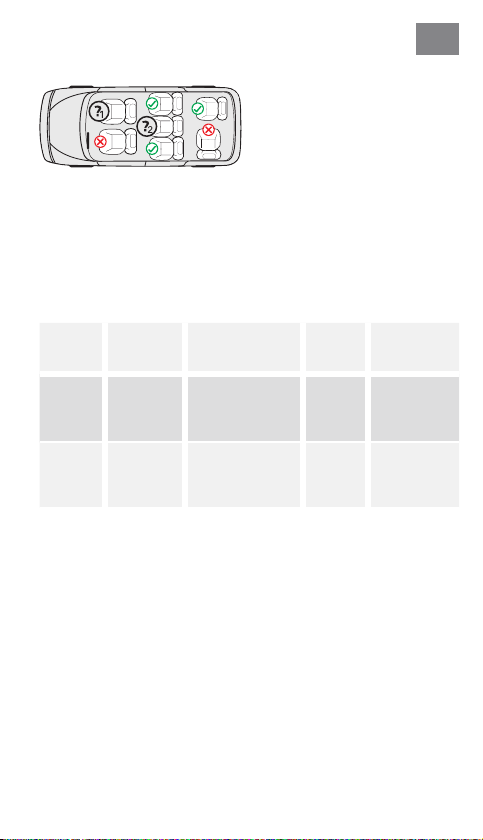
1. Solo se l’airbag può essere di-
sattivato, i connettori Isox sono
presenti e il sedile è riconosciuto
come compatibile con “i-Size” nel
manuale del veicolo.
2. Solo se i connettori Isox sono
presenti e il sedile è riconosciuto
come compatibile con “i-Size” nel
manuale del veicolo.
La seguente tabella contiene informazioni sui dispositivi e sui metodi di
ssaggio:
IT
Altezza
40-105 cmOrientato
76–105 cmOrientato
Direzione di
montaggio
all’indietro
in avanti
Installazione Tipo
Connettori Isox e
base di sostegno
Connettori Isox e
base di sostegno
i-Size
Universal
Isox
i-Size
Universal
Isox
Dispositivo di
sicurezza del
bambino
Cintura a 5
punti del seggiolino auto
per bambini
Cintura a 5
punti del seggiolino auto
per bambini
Page 40

IT
- 40 -
AVVERTENZA
• Si prega di leggere attentamente questo manuale prima dell’uso al ne di
garantire la sicurezza del bambino. Conservare le istruzioni per consultazioni
future. La mancata osservanza delle istruzioni contenute nel presente ma
nuale può causare gravi lesioni al bambino.
• Per bambini con un peso inferiore ai 19 kg e un’altezza no a 105 cm, il
seggiolino per bambini può essere utilizzato esclusivamente con il proprio
sistema di cinture a 5 punti.
• Per bambini di peso superiore ai 19 kg e un’altezza superiore a 105 cm, il
seggiolino per bambini NON può essere utilizzato con il sistema di cinture
a 5 punti.
• Il seggiolino per bambini può essere orientato in avanti e all’indietro tramite
i connettori Isox e la base di sostegno. Importante: non installarlo orientato
in avanti se il bambino non ha raggiunto i 15 mesi di età.
• Per l’installazione con Isox: leggere attentamente il manuale del costruttore
del veicolo.
• Non utilizzare punti di contatto portanti diversi da quelli descritti nelle
istruzioni e contrassegnati nel sistema di ritenuta per bambini.
• Non utilizzare questo seggiolino auto per bambini in casa. Il seggiolino per
bambini è concepito esclusivamente per l’utilizzo in auto.
• Non lasciare mai il bambino incustodito sul seggiolino.
• Non collocare il seggiolino auto per bambini orientato all’indietro su un sedile
anteriore con l’airbag attivato. Ciò può causare lesioni gravi o portare alla
morte.
• Il seggiolino per bambini deve essere sostituito nel caso in cui sia stato
sottoposto a forti sollecitazioni a causa di un incidente.
• Per motivi di sicurezza, il seggiolino auto per bambini deve essere ssato
nel veicolo anche quando il bambino non è seduto nel seggiolino auto per
bambini.
• Accertarsi sempre che tutte le cinghie che tengono ssato il seggiolino auto
per bambini al veicolo siano strette e che tutte le cinture che trattengono il
bambino siano state adattate al corpo del bambino. Assicurarsi inoltre che
le cinture non siano attorcigliate.
• Il bagaglio o altri oggetti che possano causare lesioni in caso di collisione
devono essere ssati correttamente.
• Gli oggetti rigidi e le parti in plastica di un sistema di ritenuta per bambini
devono essere collocati e installati in modo che non possano essere bloccati
da un sedile mobile o da uno sportello del veicolo.
• È importante che le cinture di sicurezza incorporate nella parte bassa del
seggiolino ssino saldamente il bacino del bambino. Per evitare cadute, il
bambino deve sempre avere le cinture allacciate.
• È pericoloso apportare modiche o aggiunte al prodotto senza il consenso
dell’autorità competente. La mancata osservanza delle istruzioni di installa
zione del produttore del sistema di ritenuta per bambini può rappresentare
un pericolo per la sicurezza del bambino.
• Questo seggiolino per bambini è stato concepito per bambini con un peso
no a 19 kg. Non sovraccaricare il seggiolino per bambini trasportando su
di esso più di un bambino o carichi aggiuntivi.
• Il dispositivo di ritenuta per bambini non deve essere utilizzato senza la
fodera del seggiolino.
-
-
Page 41
- 41 -
• La fodera del seggiolino non deve essere sostituita con una fodera diversa
da quella raccomandata dal costruttore, in quanto tale fodera è parte integrante delle prestazioni di ritenuta.
IT
PARTI DEL SEGGIOLINO
Vista anteriore
Poggiatesta
Imbottitura
per la testa
Scocca del
seggiolino
Inserto comfort
Cintura di
ritenuta spalle
Spallina
Fibbia
Imbottitura
della bbia
Regolazione
centrale della
cintura
Leva di
posizionamento
Leva di
rotazione
Base di
sostegno
Regolazione
del poggiatesta
Protettore
protezione
antiurto
laterale
Connettore
Isox
Prolunga del
connettore
Isox
Stazione
Isox
Ausili di
inserimento
Isox
Page 42
IT
- 42 -
UTILIZZO DEL SEGGIOLINO AUTO PER BAMBINI
Impostazione dell’angolo di
inclinazione del seggiolino
auto per bambini
• Azionare con una mano la leva di posizione posta nella parte anteriore inferiore della scocca del seggiolino.
• Posizionare l’altra mano sulla scocca
del seggiolino e regolare l’angolazione.
Sono possibili le seguenti posizioni:
(osservare l’etichetta sul seggiolino per
bambini)
Orientato all’indietro,
altezza 40-105 cm,
1 posizione (R)
Orientato in avanti,
altezza 76-105 cm,
almeno 15 mesi di età,
3 posizioni (1–3)
Rotazione del seggiolino auto
per bambini
• Per ruotare il seggiolino auto per bambini una volta montato, azionare la leva
di rotazione davanti sulla stazione di
base e ruotare il seggiolino auto per
bambini nella posizione orientata in
avanti o all’indietro.
• La posizione orientata in avanti è adatta soltanto a bambini con un’età minima di 15 mesi e un’altezza minima di 76
cm. La posizione orientata all’indietro è
concepita per bambini con un’altezza
compresa tra 40 e 105 cm e un peso
massimo di 19 kg.
• La posizione laterale è riservata esclusivamente all'accesso agevolato del
bambino. Questa posizione non deve
essere utilizzata durante il viaggio.
123R
Page 43
- 43 -
Regolazione della cintura
• Per slacciare la cintura, premere
con una mano il pulsante per la
regolazione della cintura nell’area
del seggiolino. Tenere la bbia con
l’altra mano e allentare con cautela
le cinture allacciate.
• Tirare la linguetta di regolazione
anteriore per stringere le cinture.
Accertarsi che le cinghie non siano
attorcigliate.
Apertura/chiusura della
cintura
• Per sbloccare la cintura, premere il
pulsante della bbia, estrarre le due
linguette della bbia e separarle.
• Per bloccare la cintura, collegare
prima le due linguette e inserirle
insieme nella bbia.
IT
Page 44
IT
- 44 -
Regolazione del poggiatesta
• Allentare la cintura e tirare la leva per
la regolazione del poggiatesta posta sul
retro del seggiolino auto per bambini.
Muovere il poggiatesta no ad innestarlo
all’altezza desiderata.
• Assicurarsi che le cinture di ritenuta
spalle fuoriescano dal seggiolino auto
per bambini appena sopra le spalle del
bambino.
• Rilasciare la leva e assicurarsi che il poggiatesta sia innestato.
RotationControl
• Il pulsante RotationControl è impiegato
come ausilio di controllo e ha lo scopo
di impedire il prematuro uso orientato in
avanti del seggiolino auto per bambini.
• Indicare sul pulsante RotationControl
(sotto il seggiolino auto per bambini) se
l'età del bambino è inferiore o superiore
a 15 mesi.
• Se il bambino ha meno di 15 mesi, è
possibile ruotare il seggiolino auto per
bambini esclusivamente nella posizione
orientata all’indietro e nella posizione laterale. La posizione orientata in avanti è
bloccata e non può essere utilizzata per
i bambini con un’età inferiore ai 15 mesi.
• Se il bambino ha più di 15 mesi e un’altezza superiore a 76 cm, il seggiolino auto
per bambini può essere usato anche nella
posizione orientata in avanti. A tale sco
po, regolare il pulsante RotationControl.
• Si consiglia di utilizzare il seggiolino auto
per bambini nella posizione orientata
all’indietro il più a lungo possibile, ma al
meno no a un’età di 15 mesi e un’altezza
minima di 76 cm.
< 15 M
40–105 cm
> 15 M
76–105 cm
< 15 M
> 15 M
40–105 cm
76–105 cm
-
-
Figura esemplicativa Lato
inferiore del seggiolino per bambini
Page 45
- 45 -
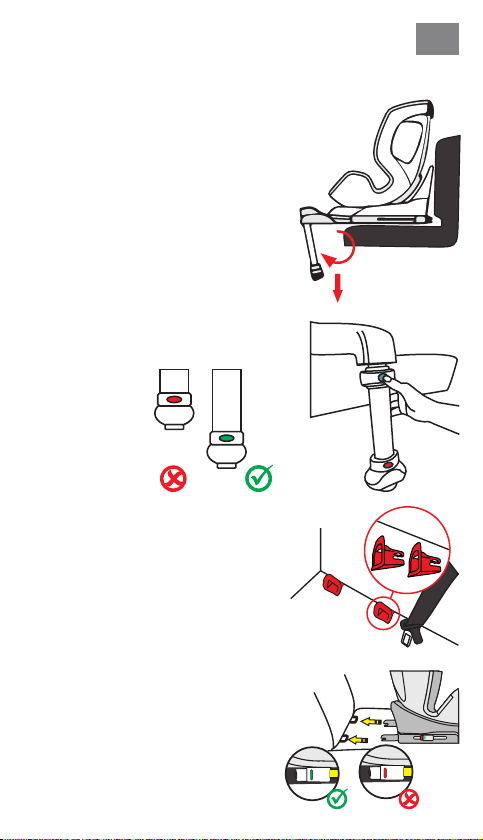
Base di sostegno
• Estrarre la base di sostegno posta sotto il seggiolino auto per bambini. Per i
bambini no a un’altezza di 105 cm,
utilizzare il seggiolino auto per bambini
esclusivamente con la base di sostegno
Isox aperta insieme ai connettori Isox.
L’utilizzo del seggiolino auto per bambi
ni soltanto con i connettori Isox non è
consentito.
• Premere il pulsante per regolare l'altezza
della base di sostegno ed estrarre la base
di sostegno telescopica. Assicurarsi che
sia completamente a contatto con il pa
vimento del veicolo.
• Accertarsi che l’indicatore sulla base di
sostegno sia di colore verde.
Connettori Isox
• Far scorrere gli ausili di inserimento ne-
gli attacchi Isox attraverso la fessura
nell’imbottitura tra lo schienale e il sedile
del posto auto.
• Il lato piatto degli ausili di inserimento
deve essere rivolto verso il basso. Questo
passaggio non è necessario se il veicolo
dispone di ausili di inserimento ssi già
installati.
• Premere entrambi i pulsanti laterali dei
connettori Isox per estendere in lunghezza i connettori Isox.
• Far scorrere i connettori Isox negli ausili di inserimento nché non scattano in
posizione in maniera udibile.
• Far scorrere il seggiolino auto per bam
bini no a farlo aderire saldamente allo
schienale del sedile auto. Assicurarsi che
entrambi gli indicatori Isox diventino di
colore verde.
IT
-
-
-
Page 46
IT
- 46 -
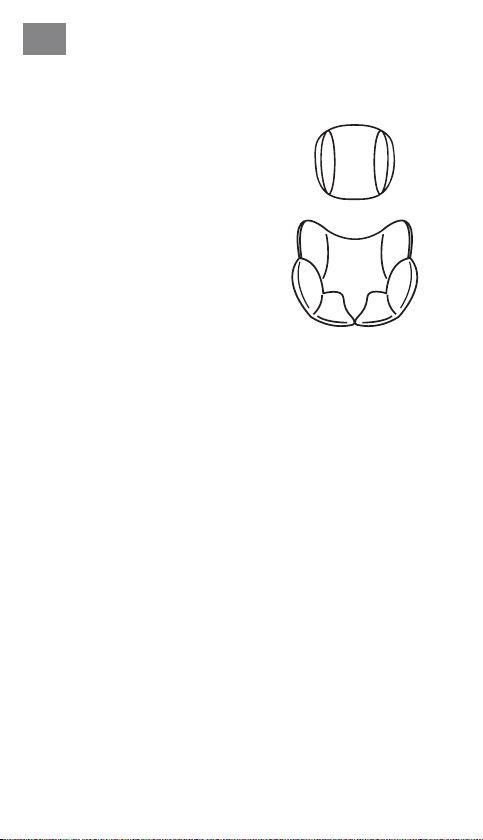
Imbottitura per la testa e inserto
comfort
• L’imbottitura per la testa e l’inserto
comfort sono progettati per bambini
con un’altezza di 40-60 cm.
• Rimuovere entrambi gli inserti non appena il bambino ha superato l’altezza
specicata.
Page 47
- 47 -
IT
INSTALLAZIONE DEL SEGGIOLINO AUTO PER BAMBINI
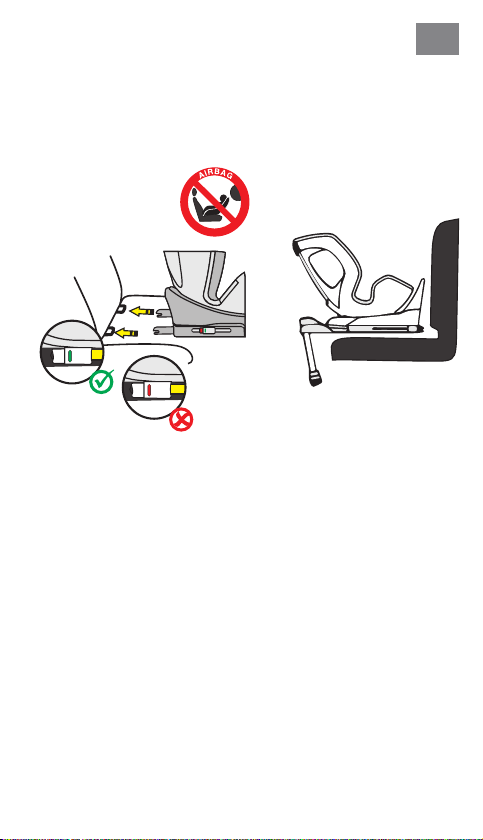
1) Altezza 40-105 cm, max. 19 kg, orientato all’indietro
1 . Regolare l’età del bambino sul pulsante RotationControl.
2 . Posizionare il seggiolino auto per bambini nella posizione reclinata massi-
ma e ruotarlo in modo che si trovi orientato all’indietro e nella posizione di
seduta circolare (R).
3 . Premere entrambi i pulsanti laterali dei connettori Isox per estendere in
lunghezza i connettori Isox.
4 . Estrarre la base di sostegno come descritto precedentemente.
5 . Guidare i connettori Isox verso gli attacchi Isox sul sedile del veicolo
e farli innestare.
6 . Far scorrere il seggiolino auto per bambini no a farlo aderire saldamente
allo schienale del sedile auto. Assicurarsi che entrambi gli indicatori Isox
siano di colore verde.
7 . Regolare l’altezza della base di sostegno e assicurarsi che sia completa-
mente a contatto con il pavimento del veicolo.
8 . Accertarsi che l’indicatore sulla base di sostegno diventi di colore verde.
9 . Per posizionare il bambino in maniera più agevole, ruotare il seggiolino
auto per bambini verso lo sportello dell’auto.
10 . Slacciare la bbia del seggiolino auto per bambini e posizionare le cinture
sul lato esterno del seggiolino.
11 . Collocare il bambino sul seggiolino auto per bambini.
12 . Regolare l’altezza del poggiatesta come descritto in precedenza.
13 . Chiudere nuovamente la bbia della cintura nché non si sente un “clic”.
14 . Tirare la linguetta di regolazione anteriore per stringere le cinture. Accertarsi
che le cinghie non siano attorcigliate.
15 . Ruotare il seggiolino nella posizione orientata all’indietro. Controllare che il
seggiolino auto per bambini sia bloccato in questa posizione.
Page 48
IT
- 48 -
INSTALLAZIONE DEL SEGGIOLINO AUTO PER BAMBINI
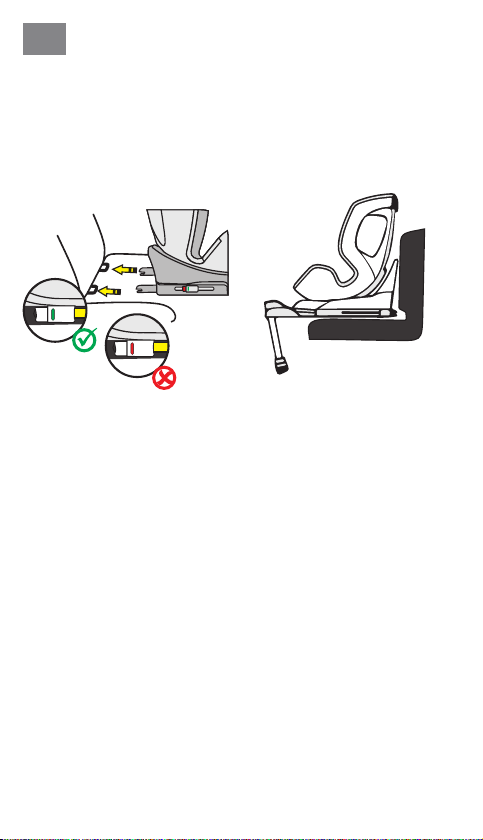
2) Altezza 76-105 cm, minimo 15 mesi, max. 19 k,
orientato
in avanti
IMPORTANTE: NON UTILIZZARE IL SEGGIOLINO AUTO PER BAMBINI NELLA
DIREZIONE DI MARCIA FINO A QUANDO IL BAMBINO NON ABBIA RAGGIUNTO
I 15 MESI DI ETÀ.
1 . Regolare l’età del bambino sul pulsante RotationControl.
2 . Premere entrambi i pulsanti laterali dei connettori Isox per estendere in
lunghezza i connettori Isox.
3 . Estrarre la base di sostegno come descritto precedentemente.
4 . Guidare i connettori Isox verso gli attacchi Isox sul sedile del veicolo
e farli innestare.
5 . Far scorrere il seggiolino auto per bambini no a farlo aderire saldamente
allo schienale del sedile auto. Assicurarsi che entrambi gli indicatori Isox
diventino di colore verde.
6 . Regolare l’altezza della base di sostegno e assicurarsi che sia completa-
mente a contatto con il pavimento del veicolo.
7 . Accertarsi che l’indicatore sulla base di sostegno sia di colore verde.
8 . Se installato nella direzione di marcia, il seggiolino auto per bambini dispone
di tre posizioni di seduta regolabili.
9 . Per posizionare il bambino in maniera più agevole, ruotare il seggiolino
auto per bambini verso lo sportello dell’auto.
10 . Slacciare la bbia del seggiolino auto per bambini e posizionare le cinture
sul lato esterno del seggiolino.
11 . Collocare il bambino sul seggiolino auto per bambini.
12 . Regolare l’altezza del poggiatesta come descritto in precedenza.
13 . Chiudere nuovamente la bbia della cintura nché non si sente un “clic”.
14 . Tirare la linguetta di regolazione anteriore per stringere le cinture. Accertarsi
che le cinghie non siano attorcigliate.
15 . Ruotare il seggiolino nella posizione orientata in avanti. Controllare che il
seggiolino auto per bambini sia bloccato in questa posizione.
Page 49

- 49 -
IT
PULIZIA
Al ne di garantire un utilizzo prolungato del seggiolino auto per bambini,
non utilizzare solventi e detergenti abrasivi o aggressivi durante la pulizia
del seggiolino auto per bambini. Dopo ogni lavaggio controllare la tenuta del
tessuto e delle cuciture. Per il lavaggio del tessuto seguire attentamente le
istruzioni riportate sull’etichetta (vedi sotto).
Lavare a 30 °C,
e
ciclo delicato
NON
o
candeggiare
Asciugatura in tamburo
s
a bassa temperatura
m
U
NON
stirare
NON
lavare a secco
MANUTENZIONE
Controllare regolarmente lo stato del prodotto per individuare eventuali danni.
In caso di danni, non utilizzare più il seggiolino auto per bambini e tenerlo fuori
dalla portata dei bambini.
In caso di domande e problemi, contattare il
servizio clienti Osann al numero +49 (0)7731 970077.
Page 50

NL
Dank u voor het kiezen van ons Turai360 SL kinderautostoeltje. Als u hulp
nodig heeft bij dit product, kunt u contact opnemen met onze klantenservice.
- 50 -
GEBRUIK
• Dit product is geschikt voor kinderen met een lichaamslengte van 40 tot
105 cm en een maximaal lichaamsgewicht van 19 kg.
• Installatie achterwaarts gericht van 40 tot 105 cm lichaamslengte
gebeurt met behulp van de Isox-connectoren en de steunpoot. Het
kind wordt beveiligd met de 5-puntsgordel van het autostoeltje.
• Voorwaarts gerichte installatie bij 76 tot 105 cm lichaamslengte bij
een minimumleeftijd van 15 maanden vindt plaats met behulp van de
Isox-connectoren en de steunpoot. Het kind wordt beveiligd met de
5-puntsgordel van het autostoeltje.
BELANGRIJK
GEBRUIK HET AUTOSTOELTJE NIET IN DE RIJRICHTING ALS HET KIND JONGER
IS DAN 15 MAANDEN.
EXTREEM GEVAAR
Het wordt aanbevolen om het autostoeltje op de achterbank van het voertuig
te plaatsen. Bevestig het achterwaarts gerichte kinderautostoeltje bij lichaam
slengtes van 40 tot 105 cm NIET op een voorstoel waar een airbag aanwezig
is. Tenzij de airbag gedeactiveerd kan worden. Lees dit na in de handleiding
van het voertuig.
WAARSCHUWING
• Dit is een kinderbeveiligingssysteem uit de categorie 'i-Size'. Dit is goedgekeurd volgens ECE-reglement nr. 129 voor gebruik in i-Size-compatibele
voertuigstoelposities, zoals gespeciceerd door de voertuigfabrikant in de
gebruiksaanwijzing van het voertuig.
• Dit kinderautostoeltje is alleen geschikt voor voertuigen die beschikken
over Isox-houders conform ECE R16 of vergelijkbare normen.
Neem bij twijfel contact op met de fabrikant van het autostoeltje of de
dealer.
-
Page 51
- 51 -
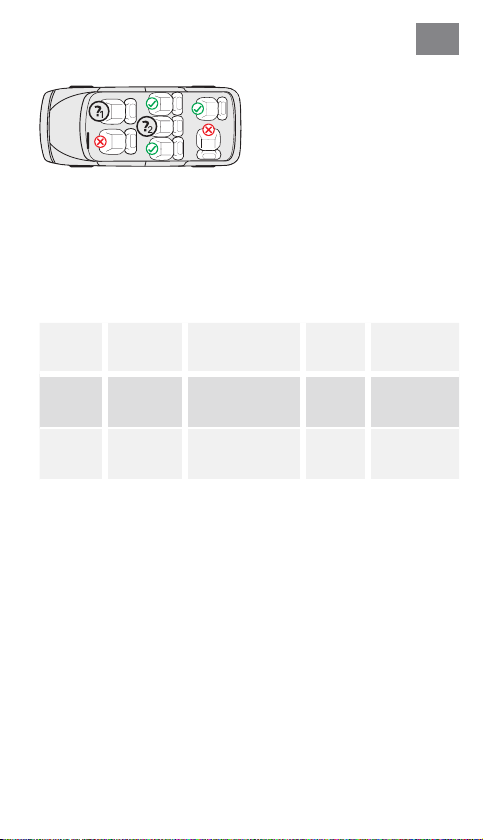
1. Alleen als de airbag kan worden
gedeactiveerd, Isox-connectoren
aanwezig zijn en de autostoel in de
handleiding van de auto als i-Si
ze-compatibel goedgekeurd is.
2. Alleen als Isox-connectoren aan-
wezig zijn en de autostoel in de
handleiding van de auto als i-Si
ze-compatibel is goedgekeurd.
De volgende tabel bevat informatie over de bevestigingsvoorzieningen en
-methodes:
NL
-
-
Grootteklasse
40-105
cm
76–105 cmVoorwaarts
Inbouwrichting
Achterwaarts
gericht
gericht
Installatie Type
Isox-connectoren
& steunpoot
Isox-connectoren
& steunpoot
i-Size
Universal
Isox
i-Size
Universal
Isox
Beveiliging
van het kind
5-puntsgordel van het
autostoeltje
5-puntsgordel van het
autostoeltje
Page 52

NL
- 52 -
WAARSCHUWING
• Lees deze handleiding voor gebruik zorgvuldig door om de veiligheid van
uw kind te waarborgen. Bewaar deze handleiding. Het niet opvolgen van
de instructies in deze handleiding kan leiden tot ernstig letsel bij uw kind.
• Het kinderzitje kan alleen worden gebruikt met het eigen 5-punts gordelsysteem voor kinderen tot een lichaamsgewicht van 19 kg en een lichaamslengte
van maximaal 105 cm.
• Het kinderzitje kan NIET worden gebruikt met het 5-punts gordelsysteem
voor kinderen die meer dan 19 kg wegen en langer zijn dan 105 cm.
• Het autostoeltje kan met de Isox-connectoren en de steunpoot voorwaarts
en achterwaarts gericht worden ingebouwd. Belangrijk: Monteer het auto
stoeltje niet voorwaarts gericht als het kind jonger is dan 15 maanden.
• Voor Isox-montage: Lees de handleiding van de autofabrikant door.
• Gebruik geen andere dragende contactpunten dan de in de handleiding beschreven en in het kinderbeveiligingssysteem aangeduide contactpunten.
• Gebruik dit autostoeltje niet thuis. Het is uitsluitend ontworpen voor gebruik
in de auto.
• Laat uw kind op geen enkel moment zonder toezicht in het stoeltje.
Bevestig het achterwaarts gerichte autostoeltje niet op een voorstoel met
•
geactiveerde airbag. Dit kan ernstig of zelfs dodelijk letsel tot gevolg hebben.
• Het autostoeltje moet worden vervangen als het bij een ongeval blootgesteld
is aan sterke belastingen.
• Om veiligheidsredenen moet het autostoeltje ook in de auto bevestigd zijn
als er geen kind op het autostoeltje zit.
• Zorg er altijd voor dat alle bevestigingspunten waarmee het autostoeltje in de
auto is bevestigd goed vastzitten en dat alle gordels die het kind beveiligen
aan het lichaam van het kind aangepast zijn. Controleer bovendien dat de
gordels niet verdraaid zijn.
• Bagage of andere voorwerpen die bij een botsing letsel kunnen veroorzaken,
moeten correct worden vastgezet.
• Starre voorwerpen en kunststof onderdelen van een kinderbeveiligingssysteem moeten zo zijn geplaatst en geïnstalleerd dat ze niet door een
beweegbare zitting of een portier kunnen worden ingeklemd.
• Het is belangrijk dat de onderste gordels het bekken van het kind goed
vastzetten. Om een risico op een val te voorkomen, moet uw kind altijd
vastzitten in de gordel.
Het is gevaarlijk om zonder toestemming van de verantwoordelijke instantie
•
modicaties of uitbreidingen aan het product aan te brengen. Niet-naleving
van de installatieaanwijzingen van de fabrikant van het kinderbeveiligings
systeem leidt eveneens tot gevaren voor de veiligheid van uw kind.
• Dit kinderzitje is ontworpen voor kinderen met een lichaamsgewicht tot
19 kg. Overbelast het kinderzitje nooit door er meer dan één kind of extra
lading in te vervoeren.
• Het kinderbeveiligingssysteem mag niet zonder de bekleding worden gebruikt.
• De bekleding mag niet worden vervangen door bekleding die niet door de
fabrikant wordt aanbevolen, omdat deze een vast onderdeel van de beveiliging is.
-
-
Page 53
- 53 -
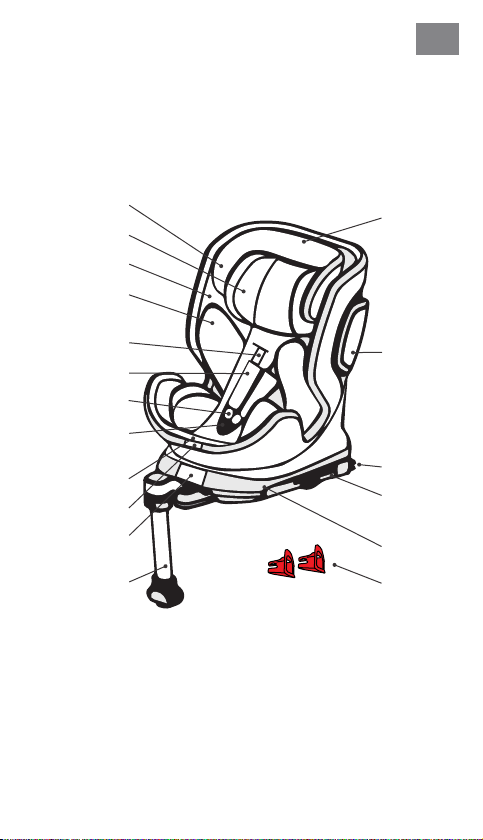
ONDERDELEN AUTOSTOELTJE
Vooraanzicht
NL
Hoofdsteun
Hoofdkussen
Zitschaal
Comfort-
inlegstuk
Schouder-
gordel
Schouderkussen
Gordelsluiting
Kussen
gordelsluiting
Centrale
gordelinstelling
Positiehendel
Draaihendel
Steunpoot
Hoofdsteuninstelling
Zijdelingse
botsingsprotector
Isox-
aansluiting
Isox-
aansluitingsuitbreiding
Isox-station
Isox-in-
voerhulpen
Page 54
NL
- 54 -
GEBRUIK VAN HET AUTOSTOELTJE
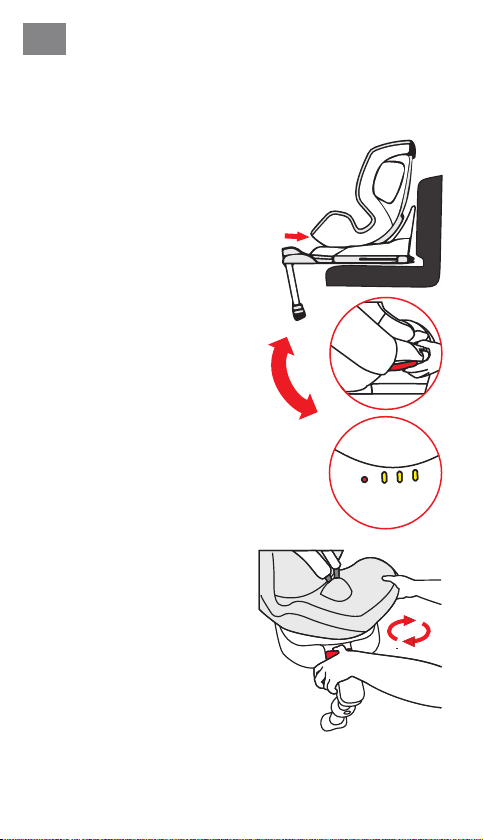
Hellingshoek van het autostoeltje instellen
• Bedien de positiehendel voor aan de
onderzijde van het zitschaal met één
hand.
• Houd met de andere hand de zitschaal
vast en stel de hoek in.
De volgende zitposities zijn mogelijk:
(Neem het label op het autostoeltje in
acht)
Achterwaarts gericht,
Lichaamslengte 40-105 cm,
1 positie (R)
Voorwaarts gericht,
Lichaamslengte 76 - 105 cm,
min. 15 maanden oud,
3 posities (1-3)
Autostoeltje draaien
• Om het geïnstalleerde autostoeltje om
te draaien, bedient u de draaihendel
aan de voorkant van het basisstation
en draait u het stoeltje naar de achter
waartse of voorwaarts gerichte positie.
• De voorwaarts gerichte positie is alleen
geschikt voor kinderen met een mini
mumleeftijd van 15 maanden en een
minimale lengte van 76 cm. De naar
achteren gerichte positie is ontworpen
voor kinderen met een lengte van 40
tot 105 cm en een maximumgewicht
van 19 kg.
• De zijwaartse positie is alleen bedoeld
om de instap van het kind te vergemakkelijken. Deze positie mag niet
worden gebruikt tijdens het rijden.
123R
-
-
Page 55
- 55 -
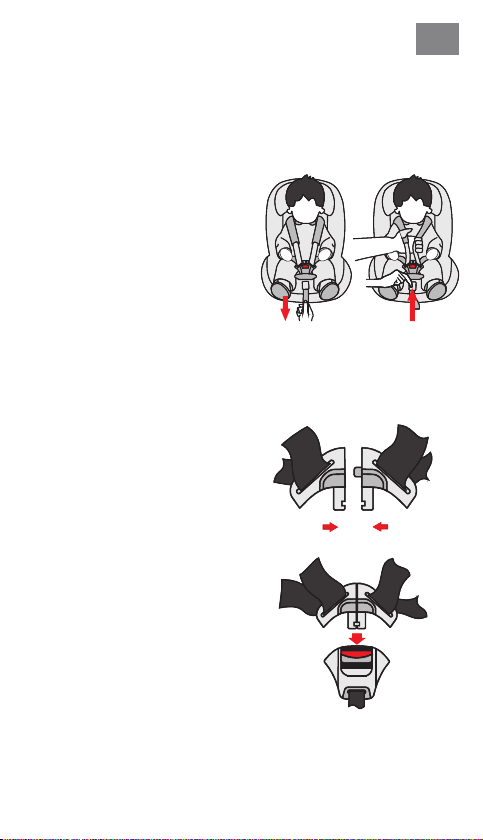
Gordel instellen
• Om de gordel los te maken, drukt u
met één hand op de knop voor de
gordelverstelling in het zitgedeelte.
Houd het gordelslot met de andere
hand vast en maak voorzichtig de
aangebrachte gordels iets losser.
• Trek aan het voorste verstellipje
om de gordels strak te trekken.
Let erop dat de gordels niet zijn
verdraaid.
Gordel openen/sluiten
• Om de gordel te ontgrendelen,
drukt u op de knop van het gordelslot, trekt u de beide gesptongen
eruit en maakt deze van elkaar los.
• Om de gordel te vergrendelen,
verbindt u eerst de beide gesptongen en steekt u deze samen in
het gordelslot.
NL
Page 56
NL
- 56 -
Hoofdsteun instellen
• Maak de gordel los en trek aan de hendel voor het instellen van de hoofdsteun
aan de achterzijde van het autostoeltje.
Beweeg de hoofdsteun tot deze op de
juiste hoogte vastklikt.
• Let erop dat de schoudergordels precies
over de schouders van uw kind uit het
autostoeltje worden geleid.
• Laat de hendel los en controleer of de
hoofdsteun is vastgeklikt.
RotationControl
• De knop RotationControl dient ter controle en is bedoeld om een vroegtijdig
voorwaarts gericht gebruik van het autostoeltje te voorkomen.
• Geef op de RotationControl-knop (onderkant van het autostoeltje) aan of uw
kind jonger of ouder is dan 15 maanden.
• Als de leeftijd minder dan 15 maanden
is, kunt u het autostoeltje uitsluitend in
de achterwaarts gerichte of zijdelingse
positie draaien. De voorwaarts gerichte
positie is vergrendeld en kan niet worden gebruikt voor kinderen van minder
dan 15 maanden.
• Als de leeftijd boven 15 maanden ligt en
de lichaamslengte hoger is dan 76 cm,
kan het autostoeltje ook in voorwaarts
gerichte positie worden gebruikt. Zet de
knop RotationControl hiervoor om.
• Wij adviseren om het autostoeltje zo lang
mogelijk, maar minimaal tot een leeftijd
van 15 maanden en een lichaamslengte
van ten minste 76 cm, achterwaarts ge
richt te gebruiken.
-
< 15 M
40–105 cm
Voorbeeldafbeelding
Onderkant kinderzitje
> 15 M
76–105 cm
< 15 M
> 15 M
40–105 cm
76–105 cm
Page 57
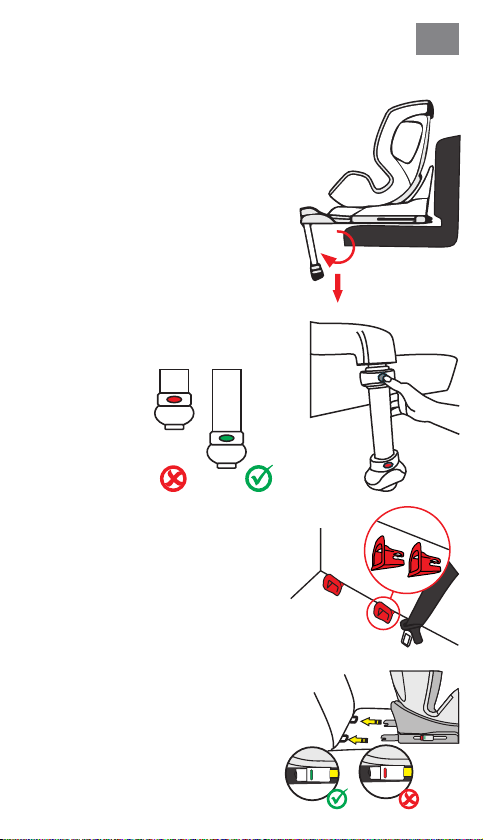
- 57 -
Steunpoot
•
Klap de steunpoot onder het autostoeltje
uit. Voor kinderen tot een lichaamslengte
van 105 cm mag het autostoeltje uitslui
tend worden gebruikt met een uitgeklap-
te Isox-steunpoot in combinatie met
de Isox-connectoren. Gebruik van het
autostoeltje met alleen de Isox-connec
toren is niet toegestaan.
• Druk op de knop om de hoogte van de
steunpoot in te stellen en schuif de telescopische steunpoot uit. Zorg ervoor
dat deze stabiel in de voetruimte van uw
auto staat.
• Controleer of de indicator op de steunpoot groen is.
Isox-connectoren
• Schuif de invoerhulpen door de gleuf
tussen rugleuning en zitting in het kussen
van de autostoel in de Isox-houders.
• De platte zijde van de invoerhulpen
moet daarbij naar beneden zijn gericht.
Deze stap is niet vereist als de auto al
vast geïnstalleerde invoerhulpen heeft.
• Druk de Isox-connectorknoppen aan
beide kanten in om de Isox-connec
toren in de lengte uit te schuiven.
• Steek de Isox-connectoren in de in-
voerhulpen tot ze hoorbaar vastklikken.
• Duw het autostoeltje stevig tegen de
rugleuning van de autostoel. Jet erop dat
beide Isox-indicatoren groen worden.
NL
-
-
-
Page 58
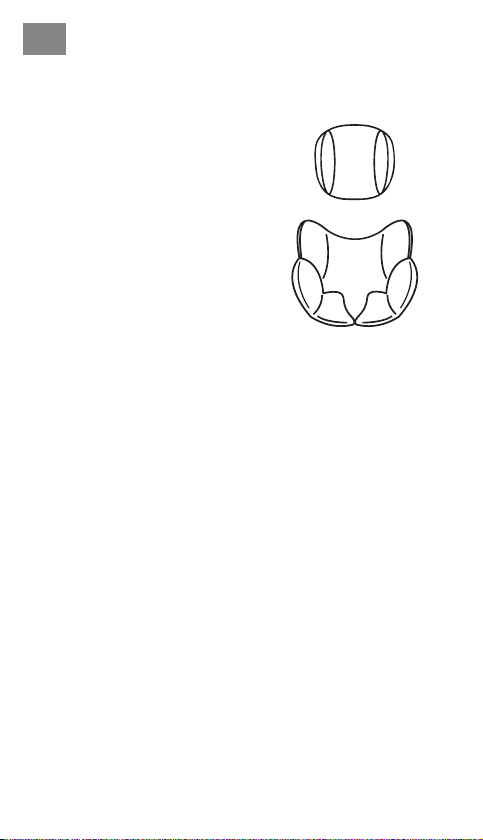
NL
Hoofdkussen en comfortinlegstuk
• Het hoofdkussen en het comfort-inlegstuk zijn ontworpen voor baby's met
een lichaamslengte van 40-60 cm.
• Gelieve beide inlegstukken te verwijderen zodra uw kind de aangegeven
lichaamslengte heeft overschreden.
- 58 -
Page 59
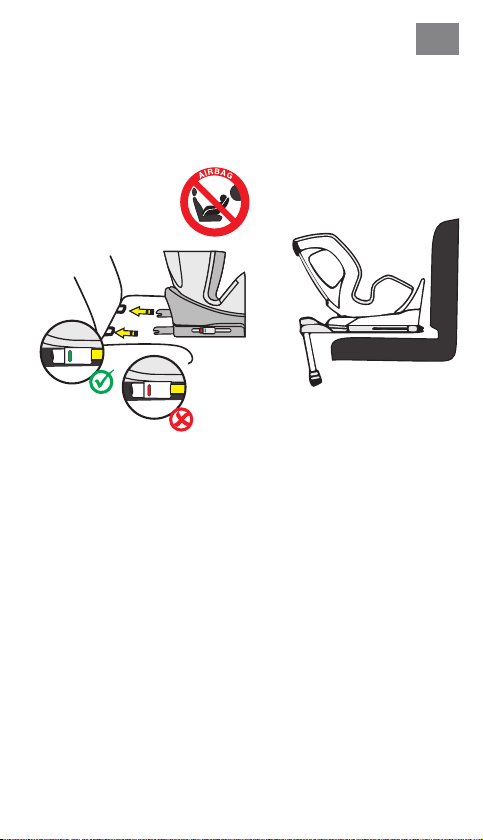
- 59 -
NL
MONTAGE VAN HET AUTOSTOELTJE
1) Lichaamslengteklasse 40-105 cm, max. 19 kg, naar
achteren gericht
1 . Stel bij de knop RotationControl de leeftijd van uw kind in.
2 . Zet het kinderautostoeltje in de maximale ligstand en draai het zo dat het
naar de ronde zitpositie (R) wijst in achterwaarts gerichte stand.
3 . Druk de zijdelingse Isox-connectorknoppen aan beide kanten in om de
Isox-connectoren in de lengte uit te schuiven.
4 . Klap de steunpoot uit op de eerder beschreven wijze.
5 . Schuif de Isox-connectoren naar de Isox-houders op de stoel van de
auto en laat ze vastklikken.
6 . Duw het autostoeltje stevig tegen de rugleuning van de autostoel. Let
erop dat beide Isox-indicatoren groen worden.
7 . Stel de hoogte van de steunpoot in en zorg ervoor dat deze stabiel in de
voetruimte van uw auto staat.
8 . Controleer of de indicator op de steunpoot groen is geworden.
9 . Om uw kind comfortabel in het zitje te plaatsen, draait u het autostoeltje
in de richting van de autodeur.
10 . Maak de gordelgesp van het autostoeltje los en leg de gordels op de
buitenkant van het autostoeltje.
11 . Plaats uw kind in het autostoeltje.
12 . Stel de hoogte van de hoofdsteun in zoals eerder is beschreven.
13 . Sluit de gordelgesp weer tot u een klik hoort.
14 . Trek aan het voorste verstellipje om de gordels strak te trekken. Let erop
dat de gordels niet verdraaid zijn.
15 . Draai het autostoeltje naar de achterwaarts gerichte positie. Controleer
of het autostoeltje in deze positie is vastgeklikt.
Page 60
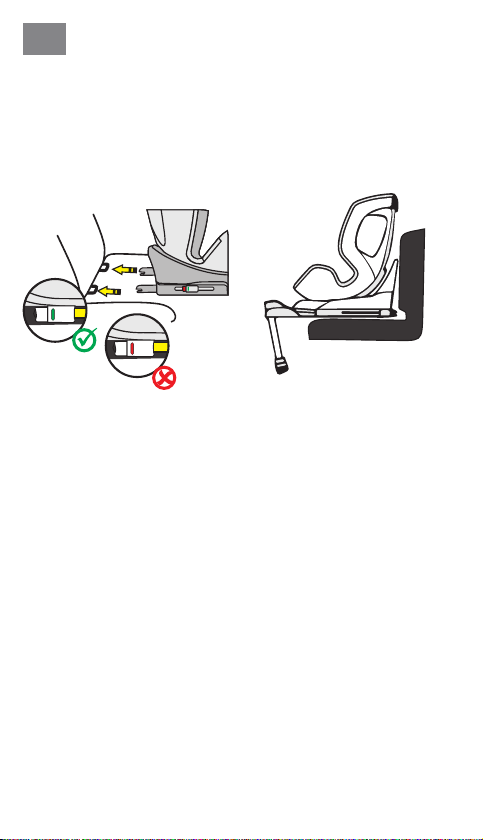
NL
- 60 -
MONTAGE VAN HET AUTOSTOELTJE
2) Lichaamslengteklasse 76-105 cm, min. 15 maanden,
max. 19 kg, voorwaarts gericht
BELANGRIJK: GEBRUIK HET AUTOSTOELTJE NIET IN DE RIJRICHTING,
ZOLANG HET KIND NOG JONGER IS DAN 15 MAANDEN.
1 . Stel bij de knop RotationControl de leeftijd van uw kind in.
2 . Druk de beide zijdelingse Isox-connectorknoppen in om de Isox-con-
nectoren in de lengte uit te schuiven.
3 . Klap de steunpoot uit op de eerder beschreven wijze.
4 . Schuif de Isox-connectoren naar de Isox-houders op de stoel van de
auto en laat ze vastklikken.
5 . Duw het autostoeltje stevig tegen de rugleuning van de stoel. Let erop dat
beide Isox-indicatoren groen worden.
6 . Stel de hoogte van de steunpoot in en zorg ervoor dat deze stabiel in de
voetruimte van uw auto staat.
7 . Controleer of de indicator op de steunpoot groen is.
8 . Het autostoeltje heeft drie instelbare zitposities in de rijrichting.
9 . Om uw kind comfortabel in het zitje te plaatsen, draait u het autostoeltje
in de richting van de autodeur.
10 . Maak de gordelgesp van het autostoeltje los en leg de gordels op de bui-
tenkant van het autostoeltje.
11 . Plaats uw kind in het autostoeltje.
12 . Stel de hoogte van de hoofdsteun in zoals eerder is beschreven.
13 . Sluit de gordelgesp weer tot u een klik hoort.
14 . Trek aan het voorste verstellipje om de gordels strak te trekken. Let erop
dat de gordels niet verdraaid zijn.
15 . Draai het autostoeltje naar de voorwaarts gerichte positie. Controleer of
het autostoeltje in deze positie is vastgeklikt.
Page 61

- 61 -
NL
REINIGING
Om uw autostoeltje lang te kunnen gebruiken, mag u voor de reiniging van het
autostoeltje geen oplosmiddelen, schuurmiddelen of agressieve reinigingsmiddelen gebruiken. Controleer na elke wasbeurt de bestendigheid van de
stof en de naden. Bij het wassen van de stof moeten de aanwijzingen op het
etiket (zie hieronder) zorgvuldig worden opgevolgd.
Wassen op 30 °C,
e
programma voor jne was
NIET
o
bleken
In trommel drogen op
s
lage temperatuur
m
U
NIET
strijken
NIET
chemisch reinigen
ONDERHOUD
Controleer het product regelmatig op mogelijke schade. Bij schade mag het
autostoeltje niet meer worden gebruikt en moet het buiten het bereik van
kinderen worden bewaard.
Neem bij vragen en problemen contact op met de
Osann klantenservice op +49 (0)7731 970077.
Page 62

ES
Gracias por elegir nuestro asiento infantil para automóvil Turai360 SL. Si necesita ayuda con este producto, diríjase a nuestro servicio de atención al cliente.
- 62 -
APLICACIÓN
• Este producto es adecuado para niños con una altura de 40 a 105 cm y un
peso máximo de 19 kg.
• La instalación a contramarcha para niños de 40 a 105 cm se realiza
mediante conectores Isox y el pie de apoyo. Se sujeta al niño con el
cinturón de 5 puntos del asiento infantil abrochado.
• Instalación en el sentido de la marcha para niños de 76 a 105 cm de
altura y edad mínima de 15 meses se realiza mediante conectores Isox
y el pie de apoyo. Se sujeta al niño con el cinturón de 5 puntos del asiento
infantil abrochado.
IMPORTANTE
NO UTILICE EL ASIENTO INFANTIL PARA AUTOMÓVIL EN EL SENTIDO DE LA
MARCHA HASTA QUE EL NIÑO CUMPLA 15 MESES.
PELIGRO EXTREMO
Se recomienda instalar el asiento infantil en el asiento trasero del vehículo.
En el caso de la clase de estatura 40 a 105cm, NO je el asiento infantil a
contramarcha en el asiento delantero donde exista un airbag, a menos que
el airbag se pueda desactivar. Para más información, consulte el manual de
instrucciones del vehículo.
ADVERTENCIA
• Se trata de un sistema de retención infantil de la categoría «i-Size». Está
homologado según el Reglamento ECE n.º 129 para su uso en las posiciones
de asiento del vehículo compatibles con i-Size, tal y como especica el
fabricante del vehículo en su manual de instrucciones.
• Este asiento infantil para automóvil solo es adecuado para vehículos equi-
pados con soportes Isox según la norma ECE R16 o normas comparables.
En caso de duda, póngase en contacto con el fabricante del asiento para
automóvil o con el distribuidor.
Page 63
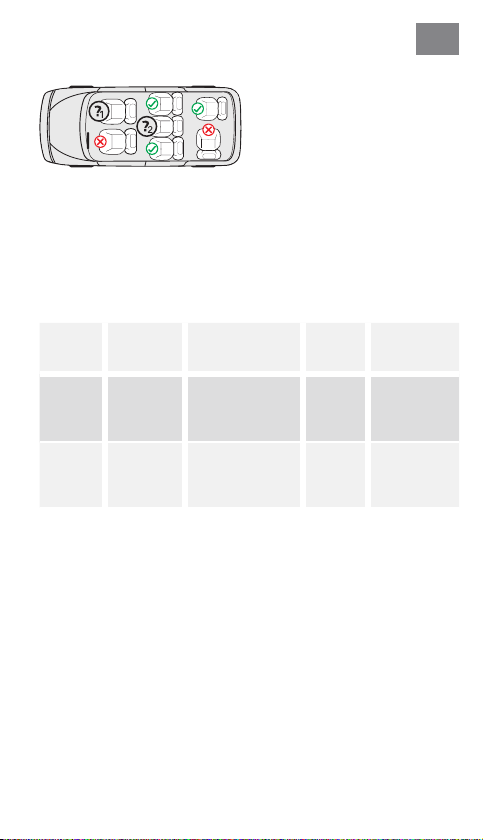
- 63 -
1. Solo si el airbag puede desactivar-
se, si los conectores Isox están
presentes y el asiento es reconoci
do como compatible con i-Sizeen
en el manual del vehículo.
2. Solo si los conectores Isox están
presentes y el asiento es reconoci
do como compatible con i-Size en
el manual del coche.
La siguiente tabla proporciona información sobre los dispositivos y métodos
de jación:
ES
-
-
Clase de
tamaño
40105 cm
76–
105cm
Sentido de
montaje
Hacia
atrás
En el sentido
de la marcha
Instalación Tipo
Conectores Isox y
pie de apoyo
Conectores Isox y
pie de apoyo
i-Size
Universal
Isox
i-Size
Universal
Isox
Protección
del niño
Cinturón de
5 puntos
del asiento
infantil
Cinturón de
5 puntos
del asiento
infantil
Page 64

ES
- 64 -
ADVERTENCIA
• Lea atentamente estas instrucciones antes de utilizarlo para garantizar la
seguridad de su hijo. Conserve estas instrucciones. El incumplimiento de
las instrucciones de este manual puede resultar en lesiones graves para
su hijo.
• El asiento infantil puede utilizarse con el sistema propio de cinturones de
5 puntos solo para niños de menos de 19kg de peso y 105cm de altura.
• El asiento infantil NO puede utilizarse con el sistema de cinturón de 5 pun-
tos para niños con un peso corporal superior a 19 kg y una altura superior
a 105cm.
• El asiento infantil puede instalarse orientado en el sentido de la marcha y a
contramarcha utilizando los conectores Isox y el pie de apoyo. Importante:
No instalar en el sentido de la marcha antes de que el niño cumpla 15 meses.
• Para la instalación Isox: Asegúrese de leer el manual del fabricante del
vehículo.
• No utilice puntos de contacto de carga distintos a los descritos en las
instrucciones y marcados en el sistema de retención infantil.
• No utilice este asiento infantil en casa. Este ha sido diseñado exclusivamente
para usar en un coche.
• Nunca deje a su hijo sin vigilancia en el asiento.
• No coloque el asiento infantil a contramarcha en un asiento delantero con
el airbag activado. Esto puede provocar lesiones graves o la muerte.
• El asiento infantil debe sustituirse si ha sido sometido a cargas pesadas
en caso de un accidente.
• Por razones de seguridad, el asiento infantil debe estar jado al vehículo
aunque no haya ningún niño en el asiento infantil.
• Asegúrese siempre de que todas las correas que sujetan el asiento infantil
al vehículo estén bien apretadas y que todos los cinturones que sujetan
al niño estén adaptados al cuerpo del niño. Asegúrese también de que los
cinturones no estén retorcidos.
• El equipaje u otros artículos que puedan causar lesiones en caso de colisión
deben estar debidamente asegurados.
• Los objetos rígidos y las piezas de plástico de un sistema de retención de
niños se deben colocar e instalar de forma que no puedan quedar atrapados
por un asiento móvil o una puerta del vehículo.
• Es importante que los cinturones bien asentados aseguren rmemente
la pelvis del niño. Para evitar caídas, su hijo debe tener siempre puesto el
cinturón de seguridad.
• Es peligroso realizar cambios o adiciones al producto sin el consentimiento de la autoridad responsable. El incumplimiento de las instrucciones de
instalación del fabricante del sistema de retención infantil también conlleva
riesgos para la seguridad de su hijo.
• Este asiento infantil ha sido diseñado para niños de hasta 19kg de peso.
Nunca sobrecargue el asiento infantil llevando más de un niño o cargas
adicionales en él.
• El sistema de retención infantil no debe utilizarse sin la funda del asiento.
La funda del asiento no debe sustituirse por otra que no sea la recomendada
•
por el fabricante, esta es una parte integral del sistema de retención.
Page 65
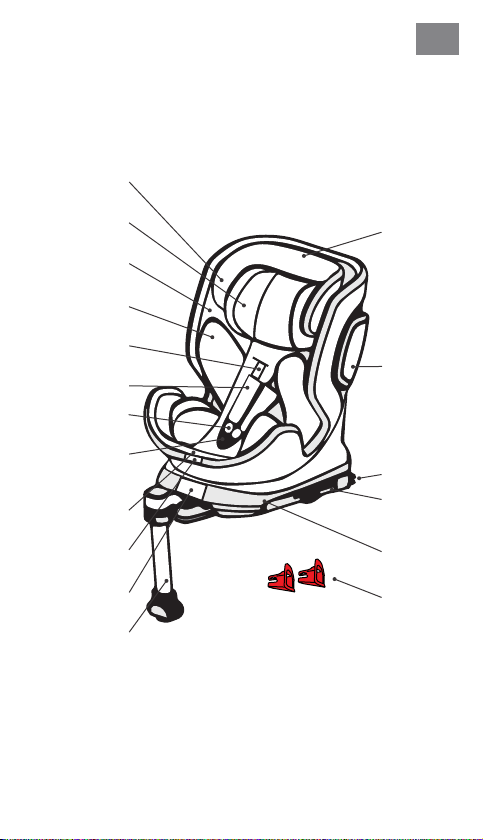
PIEZAS DEL ASIENTO
Vista frontal
Reposacabezas
Acolchado para
la cabeza
Carcasa del
asiento
Inserto de
confort
Correa para el
hombro
Almohadilla
para hombro
Hebilla del
cinturón
Almohadilla
de cierre del
cinturón
Ajuste central
del cinturón
Palanca de
posición
Palanca de
rotación
Pie de apoyo
- 65 -
ES
Ajuste de
reposacabezas
Protección
contra
impactos
laterales
Extensión
del conector
Conector
Extensión
del conector
ISOFIX
Estación
Isox
Ayudas de
inserción
ISOFIX
Page 66
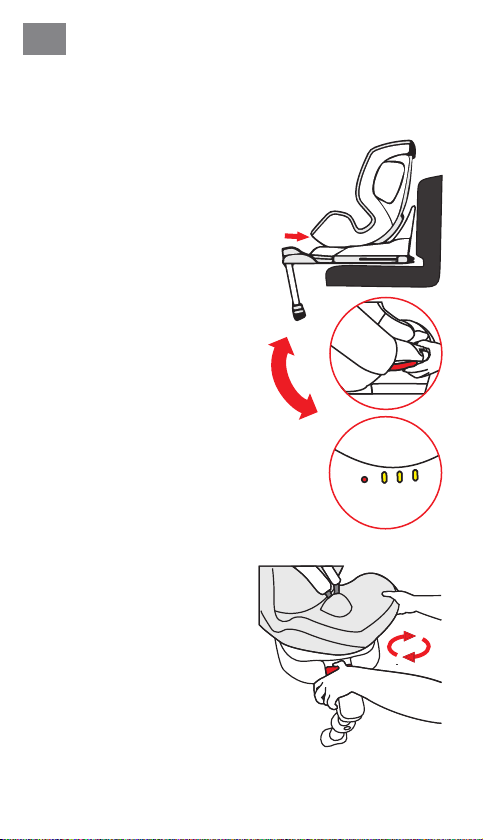
ES
- 66 -
USO DEL ASIENTO INFANTIL PARA AUTOMÓVIL
Ajuste del ángulo de inclina-
ción del asiento infantil para
automóvil
• Utilice una mano para accionar la
palanca de posición en la parte delantera inferior de la carcasa del asiento.
• Con la otra mano, sostenga la carcasa
del asiento y ajuste el ángulo.
El asiento se puede colocar de las si-
guientes maneras:
(Por favor, tenga en cuenta la etiqueta
del asiento infantil)
A contramarcha,
Estatura 40-105 cm,
1 posición (R)
En el sentido de la marcha,
estatura 76–105cm,
edad mín. 15 meses:
3 posiciones (1-3)
Rotación del asiento infantil
123R
• Para girar el asiento infantil una vez
instalado, accione la palanca de rota
ción situada en la parte delantera de la
estación base y gire el asiento infantil
hasta que esté orientado en el sentido
de la marcha o a contramarcha.
• La posición en el sentido de la marcha
es adecuada solo para niños con una
edad mínima de 15 meses y una altura
mínima de 76cm. La posición a contramarcha está diseñada para niños
de 40 a 105cm de altura y un peso
máximo de 19 kg.
• La posición lateral solo sirve para
facilitar la entrada del niño. Esta posición no debe utilizarse durante la
conducción.
-
Page 67
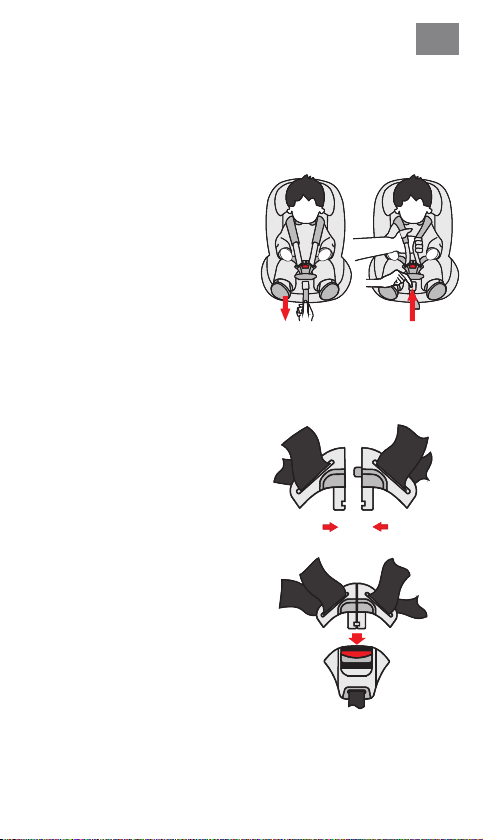
- 67 -
Ajustar el cinturón
• Para soltar el cinturón, presione el
botón de ajuste del cinturón de la
zona del asiento con una mano.
Sujete la hebilla del cinturón con la
otra mano y aoje con cuidado las
correas que lo sujetan.
• Tire de la lengüeta de ajuste frontal
para apretar los cinturones. Ase
gúrese de que las correas no estén
retorcidas.
Abrochar/desabrochar el
cinturón
• Para desabrochar el cinturón, pulse
el botón de la hebilla del mismo,
saque las lengüetas de la hebilla y
sepárelas.
• Para abrochar el cinturón, primero
conecte las dos lengüetas de la
hebilla del cinturón de seguridad e
insértelas en la hebilla.
ES
-
Page 68
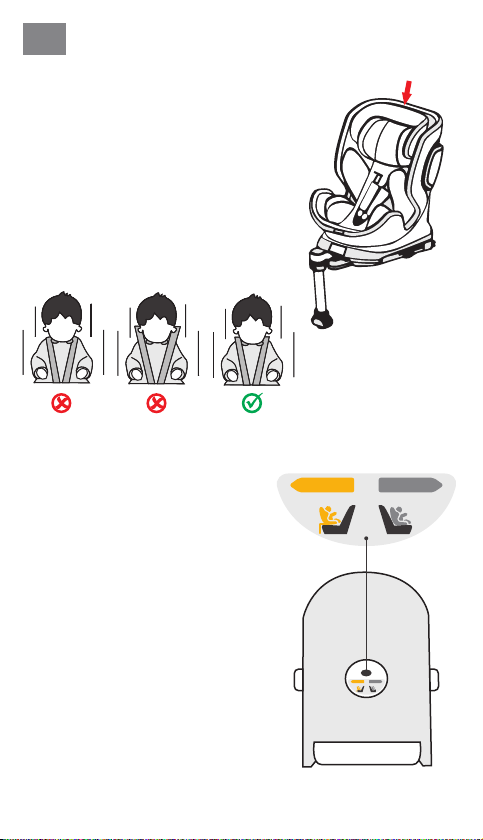
ES
- 68 -
Ajustar el reposacabezas
• Aoje el cinturón y tire de la palanca de
ajuste del reposacabezas situada en el
respaldo del asiento infantil. Mueva el
reposacabezas hasta que encaje a la
altura correcta.
• Asegúrese de que las correas de los
hombros salgan del asiento infantil justo
por encima de los hombros de su hijo.
• Suelte la palanca y asegúrese de que el
reposacabezas esté encajado.
RotationControl
• El botón RotationControl sirve para mejorar el manejo del asiento infantil y está
destinado a evitar orientar el asiento
infantil hacia delante prematuramente.
• Por favor, indique en el botón RotationControl (parte inferior del asiento para
automóvil) si la edad de su hijo es inferior
o superior a 15 meses.
• Si el niño tiene menos de 15 meses, solo
puede girar el asiento infantil en la posición a contramarcha y lateralmente. La
posición en el sentido de la marcha está
bloqueada y no puede ser utilizada por
niños menores de 15 meses.
• Si la edad es superior a los 15 meses y la
estatura es superior a los 76cm, el asien
to infantil también puede utilizarse en la
posición en el sentido de la marcha. Para
ello, ajuste el botón RotationControl.
• Se recomienda utilizar el asiento infantil
mirando hacia atrás durante el mayor
tiempo posible, pero al menos hasta
que el niño cumpla 15 meses y mida al
menos 76cm.
< 15 M
40–105 cm
-
Ejemplo de ilustración Parte
inferior asiento infantil
> 15 M
76–105 cm
< 15 M
> 15 M
40–105 cm
76–105 cm
Page 69
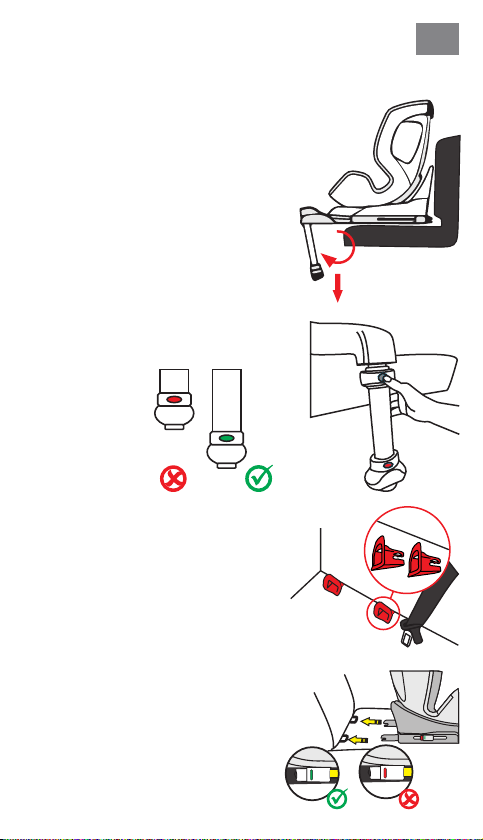
- 69 -
Pie de apoyo
• Despliegue el pie de apoyo debajo del
asiento infantil. Para niños con una esta
tura de hasta 105 cm, el asiento infantil
para el automóvil puede utilizarse solo
con el pie de apoyo Isox extendido junto
con los conectores Isox. No se permite
usar el asiento infantil solo con los conec
tores Isox.
• Pulse el botón para ajustar la altura
del soporte y extender el pie de apo
yo telescópico. Asegúrese de que esté
completamente asentado en el espacio
para los pies de su coche.
• Asegúrese de que el indicador del pie
de apoyo esté en verde.
Conectores Isox
• Deslice los dispositivos de inserción a
través de la ranura entre el respaldo y el
asiento en la tapicería del asiento infantil
en los soportes Isox.
• El lado plano de los dispositivos de inserción debe estar orientado hacia abajo. Este paso no resulta necesario si el
vehículo ya dispone de dispositivos de
inserción jos.
• Pulse los dos botones laterales del co-
nector Isox para ampliar la longitud de
los conectores Isox.
• Deslice los conectores Isox en los dis-
positivos de inserción hasta que encajen
de forma audible.
• Empuje el asiento infantil rmemente
contra el respaldo del asiento de coche.
Asegúrese de que ambos indicadores
Isox cambien a verde.
ES
-
-
-
Page 70
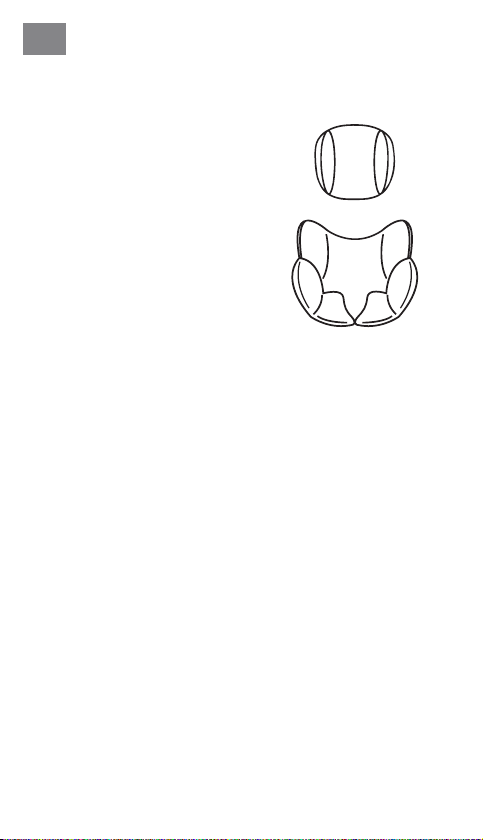
ES
- 70 -
Acolchado para la cabeza e
inserto de confort
• El alcochado para la cabeza y el inserto de confort están diseñados
para bebés con una altura corporal
de 40-60cm.
• Por favor, retire ambas plantillas en
cuanto su hijo haya superado la esta-
tura especicada.
Page 71
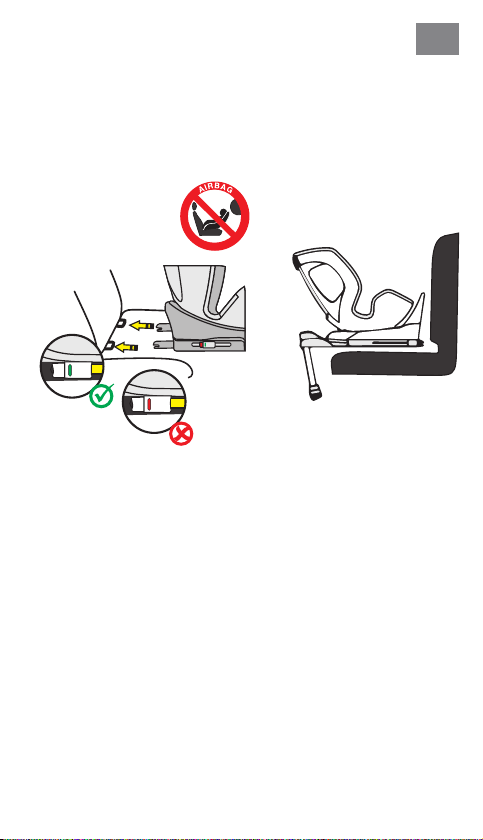
- 71 -
ES
INSTALACIÓN DEL ASIENTO INFANTIL PARA
AUTOMÓVIL
1) Clase de estatura 40-105cm, máx. 19 kg, a contramarcha
1 . Ajuste la edad de su hijo en el botón RotationControl.
2 . Coloque el asiento infantil en la posición de reclinación máxima y gírelo
de modo que apunte a la posición redonda R del asiento a contramarcha.
3 . Pulse los dos botones laterales del conector Isox para ampliar la longitud
de los conectores Isox.
4 . Despliegue el pie de apoyo como se ha descrito anteriormente.
5 . Pase los soportes Isox por los conectores Isox del asiento del coche
y encájelos.
6 . Empuje el asiento infantil rmemente contra el respaldo del asiento de
coche. Asegúrese de que ambos indicadores Isox estén en verde.
7 . Ajuste la altura del pie de apoyo y asegúrese de que esté completamente
asentado en el espacio para los pies de su coche.
8 . Asegúrese de que el indicador del pie de apoyo cambie a verde.
9 . Para sentar cómodamente a su hijo, gire el asiento infantil hacia la puerta
del automóvil.
10 . Suelte la hebilla del asiento infantil y coloque los cinturones en la parte
exterior del asiento.
11 . Coloque al niño en el asiento infantil.
12 . Ajuste la altura del reposacabezas como se ha descrito anteriormente.
13 . Cierre de nuevo la hebilla del cinturón hasta que encaje de forma audible.
14 . Tire de la lengüeta de ajuste frontal para apretar los cinturones. Asegúrese
de que las correas no estén retorcidas.
15 . Gire el asiento a la posición a contramarcha. Compruebe que el asiento
infantil esté bloqueado en esta posición.
Page 72
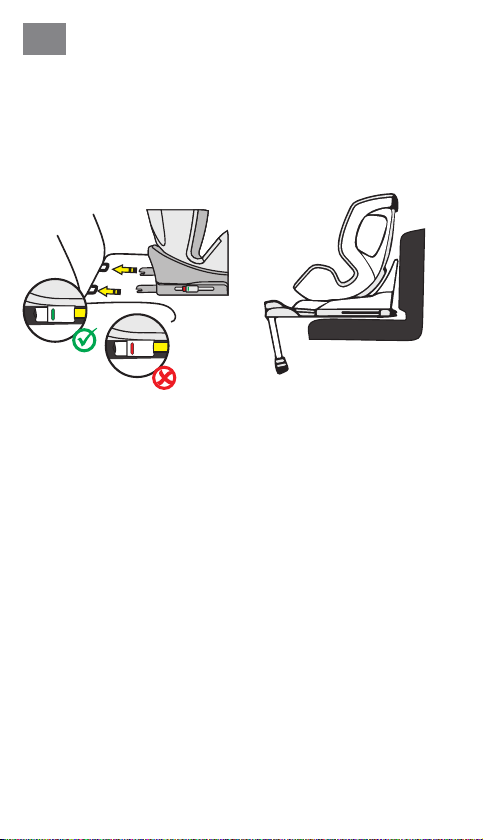
ES
- 72 -
INSTALACIÓN DEL ASIENTO INFANTIL PARA
AUTOMÓVIL
2) Clase de altura 76-105 cm, mín. 15 meses, máx. 19 kg,
mirando hacia delante
IMPORTANTE: NO UTILICE EL ASIENTO INFANTIL EN EL SENTIDO DE LA
MARCHA, SI EL NIÑO AÚN NO HA CUMPLIDO 15 MESES.
1 . Ajuste la edad de su hijo en el botón RotationControl.
2 . Pulse los dos botones laterales del conector Isox para ampliar la longitud
de los conectores Isox.
3 . Despliegue el pie de apoyo como se ha descrito anteriormente.
4 . Pase los soportes Isox por los conectores Isox del asiento del coche
y encájelos.
5 . Empuje el asiento infantil rmemente contra el respaldo del asiento de
coche. Asegúrese de que ambos indicadores Isox cambien a verde.
6 . Ajuste la altura del pie de apoyo y asegúrese de que esté completamente
asentado en el espacio para los pies de su coche.
7 . Asegúrese de que el indicador del pie de apoyo esté en verde.
8 . El asiento infantil tiene tres posiciones de asiento ajustables en el sentido
de la marcha.
9 . Para sentar cómodamente a su hijo, gire el asiento infantil hacia la puerta
del automóvil.
10 . Suelte la hebilla del asiento infantil y coloque los cinturones en la parte
exterior del asiento.
11 . Coloque al niño en el asiento infantil.
12 . Ajuste la altura del reposacabezas como se ha descrito anteriormente.
13 . Cierre de nuevo la hebilla del cinturón hasta que encaje de forma audible.
14 . Tire de la lengüeta de ajuste frontal para apretar los cinturones. Asegúrese
de que las correas no estén retorcidas.
15 . Gire el asiento a la posición en el sentido de la marcha. Compruebe que
el asiento infantil esté bloqueado en esta posición.
Page 73

- 73 -
ES
LIMPIEZA
Para garantizar una larga vida útil de su asiento infantil, no utilice disolventes
ni productos de limpieza abrasivos o agresivos para limpiarlo. Compruebe
la resistencia del tejido y de las costuras después de cada lavado. Cuando
lave la tela, siga cuidadosamente las instrucciones de la etiqueta (véase a
continuación).
Lavar a 30°C, lavado
e
delicado
NO
o
utilizar lejía
Secado en tambor a
s
baja temperatura
m
U
NO
planchar
NO
limpiar en seco
MANTENIMIENTO
Compruebe regularmente el estado del producto para comprobar si está
dañado. En caso de daños, el asiento infantil no debe seguir utilizándose y
debe guardarse fuera del alcance de los niños.
Si tiene alguna duda o problema, póngase en contacto con el
Servicio de atención al cliente de Osann: +49 (0)7731 970077.
Page 74

CZ
Děkujeme, že jste se rozhodli pro naši dětskou autosedačku Turai360 SL. Potřebujete-li pomoc ohledně tohoto výrobku, obraťte se prosím na náš zákaznický
servis.
- 74 -
POUŽITÍ
• Tento výrobek je vhodný pro děti s tělesnou výškou 40 až 105 cm a max.
19 kg tělesné hmotnosti.
• Instalace proti směru jízdy od tělesné výšky 40 do 105 cm se provádí
pomocí konektorů Isox a opěrné patky. Dítě se připoutává 5bodovým
pásem dětské autosedačky.
• Instalace s orientací ve směru jízdy pro tělesnou výšku od 76 do 105 cm a
za podmínky věku nejméně 15 měsíců se provádí pomocí konektorů Isox
a opěrné patky. Dítě se připoutává 5bodovým pásem dětské autosedačky.
DŮLEŽITÉ
NEPOUŽÍVEJTE DĚTSKOU AUTOSEDAČKU VE SMĚRU JÍZDY, DOKUD VĚK DÍTĚTE
NEPŘESÁHNE 15 MĚSÍCŮ.
EXTRÉMNÍ NEBEZPEČÍ
Doporučuje se instalovat dětskou autosedačku na zadním sedadle vozidla. NEUPEVŇUJTE dětskou autosedačku pro použití zády ke směru jízdy ve velikostní
třídě 40 až 105 cm na přední sedadlo, kde je airbag. Výjimku tvoří situace, kdy
lze airbag deaktivovat. Přečtěte si prosím v této souvislosti návod k obsluze
vozidla.
VAROVÁNÍ
• Jedná se o dětský zádržný systém v kategorii „i-Size“. Je schválen v souladu
s předpisem EHK (ECE) č. 129 pro použití v polohách sedadla kompatibil
ních s i-Size a v souladu s údaji výrobce vozidla uvedenými v provozním
návodu vozidla.
• Tato dětská autosedačka je vhodná pouze pro vozidla vybavená držáky
Isox podle normy ECE R16 nebo jiných ekvivalentních norem.
V případě pochybností kontaktujte prosím výrobce autosedačky nebo
prodejce.
-
Page 75
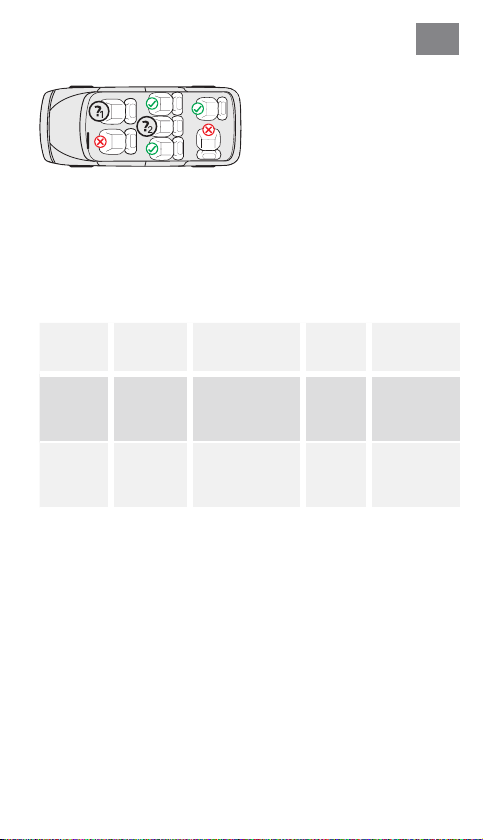
- 75 -
1. Pouze pokud lze airbag deaktivovat,
jsou k dispozici konektory Isox a
sedadlo je v příručce k automobilu
uvedeno jako kompatibilní s řadou
i-Size.
2. Pouze pokud jsou k dispozici ko-
nektory Isox a sedadlo je v příručce k automobilu uvedeno jako
kompatibilní s řadou i-Size.
Níže uvedená tabulka poskytuje informace o připojovacích zařízeních a
metodách:
CZ
Velikostní
třída
40-105 cmZpět
76–105 cmČelně
Směr
montáže
orientované
orientované
Instalace Typ Jištění dítěte
Konektory Isox a
opěrná patka
Konektory Isox a
opěrná patka
i-Size
univerzální
Isox
i-Size
univerzální
Isox
5bodový pás
dětské autosedačky
5bodový pás
dětské autosedačky
Page 76

CZ
- 76 -
VAROVÁNÍ
• Pro zajištění bezpečnosti svého dítěte si před použitím pečlivě přečtěte
tento návod. Návod si uschovejte. Nedodržení pokynů v této příručce může
vést k vážnému zranění vašeho dítěte.
Dětská sedačka se může používat s vlastním 5bodovým pásovým systémem
•
jen pro děti s hmotností méně než 19 kg a tělesnou výškou do 105 cm.
• Dětská sedačka se NEMŮŽE používat s 5bodovým pásovým systémem pro
děti s hmotností více než 19 kg a tělesnou výškou přes 105 cm.
• Dětská sedačka může být namontována s konektory Isox a opěrnou patkou
proti směru jízdy i ve směru jízdy. Důležité: Nemontujte ve směru jízdy, pokud
věk dítěte ještě nepřesáhl 15 měsíců.
• Pro montáž Isox: Nezapomeňte si přečíst příručku výrobce automobilu.
• Nepoužívejte žádné jiné nosné dotykové body než ty, které jsou popsány v
návodu a jsou vyznačeny v dětském zádržném systému.
• Nepoužívejte tuto dětskou autosedačku doma. Byla totiž navržena výhradně
k použití v autě.
• Nikdy nenechávejte své dítě v sedačce bez dozoru.
• Neumísťujte dětskou autosedačku proti směru jízdy na přední sedadlo
s aktivovaným airbagem. Může to mít za následek těžká poranění nebo
usmrcení.
• Dětskou sedačku musíte vyměnit, pokud byla při nehodě vystavena silnému
namáhání.
• Z bezpečnostních důvodů musí být dětská autosedačka ve vozidle připev-
něna také tehdy, když v dětské autosedačce nesedí žádné dítě.
• Vždy se ujistěte, že všechny pásy, které drží dětskou autosedačku ve vozidle,
jsou upevněny, a že všechny pásy, jež zadržují dítě, jsou přizpůsobeny tělu
dítěte. Kromě toho se ujistěte, že pásy nejsou překrouceny.
• Zavazadla nebo jiné předměty, které by mohly způsobit zranění v případě
nárazu, musí být řádně zajištěny.
• Pevné předměty a plastové části dětského zádržného systému musí být
umístěny a instalovány tak, aby nemohly být zachyceny pohyblivým sedadlem nebo dveřmi vozidla.
• Je důležité, aby hluboko umístěné pásy pevně xovaly pánev dítěte. Aby se
předešlo riziku pádu, mělo by být vaše dítě vždy připoutáno.
• Je nebezpečné provádět změny nebo dodatečné úpravy na výrobku bez
souhlasu příslušného úřadu. Nedodržení pokynů pro instalaci od výrobce
dětského zádržného systému je rovněž nebezpečné pro bezpečnost vašeho
dítěte.
• Tato dětská sedačka byla navržena pro děti s hmotností do 19 kg. Nikdy
nepřetěžujte dětskou sedačku přepravou více než jednoho dítěte nebo
dalších nákladů.
• Dětské zádržné zařízení se nesmí používat bez potahu sedačky.
• Potah sedačky nesmí být nahrazen jiným než tím, který doporučuje výrobce,
protože tento potah sedačky je nedílnou součástí zádržného systému.
Page 77
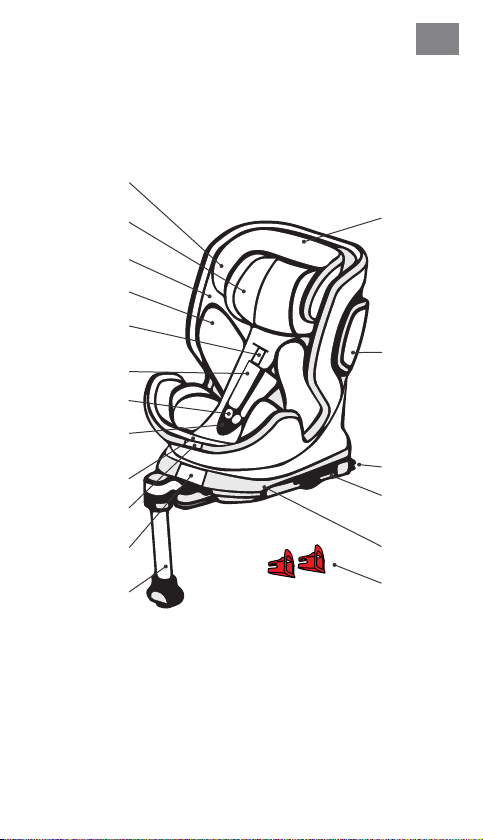
ČÁSTI SEDAČKY
Čelní pohled
Opěrka hlavy
Hlavový
polštářek
Skořepina
sedačky
Komfortní vložka
Ramenní
popruh
Ramenní
polštářek
Zámek pásu
Polštářek
zámku pásu
Centrální
nastavení pásů
Polohovací
páka
Rotační páka
Opěrná patka
- 77 -
CZ
Nastavení
opěrky hlavy
Protektor
ochrany
proti
bočnímu
nárazu
Konektor
Isox
Rozšíření
konektorů
Isox
Stanice Isox
Zasunovací
pomůcky
Isox
Page 78
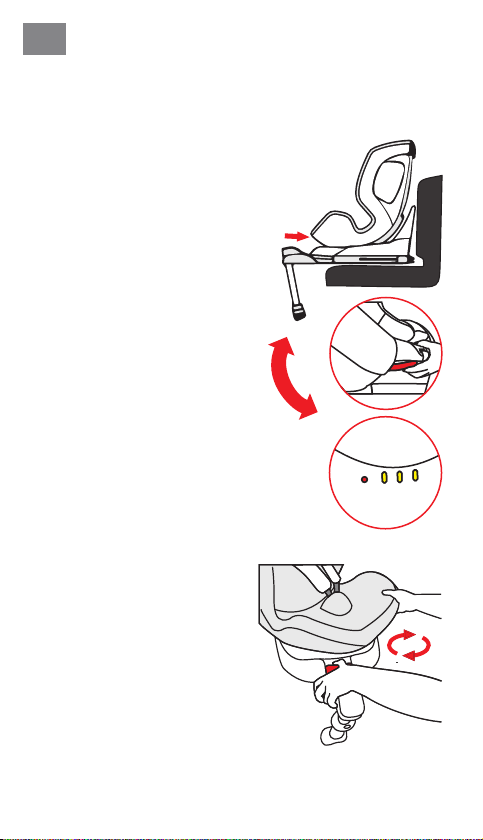
CZ
- 78 -
POUŽITÍ DĚTSKÉ AUTOSEDAČKY
Nastavení úhlu sklonu dětské
autosedačky
• Jednou rukou aktivujte polohovací
páku na spodní přední straně skořepiny sedačky.
• Druhou rukou držte skořepinu sedačky
a upravte úhel.
Možné jsou následující polohy sedačky:
(podívejte se prosím na štítek na dětské
sedačce)
Orientace proti směru jízdy,
tělesná výška 40-105 cm,
1 poloha (R)
Orientace ve směru jízdy,
tělesná výška 76–105 cm,
min. věk 15 měsíců,
3 polohy (1-3)
Otáčení dětské autosedačky
123R
• Když chcete dětskou autosedačkou
otáčet v namontovaném stavu, akti
vujte rotační páku směrem dopředu na
základně a otočte dětskou autosedač
ku do polohy proti směru jízdy, resp. po
směru jízdy.
• Poloha s orientací ve směru jízdy je
vhodná jenom pro děti ve věku nej
méně 15 měsíců a s minimální tělesnou
výškou 76 cm. Poloha proti směru jízdy
je určena pro děti od 40 do 105 cm
tělesné výšky a maximální hmotnosti
19 kg.
• Boční poloha má pouze usnadnit na-
stupování dítěte. Tato poloha se nesmí
používat za jízdy
.
-
-
-
Page 79
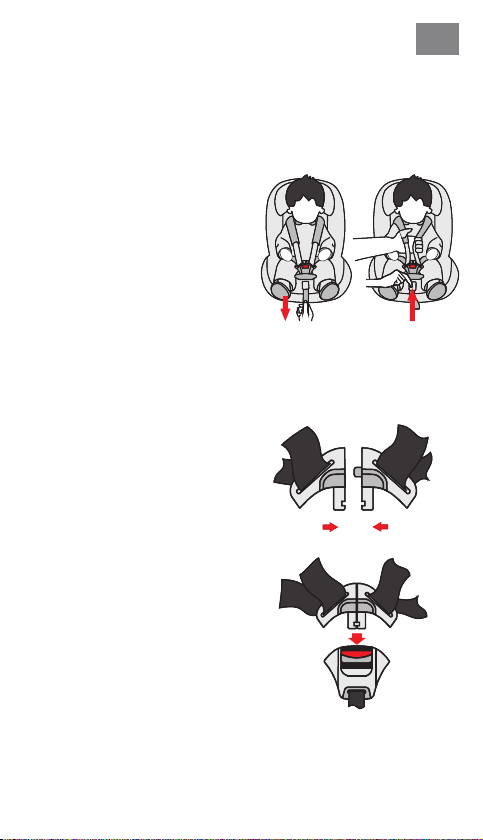
- 79 -
Nastavení pásu
• Chcete-li pás uvolnit, jednou rukou
stiskněte tlačítko seřízení pásu v
oblasti sedadla. Zámek pásu dru
hou rukou držte a opatrně uvolněte
upevněné pásy.
• Zatáhněte za přední seřizovací spo-
nu, abyste napnuli pásy. Dbejte na
to, aby popruhy nebyly překrou
cené.
Otevření/uzavření pásu
• Chcete-li pás otevřít, stiskněte
knoík zámku pásu, odtáhněte jazýčky přezky od sebe a rozpojte je.
• Chcete-li pás uzavřít, nejprve spojte oba jazýčky přezky a poté je
spolu vsuňte do zámku pásu.
CZ
-
-
Page 80
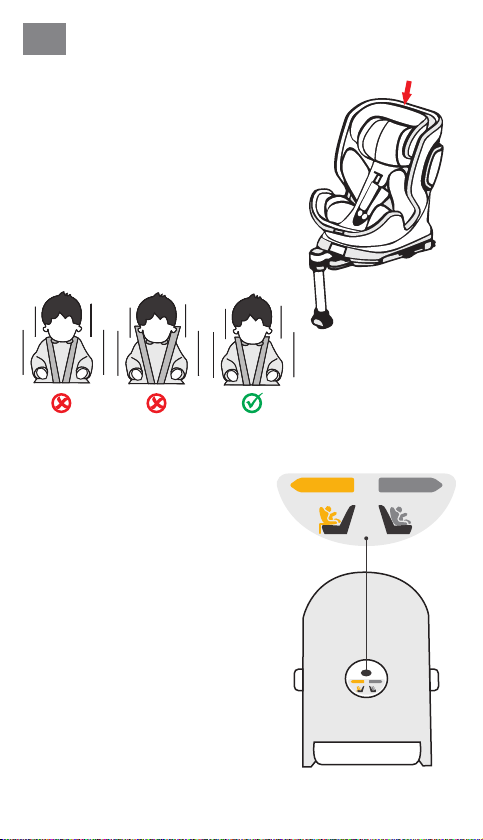
CZ
- 80 -
Nastavení opěrky hlavy
•
Povolte pás a zatáhněte páčku pro nastavení opěrky hlavy na zadní straně
dětské autosedačky. Posouvejte opěrku
hlavy a ve správné výšce ji zacvakněte.
• Dbejte na to, aby byly ramenní pásy ve-
deny z dětské autosedačky těsně nad
rameny dítěte.
• Uvolněte páčku a ujistěte se, že opěrka
hlavy zacvakla.
RotationControl
• Knoík RotationControl slouží jako kontrolní pomůcka, jejímž úkolem je zabránit
příliš brzkému používání dětské autosedačky s orientací ve směru jízdy.
• Na knoíku RotationControl (spodní strana dětské autosedačky) prosím uveďte,
zda věk vašeho dítěte činí méně nebo
více než 15 měsíců.
• Je-li věk dítěte nižší než 15 měsíců, může
te dětskou autosedačku otočit výhradně
do polohy proti směru jízdy nebo do
boční polohy. Poloha s orientací ve směru
jízdy je zablokovaná, neboť se nesmí po
užívat pro děti mladší 15 měsíců.
• Činí-li věk dítěte více než 15 měsíců a jeho
výška více než 76 cm, může být dětská
autosedačka používána také ve směru jíz
dy. K tomu prosím knoík RotationControl
přestavte.
• Doporučujeme používat dětskou autosedačku pokud možno nejdéle, alespoň
však do věku 15 měsíců a výšky nejméně
76 cm, proti směru jízdy.
< 15 M
40–105 cm
-
-
-
Ilustrační obrázek spodní
strany dětské sedačky
> 15 M
76–105 cm
< 15 M
> 15 M
40–105 cm
76–105 cm
Page 81
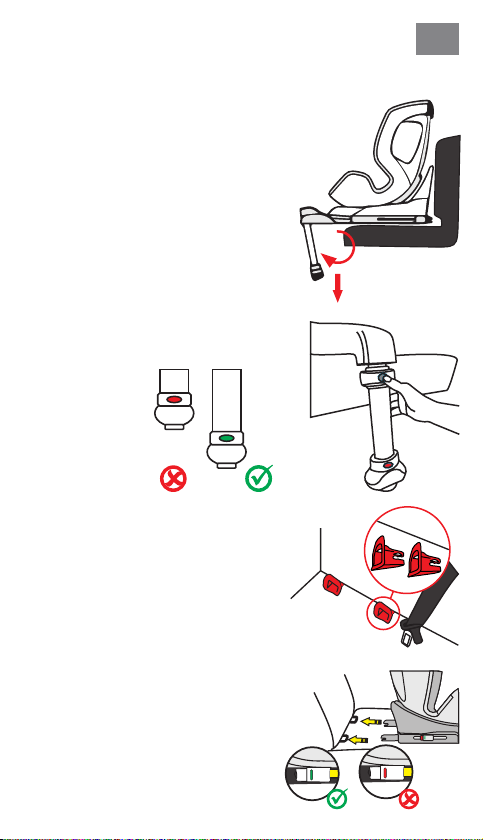
- 81 -
Opěrná patka
• Vyklopte opěrnou patku pod dětskou
autosedačku. Pro děti s výškou do 105
cm se smí dětská autosedačka používat
výhradně s vyklopenou opěrnou patkou
Isox společně s konektory Isox. Použití
dětské autosedačky pouze s konektory
Isox není povoleno.
• Stiskněte tlačítko k přestavení výšky
opěrné patky a vysuňte teleskopickou
opěrnou patku. Dbejte na to, aby zcela
dosedala na podlahu v prostoru pro nohy
ve vašem autě.
• Ujistěte se, že indikátor na opěrné patce
je zelený.
Konektory Isox
• Zasuňte zaváděcí pomůcky skrz otvor
mezi opěradlem a sedadlem v čalounění
sedadla do držáků Isox.
• Plochá strana zaváděcích pomůcek přitom musí směřovat dolů. Tento krok není
nutný, pokud vozidlo disponuje trvale
nainstalovanými zaváděcími pomůckami.
• Stisknutím obou bočních tlačítek konektoru Isox prodloužíte délku konektorů
Isox.
• Zasuňte konektory Isox do zaváděcích
pomůcek, měli byste přitom slyšet, jak
zacvakly.
• Pevně natlačte dětskou autosedačku na
opěrku zad sedadla. Ujistěte se, že oba
indikátory Isox jsou teď zelené.
CZ
Page 82
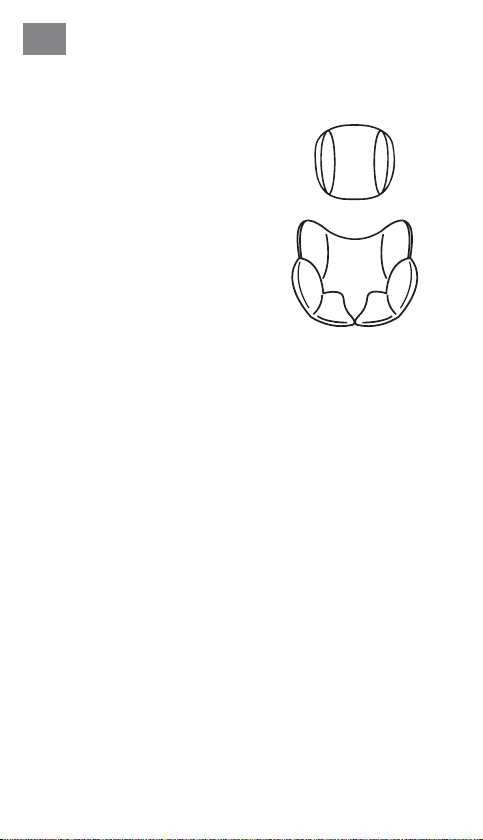
CZ
- 82 -
Hlavový polštářek a komfortní
vložka
• Hlavový polštářek a komfortní vložka
jsou určeny pro děti vysoké 40 až 60
cm.
• Vyjměte prosím obě vložky, jakmile
vaše dítě překročí stanovenou výšku.
Page 83
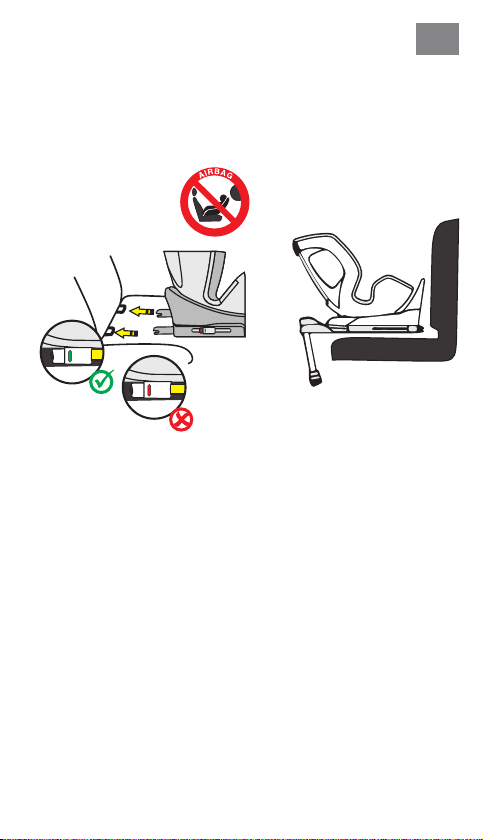
- 83 -
CZ
MONTÁŽ DĚTSKÉ AUTOSEDAČKY
1) Velikostní třída 40–105 cm, max. 19 kg, proti směru jízdy
1 . Na knoíku RotationControl nastavte věk dítěte.
2 . Nastavte dětskou autosedačku do maximální polohy pro ležení a otočte
ji tak, aby směřovala proti směru jízdy do kruhové polohy sedačky (R).
3 . Stisknutím obou bočních tlačítek konektoru Isox prodloužíte délku ko-
nektorů Isox.
4 . Vyklopte opěrnou patku dle popisu uvedeného výše.
5 . Protáhněte konektory Isox k držákům Isox na sedadle auta a zacvakněte
je.
6 . Pevně natlačte dětskou autosedačku na opěrku zad sedadla. Ujistěte se,
že jsou oba indikátory Isox zelené.
7 . Nastavte výšku opěrné patky a dbejte na to, aby zcela dosedala na podlahu
v prostoru pro nohy ve vašem autě.
8 . Ujistěte se, že indikátor na opěrné patce je teď zelený.
9 . Pro pohodlné usazení dítěte otočte dětskou autosedačku ke dveřím auta.
10 . Uvolněte přezku pásu dětské autosedačky a položte pásy na vnější stranu
sedačky.
11 . Posaďte své dítě do dětské autosedačky.
12 . Nastavte výšku opěrky hlavy tak, jak to bylo popsáno v předchozí části.
13 . Znovu uzavřete přezku pásu, měli byste přitom uslyšet zacvaknutí.
14 . Zatáhněte za přední seřizovací sponu, abyste napnuli pásy. Dbejte na to,
aby popruhy nebyly překroucené.
15 . Otočte sedačku do polohy proti směru jízdy. Zkontrolujte, zda je dětská
autosedačka zajištěna v této poloze.
Page 84
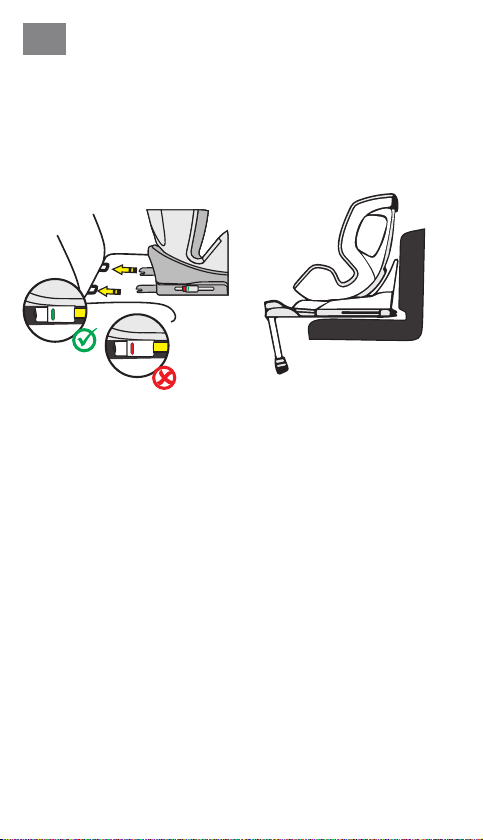
CZ
- 84 -
MONTÁŽ DĚTSKÉ AUTOSEDAČKY
2) Velikostní třída 76–105 cm, min. 15 měsíců, max. 19 kg,
orientace ve směru jízdy
DŮLEŽITÉ: NEPOUŽÍVEJTE DĚTSKOU AUTOSEDAČKU VE SMĚRU JÍZDY,
DOKUD VĚK DÍTĚTE NEPŘESÁHNE 15 MĚSÍCŮ.
1 . Na knoí ku RotationControl nastavte věk dítěte.
2 . Stisknutím obou bočních tlačítek konektoru Isox prodloužíte délku ko-
nektorů Isox.
3 . Vyklopte opěrnou patku dle popisu uvedeného výše.
4 . Protáhněte konektory Isox k držákům Isox na sedadle auta a zacvakněte
je.
5 . Pevně natlačte dětskou autosedačku na opěrku zad sedadla. Ujistěte se,
že oba indikátory Isox jsou teď zelené.
6 . Nastavte výšku opěrné patky a dbejte na to, aby zcela dosedala na podlahu
v prostoru pro nohy ve vašem autě.
7 . Ujistěte se, že indikátor na opěrné patce je zelený.
8 . Dětská autosedačka má ve směru jízdy tři nastavitelné polohy sezení.
9 . Pro pohodlné usazení dítěte otočte dětskou autosedačku ke dveřím auta.
10 . Uvolněte přezku pásu dětské autosedačky a položte pásy na vnější stranu
sedačky.
11 . Posaďte své dítě do dětské autosedačky.
12 . Nastavte výšku opěrky hlavy tak, jak to bylo popsáno v předchozí části.
13 . Znovu uzavřete přezku pásu, měli byste přitom uslyšet zacvaknutí.
14 . Zatáhněte za přední seřizovací sponu, abyste napnuli pásy. Dbejte na to,
aby popruhy nebyly překroucené.
15 . Otočte sedačku do polohy ve směru jízdy. Zkontrolujte, zda je dětská
autosedačka zajištěna v této poloze.
Page 85

- 85 -
CZ
ČIŠTĚNÍ
Pro zajištění dlouhé životnosti své dětské autosedačky nepoužívejte k čištění
dětské autosedačky žádná rozpouštědla ani abrazivní nebo agresivní čisticí
prostředky. Po každém praní zkontrolujte stabilnost látky a švů. Při praní látky
postupujte opatrně podle pokynů na štítku (viz níže).
Praní při 30 °C,
e
šetrný prací cyklus
NEBĚLIT
o
Sušení v bubnové su-
s
šičce při nízké teplotě
m
U
NEŽEHLIT
NEČISTIT
chemicky
ÚDRŽBA
Pravidelně kontrolujte stav výrobku z hlediska možného poškození. V případě
poškození nesmíte dětskou autosedačku dále používat, uchovávejte ji mimo
dosah dětí.
V případě otázek a problémů kontaktujte prosím
Zákaznický servis Osann na čísle +49 (0)7731 970077.
Page 86

PL
Dziękujemy za wybranie naszego fotelika samochodowego Turai360 SL.
Jeśli potrzebujesz pomocy związanej z niniejszym produktem, skontaktuj
się z naszym działem obsługi klienta.
- 86 -
ZASTOSOWANIE
• Produkt ten jest przeznaczony dla dzieci o wzroście od 40 do 105 cm i
maksymalnej masie ciała wynoszącej 19 kg.
• Montażtyłem do kierunku jazdy od wzrostu 40 do 105 cm odbywa się za
pomocą łączników Isox i podpórki. Dziecko zapinane jest 5-punktowym
pasem bezpieczeństwa fotelika dziecięcego.
• Montaż przodem do kierunku jazdy od wzrostu 76 do 105 cm i minimalnego wieku 15 miesięcy odbywa się za pomocą łączników Isox i pod-
pórki. Dziecko zapinane jest 5-punktowym pasem bezpieczeństwa fotelika
dziecięcego.
WAŻNE
FOTELIKA DZIECIĘCEGO NIE NALEŻY UŻYWAĆ WPOZYCJI PRZODEM DO
KIERUNKU JAZDY, DOPÓKI DZIECKO NIE UKOŃCZY WIEKU 15 MIESIĘCY.
EKSTREMALNE NIEBEZPIECZEŃSTWO
Zaleca się zainstalowanie fotelika dziecięcego na tylnym siedzeniu pojazdu.
NIE NALEŻY montować fotelika samochodowego dla dziecka zwróconego
tyłem do kierunku jazdy w przedziale wzrostowym 40-105 cm na przednim
siedzeniu, na którym znajduje się poduszka powietrzna. Chyba że poduszkę
powietrzną można wyłączyć. W tej kwestii należy zapoznać się z informacjami
zawartymi w instrukcji obsługi pojazdu.
OSTRZEŻENIE
• Produkt to system zabezpieczenia dziecka kategorii „i-Size”. System został
zatwierdzony zgodnie z regulacją ECE nr 129 w zakresie użytkowania w pozycjach foteli samochodowych kompatybilnych zi-Size zgodnie zdanymi
producenta pojazdu zawartymi winstrukcji obsługi pojazdu.
• Ten fotelik dziecięcy jest odpowiedni wyłącznie do pojazdów wyposażonych
w uchwyty Isox zgodnie znormą ECE R16 lub porównywalnymi normami.
Ewentualne wątpliwości należy kierować do producenta fotelika samochodowego lub jego sprzedawcy.
Page 87
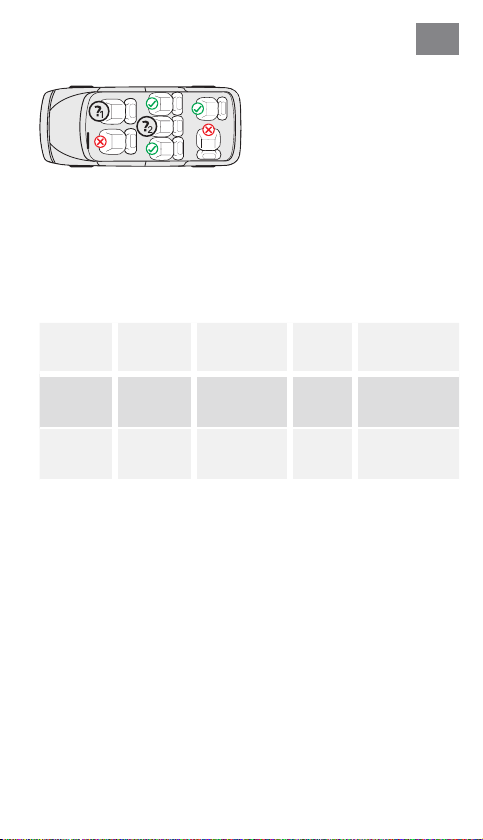
- 87 -
1. Tylko wtedy, gdy można dezakty-
wować poduszkę powietrzną, dostępne są łączniki Isox, a miejsce
siedzące jest określone w instrukcji
obsługi pojazdu jako kompatybilne
zsystemem i-Size.
2. Tylko wtedy, gdy dostępne są
łączniki Isox, a miejsce siedzące
jest określone w instrukcji obsługi
pojazdu jako zgodne zsystemem
i-Size.
Poniższa tabela zawiera informacje o urządzeniach i metodach mocowania:
PL
Przedział
wzrostowy
40–105 cm
76–105 cm
Kierunek
montażu
Tyłem
do kierunku
jazdy
Przodem
do kierunku
jazdy
Instalacja Typ
Łączniki ISOFIX
ipodpórka
Łączniki ISOFIX
ipodpórka
i-Size
Universal
Isox
i-Size
Universal
Isox
Zabezpieczenie
dziecka
5-punktowy pas
fotelika samochodowego
5-punktowy pas
fotelika samochodowego
Page 88

PL
- 88 -
OSTRZEŻENIE
• Aby zapewnić dziecku bezpieczeństwo, prosimy o uważne zapoznanie się
zniniejszą instrukcją przed użyciem produktu. Instrukcję należy zachować.
Nieprzestrzeganie poleceń zawartych w niniejszej instrukcji może spowodować poważne obrażenia ciała dziecka.
• Fotelik może być używany z własnym 5-punktowym systemem pasów
bezpieczeństwa tylko na potrzeby dzieci o masie ciała poniżej 19 kg oraz
wzroście do 105 cm.
• Fotelik NIE może być używany zwłasnym 5-punktowym systemem pasów
bezpieczeństwa na potrzeby dzieci omasie ciała powyżej 19 kg oraz wzroście
cm powyżej 105 cm.
• Fotelik dziecięcy można montować przodem lub tyłem do kierunku jazdy
za pomocą łączników Isox i podpórki. Ważne: Fotelika nie należy montować wpozycji przodem do kierunku jazdy, dopóki dziecko nie ukończy 15
miesięcy.
• Montaż Isox: Zapoznać się z instrukcją producenta samochodu.
• Nie wolno korzystać z żadnych innych nośnych punktów łączenia niż te,
które zostały opisane w instrukcji i zostały oznaczone w systemie zabezpieczającym dziecko.
• Nie należy używać fotelika dziecięcego wdomu. Fotelik został zaprojektowany wyłącznie do użytku wsamochodzie.
• Nigdy nie pozostawiać dziecka w foteliku bez opieki.
• Nie umieszczać fotelika samochodowego tyłem do kierunku jazdy
naprzednim siedzeniu zaktywną poduszką powietrzną. Może to prowadzić
do poważnych obrażeń ciała lub śmierci.
• Fotelik samochodowy należy wymienić, jeśli podczas wypadku został
narażony na duże obciążenia.
• Ze względów bezpieczeństwa fotelik samochodowy musi być przymocowany
do pojazdu, nawet jeśli w foteliku nie ma dziecka.
• Należy zawsze upewnić się, że wszystkie pasy mocujące fotelik samochodowy do pojazdu są dobrze założone i że wszystkie pasy mocujące dziecko
są dopasowane do ciała dziecka. Ponadto należy się upewnić, że pasy nie
są poskręcane.
• Bagaż lub inne przedmioty, które mogą spowodować obrażenia ciała w
przypadku kolizji, muszą być odpowiednio zabezpieczone.
• Sztywne przedmioty i części ztworzywa sztucznego systemu zabezpieczeń
dziecka należy umieszczać imontować wtaki sposób, aby nie mogły zostać
przytrzaśnięte przez ruchome siedzenie lub drzwi pojazdu.
• Ważne jest, aby głęboko osadzone pasy bezpieczeństwa mocno trzymały
miednicę dziecka. Aby uniknąć ryzyka upadku, dziecko zawsze powinno
mieć zapięte pasy.
• Wprowadzanie zmian lub modykacji do produktu bez zgody właściwej komórki jest niebezpieczne. Nieprzestrzeganie instrukcji montażu producenta
systemu zabezpieczeń dzieci stwarza również zagrożenie dla bezpieczeństwa
dziecka.
• Fotelik samochodowy został zaprojektowany dla dzieci o masie ciała do 19
kg. Nigdy nie przeciążać fotelika, przewożąc w nim więcej niż jedno dziecko
lub dodatkowe ładunki.
• Nie wolno używać systemu zabezpieczeń dziecka bez pokrowca.
• Pokrowca nie można zastąpić innym niż zalecany przez producenta, ponieważ
stanowi on integralną część systemu zabezpieczającego dziecko.
Page 89
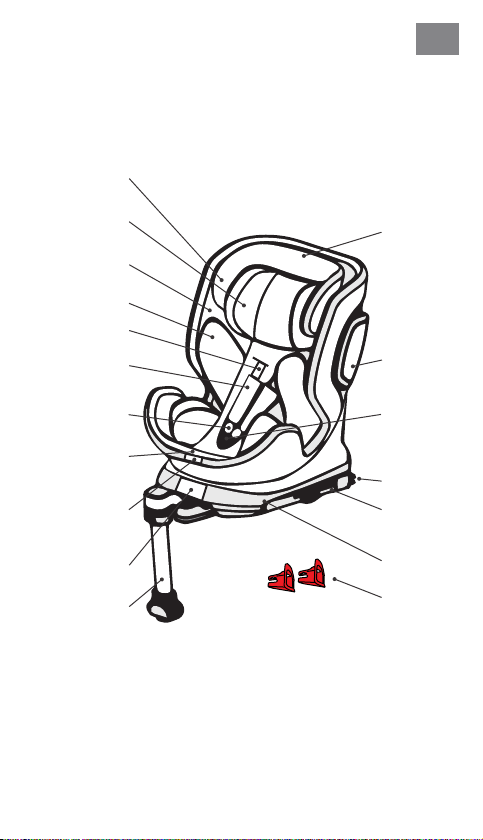
ELEMENTY FOTELIKA
Widok z przodu
Zagłówek
Pokrowiec
zagłówka
Korpus
fotelika
Wkładka
komfortowa
Pasek na ramię
Poduszka
naramienna
Klamra
zapięcia pasów
Ustawiony
centralnie
regulator
pasów
Dźwignia do
ustawiania
pozycji
Dźwignia
obrotowa
Podpórka
- 89 -
PL
Regulacja
zagłówka
Ochrona
przed
uderzeniem
bocznym
Osłona
klamry
zapięcia
pasów
Łącznik
Isox
Przedłużenie
zaczepu
Isox
Stacja Isox
Prowadnice
ISOFIX
Page 90
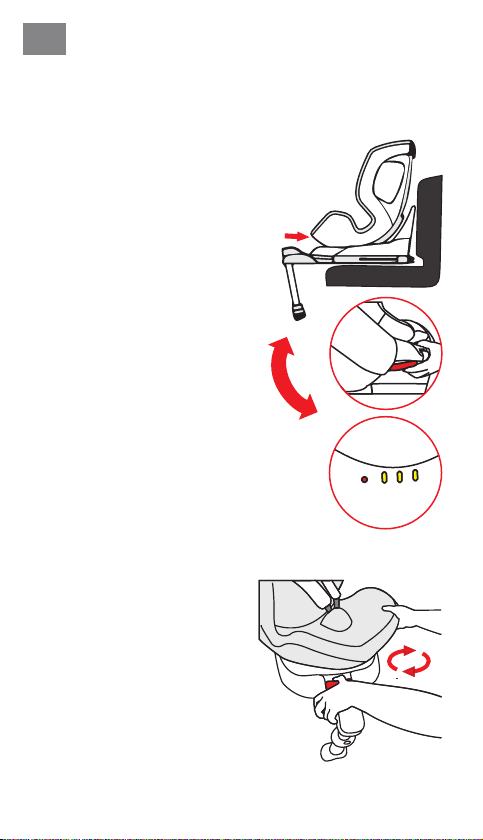
PL
- 90 -
STOSOWANIE SAMOCHODOWEGO FOTELIKA
DZIECIĘCEGO
Regulacja kąta nachylenia
samochodowego fotelika
dziecięcego
• Jedną ręką przesunąć dźwignię pozycyjną w dolnej przedniej części korpu-
su fotelika.
• Drugą ręką przytrzymać korpus fotelika
iustawić kąt.
Możliwe są następujące pozycje fotelika: (zwrócić uwagę na etykietę znajdują-
cą się na foteliku)
Tyłem do kierunku jazdy,
Wzrost 40–105 cm,
1 pozycja (R)
Przodem do kierunku jazdy,
Wzrost 76 – 105 cm,
wiek co najmniej 15 miesięcy,
3 pozycje (1–3)
Obracanie fotelika samochodowego
• Aby obrócić dziecięcy fotelik samochodowy po zainstalowaniu, użyć
dźwigni obrotu z przodu stacji bazowej
i obrócić dziecięcy fotelik samochodo
wy do pozycji tyłem lub przodem do
kierunku jazdy.
• Pozycja przodem do kierunku jazdy
jest odpowiednia tylko dla dzieci w
wieku 15 miesięcy istarszych, owzroście co najmniej 76 cm. Pozycja tyłem
do kierunku jazdy jest przeznaczona
dla dzieci o wzroście od 40 do 105 cm
i maksymalnej wadze 19 kg.
• Pozycja boczna ma jedynie ułatwić
dziecku wsiadanie. Ta pozycja nie
może być używana podczas jazdy.
-
123R
Page 91
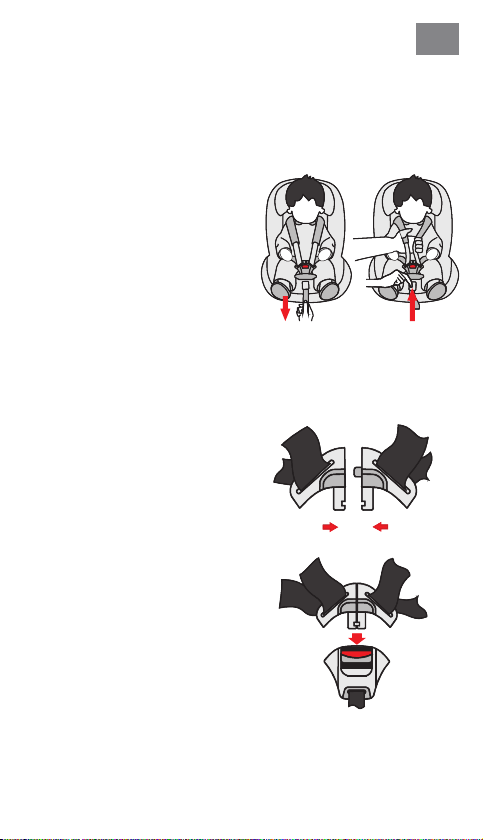
Regulacja pasa
• Aby poluzować pas, należy nacisnąć jedną ręką przycisk do re-
gulacji pasa w obszarze siedziska.
Drugą ręką chwyć zamek do zapi
nania pasów iostrożnie poluzować
zapięte pasy.
• Pociągnąć za przedni pas regulacyjny, aby napiąć pasy. Upewnić
się, że pasy nie są skręcone.
Otwieranie/zamykanie pasa
• Aby odblokować pas, należy wcisnąć czerwony przycisk na zamku
do zapinania pasów, wyciągnąć
zaczepy klamry i je rozpiąć.
•
Aby zablokować pas, należy najpierw złączyć obydwa zaczepy
klamry, a następnie włożyć je razem
do zamka do zapinania pasów.
- 91 -
-
PL
Page 92
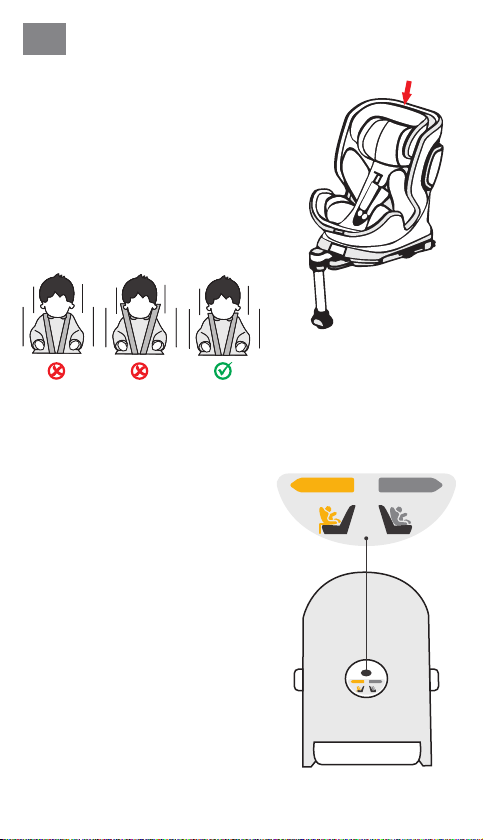
PL
- 92 -
Regulacja zagłówka
• Poluzować pasy i pociągnąć za dźwignię
regulacji zagłówka z tyłu samochodowe
go fotelika dziecięcego. Poruszyć zagłówkiem, aż zatrzaśnie się na odpowiedniej
wysokości.
• Upewnić się, że paski naramienne są wyprowadzone z fotelika samochodowego
tuż nad ramionami dziecka.
• Puścić dźwignię i upewnić się, że zagłó-
wek jest zablokowany.
-
RotationControl
(kontrola obrotów)
• Przycisk RotationControl służy jako pomoc w sterowaniu i ma na celu zapobieganie używaniu fotelika samochodowego wpozycji przodem do kierunku we
wczesnym etapie rozwoju dziecka.
• Na przycisku RotationControl (pod
spodem fotelika samochodowego) nale-
ży wskazać, czy Twoje dziecko ma mniej
czy więcej niż 15 miesięcy.
• Jeśli wiek jest mniejszy niż 15 miesięcy,
fotelik samochodowy można obrócić
tylko do pozycji tyłem do kierunku jazdy
i na bok. Pozycja przodem do kierunku
jazdy jest zablokowana i nie może być
używana dla dzieci poniżej 15 miesiąca
życia.
• Wprzypadku wieku dziecka powyżej 15
miesięcy iwzroście powyżej 76 cm fo
telik samochodowy może być również
używany w pozycji przodem do kierun
ku jazdy. Wtym celu należy przełączyć
przycisk RotationControl.
• Zalecamy używanie fotelika dziecięcego
w pozycji tyłem do kierunku jazdy tak
długo, jak to możliwe, jednak nie krócej
niż do wieku 15 miesięcy i wzrostu co
najmniej 76 cm.
-
-
< 15 M
40–105 cm
Przykładowy obraz spodu
fotelika dziecięcego
> 15 M
76–105 cm
< 15 M
> 15 M
40–105 cm
76–105 cm
Page 93
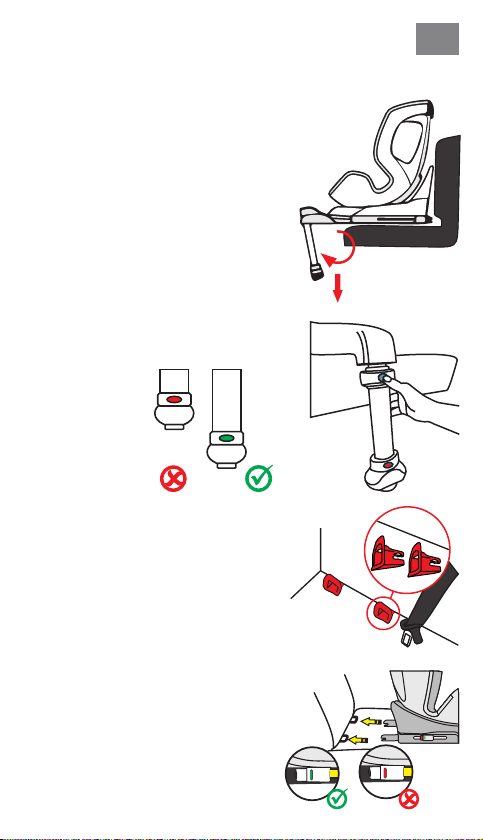
- 93 -
Podpórka
• Rozłożyć podpórkę pod fotelikiem dziecięcym. W przypadku dzieci o wzroście
do 105 cm fotelik samochodowy może
być używany tylko z rozłożoną podpórką
Isox z zastosowaniem łączników Isox.
Używanie fotelika samochodowego tylko
z łącznikami Isox jest niedozwolone.
• Nacisnąć przycisk regulacji wysokości
podpórki i wysunąć teleskopową podpórkę. Upewnić się, że spoczywa ona
całkowicie w przestrzeni na nogi auta.
• Upewnić się, że wskaźnik na stopce ma
kolor zielony.
Łączniki ISOFIX
• Wsunąć elementy pomocnicze do wsuwania przez szczelinę w tapicerce fotelika
samochodowego między oparciem a fo
telem wuchwyty Isox.
• Płaska strona elementów pomocniczych
do wsuwania musi być skierowana w dół.
Krok ten nie jest konieczny, jeżeli pojazd
jest wyposażony wzamontowane na sta
łe elementy pomocnicze do wsuwania.
• Aby przedłużyć łączniki Isox, wcisnąć
obydwa boczne przyciski łączników Isox.
• Wsunąć łączniki Isox w element pomoc
niczy do wsuwania idocisnąć, tak by był
słyszalny odgłos zatrzaśnięcia.
• Dosunąć dobrze samochodowy fotelik
dziecięcy do oparcia fotela samochodo
wego. Upewnić się, że obydwa wskaźniki
Isox zmieniły kolor na zielony.
PL
-
-
-
-
Page 94
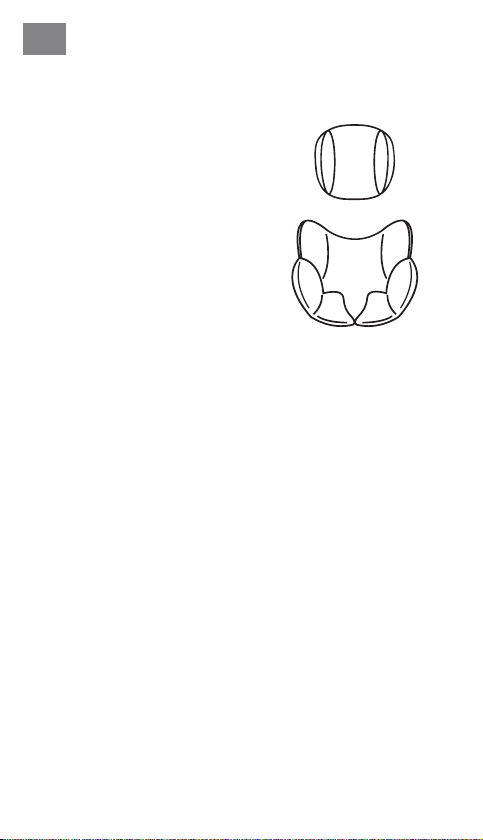
PL
- 94 -
Poduszka pod głowę i komfortowa wkładka
• Podgłówek i wkładka komfortowa są
przeznaczone dla niemowląt o wzroście od 40 do 60 cm.
• Usuń obie wkładki, gdy tylko Twoje
dziecko przekroczy podany wzrost.
Page 95
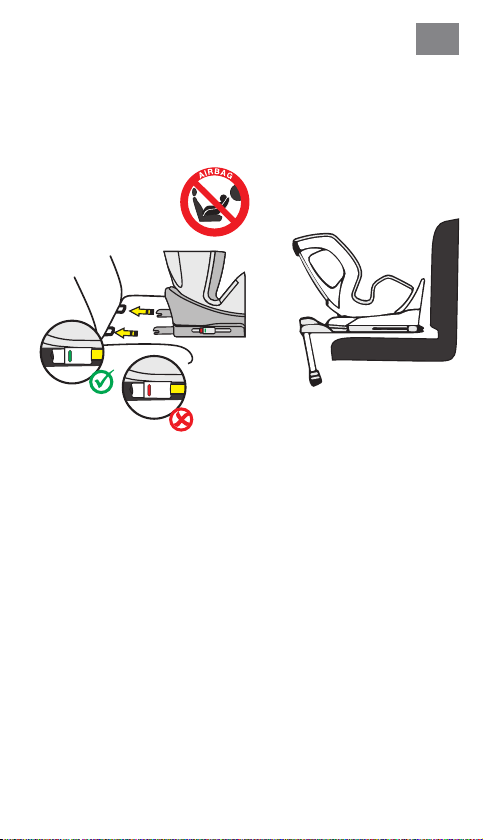
- 95 -
PL
MONTAŻ FOTELIKA DZIECIĘCEGO
1) Przedział wzrostowy 40–105 cm, maks. 19 kg, tyłem do
kierunku jazdy
1 . Ustawić wiek dziecka na przycisku RotationControl.
2 . Ustawić dziecięcy fotelik samochodowy w pozycji maksymalnie pochylonej i
obrócić go tak, aby skierowany tyłem do kierunku jazdy wskazywał obrotową
pozycję siedzenia (R).
3 . Aby przedłużyć łączniki Isox, wcisnąć obydwa bocz ne przyciski łączników
Isox.
4 . Rozłożyć podpórkę zgodnie z powyższym opisem.
5 . Wprowadzić łączniki Isox do uchwytów Isox w fotelu samochodu i za-
blokować.
6 . Dosunąć dobrze fotelik samochodowy do oparcia fotela samochodowego.
Sprawdzić, czy obydwa wskaźniki Isox mają kolor zielony.
7 . Dostosować wysokość podpórki i upewnić się, że spoczywa ona całkowicie
w przestrzeni na nogi w aucie.
8 . Upewnić się, że wskaźnik na podpórce przełączył się nakolor zielony.
9 . W celu wygodnego ułożenia dziecka obrócić fotelik dziecięcy w kierunku
drzwi samochodu.
10 . Odblokować zapięcie pasów fotelika dziecięcego i umieścić pasy po ze-
wnętrznej stronie fotelika.
11 . Posadzić dziecko w foteliku dziecięcym.
12 . Ustawić wysokość zagłówka zgodnie z wcześniejszym opisem.
13 . Ponownie zapiąć sprzączkę pasa, tak by wydała słyszalny odgłos kliknięcia.
14 . Pociągnąć za przedni pas regulacyjny, aby napiąć pasy. Upewnić się, że
pasy nie są skręcone.
15 . Obrócić fotelik do pozycji tyłem do kierunku jazdy. Sprawdzić, czy fotelik
samochodowy jest zablokowany wtej pozycji.
Page 96
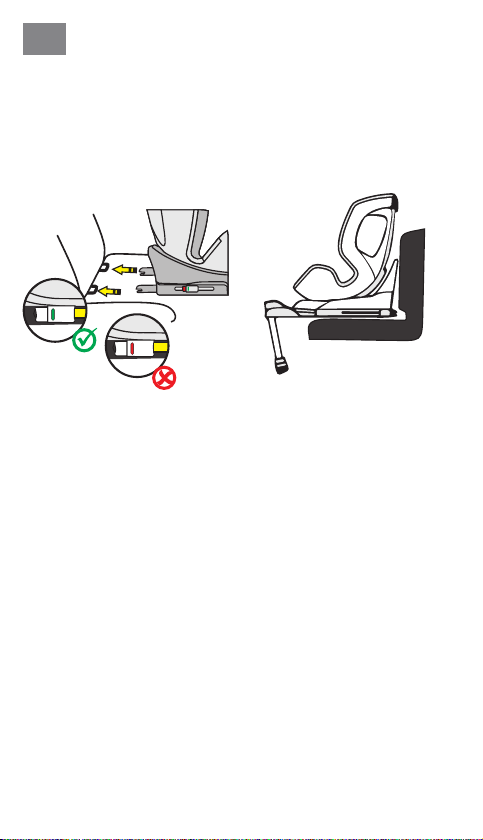
PL
- 96 -
MONTAŻ FOTELIKA DZIECIĘCEGO
2) Przedział wzrostowy 76–105 cm, min. 15 miesięcy, maks.
19 kg, przodem do kierunku jazdy
WAŻNA INFORMACJA: FOTELIKA DZIECIĘCEGO NIE NALEŻY UŻYWAĆ
WPOZYCJI PRZODEM DO KIERUNKU JAZDY, DOPÓKI DZIECKO NIE UKOŃCZY WIEKU 15 MIESIĘCY.
1 . Ustawić wiek dziecka na przycisku RotationControl.
2 . Aby przedłużyć łączniki Isox, wcisnąć obydwa boczne przyciski łączników
Isox.
3 . Rozłożyć podpórkę zgodnie z powyższym opisem.
4 . Wprowadzić łączniki Isox do uchwytów Isox w fotelu samochodu i za-
blokować.
5 . Dosunąć dobrze fotelik samochodowy do oparcia fotela samochodowego.
Upewnić się, że obydwa wskaźniki Isox zmieniły kolor na zielony.
6 . Dostosować wysokość podpórki i upewnić się, że spoczywa ona całkowicie
w przestrzeni na nogi w aucie.
7 . Upewnić się, że wskaźnik na stopce ma kolor zielony.
8 . Fotelik dziecięcy ustawiany przodem do kierunku jazdy zapewnia trzy
regulowane pozycje siedzenia.
9 . W celu wygodnego ułożenia dziecka obrócić fotelik dziecięcy w kierunku
drzwi samochodu.
10 . Odblokować zapięcie pasów fotelika dziecięcego i umieścić pasy po ze-
wnętrznej stronie fotelika.
11 . Posadzić dziecko w foteliku dziecięcym.
12 . Ustawić wysokość zagłówka zgodnie z wcześniejszym opisem.
13 . Ponownie zapiąć sprzączkę pasa, tak by wydała słyszalny odgłos kliknięcia.
14 . Pociągnąć za przedni pas regulacyjny, aby napiąć pasy. Upewnić się, że
pasy nie są skręcone.
15 . Obrócić fotelik do pozycji przodem do kierunku jazdy. Sprawdzić, czy fotelik
samochodowy jest zablokowany wtej pozycji.
Page 97
- 97 -
PL
CZYSZCZENIE
Aby zapewnić długą żywotność fotelika samochodowego, do jego czyszczenia nie należy używać rozpuszczalników, środków ściernych ani agresywnych
środków czyszczących. Po każdym praniu sprawdzać trwałość tkaniny i szwów.
Podczas prania pokrowca postępować zgodnie z instrukcjami na etykiecie
(patrz poniżej).
Prać w temperaturze
e
30 °C, program do prania
delikatnych tkanin
NIE
o
wybielać
Suszyć w suszarkach
s
bębnowych w niskiej
temperaturze
m
U
NIE
prasować
NIE
czyścić chemicznie
UTRZYMANIE W DOBRYM STANIE
Regularnie sprawdzać stan produktu pod kątem ewentualnych uszkodzeń. W
przypadku uszkodzenia, fotelika samochodowego nie wolno używać i należy
go przechowywać w miejscu niedostępnym dla dzieci.
W przypadku jakichkolwiek pytań lub problemów prosimy o kontakt z działem
Dział obsługi klienta Osann, tel. +49 (0) 7731/970077.
Page 98

SK
Ďakujeme, že ste sa rozhodli pre našu detskú autosedačku Turai360 SL. Ak
potrebujete s týmto produktom pomôcť, kontaktujte náš zákaznícky servis.
- 98 -
POUŽITIE
• Tento výrobok je vhodný pre deti s výškou od 40 do 105cma maximálnou
hmotnosťou 19kg.
• Inštalácia s orientáciou dozadu od výšky 40 do 105 cm sa vykonáva
pomocou konektorov Isox a stojana. Dieťa sa pripútava 5-bodovým
pásom detskej autosedačky.
• Montáž s orientáciou dopredu pri výške od 76 do 105 cm a minimálnom
veku 15 mesiacov sa realizuje pomocou konektorov Isox a stojana. Dieťa
sa pripútava 5-bodovým pásom detskej autosedačky.
DÔLEŽITÉ
DETSKÚ AUTOSEDAČKU NEPOUŽÍVAJTE V SMERE JAZDY, POKIAĽ VEK DIEŤAŤA
NEPREKROČIL 15 MESIACOV.
EXTRÉMNE NEBEZPEČENSTVO
Odporúčame nainštalovať detskú autosedačku na zadnom sedadle vozidla.
NEUPEVŇUJTE detskú autosedačku na použitie s orientáciou dozadu vo výškovej kategórii 40 až 105 cm na predné sedadlo, kde je airbag. Môžete tak
urobiť len vtedy, ak sa dá airbag deaktivovať. Prečítajte si preto v súvislosti s
tým návod na prevádzku vozidla.
VAROVANIE
• Ide o detský zadržiavací systém kategórie „i-Size“. Systém je podľa nariadenia ECE č. 129 povolený pre použitie v pozíciách sedadla vozidla, ktoré sú
kompatibilné s kategóriou i-Size, podľa údajov výrobcov vozidiel v návode
na obsluhu vozidla.
• Táto detská autosedačka je vhodná len pre vozidlá, ktoré sú vybavené dr-
žiakmi Isox podľa ECE R16 alebo porovnateľných noriem.
V prípade pochybností kontaktujte výrobcu autosedačky alebo predajcu.
Page 99
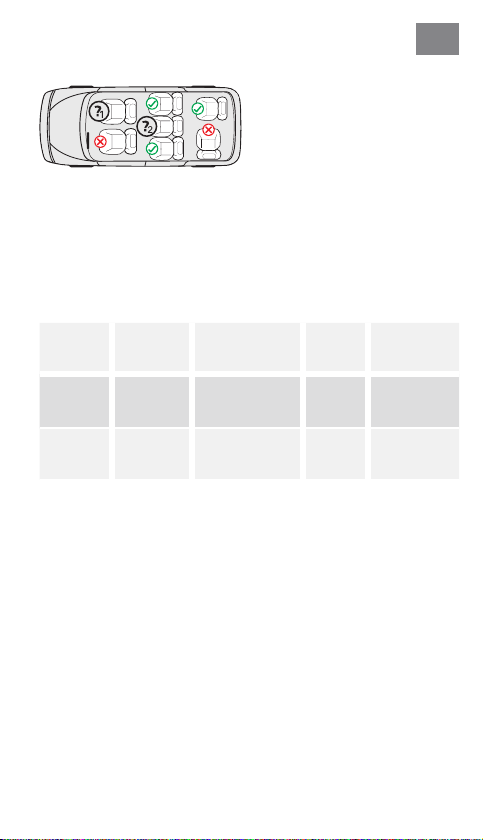
- 99 -
1. Len ak je možné airbag deaktivo-
vať, sú prítomné konektory Isox a
sedadlo je v príručke pre osobné
vozidlo uznané ako kompatibilné
s i-Size.
2. Len ak sú prítomné konektory Isox
a sedadlo je v príručke pre osobné
vozidlo uznané ako kompatibilné s
i-Size.
Nasledujúca tabuľka obsahuje informácie o upevňovacích prípravkoch a
metódach:
SK
Výšková
kategória
40 – 105 cmOrientácia
76 – 105 cmOrientácia
Smer
montáže
dozadu
dozadu
Inštalácia Typ
Konektory Isox
a stojan
Konektory Isox
a stojan
i-Size
Universal
Isox
i-Size
Universal
Isox
Zaistenie
dieťaťa
5-bodový
pás detskej
autosedačky
5-bodový
pás detskej
autosedačky
Page 100

SK
- 100 -
VAROVANIE
• Pred použitím si starostlivo prečítajte tento návod, aby ste zaistili bezpečnosť
svojho dieťaťa. Uschovajte si návod. Nedodržanie pokynov z tejto príručky
môže viesť k závažným poraneniam vášho dieťaťa.
• Detskú sedačku možno používať s vlastným 5-bodovým pásovým systémom
iba pre deti s telesnou hmotnosťou nižšou ako 19 kg a výškou do 105 cm.
• Detskú sedačku NESMIETE používať s 5-bodovým pásovým systémom pre
deti s telesnou hmotnosťou nad 19 kg a výškou nad 105 cm.
• S konektormi Isox a stojanom je možné namontovať detskú sedačku s
orientáciou smerom dozadu a dopredu. Dôležité: Nemontujte s orientáciou
dopredu, pokiaľ vek dieťaťa neprekročil 15 mesiacov.
• Pri montáži systému Isox: Prečítajte si príručku výrobcu vozidla.
• Nepoužívajte žiadne ďalšie nosné dotykové body než tie, ktoré sú opísané
v návode a vyznačené v detskom zadržiavacom systéme.
• Túto detskú autosedačku nepoužívajte doma. Bola navrhnutá výhradne na
používanie v aute.
• Dieťa nikdy nenechávajte v sedačke bez dozoru.
• Detskú autosedačku orientovanú dozadu nikdy neumiestňujte na predné
sedadlo s aktivovaným airbagom. Môže to viesť k ťažkým poraneniam alebo
k usmrteniu.
• Ak bola detská sedačka pri nehode vystavená silnému zaťaženiu, musí sa
vymeniť za novú.
• Z bezpečnostných dôvodov musí byť detská autosedačka vo vozidle pripevnená aj vtedy, keď sa v nej nenachádza dieťa.
• Uistite sa vždy, že všetky pásy, ktoré držia detskú autosedačku vo vozidle,
sú pevne utiahnuté, a všetky pásy, ktoré zadržiavajú dieťa, sú prispôsobené
telu dieťaťa. Uistite sa tiež, že pásy nie sú pretočené.
• Batožinu alebo iné predmety, ktoré by v prípade nárazu mohli spôsobiť
poranenia, musíte správnym spôsobom zaistiť.
• Tuhé predmety a plastové diely detského zadržiavacieho systému treba
umiestniť a inštalovať tak, aby nemohlo dôjsť k ich privretiu pohyblivým
sedadlom alebo dverami vozidla.
• Je dôležité, aby nízko umiestnené pásy pevne xovali panvu dieťaťa. Vaše
dieťa by malo byť neustále pripútané, aby sa predišlo riziku jeho pádu.
• Je nebezpečné meniť alebo dopĺňať výrobok bez súhlasu príslušného úradu.
Nedodržanie inštalačných pokynov výrobcu detského zadržiavacieho sys
tému taktiež môže mať za následok ohrozenie bezpečnosti vášho dieťaťa.
• Táto detská sedačka bola navrhnutá pre deti s hmotnosťou do 19 kg. Detskú
sedačku nikdy nepreťažujte tým, že v nej prepravujete viac ako jedno dieťa
alebo iné, dodatočné bremená.
• Detské zadržiavacie zariadenie sa nesmie používať bez poťahu sedačky.
• Poťah sedačky nesmiete nahradiť iným poťahom, ktorý nie je schválený
výrobcom, pretože poťah tvorí pevnú súčasť zadržiavacieho výkonu.
-
 Loading...