

Page 1
Eno360
ECE 0+/1/2/3, 0-36 kg
DE
ES
SK
EN FR IT
NL PL CZ
Page 2

DE
Vielen Dank, dass Sie sich für unseren Eno360 Kinderautositz entschieden haben.
Wenn Sie Hilfe zu diesem Produkt benötigen, wenden Sie sich bitte an unseren Kundendienst.
- 2 -
ANWENDUNG
• Dieses Produkt ist anwendbar für Kinder der ECE-Gruppe 0+/1/2/3. Gewichtsbereich:
0-36 kg. Altersbereich: 0-12 Jahre.
• Gruppe 0+ ist für Kinder mit einem Gewicht von 0 bis 13 kg. Der Kinderautositz wird rück-
wärtsgerichtet mit Isox-Konnektoren und Top-Tether oder mit dem 3-Punkt-Gurt im Auto
montiert. Das Kind wird mit dem 5-Punkt-Gurt des Kinderautositzes angeschnallt.
• Gruppe 1 ist für Kinder mit einem Gewicht von 9-18 kg. Der Kinderautositz ist nach vorne
und wird im Auto mittels Isox-Konnektoren und Top-Tether oder mit dem 3-Punkt-Gurt
gerichtet
befestigt. Auch die rückwärtsgerichtete Nutzung bis 18 kg mittels Isox-Konnektoren und TopTether ist zugelassen.
• Die Gruppen 2 und 3 eignen sich für Kinder mit einem Gewicht von 15 bis 36 kg.
Das 5-Punkt-Gurtsystem des Kinderautositzes wird entfernt. Der Kinderautositz ist nach vorne
gerichtet und wird mittels Isox-Konnektoren im Auto montiert. Das Kind wird mit dem 3-Punkt-
Gurt des Autos angeschnallt. Alternativ kann der Kinderautositz direkt mit dem 3-Punkt-Gurt
des Autos ohne Isox-Konnektoren gesichert werden.
• Es wird empfohlen, den Kinderautositz auf dem Rücksitz des Fahrzeugs zu installieren.
Befestigen Sie den Kinde rautositz für die rückwärtsgerichtete Nutzung in der ECE-Gruppe 0+ /1
NICHT auf dem Vordersitz, wo sich ein Airbag bendet. Es sei denn, der Airbag kann deaktiviert
werden. Lesen Sie diesbezüglich in der Betriebsanleitung des Fahrzeugs nach.
• Dieser Kinderautositz ist nur für Fahrzeuge geeignet, die sowohl über eine Isox-Anbindung
verfügen als auch mit 3-Punkt-Sicherheitsgurten nach ECE R16 oder anderen gleichwertigen
Normen ausgestattet sind.
Die folgende Tabelle enthält Informationen über die Befestigungsvorrichtungen und -methoden:
ECE
Gruppe
0+ Rückwärts Isox + Top-Tether
0+ Rückwärts
1 Rückwärts Isox + Top-Tether
1 Vorwärts Isox + Top-Tether
Das Kind wird mit dem 5-Punkt-Gurt des Kinderautositzes angeschnallt.
Einbaurichtung Installationsmethode Typ Isox-Größe
3-Punkt-Gurt des
Autos
Semiuniversal
Universal -
Semiuniversal
Semiuniversal
D
D
B1
Page 3

- 3 -
DE
ECE
Gruppe
2/3 Vorwärts
2/3 Vorwärts
Einbaurichtung Installationsmethode Typ Isox-Größe
1 Vorwärts
3-Punkt-Gurt des
Autos
3-Punkt-Gurt des
Autos
3-Punkt-Gurt des
Autos + Isox
Universal -
Universal –
Semiuniversal
–
WARNUNG
Einbau mit 3-Punkt-Gurt (ECE-Gruppe 0+/1/2/3, 0-36 kg)
• Dies ist eine Universal-Rückhalteeinrichtung für Kinder. Sie ist nach der UN/ECE-Regelung
Nr. 44/04 genehmigt für die allgemeine Verwendung und ist damit kompatibel mit den
meisten Fahrzeugsitzen.
• Ein korrekter Einbau der Einrichtung kann erwartet werden, wenn der Fahrzeughersteller im
Fahrzeughandbuch erklärt, dass das Fahrzeug für den Einbau einer Universal-Rückhalteeinrichtung für Kinder der jeweiligen Altersgruppe geeignet ist.
• Diese Rückhalteeinrichtung für Kinder wurde nach strengeren Bedingungen in die Kategorie
„Universal“ eingestuft als vorangehende Ausführungen, die nicht diese Aufschrift tragen.
• Es ist nur geeignet für Fahrzeuge mit xen oder mit Gurtautomat versehenen 3-Punkt-Sicher-
heitsgurten, die der UN/ECE-Regelung Nr. 16 (oder einer vergleichbaren Norm) entsprechen.
• Im Zweifelsfall kann der Hersteller der Rückhalteeinrichtung für Kinder oder der Einzelhändler
befragt werden.
Einbau mit Isox-Konnektoren & Top-Tether (ECE-Gruppe 0+/1, 0-18 kg) oder Isox-Konnektoren & 3-Punkt-Gurt (ECE-Gruppe 2/3, 15-36 kg)
• Dies ist ein semi-universales Kinderrückhaltesystem. Es ist gemäß UN/ECE-Regelung
Nr. 44/04 für die allgemeine Verwendung in Fahrzeugen mit Isox-Verankerungssystemen
zugelassen.
• Das Kinderrückhaltesystem passt in Fahrzeuge mit Sitzen, die als Isox-Positionen ge-
kennzeichnet sind (Details siehe Pkw-Bedienungsanleitung), was je nach Kategorie der
Kinderautositze und der Befestigung variiert.
• Es ist nur geeignet für Fahrzeuge mit xen oder mit Gurtautomat versehenen 3-Punkt-Sicher-
heitsgurten, die der UN/ECE-Regelung Nr. 16 (oder einer vergleichbaren Norm) entsprechen.
• Die Gewichtsklassen und die Isox-Größenklassen, für die dieses Produkt vorgesehen ist,
sind: Gruppe 1, D & B1 und Gruppe 0+, D:
• Im Zweifelsfall kann der Hersteller der Rückhalteeinrichtung für Kinder oder der Einzelhändler
befragt werden.
Page 4

DE
- 4 -
WARNUNG
• Bitte lesen Sie diese Anleitung vor der Verwendung sorgfältig durch und bewahren Sie
sie zum späteren Nachschlagen auf, um die Sicherheit Ihres Kindes zu gewährleisten. Die
Nichtbeachtung der Anweisungen in diesem Handbuch kann zu schweren Verletzungen
Ihres Kindes führen.
• Der Kindersitz kann mit dem eigenen 5-Punkt-Gurtsystem nur für Kinder unter einem Körpergewicht von 18 kg verwendet werden (Gruppe 0+ und Gruppe 1).
• Der Kindersitz kann NICHT mit dem 5-Punkt-Gurtsystem für Kinder ab einem Körpergewicht
von 18 kg verwendet werden (Gruppe 2 / 3).
• Der Kindersitz kann mit den Isox-Konnektoren und dem Top-Tether oder nur dem 3-PunktGurt des Autos rückwärts- und vorwärtsgerichtet eingebaut werden. Der Top-Tether ist nur bis
einschließlich Gruppe 1, max. 18 kg, in Verbindung mit den Isox-Konnektoren zu verwenden.
Wichtig: Nicht vorwärtsgerichtet einbauen, bis das Gewicht des Kindes nicht mindestens 9 kg
erreicht hat.
• Für den Isox-Einbau: Achten Sie darauf, das Handbuch des Autoherstellers zu lesen.
• Eine Installation des Kinderautositzes in der Gruppe 0+/1 nur mit den Isox-Konnektoren,
ohne die zusätzliche Fixierung mit dem Top-Tether, ist nicht erlaubt.
• Verwenden Sie keine anderen tragenden Berührungspunkte als diejenigen, die in der Anleitung
beschrieben und in dem Kinderrückhaltesystem gekennzeichnet sind.
• Verwenden Sie diesen Kinderautositz nicht zu Hause. Er wurde nicht für den Gebrauch zu
Hause konzipiert und sollte daher nur in einem Auto verwendet werden.
• Lassen Sie Ihr Kind zu keiner Zeit unbeaufsichtigt in dem Sitz.
• Befestigen Sie den Kinderautositz für die rückwärtsgerichtete Nutzung in der ECE-Gruppe
0+ /1 NICHT auf dem Vordersitz, wo sich ein Airbag bendet. Es sei denn, der Airbag kann
deaktiviert werden. Lesen Sie diesbezüglich in der Betriebsanleitung des Fahrzeugs nach.
• Der Kindersitz sollte ausgetauscht werden, wenn er bei einem Unfall starken Belastungen
ausgesetzt war.
• Aus Sicherheitsgründen muss der Kinderautositz auch dann im Fahrzeug befestigt sein,
wenn Ihr Kind gerade nicht im Kinderautositz sitzt.
• Stellen Sie immer sicher, dass alle Gurte, die die Sitzhalterung am Fahrzeug halten, festsitzen
und alle Gurte, die das Kind zurückhalten, an den Körper des Kindes angepasst sind.
Stellen Sie zudem sicher, dass die Gurte nicht verdreht sind.
• Gepäckstücke oder andere Gegenstände, die im Falle eines Zusammenstoßes Verletzungen
verursachen können, müssen ordnungsgemäß gesichert werden.
• Die steifen Gegenstände und Kunststoteile eines Kinderrückhaltesystems müssen so platziert
und installiert sein, dass sie bei alltäglichem Gebrauch nicht von einem beweglichen Sitz oder
einer Fahrzeugtür eingeklemmt werden können.
• Es ist wichtig, dass tiefsitzende Gurte das Becken fest xieren. Um das Sturzrisiko zu vermeiden,
sollte Ihr Kind immer angeschnallt sein.
• Es ist gefährlich, ohne Zustimmung der zuständigen Instanz Änderungen oder Ergänzungen
am Produkt vorzunehmen. Die Nichtbeachtung der Installationsanweisungen des Herstellers
des Kinderrückhaltesystems birgt ebenfalls Gefahren.
•
Dieser Kindersitz wurde für Neugeborene und Kinder mit einem Gewicht bis zu 36 kg konzipiert.
Überlasten Sie niemals den Kindersitz, indem Sie mehr als ein Kind oder zusätzliche Lasten
darin transportieren.
• Die Kinderrückhalteeinrichtung darf nicht ohne den Sitzbezug verwendet werden.
• Der Sitzbezug darf nicht durch einen anderen als den vom Hersteller empfohlenen ersetzt
werden, da dieser Sitzbezug ein fester Bestandteil der Rückhalteleistung ist.
Page 5
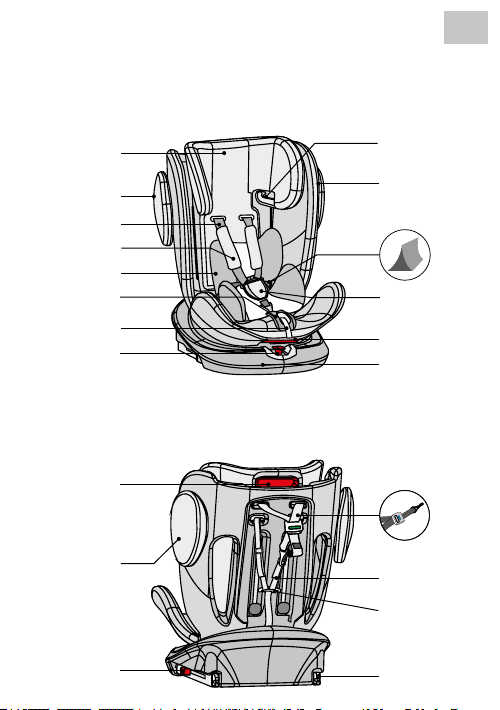
SITZTEILE
Vorderansicht
- 5 -
DE
Verstellbare
Kopfstütze
Seitenaufprallschutz
Schultergurt
Schulterposter
Komforteinlage
Gurteinstellung
Einstellband
Drehhebel
Rückansicht
Einstellung Kopfstütze
Seitenaufprallschutz
Erweiterung
Isox-Konnektor
Gurtführung
(Gruppe 2 + 3)
Sitzschale
Babyeinlage (unterhalb
Komforteinlage)
Gurtschloss &
Schlosspolster
Hebel zur
Winkeleinstellung
Isox-Station
Top-Tether
Schultergurt
Gurtbügel
Isox-
Konnektor
Page 6
DE
- 6 -
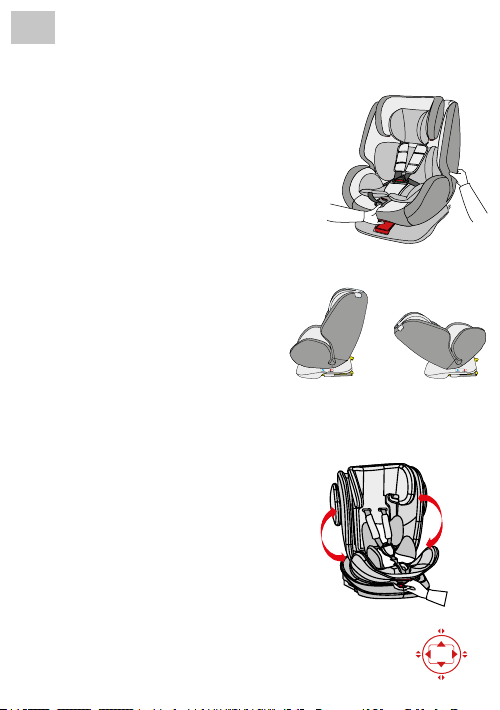
VERWENDUNG DES KINDERAUTOSITZES
Einstellen des Neigungswinkels des
Autositzes
• Mit einer Hand den Winkelverstellhebel an der
unteren Vorderseite der Sitzschale betätigen.
• Die andere Hand hält die Rückseite der Sitzschale
und stellt den Winkel ein.
• Der maximale Winkel gilt nur für die rückwärts-
gerichtete Position, der aufrechte Winkel nur für
die nach vorne gerichtete Position für Gruppe 2/3,
15-36 kg..
Folgende Sitzpositionen sind möglich:
(Bitte Label am Kindersitz beachten)
Rückwärtsgerichtet 0-18kg:
1 Position (1 + A)
Vorwärtsgerichtet 9-18 kg:
3 Positionen (2 + 3 + 4)
Vorwärtsgerichtet 15-36 kg:
1 Position (5)
Drehung des Kinderautositzes
• Mit einer Hand den roten Knopf an der Vorderseite
der Basis drücken, mit der anderen Hand die Sitzschale drehen. Während sich die Sitzschale dreht,
kann der Drehhebel gelöst werden.
• Es gibt 4 Verriegelungspositionen bei 90, 180, 270
und 0/360° in Richtung der Basis. Wenn sich die
Sitzschale in einer dieser Positionen bendet, wird
sie mit einem „Klick“-Geräusch eingerastet.
• Die nach vorne gerichtete Position ist für Kinder
der Gruppe 1, 2 und 3 geeignet. Die nach hinten
gerichtete Position ist für Kleinkinder der Gruppe
0+ und 1.
Nur vorwärtsgerichtet
(Beispielabbildung)
(Beispielabbildung)
(Beispielabbildung)
Nur rückwärtsgerichtet
(Beispielabbildung)
0/360°
90°270°
180°
Page 7
- 7 -
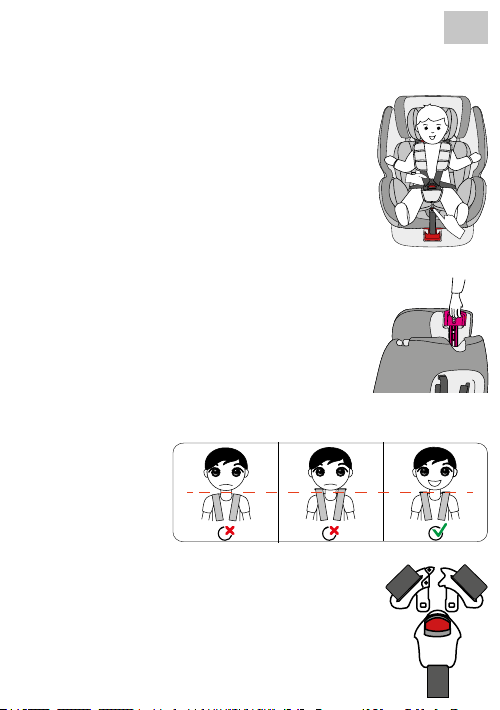
Einstellung des Gurts
• Um den Gurt zu lösen, drücken Sie mit einer Hand
den Knopf zur Gurtverstellung im Sitzbereich.
• Mit der anderen Hand halten Sie die Schnalle mit
angebrachten Gurten fest und lösen diese dann.
Um den Gurt zu befestigen, ziehen Sie am vorderen
•
Verstellband.
Einstellung der Kopfstütze
• Lösen Sie den Gurt und ziehen Sie am Hebel an
der Kopfstütze, bis sich diese auf der gewünschten
Höhe bendet.
• Achten Sie auf die korrekte Höhe der Schultergurte.
Diese sollten auf Höhe der Schultern des Kindes
aus dem Sitz treten.
• Lassen Sie den Hebel los und vergewissern Sie
sich, dass die Kopfstütze arretiert ist.
Önen/Schließen des Gurts
• Um den Gurt zu entriegeln, drücken Sie den roten
Knopf der Schnalle und trennen Sie die beiden
Schnallenzungen.
• Um den Gurt zu verriegeln, verbinden Sie zuerst
die beiden Schnallenzungen und stecken Sie diese
zusammen in die Schnalle.
DE
Page 8
DE
- 8 -
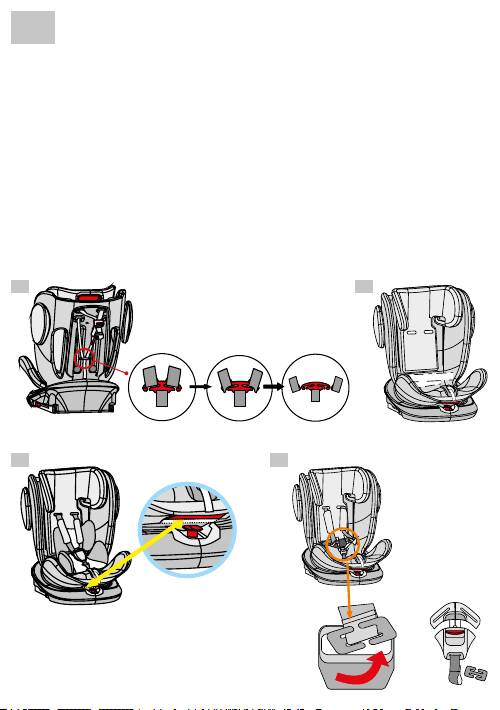
Entfernen des Gurtsystems
• Lösen Sie den Gurt
• Fädeln Sie die Schultergurte aus dem Metallbügel auf der Rückseite des Kinderau-
tositzes und führen Sie diese durch den Kinderautositz auf die Vorderseite hindurch.
(Abb. A)
• Entfernen Sie die Schulterpolster sowie die Gurtschnallen vom Gurt.
• Falten Sie den Gurt zusammen, sodass er hinter dem Bezug in der Mulde an der Rücken-
lehne aufbewahrt werden kann. (Abb. B)
• Um das Gurtschloss zu entfernen, bringen Sie zunächst den Sitz in die maximale Liegeposition.
Rotieren Sie dann den Sitz in die 90° Position.
• Entfernen Sie die Abdeckung und legen Sie diese zur Seite. (Abb. C)
• Fädeln Sie nun die Metallklammer des Gurtschlosses durch die Önung und bringen Sie
danach die Abdeckung wieder an. (Abb. D)
• Bewahren Sie alle entfernten Teile gut auf.
A B
C D
(Beispielabbildungen)
Page 9
- 9 -
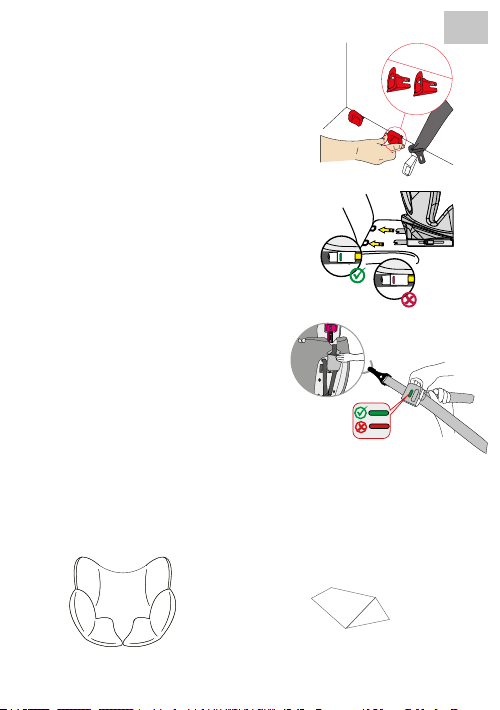
Isox-Verbindungsstücke
• Schieben Sie die Einführhilfen durch den Schlitz
in der Polsterung zwischen Rückenlehne und Sitz
und in die Isox-Halterungen.
• Die ache Seite muss dabei nach unten zeigen.
Dieser Schritt ist nicht erforderlich, falls das Fahrzeug über fest installierte Einführhilfen verfügt.
• Drücken Sie die Knöpfe der Isox-Verbindungs-
stücke auf beiden Seiten, um diese zu verlängern.
• Schieben Sie die Isox-Verbindungsstücke in diese
Einführhilfen und drücken Sie sie hinein, bis sie hörbar einrasten.
• Die Anzeigen auf beiden Seiten werden erst grün,
wenn die Verbindungen hergestellt sind. Drücken
Sie den Kinderautositz gegen die Rückenlehne, bis
er fest sitzt.
Zusätzliche Befestigung mit
Top-Tether (Gruppe 0+/1)
• Nehmen Sie den Top-Tether aus der Tasche.
• Um den Top-Tether zu lösen, drücken Sie mit einer
Hand den grauen Knopf und ziehen Sie mit der
anderen Hand die Seite des Gurtankers auf die
erforderliche Länge.
• Um den Top-Tether zu befestigen, hängen Sie den
Anker an den Befestigungspunkt am Autositz und
ziehen diesen so stra wie möglich. Die Anzeige wird
erst grün, wenn der Gurt ausreichend gestrat ist.
Komforteinlage & Babyeinlage
DE
Komforteinlage
bis max. 13 kg
Babyeinlage
(unterhalb Komforteinlage)
bis max. 9 kg
Page 10
DE
- 10 -
EINBAU DES KINDERAUTOSITZES
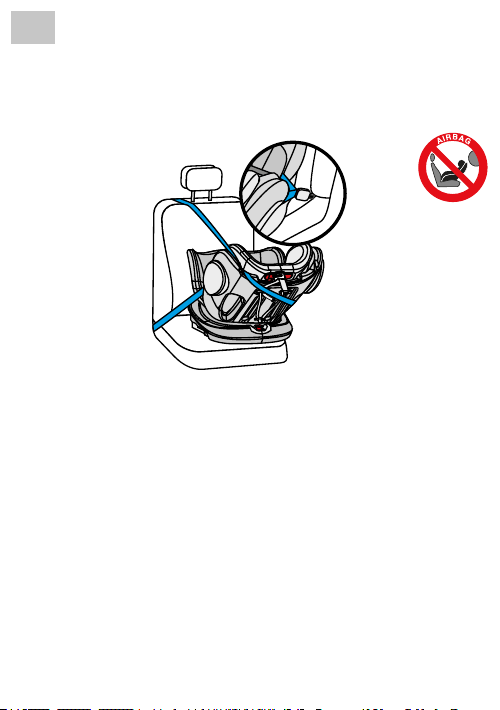
1) Gruppe 0+ (rückwärtsgerichtet, mit 3-Punkt-Gurt des Autos)
(Für Kinder von 0 bis 13 kg)
1. Stellen Sie den Kinderautositz auf die maximale Liegeposition ein (Position 1) und drehen
Sie ihn, sodass er in rückwärtsgerichteter Ausrichtung auf die Sitzposition A zeigt.
2. Schieben Sie den Kinderautositz fest an die Rückenlehne des Autositzes.
3. Lösen Sie die Gurtschnalle des Kinderautositzes und legen Sie die Gurte auf die Außenseite
des Sitzes.
4. Entfernen Sie zunächst die Komfort- und Babyeinlage des Kinderautositzes.
5. Ziehen Sie den 3-Punkt-Gurt des Autos auf die maximale Länge aus und führen Sie den
Beckengurt durch die seitlichen Führungen am Kinderautositz von der einen auf die andere
Seite durch und schließen Sie die Schnalle vom 3-Punkt-Gurt bis diese hörbar einrastet.
6. Setzen Sie jetzt wieder die Baby- und Komforteinlage in den Kinderautositz ein.
7. Führen Sie den Diagonalgurt an der Außenschale vom Kinderautositz entlang und achten
Sie darauf, dass dieser zwischen Sitzschale und Kopfstütze verläuft.
8. Ziehen Sie so fest wie möglich am Diagonalgurt, bis der gesamte 3-Punkt-Gurt gestrat ist
und der Kinderautositz stabil steht.
9. Setzen Sie Ihr Kind in den Kinderautositz.
10. Stellen Sie die Höhe der Kopfstütze so ein, dass die Schultergurte sich auf der Höhe der
Schultern Ihres Kindes benden.
11. Schließen Sie die Gurtschnalle wieder, bis ein Klicken zu hören ist.
12. Ziehen Sie an der vorderen Einstelllasche, um die Gurte strazuziehen. Achten Sie darauf,
dass die Riemen nicht verdreht sind.
Page 11
- 11 -
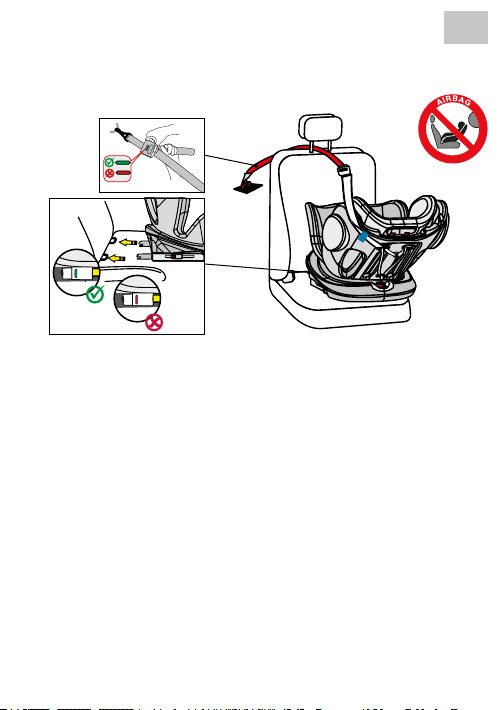
2) Gruppe 0+/1 (rückwärtsgerichtet, mit Isox & Top-Tether)
(Für Kinder von 0 bis 18 kg)
1. Stellen Sie den Kinderautositz auf die maximale Liegeposition ein (Position 1) und drehen
Sie ihn, sodass er in rückwärtsgerichteter Ausrichtung auf die Sitzposition A zeigt.
2. Drücken Sie beide seitlichen Isox-Konnektorknöpfe, um die Isox-Konnektoren in der
Länge auszufahren.
3. Führen Sie die Isox-Konnektoren zu den Isox-Verbindungsstücken am Pkw-Autositz und
lassen Sie diese einrasten.
4. Schieben Sie den Kinderautositz fest an die Rückenlehne des Autositzes. Achten Sie
darauf, dass beide Isox-Anzeigen auf Grün sind.
5. Nehmen Sie den Top-Tether aus seiner Aufbewahrungstasche und ziehen Sie diesen auf
die volle Länge aus.
6. Fädeln Sie den Top-Tether durch die blaue Gummibandführung und führen diesen entlang
der Außenseite des Kinderautositzes weiter.
7. Haken Sie den Top-Tether am entsprechenden Haken in Ihrem Auto ein (z.B. Rückseite des
Autositzes oder im Koerraum. Beachten Sie hier bitte die Bedienungsanleitung Ihres Autos).
8. Straen Sie nun den Top-Tether, bis die Anzeige am Top-Tether grün anzeigt.
9. Zum bequemen Einsetzen Ihres Kindes drehen Sie den Kinderautositz zur Autotür.
10. Lösen Sie die Gurtschnalle des Kinderautositzes und legen Sie die Gurte auf die Außenseite
des Sitzes.
11. Setzen Sie Ihr Kind in den Kinderautositz.
12. Stellen Sie die Höhe der Kopfstütze so ein, dass die Schultergurte sich auf der Höhe der
Schultern Ihres Kindes benden.
13. Schließen Sie die Gurtschnalle wieder, bis ein Klicken zu hören ist.
14. Ziehen Sie an der vorderen Einstelllasche, um die Gurte strazuziehen. Achten Sie darauf,
dass die Riemen nicht verdreht sind.
15. Drehen Sie den Sitz in die rückwärtsgerichtete Position. Überprüfen Sie, ob der Kinderautositz
in dieser Position eingerastet ist.
DE
Page 12
DE
- 12 -
EINBAU DES KINDERAUTOSITZES
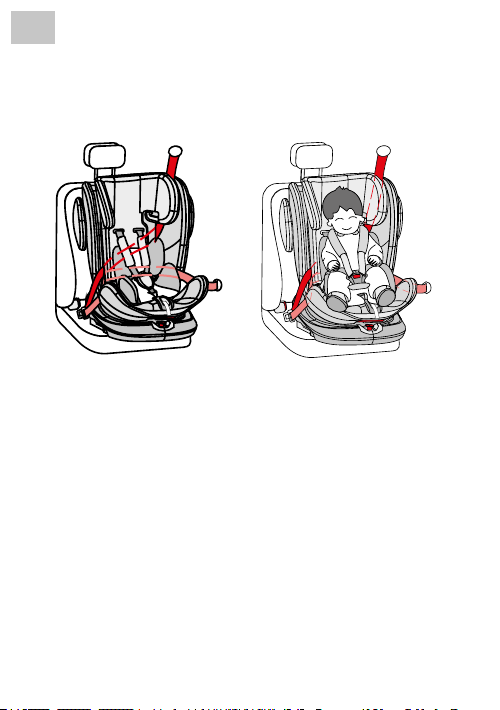
3) Gruppe 1 (vorwärtsgerichtet, mit 3-Punkt-Gurt des Autos)
(Für Kinder von 9 bis 18 kg)
WICHTIG: VERWENDEN SIE DEN KINDERAUTOSITZ NICHT IN FAHRTRICHTUNG, BEVOR DAS
GEWICHT DES KINDES 9 KG NICHT ÜBERSCHRITTEN HAT.
Drehen Sie den Kinderautositz in die vorwärtsgerichtete Position. Überprüfen Sie, ob der
1.
Kinderautositz in dieser Position eingerastet ist.
2. Der Kinderautositz verfügt in Fahrtrichtung über drei einstellbare Sitzpositionen
(Position 2, 3 & 4).
3. Ziehen Sie den 3-Punkt-Gurt des Autos auf die maximale Länge aus und führen Sie diesen
durch die erste Önung an der Vorderseite der Rückenlehne des Kinderautositzes hindurch,
welche sich auf der Seite des 3-Punkt-Gurtes des Autos bendet.
4. Führen Sie den 3-Punkt-Gurt an der Rückseite unter dem Gurtsystem des Kinderautositzes
weiter und durch die andere Önung in der Rückenlehne des Kinderautositzes wieder
nach vorne hindurch.
5. Schließen Sie die Schnalle des 3-Punkt-Gurtes, bis diese hörbar einrastet, und achten Sie
darauf, dass der Gurt nicht verdreht ist.
6. Ziehen Sie so fest wie möglich am Diagonalgurt, bis der gesamte 3-Punkt-Gurt gestrat ist
und der Kinderautositz stabil steht.
7. Lösen Sie die Gurtschnalle des Kinderautositzes und legen Sie die Gurte auf die Außenseite
des Sitzes.
8. Setzen Sie Ihr Kind in den Kinderautositz.
9. Stellen Sie die Höhe der Kopfstütze so ein, dass der Schultergurt frei bleibt.
10. Schließen Sie die Gurtschnalle wieder, bis ein Klicken zu hören ist.
11. Ziehen Sie an der vorderen Einstelllasche, um die Gurte strazuziehen. Achten Sie darauf,
dass die Riemen nicht verdreht sind.
Page 13
- 13 -
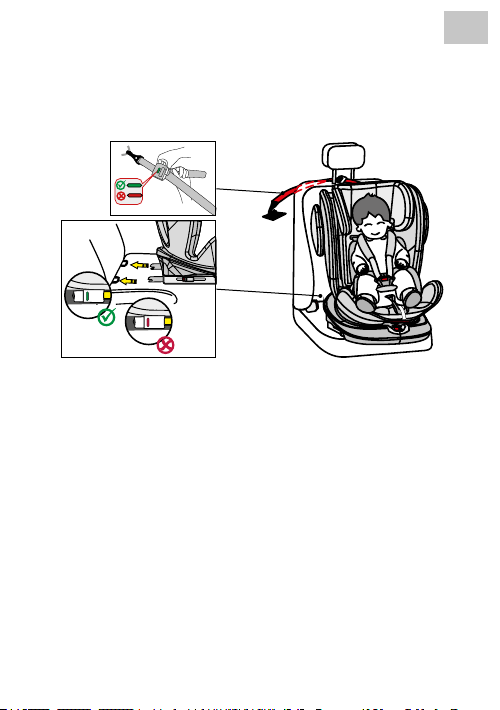
4) Gruppe 1 (vorwärtsgerichtet, mit Isox & Top-Tether)
(Für Kinder von 9 bis 18 kg)
WICHTIG: VERWENDEN SIE DEN KINDERAUTOSITZ NICHT IN FAHRTRICHTUNG, BEVOR DAS
GEWICHT DES KINDES 9 KG NICHT ÜBERSCHRITTEN HAT.
1. Drehen Sie den Sitz in die vorwärtsgerichtete Position. Überprüfen Sie, ob der Kinderautositz
in dieser Position eingerastet ist.
2. Der Kinderautositz verfügt in Fahrtrichtung über drei einstellbare Sitzpositionen
(Position 2, 3 & 4).
3. Drücken Sie beide seitlichen Isox-Konnektorknöpfe, um die Isox-Konnektoren in der
Länge auszufahren.
4. Führen Sie die Isox-Konnektoren zu den Isox-Verbindungsstücken am Pkw-Autositz und
lassen Sie diese einrasten.
5. Schieben Sie den Kinderautositz fest an die Rückenlehne des Autositzes. Achten Sie
darauf, dass beide Isox-Anzeigen auf Grün sind.
6. Nehmen Sie den Top-Tether aus seiner Aufbewahrungstasche und ziehen Sie diesen auf
die volle Länge aus.
7. Haken Sie den Top-Tether am entsprechenden Haken in Ihrem Auto ein (z.B. Rückseite des
Autositzes oder im Koerraum. Beachten Sie hier bitte die Bedienungsanleitung Ihres Autos).
8. Straen Sie nun den Top-Tether, bis die Anzeige am Top-Tether grün anzeigt.
9. Lösen Sie die Gurtschnalle des Kinderautositzes und legen Sie die Gurte auf die Außenseite
des Sitzes.
10. Setzen Sie Ihr Kind in den Kinderautositz.
11. Stellen Sie die Höhe der Kopfstütze so ein, dass der Schultergurt frei bleibt.
12. Schließen Sie die Gurtschnalle wieder, bis ein Klicken zu hören ist.
13. Ziehen Sie an der vorderen Einstelllasche, um die Gurte strazuziehen. Achten Sie darauf,
dass die Riemen nicht verdreht sind.
DE
Page 14
DE
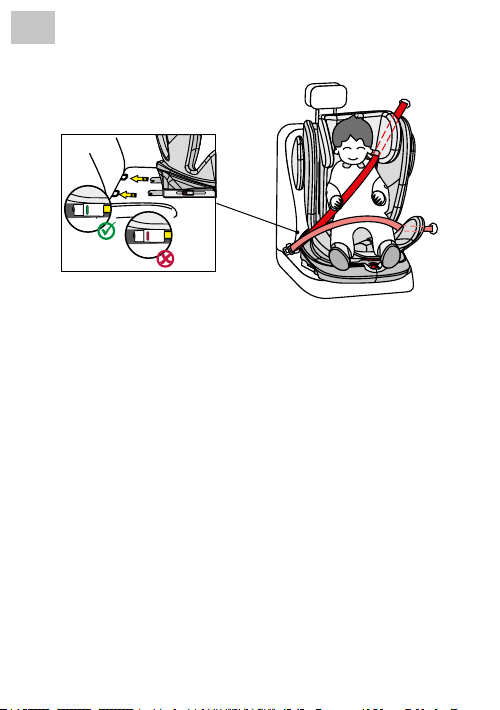
3) Gruppe 2/3 (vorwärtsgerichtet)
(Für Kinder von 15 bis 36 kg)
INFORMATION:
ENTFERNEN SIE ZUNÄCHST DAS GURTSYSTEM WIE ZUVORGEHEND BESCHRIEBEN.
1. Drehen Sie den Sitz in die vorwärtsgerichtete Position. Überprüfen Sie, ob der Kinderautositz
in dieser Position eingerastet ist.
2. Drücken Sie beide seitlichen Isox-Konnektorknöpfe, um die Isox-Konnektoren in der
Länge auszufahren.
3. Führen Sie die Isox-Konnektoren zu den Isox-Verbindungsstücken am Pkw-Autositz und
lassen Sie diese einrasten.
4. Schieben Sie den Kinderautositz fest an die Rückenlehne des Autositzes. Achten Sie
darauf, dass beide Isox-Anzeigen auf Grün sind.
5. Fädeln Sie den Diagonalgurt des 3-Punkt-Gurtes des Pkws durch die Gurtführung an der
Kopstütze des Kinderautositzes.
6. Zum bequemen Einsetzen Ihres Kindes drehen Sie den Kinderautositz zur Autotür.
7. Setzen Sie Ihr Kind in den Kinderautositz.
8. Stellen Sie die Höhe der Kopfstütze so ein, dass der Kopf des Kindes vollständig in der
Kopfstütze liegt und der Diagonalgurt durch die Gurtführung auf Höhe der Schultern des
Kindes herauskommt.
9. Drehen Sie den Sitz in die vorwärtsgerichtete Position. Überprüfen Sie, ob der Kinderauto-
sitz in dieser Position eingerastet ist.
10. Schließen Sie nun die Gurtschnalle des 3-Punkt-Gurtes des Pkws, bis ein Klicken zu hören ist.
11. Ziehen Sie am Diagonalgurt, um diesen stra zu ziehen. Achten Sie darauf, dass die
Riemen nicht verdreht sind.
12. Der Kinderautositz darf in dieser Altersklasse nur in Sitzposition 5 verwendet werden.
Einbau ohne Isox:
Alternativ kann der Kinderautositz in Gruppe 2/3 auch nur mit dem 3-Punkt-Gurt montiert werden.
Eine Verbindung mit den Isox-Konnektoren ist nicht zwingend notwendig, aber empfohlen.
- 14 -
Page 15
REINIGUNG
- 15 -
DE
Dieses Produkt wurde unter Berücksichtigung von Sicherheit, Komfort und Funktionalität entwickelt.
Bitte nehmen Sie sich die Zeit, diese Anleitung vor der Verwendung dieses Produkts sorgfältig zu
lesen und bewahren Sie sie zum späteren Nachschlagen an einem sicheren Ort auf.
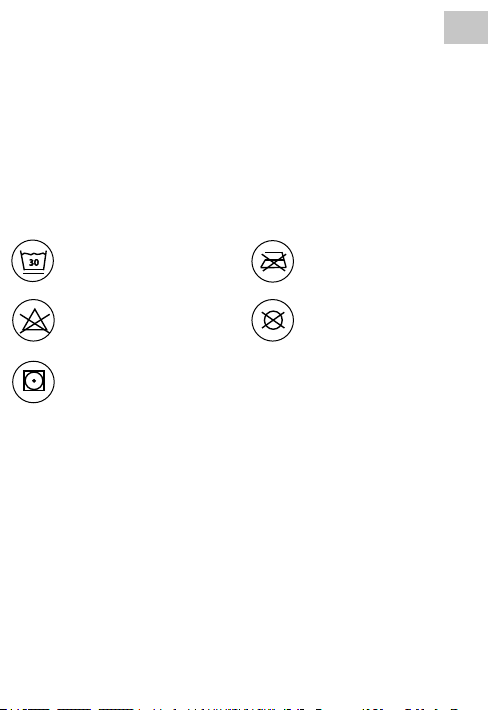
Um eine lange Nutzung Ihres Kinderautositzes zu gewährleisten, verwenden Sie keine
Lösungs mittel, Scheuermittel oder aggressive Reinigungsmittel. Überprüfen Sie nach jedem
Waschgang die Beständigkeit des Stoes und der Nähte. Beim Waschen des Stoes sind die
Anweisungen auf dem Etikett (siehe unten) sorgfältig zu befolgen.
Waschen bei 30°C,
30
Schonwaschgang
NICHT bleichen
Trommeltrocknen bei
niedriger Temperatur
NICHT bügeln
NICHT chemisch reinigen
INSTANDHALTUNG
Überprüfen Sie regelmäßig den Zustand des Produkts auf mögliche Schäden. Im Schadensfall
nicht verwenden und außerhalb der Reichweite von Kindern aufbewahren.
Bei Problemen wenden Sie sich bitte an den Osann Kundendienst unter +49 (0) 7731 / 970077.
Page 16

EN
Thank you for choosing our Eno360 child car seat.
If you need help with this product, please contact our customer service.
- 16 -
USE
• This product is suitable for children in ECE Group 0+/1/2/3. Weight range:
0-36 kg. Age range: 0-12 years.
• Group 0+ is for children weighing from 0 to 13 kg. The child car seat is installed in the car
either rear-facing with Isox connectors or with a 3-point belt. The child is strapped in with
the 5-point belt of the child car seat.
• Group 1 is for children who weigh 9-18 kg. The child car seat faces forwards and is secured
in the car using Isox connectors and top tether or a 3-point belt. Rear-facing use up to 18
kg is also permitted using Isox and top tether. The child is strapped in with the 5-point belt
of the child car seat.
• Groups 2 and 3 are suitable for children weighing between 15 and 36 kg.
The 5-point belt system on the child car seat is removed. The child car seat is forward-facing
and is tted in the car using Isox connectors. The child is strapped in with the 3-point car
seatbelt. Alternatively, the child car seat can be secured directly with the 3-point car seatbelt
without Isox connectors.
• We recommend installing the child car seat on the rear seat of the vehicle.
Do NOT secure the child car seat on the front seat in rear-facing position for ECE Group 0+/1
if the seat has an airbag. It may be used on the front seat if the airbag can be deactivated.
Please refer to the vehicle manual.
• This child car seat is suitable only for vehicles equipped with an Isox connection and 3-point
seatbelts according to ECE R16 or other equivalent standards.
The following table provides information about the fastening devices and methods:
ECE Group
Installation
direction
0+ Rear-facing Isox + top tether
0+ Rear-facing 3-point car seatbelt Universal -
1 Rear-facing Isox + top tether
1 Forward-facing Isox + top tether
Installation method Type Isox size
Semiuniversal
Semiuniversal
Semiuniversal
D
D
B1
Page 17

- 17 -
EN
ECE Group
2/3 Forward-facing 3-point car seatbelt Universal –
2/3 Forward-facing
Installation
direction
1 Forward-facing 3-point car seatbelt Universal -
Installation method Type Isox size
3-point car seatbelt
+ Isox
Semiuniversal
–
WARNING
Installation with 3-point belt (ECE Group 0+/1/2/3, 0-36 kg)
• This is a universal child restraint. It has been approved for general use in accordance with
UN/ECE Regulation No. 44/04 and is therefore compatible with most vehicle seats.
• Correct installation can be expected if the vehicle manufacturer declares in the vehicle manual
that the vehicle is suitable for the installation of a universal restraint device for children of the
respective age group.
• This child restraint has been classied in the ‘Universal’ category under stricter conditions
than previous versions that do not bear this label.
• It is only suitable for vehicles with xed 3-point seatbelts or 3-point seatbelts with seatbelt
retractor which correspond to UN/ECE Regulation No. 16 (or an equivalent standard).
• If in doubt, ask the manufacturer of the child restraint or the retailer.
Installation with Isox connectors & top tether (ECE Group 0+/1, 0-18 kg) or Isox connectors
& 3-point belt (ECE Group 2/3, 15-36 kg)
• This is a semi-universal child restraint system. It has been approved for general use in vehicles
with Isox anchorage systems in accordance with UN/ECE Regulation No. 44/04.
• The child restraint system ts in vehicles with seats that are marked as Isox positions (for
details see car manual), which varies depending on the category of child seat and attachment.
• It is only suitable for vehicles with xed 3-point seatbelts or 3-point seatbelts with seatbelt
retractor which correspond to UN/ECE Regulation No. 16 (or an equivalent standard).
• The weight classes and Isox size classes for which this product is approved are: Group 1,
D & B1 and Group 0+, D:
• If in doubt, ask the manufacturer of the child restraint or the retailer.
Page 18

EN
- 18 -
WARNING
• Please read through these instructions carefully before use and keep them for subsequent
reference, in order to guarantee the safety of your child. Non-compliance with the instructions
in this manual may result in serious injuries to your child.
• The child seat can only be used with its own 5-point belt system for children who weigh
under 18 kg (Group 0+ and Group 1).
• The child seat CANNOT be used with its own 5-point belt system for children who weigh
over 18 kg (Group 2/3).
• The child car seat can be installed with the Isox connectors and the top tether or with just
the car’s 3-point seatbelt in a rear-facing or forward-facing position. The top tether can be
used in conjunction with the Isox connectors only up to and including Group 1, max. 18
kg. Important: Do not install in forward-facing position until your child weighs at least 9 kg.
• For Isox installation: Be sure to read the car manufacturer’s manual.
• Installation of the child car seat for Group 0+/1 with the Isox connectors only and without
additional xing by means of the top tether is not permitted.
• Do not use load-bearing contact points other than those described in the instructions and
marked on the child restraint system.
• Do not use this child car seat at home. It has not been designed for use at home and should
therefore only be used in a car.
• Do not leave your child unsupervised in the seat at any time.
• Do NOT secure the child car seat on the front seat if there is an airbag for rear-facing use in
ECE Group 0+/1. It may be used on the front seat if the airbag can be deactivated. Please
refer to the vehicle manual.
• The child seat should be replaced if it is exposed to heavy impact in an accident.
• For safety reasons, the child car seat must be secured in the vehicle even when your child is
not sitting in the child car seat.
• Always make sure that all belts that hold the seat holder to the vehicle are secure and that
all belts that restrain the child are adjusted to the child’s body. Please also ensure that the
belts are not twisted.
• Items of luggage or other objects that could cause injury in the event of a collision must be
properly secured.
• The rigid items and plastic parts of a child restraint system must be positioned and installed
so that they cannot get caught by a movable seat or a vehicle door during everyday use.
• It is important that belts that sit low hold the pelvis rmly in place. To avoid the risk of falling,
your child should always be strapped in.
• It is dangerous to make changes or additions to the product without approval from the
responsible authority. Non-compliance with the installation instructions provided by the
manufacturer of the child restraint system is also associated with risks.
• This child seat has been designed for newborns and children weighing up to 36 kg. Never
overload the child seat by transporting more than one child or additional loads in it.
• The child restraint system must not be used without the seat cover.
• The seat cover must not be replaced by a cover other than that recommended by the
manufacturer as this seat cover is an important component of the restraint performance.
Page 19
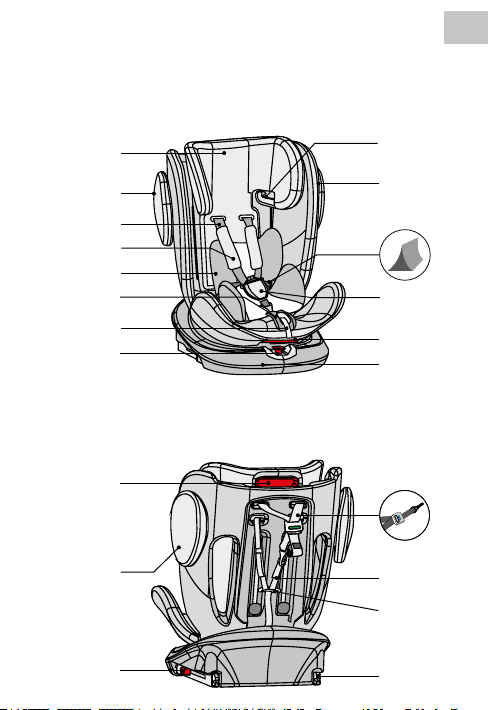
SEAT PARTS
Front view
- 19 -
EN
Adjustable
head support
Side impact protection
Shoulder belt
Shoulder pad
Comfort insert
Belt adjustment
Adjusting belt
Rotary lever
Rear view
Headrest adjustment
Side impact
protection
Isox connector
extension
Belt guide
(Group 2 + 3)
Seat bucket
Baby insert (under
comfort insert)
Belt buckle &
buckle pad
Angle adjustment
lever
Isox station
Top tether
Shoulder belt
Belt clip
Isox
connector
Page 20
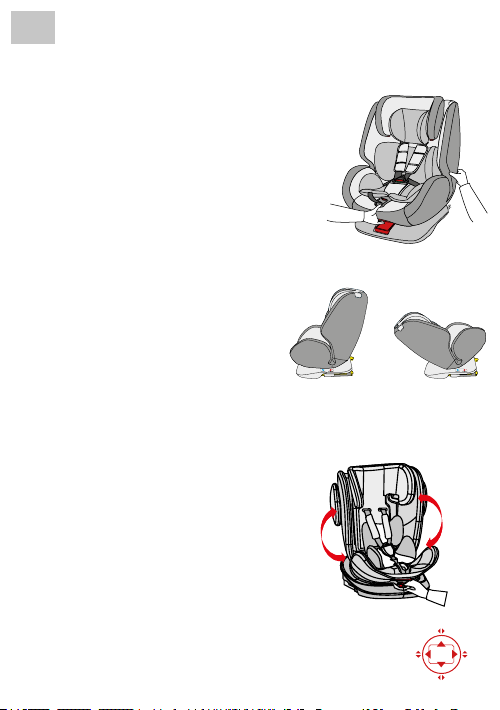
EN
- 20 -
USE OF THE CHILD CAR SEAT
Setting the car seat tilt angle
• Activate the angle adjustment lever on the lower
front side of the seat bucket with one hand.
• Use your other hand to hold the back of the seat
bucket and adjust the angle.
• The maximum angle is only for the rear-facing
position and the upright angle is only for the forward-facing position for Group 2/3, 15-36 kg.
The following seat positions are possible:
(Please see the label on the child car seat)
Rear-facing 0-18 kg:
1 position (1 + A)
Forward-facing 9-18 kg:
3 positions (2 + 3 + 4)
Forward-facing 15-36 kg:
1 position (5)
Turning the child car seat
• Use one hand to press the red button on the front
of the base and use your other hand to turn the
seat bucket. The twist lever can be released while
the seat bucket is being turned.
• There are 4 locking positions at 90, 180, 270 and
0/360° in the direction of the base. When the seat
bucket is in one of these positions, you can hear it
lock in place with a ‘click’.
• The forward-facing position is suitable for children
in Groups 1, 2 and 3. The rear-facing position is for
infants in Groups 0+ and 1.
Only forward-facing
(Sample illustration)
(Sample illustration)
(Sample illustration)
Only rear-facing
(Sample illustration)
0/360°
90°270°
180°
Page 21
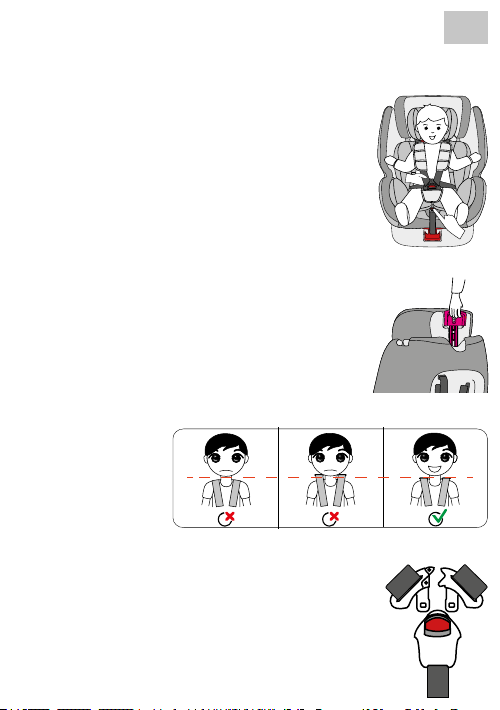
- 21 -
Adjusting the belt
• To loosen the belt, press the belt adjustment button
in the seat area with one hand.
• Use your other hand to hold the buckle in place
with the attached belts and then release them.
• To secure the belt, pull on the front adjustment
strap.
Adjusting the head support
• Loosen the belt and pull the lever on the head
support until it is set to the desired height.
• Pay attention to the correct height of the shoulder
belts. These should come out of the seat level with
your child's shoulders.
• Release the lever and ensure that the headrest is
locked in place.
Opening/closing the belt
• To unlock the belt, press the red button of the
buckle and separate the two tongues of the
buckle.
• To lock the belt, rst connect both tongues of the
buckle and then insert them together into the
buckle.
EN
Page 22
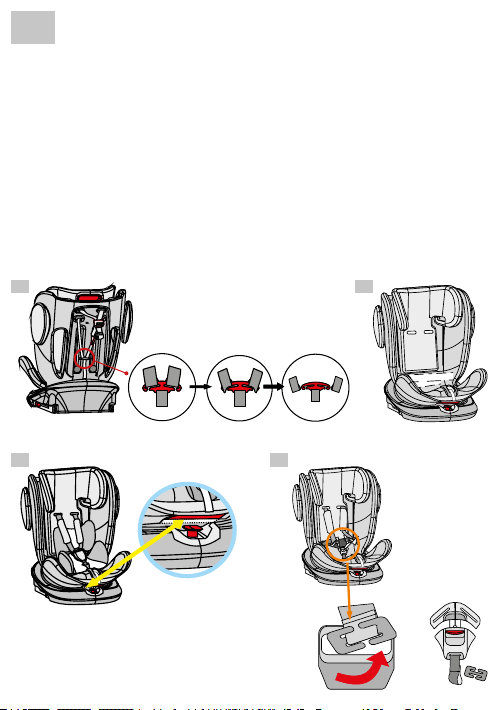
EN
- 22 -
Removing the belt system
• Loosen the belt
• Pull the shoulder belts out of their metal clips on the back of the child car seat and guide
these through the child car seat to the front. (Fig. A)
• Remove the shoulder pads and the belt buckles from the belt.
• Fold the belt up so that it can be stored in the hollow in the backrest behind the cover. (Fig. B)
• To remove the belt buckle, rst move the seat into its maximum reclining position.
Then rotate the seat into the 90° position.
• Remove the cover and put it aside. (Fig. C)
• Now bring the metal clip of the belt buckle through the opening and ax the cover again. (Fig. D)
• Ensure that you retain all the parts that are removed in a safe place.
A B
C D
(Sample illustrations)
Page 23
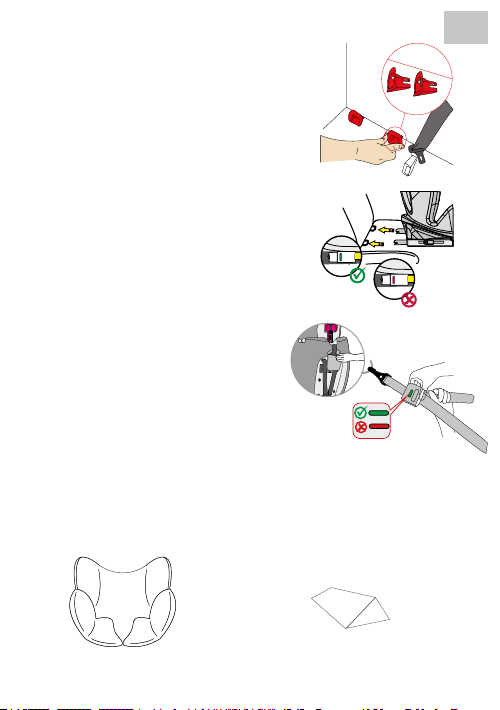
- 23 -
Isox connectors
• Push the insertion aids through the slit in the
cushion between the backrest and seat and into
the Isox holders.
• When doing this, the at side must be facing
downwards. This step is not necessary if the vehicle already has xed insertion aids.
• Press the buttons on the Isox connectors on both
sides to extend these.
• Slide the Isox connectors into these insertion aids
and press them in until you hear them lock in place.
• The indicators on both sides turn green only
when the connections are made correctly. Press
the child car seat against the backrest until it is
securely in position.
Additional fastening with top tether
(Group 0+/1)
• Remove the top tether from the pocket.
• To release the top tether, press the grey button
with one hand and pull the side of the belt anchor
to the required length with the other hand.
• To x the top tether, clip the anchor to the xing
point on the car seat and pull it as tight as possible.
The display does not turn green until the belt is
tightened suciently.
Comfort insert and baby insert
EN
Comfort insert
up to max. 13 kg
Baby insert
(under comfort insert)
up to max. 9 kg
Page 24
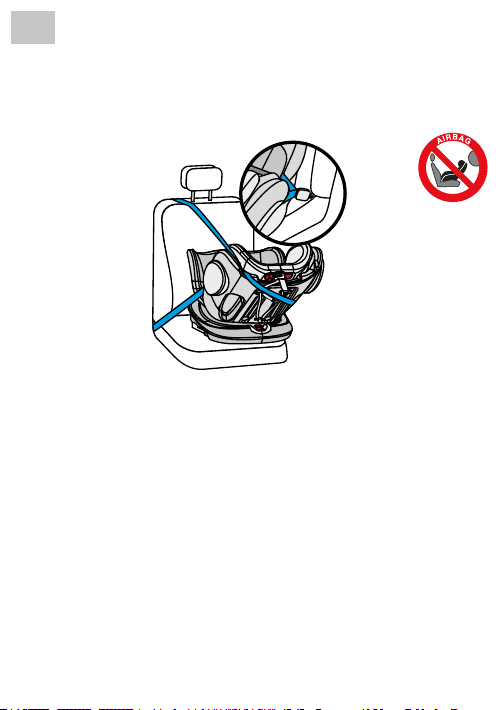
EN
- 24 -
INSTALLATION OF THE CHILD CAR SEAT
1) Group 0+ (rear-facing, with 3-point car seatbelt)
(For children weighing 0-13 kg)
1. Set the child car seat to the maximum reclining position (position 1) and turn it until it is in
rear-facing seat position A.
2. Push the child car seat in until it rests securely against the backrest of the car seat.
3. Unfasten the belt buckle on the child car seat and position the belts on the outside of the seat.
4. First remove the comfort and baby inserts from the child car seat.
5. Pull the 3-point car seatbelt out to its maximum length and feed the lap strap through
the side guides on the child car seat from one side to the other, then fasten the buckle of
the 3-point belt so that it clicks in place audibly.
6. Now replace the baby and comfort inserts in the child car seat.
7. Position the diagonal belt over the outer shell of the child car seat and ensure that it runs
between the seat shell and the headrest.
8. Pull as tightly as possible on the diagonal belt until the whole of the 3-point belt is taut and
the child car seat is rmly in position.
9. Put your child in the child car seat.
10. Adjust the height of the head support so that the shoulder belt is level with your child’s
shoulders.
11. Fasten the belt buckle again until you hear a click.
12. Pull the front adjustment strap to tighten the belts. Ensure that the straps are not twisted.
Page 25
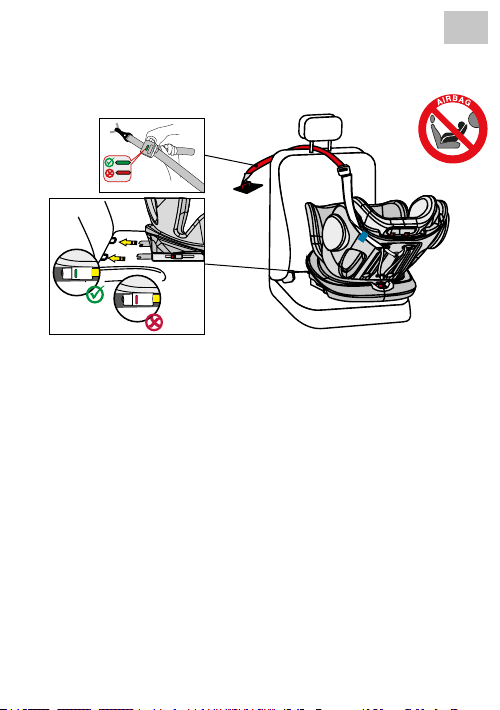
- 25 -
2) Group 0+/1 (rear-facing, with Isox and top tether)
(For children weighing 0-18 kg)
1. Set the child car seat to the maximum reclining position (position 1) and turn it until it is in
rear-facing seat position A.
2. Press the two lateral Isox connector buttons to extend the Isox connectors.
3. Guide the Isox connectors onto the Isox ttings on the seat of the vehicle and ensure
that they lock in position.
4. Push the child car seat in until it rests securely against the backrest of the car seat. Ensure
that both Isox indicators are showing green.
5. Take the top tether from its storage pocket and extend it to the maximum length.
6. Thread the top tether through the blue rubber band guide and extend it along the outside
of the child car seat.
7. Clip the top tether onto the hook provided in your car (e.g. on the back of the car seat or in
the boot. Please consult your car manual for this).
8. Tighten the top tether until the display on the top tether turns green.
9. When placing your child in the child car seat, turn the car seat towards the car door for
convenience.
10. Unfasten the belt buckle on the child car seat and place the belts on the outside of the seat.
11. Put your child in the child car seat.
12. Adjust the height of the head support so that the shoulder belt is level with your child’s
shoulders.
13. Fasten the belt buckle again until you hear a click.
14. Pull the front adjustment strap to tighten the belts. Ensure that the straps are not twisted.
15. Turn the seat into the rear-facing position. Check that the child car seat is locked in this
position.
EN
Page 26
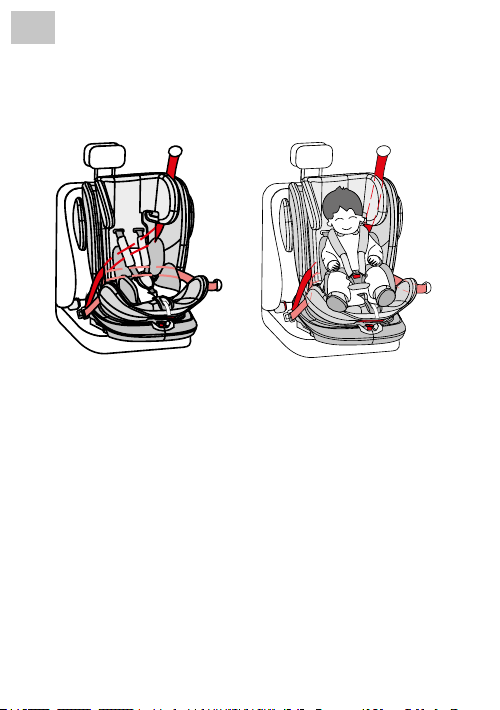
EN
- 26 -
INSTALLATION OF THE CHILD CAR SEAT
3) Group 1 (forward-facing, with 3-point car seatbelt)
(For children weighing 9-18 kg)
IMPORTANT: DO NOT USE THE CHILD CAR SEAT FACING IN THE DIRECTION OF TRAVEL
UNTIL YOUR CHILD WEIGHS AT LEAST 9 KG.
1. Turn the child car seat into the forward-facing position. Check that the child car seat is
locked in this position.
2. When facing in the direction of travel, the child car seat oers three adjustable seat
positions (position 2, 3 & 4).
3. Pull the 3-point car seatbelt out to its maximum length and guide it through the rst
opening on the front of the backrest of the child car seat, which is located on the side of
the 3-point car seatbelt.
4. Continue to feed the 3-point seatbelt under the belt system at the back of the child car
seat and through the other opening in the backrest of the child car seat and back towards
the front again.
5. Fasten the buckle of the 3-point seatbelt until it locks in place audibly and ensure that the
belt is not twisted.
6. Pull as tightly as possible on the diagonal belt until the whole of the 3-point belt is taut and
the child car seat is rmly in position.
7. Unfasten the belt buckle on the child car seat and place the belts on the outside of the seat.
8. Put your child in the child car seat.
9. Adjust the height of the head support so that the shoulder belt remains free.
10. Fasten the belt buckle again until you hear a click.
11. Pull the front adjustment strap to tighten the belts. Ensure that the straps are not twisted.
Page 27
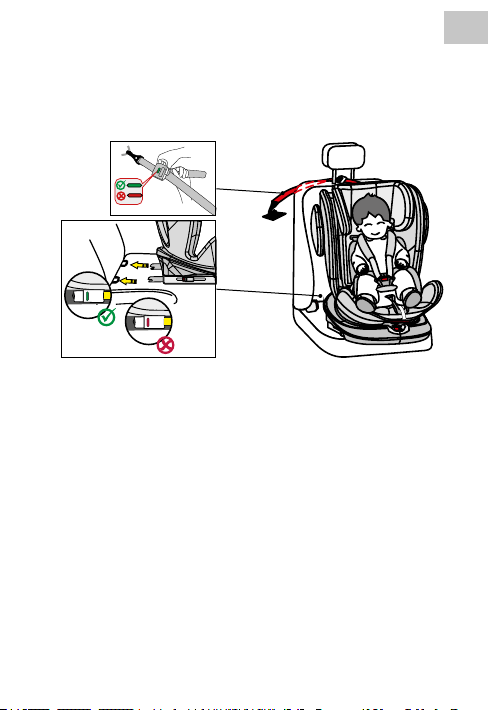
- 27 -
4) Group 1 (front-facing, with Isox and top tether)
(For children weighing 9-18 kg)
IMPORTANT: DO NOT USE THE CHILD CAR SEAT FACING IN THE DIRECTION OF TRAVEL
UNTIL YOUR CHILD WEIGHS AT LEAST 9 KG.
1. Turn the seat into the forward-facing position. Check that the child car seat is locked in this
position.
2. When facing in the direction of travel, the child car seat oers three adjustable seat
positions (position 2, 3 & 4).
3. Press the two lateral Isox connector buttons to extend the Isox connectors.
4. Guide the Isox connectors onto the Isox ttings on the seat of the vehicle and ensure
that they lock in position.
5. Push the child car seat in until it rests securely against the backrest of the car seat. Ensure
that both Isox indicators are showing green.
6. Take the top tether from its storage pocket and extend it to the maximum length.
7. Clip the top tether onto the hook provided in your car (e.g. on the back of the car seat or in
the boot. Please consult your car manual for this).
8. Tighten the top tether until the display on the top tether turns green.
9. Unfasten the belt buckle on the child car seat and place the belts on the outside of the seat.
10. Put your child in the child car seat.
11. Adjust the height of the head support so that the shoulder belt remains free.
12. Fasten the belt buckle again until you hear a click.
13. Pull the front adjustment strap to tighten the belts. Ensure that the straps are not twisted.
EN
Page 28
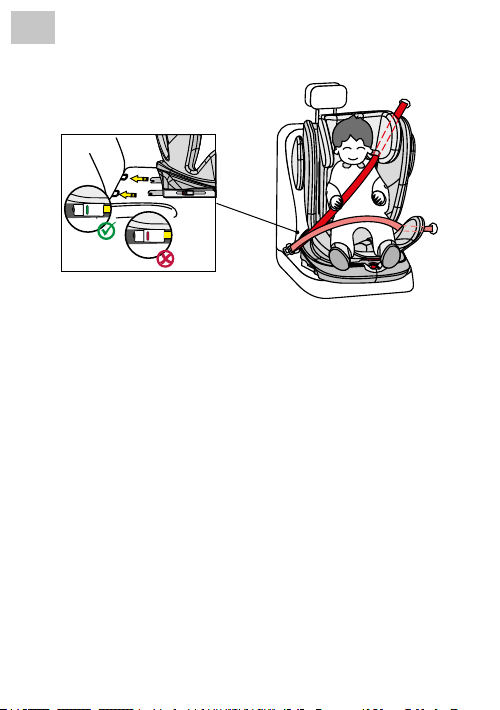
EN
3) Group 2/3 (forward-facing)
(For children weighing 15-36 kg)
INFORMATION:
FIRST REMOVE THE BELT SYSTEM AS DESCRIBED ABOVE.
1. Turn the seat into the forward-facing position. Check that the child car seat is locked in this
position.
2. Press the two lateral Isox connector buttons to extend the Isox connectors.
3. Guide the Isox connectors onto the Isox ttings on the seat of the vehicle and ensure
that they lock in position.
4. Push the child car seat in until it rests securely against the backrest of the car seat. Ensure
that both Isox indicators are showing green.
5. Now thread the diagonal belt through the 3-point car seatbelt guide on the head support
of the child car seat.
6. When placing your child in the child car seat, turn the car seat towards the car door for
convenience.
7. Put your child in the child car seat.
8. Adjust the height of the head support so that the child’s head is fully in the head support
and the diagonal belt exits the belt guide at the child’s shoulder height.
9. Turn the seat into the forward-facing position. Check that the child car seat is locked in this
position.
10. Fasten the belt buckle of the 3-point car seatbelt again until you hear a click.
11. Pull the diagonal strap in order to tighten it. Ensure that the straps are not twisted.
12. The child car seat may only be used in seat position 5 in this age class.
Installation without Isox:
Alternatively, the child car seat can also be installed for Group 2/3 with just the 3-point belt.
Connecting the seat with the Isox connectors is not absolutely essential but is recommended.
- 28 -
Page 29
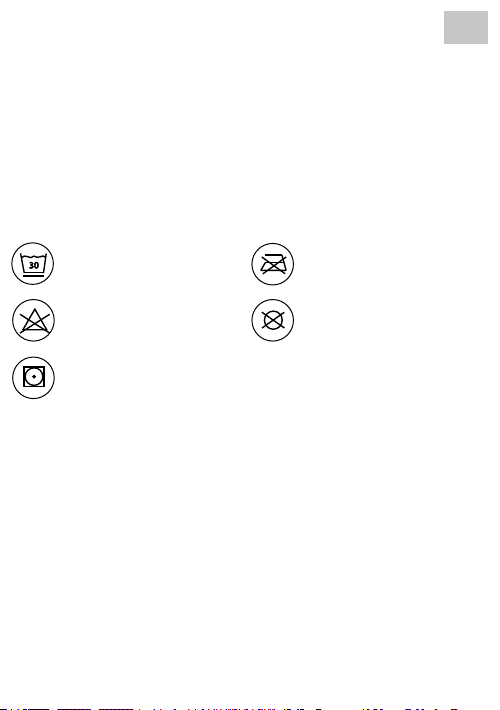
- 29 -
EN
CLEANING
This product has been developed in view of safety, comfort and functionality. Please take the
time to read these instructions carefully before using the product and store them in a safe place
for future reference.
To guarantee long-term usage of your child car seat, do not use any solvents, abrasives or
aggressive cleaning agents. Check the stability of the fabric and of the seams after each wash.
When washing the fabric, the instructions on the label (see below) must be followed carefully.
Wash at 30°C,
30
delicate wash
Do NOT bleach
Tumble dry at low temperature
Do NOT iron
Do NOT dry clean
MAINTENANCE
Regularly check the condition of the product for any damage. In the event of damage, do not
use the product and keep it out of the reach of children.
In case of any issues, please contact Osann Customer Service on +49 (0) 7731 / 970077.
Page 30

FR
Merci d'avoir choisi notre siège auto pour enfant Eno360.
Si vous avez besoin d'aide concernant ce produit, veuillez vous adresser à notre service client.
- 30 -
UTILISATION
• Ce produit est utilisable pour les enfants des groupes ECE 0+ / 1 / 2 / 3. Catégorie de poids:
0-36 kg. Tranche d'âge: 0-12ans.
• Groupe 0+ pour les enfants dont le poids est compris entre 0 à 13 kg. Le siège auto pour
enfant est monté dans la voiture dos à la route avec des connecteurs Isox et Top-Tether ou
avec la ceinture 3 points de la voiture. L'enfant est attaché par la ceinture à 5 points du siège
auto pour enfant.
• Groupe 1 pour les enfants dont le poids est compris entre 9-18 kg. Le siège auto pour enfant
est orienté vers l'avant et est attaché dans la voiture avec des connecteurs Isox et Top-Tether
ou une ceinture 3points. Une utilisation dos à la route jusqu'à 18 kg à l'aide des connecteurs
Isox et Top-Tether est également autorisée. L'enfant est attaché par la ceinture à 5 points du
siège auto pour enfant.
• Les groupes 2 et 3 sont destinés aux enfants dont le poids est compris entre 15 à 36 kg. Le
système de ceinture 5points du siège auto pour enfant est retiré. Le siège auto pour enfant
est orienté vers l'avant et monté dans la voiture via les connecteurs Isox. L'enfant est attaché
par la ceinture à 3 points de la voiture. Comme alternative, le siège auto pour enfant peut
être sécurisé directement par la ceinture à 3 points de la voiture sans les connecteurs Isox.
• Il est recommandé d'installer le siège auto pour enfant sur le siège arrière du véhicule.
Ne xez PAS le siège auto pour enfant pour une utilisation dos à la route dans le Groupe ECE
0+ / 1 sur le siège passager avant, où se trouve un airbag. Sauf si vous désactivez l'airbag.
Lisez attentivement le manuel d'utilisation du véhicule à ce sujet.
• Ce siège auto pour enfant n'est adapté que pour des véhicules équipés à la fois de xations
Isox et de ceintures de sécurité à 3 points selon ECE R16 ou d'autres normes équivalentes.
Le tableau suivant contient des informations sur les dispositifs et les méthodes de xation:
Groupe ECE Sens de montage Méthode d'installation Type Taille Isox
0+ Dos à la route Isox + Top-Tether
0+ Dos à la route
1 Dos à la route Isox + Top-Tether
Ceinture 3 points de
la voiture
Semiuniversel
Universel -
Semiuniversel
D
D
Page 31

- 31 -
Groupe ECE Sens de montage Méthode d'installation Type Taille Isox
1 Face à la route Isox + Top-Tether
1 Face à la route Isox + Top-Tether
2/3 Face à la route
2/3 Face à la route
Ceinture 3 points de
la voiture
Ceinture 3 points de la
voiture + Isox
Semiuniversel
Semiuniversel
Universel –
Semiuniversel
FR
B1
B1
–
AVERTISSEMENT
Installation avec ceinture 3 points (groupe 0+/1/2/3, 0-36 kg)
• Il s'agit d'un dispositif de retenue universel pour les enfants. Il est approuvé pour un usage
général conformément au règlement n° 44/04 de la CEE-ONU et est donc compatible avec
la plupart des sièges de véhicules.
• On peut s'attendre à une installation correcte du dispositif si le constructeur du véhicule
indique dans le manuel du véhicule que celui-ci est adapté à l'installation d'un système de
retenue universel pour les enfants du groupe d'âge concerné.
• Ce dispositif de retenue pour enfants a été classé dans la catégorie «Universel» dans des
conditions plus strictes par rapport aux versions précédentes qui ne portent pas ce marquage.
• Il convient uniquement aux véhicules équipés de ceintures de sécurité 3 points xes ou
automatiques conformes au règlement n° 16 de la CEE-ONU (ou équivalent).
• En cas de doute, consultez le fabricant ou le revendeur du dispositif de retenue pour enfants.
Installation avec connecteurs Isox & Top-Tether (groupe ECE 0+/1, 0-18 kg) ou connecteurs
Isox et ceinture 3 points (groupe ECE 2/3, 15-36 kg)
• Ce produit est un système de retenue pour enfant «semi-universel ». Il est homologué
conformément au règlement n°44/04 de la CEE-ONU pour une utilisation générale dans les
véhicules équipés de systèmes d'ancrage ISOFIX.
• Le système de retenue pour enfants s'adapte aux véhicules équipés de sièges désignés
comme positions Isox (voir le manuel du propriétaire de la voiture pour plus de détails) selon
la catégorie de siège auto pour enfant et la xation.
• Il convient uniquement aux véhicules équipés de ceintures de sécurité 3 points xes ou
automatiques conformes au règlement n° 16 de la CEE-ONU (ou équivalent).
• Les catégories de poids et les catégories de taille Isox pour lesquelles ce produit est prévu,
sont: Groupe 1, D et B1 et groupe 0+, D:
• En cas de doute, consultez le fabricant ou le revendeur du dispositif de retenue pour enfants.
Page 32

FR
- 32 -
AVERTISSEMENT
• Veuillez lire attentivement ces instructions avant utilisation et les conserver pour vous y référer
ultérieurement an d'assurer la sécurité de votre enfant. Le non-respect des consignes du
présent manuel peut entraîner de graves blessures pour votre enfant.
• Le siège enfant peut être utilisé avec son propre système de ceinture de sécurité à 5points
uniquement pour les enfants pesant moins de 18 kg (Groupe 0+ et groupe 1).
• Le siège enfant ne peut PAS être utilisé avec le système de ceinture de sécurité à 5 points
pour les enfants d'un poids supérieur à 18 kg (Groupes 2 / 3).
• Le siège enfant peut être installé face à la route avec les connecteurs Isox et Top-Tether ou
uniquement avec la ceinture à 3 points de la voiture face et dos à la route. Utiliser uniquement
le Top-Tether jusqu'au groupe 1 inclus, max. 18kg, en lien avec les connecteurs Isox.Important:
N'installez pas le siège face à la route avant que l'enfant ait atteint un poids d'au moins 9 kg.
• Pour l'installation Isox: Veillez à lire le manuel du constructeur automobile.
• Une installation du siège auto pour enfant pour le groupe 0+/1 n'est pas autorisée avec
seulement les connecteurs Isox, sans xation supplémentaire avec le Top-Tether.
• N'utilisez aucun autre point de contact porteur que ceux indiqués dans la notice et marqués
dans le système de retenue pour enfant.
• N'utilisez pas ce siège auto pour enfant à la maison. Il n'a pas été conçu pour être utilisé à la
maison et doit donc être utilisé exclusivement dans une voiture.
• Ne laissez jamais votre enfant sur le siège auto sans surveillance.
• Ne xez PAS le siège auto pour enfant pour une utilisation dos à la route dans le Groupe ECE
0+ / 1 sur le siège passager avant, où se trouve un airbag. Sauf si vous désactivez l'airbag.
Lisez attentivement le manuel d'utilisation du véhicule à ce sujet.
• Le siège pour enfant doit être remplacé lorsqu'il a été soumis à des contraintes intenses
lors d'un accident.
• Pour des raisons de sécurité, le siège auto pour enfant doit également être xé dans le
véhicule, même lorsque votre enfant ne s'y trouve pas.
• Assurez-vous toujours que toutes les sangles qui maintiennent le support de siège sur le
véhicule tiennent solidement et que toutes les sangles qui retiennent l'enfant soient adaptées
au corps de l'enfant. Assurez-vous également que les sangles ne soient pas en torsion.
• Les bagages et autres objets pouvant entraîner des blessures en cas de collision doivent
être sécurisés correctement.
• Les objets rigides et les pièces en plastique d'un dispositif de retenue pour enfant doivent
être placés et installés de manière à ne pas pouvoir être coincés par un siège ou une porte
de véhicule en mouvement pendant l'utilisation quotidienne.
• Il est important que les sangles du bas maintiennent fermement le bassin. Pour éviter le
risque de chute, votre enfant doit toujours être attaché.
• Il est dangereux d'apporter des modications ou des ajouts au produit sans l'approbation de
l'autorité compétente. Le non-respect des consignes d'installation du fabricant du système
de retenue pour enfant expose également à des risques.
• Ce siège pour enfant a été conçu pour des nouveau-nés et des enfants pesant jusqu'à 36 kg.
Ne surchargez jamais le siège pour enfant en y transportant plus d'un enfant ou des charges
supplémentaires.
• Le dispositif de retenue pour enfant ne doit pas être utilisé sans la housse de siège.
• La housse de siège ne doit pas être remplacée par une housse de siège autre que celle
recommandée par le fabricant, car cette housse fait partie intégrante des performances du
dispositif de retenue.
Page 33
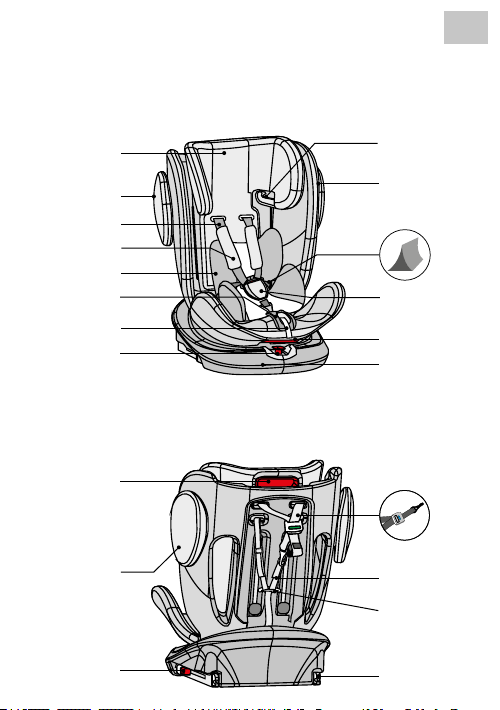
ÉLÉMENTS DU SIÈGE
Vue frontale
- 33 -
FR
Appuie-tête
réglable
Protection latérale
contre les chocs
Sangle d'épaule
Épaulette
Pads de confort
Réglage de la ceinture
Bande de réglage
Levier rotatif
Vue arrière
Réglage de
l'appuie-tête
Protection latérale
contre les chocs
Extension
Connecteur Isox
Guidage de ceinture
(Groupe 2 + 3)
Coque du siège
Support bébé (sous les
pads confort)
Fermoir de ceinture &
protège fermeture
Levier pour
réglage de l'inclinaison
Base Isox
Top-Tether
Sangle d'épaule
Arceau de ceinture
Connecteur
Isox
Page 34
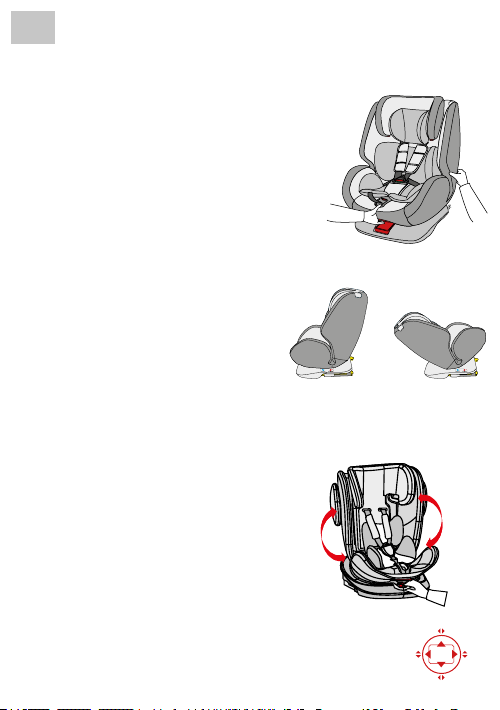
FR
- 34 -
UTILISATION DU SIÈGE AUTO POUR ENFANT
Réglage de l'angle d'inclinaison du
siège auto
• Avec une main, actionnez le levier de réglage
de l'inclinaison sur la partie inférieure avant de la
coque du siège.
• L'autre main maintient l'arrière de la coque du
siège et règle l'inclinaison.
• L'inclinaison maximale ne s'utilise que dans la po-
sition dos à la route, tandis que la position verticale
ne s'utilise que face à la route pour le groupe 2/3,
15-36kg.
Les positions d'assise suivantes sont possibles:
(Respectez l'étiquette sur le siège pour enfant)
Dos à la route 0-18 kg:
1 position (1 + A)
Face à la route 9-18 kg:
3 Positions (2 + 3 + 4)
Face à la route 15-36 kg:
1 position (5)
Rotation du siège auto pour enfant
• Avec une main, appuyez sur le bouton rouge à
l'avant de la base et avec l'autre main, tournez la
coque du siège. Lorsque la coque du siège est en
rotation, vous pouvez relâcher le levier.
• La base compte 4 positions de verrouillage à 90,
180, 270 et 0 / 360°. Si la coque du siège est dans
une de ces positions, vous l'entendez s'encliqueter.
• La position face à la route est destinée à des enfants
des groupes 1, 2 et 3. La position dos à la route est
destinée aux jeunes enfants des groupes 0+ et 1.
Uniquement face à
la route
(Illustration d'exemple)
(Illustration d'exemple)
(Illustration d'exemple)
Uniquement dos à
la route
(Illustration d'exemple)
0/360°
90°270 °
180°
Page 35
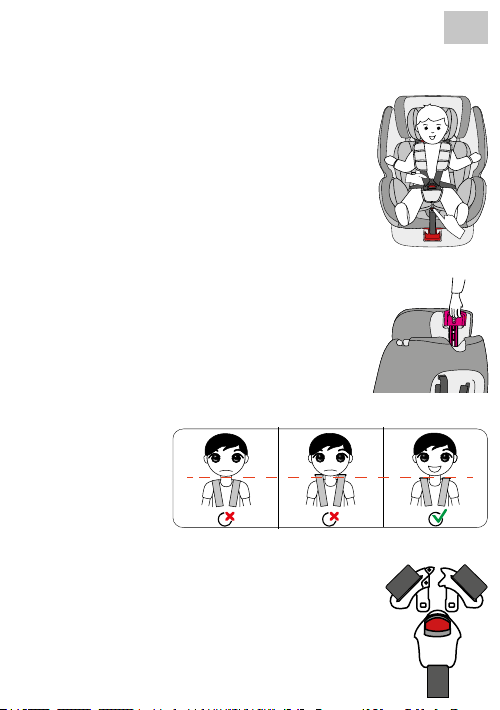
- 35 -
Réglage de la ceinture
• Pour libérer la ceinture, appuyez avec une main sur
le bouton de réglage de la ceinture avant dans la
partie du siège.
• Avec l'autre main, tenez la boucle avec les sangles
attachées, puis dégagez-la.
• Pour serrer la sangle, tirez sur la sangle de réglage
avant.
Réglage de l'appuie-tête
• Libérez la ceinture et tirez le levier à l'avant de
l'appuie-tête jusqu'à ce que l'appuie-tête soit à la
hauteur souhaitée.
• Veillez à ce que les sangles d'épaule soient à la
bonne hauteur. Celles-ci doivent sortir du siège à
la hauteur des épaules de l'enfant.
• Relâchez le levier et assurez-vous que l'appuie-tête
est bien verrouillé.
Ouverture/fermeture de la ceinture
• Pour déverrouiller la ceinture, appuyez sur le bouton
rouge de la boucle et séparez les deux languettes
de la boucle.
• Pour verrouiller la ceinture, rapprochez d'abord
les deuxlanguettes de la boucle, puis insérez-les
ensemble dans la boucle.
FR
Page 36
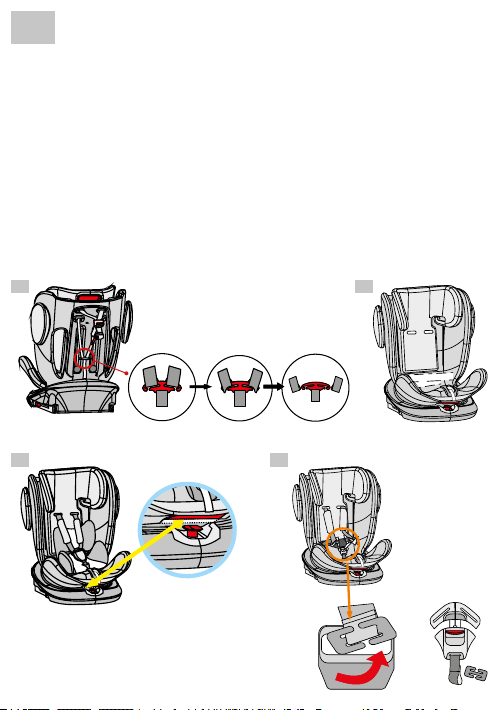
FR
- 36 -
Retrait du système de ceinture
• Détachez la ceinture
• Dégagez les sangles d'épaule de leurs supports métalliques à l'arrière du siège auto pour
enfant et faites-les passer à travers le siège auto pour enfant sur la face avant. (Fig. A)
• Retirez le rembourrage aux épaules ainsi que les boucles de la ceinture.
• Repliez la ceinture de telle sorte qu'elle puisse être rangée derrière la housse dans la cavité
sur le dossier. (Fig. B)
• An de retirer la boucle de ceinture, amenez d'abord le siège dans la position allongée maximale.
Puis faites tourner le siège dans la position à 90°.
• Retirez le capot et mettez-les de côté. (Fig. C)
• Passez maintenant les supports métalliques de la bouche de ceinture à travers l'ouverture et
remettez le capot en place. (Fig. D)
• Conservez bien toutes les pièces retirées.
A B
C D
(Illustrations d'exemple)
Page 37
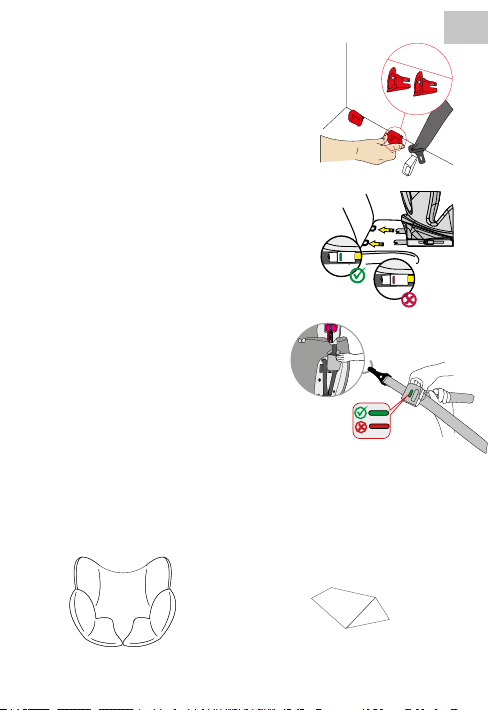
- 37 -
Connecteurs Isox
• Glissez les aides à l'insertion dans la fente du
rembourrage entre le dossier et l'assise et dans
les supports Isox.
• Le côté plat doit être orienté vers le bas. Cette
étape n'est pas nécessaire si le véhicule dispose
d'aides à l'insertion installées de façon permanente.
• Appuyez sur les boutons des connecteurs Isox
des deux côtés pour les allonger.
• Enfoncez les connecteurs Isox dans ces aides
à l'insertion et poussez-les jusqu'à ce qu'ils s'enclenchent de manière audible.
• Les achages des deux côtés deviennent verts
uniquement lorsque les connexions sont réalisées.
Appuyez le siège auto pour enfant contre le dossier
jusqu'à ce qu'il soit en position sécurisée.
Fixation supplémentaire avec
Top-Tether (Groupe 0+/1)
• Sortez le Top-Tether de la pochette.
• Pour relâcher le Top-Tether appuyez d'une main
sur le bouton gris et tirez d'une autre main sur
le côté de l'ancrage de la ceinture à la longueur
voulue.
• Pour xer le Top-Tether, accrochez l'ancrage au
point de xation du siège de la voiture et serrez-le
autant que possible. L'achage passe au vert
uniquement lorsque la ceinture est susamment
serrée.
Pads de confort et support bébé
FR
Pads de confort
jusqu'à 13 kg max.
Support bébé
(sous les pads de confort)
jusqu'à 9 kg max.
Page 38
FR
- 38 -
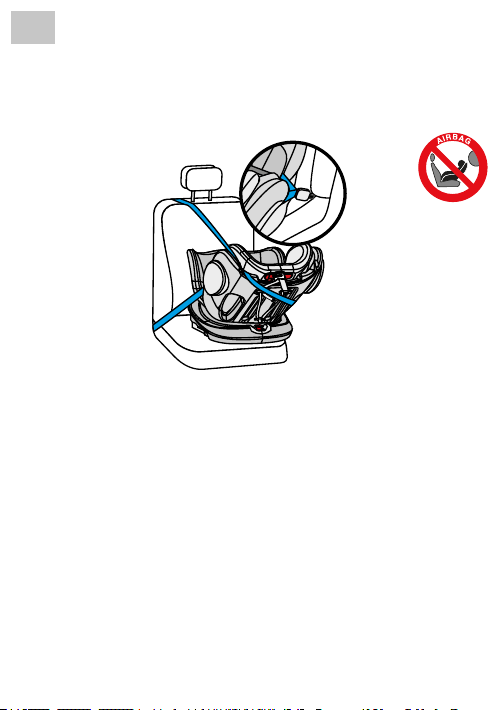
INSTALLATION DU SIÈGE AUTO POUR ENFANT
1) Groupe 0+ (dos à la route, avec ceinture 3 points de la voiture)
(Pour les enfants dont le poids est compris entre 0 et 13 kg)
1. Réglez le siège auto pour enfant en position d'inclinaison maximale (position 1) et faites-le
pivoter de manière à ce qu'il pointe vers la position A du siège vers l'arrière.
2. Poussez le siège auto pour enfant fermement contre le dossier du siège auto.
3. Déverrouillez la boucle de ceinture du siège auto pour enfant et placez les sangles sur la
partie extérieure du siège.
4. Commencez par retirer les pads de confort et le support bébé du siège auto pour enfant.
5. Desserrez au maximum la ceinture 3 points de la voiture et faites passer la ceinture
abdominale par les ouvertures latérales du siège auto pour enfant d'un côté à l'autre
verrouillez la boucle de la ceinture 3 points jusqu'à ce que vous entendiez qu'elle
s'enclenche.
6. Remettez maintenant les pads de confort et le support bébé du siège auto pour enfant.
7. Faites passer la ceinture diagonale le long de la coque extérieure du siège auto pour
enfant et assurez-vous qu'elle se trouve entre la coque du siège et l'appuie-tête.
8. Tirez au maximum sur la ceinture diagonale jusqu'à ce que toute la ceinture 3 points soit
tendue et que le siège auto pour enfant ne bouge plus.
9. Asseyez votre enfant dans le siège auto pour enfant.
10. Réglez la hauteur de l'appuie-tête de manière à ce que les sangles d'épaule se trouvent
au niveau des épaules de votre enfant.
11. Fermez à nouveau la boucle de ceinture jusqu'à entendre un «clic».
12. Tirez sur la languette de réglage avant pour tendre la ceinture. Veillez à ce que les sangles
ne soient pas en torsion.
et
Page 39
- 39 -
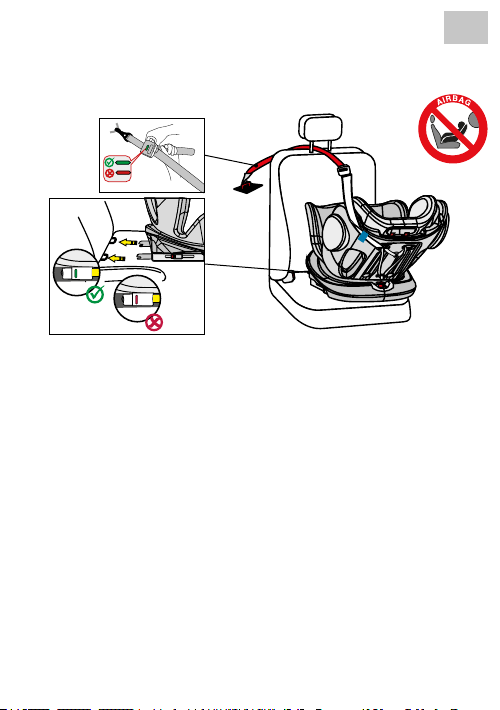
2) Groupe 0+/1 (dos à la route, avec Isox et Top-Tether)
(Pour les enfants dont le poids est compris entre 0 et 18 kg)
1. Réglez le siège auto pour enfant en position d'inclinaison maximale (position 1) et faites-le
pivoter de manière à ce qu'il pointe vers la position A du siège vers l'arrière.
2. Pressez les deux boutons de connecteurs latéraux Isox pour allonger les connecteurs
Isox sur la longueur.
3. Guidez les connecteurs Isox vers les éléments de liaison Isox du siège de la voiture et
laissez-les s'enclencher.
4. Poussez le siège auto pour enfant fermement contre le dossier du siège auto. Veillez à ce
que les deux achages Isox soient verts.
5. Sortez le Top-Tether de son sac de rangement et tirez-le jusqu'à la longueur maximale.
6. Passez le Top-Tether à travers le passant en caoutchouc bleu et tirez-le le long de l'extérieur
du siège auto pour enfant.
7. Accrochez le Top-Tether au crochet correspondant dans votre voiture (p.ex. à l'arrière du
siège ou dans le core. Veuillez consulter ici la notice d'utilisation de votre voiture).
8. Tendez maintenant le Top-Tether jusqu'à ce que l'achage sur le Top-Tether soit vert.
9. Pour asseoir confortablement votre enfant, tournez le siège auto pour enfant vers la
portière de la voiture.
10. Déverrouillez la boucle de ceinture du siège auto pour enfant et placez les sangles sur la
partie extérieure du siège.
11. Asseyez votre enfant dans le siège auto pour enfant.
12. Réglez la hauteur de l'appuie-tête de manière à ce que les sangles d'épaule se trouvent
au niveau des épaules de votre enfant.
13. Fermez à nouveau la boucle de ceinture jusqu'à entendre un «clic».
14. Tirez sur la languette de réglage avant pour tendre la ceinture. Veillez à ce que les sangles
ne soient pas en torsion.
15. Tournez le siège en position dos à la route. Vériez que le siège auto pour enfant soit bien
verrouillé dans cette position.
FR
Page 40
FR
- 40 -
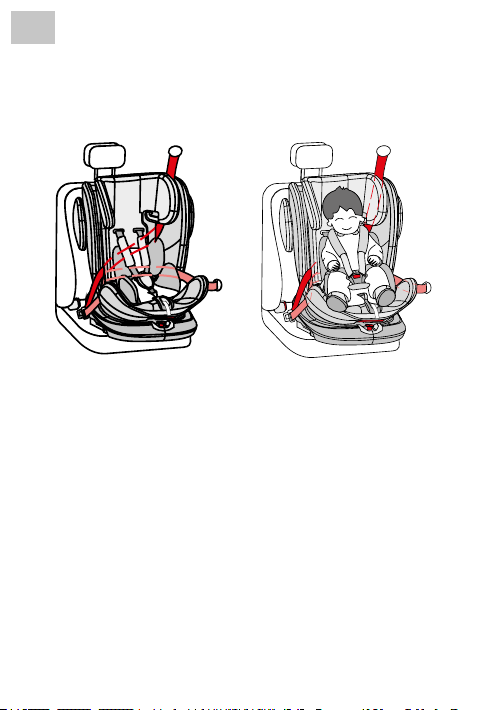
INSTALLATION DU SIÈGE AUTO POUR ENFANT
3) Groupe 1 (face à la route, avec ceinture 3 points de la voiture)
(Pour les enfants dont le poids est compris entre 9 et 18 kg)
IMPORTANT: N'UTILISEZ PAS LE SIÈGE AUTO POUR ENFANT DANS LE SENS DE CIRCULATION
TANT QUE LE POIDS DE L'ENFANT N'A PAS DÉPASSÉ 9 KG.
1. Tournez le siège auto pour enfant en position face à la route. Vériez que le siège auto
pour enfant soit bien verrouillé dans cette position.
2. Le siège auto enfant dispose de trois positions réglables dans le sens de circulation
(position 2, 3 et 4).
3. Sortez toute la longueur de la ceinture 3 points de la voiture. Passez-la dans la première
ouverture à l'avant du dossier du siège auto qui se trouve du côté de la ceinture 3 points
de la voiture.
4. Passez ensuite la ceinture 3 points à l'arrière sous le système de ceinture du siège auto
pour enfant et par l'autre ouverture dans le dossier du siège auto pour enfant et repassez
vers l'avant.
5. Insérez la boucle de la ceinture 3 points jusqu'à entendre un «clic» et veillez à ce que la
boucle ne soit pas entortillée.
6. Tirez au maximum sur la ceinture diagonale jusqu'à ce que toute la ceinture 3 points soit
tendue et que le siège auto pour enfant ne bouge plus.
7. Déverrouillez la boucle de ceinture du siège auto pour enfant et placez les sangles sur la
partie extérieure du siège.
8. Asseyez votre enfant dans le siège auto pour enfant.
9. Réglez la hauteur de l'appuie-tête de manière à ce que la sangle d'épaule reste libre.
10. Fermez à nouveau la boucle de ceinture jusqu'à entendre un «clic».
11. Tirez sur la languette de réglage avant pour tendre la ceinture. Veillez à ce que les sangles
ne soient pas en torsion.
Page 41
- 41 -
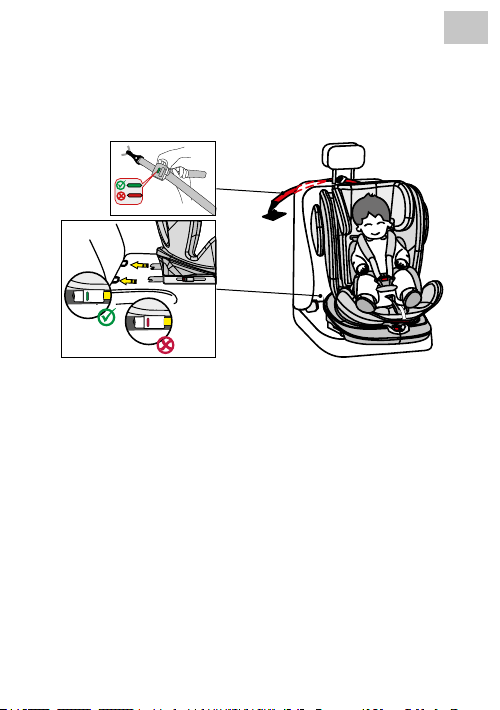
4) Groupe 1 (face à la route, avec Isox et Top-Tether)
(Pour les enfants dont le poids est compris entre 9 et 18 kg)
IMPORTANT: N'UTILISEZ PAS LE SIÈGE AUTO POUR ENFANT DANS LE SENS DE CIRCULATION
TANT QUE LE POIDS DE L'ENFANT N'A PAS DÉPASSÉ 9 KG.
1. Tournez le siège en position face à la route. Vériez que le siège auto pour enfant soit bien
verrouillé dans cette position.
2. Le siège auto enfant dispose de trois positions réglables dans le sens de circulation
(position 2, 3 et 4).
3. Pressez les deux boutons de connecteurs latéraux Isox pour allonger les connecteurs
Isox sur la longueur.
4. Guidez les connecteurs Isox vers les éléments de liaison Isox du siège de la voiture et
laissez-les s'enclencher.
5. Poussez le siège auto pour enfant fermement contre le dossier du siège auto. Veillez à ce
que les deux achages Isox soient verts.
6. Sortez le Top-Tether de son sac de rangement et tirez-le jusqu'à la longueur maximale.
7. Accrochez le Top-Tether au crochet correspondant dans votre voiture (p.ex. à l'arrière du
siège ou dans le core. Veuillez consulter ici la notice d'utilisation de votre voiture).
8. Tendez maintenant le Top-Tether jusqu'à ce que l'achage sur le Top-Tether soit vert.
9. Déverrouillez la boucle de ceinture du siège auto pour enfant et placez les sangles sur la
partie extérieure du siège.
10. Asseyez votre enfant dans le siège auto pour enfant.
11. Réglez la hauteur de l'appuie-tête de manière à ce que la sangle d'épaule reste libre.
12. Fermez à nouveau la boucle de ceinture jusqu'à entendre un «clic».
13. Tirez sur la languette de réglage avant pour tendre la ceinture. Veillez à ce que les sangles
ne soient pas en torsion.
FR
Page 42
FR
3) Groupe 2/3 (face à la route)
(Pour les enfants dont le poids est compris entre 15 et 36 kg)
INFORMATION:
TOUT D'ABORD, ENLEVEZ LE SYSTÈME DE CEINTURE DE SÉCURITÉ COMME DÉCRIT
PRÉCÉDEMMENT.
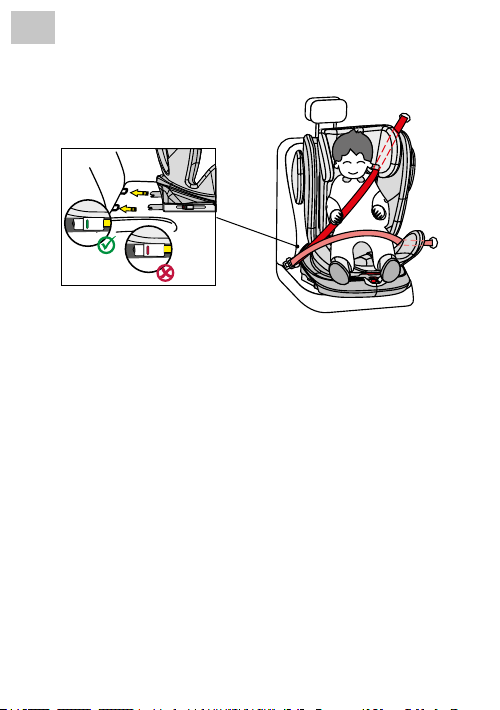
1. Tournez le siège en position face à la route. Vériez que le siège auto pour enfant soit bien
verrouillé dans cette position.
2. Pressez les deux boutons de connecteurs latéraux Isox pour allonger les connecteurs
Isox sur la longueur.
3. Guidez les connecteurs Isox vers les éléments de liaison Isox du siège de la voiture et
laissez-les s'enclencher.
4. Poussez le siège auto pour enfant fermement contre le dossier du siège auto. Veillez à ce
que les deux achages Isox soient verts.
5. Enlez la sangle diagonale de la ceinture à 3 points de la voiture dans le guide de ceinture
sur l'appuie-tête du siège auto pour enfant.
6. Pour asseoir confortablement votre enfant, tournez le siège auto pour enfant vers la
portière de la voiture.
7. Asseyez votre enfant dans le siège auto pour enfant.
8. Réglez la hauteur de l'appuie-tête de manière à ce que la tête de l'enfant soit entièrement
dans l'appuie-tête et que la sangle diagonale sorte par le guide de la ceinture au niveau
des épaules de l'enfant.
9. Tournez le siège en position face à la route. Vériez que le siège auto pour enfant soit bien
verrouillé dans cette position.
10. Fermez maintenant la boucle de la ceinture à 3 points de la voiture jusqu'à ce que vous
entendiez un clic.
11. Tirez sur la sangle diagonale pour la serrer. Veillez à ce que les sangles ne soient pas en
torsion.
12. Pour cette tranche d'âge, le siège auto pour enfant ne doit être utilisé que dans la position 5.
- 42 -
Page 43
- 43 -
Mise en place sans Isox:
Comme alternative, le siège auto pour enfant peut être monté uniquement avec la ceinture à
3 points pour le groupe 2/3. Une connexion avec les connecteurs Isox n'est pas obligatoire,
mais recommandée.
FR
NETTOYAGE
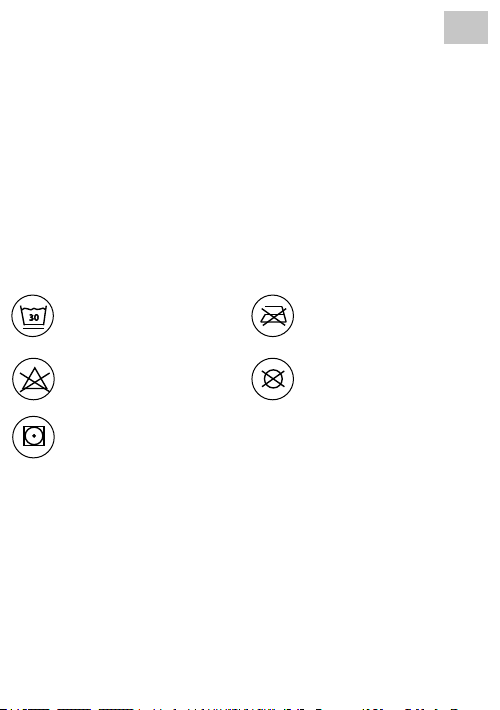
Ce produit a été conçu dans un souci de sécurité, de confort et de fonctionnalité. Veuillez
prendre le temps de lire attentivement cette notice avant d'utiliser ce produit et conservez-la
dans un endroit sûr pour vous y référer ultérieurement.
Pour assurer une longue durée de vie à votre siège auto pour enfant, n'utilisez pas de solvants,
produits abrasifs ou produits de nettoyage agressifs. Après chaque nettoyage, vériez la résistance du tissu et des coutures. Lors du lavage du tissu, suivez attentivement les instructions
sur l'étiquette (voir ci-dessous).
Lavage à 30°C,
30
lavage délicat
NE PAS utiliser d'eau de javel
Sèche-linge à basse
température
NE PAS repasser
NE PAS nettoyer chimiquement
ENTRETIEN
Vériez régulièrement l'état du produit pour déceler d'éventuels dommages. En cas de dommage,
n'utilisez pas le produit et conservez-le hors de portée des enfants.
En cas de problème, veuillez contacter le service client Osann au +49 (0) 7731 / 970077.
Page 44

IT
Grazie per aver scelto il nostro seggiolino auto per bambini Eno360.
In caso di domande riguardo al prodotto, rivolgersi al nostro servizio clienti.
- 44 -
UTILIZZO
• Questo prodotto è destinato ai bambini del gruppo ECE 0+/ 1/2/3. Intervallo di peso:
0-36 kg. Classe di età: 0-12 anni.
• Il gruppo 0+ è adatto ai bambini con un peso di 0-13 kg. Il seggiolino auto per bambini è
orientato all’indietro e montato sull’auto per mezzo dei connettori Isox e Top-Tether o di
una cintura a 3 punti. Il bambino viene allacciato con la cintura a 5 punti del seggiolino auto.
• Il gruppo 1 indica i bambini con un peso di 9-18 kg. Il seggiolino auto per bambini è orientato
in avanti ed è montato sull’auto per mezzo dei connettori Isox e della cinghia Top-Tether, o di
una cintura a 3 punti. È consentito anche l’utilizzo orientato all’indietro no a 18 kg con connettori Isox e Top-Tether. Il bambino viene allacciato con la cintura a 5 punti del seggiolino auto.
• I gruppi 2 e 3 sono adatti ai bambini con un peso di 15-36 kg. Il sistema di cinture a 5 punti
del seggiolino auto per bambini viene rimosso. Il seggiolino auto per bambini è orientato in
avanti ed è montato sull’auto per mezzo dei connettori Isox. Il bambino deve essere legato
per mezzo della cintura a 3 punti dell’auto. In alternativa, il seggiolino auto per bambini può
essere ssato direttamente con la cintura a 3 punti dell’auto senza i connettori Isox.
• Si consiglia di installare il seggiolino auto per bambini sul sedile posteriore del veicolo.
Per l’utilizzo orientato all’indietro nel gruppo ECE 0+/1, NON ssare il seggiolino auto per
bambini sul sedile anteriore dove si trova un airbag, a meno che non si disattivi l’airbag. A tale
scopo leggere le istruzioni d’uso del veicolo.
• Questo seggiolino auto per bambini è adatto esclusivamente a veicoli dotati sia di una connessione Isox che di cinture di sicurezza a 3 punti conformi alla norma ECE R16 o ad altre
norme equivalenti.
La seguente tabella contiene informazioni sui dispositivi e sui metodi di ssaggio:
Gruppo
ECE
Direzione di
montaggio
0+ All’indietro Isox + Top-Tether
0+ All’indietro
1 All’indietro Isox + Top-Tether
Metodo di instal-
lazione
Cintura a 3 punti
dell’auto
Tipo
Semi
universale
Universale -
Semi
universale
Grandezza
Isox
D
D
Page 45

- 45 -
IT
Gruppo
ECE
2/3 In avanti
2/3 In avanti
Direzione di
montaggio
1 In avanti Isox + Top-Tether
1 In avanti
Metodo di instal-
lazione
Cintura a 3 punti
dell’auto
Cintura a 3 punti
dell’auto
Cintura a 3 punti
dell’auto + Isox
Tipo
Semiuniversale
Universale -
Universale –
Semi
universale
Grandezza
Isox
B1
–
AVVERTENZA
Installazione con cintura a 3 punti (gruppo ECE 0+/1/2/3, 0-36 kg)
• Questo è un dispositivo di ritenuta universale per bambini. È omologato per l’uso generico
in conformità con il regolamento UN/ECE n. 44/04 ed è quindi compatibile con la maggior
parte dei sedili per veicoli.
• Se il costruttore del veicolo dichiara nel manuale che il veicolo è adatto al montaggio di
un sistema di ritenuta universale per bambini della rispettiva fascia di età, si può prevedere
un’installazione corretta del dispositivo.
• Questo sistema di ritenuta per bambini è stato classicato come appartenente alla categoria
“universale” in condizioni più rigorose rispetto ai modelli precedenti che non riportano questa
dicitura.
• È adatto esclusivamente a veicoli equipaggiati con cinture di sicurezza a 3 punti sse o
automatiche conformi al regolamento UN/ECE n. 16 (o a una norma equivalente).
• In caso di dubbi, è possibile rivolgersi al produttore del sistema di ritenuta per bambini o al
rivenditore.
Installazione con connettori Isox e cinghia Top-Tether (gruppo ECE 0+/1, 0-18 kg) o
connettori Isox e cintura a 3 punti (gruppo ECE 2/3, 15-36 kg)
• Questo è un sistema di ritenuta per bambini semi-universale. Conformemente al regolamento
UN/ECE n. 44/04, è omologato per l’uso generico in veicoli con sistemi di ancoraggio Isox.
• Il sistema di ritenuta per bambini è idoneo per i veicoli con sedili contrassegnati come posizioni
Isox (per dettagli, vedi il manuale operativo del veicolo): ciò varia a seconda della categoria di
seggiolini auto per bambini e del ssaggio.
• È adatto esclusivamente a veicoli equipaggiati con cinture di sicurezza a 3 punti sse o
automatiche conformi al regolamento UN/ECE n. 16 (o a una norma equivalente).
• Le classi di peso e le classi di grandezza Isox previste per questo prodotto sono: Gruppo 1,
D & B1 e gruppo 0+, D:
• In caso di dubbi, è possibile rivolgersi al produttore del sistema di ritenuta per bambini o al
rivenditore.
Page 46

IT
- 46 -
AVVERTENZA
• Si prega di leggere attentamente questo manuale prima dell’uso e di conservarlo per con-
sultazioni future, al ne di garantire la sicurezza del bambino. La mancata osservanza delle
istruzioni contenute nel presente manuale può causare gravi lesioni al bambino.
• Per bambini con un peso inferiore ai 18 kg (gruppo 0+ e gruppo 1), il seggiolino per bambini
può essere utilizzato esclusivamente con il proprio sistema di cinture a 5 punti.
• Per bambini con un peso superiore ai 18 kg (gruppo 2/3), il seggiolino per bambini NON può
essere utilizzato con il sistema di cinture a 5 punti.
• Il seggiolino per bambini può essere installato con un orientamento in avanti con i connettori
Isox e la cinghia Top-Tether, o solo con la cintura a 3 punti dell’auto. La cinghia Top-Tether può
essere utilizzata solo no al gruppo 1 compreso, max. 18 kg, in combinazione con i connettori
Isox. Importante: non installarlo orientato in avanti nché il bambino non abbia raggiunto un
peso di almeno 9 kg.
• Per l’installazione con Isox: leggere attentamente il manuale del costruttore del veicolo.
• L'installazione del seggiolino per bambini nel gruppo 0+/1 solo con i connettori Isox, senza
il ssaggio aggiuntivo con la cinghia Top-Tether, non è consentita.
• Non utilizzare punti di contatto portanti diversi da quelli descritti nelle istruzioni e contrassegnati
nel sistema di ritenuta per bambini.
• Non utilizzare questo seggiolino auto per bambini in casa. Non è progettato per l’uso domestico
e deve quindi essere utilizzato esclusivamente in un’auto.
• Non lasciare mai il bambino incustodito sul seggiolino.
• Per l’utilizzo orientato all’indietro nel gruppo ECE 0+/1, NON ssare il seggiolino auto per
bambini sul sedile anteriore dove si trova un airbag, a meno che non si disattivi l’airbag. A tale
scopo leggere le istruzioni d’uso del veicolo.
• Il seggiolino per bambini va sostituito nel caso in cui sia stato sottoposto a forti sollecitazioni
a causa di un incidente.
• Per motivi di sicurezza, il seggiolino auto per bambini deve essere ssato nel veicolo anche
quando il bambino non è seduto nel seggiolino auto per bambini.
• Accertarsi sempre che tutte le cinghie che tengono ssato il supporto del seggiolino al veicolo
siano strette e che tutte le cinture che trattengono il bambino siano state adattate al corpo del
bambino. Assicurarsi inoltre che le cinture non siano attorcigliate.
• Il bagaglio o altri oggetti che possano causare lesioni in caso di collisione devono essere
ssati correttamente.
• Gli oggetti rigidi e le parti in plastica di un sistema di ritenuta per bambini devono essere
collocati e installati in modo che nell’uso quotidiano non possano essere bloccati da un
sedile mobile o da uno sportello del veicolo.
• È importante che le cinture di sicurezza incorporate nella parte bassa del seggiolino ssino
saldamente il bacino. Per evitare cadute, il bambino deve sempre avere le cinture allacciate.
• È pericoloso apportare modiche o aggiunte al prodotto senza il consenso dell’autorità
competente. La mancata osservanza delle istruzioni di installazione del produttore del
sistema di ritenuta per bambini può esporre a pericoli.
• Questo seggiolino per bambini è stato concepito per neonati e bambini con un peso no a 36
kg. Non sovraccaricare il seggiolino per bambini trasportando su di esso più di un bambino
o carichi aggiuntivi.
• Il dispositivo di ritenuta per bambini non deve essere utilizzato senza la fodera del seggiolino.
• La fodera del seggiolino non deve essere sostituita con una fodera diversa da quella racco-
mandata dal costruttore, in quanto tale fodera è parte integrante delle prestazioni di ritenuta.
Page 47
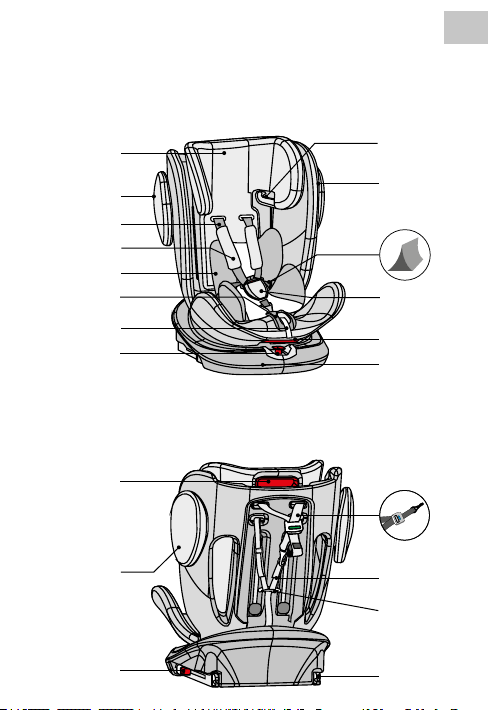
PARTI DEL SEGGIOLINO
Vista anteriore
- 47 -
IT
Poggiatesta
regolabile
Protezione antiurto
laterale
Cintura di ritenuta
spalle
Spallina
Inserto comfort
Regolazione della
Cinghia di regolazione
cintura
Leva girevole
Vista posteriore
Regolazione del
poggiatesta
Protezione antiurto
laterale
Estensione
connettore Isox
Guida della cintura
(Gruppo 2 + 3)
Guscio del seggiolino
Inserto per bebè (sotto
l’inserto comfort)
Fibbia e
imbottitura della bbia
Leva per la
regolazione dell’angolo
Stazione Isox
Top-Tether
Cintura di
ritenuta spalle
Staa della cintura
Connettore
Isox
Page 48
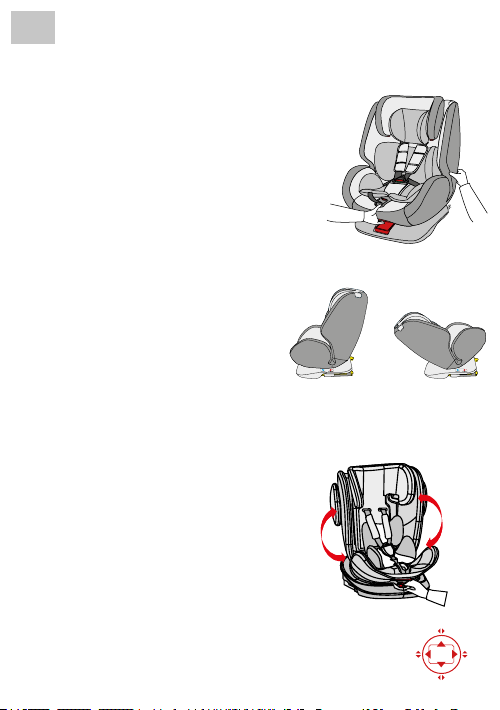
IT
- 48 -
UTILIZZO DEL SEGGIOLINO AUTO PER BAMBINI
Impostazione dell’angolo di
inclinazione del sedile dell’auto
• Azionare con una mano la leva per la regolazione
dell’angolo posta nella parte anteriore inferiore del
guscio del seggiolino.
• Con l’altra mano sorreggere il retro del guscio del
seggiolino e regolare l’angolo.
• L’angolo massimo si applica soltanto alla posizione
orientata all’indietro, l’angolo retto soltanto alla po-
sizione orientata in avanti per il gruppo 2/3, 15-36 kg.
Sono possibili le seguenti posizioni:
(Osservare l’etichetta sul seggiolino per bambini)
Orientato all’indietro 0-18 kg:
1 posizione (1 + A)
Orientato in avanti 9-18 kg:
3 posizioni (2 + 3 + 4)
Orientato in avanti 15-36 kg:
1 posizione (5)
Rotazione del seggiolino auto per
bambini
• Premere con una mano il pulsante rosso nella parte
anteriore della base e con l’altra mano ruotare il guscio del seggiolino. Mentre il guscio del seggiolino
ruota, la leva girevole può essere rilasciata.
• Ci sono 4 posizioni di blocco a 90°, 180°, 270° e
0/360° in direzione della base. Se il guscio del seggiolino si trova in una di queste posizioni, si blocca
in posizione con un clic udibile.
• La posizione orientata in avanti è indicata per i bambini dei gruppi 1, 2 e 3. La posizione orientata all’indietro è per i bambini più piccoli dei gruppi 0+ e 1.
Unicamente orientato
in avanti
(Figura esemplicativa)
(Figura esemplicativa)
(Figura esemplicativa)
Unicamente orientato
all’indietro
(Figura illustrativa)
0/360°
90°270°
180°
Page 49
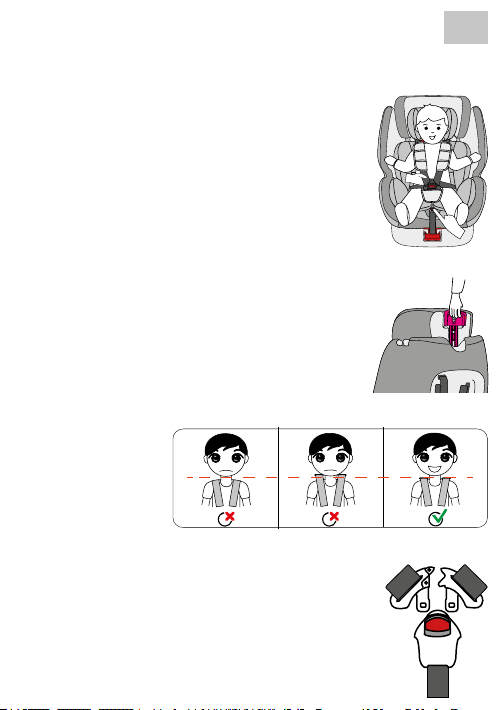
- 49 -
Regolazione della cintura
• Per slacciare la cintura, premere con una mano il
pulsante per la regolazione della cintura nell’area
del seggiolino.
• Con l’altra mano tenere ferma la bbia con le cinture
allacciate e poi rilasciarla.
• Per ssare la cintura, tirare la cinghia di regolazione
anteriore.
Regolazione del poggiatesta
• Slacciare la cintura e tirare la leva del poggiatesta
nché non si trova all’altezza desiderata.
• Prestare attenzione all’altezza corretta delle cinture
di ritenuta spalle, che dovrebbe corrisponde all’al-
tezza delle spalle del bambino sul seggiolino.
• Rilasciare la leva e assicurarsi che il poggiatesta
sia bloccato.
Apertura/chiusura della cintura
• Per sbloccare la cintura, premere il pulsante rosso
sulla bbia e separare le due linguette della bbia.
• Per bloccare la cintura, collegare prima le due
linguette e inserirle insieme nella bbia.
IT
Page 50
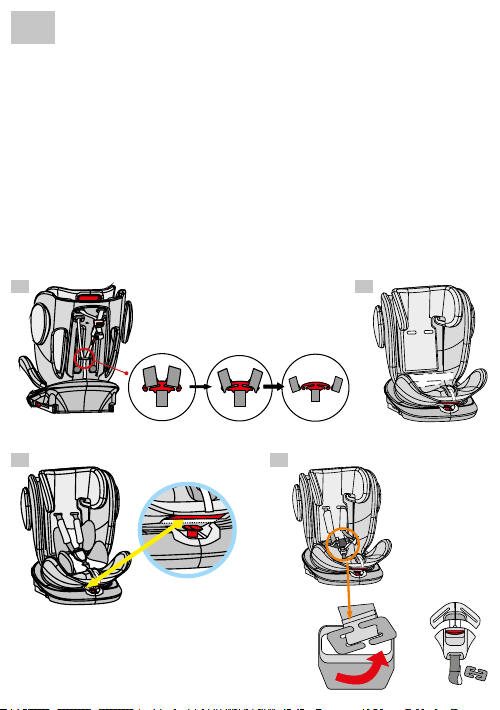
IT
- 50 -
Rimozione del sistema cintura
• Slacciare la cintura
• Estrarre il sistema cintura e le imbottiture dalla staa metallica sul retro del seggiolino e farle
passare attraverso il seggiolino sul lato anteriore. (Fig. A)
• Rimuovere le spalline e le bbie della cintura dalla cintura.
• Piegare la cintura in modo che possa essere riposta dietro la fodera nella depressione dello
schienale. (Fig. B)
• Per rimuovere la bbia della cintura, innanzitutto spostare il seggiolino nella posizione reclinata
massima. Dopodiché, ruotare il seggiolino nella posizione a 90°.
• Rimuovere la copertura e metterla da parte. (Fig. C)
• Far passare il morsetto metallico della bbia attraverso l’apertura e in seguito riapplicare la
copertura. (Fig. D)
• Conservare con cura tutti i componenti rimossi.
A B
C D
(Figure esemplicative)
Page 51
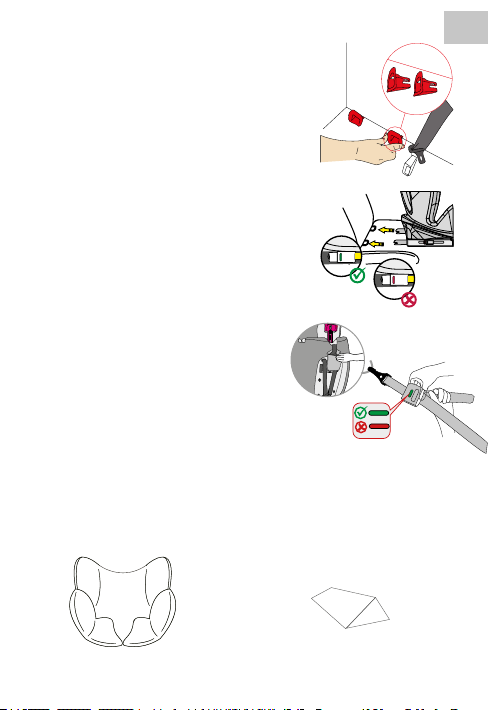
- 51 -
Elementi di connessione Isox
• Far scorrere gli ausili di inserimento attraverso la
fessura nell’imbottitura tra schienale e sedile e
negli attacchi Isox.
• Il lato piatto deve essere rivolto verso il basso.
Questo passaggio non è necessario se il veicolo
dispone di ausili di inserimento ssi già installati.
• Premere i pulsanti degli elementi di connessione
Isox su entrambi i lati per allungarli.
• Far scorrere gli elementi di connessione Isox in
questi ausili di inserimento e premere nché non
scattano in posizione in maniera udibile.
• Le spie su entrambi i lati diventano verdi solo
quando vengono stabiliti i collegamenti. Premere
il seggiolino auto per bambini contro lo schienale
nché non si trova saldamente in posizione.
Fissaggio supplementare con
Top-Tether (Gruppo 0+/1)
• Rimuovere la cinghia Top-Tether dal suo involucro.
• Per sbloccare la cinghia Top-Tether, premere con
una mano il pulsante grigio e tirare con l’altra mano
il lato dell’ancoraggio della cintura alla lunghezza
desiderata.
• Per ssare la cinghia Top-Tether, appendere l’ancoraggio al punto di ssaggio sul sedile dell’auto e
tirarlo no a stringerlo il più possibile. L’indicatore
non diventa verde nché la cintura non è sucien-
temente tesa.
Inserto comfort e inserto per bebè
IT
Inserto comfort
max. 13 kg
Inserto per bebè
(sotto l’inserto comfort)
max. 9 kg
Page 52
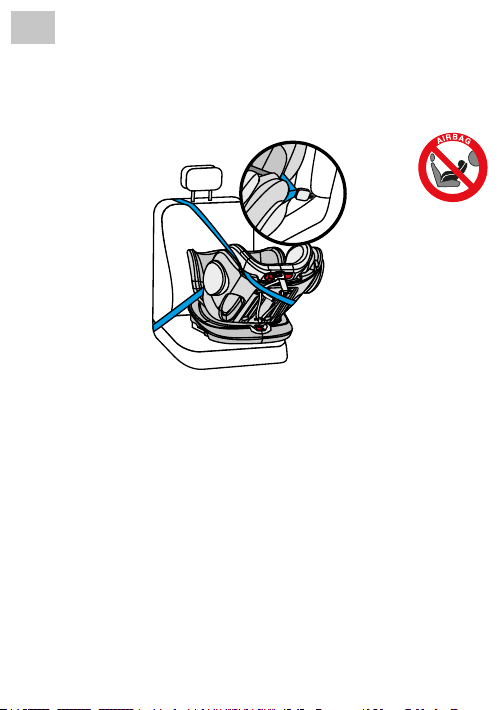
IT
- 52 -
INSTALLAZIONE DEL SEGGIOLINO AUTO PER BAMBINI
1) Gruppo 0+ (orientato all’indietro, con cintura a 3 punti dell’auto)
(Per bambini con un peso di 0-13 kg)
1. Posizionare il seggiolino auto per bambini nella posizione reclinata massima (posizione 1) e
ruotarlo in modo che si trovi nella posizione A con un orientamento all’indietro.
2. Far scorrere il seggiolino auto per bambini nché non aderisca saldamente allo schienale
del sedile auto.
3. Slacciare la bbia del seggiolino auto per bambini e posizionare le cinture sul lato esterno
del seggiolino.
4. Rimuovere prima l’inserto comfort e l’inserto per bebè del seggiolino auto per bambini.
5. Tirare la cintura a 3 punti dell'auto alla lunghezza massima e guidare la cintura addominale
attraverso le guide laterali del seggiolino auto per bambini da un lato all'altro e chiudere la
bbia della cintura a 3 punti nché non si sente lo scatto in posizione.
6. Quindi, reinserire l’inserto comfort e l’inserto per bebè nel seggiolino.
7. Guidare la cintura diagonale lungo il guscio esterno del seggiolino e assicurarsi che passi
tra il guscio del seggiolino e il poggiatesta.
8. Tirare il più a fondo possibile il segmento diagonale della cintura no a quando l'intera
cintura a 3 punti non sia tesa e il seggiolino stabile.
9. Collocare il bambino sul seggiolino auto per bambini.
10. Regolare l’altezza del poggiatesta in modo che le cinture di ritenuta spalle si trovino
all’altezza delle spalle del bambino.
11. Chiudere nuovamente la bbia della cintura nché non si sente un “clic”.
12. Tirare la linguetta di regolazione anteriore per stringere le cinture. Accertarsi che le cinghie
non siano attorcigliate.
Page 53
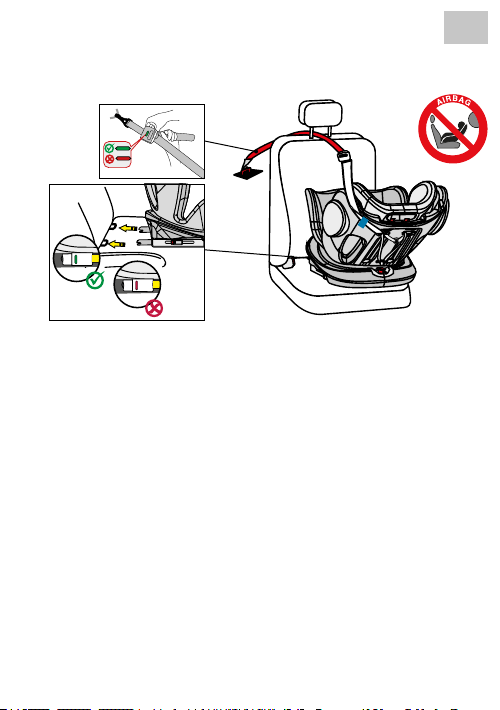
- 53 -
2) Gruppo 0+/1 (orientato all’indietro, con Isox e Top-Tether)
(Per bambini con un peso di 0-18 kg)
1. Posizionare il seggiolino auto per bambini nella posizione reclinata massima (posizione 1) e
ruotarlo in modo che si trovi nella posizione A con un orientamento all’indietro.
2. Premere entrambi i pulsanti laterali dei connettori Isox per estendere in lunghezza i
connettori Isox.
3. Guidare i connettori Isox verso gli elementi di connessione Isox sul sedile del veicolo e
farli innestare.
4. Far scorrere il seggiolino auto per bambini nché non aderisca saldamente allo schienale
del sedile auto. Assicurarsi che entrambi gli indicatori Isox siano di colore verde.
5. Estrarre la cinghia Top-Tether dalla sua custodia protettiva e tirarla no a raggiungere la
sua lunghezza massima.
6. Far passare la cinghia Top-Tether attraverso la guida blu dell'elastico e continuare ad
accompagnarla lungo il lato esterno del seggiolino.
7. Agganciare la cinghia Top-Tether al gancio corrispondente della propria auto (ad es. sul
retro del sedile dell’auto). Fare riferimento al manuale d’uso della propria auto).
8. Stringere quindi la cinghia Top-Tether nché l'indicatore sulla cinghia Top-Tether non
diventi verde.
9. Per posizionare il bambino in maniera più agevole, ruotare il seggiolino auto per bambini
verso lo sportello dell’auto.
10. Slacciare la bbia del seggiolino auto per bambini e posizionare le cinture sul lato esterno
del seggiolino.
11. Collocare il bambino sul seggiolino auto per bambini.
12. Regolare l’altezza del poggiatesta in modo che le cinture di ritenuta spalle si trovino
all’altezza delle spalle del bambino.
13. Chiudere nuovamente la bbia della cintura nché non si sente un “clic”.
14. Tirare la linguetta di regolazione anteriore per stringere le cinture. Accertarsi che le cinghie
non siano attorcigliate.
15. Ruotare il seggiolino nella posizione orientata all’indietro. Controllare che il seggiolino auto
per bambini sia bloccato in questa posizione.
IT
Page 54
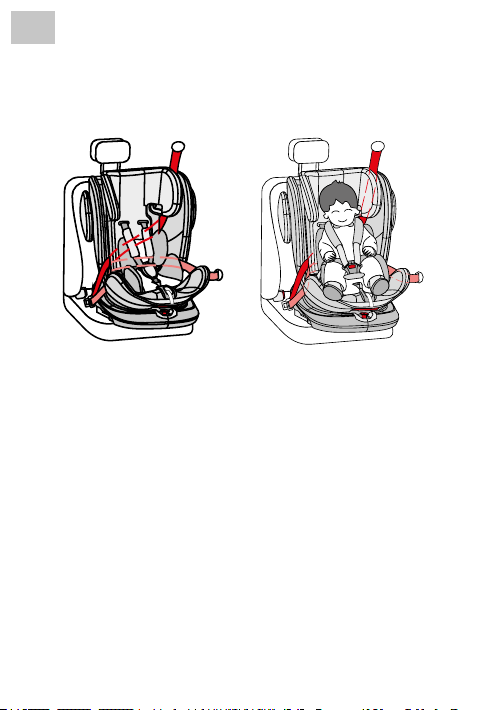
IT
- 54 -
INSTALLAZIONE DEL SEGGIOLINO AUTO PER BAMBINI
3) Gruppo 1 (orientato all’indietro, con cintura a 3 punti dell’auto)
(Per bambini di peso 9-18 kg)
IMPORTANTE: NON UTILIZZARE IL SEGGIOLINO AUTO PER BAMBINI NELLA DIREZIONE DI
MARCIA FINO A QUANDO IL BAMBINO NON ABBIA RAGGIUNTO I 9 KG DI PESO.
1. Ruotare il seggiolino auto per bambini nella posizione orientata in avanti. Controllare che il
seggiolino auto per bambini sia bloccato in questa posizione.
2. Se installato nella direzione di marcia, il seggiolino auto per bambini dispone di tre posizio
ni di seduta regolabili (Posizione 2, 3 e 4).
3. Estendere la cintura a 3 punti dell'auto alla sua lunghezza massima e farla passare attraverso
la prima apertura sulla parte anteriore dello schienale del seggiolino, che si trova sul lato
della cintura a 3 punti dell'auto.
4. Far passare la cintura a 3 punti sul retro sotto il sistema cintura del seggiolino auto per
bambini e attraverso l'altra apertura nello schienale del seggiolino per riportarla indietro
no alla parte anteriore.
5. Chiudere la bbia della cintura a 3 punti nché non si sente lo scatto in posizione e assicurarsi
che la cintura non sia attorcigliata.
6. Tirare il più a fondo possibile il segmento diagonale della cintura no a quando l'intera
cintura a 3 punti non sia tesa e il seggiolino stabile.
7. Slacciare la bbia del seggiolino auto per bambini e posizionare le cinture sul lato esterno
del seggiolino.
8. Collocare il bambino sul seggiolino auto per bambini.
9. Regolare l’altezza del poggiatesta in modo che la cintura di ritenuta spalle rimanga libera.
10. Chiudere nuovamente la bbia della cintura nché non si sente un “clic”.
11. Tirare la linguetta di regolazione anteriore per stringere le cinture. Accertarsi che le cinghie
non siano attorcigliate.
Page 55
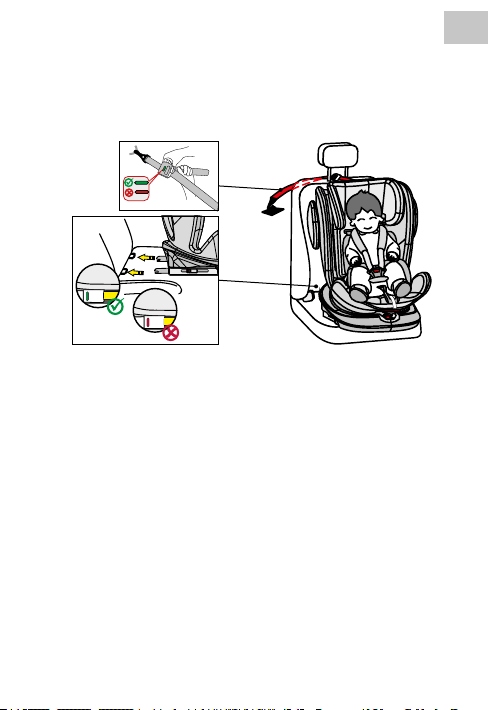
- 55 -
4) Gruppo 1 (orientato all’indietro, con Isox e Top-Tether)
(Per bambini di peso 9-18 kg)
IMPORTANTE: NON UTILIZZARE IL SEGGIOLINO AUTO PER BAMBINI NELLA DIREZIONE DI
MARCIA FINO A QUANDO IL BAMBINO NON ABBIA RAGGIUNTO I 9 KG DI PESO.
1. Ruotare il seggiolino nella posizione orientata in avanti. Controllare che il seggiolino auto
per bambini sia bloccato in questa posizione.
2. Se installato nella direzione di marcia, il seggiolino auto per bambini dispone di tre posizioni
di seduta regolabili (Posizione 2, 3 e 4).
3. Premere entrambi i pulsanti laterali dei connettori Isox per estendere in lunghezza i
connettori Isox.
4. Guidare i connettori Isox verso gli elementi di connessione Isox sul sedile del veicolo e
farli innestare.
5. Far scorrere il seggiolino auto per bambini nché non aderisca saldamente allo schienale
del sedile auto. Assicurarsi che entrambi gli indicatori Isox siano di colore verde.
6. Estrarre la cinghia Top-Tether dalla sua custodia protettiva e tirarla no a raggiungere la
sua lunghezza massima.
7. Agganciare la cinghia Top-Tether al gancio corrispondente della propria auto (ad es. sul
retro del sedile dell’auto). Fare riferimento al manuale d’uso della propria auto).
8. Stringere quindi la cinghia Top-Tether nché l'indicatore sulla cinghia Top-Tether non
diventi verde.
9. Slacciare la bbia del seggiolino auto per bambini e posizionare le cinture sul lato esterno
del seggiolino.
10. Collocare il bambino sul seggiolino auto per bambini.
11. Regolare l’altezza del poggiatesta in modo che la cintura di ritenuta spalle rimanga libera.
12. Chiudere nuovamente la bbia della cintura nché non si sente un “clic”.
13. Tirare la linguetta di regolazione anteriore per stringere le cinture. Accertarsi che le cinghie
non siano attorcigliate.
IT
Page 56
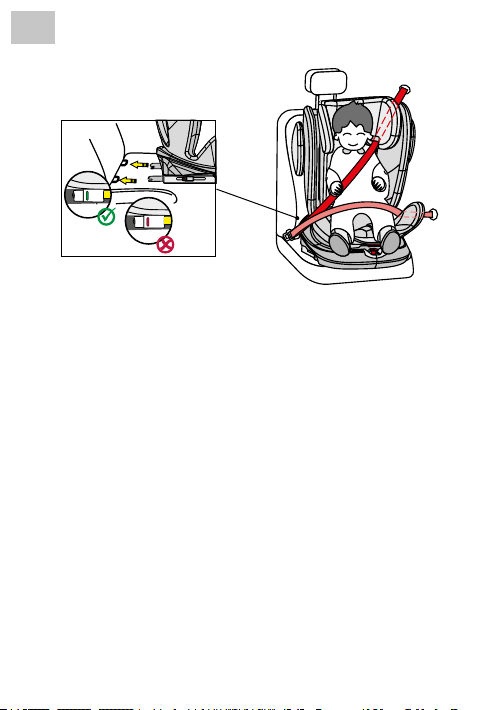
IT
3) Gruppo 2/3 (orientato in avanti)
(Per bambini con un peso di 15-36 kg)
INFORMAZIONE:
RIMUOVERE INNANZITUTTO IL SISTEMA CINTURA COME DESCRITTO IN PRECEDENZA.
1. Ruotare il seggiolino nella posizione orientata in avanti. Controllare che il seggiolino auto
per bambini sia bloccato in questa posizione.
2. Premere entrambi i pulsanti laterali dei connettori Isox per estendere in lunghezza i
connettori Isox.
3. Guidare i connettori Isox verso gli elementi di connessione Isox sul sedile del veicolo e
farli innestare.
4. Far scorrere il seggiolino auto per bambini nché non aderisca saldamente allo schienale
del sedile auto. Assicurarsi che entrambi gli indicatori Isox siano di colore verde.
5. Far passare il segmento diagonale della cintura a 3 punti attraverso la guida della cintura
nel poggiatesta del seggiolino auto.
6. Per posizionare il bambino in maniera più agevole, ruotare il seggiolino auto per bambini
verso lo sportello dell’auto.
7. Collocare il bambino sul seggiolino auto per bambini.
8. Regolare l’altezza del poggiatesta in modo che la testa del bambino poggi completamente
contro il poggiatesta e il segmento diagonale fuoriesca dalla guida della cintura all’altezza
delle spalle del bambino.
9. Ruotare il seggiolino nella posizione orientata in avanti. Controllare che il seggiolino auto
per bambini sia bloccato in questa posizione.
10. Ora chiudere la bbia della cintura a 3 punti dei veicolo nché non si sente un “clic”.
11. Tirare la cinghia di regolazione anteriore per tenderla. Accertarsi che le cinghie non siano
attorcigliate.
12. In questa classe di età, il seggiolino auto per bambini può essere utilizzato unicamente
nella posizione 5.
Montaggio senza Isox:
In alternativa, nel gruppo 2/3 il seggiolino auto per bambini può essere montato anche soltanto
con la cintura a 3 punti. La connessione con i connettori Isox non è strettamente necessaria,
ma raccomandata.
- 56 -
Page 57
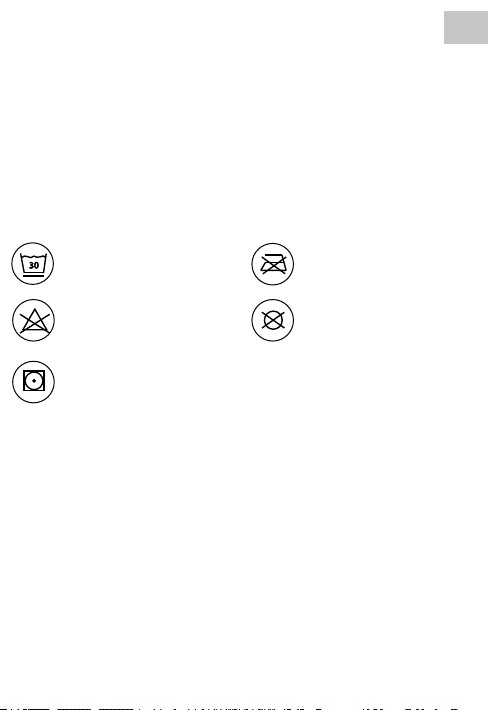
- 57 -
IT
PULIZIA
Questo prodotto è stato progettato pensando alla sicurezza, al comfort e alla funzionalità. Si
prega di leggere attentamente il presente manuale prima di utilizzare il prodotto e di conservarlo
in un luogo sicuro per eventuali consultazioni future.
Al ne di garantire un utilizzo prolungato del seggiolino auto per bambini, non utilizzare solventi
e detergenti abrasivi o aggressivi. Dopo ogni lavaggio controllare la tenuta del tessuto e delle
cuciture. Per il lavaggio del tessuto seguire attentamente le istruzioni riportate sull’etichetta
(vedi sotto).
Lavare a 30 °C,
30
ciclo delicato
NON candeggiare
Asciugatura in tamburo a
bassa temperatura
NON stirare
NON lavare a secco
MANUTENZIONE
Controllare regolarmente lo stato del prodotto per individuare eventuali danni. In caso di danni,
non utilizzare il prodotto e tenerlo fuori dalla portata dei bambini.
In caso di problemi, contattare il servizio clienti Osann al numero +49 (0) 7731 / 970077.
Page 58
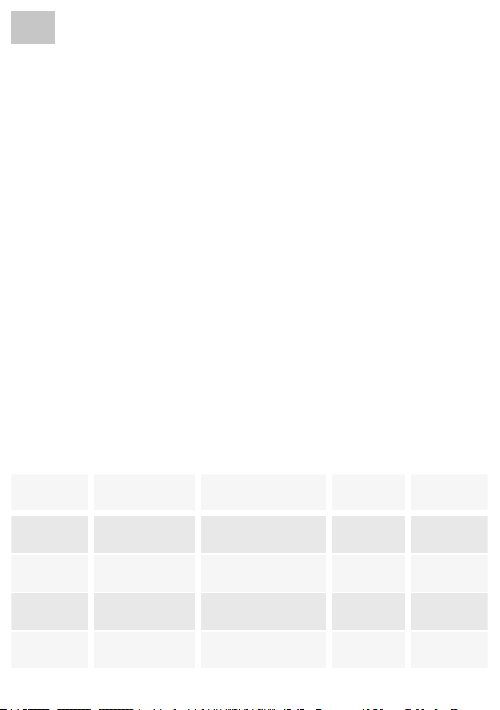
ES
Muchas gracias por elegir nuestro asiento infantil Eno360.
Si necesita ayuda con este producto, diríjase a nuestro servicio de atención al cliente.
- 58 -
USO
• Este producto está destinado a niños del grupo ECE 0+/1/2/3. Rango de peso: 0-36 kg.
Rango de edad: 0-12 años.
• El grupo 0+ hace referencia a los niños de 0 a 13 kg. El asiento infantil se instala orientado
hacia atrás con conectores Isox y el anclaje superior o con el cinturón de 3 puntos en el
automóvil. Se sujeta al niño con el cinturón de 5 puntos del asiento infantil abrochado.
• El grupo 1 hace referencia a los niños de 9 a 18 kg. El asiento infantil está orientado hacia
delante y se ja en el coche mediante conectores Isox y el anclaje superior o el cinturón de
3 puntos. También se permite el uso hacia atrás hasta 18 kg con conectores Isox y el anclaje
superior. Se sujeta al niño con el cinturón de 5 puntos del asiento infantil abrochado.
• Los grupos 2 y 3 hacen referencia a niños con un peso de 15 a 36 kg.
El sistema de cinturones de seguridad de 5 puntos del asiento infantil para automóvil se
retira. El asiento infantil para automóvil se coloca orientado hacia delante y se monta en el
coche mediante conectores Isox. Se sujeta al niño con el cinturón de 3 puntos del automóvil
abrochado. Alternativamente, el asiento infantil para automóvil puede jarse directamente
con el cinturón de 3 puntos del coche sin necesidad de conectores Isox.
• Se recomienda instalar el asiento infantil en el asiento trasero del vehículo. En el caso del
Grupo ECE 0+ /1, NO je el asiento infantil orientado hacia atrás en el asiento delantero donde
haya un airbag. a menos que el airbag se pueda desactivar. Para más información, consulte el
manual de instrucciones del vehículo.
• Este asiento infantil solo es adecuado para vehículos equipados con conectores Isox, así
como con cinturones de seguridad de 3 puntos de acuerdo con la norma ECE R16 u otras
normas equivalentes.
La siguiente tabla proporciona información sobre los dispositivos y métodos de jación:
Grupo ECE
0+ Hacia atrás
0+ Hacia atrás
1 Hacia atrás
1
Sentido de
montaje
En el sentido de la
marcha
Método de instalación Tipo
ISOFIX + anclaje
superior
Cinturón de 3 puntos
del coche
ISOFIX + anclaje
superior
ISOFIX + anclaje
superior
Semiuniversal
Universal -
Semiuniversal
Semiuniversal
Tamaño
Isox
D
D
B1
Page 59

- 59 -
ES
Grupo ECE
1
2/3
2/3
Sentido de
montaje
En el sentido de la
marcha
En el sentido de la
marcha
En el sentido de la
marcha
Método de instalación Tipo
Cinturón de 3 puntos
del coche
Cinturón de 3 puntos
del coche
Cinturón de 3 puntos
del coche + Isox
Universal -
Universal –
Semiuniversal
Tamaño
Isox
–
ADVERTENCIA
Instalación con cinturón de 3 puntos (grupo ECE 0+/1/2/3, 0-36 kg)
• Este es un sistema de retención universal para niños. Está aprobado para su uso general de
acuerdo con el Reglamento CEPE n.º 44/04 y, por tanto, es compatible con la mayoría de los
asientos de los vehículos.
• Se puede esperar una instalación correcta del dispositivo si el fabricante del vehículo indica
en el manual del mismo que este es apto para la instalación de un sistema de retención
universal para niños del grupo de edad correspondiente.
• Este sistema de retención infantil ha sido clasicado en la categoría «Universal» según
condiciones más estrictas que las versiones anteriores que no llevan este marcado.
• Solo es adecuado para vehículos equipados con cinturones de seguridad jos o automáticos
de 3 puntos que cumplan el Reglamento n.º 16 de la CEPE (o una norma equivalente).
• En caso de duda, consulte al fabricante del sistema de retención infantil o al distribuidor.
Instalación con conectores Isox y anclaje superior (grupo ECE 0+/1, 0-18 kg) o conectores
Isox y cinturón de 3 puntos (grupo ECE 2/3, 15-36kg)
• Este es un sistema de retención infantil semiuniversal. Está homologado de acuerdo con el
Reglamento CEPE/ONU n.º 44/04 para su uso general en vehículos con sistemas de anclaje
Isox.
• El sistema de retención infantil se adapta a los vehículos con asientos marcados como
posiciones Isox (consulte el manual del propietario del coche para obtener más detalles),
que varía en función de la categoría del asiento infantil para el coche y la jación.
• Solo es adecuado para vehículos equipados con cinturones de seguridad jos o automáticos
de 3 puntos que cumplan el Reglamento n.º 16 de la CEPE (o una norma equivalente).
• Las clases de peso y las clases de tamaño Isox a las que está destinado este producto son
las siguientes: Grupo 1, D & B1 y Grupo 0+, D:
• En caso de duda, consulte al fabricante del sistema de retención infantil o al distribuidor.
Page 60

ES
- 60 -
ADVERTENCIA
• Lea este manual detenidamente antes de usar el producto y consérvelo para futuras referencias
con el n de garantizar la seguridad de su hijo. El incumplimiento de las instrucciones de este
manual puede resultar en lesiones graves para su hijo.
• El asiento infantil puede utilizarse con su propio sistema de cinturones de 5 puntos solo para
niños menores de 18 kg de peso (Grupo 0+ y Grupo 1).
• El asiento infantil no se puede utilizar con el sistema de cinturones de seguridad de 5 puntos
para niños de 18 kg o más (grupo 2 / 3).
• El asiento infantil puede instalarse con los conectores Isox y el anclaje superior o únicamente
con el cinturón de 3 puntos del coche en el sentido de la marcha y en el sentido contrario. El
anclaje superior solo debe usarse hasta el grupo 1 inclusive, máx. 18 kg, en combinación con
los conectores Isox. Importante: No lo instale orientado hacia delante hasta que el peso del
niño haya alcanzado, al menos, 9 kg.
• Para la instalación Isox: Asegúrese de leer el manual del fabricante del vehículo.
• La instalación del asiento infantil en el grupo 0+/1 solo con los conectores Isox, sin ninguna
jación adicional con el anclaje superior, no está permitida.
• No utilice puntos de contacto de carga distintos a los descritos en las instrucciones y marcados
en el sistema de retención infantil.
• No utilice este asiento infantil en casa. No ha sido diseñado para usarse en casa y, por lo
tanto, solo debe emplearse en un coche.
• Nunca deje a su hijo sin vigilancia en el asiento.
• En el caso del Grupo ECE 0+ /1, NO je el asiento infantil orientado hacia atrás en el asiento
delantero donde haya un airbag. a menos que el airbag se pueda desactivar. Para más
información, consulte el manual de instrucciones del vehículo.
• El asiento infantil debe sustituirse si ha sido sometido a cargas pesadas en caso de un
accidente.
• Por razones de seguridad, el asiento infantil debe jarse al vehículo incluso si su hijo no está
sentado en el asiento.
• Asegúrese siempre de que todas las correas que sujetan el retenedor del asiento al vehículo
estén bien apretadas y que todos los cinturones que sujetan al niño estén adaptados al cuerpo
del niño. Asegúrese también de que los cinturones no estén retorcidos.
• El equipaje u otros artículos que puedan causar lesiones en caso de colisión deben estar
debidamente asegurados.
• Los objetos rígidos y las piezas de plástico de un sistema de retención de niños se deben
colocar e instalar de forma que no puedan quedar atrapados por un asiento móvil o una
puerta del vehículo en el uso diario.
• Es importante que los cinturones bien asentados aseguren la pelvis rmemente. Para evitar
caídas, su hijo debe tener siempre puesto el cinturón de seguridad.
• Es peligroso realizar cambios o adiciones al producto sin el consentimiento de la autoridad
responsable. El incumplimiento de las instrucciones de instalación del fabricante del sistema
de retención infantil también conlleva riesgos.
• Este asiento infantil ha sido diseñado para recién nacidos y niños de hasta 36 kg de peso.
Nunca sobrecargue el asiento infantil transportando más de un niño o cargas adicionales
en él.
• El sistema de retención infantil no debe utilizarse sin la funda del asiento.
• La funda del asiento no debe sustituirse por otra que no sea la recomendada por el fabricante,
ya que la funda del asiento es una parte integral del sistema de retención.
Page 61
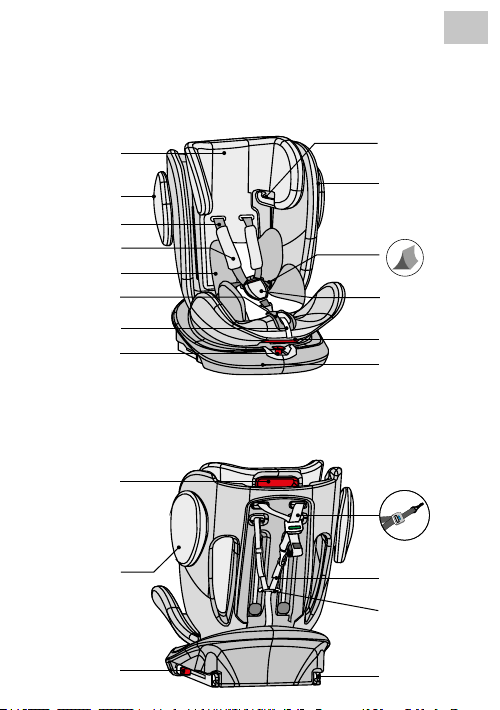
PIEZAS DEL ASIENTO
Vista frontal
- 61 -
ES
Reposacabezas
ajustable
Protección lateral frente
a impactos
Cinturón del hombro
Almohadilla del hombro
Inserto de confort
Ajuste del cinturón
Cinta de ajuste
Palanca giratoria
Vista trasera
Ajuste del
reposacabezas
Protección lateral frente
a impactos
Amplicación del
conector Isox
Guía del cinturón
(Grupo 2 + 3)
Carcasa del asiento
Inserto para bebé
(debajo del inserto de
confort)
Cierre del cinturón y
almohadilla de cierre
Palanca para el
ajuste del ángulo
Estación Isox
Anclaje
superior
Cinturón del hombro
Abrazadera del cinturón
Conector
Isox
Page 62
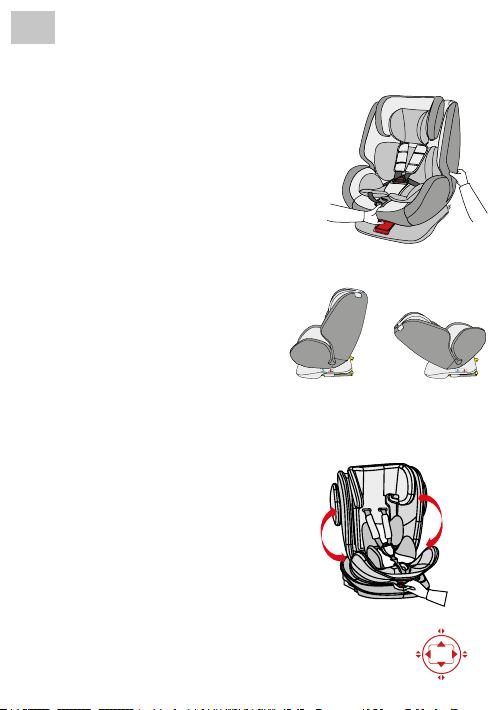
ES
- 62 -
USO DEL ASIENTO INFANTIL PARA AUTOMÓVIL
Ajuste del ángulo de inclinación del
asiento para automóvil
• Utilice una mano para accionar la palanca de
ajuste del ángulo en la parte delantera inferior de
la carcasa del asiento.
• Con la otra mano, sostenga el respaldo de la carcasa del asiento y ajuste el ángulo.
• El ángulo máximo se aplica solo a la posición
orientada hacia atrás; el ángulo vertical, solo a la
posición orientada hacia delante para el grupo 2/3,
15-36 kg.
El asiento se puede colocar de las siguientes
maneras:
(Por favor, tenga en cuenta la etiqueta del asiento
infantil)
Orientado hacia atrás 0-18 kg:
1 posición (1 + A)
Orientado hacia delante 9-18 kg:
3 posiciones (2 + 3 + 4)
Orientado hacia delante 15-36 kg:
1 posición (5)
Rotación del asiento infantil
• Con una mano, presione el botón rojo de la parte
delantera de la base, y con la otra mano gire la carcasa del asiento. Mientras la carcasa del asiento se
esté girando, la palanca puede soltarse.
• Hay 4 posiciones de bloqueo: 90, 180, 270 y 0/360°
en dirección a la base. Si la carcasa del asiento
está en una de estas posiciones, encajará en el
lugar con un «clic» audible.
• La posición orientada hacia delante para los niños
de los grupos 1, 2 y 3. La posición orientada hacia
detrás es para los niños de los grupos 0+ y 1.
Solo orientado hacia
delante (ilustración de
ejemplo)
(ilustración de ejemplo)
(ilustración de ejemplo)
Solo orientado hacia
atrás (ilustración de
ejemplo)
0/360°
90°270°
180°
Page 63
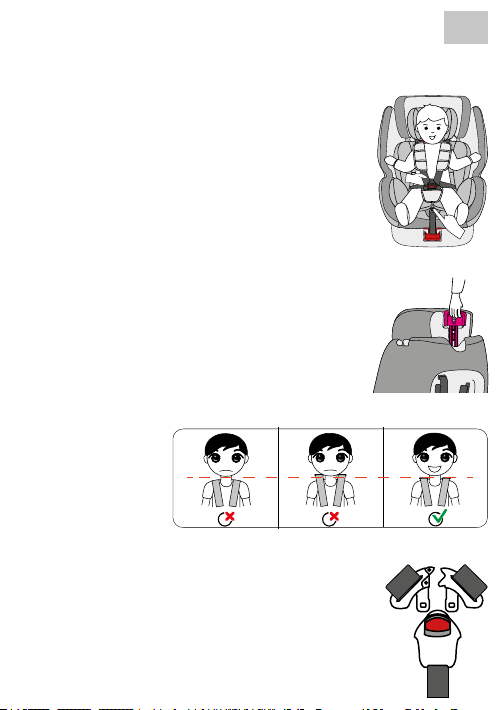
- 63 -
Ajustar el cinturón
• Para soltar el cinturón, presione el botón de ajuste
del cinturón de la zona del asiento con una mano.
• Con la otra mano, sujete la hebilla con el cinturón
puesto y luego suéltelo.
• Para abrochar el cinturón, tire del ajuste del cinturón
delantero.
Ajustar el reposacabezas
• Aoje el cinturón y tire de la palanca situada en el
reposacabezas hasta que el reposacabezas esté a
la altura deseada.
• Preste atención a la altura correcta de los cinturones
para hombros. Estos deberían pasar a la altura de
los hombros del niño.
• Suelte la palanca y asegúrese de que el reposaca-
bezas esté bloqueado.
Abrochar/desabrochar el cinturón
• Para desbloquear el cinturón, presione el botón
rojo de la hebilla y separe las dos lengüetas de la
hebilla.
• Para bloquear el cinturón, primero conecte las dos
lengüetas de la hebilla e insértelas en la hebilla.
ES
Page 64
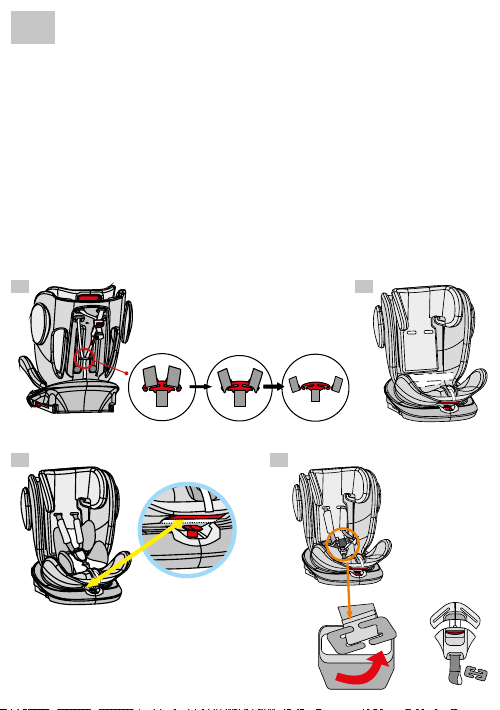
ES
- 64 -
Desmontaje del sistema de cinturones
• Aoje el cinturón
• Saque los cinturones para los hombros del estribo metálico en la parte posterior del asiento
infantil y páselos a la parte delantera a través del asiento infantil. (Fig. A)
• Retire las almohadillas para los hombros y las hebillas del cinturón.
• Pliegue el cinturón de manera que se pueda guardar detrás de la funda en el hueco del
respaldo. (Fig. B)
• Para quitar la hebilla del cinturón, primero mueva el asiento a la posición de reposo máxima.
A continuación, gire el asiento a la posición de 90°.
• Retire la tapa y póngala a un lado. (Fig. C)
• Pase la abrazadera metálica de la hebilla del cinturón a través de la abertura y luego vuelva
a colocar la tapa. (Fig. D)
• Mantenga todas las piezas desmontadas en un lugar seguro.
A B
C D
(Ilustraciones de ejemplo)
Page 65
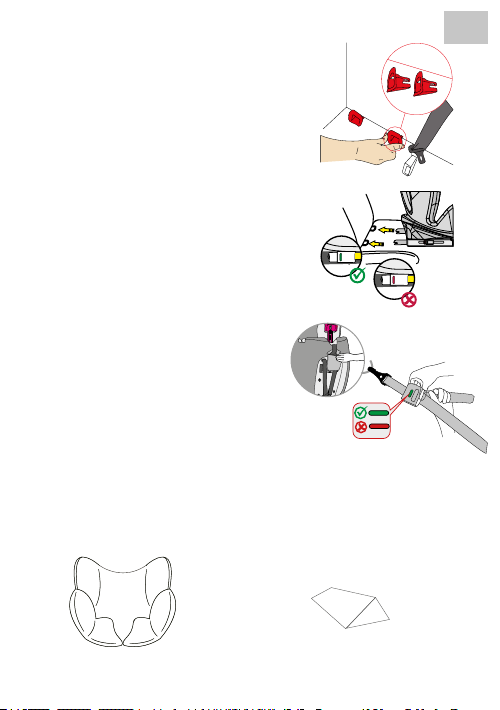
- 65 -
Conectores Isox
• Deslice las ayudas de inserción suministradas a
través de la ranura del acolchado entre el respaldo
y el asiento y dentro de los soportes Isox.
• El lado plano debe estar boca abajo. Este paso no
es necesario si el vehículo ya dispone de ayudas
de inserción jas.
• Presione los botones de los conectores Isox en
ambos lados para extenderlos.
• Inserte los conectores Isox en estas ayudas de
inserción y presiónelas hasta que encajen de forma
audible.
• Los indicadores de ambos lados solo estarán en
verde si se realizan las conexiones correctamente.
Presione el asiento infantil contra el respaldo hasta
que esté rmemente asentado.
Fijación adicional con anclaje superior
(grupo 0+/1)
• Saque el anclaje superior del bolsillo.
• Para soltar el anclaje superior, presione el botón
gris con una mano y tire del lado del anclaje del
cinturón hasta la longitud deseada con la otra
mano.
• Para jar el anclaje superior, cuelgue el anclaje
en el punto de jación del asiento del coche y tire
de él lo más fuerte posible. El indicador no estará
verde hasta que se ajuste el cinturón lo suciente.
Inserto de confort y para bebés
ES
Inserto de confort
hasta un máximo de 13 kg
Inserto para bebés
(debajo del inserto de confort)
hasta un máximo de 9 kg
Page 66
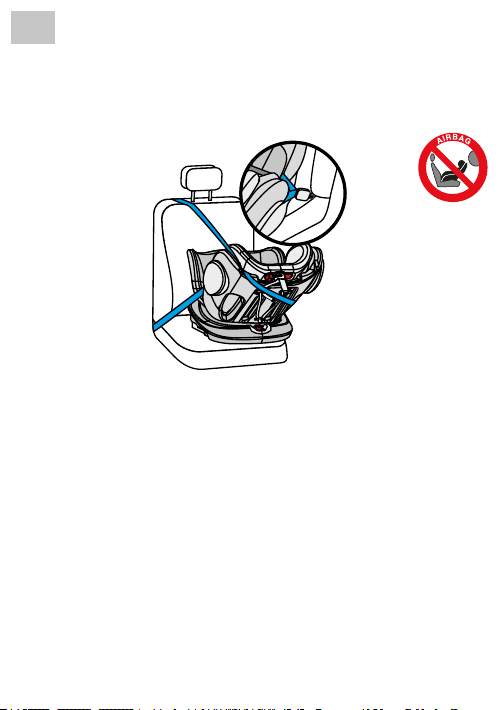
ES
- 66 -
INSTALACIÓN DEL ASIENTO INFANTIL PARA AUTOMÓVIL
1) Grupo 0+ (orientado hacia atrás, con cinturón de 3 puntos del
coche)
(Para niños de 0 a 13 kg)
1. Ponga el asiento de seguridad infantil en la posición de máxima reclinación (posición 1) y
gírelo de modo que apunte a la posición de asiento A orientada hacia atrás.
2. Empuje el asiento infantil rmemente contra el respaldo del asiento de coche.
3. Suelte la hebilla del asiento infantil y coloque los cinturones en la parte exterior del asiento.
4. En primer lugar, quite el inserto de confort para bebé del asiento infantil para automóvil.
5. Despliegue el cinturón de 3 puntos del automóvil hasta la máxima longitud y pase el cinturón
subabdominal a través de las guías laterales del asiento infantil para automóvil de un lado a
otro y cierre la hebilla del cinturón de 3 puntos hasta que encaje de forma audible.
6. Ahora vuelva a colocar el inserto de confort para bebé en el asiento infantil para automóvil.
7. Pase el cinturón diagonal a lo largo de la carcasa exterior del asiento infantil para automóvil
y asegúrese de que pasa entre la carcasa del asiento y el reposacabezas.
8. Tire todo lo que pueda del cinturón diagonal hasta que todo el cinturón de 3 puntos esté
apretado y el asiento infantil para automóvil esté estable.
9. Coloque al niño en el asiento infantil.
10. Ajuste la altura del reposacabezas de modo que los cinturones de hombros queden a la
altura de los hombros del niño.
11. Cierre la hebilla del cinturón de nuevo hasta que encaje de forma audible.
12. Tire de la lengüeta de ajuste frontal para apretar los cinturones. Asegúrese de que las
correas no estén retorcidas.
Page 67
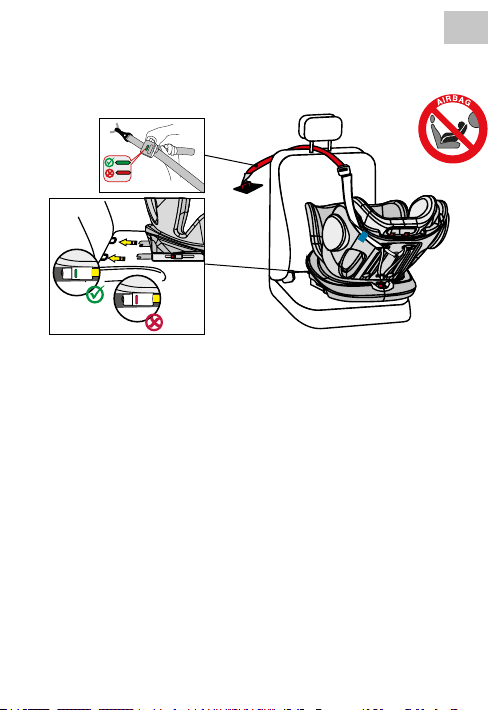
- 67 -
2) Grupo 0+/1 (orientado hacia atrás, con Isox y anclaje superior)
(Para niños de 0 a 18 kg)
1. Ponga el asiento de seguridad infantil en la posición de máxima reclinación (posición 1) y
gírelo de modo que apunte a la posición de asiento A orientada hacia atrás.
2. Pulse los dos botones laterales del conector Isox para ampliar la
longitud de los conectores Isox.
3. Pase los conectores Isox por las piezas de conexión Isox del asiento del coche y encájelos.
4. Empuje el asiento infantil rmemente contra el respaldo del asiento de coche. Asegúrese
de que ambos indicadores Isox estén en verde.
5. Saque el anclaje superior de la bolsa de almacenamiento y extiéndalo por completo.
6. Pase el anclaje superior a través de la guía de la cinta de goma azul, a lo largo de la parte
exterior del asiento infantil para automóvil.
7. Enganche el anclaje superior del gancho correspondiente del automóvil (por ejemplo, en
la parte trasera del asiento del automóvil o en el maletero). Tenga en cuenta el manual de
instrucciones de su vehículo).
8. Abroche el anclaje superior, hasta que el indicador del anclaje superior esté en verde.
9. Para sentar cómodamente a su hijo, gire el asiento infantil hacia la puerta del automóvil.
10. Suelte la hebilla del asiento infantil y coloque los cinturones en la parte exterior del
asiento.
11. Coloque al niño en el asiento infantil.
12. Ajuste la altura del reposacabezas de modo que los cinturones de hombros queden a la
altura de los hombros del niño.
13. Cierre la hebilla del cinturón de nuevo hasta que encaje de forma audible.
14. Tire de la lengüeta de ajuste frontal para apretar los cinturones. Asegúrese de que las
correas no estén retorcidas.
15. Gire el asiento a la posición orientada hacia atrás. Compruebe que el asiento infantil esté
bloqueado en esta posición.
ES
Page 68
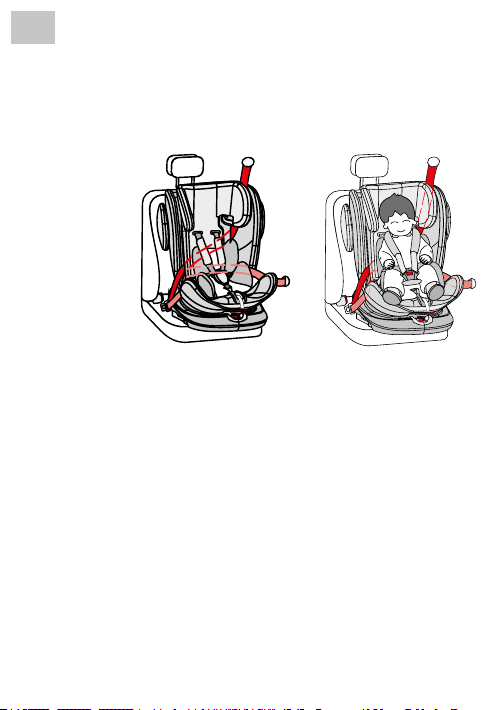
ES
- 68 -
INSTALACIÓN DEL ASIENTO INFANTIL PARA AUTOMÓVIL
3) Grupo 1 (orientado hacia delante, con el cinturón de 3 puntos del
automóvil)
IMPORTANTE: NO UTILICE EL ASIENTO INFANTIL EN EL SENTIDO DEL DESPLAZAMIENTO
HASTA QUE EL PESO DEL NIÑO HAYA SUPERADO 9 KG.
1. Gire el asiento infantil a la posición orientada hacia delante. Compruebe que el asiento
2. El asiento infantil tiene tres posiciones de asiento ajustables en el sentido de la marcha
(Posición 2, 3 & 4).
3. Extienda el cinturón de 3 puntos del automóvil por completo y páselo a tráves de la
primera abertura de la parte delantera del respaldo del asiento infantil para automóvil, que
se encuentra en el lado del cinturón de 3 puntos del automóvil.
4. Pase el cinturón de 3 puntos de la parte posterior por debajo del sistema de cinturones
del asiento infantil para automóvil y por la otra abertura del respaldo del asiento infantil
para automóvil hacia la parte delantera.
5. Cierre la hebilla del cinturón de 3 puntos hasta que encaje de forma audible y asegúrese
de que el cinturón no esté retorcido.
6. Tire todo lo que pueda del cinturón diagonal hasta que todo el cinturón de 3 puntos esté
apretado y el asiento infantil para automóvil esté estable.
7. Suelte la hebilla del asiento infantil y coloque los cinturones en la parte exterior del
8. Coloque al niño en el asiento infantil.
9. Ajuste la altura del reposacabezas de modo que el cinturón del hombro quede libre.
10. Cierre la hebilla del cinturón de nuevo hasta que encaje de forma audible.
11. Tire de la lengüeta de ajuste frontal para apretar los cinturones. Asegúrese de que las
(Para niños de 9 a 18 kg)
infantil esté bloqueado en esta posición.
asiento.
correas no estén retorcidas.
Page 69
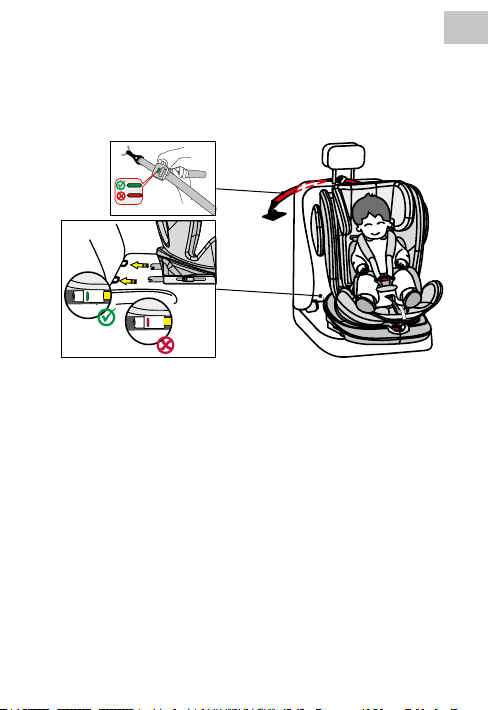
- 69 -
4) Grupo 1 (orientado hacia delante, con Isox y anclaje superior)
(Para niños de 9 a 18 kg)
IMPORTANTE: NO UTILICE EL ASIENTO INFANTIL EN EL SENTIDO DEL DESPLAZAMIENTO
HASTA QUE EL PESO DEL NIÑO HAYA SUPERADO 9 KG.
1. Gire el asiento a la posición orientada hacia delante. Compruebe que el asiento infantil
esté bloqueado en esta posición.
2. El asiento infantil tiene tres posiciones de asiento ajustables en el sentido de la marcha
(Posición 2, 3 & 4).
3. Pulse los dos botones laterales del conector Isox para ampliar la longitud de los conectores
Isox.
4. Pase los conectores Isox por las piezas de conexión Isox del asiento del coche y encájelos.
5. Empuje el asiento infantil rmemente contra el respaldo del asiento de coche. Asegúrese
de que ambos indicadores Isox estén en verde.
6. Saque el anclaje superior de la bolsa de almacenamiento y extiéndalo por completo.
7. Enganche el anclaje superior del gancho correspondiente del automóvil (por ejemplo, en
la parte trasera del asiento del automóvil o en el maletero). Tenga en cuenta el manual de
instrucciones de su vehículo).
8. Abroche el anclaje superior, hasta que el indicador del anclaje superior esté en verde.
9. Suelte la hebilla del asiento infantil y coloque los cinturones en la parte exterior del asiento.
10. Coloque al niño en el asiento infantil.
11. Ajuste la altura del reposacabezas de modo que el cinturón del hombro quede libre.
12. Cierre la hebilla del cinturón de nuevo hasta que encaje de forma audible.
13. Tire de la lengüeta de ajuste frontal para apretar los cinturones. Asegúrese de que las
correas no estén retorcidas.
ES
Page 70
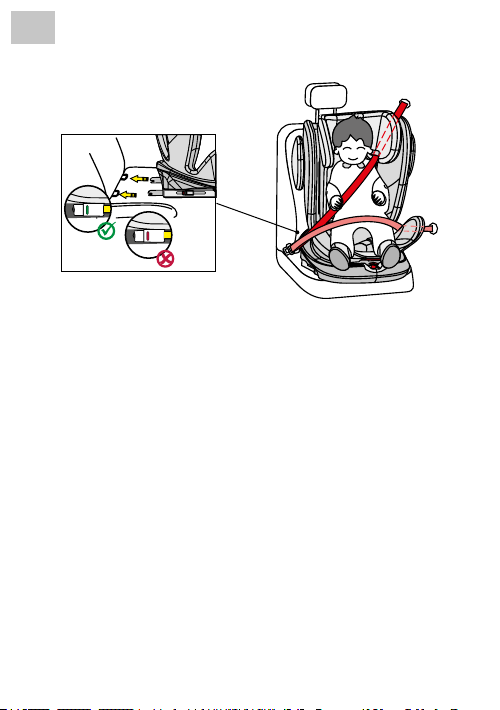
ES
3) Grupo 2/3 (orientado hacia delante)
(Para niños de 15 a 36 kg)
INFORMACIÓN:
PRIMERO RETIRE EL SISTEMA DE CINTURONES TAL Y COMO SE DESCRIBE ANTERIORMENTE.
1. Gire el asiento a la posición orientada hacia delante. Compruebe que el asiento infantil
esté bloqueado en esta posición.
2. Pulse los dos botones laterales del conector Isox para ampliar la longitud de los conectores
Isox.
3. Pase los conectores Isox por las piezas de conexión Isox del asiento del coche y
encájelos.
4. Empuje el asiento infantil rmemente contra el respaldo del asiento de coche. Asegúrese
de que ambos indicadores Isox estén en verde.
5. Ahora pase el cinturón diagonal del cinturón de 3 puntos del automóvil por la guía del
cinturón en el reposacabezas del asiento infantil.
6. Para sentar cómodamente a su hijo, gire el asiento infantil hacia la puerta del automóvil.
7. Coloque al niño en el asiento infantil.
8. Ajuste la altura del reposacabezas de modo que la cabeza del niño esté completamente
colocada en el reposacabezas y el cinturón diagonal salga a través de la guía del cinturón
a la altura de los hombros del niño.
9. Gire el asiento a la posición orientada hacia delante. Compruebe que el asiento infantil
esté bloqueado en esta posición.
10. Cierre la hebilla del cinturón de 3 puntos del automóvil hasta que se escuche un clic.
11. Tire de la correa diagonal para apretarla fuerte. Asegúrese de que las correas no estén
retorcidas.
12. El asiento infantil solo puede utilizarse en la posición de asiento 5 en este grupo de edad.
Instalación sin Isox:
Alternativamente, el asiento infantil en el grupo 2/3 también puede montarse solo con el
cinturón de 3 puntos. No es absolutamente necesario conectarlo con los conectores Isox,
pero se recomienda.
- 70 -
Page 71
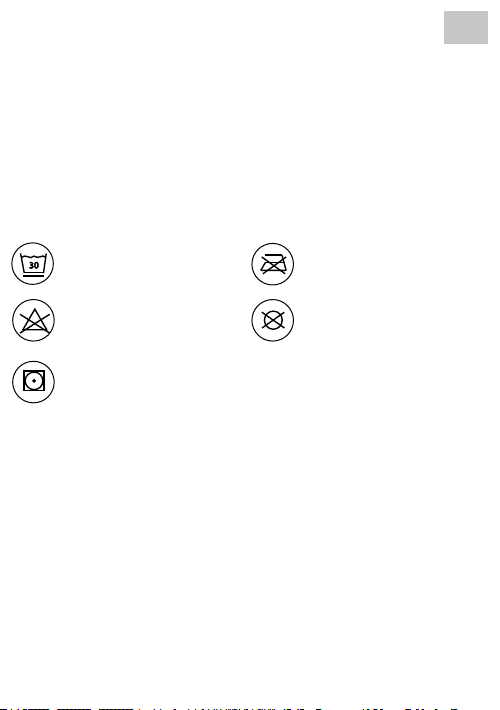
- 71 -
ES
LIMPIEZA
Este producto ha sido diseñado teniendo en cuenta la seguridad, la comodidad y la funcionalidad.
Lea detenidamente este manual antes de utilizar el producto y guárdelo en un lugar seguro para
futuras consultas.
No utilice disolventes, productos de limpieza abrasivos o agresivos para garantizar el uso a
largo plazo del asiento para automóvil de su hijo. Compruebe la resistencia del tejido y de las
costuras después de cada lavado. Cuando lave la tela, siga cuidadosamente las instrucciones
de la etiqueta (véase a continuación).
Lavar a 30°C, ciclo
30
suave
NO utilizar lejía
Secado en tambor a baja
temperatura
NO planchar
NO limpiar en seco
MANTENIMIENTO
Compruebe regularmente el estado del producto para comprobar si está dañado. No utilizar en
caso de daños y mantener fuera del alcance de los niños.
Si tiene algún problema, póngase en contacto con el Servicio de atención al cliente de Osann
en el +49 (0) 7731 / 970077.
Page 72

NL
Hartelijk dank dat u voor ons autostoeltje Eno360 heeft gekozen.
Als u hulp nodig heeft bij dit product, kunt u contact opnemen met onze klantenservice.
- 72 -
GEBRUIK
• Dit product kan worden gebruikt voor kinderen uit de ECE-groep 0+/1/2/3. Gewichtsklasse:
0-36 kg. Leeftijdsklasse: 0-12 jaar.
• Groep 0+ is geschikt voor kinderen met een gewicht van 0 tot 13 kg. Het autostoeltje wordt
achterwaarts gericht met Isox-connectoren en Top-Tether of met de 3-puntsgordel in de
auto gemonteerd. Het kind wordt vastgezet met de 5-puntsgordel van het autostoeltje.
• Groep 1 is geschikt voor kinderen met een gewicht van 9-18 kg. Het autostoeltje is voorwaarts
gericht en wordt in de auto bevestigd met Isox-connectoren en Top-Tether of met de 3-puntsgordel. Ook achterwaarts gericht gebruik met Isox-connectoren en Top-Tether is tot 18 kg
toegestaan. Het kind wordt vastgezet met de 5-puntsgordel van het autostoeltje.
• Groep 2 en 3 zijn geschikt voor kinderen met een gewicht van 15 tot 36 kg. Het 5-punts-
gordelsysteem van het autostoeltje wordt verwijderd. Het autostoeltje wordt voorwaarts
gericht en met Isox-connectoren in de auto bevestigd. Het kind wordt vastgezet met de
3-puntsgordel van de auto. Desgewenst kan het autostoeltje direct met de 3-puntsgordel
van de auto en zonder Isox-connectoren worden bevestigd.
•
Aanbevolen wordt om het autostoeltje op de achterbank van het voertuig te plaatsen.
Bevestig het autostoeltje NIET op de voorstoel waar zich een airbag bevindt indien u het
autostoeltje achterwaarts gericht gebruikt voor ECE-groep 0+/1. Tenzij de airbag kan wor-
den uitgeschakeld. Lees dit na in de handleiding van het voertuig.
• Dit autostoeltje is alleen geschikt voor voertuigen die beschikken over een Isox-aansluiting
en 3-puntsveiligheidsgordels conform ECE R16 of andere vergelijkbare normen.
De volgende tabel bevat informatie over de bevestigingsvoorzieningen en -methoden:
ECE-groep Inbouwrichting Installatiemethode Type Isox-maat
0+ Achterwaarts Isox + Top-Tether
0+ Achterwaarts
1 Achterwaarts Isox + Top-Tether
1 Voorwaarts Isox + Top-Tether
1 Voorwaarts
3-puntsgordel van
de auto
3-puntsgordel van
de auto
Semiuniverseel
Universeel -
Semiuniverseel
Semiuniverseel
Universeel -
D
D
B1
Page 73

- 73 -
ECE-groep Inbouwrichting Installatiemethode Type Isox-maat
2/3 Voorwaarts
2/3 Voorwaarts
3-puntsgordel van
de auto
3-puntsgordel van de
auto + Isox
Universeel –
Semiuniverseel
NL
–
WAARSCHUWING
Installatie met 3-puntsgordel (ECE groep 0+/1/2/3, 0-36 kg)
• Dit is een universeel beveiligingssysteem voor kinderen. Het is goedgekeurd voor algemeen
gebruik volgens de verordening UN/ECE nr. 44/04 en is dus compatibel met de meeste
autostoelen.
• Een correcte montage van het systeem is mogelijk wanneer de autofabrikant in de gebruikershandleiding aangeeft dat de auto geschikt is voor het monteren van een universeel
beveiligingssysteem voor kinderen van de betreende leeftijdsklasse.
• Dit beveiligingssysteem voor kinderen is volgens strengere voorwaarden ingedeeld in de
categorie "universeel" dan voorgaande uitvoeringen die deze vermelding niet dragen.
• Het is uitsluitend geschikt voor voertuigen met vaste of automatische gordels met 3-puntsveiligheidsgordels die voldoen aan de verordening UN/ECE nr. 16 (of een vergelijkbare norm).
• Raadpleeg in geval van twijfel de fabrikant van het kinderzitje of de verkoper.
Installatie met Isox-connectoren & Top-Tether (ECE-groep 0+/1, 0-18 kg) of Isox-connectoren & 3-puntsgordel (ECE-groep 2/3, 15-36 kg)
• Dit is een semi-universeel kinderbeveiligingssysteem. Het is conform VN/ECE-reglement
nr. 44/04 goedgekeurd voor algemeen gebruik in auto's met Isox-verankeringssystemen.
• Het kinderbeveiligingssysteem past in auto's met stoelen die gemarkeerd zijn als Isox-
-posities (zie voor details de gebruikershandleiding van de auto), wat varieert afhankelijk
van de categorie van het autostoeltje en van de bevestiging.
• Het is uitsluitend geschikt voor voertuigen met vaste of automatische gordels met 3-puntsveiligheidsgordels die voldoen aan verordening UN/ECE nr. 16 (of een vergelijkbare norm).
• De gewichtsklassen en Isox-klassen waarvoor het product is goedgekeurd, zijn: Groep 1, D
& B1 en groep 0+, D:
• Raadpleeg in geval van twijfel de fabrikant van het kinderzitje of de verkoper.
Page 74

NL
- 74 -
WAARSCHUWING
• Lees deze handleiding voor gebruik zorgvuldig door en bewaar de handleiding voor later
gebruik om de veiligheid van uw kind te waarborgen. Niet-inachtneming van de aanwijzingen
in deze handleiding kan leiden tot ernstig letsel bij uw kind.
• Het autostoeltje kan met het eigen 5-puntsgordelsysteem alleen voor kinderen onder een
lichaamsgewicht van 18 kg worden gebruikt (groep 0+ en groep 1).
• Het autostoeltje kan NIET met het 5-puntsgordelsysteem voor kinderen vanaf een lichaams-
gewicht van 18 kg worden gebruikt (groep 2/3).
• Het autostoeltje kan met de Isox-connectoren en de Top-Tether of alleen met de 3-puntsgordel van de auto achterwaarts en voorwaarts gericht worden ingebouwd. De Top-Tether
mag alleen tot en met groep 1, max. 18 kg, in combinatie met de Isox-connectoren worden
gebruikt. Belangrijk: Niet voorwaarts gericht inbouwen tot het lichaamsgewicht van het kind
ten minste 9 kg is.
• Voor Isox-montage: Lees de handleiding van de autofabrikant door.
• Een installatie van het autostoeltje in de groep 0+/1 uitsluitend met de Isox-connectoren,
zonder aanvullende bevestiging met de Top-Tether, is niet toegestaan.
• Gebruik geen andere dragende contactpunten dan de in de handleiding beschreven en in
het kinderbeveiligingssysteem aangeduide contactpunten.
• Gebruik dit autostoeltje niet in huis. Het autostoeltje is niet bedoeld voor thuisgebruik en mag
daarom alleen in een auto worden gebruikt.
• Laat uw kind op geen enkel moment zonder toezicht in het stoeltje.
• Bevestig het autostoeltje NIET op de voorstoel waar zich een airbag bevindt indien u het
autostoeltje achterwaarts gericht gebruikt voor ECE-groep 0+/1. Tenzij de airbag kan worden
uitgeschakeld. Lees dit na in de handleiding van het voertuig.
• Het autostoeltje moet worden vervangen als het bij een ongeval is blootgesteld aan sterke
belastingen.
• Om veiligheidsredenen moet het autostoeltje ook in de auto zijn bevestigd als uw kind niet
op het autostoeltje zit.
• Zorg er altijd voor dat alle bevestigingspunten die het autostoeltje in de auto bevestigen
goed vastzitten en dat alle gordels die het kind beveiligen zijn aangepast aan het lichaam
van het kind. Controleer bovendien dat de gordels niet gedraaid zijn.
• Bagage of andere voorwerpen die bij een botsing letsel kunnen veroorzaken, moeten correct
worden vastgezet.
• De starre voorwerpen en kunststof onderdelen van een kinderbeveiligingssysteem moeten
zo zijn geplaatst en geïnstalleerd dat ze bij dagelijks gebruik niet door een beweegbare zitting of een portier kunnen worden ingeklemd.
• Het is belangrijk dat de lage gordels het bekken goed vasthouden. Om valrisico te voorkomen,
moet uw kind altijd vastzitten in de gordel.
• Het is gevaarlijk om zonder toestemming van de verantwoordelijke instantie wijzigingen of aanvullingen aan het product aan te brengen. Niet-inachtneming van de installatieaanwijzingen
van de fabrikant van het kinderbeveiligingssysteem leidt eveneens tot gevaren.
• Dit autostoeltje is ontworpen voor baby's en kinderen met een gewicht tot 36 kg. Overbelast
het autostoeltje nooit door meer dan één kind of aanvullende lasten erin te vervoeren.
• Het kinderbeveiligingssysteem mag niet zonder de bekleding worden gebruikt.
• De bekleding mag niet worden vervangen door bekleding die niet door de fabrikant wordt
aanbevolen, omdat deze een vast onderdeel van de beveiliging is.
Page 75
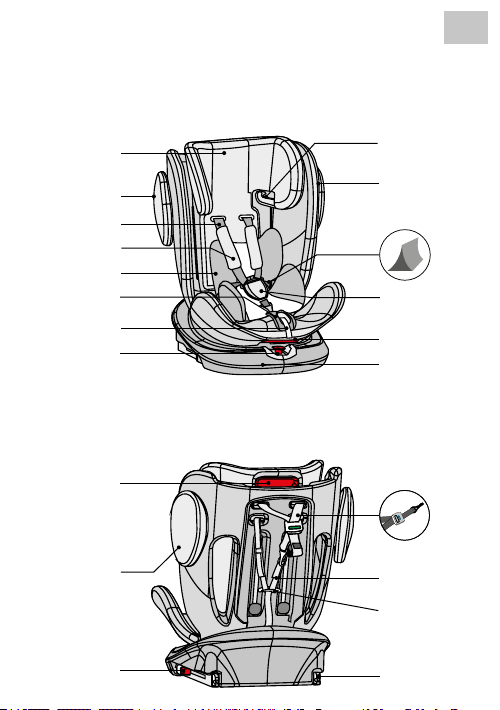
- 75 -
ONDERDELEN AUTOSTOELTJE
Vooraanzicht
NL
Verstelbare
hoofdsteun
Stootbescherming
zijkant
Schoudergordel
Schouderkussen
Comfort-inlegstuk
Gordelaanpassing
Instelband
Draaihendel
Achteraanzicht
Instelling hoofdsteun
Stootbescherming
zijkant
Uitbreiding
Isox-connector
Gordelgeleiding
(groep 2 + 3)
Zitschaal
Baby-inlegstuk (onder
comfort-inlegstuk)
Gordelslot &
kussen gordelslot
Hendel voor
hoekinstelling
Isox-basis
Top-Tether
Schoudergordel
Riembeugel
Isox-
connector
Page 76
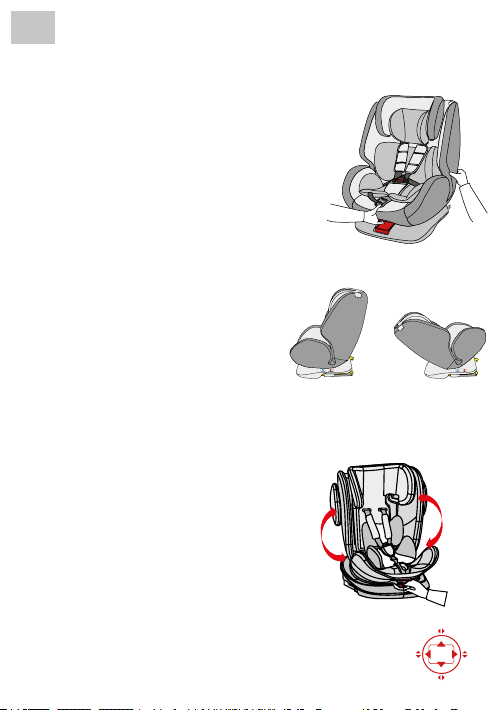
NL
- 76 -
GEBRUIK VAN HET AUTOSTOELTJE
Hellingshoek van het autostoeltje
instellen
• Met één hand bedient u de hendel voor de hoekver-
stelling onderaan aan de voorkant van de zitschaal.
• Met uw andere hand houdt u de achterkant van de
zitschaal vast en stelt u de hoek in.
• De maximale hoek geldt uitsluitend voor de achter-
waarts gerichte positie, de hoek voor de rechtopstaande positie alleen voor de voorwaarts gerichte
positie voor groep 2/3, 15-36 kg.
De volgende zitposities zijn mogelijk:
(Neem het label op het autostoeltje in acht)
Achterwaarts gericht 0-18 kg:
1 positie (1 + A)
Voorwaarts gericht 9-18 kg:
3 posities (2 + 3 + 4)
Voorwaarts gericht 15-36 kg:
1 positie (5)
Autostoeltje draaien
• Druk met uw hand op de rode knop aan de voor-
kant van de basis en gebruik uw andere hand om de
zitschaal te draaien. U kunt de draaihendel loslaten
wanneer u de zitschaal draait.
• Er zijn 4 vergrendelposities op 90, 180, 270 en
0 / 360° in de richting van de basis. Wanneer de
zitschaal zich in een van deze posities bevindt, klikt
hij hoorbaar vast.
• De voorwaarts gerichte positie is geschikt voor
kinderen van groep 1, 2 en 3. De achterwaarts
gerichte positie is geschikt voor kleine kinderen
van groep 0+ en 1.
Alleen voorwaarts
gericht
(voorbeeldafbeelding)
(voorbeeldafbeelding)
(voorbeeldafbeelding)
Alleen achterwaarts
gericht
(voorbeeldafbeelding)
0/360°
90°270°
180°
Page 77
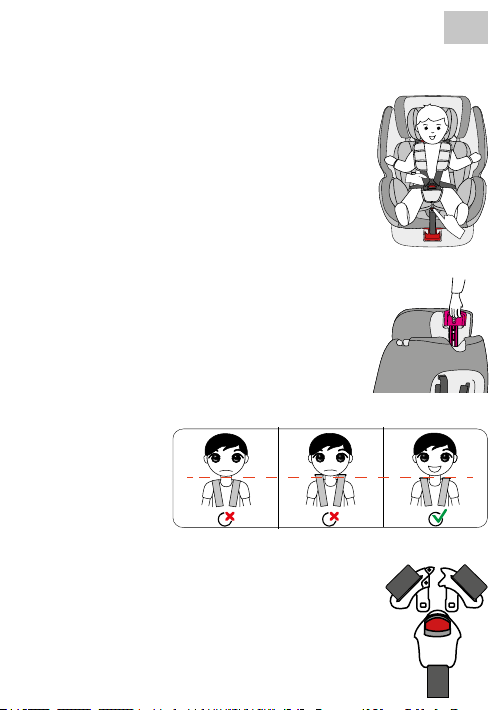
- 77 -
Gordel instellen
• Om de gordel los te maken, drukt u met één
hand op de knop voor de gordelverstelling in het
zitgedeelte.
• Met uw andere hand houdt u de gesp met de aangebrachte gordel vast, die u vervolgens losmaakt.
• Om de gordel te spannen, trekt u aan de voorste
verstelband.
Hoofdsteun instellen
• Maak de gordel los en trek aan de hendel van de
hoofdsteun totdat deze op de gewenste hoogte is.
• Let op de correcte hoogte van de schoudergordels.
Deze moeten ter hoogte van de schouders van het
kind uit het stoeltje komen.
• Laat de hendel los en controleer of de hoofdsteun
is vergrendeld.
Gordel openen/sluiten
• Om de gordel te ontgrendelen, drukt u op de rode
knop van de gesp en trekt u beide gesptongen eruit.
• Om de gordel te vergrendelen, verbindt u eerst de
2 gesptongen en steekt u deze samen in de gesp.
NL
Page 78
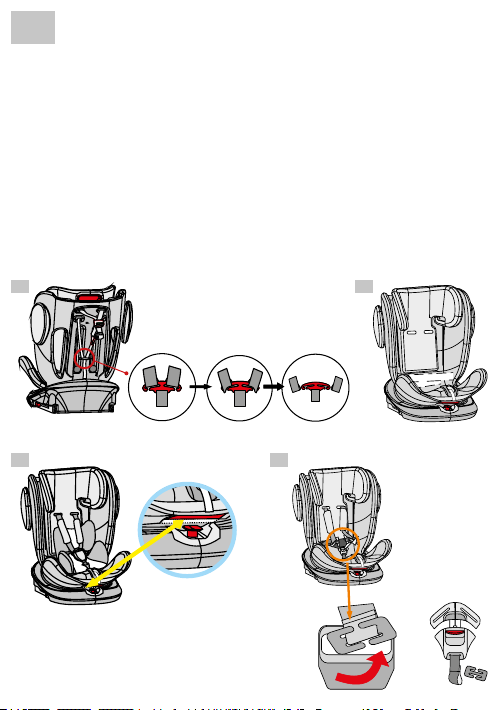
NL
- 78 -
Gordelsysteem verwijderen
• Maak de gordel los
• Haal de schoudergordels uit de metalen beugel aan de achterkant van het autostoeltje en
haal deze door het autostoeltje naar voren. (afb. A)
• Verwijder het schouderkussen en de gordelgespen van de gordel.
• Vouw de gordel samen, zodat hij achter in de inkeping van de rugleuning kan worden
opgeborgen. (afb. B)
• Zet vervolgens het autostoeltje in de maximale ligpositie om het gordelslot te verwijderen.
Draai het autostoeltje daarna in de 90°-positie.
• Verwijder het deksel en leg dit apart (afb. C). (afb. C)
• Haal nu de metalen klem van het gordelslot door de opening en breng vervolgens de
bekleding weer aan. (afb. D)
• Berg alle verwijderde onderdelen goed op.
A B
C D
(voorbeeldafbeeldingen)
Page 79
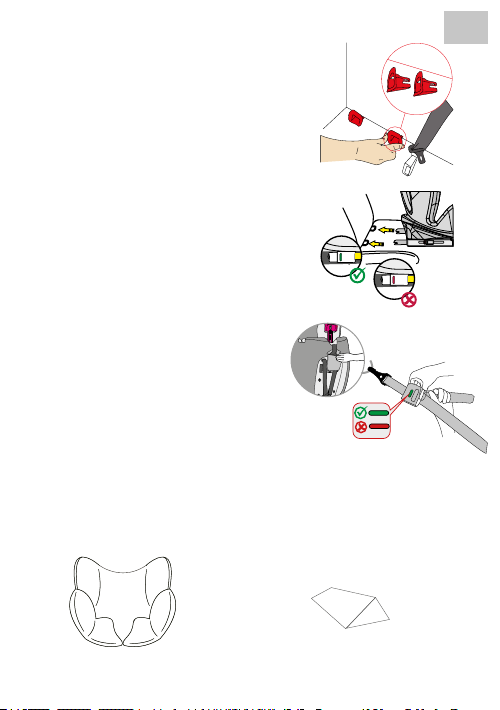
- 79 -
Isox-verbindingsstukken
• Schuif de inbrenghulpen door de gleuf in het kussen
tussen rugleuning en zitting en in de Isox-houders.
• De platte kant moet naar beneden zijn gericht. Deze
stap is niet vereist als de auto al vast geïnstalleerde
inbrenghulpen heeft.
• Druk op de knoppen van de Isox-verbindings-
stukken aan beide zijden om ze te verlengen.
• Steek de Isox-verbindingsstukken in deze in-
brenghulpen en druk deze verder tot ze hoorbaar
vastklikken.
• De indicatoren aan beide kanten worden alleen
groen als de verbindingen tot stand zijn gebracht.
Druk het autostoeltje tegen de rugleuning tot het
stabiel staat.
Extra bevestiging met Top-Tether
(groep 0+/1)
• Haal de Top-Tether uit de tas.
• Om de Top-Tether los te maken, drukt u met een
hand op de grijze knop en trekt u met de andere
hand de zijkant van het gordelanker tot de vereiste
lengte.
Om de Top-Tether te bevestigen, hangt u het anker
•
aan het bevestigingspunt aan de autozitting en trekt
u deze zo strak mogelijk. De indicatie wordt pas
groen als de gordel voldoende strak zit.
Comfort-inlegstuk en baby-inlegstuk
NL
Comfort-inlegstuk
tot max. 13 kg
Baby-inlegstuk
(onder comfort-inlegstuk)
tot max. 9 kg
Page 80
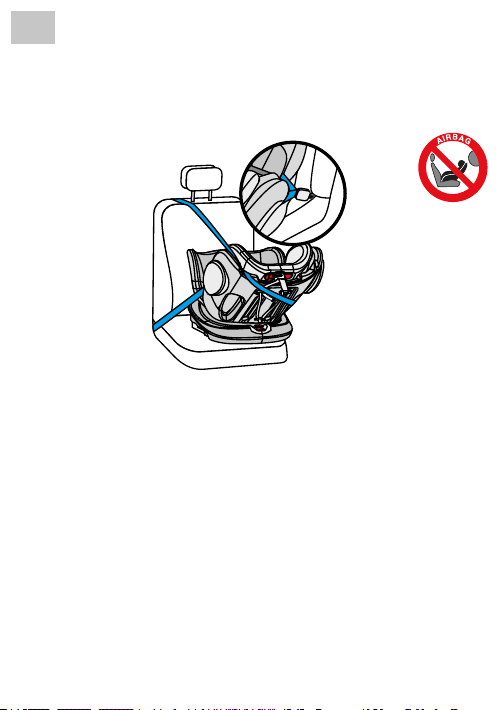
NL
- 80 -
MONTAGE VAN HET AUTOSTOELTJE
1) Groep 0+ (achterwaarts gericht, met 3-puntsgordel van de auto)
(Voor kinderen met een gewicht van 0 tot 13 kg)
1. Stel het autostoeltje in de maximale ligpositie in (positie 1) en draai het zo dat het achter-
waarts gericht staat in de zitpositie A.
2. Duw het autostoeltje stevig tegen de rugleuning van de stoel.
3. Maak de gordelgesp van het autostoeltje los en leg de gordels aan de buitenkant van het
autostoeltje.
4. Verwijder eerst het comfort- en baby-inlegstuk van het autostoeltje.
5. Trek de 3-puntsgordel van de auto tot op de maximale lengte uit en trek de heupgordel
door de geleiders aan de zijkant het autostoeltje van de ene naar de andere kant door en
sluit de gesp van de 3-puntsgordel tot deze hoorbaar vastklikt.
6. Plaats nu het baby- en comfort-inlegstuk weer in het autostoeltje.
7. Trek de diagonale gordel langs de buitenschaal van het autostoeltje heen en zorg dat deze
tussen de zitschaal en de hoofdsteun loopt.
8. Trek zo stevig mogelijk aan de diagonale gordel tot de volledige 3-puntsgordel strak
gespannen is en het autostoeltje stabiel staat.
9. Plaats uw kind in het autostoeltje.
10. Stel de hoogte van de hoofdsteun zo in dat de schoudergordels zich ter hoogte van de
schouders van uw kind bevinden.
11. Sluit de gordelgesp weer tot u een klik hoort.
12. Trek aan het voorste verstellipje om de gordels strak te trekken. Let erop dat de gordels
niet zijn gedraaid.
Page 81
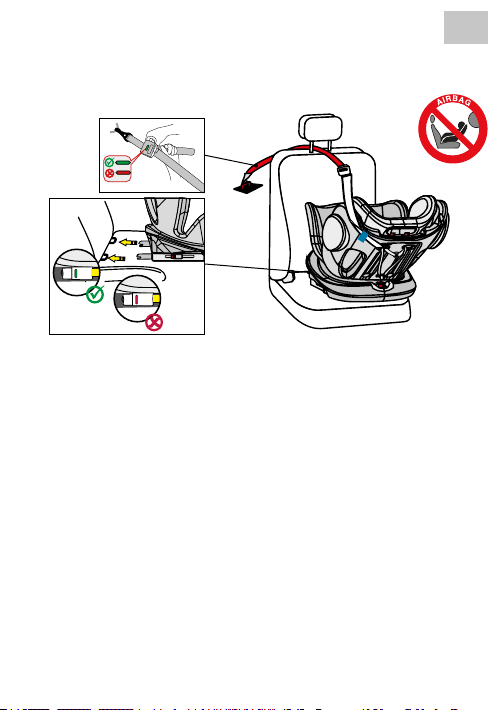
- 81 -
2) Groep 0+/1 (achterwaarts gericht, met Isox & Top-Tether)
(Voor kinderen met een gewicht van 0 tot 18 kg)
1. Stel het autostoeltje in de maximale ligpositie in (positie 1) en draai het zo dat het achter-
waarts gericht staat in zitpositie A.
2. Druk de Isox-connectorknoppen aan beide kanten in om de Isox-connectoren in de
lengte uit te schuiven.
3. Schuif de Isox-connectoren naar de Isox-verbindingsstukken op de stoel van de auto en
laat ze vastklikken.
4. Duw het autostoeltje stevig tegen de rugleuning van de stoel. Zorg ervoor dat beide
Isox-indicatoren groen zijn.
5. Neem de Top-Tether uit de bewaartas en trek deze volledig uit.
6. Haal de Top-Tether door de blauwe rubberen geleider en trek deze verder langs de
buitenkant van het autostoeltje.
7. Bevestig de Top-Tether aan de overeenkomstige haak in uw auto (bijv. achterkant van de
autostoel of in de koerruimte. Neem hierbij de gebruiksaanwijzing van uw auto in acht).
8. Span de Top-Tether nu tot de indicatie op de Top-Tether groen is.
9. Om uw kind comfortabel in het zitje te plaatsen, draait u het autostoeltje in de richting van
de autodeur.
10. Maak de gordelgesp van het autostoeltje los en leg de gordels aan de buitenkant van het
autostoeltje.
11. Plaats uw kind in het autostoeltje.
12. Stel de hoogte van de hoofdsteun zo in dat de schoudergordels zich ter hoogte van de
schouders van uw kind bevinden.
13. Sluit de gordelgesp weer tot u een klik hoort.
14. Trek aan het voorste verstellipje om de gordels strak te trekken. Let erop dat de gordels
niet zijn gedraaid.
15. Draai het autostoeltje naar de achterwaarts gerichte positie. Controleer of het autostoeltje
in deze positie is vastgeklikt.
NL
Page 82
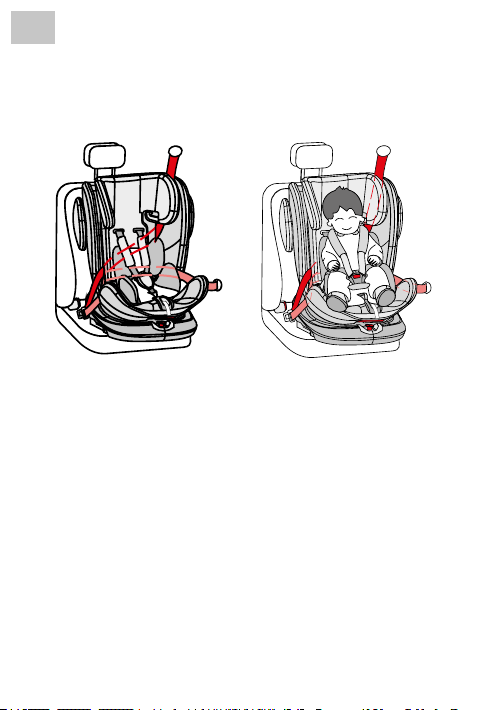
NL
- 82 -
MONTAGE VAN HET AUTOSTOELTJE
3) Groep 1 (voorwaarts gericht, met 3-puntsgordel van de auto)
(Voor kinderen met een gewicht van 9 tot 18 kg)
BELANGRIJK: GEBRUIK HET AUTOSTOELTJE NIET IN DE RIJRICHTING ALS HET GEWICHT VAN
HET KIND NIET MEER DAN 9 KG BEDRAAGT.
1. Draai het autostoeltje naar de voorwaarts gerichte positie. Controleer of het autostoeltje in
deze positie is vastgeklikt.
2. Het autostoeltje heeft drie instelbare zitposities in de rijrichting (positie 2, 3 & 4).
3. Trek de 3-puntsgordel van de auto tot op de maximale lengte uit en haal deze door de
eerste opening aan de voorkant van de rugleuning van het autostoeltje. Deze bevindt zich
aan de kant van de 3-puntsgordel van de auto.
4. Trek de 3-puntsgordel aan de achterkant verder onder het gordelsysteem van het auto-
stoeltje en door de andere opening in de rugleuning van het autostoeltje weer naar voren.
5. Sluit de gesp van de 3-puntsgordel tot deze hoorbaar vastklikt en let erop dat de gordel
niet verdraaid is.
6. Trek zo stevig mogelijk aan de diagonale gordel tot de volledige 3-puntsgordel strak
gespannen is en het autostoeltje stabiel staat.
7. Maak de gordelgesp van het autostoeltje los en leg de gordels aan de buitenkant van het
autostoeltje.
8. Plaats uw kind in het autostoeltje.
9. Stel de hoogte van de hoofdsteun zo in dat de schoudergordel vrij blijft.
10. Sluit de gordelgesp weer tot u een klik hoort.
11. Trek aan het voorste verstellipje om de gordels strak te trekken. Let erop dat de gordels
niet zijn gedraaid.
Page 83
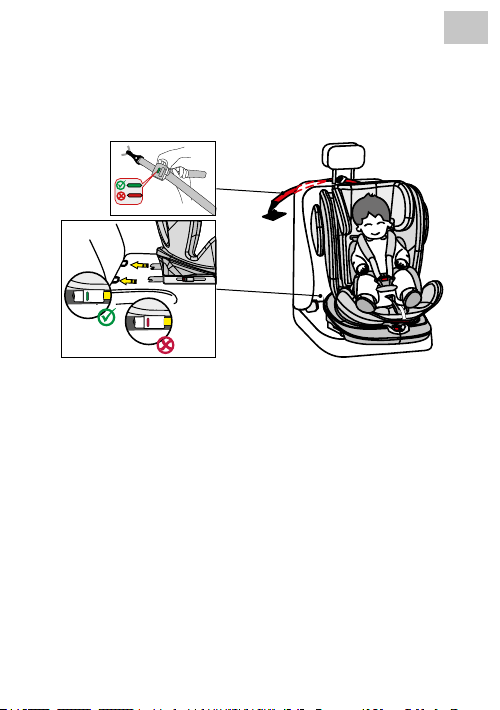
- 83 -
4) Groep 1 (voorwaarts gericht, met Isox & Top-Tether)
(Voor kinderen met een gewicht van 9 tot 18 kg)
BELANGRIJK: GEBRUIK HET AUTOSTOELTJE NIET IN DE RIJRICHTING ALS HET GEWICHT VAN
HET KIND NIET MEER DAN 9 KG BEDRAAGT.
1. Draai het autostoeltje naar de voorwaarts gerichte positie. Controleer of het autostoeltje in
deze positie is vastgeklikt.
2. Het autostoeltje heeft drie instelbare zitposities in de rijrichting (positie 2, 3 & 4).
3. Druk de Isox-connectorknoppen aan beide kanten in om de Isox-connectoren in de
lengte uit te schuiven.
4. Schuif de Isox-connectoren naar de Isox-verbindingsstukken op de stoel van de auto en
laat ze vastklikken.
5. Duw het autostoeltje stevig tegen de rugleuning van de stoel. Zorg ervoor dat beide
Isox-indicatoren groen zijn.
6. Neem de Top-Tether uit de bewaartas en trek deze volledig uit.
7. Bevestig de Top-Tether aan de overeenkomstige haak in uw auto (bijv. achterkant van de
autostoel of in de koerruimte. Neem hierbij de gebruiksaanwijzing van uw auto in acht).
8. Span de Top-Tether nu tot de indicatie op de Top-Tether groen is.
9. Maak de gordelgesp van het autostoeltje los en leg de gordels aan de buitenkant van het
autostoeltje.
10. Plaats uw kind in het autostoeltje.
11. Stel de hoogte van de hoofdsteun zo in dat de schoudergordel vrij blijft.
12. Sluit de gordelgesp weer tot u een klik hoort.
13. Trek aan het voorste verstellipje om de gordels strak te trekken. Let erop dat de gordels
niet zijn gedraaid.
NL
Page 84
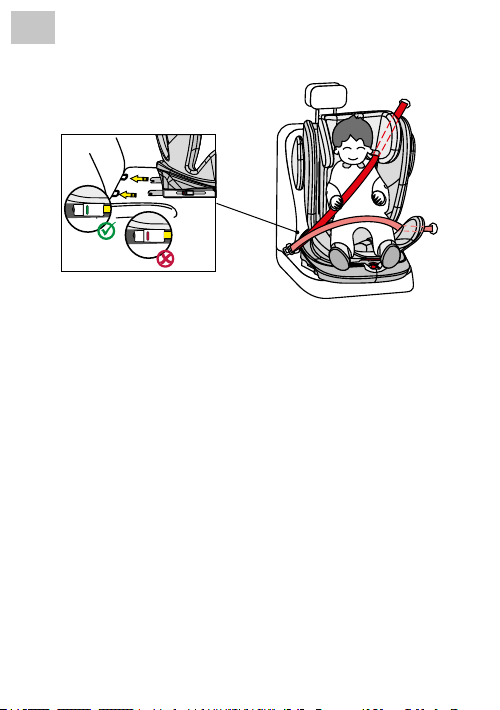
NL
3) Groep 2/3 (voorwaarts gericht)
(Voor kinderen met een gewicht van 15 tot 36 kg)
INFORMATIE:
VERWIJDER EERST HET GORDELSYSTEEM ZOALS HIERBOVEN BESCHREVEN.
1. Draai het autostoeltje naar de voorwaarts gerichte positie. Controleer of het autostoeltje in
deze positie is vastgeklikt.
2. Druk de Isox-connectorknoppen aan beide kanten in om de Isox-connectoren in de
lengte uit te schuiven.
3. Schuif de Isox-connectoren naar de Isox-verbindingsstukken op de stoel van de auto en
laat ze vastklikken.
4. Duw het autostoeltje stevig tegen de rugleuning van de stoel. Zorg ervoor dat beide
Isox-indicatoren groen zijn.
5. Haal de diagonale gordel van de 3-puntsgordel van de auto door de gordelgeleiding aan
de hoofdsteun van het autostoeltje.
6. Om uw kind comfortabel in het zitje te plaatsen, draait u het autostoeltje in de richting van
de autodeur.
7. Plaats uw kind in het autostoeltje.
8. Stel de hoogte van de hoofdsteun zo in dat het hoofd van het kind volledig in de hoofdsteun
rust en de diagonale gordel door de gordelgeleiding ter hoogte van de schouders van het
kind naar buiten komt.
9. Draai het autostoeltje naar de voorwaarts gerichte positie. Controleer of het autostoeltje in
deze positie is vastgeklikt.
10. Sluit nu de gordelgesp van de 3-puntsgordel van de auto tot u een klik hoort.
11. Trek aan de diagonale gordel om deze strak te trekken. Let erop dat de gordels niet zijn
gedraaid.
12. Het autostoeltje mag in deze gewichtsklasse alleen in zitpositie 5 worden gebruikt.
Montage zonder Isox:
Als alternatief kan het autostoeltje in groep 2/3 ook alleen met de 3-puntsgordel worden ge-
monteerd. Een verbinding met de Isox-connectoren is niet absoluut noodzakelijk, maar wordt
wel aanbevolen.
- 84 -
Page 85
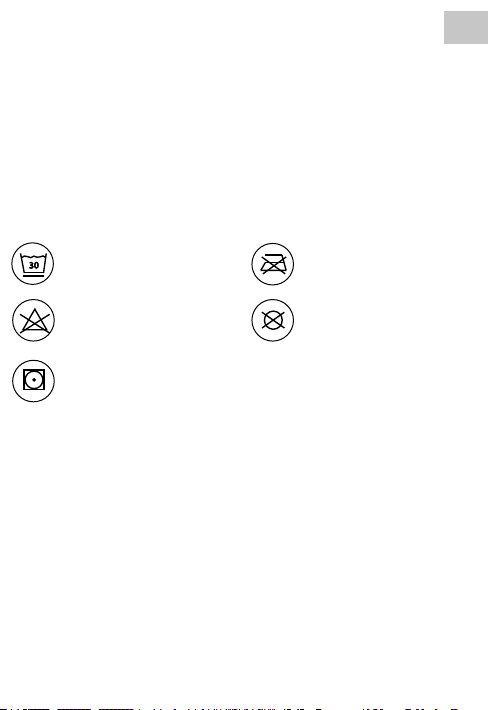
- 85 -
NL
REINIGING
Dit product is ontwikkeld met inachtneming van veiligheid, comfort en functionaliteit. Neem de
tijd om deze handleiding voor het gebruik van dit product zorgvuldig door te lezen en bewaar
de handleiding voor later gebruik op een veilige plek.
Om uw autostoeltje lang te kunnen gebruiken, mag u geen oplosmiddelen, schurende middelen
of agressieve reinigingsmiddelen gebruiken. Controleer na elke wasbeurt de bestendigheid van
de stof en de naden. Bij het wassen van de stof moeten de aanwijzingen op het etiket (zie hieronder) worden opgevolgd.
Wassen bij 30°C,
30
programma voor jne was
NIET bleken
Trommeldrogen op lage
temperatuur
NIET strijken
NIET chemisch reinigen
ONDERHOUD
Controleer het product regelmatig op mogelijke schade. Niet gebruiken bij schade en buiten
bereik van kinderen bewaren.
Neem bij problemen contact op met de Osann-klantenservice via +49 (0) 7731 / 970077.
Page 86

PL
Dziękujemy za wybór naszego fotelika dziecięcego Eno360.
Jeśli będzie Państwu potrzebna pomoc w związku z niniejszym produktem, proszę zwrócić się
do naszego działu obsługi klienta.
- 86 -
ZASTOSOWANIE
• Niniejszy produkt jest przeznaczony dla dzieci z grupy EKG ONZ 0+/1/2/3. Zakres wagowy:
0-36 kg. Zakres wiekowy: 0-12 lat.
• Grupa 0+ obejmuje dzieci o wadze od 0 do 13 kg. Fotelik dziecięcy montowany jest w samochodzie za pomocą zaczepów Isox i górnego pasa mocującego lub 3-punktowego pasa samochodowego. Dziecko zapinane jest 5-punktowym pasem bezpieczeństwa fotelika dziecięcego.
•
Grupa 1 obejmuje dzieci o wadze 9-18 kg. Fotelik dziecięcy jest skierowany przodem do kierun-
ku jazdy i mocowany w samochodzie za pomocą zaczepów Isox i górnego pasa mocującego
lub 3-punktowego pasa samochodowego. Dozwolone jest również użycie tyłem do kierunku
jazdy dla dzieci o wadze do 18 kg przy użyciu zaczepów Isox i górnego pasa mocującego.
Dziecko zapinane jest 5-punktowym pasem bezpieczeństwa fotelika dziecięcego.
• Grupy 2 i 3 obejmują dzieci o wadze od 15 do 36 kg. 5-punktowy pas bezpieczeństwa dziecię-
cego fotelika samochodowego zostaje zdjęty. Fotelik dziecięcy jest skierowany do przodu i jest
montowany w samochodzie za pomocą zaczepów Isox. Dziecko zapinane jest 3-punktowym
pasem samochodowym. Alternatywnie, dziecięcy fotelik samochodowy można zabezpieczyć
bezpośrednio za pomocą 3-punktowego pasa samochodowego bez zaczepów Isox.
• Zaleca się zainstalowanie fotelika dziecięcego na tylnym siedzeniu pojazdu. W przypadku
używania fotelika dziecięcego tyłem do kierunku jazdy w grupie EKG ONZ 0+ /1 NIE mocować
fotelika na przednim siedzeniu, gdzie znajduje się poduszka powietrzna. Chyba że można dezaktywować poduszkę powietrzną. W tej kwestii należy zapoznać się z informacjami zawartymi
w instrukcji eksploatacji pojazdu.
• Ten dziecięcy fotelik samochodowy nadaje się tylko do pojazdów wyposażonych w zaczepy
Isox, a także w 3-punktowe pasy bezpieczeństwa zgodne z EKG ONZ R16 lub innymi równoważnymi normami.
Poniższa tabela zawiera informacje o urządzeniach i metodach mocowania:
Grupa ECE
0+
0+
1
1
Kierunek
montażu
Tyłem do
kierunku jazdy
Tyłem do
kierunku jazdy
Tyłem do
kierunku jazdy
Przodem do
kierunku jazdy
Metoda instalacji Typ
Isox + górny pas
mocujący
3-punktowy pas
samochodowy
Isox + górny pas
mocujący
Isox + górny pas
mocujący
Półuni-
wersalny
Uniwersalny -
Półuniwersalny
Półuniwersalny
Rozmiar
Isox
D
D
B1
Page 87

- 87 -
PL
Grupa ECE
1
2/3
2/3
Kierunek
montażu
Przodem do
kierunku jazdy
Przodem do
kierunku jazdy
Przodem do
kierunku jazdy
Metoda instalacji Typ
3-punktowy pas
samochodowy
3-punktowy pas
samochodowy
3-punktowy pas
samochodowy + Isox
Uniwersalny -
Uniwersalny –
Półuniwersalny
Rozmiar
Isox
–
UWAGA
Montaż z 3-punktowym pasem bezpieczeństwa (grupa ECE 0+/1/2/3, 0-36 kg)
• To jest uniwersalne urządzenie do przytrzymywania dla dzieci. Posiada homologację zgodną z
regulaminem EKG/ONZ nr 44/04 do ogólnego użytkowania w pojazdach i pasuje do większości
siedzeń w pojazdach.
• Można spodziewać się prawidłowego zainstalowania urządzenia w przypadku, gdy producent
pojazdu deklaruje, że jego pojazdy nadają się do zainstalowania „uniwersalnego” urządzenia
przytrzymującego dla dzieci określonej grupy wiekowej.
• To urządzenie przytrzymujące dla dzieci zostało sklasykowane zgodnie z surowymi wymaga-
niami dla kategorii „uniwersalny” jako nowatorski model, który nie posiada niniejszego napisu.
• Nadaje się tylko do pojazdów ze stałymi lub automatycznymi 3-punktowymi pasami bezpieczeństwa odpowiadającymi regulaminowi EKG/ONZ nr 16 (lub równoważnym).
• W razie wątpliwości należy pytać producenta urządzenia przytrzymującego dla dzieci lub
sprzedawcy.
Montaż z zaczepami Isox i górnym pasem mocującym (grupa ECE 0+/1, 0-18 kg) lub
zaczepami Isox i 3-punktowym pasem samochodowym (grupa ECE 2/3, 15-36 kg)
• Niniejszy produkt jest półuniwersalnym systemem przytrzymującym dla dzieci. Posiada homologację zgodną z regulaminem EKG/ONZ nr 44/04 do ogólnego użytkowania w pojazdach
z system Isox.
• System przytrzymujący dla dzieci pasuje do pojazdów z siedzeniami, które oznaczone są jako
pozycje z systemem Isox (szczegóły patrz w książce pojazdu osobowego), co w zależności
od kategorii fotelika samochodowego dla dzieci i mocowania jest różne.
• Nadaje się tylko do pojazdów ze stałymi lub automatycznymi 3-punktowymi pasami bezpieczeństwa odpowiadającymi regulaminowi EKG/ONZ nr 16 (lub równoważnym).
• Grupy wagowe i klasy wzrostu systemu Isox, dla których przeznaczony jest ten produkt, to:
grupa 1, D i B1 oraz grupa 0+, D:
• W razie wątpliwości należy pytać producenta urządzenia przytrzymującego dla dzieci lub
sprzedawcy.
Page 88

PL
- 88 -
UWAGA
• Prosimy o uważne przeczytanie niniejszej instrukcji przed użyciem i zachowanie jej na przy-
szłość, aby zapewnić bezpieczeństwo dziecka. Nieprzestrzeganie instrukcji zawartych w
niniejszej instrukcji może spowodować poważne obrażenia ciała dziecka.
• Fotelik może być używany tylko z własnym 5-punktowym systemem pasów bezpieczeństwa
przez dzieci o maksymalnej masie ciała 18 kg (grupa 0+ i grupa 1).
• Fotelik NIE może być używany z 5-punktowym systemem pasów bezpieczeństwa przez
dzieci powyżej masy ciała 18 kg (grupa 2/3).
• Fotelik dla dzieci może być montowany w samochodzie tyłem lub przodem do kierunku
jazdy przy pomocy zaczepów Isox i górnego pasa mocującego lub tylko 3-punktowego
pasu samochodowego. Górny pas mocujący można używać wyłącznie dla grupy 1, maks.
18 kg w połączeniu z zaczepami Isox. Ważne: nie instalować przodem do kierunku jazdy,
dopóki waga dziecka nie przekroczy 9 kg.
• Dla montażu Isox: Zapoznać się z instrukcją producenta samochodu.
• Montaż fotelika dziecięcego w grupie 0+/1 wyłącznie przy pomocy zaczepów Isox, bez
dodatkowego mocowania górnym pasem mocującym jest niedozwolone.
• Nie wolno korzystać z żadnych innych obciążonych punktów łączenia niż te, które zostały
opisane w instrukcji i są oznaczone na urządzeniu przytrzymującym.
• Nie należy używać fotelika dziecięcego w domu. Nie został on zaprojektowany do użytku
domowego i dlatego powinien być używany tylko w samochodzie.
• Nigdy nie pozostawiać dziecka w foteliku bez opieki.
• W przypadku używania fotelika dziecięcego tyłem do kierunku jazdy w grupie ECE 0+ /1 NIE
mocować fotelika na przednim siedzeniu, gdzie znajduje się poduszka powietrzna. Chyba że
można dezaktywować poduszkę powietrzną. W tej kwestii należy zapoznać się z informacjami
zawartymi w instrukcji eksploatacji pojazdu.
• Fotelik dziecięcy powinien zostać wymieniony, jeśli w razie wypadku został poddany dużym
obciążeniom.
• Ze względów bezpieczeństwa fotelik dziecięcy musi być zamocowany w pojeździe, nawet
jeśli dziecko w nim nie siedzi.
• Zawsze należy się upewnić, że wszystkie pasy fotelika do pojazdu są zaczepione i że wszystkie
pasy przytrzymujące dziecko są dopasowane do ciała dziecka. Ponadto należy się upewnić,
czy pasy nie są poskręcane.
• Bagaż lub inne przedmioty, które mogą spowodować obrażenia w przypadku kolizji, muszą
być odpowiednio zabezpieczone.
• Sztywne przedmioty i plastikowe części urządzenia przytrzymującego należy umieścić i
zainstalować w taki sposób, aby nie mogły zostać przytrzaśnięte przez ruchome fotele lub
drzwi pojazdu w codziennym użytkowaniu.
• Ważne jest, aby głęboko osadzone pasy mocno zabezpieczały miednicę. Aby uniknąć upadku
dziecka z fotelika, powinno być ono cały czas zapięte pasami.
• Wprowadzanie zmian lub modykacji do produktu bez zgody właściwego organu jest niebezpieczne. Niezastosowanie się do instrukcji montażu dostarczonych przez producenta
systemu przytrzymującego również stanowi zagrożenie.
• Ten fotelik dziecięcy został zaprojektowany dla noworodków i dzieci o wadze do 36 kg. Nigdy
nie należy przeciążać fotelika, przewożąc więcej niż jedno dziecko lub dodatkowe obciążenia.
• Nie wolno używać urządzenia przytrzymującego bez pokrowca.
• Pokrowiec nie może być zastąpiony innym niż zalecany przez producenta, ponieważ stanowi
on integralną część urządzenia przytrzymującego.
Page 89
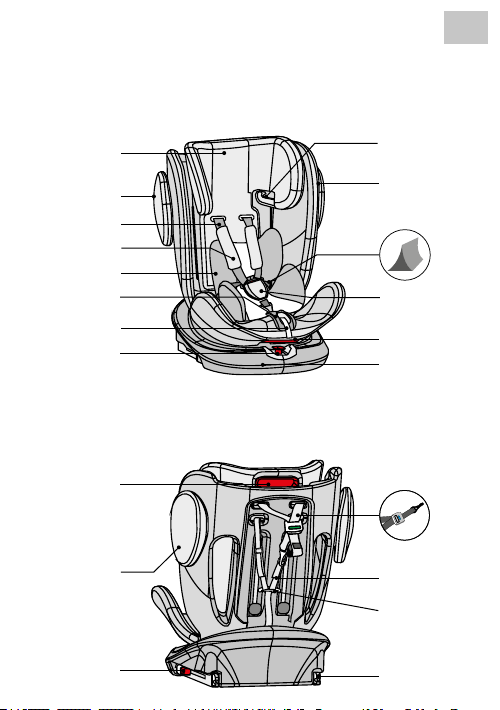
ELEMENTY FOTELIKA
Widok z przodu
- 89 -
PL
Regulowany
zagłówek
Ochrona przed uderze-
niem bocznym
Pas naramienny
Poduszka naramienna
Wkładka komfortowa
Regulator pasów
Taśma regulacyjna
Dźwignia do obracania
Widok z tyłu
Ustawienie zagłówka
Ochrona przed
uderzeniem bocznym
Rozszerzenie
zaczep Isox
Prowadnica pasa
(grupa 2 + 3)
Poduszka siedzenia
Podkładka dziecięca
(pod wkładką komfortową)
Klamra zapięcia pasów i
osłona klamry
Dźwignia do
regulacji kąta
Stacja Isox
Górny pas
mocujący
Pas naramienny
Sprzączka pasa
Zaczep
Isox
Page 90
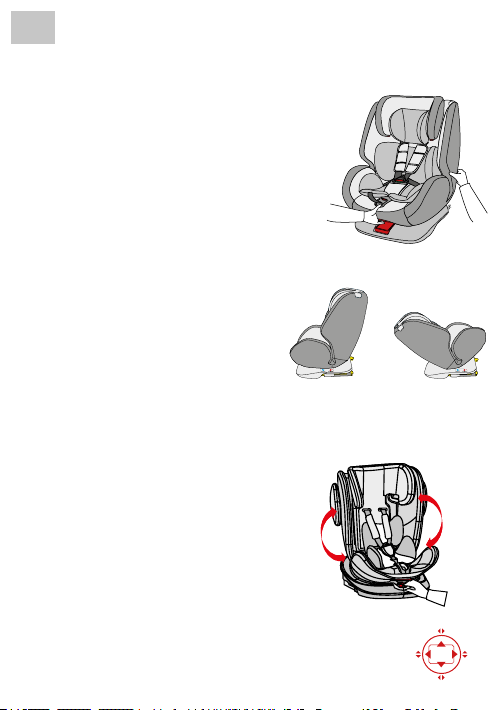
PL
- 90 -
STOSOWANIE FOTELIKA DZIECIĘCEGO
Regulacja kąta nachylenia fotelika
samochodowego
• Jedną ręką przesunąć dźwignię regulacji kąta w
dolnej przedniej części poduszki siedzenia.
• Druga ręka trzyma tył korpusu fotelika i ustawia kąt.
• Maksymalny kąt dotyczy tylko pozycji tyłem do
kierunku jazdy, kąt pionowy dotyczy tylko pozycji
przodem do kierunku jazdy dla grupy 2/3, 15-36 kg.
Możliwe są następujące pozycje siedzenia:
(Proszę zwrócić uwagę na etykietę znajdującą się na
foteliku)
Tyłem do kierunku jazdy 0-18 kg:
1 pozycja (1 + A)
Skierowany przodem do kierunku jazdy 9-18 kg:
3 pozycje (2 + 3 + 4)
Skierowany przodem do kierunku jazdy 15-36 kg:
1 pozycja (5)
Obracanie fotelika dziecięcego
• Jedną ręką nacisnąć czerwony przycisk z przodu
podstawy, a drugą obrócić poduszkę siedzenia.
Gdy poduszka siedzenia się obraca, dźwignię do
obracania można zwolnić.
• Istnieją 4 pozycje blokowania przy 90, 180, 270 i
0/360° w kierunku podstawy. Gdy poduszka siedze-
nia znajdzie się w jednym z tych położeń, zostaje
zablokowana, czemu towarzyszy charakterystyczne
„kliknięcie”.
• Pozycja przodem do kierunku jazdy przeznaczo-
na jest dla dzieci z grupy 1, 2 i 3. Pozycja tyłem do
kierunku jazdy przeznaczona jest dla małych dzieci
grupy 0+ i 1.
Tylko przodem do
kierunku jazdy
(ilustracja przykładowa)
(ilustracja przykładowa)
(ilustracja przykładowa)
Tylko tyłem do kierunku
jazdy
(ilustracja przykładowa)
0/360°
90°270 °
180°
Page 91
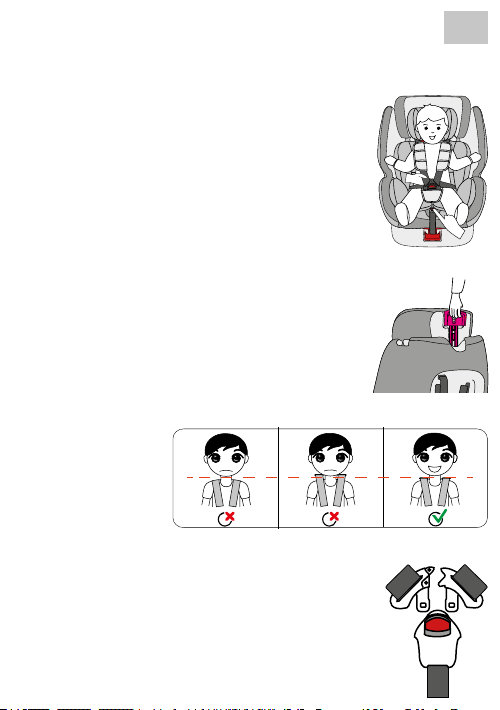
- 91 -
Regulacja pasa
• Aby poluzować pas, należy nacisnąć jedną ręką
przycisk do regulacji pasa w obszarze fotelika.
• Drugą ręką przytrzymać klamrę z przymocowanymi
paskami, a następnie poluzować ją.
• Aby zamocować pas, należy pociągnąć przedni
pas regulacyjny.
Regulacja zagłówka
• Poluzować pas i pociągnąć za dźwignię na zagłówku, aż znajdzie się na żądanej wysokości.
• Upewnić się, czy pasy naramienne znajdują się na
odpowiedniej wysokości. Powinny wychodzić z
fotelika na wysokości ramion dziecka.
• Zwolnić dźwignię i upewnić się, że zagłówek jest
zablokowany.
Otwieranie/zamykanie pasa
• Aby odblokować pas, należy nacisnąć czerwony
przycisk na zatrzasku i oddzielić dwa języczki
klamry.
• Aby zablokować pas, należy najpierw złączyć dwa
języczki klamry, a następnie włożyć je razem do
klamry zapięcia pasów.
PL
Page 92
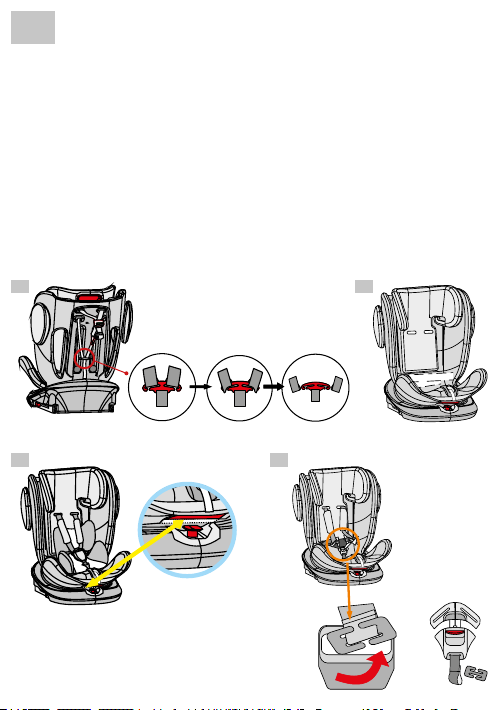
PL
- 92 -
Zdejmowanie systemu pasów
• Poluzować pas
• Przeciągnąć pasy barkowe z metalowego wspornika znajdującego się z tyłu fotelika dziecię-
cego i poprowadzić je przez fotelik do przodu (Rys. A)
• Zdjąć poduszki naramienne i klamry z pasa.
• Złożyć pas tak, aby można go było przechować za pokryciem w korytku na oparciu. (Rys. B)
• Aby zdjąć klamrę zapięcia pasów, najpierw przesunąć siedzenie do maksymalnej pozycji leżącej.
Następnie obrócić siedzenie do pozycji 90°.
• Zdjąć pokrywę i odłożyć ją na bok. (Rys. C)
• Teraz przełożyć metalową klamrę zapięcia pasów przez otwór, a następnie ponownie założyć
pokrywę. (Rys. D)
• Wszystkie usunięte części starannie przechowywać.
A B
C D
(ilustracje przykładowe)
Page 93
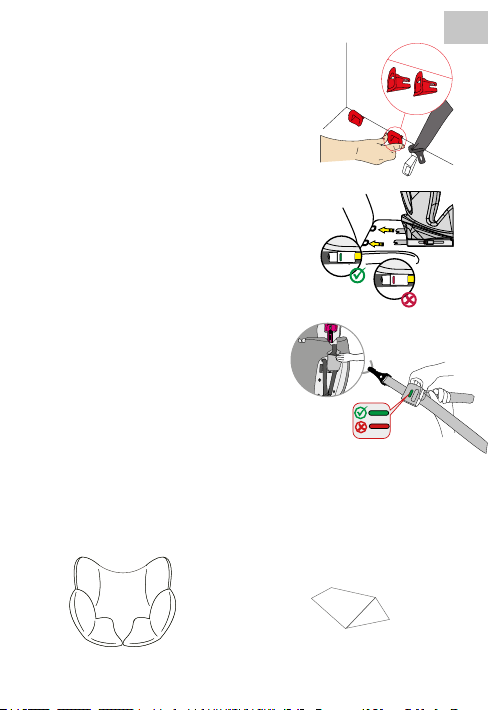
- 93 -
Łączniki Isox
• Wsunąć prowadnice w szczelinę w tapicerce pomiędzy oparciem a fotelem, a następnie w uchwyty
Isox.
• Płaska strona musi przy tym wskazywać w dół. Nie
jest to konieczne, jeżeli pojazd jest wyposażony w
fotele z prowadnicami Isox.
• Nacisnąć przyciski łączników Isox po obu stronach,
aby je przedłużyć.
• Wsunąć łączniki Isox do prowadnic i docisnąć, aż
będzie słyszalny odgłos kliknięcia.
• Wskaźnik po obu stronach zmieni kolor na zielony
dopiero po prawidłowym połączeniu. Docisnąć fotelik dziecięcy do oparcia fotela, aż znajdzie się on
w bezpiecznej pozycji.
Dodatkowe mocowanie przy pomocy
górnego pasu mocującego (Grupa
0+/1)
• Wyjąć górny pas mocujący z kieszeni.
• Aby poluzować górny pas mocujący, należy jedną
ręką nacisnąć szary przycisk, a drugą ręką pociągnąć za boczną część zaczepu pasa na wymaganą
długość.
• Aby zamocować górny pas mocujący, należy zaczepić zaczep pasa w punkcie zamocowania fotela samochodowego i pociągnąć, aby był jak najbardziej
napięty. Wskaźnik zmieni kolor na zielony dopiero
wtedy, gdy pas zostanie wystarczająco napięty.
Wkładka komfortowa i podkładka dziecięca
PL
Wkładka komfortowa
do maks. 13 kg
Podkładka dziecięca
(pod wkładką komfortową)
do maks. 9 kg
Page 94
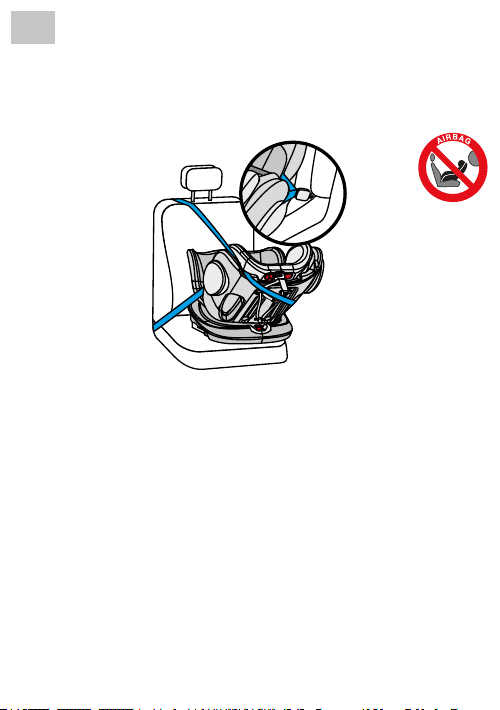
PL
- 94 -
MONTAŻ FOTELIKA DZIECIĘCEGO
1) Grupa 0+ (tyłem do kierunku jazdy, z 3-punktowym pasem
samochodowym)
1. Ustawić fotelik dziecięcy w maksymalnej pozycji do leżenia (pozycja 1) i obrócić go, aby w
pozycji tyłem do kierunku jazdy wskazywał na pozycję siedzenia A.
2. Dosunąć fotelik dziecięcy do oparcia fotelu samochodowego.
3. Poluzować zapięcie pasa fotelika dziecięcego i umieścić pasy po zewnętrznej stronie fotelika.
4. Najpierw wyjąć z fotelika dziecięcego wkładkę komfortową i podkładkę dziecięcą.
5. Rozciągnąć maksymalnie 3-punktowy pas samochodowy i przeprowadzić pas biodrowy
przez boczne prowadnice w foteliku z jednej strony na drugą i zamknąć klamrę 3-punkto wego pasa samochodowego aż będzie słyszalny odgłos kliknięcia.
6. Teraz należy ponownie włożyć do fotelika podkładkę dziecięcą i wkładkę komfortową.
7. Przeprowadzić pas barkowy wzdłuż zewnętrznej skorupy fotelika, zwracając przy tym
uwagę, aby pas przebiegał między poduszką siedzenia a zagłówkiem.
8. Dociągnąć maksymalnie pas barkowy, aż do napięcia 3-punktowego pasa samochodowe
go i uzyskania stabilnej pozycji fotelika.
9. Posadzić dziecko w foteliku dziecięcym.
10. Wyregulować wysokość zagłówka tak, aby pas naramienny znajdował się na wysokości
ramion dziecka.
11. Ponownie zamknąć zapięcie pasa aż będzie słyszalny odgłos kliknięcia.
12. Pociągnąć przedni pas regulacyjny, aby napiąć pasy. Upewnić się, że pasy nie są skręcone.
(Dla dzieci od 0 do 13 kg)
Page 95
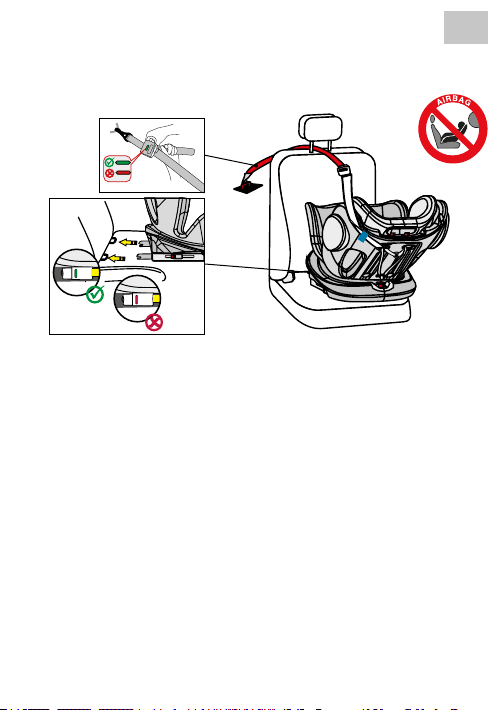
- 95 -
PL
2) Grupa 0+/1 (tyłem do kierunku jazdy, z Isox i górnym pasem
mocującym)
1. Ustawić fotelik dziecięcy w maksymalnej pozycji do leżenia (pozycja 1) i obrócić go, aby w
pozycji tyłem do kierunku jazdy wskazywał na pozycję siedzenia A.
2. Wcisnąć oba boczne przyciski łączników Isox, aby
je przedłużyć.
3. Wprowadzić łączniki Isox do łączników Isox w fotelu samochodu i zablokować.
4. Dosunąć fotelik dziecięcy do oparcia fotelu samochodowego. Sprawdzić, czy oba wskaźniki
Isox mają kolor zielony.
5. Chwycić górny pas mocujący i wyciągnąć go na maksymalną długość.
6. Wsunąć górny pas mocujący do niebieskich, gumowych prowadnic i poprowadzić go
wzdłuż zewnętrznej części fotelika.
7. Zahaczyć górny pas mocujący o odpowiednie haczyki w samochodzie (np. tył siedzenia
w samochodzie lub w bagażniku. Należy przy tym przestrzegać instrukcji obsługi samochodu).
8. Następnie napiąć górny pas mocujący, aż pojawi się na nim zielony wskaźnik.
9. W celu wygodnego wkładania dziecka obrócić fotelik dziecięcy w kierunku drzwi samochodu.
10. Poluzować zapięcie pasa fotelika dziecięcego i umieścić pasy po zewnętrznej stronie
fotelika.
11. Posadzić dziecko w foteliku dziecięcym.
12. Wyregulować wysokość zagłówka tak, aby pas naramienny znajdował się na wysokości
ramion dziecka.
13. Ponownie zamknąć zapięcie pasa aż będzie słyszalny odgłos kliknięcia.
14. Pociągnąć przedni pas regulacyjny, aby napiąć pasy. Upewnić się, że pasy nie są skręcone.
15. Obrócić siedzisko do pozycji tyłem do kierunku jazdy. Sprawdzić, czy fotelik dziecięcy jest
zablokowany w tej pozycji.
(Dla dzieci o masie ciała od 0 do 18 kg)
Page 96
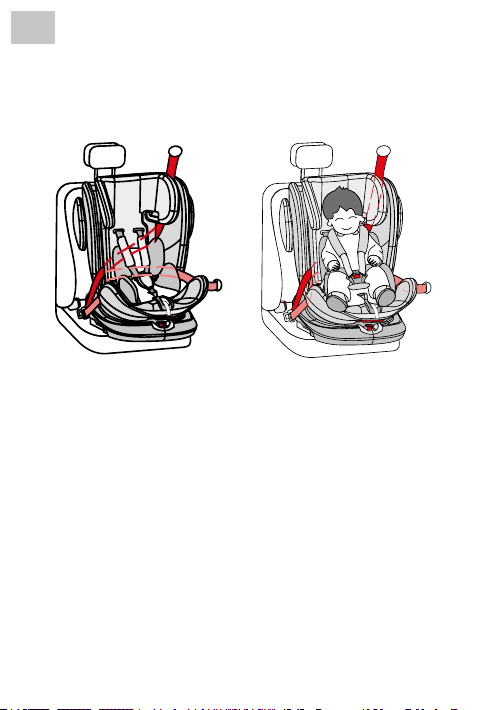
PL
- 96 -
MONTAŻ FOTELIKA DZIECIĘCEGO
3) Grupa 1 (przodem do kierunku jazdy, z 3-punktowym pasem
samochodowym)
WAŻNE: FOTELIKA DZIECIĘCEGO NIE NALEŻY UŻYWAĆ W POZYCJI PRZODEM DO KIERUNKU
JAZDY, DOPÓKI WAGA DZIECKA NIE PRZEKROCZY 9 KG.
1. Obrócić fotelik dziecięcy do pozycji przodem do kierunku jazdy. Sprawdzić, czy fotelik
dziecięcy jest zablokowany w tej pozycji.
2. Fotelik dziecięcy ustawiany przodem do kierunku jazdy zapewnia trzy regulowane pozycje
siedzenia (pozycja 2, 3 i 4).
3. Rozciągnąć maksymalnie 3-punktowy pas samochodowy i przeprowadzić go przez
pierwszy otwór z przodu oparcia fotelika, który znajduje się z boku 3-punktowego pasa
samochodowego.
4. Przeprowadzić 3-punktowy pas samochodowy z tyłu pod systemem pasów fotelika
dziecięcego i do przodu przez kolejny otwór w oparciu fotelika.
5. Zamknąć klamrę 3-punktowego pasa, aż do usłyszenia kliknięcia. Zwrócić przy tym uwagę,
aby pas bezpieczeństwa nie był skręcony.
6. Dociągnąć maksymalnie pas barkowy, aż do napięcia 3-punktowego pasa samochodowego
i uzyskania stabilnej pozycji fotelika.
7. Poluzować zapięcie pasa fotelika dziecięcego i umieścić pasy po zewnętrznej stronie
fotelika.
8. Posadzić dziecko w foteliku dziecięcym.
9. Wyregulować wysokość zagłówka tak, aby pas naramienny wychodził nad ramieniem.
10. Ponownie zamknąć zapięcie pasa aż będzie słyszalny odgłos kliknięcia.
11. Pociągnąć przedni pas regulacyjny, aby napiąć pasy. Upewnić się, że pasy nie są skręcone.
(Dla dzieci od 9 do 18 kg)
Page 97
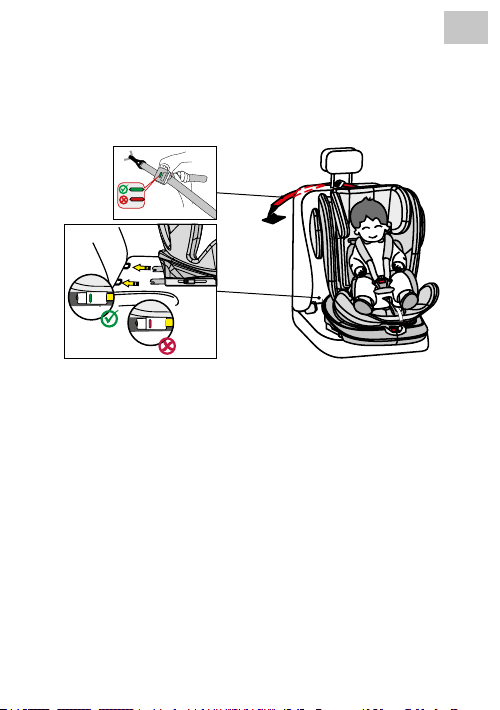
- 97 -
PL
4) Grupa 1 (przodem do kierunku jazdy, z Isox i górnym pasem
mocującym)
WAŻNE: FOTELIKA DZIECIĘCEGO NIE NALEŻY UŻYWAĆ W POZYCJI PRZODEM DO KIERUNKU
JAZDY, DOPÓKI WAGA DZIECKA NIE PRZEKROCZY 9 KG.
1. Obrócić siedzisko do pozycji przodem do kierunku jazdy. Sprawdzić, czy fotelik dziecięcy
jest zablokowany w tej pozycji.
2. Fotelik dziecięcy ustawiany przodem do kierunku jazdy zapewnia trzy regulowane pozycje
siedzenia(pozycja 2, 3 i 4).
3. Wcisnąć oba boczne przyciski łączników Isox, aby je przedłużyć.
4. Wprowadzić łączniki Isox do łączników Isox w fotelu samochodu i zablokować.
5. Dosunąć fotelik dziecięcy do oparcia fotelu samochodowego. Sprawdzić, czy oba wskaźni-
ki Isox mają kolor zielony.
6. Chwycić górny pas mocujący i wyciągnąć go na maksymalną długość.
7. Zahaczyć górny pas mocujący o odpowiednie haczyki w samochodzie (np. tył siedzenia w
samochodzie lub w bagażniku. Należy przy tym przestrzegać instrukcji obsługi samochodu).
8. Następnie napiąć górny pas mocujący, aż pojawi się na nim zielony wskaźnik.
9. Poluzować zapięcie pasa fotelika dziecięcego i umieścić pasy po zewnętrznej stronie
fotelika.
10. Posadzić dziecko w foteliku dziecięcym.
11. Wyregulować wysokość zagłówka tak, aby pas naramienny wychodził nad ramieniem.
12. Ponownie zamknąć zapięcie pasa aż będzie słyszalny odgłos kliknięcia.
13. Pociągnąć przedni pas regulacyjny, aby napiąć pasy. Upewnić się, że pasy nie są skręcone.
(Dla dzieci od 9 do 18 kg)
Page 98
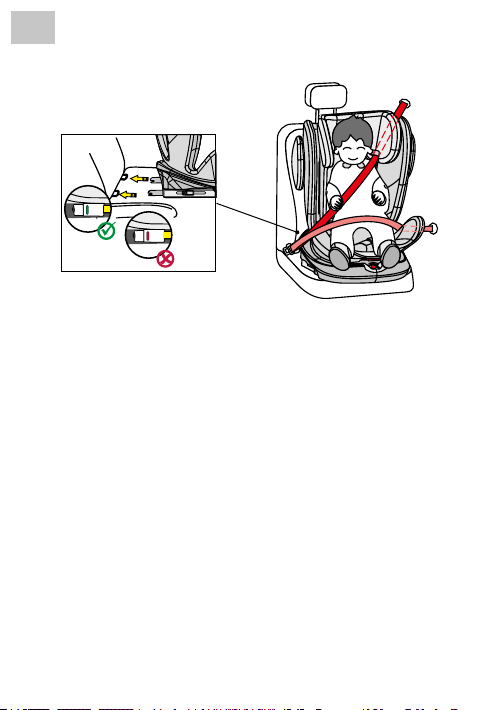
PL
3) Grupa 2/3 (przodem do kierunku jazdy)
(Dla dzieci od 15 do 36 kg)
INFORMACJA:
W PIERWSZEJ KOLEJNOŚCI USUNĄĆ OPISANY WCZEŚNIEJ SYSTEM PASÓW BEZPIECZEŃSTWA.
1. Obrócić siedzisko do pozycji przodem do kierunku jazdy. Sprawdzić, czy fotelik dziecięcy
jest zablokowany w tej pozycji.
2. Wcisnąć oba boczne przyciski łączników Isox, aby je przedłużyć.
3. Wprowadzić łączniki Isox do łączników Isox w fotelu samochodu i zablokować.
4. Dosunąć fotelik dziecięcy do oparcia fotelu samochodowego. Sprawdzić, czy oba wskaźni-
ki Isox mają kolor zielony.
5. Przewlec pas przekątny 3-punktowego pasa bezpieczeństwa w samochodzie przez
prowadnicę pasa przy zagłówku fotelika dziecięcego.
6. W celu wygodnego wkładania dziecka obrócić fotelik dziecięcy w kierunku drzwi samochodu.
7. Posadzić dziecko w foteliku dziecięcym.
8. Wyregulować wysokość zagłówka w taki sposób, aby głowa dziecka znajdowała się w
całości w zagłówku i pas przekątny wychodził przez prowadnicę pasa na wysokości barku
dziecka.
9. Obrócić siedzisko do pozycji przodem do kierunku jazdy. Sprawdzić, czy fotelik dziecięcy
jest zablokowany w tej pozycji.
10. Następnie zamknąć zapięcie 3-punktowego pasa bezpieczeństwa w samochodzie, aż
będzie słyszalny odgłos kliknięcia.
11. Pociągnąć za pas przekątny, aby go napiąć. Upewnić się, że pasy nie są skręcone.
12. Fotelik dziecięcy wolno wykorzystywać w tej grupie wiekowej tylko w pozycji siedzącej 5.
Montaż bez systemu Isox:
Alternatywnie fotelik dziecięcy można zamontować w grupie 2/3 tylko za pomocą 3-punktowego pasa samochodowego. Połączenie za pomocą zaczepów Isox nie jest konieczne ale
zalecane.
- 98 -
Page 99
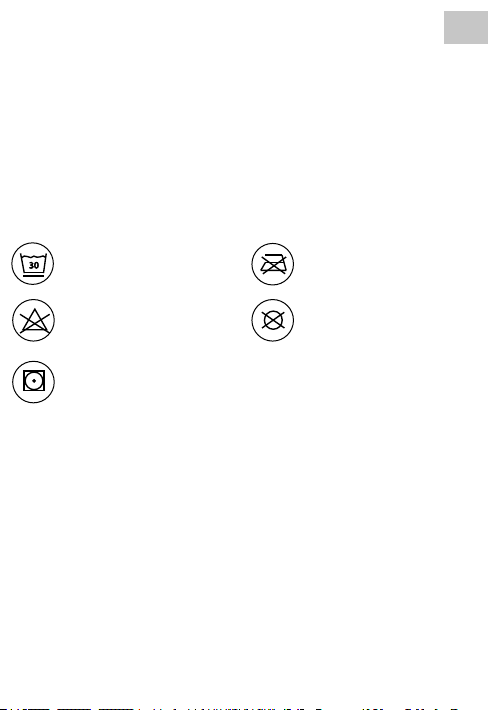
- 99 -
PL
CZYSZCZENIE
Produkt ten został zaprojektowany z myślą o bezpieczeństwie, wygodzie i funkcjonalności. Należy
dokładnie zapoznać się z niniejszą instrukcją obsługi przed użyciem produktu i przechowywać ją
w bezpiecznym miejscu w celu użycia w przyszłości.
Nie należy stosować rozpuszczalników, środków do szorowania lub agresywnych środków
czyszczących, aby zapewnić długotrwałe użytkowanie fotelika dziecięcego. Po każdym praniu
sprawdzać trwałość tkaniny i szwów. Podczas prania tkaniny należy postępować zgodnie z instrukcjami podanymi na etykiecie (patrz poniżej).
Prać w temperaturze 30°C,
30
program do prania delikatnych
tkanin
NIE wybielać
Suszyć w suszarkach w
niskiej temperaturze
NIE prasować
NIE czyścić chemicznie
UTRZYMANIE W DOBRYM STANIE
Regularnie sprawdzać stan produktu pod kątem ewentualnych uszkodzeń. Nie używać w
przypadku uszkodzenia i przechowywać w miejscu niedostępnym dla dzieci.
W razie problemów prosimy o kontakt z działem obsługi klienta rmy Osann pod numerem
+49 (0) 7731 / 970077.
Page 100

CZ
Děkujeme, že jste se rozhodli pro naši dětskou autosedačku Eno360.
Budete-li potřebovat s tímto výrobkem pomoc, obraťte se prosím na náš zákaznický servis.
- 100 -
POUŽITÍ
• Tento výrobek je určený pro děti ECE skupiny 0+/1/2/3. Rozsah hmotnosti: 0-36 kg. Věkový
rozsah: 0-12 let.
• Skupina 0+ je pro děti o hmotnosti 0 až 13 kg. Dětská autosedačka se v autě montuje proti
směru jízdy pomocí konektorů Isox a pásu Top Tether nebo pomocí 3bodového pásu. Dítě
se připoutává 5bodovým pásem dětské autosedačky.
• Skupina 1 je pro děti o hmotnosti 9-18 kg. Dětská autosedačka je umístěna po směru jízdy a
připevňuje se ve vozidle pomocí konektorů Isox a pásu Top Tether nebo pomocí 3bodového
pásu. Je také možné používat ji umístěnou proti směru jízdy až do 18 kg pomocí konektorů
Isoxu a Top Tetheru. Dítě se připoutává 5bodovým pásem dětské autosedačky.
• Skupiny 2 a 3 jsou vhodné pro děti o hmotnosti 15 až 36 kg. 5bodový pásový systém dětské
autosedačky se odstraní. Dětská autosedačka se umisťuje po směru jízdy a montuje se v autě
pomocí konektorů Isox. Dítě se připoutává 3bodovým pásem auta. Alternativně lze dětskou
autosedačku také zajistit přímo 3bodovým pásem auta bez konektorů Isox.
• Doporučuje se instalovat dětskou autosedačku na zadním sedadle vozidla. NEPŘIPEVŇUJTE
dětskou autosedačku proti směru jízdy ve skupině ECE 0+ /1 na přední sedadlo, kde se nachází
airbag. Výjimku tvoří situace, kdy lze airbag deaktivovat. Přečtěte si prosím v této souvislosti
návod k obsluze vozidla.
•
Tato dětská autosedačka je vhodná pouze pro vozidla vybavená jak vázáním Isox, tak i
3bodovými bezpečnostními pásy podle ECE R16 nebo jiných srovnatelných norem.
Následující tabulka obsahuje informace o připevňovacích prvcích a metodách:
ECE
skupina
Směr montáže Metoda instalace Typ
0+ Proti směru jízdy Isox + Top Tether
0+ Proti směru jízdy 3bodový pás auta Univerzální -
1 Proti směru jízdy Isox + Top Tether
1 Po směru jízdy Isox + Top Tether
1 Po směru jízdy 3bodový pás auta Univerzální -
Polouniverzální
Polouniverzální
Polouniverzální
Velikost
Isox
D
D
B1
 Loading...