

OSANG Healthcare Infopia Clover A1c Instruction Manual
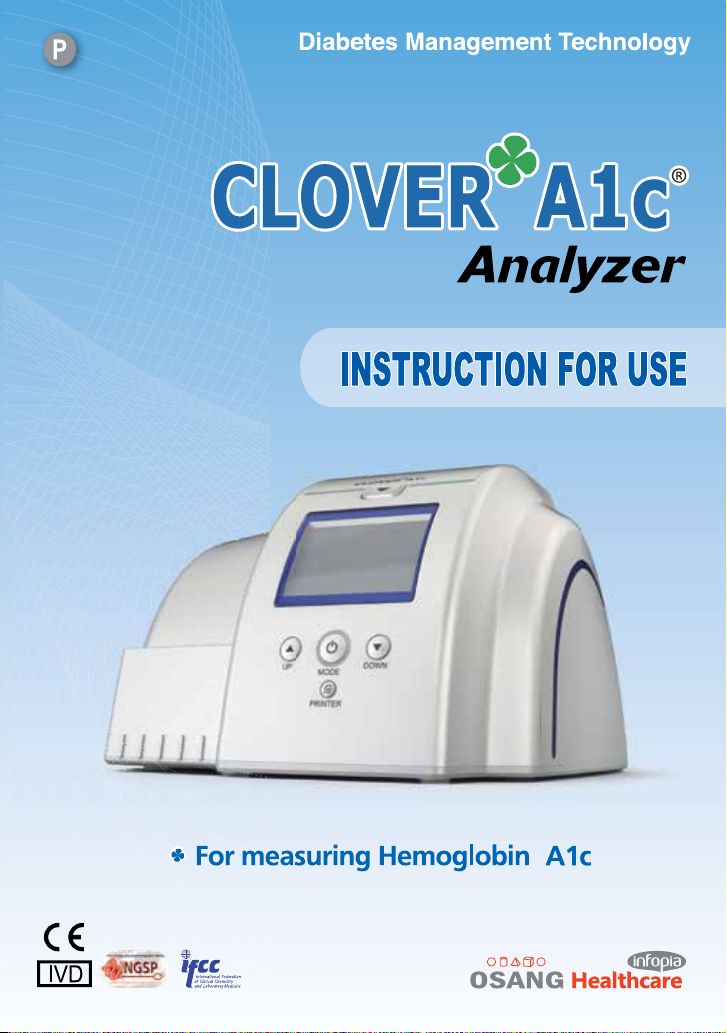

TABLE OF CONTENTS
1. INTENDED USE
4
2. GENERAL INFORMATION
3. PRINCIPLES OF OPERATION
4.
CLOVER A1c® CONTENTS
5. STORAGE INSTRUCTIONS
6. DEVICE DESCRIPTION
7. LIST OF ICONS
8. INSTALLATION
9. OPERATION
10. SETTING THE ANALYZER
11. TESTING HbA1c
12. REVIEWING RESULTS
13. CHECKING THE SYSTEM
14. OPTION
15. TROUBLESHOOTING
16. SPECIFICATION
17. MAINTENANCE
18. SAFETY
4
5
6
6
7
8~9
10
11~12
13~15
16~25
26~27
28~38
39~43
44~46
47
48~49
50
19. DISPOSAL
20. PRECAUTION
21. SYMBOL & DESCRIPTION
51
52~54
55~56
3

1. INTENDED USE
AB
3. Principles of Operation
The CLOVER A1c® analyzer is an IVD(In Vitro Diagnostic Device) device for measuring
Hemoglobin A1c by the well established method of boronate affinity. It is able to analyze
both capillary whole blood and venous blood. Anticoagulants may be used, such as
EDTA(ethylenediaminetetraacetic acid) and heparin etc. This CLOVER A1c
®
system is
designed to help controlling diabetes and it is intended to be used by professionals in
laboratories, clinics and hospitals. Same as all diagnostic tests, do not make a definitive
diagnosis of diabetes based on the result of
a single test. A physician should make a diagnosis after all clinical and laboratory
findings are evaluated.
2. General Information
The CLOVER A1c
Hemoglobin A1c. It is easily validated with the Check Cartridge provided with the Analyzer
kit for quality assurance.
The Analyzer also includes a DC 9 V, 2A adapter. Using other adapters may affect the
analyzer and give inaccurate test results.
Calibration
The CLOVER A1c
standardized to DCCT (Diabetes Control and Complications Trial).
The DCCT is a landmark multi-center trial which conclusively linked elevated HbA1c
level to the complications associated with Diabetes.
The DCCT showed the importance of improved glycemic control in reducing the risk and
progression of the complications of diabetes. Glycemic control was determined by the
measurement of Hemoglobin A1c. The ADA (American Diabetes Association) recommends measurement of the Hemoglobin A1c levels of two to four times per user, with
less frequency in patients with stable control, and more frequency in patients with
unstable control.
®
Analyzer uses the reflectance spectrophotometer for measuring the
®
Analyzer has been programmed to produce results that are
3.1 Reflectance Spectrophotometry
The CLOVER A1c
®
system is a fully automated boronate affinity assay for the
determination of the percentage of Hemoglobin A1c(HbA1c%) in whole blood.
The CLOVER A1c
®
system Test Cartrideg includes a cartridge and reagent pack.
The reagent pack is pre-filled with reagent solution and rinsing solution. The reagent
solution contains agents that lyse erthrocytes and boronate bead that binds cis-diols of
glycated hemoglobin.
The blood sample (4µL) is collected at the sampling area of the reagent pack.
The reagent pack is then inserted into the cartridge, where the blood is instantly lysed
releasing the hemoglobin and the boronate resin binding the glycated hemoglobin.
The blood sample mixture is rotated to the measurement zone of the cartridge, where
the amount of total hemoglobin in the blood sample is measured by the reflectance of
the photo sensor, which consists of LED (Light Emitting Diode) and PD (Photo Diode).
The cartridge is then rotated so that the rinsing solution washes out non-glycated
hemoglobin from the blood sample, thus the amount of glycated hemoglobin can be
photometrically measured.
The ratio of glycated hemoglobin with respect to total hemoglobin in the blood sample
is calculated.
3.2 calculation of Results
Total Hemoglobin
'A' and 'B' are the slope and intercept factor to correct the value for DCCT calibration.
4 5

4. CLOVER A1c® Contents
6. Device Description
Upon receipt of the product, carefully inspect for any obvious physical damage.If any
damage is evident to the CLOVER A1c
®
Analyzer, please consult our authorizedrepre-
sentative in your area.
Contents
1. CLOVER A1c
2. Instructions for Use
3. Exclusive Power Adapter
4. Fan Filters
5. Daily Check Cartridge
6. Monthly Check Cartridge
®
Analyzer
6.1 Analyzer
Lid
LCD Display
Arrow Buttons
6.2 Test Cartridge
[ Cartridge ]
Reagent
Solution
Mode Button
Printer Button
[ Reagent Pack ]
Rinsing
Solution
5. Storage Instructions
The CLOVER A1c
(50~95°F). Test Cartridges must be stored between 2~32°C (36-90 °F) and at a relative
humidity between 10% to 90%.
WARNING:
Do not modify this equipment without authorization of the manufacturer.
®
Analyzer must be stored at temperatures between 10°C~35°C
6 7
Cartridge
Code Area
Sample Area
CAUTION:
Do not touch the cartridge code area. Fingerprints and scratches may affect
the recognition of cartridge barcode.
7. LIST OF ICONS
7. LIST OF ICONS
Icon
Warming up
CHECK
CHECK
Warming up
Open the lid
Insert
Check Cartridge
Insert
Check Reagent
Pack
Insert
Test Cartridge
Apply sample to
sample area
FunctionName
It is displayed on the analyzer LCD
once it is powered on.
Open the lid of the analyzer.
Analyzer is under 'Check Mode‘.
Insert Check Cartridge into the analyzer.
Insert Check reagent pack into the analyzer.
Insert Test Cartridge into the analyzer.
Apply sample to sample area of reagent pack.
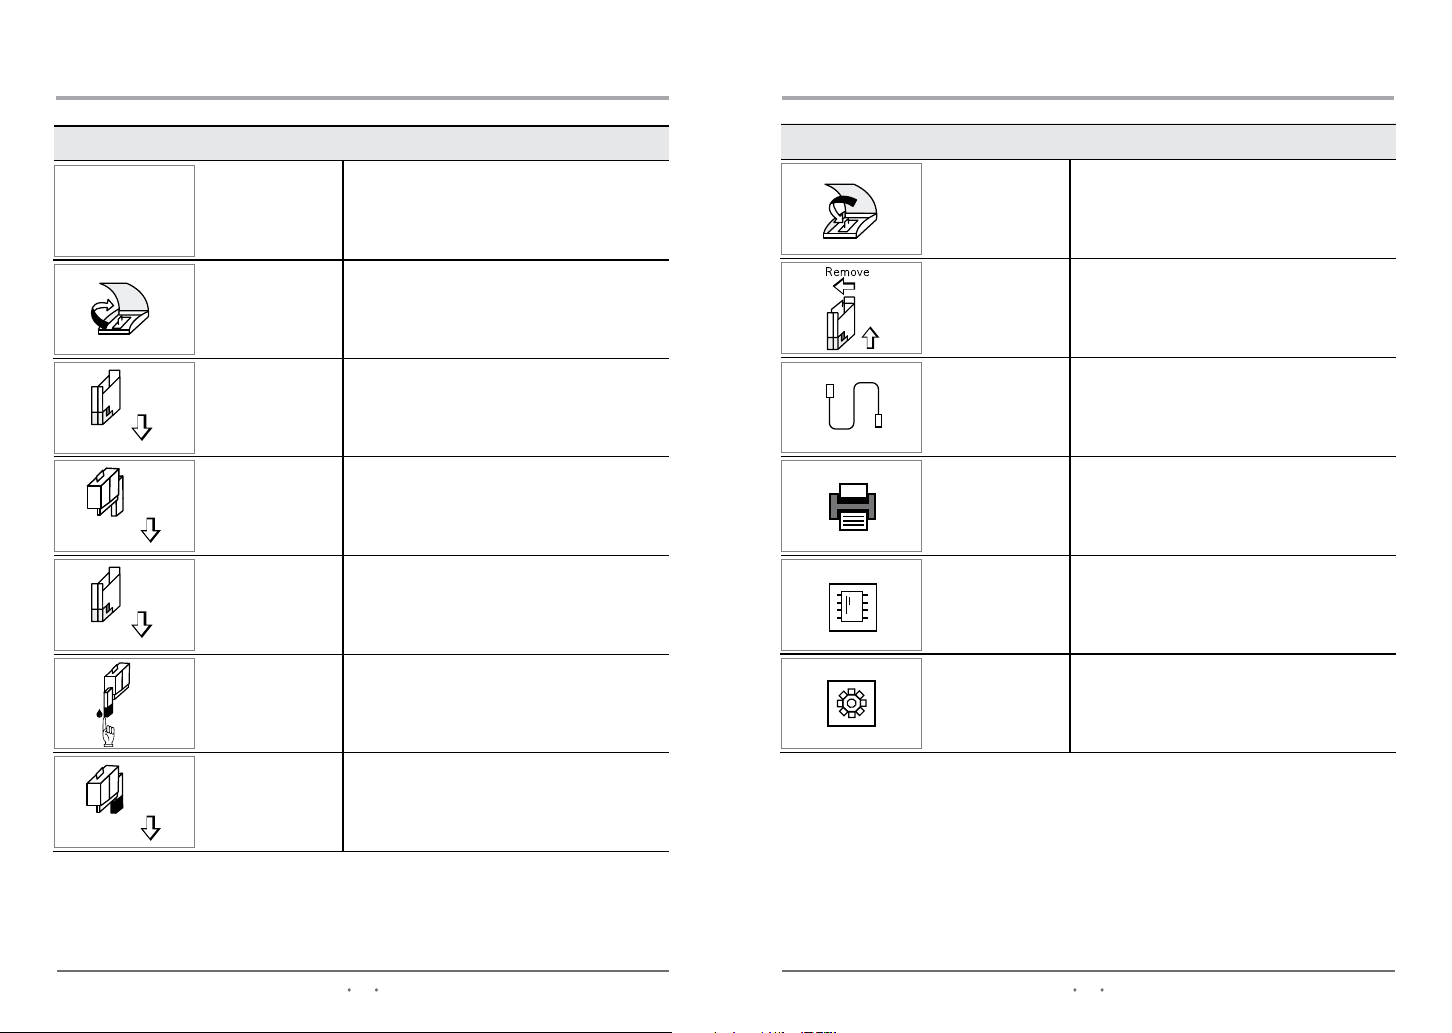
Icon
Close the lid
Remove cartridge
PC Connection
Printer
Memory
FunctionName
Close the lid of the analyzer.
Remove the cartridge from the
analyzer.
Indicates that the analyzer is connected
to a PC.
Indicates that the thermal printer use
is active.
Select this icon to view the test results
in memory.
Select this icon to set up the analyzer.Set up
Insert Reagent
Pack
Insert reagent pack with sample
into the analyzer.
8 9
8. INSTALLATION
9. OPERATION
Overview
This section provides detailed installation instructions for the CLOVER A1c®.
You must follow the installation steps correctly to ensure proper installation, operation,
and service.
CAUTION
Do not drop or handle the system roughly. This can disturb internal calibrated optics
and electronics or cause other damages.
Always handle the system with care. The CLOVER A1c
and must be handled accordingly.
Place the system where it will not be subjected to extreme temperature variations. Avoid
proximity to open windows, direct sunlight, ovens, hot plates, open burners, radiators
and dry ice baths.
Do not place the CLOVER A1c
®
on the same bench with a source of vibration.
Provide bench space large enough to allow free air circulation around the system - 8cm
(3 inches) on all sides.
Your CLOVER A1c
®
is delivered in 1 shipping carton.
1. Carefully remove the contents of the shipping carton.
2. Inspect the carton and system for visible signs of damage.
3. If damage to the system exists, immediately file a complaint with the carrier.
4. Make sure all items are included with your system, and keep them for future use.
®
Self is a precision system
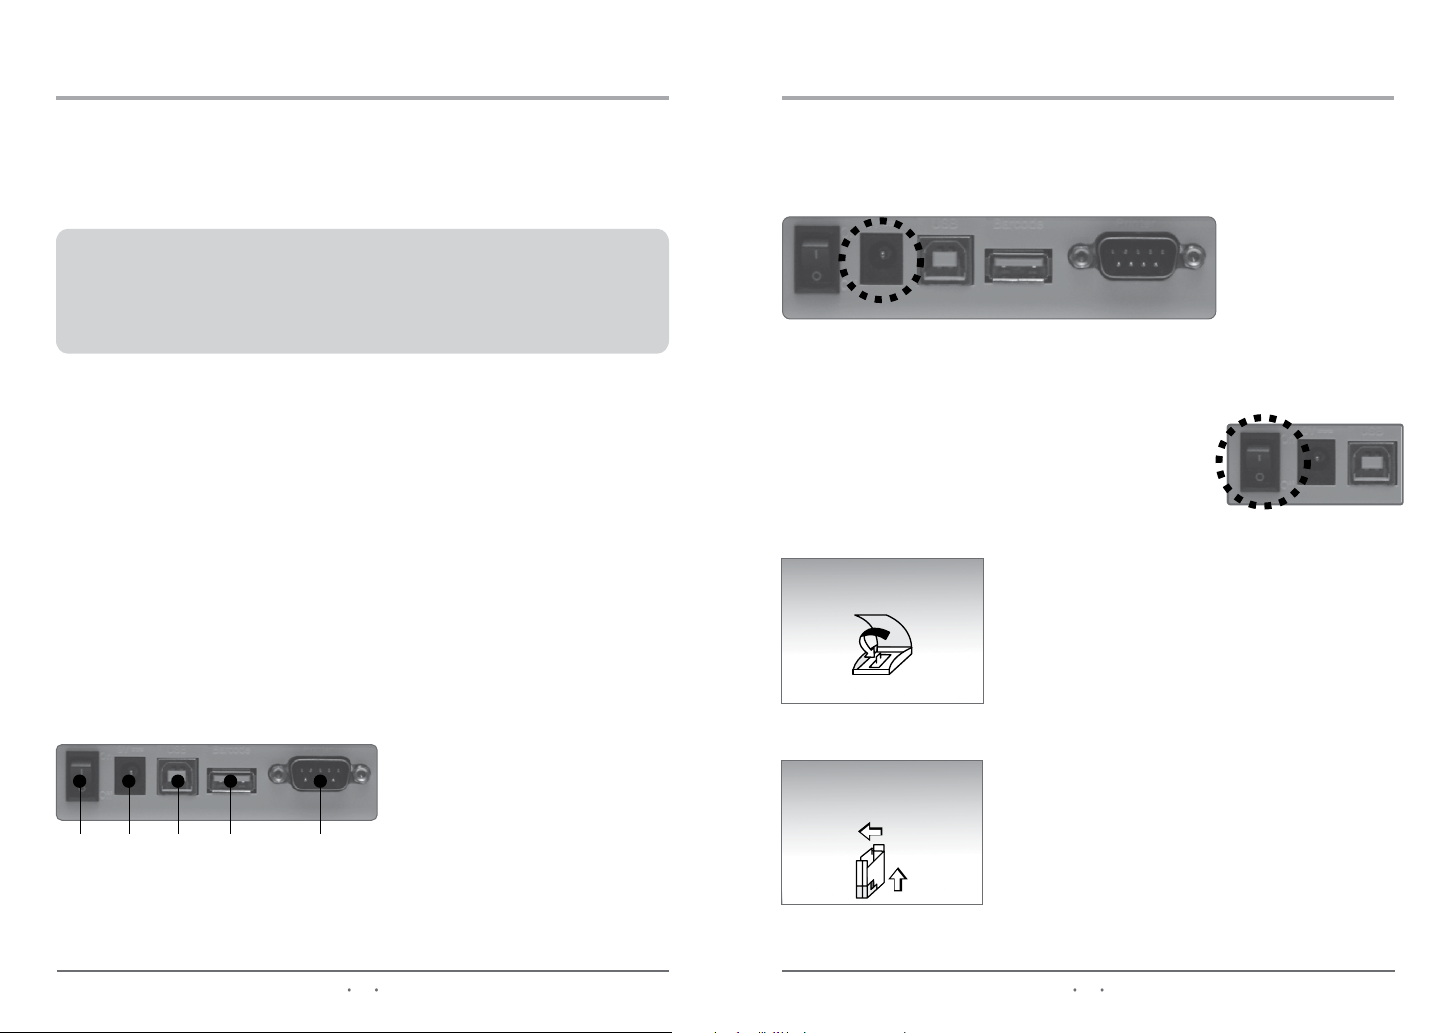
9.1 Power On
Connect the DC 9V adapter to the power port on the back side of the analyzer.
On/off 9V USB Barcode Printer
Make sure that the lid is closed before connecting the adapter.
After the system is properly installed, you can start the CLOVER A1c®.
To start the CLOVER A1c
switch to the 'ON' position.
13/03/30
AM10:03
®
, turn the power
If the lid is open, the icon of "Close the lid "
will be displayed.
Close the lid, and the warming up will start.
Installing Connections
System Connections:
1. Power Button
2. DC 9V adapter port
3. USB port (PC connection port)
4. Barcode Scanner port
5. Thermal Printer port (Serial port RS 232)
12
45
3
Connect the System Power
1. Ensure that the system power button is in the off position.
2.Connect the power code of the system to appropiately grounded AC electrical outlet.
10 11
13/03/30
AM10:04
Remove
If the cartridge is inserted, the icon of
"Remove the cartridge" will be displayed.
Remove the cartridge and close the lid.
Warming up will start.

armi
p
9. OPERATION
10. SETTING THE ANALYZER
9.2 Warming up
When the power is connected, the displays shows 'Warming up' until the device is ready
for test.
Warming up will take approximately 5 minutes depending on the ambient temperature.
While warming up, the CLOVER A1c® performs hardware
functionality test to verify that the internal optics and the
ng u
mechanical system are operating correctly.
9.3 Stand-by
After warming up, the analyzer goes into 'Stand-by' mode.
13/03/30 AM10:00
Note: The analyzer will automatically go into
'stand-by' mode after a test.
9.4 Power Save
After 30 minutes in 'stand-by' mode, without any action, the Analyzer goes into 'Power
Save' mode.
To Return to 'Stand-by' mode, press shortly, or just open the lid for testing.
Getting into set up mode
Set up Memory
Date
DATE yy/mm/dd
13 / 03 / 30
TIME 12h
AM 08 : 00
Time
DATE yy/mm/dd
13 / 03 / 30
TIME 12h
AM 08 : 00
In stand-by mode, press the button and hold for 3
seconds. Choose between set up and memory mode
by pressing
G
or Gbuttons. Then, press button
to select.
Select the date format ('yy/mm/dd' or 'mm/dd/yy' or
'dd/mm/yy') by pressing the
Next, set the date by pressing the
G
or , then press
G
or Gbottens.
You may hold the arrow keys to scroll through the
dates faster.
Select the time format by pressing the
G
or
G
buttons, then press . 12h for standard time / 24h
for military time
12 13

10. SETTING THE ANALYZER
10. SETTING THE ANALYZER
HbA1c test result unit
HbA1c Unit
NGSP IFCC
Barcode use
Barcode Use
Use Not Use
Select the desired HbA1c test unit by pressing the
or
, then press .
[ NGSP ][ IFCC ]
13/03/30
AM10:08
7.3%
ID:
13/03/30
mmol/mol
ID:
AM10:08
56
Select whether or not to use the barcode system by
pressing
G
or , then press .
Printer use
Printer
Use Not Use
Printer mode
LCD contrast control
Select whether or not to use the printer by pressing
G
or , then press .
If 'Use' is selected, Printer mode option is displayed.
If 'Not Use' is selected, LCD contrast control is
displayed.
Once the printer option is selected, choose either
'Automatic' or 'Manual' by pressing the
G
and Garrows.
• Automatic: Result is printed automatically after each test.
• Manual: Result will only be printed when the print button
is pressed.
Set up the contrast desired, by pressing the Gor , then
LCD Contrast
press .
+ 10
14 15

11. TESTING HbA1c
11. TESTING HbA1c
PROCEDURE
The CLOVER A1c® test can be performed on capillary blood sample or on
venous whole blood collected using K
sodium fluoride/ oxalate as an anticoagulant.
EDTA, lithium heparin, sodium citrate or
2∙K3
Test Procedure
IMPORTANT : Please read through and familiarize yourself with the contents of this
instruction manual and the CLOVER A1c
before using the system for the first time.
®
System operation
STEP 1.
When the power is connected, the display will show ‘Warming up’ until the device is
ready for use. This will approximately 5 minutes depending on the ambient temperature.
While warming up, the CLOVER A1c® performs
hardware funtionality test to verify that the internal
optics and the mechanical system are operating
correctly.
Warming up
STEP 2.
Open the lid of the CLOVER A1c
mode, displaying the 'Open the lid' icon.
08/03/30 AM10:00
®
analyzer, when the analyzer is in 'Stand-by'
STEP 3.
Open the Test Cartridge pouch by tearing the pouch
on the side with serrated edge.
DO NOT use scissors to open the pouch
Scissors can damage the reagent pack.
Use the test cartridge within 2 minutes of opening.
CAUTION
When handling the Reagent pack and Cartridge, do not touch the cartridge code
area on the front or the bead window at the back. Any contamination of these area
may cause of erroneous values.
IMPORTANT : Do not move the analyzer during the ‘Warming up’.
16 17
Cartridge
Code Area
Bead Window
11. TESTING HbA1c
11. TESTING HbA1c
STEP 4.
Gently insert the cartridge into the cartridge compartment when ‘Insert Test Cartridge’ is
shown. Hold the cartridge with barcode facing left.
Ensure a gentle snap is either heard or felt to confirm proper placement.
13/03/30 AM10:00
NOTE : Do not force the cartridge into the analyzer. The cartridge is
designed to fit only in one way.
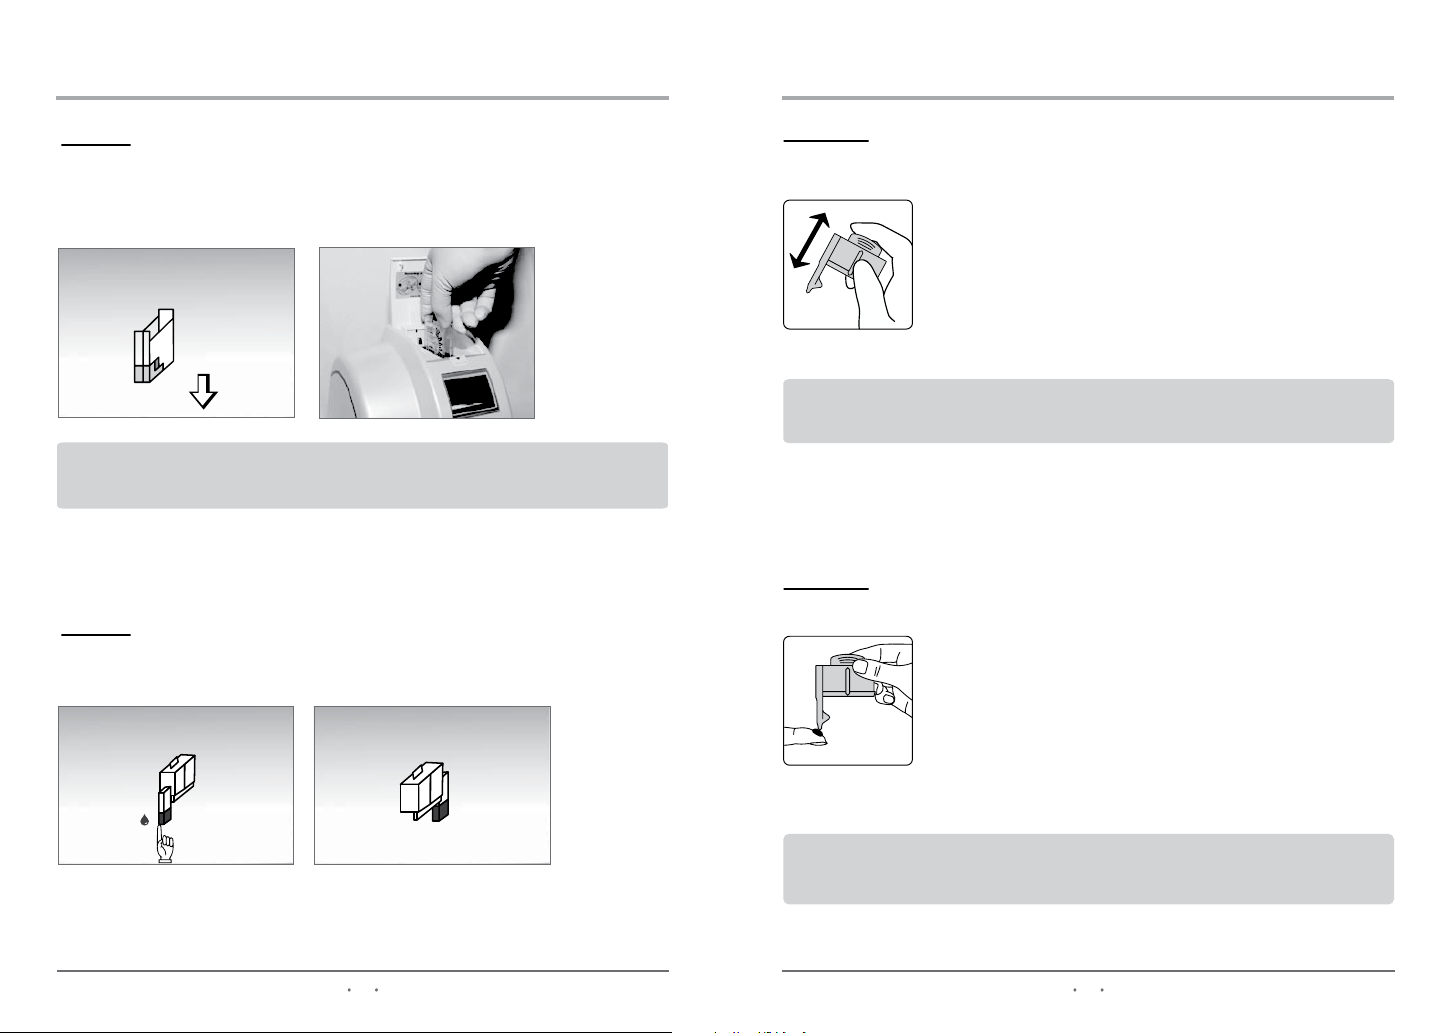
STEP 5.
The display will show the ‘'Apply sample to sample area'' and 'Insert Reagent Pack' icon.
STEP 5-1.
Gently mix the reagent pack 5 ~ 6 times before applying blood sample.
CAUTION : Do not mix too vigorously, it may cause air bubbles. If bubbles are
present wait until they disappear before testing.
STEP 5-2.
Apply the blood sample by gently touching the drop of
blood with the tip of the sampling area.
Ensure that the sampling area is completely filled.
13/03/30 AM10:02
13/03/30 AM10:02
IMPORTANT : Once the reagent pack is filled with the blood sample, analysis must
begin immediately.
18 19
 Loading...