

Page 1
SAVE THESE INSTRUCTIONS
First Class LE
SPACE INTELLIGENT CHAIR
OPERATION INSTRUCTIONS
Page 2

Thanks for purchasing this product. Please read this manual instruction carefully in
order to know how to use this product correctly before operation. Please pay more
attention to some important safety warning and keep this manual book properly for
future use.
Note: Our Company reserves the right to revise the design and description of this
product without any further notice. Please refer to the actual color of this product.
CONTENTS
Safety and maintenance matters
Instructions De Securite Importantes
Use safety warning
Part Name
Function
Touch screen manual controller interface introduction
Method of usage
1.Switch power supply on
2.Massage function control operation
3.Turn off power, stop massage
4.Installing the Arm Rests
5.Calf installation
6.Touch screen hand controller bracket installation instructions
7.Pillow Pad and backrest pad's dismounting and use manual
8.Floor Protection
9.Replace the chair
Product specifications
02-03
04-05
06-07
08
09
10
11
11
11-25
26
26-28
28-29
30
31
31
32
33
01
Page 3

Important Safety Instruc tion Important Safety Instruc tion
When using an electrical appliance, basic precautions should
always be followed, including the following:
Read all instructions before using (this appliance)
DANGER-To reduce the risk of electric shock:
1) Always unplug this appliance from the electrical outlet immediately after
using and before cleaning.
WARNING-To reduce the risk of burns, fire,
electric shock, or injury to Persons:
1) An appliance should never be left unattended when plugged in. Unplug
from outlet when not in use, and before putting on or taking off parts.
2) Do not operate under blanket or pillow. Excessive heating can occur and
Cause fire, electric shock, or injury to persons.
3) Close supervision is necessary when this appliance is used by, on, or near
children, invalids, or disabled persons.
4) Use the appliance only for its intended use as described in this manual.
Do not use attachments not recommended by the manufacturer.
5) Never operate this appliance if it has a damaged cord or plug, if it is not
working properly, if it has been dropped or damaged, or dropped into
water. Return the appliance to a service center for examination and repair.
6) Do not carry this appliance by supply cord or use cord as a handle.
7) Keep the cord away from heated surfaces.
8) Never operate the appliance with the air openings blocked. Keep the air
openings free of lint, hair, and the like.
9) Never drop or insert any object into any opening.
10) Do not use outdoors.
11) Do not operate where aerosol (spray) products are being used or where
oxygen is being administered.
12) To disconnect, turn all controls to the off position, then remove plug from
outlet.
13) The appliance is intended for household and indoor use only.
14) Connect this appliance to a properly grounded outlet only ,see grounding
instructions .
15)Keep children away from extended foot support (or other similar parts
16)Do not use massager in close proximity to loose clothing or jewelry.
17)Keep long hair away from massager while in use.
18)Connect this appliance to properly grounded outlet only. See Grounding Instructions.
19)Donot use massager inclose proximity to loose clothing or jewelry.
20)Keep long hair away from massager while in use.
SAVE THESE INSTRUCTIONS
GROUNDING INSTRUCTIONS
This product must be grounded, if it should malfunction or breakdown, grounding
provides a path of least resistance for electric current to reduce the risk of electric
shock, this product is equipped with a cord having an equipment grounding
conductor and a grounding plug, the plug must be plugged into an appropriate outlet
that is properly installed and grounded in accordance with all local codes and
ordinances.
DANGER: Improper connection of the equipment grounding
conductor can result in a risk of electric shock, check with a qualified electrician or
serviceman of you are in doubt as to whether the product is properly grounded, do
not modify the plug provided with the product-if it will not fit the outlet, have a proper
outlet installed by a qualified electrician.
1)This product is for use on nominal 120-volt circuit, and has a grounding plug that
looks like the plug illustrated in sketch on the page 17, A temporary adapter that
looks like the adapter illustrated in sketches B and C may be used to connect this
plug to a 2-pole receptacle as shown in sketch B if a properly grounded outlet is not
available the temporary adapter should be used only until a properly grounded
outlet (shetch A )can be installed by a qualified electrician, the green colored rigid
ear, lug, or the like extending from the adapter must be connected to a permanent
ground such as a properly grounded outlet box cover, Whenever the adapter is
used, it must be held in place by a metal screw.
0302
Page 4

Instructions De Securite Importantes Securite Et Entretien
lors de l'utilisation d'un appareil électrique, des précautions de bases doivent être
respectées, y compris ce qui suit :
Lisez toutes les instructions avant d'utiliser l'appareil.
DANGER- Pour réduire le risque de choc électrique:
1) Toujours débrancher cet appareil de la prise électrique immédiatement après
usage et avant nettoyage
AVERTISSEMENT- Pour réduire le risque de brûlures, d'incendie, de choc
électrique ou de blessures:
1) Cet appareil ne doit jamais quittervotre surveillance lorsqu'il est branché.
Débranchez le de la prise lorsqu'il estinutilisé, et avant de placer ou d'enlever des
pièces.
2) Ne pas utiliser cet appareil sous une couverture ou un oreiller. Une chaleur
excessive peut provoquer un incendie, un choc électrique ou des blessures
corporelles.
3) Soyez prudent et maintenez une surveillance accrue lorsque cet appareil est
utilisé par, sur, ou près des enfants, de personnes invalides ou handicapées.
4) Utilisezl'appareil uniquement pour un usage habituel, comme décrit dans ce
manuel. Ne pas utiliser d'accessoires non recommandés par le fabricant.
5) Ne jamais faire fonctionner cet appareil si le cordon ou la fiche sont
endommagés, s'il ne fonctionne pas correctement, s'il est endommagé ou s'il est
tombé dans l'eau. Retournez l'appareil auservice technique pour examen et
réparation.
6) Ne transportez pas cet appareil par le cordon d'alimentation ou d'utilisation
comme une poignée.
7) Gardez le cordon loin des surfaces chauffées.
8) Ne jamais faire fonctionner l'appareil en obstruant les ouvertures d'air. Gardez les
ouvertures à l'air, libre de peluches, de cheveux, etc.
9) Ne jamais laisser tomber, ou insérer d'objet dans les ouvertures.
10) Ne pas utiliser à l'extérieur.
11) Ne pas utiliser dans les lieux où des aérosols (vaporisateurs) sont utilisés, ni là
où l'oxygène est administré.
12) Pour débrancher, mettre tous les boutons de l'appareil sur la position arrêt, puis
retirer la fiche de la prise.
13) L'appareil est destiné à un usage domestique et à l'intérieur seulement.
14) Connectez cet appareil à une prise correctement reliée à la terre. Voir les
instructions de mise à la terre.
15) Éloignez les enfants du support de pied ouvert (ou des autres pièces
semblables).
16) Ne pas utiliser de massage à proximité des vêtements amples ou des bijoux.
17) Garder les cheveux longs à l'écart de masseur en cours d'utilisation.
18) Raccordez cet appareil à une prise correctement mise à la terre.
19) Ne pas utiliser l'appareil de massage à proximité des vêtements amples ou des
bijoux.
20) Gardez les cheveux longs loin du masseur pendant l'utilisation.
CONSERVER CES INSTRUCTIONS
INSTRUCTIONS DE BASES
Ce produit doit être relié à la terre. Si il dysfonctionne ou tombe en panne, la
terrefournit un chemin de moindre résistance pour le courant électrique afin de
réduire le risque de choc électrique. Cet appareil est équipé d'un cordon avec un
conducteur de mise à la terre des équipements et une prise de terre. La fiche doit
être branchée dans une prise appropriée qui est correctement installée et mise à la
terre conformément à la règlementation locale.
DANGER: un mauvais branchement de l'équipement à la prise de terre, peut
entraîner un risque de choc électrique. Consultez un électricien qualifié si vous avez
des doutes quant à savoir si le produit est correctement mis à la terre. Ne pas
modifier la fiche fournie avec le produit si elle ne rentre pas dans la prise. Adressez
vous à un électricien qualifié le cas échéant.
1)Ce produit est destiné à être utilisé sur un circuit de 120 volts, et possède une
fiche de mise à la terre semblable à la fiche illustrée sur le croquis de la page 17. Un
adaptateur temporaire qui ressemble à l'adaptateur illustré sur le croquis B et C peut
être utilisé pour brancher cette fiche à un réceptacle 2-pole, comme indiqué sur le
croquis B. Si une prise de terre n'est pas disponible, l'adaptateur temporaire ne doit
être utilisé que jusqu'à une prise de terre correcte (croquis A) pour être installé par
un électricien qualifié. L'oreille rigide de couleur verte, qui dépasse de l'adaptateur,
doit être connectée à une terre permanente comme un couvercle de boîte de sortie
mise à la terre. Chaque fois que l'adaptateur est utilisé, il doit être maintenu en
place par une vis en métal.
S'il vous plaît noter que lorsque ne pas coincer votre détection des doigts
Avant le nettoyage ou la réparation doivent couper l'alimentation
0504
Page 5
Use safety warning Use safety warning
Warning Warning
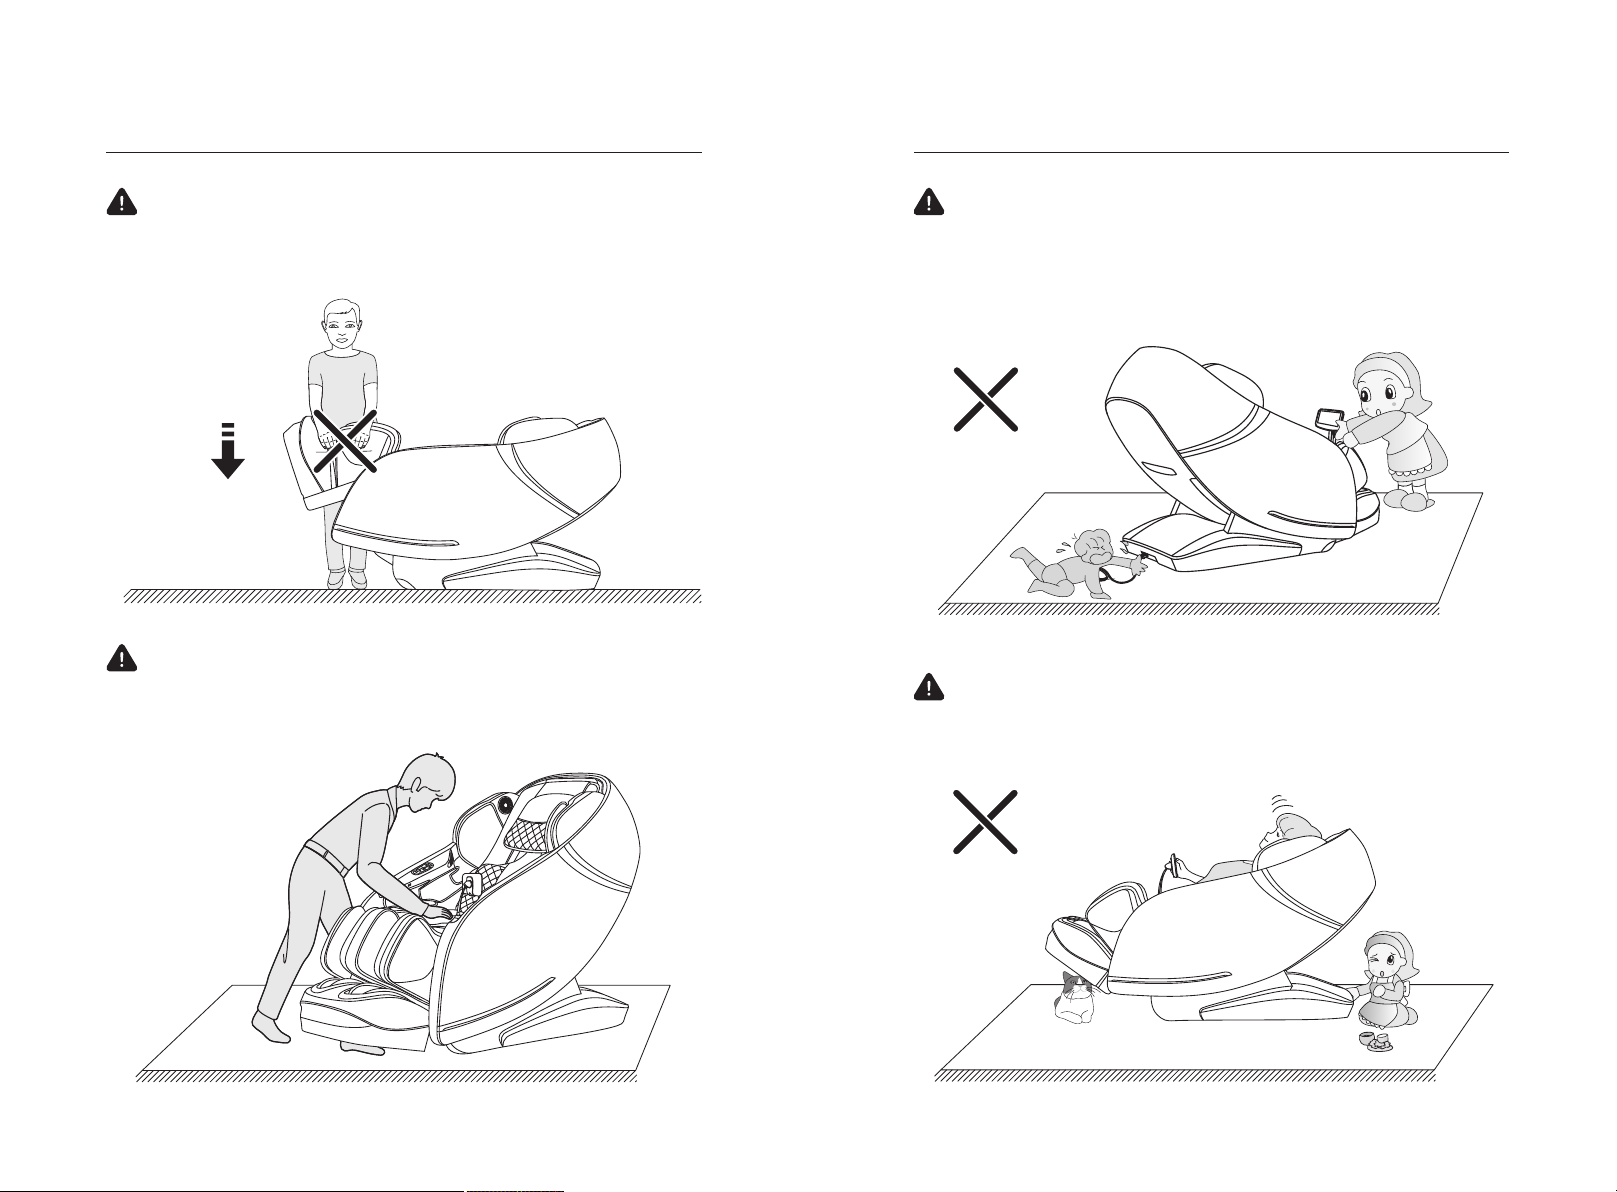
·When the footrest lifting, people should not apply pressure on the footrest to avoid
the massage chair falling forward to damage the product or cause personal
injuries
Prohibit pressing
·Do not strive to pull out the touch screen control cable or power cord during
standby or power-on state to avoid product damaged or electrocution accidents.
Advise you unplug the controller cable and power cord and store properly if you
do not use the chair.
·The touch screen controller holder is fixed. During the use or movement of the
massage chair, do not pull the holder hard to avoid damage the chair.
Warning
·Before sitting on the massage chair, Please make sure the massage hand cannot
place in the seat position, so as avoiding the massage hand to damage the
product or cause personal buttocks injuries.
Warning
· When turning on the zero-gravity lying function, be sure to notice whether there
are children or pets under the massage table under the bottom of the calf and the
backrest to stay or play to avoid product damage and personal injury.
0706
Page 6
Part Name Function
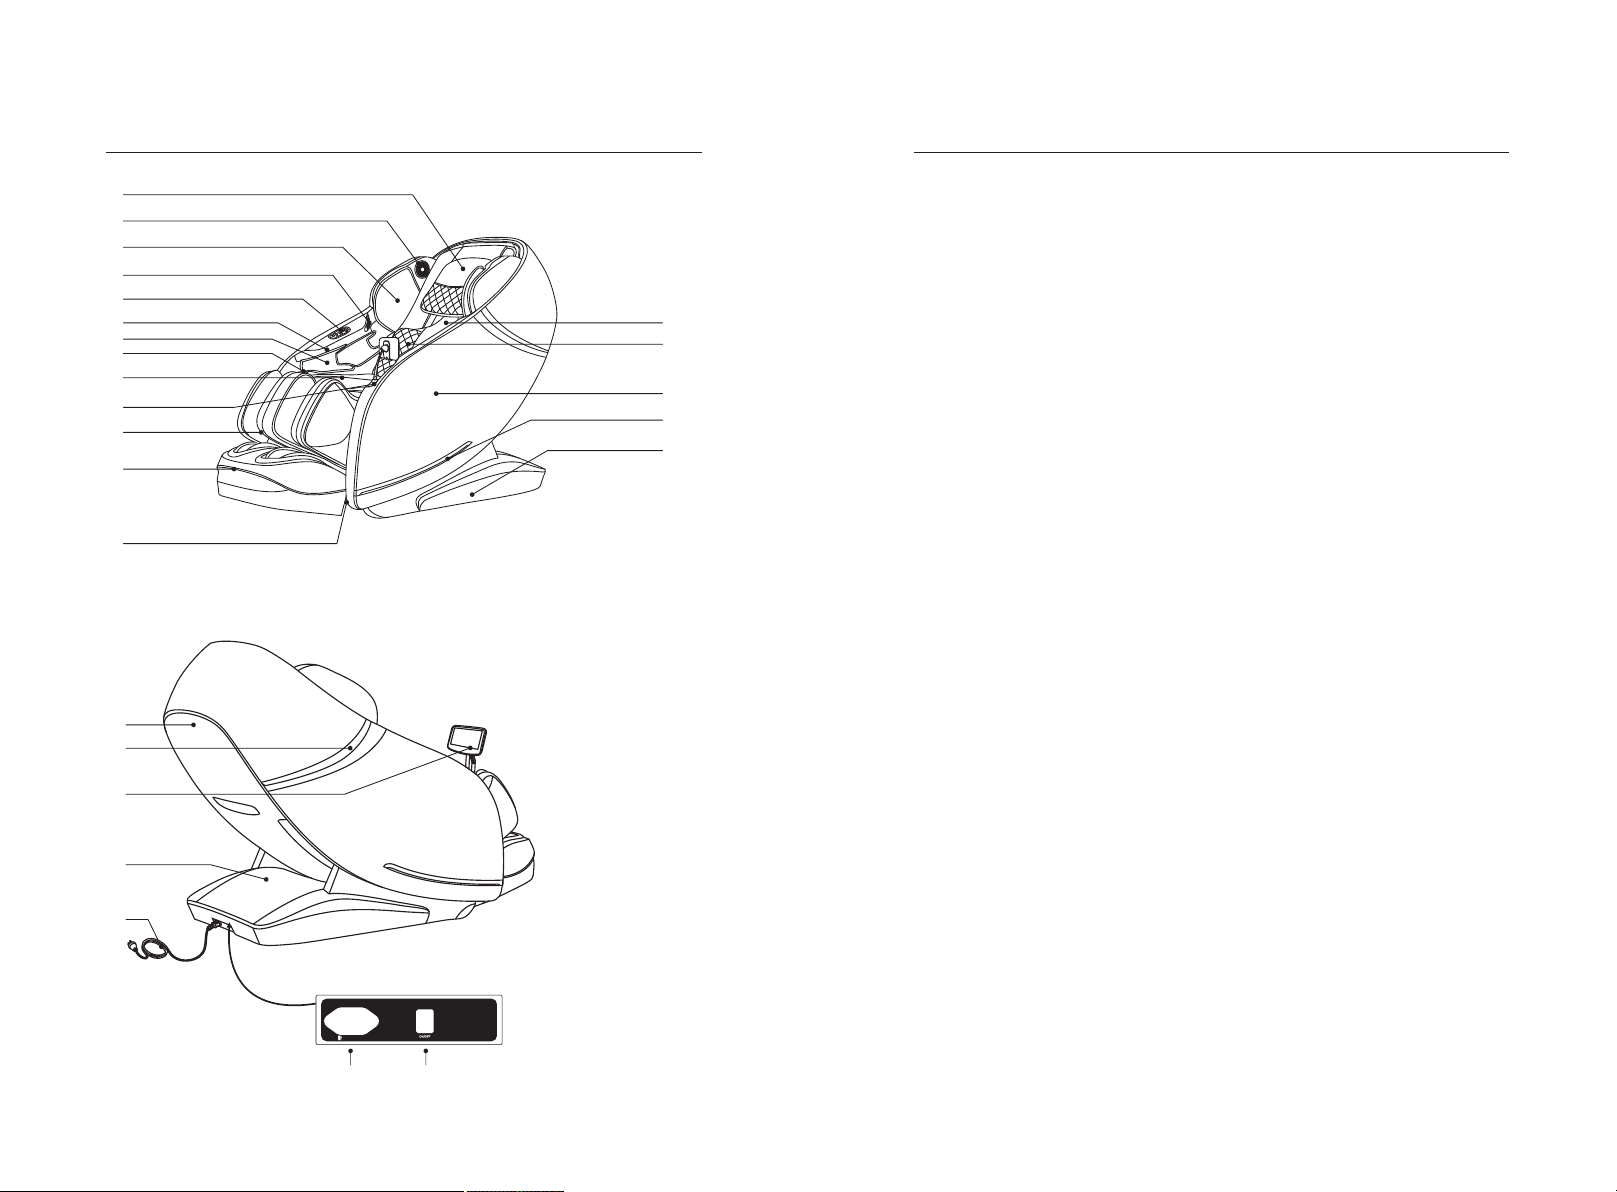
1
2
3
4
5
6
7
8
9
10
11
12
13
19
20
21
22
23
·This product is designed with a set of intelligent 3D massage head that can walk up and
down, front and rear telescopic, and silent design.
·It can automatically detect the position of the shoulder and can be fine-tuned; detect the
human body curve and the position of the massage finger pressure point, and
automatically adjust the front and rear telescopic length of the massage head according
to the detected human body curve and the massage finger pressure point.
· :With four different automatic massage scenes VIP, Healthcare, Special, Relaxation. A
14
15
16
17
18
1.Pillow Pad
2.3D digital Speakers
3.Upper Arm Air Bag
Assembly
4.O2 Ionizer
5. Shortcut Button
6. USB Charging Port
7. Arm Air Bag Assembly
8. Phone pocket
9. Seat Cushion
10. Touch screen
controller stand
11. Calf Massage Assembly
12. Foot Massage Assembly
13. End Sealing Plate
14. Back Cushion
15. Back air massage
16. Armrest
17. LED Lights
18. Side panel
19.Back Cover
20.Armrest Decoration
21. Touch screen remote
controller
22. PCB Box Cover
23. Power Cord and plug
POWER INPUT
24
25
08 09
24. Power Cord Socket
25. Power Switch
total of 23 automatic massage program.
·Three memory functions: program memory Ⅰ, program memory Ⅱ, program memory Ⅲ.
·The upper half manually selects the massage function; there are five kinds of massage
position selections such as full, partial, fixed point, upper back and lower back; shoulder
lifting, kneading, tapping, shiatsu, kneading and tapping and 3D six massage techniques;
The massage technique has five speeds that can be adjusted; when massaged in
tapping and shiatsu, the robot massage ball has five widths to adjust.
·Air massage function: Arm pressure massage function (built-in 8 airbags), upper arm air
pressure massage function (built-in 4 airbags), and three levels air pressure intensity
adjustment.
·Lower half air massage function: Waist pressure massage function (built-in 4 airbags),
leg air pressure massage function (built-in 4 airbags), foot air pressure massage function
(built-in 16 airbags), and three levels air pressure intensity adjustment.
·The back heating function uses carbon fiber as an infrared heating source
·As the back rest reclines down, this product is built to save wall space by making the
chair slide forward.
·Music playback system: built-in 3D digital speaker on the left and right arms. The
Bluetooth function of the smart device can be used to play music on a wireless
connection.
·Twisting massage function: it uses the waist airbag pressure to swing around to form a
twisting massage function, which relieves sedentary and causes tension in the waist
muscles.
·The right armrest is provided with a negative oxygen ion button, raise button, recline
button, zero gravity button, pause button, automatic mode button, foot adjustment button,
and calf adjustment button.
·Leg lifting or recline adjustment, lifting or recline adjustment of leg and back, zero gravity
I or zero gravity II.
·Calf squeeze function: it has a positive and negative squat and an airbag squeeze
massage function on the lower leg, which can alleviate the stiffness or tension of the calf
muscle caused by long standing; there are three different sputum modes.
·Roller massage function: At the bottom of foot, two pairs of mastoid rotating massage on
toe root; scraping massage on the arch and heel.
·The footrest is equipped with an automatic sensor detection of the leg length function.
When the calf is raised or lowered to a suitable angle, the footrest will automatically
detect the length of the leg and detect the most comfortable massage area.
·The backrest rail adopts “SL” rail technology, which fits perfectly with the curve of the
back of the human body and can enjoy close-fitting massage from the head to the thigh.
·Configure 7-inch touch screen remote controller.
·Armrest LED light decoration.
·Configuring a O2 Ionizer at both side of upper armrest.
·USB charging function on the right armrest.
·The upper arm is provided with a width adjustment function, which is adjusted in two
steps (when it reaches the innermost position, the arm is pushed in about one gear to
release the hand, the arm is automatically reset, and so on), adapting to different
shoulder widths.
·Shutdown automatic reset function, massage head automatic reset function.
Page 7
Touch screen manual controller interface introduction Method of usage
Touch screen remote controller introduction
1
7
2
Setting
Stress Relieving
Energy
Good-night Sleep
Joint Care
Frozen Shoulder
Spine Massage
Thai Massage
More
8
9
3
Waist Care
4
2
16min
Manual
Customise
Angle
06
5
6
Upper Air
Lower Air
10
11
12
Note: The touch screen remote controller displays the color, massage function
and massage function icon layout order, please refer to the physical display!
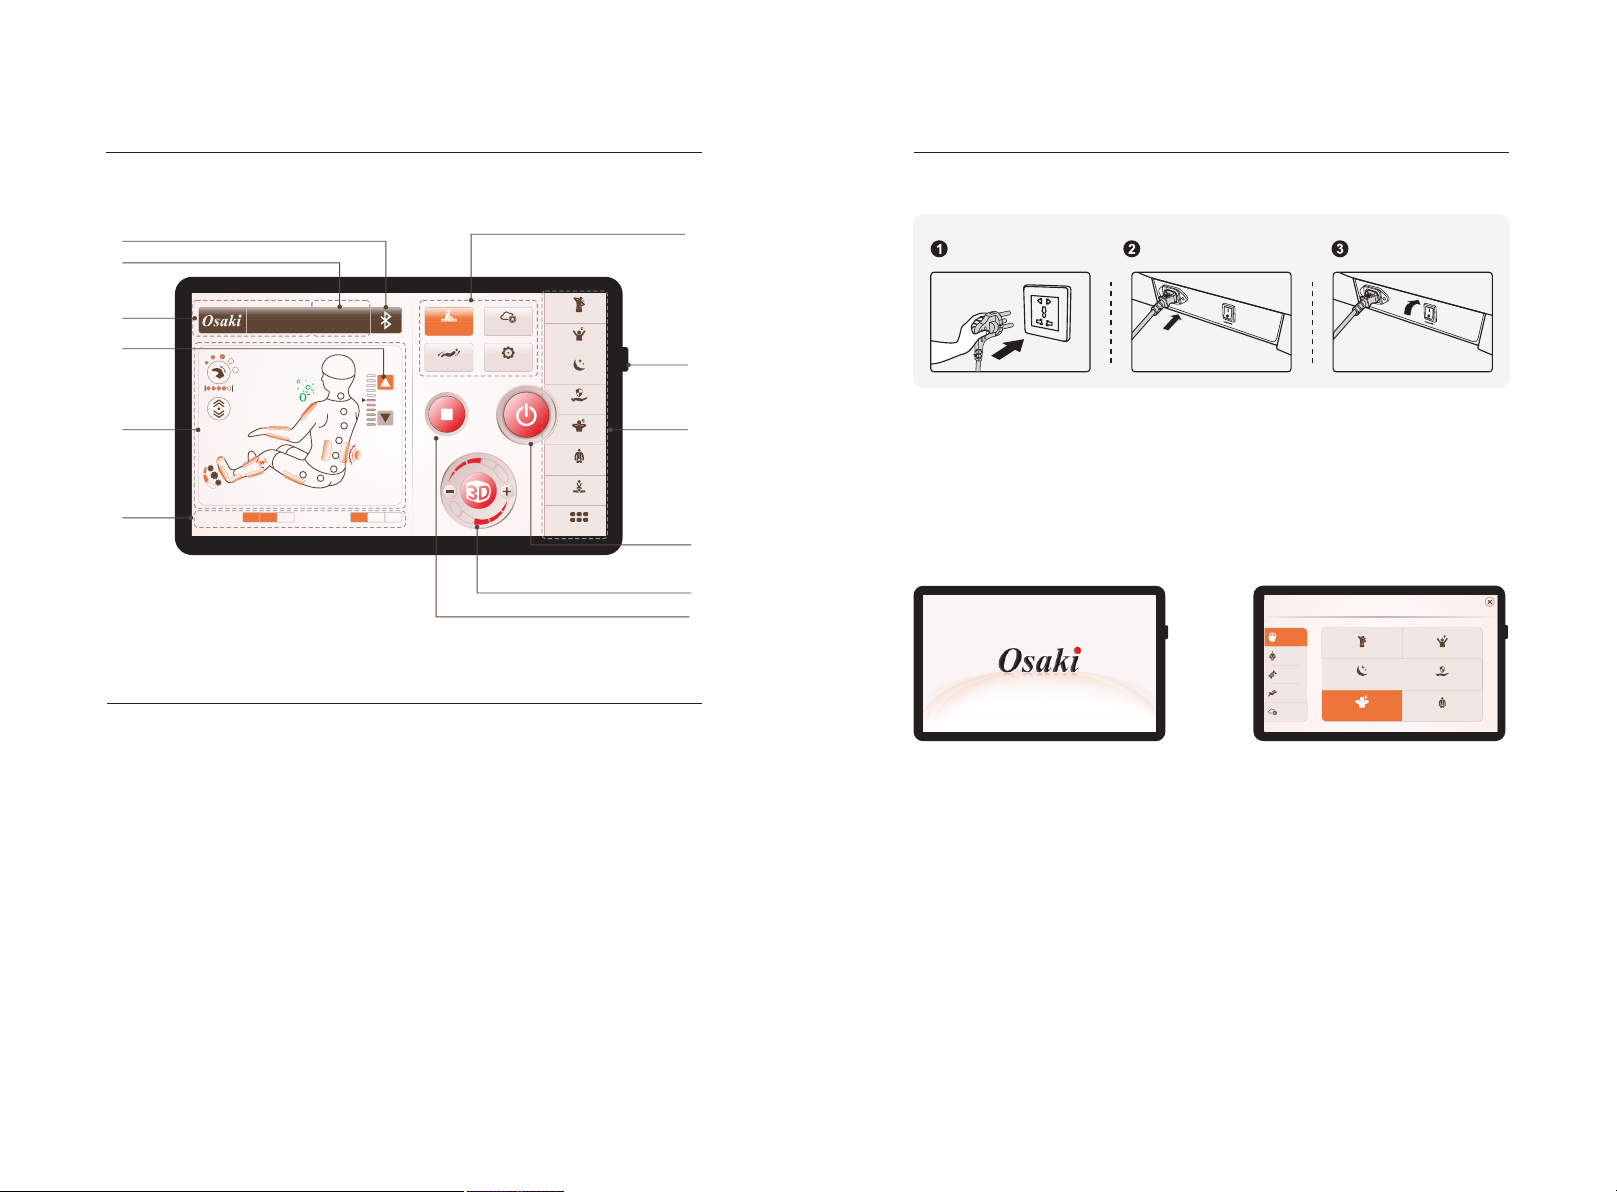
1.Bluetooth switch and display
2.Time adjustment button and display
3.The status bar
4.The shoulder position can be adjusted up and down
5.Massage status information display
6.Air pressure intensity display
7.Manual, intelligent storage, angle adjustment, settings and other massage function keys
8.The power switch
9.Automatic massage function
10.Massage switch
11.3D massage function keys
12.Operation / pause button
1、Switch power supply on
Diagram of plug in
Diagram of line
POWER INPUT
Diagram of the switch
position of power supply
POWER INPUT
2 Massage function control operation、
1)Start to massage
·After the massage chair cannot enter any mode operation in standby mode.
·Press “Power” button to start massage, enter the boot screen, backrest maintains
the default position, calf rest raises slightly, choosing certain auto mode to start
massage (Auto mode or memory function can be selected). The massage chair
will shut down automatically if auto mode is not selected within 5 minutes.
Select the automatic function to start the massage
VIP
Healthcare
Special
Relaxation
Customise
Stress Relieving
Good-night Sleep
Frozen Shoulder
Energy
Joint Care
Spine Massage
·VIP Auto Program: Stress Relieving, Energetic Morning, Good-night Sleep, Joint
Care, Frozen Shoulder, Spine Massage.
·Healthcare Auto Program: Office Regimen, Sport Recovery, Brain Refresh, Spine
Care, Waist Care, Legs Care.
·Special Auto Program: Health Recharge, Meridian Treatment, Keep Fit, Bottom
Toning, Restoration Massage, Tiredness Relief.
·Relaxation Auto Program: Full-body Stretch, Thai Massage, Chinese Massage,
Total Relax, Airbag.
1110
Page 8
Method of usage Method of usage
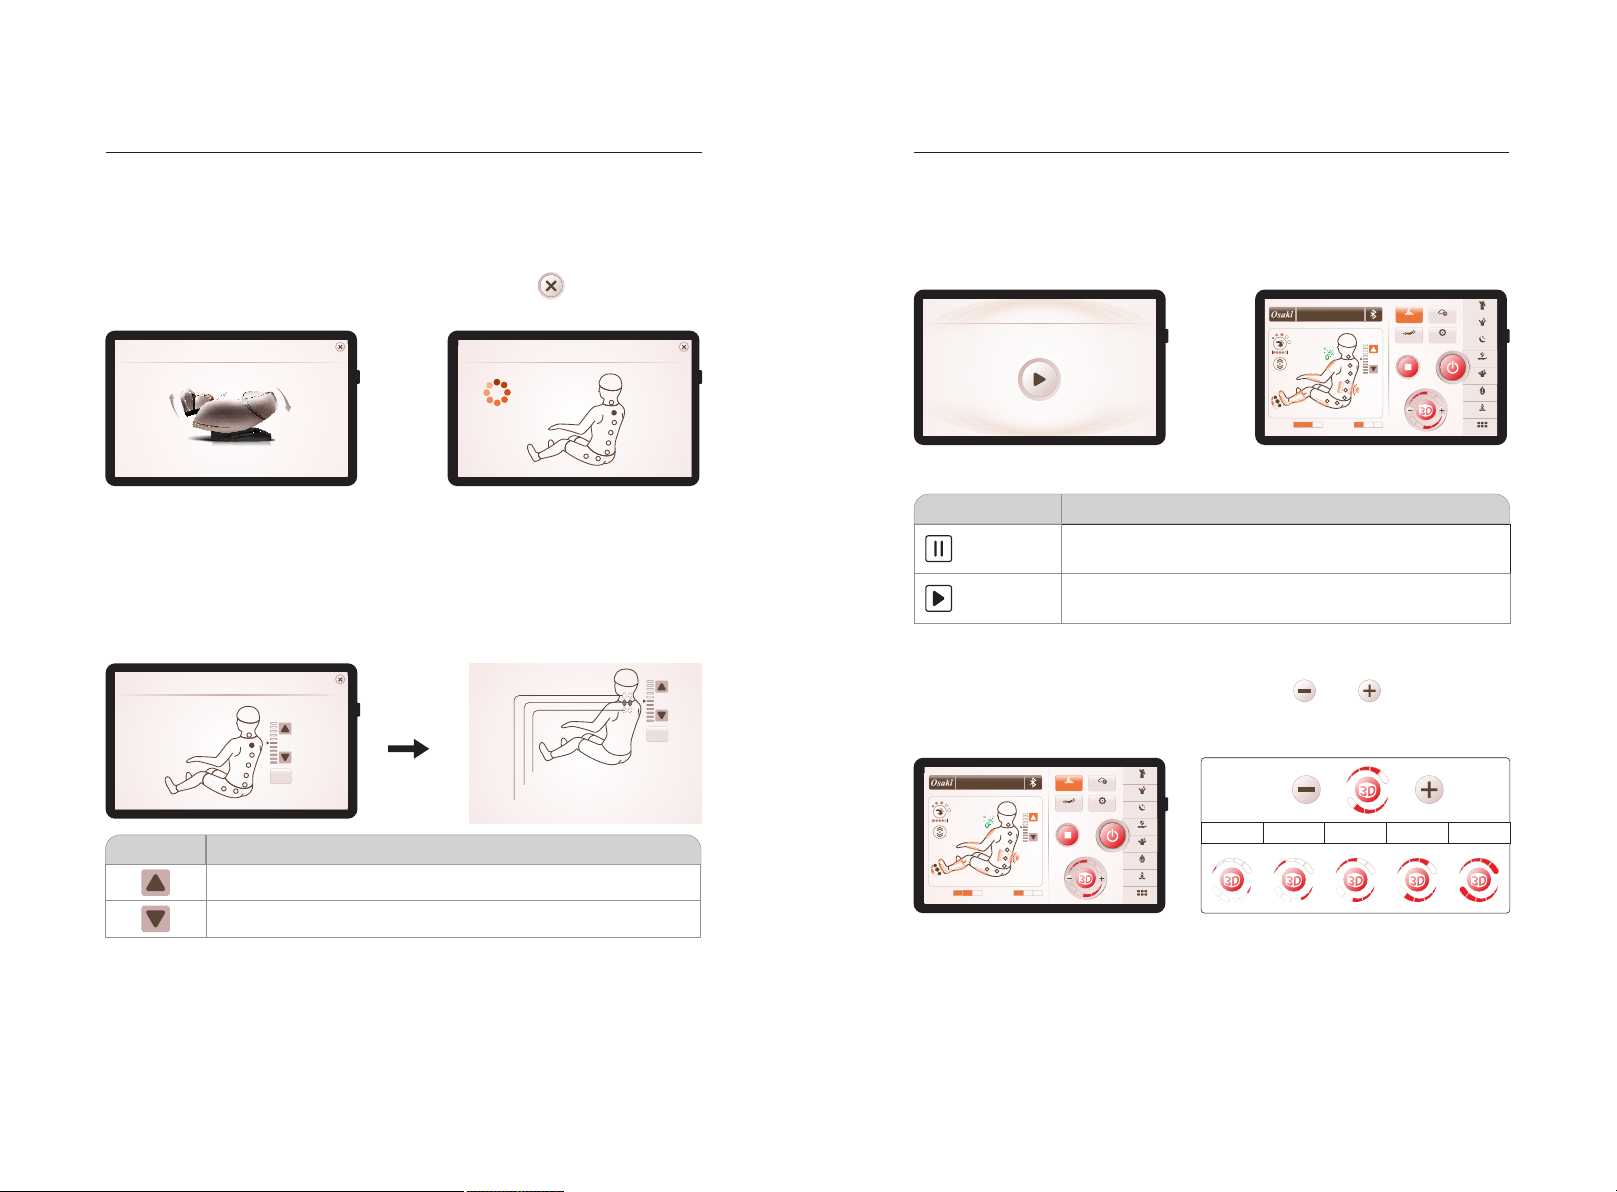
·When you select any of the automatic modes, the backrest and calf position will
be adjusted to the set angle.
·After adjusting the angle, the massage chair will automatically proceed detection
of your shoulder position and acupressure points (Note: There is only shoulder
position detection when in Frozen Shoulder program, while the others are whole
body detection.). If the scan uncompleted, you press the “ ” button to skip the
detection, automatically operate the default massage mode.
Angleadjustment
Body Sensing
Justamoment......
· Upon completion of scan, a beeping sound will emitting from the chair for 10
seconds or press the enter button, the massage heads will gently roll on your
shoulders. During this period, if you would like to further adjust the detected
shoulder region, you can do so by depressing the up or down shoulder button.
There are 11 levels adjust position. If fail to detect, automatically operate the
default massage point.
Please adjust the position of the shoulder......
Buttons
ShoulderPositionAdjust
06
OK
·Position too low
·Proper position
·Position too high
Description
06
OK
Press to adjust the massage heads higher.
Press to adjust the massage heads lower.
2)The pause but ton
·While the massage function is operate, press the “Pause” button to temporarily stop
all massage functions; Press the “Pause” button again to continue the massage. If
the pause time exceeds 20 minutes, all massage functions are automatically turned
off.
16min
Upper Air
Waist Care
2
Lower Air
Manual
Angle
06
Pause
Customise
Setting
Stress Relieving
Energy
Good-night Sleep
Joint Care
Frozen Shoulder
Spine Massage
Thai Massage
More
Massage function pause Massage function operation
Run/pause Button
Pause
Operation
In the operation state, press this button to pause all current
massage functions.
In the pause state, press this button to continue the massage
function before the pause
Functional description
3)Upper body massage strength (3D key)
·Under the massage information interface, click the “ ” or “ ” button on the
3D icon to adjust the massage intensity of the upper back muscles, Five levels
intensity.
Customise
Setting
Stress Relieving
Energy
Good-night Sleep
Joint Care
Frozen Shoulder
Spine Massage
Thai Massage
More
Speed
1 level 2 level 3 level 4 level 5 level
Upper Air
Waist Care
2
Lower Air
16min
Manual
Angle
06
Note:
·Massage strength: 3D massage strength, that is, the massage head is extended
forward or the whole is retracted. The strength of the massage is adjusted to the
strength within a certain massage area. Detect acupressure points, the strength of
each massage point can be tested. You can adjust the strength of a certain
massage point with this button in both automatic and manual conditions.
1312
Page 9
Method of usage Method of usage
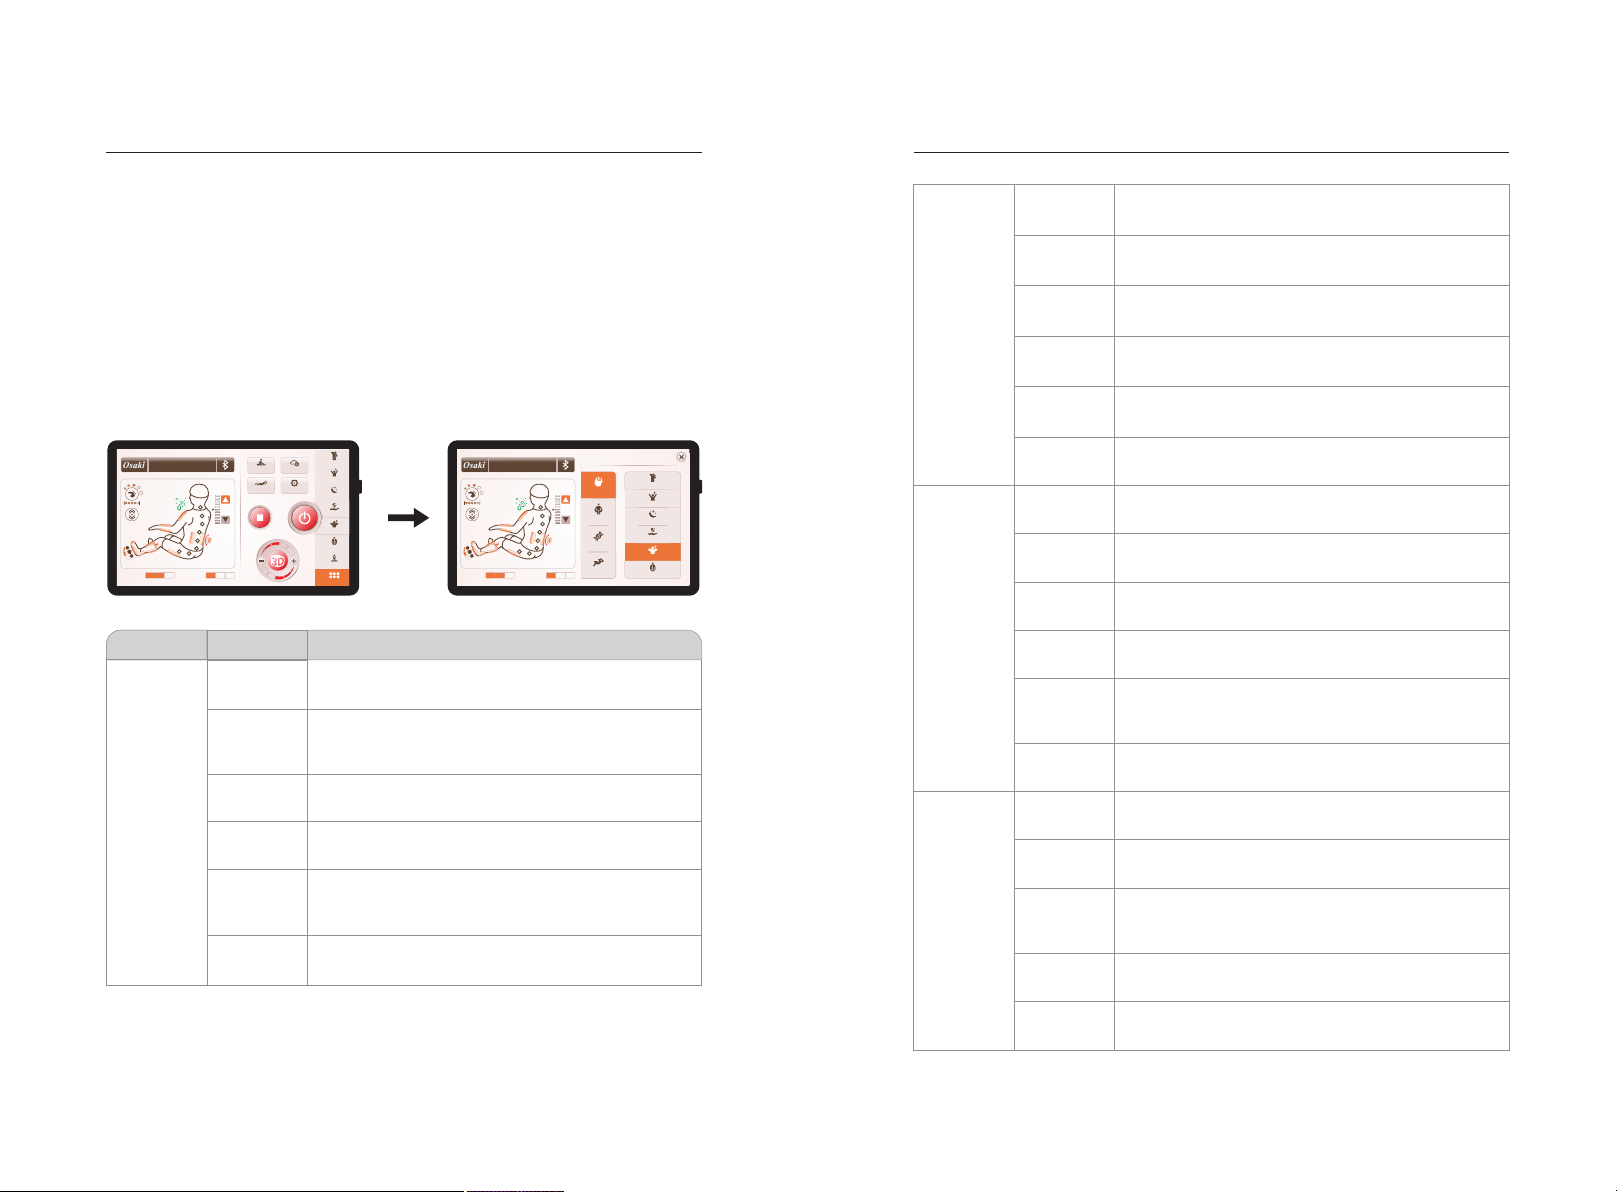
4)Automatic function
·There are four different automatic massage scenes in Auto mode:
·VIP Auto Program: Stress Relieving, Energetic Morning, Good-night Sleep, Joint
Care, Frozen Shoulder, Spine Massage.
·Healthcare Auto Program: Office Regimen, Sport Recovery, Brain Refresh,
Spine Care, Waist Care, Legs Care.
·Special Auto Program: Health Recharge, Meridian Treatment, Keep Fit,
Bottom Toning, Restoration Massage, Tiredness Relief.
·Relaxation Auto Program: Full-body Stretch, Thai Massage, Chinese
Massage, Total Relax, Airbag. There are 23 automatic massage functions
in total. Click the “auto” icon to select the automati c massage, when in
automatic massage, the speed and width can not be adjusted.
·Press “more" icon to select the corresponding automatic massage function.
Waist Care
2
Upper Air
Lower Air
Auto mode
16min
Manual
Angle
06
Function
Stress
Relieving
Energy
Customise
Setting
Stress Relieving
Energy
Good-night Sleep
Joint Care
Frozen Shoulder
Spine Massage
Thai Massage
More
Upper Air
Waist Care
16min
2
Lower Air
Description
Relieve fatigue and relax muscle, improve microcirculation of back & limbs and quickly relieve stress.
The body gets rest after one night sleeping. Quickly
wakeup all the body functions by massaging whole
VIP Auto Program
Stress Relieving
VIP
Healthcare
Special
Relaxation
Energy
Good-night Sleep
Joint Care
Frozen Shoulder
Spine Massage
06
muscle to start a fresh day.
It helps balance your body, quickly improve sleep
quality by massaging the 12 health acupoints.
Care for the health of all joints by pushing, pulling,
stretching and other massage modes
The unique massage mode for neck and shoulder,
relieve neck and shoulder pain and improve blood
supply in the brain.
Massage each spine to protect its health, alleviate
slipped disc.
VIP
Good-night
Sleep
Joint Care
Frozen
Shoulder
Spine
Massage
Healthcare
Special
Relaxation
Office
Regimen
Sport
Recovery
Brain
Refresh
Spine Care
Waist Care
Legs Care
Health
Recharge
Meridian
Treatment
Keep Fit
Bottom
Toning
Restoration
Massage
Tiredness
Relief
Full-body
Stretch
Thai
Massage
Chinese
Massage
Total Relax
Airbag
Increase physical exercise by massage, improve the
body functions of Office Sedentary.
Restoring physical fatigue quickly of after-exercise-body.
Relieve neck and shoulder pain, promote blood supply
to the brain by massaging YUZHEN and DAZHU points.
Care for the health of spine and improve the lack of
exercise.
Focus on improving spine health and relieving stiffness
in the waist muscles.
Quickly relieve the soreness and muscle fatigue in
lower body.
Improve the quality of nap and work efficiency.
Dredge the meridians, improve the body's microcirculation
and immunity quickly。
Effectively massage buttocks and legs to shaping the
body, reduce the accumulation of body fat.
Improve overall blood circulation of body to enhance
vitality and immunity.
Wake up all body functions quickly, replenish physical
strength and restore fatigue by massaging the 12
health acupoints.
Relieve fatigue, restore vitality, clean the blood lactic
acid produced after exercise.
Stretch the body to increasing its flexibility by Thai
massage.
Comprehensively relieve fatigue and soreness through
a deep massage for whole body.
According to the traditional Chinese medicine theory,
balance the body function to achieve physical fitness
and remove the disease.
Total Relax, soothing massage the whole body by
kneading and tapping to relieve fatigue.
Focusing on body pressure massage, it can fully relax
the body, restore fatigue, and calm the nerves.
1514
Page 10
Method of usage Method of usage
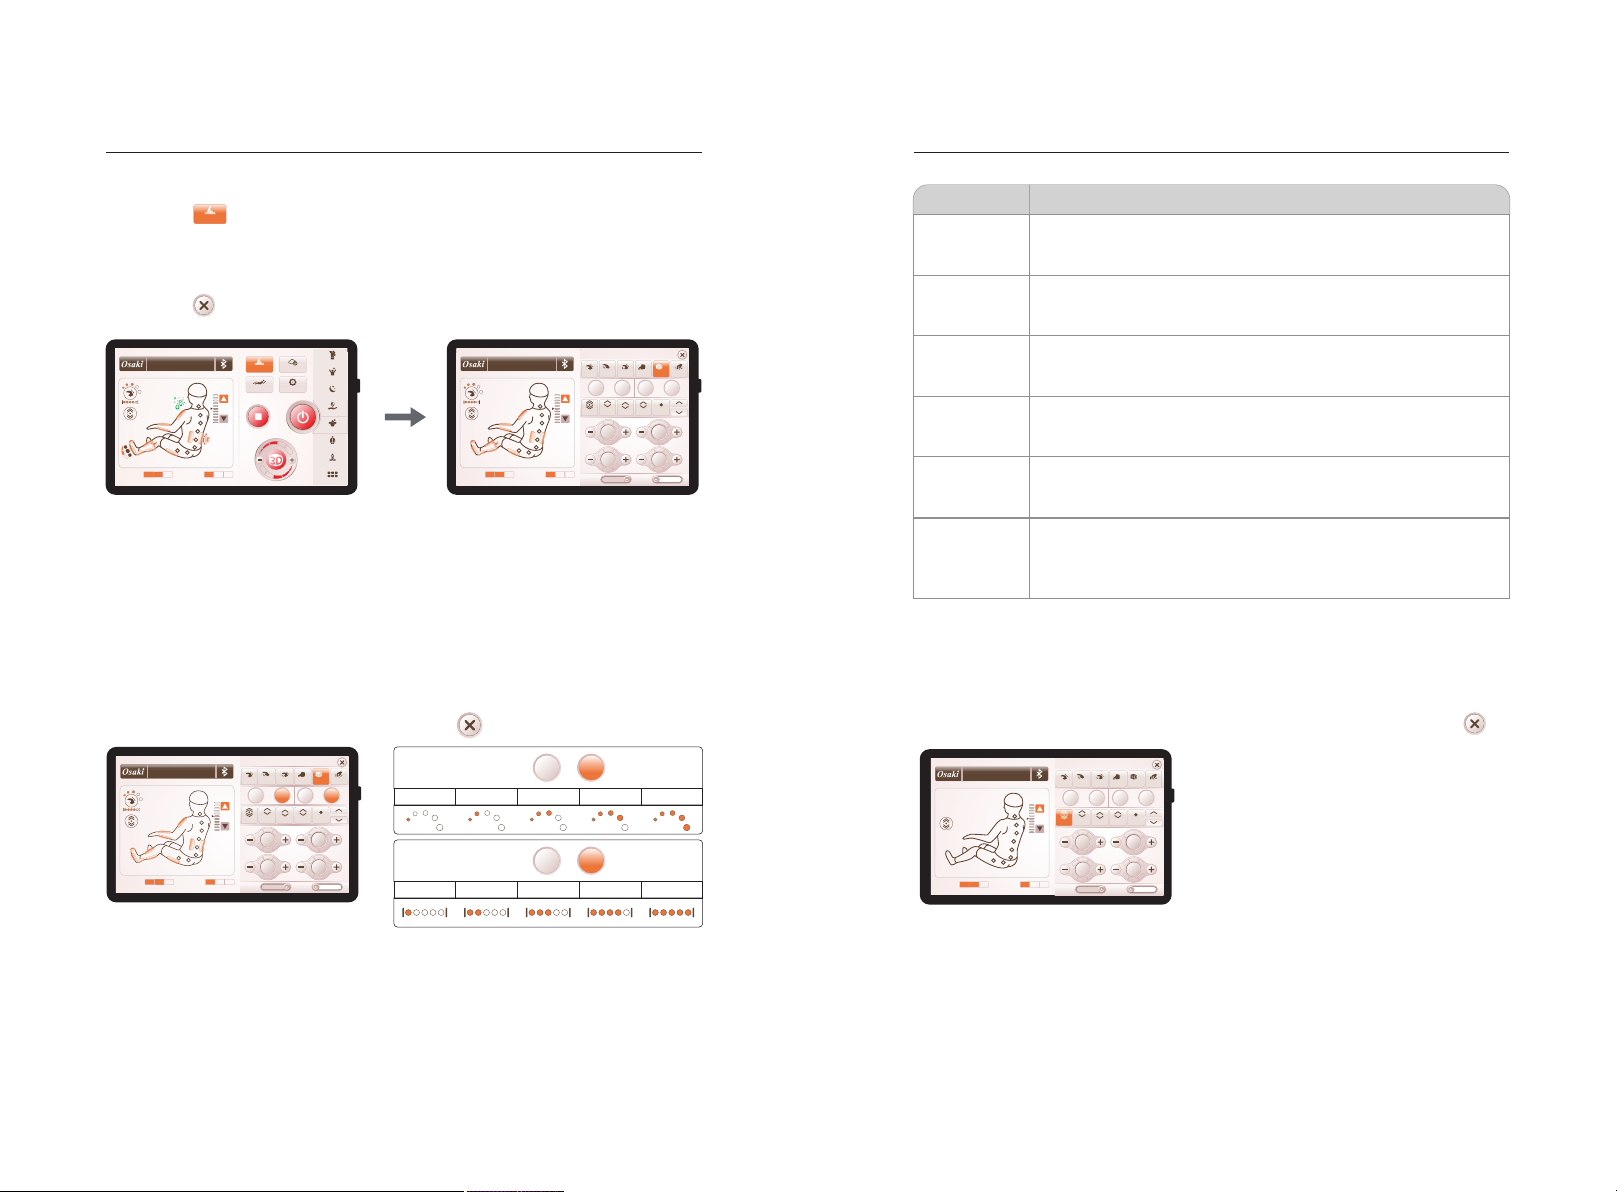
5)Manual
·Click the “ ” icon to enter the manual massage function selection interface,
Manual
including manual, manual strength and width, back stretch, upper airbag massage,
lower air bag massage, calf squeeze, foot rollers, Negative oxygen ions, heat and
other massage functions.
·Click the “ ” icon to close the manual massage interface.
06
Knead Flap
Speed-
Full Upper Lower
Upper
Lower
Negative Ions
ON
Manual Mode
Ⅱ Ⅱ
Swedish
Speed+
Air
Air
Ⅳ
Shiatsu Grasp
3D
Width-
Partial Fixed
Calf
Knead
Foot
Roller
Heat Therapy
开启
Width+
OFF
Upper Air
Waist Care
2
Lower Air
16min
Customise
Setting
Stress Relieving
Energy
Good-night Sleep
Joint Care
Frozen Shoulder
Spine Massage
Thai Massage
More
Upper Air
Manual
Angle
06
Waist Care
16min
Lower Air
Manual massage function selected interface Manual massage function interface
01)Manual - manipulation
· Under the manual massage function interface, select the manual massage
technique, back stretch, speed and width adjustment.
· Manual (manipulation): includes six different massage techniques: knead, tap,
knead & tap, shiatsu, 3D, and shoulder. In the state of tap and shiatsu massage,
the width of the massage ball of the robot is adjustable. The massage speed can
be adjusted in other massage techniques except for stopping. You can also close
the manual massage interface by clicking the " " icon.
06
Knead Flap
Speed-
Full Upper Lower
Upper
Lower
Negative Ions
ON
Manual Mode
Ⅱ Ⅱ
Swedish
Speed+
Air
Air
Ⅳ
Shiatsu Grasp
3D
Width-
Partial Fixed
Calf
Knead
Foot
Roller
Heat Therapy
开启
Width+
OFF
Upper Air
Waist Care
16min
Lower Air
Manual massage function - manual interface
Speed
1 level 2 level
Width
1 level 2 level
Speed-
3 level
Width- Width+
3 level
Speed+
4 level
4 level
5 level
5 level
Manual button
3D massage
Knead
Knead & tap
Shoulder
Tap
4 different kinds of 3D modes, speed and strength may also be
adjusted
Speed and strength may also be adjusted
Combination kneading and tapping function. Speed and strength
may also be adjusted
Shoulder grasping function relieve neck and shoulder tension.
Speed and strength may also be adjusted
Two different tapping methods may be accessed by pressing this
button again. Speed, width and strength may also be adjusted
Functional description
Two different shiatsu methods may be accessed by pressing this
Shiatsu
button more than once, speed, width and strength may also be
adjusted with speed, back intensity, and width buttons.
02)Manual - back stretching
·Manual (massage area): includes massage functions such as fixed, partial, overall,
upper back, and lower back.
·Click on the corresponding stretch mode icon to select the personalized massage
function. You can also close the manual massage interface by clicking the " " icon.
06
Knead Flap
Speed-
Full Upper Lower
Upper
Lower
Negative Ions
ON
Manual Mode
Ⅱ Ⅱ
Swedish
Speed+
Air
Air
Ⅳ
Shiatsu Grasp
3D
Width-
Partial Fixed
Calf
Knead
Foot
Roller
Heat Therapy
开启
Width+
OFF
Upper Air
Waist Care
16min
Lower Air
Manual massage function - back stretching interface
1716
Page 11
Method of usage Method of usage
Function
Point
Local
Upper back
Lower back
overall
Upper adjust
Lower adjust
Press button once, a single dot appears in the display. Massage
apparatus will stay stationary.
Press button again, two arrows appear. Massage apparatus will
move in an approximately 3 inch range.
Round back massage.
Round back massage.
Full back massage.
Press and hold to move the range of the massage area up in the
Fixed or Partial Position.
Press and hold to move the range of the massage area up in the
Fixed or Partial Position.
Description
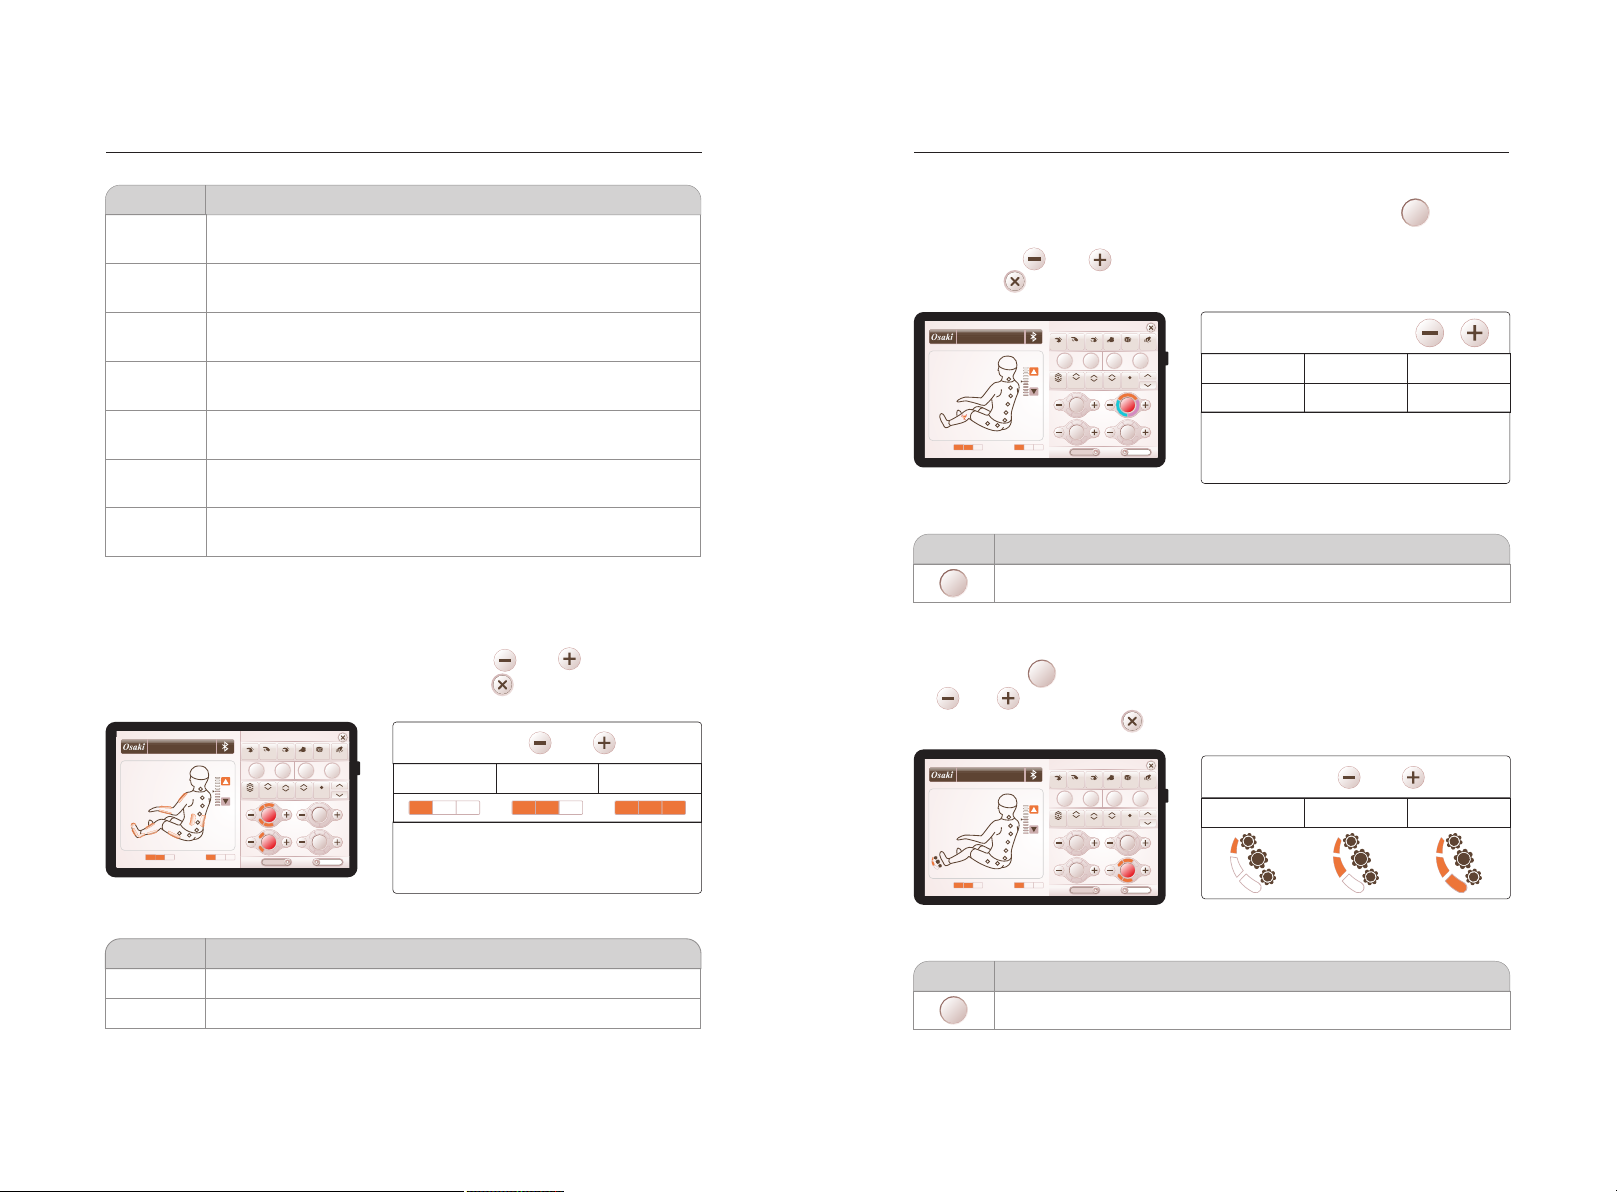
03)Manual - air pressure massage
·Manual (air pressure): includes upper body airbag pressure and lower body air pressure
massage function. Click the air pressure function icon to turn the air pressure massage
function on or off. Adjust the intensity by clicking the " " or " "button. You can also
close the manual massage interface by clicking the " " icon.
06
Knead Flap
Speed-
Full Upper Lower
Upper
Lower
Negative Ions
ON
Manual Mode
Ⅱ Ⅱ
Swedish
Speed+
Air
Air
Shiatsu Grasp
3D
Width-
Partial Fixed
Calf
Knead
Foot
Roller
Heat Therapy
开启
Ⅳ
Width+
OFF
16min
Waist Care
Upper Air
Manual massage function - air pressure
selection interface
Lower Air
Function
Upper Air
Lower Air
Turn the upper body air pressure massage function on or off.
Turns the lower body air pressure massage function on or off.
Speed
1level 2level 3level
In the upper body air pressure or lower body air
pressure open state, you can adjust the air
pressure massage three level strength.
Description
04)Manual - calf squeeze
· Select to turn the calf massage function on or off by pressing the “ ” button;
Calf
Knead
There are three different calf massage modes. Adjust the calf massage mode by
clicking the " " or " " button.
·Click the “ ” icon to close the manual massage interface.
06
Knead Flap
Speed-
Full Upper Lower
Upper
Lower
Negative Ions
ON
Manual Mode
Ⅱ Ⅱ
Swedish
Speed+
Air
Air
Ⅳ
Shiatsu Grasp
3D
Width-
Partial Fixed
Calf
Knead
Foot
Roller
Heat Therapy
开启
Calf squeeze massage mode
Width+
ModeⅠ ModeⅡ ModeⅢ
Forward Reverse
Positive
inversion
After opening calf squeeze massage
OFF
function, adjust positive and negative
Upper Air
Waist Care
16min
Lower Air
rotation massage function.
Manual massage function – the calf
squeeze interface
Function
Calf
Knead
Press the switch on or off the calf squeeze massage function.
Description
05)Manual - foot rollers
Foot
· By Pressing “ ” to select switch on or off the foot rollers massage function. Click
Roller
“ ” or “ ” to adjust the speed of the roller. The speed can be adjusted in three
levels. You can also click “ ” icon to close the manual massage interface.
Manual Mode
Ⅳ
Ⅱ Ⅱ
Knead Flap
Shiatsu Grasp
Knead&fiap
Upper Back
Upper
Lower
ON
3D
Speed+
Width-
Width+
Lower Back
Partial Fixed
Calf
Air
Knead
Foot
Roller
Air
Heat Therapy
开启
OFF
Speed-
06
Full Back
Negative Ions
Speed
1level 2level
3level
Upper Air
Waist Care
16min
Lower Air
Manual massage function - foot rollers
selection interface
Function
Foot
Roller
Press the switch on or off the foot rollers massage function.
Description
1918
Page 12
Method of usage Method of usage
06)Manual-negativeoxygenion
·Click the “Negative Ions ” button to select switch on or off the negative
ON
oxygen ion massage function. You can also click the “ ” icon to close the manual
massage interface.
16min
Waist Care
2
Upper Air
Lower Air
Function
ON
Negative oxygen ion
Manual Mode
Ⅳ
Ⅱ Ⅱ
Knead Flap
Shiatsu Grasp
Swedish
3D
Speed+
Width-
Width+
Partial Fixed
Upper
Calf
Air
Knead
Foot
Lower
Roller
Air
Heat Therapy
ON
Manual massage function -
开启
OFF
Negative Ions selection interface
06
Speed-
Full Upper Lower
Negative Ions
Description
Press this button switch on or off the negative oxygen ion function.
07)Manual-backheating
·Click the “heat ” button to select switch on or off the heating massage function.
ON
Heating is far infrared heating function, and it will be warm after 3 minutes.
·Click the “ ” icon to close the manual massage interface.
Waist Care
Upper Air
Function
ON
16min
Lower Air
Manual Mode
Ⅳ
Ⅱ Ⅱ
Knead Flap
Shiatsu Grasp
Swedish
3D
Speed+
Width-
Width+
Partial Fixed
Upper
Calf
Air
Knead
Foot
Lower
Roller
Air
Heat Therapy
OFF
Manual massage function -
ON
heating selection interface
06
Speed-
Full Upper Lower
Negative Ions
Description
Press this switch on or off the heating function.
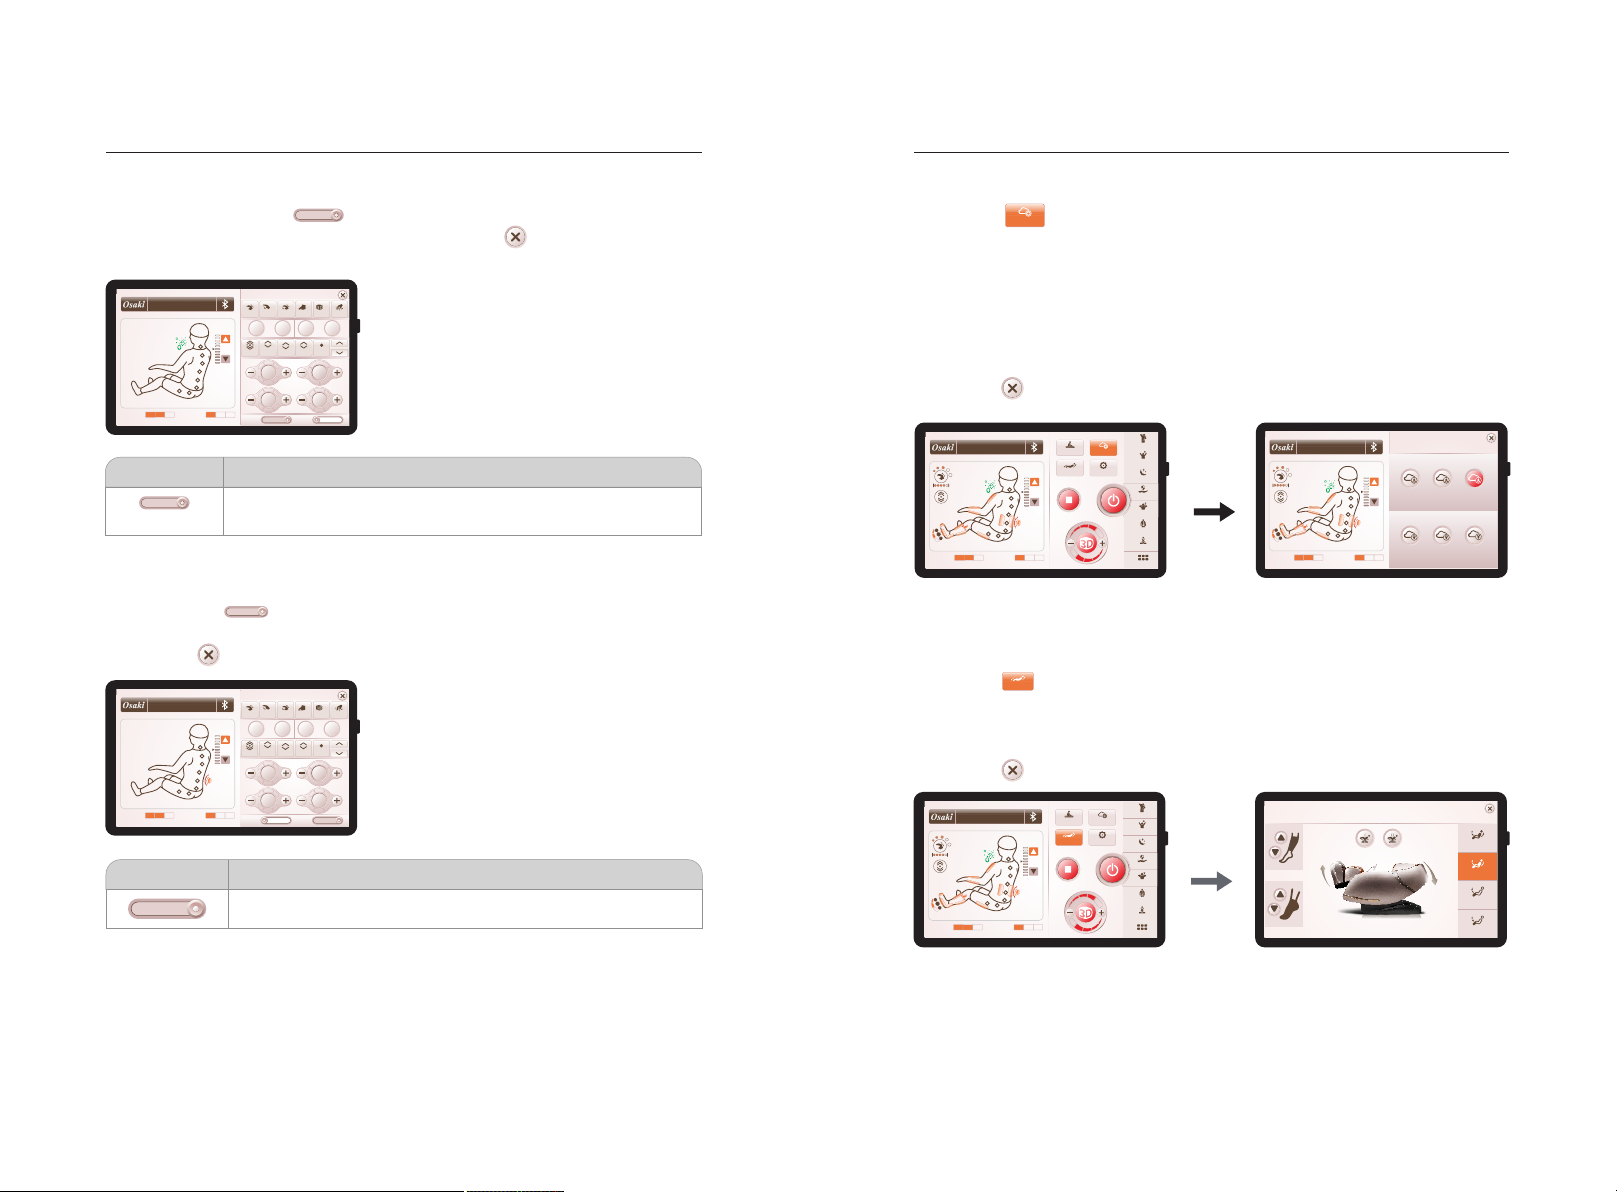
6)Customise
· Click the “ ” button icon to enter the program memory massage function
Customise
selection interface, including program memory I, program memory II, program
memory III and other storage or recall functions.
·Select to the storage or recall massage function by clicking on it.
· Storage: Store all current massage methods, air pressure, angle, and other
massage functions.
·Call: Call the previously stored technique, air pressure, angle, and other massage
functions.
·Click the “ ” icon to close the program memory massage interface.
Upper Air
Waist Care
2
Lower Air
16min
Customise
Setting
Stress Relieving
Energy
Good-night Sleep
Joint Care
Frozen Shoulder
Spine Massage
Thai Massage
More
Upper Air
Manual
Angle
06
Waist Care
2
Lower Air
16min
Customise
Ⅱ
Memory Save
Ⅱ
Memory Use
Ⅲ
Ⅲ
Ⅰ
06
Ⅰ
Program memory selection interface Program memory interface
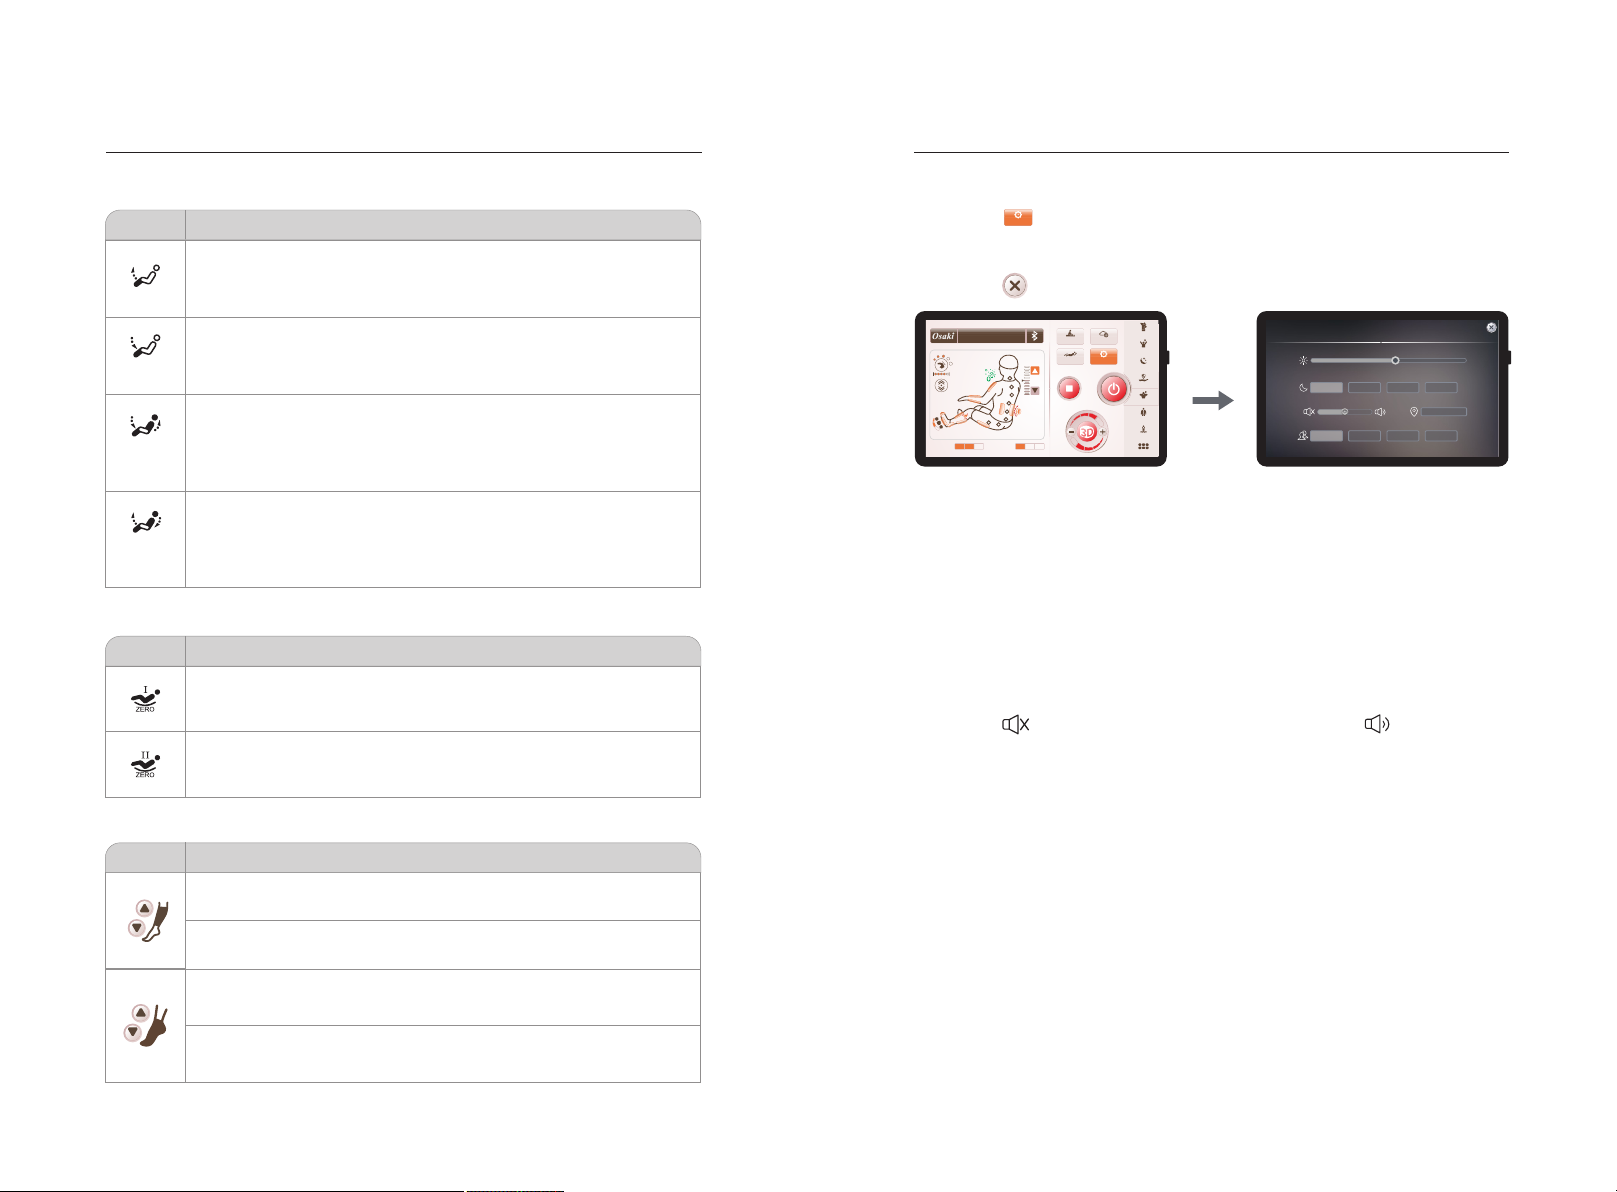
7)Angularadjustment
· Click the “ ” button icon to enter the angle adjustment selection interface,
Angle
including massage functions such as back rest & calf unit linked up, back rest &
calf unit linked down, calf rest up, calf rest down, zero gravity, leg extension, and
foot extension.
·Click the “ ” icon to close the angle adjustment interface.
Customise
Setting
Stress Relieving
Energy
Good-night Sleep
Joint Care
Frozen Shoulder
Spine Massage
Thai Massage
More
Leg Expansion
Foot Expansion
Angle Adjustment
Linkage Rise
Linkage Fall
Leg Up
Leg Down
Upper Air
Waist Care
2
Lower Air
16min
Manual
Angle
06
Angle adjustment selected interface Angle adjustment interface
2120
Page 13
Method of usage Method of usage
01)Lyingangleadjustment
Function
Leg up: Press and hold to raise the calf unit independently of the
backrest, release to stop; After the calf rest up is completed, the calf
Leg Up
frame will automatically detect the length of the foot.
Leg down: Press and hold to lower the calf unit independently of the
Leg Down
backrest, release to stop; After the calf rest down is completed, the calf
frame will automatically detect the length of the foot.
Linkage Rise: Press and hold to raise both the backrest and calf unit
at the same time, release to stop. After the back rest & calf unit linked
Linkage
Rise
up is completed, the calf frame will automatically detect the length of
the foot.
Linkage Fall: Press and hold to lower both the backrest and calf unit at
the same time, release to stop. After the back rest & calf unit linked
Linkage
Fall
down is completed, the calf frame will automatically detect the length of
the foot.
02)Zerogravityadjustment
Function
Zero gravityⅠ: Automatically adjust the calf and backrest position to
zero gravityⅠposition.
Zero gravityⅡ: Automatically adjust the calf and backrest position to
zero gravityⅡposition.
03)Legextension
Function
Up button: Press and hold to manually raise the calf massage assembly
to the knee position, release to stop.
Lower button: Press and hold to manually lower the calf massage
assembly to the calf position, release to stop.
Description
Description
Description
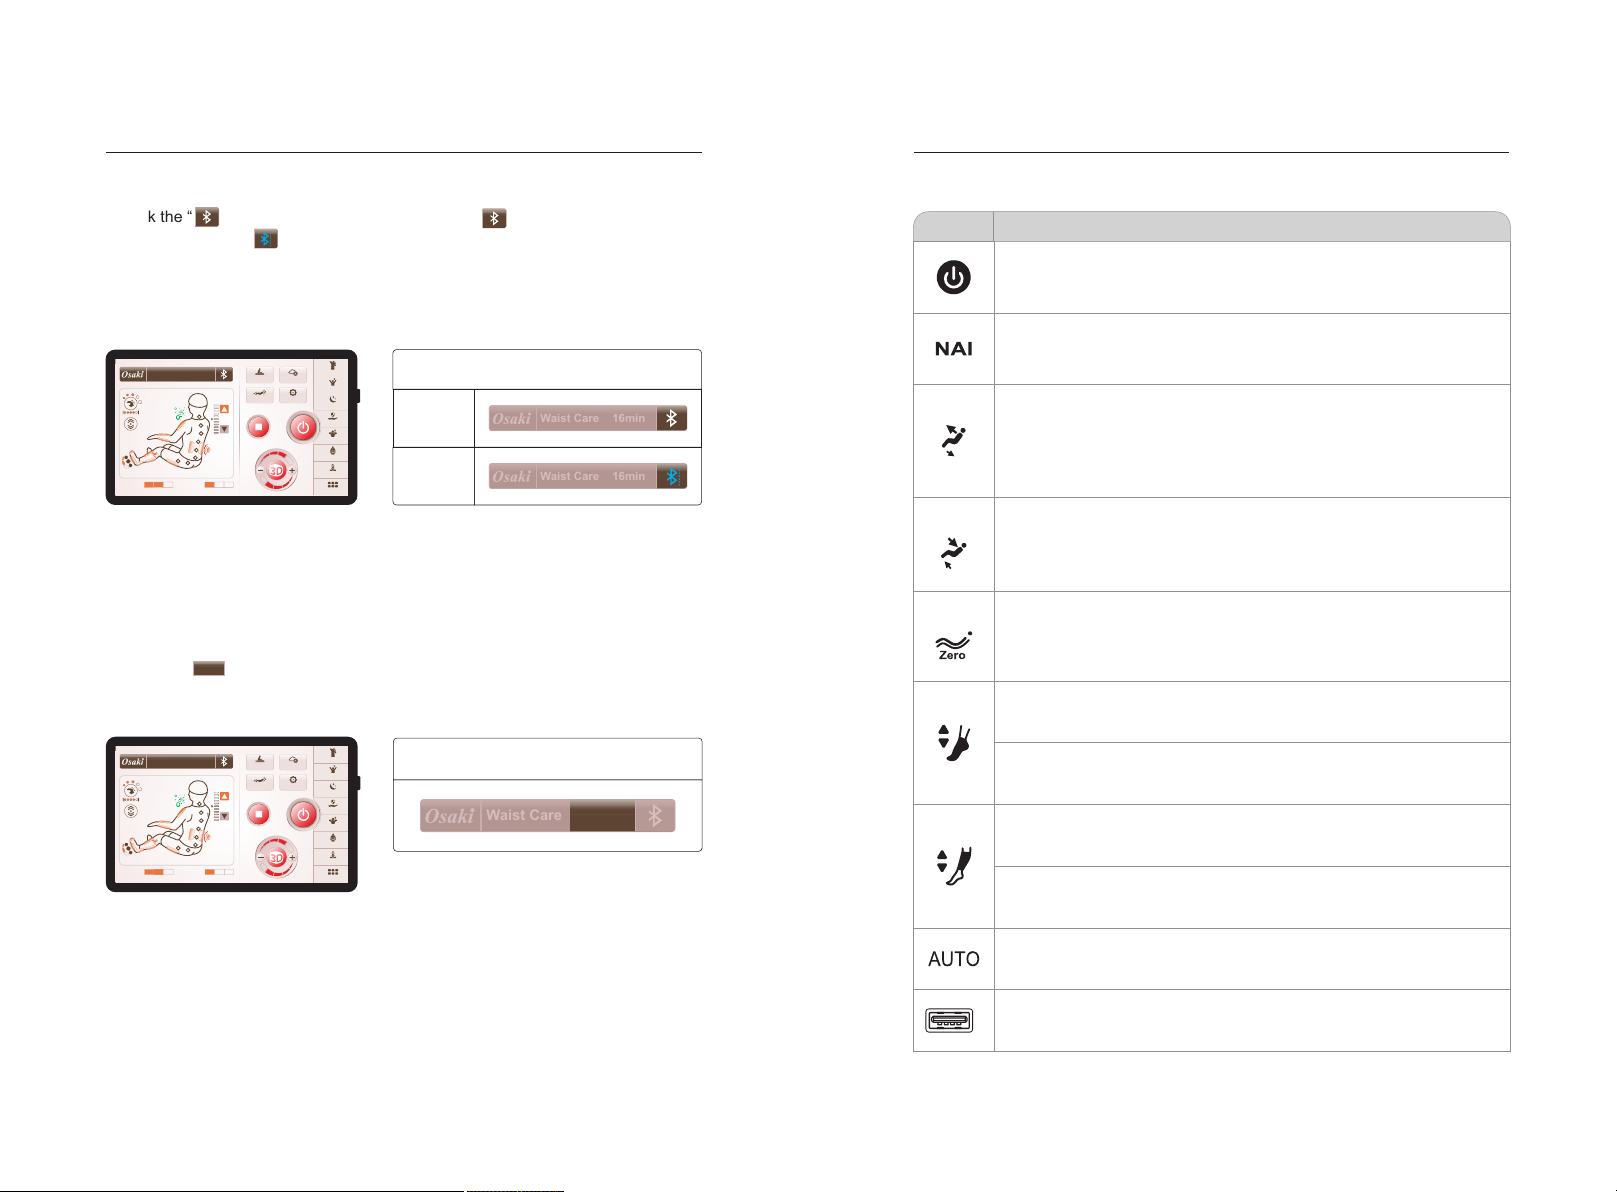
8)Settings
· Click the “ ” button icon to enter the setting selection interface, including backlight
Setting
brightness adjustment, sleep time adjustment, button volume switch, serial number,
language selection and other settings.
·Click the “ ” icon to close the settings interface.
16min
Upper Air
Waist Care
2
Lower Air
Manual
Angle
06
Setting selection interface
Customise
Setting
Stress Relieving
Energy
Good-night Sleep
Joint Care
Frozen Shoulder
Spine Massage
Thai Massage
More
Brightness
Sleep Off
Sound
Language
Setting
1Min 2Min 5Min 1 0Min
S/N
201804150001
English
Chines e
Setting interface
01)Brightness
·Select the backlight brightness slider, slide left and right to adjust the backlight
brightness.
02)Sleepoff
·Select the sleep time button and set it for 1 minute, 3 minutes, 10 minutes or
30 minutes.
03)sound
·Click the “ ” icon to turn off the button volume, and click “ ” to turn on the
button volume.
04)Language
·Language selection
05)SerialNo.
·Displays information such as current equipment.
Up button: Press and hold this button to manually adjust the foot
massage assembly to slowly shorten, release to stop.
Lower button: Press and hold this button to manually adjust the foot
massage assembly to slowly extend, release to stop.
2322
Page 14
Method of usage Method of usage
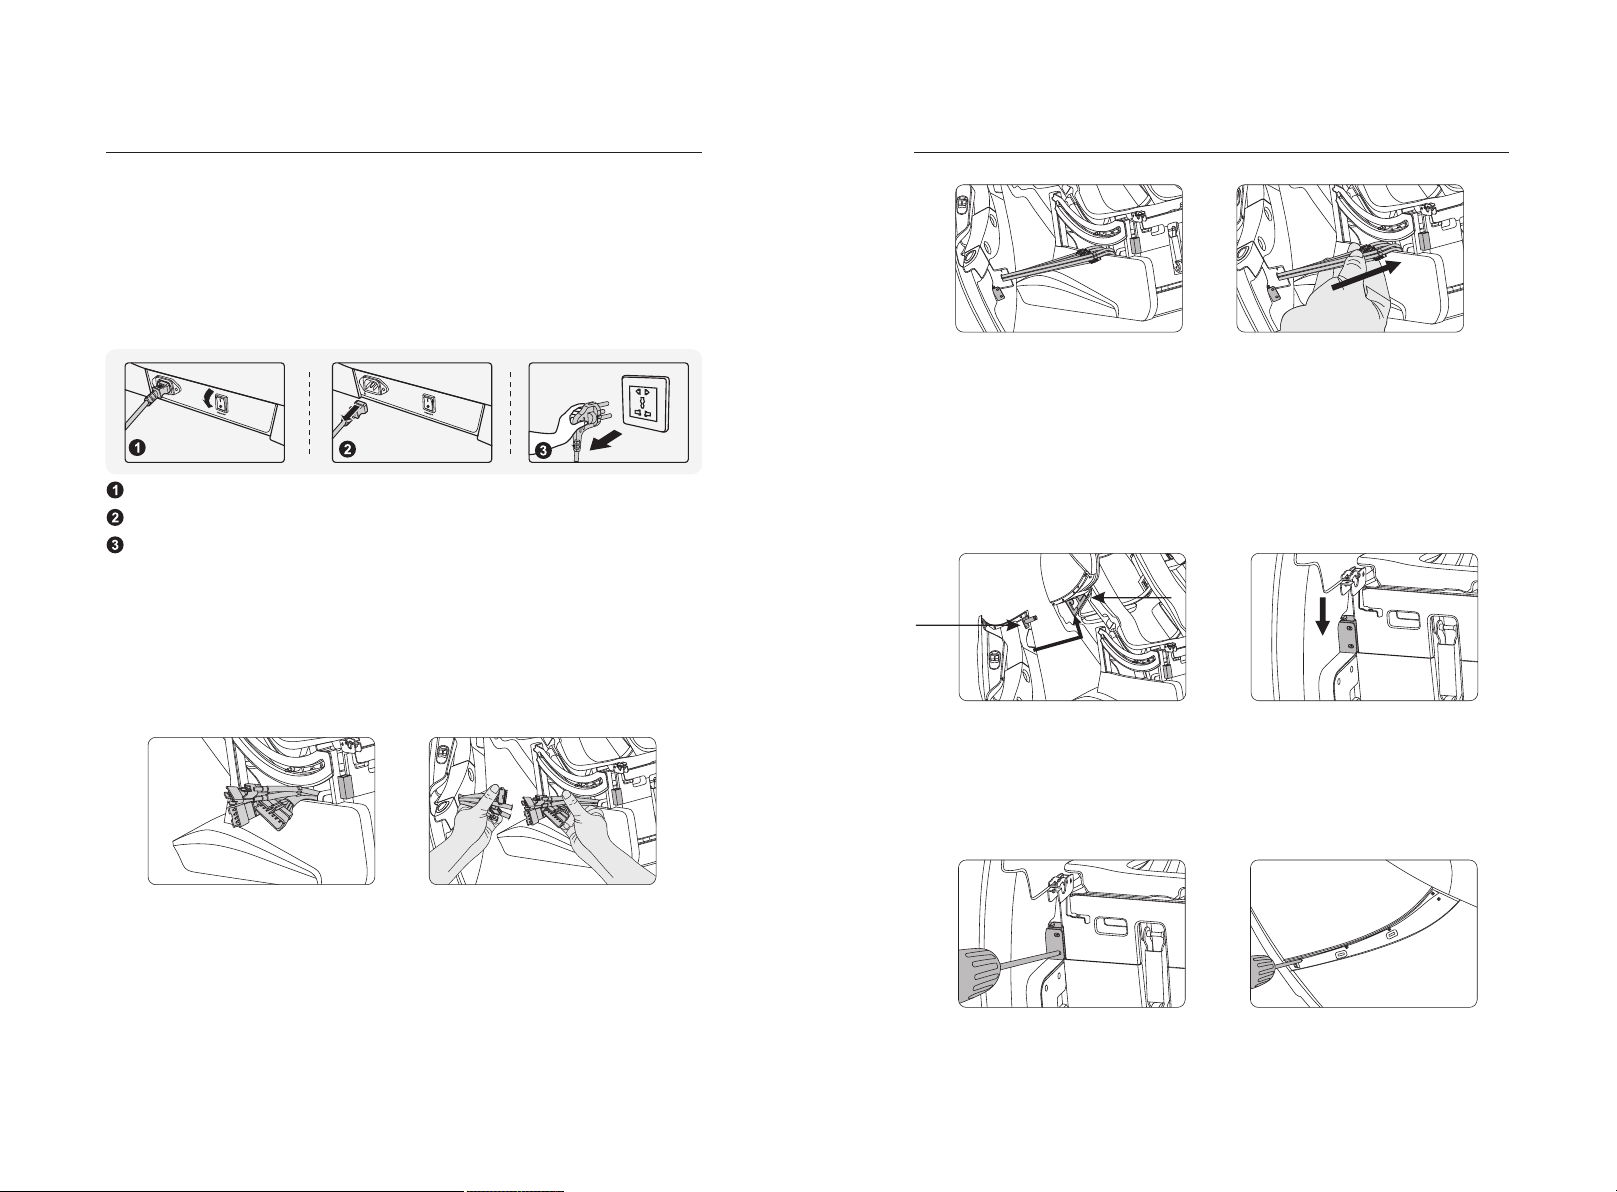
9)Bluetooth
·Click the “ ” icon to switch on or off Blue tooth. “ ” is to switch off the Blue
tooth status, and “ ” is to switch on the Blue tooth status.
·After the Blue tooth-enabled audio source device (such as mobile phone, MID
tablet, etc.) is paired with the massage chair Blue tooth module, the music played
by the audio source device can be wirelessly transmitted to the massage chair
audio system for music playback via Blue tooth.
Upper Air
Waist Care
2
Lower Air
16min
Customise
Setting
Stress Relieving
Energy
Good-night Sleep
Joint Care
Frozen Shoulder
Spine Massage
Thai Massage
More
Blue tooth
off state
Blue tooth
on state
Manual
Angle
06
Blue tooth switch
Waist Care
Waist Care
16min
16min
Blue tooth interface not enabled
Attentions: When controlling the Blue tooth switch, you should return to the main
information control interface. If you are in the manual, angle adjustment or custom
storage control interface, Blue tooth can't be controlled.
10)Timeadjustment
·Click the “ ” icon to adjust the massage time function. Each time you press it,
16mi n
it will add 5 minutes. It cannot exceed 40 minutes. If it exceeds 40 minutes, it will
return to 5 minutes.
Upper Air
Waist Care
2
Lower Air
16min
Customise
Setting
Stress Relieving
Energy
Good-night Sleep
Joint Care
Frozen Shoulder
Spine Massage
Thai Massage
More
Manual
Angle
06
Time Setting
Waist Care
16min
Time adjustment interface
11)Handrailshortcutbutton
Function
Power button: Short press this button to pause the operation, long
press for 3 seconds to open the key. Pause for more than 20 minutes
during the massage will automatically turn off all massage functions.
O2 Ionizer: Press this switch on or off the negative oxygen ions function.
Back rest & calf unit linked up: Press and hold to raise both the
backrest and calf unit at the same time, release to stop. After the back
rest & calf unit linked up is completed, the calf sensor will automatically
detect the length of the foot.
Back rest & calf unit linked down: Press and hold to lower both the
backrest and calf unit at the same time, release to stop. After the back
rest & calf unit linked down is completed, the calf sensor will
automatically detect the length of the foot.
Zero gravity button: Each time the button is pressed, the position of
the calf frame and the back frame is automatically adjusted to the zero
gravity position. There are two zero gravity modes, and the cycle is
switched.
Up button: Press and hold to manually adjust the foot massage
assembly to slowly shorten, release to stop.
Lower button: Press and hold to manually adjust the foot massage
assembly to slowly extend, release to stop.
Up button: Press and hold to manually raise the calf massage
assembly to the knee position, release to stop.
Lower button: Press and hold to manually lower the calf massage
assembly to the calf position, release to stop.
Description
Attentions: When adjusting the time, you should return to the main information
control interface. If you are in manual, angle adjustment or custom storage control
interface, the time cannot be controlled.
Automatic mode button: each press, automatic massage function
switch.
USB jack: a USB charging port that can charge smart devices (such
as mobile phones).
2524
Page 15
Method of usage Method of usage
3 Turnoffpower,stopmassage、
·In the process of massage, press the power switch key to immediately turn off all
massage functions, the backrest and the calf are reset, the massage time is up,
and all massage functions are immediately turned off, and the backrest and the
calf are not reset.
·Cut off the power supply of the whole machine, the figure (schematic diagram of
the whole machine power cut).
Figure 3
Figure 4
POWER INPUT
POWER INPUT
Schematic diagram of the whole machine power turning off.
Schematic diagram of unplugging the whole machine wiring.
Schematic diagram of unplugging the power plug.
4 Installing the arm rests、
·Locate the connector plug corresponding to the armrest from the bottom of the
frame and pass it out from the center of the rear end of the frame (Figure 1).
·After passing the connector plug from the middle of the rear end of the frame,
corresponding to each pair of wiring plugs (docking according to the mark on the
physical pair wiring) (Figure 2).
Figure 1
·The connector from the bottom of the frame is inserted firmly with the armrest
connector, and the air pipe connector is also inserted into the position (Figure 3).
·After connecting with the corresponding connecting wires, gently insert the middle
of the steel pipe behind the frame steel frame into the bottom of the frame by
hand, and take care to avoid the air pipe collapse (Figure 4).
Figure 2
·Hold the front and rear ends of the armrests with both hands, first insert the limit
shaft at the rear end of the armrest into the limit shaft card at the lower end of the
back steel frame, then push the armrest up slightly by hand and check whether
the armrest limit shaft is firmly inserted (Figure 5).
·After inserting the rear end of the armrest, hook the front end of the armrest into
the steel tube of the seat frame and press down on the front end of the armrest;
then gently shake the armrest to check whether the front and rear ends of the
armrest are in place (Figure 6).
Limit axis
Limit block
Figure 5
Figure 6
·Aim at the mounting hole of the steel frame on the front end of the fixed handrail,
and fix the handrail and the steel pipe of the holder firmly with two (M5X16)
screws (figure 7).
· fiveTighten the rear end of the armrest and the capsule with M4x10 screws.
Figure 7
Figure 8
2726
Page 16
Method of usage Method of usage
·Insert the hook on the lower part of the shoulder decoration bar into the groove
below the armrest, then fasten the two metal fasteners in the middle to the
armrest (figure 9).
· Tighten the handrail and decorative bar firmly on the inside shoulder of the
handrail with a screw of ST4.2x12, and then gently shake the entire handrail to
check whether the front and rear ends of the handrail are installed in place. After
the armrest is installed, the installation steps of both armrest are the same (figure
10).
·Then hang the lower leg (left and right shaft) into the frame support hinge plate at
the same time(figure 5).
·Cover the rotating shaft cover, press the rotating outer sleeve of calf, and then
use a M5x12 pan head Phillips screw to lock the calf support rotating cover, and
the calf is installed(figure 6).
Figure 3
Figure 4
Figure 9
Figure 10
5 Calf in stall ation、
·First cut the connecting wire and the air pipe tie fixed on the steel pipe(figure 1).
·Connect the connecting wire and the air pipe leading from the lower end of the
frame to the lower leg joint, and confirm whether the docking is in place, and then
insert the connecting line and air pipe into the bottom of the seat frame from the
lower end hole of the abutment, and pay attention to avoiding the dead air pipe
when filling(figure 2).
Figure 1
·First insert the rotating inner sleeve and the rotating outer sleeve into the left side
of the calf and the right side of the lower leg (note: the large step must face
inward) (figure 3).
·Then open the calf on the left and right mounts of the massage chair to support the
hinge cover(figure 4).
Figure 2
Figure 5
·After the screw is locked, the groove at the back end of the lower leg cover is
clamped onto the pin axis, and then the front end of the lower leg cover is
pressed down completely parallel to the rotating shaft cover plate, and the convex
point at the side of the lower leg cover is stuck into the hole at the side of the
lower leg hook, and the lower leg is installed(figure 7).
Figure 7
Figure 6
28
29
Page 17
Method of usage Method of usage
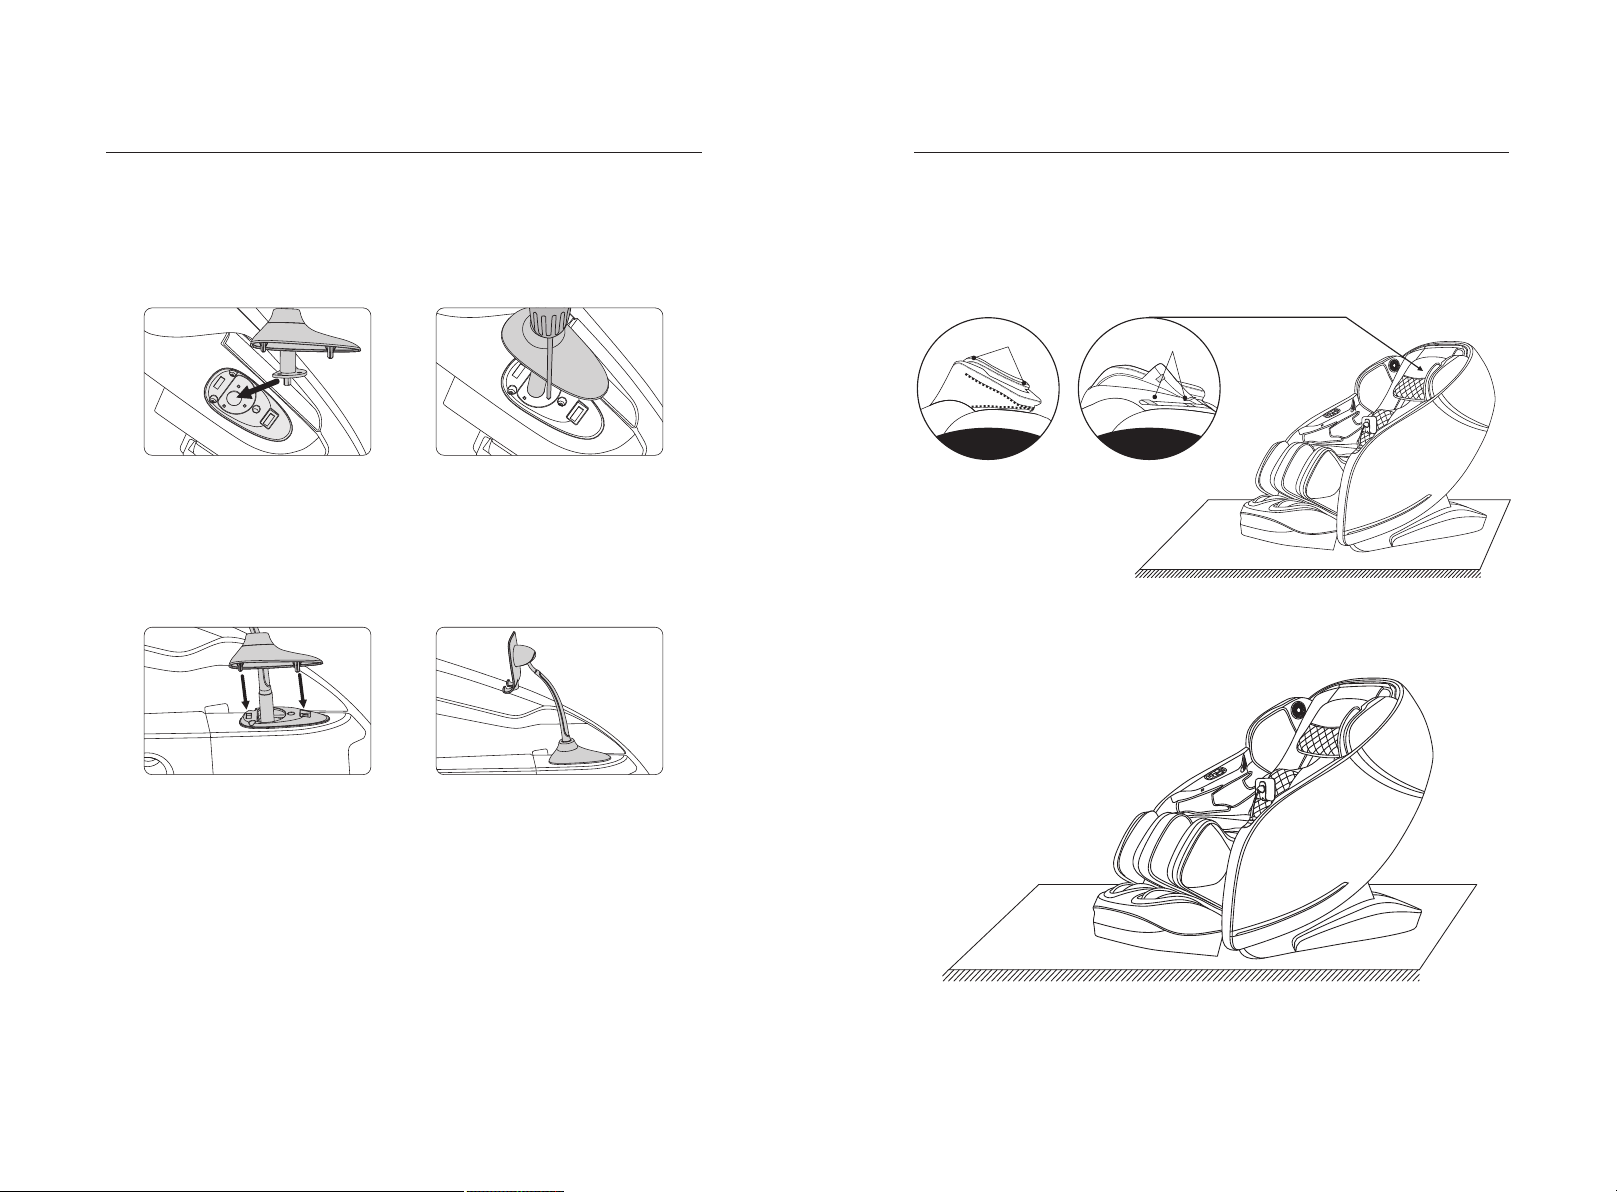
6.Touch screen hand controller bracket installation instructions
·Take out the touch screen remote controller stand from the accessory bag and put
the mounting flange on the bracket assembly into the mounting seat on the
armrest(figure 1).
·Secure the stand assembly to the armrest with three M4 screws(figure 2).
Figure 1
·Align the two metal cards on the decorative cover with the square bayonet on the
armrest mount, and then press down firmly into the square bayonet to secure
it(figure 3).
·After the entire stand is installed, shake the stand gently to confirm whether it is
installed firmly; Stand installation is completed(figure 4).
Figure 2
7.Pillow pad and backrest pad's dismounting and use manual
·Using head cushions can reduce the kneading massage intensity on neck
andshoulder, according to your needs to decide whether the head cushions
isneeded (recommend head cushions). Backrest cushion and backrest connected
by zipper (1), head cushions and backrest pad connected by thread gluing (2).
Zipper
Thread gluing
1 2
8.Floor protection
·Put the heavy massage chairs on the wood floor for a may damage the floor, so
please place a carpet or other object to avoid this damage.
Figure 3
Figure 4
Caution: Do not move the chairs with its wheels on wood floor, rough ground or in
a narrow space. Two people are required to lift the chair. During the lifting period,
take the calf rest end sealing plate and backrest cover grooves as the force-bearing
point(Please do not lift armrest directly.)
30
31
Page 18
Method of usage
Product specifications
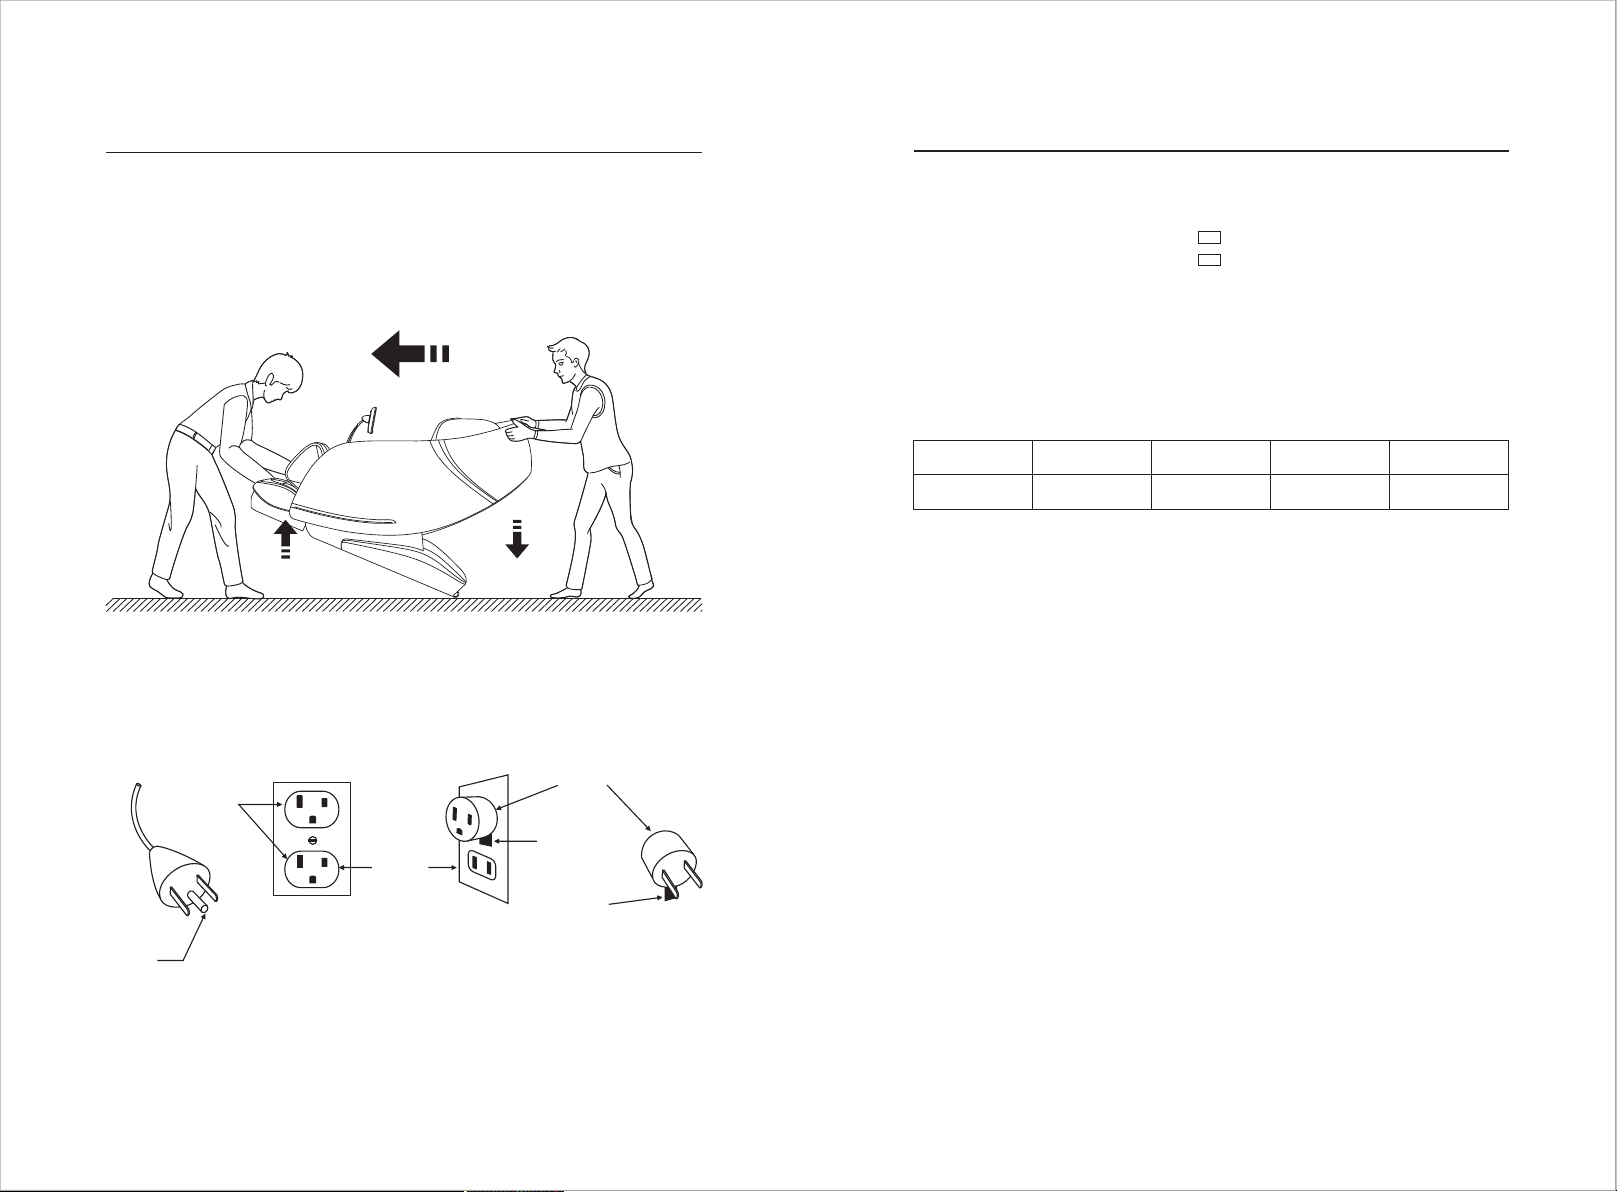
9.Replace the chair
·Ensure all the wires are pulled out of massage chair before moving, and it must
be moved by two people. One person in front of and the other behind, front one
lifts the massage chair up while the behind one presses it down. Massage chair
can be pushed forward when its weight completely falls on the base pulley, then
gently put it back to normal angle after moving to the right position.
lift it up
Note: During movement you must turn off the power first and then unplug the
power cord and the controller cord.
Press It Down
Model: First Class LE
Name: Massage Chair
Rated voltage: 110-120V~ 60Hz
220-240V~ 50Hz/60Hz
Rated power input:220W
Rated time: 20Min
Safety structure: Class I
Material introduction: PVC, PA, steel parts and electric & electron parts
MATERIAL
PU
LEATHER CLOTH WOOD
GRO UNDIN G
PIN
Aa2 00
GRO UNDED
OUT LET
GRO UNDED
OUT LET BOX
(A) (B) (C )
32
ADA PTER
METAL
SCR EW
CRO UNDIN G SCREW
TAB FOR
33
 Loading...