

For your first assembly, avoid common mistakes by reading this Assembly Guide or
watching the assembly video at www.orukayak.com/assembly
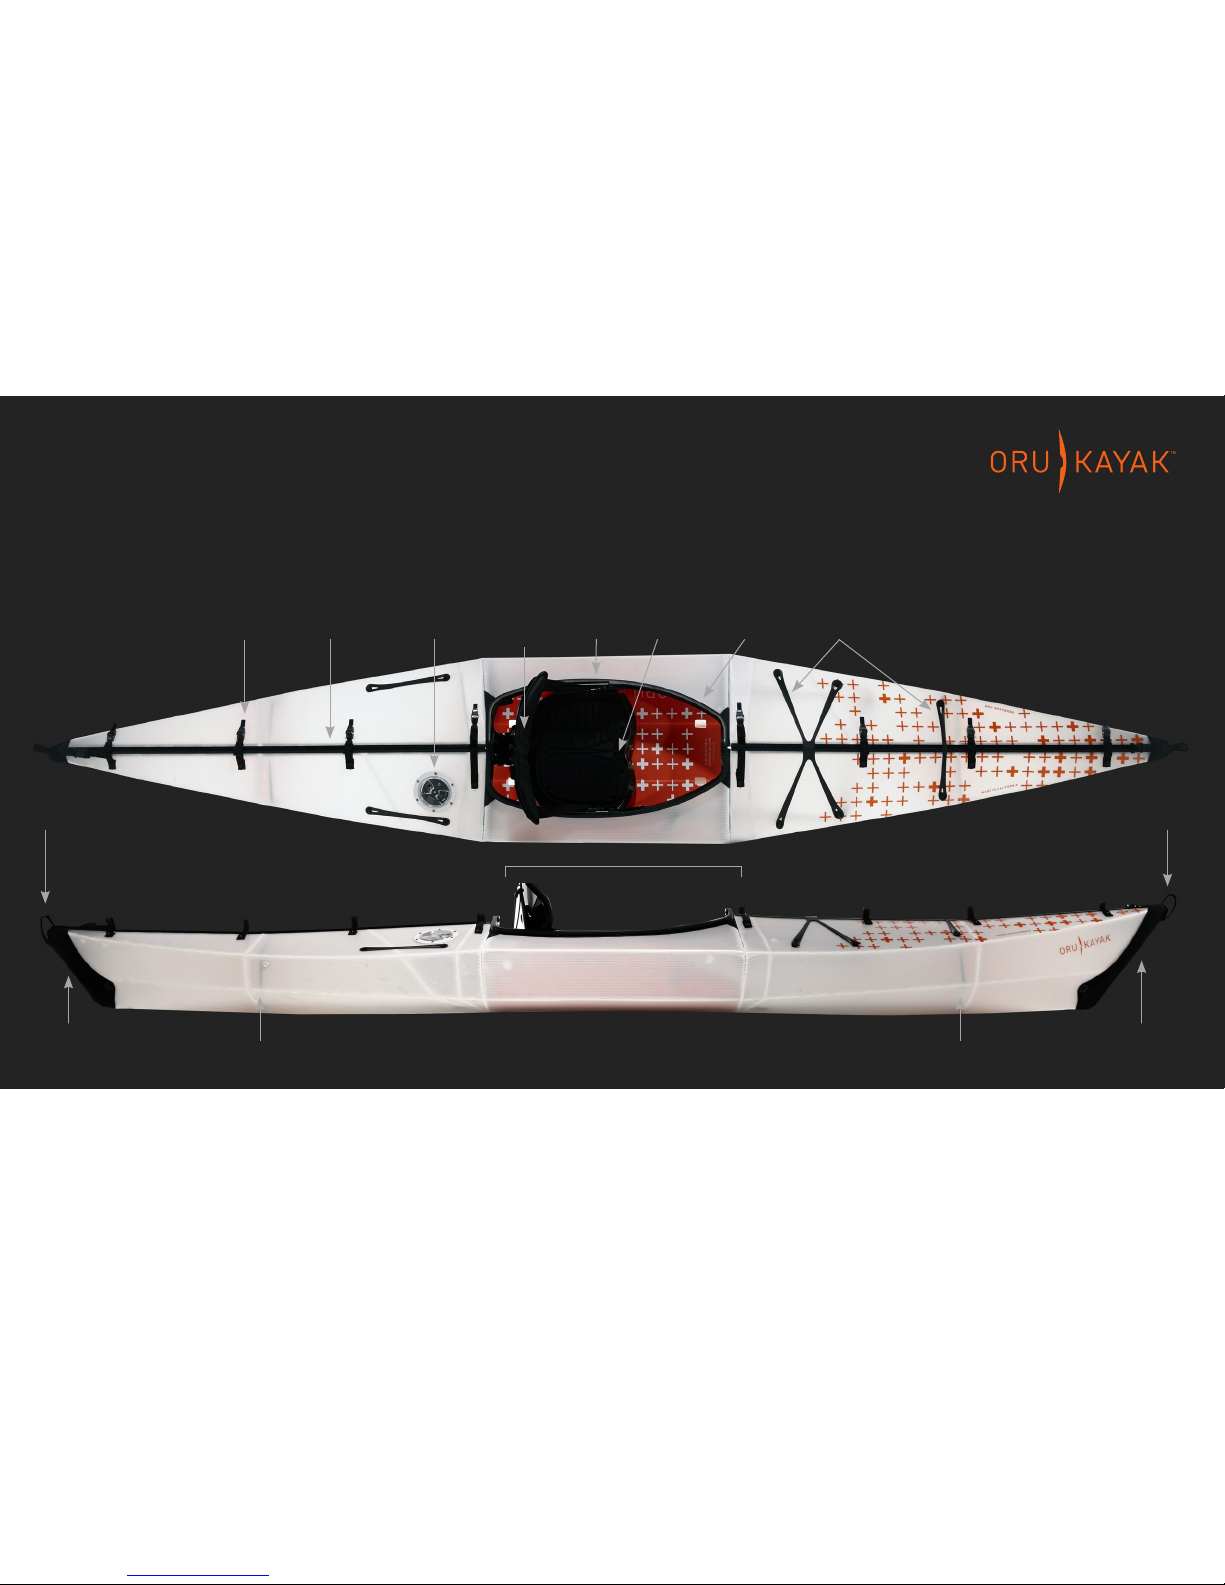
BOW
(front)
Bow
fairing
Stern
fairing
STERN
(back)
Handle Handle
Cockpit
handles
Cockpit
Adjustable
ergonomic
backrest
Ratchet
buckles
Bulkhead
Bulkhead
Seam
channels
Deck
hatch
Seat
pad
Coaming
(cockpit rim)
Deck
straps
US PATENT NO. 8,316,788
BAY+
ASSEMBLY GUIDE
The

HOW TO GET STARTED
Read this entire Assembly Guide before
assembling your Oru Kayak.
Watch the instruction video:
www.orukayak.com/bay-plusassembly-guide-2015
Check out our Tips & Tricks:
www.orukayak.com/tips-and-tricks
PLEASE NOTE
Your first time assembling may
take 20-30 minutes, but with
practice you’ll get closer to 5.
Be patient!
All Oru Kayak components have
been custom-engineered for a
precise fit. If a component seems
difficult to assemble, check the
directions instead of forcing a fit
that might not be correct.
WE’RE HERE TO HELP!
If you have questions, email us at
service@orukayak.com.
Oru Kayak:
Explore outside the box.
With a few steps, the box you’re looking at will unfold into a twelvefoot long kayak that’s beautiful, robust, swift, and smooth. It’s
inspired by the Japanese art of origami— and while it’s not quite as
easy as unfolding a piece of paper, your Oru Kayak is designed to
be simple and intuitive to assemble.
With a bit of practice, your Oru Kayak can be put together in five
minutes—but the first time will take longer, as you learn the process and the folds break in. Be patient and don’t force anything;
components are custom-engineered to fit together precisely. We
recommend doing it at home the first time, and also watching our
assembly video.
You’ll be on the water in no time at all, and we can’t wait to hear
about your Oru Kayak journeys. Send your photos and videos to
info@orukayak.com or add #orukayak to share them with the
community.
Enjoy your adventures!
The Oru Kayak team
WWW.ORUKAYAK.COM 1
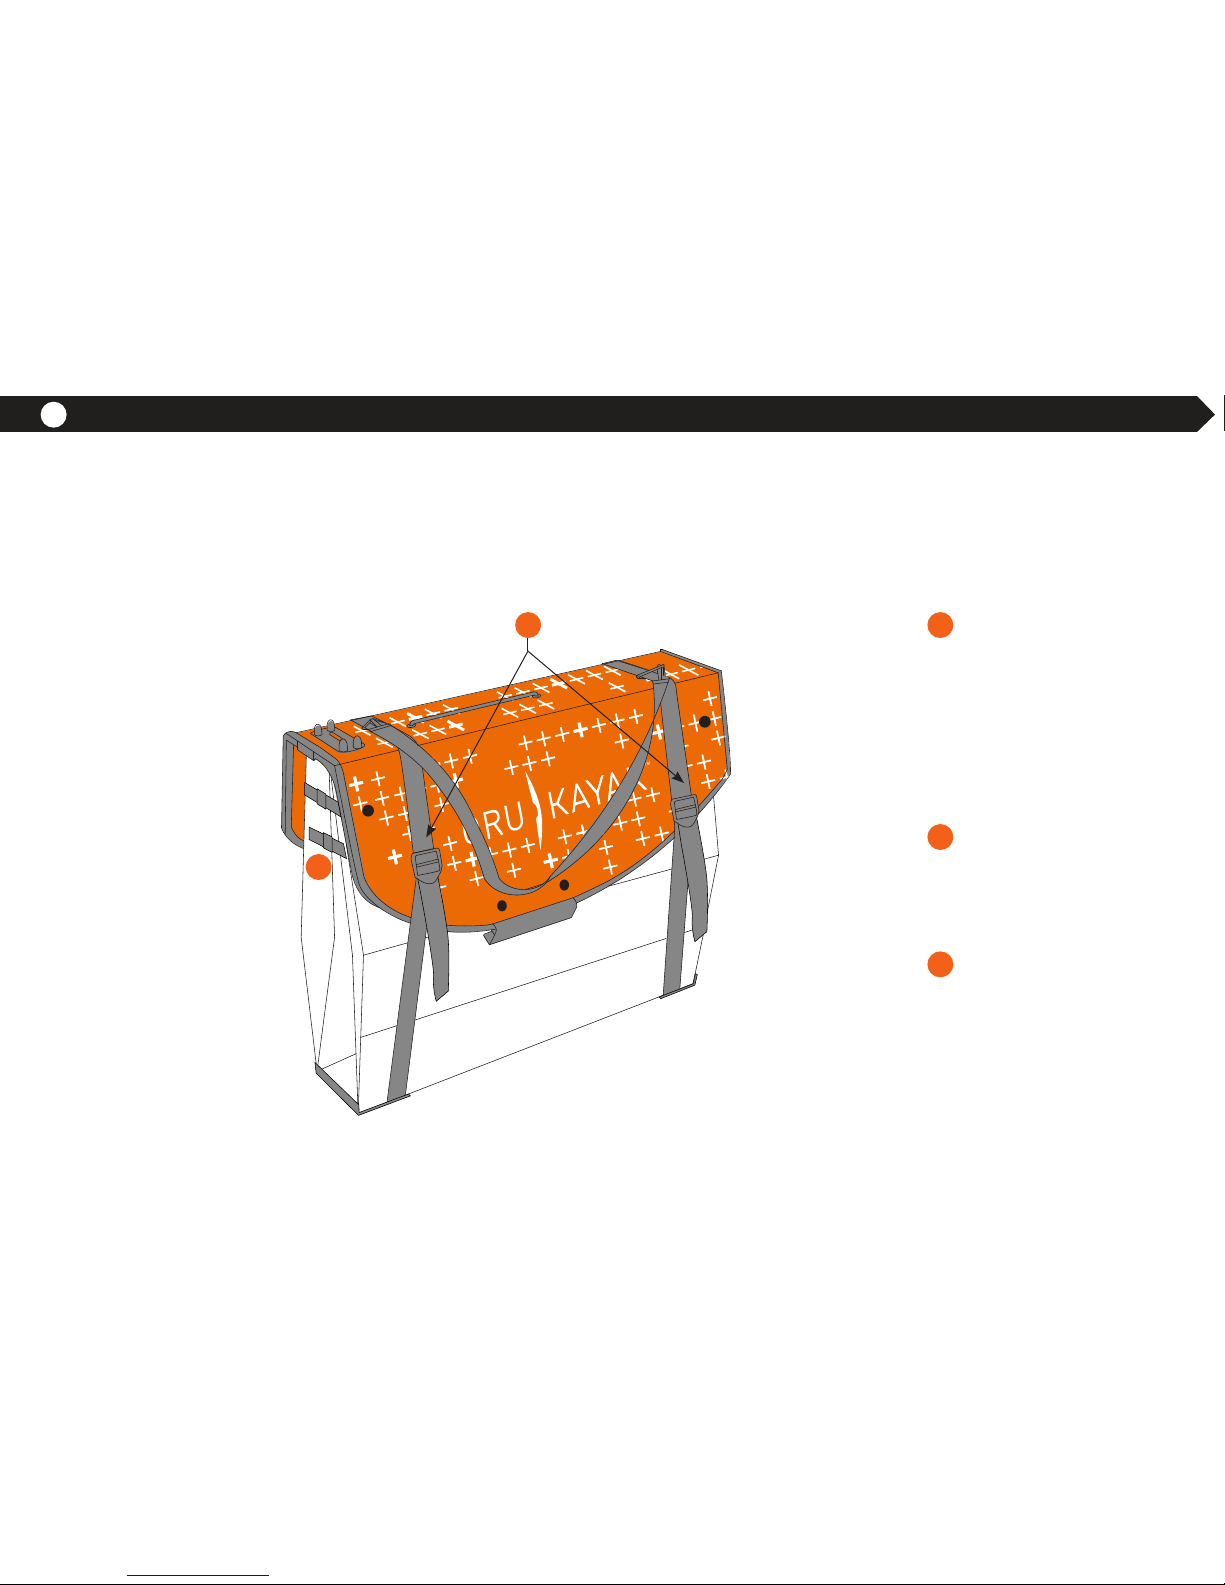
A
B
C
Loosen and slide the
shoulder strap off
the sides of the box.
You won’t use it while
kayaking, but you will
need it when you fold
the Oru Kayak back into
box form.
Unclip the two sets of
box buckles on both
sides of the orange lid.
Lift the lid off.
Remove the loose kayak
components packed into
the box. See page 2 for
a guide to the loose
components.
Step 1: Open the Oru Kayak box
The box contains all the components needed for assembly, and includes space to
store gear—such as a personal flotation device (PFD) and a 4-piece paddle.
B
The lid
becomes
the kayak’s
floorboard.
The box becomes
the kayak’s hull
and deck.
A
3 4 5 6 7 8 9 1032 4 5 6 7 8 91
1
2 ORU KAYAK | ASS EMBLY GUID E
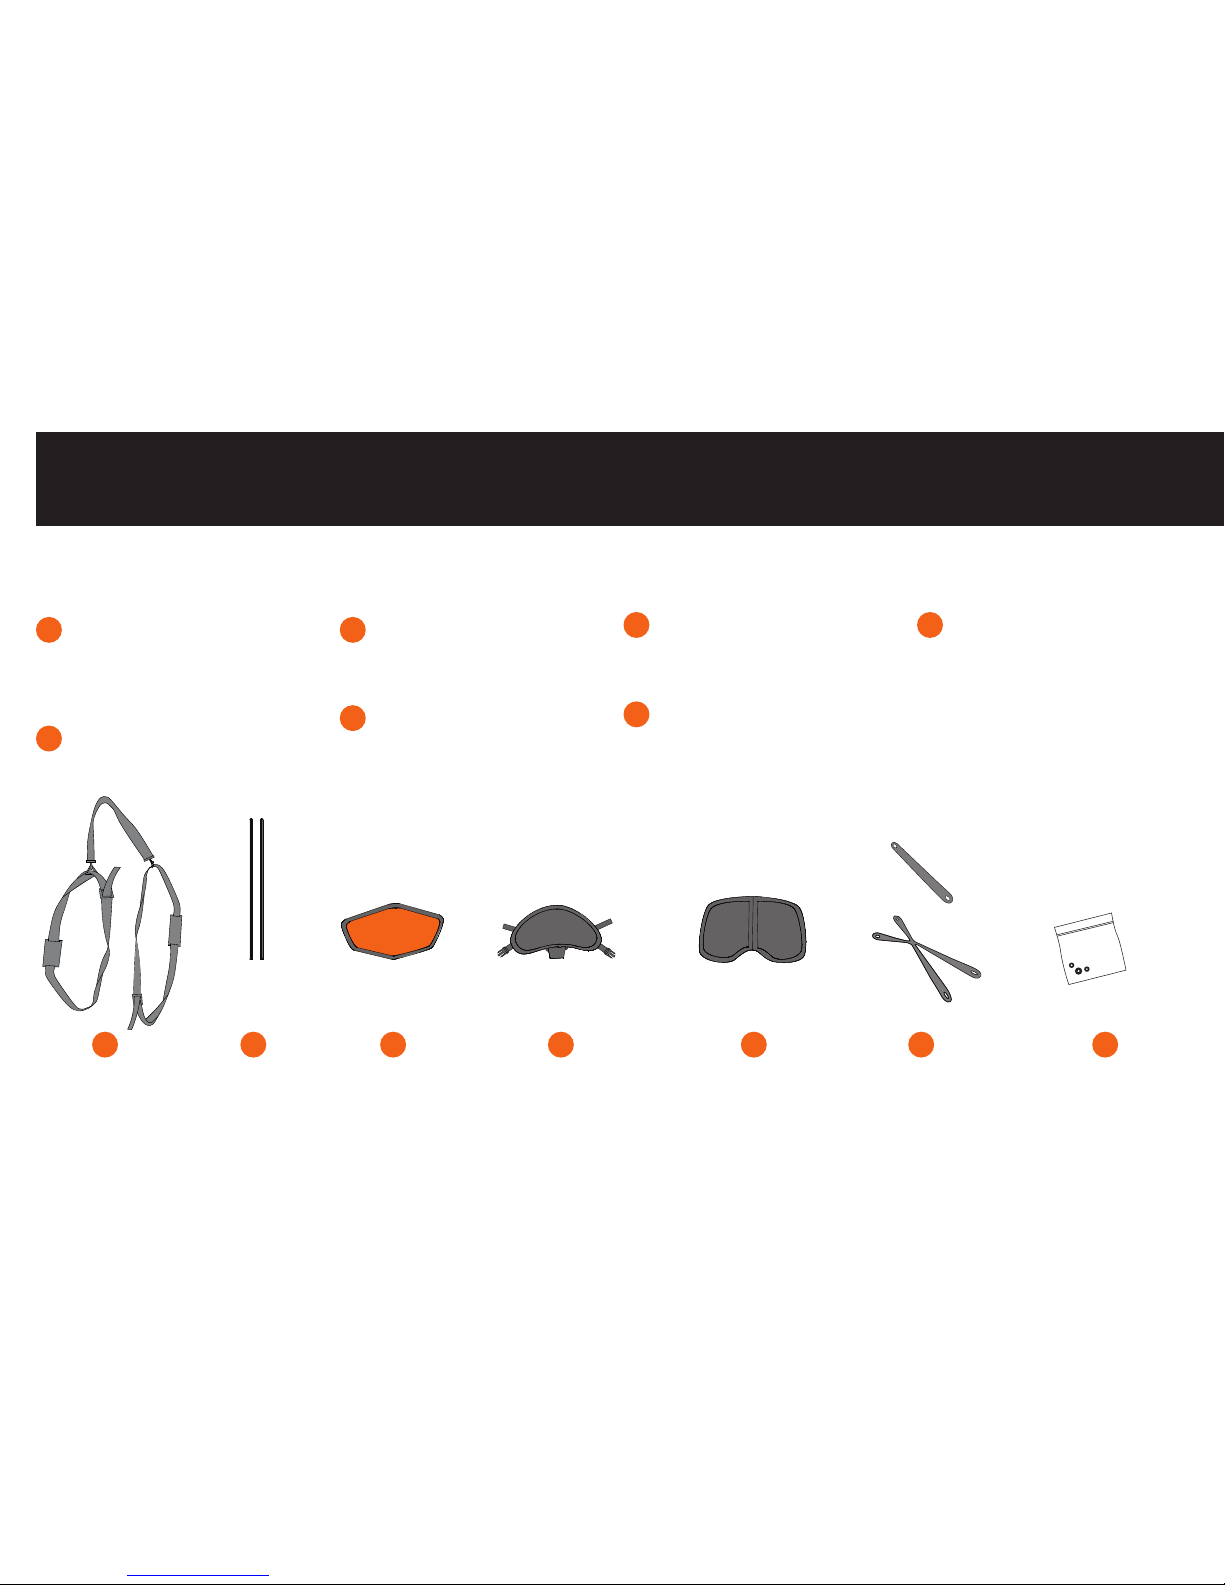
Shoulder strap: Used to
carry the kayak when in
box form. Stow behind the
backrest while kayaking.
Seam channels (2): Help
seal the deck seam.
Stern (back) bulkhead:
Provides structural
rigidity.
Adjustable ergonomic
backrest: Combines
adjustable back support
and structural rigidity.
Seat pad: Tucks under the
shock cord in the floorboard.
Deck straps: Stores
extra gear on the
kayak deck.
Spare parts: Extra
hardware for repairs or
replacements.
1
2
3
4
5 7
6
Parts: loose components
2
2 SEAM
CHANNELS
1
SHOULDER
STRAP
3
STERN
BULKHEAD
2 DECK
STRAPS
64
BACKREST
5
SEAT PAD
SPARE
PARTS
7
WWW.ORUKAYAK.COM 3
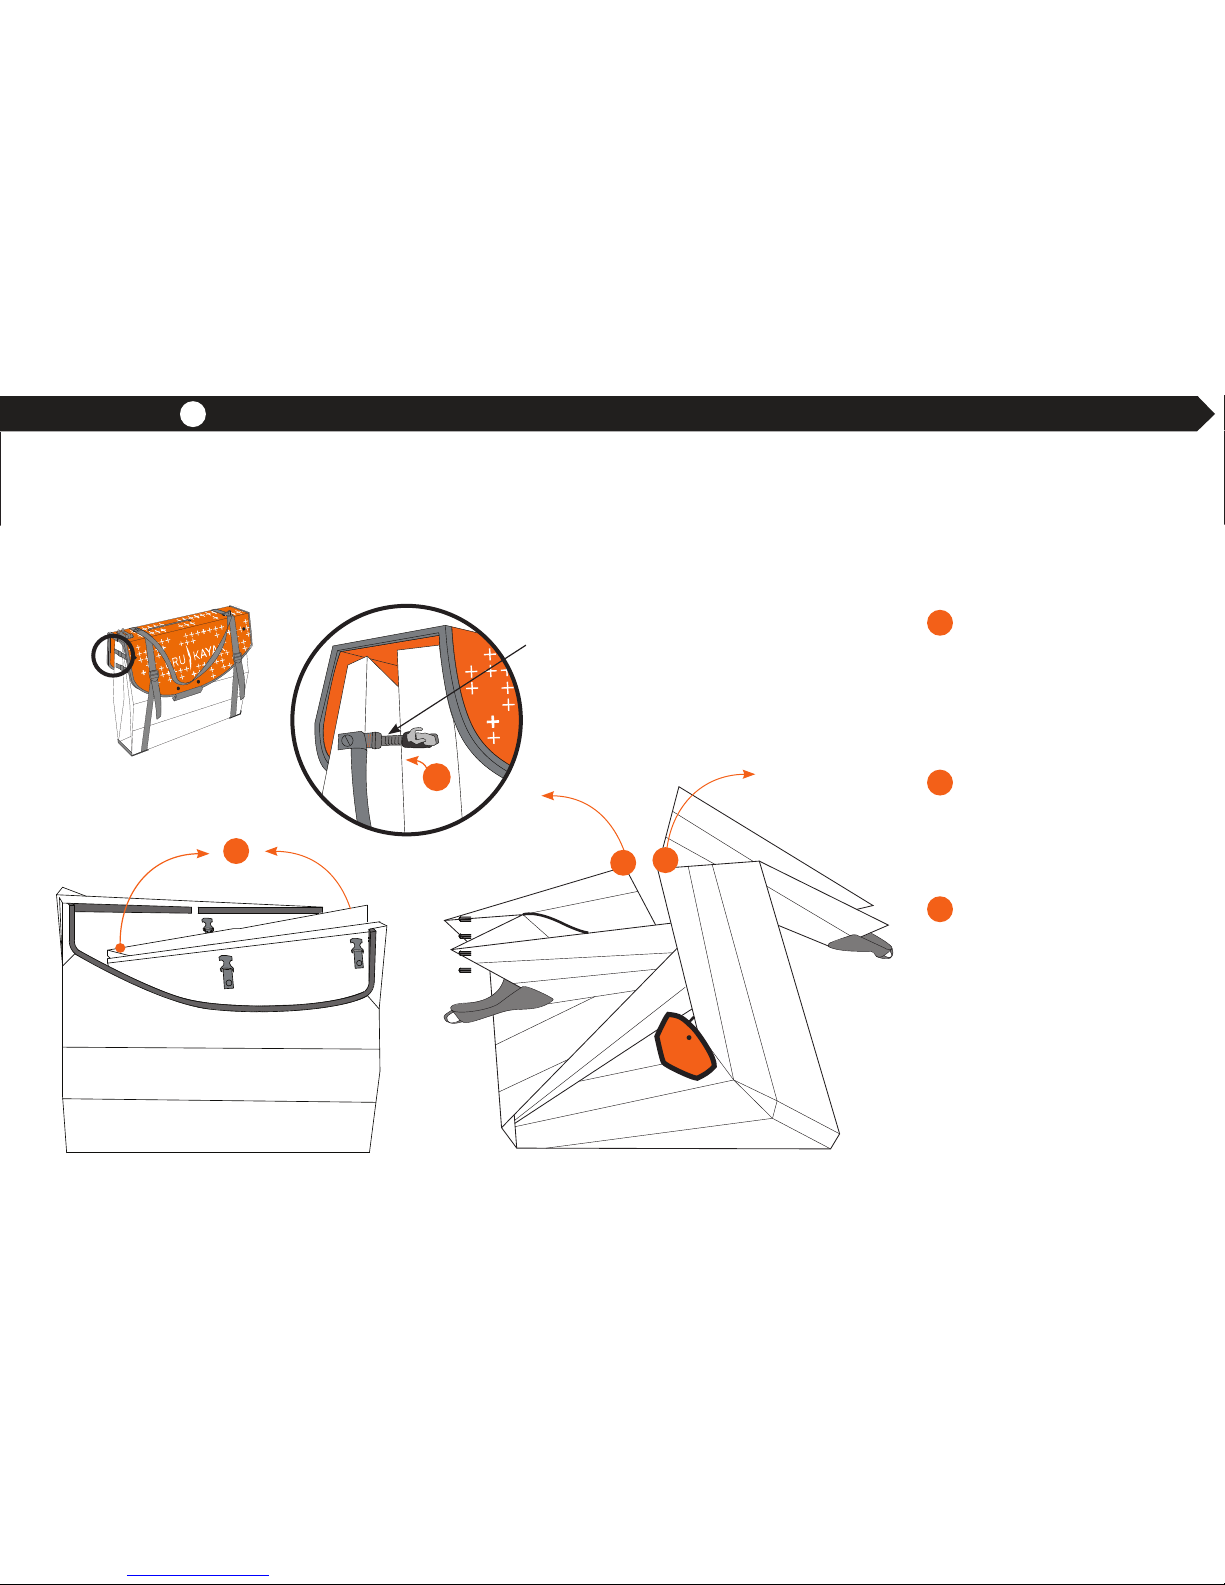
Step 2: Open and unfold the box
Open ratchet buckles
on either side of box, by
squeezing box together
slightly, then lifting up on
Y-shaped lever to release
strap.
Hold the two folds at the
orange stickers. Pull apart
as indicated in the illustration (at left) to open.
Push the ends apart to
extend the box into a long
sheet. Pop the hull flat
with your hands as you
extend it.
A
B
C
B
C
C
NOTE: Removable
orange stickers will
help guide you through
your first assembly.
A
The buckles that close the side of the kayak box become the deck buckles closest to the
cockpit on the kayak. They rotate into two different positions, and have two different straps.
In this step you will open the buckles and release the short strap, then open the box.
short strap
with orange
stitching
3 4 5 6 7 8 9 1032 4 5 6 7 8 91 2

4 ORU KAYAK | ASS EMBLY GUID E
1
2
5
2
3
4
Fairings: These seal the
boat at the bow and stern,
and include handles for
carrying the kayak.
Ratchet buckles: Eight
ratchet buckles close the
deck tightly and easily.
Bow (front) bulkhead:
Like the loose stern
bulkhead, this provides
structural rigidity.
Adjustable footrest:
Keeps your legs in a
comfortable position and
gives you greater control
of the kayak.
Bulkhead hook:
This helps the footrest
pack more neatly when
the kayak folds into
the box.
Coaming: The rim around
the cockpit can hold
a standard spray skirt
(size: medium) if desired.
Deck hatch: For keeping
things close at hand.
Simply turn the hatch
cover to open or
close it.
1
5
6
7
7
2
3
4
6
6
Parts: hull/deck
The box becomes the hull and deck of the kayak. Several key parts are permanently
attached to the hull/deck. The bow (front) and stern (back) of the Oru Kayak are
different, so pay attention to orientation throughout the assembly process.
BOW
(front)
STERN
(back)

WWW.ORUKAYAK.COM 5
Handles: Lock into
coaming and provide
support when entering
or exiting the kayak.
Backrest plate: Holds the
backrest and column (see
Step 9).
Seat pad shock cord:
The seat pad tucks under
the shock cord in the
center of the floorboard
(see Step 10).
Box buckles: Two sets
of buckles hold the box
closed, but are not used
when in kayak form.
Backrest
plate
Right cockpit
handle
Left cockpit
handle
Seat pad
shock cord
Box
Buckles
1
1
1
2
3
4
3
4
2
Parts: floorboard
The box lid becomes the floorboard. The floorboard is a crucial part
of the Oru Kayak assembly: it locks into the cockpit at the coaming,
adding structure, and holds the seat pad and backrest.
STERN
NOTE:
If you like, you
can buckle these
together to keep
them out of the way
before assembling
the kayak.

seam
channel
seam
channel
B
BOW
STERN
A
Fit one loose seam
channel tightly end-to-end
with the permanentlyattached seam channel at
the bow. There should be
no gap between the two
seam channels. (See close
up.) Repeat at the stern.
B
B
loose
seam
channel
no
space
permanently
attached seam
channel
6 ORU KAYAK | ASS EMBLY GUID E
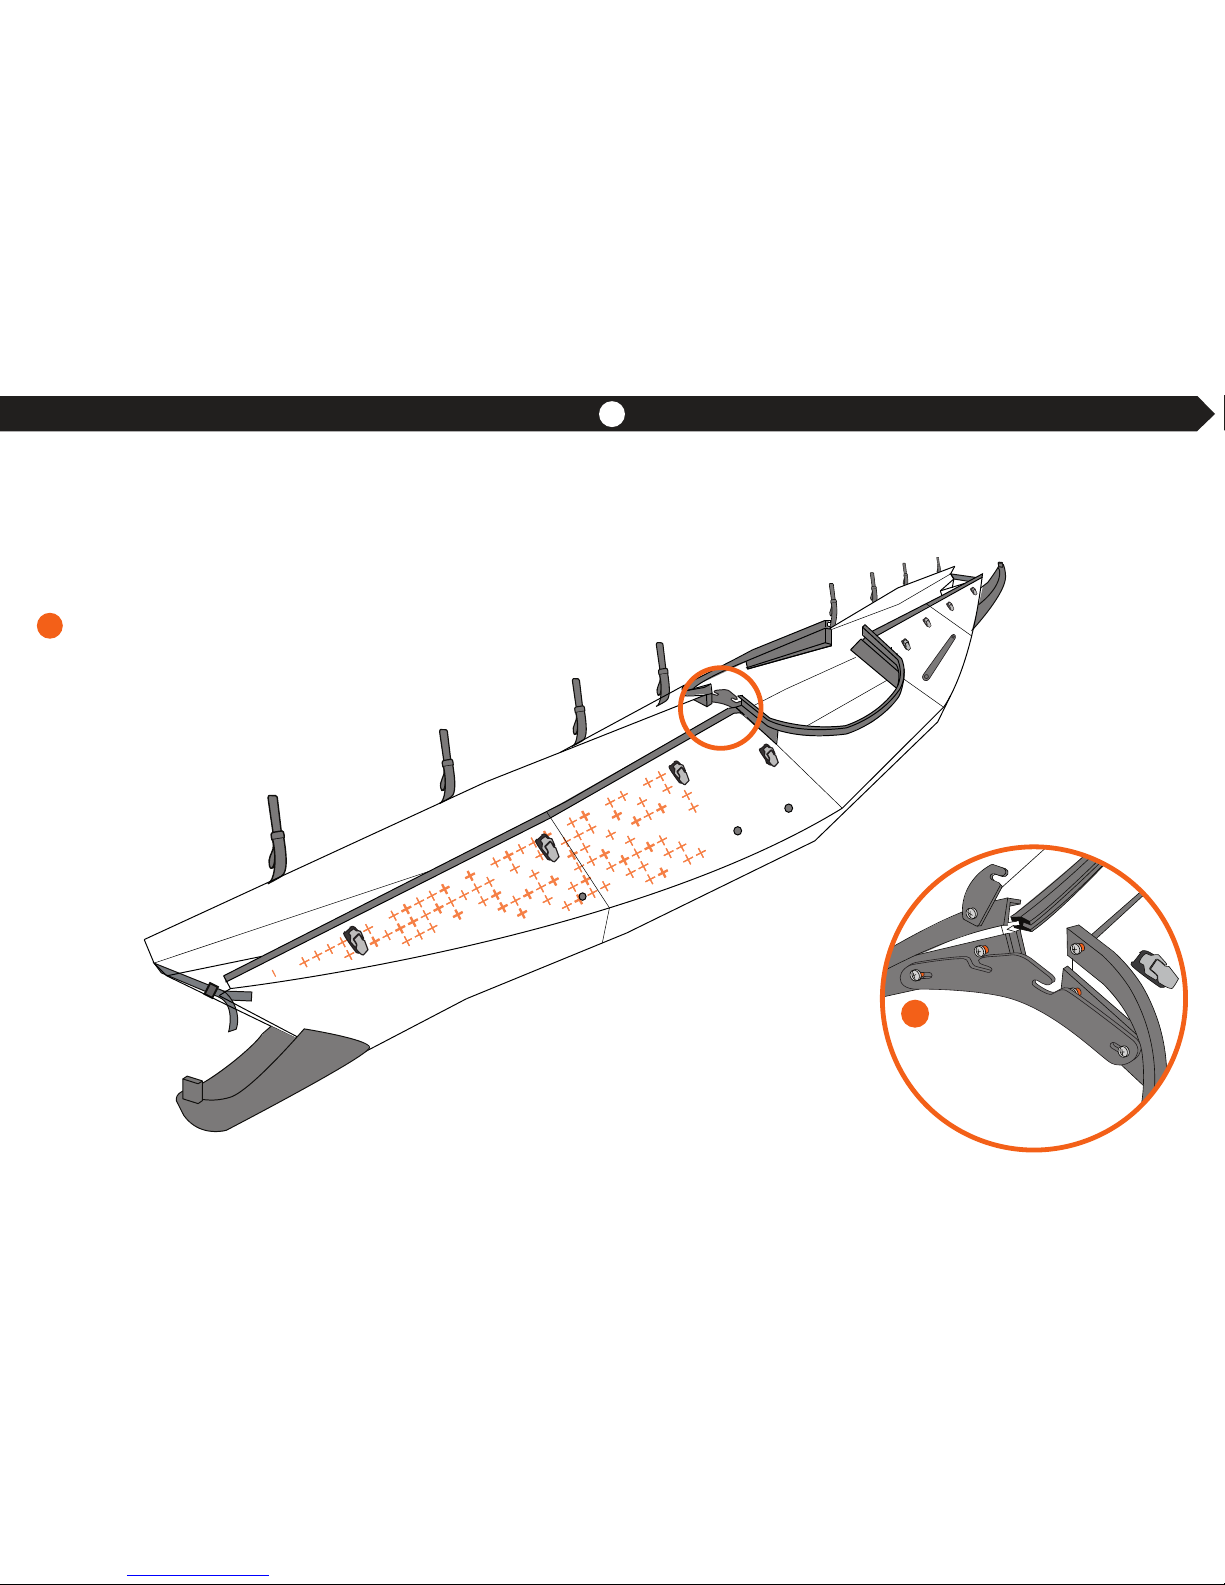
Step 3: Unhook bulkhead & attach seam channels
Unhook snaphook
from D-ring.
(Later, when folding the
kayak back into its box,
you will re-hook.)
The bulkhead hook keeps the front bulkhead and footrest out of the way while folding the kayak into box form. Four seam channels
seal the deck (top) of the kayak. Two are permanently attached to one side of the deck, and you’ll attach the other two.
A
unhook
3 4 5 6 7 8 9 1032 4 5 6 7 8 91
3

WWW.ORUKAYAK.COM 7
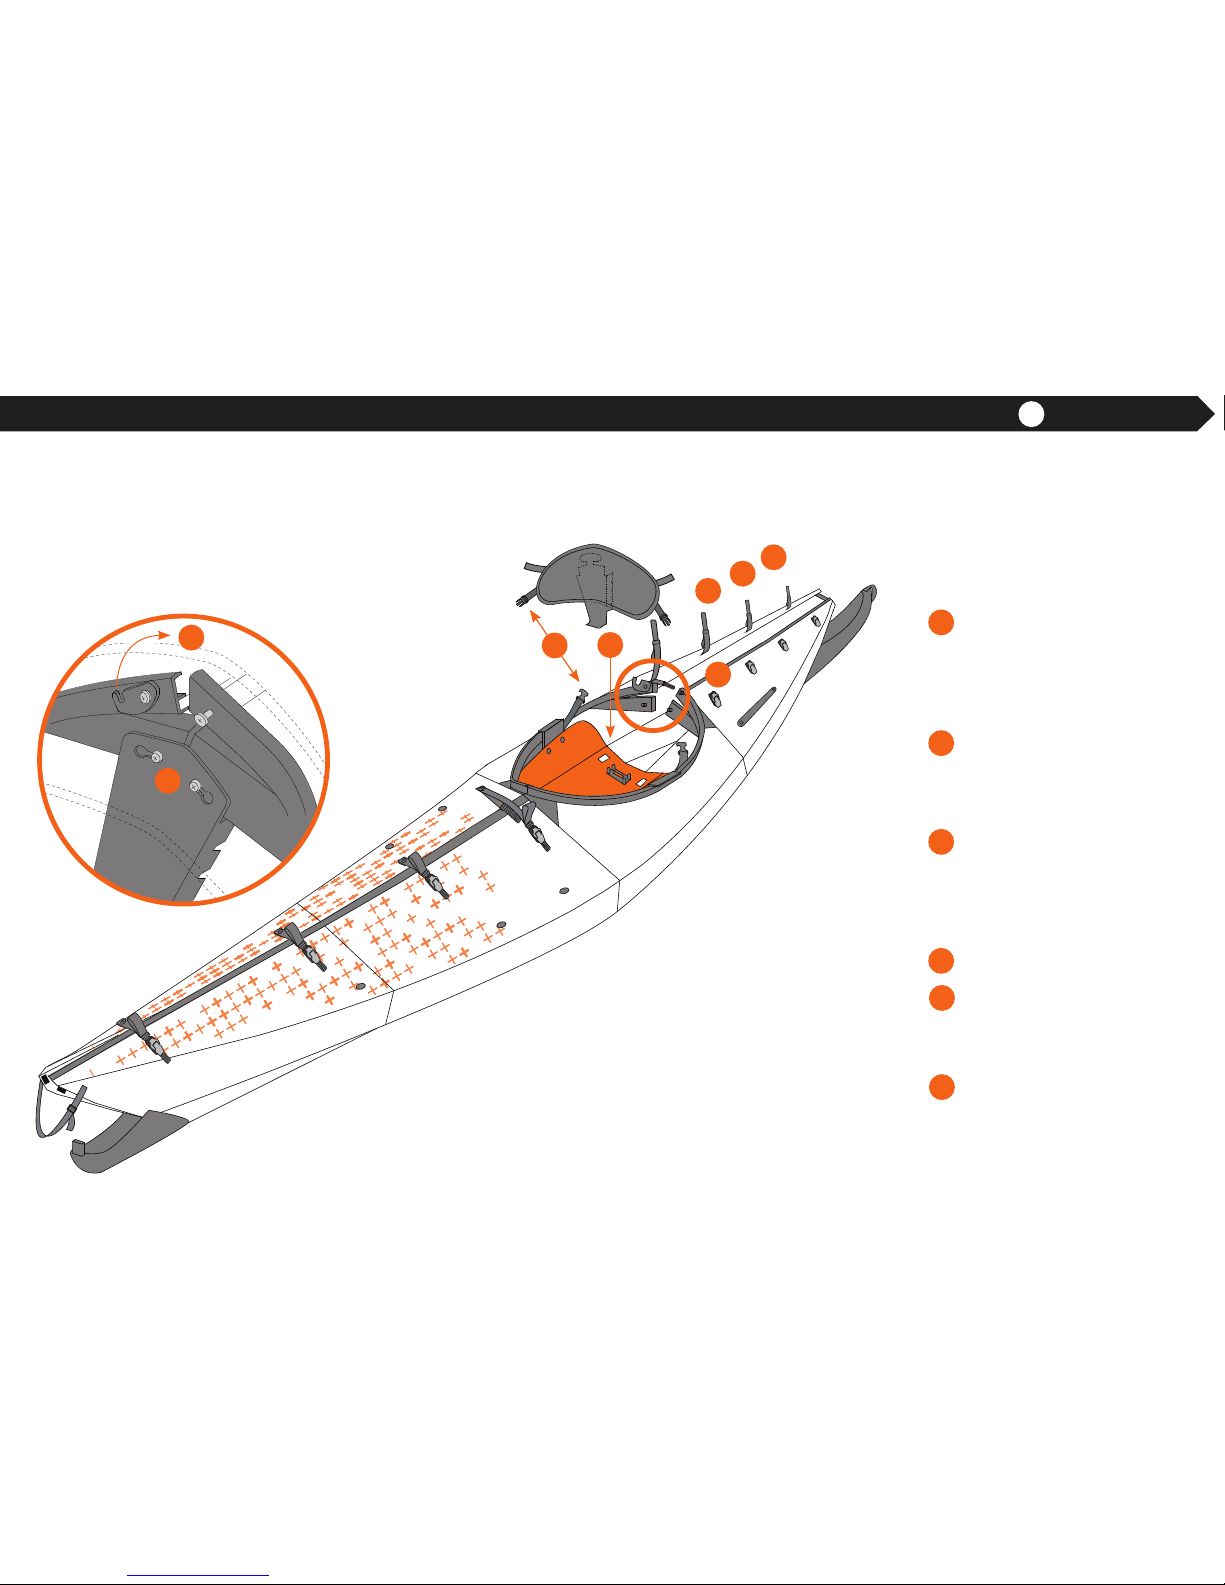
Step 4: Insert bulkheads
Bow and stern bulkheads provide the Oru Kayak with structural rigidity. They do
not provide flotation. For extra buoyancy, place Oru Float Bags (not included, but
available from Oru Kayak) between the bulkheads and the bow and stern.
Insert the bow bulkhead
(attached by a shock cord)
into the two black
U-channels affixed to
the hull at the bow.
Insert the stern bulkhead
into the two black
U-channels affixed to the
hull at the stern.
A
B
B
B
A
A
STERN
BOW
3 4 5 6 7 8 9 1032 4 5 6 7 8 91 4
Step 5: Close the front coaming rib
Rotate the front cockpit
rib to slide the keyhole
over the farthest shiny
screw.
Don’t worry about the
other screws yet.
A
This step puts the kayak into its basic shape.
A
front
cockpit
rib
STERN
BOW
8 ORU KAYAK | ASS EMBLY GUID E
NEED HELP WITH THIS STEP?
GO TO WWW.ORUKAYAK.COM/TIPS-AND-TRICKS
CLOSE UP
Slide the
keyhole over
farthest shiny
screw.
3 4 5 6 7 8 9 1032 4 5 6 7 8 91
5

WWW.ORUKAYAK.COM 9
Step 6: Insert the floorboard
The floorboard adds structure to the cockpit area. The handles rotate and
clip onto the coaming (cockpit rim) to hold the floorboard in place.
Fold the floorboard into a
U-shape, and insert it into
the cockpit.
Flex the middle of the
floorboard upward, forming a W-shape. Place the
edge of one handle into
the recessed groove in the
coaming, over the strap.
While pushing the middle
of the floorboard down,
rotate the handle to lock it
into place; the handle will
snap in when fully rotated.
Repeat with the other
handle. See close up.
A
B
C
A
STERN
Now rotate the handles
and lock them into
the coaming.
Fold the floorboard
into the hull. Flex the
middle of the
floorboard upward.
B C
NEED HELP WITH THIS STEP?
GO TO WWW.ORUKAYAK.COM/TIPS-AND-TRICKS
CLOSE UP
Handle goes over
coaming latch.
Rotate the cockpit
handle to lock into
the coaming, as
shown.
C
B
3 4 5 6 7 8 9 1032 4 5 6 7 8 91
1
6

CLOSE UP
Make sure the
black trim on the deck
slides entirely into the
seam channels.
deck
deck
trim
seam
channel
D
deck
Step 7: Close the front of the kayak
D
D
D
STERN
BOW
front
cockpit
rib
long strap
with finger
loop
front
coaming
latch
B
A
C
10 ORU KAYAK | ASS EMBLY GUID E
A
Line up the shiny screws
with the slots in the front
cockpit rib.
Insert long strap with
finger loop into the first
ratchet buckle by just a few
clicks. Tighten buckle by
pulling up on lever, sliding
the shiny screws all the
way into the slots in the
front cockpit rib.
Close front coaming latch.
Insert the straps and
tighten the three remaining ratchet buckles on the
front deck, starting at the
cockpit and working
towards the bow.
Make sure that the edges
of both sides of the deck
slide completely into the
seam channel (applied in
step 3). See close up.
Push downward on the
seam channel while
tightening each strap to
make it easier.
B
C
D
3 4 5 6 7 8 9 1032 4 5 6 7 8 91
7
WWW.ORUKAYAK.COM 11
Step 8: Close the back of the kayak
Closing the back of the kayak is similar to closing the
front (steps 7-8). You’ll install the backrest column
which supports the rear cockpit area.
D
B
C
A
E
E
E
CLOSE UP
How to lock the backrest column into the
cockpit and coaming.
This view shows
behind the backrest.
F
STERN
BOW
Slide the backrest column
into the slotted backrest
plate in the floorboard. Tilt
upward to lock the backrest column in place.
Lock the top of the backrest column into the two
shiny screws below the
kayak deck (see close up).
Insert long strap with
finger loop into ratchet
buckle behind backrest
and tighten to close the
deck seam.
Close cockpit latch.
Insert the straps and
tighten remaining ratchet
buckles, as in Step 8.
Clip the buckle on each
side of the backrest into
the straps on the coaming.
B
A
C
D
E
F
NEED HELP WITH THIS STEP?
GO TO WWW.ORUKAYAK.COM/TIPS-AND-TRICKS
3 4 5 6 7 8 9 1032 4 5 6 7 8 91
8
12 ORU KAYAK | ASS EMBLY GUID E
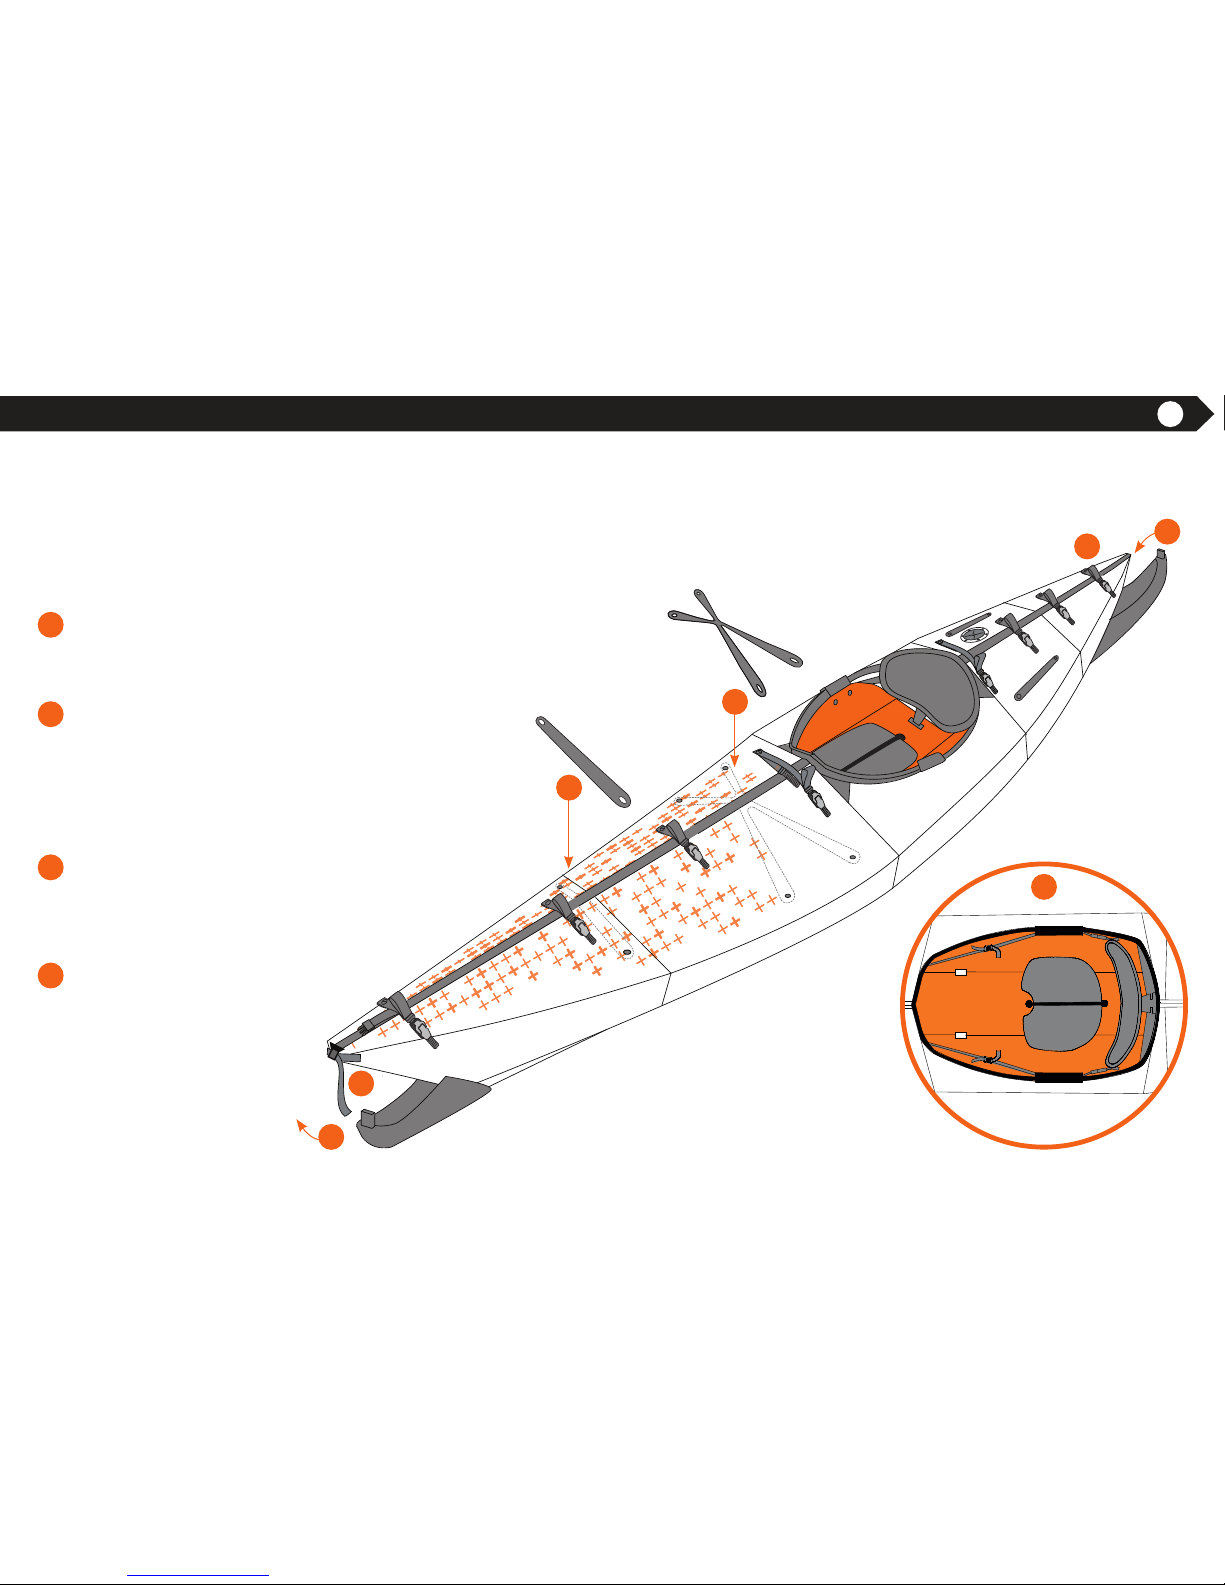
Step 9: Add the finishing touches
Tighten straps at bow and
stern, sealing ends with
the foam blocks.
Stretch the neoprene
fairings over the bow and
stern, and clip the buckles
to the buckle attached to
the first ratchet strap at
each end.
Stretch the two rubber
deck straps across the
two sets of buttons in front
of the cockpit.
Slip the seat pad under
the shock cord on the
floorboard.
A
B
C
D
D
CLOSE UP
The notch of the
seat pad should
face the bow.
A
A
B
C
C
B
STERN
BOW
Just a few more things to get your Oru Kayak ready for the water!
3 4 5 6 7 8 9 1032 4 5 6 7 8 91
9

WWW.ORUKAYAK.COM 13
Storing items in your kayak
Now that your kayak is built, you have two ways to store items you want to
bring with you while paddling.
Stash water bottles, spare
paddles, and other larger
gear under the rubber
deck straps.
Rotate deck hatch cover
left to open.
Stash small items you
want close at hand in the
deck hatch, using a waterproof bag for electronics.
Replace cover and rotate
right to tighten.
A
B
C
D
STERN
BOW
B
D
C
A
UNDER THE RUBBER DECK
STRAPS:
IN THE DECK HATCH:
CLOSE UP
Using the
deck hatch.
NOTE: The deck hatch is waterresistant in normal paddling
conditions, but if submerged, is
not watertight.
PUT ELECTRONICS IN THE
DRY BAG PROVIDED BEFORE
STOWING IN DECK HATCH.

14 ORU KAYAK | ASS EMBLY GUID E
Final adjustments
D
D
B
C
A
C
D
D
THE BACKREST:
THE FOOTREST:
Loosen or tighten the left
and right buckles just
below the kayak deck, in
front of the cockpit handles. The footrest should
keep your legs comfortably bent, with your knees
splayed outward.
E
E
E
ASSEMBLY
CHECKLIST
n Bow and stern straps
are tight and the fairings cover both ends.
n Seam channels
are tight and no
deck trim is visible
underneath.
n All 8 ratchet
buckles are tight.
n Coaming is locked at
front and back of the
cockpit.
n Both cockpit handles
are locked onto the
coaming.
n Deck hatch is tight.
Congratulations! Your
Bay+ is ready for the
water.
STERN
BOW
D
C
Unclip the shock cord
from the strap.
Move the orange cord
up or down the notched
backrest column to a
comfortable height.
Re-clip the shock
cord to the strap.
Adjust seat back by pulling side straps to tighten
and pull seat back
forward, and loosening
straps to release seat
back.
A
B

Disassembling the Oru Kayak is basically
a simple reversal of the assembly.
However, there are a few tricks. Follow these
directions to learn how to pack your
Oru Kayak back into its box quickly and easily.
NOTE: Some water may collect inside the
plastic corrugations. To let it escape, flip the
unfolded kayak upside down to let it drain out,
before moving on to Step 6.
The Oru Kayak box holds all the loose components, and can also fit a paddle, PFD (personal flotation device), and other accessories.
At first, the box may take some effort to close,
but with use, folding it up will become easier.
The shoulder strap makes it easy to carry the
Oru Kayak short distances; for longer trips we
recommend our Oru Pack, available from
Oru Kayak.
Back on land: Folding your Oru Kayak into its box
WWW.ORUKAYAK.COM 15
Unclip the fairings and fully loosen the
end straps at bow and stern (as shown).
IMPORTANT: Remove the two loose
seam channels (applied in Step 3).
Remove the backrest.
Remove rubber deck straps, and open
all eight ratchet buckles by lifting up on
Y-shaped lever and pulling finger loop.
1
2
43

The big fold is an almost magical
transformation, from boat back to box.
Once you’ve removed all the detachable
parts, note the black and orange arrows and
targets on the hull. You’ll use these to guide
the next step, in which you will fold the bow
and stern of the Oru Kayak inward—like an
accordion.
The big fold
16 ORU KAYAK | ASS EMBLY GUID E
DIAGONAL
CREASE
ORANGE
ARROW
BLACK
ARROW
ORANGE
TARGET
BLACK
TARGET
DIAGONAL
CREASE

Fold one end inward as shown,
compressing it like an accordion
(you can start with the bow or stern).
7
Hook the bulkhead keeper to the
D-ring, as it was when you received
your kayak.
6
Repeat with the other end.
8
Fold the two accordioned ends towards
the middle, to slide past each other.
Push the orange arrow towards the
orange target, and the black arrow
towards the black target.
9
Continue pushing, in a twisting motion,
until the arrows hit their targets!
10
WWW.ORUKAYAK.COM 17
Unlatch the front and back of the cockpit,
and remove the floorboard. You’ve now
removed all the loose components.
5
NEED HELP WITH THIS STEP?
GO TO WWW.ORUKAYAK.COM/TIPS-AND-TRICKS

CARING FOR YOUR ORU KAYAK
• Inspect your kayak before each use
to make sure it is not damaged,
and that all fasteners are tight.
• Rinse off your kayak with clean,
fresh water after each use,
focusing on the ratchet buckles,
especially after paddling in salt
water.
• Make sure water does not collect
inside the kayak box after use.
• Some water may collect inside
the plastic corrugations. To let it
escape, flip the unfolded kayak
upside down to let it drain out.
• For additional cleaning, use
general-purpose cleaning spray
with a non-abrasive rag or sponge.
• In case of serious damage or
punctures, email us at
service@orukayak.com.
0815 © 2015 ORU KAYAK, INC. ALL RIGHTS RESERVED
Kneel on the folded box to compress it.
Using the short ratchet straps with the
orange stitching, clip and tighten the
two sets of buckles on either side.
Stash loose components in the box,
along with any extra gear. Place the
floorboard over the top of the box.
Place and tighten the shoulder strap
loops over the box as shown .
All packed up and ready to go!
11 12
Folding the Oru Kayak back into the box
STASH
LOOSE
COMPONENTS
HERE
13
14
 Loading...