

Ortopedia Varius Operating Manual
1
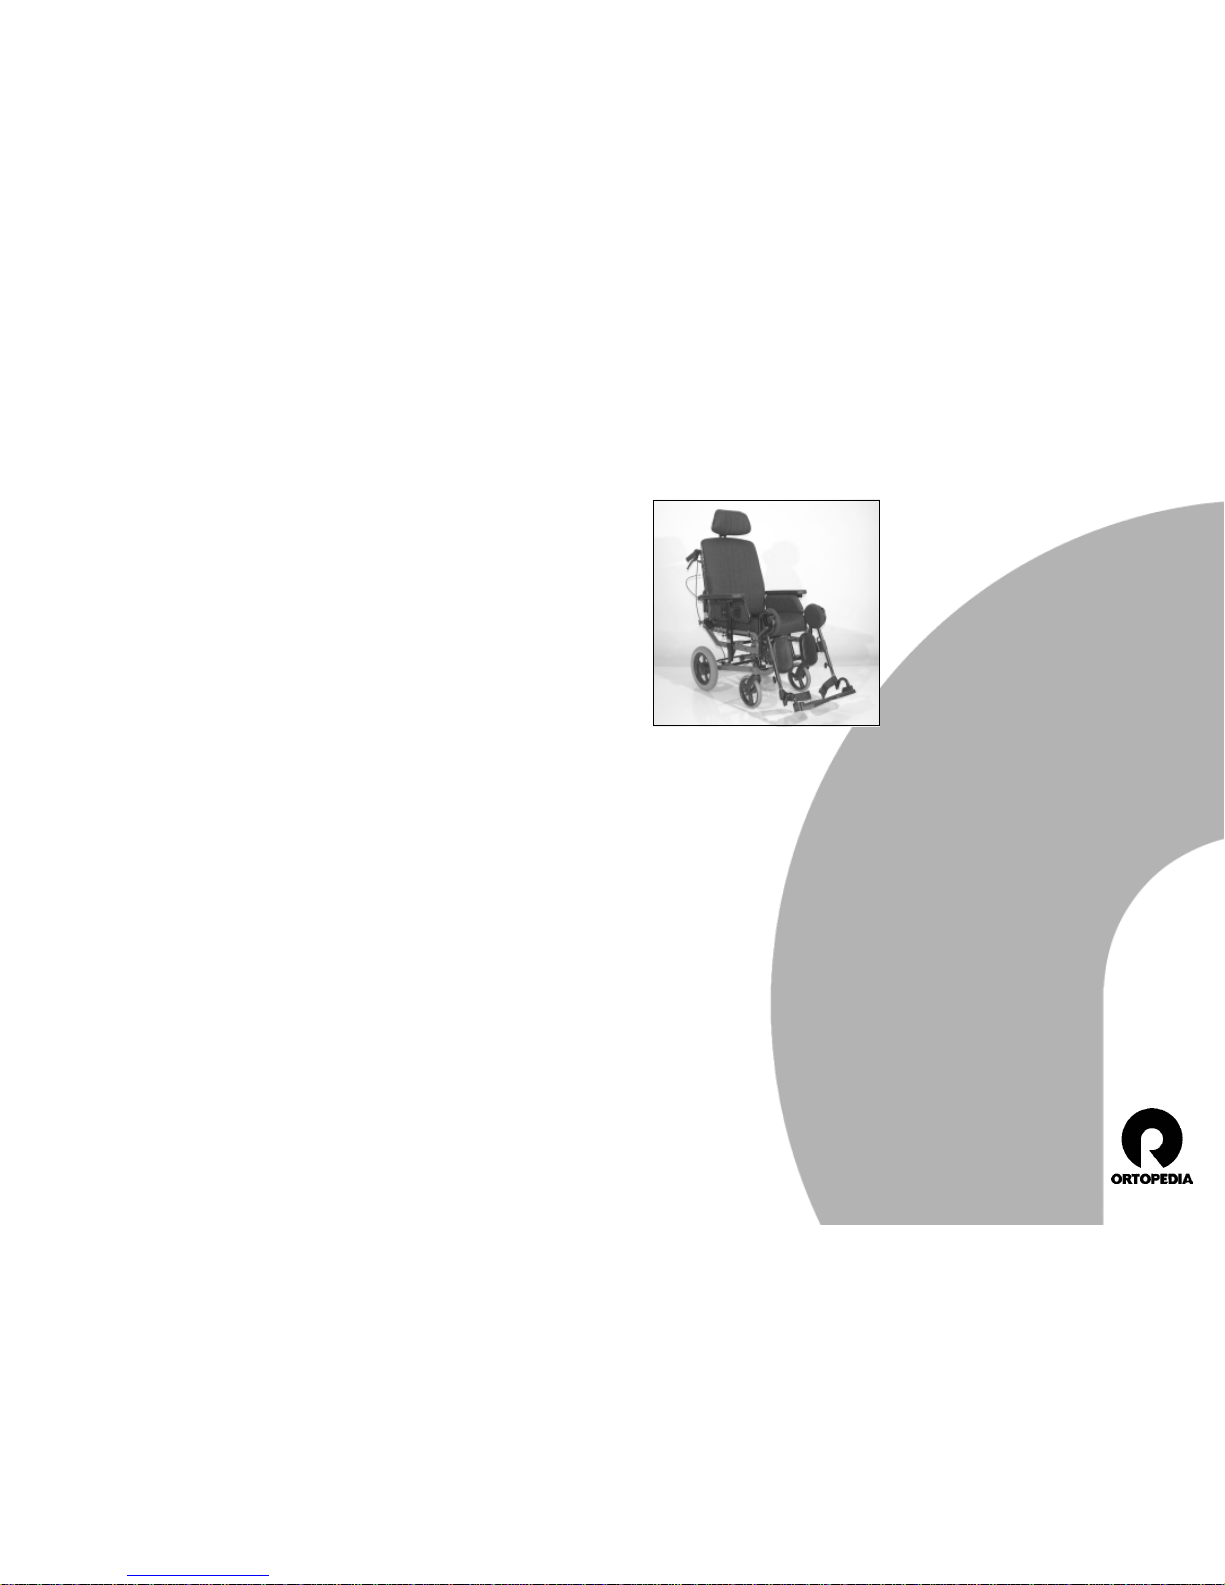
Therapy wheelchair
Varius
S T A Y M O B I L E
Operating Manual

32
Table of contents
1. Foreword........................................................................................................................ 4
2. Handling the wheelchair .............................................................................................. 4
2.1 Use ..................................................................................................................................... 4
2.2 Performance ....................................................................................................................... 5
2.3 Additional user/safety information ..................................................................................... 5
2.4 Stowage or transport ......................................................................................................... 6
2.4.1 Stowing the wheelchair ......................................................................................... 6
2.4.2 Assembly of the wheelchair ................................................................................... 6
2.5 Transport ............................................................................................................................ 7
3. Overview ........................................................................................................................ 7
3.1 Therapy wheelchair Varius ................................................................................................. 8
4. Components ................................................................................................................... 9
4.1 Armrests ............................................................................................................................. 9
4.1.1 Adjustment of the seat width ................................................................................ 9
4.1.2 Detaching the armrest ........................................................................................... 9
4.1.3 Armrest height adjustment .................................................................................. 10
4.1.4 Depth adjustable side element ........................................................................... 10
4.1.5 Positioning the side element ............................................................................... 11
4.2 Legrests ............................................................................................................................ 12
4.2.1 Folding up the foot plates .................................................................................... 12
4.2.2 Swivelling leg supports aside .............................................................................. 12
4.2.3 Removal of leg supports ...................................................................................... 13
4.2.4 Attachment of leg supports ................................................................................. 13
4.2.5 Angle adjustable legrest ..................................................................................... 14
4.2.6 Adjustment of foot plate angle ............................................................................ 14
4.2.7 Height adjustment of the footplates .................................................................... 15
4.2.8 Height adjustment of the calf plates ................................................................... 15
4.2.9 Depth adjustment of the calf plates .................................................................... 15
4.3 Back cushion ..................................................................................................................... 16
4.3.1 Ortoform-back cushion ........................................................................................ 16
4.3.1.1 Removing the Ortoform-back cushion ................................................ 16
4.3.1.2 Mounting the Ortoform-back cushion ................................................ 16
4.3.2 ERGOpor-backrest element ................................................................................. 17
4.3.2.1 Removing the ERGOpor-backrest element ......................................... 17
4.3.2.2 Attaching the ERGOpor-backrest element ......................................... 17
4.3.2.3 ERGOpor backrest cushion .................................................................. 17
4.4 Seat cushion ..................................................................................................................... 18
4.4.1 Ortoform seat cushion .......................................................................................... 18
4.4.1.1 Removing the Ortoform seat cushion ................................................. 18
4.4.1.2 Placing the Ortoform seat cushion ...................................................... 18

54
2. Handling the
wheelchair
2.1 Use
The
THERAPY WHEELCHAIR VARIUS
is designed for at home or geriatric provisioning.
Besides the upholstered seat and an
angle adjustable, upholstered backrest
the
VARIUS
possesses a seat depth adjustment as well as infinitely cant adjustment from -4° (as an aid for rising) to
20° seat inclination.
The
VARIUS
is designed for the daily use
indoors and outdoors.
Before the first use the
THERAPY WHEEL-
CHAIR
should be adapted to you by your
authorised specialist dealer. The driving
experience and physical boundaries of
the user as well as the main field of operations of the
THERAPY WHEELCHAIR
will
be considered during this adaptation.
!
Attention:
Always have adaptation and adjustment work carried out by an authorised specialist dealer.
1. Foreword
We thank you for the trust that you
placed in our company by choosing a
THERAPY WHEELCHAIR VARIUS
.
The
THERAPY WHEELCHAIR VARIUS
supplies the respectively required adaptations
to your disability with all its equipment
variations and their accessories.
A
THERAPY WHEELCHAIR
is a technical aid,
like any other vehicle. It requires explanation, a little care and holds dangers when
used improperly. The correct handling
must therefore be learned.
This users manual combined with the brochure
safety information for mechanical
wheelchairs
should help you get accus-
tomed to the handling of the
THERAPY
WHEELCHAIR
and prevent accidents.
If need be this users manual as well as the
brochure
safety information for mechani-
cal wheelchairs
are to be read together
with a supervisor or assistant be making
the first drive.
☞ Remark:
Please note that the illustrated equipment variants can deviate from your
model.
4.4.2 ERGOpor seat element ........................................................................................ 19
4.4.2.1 Detaching the ERGOpor seat element ............................................... 19
4.4.2.2 Attaching the ERGOpor seat element ................................................ 19
4.4.2.3 ERGOpor-seat cushion ........................................................................ 19
4.5 Seat inclination ................................................................................................................ 20
4.5.1 Adjustment of the seat inclination ....................................................................... 20
4.6 Seat depth ....................................................................................................................... 21
4.6.1 Adjustment of the seat depth .............................................................................. 21
4.7 Angle adjustable backrest (gas spring adjustment) ........................................................ 21
4.8 Height-adjustable sliding handles ................................................................................... 22
4.9 Headrest........................................................................................................................... 22
4.10 Brake ................................................................................................................................23
4.10.1 Safety information ................................................................................................ 23
4.10.2 Adjustment of the drum brakes ........................................................................... 23
4.10.3 Disengaging the drum brake .............................................................................. 24
4.11 Swivel wheels................................................................................................................... 24
4.11.1 Tyre equipment ................................................................................................... 24
4.12 Anti-tip castors ................................................................................................................. 24
5. Optional accessories ................................................................................................... 25
5.1 Lateral supports................................................................................................................ 25
5.1.3 Swivelling the lateral support to the rear ........................................................... 25
5.2 Splay wedge .................................................................................................................... 26
5.2.1 Setting the depth ................................................................................................ 26
5.2.2 Setting the height ................................................................................................ 26
5.3 Therapy table................................................................................................................... 27
5.3.1 Assembly of the therapy table ............................................................................. 27
5.4 Lap belt ............................................................................................................................ 28
5.4.1 Putting on the lap seatbelt with catch ................................................................ 29
5.4.2 Putting on the lap seatbelt with Velcro fastener ................................................. 29
5.4.3 Setting belt length .............................................................................................. 29
6. Care and maintenance ................................................................................................ 30
6.1 Cleaning ........................................................................................................................... 30
6.2 Maintenance .................................................................................................................... 31
6.2.1 Tools ..................................................................................................................... 31
6.2.2 Maintenance instructions ..................................................................................... 32
6.3 Repair ............................................................................................................................... 33
6.4 Customer service .............................................................................................................. 33
6.5 Spare parts ....................................................................................................................... 33
6.6 Disposal ............................................................................................................................ 33
7. Technical data ............................................................................................................. 34
8. Guarantee .................................................................................................................... 35
76
1
2.4 Stowage or trans-
port
2.4.1 Stowing the wheelchair
To stow the
THERAPY WHEELCHAIR
(fig.
1) remove the armrests, legrests, seat
and back.
To fold down the backrest press the button at the side (fig. 2/ ➀) then pull the
ball plug outward (fig. 3).
The backrest is now unlocked and can
be folded forward.
2.4.2 Assembly of the wheelchair
To assemble the
THERAPY WHEELCHAIR
remount the armrests, legrests, seat and
back in reverse order.
☞ Remark:
Regarding this observe section 4.3
and 4.4.
2
3
1
2.2 Performance
Optimising the driving features of the
VARIUS
to the personal facts is to be done
in coordination with your authorised specialist dealer or therapist.
The adaptability supplies very good driving comfort as well as a high operational security.
2.3 Additional user/
safety information
▲ A clean, passive illumination is re-
quired for the driving on public highways/pavements!
▲ Do not throw or drop parts belong-
ing to the wheelchair! – Removable
parts, e.g. armrests and legrests,
must be correctly handled in order
maintain their function.
▲ Removable parts, e.g. armrests and
legrests, must be checked for correct
locking before the start of each drive.
▲ Never leave children/adolescents in
wheelchairs unsupervised.
▲ For smaller obstacles, e.g. small ledg-
es/slopes, always move slowly and at
a right angle (90°) to the obstacle,
until the swivel wheels are almost
touching the obstacle. Briefly stop the
wheelchair and then drive over the
obstacle.
▲ A direct change of movement to the
opposite direction, e.g. from reverse
to forward movement without involving a steering action, causes full braking if the swivel wheels are moving
inwards at the same time.
▲ The use of a safety belt prevents the
user from falling out of the wheelchair.
▲ Observe the brochure
safety informa-
tion for mechanical wheelchairs
.
98
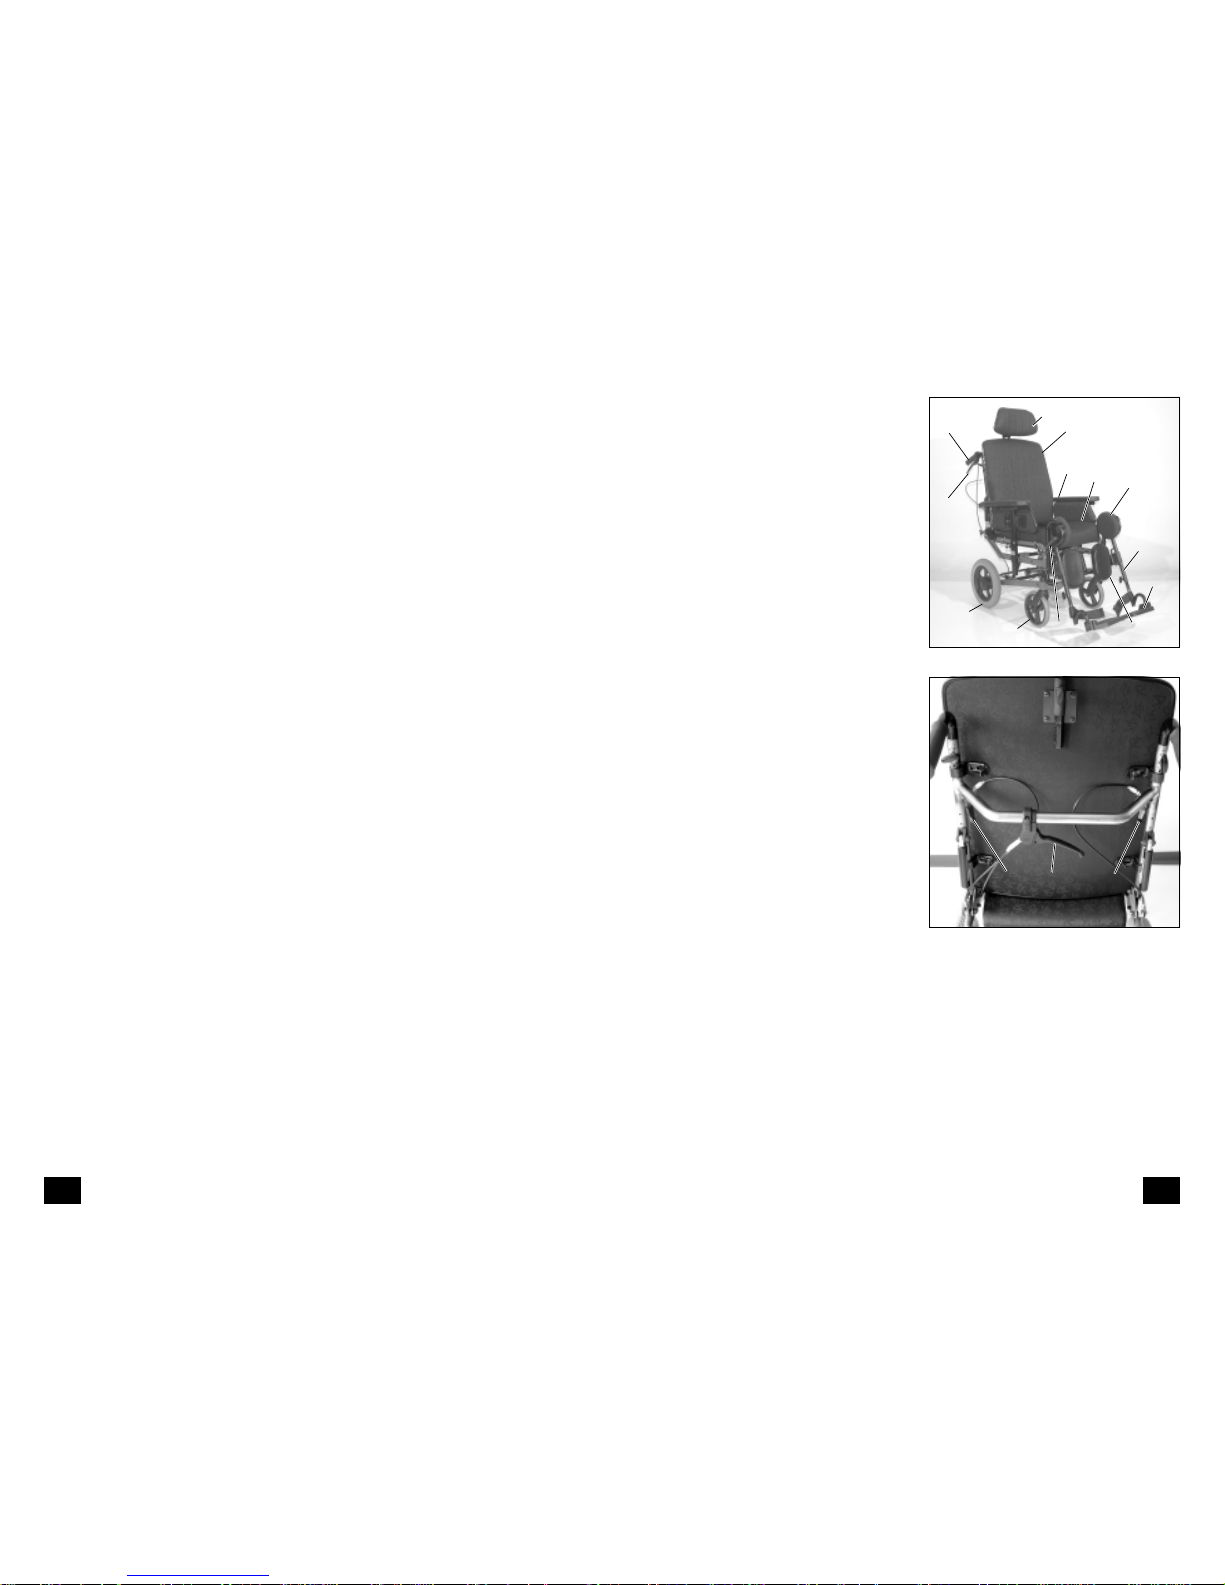
4
3.1 Therapy wheelchair
VARIUS
Figure 4 and 5 show the main aspects
of the
VARIUS
.
1 Sliding handle
2 Backrest
3 Armrest
4 Seat
5 Lever for height-adjustment of the
legrest
6 Legrest
7 Footrest
8 Swivel wheel
9 Rear wheel
10 Headrest
11 Calf pad
12 Lever for inclination adjustment of
the backrest
13 Lever for inclination adjustment of
the seat
14 Brake lever
15 Knee cushion
1
2
3
4
5
6
7
8
9
10
11
14
15
5
12
13
12
2.5 Transport
For storage or transportation purposes,
the
VARIUS
can be dismantled into port-
able elements without the need for tools.
☞ Remark:
Regarding this observe chapter 2.4.
During reassembly, ensure that each
part is correctly installed and securely
fastened. Check that components are
correctly positioned. Check the correct
seating of the components.
3. Overview
The overview shows the most important
components and operating elements of
the
VARIUS.
The components shown in the following illustrations may not be identical to
those on your wheelchair. Nevertheless
the position and handling of the parts
to be operated are transferable to your
wheelchair model. Each time the wheelchair is assembled, or each time a setting is made, checks should be carried
out to ensure that the component in
question is fitted correctly and functioning properly.

1110
8
4.1.3 Armrest height adjustment
For the height adjustment of the armrest first loosen the clamping screw (fig.
8/
➀) of the height stopper.
Then slacken the clamping screw (fig.
8/
➁).
!
Attention:
Hold the armrest with one hand in
order to stop it falling. – Danger of
crushing!
Slide the armrest to the desired height
and tighten the clamping screw (fig. 8/
➁). Afterward push the height topper
down and tighten the clamping screw
fig. 8/1.
!
Attention:
The maximum armrest height has
been reached when the marking on
the square tube is visible.
The stopper serves to find the adjusted
height position again when the armrest
is removed.
4.1.4 Depth adjustable side ele-
ment
The side element can be adjusted in
depth. Regarding this, loosen the four
screws (fig. 8/ ➂) and adjust the side
element to the desired depth, then
tighten the four screws (fig. 8/ ➂) again.
3
2
1
3
6
4. Components
4.1 Armrests
!
Attention:
Do not use wheelchair without armrests guards fitted.
Do not use the armrests to lift or carry the wheelchair.
4.1.1 Adjustment of the seat
width
The seat width can be adjusted by a lateral displacement of the armrests. After
loosening the clamping screws (fig. 6 /
➀) on both sides adjust the armrests on
both sides by the same length.
!
Attention:
The maximum seat width has been
reached when a marking is visible
on the square tube.
The retrofit may only be carried out
by an authorised dealer!
4.1.2 Detaching the armrest
Slacken the clamping screw (fig. 7/
➁)
and pull off the armrest upwards.
7
1
2
1312
4.2 Legrests
!
Attention:
Do not use the leg supports to lift or
carry the wheelchair.
4.2.1 Folding up the foot plates
Prior to getting into or out of the chair
or to scuttle (forward movement of the
THERAPY WHEELCHAIR
with the feet), the
footplates are to be folded up and the
calf plates outward (fig. 10).
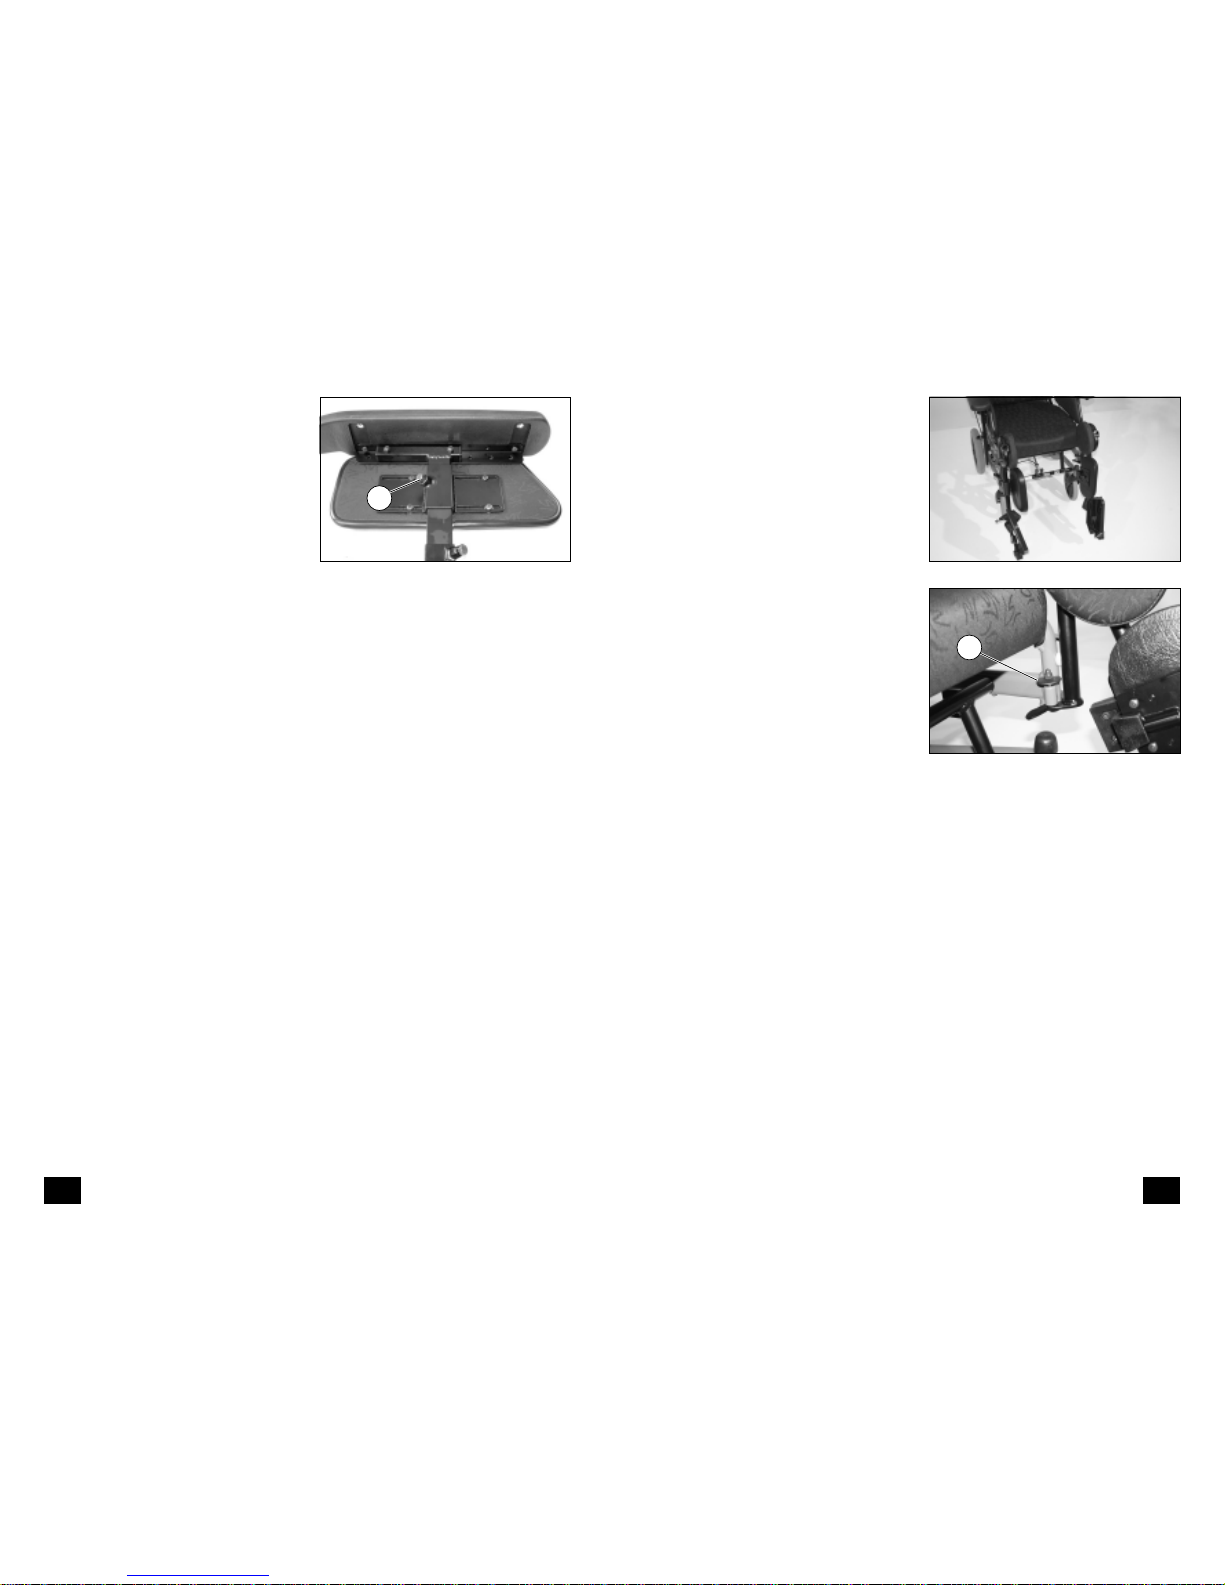
4.2.2 Swivelling leg supports
aside
Regarding this pull up the respective
locking lever (fig. 11/
➀) and swivel the
respective legrest outward.
!
Attention:
Swivelled-away leg stump supports
are automatically unlocked and can
easily fall off. Note this when handling (e.g. transport).
Do not forget to check the correct
functioning of the respective locking
device (fig. 11/
➀) after having swiv-
elled in the leg supports again.
10
1
11
9
4
4.1.5 Positioning the side element
Loosen the clamping screw (fig. 9/
➃)
and position the side element accordingly in height. Retighten clamping
screw (fig. 9/
➃).
 Loading...