

Page 1
Cone Fire/Ramp-Hold Version
Sentry Xpress
Digital Temperature Controller
°F
°C
Hr./Min.
when lit
SENTRY
MICRO PROCESSOR
Temperature Display
Tempera
ture display is in °F.
Temperature display is in °C.
See page 7 for instructions on
selecting °F and °C.
°C Display Dot
START/
STOP
HIGHER
LOWER
Xpress
The Sentry Xpress 2.0 micro processor is manufactured by the
Orton Ceramic Foundation and displays the CE mark.
TM
-
Time Display
hours from minutes. Example:
Display shown above is 1 hour
and 2 minutes.
Program
Review
Run
When Off
°F
°C
When Lit
: Separates
Indicator
Lights
On during
programming.
On during
program review.
Blinks dur
ing firing.
-
START/STOP Key
Starts and stops a
firing.
Press after
each programming step. It
works like the Enter key on a
computer.
Up Arrow Key
From press START.
Press Up Arrow to select
Cone-Fire or Ramp-Hold.
during
a Ramp-Hold firing, skips to
the next segment. After
pressing Up Arrow,
will appear. To skip, press Up
Arrow again.
Down Arrow Key
from or during fir
ing, press Down Arrow.
The program you have se
lected will appear one
step at a time.
from press Down
Arrow.
-
-
1
Page 2

Contents
Safety
General Guidelines . . . . . . . . . . . . . . . . . 3
Time and Temperature Display . . . . . . . . . . . . . . . . . . .3
Operation Begins from the IdLE Display. . . . . . . . . . . . 3
Thermocouple Inspection . . . . . . . . . . . . . . . . . . . . . . .3
A Rapid Way to Scroll Numbers . . . . . . . . . . . . . . . . . . 3
Program Review & Repeat Firing . . . . . . . . . . . . . . . . . 3
Delay . . . . . . . . . . . . . . . . . . . . . . . . . . . . . . . . . . . . . . . 3
Power Failures . . . . . . . . . . . . . . . . . . . . . . . . . . . . . . . .4
CPLT Message: Firing Completed . . . . . . . . . . . . . . . . 4
Thunder Storms and Power Surges . . . . . . . . . . . . . . . 4
Two Firing Modes: Cone-Fire and Ramp-Hold . . . . . . . 4
Cone-Fire Mode . . . . . . . . . . . . . . . . . . . . 4
Pyrometric Witness Cones . . . . . . . . . . . . . . . . . . . . . . 4
How to Correct for Under- or Over-Fired Cones. . . . . . 5
Cone-Fire Hold. . . . . . . . . . . . . . . . . . . . . . . . . . . . . . . . 5
When the Kiln Shuts Off Too Soon . . . . . . . . . . . . . . . . 5
How to Customize Cone-Fire. . . . . . . . . . . . . . . . . . . . . 5
Cone-Fire Firing Instructions . . . . . . . . . . . . . . . . . . . . .6
Ramp-Hold Mode. . . . . . . . . . . . . . . . . . . 6
Theory of Operation. . . . . . . . . . . . . . . . . . . . . . . . . . . . 6
Rate . . . . . . . . . . . . . . . . . . . . . . . . . . . . . . . . . . . . . . . .7
Hold . . . . . . . . . . . . . . . . . . . . . . . . . . . . . . . . . . . . . . . .7
Temperature Over-Shoot. . . . . . . . . . . . . . . . . . . . . . . . 7
Repeat Firings . . . . . . . . . . . . . . . . . . . . . . . . . . . . . . . .7
Programming a Cooling Segment. . . . . . . . . . . . . . . . . 7
A Ramp-Hold Practice Program . . . . . . . . . . . . . . . . . . 7
Skipping a Segment in a Ramp-Hold Program . . . . . . 8
Ramp-Hold Programming Instructions. . . . . . . . . . . . . 8
Lost Wax Burnout . . . . . . . . . . . . . . . . . . 9
Error Messages . . . . . . . . . . . . . . . . . . . 10
BAdP / Bad Programming . . . . . . . . . . . . . . . . . . . . . .10
EtH / Electronics Too Hot . . . . . . . . . . . . . . . . . . . . . . 10
FaIL / Thermocouple Failure . . . . . . . . . . . . . . . . . . . . 10
TCR / Thermocouple Reversed . . . . . . . . . . . . . . . . . . 10
FtL / Fired Too Long . . . . . . . . . . . . . . . . . . . . . . . . . . 10
PF 1 / Power Failure. . . . . . . . . . . . . . . . . . . . . . . . . . . 10
PF 2 / Power Failure. . . . . . . . . . . . . . . . . . . . . . . . . . . 10
tC / Thermocouple Failure. . . . . . . . . . . . . . . . . . . . . . 10
The warranty on your Sentry Xpress
controller does not cover damage from
overfiring, regardless of the
circumstances. It is the operator’s
responsibility to make sure the kiln turns
off at the proper time.
When the kiln is not in use, disconnect the
power.
Do not leave the kiln unattended, especially
near the expected shut-off time.
Wear firing safety glasses when looking into the
firing chamber of a hot kiln.
Do not touch hot sides of kiln. Keep unsuper
vised children away.
Install your kiln at least 12 inches from any wall
or combustible surface.
Do not openlidor door until kilnhas cooled and
all switches are off.
Fire only in a well-ventilated, covered and protected area away from combustible materials.
Keep cordset away from hot sides of kiln or furnace.
DANGEROUS VOLTAGE! Donottouch heating elements with anything. Disconnect before
servicing.
-
Selecting °F or °C Display . . . . . . . . . . . 10
Display Messages . . . . . . . . . . . . . . . . . 11
Trouble Shooter. . . . . . . . . . . . . . . . . . . 11
Problem: Controller display is blank. No heat in kiln.. 11
Problem: Controller display turns on. No heat in kiln. 12
Problem: Kiln switch box ½ amp fuses keep blowing.12
Cone-Fire Schedules. . . . . . . . . . . . . . . 13
Pyrometric Cone Temperature Chart. . 15
Shorthand Instructions. . . . . . . . . . . . . 16
2 Cone-Fire / Ramp-Hold
©2004, by Paragon Industries, L.P. IM-222/10-04
Page 3
General
Guidelines
Time and Temperature
Display
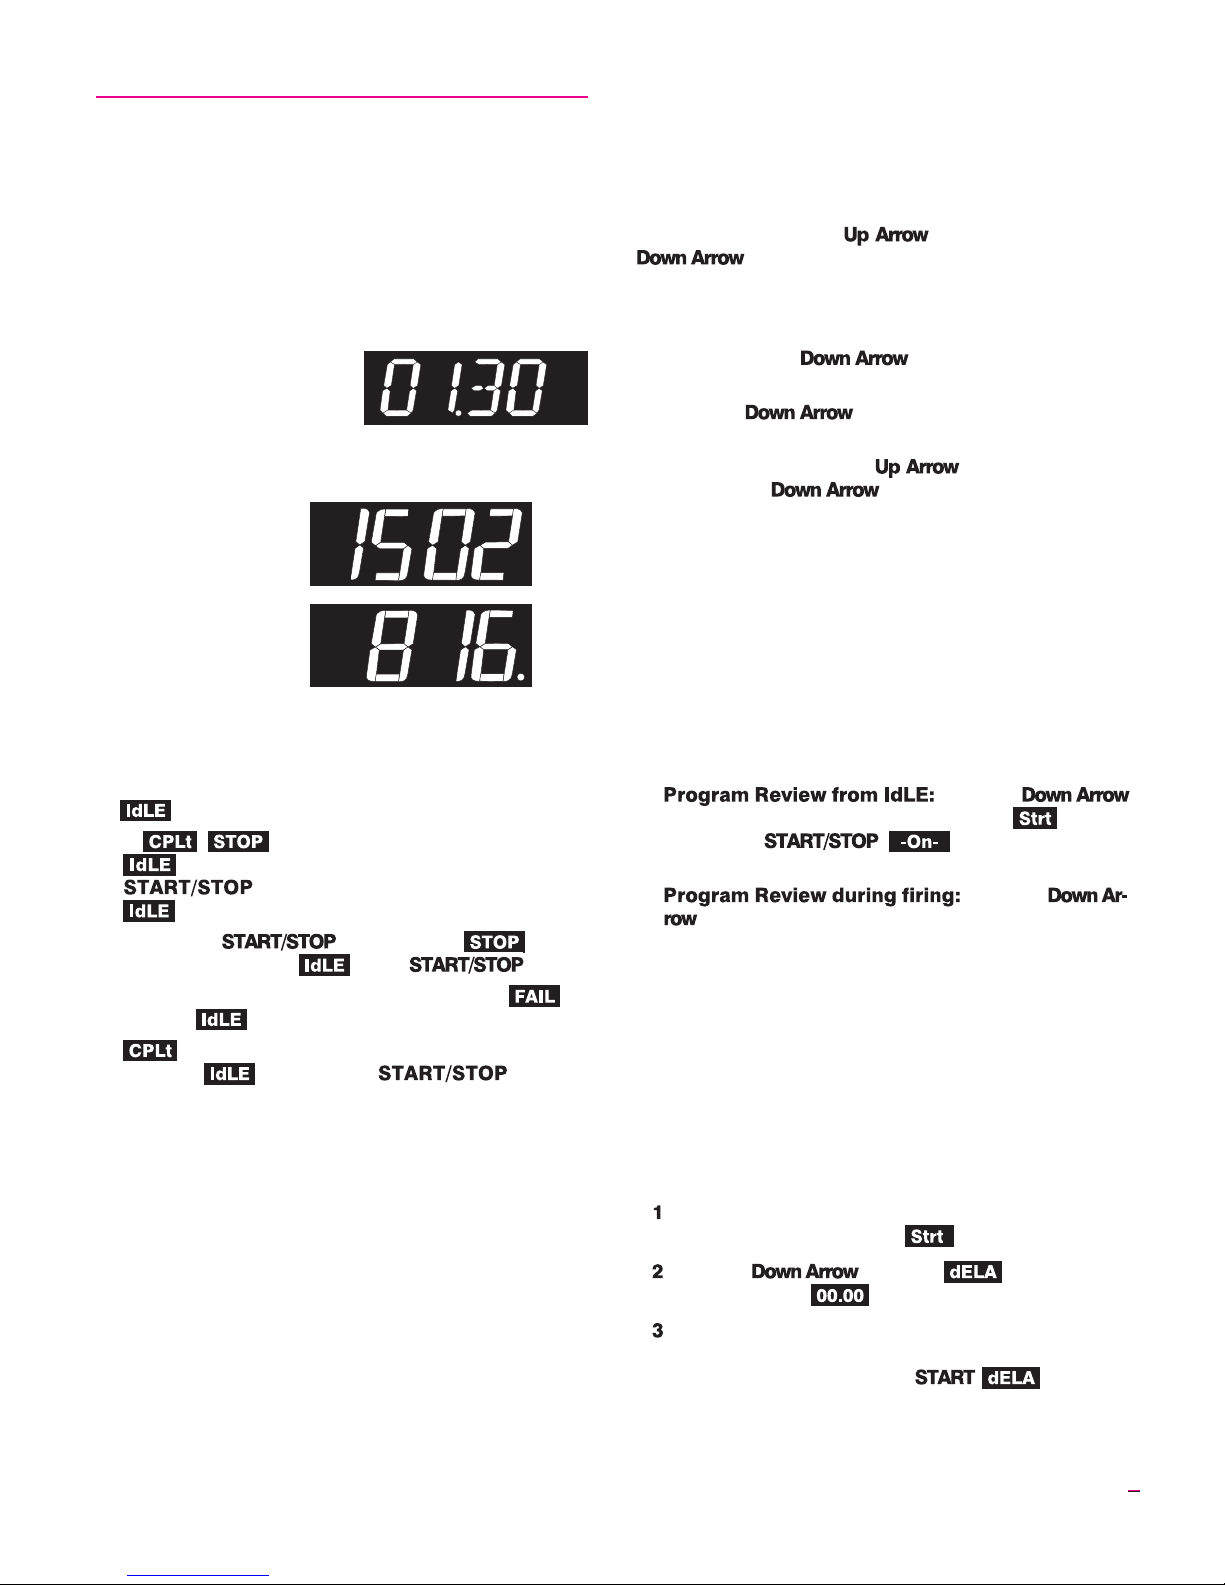
Center Dot: Time
A center dot appears dur
ing time display. It separates
hours from minutes (i.e. 1
hour, 30 minutes displays as
01.30). During temperature
display, the dot disappears.
Right-Hand Dot: °C
When temperature
is displayed in °C, a dot
appears in the lower
right. In °F display, it
disappears. You can
choose between Fahr
enheit and Celsius display. See page 9.
Operation Begins from the
IdLE Display
must appear before you can fire the kiln.
I
If , , or other message appears instead of
when the kiln is first turned on, press the
key (the key with the circular arrow).
will appear.
I
If youpress during afiring, willap
pear. To get back to , press again.
I
If the display shows an error message such as in
stead of , see page 9.
I
(firing completed) appears at the end of a firing.
To make appear, press .
Thermocouple Inspection
The small rod protruding into the firing chamber is the
temperature sensor, or thermocouple.
CAUTION: Bumping the thermocouple can push it
out of the firingchamber.This could cause an overfire!
The controllerdoes not containan alarm to detectthis
type of failure. Bumping the thermocouple could also
cause inaccurate readings.
I
A 1/8” diameter thermocouple should extend into the
firing chamber ½” - 5/8”.
I
A ¼” diameterthermocouple shouldextendinto the fir
ing chamber 1” or more.
I
Keep shelves, posts and ware 1” - 1 ½” away from the
thermocouple.
-
The center display dot indicates
time instead of temperature.
-
°F
°C
ARapidWayto
Scroll Numbers
During programming, hold an arrow key down several
seconds, and numbers will begin to scroll rapidly. Ordi
narily, you would press to raise a number and
to lower it. But sometimes it is faster to press
the opposite key. This is because the numbers scroll below
0000 to the highest number, and vice versa. Examples:
I
To program a 99.59 hour Hold when the display shows
00.00, press the once.
I
To program a FULL rate when the display shows 0000,
press the once.
I
To program a temperature of 200°F when the display
shows 1800°F, press the . That is faster than
pressing the .
Program Review &
Repeat Firing
Program Review lets you check that the information
programmed into the controlleriscorrect.It is a good habit
to use Program Review before every firing. Program Review shows the values for the program in active memory,
which is either—
The program that was fired last, or
The program that was entered since the last firing.
I
key. After rate, temperature, hold, etc., will appear. Press . will appear, and the
kiln will begin firing the program just reviewed.
I
key. The rate, temperature, hold, etc. will display
-
-
-
one after the other. Firing will continue.
Delay
Delay is acount-downtimer.The kiln beginsfiringwhen
the timerrunsoutoftime. UseDelayto fitafiringinto your
schedule.
CAUTION: Forsafety, donot leavethe kiln alonedur
ing a delay or a firing. We cannot guarantee your kiln
against overfiring even though the controller is auto
matic.
After you have selected a program and the control
ler is ready to begin firing, will appear.
Press the key once. will appear,
alternating with .
Use thearrow keysto enterdelay time.(The decimal
separates hours and minutes. Example: 1 hour 10
minutes =01.10)Thenpress . will ap
pear, alternating with time left until the firing be
gins.
Press the
Press the
-
-
-
-
-
-
3
Page 4
Power Failures
After a power failure, the controller will continue firing
provided that:
I
The kiln temperature is above 212°F/100°C when the
power comes back on.
I
The temperature dropped no more than 180°F/100°C
while the power was off.
Power Failure Messages
The power failed during firing, and temperature
dropped more than 180°F/100°C.
The power failed during firing, and kiln tempera
turewasbelow 212°F/100°Cwhen thepower camebackon.
CPLT Message:
Firing Completed
When the firing has successfully completed, the Sentry
Xpress will shut off power to
the elements. Then three mes
sages will cycle one after the
other:
(complete)
Firing time in hours and minutes
The current kiln temperature
-
Thunder Storms and
Power Surges
Unplug the kiln or disconnect the power when the kiln is
not in use, especially during thunder storms and in areas
with frequent power surges. If the kiln is partwaythrougha
firing when a storm begins, it is probably okay to continue
the firing withclosesupervision. Do not leavethe kiln unat
tended.
Two Firing Modes:
Cone-Fire and Ramp-Hold
To give you greater flexibility, your controller has two
firing modes: Cone-Fire and Ramp-Hold.
Cone-Fire Mode (see next column)
Cone-Fire mode fires the ware to a pyrometric cone
number usingtheOrtoncone tables on page 15. Thismode
is for ceramics, pottery, stoneware, and glazes. Your sup
plier can tell you which cone number to program.
Ramp-Hold Mode (see page 7)
Use Ramp-Hold mode to create custom firings. Select
your own firing speed, temperature, and temperature hold
time in up to 8 steps, or segments.
The chart in the next column shows the recommended
firing mode for several types of ware:
Type of Firing Suggested Firing Mode
China Painting Cone-Fire
Ceramic Decals Cone-Fire
Ceramic Glaze Cone-Fire
Ceramic Greenware Cone-Fire
Glass Bead Annealing Ramp-Hold
Glass Fusing Ramp-Hold
Glass Slumping Ramp-Hold
Lost Wax Ramp-Hold
-
Cone-Fire
Cone-Fire mode is based on firing the
ware to a pyrometric cone. Cone-Fire is
not designed for heat treating, glass
fusing and enameling. For these firings,
use Ramp-Hold mode (page 6). Use
Ramp-Hold to fire ceramic pieces that
require a custom firing schedule.
Pyrometric Witness Cones
It is important to understand pyrometric witness cones,
because clay and glazes are rated to cone numbers. Pyrometric cones are smallpyramids of clay that bendwhen exposed to the correct amount of heatwork. Cones are rated
by number.Seepage15 for alistof cone numbers and their
temperatures.
When a witness cone bends during firing, the clay and
glaze in that firing, rated to that cone number, have received the correct amount of heat.
-
-
Place the pyrometric witness cone on the kiln shelf near
the ware you arefiring. Usethe cone to check forfiring ac
curacy. The cone is themost accurate measurementof heat
work in a ceramic firing. This is because thecone measures
the combined effectsoftime, kilnatmosphere,and temper
ature.
We suggestusing thewitnesscone totrouble shootprob
lems with the ware. If china paints appear faded and you
suspect it is due to over-firing, test firewith a witness cone.
Anotherexample:glaze crazingdueto under-firedbisque.
How to Interpret the Bending
of a Pyrometric Cone
The cones illustrated here are called self-supporting
cones. They are the easiest type of
witness cone to use.
1. Correct Bend
When the self-supporting cone
bends so that the tip is approxi
mately even with the top of the
base, the cone has been exposed to
-
A cone fired to maturity.
-
-
-
4 Cone-Fire / Ramp-Hold
Page 5
the correct amount of heat work
for thatcone number.This iscalled
a 6 o’clock bend.
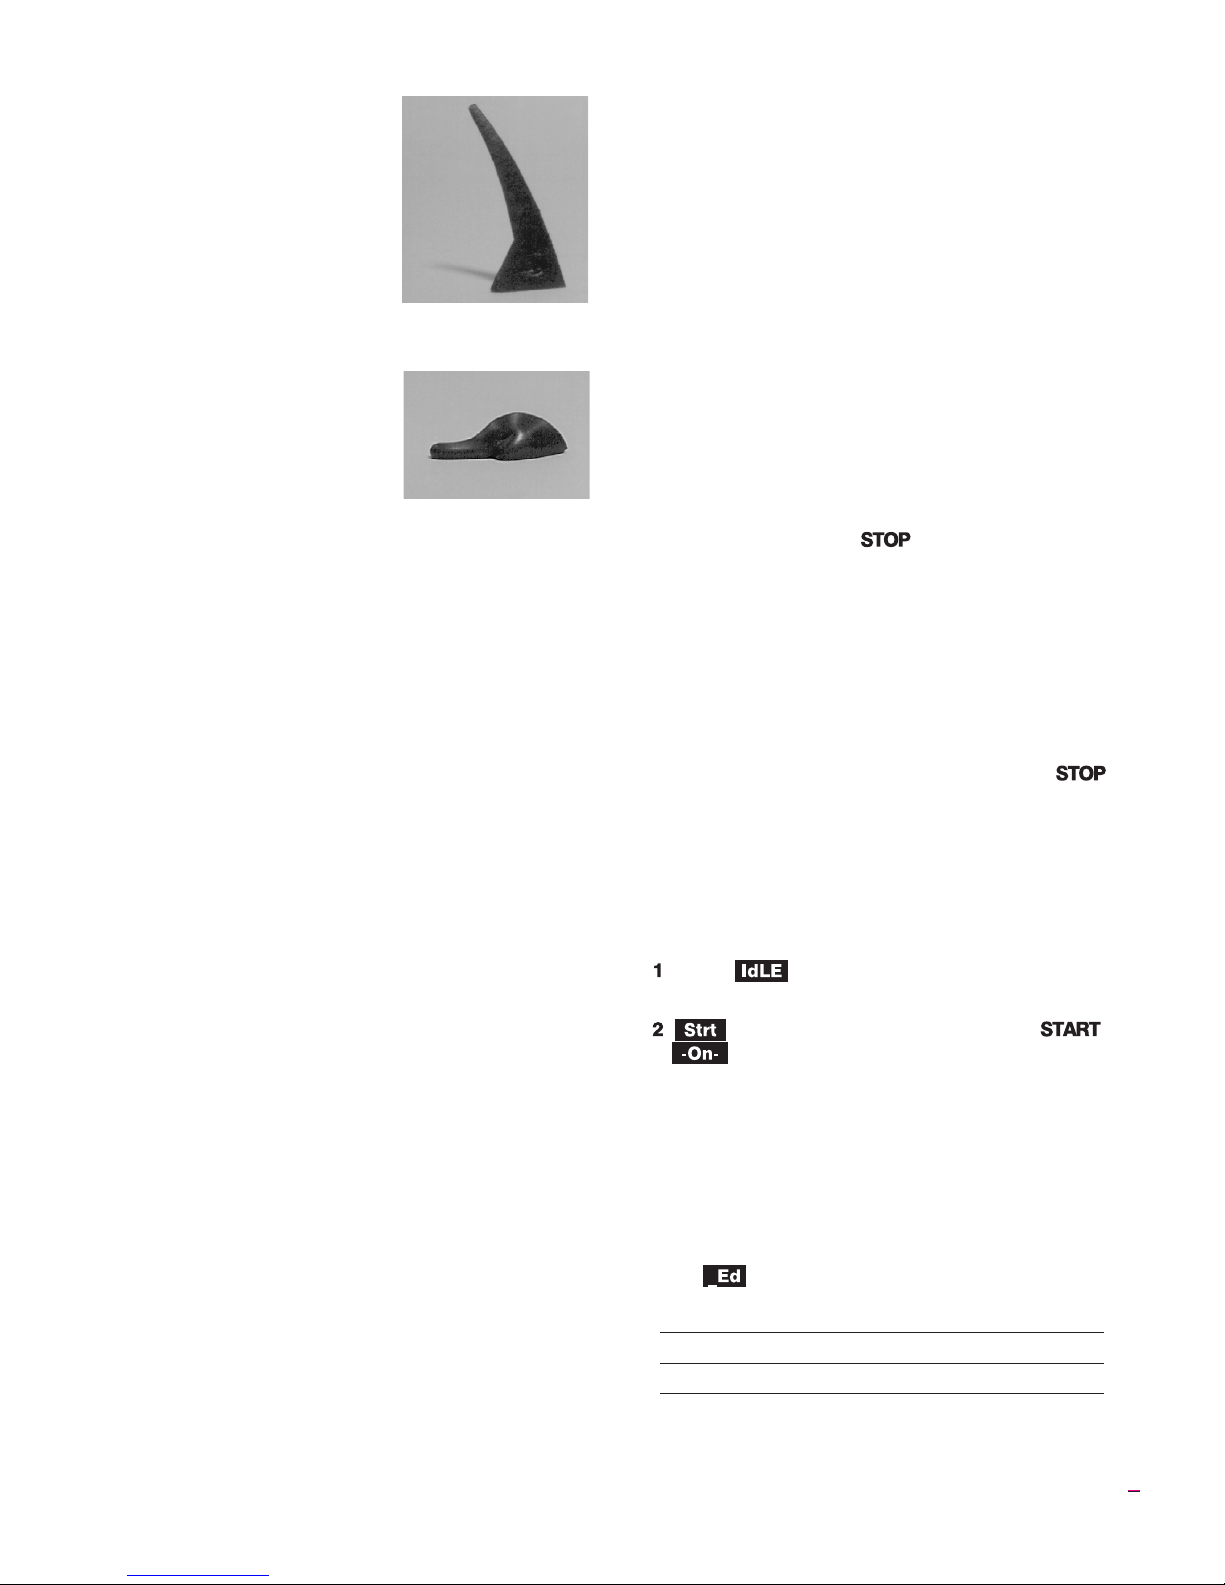
2. Under-Fired Cone
The conein theupper photohas
not bent far enough. It indicates
that the kiln did not fire long
enough or hot enough.
3. Over-Fired Cone
When a cone collapses or pud
dles (see lower photo), it indicates
that the kiln over-fired the ware
rated to that cone number.
Note: Do not be overly con
cerned with achieving an exact 6
o’clock bend. The difference be
tween a3 o’clock and a6 o’clock
bend is only a few degrees of
temperature.
An under-fired cone.
-
-
-
An over-fired cone.
HowtoCorrectforUnder-or
Over-Fired Cones
Before changing a firing because of an under- or
over-fired cone,makesure the correct conewas in the kiln.
For instance, if you fired to cone 05, make sure the cone in
the kilnwas nota cone5 instead.(See thecone temperature
chart on page 15.)
Compensating for an Under-Fired Cone
I
Fire to the same cone number next time, but add hold
time. How much hold time to add is a matter of experimentation.Ageneral guidelinewould be10-30 minutes.
I
If the kiln still does not fire hot enough, then fire to the
next hotter cone number, without hold time.
I
Another option: customize the firing in Ramp-Hold.
See the next page.
Compensating for an Over-Fired Cone
I
Fire to the next cooler cone number.
I
If firing to the next cooler cone number results in un
der-firing, add hold time.
I
Another option: customize the firing in Ramp-Hold.
See the next page.
Cone-Fire Hold
Cone-Fire Holdheat-soaksthe wareatthe conetemper
ature at the end of the firing. Without Hold, the kiln shuts
off after it reaches the cone temperature. Hold maintains
the cone temperature for the period you specify.
Hold is not needed in every firing. Experience will help
you decide when to use Hold. Some of the reasons you
might consider using it:
I
To even out the temperature throughout the kiln.
I
To allow heat to penetrate more completely into the
clay. (Rapid firing is like cooking: the turkey will be
done on the outside but not on the inside.)
I
To help glaze absorb china paint.
I
To heal glaze defects such as bubbles.
CAUTION: Use Holdsparingly. A little hold time can
yield dramaticresults.But toomuchhold timecan eas
ily overfire your ware and burn out colors.
One waytoadd Holdtime withoutover-firing isto fireto
one cone cooler than needed. Then add enough hold time
to bend the next hotter cone. Hold time neededtobendthe
next cone will vary. As a rule of thumb, 45 - 60 minutes of
hold = one cone of heat work.
Example: to fire to cone 05, program Cone-Fire for 06
and add 45-60 minutes of hold time.
If yourkilnhas apeephole,watch thepyrometric witness
cones during firing. Press when the correct witness
cone bends. Note how much Hold time was needed. Pro
gram that much Hold time the next time you fire the same
type of ware.
Note: During Hold,thedisplay temperaturewill alter
nate with time left in Hold. To figure hold time for the
next firing, subtract time left in Hold from the total
Hold time entered.
When Hold is set to 99.99 hours, the Sentry Xpress will
remain at that temperature indefinitely, until is
pressed.
When the Kiln Shuts Off
Too Soon
If the kiln shuts off before the pyrometric witness cone
bends, you can turn the hot kiln back on and keep firing.
From , program the next hotter cone in
Cone-Fire.
will appear. To begin firing, press .
will appear and the Run indicator light will
-
begin blinking. The hot kiln will begin firing, taking
up where it left off.
How to Customize Cone-Fire
You can customize a Cone-Fire program using
Ramp-Hold. (Seethenextsection.) On pages13and14,ta
bles show thesegments used to program each cone number
in Cone-Fire. For instance, a cone 016 firing at medium
speed ( )uses these two segments:
Segment °F/°C °F/°C Hold
1 396/220 1314/712 00.00
2 108/60 1422/772 00.00
Rate Temp.
-
-
-
-
5
Page 6
Cone-Fire Firing
Instructions
From , press .
Using the key (not the ),
by-pass and select . Then press
.
Suppose your 016 witness cone, at a medium speed fir
ing, onlybarelystarted to bend. Tofire 25° hotter, raise the
target temperature of segment 2 by 25°:
1422 + 25 = 1447
This is the program you would enter in Ramp-Hold:
Rate Temp.
Segment °F/°C °F/°C Hold
1 396/220 1314/712 00.00
2 108/60 1447/786 00.00
You could also easily add a slow cooling segment:
Rate Temp.
Segment °F/°C °F/°C Hold
1 396/220 1314/712 00.00
2 108/60 1447/786 00.00
3 100/55 1000/537 00.00
-
The lastpyrometriccone youfired, andits tem
perature, will appear. Use the arrow keys to
change the cone number. Then press .
(slow) (medium) or will
appear. Use the arrow keys to change speed.
Then press .
andthehold timefrom thelast firingwill
appear (e.g. 1 hour 10 minutes = 01.10). Use
the arrow keys to change the hold time. Then
press .
will appear. Press . will appear, the Run indicator light with begin blinking, and the kiln will begin firing.
To stop a firing before completion, press
. will appear, alternating with kiln
temperature.
Note: Do not be concerned if your kiln makes a
clicking sound during firing. Kilns use relays to
power the elements. The relays click each time
their electrical contacts come together.
Note: Thekiln’s actualfiring ratemay beless than
the rate you programmed, depending on the kiln
model, available voltage, and density of the load
you are firing.
When the kiln fires to completion, it willbeep for 30
seconds. The display will show the following:
I
Firing time
I
Present temperature
I
To return to , press .
= fired to completion
-
Ramp-Hold
Mode
Theory of Operation
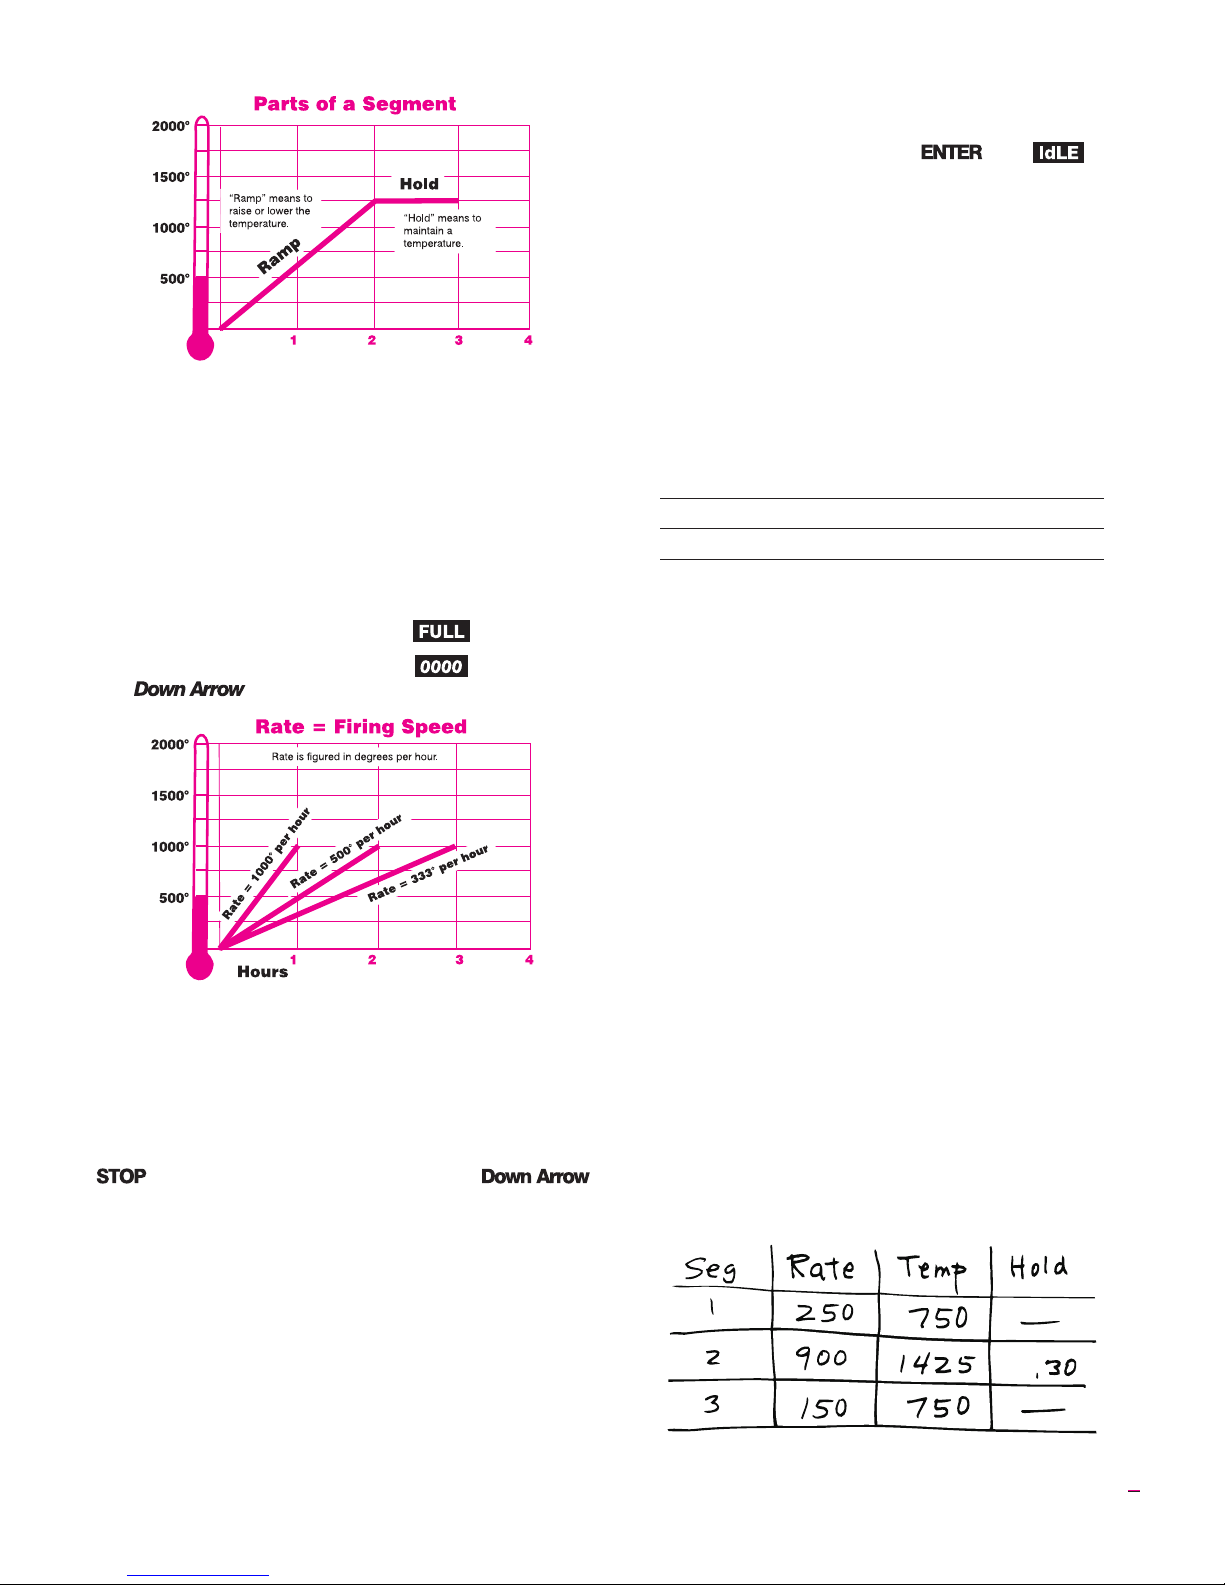
The temperature you are firing to is called the target
temperature. After the controller reaches the target temperature, it can also hold that temperature.
The controllerfiresat acontrolled heatingrate. Therate
is figured in degreesper hour. If you selecteda rate of 100°
per hour, it would take10 hours forthe kiln to reach1000°.
Rate is similar to “miles per hour.”
In summary, the controller does three basic tasks:
1) It fires at a controlled heating rate, or speed, mea
sured in degrees of temperature change per hour.
2) It fires to a target temperature.
3) It can hold the target temperature.
The controller fires in segments, or stages. A segment is
a given heating rate to a target temperature. Shown in the
chart onthenext page(upper leftcolumn)is asegment with
a target temperatureof1250°andarateof 625°, with a hold
of one hour.
Heating rate is figured in degrees per hour. The recom
mended heating rate for the material you are firing is usu
ally available from your supplier. It also varies depending
on the thickness of the material.
To figure how long a firing segment will take, subtract
the current temperature from the target temperature and
divide the resultant temperature by theheating rate. Inthe
upper diagram, next page, the firing time is 1250° - 80°
(room temperature) = 1170 ÷625 = 1.87 hours.
-
-
-
6 Cone-Fire / Ramp-Hold
Page 7
The controller can fire up to 8 segments per firing. One
segment is often all that is needed, though.
After the controller has finished firing the last segment,
it will turn off power to the elements.
Rate
Each segment must include a rate, which is degrees of
temperature change per hour.
The kiln will fire at full power when the rate is
1799°F/999°C. Full power displays as .
Note: To select full power from , press the
key once.
Repeat Firings
To repeat the last firing, press from . The
kiln will begin firing. But first, makesure you are repeating
the correct firing by using Program Review (page 3).
Programming a
Cooling Segment
For controlled cooling, program a segment to a lower
target temperature than that of the preceding segment.
Example: You fire at a rate of 500°F per hour to 1450°F
with your first segment. You want the kiln to cool at a rate
of 100°F per hour down to 700°F. Here is how you would
program the two segments:
Rate Temp.
Segment °F/°C °F/°C Hold
1 500/277 1450/788 00.00
2 100/55 700/371 00.00
The first segment is the heating segment. The second
one isthe cooling segment. The controllerdoes not usemi
nus numbersfor cooling. Just enter a lowertargettempera
ture than that of the previous segment.
If you prop the lid or door for a fast cooling, program a
fast coolingratefor thatsegment.If youlowerthe temperature quicklyby propping the lid butprograma slow cooling
rate, the controller will just raise the temperature again.
Example: Someglass artistsflash-coolthe glassjust after
it fuses. They open the door a few inches to remove heat,
then close it again. This takes the glass down rapidly
through the devitrification range. To programa flash-cool,
use maximum rate. This shuts off theheatingelementsduring that segment, allowing the kiln to cool rapidly.
-
-
Hold
Hold maintains a steady temperature for the length of
time you specify. Youcan use Hold in both heating-up and
cooling-down segments.
When Hold is set to 99.59 hours, the controller will re
main at that temperature indefinitely, until you press
. To enter a 99.59 hour Hold, press the
once from 00.00 during programming.
Note: During firing, the display shows Hold tempera
ture and time left in Hold.
-
Temperature Over-Shoot
When akiln is heated toofast,it may over-shoot thetar
get temperature,especially in small kilns atlowertempera
tures. To avoidthis, add an extrasegment in a Ramp-Hold
program to slow the firing. The segment with the slower
rate should begin approximately 40° - 60° below the target
temperature.
Note: During fastcooling, do not open the door allthe
way. Do not force-cool the kiln with a fan.
A Ramp-Hold
Practice Program
To practiceusing the controller,we will enter aprogram
that includes three segments. The last segment is a cooling
segment.
Using the programming instructions on the next page,
enter this firing schedule. Thenuse Program Review(page
3) to check for accuracy.
-
-
7
Page 8
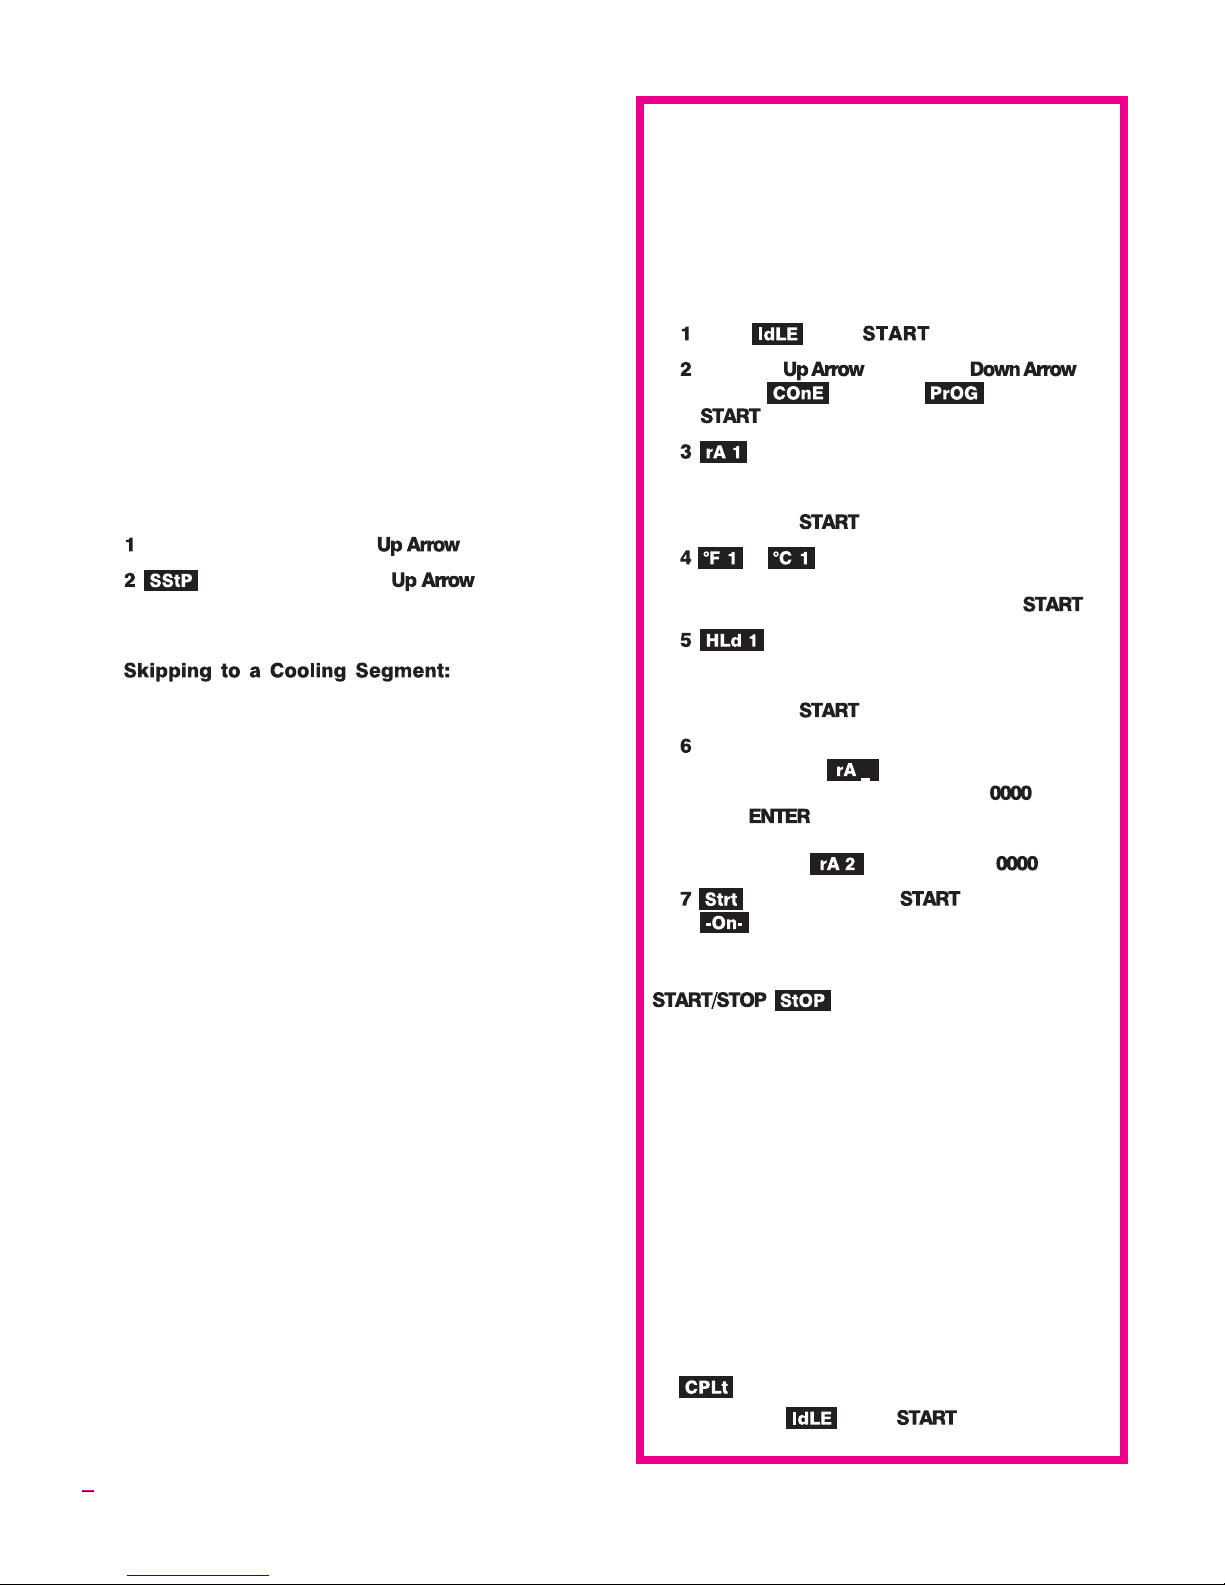
PrOG
rA1 = 250
°F1=750
HLd 1 = 00.00
rA2 = 900
°F 2 = 1425
HLd 2 = 00.30
rA3 = 150
°F3=750
HLd 3 = 00.00
rA4 = 0000 (zeroes cancel segments 4-8)
Skipping a Segment in a
Ramp-Hold Program
You canskip a segment in a Ramp-Hold program as fol
lows:
The kiln is firing. Press the key.
will appear. Press the key again.
The firing will skip to the next segment.
Ramp-Hold Programming
Instructions
Note: Up to 8 segments are available in
Ramp-Hold. If you don’t need all 8, zero out the
unused segments.Seestep 6below. Enteringa new
program automatically over-writes the previous
program.
From , press .
Using the key (not the ),
by-pass and select . Then press
.
will appear. Enter firing rate (tempera
-
ture change per hour) for segment 1. (1° =
slowest rate. 1799°F/999°C = full power.)
Then press .
or and thetargettemperature from
the last firing will appear. Use the arrow keys
tochangethe temperature.Then press .
-
Skip Segment Example
I
grammed a target temperature of 1425°F for glass fusing, followed by a segment for controlled cooling.
Watching the glass through the peephole, you notice
that the glassedges have rounded nicelyat 1375°F. Use
Skip Segment to end the firing segment and begin the
one for slow cooling.
Note: Make a note of the temperature at which the
glass fused. Program that temperature for the nextfiring of that type of glass.
You have pro-
and the hold time from the last firing
will appear (e.g. 1 hour, 10 minutes = 01.10).
Use the arrow keys to change the hold time.
Then press .
Continue entering values for the segments
needed. When appears for the next segment that you don’t need, select . Then
press . This will zero out the remaining
segments. (Example: You need only 1 segment. When appears, enter .)
will appear. Press to begin firing.
will appear and the Run indicator light
with begin blinking. The kiln is now firing.
To stop a firing before completion, press
. will appear,alternating with total
firing time and kiln temperature.
Note: Do not be concerned if your kiln makes a
clicking sound during firing. Kilns use relays to
power the elements. The relays click each time
their electrical contacts come together.
Note: Thekiln’s actualfiring ratemay beless than
the rate you programmed, depending on the kiln
model, available voltage, and density of the load
you are firing.
8 Cone-Fire / Ramp-Hold
When the kiln fires tocompletion, it willbeep for 30
seconds. The display will show the following:
I
Firing time
I
Present temperature
I
To return to , press .
= Fired to completion
Page 9

Lost Wax
Burnout
CAUTION: Only kilns with vent holes are designed
for lost wax burnout. However, you can use a kiln with
out the vent hole provided that you open the door ½”
during venting.
CAUTION: Always use a wax tray.
Note: These instructions apply to injection wax that
melts at 200°F, not pattern waxes and plastics that
melt at higher temperatures. If smoke appears during
wax elimination, turn off the kiln. Smoking wax means
the kiln fired hotter than 300°/148°C.
Overview
Lost wax casting is the process of carving a shape in wax
and thencastingthat shapein metal.After thewax hasbeen
carved, a moldis made of the wax shape. The moldis a neg
ative image of the wax. The wax is later melted out of the
mold through hollow channels called sprues.
Lost wax burnout is the process of preparing a casting
mold for the melted metal that will be poured into it. The
steps in lost wax burnout:
Melt the wax from the mold.
Remove wax from the kiln before raising the tem-
perature higher than 300°F/148°C.
Harden the mold at high temperature.
Maintain the mold at the casting temperature rec-
ommended forthe type of metalthat will bepoured
into the mold.
CAUTION: Prevent wax or carbon from contacting
the kiln’swallsand elements.Carbonbuild-up insidea
kiln ruinsthe interior. Carbon conducts electricityand
causes elements to short circuit. Damage to elements
from contact with foreign materials is not covered by
warranty.
A Sample Program
See instructions on page 8 to enter this program:
Rate Temp.
Segment °F/°C °F/°C Hold
1 500/277 300/148 01.00
2 500/277 1350/732 01.00
3 450/250 800/426 02.00
Segment 1 heats thewax to 300°F/148°C and holds it for
one hour, allowing it to drip from the mold.
Segment 2 hardens the mold.
-
Segment 3 lowers temperatureto 800°F/426°C, the typi
cal casting temperature for silver. (Most types of gold cast
at 900°F/482°C.)
Note: Casting temperature depends on the size of the
mold. The temperatures above are only a guide. See
your jewelry supply dealer for temperature
recommendations.
Burnout Instructions
Place a metal tray inside the kiln on three ½” posts.
Place the mold on a wire mesh screen on top of the
tray. The mold’s sprue hole should be down. The
tray willcatch melting wax asitdrips from thesprue
hole.
Keep thekiln’s vent hole(s),if any, openduring wax
elimination. If the kiln has no vent hole, leave the
door open ½”. This allows fumes to escapethe kiln.
Heat the kiln to 300°F/148°C and hold it at thattem
perature for at least one hour.
-
Note: DoNOTheat thewax above300°F/148°C.Hold
at 300°F/148°Cforat leastone hour.During thishour,
the waxwill meltfrom themold anddrip into thetray. If
the kiln gets hotter than 300°F/148°C, the wax may
smoke and deposit carboninsideyourkiln, causing expensive damage.
After one hour at 300°F/148°C, open the kiln. Remove the mold and wax tray. Pour the wax from the
tray andleavethe tray out ofthe kiln until yournext
waxelimination.(Do notleave thetrayin thekiln!)
Heat themoldto the temperature recommended by
your jewelers’ supply house where you purchased
the mold material. This is usually around
1350°F/732°C.
Lower the temperature to the casting temperature
of the metal. Hold at that temperature untilyou are
ready tobegincasting.Remove themoldwith tongs.
Wear protective gloves and safety glasses.
Saving a Carbon-Damaged Kiln
If you follow the above directions, your kiln should be
safe from wax damage. In some cases, a small amount of
carbon may form on the walls over a period of time. This is
due to the burning of wax residue that was left in the mold.
For thisreason werecommend thatyou periodicallyfirethe
kiln to 1500°F/815°C as follows:
Open the vent cover(s) or leave the door ajar ½”.
Fire the kiln empty to 1500°F/815°C at a rate of
300°F/166°C with a one hour hold (01.00).
-
-
9
Page 10
Error Messages
BAdP / Bad Programming
The kiln will not fire because the program just entered
has a rate of 0000 in segment 1. Program the firing again.
EtH / Electronics Too Hot
The temperatureof the electronic circuit boardis above
158°F/70°C. This could damagethecontroller, so thefiring
has been stopped. To prevent this, keep the firing room
cooler. Use better ventilation.
The powerfailed during firing andkiln temperature was
below 212°F/100°C when the power came back on.
tC / Thermocouple Failure
The thermocouplefailed orwas disconnectedduring the
display. See “FaIL,” column at left.
Selecting °F or
FaIL / Thermocouple Failure
The thermocouple, or temperaturesensor, failedduring
firing. Causes:
I
Defective thermocouple or disconnected/loose wires
I
Defective controller
I
Electrical noise
Thermocouple Paperclip
Test
Check the thermocou
ple wire connections. (See
your kiln instruction manual.) If connections are
tight, perform this test:
UNPLUG the kiln or
disconnect the power. Remove thecontroller.Remove thetwothermocouple wiresfrom theback of
the controller.
Cut a thin paperclip in half. Insert a U-shaped
paperclip piece, or other piece of thin wire, where
you removed the thermocouple wires.
Plug in the kiln. If the controller displays room
temperature,replacethe thermocouple.Ifit shows
, replace the controller.
-
°C Display
The controller can display temperature in either °F or
°C. If your controllershows a smalldisplay dot inthe lower
right corner ofthedisplay,the temperatureshown is °C.No
dot means °F. To change temperature display:
UNPLUG kiln or disconnect power.
Remove thefour screws thathold the controllerto
the frontof the kiln.Carefullyremove the control
ler from the kiln. Leave wires attached to the con
troller.
-
-
TCR / Thermocouple
Reversed
Thermocouple lead wires are reversed.
FtL / Fired Too Long
This messageappearswhen both of thefollowing condi
tions are met:
I
The temperature rise is less than 27°F/15°C per hour.
I
The firing is 4 hours longer than programmed.
See “Controller turns on. No heat in kiln,” page 11.
PF 1 / Power Failure
The powerfailed duringfiring andtemperature dropped
more than 180°F/100°C by the time the power came back
on.
10 Cone-Fire / Ramp-Hold
-
Look atthe backof thecontroller. Aplastic jumper
on the back of the board determines the type of
temperature display. When the jumper connects
two pin-typeterminals, display reads °F. When the
jumper is removed, display reads °C. Remove or
insert the jumper as desired. (You can purchase
the jumper from a computersupply store if neces
sary.)
Install the controller being careful not to jar com
ponents on the back of the controller against the
kiln case.
-
-
Page 11
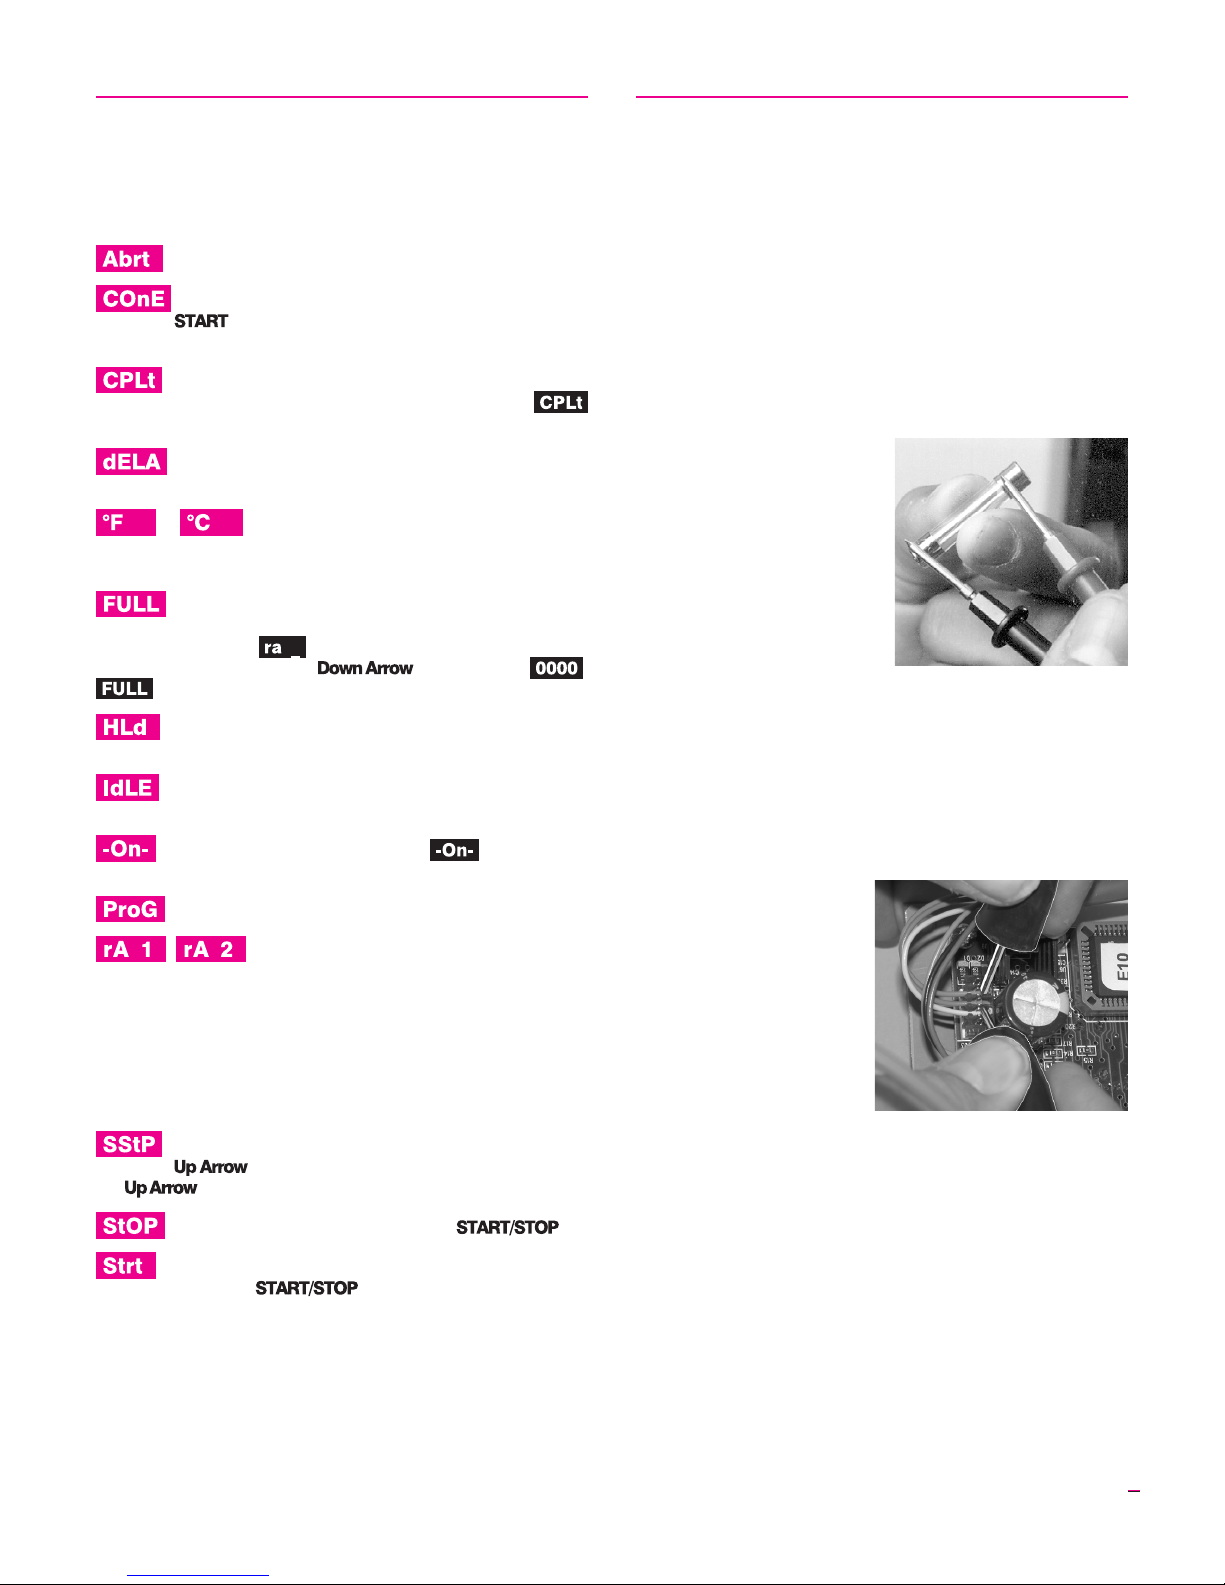
Display
Trouble Shooter
Messages
The firing was stopped.
(page 8) This is the prompt for Cone-Fire mode.
Press the key to select Cone-Fire.The controller is then
ready for you to select a pyrometric cone number.
Fired tocompletion. Ifthe kilnis alreadyhotter thanthe
programmed targettemperature when you begin firing,
will appear immediately after you begin firing.
(page 3) Delay is a count-down timer that starts the
kiln when the time runs out.
or (and temperature) (page 8) The target tem
perature (the temperature that the kiln will fire to). Each seg
ment has a target temperature.
Full power firing rate in Ramp-Hold mode. At this set
ting the kiln will fire at its fastest rate. Select a rate of
1799°F/999°C at the prompt in Ramp-Hold mode. A fast
way to dothis isto press the key once from .
will appear.
(pages 5, 7) Hold time of a segment, shown in hours
and minutes. (i.e. 2 hours 15 minutes = 02.15.)
(page 3) The controller is ready for you to enter a pro-
gram or to begin a repeat firing.
Firing has begun. A moment after appears, you
will hear the relay(s) clicking.
(page 4)Select thisoption toprogram acustom firing.
etc. (Rate) (page 8) This appears in
Ramp-Hold programming for each segment.1, 2, etc. are seg
ment numbers. Enter the rate of temperature change for that
segment. Rate is figured in degreesof temperature change per
hour. Example:
A temperature rise of 100° in two hours = 50° rate.
A temperature drop of 200° in one hour = 200° rate.
(Skip Step)(page 8) This message appears whenyou
press the key during a Ramp-Hold firing. If you press
the key again,the firingwill skipto thenext segment.
The firing was stopped by pressing .
The “Ready to Start” message appears after program
ming a firing. Press to begin firing.
Problem: Controller display is
blank. No heat in kiln.
I
Is the kiln connected to the power?
I
Has the circuit breaker tripped or fuse blown?
I
Is power reaching the wall receptacle?
Test with a voltmeter or test light if you are not sure.
I
Has the kiln switch box ½ amp fuse blown?
The kiln’s ½ amp fuse is
located in the kiln switch
box. Remove by pressing the
fuse holder and turning
counter-clockwise half a
-
turn. Check the fuse by plac
-
ing the probes of anohmme
ter on the endsof the fuse.If
-
the ohmmeter reads less
than an ohm (digital meter)
or reads 0 ohms (analog me
ter), the fuse is okay. If the
reading is OPEN (digital meter) or infinity/no needle
movement (analog meter), the fuse is bad. Replacement
fuse:
AGC 1/2 A 250V AC
I
Is the controller receiving power? Test the power INPUT connections on the back of the controller with a
voltmeter.
Controller Power
Input Test
Unplug the kiln. Re
move the 4 screws holding
-
the controller faceplate to
the switch box. Lift face
plate out of box and letthe
board hang on the box
with the back of the board
facing you. Plug the kiln
back in. Touch voltmeter
probes (in AC mode) to
both INPUT connections (the white and orange wires).
CAUTION: Do not let the back of the board touch a
grounded object. Make sure the voltmeter is in the AC
modewhenplacing theprobes onINPUTconnections.
-
Controller Power Input Test Result: No voltage
UNPLUG kiln. Check the switch box for disconnected
wires betweenthecord, transformer, and controller. If wir
ing is okay, replace the transformer.
Controller Power Input Test Result: 20 - 24 volts AC
Correct current is reaching the board from the trans
former. Butsince the board isnot lighting up, itis probably
defective.Returnthe controllerfor repairor replacement.
-
-
-
-
-
-
-
11
Page 12
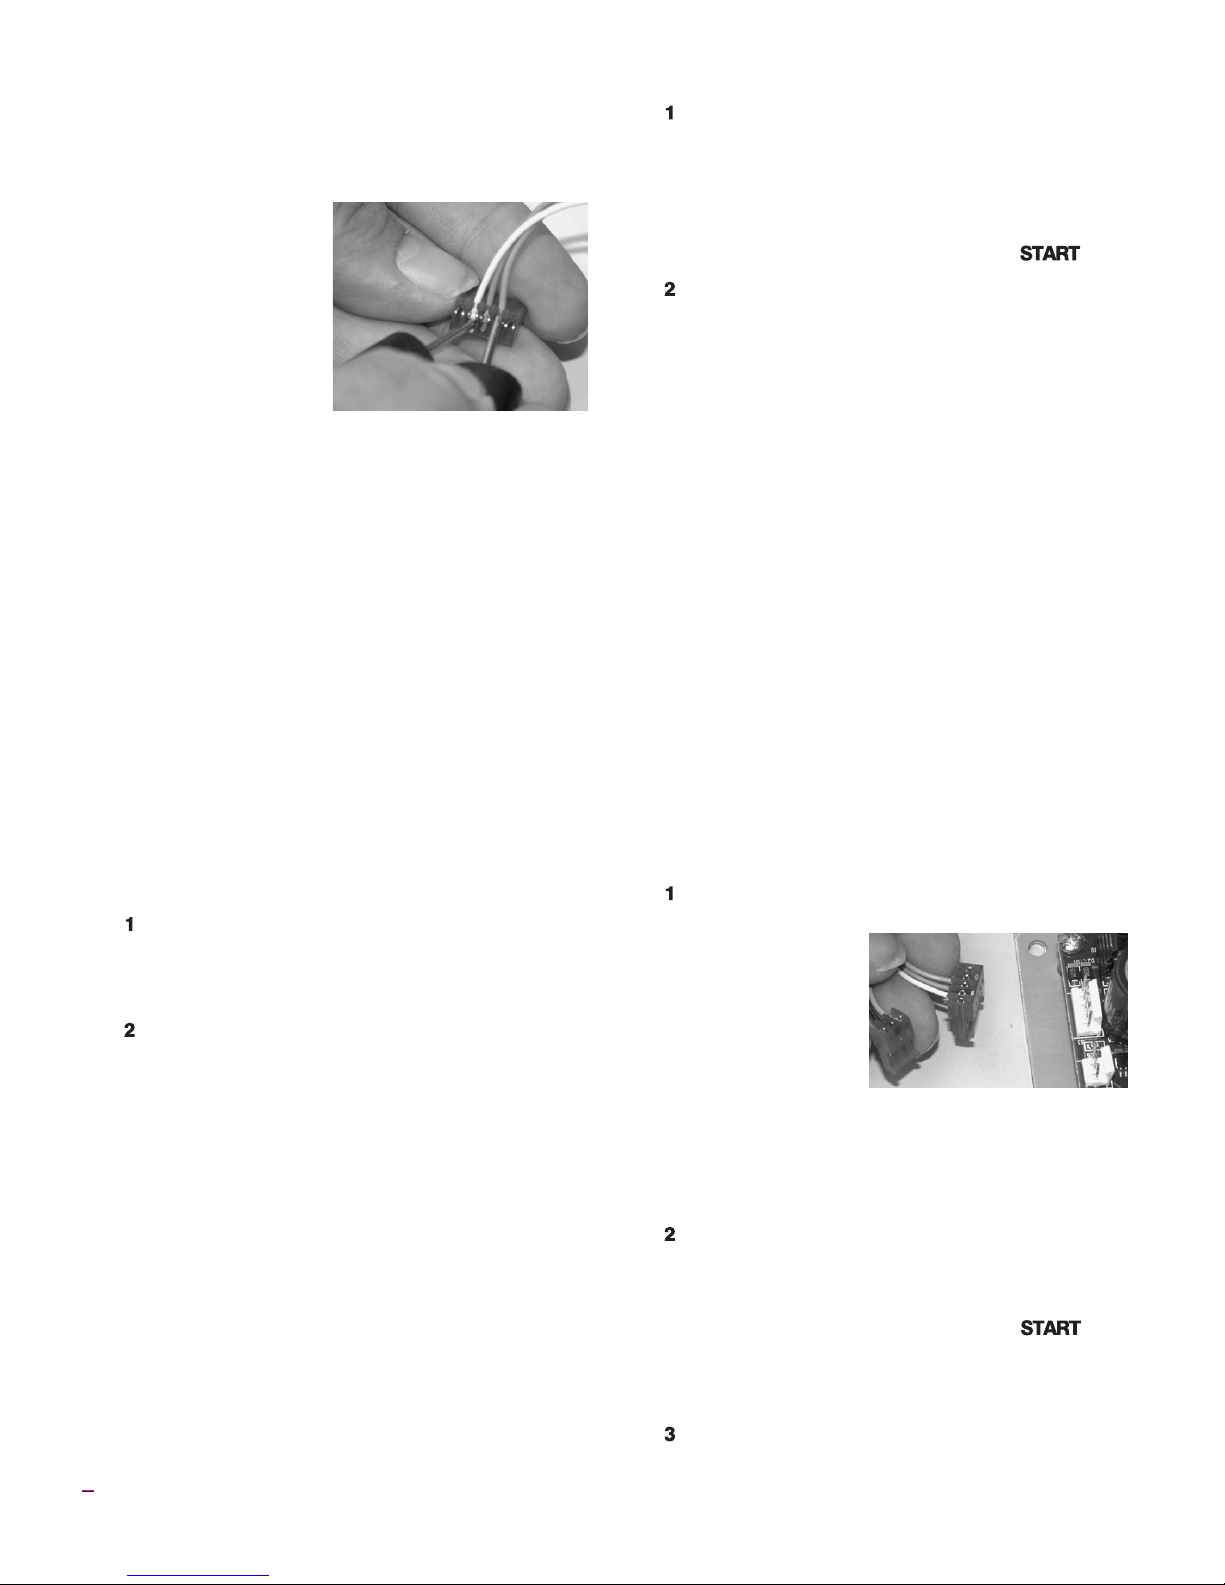
Controller Power Input Test Result: less than 20 volts
Did you recently replace the transformer?It may be the
wrong voltage.Thevoltageis below20,whichisnot enough
power for the controller. To find out the cause of low volt
age, continue below:
Controller Input Test #2
The back oftheboardis
still facingyou and thekiln
is plugged in. Remove the
INPUT plug, which is the
white, orange, and blue
wires, from the backof the
controller. Touch a volt
meter probe to the white
wire and the other probe to the orange wire.
Input Test #2 Result: Less than 20 Volts AC
There are two possible reasons: 1) Low voltage at the
wall receptacle;2) defective transformer. If wallreceptacle
voltage is correct, replace the transformer.
Input Test #2 Result: 20 - 24 Volts AC
The transformer is sending correct voltage to the con
troller. Yet when the INPUT plug was connected to the
controller, voltagewas lessthan20. Thismeansthe control
ler is draining the voltageand is defective. Return the controller for repair or replacement.
-
Problem: Controller display
turns on. No heat in kiln.
I
Is the relay making its normal clicking sound?
Yes, the relay is clicking.
Test the elements with an ohmmeter:
Element Resistance Test
UNPLUG kiln/disconnect the power. Open the
kiln’s switch box. Make sure the wires connecting
the relay to the elements are secure. If connec
tions are okay, continue to step 2:
Touch theohmmeterleads tothe twoelement con
nectors of each element. A no-needle-movement
reading on an analog meter, or OPEN on a digital
meter, indicates a broken element.
If the elements check out okay, replace the relay.
Note: To replace relay, see your kiln’s instruction and
service manual.
No, the relay is not clicking.
We knowthecontrolleris receivingvoltage, becausethe
display is lit. But the voltage from the transformer may be
too low topowerthe relays.Performthe“Controller Power
Input Test,”page 10.If yourcontroller passesthe inputtest,
perform the “Controller Power Output Test”:
Controller Power Output Test
Is thecontrollersending voltageto therelay? TestOUT
PUT with a voltmeter:
12 Cone-Fire / Ramp-Hold
-
-
UNPLUG thekiln/disconnectthe power. Remove
the 4screws holding the controller faceplate to the
-
-
-
switch box. Lift faceplate out of box and let the
controller hang on the outside of the box with the
back of the board facing you. Then plug the kiln
back in.Program the controller to fire to 1000°F at
FULL rate in Ramp-Hold mode. Press .
Put the voltmeter in DC mode. (It must be in DC
mode when testing OUTPUT voltage.) Touch
probes to the red wireand black wire connections.
Measure voltage when the relay clicks on.
Output Test Result: No voltage at red and black wires
The controller is notsending power tothe relay. Return
the controller for repair or replacement.
Output Test Result: 10 - 14 v. at red and black wires
The controlleris sending correct power to therelay.Un
plug kiln/disconnect power. Remove the kiln switch box.
Look for disconnected wires between the controller, relay
and elements. Check the wiring diagram to be sure wires
are connectedto thecorrectterminals. Besure connections
are tight. If the wiring is okay, replace the relay.
Note: To replace relay, see your kiln’s instruction and
service manual.
Problem: Kiln switch box ½
amp fuses keep blowing.
I
What size fuse are you using? Correct fuse:
AGC ½ A 250V AC.
If thefuse isthe correctsize, performthefollowing test:
Kiln Switch Box ½ Amp Fuse Power Test
UNPLUG thekiln/disconnectthe power. Remove
the 4 screws holdingthecontrollerboard faceplate
to the switch box.
Lift faceplateout of
box and let the
board hang on the
outside of the box
with the back of the
board facing you.
Disconnect both wire plugs from the back of the
controller. Then plug the kiln back in. Apply
power to kiln. If fuse blows, replace the trans
former. (If thefuse does not blow, the problemisa
board or relay. Go to step 2.)
Connect theINPUT plug (orange,blue, and white
wires) to the board again.Leave off the OUTPUT
wire plug (the one with the red, green and black
wires). Program the controller to fire to 1000°F at
FULL rate in Ramp-Hold mode. Press .If
the fuseblows, replace or service the board.(If the
fuse does not blow, the problem is caused by a
-
short in the coil of a relay. Go to step 3.)
UNPLUG kiln/disconnect power. Reconnect the
OUTPUT wire plug. Reinstall the board in the
switch box. Replace the relay.
-
-
Page 13

Cone-Fire Schedules - °F
These aretheMedium Speedfiring schedulesprogrammed inCone-Fire mode.To customizea schedule,write downyour
changes on a separate sheet of paper. Then load your new schedule into Ramp-Hold.
Note: Your controller accepts only cone numbers that fall within the kiln’s maximum temperature range.
Low Fire Cones °F
Segment 1 Segment 2
Cone Rate 1 Temp. 1 Rate 2 Temp. 2
022 396 979 108 1087
021 396 1004 108 1112
020 396 1051 108 1159
019 396 1144 108 1252
018 396 1211 108 1319
017 396 1252 108 1360
016 396 1314 108 1422
015 396 1348 108 1456
014 396 1377 108 1485
013 396 1431 108 1539
012 396 1474 108 1582
011 396 1499 108 1607
Medium Fire Cones °F
Segment 1 Segment 2 Segment 3 Segment 4
Cone Rate 1 Temp. 1 Rate 2 Temp. 2 Rate 3 Temp. 3 Rate 4 Temp. 4
010 324 1022 153 1112 180 1549 108 1657
09 324 1022 153 1112 180 1580 108 1688
08 324 1022 153 1112 180 1620 108 1728
07 324 1022 153 1112 180 1681 108 1789
06 324 1022 153 1112 180 1720 108 1828
05 324 1022 153 1112 180 1780 108 1888
04 324 1022 153 1112 180 1837 108 1945
03 324 1022 153 1112 180 1879 108 1987
02 324 1022 153 1112 180 1908 108 2016
01 324 1022 153 1112 180 1938 108 2046
High Fire Cones °F
Segment 1 Segment 2 Segment 3 Segment 4
Cone Rate 1 Temp. 1 Rate 2 Temp. 2 Rate 3 Temp. 3 Rate 4 Temp. 4
1 324 1022 153 1112 162 1863 108 2079
2 324 1022 153 1112 162 1872 108 2088
3 324 1022 153 1112 162 1890 108 2106
4 324 1022 153 1112 162 1908 108 2124
5 324 1022 153 1112 162 1951 108 2167
6 324 1022 153 1112 162 2016 108 2232
7 324 1022 153 1112 162 2046 108 2262
8 324 1022 153 1112 162 2064 108 2280
9 324 1022 153 1112 162 2084 108 2300
10 324 1022 153 1112 162 2129 108 2345
13
Page 14

Cone-Fire Schedules - °C
These aretheMedium Speedfiring schedulesprogrammed inCone-Fire mode.To customizea schedule,write downyour
changes on a separate sheet of paper. Then load your new schedule into Ramp-Hold.
Note: Your controller accepts only cone numbers that fall within the kiln’s maximum temperature range.
Low Fire Cones °C
Segment 1 Segment 2
Cone Rate 1 Temp. 1 Rate 2 Temp. 2
022 220 526 60 586
021 220 540 60 600
020 220 566 60 626
019 220 618 60 678
018 220 655 60 715
017 220 678 60 738
016 220 712 60 772
015 220 731 60 791
014 220 747 60 807
013 220 777 60 837
012 220 801 60 861
011 220 815 60 875
Medium Fire Cones °C
Segment 1 Segment 2 Segment 3 Segment 4
Cone Rate 1 Temp. 1 Rate 2 Temp. 2 Rate 3 Temp. 3 Rate 4 Temp. 4
010 180 550 85 600 100 843 60 903
09 180 550 85 600 100 860 60 920
08 180 550 85 600 100 882 60 942
07 180 550 85 600 100 916 60 976
06 180 550 85 600 100 938 60 998
05 180 550 85 600 100 971 60 1031
04 180 550 85 600 100 1003 60 1063
03 180 550 85 600 100 1026 60 1086
02 180 550 85 600 100 1042 60 1102
01 180 550 85 600 100 1059 60 1119
High Fire Cones °C
Segment 1 Segment 2 Segment 3 Segment 4
Cone Rate 1 Temp. 1 Rate 2 Temp. 2 Rate 3 Temp. 3 Rate 4 Temp. 4
1 180 550 100 600 90 1017 60 1137
2 180 550 100 600 90 1022 60 1142
3 180 550 100 600 90 1032 60 1152
4 180 550 100 600 90 1042 60 1162
5 180 550 100 600 90 1066 60 1186
6 180 550 100 600 90 1102 60 1222
7 180 550 100 600 90 1119 60 1239
8 180 550 100 600 90 1129 60 1249
9 180 550 100 600 90 1140 60 1260
10 180 550 100 600 90 1165 60 1285
14 Cone-Fire / Ramp-Hold
Page 15
Temperature Equivalents For
Orton Self-Supporting Pyrometric Cones
°F
Cone Self-Supporting Cones Pre-Fire
Num-ber Color
Heated at: 27° F 108° F 270° F
Per Hour* Per Hour* Per Hour*
022 — 1087 1094 Green
021 — 1112 1143 Fuschia
020 — 1159 1180 Orange
019 1213 1252 1283 Yellow
018 1267 1319 1353 White
017 1301 1360 1405 Pink
016 1368 1422 1465 Light Blue
015 1382 1456 1504 Violet
014 1395 1485 1540 Gray
013 1485 1539 1582 Green
012 1549 1582 1620 Fuschia
011 1575 1607 1641 Orange
010 1636 1657 1679 Dark Red
09 1665 1688 1706 Dark Red
08 1692 1728 1753 Dark Red
07 1764 1789 1809 Dark Red
06 1798 1828 1855 Dark Red
051/2 1839 1859 1877 Dark Red
05 1870 1888 1911 Dark Red
04 1915 1945 1971 Dark Red
03 1960 1987 2019 Dark Red
02 1972 2016 2052 Dark Red
01 1999 2046 2080 Dark Red
1 2028 2079 2109 Dark Red
2 2034 2088 2127 Dark Red
3 2039 2106 2138 Dark Red
4 2086 2124 2161 Gray
5 2118 2167 2205 Green
51/2 2133 2197 2237 White
6 2165 2232 2269 Fuchsia
7 2194 2262 2295 Orange
8 2212 2280 2320 Yellow
9 2235 2300 2336 White
10 2284 2345 2381 Pink
*Rate of temperature increase duringlast 90 - 120
minutes of firing. Tables by courtesy of the Edward
Orton, Jr. Ceramic Foundation.
°C
Cone Self-Supporting Cones Pre-Fire
Number Color
Heated at: 15° C 60° C 150° C
Per Hour* Per Hour* Per Hour*
022 — 586 590 Green
021 — 600 617 Fuschia
020 — 626 638 Orange
019 656 678 695 Yellow
018 686 715 734 White
017 705 738 763 Pink
016 742 772 796 Light Blue
015 750 791 818 Violet
014 757 807 838 Gray
013 807 837 861 Green
012 843 861 882 Fuschia
011 857 875 894 Orange
010 891 903 915 Dark Red
09 907 920 930 Dark Red
08 922 942 956 Dark Red
07 962 976 987 Dark Red
06 981 998 1013 Dark Red
051/2 1004 1015 1025 Dark Red
05 1021 1031 1044 Dark Red
04 1046 1063 1077 Dark Red
03 1071 1086 1104 Dark Red
02 1078 1102 1122 Dark Red
01 1093 1119 1138 Dark Red
1 1109 1137 1154 Dark Red
2 1112 1142 1164 Dark Red
3 1115 1152 1170 Dark Red
4 1141 1162 1183 Gray
5 1159 1186 1207 Green
51/2 1167 1203 1225 White
6 1185 1222 1243 Fuchsia
7 1201 1239 1257 Orange
8 1211 1249 1271 Yellow
9 1224 1260 1280 White
10 1251 1285 1305 Pink
*Rate of temperature increase duringlast 90 - 120
minutes of firing. Tables by courtesy of the Edward
Orton, Jr. Ceramic Foundation.
15
Page 16
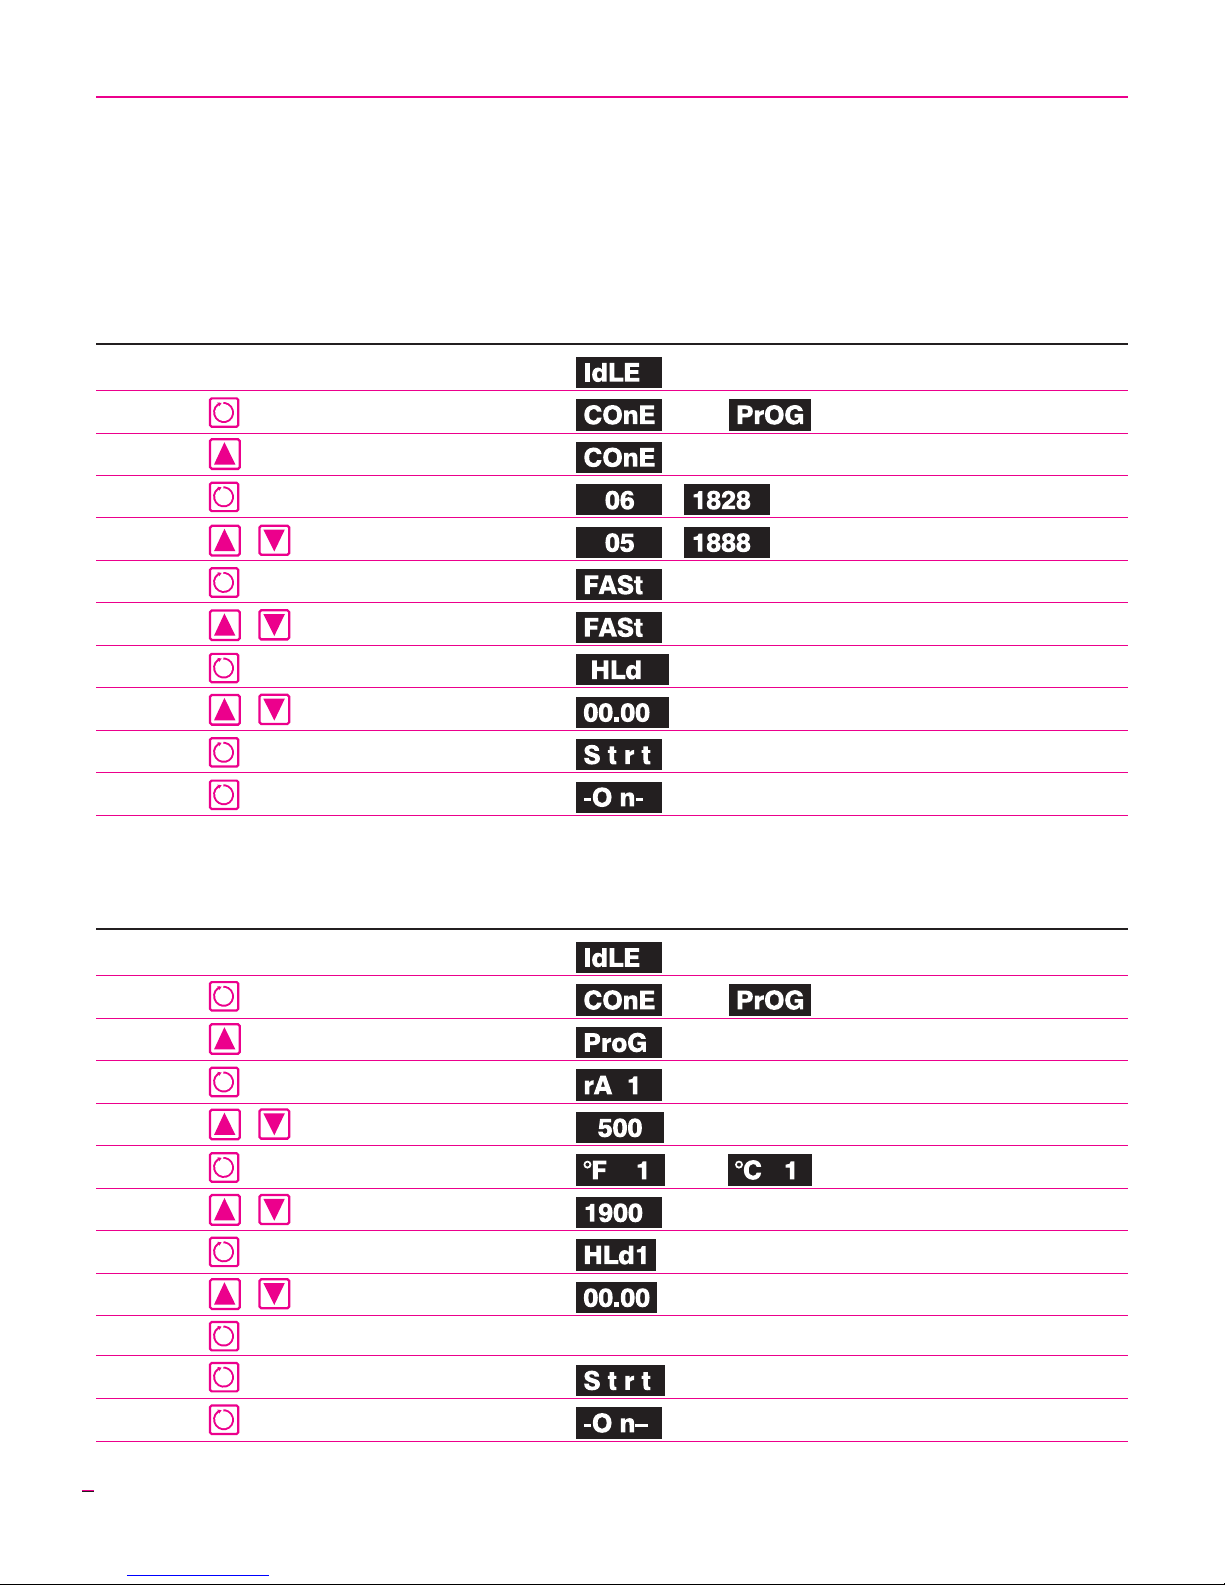
Shorthand Instructions
These instructions maybe confusing until you have readmoredetailedinstructions on Cone-Fire, page 6, or Ramp-Hold,
page8.Read thesafety guidelines,page 2.After pressingthe keysin theleft column,the messageinthe centerwill appear.
Cone-Fire
Keys to Press Display
or
(Not Down Arrow) Select COnE
/ (Last cone fired)
Select cone number / (Sample cone)
Select speed (Sample speed)
Enter Hold Time (Or hold time)
Ramp-Hold
Keys to Press Display
(Not Down Arrow)
Enter Segment 1 rate (Sample rate)
Enter Temperature (Sample temperature)
Enter Hold Time (Or hold time)
First segment not needed: enter a rate of 0000.
The kiln is now firing.
or
or
16 Cone-Fire / Ramp-Hold
The kiln is now firing.
 Loading...