

Page 1
TRANSFUSION MEDICINE
J55700ENna
ID-MTS™ Gel Cards
Reference Guide
Page 2
Customer – For Future Reference:
WARNING: CAREFULLY READ AND FOLLOW
THE INSTRUCTIONS PROVIDED IN THIS MANUAL
BEFORE OPERATING THE INSTRUMENT
In the box below, please transcribe the serial number as it
appears on the ORTHO
™
Workstation.
ORTHO
™
Workstation Serial Number:
6904630
Proprietary Notice
No part of this manual may be reproduced or transmitted in any form or
by any means, electronic or mechanical, including photocopying and
recording, for any purpose without the express written permission of
Ortho-Clinical Diagnostics, Inc.
MTS is a trademark of Ortho-Clinical Diagnostics, Inc
.
Copyright © by Ortho-Clinical Diagnostics, Inc. 2013
All rights reserved
ii Pub. No.: J55700ENna
2013-09-04
Page 3

ORTHO™ Workstation for ID-MTS
™
Gel Cards Reference Guide
Contents
Section 1 - Description . . . . . . . . . . . . . . . . . . . . . . . . . . . . . . . . . . . . . . . . . . . . . 5
Intended Use . . . . . . . . . . . . . . . . . . . . . . . . . . . . . . . . . . . . . . . . . . . . 5
Overview . . . . . . . . . . . . . . . . . . . . . . . . . . . . . . . . . . . . . . . . . . . . . . . 5
Section 2 - Warnings and Precautions . . . . . . . . . . . . . . . . . . . . . . . . . . . . . . . . . 6
Section 3 - Installation & Specifications. . . . . . . . . . . . . . . . . . . . . . . . . . . . . . . . . 8
Unpacking Procedure . . . . . . . . . . . . . . . . . . . . . . . . . . . . . . . . . . . . . 8
Specifications . . . . . . . . . . . . . . . . . . . . . . . . . . . . . . . . . . . . . . . . . . . 8
Site Specifications . . . . . . . . . . . . . . . . . . . . . . . . . . . . . . . . . . . . . . . 9
Environmental Requirements . . . . . . . . . . . . . . . . . . . . . . . . . . . . . . . 9
Electrical Requirements . . . . . . . . . . . . . . . . . . . . . . . . . . . . . . . . . . . 9
Ventilation Requirements . . . . . . . . . . . . . . . . . . . . . . . . . . . . . . . . . . 9
Safety Requirements . . . . . . . . . . . . . . . . . . . . . . . . . . . . . . . . . . . . . 10
EMC Requirements . . . . . . . . . . . . . . . . . . . . . . . . . . . . . . . . . . . . . . 10
Section 4 - Centrifuge . . . . . . . . . . . . . . . . . . . . . . . . . . . . . . . . . . . . . . . . . . . . . 11
Operational Guidelines . . . . . . . . . . . . . . . . . . . . . . . . . . . . . . . . . . . 11
Procedure- Spin Cards . . . . . . . . . . . . . . . . . . . . . . . . . . . . . . . . . . . 11
Centrifuge Card Holder Replacement . . . . . . . . . . . . . . . . . . . . . . . . 12
Section 5 - Incubator . . . . . . . . . . . . . . . . . . . . . . . . . . . . . . . . . . . . . . . . . . . . . . 13
Operational Guidelines . . . . . . . . . . . . . . . . . . . . . . . . . . . . . . . . . . . 13
Procedure- Incubate ID-MTS
Section 6 - Troubleshooting and Error Codes . . . . . . . . . . . . . . . . . . . . . . . . . . . 14
Troubleshooting. . . . . . . . . . . . . . . . . . . . . . . . . . . . . . . . . . . . . . . . . 14
Error Codes . . . . . . . . . . . . . . . . . . . . . . . . . . . . . . . . . . . . . . . . . . . . 14
Section 7 - Qualification Procedures . . . . . . . . . . . . . . . . . . . . . . . . . . . . . . . . . . 17
When to Perform Qualification Procedures . . . . . . . . . . . . . . . . . . . . 17
Daily Procedures . . . . . . . . . . . . . . . . . . . . . . . . . . . . . . . . . . . . . . . . 17
As Needed Procedures . . . . . . . . . . . . . . . . . . . . . . . . . . . . . . . . . . . 17
Section 8 - Maintenance . . . . . . . . . . . . . . . . . . . . . . . . . . . . . . . . . . . . . . . . . . . 19
Cleaning and Disinfection . . . . . . . . . . . . . . . . . . . . . . . . . . . . . . . . . 19
Cleaning Under the Incubator (As Needed) . . . . . . . . . . . . . . . . . . . 20
Replacing Fuses . . . . . . . . . . . . . . . . . . . . . . . . . . . . . . . . . . . . . . . . 20
Section 9 - Warranty . . . . . . . . . . . . . . . . . . . . . . . . . . . . . . . . . . . . . . . . . . . . . . 21
Section 10 - Revision History . . . . . . . . . . . . . . . . . . . . . . . . . . . . . . . . . . . . . . . 22
™
Gel Cards. . . . . . . . . . . . . . . . . . . . . 13
Section 11 - Key to Symbols . . . . . . . . . . . . . . . . . . . . . . . . . . . . . . . . . . . . . . . . 23
Pub. No.: J55700ENna 3
2013-09-04
Page 4

4 Pub. No.: J55700ENna
2013-09-04
Page 5
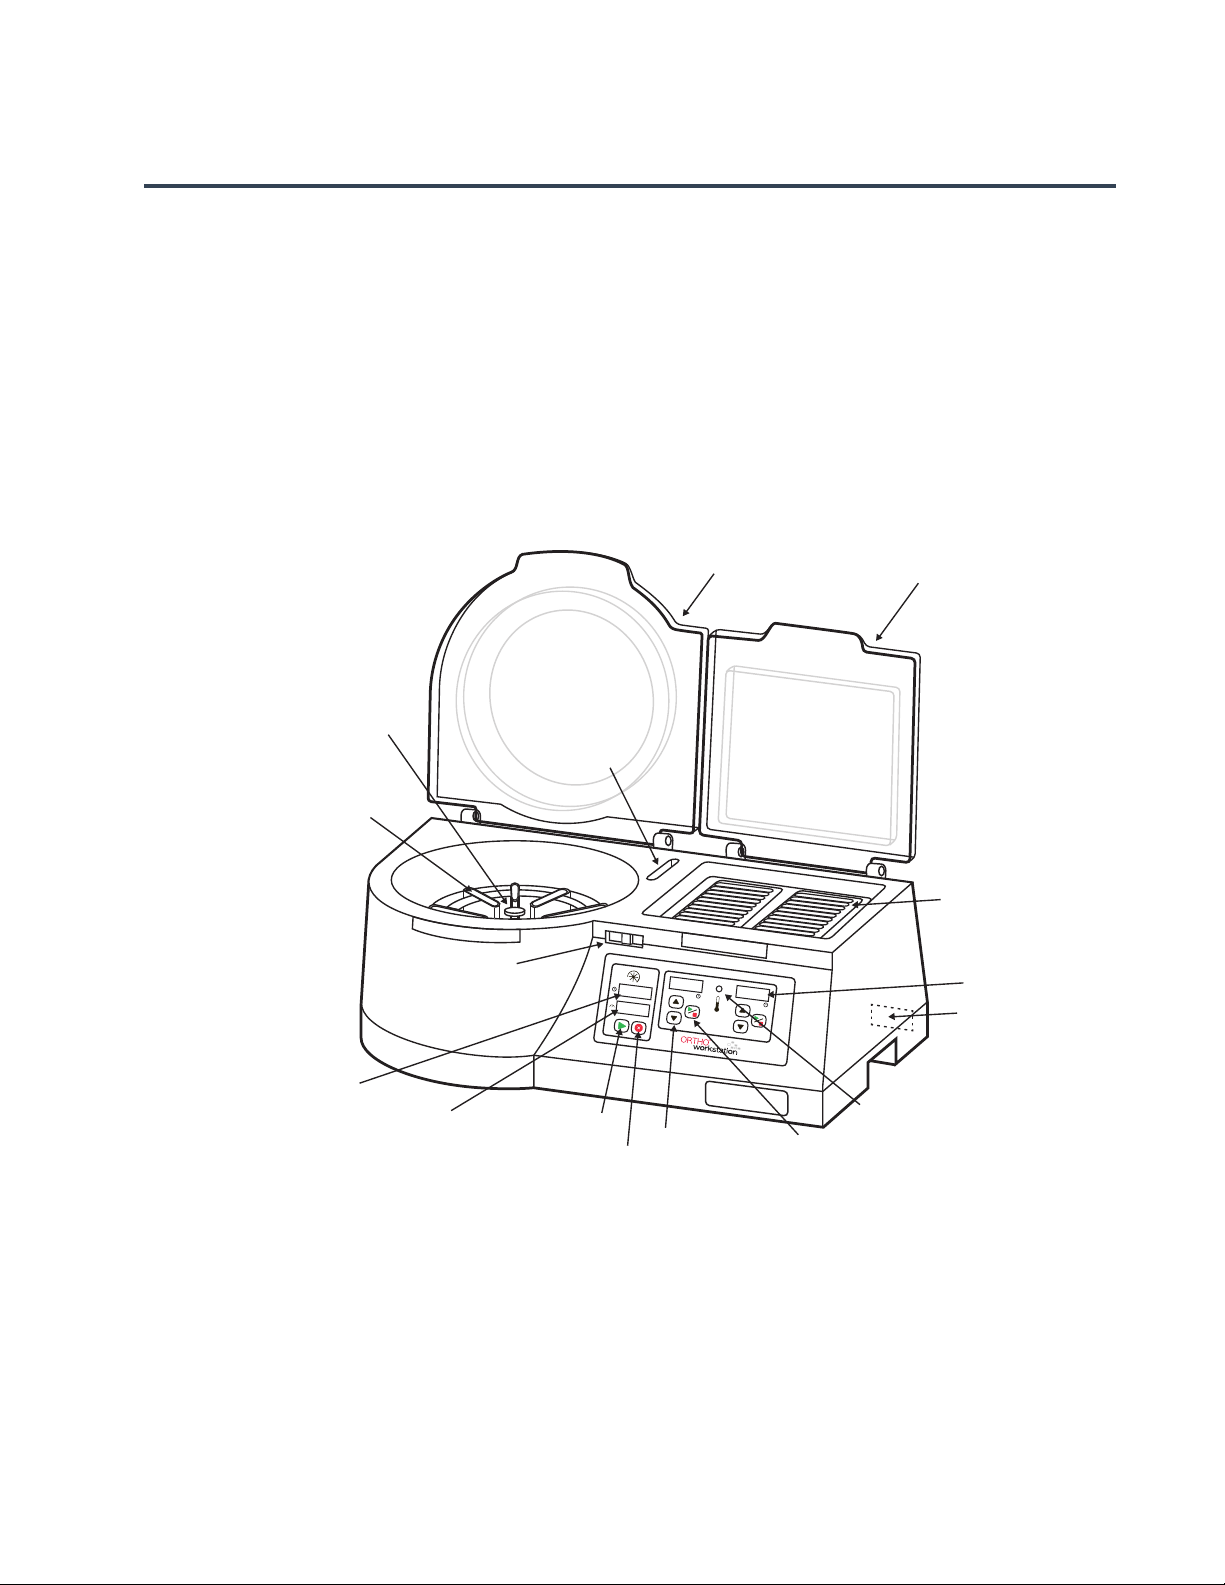
ORTHO™ Workstation for ID-MTS™ Gel Cards Reference Guide
Centrifuge Rotor
Centrifuge Lid
Incubator Lid
Balance Card
Holder
Centrifuge
Card Holder
Centrifuge
Start Button
Centrifuge
Stop Button
Incubator Timer
Up/Down Buttons
Incubator
Start/Stop Button
Incubator Temperature
Status Display
Incubator Block
Centrifuge
Lid Latch
Centrifuge Time
LED Display
Centrifuge RPM
LED Display
Power Cord and
Fuse Assembly
Incubator Time
LED Display
Section 1 - Description
Intended Use
Section 1 - Description
The ORTHO™ Workstation is intended to support the in vitro immunohematology testing of human
blood through the incubation and centrifugation of ID-MTS
™
Gel cards.
Overview
The ORTHO™ Workstation is a combined bench top workstation providing incubation and
centrifugation, utilizing ID-MTS
Workstation includes (refer to Figure 1):
Figure 1: ORTHO
™
Workstation
™
Gel card Column Agglutination Technology. The ORTHO™
Materials provided:
• ORTHO™ Workstation • Reference Guide
• Power Cord
temperature meter
• Phillips screwdriver
Materials required but not provided:
• Balance card • Photo calibrated tachometer • Calibrated thin wire
•
ID-MTS™ Gel card and reagents
listed in corresponding IFU
• A calibrated stopwatch or
equivalent
Pub. No.: J55700ENna 5
2013-09-04
Page 6

Section 2 - Warnings and Precautions ORTHO™ Workstation for ID-MTS™ Gel Cards Reference Guide
Section 2 - Warnings and Precautions
This section contains warnings and safety precautions applicable to the ORTHO™ Workstation.
These warnings and safety precautions must be observed in order to avoid possible harm to
personnel and the instrument, and to avoid false test interpretations.
Refer to the Instructions For Use for each product used with the ORTHO
important information, including proper storage temperature. Do not attempt to operate this
instrument before thoroughly reading the instructions.
™
Workstation for
General precautions regarding use
• This equipment must only be operated by operators who are trained laboratory technicians and
have a knowledge of immunohematology.
• Use of the instrument in a different way than specified in this reference guide may damage the
instrument and system parts.
• Do not repeatedly turn on and turn off the power switch. This could cause damage to the
electronics of the instrument.
• Incomplete, interrupted or multiple cycles may produce erroneous results. When in doubt, discard
the cards and repeat the test.
• To avoid temperature loss and potentially impacting test results, close the incubator lid as soon as
operator is finished loading cards. Operator may place additional cards in the heated block at any
time. After placing additional cards, close lid immediately.
• If an error occurs in the ORTHO
provided or assistance is needed, or if you have any doubts about the safety of the equipment,
please contact OCD Customer Technical Services.
™
Workstation hardware for which corrective action is not
• Flashing "0000" on all displays indicates that power has been applied or that a power interruption
has occurred. If an unexpected power interruption occurs during a test then the test results are no
longer valid. Press any button to reset the system and continue normal use.
Electrical safety precautions
• The electrical plug is a three-prong type for safe grounding. If the wall outlet is not the grounded
type, the outlet must be changed or another outlet must be used.
• In order to totally disconnect the instrument from the power supply, the instrument must be
unplugged (the On/Off switch is insufficient).
• For continued protection against electrical hazard, use only voltages and fuses of the same type
and rating as stated in Section 3 - Installation & Specifications and Section 8 - Maintenance.
• Although the instrument is completely isolated and grounded, it is important that all operators
realize the danger of using liquids near a power supply. In the case of a large liquid spill, the
instrument should be immediately disconnected from the power supply and cleaned.
6 Pub. No.: J55700ENna
2013-09-04
Page 7
ORTHO™ Workstation for ID-MTS™ Gel Cards Reference Guide
• Due to the risk of electromagnetic interference, the instrument should not be used adjacent to, or
stacked with, other equipment. The instrument should be observed to verify normal operation in
the configuration in which it will be used.
Biohazardous materials
Section 2 - Warnings and Precautions
• Use universal precautions when working with the ORTHO™ Workstation. Use only materials and
substances for which the ORTHO
outlined in this reference guide or laboratory procedures. Follow the laboratory’s Standard
Operating Procedures when working with these materials and substances.
• Universal precautions and good laboratory working practices must be observed, and laboratory
procedures regarding personal protective equipment (lab coats, gloves, and eye protection) must
be followed.
• All areas of the instrument must be considered potentially biohazardous and handled with the
appropriate care as per the laboratory’s Standard Operating Procedure.
™
Workstation was designed. All materials and substances are
MTS™ Gel card handling
When preparing ID-MTS™ Gel cards refer to the corresponding IFU.
Ensure regular cleaning and maintenance
• The ORTHO™ Workstation is a precision instrument and requires regular cleaning and
maintenance to ensure accurate operation and positioning of its movable parts. Care must be
taken to ensure the maintenance schedule and procedures in this reference guide are followed.
• Failure to perform the appropriate cleaning, maintenance or quality control procedure at the
necessary time can result in damaged parts, operating inaccuracy and/or compromised sample
results.
• When cleaning the ORTHO
date.
• Be sure to use 70% isopropyl alcohol or mild detergent. Do not use bleach.
™
Workstation, do not use cleaning solutions past their expiration
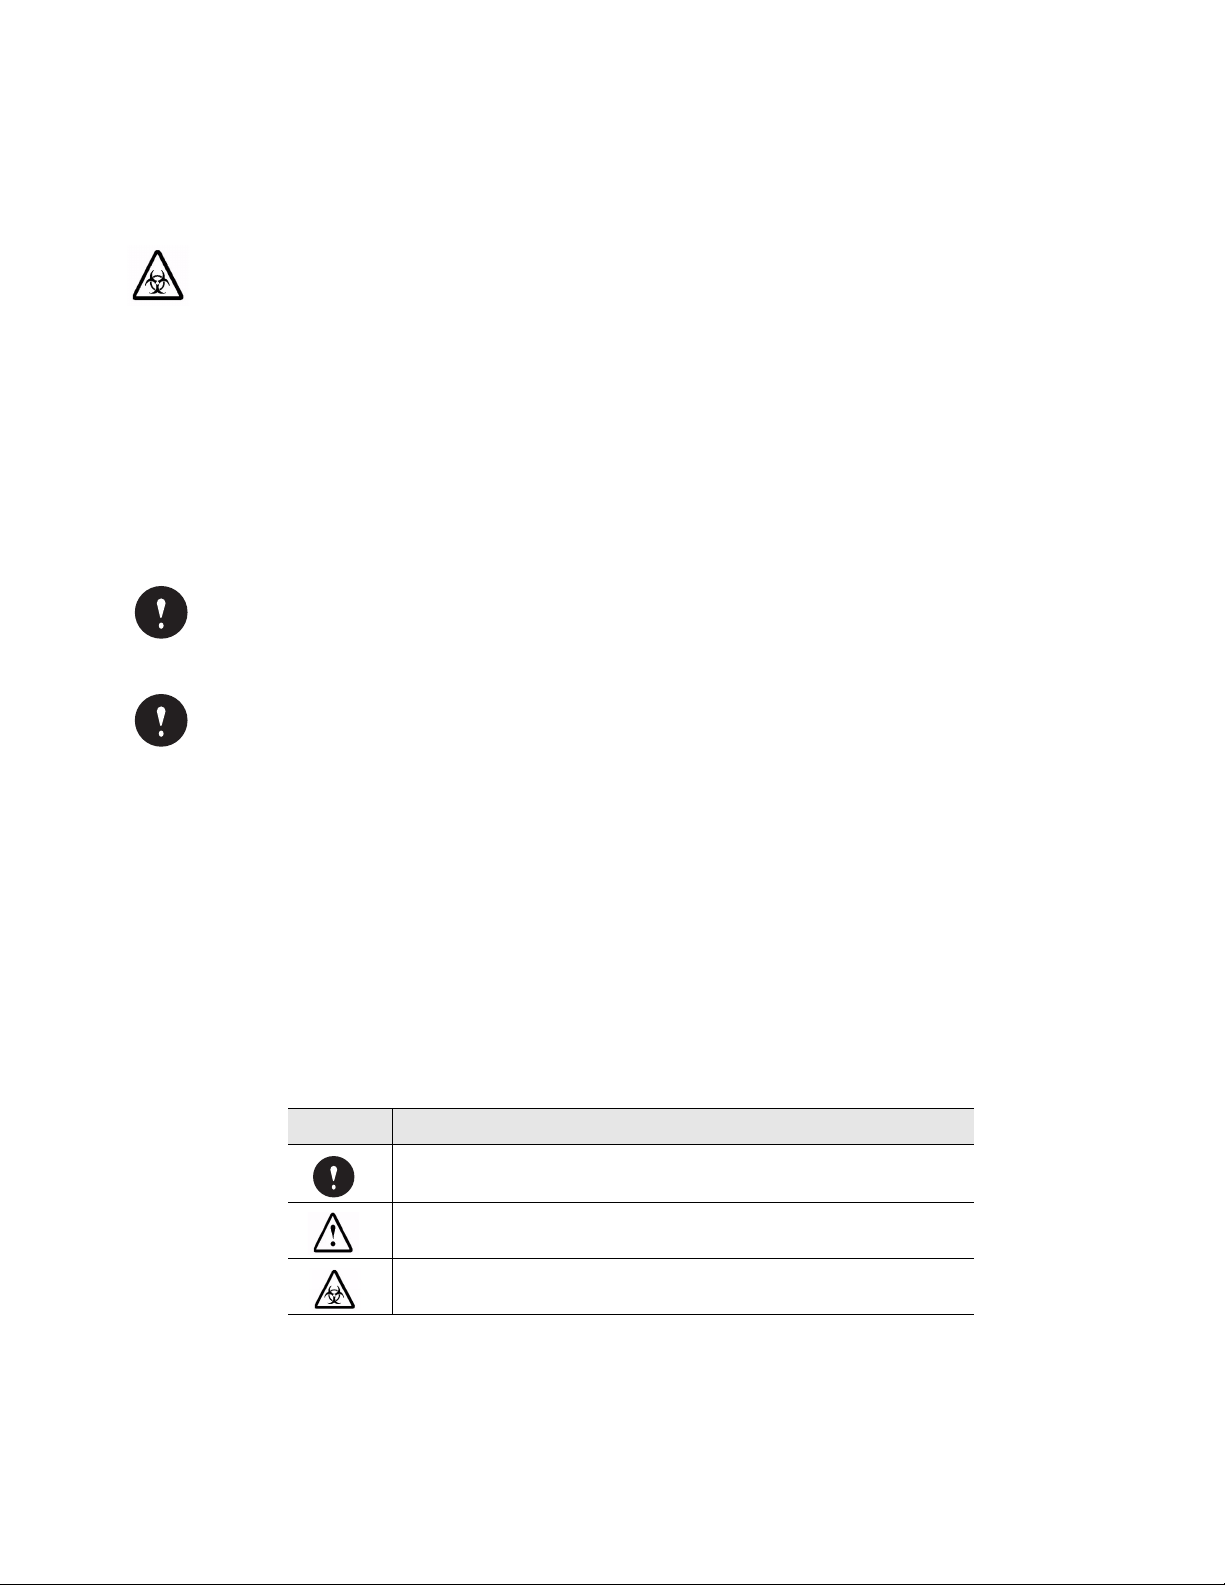
General warning symbols used in this guide
Symbol Description
Important or Caution
General Warning
(Direct or indirect danger to personal safety or instrument)
Biohazard
Pub. No.: J55700ENna 7
2013-09-04
Page 8

Section 3 - Installation & Specifications ORTHO™ Workstation for ID-MTS™ Gel Cards Reference Guide
CAUTION: Operator is advised to read all instructions before plugging the
instrument in.
Section 3 - Installation & Specifications
Unpacking Procedure
1. Visually inspect the container for damage and ensure it is in an upright position before it is
opened.
2. Remove power cord from box.
3. Remove the instrument from the box and protective bag.
4. Remove the foam block from the rotor area.
5. Visually inspect the instrument for loose, bent, or broken parts.
Report any damage immediately by contacting the OCD Customer Technical Services number
provided by Ortho Clinical Diagnostics or your distributor.
6. Compare the serial number on the rear panel of the instrument with the serial number in the
packing slip.
If the Instrument is Received Damaged
If you have received an instrument with obvious shipping damage, do not connect power to the
instrument. Contact the OCD Customer Technical Services number provided by Ortho Clinical
Diagnostics or your distributor for assistance.
After installation, a quality control program should be followed through the life of the ORTHO
Workstation to provide assurance of accurate test results. Never use if the equipment does not
operate properly or is damaged.
Specifications
Dimensions: Height – 220 mm (8.66 inches)
Width – 575 mm (22.64 inches)
Depth – 325 mm (12.80 inches)
Weight: 10.89 kg (24 lb)
Power Requirements: 100 – 240 V~, 50/60 Hz, single phase
(Input auto-senses voltage/current, no
manual selection required)
Power Consumption: 150 VA
™
8 Pub. No.: J55700ENna
2013-09-04
Page 9

ORTHO™ Workstation for ID-MTS™ Gel Cards Reference Guide
WARNING: As with any electrical appliance, place the instrument AWAY from any
source of water, such as a laboratory sink. An electrical hazard may exist when
improperly using the ORTHO
™
Workstation near water.
WARNING: Do not block access to the power cord or Stop button during
ORTHO
™
Workstation operation.
Fuses: 2 required, T4AH250V - 4 Amp, 250V,
Cycle Speed: 1032 rpm ± 10 rpm
Speed Indicator: 4 digits
Timing Indicator: 4 digits
Cycle Timing: 10 minutes ± 10 sec.
Centrifuge Card Capacity: 10 cards
Incubation Temperature: 37°C ± 2°C
Incubator Card Capacity: 20 cards (two sections of 10)
Noise Level Generated: Maximum 50 dba at 1 meter (during normal
Site Specifications
Select a location for the ORTHO™ Workstation that is convenient for laboratory personnel to
perform testing. The surface must be a stable, level, vibration-free surface, away from direct
sunlight, free from dust, solvent and acid vapors and have an electrical outlet close enough to the
instrument to permit power access without an extension cord. Do not expose it to heat or cold
(close proximity to heating or air-conditioning systems). Never subject it to violent shaking or any
other shock or impact.
Section 3 - Installation & Specifications
ceramic, time delay, 5x20mm.
(including ramp-up time)
operation)
\
Environmental Requirements
Temperature: 15 – 30°C (59 – 86°F)
Relative Humidity: 15 – 85% (non-condensing)
Electrical Requirements
The ORTHO™ Workstation is equipped with automatic sensing of input voltage within the range of
100 – 240 V~, 50/60 Hz, single phase. Connect the instrument to the power outlet with the
grounded three-prong power cord provided.
Ventilation Requirements
There are no special ventilation requirements for this instrument.
Pub. No.: J55700ENna 9
2013-09-04
Page 10

Section 3 - Installation & Specifications ORTHO™ Workstation for ID-MTS™ Gel Cards Reference Guide
Safety Requirements
This instrument meets the following International, US and Canadian standards for Safety for in
vitro diagnostic electrical equipment, and is audited through ETL/Intertek for compliance to the
standards:
• ANSI/UL 61010-1:2004, 2nd Edition, Safety Requirements for Electrical Equipment for
Measurement, Control and Laboratory Use - Part 1: General Requirements
• CAN/CSA C22.2 No.61010-1:2004, 2nd Edition, Safety Requirements for Electrical Equipment
for Measurement, Control and Laboratory Use - Part 1: General Requirements
• IEC 61010-1, 2nd Edition (2001), Safety Requirements for Electrical Equipment for
Measurement, Control and Laboratory Use -Part 1: General Requirements
• IEC 61010-2-010, 2nd Edition (2003-06), Safety Requirements for Electrical Equipment for
Measurement, Control and Laboratory Use - Part 2-010: Particular Requirements for Laboratory
Equipment for the Heating of Materials
• IEC 61010-2-020, 2nd Edition (2006-05), Safety Requirements for Electrical Equipment for
Measurement, Control and Laboratory Use - Part 2-020: Particular Requirements for Laboratory
Centrifuges
• IEC 61010-2-101, First Edition (2002-01), Safety Requirements for Electrical Equipment for
Measurement, Control, and Laboratory Use Part 2-101: Particular Requirements for in Vitro
Diagnostic (IVD) Medical Equipment
EMC Requirements
This equipment has been tested and found to comply with the limits for a Class A digital device,
pursuant to part 15 of the FCC Rules. These limits are designed to provide reasonable protection
against harmful interference when the equipment is operated in a commercial environment. This
equipment generates, uses, and can radiate radio frequency energy and, if not installed and used
in accordance with the instruction manual, may cause harmful interference to radio
communications. Operation of this equipment in a residential area is likely to cause harmful
interference in which case the user will be required to correct the interference at his own expense.
10 Pub. No.: J55700ENna
2013-09-04
Page 11

ORTHO™ Workstation for ID-MTS™ Gel Cards Reference Guide
BIOHAZARD: Handle all blood and materials in contact with blood as if capable of
transmitting infectious agents. It is recommended that blood and materials in
contact with blood be handled using established good laboratory practices.
* The gold-filled slot indicates proper placement of the balance card, the black-filled slot represents cards
being tested and the white-filled slot represents an empty position.
Section 4 - Centrifuge
Operational Guidelines
The ORTHO™ Workstation centrifuge has a rotor designed to hold up to 10 cards. The centrifuge
is preset to spin the cards at 1032 rpm for 10 minutes. You may check the rpm any time during the
centrifugation cycle by checking the centrifuge RPM LED display. The centrifuge RPM LED display
is continuously updated. Never attempt to open the centrifuge while rotor is spinning; serious injury
could result if rotating parts are exposed. If you hear a loud noise, hit the Stop button immediately.
Procedure- Spin Cards
No special training is required to operate this instrument.
Section 4 - Centrifuge
1. Turn instrument on.
2. The time LED display will read 10:00.
3. Open the lid of the centrifuge.
4. Insert cards into holders. The centrifuge rotor is rigid mounted, however, care should be taken to
ensure that the centrifuge rotor is balanced. The balance card may be required to balance the
rotor. Balance card storage is located in the balance card holder on the top of the instrument. Your
lab will need to provide an ID-MTS
follow Balance Card Configurations as shown below in Figure 2.
Figure 2: Balance Card Configurations
1 card
3 cards 7 cards
™
Gel card for use. To avoid imbalance of the centrifuge, please
5 cards 9 cards
5. Close the lid. The centrifuge will not spin with the lid opened.
NOTE: Failure to completely close the centrifuge lid can prevent the start of a centrifuge cycle and
if not closed for an extended period of time a critical error condition could occur that would require
a system power cycle to correct.
Pub. No.: J55700ENna 11
2013-09-04
Page 12

Section 4 - Centrifuge ORTHO™ Workstation for ID-MTS™ Gel Cards Reference Guide
CAUTION: ID-MTS Gel cards placed incorrectly in the centrifuge card holders may
result in incorrect results. Always verify ID-MTS Gel cards are seated firmly in the
card holder.
CAUTION: Incomplete, interrupted or multiple cycles may produce erroneous
results. When in doubt, discard the cards and repeat the test.
WARNING: If the equipment is used in a manner not specified by the
manufacturer, the protection provided by the equipment may be impaired.
WARNING: A pinch hazard exists if the centrifuge lid is opened before the rotor
stops spinning. Allow the rotor to come to a complete stop before opening the lid.
6. Press the centrifuge Start button. Centrifuge rotor will accelerate up to speed.
The centrifuge rotor speed is monitored for the duration of the centrifuge cycle. If the instrument
cannot reach speed due to a malfunction, an alarm will sound and an error code will be displayed.
An incomplete cycle voids all results. See Section 6 - Troubleshooting and Error Codes.
You can cancel a cycle in progress by pressing the centrifuge Stop button. An incomplete cycle
voids all results.
At the conclusion of the ten-minute spin, the completion alarm will beep three times and the time
display will flash 00:00.
7. Open the lid and remove the cards.
NOTE: Check the centrifuge rotor regularly for signs of damage. The centrifuge must not be used
if there are signs of damage or if the speed or timer is out of specification.
Centrifuge Card Holder Replacement
1. Open the centrifuge lid.
2. Pinch the center of the damaged card holder and remove it from the centrifuge rotor.
3. Place the new card holder in the centrifuge rotor and pinch the center of the card holder so that
it sits in place in the centrifuge rotor.
4. Ensure that the card holder swings freely.
5. Close the centrifuge lid.
12 Pub. No.: J55700ENna
2013-09-04
Page 13

ORTHO™ Workstation for ID-MTS™ Gel Cards Reference Guide
CAUTION: The factory-set default incubation time is 15 minutes.
CAUTION: Once incubation time has been set by the operator, and until the system
is powered off, the displayed starting incubation time shall be the previously set
time. Once the system has been powered off and back on, the starting incubation
time shall return to the factory-set default.
BIOHAZARD: Handle all blood and materials in contact with blood as if capable of
transmitting infectious agents. It is recommended that blood and materials in
contact with blood be handled using established good laboratory practices.
Section 5 - Incubator
Operational Guidelines
The ORTHO™ Workstation incubator has one heated block with two sections able to hold up to 10
cards each.
NOTE: The incubator must not be used if the timer or temperature is out of specification.
Operators can set each block timer to any time between and including 1 to 99 minutes, with one
minute increments.
Incubator timed countdown is displayed on the incubator time LED display on the front of the
incubator. When incubation is finished, a completion alarm sounds and the display will flash and
count up indicating over-incubation.
Section 5 - Incubator
NOTE: If the temperature indicator flashes red during incubation, discard all cards in incubation
process. Avoid incubation until the temperature indicator returns to green.
Procedure- Incubate ID-MTS™ Gel Cards
No special training is required to operate this instrument.
1. Turn the instrument on and ensure that the incubator lid is closed completely.
2. Wait until the temperature of the ORTHO
incubator temperature status display is green. If the temperature is not within the required limits
the indicator will flash red and the incubator should not be used.
3. Open the lid and load the cards. When loading cards into the incubator block, make sure the
card is seated fully in the slot. Ensure that the incubator lid is closed completely at all times during
incubation except when loading and unloading cards.
4. To select a desired incubation time other than the factory-set default (15 minutes), press the Up
or Down button.
5. Press the Start/Stop button to start incubation time. The instrument displays the remaining time
continuously. When the incubation is completed, a completion alarm will beep three times and will
flash and count up to show over-incubation time. To stop the timer and reset the display, press the
Start/Stop button.
™
Workstation is stabilized (10 to 15 minutes) and the
NOTE: Stopping the incubator timer does not stop the incubator block from heating. Heating will
only stop when the instrument is turned off.
Pub. No.: J55700ENna 13
2013-09-04
Page 14

Section 6 - Troubleshooting and Error Codes ORTHO™ Workstation for ID-MTS™ Gel Cards Reference Guide
Section 6 - Troubleshooting and Error Codes
Troubleshooting
Use Table 1 to help correct problems with the ORTHO™ Workstation.
Table 1: Troubleshooting
Troubleshooting
Symptom Possible Cause Suggested Remedy
Ensure the power cord is connected to a working
receptacle and to the instrument, and that the
instrument is turned on. Check the fuse.
Power cycle the instrument; turn off the instrument
for 10 seconds and power back on.
Ensure lid is closed.
Open and close lid.
Press and release latch.
Review error codes in Table 2: Error IDs.
Power cycle the instrument; turn off the instrument
for 10 seconds and power back on.
Power cycle the instrument; turn off the instrument
for 10 seconds and power back on.
Contact the OCD Customer Technical Services
number provided by Ortho Clinical Diagnostics or
your distributor for assistance.
Power cycle the instrument; turn off the instrument
for 10 seconds and power back on.
Contact the OCD Customer Technical Services
number provided by Ortho Clinical Diagnostics or
your distributor for assistance.
No display
Centrifuge will not spin
Improper speed
(identified during routine
speed verification)
Improper timing
(identified during routine
timer verification)
Power cord pulled from
the instrument or from
the outlet
• Lid is open or not
closed properly.
• Lid may not have been
opened after previous
cycle.
• Latch is pressed.
• Malfunction error
reported.
Internal malfunction or
external line voltage
Internal malfunction or
external line voltage
Flashing "0000" on all displays indicates that power has been applied or that a power interruption
has occurred. If an unexpected power interruption occurs during a test then the test results are no
longer valid. Press any button to reset the system and continue normal use.
Error Codes
When an error occurs it will be posted on either the centrifuge speed display or on the right
incubator timer display. There are a two different types of errors; clearable errors and nonclearable "critical" errors. See Table 2 for a list of the Error IDs and the description of each.
Clearable errors are cleared by pressing the centrifuge Stop button or the incubator Start/Stop
button (see Figure 3).
14 Pub. No.: J55700ENna
2013-09-04
Page 15

ORTHO™ Workstation for ID-MTS™ Gel Cards Reference Guide
Centrifuge
error display
Clear
centrifuge error
by pressing
centrifuge Stop
Incubator
error display
Clear incubator
error by pressing
incubator
Start/Stop
Section 6 - Troubleshooting and Error Codes
Critical errors are errors that prevent proper operation of the centrifuge or incubator. If the error is
deemed critical the ORTHO
™
Workstation will become unresponsive to buttons pressed. Error IDs
100 and above are identified as critical errors. If a critical error occurs, turn off the instrument for 10
seconds and power back on. If the error reoccurs contact the OCD Customer Technical Services
number provided by Ortho Clinical Diagnostics or your distributor for assistance.
NOTE: If an error occurs that could cause a potential invalid test result (error code number 3, 50,
51, or 52) a 4 beep alarm will sound when the latch is pressed to open the lid.
Figure 3: Clearable Error Displays
Table 2: Error IDs
Error ID Error Description
Clearable Errors
1
2
3
5
50
51
52
†
†
†
†
Lid Open Error: The centrifuge lid is open. Close centrifuge lid and make sure latch is
engaged. This error is automatically cleared when the centrifuge lid is opened.
Lid Cycle Required Error: The centrifuge lid needs to be opened before the centrifuge can
be started again. This is done to insure that cards do not get centrifuged more than once. It is
assumed that the cards are removed when the lid is opened. This error is automatically
cleared when the centrifuge lid is opened.
Aborted Error: The centrifuge Stop button was pressed, the latch was pressed or the lid was
opened during a centrifuge cycle.
Latch Open Error: The centrifuge lid latch was open while attempting to start the centrifuge.
Ensure that the lid is fully closed. This error is automatically cleared when the centrifuge lid is
opened.
Still Rotating Error: The centrifuge is moving when it is not expected to be.
Speed Verify Error: The centrifuge speed was not correct at some point in the cycle and as a
result the cycle was aborted.
Start Error: The centrifuge did not achieve sufficient speed within 5 seconds of pressing the
centrifuge Start button. Open and close the centrifuge lid and restart the centrifuge. If this
occurs more than once in a row, power cycle the centrifuge (waiting a few seconds with power
off then on).
Critical Errors (Not Clearable)
Latch Sensor Error: The latch sensor failed its health check. This check is done hourly (note
100
200
201
Pub. No.: J55700ENna 15
2013-09-04
test is only performed when the centrifuge is not in operation). Make sure the centrifuge lid is
securely closed.
Ambient Temperature Sensor Error: There was a failure reading the external ambient
temperature sensor.
Setpoint Low Error: The setpoint value read from the temperature controller’s was lower
than expected.
Page 16

Section 6 - Troubleshooting and Error Codes ORTHO™ Workstation for ID-MTS™ Gel Cards Reference Guide
202
203
204
205
206
207
208
†
Test is no longer valid
Setpoint High Error: The setpoint value read from the temperature controller’s was higher
than expected.
Setpoint Calculated Low Error: The calculated temperature setpoint is less than the
acceptable minimum. This could be caused by lab environmental temperature. Let the system
stabilize for one hour, turn the instrument off then on.
Setpoint Calculated High Error: The calculated temperature setpoint is higher than the
acceptable maximum. This could be caused by lab environmental temperature. Let the
system stabilize for one hour, then turn the instrument off then on.
Temperature Sensor 1 Low Error: The temperature sensor value read from the temperature
controller was lower than expected.
Temperature Sensor 1 High Error: The temperature sensor value read from the temperature
controller was higher than expected.
Heater Controller Read Error: There was a failure reading from the temperature controller.
Heater Controller Write Error: There was a failure writing to the temperature controller.
16 Pub. No.: J55700ENna
2013-09-04
Page 17

ORTHO™ Workstation for ID-MTS™ Gel Cards Reference Guide
Section 7 - Qualification Procedures
When to Perform Qualification Procedures
The frequency in which these procedures are performed may vary depending on the requirements
and regulations your national, state, provincial, and local governments require. Your own
laboratory procedures may require a different frequency.
Daily Procedures
Centrifuge Display - Speed Check
Since the speed of the centrifuge is displayed during operation, OCD recommends a daily check of
the displayed speed. This will ensure the centrifuge speed LED display matches the correct speed
of 1032 rpm ± 10 rpm.
Incubator Temperature Status Display Check
Section 7 - Qualification Procedures
Check the incubator temperature status display and verify that it is green. This will indicate it is
within the correct range.
As Needed Procedures
Speed Verification
The centrifuge is fully calibrated at the factory. Additional calibration is not necessary. However, an
additional speed verification may be performed with an optical or electronic device (e.g., photo
calibrated tachometer) as needed. Refer to your local laboratory practices for frequency of speed
verification. OCD recommends that calibration checks be performed with 10 cards.
• Cycle Speed: 1032 rpm ± 10 rpm.
NOTE: The centrifuge must not be used if speed is outside of specification.
Centrifuge Timing Verification
A calibrated stopwatch or equivalent is acceptable to check the timer. Verify accuracy of the
centrifuge timer according to your organization’s standard operating procedures.
• Cycle Timing: 10 minutes ± 10 sec. (including ramp-up time)
NOTE: The centrifuge must not be used if the timer is out of specification.
Incubator Temperature Verification
NOTE: Fluid temperature measurements should be made with an unused card and a calibrated,
thin wire digital temperature meter. Temperature must read 37°C ± 2°C.
1. Remove the foil from the top of an unused card.
Pub. No.: J55700ENna 17
2013-09-04
Page 18

Section 7 - Qualification Procedures ORTHO™ Workstation for ID-MTS™ Gel Cards Reference Guide
2. Fill reaction chamber of empty card with 100 µL of deionized (DI) or distilled water.
3. Place sensor wire into the reaction chamber of either of the two middle columns of the card (see
Figure 4).
NOTE: A thin piece of tape can be used to secure sensor wire to top of card. Do not tape over the
top of the measurement reaction chamber.
Figure 4: Sensor Wire Placement
4. Place card into any slot in the incubator and route the sensor wire out under the lid through the
small slot in the right side. Ensure the card is still seated completely in incubator slot after closing
the lid.
5. Incubate the card for 15 minutes and record the temperature.
• Incubation Temperature: 37°C ± 2°C
Incubator Timing Verification
A calibrated stopwatch or equivalent is acceptable to check the timer. Verify accuracy of the
incubator timer according to your organization’s standard operating procedures.
NOTE: The incubator must not be used if the timer is out of specification.
18 Pub. No.: J55700ENna
2013-09-04
Page 19

ORTHO™ Workstation for ID-MTS™ Gel Cards Reference Guide
BIOHAZARD: If parts of the instrument come into contact with the test specimen or
control samples they must be treated as potentially infectious areas. It is advisable
to wear disposable gloves when performing the washing procedure.
WARNING: Turn off the instrument and disconnect the power cord from BOTH the
power source and the ORTHO
™
Workstation before cleaning the instrument.
CAUTION: Be sure to use 70% isopropyl alcohol and not more-concentrated
solutions. Do not use bleach for cleaning.
WARNING: If other chemicals are used that are not specified for cleaning by the
manufacturer, the protection provided by the equipment may be impaired.
Section 8 - Maintenance
Cleaning and Disinfection
It is very important that the instrument is thoroughly disinfected before it is removed from the
laboratory. If return to Ortho Clinical Diagnostics or your distributor is needed the instrument must
be disinfected.
Call OCD Customer Technical Services for a return authorization number and specific
instructions for how to return the instrument.
NOTE: If the laboratory has its own disinfection procedure, please contact the OCD Customer
Technical Services number provided by Ortho Clinical Diagnostics or your distributor to ensure
that the procedure will not damage the instrument.
Section 8 - Maintenance
Use the following procedure to clean and disinfect the instrument:
1. Turn off the instrument and unplug the power cord.
2. Clean all obvious materials from the outside of the system, inside the rotor well, and the
incubator heating blocks with a cloth moistened with mild detergent. Avoid excessive use of water.
Remove detergent residue with a cloth moistened with clean water.
3. Clean the system lids with distilled water.
4. Clean any potentially contaminated areas of the system with mild detergent and then with 70%
isopropyl alcohol. Do not scrub excessively.
5. Allow the surfaces to air dry completely.
6. Plug in the power cord and turn instrument on.
NOTE: Follow instructions in the ID-MTS
cards.
™
Gel card instructions for use regarding disposal of
Pub. No.: J55700ENna 19
2013-09-04
Page 20

Section 8 - Maintenance ORTHO™ Workstation for ID-MTS™ Gel Cards Reference Guide
WARNING: Do not open the instrument housing and attempt repairs. If the
troubleshooting table suggestions do not correct the problem, contact the OCD
Customer Technical Services number provided by Ortho Clinical Diagnostics or
your distributor for assistance.
Cleaning Under the Incubator (As Needed)
1. Turn off the instrument and unplug the power cord.
2. Open the incubator lid.
3. Using a Phillips screwdriver remove the three screws located on the incubator block.
4. Tilt the incubator block to gain access to the area beneath the incubator.
NOTE: Do not pull the incubator block out or remove the heater harness.
5. Clean any potentially contaminated areas of the system with mild detergent and then with 70%
isopropyl alcohol. Do not scrub excessively.
6. Once cleaning is complete, place the incubator block down.
7. Install the three screws.
8. Close the incubator lid
Replacing Fuses
1. Turn off the instrument.
2. Unplug the power cord.
3. Pull out and flip fuse lid upwards on rear panel to open.
4. Replace the broken fuse with another one of the same type and value. See Section 3 Installation & Specifications.
5. Flip down and push in fuse lid to close.
6. Plug in the power cord and turn on the instrument.
If the instrument does not switch on or the new fuse is not functioning, contact the OCD Customer
Technical Services number provided by Ortho Clinical Diagnostics or your distributor for
assistance.
20 Pub. No.: J55700ENna
2013-09-04
Page 21

ORTHO™ Workstation for ID-MTS™ Gel Cards Reference Guide
Section 9 - Warranty
Warranty Time Period
Section 9 - Warranty
Ortho Clinical Diagnostics warrants the ORTHO
from date of shipment (from manufacturer storehouse). This warranty covers the purchaser of this
instrument and anyone else who owns it during the warranty period.
Warranty Repair Coverage
If this equipment does not function properly during the warranty period, please contact the
technical assistance OCD Customer Technical Services number provided by Ortho Clinical
Diagnostics or your distributor to arrange for service. The equipment will be replaced.
Limitations
OCD will not be responsible for any consequential or incidental damages resulting from the sale,
use or improper functioning of this equipment.
™
Workstation to function properly for one year
Pub. No.: J55700ENna 21
2013-09-04
Page 22

Section 10 - Revision History ORTHO™ Workstation for ID-MTS™ Gel Cards Reference Guide
Section 10 - Revision History
ORTHO™
Workstation for ID-
™
MTS
Gel Cards
Reference Guide
Effective
Date
2013-09-04 Original Manual
Description
22 Pub. No.: J55700ENna
2013-09-04
Page 23

ORTHO™ Workstation for ID-MTS™ Gel Cards Reference Guide
▲▲
Section 11 - Key to Symbols
Symbol What it means
Biohazard
Electrical Hazard
General Warning (Direct or indirect danger to personal safety or instrument). Refer to
Reference Guide.
Important or Caution
Lot Number
Manufacturer’s Serial Number
Section 11 - Key to Symbols
Catalog Number or Product Code
Manufacturer
Date of Manufacture
For In Vitro Diagnostic Use
Fragile, Handle with Care
Keep Dry
This End Up
Fuse Label
Handle with Care
ETL/Intertek Certification Mark indicating compliance to US and Canadian standards
Pub. No.: J55700ENna 23
2013-09-04
Page 24

Page 25

Page 26

Ortho-Clinical Diagnostics, Inc.
1001 US Highway 202
Raritan, NJ 08869 USA
IVD
 Loading...