

Orthman 1tRIPr Owner's Manual

1tRIPr
125-000-01
Operator’s Manual

INTRODUCTION
PREPLANT TILLAGE AND
PRECISION NUTRIENT PLACEMENT
Made in the U.S.A.

INTRODUCTION
(6 row - 30 inch configuration)
(standard row units with baskets)
The Orthman
precision nutrient placement, and seedbed preparation in a single field pass to provide
unprecedented field efficiency. The
operations to meet preplant objectives while conserving moisture, soil, time, and money,
in
1tRIP.
The
1tRIPr®
foundation. The strong foundation, teamed with Orthman’s rigid, folding, or stacking
toolbars, provides supreme implement strength. Four down pressure springs per row unit
supply down pressure to assist with soil penetration. Parallel linkages allow the row unit to
operate independent of the toolbar to provide uniform tillage depth despite terrain varia-
tions.
1tRIPr®
preplant tillage tool combines proven strip-till soil management,
1tRIPr®
name is derived from combining multiple
row unit wraparound mount and parallel linkage provide a durable row unit
The depth band coulter assembly initiates the strip-till application. The depth
band provides consistent row unit tooling depth while the coulter cuts all surface
and subsurface residue to reduce rearward tooling interference and aid in residue
decomposition. The coulter also reduces side draft by providing lateral implement stability.
The trash opener assembly reduces field residue directly behind the depth band coulter
assembly prior to the arrival of rearward tooling.
The tillage shank assembly shatters the root zone compacted layer to increase soil
porosity, reduce run off, and allow root systems to utilize deeper soil moisture and
nutrients. Tillage shank assembly fertilizer tube(s) allow precision fertilizer placement
at two depths, if desired, to provide crop plants with timely fertilizer access to maximize
development from germination through maturity.
Made in the U.S.A.
1 - 21 - 2

INTRODUCTION
The wavy coulter assemblies “lift and pinch” action incorporates field residue, decreases
soil variability, and firms the seedbed. Optional rearward mounted rolling baskets
are available to reduce clod size, retain existing soil moisture, firm, and complete the
seedbed.
The
1tRIPr®
utilized with a Combo Caddy or attachment package attaches the planter
and
1tRIPr®
to maximize each field pass. Contact your Orthman dealer for Combo
Caddy or attachment package information to meet your needs. The
utilized as a stand-alone preplant tillage and precision nutrient placement tool.
NOTE: If combining strip-tillage and planting operations with a Combo Caddy or
attachment package, lateral offset of the 1tRIPr® row unit relative to seed placement is
recommended to allow fertilizer placement without detriment to seed germination.
1tRIPr®
can also be
(6 row - 30 inch configuration)
(automatic reset row units with baskets)
This manual is considered to be an integral component of the
to educate the owner and/or operator(s) regarding safety, operation, maintenance,
1tRIPr®
and is designed
Made in the U.S.A.
troubleshooting, and component identification. All personnel involved in the operation of
this implement are responsible for reading and understanding entire manual content.
This manual is designed to keep the operator safe and knowledgeable as well as prolong
the life of the implement and maximize field efficiency. This manual should accompany
the implement if it were ever to be sold.
We would like to thank you for placing your confidence in Orthman Mfg., Inc. Your
is manufactured to meet the highest standards and is built with precision and strength to
increase your agricultural operation’s dependability and profitability.
Thank you for choosing Orthman.
1tRIPr®
STILL THE STRONGEST.
1 - 21 - 3

INTRODUCTION
WARRANTY
Orthman Mfg., Inc. warrants the whole goods products it manufactures to be free from defects in material or workmanship for a period of one (1) year
from the date of sale of the product(s) to the original user. Products not manufactured, but supplied by Orthman Mfg., Inc. on Orthman products, are
subject to, conform with, and are limited to the warranty of our suppliers.
Orthman Mfg., Inc. warrants the parts it manufactures to be free from defects in material or workmanship for a period of ninety (90) days from the date
of delivery of the product(s) to the original user. Products not manufactured, but supplied by Orthman Mfg., Inc. on Orthman products, are subject to,
conform with, and are limited to the warranty of our suppliers.
Warranty of Orthman whole goods and/or parts applies only to material and workmanship. Misuse, misapplication, neglect, alteration, accident,
normal wear, or acts of God affecting Orthman products are not eligible for warranty.
Warranty of serial numbered goods will only be considered if the product has a completed Warranty Registration on file at Orthman. This Warranty
Registration must be completed and returned to Orthman within thirty (30) days of the sale of the product(s) to the original user.
goods or related parts and/or labor will be warranted without a Warranty Registration on file.
product’s use will be handled at the discretion of Orthman. Warranty of parts will not require a Warranty Registration, but proof of date of delivery of
the product to the original customer must be provided.
Warranty issues falling within the first thirty days of a
No serial numbered
WARRANTY CLAIMS:
selling dealer describing the defect in material or workmanship of an Orthman product(s) within ten (10) days of its discovery. This claim may be
made via phone, e-mail, fax, or written request. Claims for warranty of serial numbered goods must include the Orthman product serial number and
model number. Claims for warranty of partswill not require a product serial number or model number, but must be identified by an Orthman part
number. Claims for warranty of whole goods or parts must also include proof of date of sale of the product to the original customer by an Orthman
dealer.
The Orthman Service Department will proceed in making a preliminary decision as to the eligibility of the claim for warranty consideration. After the
Orthman Service Department deems it necessary to proceed with warranty consideration, a Return Goods Authorization (RGA) will be completed by
the Orthman Service Department in conjunction with the selling dealer. Upon completion of the RGA, the defective product(s) must be returned to
Orthman to ensure warranty consideration. Defective product(s) must be returned to Orthman by either the selling dealer or the customer. Customer
delivery of defective product(s) must be approved by Orthman and the selling dealer prior to delivery. The defective product(s) in question must be
sent, freight prepaid, within sixty (60) days of the discovery of the product(s) failure and initial warranty claim. Replacement product(s) may be sent
to the selling dealer, directly to the customer, or picked up at the Orthman facility. Replacement product(s), sent directly to the customer or picked
up must be approved by Orthman and the selling dealer. At the discretion of the Orthman Service Department, replacement product(s) may be sent
prior to, or after, the Orthman Service Department receives the defective product(s).
No products will be accepted at Orthman without all proper paperwork completed including Warranty Registration and RGA(s).
Orthman agrees to handle all warranty claims in a timely manner and will inform dealers of any revisions or modifications to the Orthman Warranty
Policy. Eligible warranty claims will be processed by Orthman within sixty (60) days of receiving failed product(s) or a valid service or repair
labor claim. Eligible warranty claims regarding returned product(s) or service and/or repair labor will be paid through a credit memo issued to the
appropriate dealer’s account as determined by the Orthman Service Department.
A warranty claim and request to return defective product(s) must be presented to the Orthman Service Department by the
Any variation in the above procedure is at the sole discretion of the Orthman Service Department.
Parts returned to Orthman without proper authorization will be returned to the sender at the sender’s expense.
If a warranty claim is found to be ineligible for warranty coverage, the Orthman Service Department will be responsible to inform the dealer in order
to determine the course of action to be taken. Orthman reserves the right to make changes in specification and design without notice and without
incurring any obligations to owners of products previously sold.
© Copyright 2010
Orthman Manufacturing Inc.
Lexington, Nebraska
All rights reserved.
Made in the U.S.A.
Orthman provides this manual without warranty of any kind, expressed or implied.
This manual reflects the product at the time of publication. All information within
is based upon current information on the publication date. Orthman assumes no
responsibility for damages incurred due to the use of the illustrations, information,
and specifications within this publication.
1 - 4

TABLE OF CONTENTS
INTRODUCTION
INTRODUCTION
General Information -
Warranty Information ...................................................................................................................................1 - 4
Table of Contents ........................................................................................................................................1 - 5
1tRIPr®
. .....................................................................................................................1 - 2
IMPORTANT SAFETY INFORMATION
Your Protection - Equipment Safety - Safety Alert Symbol ..........................................................................2 - 1
Signal Words - Shutdown and Storage ........................................................................................................2 - 2
Safe Transport - Warning and Safety Lights ................................................................................................2 - 3
Safe Operation - No Riders .........................................................................................................................2 - 4
Practice Safe Maintenance ..........................................................................................................................2 - 5
Practice Safe Maintenance - Prepare for Emergencies ................................................................................2 - 6
Anhydrous Ammonia - Liquid Fertilizer Precautions - Safety Never Hurts ...................................................2 - 7
Safety Decals ..............................................................................................................................................2 - 8
Orthman Decals ..........................................................................................................................................2 - 9
Orthman Serial Tab ...................................................................................................................................2 - 10
PREPARATION AND SETUP
Made in the U.S.A.
Shipping Configuration ................................................................................................................................3 - 1
Preparing the
Standard Row UnitComponent Identification ..............................................................................................3 - 3
1tRIPr® - Implement-to-Tractor Connection
...........................................................................3 - 2
TOOLING OPTIONS AND INSTALLATION
Rolling Basket Assembly - Installation ........................................................................................................4 - 1
Mole Shank Assembly.................................................................................................................................4 - 2
Mole Knife Assembly ...................................................................................................................................4 - 3
Tillage Shank Assembly (mole shank and mole knife) - Installation ............................................................4 - 4
Mole Shank Assembly Fertilizer Tube - Installation .....................................................................................4 - 5
Mole Shank Assembly Adjustable Dry Fertilizer Boot - Installation .............................................................4 - 6
Air Diffuser and Air Diffuser Mount - Installation .........................................................................................4 - 7
Mole Knife Assembly Fertilizer Tube - Installation ........................................................................................4 - 8
Auto Reset Trip Linkage - Installation...........................................................................................................4 - 9
1 - 5

INTRODUCTION
TABLE OF CONTENTS
FIELD SETTINGS
Toolbar Height and Orientation ....................................................................................................................5 - 1
Row Unit Depth ...........................................................................................................................................5 - 2
Row Unit Down Pressure .............................................................................................................................5 - 3
Trash Opener Assembly Depth ....................................................................................................................5 - 4
Trash Opener Assembly Width ....................................................................................................................5 - 5
Tillage Shank (mole shank and mole knife) Assembly Depth .....................................................................5 - 6
Wavy Coulter Assembly Depth and Width ...................................................................................................5 - 8
Wavy Coulter Assembly Fore and Aft ..........................................................................................................5 - 9
Rolling Basket Down Pressure ...................................................................................................................5 - 10
Standard Shear Bolt Protected Tail ...............................................................................................................5-11
Adjustable Liquid Tubes ...............................................................................................................................5-13
Adjustable Dry Fertilizer Boot ......................................................................................................................5-15
Automatic Reset Linkage .............................................................................................................................5-17
Spring / Set Screw Setting Chart .................................................................................................................5-20
TROUBLESHOOTING
Row unit tooling does not penetrate soil. Wing row units float upward ........................................................6 - 1
Row unit plugs with field residue between the depth band coulter assembly and trash opener assembly ..6 - 2
Row unit plugs with field residue between the trash opener assembly and tillage shank ............................6 - 3
Row unit plugs with field residue between the tillage shank and wavy coulters...........................................6 - 4
Field residue plugs between row units .........................................................................................................6 - 5
Row unit tripping or shear bolt problems......................................................................................................6 - 6
PARTS IDENTIFICATION
Row Unit Assembly ........................................................................................................................... 7 - 1, 7 - 2
Mount and Parallel Linkage Assembly .........................................................................................................7 - 3
Depth Band Coulter Assembly .....................................................................................................................7 - 4
Row Cleaner Assembly ...............................................................................................................................7 - 5
Mole Shank Assembly .................................................................................................................................7 - 6
Mole Knife Assembly ...................................................................................................................................7 - 7
Wavy Coulter Assembly ...............................................................................................................................7 - 8
Trip Linkage Assembly .................................................................................................................................7 - 9
Rolling Basket Assembly ...........................................................................................................................7 - 10
MAINTENANCE
Practice Safe Maintenance ..........................................................................................................................8 - 1
Lubrication - Implement Inspection .............................................................................................................8 - 2
Torque Specifications...................................................................................................................................8 - 3
Implement Storage ......................................................................................................................................8 - 4
Notes ...........................................................................................................................................................8 - 5
Made in the U.S.A.
1 - 6

SAFETY INFORMATION
C A U T I O N
OPERATOR’S
MANUAL
FOR YOUR PROTECTION
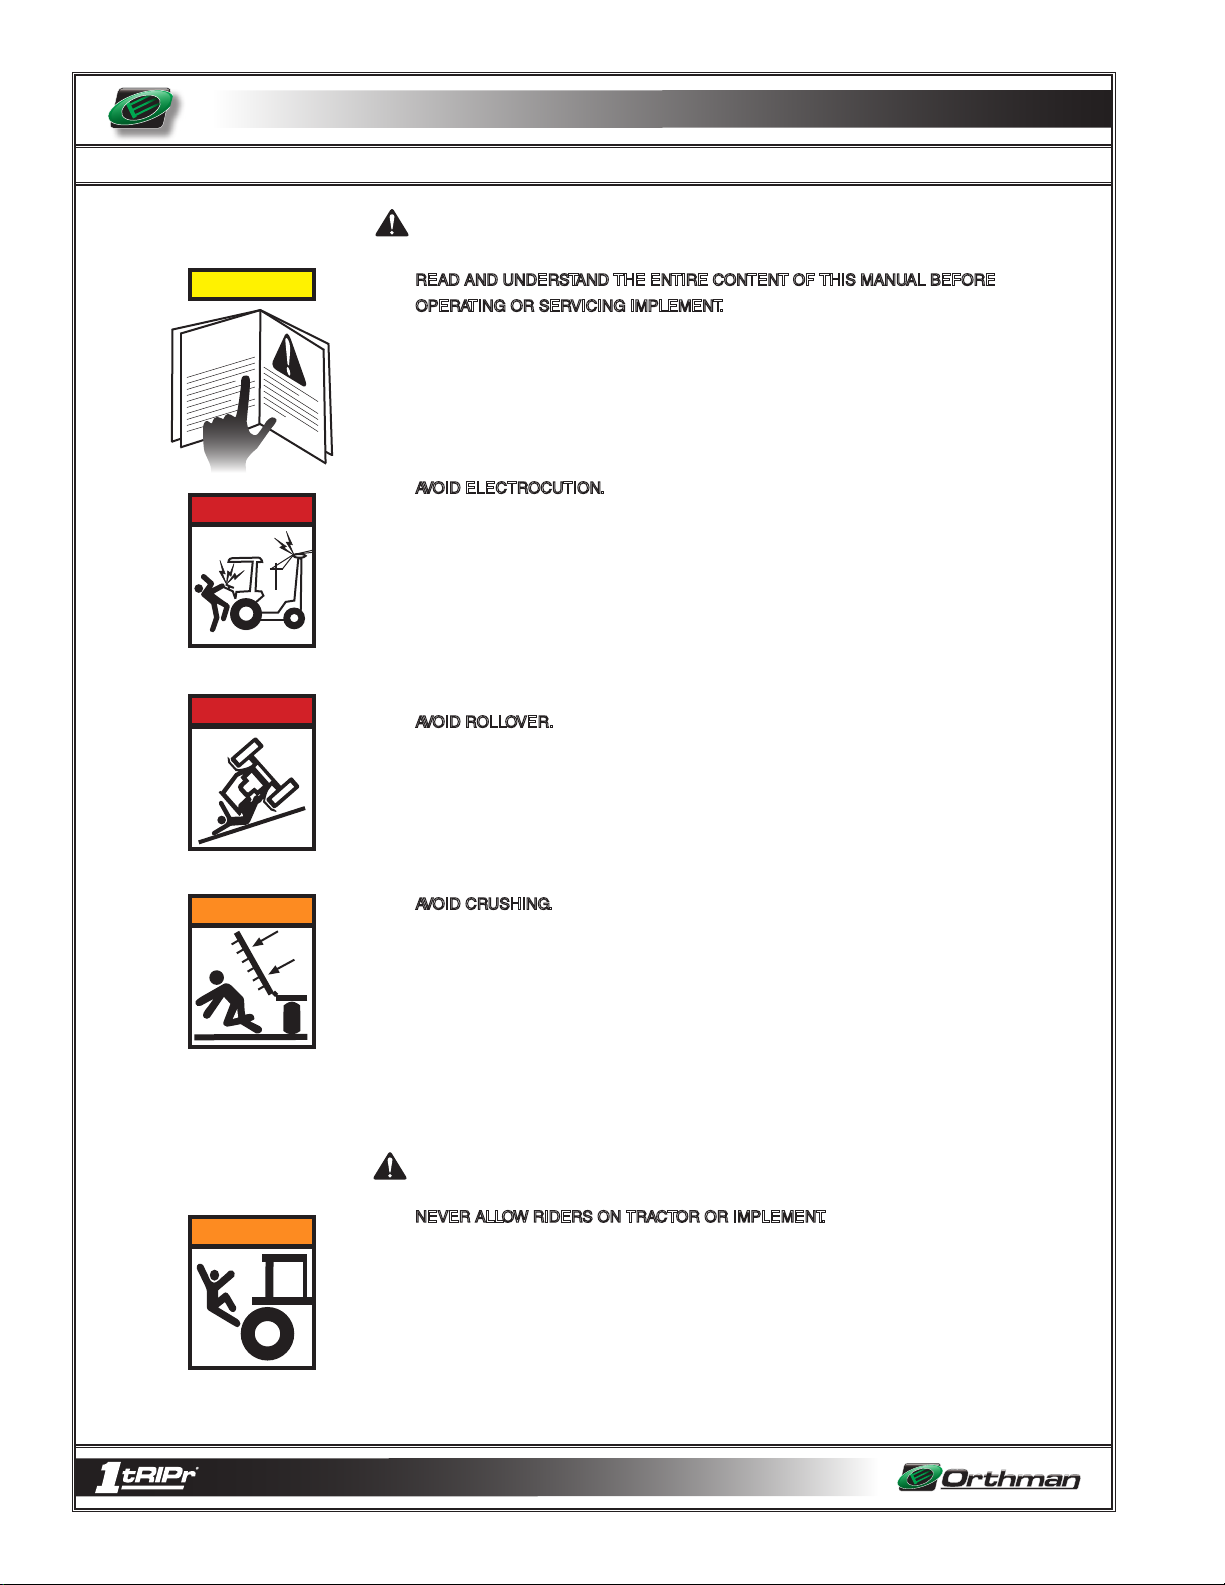
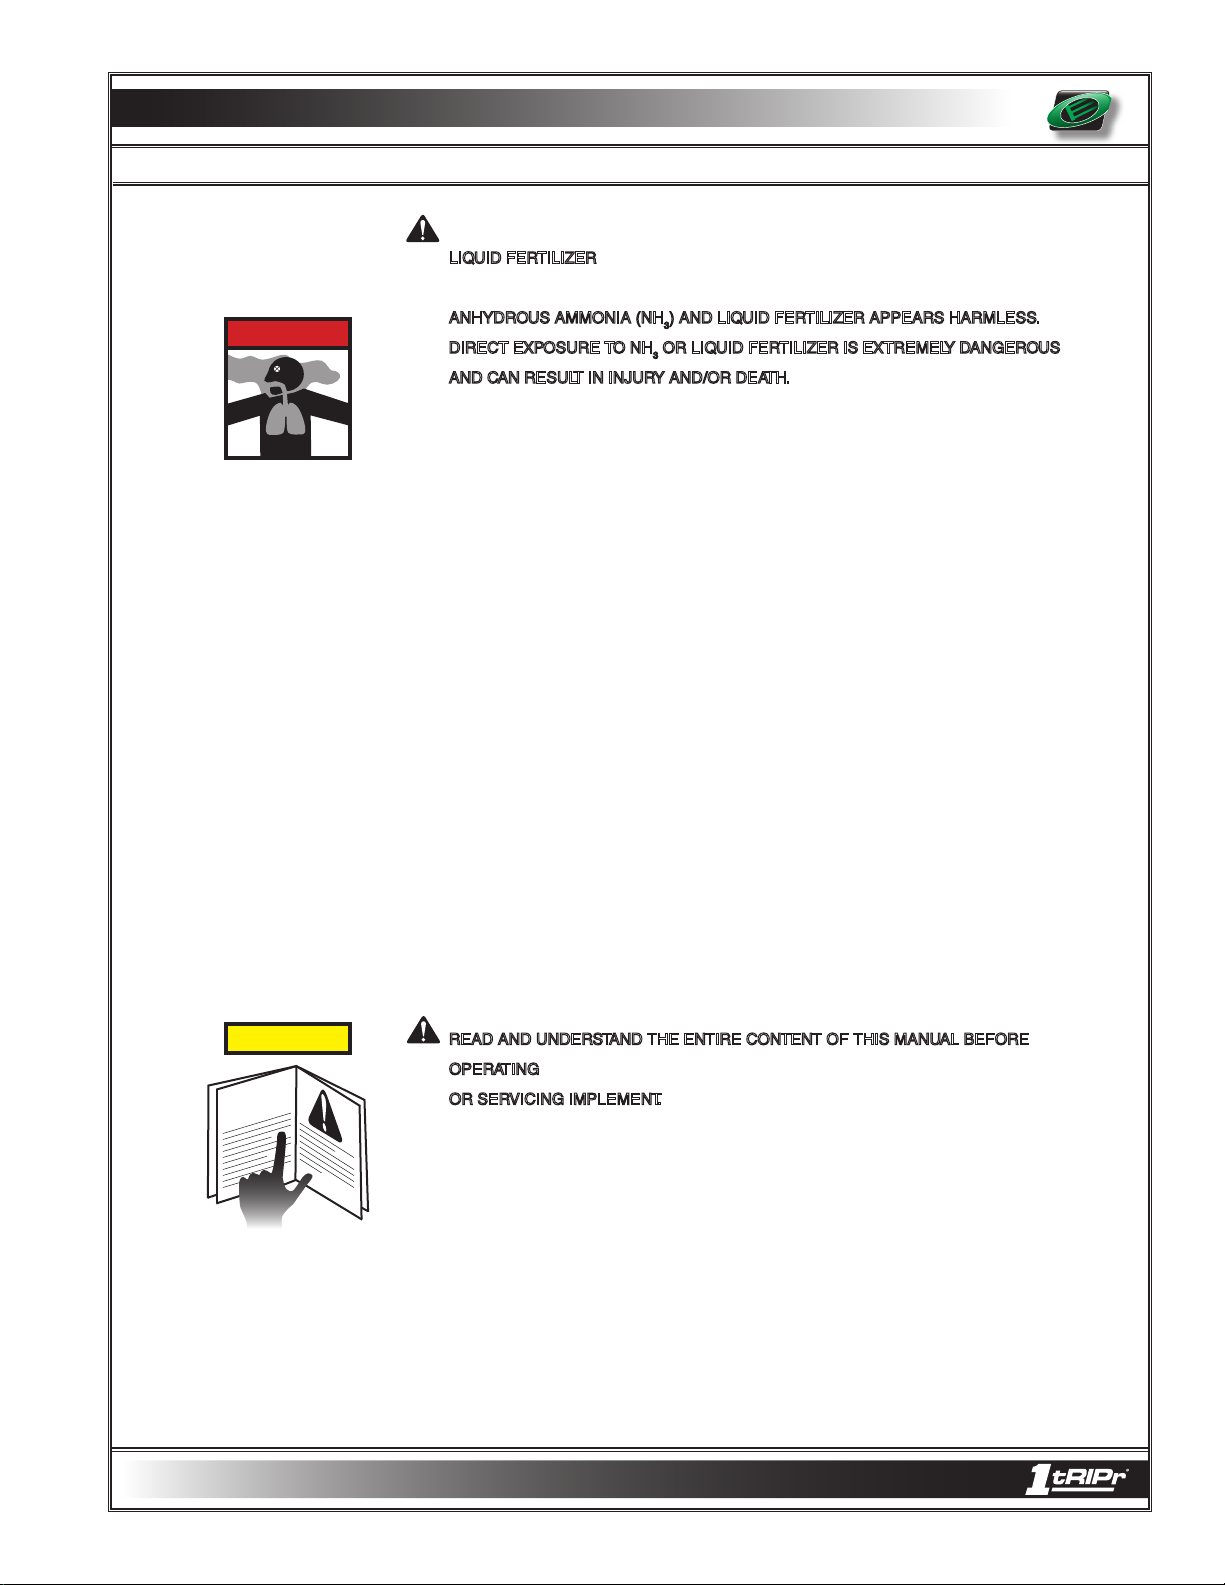
READ AND UNDERSTAND THE ENTIRE CONTENT OF THIS MANUAL BEFORE
OPERATING OR SERVICING IMPLEMENT. Read and understand all operator manuals
for the machinery used in conjunction with your Orthman equipment.
• Carefully READ ALL SAFETY DECALS in this manual as well as on the implement.
Keep implement clean so decals are easily visible. Keep all safety decals in good, clean,
and legible condition. Immediately replace damaged and/or missing decals. Replace-
ment decals are available from your Orthman dealer.
• Learn to operate the implement and all components properly. Do not let others operate
implement without proper instruction. Unauthorized implement modifications may impair
function and safety. If you do not understand any content in this manual or need assis-
tance, contact your Orthman dealer.
(Orthman Manufacturing Inc. - 75765 Rd. 435 - Lexington, NE 68850 - (308) 324-4654)
EQUIPMENT SAFETY GUIDELINES
Operator safety is the primary concern when designing an Orthman implement. Orthman
integrates as many safety features into the implement as possible. You can avoid many
hazards and possible accidents by observing precautions in this safety section.
• Insist that yourself and personnel working with and around you follow all safety precau-
tions. Be cautious when working with or around implement to avoid injury.
SAFETY ALERT SYMBOL
The SAFETY ALERT SYMBOL warns of potential hazards to personal safety and
that extra precautions must be taken. When you see this symbol, carefully read the
message(s) that follow. Follow all recommended precautions and safe operating practices
in this manual.
NOTE: Hazard control and accident prevention are dependent upon the safety awareness
and proper training of personnel involved in the operation of this implement.
Made in the U.S.A.
2 - 1
SAFETY INFORMATION
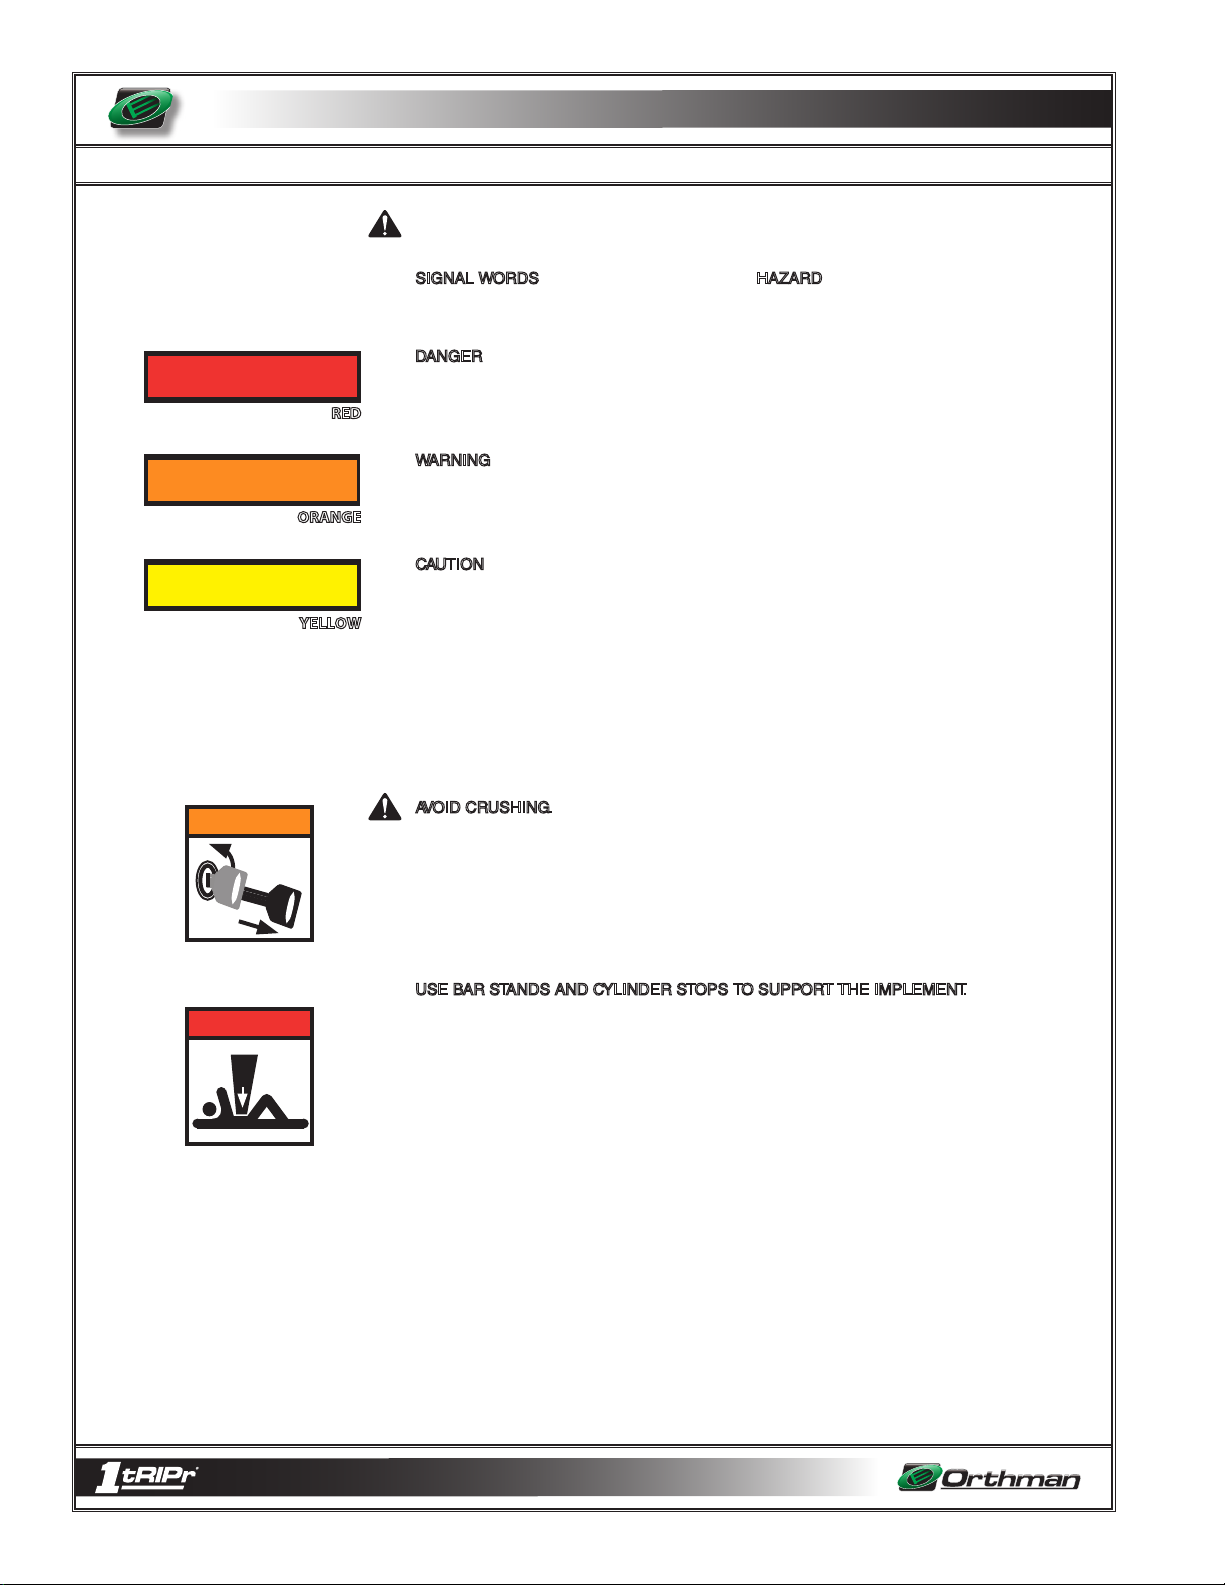
BE AWARE OF SIGNAL WORDS
SIGNAL WORDS designate a degree or level of HAZARD seriousness.
These signal words include:
DANGER indicates a hazardous situation that, if not avoided, will result in death or
D A N G E R
RED
W A R N I N G
ORANGE
C A U T I O N
YELLOW
serious injury. Danger is limited to extreme situations, typically for machine components
which for functional purposes, cannot be guarded.
WARNING indicates a potentially hazardous situation that, if not avoided, could result in
death or serious injury. Warning includes hazards that are exposed when safety guards
are removed. Warning may also be used to alert against unsafe practices.
CAUTION indicates a potentially hazardous situation that, if not avoided, may result in
minor or moderate injury. Caution may also be used to alert against unsafe practices.
W A R N I N G
off
D A N G E R
SHUTDOWN AND STORAGE
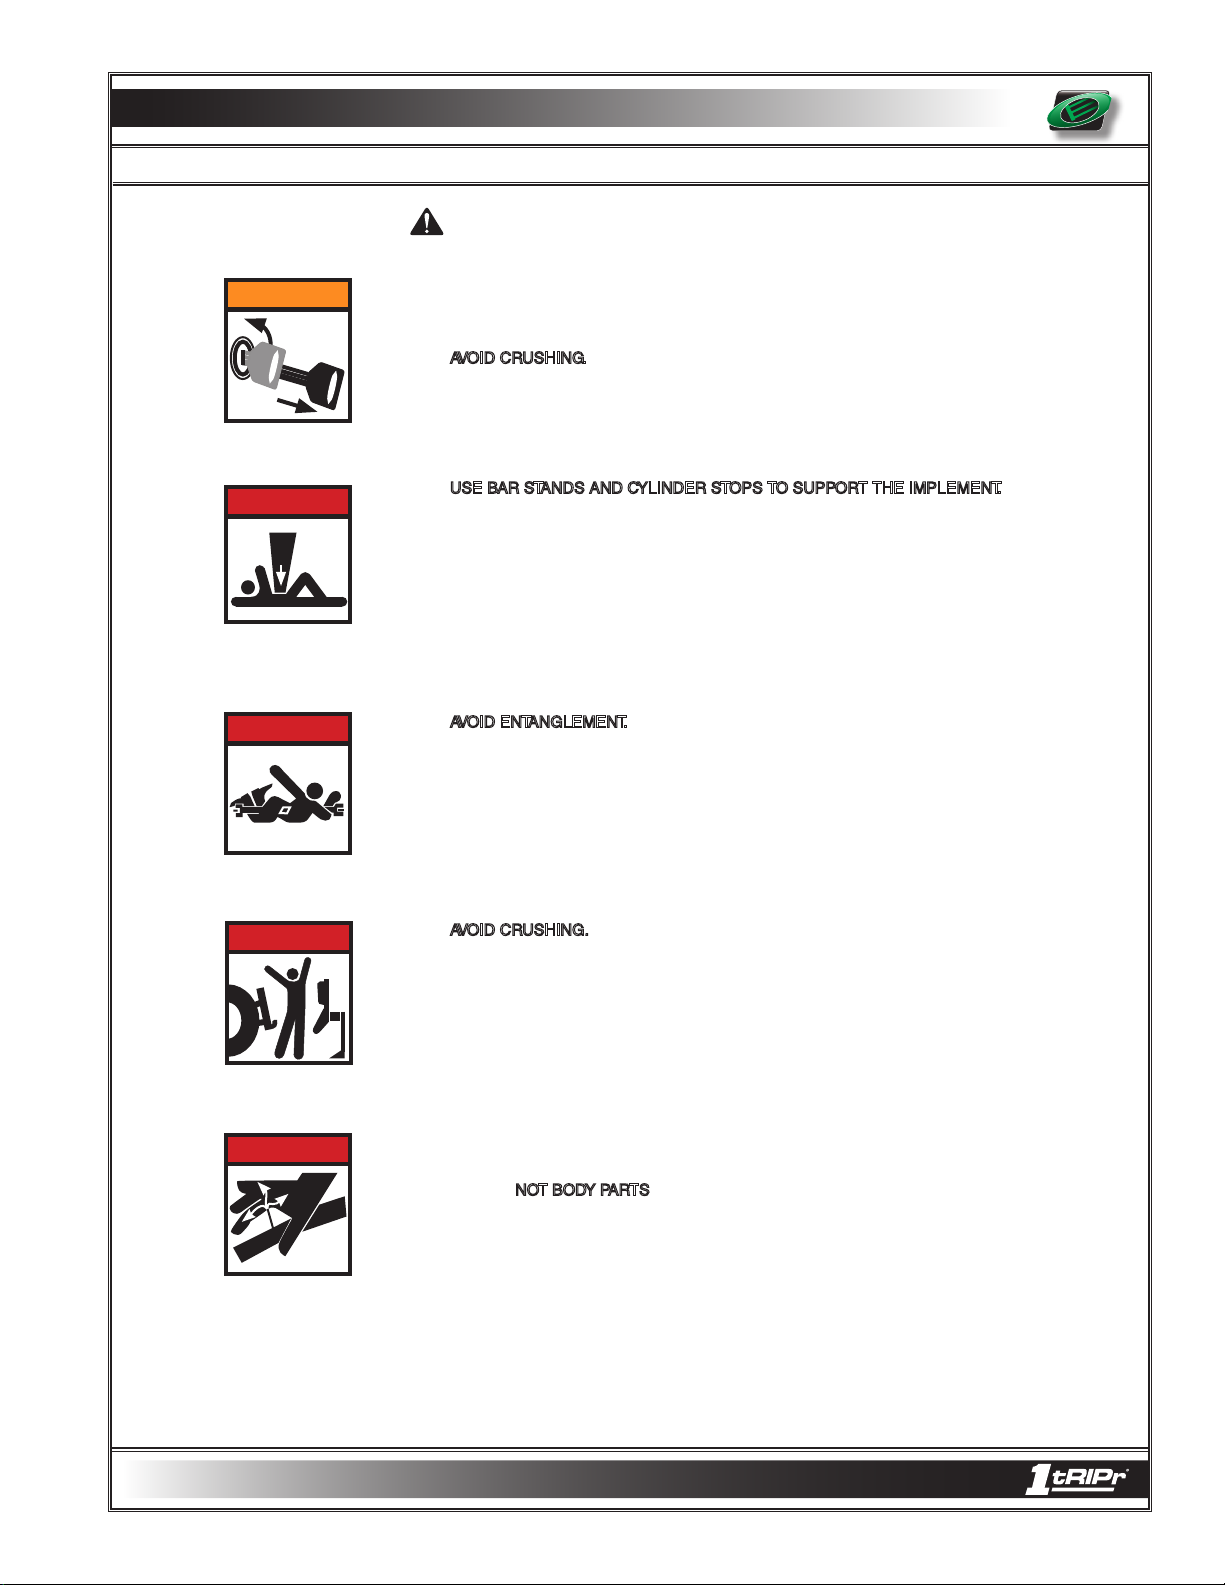
AVOID CRUSHING. Make sure all personnel are clear of the implement. Lower implement
to the ground, place tractor in park, turn off engine, and remove key.
USE BAR STANDS AND CYLINDER STOPS TO SUPPORT THE IMPLEMENT.
Store implement on a clean, dry, and level surface. An uneven surface could cause
implement to shift or fall, resulting in injury or death, as well as implement damage.
Securely support all implement components that must be raised. Store implement away
from human activity.
Made in the U.S.A.
2 - 2

SAFETY INFORMATION
SAFE TRANSPORT
• Engage transport locking devices prior to transport.
• Plan your route to avoid traffic. Yield to traffic in all situations.
• Maximum transport speed is 20 mph (32 kph). Various conditions will require reduced
speed. Travel at speeds that allow for adequate control of stopping and steering.
D A N G E R
SMV
STOP
AVOID ELECTROCUTION. Be aware of overhead power lines. Contact or close proximity
to power lines can result in injury or death. Use extreme care when operating implement
near power lines.
• Know implement transport height and gross weight. Avoid overhead obstructions not
allowing your transport height. Do not use bridges rated below combined implement and
tractor weight.
• Make sure a slow moving vehicle (SMV) placard is mounted to the implement and is
easily visible to other motorists.
• Make allowances for implement size when transporting. Sudden braking can cause a
towed load to swerve and/or rollover. Never use independent braking with implement in
tow as loss of control and/or rollover can result. Reduce speed if towed implement is not
equipped with brakes.
• Do not coast. Always keep tractor or towing device in gear to provide engine braking when
traveling downhill.
• Comply with state and local laws governing implement transport.
Made in the U.S.A.
C A U T I O N
WARNING AND SAFETY LIGHTS
• Oversized implements and slow moving vehicles create a hazard when transported on
public roads.
• Make sure all warning, safety lights, and turning signals are working and clean. Use safety
lighting when using public roads day and night. Replace missing or damaged lights
immediately. Comply with state and local laws governing implement safety lighting.
• A safety lighting package, conforming to implement lighting standard ANSI/ASAE S279.12,
if not supplied with, is available for addition to your equipment. Contact your Orthman
dealer for safety lighting package information. Refer to toolbar operator’s manual for safety
lighting package installation and adjustment.
2 - 3
SAFETY INFORMATION
SAFE OPERATION
C A U T I O N
OPERATOR’S
MANUAL
D A N G E R
D A N G E R
READ AND UNDERSTAND THE ENTIRE CONTENT OF THIS MANUAL BEFORE
OPERATING OR SERVICING IMPLEMENT. Implement is to be operated by qualified per-
sonnel only. Never let children operate implement. A complete understanding of safety
precautions, operation, and maintenance is mandatory before implement use.
AVOID ELECTROCUTION. Be aware of overhead power lines. Contact or close proximity
to power lines can result in injury or death. Use extreme care when operating implement
near power lines.
• Know implement transport height and gross weight. Avoid overhead obstructions not
allowing your transport height. Do not use bridges rated below combined implement and
tractor weight.
AVOID ROLLOVER. Do not fold or unfold implement and avoid sharp turns when on a
hillside, as shift of weight could cause rollover. Operate implement at a safe distance from
terrain irregularities and other obstructions that could cause rollover.
W A R N I N G
W A R N I N G
AVOID CRUSHING. Make sure all personnel are clear of implement at all times imple-
ment is in motion. Be aware of obstructions above, below, and around implement when in
operation or transport. Injury or death can result from being struck by the implement.
NO RIDERS
NEVER ALLOW RIDERS ON TRACTOR OR IMPLEMENT. Riders hinder operator
visibility and can be thrown from the implement and/or be struck by foreign objects
resulting in injury or death.
Made in the U.S.A.
2 - 4
SAFETY INFORMATION
PRACTICE SAFE MAINTENANCE
W A R N I N G
off
D A N G E R
D A N G E R
Proper maintenance is your responsibility. Maintenance neglect and/or poor maintenance
practices can result in injury or death. Always use the proper tools to maintain implement.
AVOID CRUSHING. Make sure all personnel are clear of the implement. Lower implement
to the ground, place tractor in park, turn off engine, and remove key.
USE BAR STANDS AND CYLINDER STOPS TO SUPPORT THE IMPLEMENT. Store
implement on a clean, dry, and level surface. An uneven surface could cause implement
to shift or fall, resulting in injury or death, as well as implement damage. Securely support
all implement components that must be raised. Store implement away from human
activity.
AVOID ENTANGLEMENT. Never lubricate or service implement in motion. Keep away from
power driven parts when in motion. Disengage power sources prior to maintaining imple-
ment. Injury or death can result from contact with power driven parts when in motion.
D A N G E R
D A N G E R
AVOID CRUSHING. Do not stand between the tractor and implement when connecting
or disconnecting implement. Injury or death can result from being trapped between the
tractor and implement.
Escaping pressurized hydraulic fluid can penetrate skin, resulting in injury or death. Re-
lieve hydraulic system pressure before connecting or disconnecting tractor. Use cardboard
or wood, NOT BODY PARTS, to check for suspected hydraulic leaks. Wear protective
gloves and safety glasses or goggles when working with hydraulic systems. If an accident
occurs, see a doctor immediately for proper treatment.
Made in the U.S.A.
2 - 5
SAFETY INFORMATION
PRACTICE SAFE MAINTENANCE
D A N G E R
D A N G E R
C A U T I O N
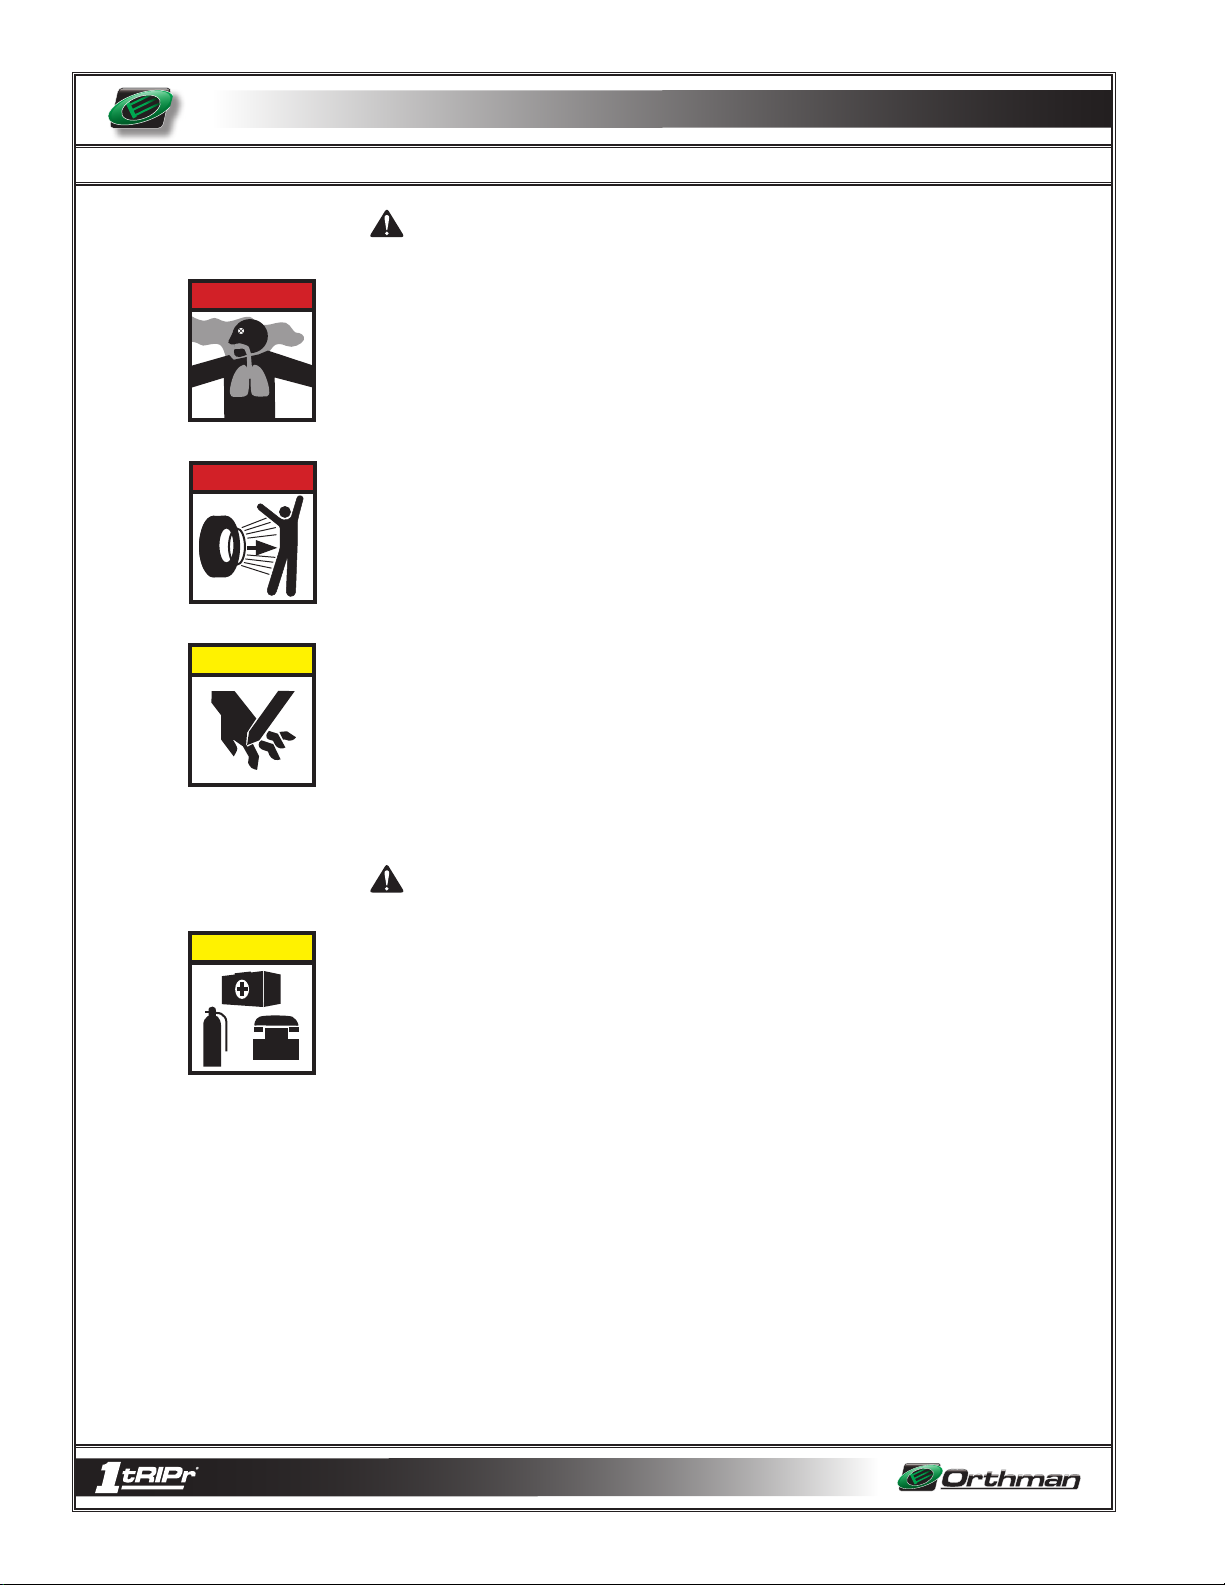
• Never operate a combustion engine in an enclosed area. Make sure there is adequate
ventilation. Exhaust fumes can cause asphyxiation.
• Service tires safely. Tire and rim separation can result in serious injury or death. Do not
over inflate tires. Only mount or dismount tires if you possess the proper equipment,
otherwise contact a trained professional. Always maintain correct tire pressure. Inspect
tires and wheels daily. Do not operate tires with inadequate pressure, cuts, visible dam-
age, or missing hardware.
• Be extremely careful working around unshielded sharp edges. Injury may result from
contact with sharp edges.
• Keep all parts in good condition and properly installed. Replace damaged or missing
parts immediately.
• Remove tools and unused parts prior to implement operation.
C A U T I O N
91 1
PREPARE FOR EMERGENCIES
• Be prepared for a fire. Keep a readily accessible fire extinguisher at all times.
• Keep a readily accessible stocked first aid kit and emergency phone numbers for your
doctor, hospital, ambulance, and fire department.
• Wear protective clothing and equipment. Wear clothing appropriate for the situation.
Protect your eyes, ears, hands, and feet with the use of protective goggles, ear plugs,
gloves, boots, etc.
Made in the U.S.A.
2 - 6
SAFETY INFORMATION
D A N G E R
ANHYDROUS AMMONIA - NH
LIQUID FERTILIZER
ANHYDROUS AMMONIA (NH3) AND LIQUID FERTILIZER APPEARS HARMLESS.
DIRECT EXPOSURE TO NH3 OR LIQUID FERTILIZER IS EXTREMELY DANGEROUS
AND CAN RESULT IN INJURY AND/OR DEATH.
• Keep a clean supply of water readily accessible in case of exposure to NH3 or liquid
fertlizer.
• Wear protective goggles and gloves when working with NH
all persons involved in the operation are properly trained concerning the dangers and
precautions involved in the application of NH
• If you choose to apply NH
information regarding safe handling and application of NH
is available from the following recognized sources:
1. American National Standards Institute -
2. Material Safety Data Sheets - MSDS -
3. National Safety Council -
4. The Fertilizer Institute -
5. United States Department of Transportation - D.O.T. -
6. Compressed Gas Association -
or liquid fertilizer, it is advisable to consult documented
3
www.nsc.org/necas
www.tfi.org
or liquid fertilizer.
3
www.ansi.org - (212) 642-4900
www.msdsonline.com
www.cganet.com
or liquid fertilizer. Be sure
3
or liquid fertilizer. Information
3
www.dot.gov
3
Made in the U.S.A.
C A U T I O N
OPERATOR’S
MANUAL
SAFETY NEVER HURTS
READ AND UNDERSTAND THE ENTIRE CONTENT OF THIS MANUAL BEFORE
OPERATING
OR SERVICING IMPLEMENT.
• Understand all implement functions.
• Never stand between tractor and implement when connecting or disconnecting imple-
ment.
• Be aware of all surroundings before moving implement.
• Operate implement from operator’s seat only.
• Never mount or dismount a moving tractor.
• Never leave engine running when implement is unattended.
• Keep away from power driven parts when in motion.
• Make sure all personnel are clear before lowering implement to the ground.
2 - 7
SAFETY INFORMATION
SAFETY DECALS
D A N G E R
W A R N I N G
C A U T I O N
Safety decals promote awareness and knowledge concerning safe operation and
maintenance of the implement.
Carefully READ ALL SAFETY DECALS in this manual as well as on the implement.
Keep implement clean so decals are easily visible. Keep all decals in good and legible
condition. Immediately replace damaged and/or missing decals. Replacement decals are
available from your Orthman dealer.
To install decals: Thoroughly clean area where decal is to be placed and attach decal void
of bubbles. Refer to this safety information section for proper decal placement.
I M PO R TA N T
Equipment operators should understand the enclosed manual before
operating this equipment. Replacement manual, call 308-324-4654
Orthman Mfg., Inc. - 75765 Rd. 435 - Lexington, NE 68850
(manual enclosure)
6
153-101
IMPORTANT
READ MANUAL
5
4
3
2
1
0
153-152
(side of tillage shanks and trash openers)
C A U T I O N
Be extremely careful working
around unshielded sharp edges.
Injury may result from contact
with sharp edges.
(outer side of outer row units)
153 - 045
Made in the U.S.A.
2 - 8
(front right and rear left of toolbar)
SAFETY INFORMATION
ORTHMAN DECALS
153-000
153-194
(front left and rear right of toolbar)
153-193
(outer side of outer row units)
Made in the U.S.A.
2 - 9
SAFETY INFORMATION
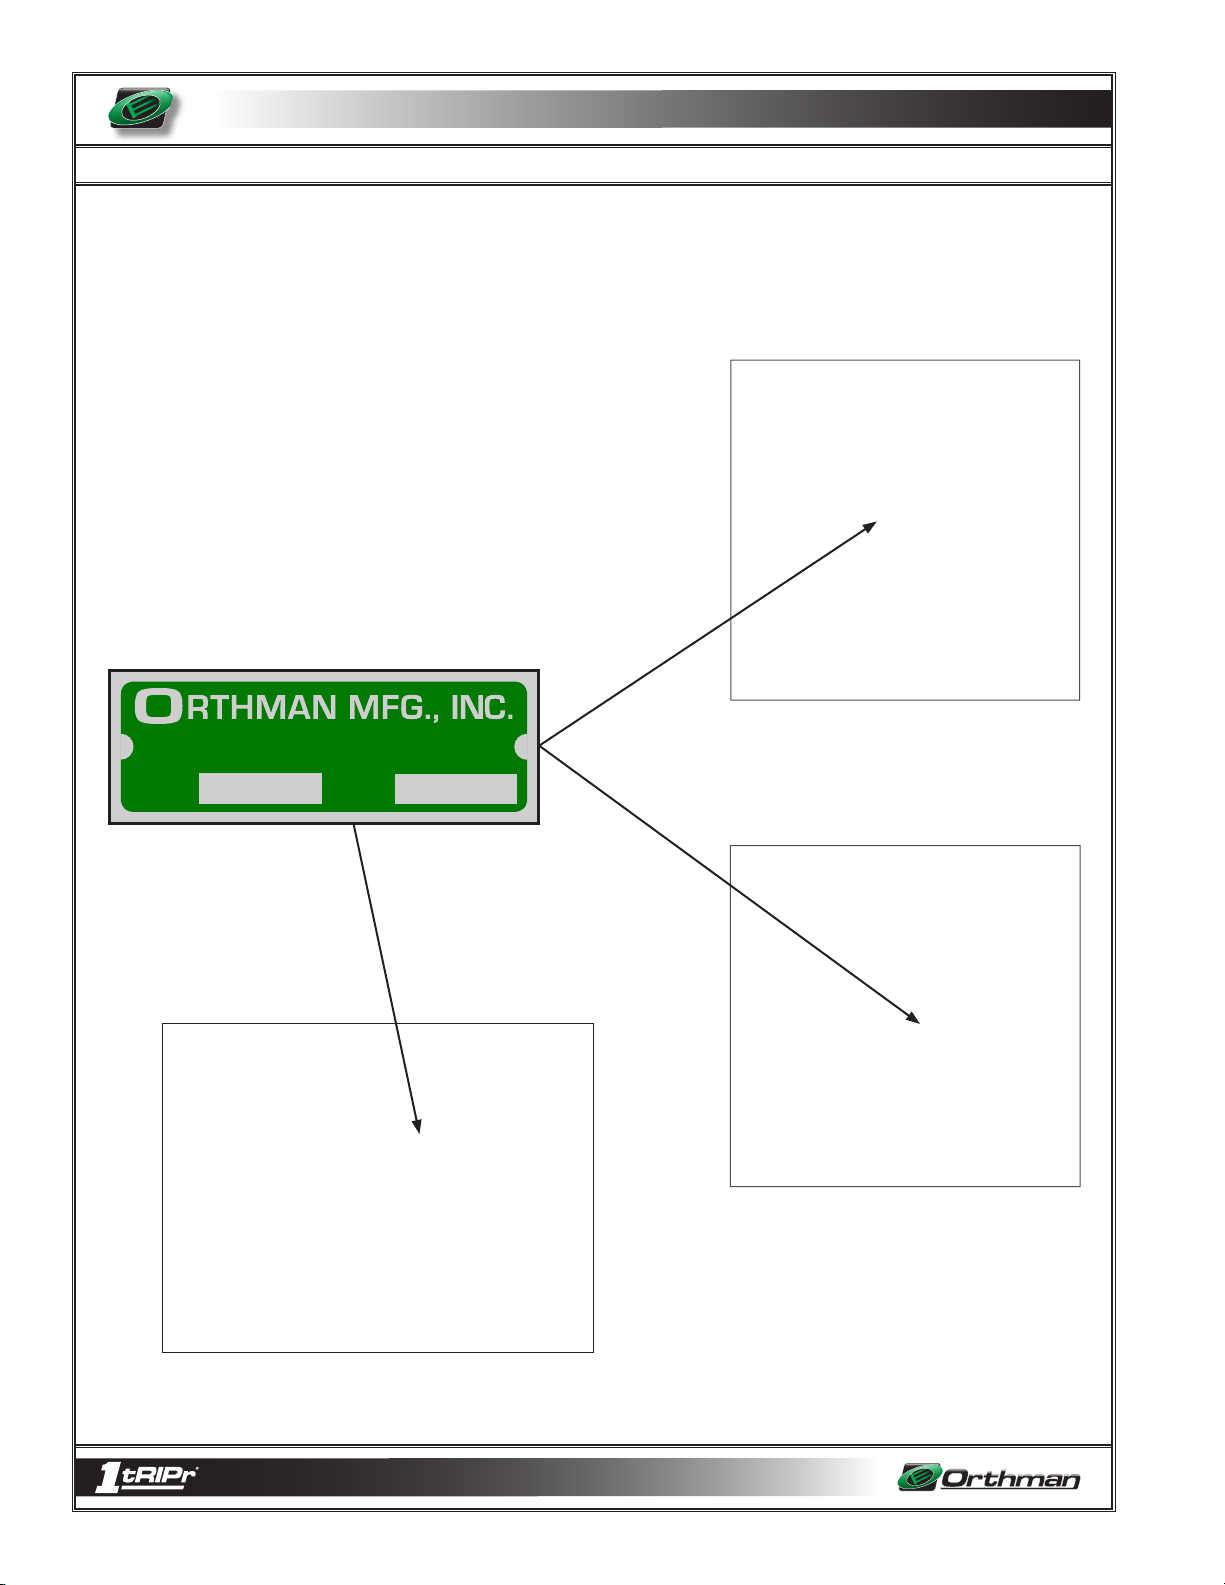
ORTHMAN SERIAL TAG
The Orthman serial tag contains valuable information. The model and serial numbers pro-
vide Orthman dealers and the Orthman Service Department with the exact specifications
of your implement if any warranty or service issues need to be addressed.
MODEL
LE X INGT O N, N E BRAS K A
30 8 -324 - 4654
#
SERIAL
(serial tag location on rigid toolbar)
#
153-011
(serial tag location on 1500 folding
(serial tag location on 1550 folding toolbar)
Made in the U.S.A.
2 - 10
PREPARATION AND SETUP
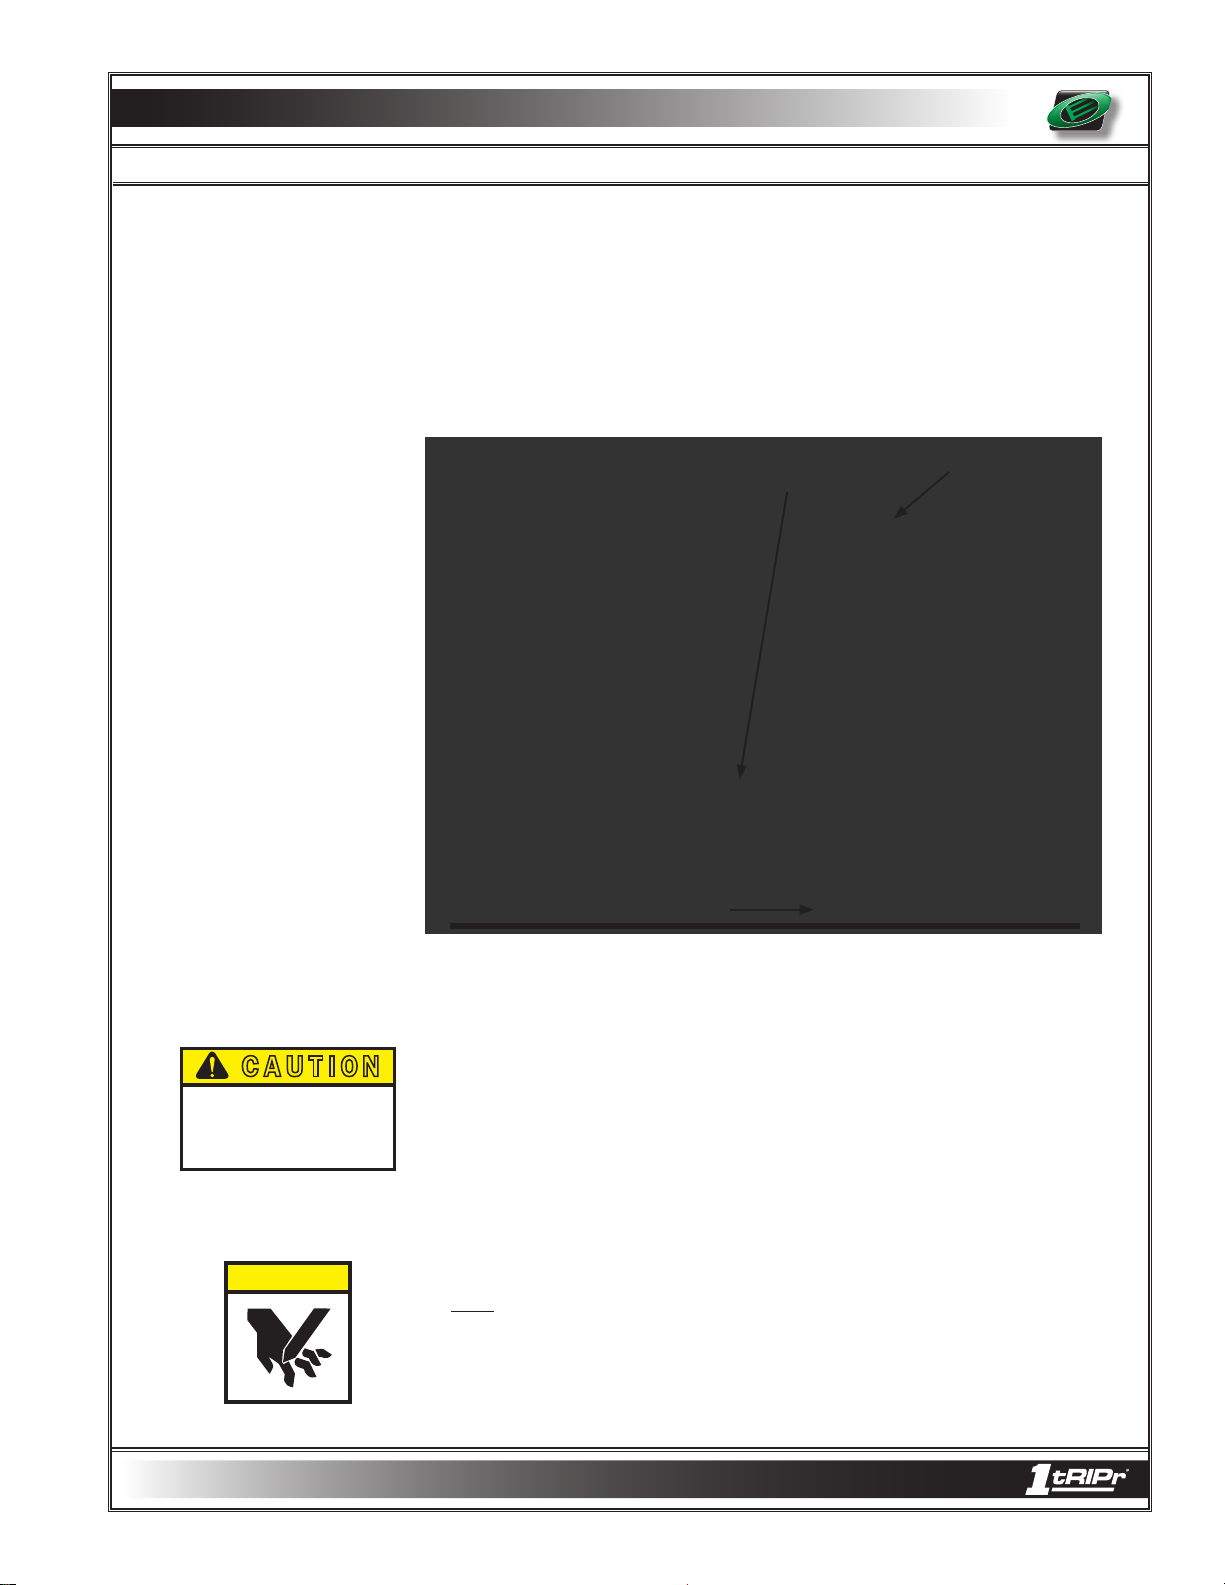
SHIPPING CONFIGURATION
The majority of the 1tRIPr® is assembled at Orthman Mfg., Inc. The 1tRIPr® is as-
sembled in an appropriate shipping configuration to ensure transport safety and efficiency
from the manufacturer. Installation of optional tooling (if applicable) and adjustment of
installed tooling is necessary prior to an initial field trial.
Trash
Opener
Shipping/Storage Surface
Tillage Shank Assembly
Made in the U.S.A.
C A U T I O N
Be extremely careful working
around unshielded sharp edges.
Injury may result from contact
with sharp edges.
C A U T I O N
153 - 045
The shipping configuration provides even implement weight distribution between the
depth band coulter assembly and the wavy coulter assemblies. The trash opener
assembly and the tillage shank assembly do not bear implement weight, as illustrated
above.
Prior to off-season storage, it is recommended to restore the 1tRIPr® row units to the ship-
ping configuration illustrated above to avoid placing weight on the trash opener or tillage
shank assembly. When storing in-season, lower implement very slowly to avoid sharp
impact between the storage surface and the tillage shank assembly foot piece.
NOTE: The tillage shank assembly foot piece consists of a hard material to decrease
wear and improve field performance. Due to material hardness, sharp impact, excessive
weight, etc. can damage the tillage shank assembly foot piece.
3 - 1

PREPARATION AND SETUP
PREPARING THE 1TRIPR
C A U T I O N
OPERATOR’S
MANUAL
D A N G E R
Tooling options available for added 1tRIPr® versatility are illustrated and explained in the
tooling options section of this manual. Field adjustments are illustrated and explained in
the field settings section of this manual.
If an Orthman toolbar is used in conjunction with 1tRIPr® row units, be sure to consult the
toolbar operator’s manual before attempting to operate the implement. Read and under-
stand operator manuals for machinery used in conjunction with the 1tRIPr®.
Before each use, check hardware for wear and proper torque. Replace damaged or
missing hardware with hardware of an identical grade to restore implement to original
specifications.
IMPLEMENT TO TRACTOR
CONNECTION
AVOID CRUSHING. Do not stand between tractor and implement when connecting or
disconnecting implement. Injury or death can result from being trapped between the trac-
tor and implement.
AVOID CRUSHING. Make sure all personnel are clear of the implement. Lower implement
to the ground, place tractor in park, turn off engine, and remove key.
D A N G E R
Made in the U.S.A.
3 - 2
USE BAR STANDS TO SUPPORT THE IMPLEMENT. Park implement on a clean, dry,
and level surface. An uneven surface could cause implement to shift or fall, resulting in
injury or death, as well as implement damage. Securely support all implement compo-
nents that must be raised.
PREPARATION AND SETUP
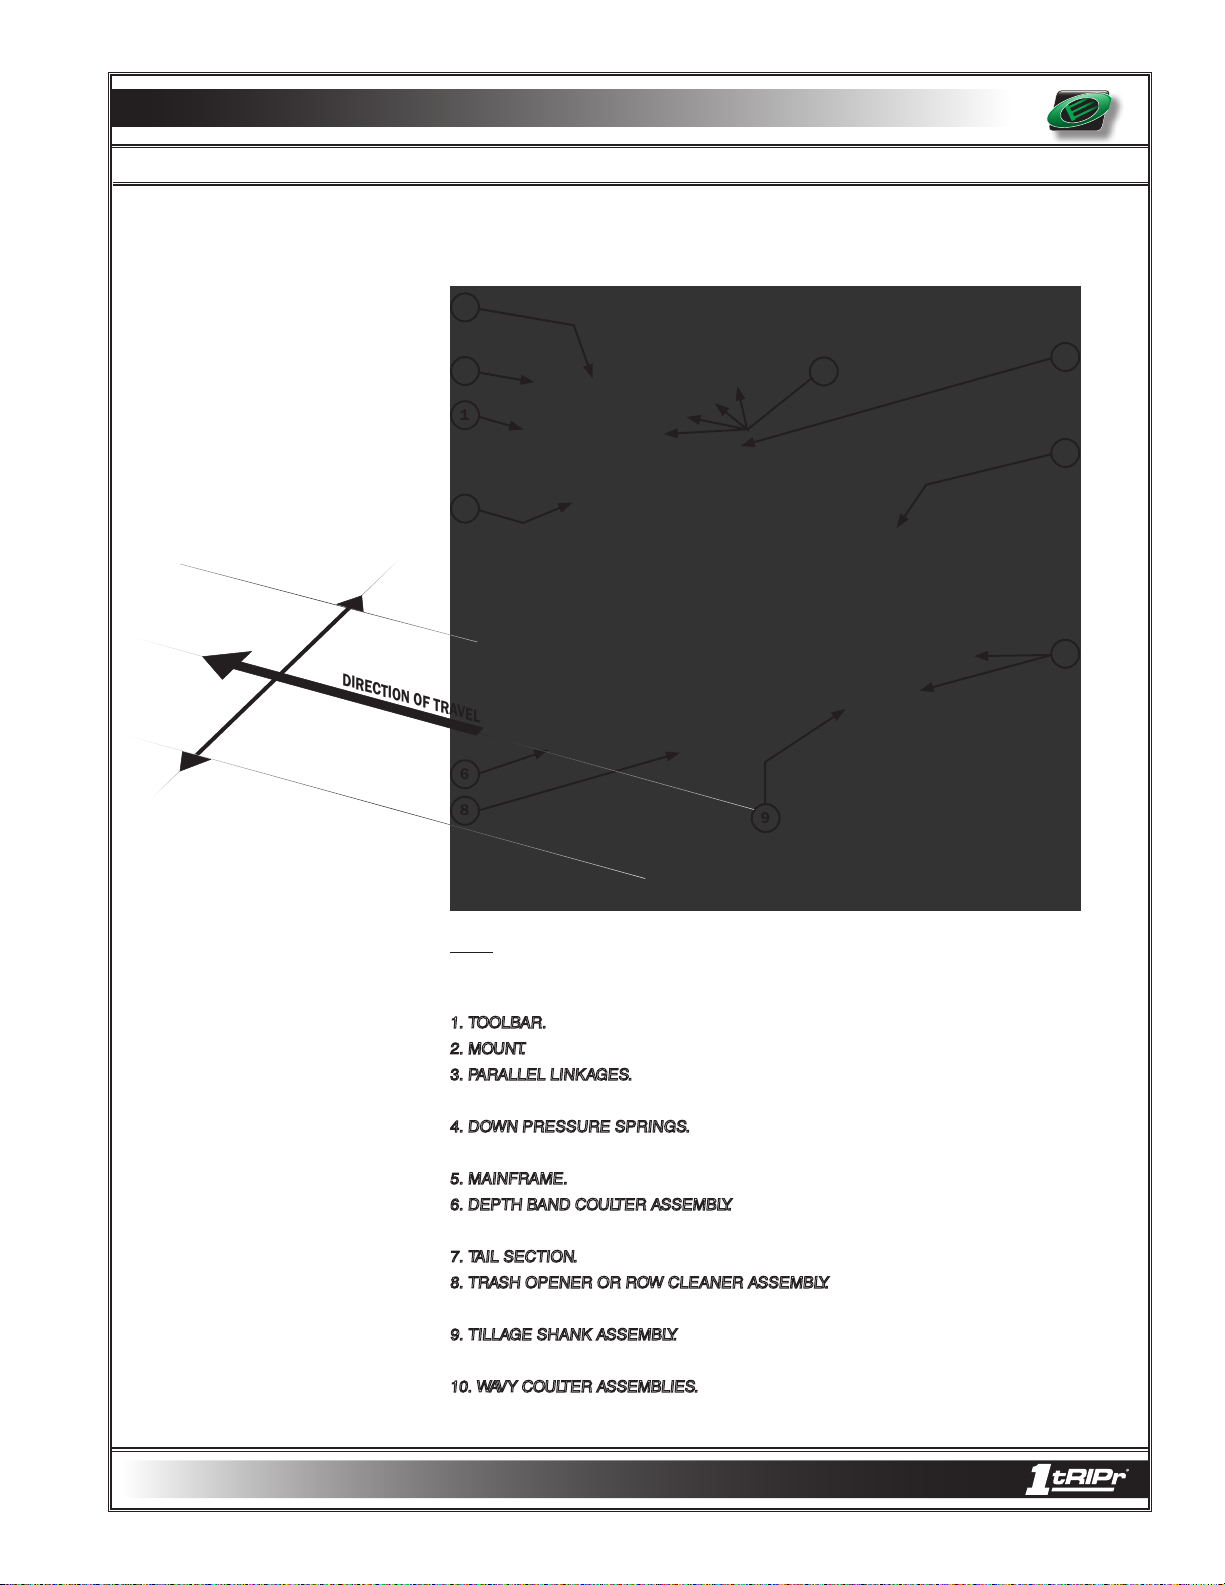
STANDARD ROW UNIT
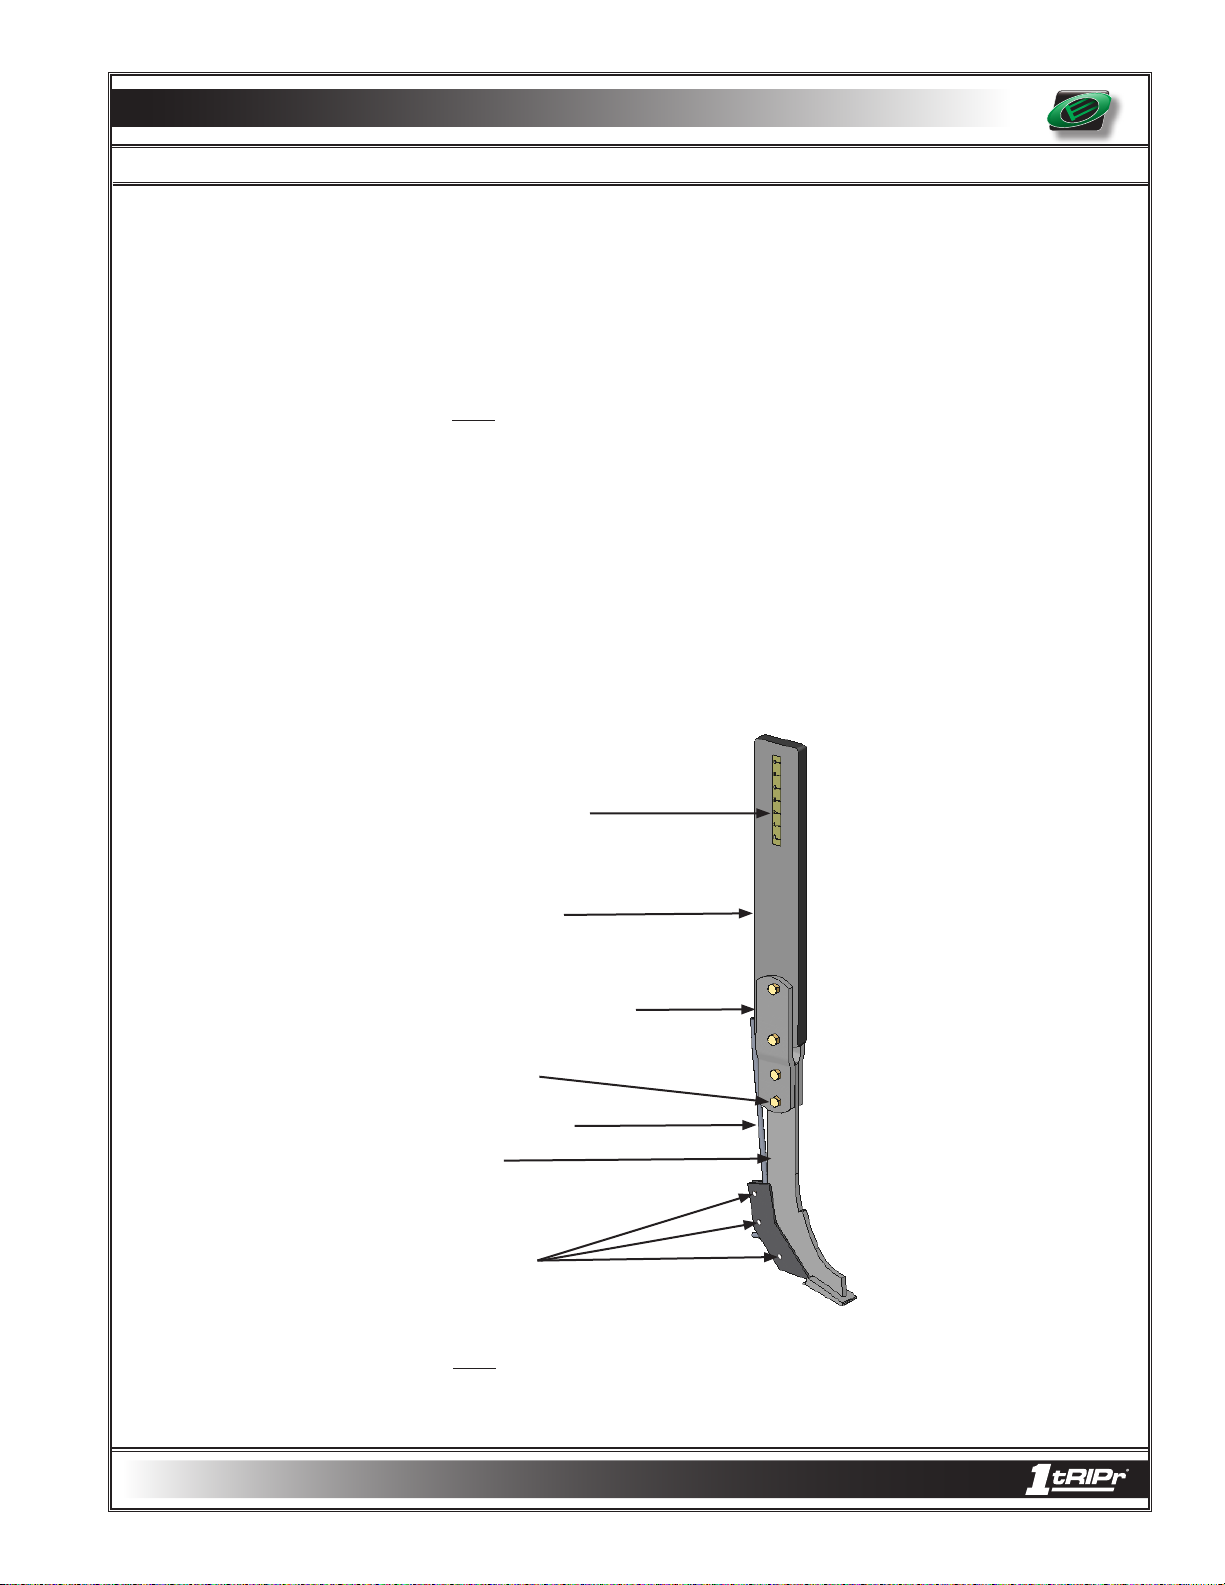
COMPONENT IDENTIFICATION
3
LEFT
RIGHT
DIRECTION OF TRAVEL
2
1
3
6
8
4
9
5
7
10
NOTE: Right and left as illustrated above and referenced from this point on, is determined
by facing the same direction the implement will travel while in use.
1. TOOLBAR.
2. MOUNT.
3. PARALLEL LINKAGES.
to operate independent of the toolbar to allow uniform tillage depth despite terrain variations.
4. DOWN PRESSURE SPRINGS.
supply down pressure to assist with row unit tooling soil penetration.
5. MAINFRAME.
6. DEPTH BAND COULTER ASSEMBLY.
ing depth while the coulter cuts surface and subsurface residue.
7. TAIL SECTION.
8. TRASH OPENER OR ROW CLEANER ASSEMBLY.
residue directly behind the depth band coulter prior to the arrival of rearward tooling.
9. TILLAGE SHANK ASSEMBLY.
the root zone compacted layer, while allowing precision fertilizer placement at two depths, if desired.
10. WAVY COULTER ASSEMBLIES.
to incorporate field residue, till, and firm the seedbed.
Proven Orthman toolbar design provides unmatched strength.
A wrap- around mount provides a long lasting row unit foundation.
Parallel linkages, with the ability to travel vertically, allow the row units
Four adjustable down pressure springs per row unit
The row unit mainframe serves as the primary mount for row unit tooling.
The depth band provides consistent row unit tool-
The tail section houses adjustable tooling.
The trash opener reduces field
The tillage shank assembly
Wavy coulter assemblies provide “lift and pinch” action
(mole shank or mole knife)
shatters
Made in the U.S.A.
3 - 3

TOOLING OPTIONS AND INSTALLATION
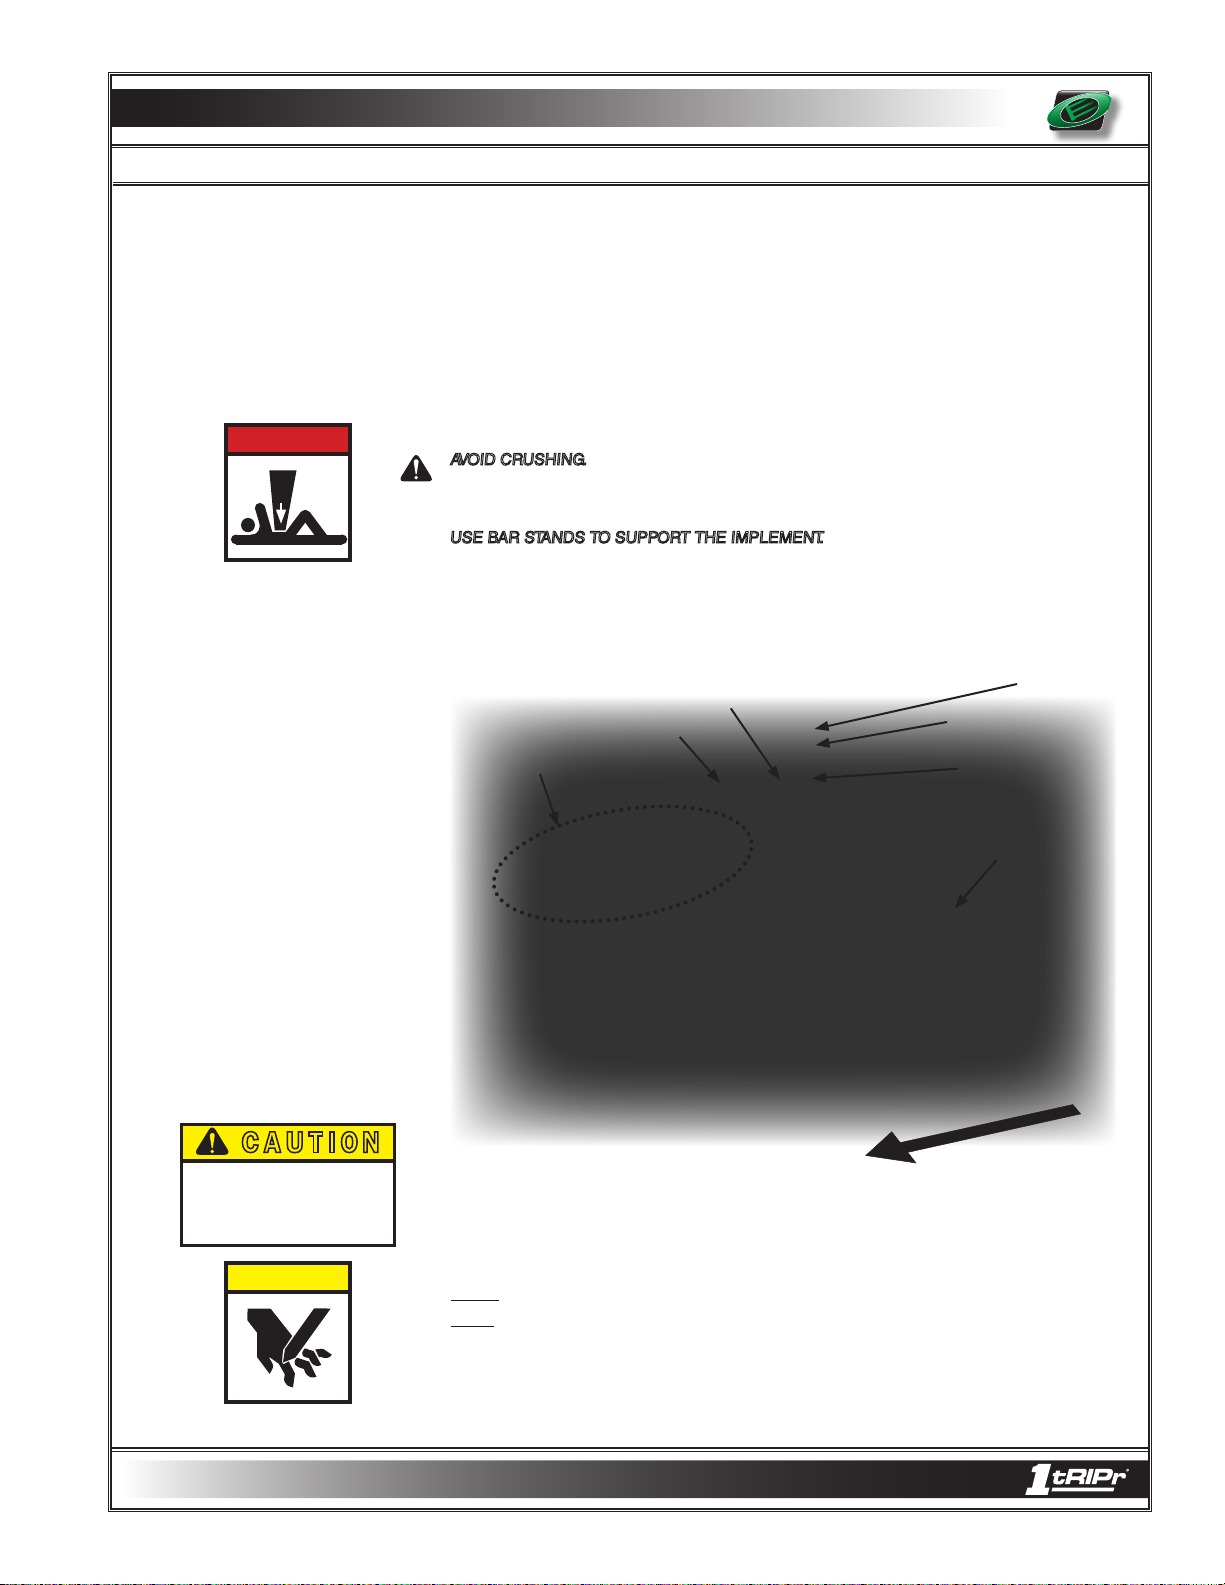
ROLLING BASKET ASSEMBLY
D A N G E R
An optional rolling basket assembly is available to complement the
ing baskets reduce clod size, retain existing soil moisture, firm, and complete the optimum
seedbed. The rolling basket is mounted to the rear of the row unit tail section.
1tRIPr®
row unit. Roll-
INSTALLATION OF ROLLING
BASKET ASSEMBLY
AVOID CRUSHING. Make sure all personnel are clear of the implement. Lower implement
to the ground, place tractor in park, turn off engine, and remove key.
USE BAR STANDS TO SUPPORT THE IMPLEMENT. Park implement on a clean, dry,
and level surface. An uneven surface could cause implement to shift or fall, resulting in
personal injury or death, as well as implement damage. Securely support all implement
components that must be raised. Remove buildup of grease, oil, or debris prior to
installing the rolling basket.
Tail Section Bolt Holes (4)
Tail Section
Carriage Mounting
Bolt (4)
Lock Washer (4)
Rolling Basket
Rolling Basket
Nut (4)
Bolt Hole (4)
Assembly
Made in the U.S.A.
C A U T I O N
Be extremely careful working
around unshielded sharp edges.
Injury may result from contact
with sharp edges.
C A U T I O N
153 - 045
DIRECTION OF TRAVEL
1. Align tail section and rolling basket bolt holes.
2. Mount rolling basket assembly to tail section with carriage mounting bolts, lock
washers, and nuts.
3. Tighten all hardware to proper torque specifications.
NOTE: Recommended tools: 3/4” socket or end wrench.
NOTE: Due to clearance issues, rolling baskets cannot be used in conjunction with
certain planter attachment packages. A lift assist wheel extension package is available to
utilize rolling baskets and lift assist wheels simultaneously. Contact your Orthman dealer
for lift assist wheel extension package information to alleviate clearance issues. For
basket down pressure adjustment, see page 5-10.
(pg. 8 - 4)
4 - 1
TOOLING OPTIONS AND INSTALLATION
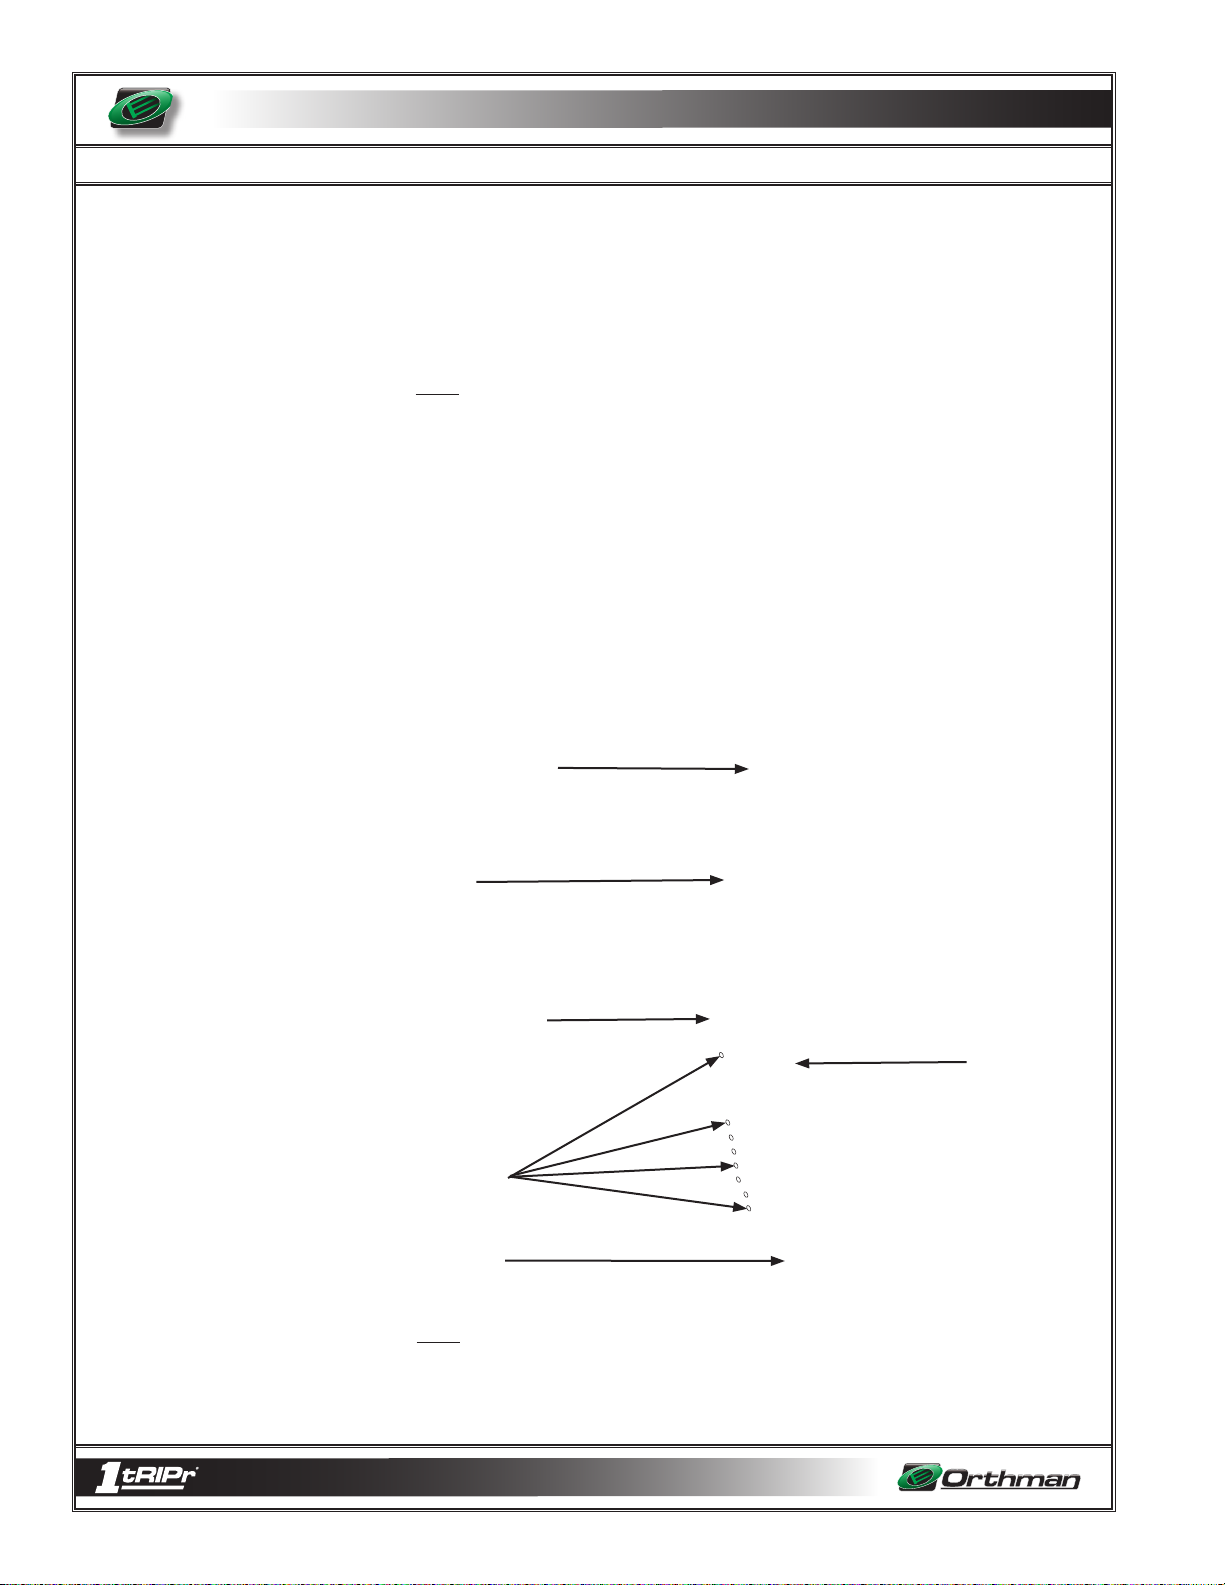
MOLE SHANK ASSEMBLY
The mole shank assembly provides benefits to maximize strip-till soil management. The
foot piece shatters the root zone compacted layer to increase soil porosity, reduce run
off, and allow root systems to utilize deeper soil moisture and nutrients.
NOTE: A depth indicator allows for uniform mole shank assembly depth between row
units. Depth indicator decal does not reflect actual tillage depth. Use depth indicator
decal as a tool to achieve uniform depth across the implement.
Fertilizer tube(s) allow precision fertilizer placement at two depths,
if desired. Precision fertilizer placement provides crop plants with
timely fertilizer access to maximize development from germination
through maturity.
If combining strip-tillage and planting operations with a Combo Caddy or attachment
package, lateral offset of the
to allow fertilizer placement without detriment to seed germination.
1tRIPr®
row unit relative to seed placement is recommended
Depth Indicator
Shank
Fertilizer Tubes
Shin Cap
(see note)
Pin Holes
(used to support
fertilizer tube(s)
Foot Piece
NOTE: Refer to (pg. 4 - 4) for mole shank assembly installation instructions. Refer to (pg.
4 - 5) for fertilizer tube installation instructions.
Shin cap may not be included or fit on later model machines due to footpiece design.
Made in the U.S.A.
4 - 2
TOOLING OPTIONS AND INSTALLATION
MOLE KNIFE ASSEMBLY
The mole knife assembly provides benefits to maximize strip-till soil management. The
knife shatters the root zone compacted layer to increase soil porosity, reduce run off, and
allow root systems to utilize deeper soil moisture and nutrients. The fertilizer knife clamp
shear bolt provides mole knife shear protection.
NOTE: A depth indicator allows for uniform mole knife assembly depth between row
units. Depth indicator decal does not reflect actual tillage depth. Use depth indicator
decal as a tool to achieve uniform depth across the implment.
Fertilizer tube(s) allow precision fertilizer placement at two depths,
if desired. Precision fertilizer placement provides crop plants with
timely fertilizer access to maximize development from germination
through maturity.
If combining strip-tillage and planting operations with a Combo Caddy or attachment
package, lateral offset of the
to allow fertilizer placement without detriment to seed germination.
1tRIPr®
row unit relative to seed placement is recommended
Depth Indicator
1” x 4” Shank
Fertilizer Knife Clamp
Shear Bolt
Fertilizer Tube
Knife
Pin Holes
(used to support
fertilizer tube)
NOTE: Refer to (pg. 4 - 4) for mole knife assembly installation instructions. Refer to (pg. 4 - 5)
for fertilizer tube installation instructions. Contact your Orthman dealer for additional fertilizer
tubes to place fertilizer at two depths.
Made in the U.S.A.
4 - 3
 Loading...