

Wireless Entertainment Smart Pad
Keyboard
User’s Manual
Version 1.0 2008/12
ID NO: PAKL-231B2001-00
0

About This Manual
This manual is designed to assist you in installing and using the
Wireless Touchpad Keyboard. Information in this document has
been carefully checked for accuracy; however, no guarantee is given
to the correctness of the contents. The information in this document
is subject to change without notice.
Edition
st
Edition,
1
Copyright
© Copyright 2008
This document contains proprietary information protected by
copyright. All rights are reserved. No part of this manual may be
reproduced by any mechanical, electronic or other means, in any
form, without prior written permission of the manufacturer.
1

FEDERAL COMMUNICATIONS COMMISSION STATEMENT
This Equipment has been tested and found to comply with the limits
for a class B digital device, pursuant to Part 15 of the Federal
Communications Commission (FCC) rules. These limits are
designed to provide reasonable protection against harmful
interference in a residential installation. This equipment generates,
uses, and can radiate radio frequency energy and, if not installed
and used in accordance with the instructions, may cause harmful
interference to radio communications. However, there is no
guarantee that interference will not occur in a particular installation. If
this equipment does cause harmful interference to radio or television
reception, which can be determined by turning the equipment off and
on, the user is encouraged to try to correct the interference by one or
more of the following measures:
♦ Reorient or relocate the receiving antenna.
♦ Increase the separation between the equipment and receiver.
♦ Connect the equipment into and outlet on a circuit different from
that to which the receiver is connected.
♦ Consult the dealer or an experienced radio/TV technician for
help.
WARNING
A shielded-type power cord is required in order to meet FCC
emission limits and to prevent interference to nearby radio and
television reception. It is essential that only the supplied power cord
be used.
Use only shielded cables to connect I/O devices to this equipment.
You are cautioned that changes or modifications not expressly
approved by the party responsible for compliance could void your
authority to operate the equipment.
2

15.21
You are cautioned that changes or modifications not expressly
approved by the part responsible for compliance could void the
user’s authority to operate the equipment.
15.105(b)
This equipment has been tested and found to comply with the limits
for a Class B digital device, pursuant to part 15 of the FCC rules.
These limits are designed to provide reasonable protection against
harmful interference in a residential installation. This equipment
generates uses and can radiate radio frequency energy and, if not
installed and used in accordance with the instructions, may cause
harmful interference to radio communications. However, there is no
guarantee that interference will not occur in a particular installation. If
this equipment does cause harmful interference to radio or television
reception, which can be determined by turning the equipment off and
on, the user is encouraged to try to correct the interference by one or
more of the following measures:
-Reorient or relocate the receiving antenna.
-Increase the separation between the equipment and receiver.
-Connect the equipment into an outlet on a circuit different from that
to which the receiver is connected.
-Consult the dealer or an experienced radio/TV technician for help.
Operation is subject to the following two conditions:
1) this device may not cause harmful interference and
2) this device must accept any interference, including interference
that may cause undesired operation of the device.
3

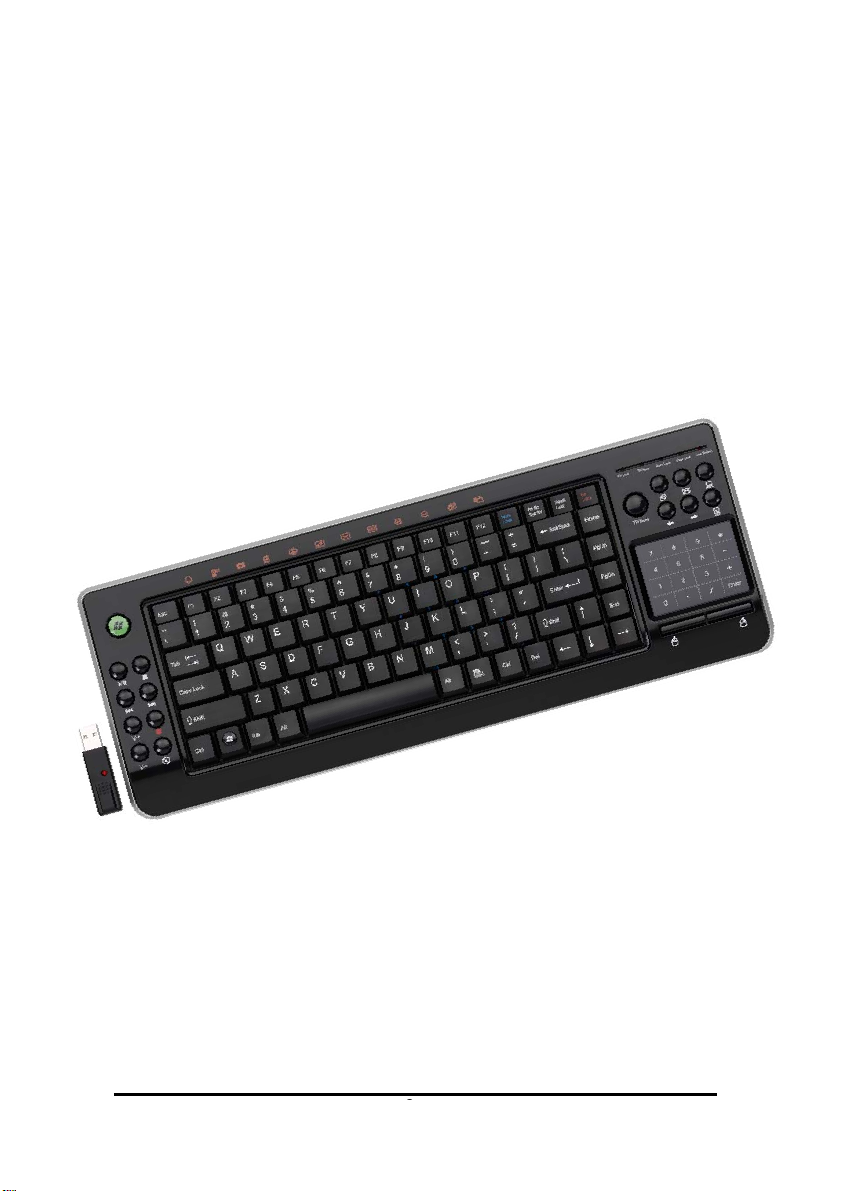
1. INTRODUCTION
Thank you for purchasing the Wireless Entertainment Smart Pad
Keyboard. This User’s Manual contains information that will help
you to operate your keyboard as well as answer questions about
certain special keys and buttons.
• MCE Buttons: My Music, My Videos, My Pictures, My TV,
My Radio, DVD.
• Internet Buttons: WWW, E-mail, Back, Forward
• Multimedia Buttons: Hot Keys: Volume down, Volume up,
Mute, Pre track, Next track, Play/Pause, Stop and Record.
• Application hotkeys: My Computer, Calculator
Note: All the MCE buttons need to work under MCE application.
If press in Windows XP or Vista, will not work.
2. SYSTEM REQUIREMENTS
• Microsoft Windows® XP with MCE/ Vista operating system
• Microsoft Internet Explorer 6.0 or later.
3. INSTALLATION
z Connect the receiver to your PC USB port.
z A Windows dialog box, New Hardware Found.
z The system will install the driver automatically and complete
the installation.
z Put the driver CD into your CD-Rom and install the driver.
z After the installation, please reboot your computer.
z Install the battery to your keyboard and turn it on.
z Start to use your wireless touchpad keyboard.
Note: After 30 minutes non-operation, the keyboard will go to
sleep mode. Please press any key to wake up.
4

4. Keyboard Button Functions
Function Name Function Description
Start
Start Open the MCE application.
Goes back to a previous item that was already
Back
Forward
WWW
Email Starts the default e-mail program.
My
Computer
Calculator Starts Microsoft Calculator
Record Record the TV or copy the media to PC.
Play/Pause
viewed in programs that support the “Back”
command, such as a Web browser
Goes to the next item—if it was previously
viewed in the same session, in programs that
support the “Forward” command, such as a
Web browser.
Starts the default Web browser and goes to
the home page. If the Web browser is active, it
opens the home page.
Opens My Computer.
Switches between Play and Pause of
DVD/VCD/MP3/Audio media. Once Pause is
pressed, pressing this button again resumes
play.
Stop Stops playing the media.
V-
V+
Mute
Decreases the computer’s sound volume.
Hold down to decrease volume more quickly.
Increases the computer’s sound volume.
Hold down to increase volume more quickly.
Mutes the computer’s sound volume. Press it
again to turn the system volume back on.
5

Next track
Pre-track
Switches to the next media track. Press once
for each subsequent media track.
Switches to the previous media track. Press
once for each preceding media track.
Enhanced Function Keys: (12 Embedded Vista Keys that are controlled by
the “Fn Key”)
Fn
Fn key
Enables the 12 Embedded Keys. By
default, the function is OFF.
F1: My Music Open My Music application
F2: My Video Open My Videos application.
F3: My Picture Open My Pictures application.
F4: My Radio Open My Radio application.
F5: My TV Open My TV application.
F6: DVD Open DVD menu application.
F7: Close Close the active Windows
®
application.
F8: Win Select Call the Win Select function.
F9:Zoom in Zoom in the picture.
F10:Zoom out Zoom out the picture.
F11:Gatget Open the Gatget application.
F12: Flip 3D Call the Flip 3D function
6

5. Smart-Pad Function List
Two Finger Function
Gesture
Tapping
Magnifier
Rotate
Room In/Out
Application
Program
All Program
All Program
• ACDsee
• Windows picture
and fax viewer
• Adobe Reader
• ACDsee
• Windows picture
and fax viewer
• Internet Explore
• Microsoft Office
Function Description
Tap two fingers on the pad
simultaneously; you can simulate the
mouse’s middle key. You also can
define different function in driver.
First tap and hold the pad with one
Finger and then tap it again twice with
another finger. When the rectangular
magnifying glass appeared, drag the
portion of the window you wish to
magnify. Tap the pad again to
deactivate the feature.
You can perform the rotation by touch
and rotate two fingertips on the pad in
the desired direction. You can also tap
and hold one finger on pad to set a
rotation axis and rotate the other finger
around the axis in the desired
direction.
To zoom in, place two fingers on the
pad and move it away from each other,
and vice versa, move it toward each
other for zoom out.
Vertical
Scroll
• Adobe Reader
• Internet Explore
• Microsoft Office
This operation is done by dragging two
fingertips on the Smart-Pad. Simply tap
the pad and drag the window you wish
to scroll. Drag up or down to perform
7

Horizontal
Scroll
Gesture
Tapping
Switch
Window
My
Computer
Page down
• My computer
Application
Program
All Program
All Program
All Program
• ACDsee
• Windows picture
viewer
• Adobe Reader
• Internet Explore
• Power Point、
Excel
• My computer
vertical scrolling. Similarly, drag left or
right to scroll horizontally.
Three Finger Function
Function Description
Tap three fingers on the pad
simultaneously; you can simulate the
mouse’s middle key. You also can
define different function in driver
Tap three fingers on the pad, continue
moving down until active window
switch menu, and then choose the
desired window by moving one finger.
After you release finger from the pad,
the desired window shows.
Tap three fingers simultaneously on
the pad, continue moving up until
active "My computer" window, and then
you can release fingers from the pad.
To view the next page (page down),
simply swipe 3-fingertips once from left
to the right
8

• ACDsee
• Windows picture
Page up
viewer
• Adobe Reader
• Internet Explore
• Power Point、
Excel
• My computer
To view the previous page (page up),
simply swipe 3-fingertips once from
right to the left
Note: To get more information about the Smart Pad function,
just double click the icon on the system tray.
Number Pad function:
Press the TP/Num button to switch touchpad or
Num pad function. When the Num pad led on, it
means that you can input the numeric from touchpad.
Don’t need to turn on the number lock.
9

6. Switch Numeric
Press the NumLock key to switch on/ off.
NUMLOCK
OFF
7 & 7 J 1
8 * 8 K 2
9 ( 9 L 3
0 ) * ; : +
U 4 M 0
I 5 > . .
O 6 ? / /
P -
NUM LOCK
ON
NUMLOCK
OFF
NUM LOCK
ON
7. Troubleshooting
¾ Wireless Product Does Not Work
• Make sure you have connected the receiver correctly.
• Make sure you have installed the batteries correctly. Check
to make sure the batteries you have installed are not dead.
Try the batteries in another device.
• Try unplugging then reconnecting the receiver to the
computer and press the ID button at back of the keyboard.
• When it connected, the led of the receiver will start flashing.
¾ Screen Cursor Does Not Move Properly
10

It is possible that the receiver may be too far from the keyboard.
Or the computer monitor (or a large metal object) may be
interfering with the receiver's radio reception. Also, the batteries
may be low. Check the batteries status. You may also need to
re-establish the connection between the keyboard and receiver.
11
 Loading...