

Page 1

Wireless Multimedia Pro
Keyboard and Optical Mouse
User’s Manual
Version 1.0 2003/07
ID NO: PAK-23188101-00
Page 2

Wireless Multimedia Keyboard And Optical Mouse
About This Manual
This manual is designed to assist you in installing and using the Wireless
Office Keyboard and
Ergo Optical Mouse. Information in this document
has been carefully checked for accuracy; however, no guarantee is given to
the correctness of the contents. The information in this document is subject
to change without notice.
Edition
st
1
Edition,
Copyright
© Copyright 2002
This document contains proprietary information protected by copyright. All
rights are reserved. No part of this manual may be reproduced by any
mechanical, electronic or other means, in any form, without prior written
permission of the manufacturer.
Trademarks
All trademarks and registered trademarks are the property of their respective
owners.
1
Page 3

Wireless Multimedia Keyboard And Optical Mouse
FEDERAL COMMUNICATIONS COMMISSION STATEMENT
This Equipment has been tested and found to comply with the limits for a
class B digital device, pursuant to Part 15 of the Federal Communications
Commission (FCC) rules. These limits are designed to provide reasonable
protection against harmful interference in a residential installation. This
equipment generates, uses, and can radiate radio frequency energy and, if
not installed and used in accordance with the instructions, may cause
harmful interference to radio communications. However, there is no
guarantee that interference will not occur in a particular installation. If this
equipment does cause harmful interference to radio or television reception,
which can be determined by turning the equipment off and on, the user is
encouraged to try to correct the interference by one or more of the following
measures:
♦ Reorient or relocate the receiving antenna.
♦ Increase the separation between the equipment and receiver.
♦ Connect the equipment into and outlet on a circuit different from that to
which the receiver is connected.
♦ Consult the dealer or an experienced radio/TV technician for help.
This device complies with Part 15 of the FCC rules. Operation is subject to
the following two conditions: (1) this device may not cause harmful
interference, and (2) this device must accept any interference that may cause
undesired operation.
2
Page 4

TABLE OF CONTENTS
ntroduction............................................................................................4
I
System Requirements ..............................................................5
Wireless Multimedia Keyboard:
1. Installation............................................................................................ 6
Installation for Windows
Un-installation...................................................................................... 6
2. Multimedia Keyboard Button Functions........................................... 7
Important Notes Regarding Software Support................................. 9
3. Setting Multimedia keyboard and Program.................................... 11
Multimedia Keyboard Buttons......................................................... 12
Wireless Ergo Optical Mouse:
1. Installation.......................................................................................... 14
2. Wireless Optical Mouse Functions...................................................15
3. Setting Wireless Ergo Optical Mouse...............................................16
Setting wireless program...................................................................17
Magic Function................................................................................... 19
®
98/ME/2000/XP ....................................... 6
Troubleshooting...............................................................................…20
Page 5

Wireless Multimedia Keyboard And Mouse
INTRODUCTION
Thank you for purchasing the WIRELESS OFFICE KEYBOARD AND
ERGO OPTICAL MOUSE. This User’s Manual contains information that
will help you to operate your keyboard as well as answer questions abou t
certain special keys and buttons. Please keep this manual and the Setup CD
in a safe place for future reference.
SYSTEM REQUIREMENTS
Before installing the Wireless Office Keyboard and Ergo Optical Mouse
software, please make sure that the following hardware and software
components are installed and correctly set up. The following system
specifications are required:
• Pentium 133 or higher processor.
• Microsoft Windows
• Microsoft Internet Explorer 4.0 or later.
• 64MB of RAM is recommended.
• CD-ROM or DVD drives.
• Two AA alkaline batteries for keyboard; two AA alkaline batteries
for the mouse.
®
98/ME/2000/XP operating system or later.
4
Page 6

Wireless Multimedia Keyboard And Optical Mouse
Wireless Multimedia Keyboard:
1. INSTALLATION
Package Contents: Batteries; Receiver; Software; Keyboard;
Mouse
Place the batteries into the keyboard.
Connect the receiver to the desktop.
Setting ID and install the software.
NSTALLATION FOR WINDOWS® 98/ME/2000/XP
I
• Before installing the Wireless Multimedia Keyboard driver, please
check to see if there is any other keyboard drivers already installed
on your system. All other keyboard drivers must be uninstalled
BEFORE installing the Wireless Multimedia Keyboard drivers.
• Insert the Driver CD into your CD-ROM drive and the CD will
Auto Run. Choose to install the Keyboard driver; the first screen is
Language Selection. Choose your language and proceeding to the
next step. The software will automatically begin to install to your
hard disk in a sub-directory titled C:\PROGRAM
FILES\ORTEK\Multimedia Keyboard 1.1. After installation,
you will be prompted to restart your computer in order to enable
the Wireless Multimedia Keyboard software.
• Click (Finish) and restart your computer. The Wireless Multimedia
Keyboard Icon will be activated automatically after Windows
restarts.
NOTE: After installing the Wireless Multimedia Keyboard drivers, you
need to restart your computer, or the Wireless Multimedia
Keyboard software will not be enabled.
N-INSTALLATION
U
To remove the Wireless Multimedia Keyboard drivers from your system,
simply go to C:\PROGRAM FILES\ORTEK\Uninstall Multimedia
Keyboard 1.1. The system will uninstall the Multimedia Keyboard driver
automatically.
5
Page 7
Wireless Multimedia Keyboard And Mouse
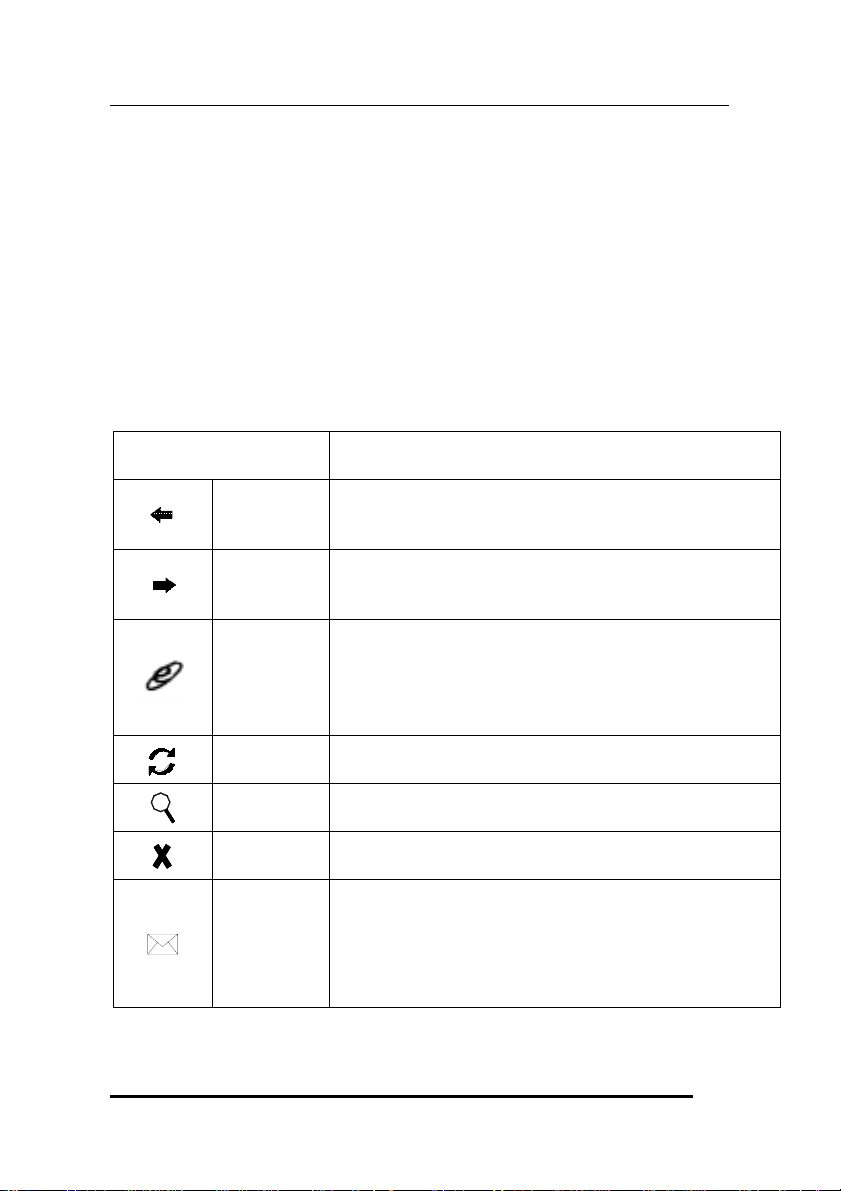
2. Wireless Multimedia Keyboard Button Functions
• Internet Buttons: Back, Forward, WWW, Refresh, Search, Stop,
Email and Favorite.
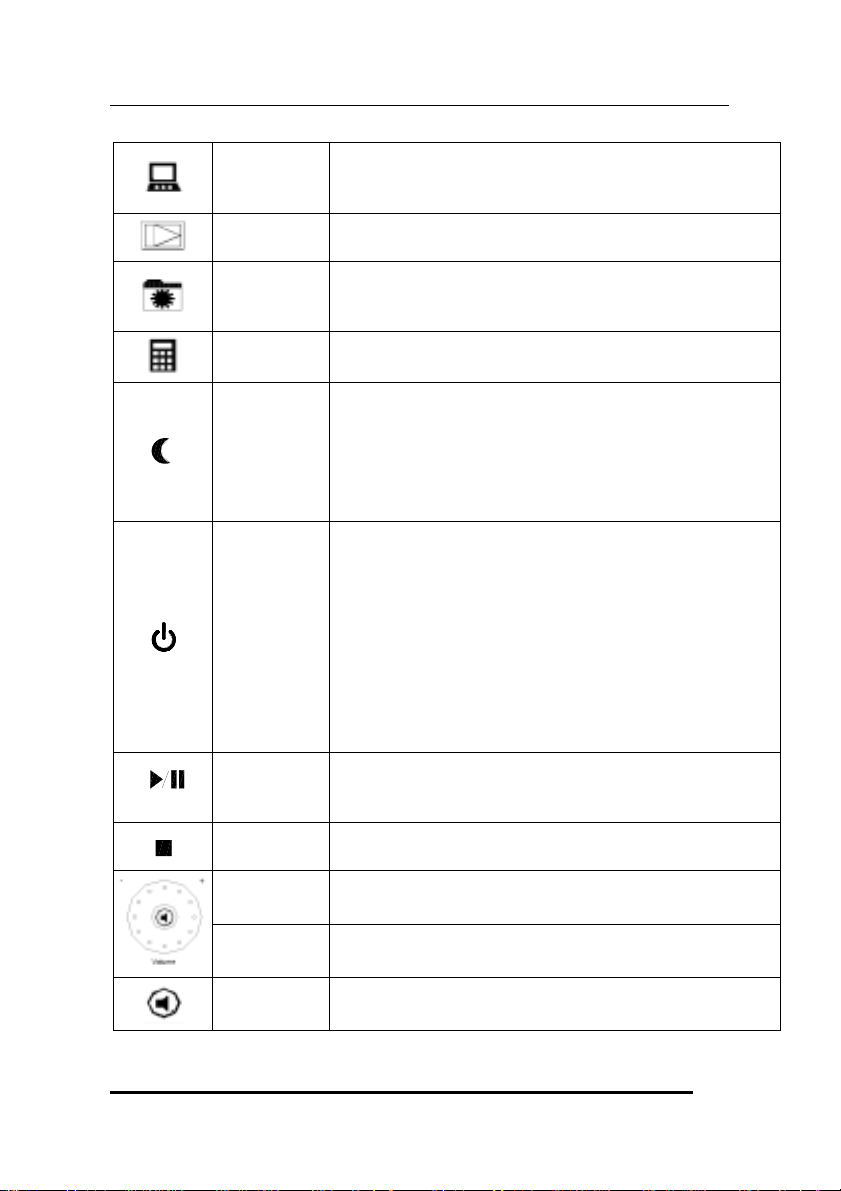
• Application Buttons: My Computer, Calculator, Log Off, Sleep
and Power.
• Multimedia Buttons: Play/Pause, Stop, V+, V-, Mute, Next track
and Pre-track.
Please make sure that both the hardware requirements referenced on Page 5
are met prior to using any of the Wireless Multimedia Keyboard Buttons.
Function Name Function Description
Goes back to a previous item that was already
Back
Forward
WWW
Refresh
viewed in programs that support the “Back”
command, such as a Web browser
Goes to the next item—if it was previously viewed
in the same session, in programs that support the
“Forward” command, such as a Web browser.
Starts the default Web browser and goes to the
home page. If the Web browser is active, it opens
the home page. You can reassign the WWW key to
start another Web/Home or use a different
Application.
Updates the Information on an active Web page or
the contents of certain windows.
Search Open the Internet Explorer Search pane.
Stop
Stops loading or refreshing a Web page or the
contents of certain windows.
Starts the default e-mail program. Pressing the Mail
Hot Key will tell you what the default e-mail
Email
program is. You can reassign the mail Hot Key to
start another email Program or use a different
Application.
6
Page 8
Wireless Multimedia Keyboard And Optical Mouse
My
Computer
Media Opens Microsoft Media Player.
Opens My Computer. This shows the contents of
the floppy disk, hard disk, CD-ROM drive and
network drives, etc.
Opens the Internet Explorer Favorites pane. This is
Favorite
Calculator Starts Microsoft Calculator
where you can store shortcuts to frequently used
files, Web Sites, or other items, for easy access.
Puts the system into Sleep mode if the PC supports
power management and it is enabled. You can put
Sleep
your computer to sleep by pressing this button
directly on your desktop, protecting your data and
saving energy. If power management is not enabled,
this Hot Key will not work.
Puts the system into Power-Off mode if the PC
supports power management and it is enabled. You
can power off your computer with the press of a
button. If power management is not enabled, this
Power
Hot Key will not work. The Power-On function
available depends on how the Motherboard is set
up. For more information about how your system
resumes operation, see the documentation that
accompanied your computer or contact the dealer or
manufacturer.
Switches between Play and Pause of
Play/Pause
DVD/VCD/MP3/Audio media. Once Pause is
pressed, pressing this button again resumes play.
Stop Stops playing the media.
V-
V+
Mute
Decreases the computer’s sound volume. Turn left
to decrease volume.
Increases the computer’s sound volume. Turn right
to increase volume.
Mutes the computer’s sound volume. Press it again
to turn the system volume back on.
7
Page 9

Wireless Multimedia Keyboard And Mouse
Switches to the next media track. Press once for
each subsequent media track.
Switches to the previous media track. Press once for
each preceding media track.
Provides the same functions as a scrolling mouse.
Next track
Pre-track
Scroll
Wheel
IMPORTANT NOTES REGARDING SOFTWARE SUPPORT:
Keys that don’t need any software support while running under
®
Windows
98 or later are: My Computer, Sleep and Power.
Keys that don’t need any software support while running under
Windows
®
ME/2000/XP are: Back, Forward, Internet Keys and
Multimedia Keys.
Keys that need software support while run ning under an y windows
OS are: Media, Scroll Wheel and Calculator.
NOTE: If two CD-ROM drives are installed in your system, multimedia
keys only can control the default drive.
8
Page 10
Wireless Multimedia Keyboard And Optical Mouse
3. Setting Wireless Multimedia keyboard and Program
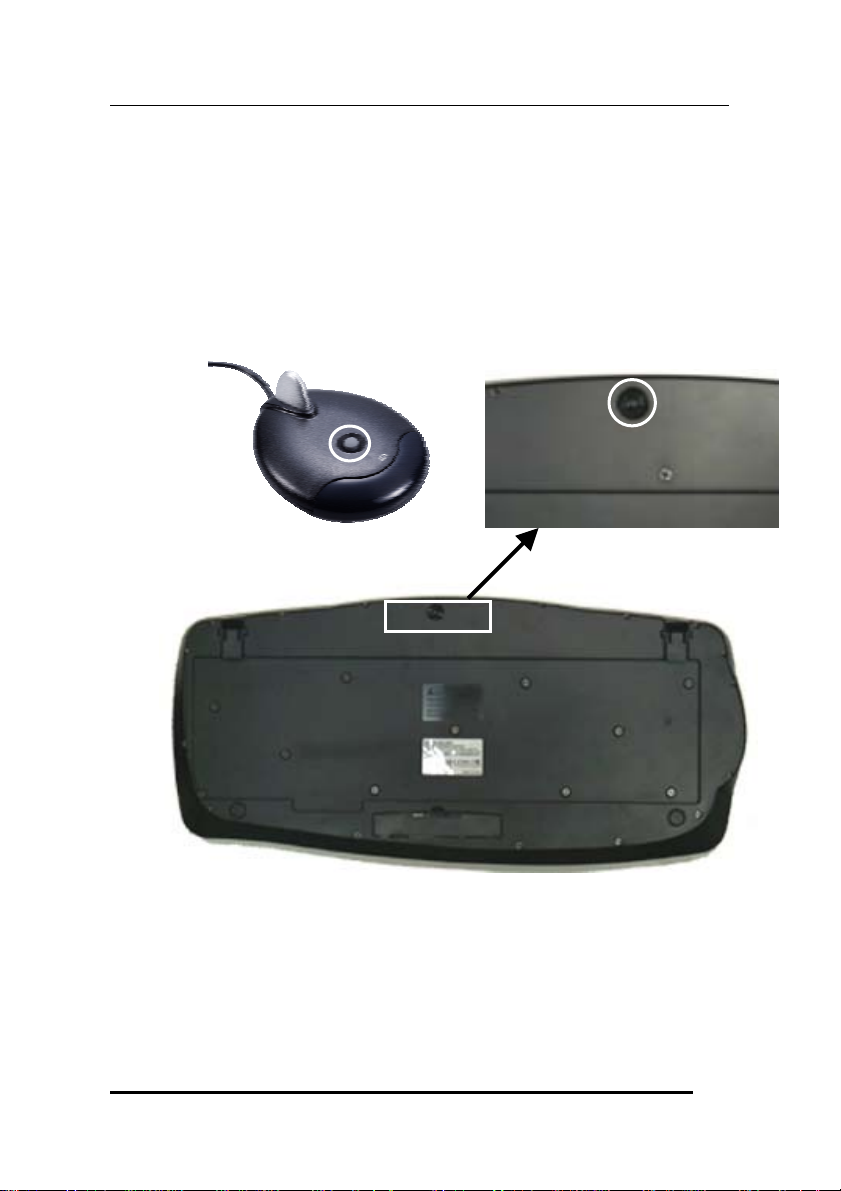
A. Make sure the receiver cable (purple) is plugged into the PS/2
keyboard port and the other cable (green) is plugged into the PS/2
mouse port.
B. Establish communication between the receiver and the keyboard.
There is an ID button on the top of the receiver; bottom of the
keyboard.
C. Press the ID button on the receiver first; then the receiver’s ID LED
will flash. Then press the ID button under the keyboard. The
receiver’s ID LED will accelerate flashing; it means the keyboard’s
setting up is completed.
NOTE: When you replace the batteries, remember to reset again!
ID Button
9
Page 11
Wireless Multimedia Keyboard And Mouse
Setting Program:
This section describes how to use the Multimedia Keyboard setting program.
Once the software installation for the Multimedia Keyboard is completed,
the icon
any application and several functions of your computer by simply clicking a
single button on your KEYBOARD. Right click on the (Multimedia
Keyboard Icon) to activate a menu with options to configure the OnScreen
Display and Office Keyboard Software.
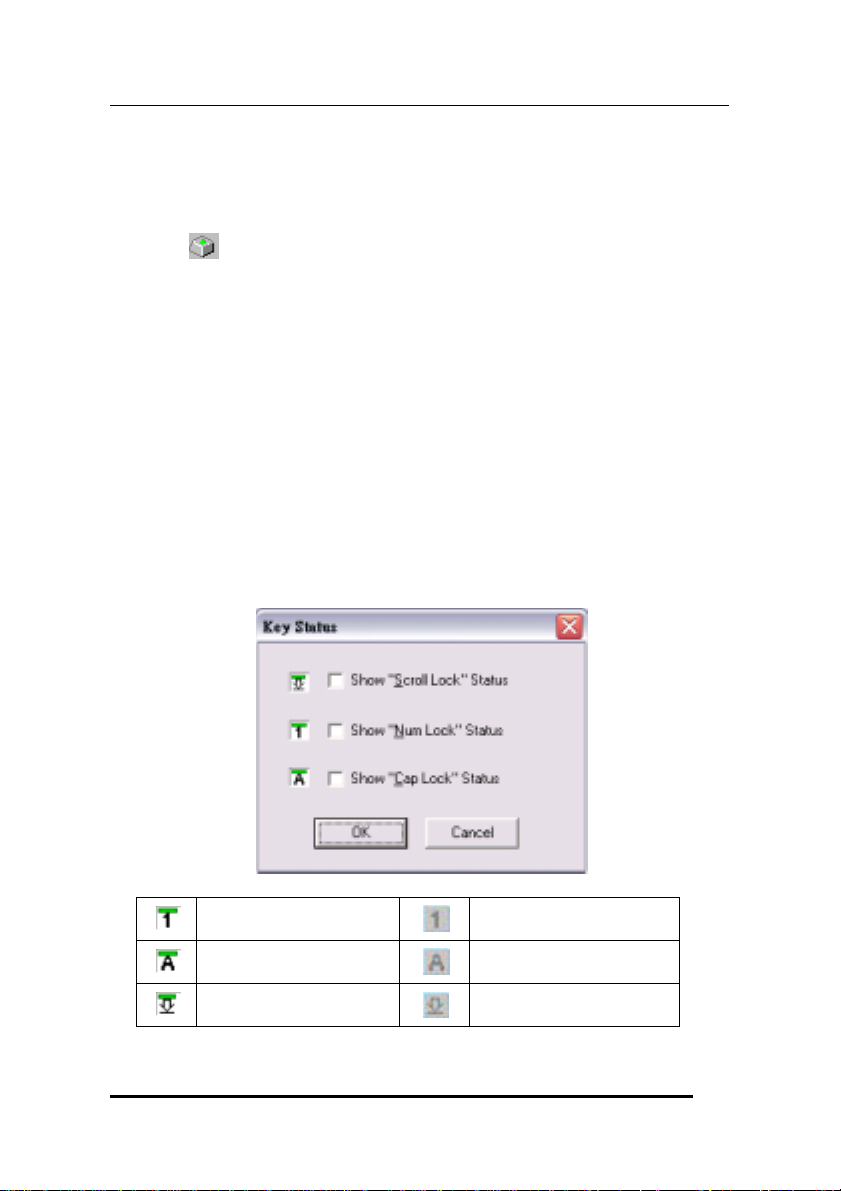
LED ICONS
When you launch the Multimedia keyboard application, go to the Setting→
Key Status to click which LED that you want to show on system tray. (See
the photo as below)
is shown on the Windows taskbar. It allows you to launch
Number Lock ON
Caps Lock ON
Scroll Lock ON
10
Number Lock Off
Caps Lock Off
Scroll Lock Off
Page 12
Wireless Multimedia Keyboard And Optical Mouse
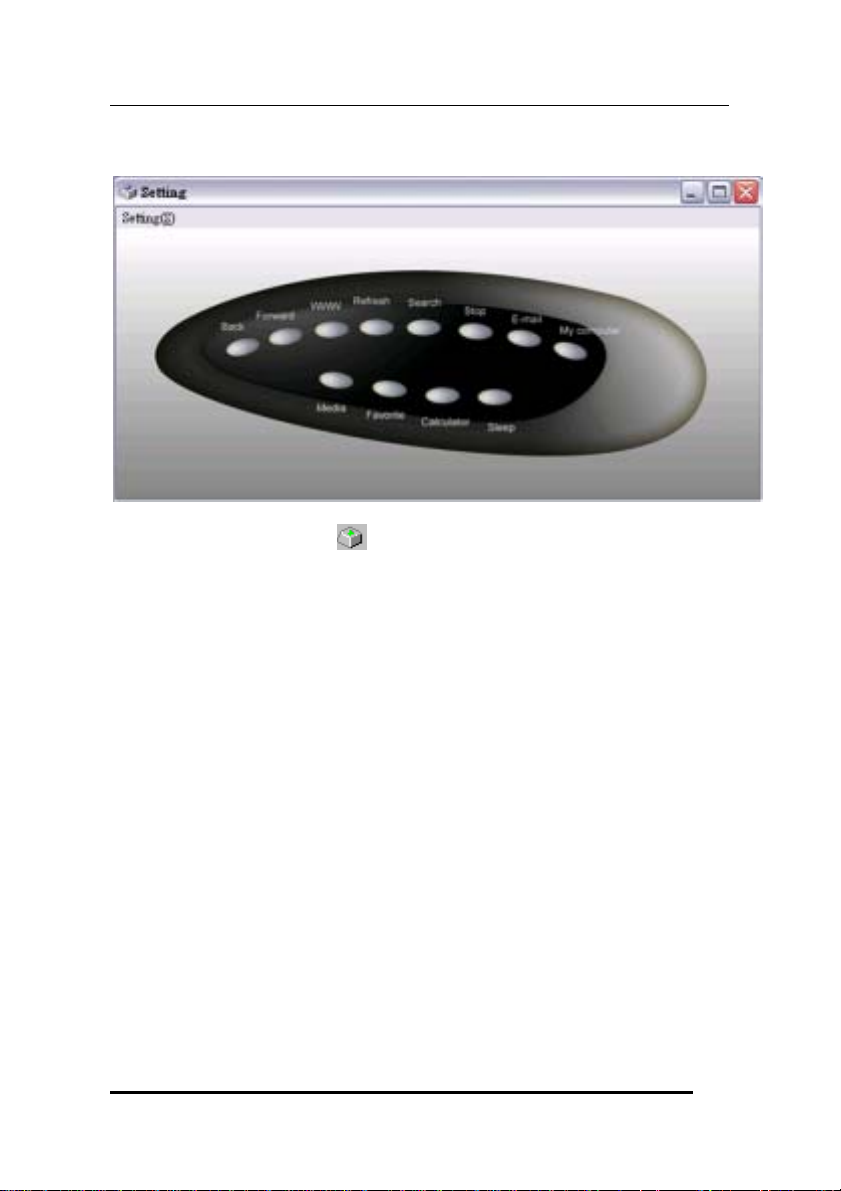
MULTIMEDIA KEYBOARD BUTTONS
Double Left-click the icon
on the taskbar of Windows to activate the
Multimedia Keyboard Software. The 12 Multimedia Keyboard buttons are
labeled according to their corresponding Icons. Left-click an OnScreen
button to define a key and then press the Hot key on the keyboard to
perform the function that you defined.
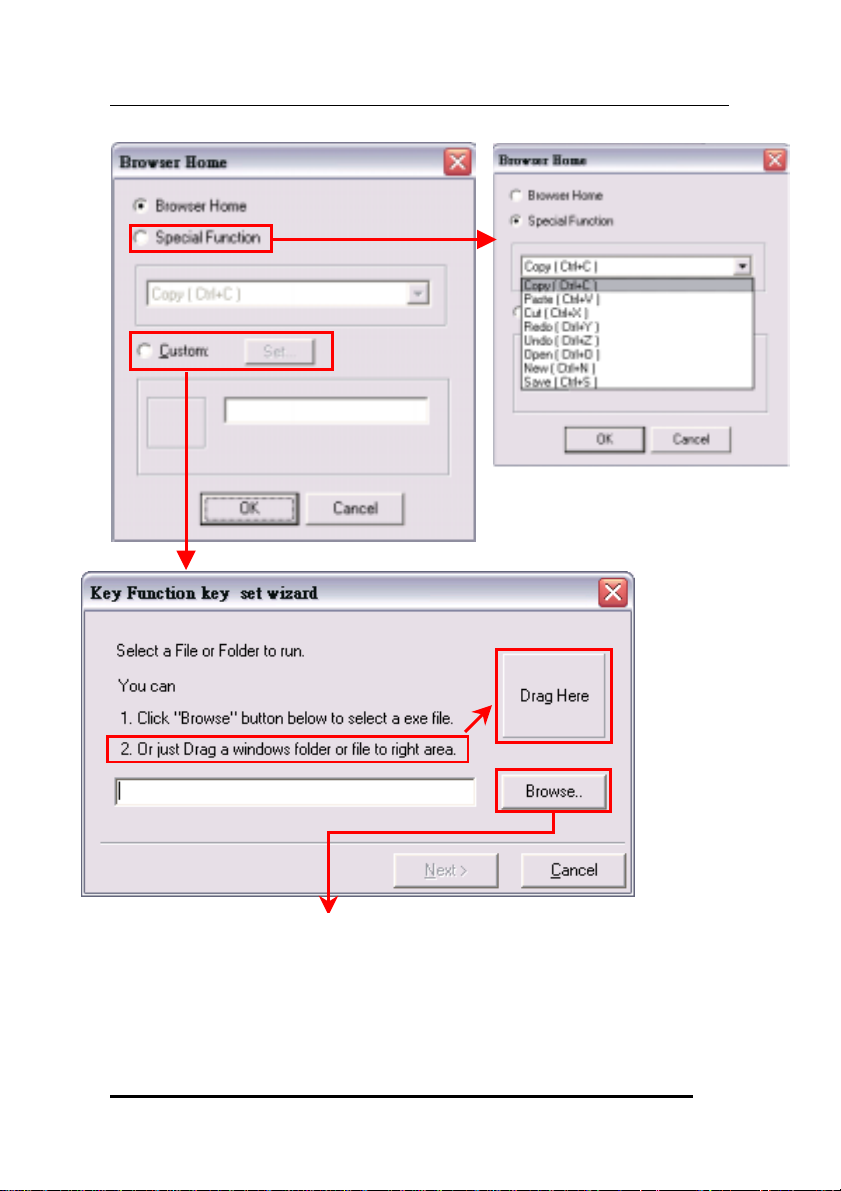
Please refer to the photographs to define your function.
11
Page 13
Wireless Multimedia Keyboard And Mouse
Assign the shortcut route
12
Page 14

Wireless Multimedia Keyboard And Optical Mouse
WIRELESS ERGO OPTICAL MOUSE:
1.INSTALLATION
Place the batteries into the mouse.
Turn off the computer. Connect the receiver to the desktop.
Turn on your PC, and then install the software.
I
NSTALLATION FOR WINDOWS® 98/ME/2000/XP
• Before installing the Wireless Ergo Optical Mouse driver, check to
see if there are any other mouse drivers already installed on your
system. All other mouse drivers must be uninstalled
installing the Wireless Ergo Optical Mouse drivers.
• Insert the Driver CD into your CD-ROM drive and the CD will
Auto Run. If it does not, please choose (Run) from the Start Menu.
The file name on the CD is ”AUTORUN”. The first screen is an
introduction. Read it before proceeding to the next step. The
software will automatically begin to install to your hard disk in a
sub-directory titled C:\PROGRAM FILES\Magic Function\.
After installation, you will be prompted to restart your computer in
order to enable the Wireless Ergo Optical Mouse software.
• Click (Finish) and restart your computer. The Wireless Ergo
Optical Mouse Icon will be activated automatically after Windows
restarts.
NOTE: After installing the Wireless Ergo Optical Mouse drivers, you
must restart your computer, or the Wireless Ergo Optical Mouse
software will not be enabled.
BEFORE
13
Page 15

Wireless Multimedia Keyboard And Mouse
N-INSTALLATION
U
To remove the Wireless Ergo Optical Mouse drivers from your system,
simply go to Starting Program Files Magic Function and choose
“Uninstall Magic Function program” application software.
2. WIRELESS ERGO OPTICAL MOUSE FUNCTIONS
An Ergo Optical Mouse Function icon will be shown in system tray after
Magic Function has been installed. Appears "Ergo Optical Mouse" as the
Hint when mouse comes over it.
A Pop-up Menu will appear with a mouse right-clicking of Ergo
Optical Mouse icon in system tray.
The Pop-up Menu contains:
Option: To bring up the options dialog box for you to program
Mouse AP.
Show/Hide Optical Mouse Icon: Show/Hide Ergo Optical
Mouse Icon and the default setting is "Show"
Help: Launch Help file of Magic function.
About: Information about the driver
Exit: Exit “Magic function” program
Magic Function Configuration:
The Magic Function configuration tool will be located in the
"Mouse Properties" from the MS "Control Panel"
14
Page 16
Wireless Multimedia Keyboard And Optical Mouse
3. SETTING WIRELESS ERGO OPTICAL MOUSE AND
PROGRAM
Setting Wireless Ergo Optical Mouse:
A. Make sure the receiver cable (purple) is plugged into the PS/2
keyboard port and the other cable (green) is plugged into the PS/2
mouse port.
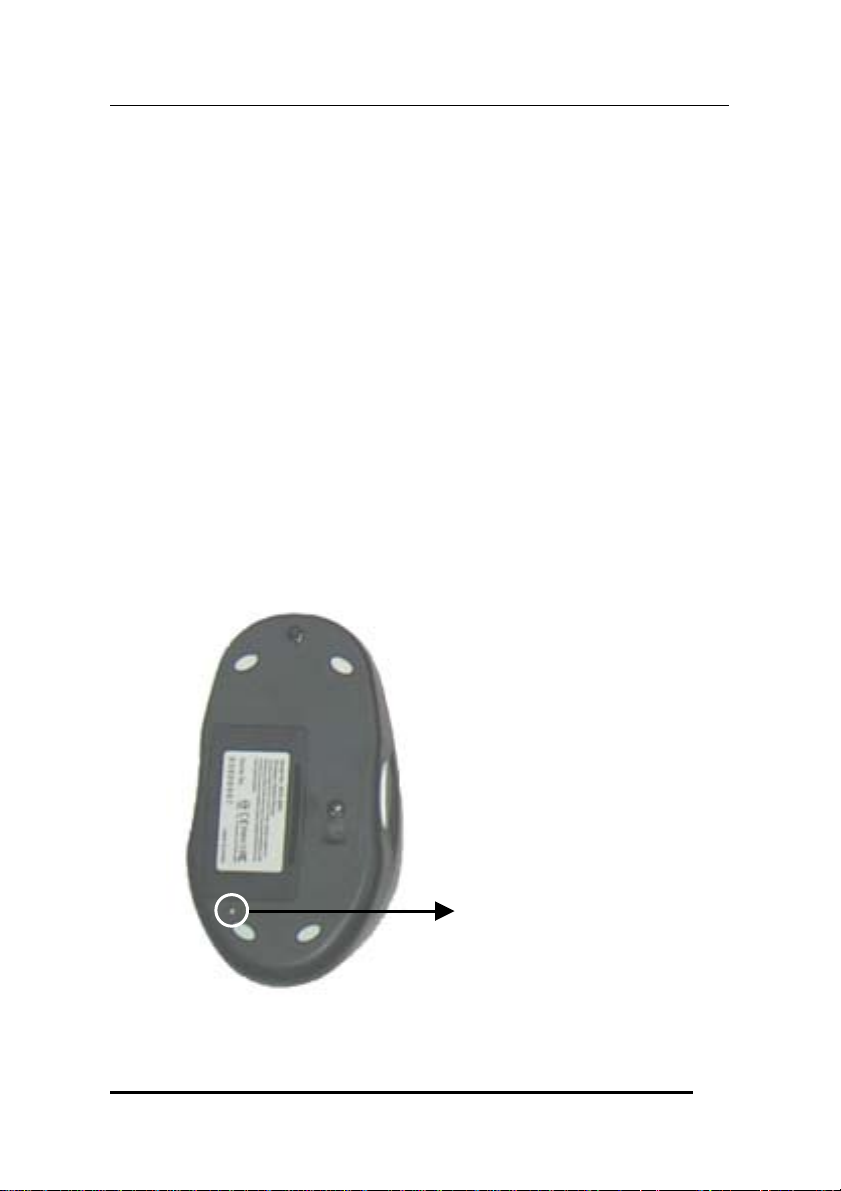
B. Establish communication between the receiver and the mouse.
There is an ID button on the top of the receiver; bottom of the
mouse.
ID Setting Button
15
Page 17

Wireless Multimedia Keyboard And Mouse
C. Press the ID button on the receiver first; then the receiver’s ID LED
will flash. Then press the ID button under the mouse. The receiver’s
ID LED will accelerate flashing; it means the mouse’s setting up is
completed.
NOTE: When you replace the batteries, remember to reset
again!
Setting Program:
This section describes how to use the Wireless Ergo Optical Mouse setting
program. Once the software installation for the Wireless Ergo Optical
Mouse is completed, the icon
click on the (Ergo Optical Mouse Icon) to activate a menu with options to
configure the Magic Function Software.
5-1. Magic Function: Configuration tool provided for you to design the
mouse functions.
5-2. Mouse Buttons: There are 4 buttons of Magic function for Wireless
Ergo Optical Mouse. And you can select the functionality of these
buttons.
is show n on the Windows taskbar. Right
5-3. Function Assignment: There are totally 27 functionalities listed as
the following and you can select one of them easily in this drop-pop
menu.
1.Calculator 2.Copy 3.Copy/Paste 4.Control Panel
5.Cut 6.Display Property 7.Dos Shell 8.Eject
9.Email 10.Enter 11.File Explore r 12.F1-F12
13.Media Wheel 14.My Document 15. My Shortcut 16.Next Track
17.Paste 18.Play/Pause 19.Previous Track 20.Property
21.Screen Saver 22.Stop 23.Switch Window 24.System Property
25.Undo 26.Volume Control 27.WWW
5-4. Load Default Setting: Easily for you to get the Default Setting of
Media Wheel
16
Page 18
Wireless Multimedia Keyboard And Optical Mouse
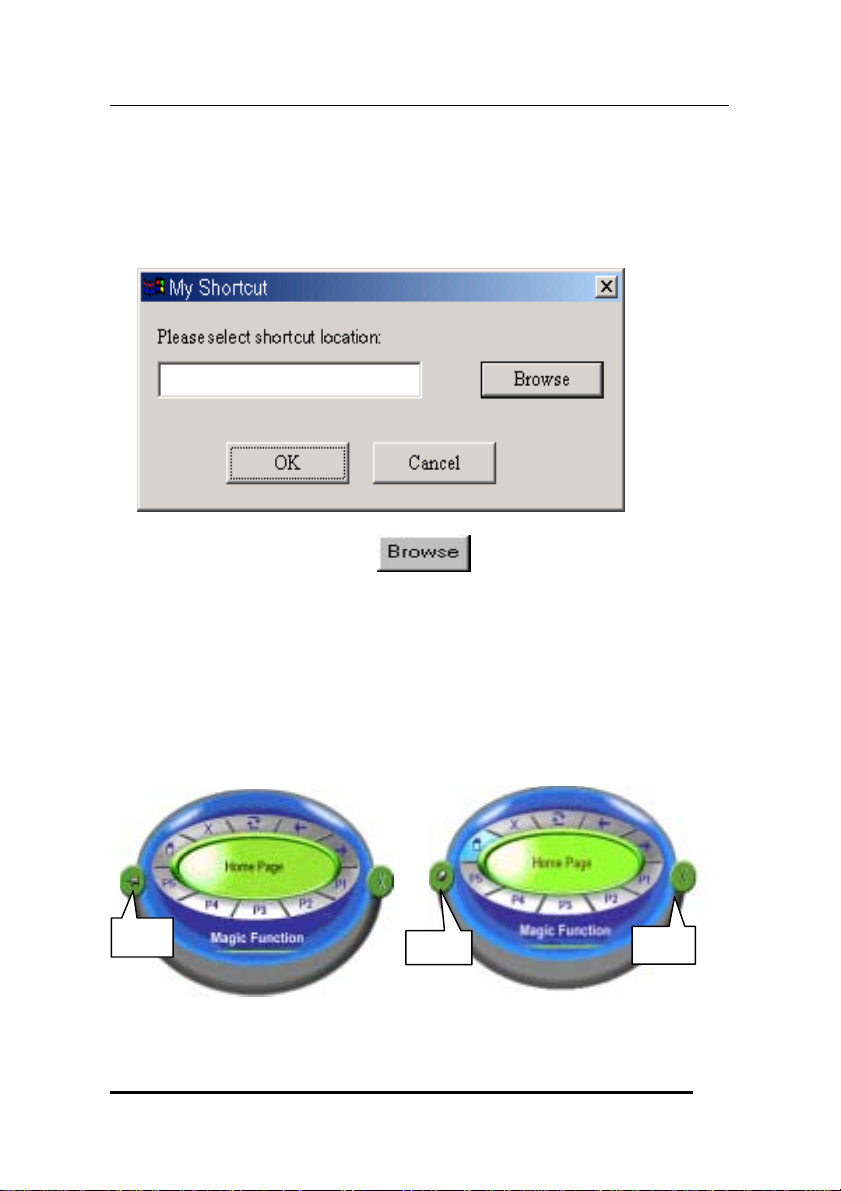
For My Shortcut functionality:
When you select this functionality, the dialog, as the following will popup.
By clicking the browse button
file to be launched by the assigned button.
After you assigned the shortcut, below dialog box will appear to indicate
you that Shortcut location you selected.
AGIC FUNCTION
M
The below Interface will pup-up when you assign the button function as
"Magic Function".
A-1
, you can select an execution
-
A-2
17
Page 19

Wireless Multimedia Keyboard And Mouse
A-1 & A-3: Tack function. You can enable or disable it to make Magic
Function UI to appear on the screen or disappear when mouse
move away.
A-2: To close the Magic Function.
The Media Wheel UI will come with function Hint in the central and
change the color when you move mouse over the UI.
The 10 functions of Magic Function includes:
1-5 5-fix functions for Internet control functions, such as
Home, Stop, Refresh, Back and Forward.
P1-P5 5 programmable functions for you to define easily.
And the default functionality of P1-P5 is as the following:
P1: Launch the application of E-mail
P2: Launch File Explorer
P3: Open Control panel
P4: Open My document
P5: Open the Help file of Ergo Optical Mouse
Right-click the button of UI to bring the Magic Function setting
dialog box.
TROUBLESHOOTING
If you have any problems in using the Wireless Multimedia keyboard and
Ergo Optical Mouse, please consult the Troubleshooting Guide below to see
if your problem is listed.
Wireless Product Does Not Work
• Make sure you have connected the receiver correctly (please refer
to the setting up a wireless optical mouse). For optimal
18
Page 20

Wireless Multimedia Keyboard And Optical Mouse
performance, place the receiver at least 8 inches or 20
centimeters away from other electrical devices, such as the
computer, the computer monitor, or external storage drives.
• Make sure you have installed the batteries correctly. Check to
make sure the batteries you have installed are not dead. Try the
batteries in another device.
• If you are working on a metallic surface, try moving the receiver
closer to the mouse or standing the receiver on its side.
• Try unplugging then reconnecting the receiver cable to the
computer.
Wireless Product Is Not Detected
• Make sure the receiver cable (purple) is plugged into the PS/2
keyboard port and the other cable (green) is plugged into the PS/2
mouse port .Do not plug or unplug the receiver cable while the
computer is running.
• In Windows you may have other system devices that conflict with
the mouse, trackball, or keyboard. Check the IRQ/address settings
of these devices for conflicts, and change the settings as required.
Refer to your computer documentation to make these changes.
• Try unplugging then reconnecting the receiver cable to the
computer.
Non-Wireless Pointing Device Is Not Detected
• Make sure the mouse cable is plugged into the right port - PS/2.
• In Windows you may have other system devices (e.g., a modem
card) that conflict with the mouse. Check the IRQ/address settings
of these devices for conflicts, and change the settings as required.
If the problem persists, please contact technical support.
19
Page 21

Wireless Multimedia Keyboard And Mouse
Screen Cursor Does Not Move Properly
For wireless devices, try changing the position of the receiver. It is
possible that the receiver may be too far from the mouse. Or the
computer monitor (or a large metal object) may be interfering with the
receiver's radio reception. Also, the batteries may be low. Check the
batteries as described previously. You may also need to re-establish
the connection between the mouse and its receiver. To do this, first
press the ID button on the receiver, and then press the ID button on
the bottom of the mouse.
If you are using a mouse with optical technology and your tabletop
surface is red in color or is highly reflective like a mirror, your
tabletop surface may be interfering with the optical sensor of the
mouse. Try using a traditional mouse pad, or use the mouse on a
different tabletop surface.
The Multimedia Keyboard software is not working properly.
The Hot Key functions do not work after installing the Multimedia
Keyboard Software. Please make sure you have no other drivers
installed for another brand of keyboard that uses Hot Key drivers. If so,
you must un-install the other driver and then reinstall the Multimedia
Keyboard Software to fix the problem.
**If you still cannot solve your problem, please contact with your
local dealer. **
20
 Loading...