

Page 1
User’s Guide
Copyright © Ortech Controls, All Rights Reserved
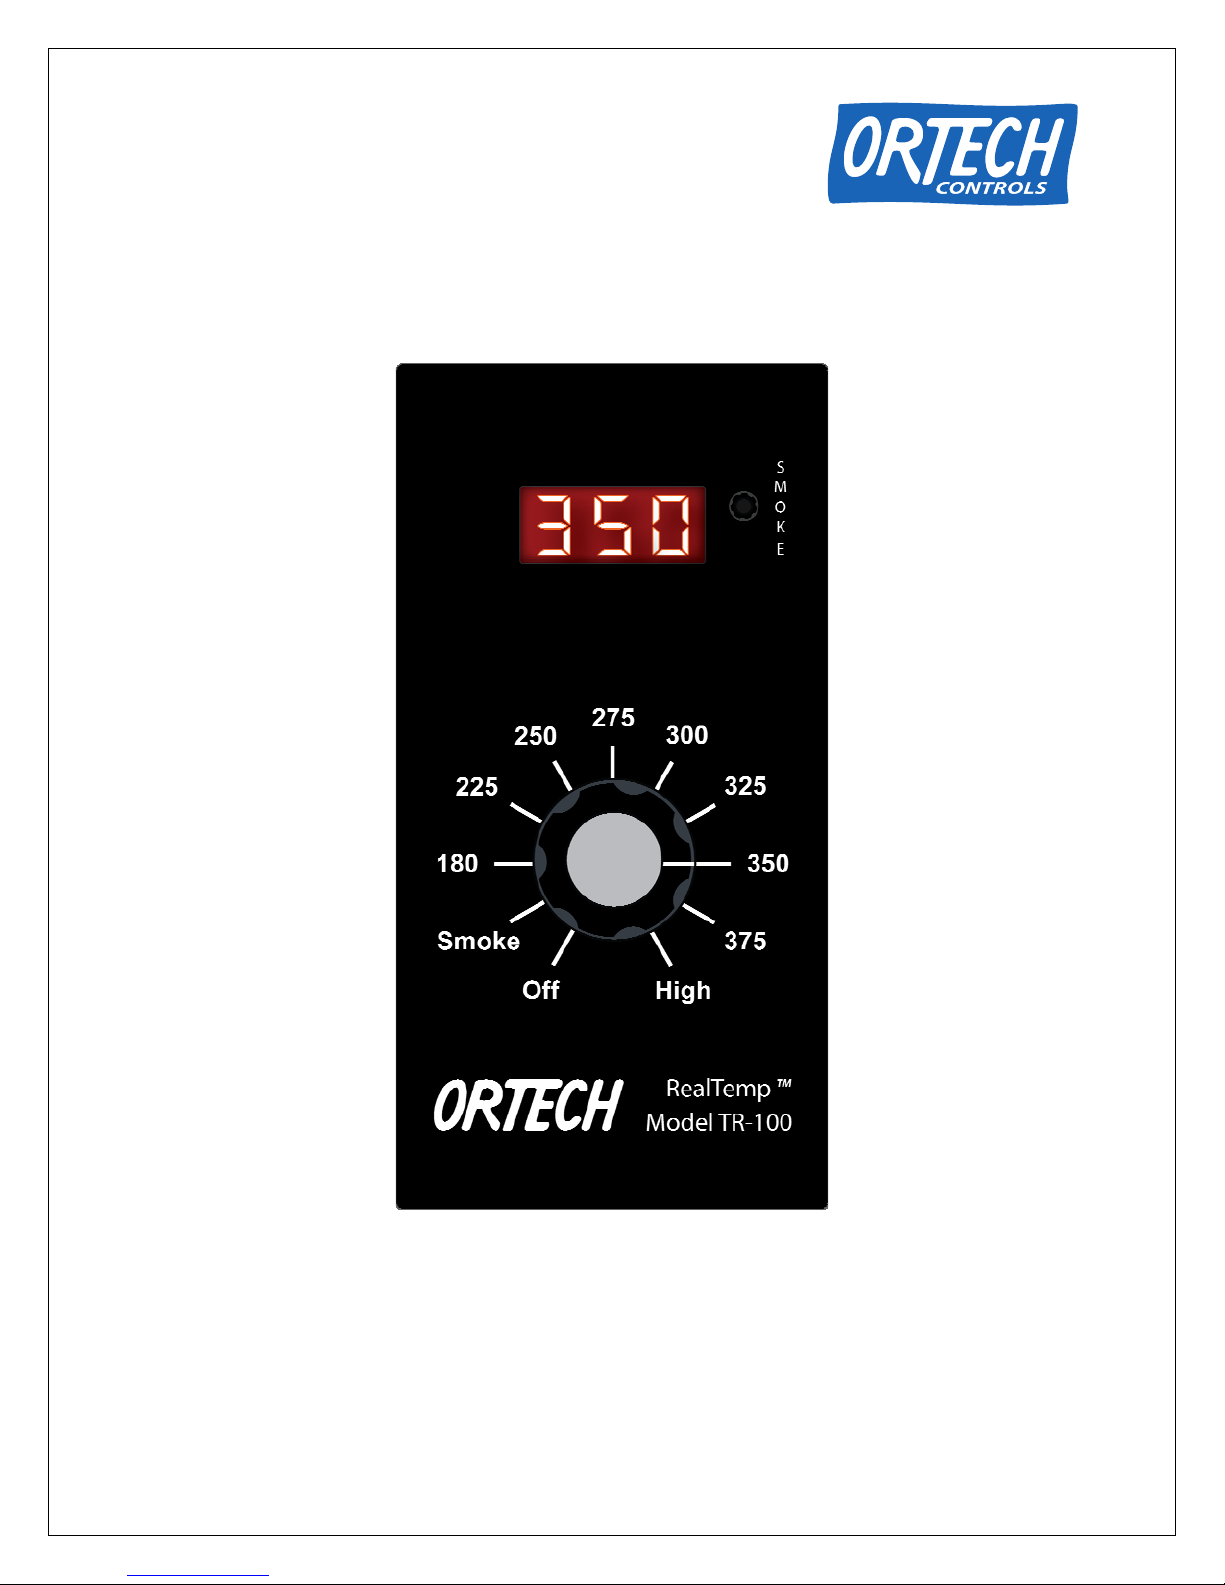
Model TR-100
Digital Grill Control
Page 2
Table of Contents
Introduction................................................................................. 1
What’s in the Box..................................................................... 1
Major Features ........................................................................ 1
Applications............................................................................. 1
How It Works ..........................................................................2
Compatible Grills...................................................................... 2
Installation .................................................................................. 3
Removing the Old Control......................................................... 3
Installing the RealTemp TR-100 Digital Control........................... 5
Testing the Grill....................................................................... 9
Operation.................................................................................. 10
Overview............................................................................... 10
Understanding the Display...................................................... 11
Connecting the Grill to AC Power............................................. 12
Igniting the Grill..................................................................... 12
Cooking................................................................................. 13
Smoking................................................................................ 15
Cooling Down the Grill............................................................ 16
Understanding Idle Fuel Feed Rate and Smoke Settings............ 17
Error Modes and Messages ..................................................... 19
Product Service and Support....................................................... 20
Wiring Diagram...................................................................... 20
AC Auger Theory of Operation ................................................ 21
Troubleshooting..................................................................... 22
Replacement Parts List........................................................... 28
Contacting Ortech Controls..................................................... 28
Page 3
Foreword
Preface Ortech Controls is a leading supplier of electronic controls for
wood pellet stoves, furnaces, and grills. Founded in 1983
and located in Washington, Ortech has designed and
manufactured controls for American Energy Systems, Lennox
Hearth Products, and Traeger Grills, among others. Working
closely with Joe Traeger, Ortech developed electronic
controls for his revolutionary line of wood pellet grills,
including the original 3-speed and digital controls, and has
shipped more than 100,000 controls for Traeger grills.
Copyright Notice Copyright © Ortech Controls, Inc. All rights reserved. No
part of this publication may be reproduced, transmitted,
transcribed, stored in a retrieval system, or translated into
any language, in any form or by any means, electronic,
mechanical, magnetic, optical, chemical, manual or
otherwise, without the prior written consent of Ortech
Controls, Inc.
Trademarks Ortech Controls and RealTemp are trademarks of Ortech
Controls, Inc.
Disclaimer Ortech Controls, Inc. makes no representations or
warranties with respect to the contents hereof and
specifically disclaims any implied warranties of
merchantability or fitness for any particular purpose.
Further, information in this document is subject to change
without notice and does not represent any commitment on
the part of Ortech Controls, Inc.
Product Reference Model: TR-100
Product Number: 100
Applicable Software Versions: 1.10
Ortech Document Number: 100-72-01-06
Page 4

Introduction
What’s in the Box
Ortech RealTemp Model TR-100 Digital Grill Control
Ortech RealTemp RTD Temperature Detector
Wiring Harness Tie Wrap
User’s Guide
Major Features
Three Digit Temperature Display
Front Panel Cook Control
Eight Cook Temperature Settings (180 through 375 degrees)
“High” Cook Temperature Setting
Front Panel Smoke Control
Sixteen Smoke Settings (P0 - P15)
Ignition Indicator
Smoke Setting Indicator
Cook Idle Fuel Rate Indicator
Low Temperature Indicator
Inadvertent Start Protection
Overtemperature Protection
Cool Down Feature
Applications
The RealTemp TR-100 is a plug-compatible replacement part
for the Traeger Standard 3-Speed Control and the Traeger
Digital Control and is compatible with the entire line of
Traeger wood fired pellet grills.
High performance upgrade replacement for Traeger
High performance upgrade replacement for Traeger Digital
High performance service replacement for Traeger Standard
High performance service replacement for Traeger Digital
Typical Applications
Standard 3-Speed Control.
Control.
3-Speed Control.
Control.
1
Page 5
How It Works
y
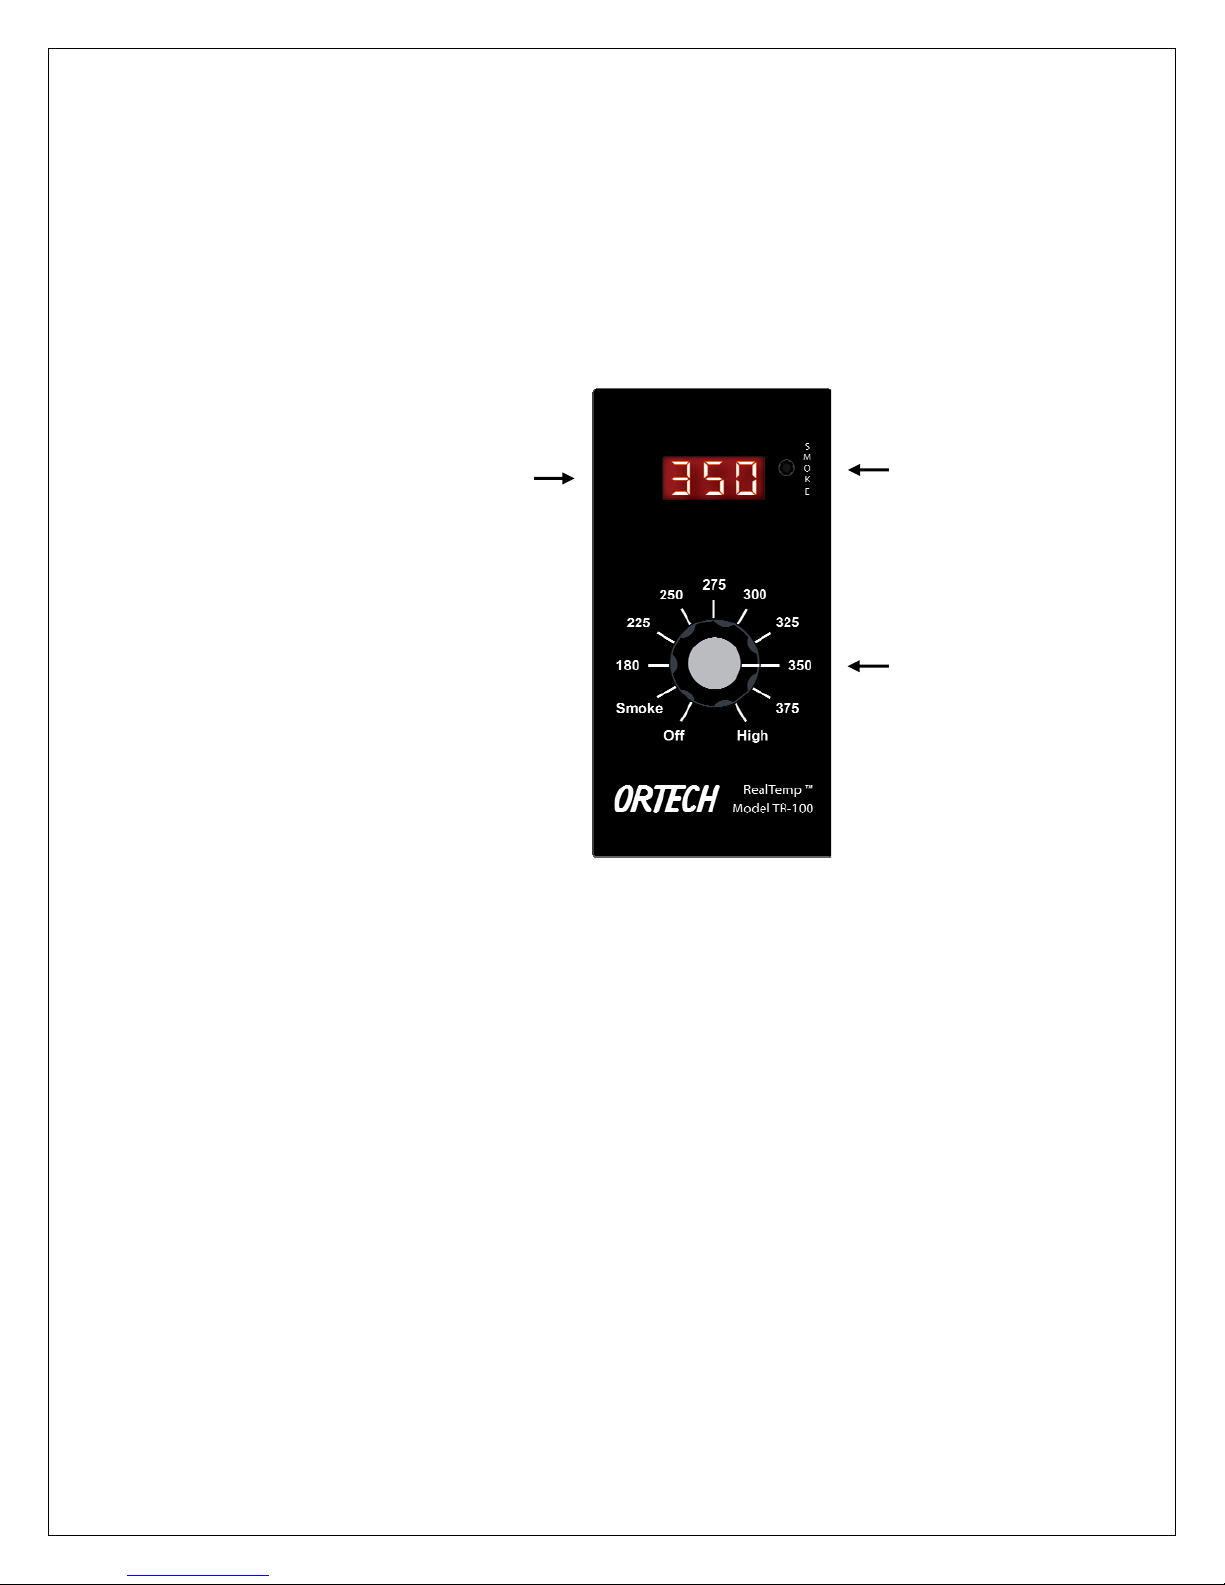
Cook Mode In Cook Mode, the temperature of the grill is continually
monitored and a microprocessor operates the draft fan and
fuel feed auger to maintain a constant grill temperature.
Smoke Mode In Smoke Mode, the fuel feed rate is set manually by the
operator. The grill operates at low temperature to provide
maximum smoke.
Displa
Smoke Control
Cook Control
Compatible Grills
Junior BBQ055
Lil' Tex BBQ070
Texas Grill BBQ075
Lil' Tex Elite BBQ07E
Traeger XL BBQ150
Deluxe BBQ300
Lil' Pig BBQPIG
Double Commercial Trailer COM190
Large Commercial Trailer COM200
Picnic BBQ020
Big Tex BBQ075
Professional BBQ124
Executive BBQ125
Executive Built-In BBQ126
Longhorn Steer BBQLHS
Red Tractor Grill BBQRTG
Stationary Smoker COM150
2
Page 6
Installation
Removing the Old Control
Required Tools Medium Phillips screwdriver
Small slotted screwdriver
Unplug the Grill Unplug the grill from AC power.
WARNING: AC power is present on the control at all
times and is a shock hazard unless the grill is
disconnected from the wall socket or AC line.
Remove Hopper Some grills are equipped with a protective panel mounted
Bottom Panel below the hopper. This panel protects grill components
while allowing air to flow into the draft fan. Remove the
screws and panel from the grill, slide the panel down the
power cord, and set aside.
Disconnect the Working under the grill, locate the control’s wiring harness.
Control Disconnect all four plugs that connect the control to the
grill’s components (fuel feed auger, draft fan, igniter, and AC
power).
Remove the Control Remove the faceplate screws using a medium Phillips
screwdriver. Save the screws for use later. Gently pull the
control forward, rotating it slightly to the right. Once clear,
pull the wire harness up and out of the cutout.
3
Page 7
Disconnect the If you are removing a Traeger Digital Control, you must
Temperature disconnect the temperature detector. Turn the control until
Detector the circuit board is facing you. Using a small slotted
screwdriver, disconnect the temperature detector lead wires
from the two-terminal connector J1 located in the upper
right hand corner of the printed circuit board.
Remove the If you are replacing a Traeger Digital Control, the
Temperature temperature detector is compatible with the RealTemp
Detector TR-100. Replacing it is optional. For best results, we do
recommend replacing the temperature detector, especially
when installing the TR-100 as a service replacement.
Open the cook lid and remove the internal grill and drip pan.
Locate the temperature detector. Using a medium Phillips
screwdriver, loosen its mounting screw and nut. Lift the
detector and feed its wire leads up and out of the grill.
Temperature
Detector
4
Page 8
Installing the RealTemp TR-100 Digital Control
Position the Open the cook lid and remove the internal grill and drip pan.
Temperature
Detector Locate the temperature detector’s mounting holes on the
horizontal rail inside the grill.
Remove the screw and nut from the base of the new
detector. Set the screw and nut aside for later use.
Feed the detector’s wire lead down through the shaft hole
and out through the wire hole.
Screw hole
Shaft hole
Wire hole
Run the Detector Feed the detector wire lead down between the grill and the
Wire Lead pellet hopper, then up and out through the control cutout.
Use caution when feeding the wire lead to avoid damaging
its insulation.
5
Page 9
Attach the Detector Install the detector into the shaft hole with the slot
to the Rail positioned over the screw hole. Install the screw from
above, down through the slot and through the screw hole.
Install the nut from below and tighten.
Connect the WARNING: Disconnect the grill from AC power.
Temperature Installing the control while the grill is connected to
Detector AC power could result in shock or could damage the
to the Control control.
Connect the temperature detector lead wires to connector J1
located in the upper right hand corner of the printed circuit
board. Use a small flat blade screwdriver to fully open the
contacts by turning the set screw counter clockwise. Insert
the wires and tighten the contacts by turning the set screw
clockwise. You can connect either lead wire to either
terminal of connector J1.
6
Page 10
Install the Control Feed the control wiring harness (four plugs with orange,
into the Cutout purple, red, black, and white wires) downward into the grill’s
cutout.
Insert the control into the cutout. Install the control’s circuit
board into the cutout at an angle to ensure the circuit board
fits through the cutout without damage.
WARNING: Do not force the control into the cutout.
Bumping electronic components into the edge of the
cutout during installation may damage the control.
Retrieve the two faceplate mounting screws that were used
to hold the old control in place.
Using a medium Phillips screwdriver, install the top faceplate
screw and lightly tighten. Install the bottom faceplate screw
and tighten. Tighten the top faceplate screw.
Connect the Control Connect the fuel feed auger, draft fan, igniter, and AC
to Grill Components power to the TR-100. Working under the hopper, connect
the control wiring harness to the grill components as follows:
Control Wiring Harness Grill Component
Plug with Red Wire Fuel Feed Auger
Plug with Orange Wire Draft Fan
Plug with Purple Wire Igniter
Plug with Black Wire AC Power
See the figures on the following pages.
7
Page 11
Connect Control’s
g
g
g
Red Wire to
Auger
Connect Control’s
Orange Wire to
Draft Fan
Connect Control’s
Purple Wire to
Igniter
Auger Plu
Draft Fan Plu
Igniter Plu
8
Page 12
Connect Control’s
g
Black Wire to
AC Power
AC Power Plu
Organize Wire Lead If necessary, use the tie wrap to tie back the temperature
detector wire lead and the control’s wiring harness to ensure
they do not interfere with the draft fan and other grill
components.
Attach Hopper If your grill is equipped with a hopper bottom panel, attach
Bottom Panel the panel, install and tighten the screws.
Testing the Grill
Prepare the Grill Set the Cook Control to the Off position. Open the cook lid
and remove the internal grill, the drip pan, and the heat
baffle to expose the firepot.
Turn the Grill On Plug the grill's AC power cord into an outlet. Turn the Cook
Control switch to the Smoke position.
Check the Draft Fan Place your hand above the firepot and verify air movement
from the draft fan.
Check the Igniter Verify the igniter located in the base of the firepot is getting
hot. DO NOT TOUCH THE IGNITER!
Check the Fuel Auger Verify that pellets are flowing into the firepot. If the pellet
hopper is empty, open the hopper lid, look inside the hopper
and verify the auger is turning.
Turn the Grill Off Set the Cook Control to the Off position.
Reassemble the Grill If the grill passes the tests above, reassemble the grill. If
not, refer to the "Troubleshooting" section of this manual.
9
Page 13
Operation
y
Overview
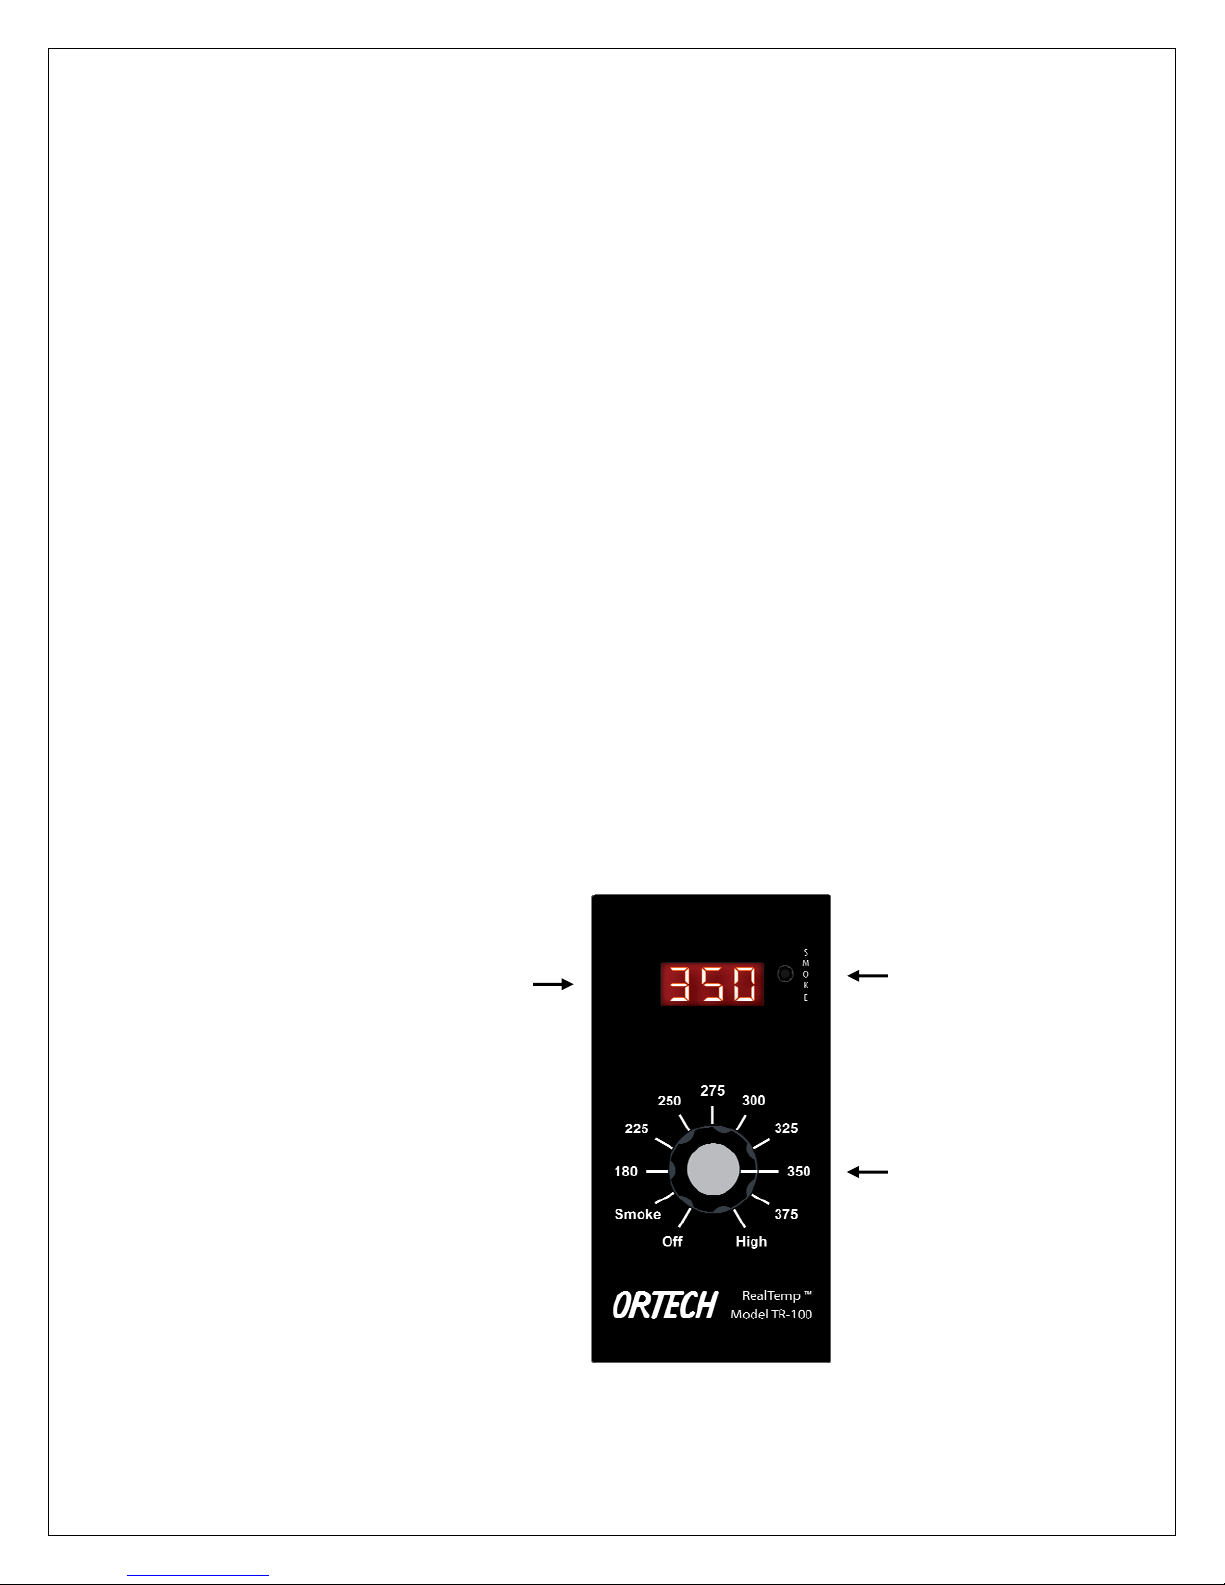
LED Readout Displays grill temperature, smoke settings, idle fuel feed
settings, igniter status, cool down timer, low temperature
status, and error messages.
Cook Control Switch Selects Off, Smoke Mode, or one of nine Cook Mode grill
temperatures.
Smoke Control Switch Selects one of sixteen smoke/Idle Fuel Feed Rates.
Cook Mode Maintains the selected cook temperature automatically.
Smoke Mode Provides manual control of the fuel feed rate to produce
maximum smoke at a low grill temperature.
Microprocessor In Cook Mode, the temperature of the grill is continually
Control monitored and a microprocessor operates the draft fan and
fuel feed auger to maintain a constant grill temperature.
Manual Control In Smoke Mode, the fuel feed rate is set manually by the
operator. The grill operates at low temperature to provide
maximum smoke.
Displa
Smoke Control
Cook Control
10
Page 14
Understanding the Display
Numbers When the grill is connected to AC power, the model number
and software version of the control are displayed
momentarily.
Temperature In Cook Mode and Smoke Mode, the grill temperature is
displayed in 5 degree (Fahrenheit) increments.
Flashing In Cook Mode, the displayed temperature flashes if the grill
Temperature temperature is below 150 degrees.
In Smoke Mode, the displayed temperature flashes if the grill
temperature is below 110 degrees.
Flashing Dots The igniter is on.
“P0” - “P15” When the Cook Control switch is set to the Smoke position,
the smoke setting is displayed for 3 seconds.
If you adjust the Smoke Control switch while in Smoke
Mode, the smoke setting is displayed for 3 seconds.
If you adjust the Smoke Control switch while in the Cook
Mode, the Idle Fuel Feed Rate setting is displayed for 3
seconds.
Flashing “C10” The grill is cooling down. The cool down timer is displayed
and decremented ("C10", "C 9", "C 8"...).
Flashing “ErH” The grill temperature exceeded 615 degrees.
Flashing “ErP” The Cook Control switch was not in the Off position when
the grill was connected to AC power.
11
Page 15
Connecting the Grill to AC Power
Turn the Grill Off Set the Cook Control switch to the Off position.
Plug the Grill In Connect the grill to AC power. The control displays its
model number and software version.
If you see “ErP” If the Cook Control switch is in the Smoke position or any
temperature setting when the grill is plugged in, the control
will display “ErP”, indicating an inadvertent start error. The
standard ignition sequence is halted. This feature prevents
an inadvertent start. To clear the error, set the Cook
Control switch to Off.
Igniting the Grill
Cook Control To ignite the grill, open the grill lid and set the Cook Control
switch to the Smoke position. The grill will begin to smoke
once the pellets are ignited. When you see smoke, shut the
grill lid and turn the Cook Control switch to your desired
setting. Allow the grill to warm up for 15 minutes before
adding food or making any other changes.
Ignition Sequence The draft fan turns on.
The igniter turns on.
The fuel feed auger turns on and delivers fuel continuously
for two minutes.
The grill temperature is displayed along with three flashing
dots signifying that the igniter is on.
The igniter will turn off when one of the following three
conditions is met:
- The igniter has been on for four minutes and the grill
temperature has increased by 30 degrees.
- The igniter has been on for four minutes and the grill
temperature is greater than 150 degrees.
- The igniter has been on for five minutes.
Once the igniter turns off, if th e Cook Control switch is set to
the Smoke position, the grill operates in Smoke Mode. If the
Cook Control switch is set to a temperature setting, the grill
operates in Cook Mode. The flashing dots are turned off.
12
Page 16
Cooking
Cook Control Set the Cook Control switch to the desired temperature. The
control displays the grill’s current temperature.
Cook Sequence Once the ignition sequence is complete and the igniter turns
off, the auger feeds fuel into the fire pot to maintain the set
temperature.
Temperature 180 180 degrees
Settings 225 225 degrees
250 250 degrees
275 275 degrees
300 300 degrees
325 325 degrees
350 350 degrees
375 375 degrees
High 450 degrees or Maximum Temperature
High Temperature If the Cook Control switch is set to High, the grill operates at
Setting 450 degrees. If the grill is unable to attain 450 degrees due
to ambient temperature and humidity, fuel type and quality,
and/or thermal characteristics of the grill, the auger feeds
fuel continuously allowing the grill to operate at its Maximum
Temperature.
On Fuel Feed Rate The On Fuel Feed Rate is the rate the auger delivers fuel
while the grill is below the set temperature. In Cook Mode,
the On Fuel Feed Rate is designed to drive the grill's
temperature upward to the set temperature and limit
temperature overshoot. The On Fuel Feed Rates are
preprogrammed into the control and are not adjustable.
180 Auger on for 15 seconds, off for 15 seconds
225 Auger always on
250 Auger always on
275 Auger always on
300 Auger always on
325 Auger always on
350 Auger always on
375 Auger always on
High Auger always on
Temperature
Setting On Fuel Feed Rate
13
Page 17
Idle Fuel Feed Rate The Idle Fuel Feed Rate is the rate the auger delivers fuel
while the grill is idling at or above the set temperature. In
Cook Mode, you can manually adjust the Idle Fuel Feed Rate
using the Smoke Control switch. See “Understanding Idle
Fuel Feed Rate and Smoke Settings” for more information.
Low Temperature If the grill temperature is less than 150 degrees, the
displayed temperature flashes, indicating a low temperature.
This is not an error condition and does not affect the
operation of the grill. The flashing display is designed to
alert the operator that there is some risk of the fire going
out.
High Temperature If the grill temperature is greater than 615 degrees, a
Limit Error (ErH) flashing “ErH” is displayed indicating a high limit error and
the grill shuts down. Refer to the “Error Modes and
Messages” section for details.
14
Page 18
Smoking
Smoke Control Set the Cook Control switch to Smoke. Use the Smoke
Control switch to manually select the auger fuel feed rate.
The control displays the grill’s current temperature.
Smoke Sequence Once the ignition sequence is complete and the igniter turns
off, the auger delivers fuel at a constant rate determined by
the smoke setting (P0 - P15).
Smoke Setting The smoke fuel feed rate is the rate the auger delivers fuel
while the grill is operating in Smoke Mode. In Smoke Mode,
manually adjust the fuel feed rate using the Smoke Control
switch to establish the desired temperature and/or smoke
output. See “Understanding Idle Fuel Feed Rate and Smoke
Settings” for more information.
Low Temperature If the grill temperature is less than 110 degrees, the
displayed temperature flashes, indicating a low temperature.
This is not an error condition and does not affect the
operation of the grill. The flashing display is designed to
alert the operator that there is some risk of the fire going
out.
High Temperature If the grill temperature is greater than 615 degrees, a
Limit Error (ErH) flashing “ErH” is displayed indicating a high limit error and
the grill shuts down. Refer to the “Error Modes and
Messages” section for details.
15
Page 19
Cooling Down the Grill
Cook Control To cool down the grill, change the Cook Control switch from
Smoke or any of the temperature settings to the Off
position.
Cool Down Sequence The igniter turns off.
The fuel feed auger turns off.
The draft fan turns on.
A count down timer is displayed. The counter starts at
"C10" and is decremented every minute.
Once the 10 minute count down timer expires:
- The display is blank.
- The draft fan turns off.
- The fuel feed auger pulses on for 10 seconds to clear
burned pellets from the auger tube.
16
Page 20

Understanding Idle Fuel Feed Rate and Smoke Settings
Smoke Control The Smoke Control switch sets the fuel feed rate (the
Switch amount of fuel delivered in a given period of time) when the
grill is operating in Smoke Mode and when the grill is idling
in Cook Mode.
During cook idle or smoke mode, the auger turns on,
delivers fuel for 15 seconds, then turns off. The off time is
set by the Smoke Control switch.
“P” Settings The fuel feed rate setting is displayed momentarily
whenever the Cook Control switch is set to the Smoke
position. It is also displayed whenever the Smoke Control
switch is adjusted. The setting is designated with the letter
“P” and a number. The greater the “P” setting number the
greater the auger off time.
P 0 15 seconds 45 seconds
P 1 15 55
P 2 15 65
P 3 15 75
P 4 15 85
P 5 15 95
P 6 15 105
P 7 15 115
P 8 15 125
P 9 15 135
P10 15 140
P11 15 145
P12 15 150
P13 15 155
P14 15 160
P15 15 165
Dual Function The selected “P” setting controls both the Smoke Mode fuel
For example, if “P3” is selected using the Smoke Control
Setting Auger On Auger Off
feed rate and the Cook Mode Idle Fuel Feed Rate. They are
one and the same.
switch, the auger delivers fuel for 15 seconds, turns off for
75 seconds, and repeats in Smoke Mode. It also delivers
fuel for 15 seconds, turns off for 75 seconds and repeats
while idling at or above the selected set temperature in Cook
Mode.
17
Page 21
Cook Mode The Idle Fuel Feed Rate is the rate of fuel delivery that
Idle Fuel Feed Rate maintains the fire in the fire pot without raising the grill’s
temperature.
In Cook Mode, whenever the grill temperature is at or above
the set temperature, the auger runs at the Idle Fuel Feed
Rate. If the grill temperature is below the set temperature,
the auger operates per the On Fuel Feed Rate.
We recommend the “P2” setting as the default Idle Fuel
Feed Rate while in Cook Mode.
For the experienced operator, the auger Idle Fuel Feed Rate
can be adjusted to improve the grill's performance. For
example, to optimize temperature stability at a high
temperature setting, select “P1” or “P0” to increase the
auger Idle Fuel Feed Rate. Or, if due to ambient conditions
the grill is unable to cool down enough to reach a low
temperature setting such as 180 degrees, select “P3”, “P4”,
or higher to decrease the Idle Fuel Feed Rate.
High Temperature In Cook Mode, the Idle Fuel Feed Rate for the High
Idle Fuel Feed Rate temperature setting is preprogrammed into the control. The
idle fuel feed auger timing at High is 15 seconds on / 15
seconds off and is independent of the Smoke Control switch
"P" setting. The preprogrammed fuel feed rate helps
maintain the elevated cooking temperature at the High
setting.
Smoke Mode In Smoke Mode, increasing the “P” setting decreases the
Fuel Feed Rate fuel feed rate, lowering the grill temperature. Start at
setting “P2”, adjust the “P” setting manually for the desired
temperature and/or smoke output.
18
Page 22
Error Modes and Messages
Inadvertent Start If the Cook Control switch is set to Smoke or to a
Error (ErP) temperature setting at the time the grill is plugged in, the
control will display “ErP” indicating an Inadvertent Start
Error. The standard ignition sequence is halted.
This feature prevents an inadvertent start. For example, if
the grill is stored in the garage, the grill will not ignite if
plugged in inadvertently.
To clear the error, set the Cook Control switch to the Off
position.
High Temperature If the grill temperature exceeds 615 degrees, the control
Limit Error (ErH) displays “ErH” indicating a High Temperature Limit Error.
The fuel feed auger is turned off, the igniter is turned off,
and the draft fan is turned off.
To clear the error, set the Cook Control switch to the Off
position. If the error will not clear, your temperature
detector is not functioning normally. See “Display is
Flashing ‘ErH’” in the “Troubleshooting” section.
Flashing In Cook Mode, the displayed temperature flashes if the grill
Temperature temperature is below 150 degrees.
In Smoke Mode, the displayed temperature flashes if the grill
temperature is below 110 degrees.
These are not error conditions and do not affect the
operation of the grill. The flashing display is designed to
alert the operator that there is some risk of the fire going
out.
Cool Down Timer The grill is cooling down.
(C10)
This is not an error condition. During cool down, a timer is
displayed and decrement. The flashing timer is designed to
alert the operator that the grill cooling down.
Flashing Dots The igniter is on.
This is not an error condition and does not affect the
operation of the grill. The flashing dots are designed to alert
the operator that the igniter is on.
19
Page 23
Product Service and Support
d
Wiring Diagram
Digital
Control
RTD
Igniter
Purple
Auger
Orange
White White White
White
BlackRe
Power Cord
Draft Fan
20
Page 24
AC Auger Theory of Operation
AC Auger The grill is equipped with an AC auger. AC augers operate
at a single speed and deliver fuel at a constant rate while
on. The fuel feed rate (amount of fuel delivered in a given
period of time) is adjusted by varying the on and off time
intervals.
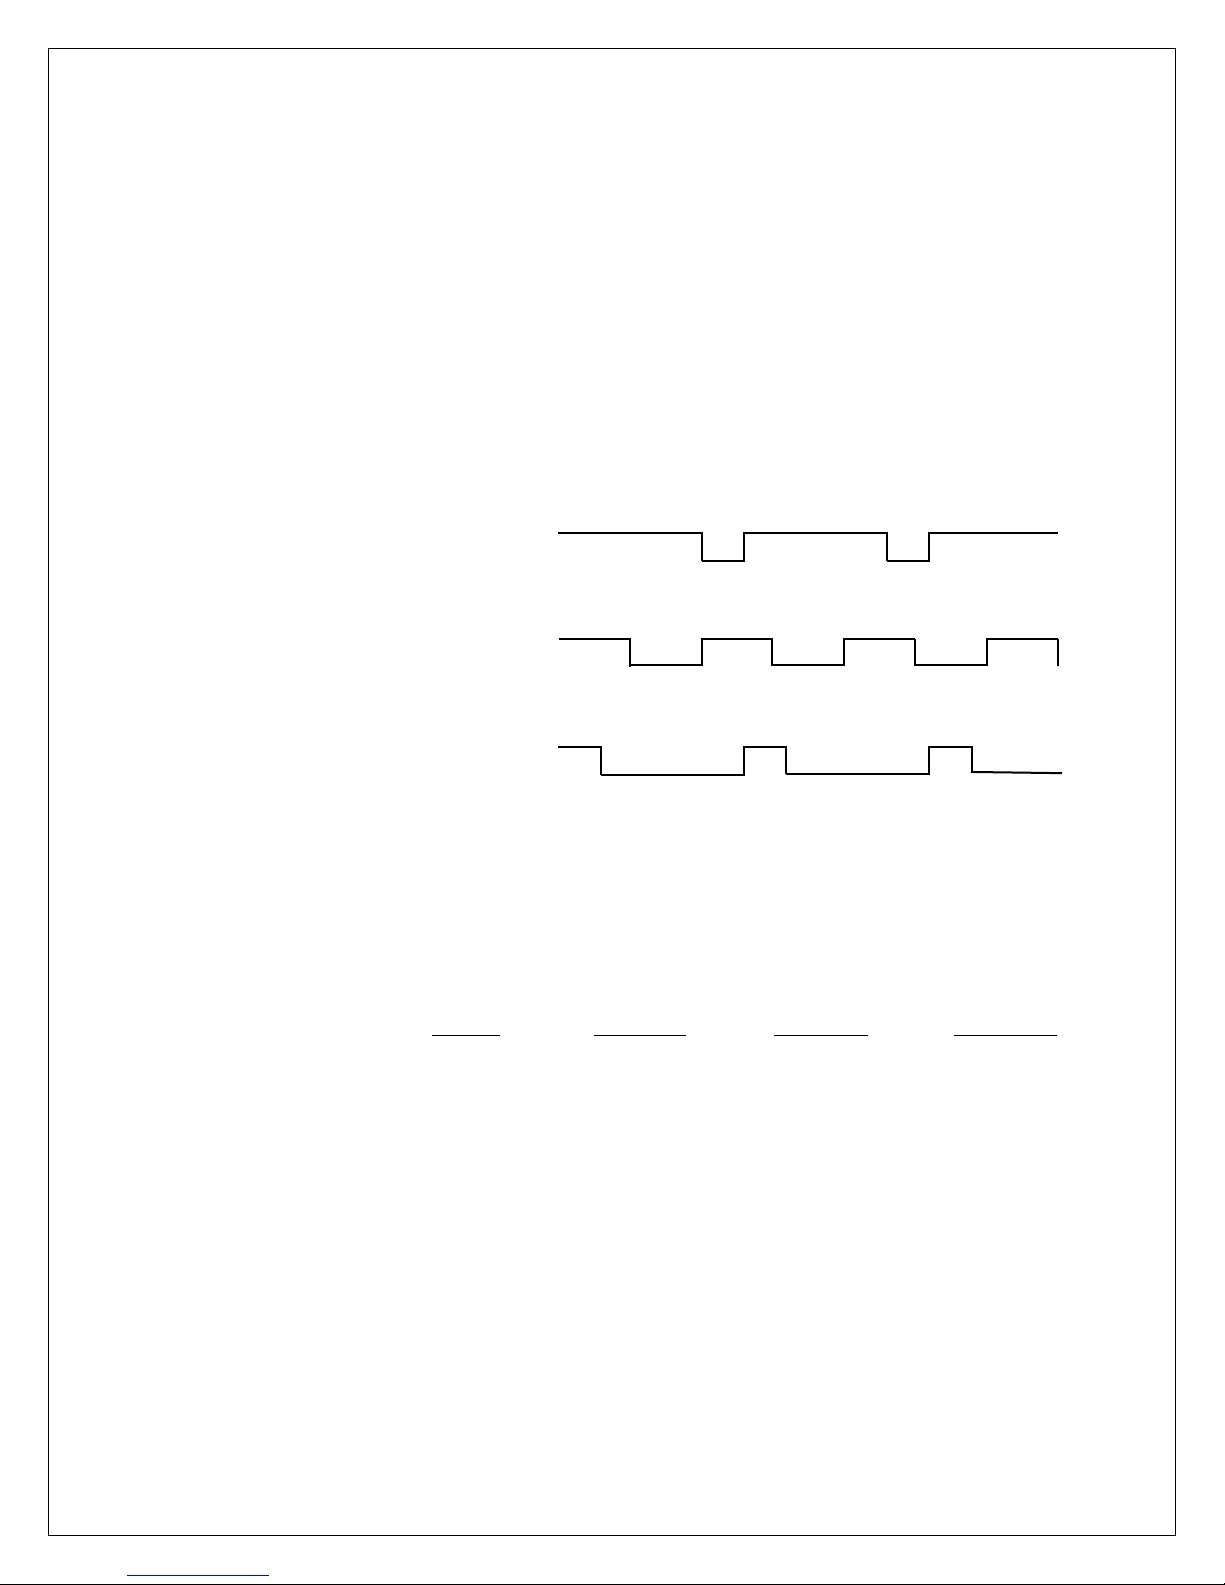
Duty Cycle The ratio of time the auger is on is sometimes referred to
as the duty cycle and is expressed as a percentage. For
example, if the auger is always on, its duty cycle is 100
percent. If the auger is on half the time, its duty cycle is 50
percent, etc.
Auger On
Auger Off
Auger On
Auger Off
Auger On
Auger Off
Idle and Smoke When the TR-100 is in Smoke Mode or idling in Cook Mode,
Fuel Feed Rates the AC auger is turned on and delivers fuel continuously for
and “P” Settings 15 seconds and is then turned off. The Smoke Control
switch sets the auger off time. The Smoke Mode/Cook Mode
Idle Fuel Feed Rates are as follows:
P 0 15 seconds 45 seconds 25.0 percent
P 1 15 55 21.4
P 2 15 65 18.8
P 3 15 75 16.7
P 4 15 85 15.0
P 5 15 95 13.6
P 6 15 105 12.5
P 7 15 115 11.5
P 8 15 125 10.7
P 9 15 135 10.0
P10 15 140 9.7
P11 15 145 9.4
P12 15 150 9.1
P13 15 155 8.8
P14 15 160 8.6
P15 15 165 8.3
Setting Auger On Auger Off Duty Cycle
75 percent duty cycle
50 percent duty cycle
25 percent duty cycle
21
Page 25
Troubleshooting
g
WARNING! Always disconnect the grill from AC power before
accessing the control for service or working under
the grill.
Removing the control from the grill, installing the
control into the grill, or working under the grill while
the grill is connected to AC power could result in
shock or damage the control.
Digital Control
Display is Blank Set Cook Control switch to the Smoke position or any
Reset wall power outlet circuit breaker.
Verify control wiring harness plug with black wire is
Cook Control switch is set to the Off position.
temperature setting.
Circuit breaker on AC outlet is tripped.
Control is disconnected from grill AC power.
connected to AC power.
AC Power Plu
22
Page 26

Digital Control
Control AC line fuse is blown.
Display is Blank Replace control’s fuse F1 with provided spare fuse or a
replacement fuse.
A blown AC line fuse may be caused by several conditions
including shorted grill component lead wires, a jammed
auger, or a failing igniter. Inspect the grill's components
and component lead wires if replacement fuses are
continually blown.
Fuse:
Example:
3A 250V fast blow 5x20mm
Littelfuse part number 235003
The following grills contain dual draft fans, igniters,
and augers and use a 5A 250V fast blow 5x20mm fuse.
Traeger XL BBQ150
Double Commercial Trailer COM190
Large Commercial Trailer COM200
Fuse
Control is defective.
Contact Ortech Controls customer service.
23
Page 27
Grill Will Not Ignite
Fill hopper with good, dry fuel.
Verify auger is properly connected to control.
Clear auger if jammed.
Replace auger and/or auger motor if defective.
Verify draft fan is properly connected to control and
Replace draft fan if defective.
Verify igniter is properly connected to control and operating
Replace igniter if defective.
Contact Ortech Controls customer service.
Fire Goes Out Set Cook Control switch to the Off position and allow grill to
Fill hopper with good, dry fuel.
Verify the control is properly connected to auger.
Clear auger if jammed.
Replace auger and/or auger motor if defective.
Adjust Smoke Control switch (decrease the “P” setting) to
Verify the control is properly connected to draft fan and
Replace draft fan if defective.
Contact Ortech Controls customer service.
No fuel in firepot.
No draft air flow.
operating normally.
No ignition heat source.
normally.
Control is defective.
cool.
No fuel in hopper.
No fuel in firepot.
Unburned fuel in firepot.
increase auger Idle Fuel Feed Rate.
No draft air flow.
operating normally.
Control is defective.
24
Page 28
Grill Temperature
at the 180 Degree Adjust Smoke Control switch (increase the “P” setting) to
Cook Setting is too decrease Idle Fuel Feed Rate.
High
Replace temperature detector.
Contact Ortech Controls customer service.
Grill Temperature At the High temperature setting, the auger runs continually
at the High Cook until the grill temperature reaches 450 degrees.
Setting is too Low
Auger Idle Fuel Feed Rate is too high.
Temperature detector is defective.
Control is defective.
Grill lid is open.
Close grill lid. Grill is designed to operate with grill lid
closed.
Insufficient amount of fuel in fire pot.
Clear auger if jammed.
Tighten auger connection to auger motor shaft if slipping.
Replace auger and/or auger motor if defective.
Damp fuel source.
Replace damp fuel with good dry fuel.
Adverse operating conditions.
Grill may not be able to attain 450 degrees in an extremely
Replace temperature detector.
Contact Ortech Controls customer service.
Shield grill from cold wind and/or rain.
cold operating environment.
Temperature detector is defective.
Control is defective.
25
Page 29
Unexpected
Temperature is Adjust Smoke Control switch (increase the “P” setting) to
Displayed decrease Idle Fuel Feed Rate.
Adjust Smoke Control switch (decrease the “P” setting) to
Auger Idle Fuel Feed Rate is too high.
Auger Idle Fuel Feed Rate is too low.
increase Idle Fuel Feed Rate.
Grill lid is open.
Close grill lid. Grill is designed to operate with grill lid
closed.
Replace temperature detector.
Contact Ortech Controls customer service.
Grill Temperature
Displayed is Different The displayed temperature is the precise temperature at
Than Dome the temperature detector. The dome thermometer is
Thermometer located in a different position inside the grill.
Displayed
Temperature This is not an error condition and does not affect the
is Flashing operation of the grill. The flashing display is designed to
Display Always
Reads 0 Degrees Check connection at control terminal J1. Fully open contacts
Check the insulation for shorts throughout the wire run from
Replace temperature detector.
Contact Ortech Controls customer service.
Temperature detector is defective.
Control is defective.
This is normal.
Low grill temperature.
alert the operator that there is some risk of the fire going
out.
Temperature detector wire leads are shorted.
by turning set screw counter clockwise. Reinsert wires and
tighten contacts by turning set screw clockwise.
detector to control terminal J1.
Temperature detector is defective.
Control is defective.
26
Page 30
Display is
Flashing “ErP”
Inadvertent Start Error.
The grill was plugged in with the Cook Control switch in the
Smoke position or set to a temperature setting.
Set the Cook Control switch to the Off position.
Display is
Flashing “ErH”
Overtemperature Error.
The grill temperature exceeded 615 degrees and shut off
automatically.
Set the Cook Control switch to the Off position.
Check connection at control terminal J1. Fully open contacts
Check for breaks in the wire throughout the wire run from
detector to control terminal J1.
Replace temperature detector.
Contact Ortech Controls customer service.
Temperature detector wire leads are open.
by turning set screw counter clockwise. Reinsert wires and
tighten contacts by turning set screw clockwise.
Temperature detector is defective.
Control is defective.
27
Page 31
Replacement Parts List
Description and RealTemp TR-100 Digital Control 31-100-ORT
Ortech Part Number
4 Inch RTD Temperature Detector 31-098-PKG-48
3 Amp Fuse Kit, five 3A fuses 39-100-3A
5 Amp Fuse Kit, five 5A fuses 39-100-5A
Contacting Ortech Controls
Customer Service For product support and servi ce, contact Ortech Controls:
Ortech Controls, Inc.
14739 Aurora Ave N, #120
Shoreline, WA 98133
Email: [email protected]
Telephone: 206.633.7914
Fax: 206.633.7929
Website: www.ortechcontrols.com
28
 Loading...