

READ AND SAVE THESE INSTRUCTIONS
Installer: Leave this manual with the homeowner.
CLEANING & MAINTENANCE
For general ventilating use only. Do not use to exhaust hazardous or explosive materials and vapors.
This DO
NOT MOUNT THIS PRODUCT IN A WALL.
•
•
General Information
1
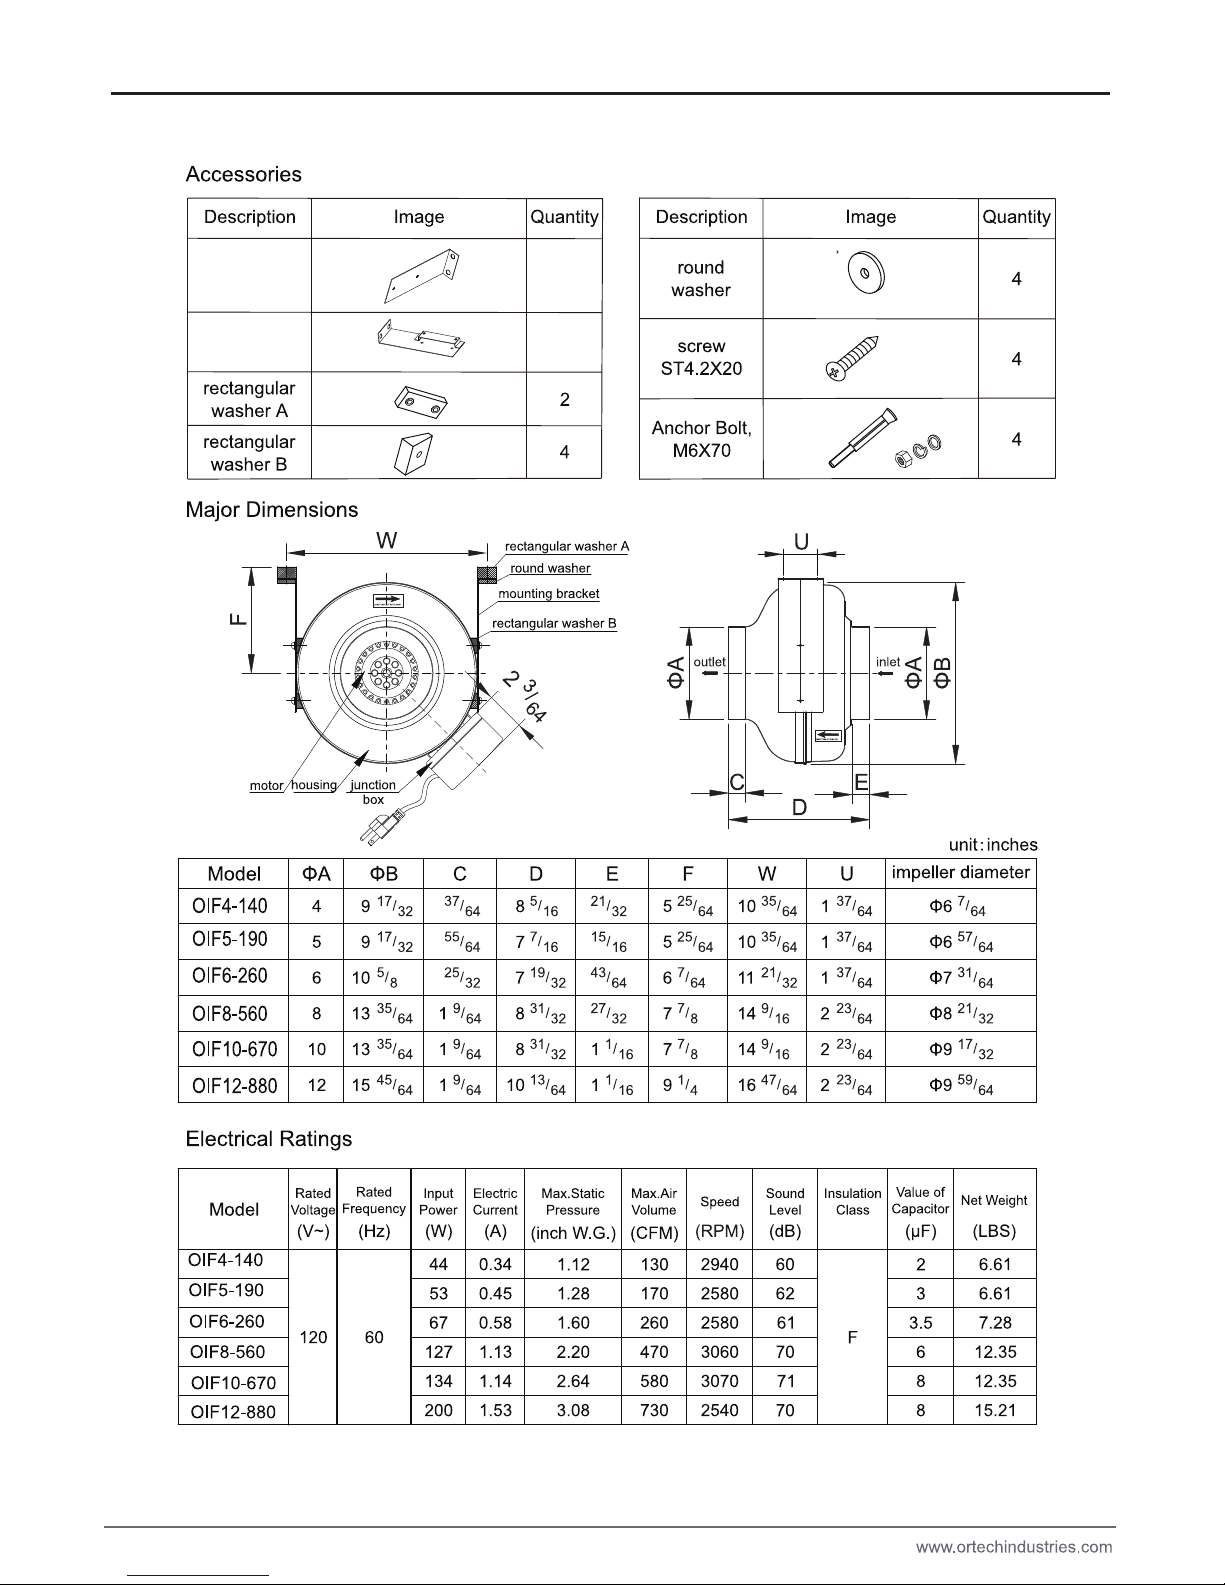
MODEL: OIF4-140 OIF5-190
WARNING
INLINE DRYER BOOSTER FAN
Use this unit only in the manner intended by the manufacturer. If you have questions, contact the manufacturer.
Before servicing or cleaning unit, switch power off at service panel and lock the service disconnecting means to prevent power from being switching on
accidentally. When the service disconnecting means cannot be locked, securely fasten a prominent warning device, such as a tag, to the service panel.
Installation work and electrical wiring must be done by a qualified person in accordance with all applicable codes and standards, including fire-rated
construction codes and standards.
Sufficient air is needed for proper combustion and exhausting of gases through the flue (chimney) of fuel burning equipment to prevent backdrafting.
Follow the heating equipment manufacturer’s guideline and safety standards such as those published by the National Fire Protection Association (NFPA),
and the American Society for Heating, Refrigeration and Air Conditioning Engineers (ASHRAE), and the local code authorities.
When cutting or drilling into wall or ceiling, do not damage electrical wiring and other hidden utilities.
Ducted fans must always be vented to the outdoors.
Acceptable for use over a tub or shower when connected to a GFCI (Ground Fault Circuit Interrupter) - protected branch circuit (ceiling installation only).
CAUTION
WARNING -TO REDUCE THE RISK OF FIRE, ELECTRIC SHOCK, OR INJURY TO PERSONS, OBSERVE THE
FOLLOWING:
To ensure quiet operation of ENERGY STAR qualified in-line and remote fans, each fan shall be installed using sound attenuation
techniques appropriate for the installation.
For bathroom and general ventilation applications, at least 8 feet of insulated flexible duct shall be installed between the exhaust or
supply grille(s) and the fan.
For kitchen rangehood remote ventilation applications, where metal duct is generally required by the code, a metal sound attenuator
shall be installed between the rangehood and the fan.
An appropriate duct termination device (roof, cap, wall cap, louvered shutters, etc.) are to be used with this fan. The ducting from this fan
to the outside of the building has a strong effect on the air flow, noise and energy use of the fan.
Use the shortest, straightest duct routing possible for the best performance, avoid installing the fan with smaller ducts than
recommended. Insulation around the ducts can reduce engergy loss and inhibit mold growth.
Fans installed with existing ducts may not achieve their rated air flow.
Duct sealant, caulk, or tape should be applied to all seems to prevent air leakage and maximize air performance.
Flex, spiral, or snap lock ducting may be used.
To minimize static pressure losses and promote adequate airflow, minimize duct run lengths where possible. If using flex duct, keep
duct runs straight and taut.
ASSEMBLY INSTRUCTIONS
2
mounting
bracket A
mounting
bracket B
1
1

Assembly Instructions
3
Mounting
1. Attach mounting bracket A to the fan on opposite side of the junction box using 2 rubber washers (rectangular washer
B) and 2 cross tapping screws (ST4.2x20) provided
2. Attach mounting bracket B to the fan on the junction box side using the remaining 2 rubber washers and 2 cross
tapping screws, this bracket contains an optional sensor switch mounting hole. Visit www.ortechindustries.com for
sensor switch options.
3. Using table A below, mark the holes for the fan's installation screw the 4 pcs of M6X80 screws to the stud where the
fan will be mounted(refer to illustration 3)
4. Mount the fan with a rubber washer through the screws. Before fully tightening, review illustration 4
for the remaining
washer placement.
5. Duct the fan with the duct tape or mounting clamps (sold separately).
Notices on Installation
Fan can be installed vertically or horizontally
1. The inlet and outlet directly connected with the duct and fastened with the mounting clamps then finally
suspended with the suspended bracket.
2. The insulation resistance test should be conducted in case the fans are kept at the warehouse for more than 6
months before the operation. The resistance should be over 20M.
3. Rotate the impeller by hand before operation and check its flexibility to make sure no bump or block. Connect
to power source, and make impeller and motor work to observe:
- Direction of rotation should correspond to direction-of-rotation arrow on the label.
- Operation that it should not be any overheating, noise, gradually slow-impeller
if not, it approves to operate in normal condition.
4. For a durability reason, the filter and back-draft damper are recommended.
5. For inquiry of a three-speed regulator, please contact us and assistance of installation in the instruction
manual.
6. The unit is for indoor use and both ends must be properly ducted.
7. The lead of the fan shall be No.18 AWG
8. The minimal height of installation is 2.3M.
9. Back draft devices are recommended.

CONNECT ELECTRICAL WIRING
4
WARRANTY
ONE YEAR LIMITED WARRANTY from the original date of purchase against defects in material and workmanship.
This warranty is limited up to the amount of the original purchase price of the product, excluding any labor cost. For
inquiries please visit www.ortechindustries.com or call 1-888-543-6473.
SERVICE PARTS
 Loading...