

Read these instructions carefully before attempting to assemble, install, operate or maintain
the product described. Protect yourself and others by observing all safety information. Failure
to comply with instructions could result in personal injury and / or property damage. Retain
instructions for future reference.
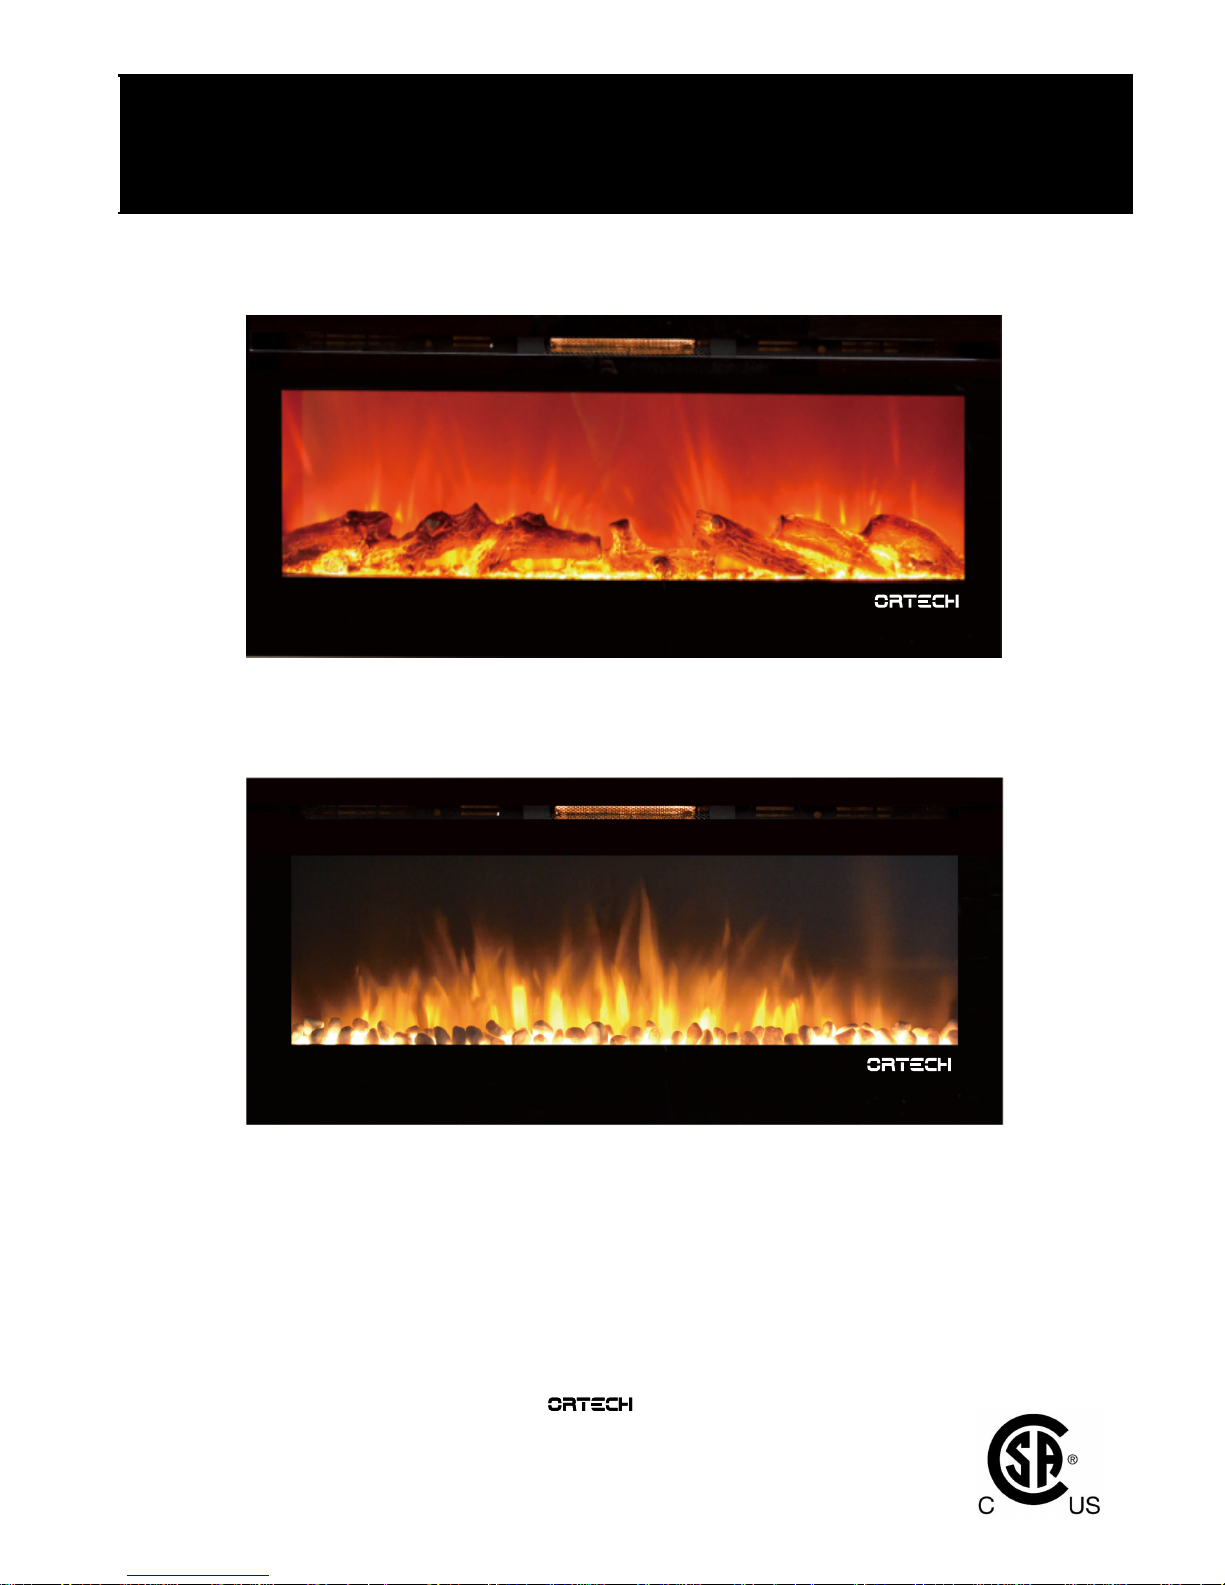
50" Built-in Electric Fireplace with Pebbles or crystals
IMPORTANT INSTRUCTIONS & OPERATING MANUAL
Model Numbers: OD-B50LED
OWNER’S MANUAL
50" Built-in Electric Fireplace with Log
www.ortechindustries.com

1
IMPORTANT: It is important to read these instructions carefully before using the appliance for
the first time. Keep the instructions safe so that you can refer to them later if necessary.
【IMPORTANT INSTRUCTIONS】
When using electrical appliances basic precautions should always be followed to reduce the risk of fire,
electric shock and injury to persons, including the following:
1) Read all instructions before using this heater.
2) This heater is hot when in use. To avoid burning, do not touch hot surface. If provided, use handles
when moving this heater. Keep combustible materials, such as furniture, pillows, bedding, papers,
clothes, and curtains at least 1 m from the front of the heater and keep them away from the sides and
rear. In order to avoid overheating, do not cover the heater.
3) Extreme caution is necessary when any heater is used near children or the infirm and whenever the
heater is left operating and unattended.
4) Always unplug heater when not in use.
5) Do not operate any heater with a damaged cord or plug or after the heater malfunctions, has been
dropped or damaged in any manner, return heater to authorized service facility for examination,
electrical or mechanical adjustment, or repair.
6) Do not use outdoors.
7) This heater is not intended for use in bathrooms, laundry areas and similar indoor locations. Never
locate heater where it may fall into a bathtub or other water container.
8) Do not run cord under carpeting. Do not cover cord with throw rugs, runners, or similar coverings.
Arrange cord away from traffic area and where it will not be tipped over.
9) To disconnect heater, turn controls to off, then remove plug from outlet.
10) Do not inset or allow foreign objects to enter any ventilation or exhaust opening as this may cause
an electric shock or fire, or damage the heater.
11) To prevent a possible fire, do not block air intakes or exhaust in any manner. Do not use on soft
surfaces, like a bed, where openings many become blocked.
12) A heater has hot and arcing or sparking parts inside. Do not use it in areas where gasoline, or
flammable liquids are used or stored.
13) Use this heater only as describes in this manual. Any other use not recommended by the
manufacturer may cause fire, electric shock, or injury to persons.
14) DANGER-HIGH Temperatures may be generated under certain abnormal conditions. Do not
partially or fully cover or obstruct the front of this heater.
15) Replacement of the lamps should be done only while the heater is disconnected from the supply
circuit.
16)This appliance is not intended for use by persons (including children) with reduced physical, sensory
or capabilities, or lack of experience and knowledge, unless they have been given supervision or
instruction concerning use of the appliance by a person responsible for their safety.Children should be
supervised to ensure that they do not play with the appliance.
17) CAUTION: In order to avoid a hazard due to inadvertent resetting of the thermal cut-out, this
appliance must not be supplied through an external switching device, such as a timer, or connected to a
circuit that is regularly switched on and off by the utility.

2
UNPACKING AND TESTING APPLIANCE
Carefully remove the appliance from the box. Prior to installing the appliance, test to make sure the
appliance operates properly by plugging the power supply cord into a conveniently located 110-120 Volt
grounded outlet.
【Grounding Appliance】
This appliance is for use on 120 Volts. The cord has a plug
as shown in (A). An adapter as shown in (C) is available
for connecting three-blade grounding type plugs to two-slot
receptacles. The green grounding lug extending from the
adapter must be connected to a permanent ground such as
a properly grounded outlet box. The adapter should not be
used if a three-slot grounded receptacle is available.
To disconnect appliance, turn controls to off, then remove
plug from outlet.
WARNING:
Keep the front of the appliance through which the heat is
radiated at least 1 meter away from furniture, curtains and
other flammable objects at all time.
Never use an extension lead. The mains cable must remain
at the back of the appliance and must not be in contact with
any hot elements.
【INSTALLATION】
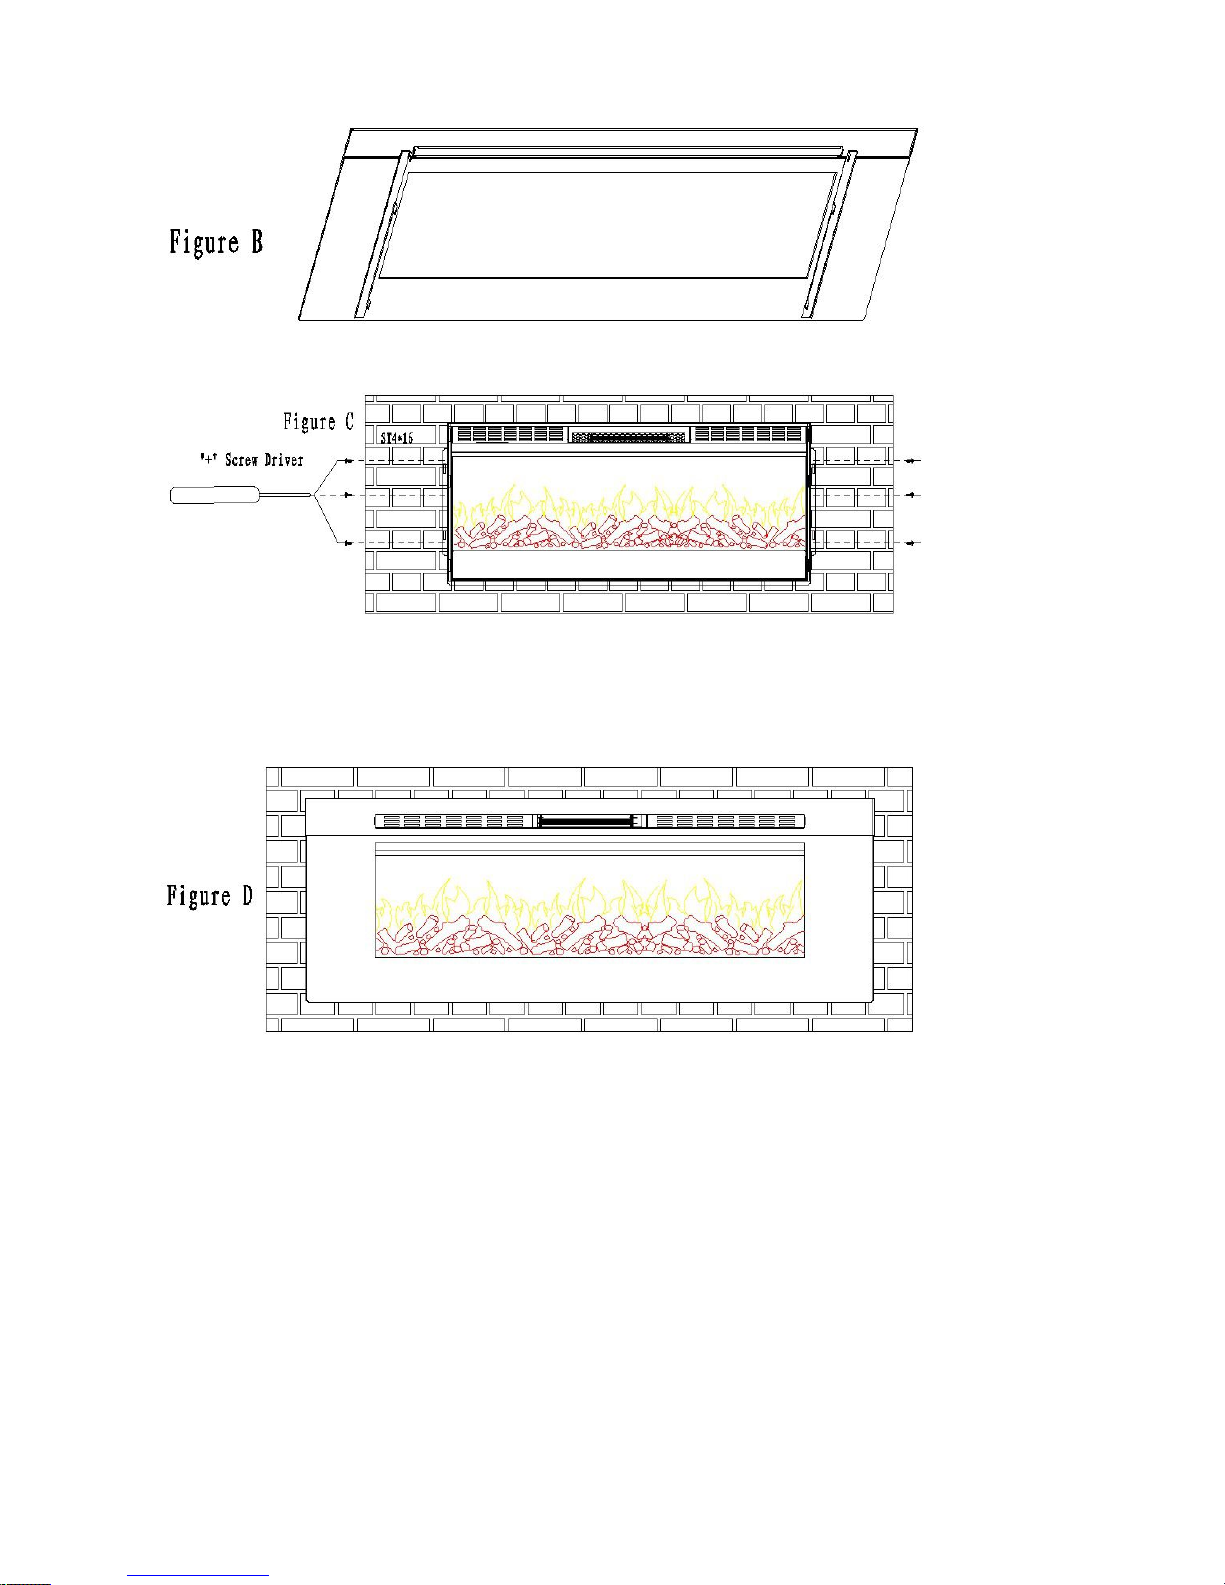
Using the Philips Screw Driver"+" to take off the two screws in the front two sides Figure (A), then
have two people to take off the Glass Panel Figure (B)
ALWAYS unplug this fireplace heater before assembly or cleaning, or before relocating.
Failure to do so could result in electric shock, fire, or personal injury.
Warning
3
Put the Fireplace box into the wall, there're two hanger brackets in both sides of the fireplace box, using
6 pcs of ST4X 16 screws(each side with 3 screws) to lock the fireplace in the wooden wall Figure (C)
After firmly installed the Fireplace box, then move the Glass Panel back to the Fireplace box, using
the two screws to lock in both sides Like Figure (A), the Fireplace will look like this after the
installation see Figure (D)
【Instruction for LOG, Pebbles,Crystals】
WARNING: Unplug the Fireplace before making any replacement
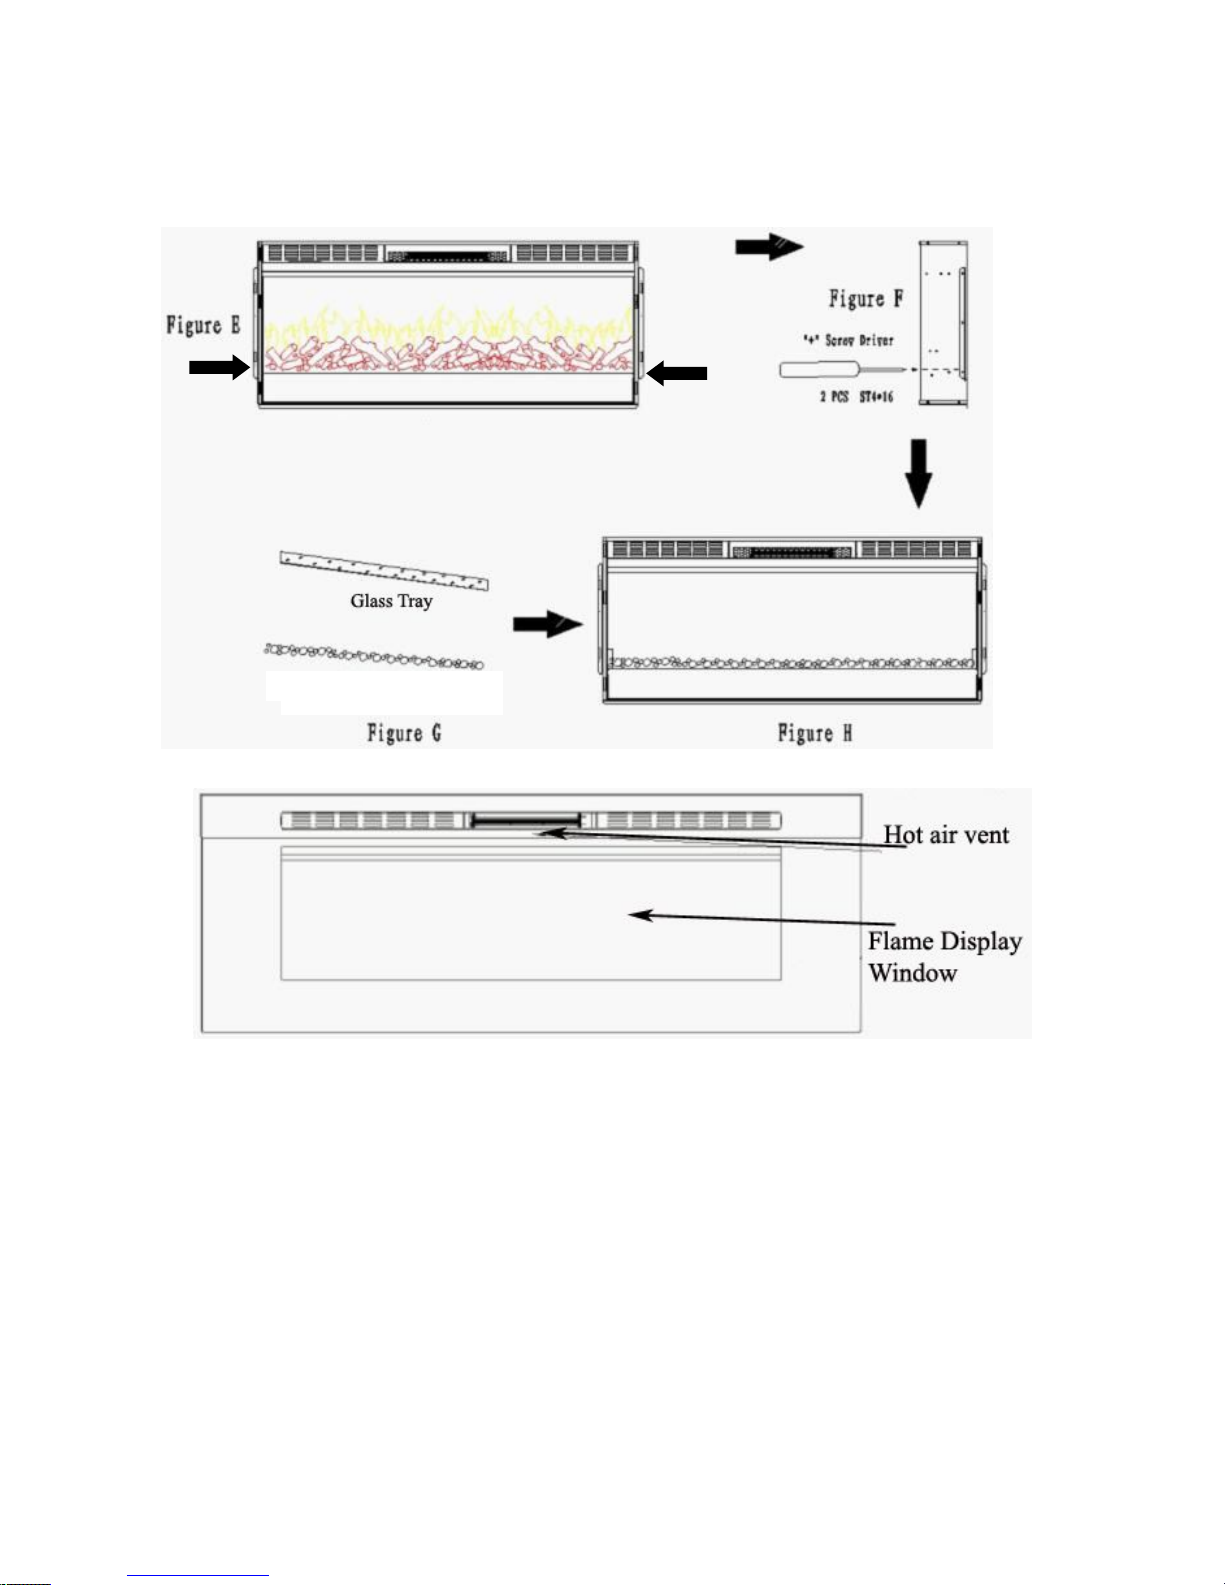
Take off the Front Glass panel before make replacement of LOG, Rocks, Or Glass Media. See Figure
(A,B)
A. Using the Philips Screw Driver"+" to disassemble the two screws in both side of the fireplace box,
then take out the LOG. Figure (E)
4
【
【
【
【Special
Special
Special
Specialcharacteristics
characteristics
characteristics
characteristicsof
of
of
ofthis
this
this
thisElectric
Electric
Electric
ElectricFireplace
Fireplace
Fireplace
Fireplace】
】
】
】
1、Thesmoulderingglowoftheflamescanhardlybedistinguishedfromthatofarealfireplace.
2、Producestheeffectofahotcurrentofair.
3、Automaticandconstanttemperaturecontrol.
4、FireplacecanbebothusedasWallHangingandBuild-inthewall
5、FireplaceexchangedfreelyfromLOG,RocksandGlassMedia
6、Perfectforsmalltomid-sizedrooms
7、Timer(0.5hrsto7.5hrs)
8、OperatedwithremotecontrolandManualPanelSwitch
9、Dimmer(FivestepsFlameadjustfromDimmertoLighter)
B. Put the Glass tray (included in carton) to the slot of the Fireplace, than laying the decorative pebbles
or crystals (included in carton), Figure (G,H)
Pebbles / Crystals
5
【
【
【
【Safety
Safety
Safety
Safetyinstructions
instructions
instructions
instructions】
】
】
】
Onlyusetheapplianceinaccordancewiththeinstructionsinthismanual!Itcannotbeusedforany
otherpurpose.
Neveroperatetheappliancewhentheapplianceitselforthemaincableshowanysignsofdamage.
Inordertoavoidoverheating,donotcovertheheater.
Beresponsiblewhenhandlingthepackingmaterial.Warning:plasticwrappingmaybelethaltochildren.
Donotplacetheappliancenexttoasocket.
Neveroperatetheheateronaprogramswitch,timerswitchoranyotherapplianceforautomatic
operation.
Theheaterisonlysuitableforindooruse.
Neverusetheheaterinthebathroom,showerornearaswimmingpool.
Theheatermustnotbelocatedimmediatelybelowasocket-outlet
Ifthesupplycordisdamaged,itmustbereplacedbythemanufactureroritsserviceagentorasimilarly
qualifiedpersoninordertoavoidahazard.
Neverleavesmallchildrenunattendedneartheappliance.
Incaseofmalfunction,disconnecttheplugimmediately.
Whennotinuseforaconsiderableamountoftime,unplugtheappliance.
Componentsshouldonlybeservicedbyanapprovedelectrotechnician.
【
【
【
【
To
switchon】
】
】
】
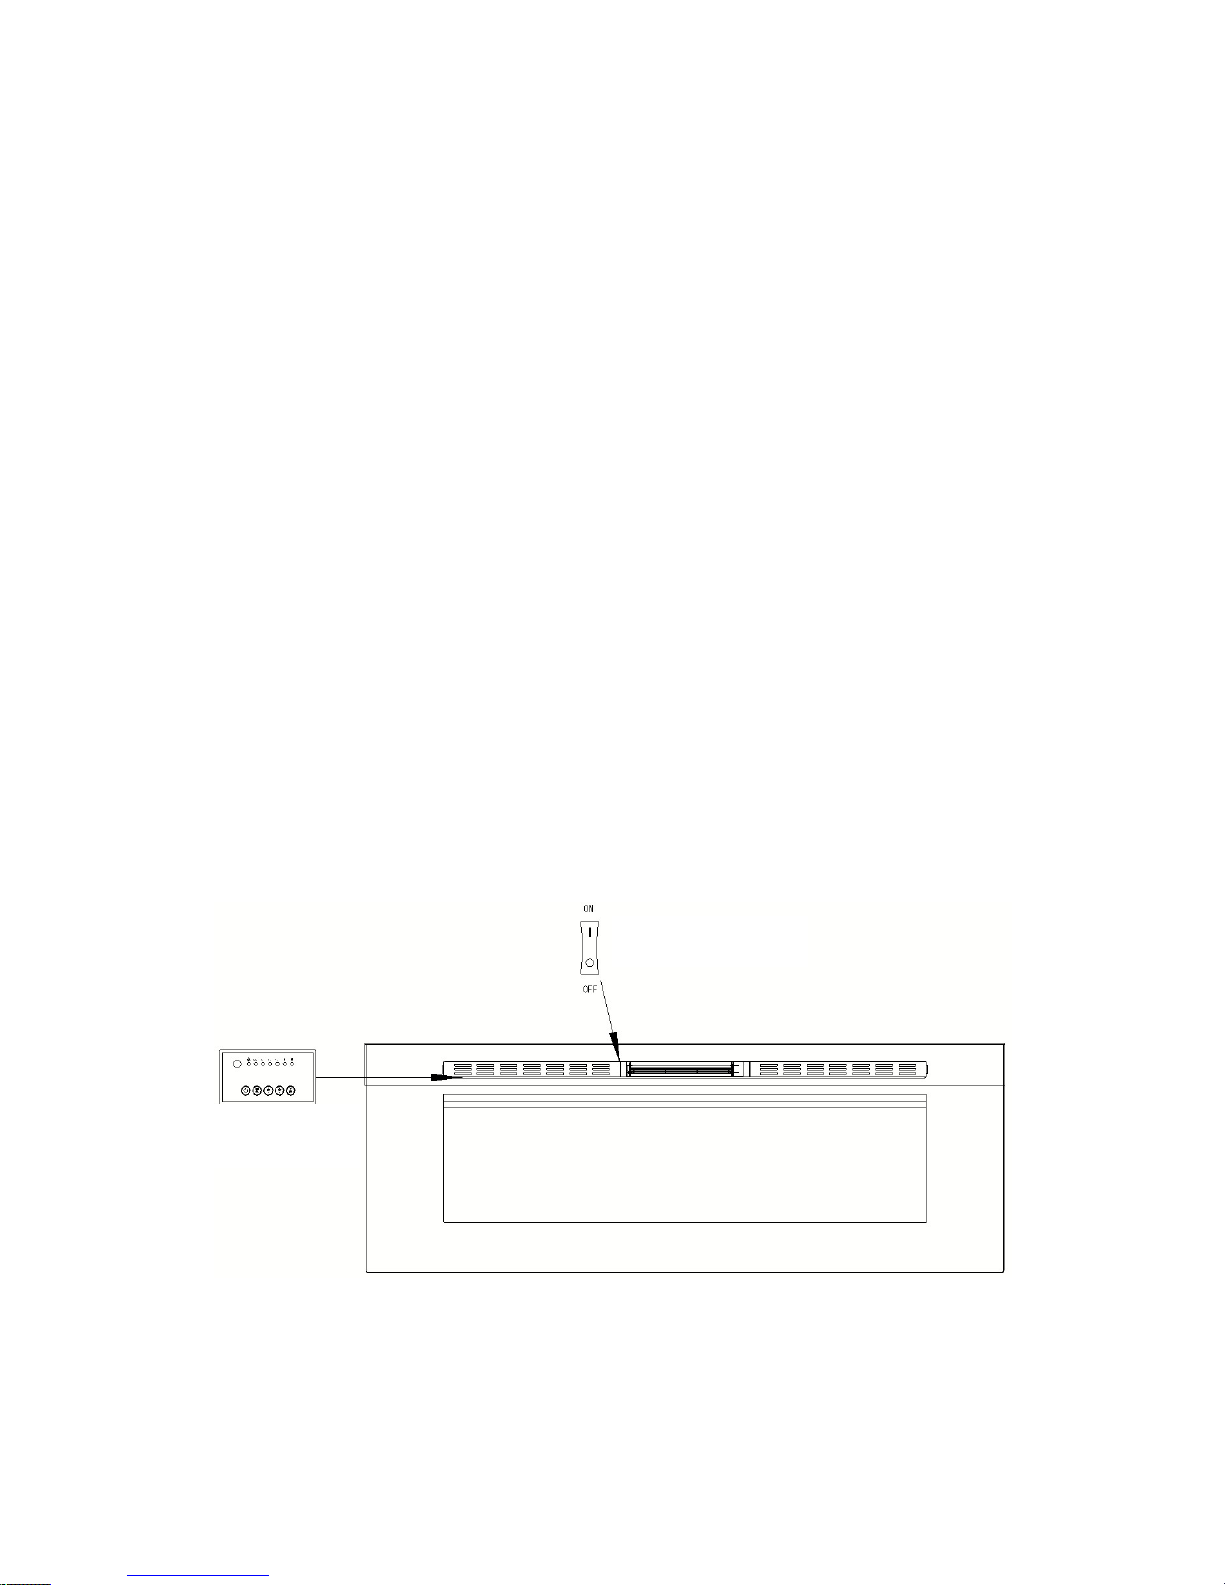
Plugintheapplianceintothesocket.TurnonthePower
Power
Power
PowerSwitch
Switch
Switch
Switch
ThecontrolSwitch
Switch
Switch
SwitchPanel
Panel
Panel
PanelisundertheVentinfrontofthefireplace(See
(See
(See
(Seepic)
pic)
pic)
pic)
Power
Power
Power
PowerSwitch
Switch
Switch
Switch
ControlSwitchPanel
6
【
【
【
【Instruction
Instruction
Instruction
Instructionfor
for
for
forRemote
Remote
Remote
RemoteController
Controller
Controller
Controllerand
and
and
andSwitch
Switch
Switch
SwitchPanel
Panel
Panel
Panel】
】
】
】
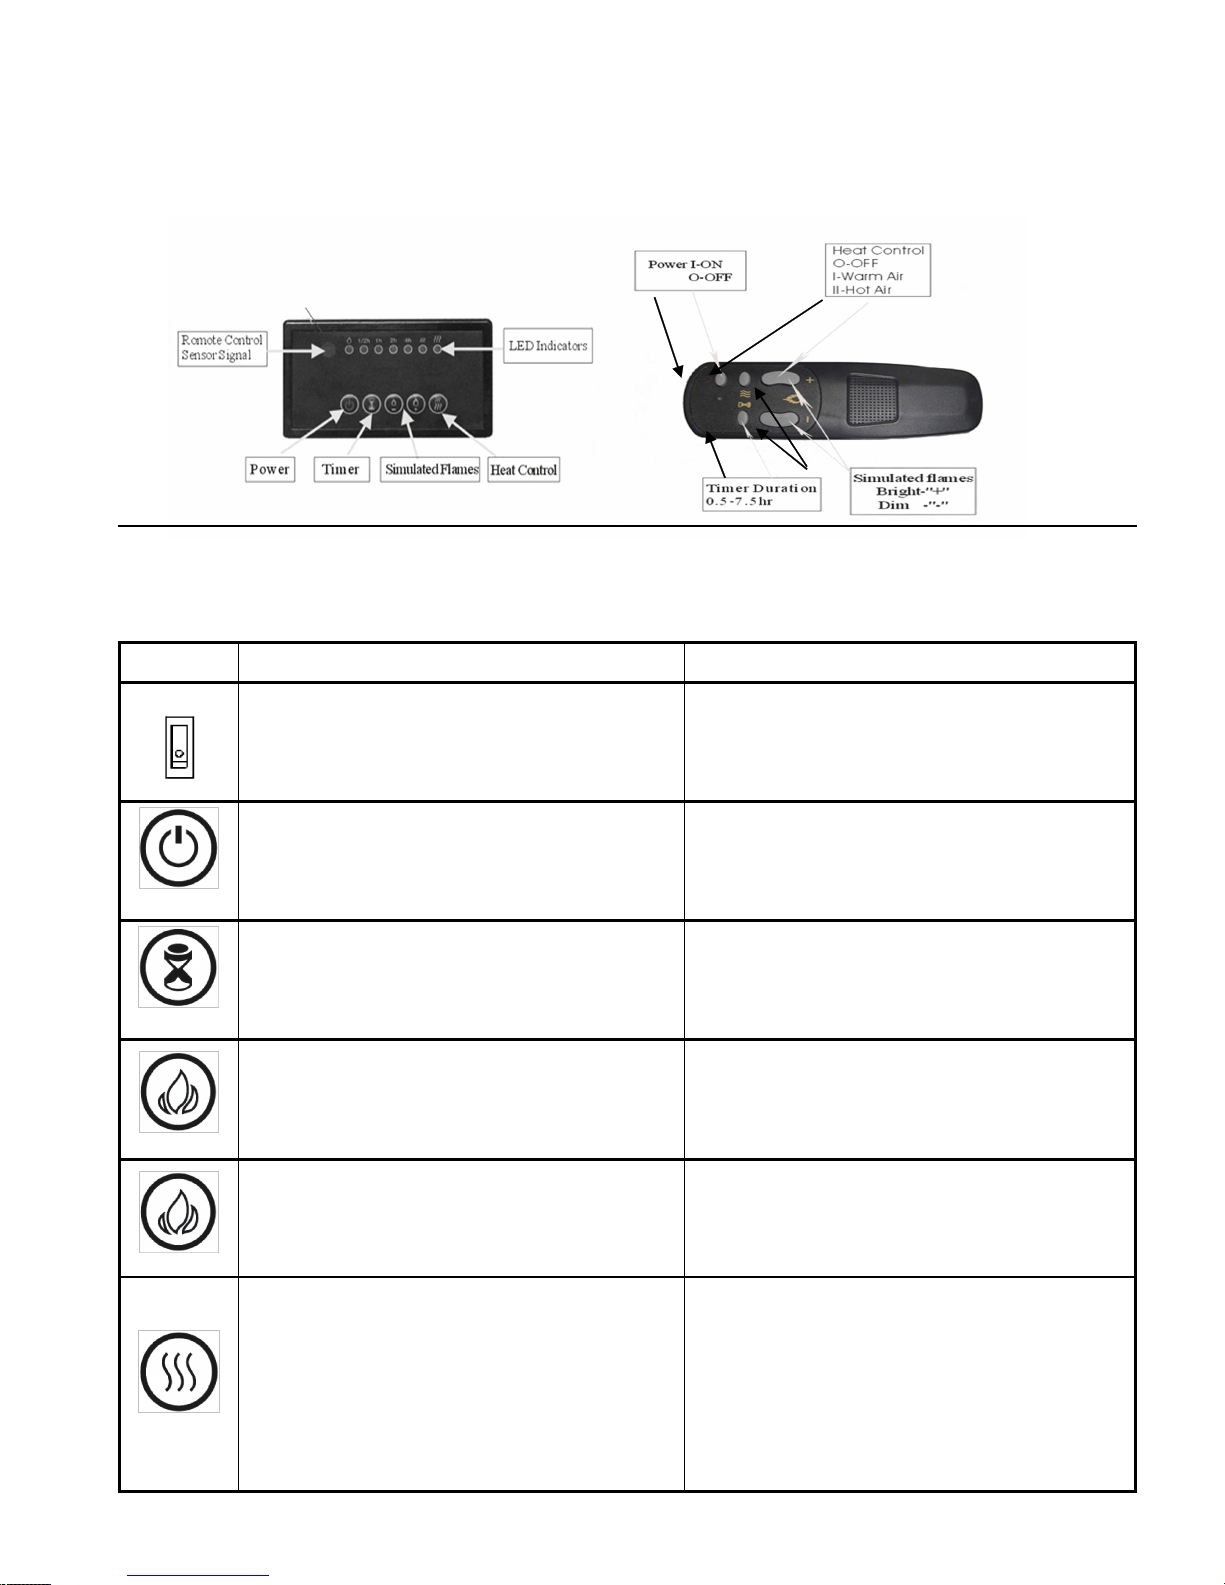
Control Panel / Remote Control Operation
(Control panel POWER switch must be ON to use remote control.)
BUTTON FUNCTION ACTION & INDICATION
ON
OFF
ON (l). Enables all functions.
OFF (O). Turns off all functions on control
panel and remote control.
1. Press ON (l). Power turns on. All
functions are enabled.
2. Press OFF (O). Power, flame effect, and
all functions turn off.
POWER
ON: Enables touch panel functions and
remote control. Turns on flame effect.
OFF: Disables touch panel functions and
remote control. Turns off flame effect.
1. Press once. Indicator light turns on.
Power turns on. All functions enabled.
2. Press again. Flame effect turns off.
Power and all functions turn off.
TIMER
TIMER button: Controls timer settings to
turn off fireplace at selected time.
Settings range from 0.5 hours to 7.5 hours.
1. Press once. Indicator light turns on.
Timer is set to 0.5 hours.
2. Press again until desired setting is
reached. Indicator lights show setting.
FLAME -
FLAME “-”: Makes flame effect dimmer.
NOTE: Flame effect stays on until power
button is turned off. Flame effect must be
on for heater to turn on.
1. Press once. Flame effect gets dimmer.
2. Press again until desired setting is
reached. Flame effect continues to get
dimmer each time button is pressed.
FLAME +
FLAME “+”: Makes flame effect brighter.
NOTE: Flame effect stays on until power
button is turned off. Flame effect must be
on for heater to turn on.
1. Press once. Flame effect gets brighter.
2. Press again until desired setting is
reached. Flame effect continues to get
brighter each time button is pressed.
HEATER
HEATER button: Turns heater on and off.
NOTE: The heater only works when the
flame effect is on. If the flame effect is off,
the heater will not turn on.
NOTE: To prevent overheating, the heater
blows cool air for 10 seconds before the
heater turns on, and after it turns off.
1. Press once. Indicator lights up.
Fan blows cool air for 10 seconds. Low
heater turns on and blows warm air.
2. Press again. Indicator lights up.
High heater turns on and blows hot air.
3. Press again. Heaters turn off.
The fan blows cool air, then turns off.
6

NOTICE
When the heater is first turned on, a slight odor may be present. This is normal and
should not occur again unless the heater is not used for a long period of time.
NOTICE
To improve operation, aim the remote control at the front of the fireplace. DO NOT
press the buttons too quickly. Give the unit time to respond to each command.
Remote Control Battery Information
This remote control uses two AAA batteries (Not included).
Instructions for battery installation are on the Remote Control battery compartment.
NEVER dispose of batteries in fire. Failure to observe this precaution may result in an
explosion. Dispose of batteries at your local hazardous material processing center.
Temperature Limiting Control
This heater is equipped with a Temperature Limiting Control. Should the heater reach an unsafe
temperature, the heater will automatically turn OFF. To reset:
1. Unplug the power cord from the outlet.
2. Turn the ON/OFF switch on the CONTROL PANEL to OFF. Wait 5 minutes.
3. Inspect the fireplace to make sure no vents are blocked, or clogged with dust or lint. If they are,
use a vacuum to clean the vent areas.
4. With the POWER switch in the OFF position, plug the power cord back into the outlet.
5. If the problem continues, have your outlet and wiring inspected by a professional.
Care and Maintenance
Cleaning
ALWAYS turn the heater OFF and unplug the power cord from the outlet before
cleaning, performing maintenance, or moving this fireplace. Failure to do so could result in
electric shock, fire, or personal injury.
NEVER immerse in water or spray with water. Doing so could result in electric shock,
fire, or personal injury.
Metal:
Buff using a soft cloth, slightly dampened with a citrus oil-based product.
DO NOT use brass polish or household cleaners as these products will damage the metal trim.
Glass:
Use a good quality glass cleaner sprayed onto the cloth or towel. Dry thoroughly with a paper
towel or lint-free cloth.
NEVER use abrasive cleansers, liquid sprays, or any cleaner that could scratch the surface.
Vents:
Use a vacuum or duster to remove dust and dirt from the heater and vent areas.
Plastic:
Wipe gently with a slightly damp cloth and a mild solution of dish soap and warm water.
NEVER use abrasive cleansers, liquid sprays, or any cleaner that could scratch the surface.
7

CAUTION:
CAUTION:
CAUTION:
CAUTION:sharp
sharp
sharp
sharpedges!
edges!
edges!
edges!
Forassembly,proceedinreverseorder.
1.Afterinstallation,thepowerplugshouldbeaccessible.
2.Ifthepowercordisdamaged.Itmustbereplacedbythemanufactureroritsserviceagentora
similarlyqualifiedpersoninordertoavoidahazard.
3.Theheatermustnotbelocatedimmediatelybelowasocket.
4.Theapplianceisnotintendedforusebyyoungchildrenorinfirmpersons.Youngchildrenshouldbe
supervisedtoensurethattheydonotplaywiththeappliance.
5.Donotusethisheaterintheimmediatesurroundingsofabath,ashoweroraswimmingpool.
6.Inordertoavoidoverheating,donotcovertheheater.
Technical
Technical
Technical
Technicaldata:
data:
data:
data:
RatedVoltage:120V~
RatedFrequency:60Hz
RatedPower:1500W
WEEE
WEEE
WEEE
WEEE:
Meaning
Meaning
Meaning
Meaningof
of
of
ofcrossed
crossed
crossed
crossed–
–
–
–out
out
out
outwheeled
wheeled
wheeled
wheeleddustbin:
dustbin:
dustbin:
dustbin:
Donotdisposeofelectricalappliancesasunsortedmunicipalwaste,useseparatecollectionfacilities.
Contactyoulocalgovernmentforinformationregardingthecollectionsystemsavailable.Ifelectrical
appliancesaredisposedofinlandfillsordumps,hazardoussubstancescanleakintothegroundwaterand
getintothefoodchain,damagingyourhealthandwell-being.
Whenreplacingoldapplianceswithnewones,theretailerislegallyobligatedtotakebackyouroldappliance
fordisposalsatleastfreeofcharge.
8
 Loading...