

ORTAL Lyric Clear RS, Lyric Clear 90 F, Lyric Clear LS, Lyric Clear 90H F, Lyric Clear TS Installation And Operation Manual
...
Lyric Installation Manual: Built-in Models, April 2019
Installation and Operation Manual
-Built-in Models-
Manufacturer Update – Installation Manual
Manufacturer Effective Date: April 24th, 2019
Serial Number 19473 and forward
Built-in Models:
Front Facing Series
Corner (RS/LS) Series
See Through Series
Three Sided Series
2 Lyric Installation Manual: Built-in Models, April 2019
Fireplace Safety Information and Warnings
This section provides safety guidelines and instructions. It is important to SAVE THESE INSTRUCTIONS and
to make yourself fully aware of all the safety protocols and features of the Lyric direct vent gas fireplace.
ALL warnings and instructions below apply to all products manufactured and distributed by the
manufacturer.
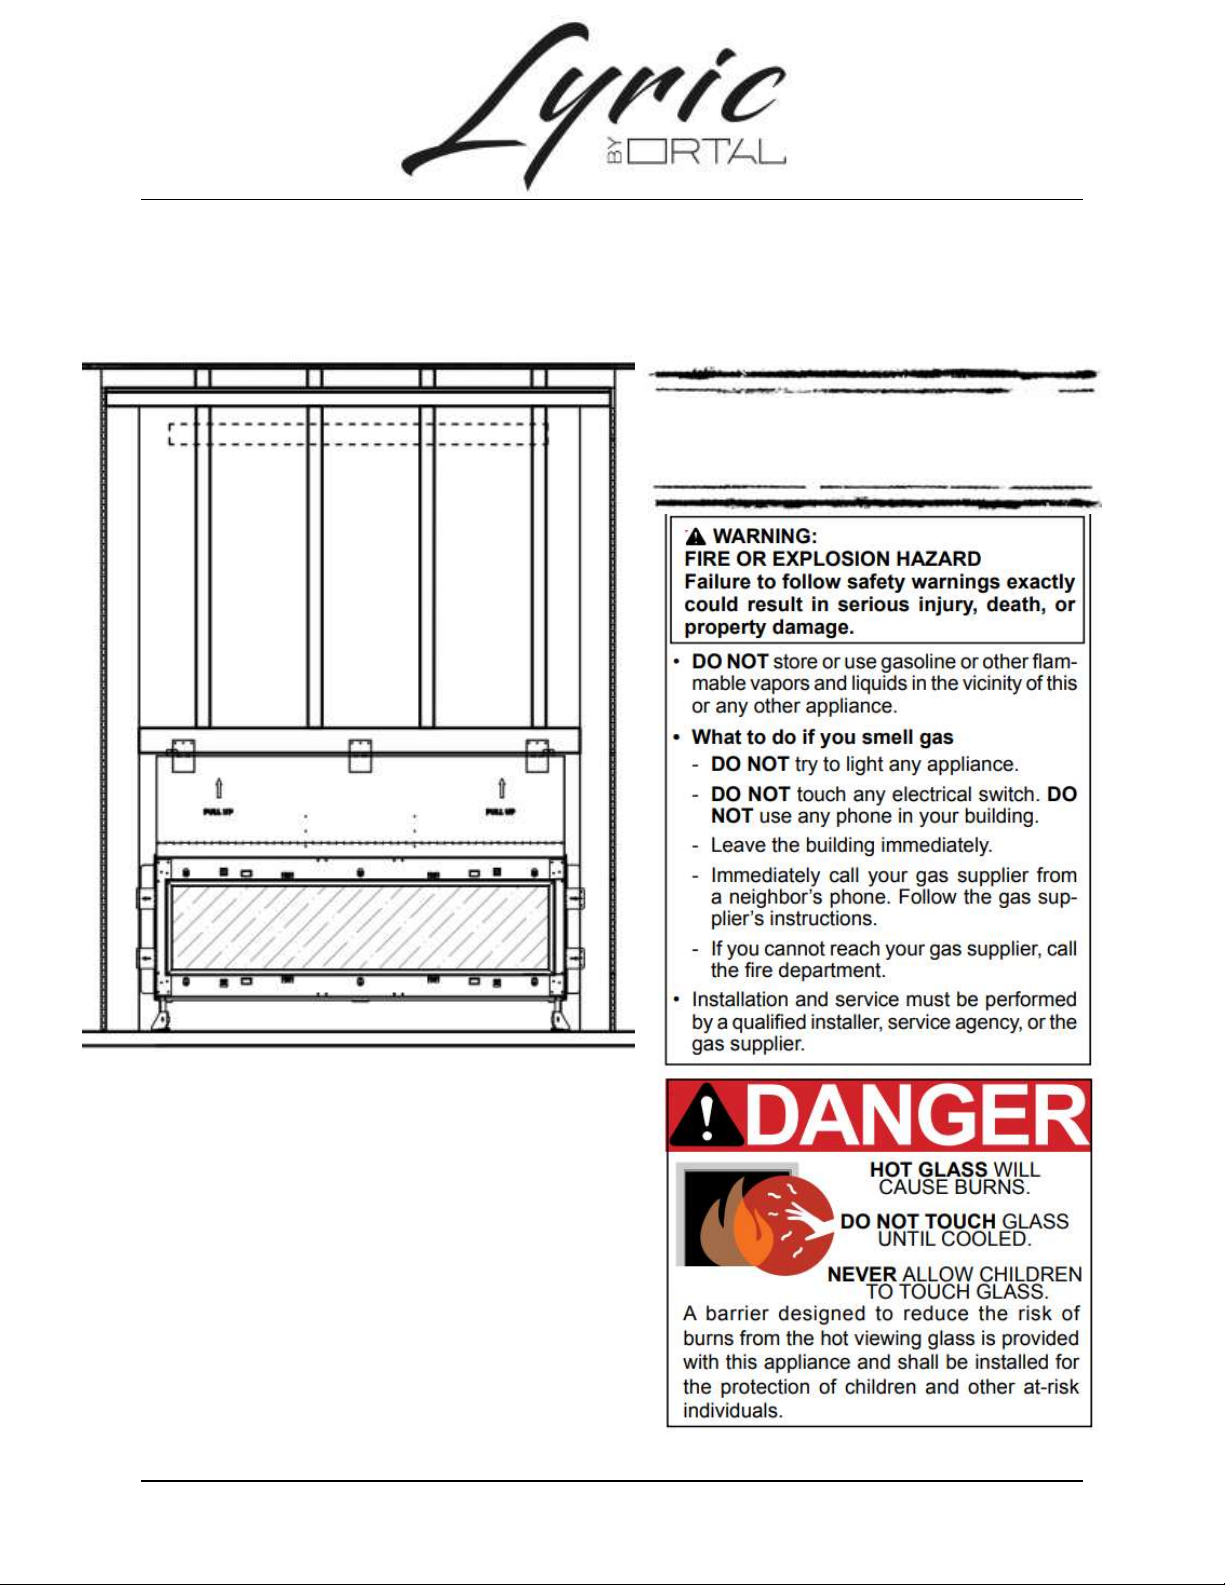
WARNING – HEAT BARRIER
A screen heat barrier designed to reduce the risk of burns from hot viewing glass is provided with this
fireplace and shall be installed.
Fireplace must NOT be used without the screen in place.
If the screen becomes damaged, a replacement screen must be obtained from the manufacturer through
a manufacturer-approved fireplace dealer/installer.
If the screen is removed for servicing, it must be replaced prior to operating the fireplace. Screen can only
be removed and replaced by a manufacturer-approved fireplace dealer/installer.
WARNING – FIREPLACE TEMPERATURE
Due to hot temperatures, the fireplace should be located out of traffic and away from furniture and
draperies.
Children and adults should be alerted to the hazards of high surface temperature and should stay away
to avoid burns or clothing ignition.
Clothing or other flammable material should not be placed on or near the fireplace.
Young children should be carefully supervised when they are in the same room as the fireplace.
Toddlers, young children and others may be susceptible to accidental contact burns. A physical barrier is
recommended if there are at-risk individuals in the house. To restrict access to a fireplace or stove, install
an adjustable safety gate to keep toddlers, young children and other at-risk individuals out of the room
and away from hot surfaces.
WARNING – GLASS HANDLING
The glass must ONLY be removed by an authorized and/or qualified installer. The authorized technician
should ONLY remove the glass with the suction cups supplied or approved by the manufacturer. To
prevent damage to the glass edges, lower the glass to rest in a safe place.
Follow these guidelines for glass handling:
Step 1: Prepare a safe place for the glass to rest.
Step 2: Remove the glass using the suction cup.
Step 3: The glass can now be rested safely.
WARNING – INSTALLATION AND OPERATION
The direct vent system fireplace must be installed as an OEM installation in manufactured homes (USA
only) or an aftermarket permanently located, or a mobile home, where not prohibited by local codes.
The fireplace must be installed in accordance with the manufacturer's instructions and the Manufactured
Home Construction and Safety Standard, Title 24 CFR, Part 3280, in the United States, or the Standard for
Installation in Mobile Homes, CAN/CSA Z240 MH Series, in Canada.
If the information in these instructions are not followed exactly, a fire or explosion may result, causing
property damage, personal injury or loss of life. Do not store or use gasoline or other flammable vapors
and liquids near this fireplace.

Lyric Installation Manual: Built-in Models, April 2019 3
WARNING – INSTALLATION AND SERVICE
Installation and repairs must be done by an authorized, qualified dealer/installer (and gas supplier if
necessary). The fireplace should be inspected before use and at least annually by a professional service
person. More frequent cleaning may be required due to excessive lint from carpeting, bedding material,
etc. It is imperative that control compartments, burners and circulating air passageways of the fireplace
be kept clean.
Any alteration to the product can cause soot or carbon to form and may result in damage. This damage
and any other damage that results from not following the instructions outlined in this manual is not the
responsibility of the manufacturer. Installation and/or service performed by any party other than an
authorized dealer/installer is potentially subject to a fire hazard and invalidation of the manufacturer’s
warranty.
WARNING – ELECTRICAL GROUNDING
These direct vent fireplaces must be electrically grounded in accordance with the local codes or, in the
absence of local codes, with National Electric code, ANSI/NFPA 70, or the Canadian Electric Code, CSA
C22.1.
WARNING – GAS FIREPLACE
This fireplace is for use only with the type of gas indicated on the rating plate. These fireplaces are not
convertible for use with other gases unless a manufacturer-certified kit is used, and the conversion is
performed by an authorized and qualified technician.
Applicable standards are Vented Gas Fireplace Heaters ANSI Z21.88 / CSA 2.33a and Gas-fired Fireplaces
for Use at High Altitudes CAN/CGA 2.17-M91.

4 Lyric Installation Manual: Built-in Models, April 2019
Table of Contents
Fireplace Safety Information and Warnings ....................................................................................................2
Certifications and Codes ..................................................................................................................................7
Product List: Built-In Lyric Models and Burners...............................................................................................8
General Building Requirements .......................................................................................................................8
“Zero-Clearance” Requirements ................................................................................................................8
Non-combustible Material Definition ........................................................................................................9
Heat Release ..............................................................................................................................................9
Heat Release: Reveal and Gap ............................................................................................................10
Heat Release: Ventilation Grill (Louver) ............................................................................................11
Vertical Heat Release Designs ............................................................................................................12
Sprinkler Clearance to Heat Release ..................................................................................................14
Chase Area Minimums .............................................................................................................................14
Fireplace Legs ...........................................................................................................................................14
Floor/Platform .........................................................................................................................................14
Securing the Fireplace ..............................................................................................................................15
Access Panel .............................................................................................................................................15
Framing Requirements ..................................................................................................................................16
5/8” Type X Drywall Requirements ..........................................................................................................16
Wood Framing ....................................................................................................................................17
Metal Framing ....................................................................................................................................17
Framing Diagrams ....................................................................................................................................18
Front (F) Series Framing Diagram .......................................................................................................18
Corner (RS/LS) Series Framing Diagram .............................................................................................19
See Through (ST) Framing Diagram ....................................................................................................20
Three Side (TS) Framing Diagram .......................................................................................................21
Clearance & Finish Diagrams .........................................................................................................................22
General Clearance Requirements ............................................................................................................22
Clearance to Furniture & Other Combustibles ...................................................................................23
Inside Corner Clearances ....................................................................................................................23
Television/Art Installation Information & Diagrams ................................................................................24
TV and Art Mounting Requirements ..................................................................................................24
Finish Diagrams ........................................................................................................................................27
Non-Combustible (Stone) Finish – Flush Application .........................................................................27
Brick Veneer Finish – Flush Application ..............................................................................................29
Brick Veneer Finish – Recessed Application .......................................................................................30
Combustible (Wood) Finish - Flush
..................................................................................................31
Combustible (Wood) Finish - Recessed ..............................................................................................32
Wood Hearth Extension .....................................................................................................................33
Mantel Diagrams ......................................................................................................................................34
Mantel Detail - Recess and Flush Application ....................................................................................34

Lyric Installation Manual: Built-in Models, April 2019 5
Diagram for Structural Weight Support ...................................................................................................35
Structural Weight Support – Flush Application ..................................................................................35
Structural Weight Support – Recessed Application ............................................................................36
Gas Requirements and Setup ........................................................................................................................37
Routing the Gas Line ................................................................................................................................37
Gas Pressure and Heat Input Charts ........................................................................................................38
High Altitude Gas Requirement ...............................................................................................................38
Gas Control Assemblies and Components ...............................................................................................39
Gas Conversion ........................................................................................................................................39
Pilot Inspection ........................................................................................................................................40
Pilot Maintenance ....................................................................................................................................40
Thermocouple Maintenance ....................................................................................................................40
Electrical Guidelines ......................................................................................................................................41
Electrical Requirements ...........................................................................................................................41
Batteries .............................................................................................................................................41
Electrical Outlet ..................................................................................................................................41
TV/Electronics Electrical Wires ...........................................................................................................41
Wiring Diagrams .......................................................................................................................................42
Lyric Fireplace .....................................................................................................................................42
Lyric Fireplace with Lights ..................................................................................................................43
Lyric Fireplace with ORTAL Power Vent .............................................................................................44
Lyric Fireplace with ORTAL Power Vent and Lights ............................................................................45
Lyric Fireplace Enervex Power Vent ...................................................................................................46
Smart Home System Wiring Information ...........................................................................................48
Vent System Information ...............................................................................................................................49
General Pipe Requirements & Certified Pipe Manufacturers ..................................................................49
Venting Installation and Clearances ...................................................................................................49
Vent Pipe Clearances ..........................................................................................................................50
Venting Diagrams .....................................................................................................................................50
Offset (bends/elbows) Maximums .....................................................................................................50
Horizontal Termination Venting Run Diagram ...................................................................................51
Vertical Termination Venting Run Diagram ........................................................................................52
Vertical Termination Venting Run Diagram – Straight Vertical ..........................................................53
Vent Restrictor Sizing Guidelines .............................................................................................................53
Fireplace Restrictors and Vent Arrangement ...........................................................................................55
Restrictor Table: Series 90 (Burner 70) ..............................................................................................56
Restrictor Table: Series 110/120 (Burner 100) ...................................................................................56
Restrictor Table: Series 140 (Burner 120) ..........................................................................................56
Horizontal Termination Clearance Diagrams ...........................................................................................57
Vertical Termination Clearance Diagrams ...............................................................................................58
Chimney Shroud Detail ............................................................................................................................59
Vent Maintenance ...................................................................................................................................60

6 Lyric Installation Manual: Built-in Models, April 2019
Fireplace Chase (Cavity) Construction ...........................................................................................................60
Cavity (Chase) Construction Notes...........................................................................................................61
Fireplace Installation Instructions .................................................................................................................62
Selecting a Location .................................................................................................................................62
Installation Sequence ...............................................................................................................................62
First Trip to Site: Planning Phase ........................................................................................................62
Second Trip to Site: Installation Phase ...............................................................................................63
Third Trip to Site: Startup Phase ........................................................................................................63
Working with Glass Panels .......................................................................................................................64
Remote Control Setup and Operation ...........................................................................................................65
Remote Control Radio Frequency ............................................................................................................65
Pairing Remote to Receiver (Setting the Electronics Code) .....................................................................66
Battery Requirements ..............................................................................................................................66
Operating Instructions .............................................................................................................................67
Interior Design Media ....................................................................................................................................68
Media Placement Guidelines ...................................................................................................................68
Cold Climate Insulation ..................................................................................................................................69
Post-installation Procedures ..........................................................................................................................69
Operating Warnings .......................................................................................................................................70
Maintenance Instructions ..............................................................................................................................70
Warranty Policy .............................................................................................................................................72
Sample Product Certification Labels ..............................................................................................................75

Lyric Installation Manual: Built-in Models, April 2019 7
Certifications and Codes
Lyric direct vent gas fireplaces have been tested and approved by CSA Group for safety and efficiency for
use with either Natural Gas (NG) or Propane (LP), and NOT for use with solid fuels.
Certification Code (U.S. & Canada):
ANSI Z21.88/CSA 2.33 – 2018 for Vented Gas Fireplace Heaters
Products:
CLASS 2901 84 – DOMESTIC HEATERS (GAS) Vented Fireplace – Certified to US Standard
CLASS 2901 04 – DOMESTIC HEATERS (GAS) Vented Fireplace
CSA Group is approved by the American National Standards Institute (ANSI) as an Accredited Standards Developer.
All Lyric fireplaces are CSA certified for indoor use only. Lyric fireplaces are not approved for outdoor
installation. Fireplaces must be installed while maintaining required clearances as outlined in this manual
as applicable. Installation is recommended in living spaces such as bedrooms, living rooms, great rooms,
etc. The fireplaces are not approved for closet installation.
The fireplace must be installed according to Lyric requirements in addition to any local codes that may
apply, such as:
• USA: ANSI Z223.1/NFPA 54
• Canada: CSA B149
In addition:
• Consult the authority having jurisdiction to determine the need for a permit PRIOR to starting the
installation.
• The fireplace must be purchased from and installed by a fireplace dealer that has been authorized
by the manufacturer.
• It is the responsibility of an authorized Lyric dealer and installer to ensure that this fireplace is
installed in compliance with the manufacturer's instructions and all the applicable codes.
• Before starting, take careful note of ALL the WARNINGS in this manual.

8 Lyric Installation Manual: Built-in Models, April 2019
Product List: Built-In Lyric Models and Burners
This manual applies to the Lyric models mentioned in the following table. This table also lists basic burner
and vent pipe specifications for each Lyric model.
Burner Sizes: Vented Gas Fireplace Heaters
Series
Burner
Models
Vent Pipe Size
90
90H
70
Clear 90 F/RS/LS/TS
Clear 90H F
5x8 co-axial direct vent pipe
110
100
Clear 110 F/RS/LS/TS/ST
5x8 co-axial direct vent pipe
140
135
Clear 140 F
5x8 co-axial direct vent pipe
Please note that the manufacturer does not supply vent pipe. Only the body of the fireplace and items
contained therein are provided by the manufacturer. Lyric products are certified to be used with and can
be obtained from the following direct vent pipe manufacturers:
Olympia: "Ventis" line
DuraVent: "Direct Vent Pro" line
ICC: "EXCELDirect" line
BDM: "Pro-Form Direct Vent System" line
Selkirk: "Direct-Temp System" line
Also note that if you require a power vent, the vent pipe type will change. Please see section titled,
“General Pipe Requirements & Certified Pipe Manufacturers” for details.
General Building Requirements
This section provides information, diagrams and recommendations related to building requirements for
Lyric fireplaces.
“Zero-Clearance” Requirements
The Lyric fireplaces mentioned in this manual have a
“zero clearance” fireplace, meaning you can build with
combustible material right up to the metal “zeroclearance” stand-offs on the fireplace. For
transportation purposes, the fireplace will arrive to the
jobsite with metal stand-offs flat against the fireplace.
All stand-offs on the fireplace must be fully extended
upon installation and remain extended after
installation. This ensures the safety and proper
functioning of the fireplace. Should you choose to
ignore this requirement, the warranty of the Lyric product will automatically void. The only exception
to this requirement applies to TV/artwork installation. Should you put a TV or artwork at the allowable
12” minimum above the fireplace viewing area, the front stand-off must be removed for this purpose
only. Please see TV/Artwork mounting requirements section for more details.

Lyric Installation Manual: Built-in Models, April 2019 9
Surrounding material is not allowed to transfer weight to the fireplace or be connected in any way to the
fireplace, with the exception of 5/8 Type X drywall (or its equivalent) in a flush installation. It may be
fastened to the frame with 1" self-tapping drywall screws 16'' on center, with a minimum of 2 ½” from
the metal lip. It must not transfer weight to the fireplace. No material is permitted to extend past the ½”
metal lip surrounding the glass viewing area. This area must be unobstructed so the screen heat barrier
and inside glass panel remain removable.
Non-combustible Material Definition
“Non-combustible material” is defined as material which will not ignite and burn. Such materials are those
consisting entirely of steel, iron, brick, tile, concrete, slate, glass or plasters, or any combination thereof.
Materials that are reported as passing ASTM E 136, Standard Test Method for Behavior of Materials in a
Vertical Tube Furnace at 750 ºC shall be considered non-combustible materials. An exception is made only
for fire rated 5/8” Type X drywall UL authorized or equivalent. For the purposes outlined in this manual,
5/8” Type X drywall may be used as a non-combustible material. Fireplace-specific construction boards
such as Promafour made by Promat are approved for use for added heat protection in place of 5/8” Type
X drywall. This is not a requirement. The use of these materials does not reduce any of the listed
clearances.
These materials are not being used for fire protection. They are used for high K and R value. Do not use
cement boards containing EPS beads.
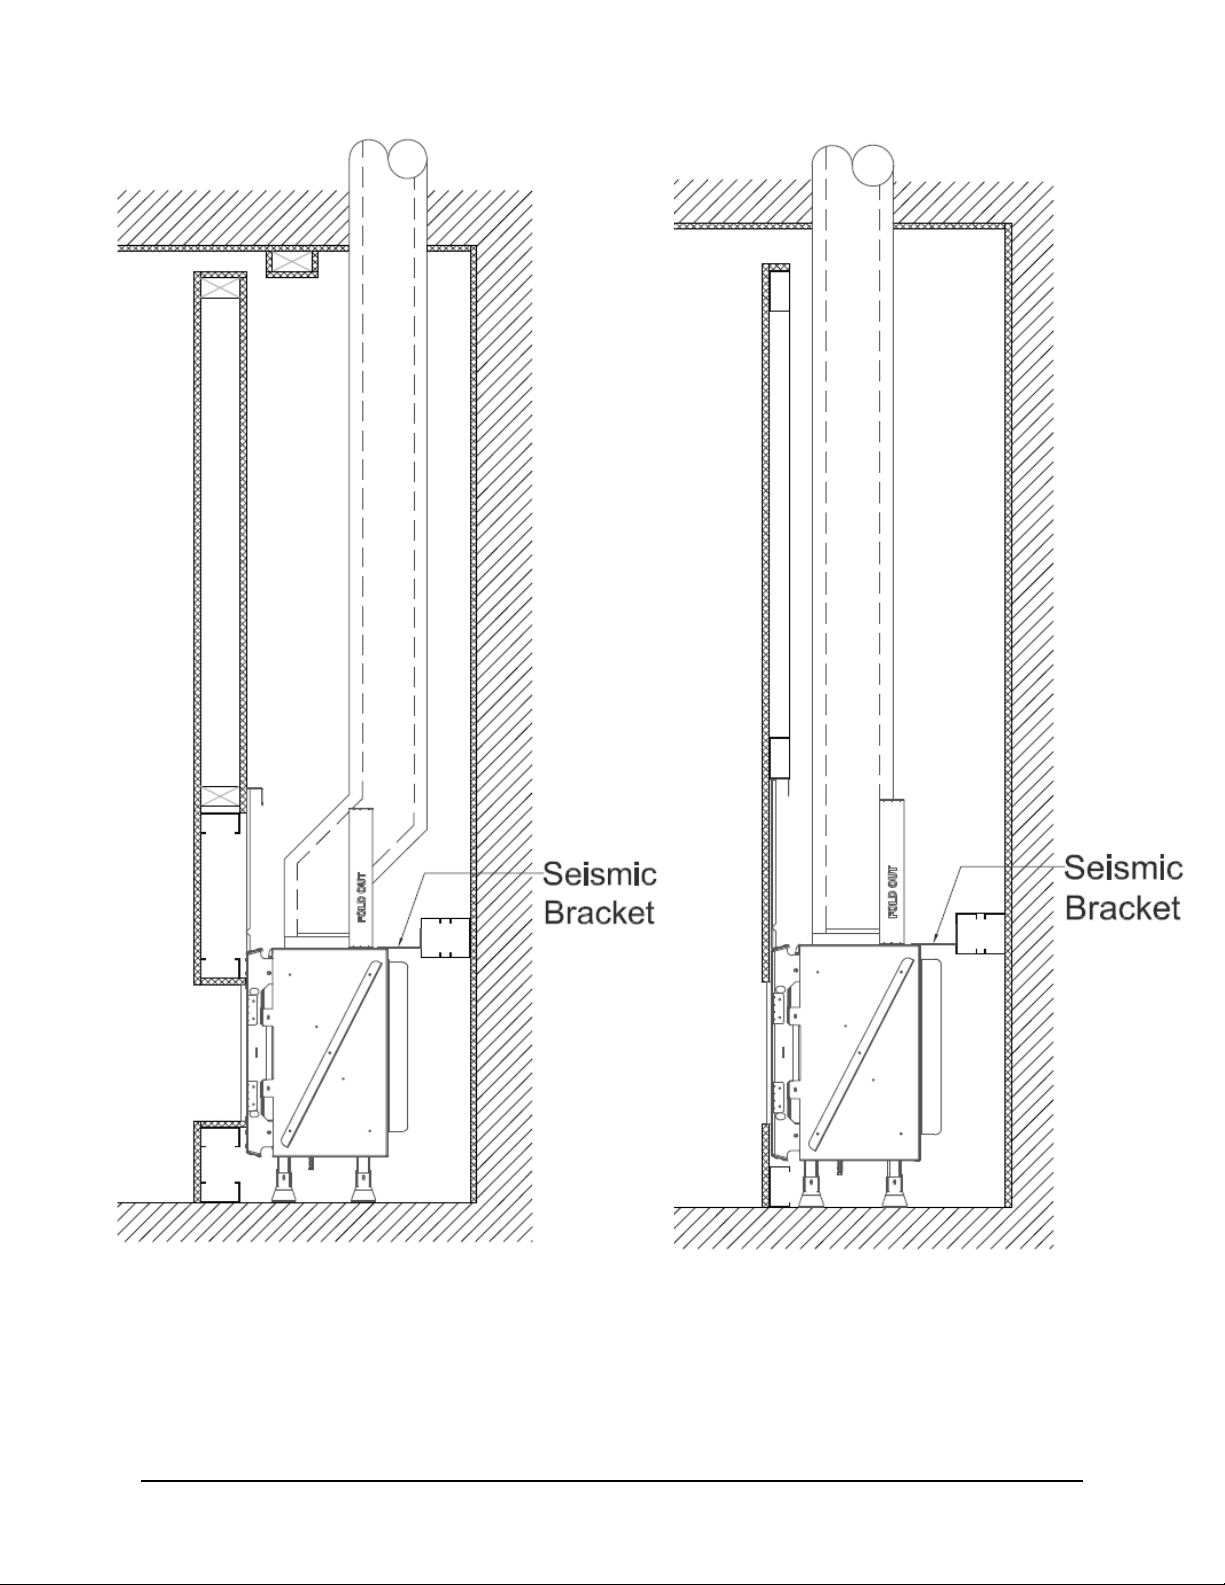
Heat Release
A heat release is required for Lyric models listed in this manual. This allows for heat within the chase (the
cavity the fireplace is built in) to be released back into the living space, helping to keep the fireplace wall
cool. It must be located at the top of the fireplace chase and be placed within 6 inches (0-6”) of the
fireplace chase ceiling (aka draft stop). It can be located on the front, sides or back of the fireplace chase,
as long as it is being released into an interior space. The heat release cannot be vented outdoors as this
would expose the fireplace to outdoor elements and compromise the building envelope. A minimum air
space is required per series:
Series 90-110: Minimum 124 sq. in. of free air space
Series 140: Minimum 200 sq. in. of free air space
These air space values are the minimum required; they can always be increased. The heat release can be
in the form of (but not limited to) a ventilation grill (louver), gap, or reveal. If using a grill, make sure that
the net free air space allowed in the louvered area is equal or greater than the minimum number of square
inches required per fireplace (as listed above).
The interior area of the fireplace cavity (in square inches) can never be less than your required heat release
size. The area of the fireplace cavity is determined by multiplying the cavity width by the cavity depth. See
section titled, “Chase Area Minimums” for details.
10 Lyric Installation Manual: Built-in Models, April 2019
Heat Release: Reveal and Gap
Heat Release – Reveal, Recessed (Section) Heat Release – Gap, Flush (Section)
Lyric Installation Manual: Built-in Models, April 2019 11
Heat Release: Ventilation Grill (Louver)
Heat Release – Louver, Recessed (Front Elevation) Heat Release – Louver,
Recessed (Section)

12 Lyric Installation Manual: Built-in Models, April 2019
Vertical Heat Release Designs
If your design cannot accommodate a horizontal heat release, a vertical heat release is acceptable.
Because heat rises, it will take longer for the heat to dissipate out of a vertically oriented heat release. To
compensate, a vertical heat release must be 30% larger than a horizontal heat release.
Series 40-110: Minimum 160 sq. in. of free air space for a vertical heat release
Series 140: Minimum 260 sq. in. of free air space for a vertical heat release
The heat release needs to start within 6 inches (0-6”) of the ceiling. The vertical heat release can be
applied using (but is not limited to) the following methods:
Front Split Vertical Heat Release
Front Split Vertical Heat Release (Front Elevation)

Lyric Installation Manual: Built-in Models, April 2019 13
Split Side Vertical Heat Release
Each half of the vertical heat release is put on each side of the fireplace cavity.
Left Side Vertical Heat Release (Side Elevation) Right Side Vertical Heat Release (Side Elevation)
Full Side Vertical Heat Release
The entire heat release is put on just one side of the fireplace cavity.
Full Side Vertical Heat Release (Right Elevation)
14 Lyric Installation Manual: Built-in Models, April 2019
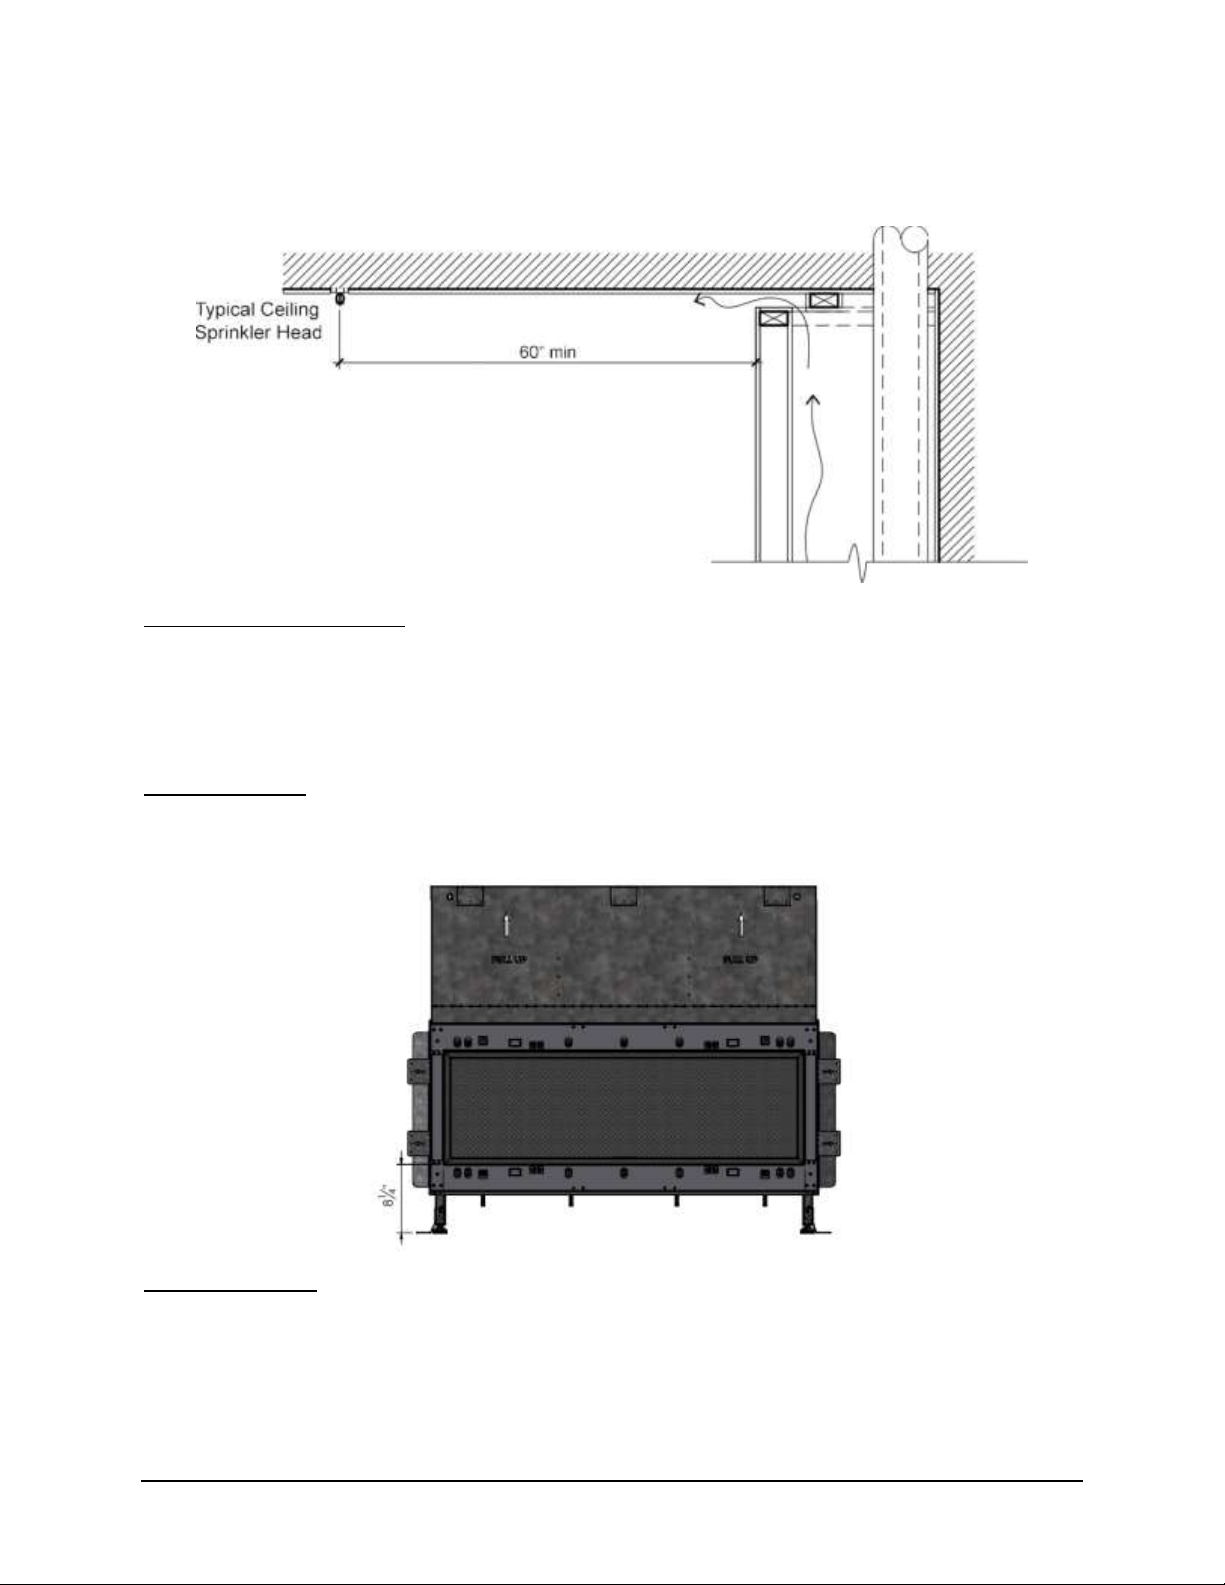
Sprinkler Clearance to Heat Release
In a situation where a sprinkler head is in close proximity to the heat release, the detail shown in the
diagram below
must
be followed. The distance between the sprinkler head to the heat release opening
cannot be less than 60 inches (linear length) from any point of the heat release opening.
Chase Area Minimums
No part of the fireplace chase can have a smaller area than the required heat release size for your model
(in square inches). See the section “Heat Release” to find your model’s minimum required heat release
size. The size of the smallest part your chase should not be less than the size of your required heat
release.
Fireplace Legs
The Lyric models listed in this manual come standard with legs. These legs ensure that there is enough air
flow under the fireplace for proper operation. The legs cannot be removed. Leg height Lyric fireplaces is
8
1
4
⁄ ” from the bottom of the glass opening to the floor:
Floor/Platform
A Lyric fireplace can be set on wood, concrete, metal and other typical solid floor types. Lyric fireplaces come
with legs that position the fireplace above the floor or platform on which they are installed. To lower the
fireplace, it must be recessed into the floor. The legs cannot be removed, cut or adjusted.
Lyric Installation Manual: Built-in Models, April 2019 15
To raise the fireplace, build a platform to which the fireplace can be secured. Platform must be stable and able
to bear the full weight of the fireplace. Platform can be constructed out of plywood, concrete, metal or any
other solid materials. Material does not have to be non-combustible.
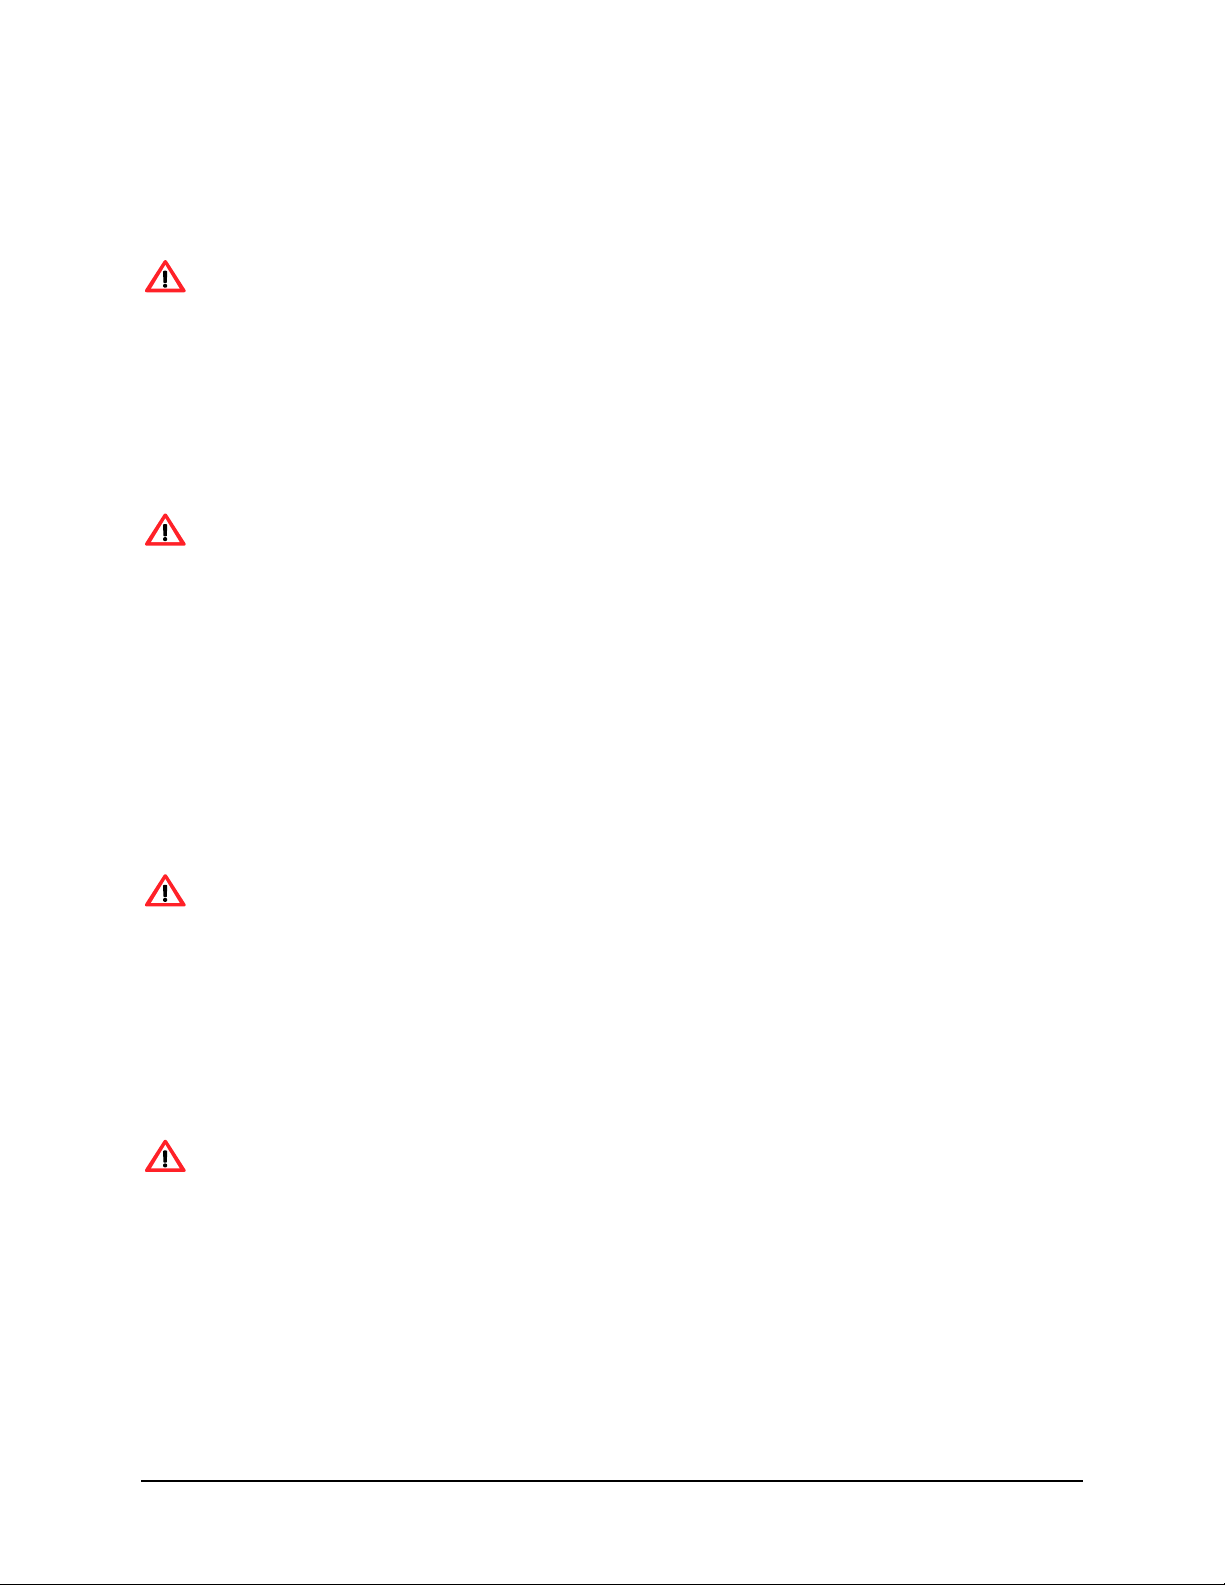
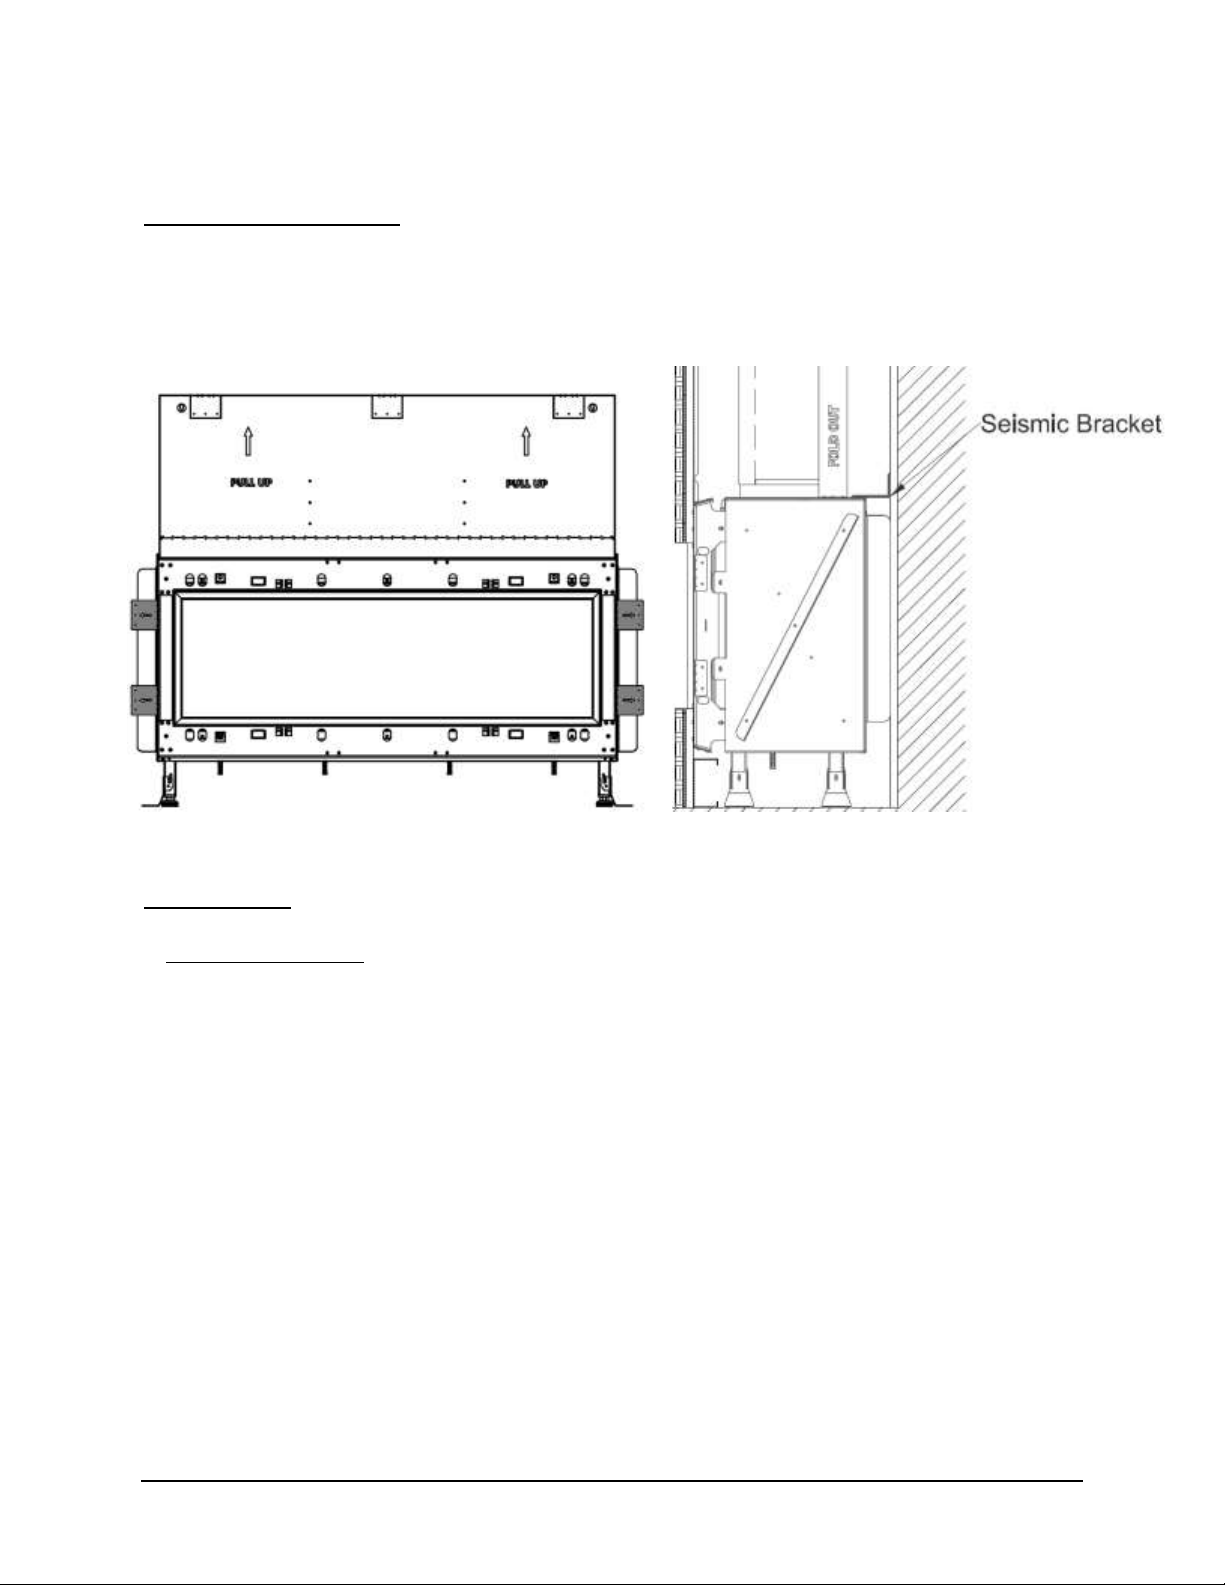
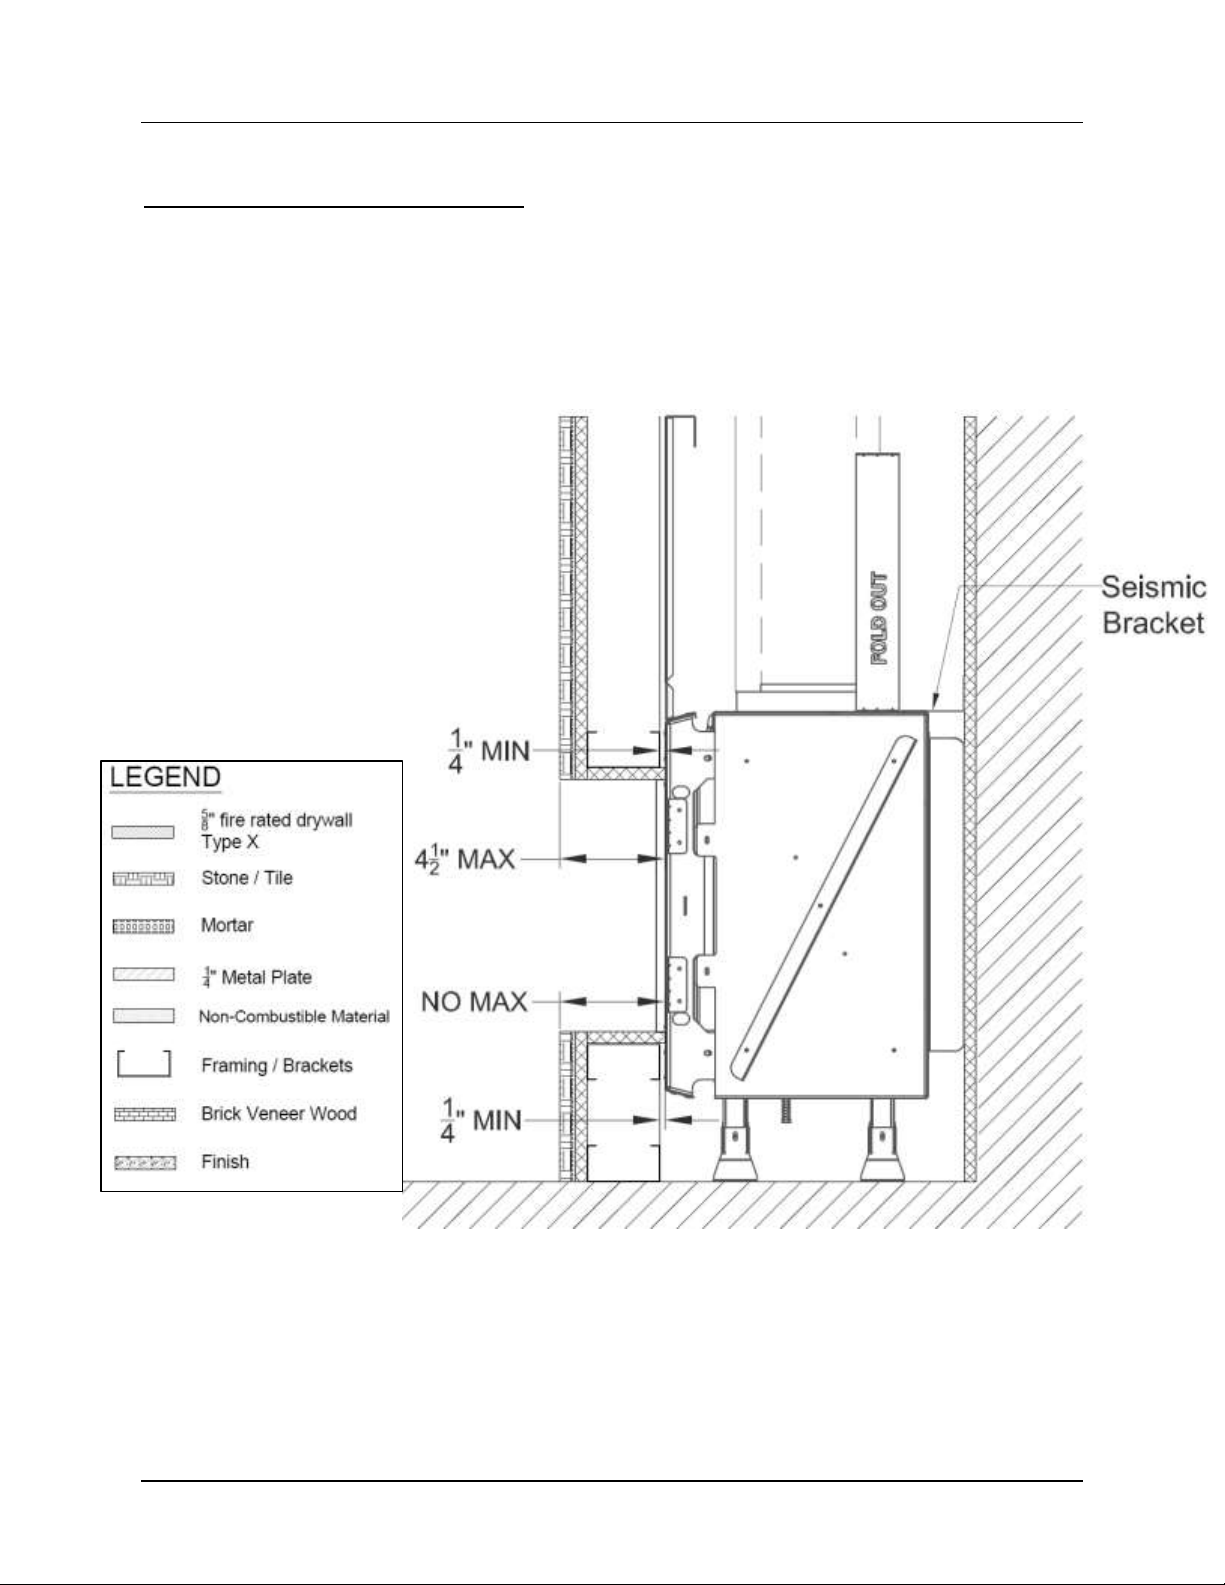
Securing the Fireplace
The fireplace has four total nailing flanges attached to the upper and lower sides of the front of the
fireplace body. Two seismic brackets on the top of the fireplace body are also supplied with the fireplace
for added security and stabilization. The nailing flanges and seismic brackets are to be attached into a
support structure upon installation. It is crucial to the finishing that the fireplace is stable, level and plumb.
Nailing Flanges Seismic Bracket
Access Panel
An access panel is not required by the manufacturer, but it may be required by the AHJ. An access panel
is highly recommended for all Lyric fireplaces mentioned in this manual. It allows for access to the
fireplace’s gas and electrical components for servicing.
Access Panel Size and Location Recommendations:
• Minimum of 10”x10” in size
• Located within 36” of the pilot (see “Gas Requirements and Setup” for diagram)
The size and location of the access panel may vary, but in all cases, it must allow the technician to
comfortably access and service the fireplace’s gas and electrical components. These components are
attached to the pilot on a flexible gas line and can be moved to any location within 36 inches of the pilot
(which is located at the center front of the burner).
For ease of access, move the fireplace’s gas and electrical components as close to the access panel as
possible. If there is any distance between the access panel and the gas and electrical components, it is
recommended to increase the size of the access panel accordingly. Prior to installation, fireplace
dealers/installers should work with their clients, project architects and/or interior designers to determine
the best size and location of their access panel.

16 Lyric Installation Manual: Built-in Models, April 2019
If an access panel cannot be incorporated, the alternative method of servicing the gas and electrical
components would be though the fireplace. This procedure requires removing the screen heat barrier,
internal glass panel, taking out the interior design media, and lifting the grill, burner and bottom pressure
release valve. This will increase service time and difficulty. An access panel is always preferred.
Fireplace dealers/installers are advised to consult with their clients regarding the advantages and
disadvantages of each service option.
Framing Requirements
The following sections show general framing requirements. Diagrams are shown with a flush wall application as
an example, but this is not the only type of application allowed. A recess of up to 4.5” over each glass opening
is allowed.
5/8” Type X Drywall Requirements
Framing must be covered completely with non-combustible material (as specified in the diagrams below) and
have the gaps sealed with a non-combustible fire sealant. We recommend using 5/8” Type X drywall (or
equivalent) with a level 1 finish (or better), but any building material that is equivalent to 5/8” Type X Drywall in
heat insulation (R-value and K-value). 5/8” Type X Drywall (or equivalent) must comply with ASTM C1396 ‐
Specification for Gypsum Board. Level 1 finish must be accordance with GA‐214 ‐ Recommended Levels of
Gypsum Board Finish.
Do not locate exposed 5/8” Type X Drywall joints directly above the fireplace. Plan to include weight of other
finish materials placed on the 5/8” Type X Drywall (or equivalent). If corner beads and other drywall trim are
required, use metal products where non‐combustible materials are required.
Fireplace-specific construction boards such as Promafour made by Promat are approved for use for added heat
protection. This is not a requirement.
The following diagrams show 5/8” Type Drywall (or equivalent) requirements for metal vs. wood framing.

Lyric Installation Manual: Built-in Models, April 2019 17
Wood Framing
5/8” Type X Drywall is required on the
interior (cladding the entire inner
cavity/chase) and exterior of the wood
framing. This provides heat protection for
both the combustible framing and your
finish material.
Wood Framing
Metal Framing
5/8” Type X Drywall is required on the exterior of the
metal framing only. This provides heat protection for
your finish material.
Metal Framing
NOTE: If you are putting a TV or artwork above the fireplace, you will need a layer of 5/8” Type X
Drywall (or equivalent) inside as well as outside your framing, regardless of framing material. See the TV
Detail section for more information.

18 Lyric Installation Manual: Built-in Models, April 2019
Framing Diagrams
The following diagrams show framing dimensions in a flush application as an example. A flush application is
not the only possible application for Lyric fireplaces. A recess of up to 4.5” over each glass opening is allowed.
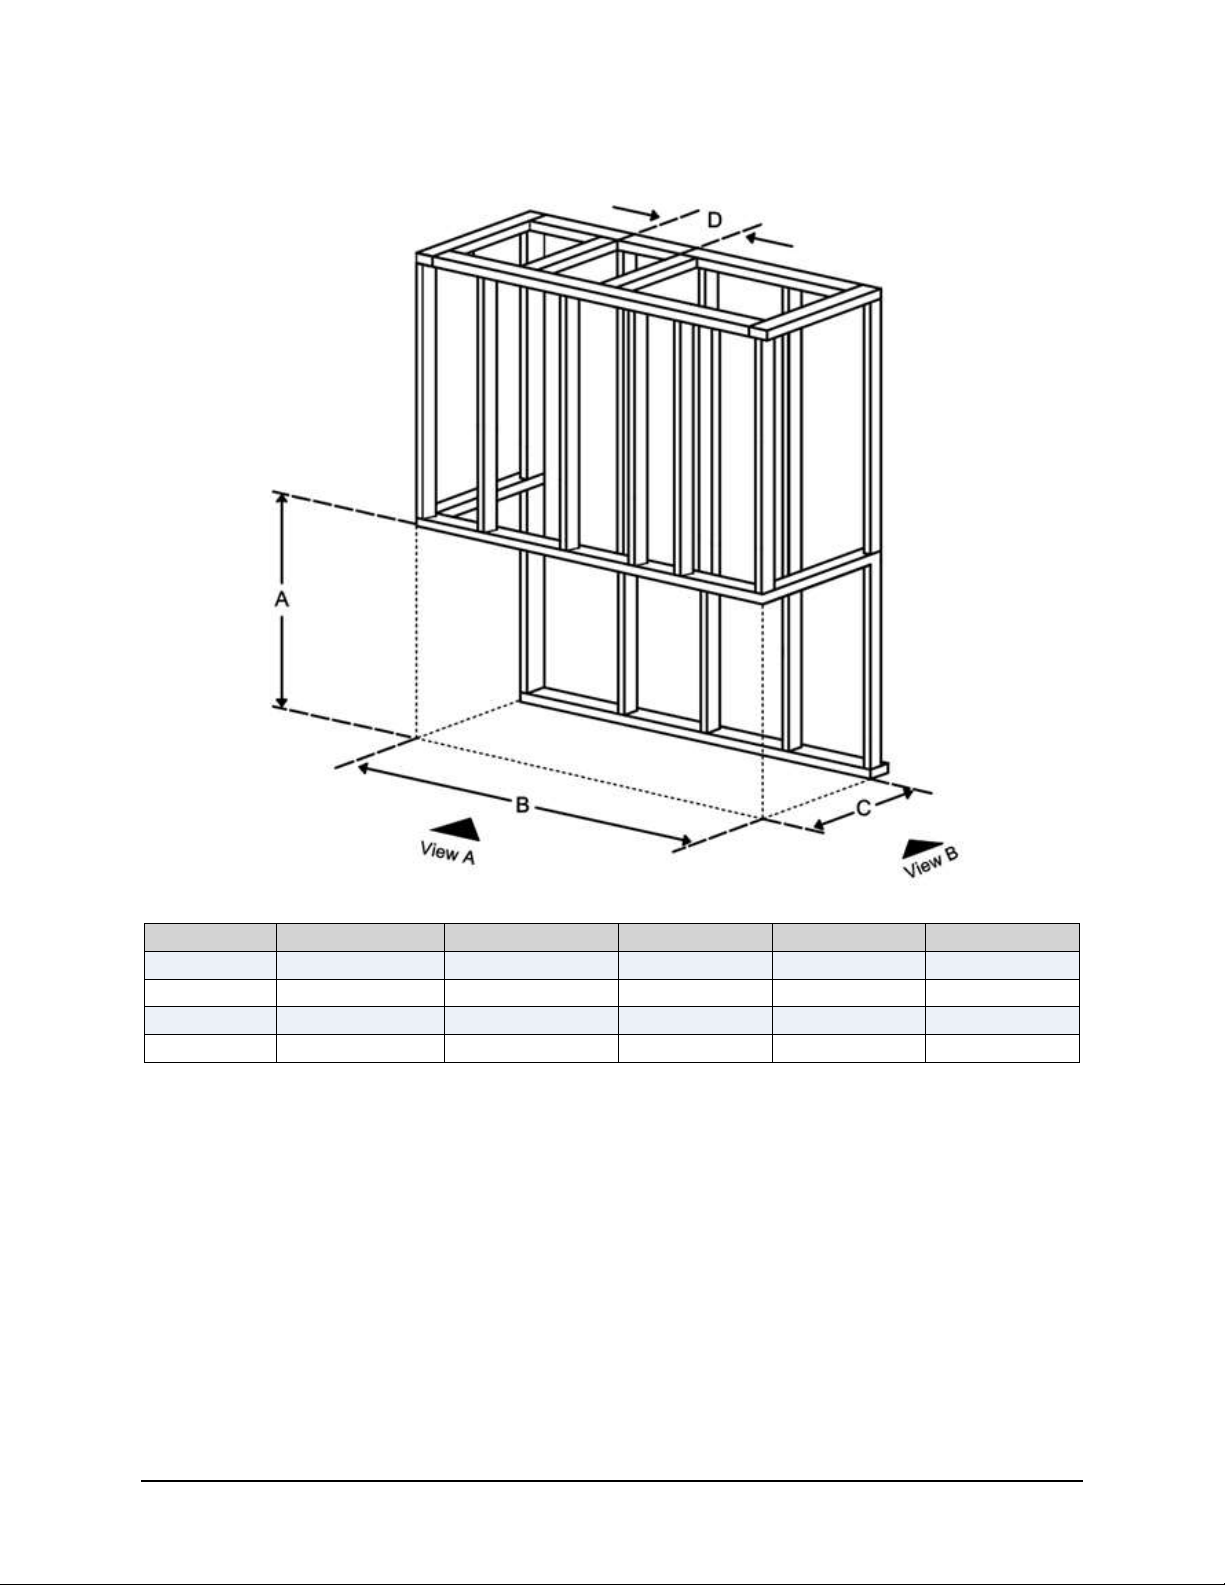
Front (F) Series Framing Diagram
Dimension A – Metal: fireplace height + 1/4" (for maneuvering)
Dimension A – Wood: fireplace height + 1/4” (for maneuvering)
Dimension B – Metal: fireplace width
Dimension B – Wood: fireplace width + 5/8” + 5/8” (type X drywall on either side)
Dimension C – Metal: fireplace depth – 1/2" (drywall lip)
Dimension C – Wood: fireplace depth – 1/2" (drywall lip) + 5/8” (type X drywall)
Dimension D – Metal: pipe diameter + 1” right side clearance + 1” left side clearance
Dimension D – Wood: pipe diameter + 1” right side clearance + 1” left side clearance
*If you plan on putting a TV or artwork over the fireplace, use Wood framing values.
Model
Framing
Dimension A
Dimension B
Dimension C
Dimension D
90 F
Metal*
42-1/16”
43-7/8”
16-5/16”
10”
90 F
Wood
42-1/16”
45-1/8”
16-15/16”
10”
90H F
Metal*
42-1/16”
43-7/8”
16-5/16”
10”
90H F
Wood
42-1/16”
45-1/8”
16-15/16”
10”
110 F
Metal*
42-1/16”
50-7/8”
16-5/16”
10”
110 F
Wood
42-1/16”
52-1/8”
16-15/16”
10”
140 F
Metal*
42-1/16”
63-9/16”
16-5/16”
10”
140 F
Wood
42-1/16”
64-13/16”
16-15/16”
10”
Lyric Installation Manual: Built-in Models, April 2019 19
Corner (RS/LS) Series Framing Diagram
Dimension A – Metal: fireplace height + 1/4” (for maneuvering)
Dimension A – Wood: fireplace height + 1/4” (for maneuvering)
Dimension B – Metal: fireplace width – 1/2" (drywall lip)
Dimension B – Wood: fireplace width – 1/2" (drywall lip) + 5/8” (type X drywall)
Dimension C – Metal: fireplace depth – 1/2" (drywall lip)
Dimension C – Wood: fireplace depth – 1/2" (drywall lip) + 5/8” (type X drywall)
Dimension D – Metal: pipe diameter + 1” right side clearance + 1” left side clearance
Dimension D – Wood: pipe diameter + 1” right side clearance + 1” left side clearance
*If you plan on putting a TV or artwork over the fireplace, use Wood framing values.
Model
Framing
Dimension A
Dimension B
Dimension C
Dimension D
90 RS/LS
Metal*
42-1/16”
40-3/8”
18-15/16”
10”
90 RS/LS
Wood
42-1/16”
41”
19-9/16”
10”
110 RS/LS
Metal*
42-1/16”
47-7/16”
18-15/16”
10”
110 RS/LS
Wood
42-1/16”
48-1/16”
19-9/16”
10”
20 Lyric Installation Manual: Built-in Models, April 2019
See Through (ST) Framing Diagram
Dimension A – Metal: fireplace height + 1/4” (for maneuvering)
Dimension A – Wood: fireplace height + 1/4” (for maneuvering)
Dimension B – Metal: fireplace width
Dimension B – Wood: fireplace width + 5/8” + 5/8” (type X drywall on either side)
Dimension C – Metal: fireplace depth – 1/2"– 1/2" (drywall lips)
Dimension C – Wood: fireplace depth – 1/2"– 1/2" (drywall lips)
Dimension D – Metal: pipe diameter + 1” right side clearance + 1” left side clearance
Dimension D – Wood: pipe diameter + 1” right side clearance + 1” left side clearance
*If you plan on putting a TV or artwork over the fireplace, use Wood framing values.
Model
Framing
Dimension A
Dimension B
Dimension C
Dimension D
110 ST
Metal*
42-1/16”
51-9/16”
15-3/4”
10”
110 ST
Wood
42-1/16”
52-13/16”
15-3/4”
10”
Lyric Installation Manual: Built-in Models, April 2019 21
Three Side (TS) Framing Diagram
Dimension A – Metal: fireplace height + 1/4” (for maneuvering)
Dimension A – Wood: fireplace height + 1/4” (for maneuvering)
Dimension B – Metal: fireplace width – 1/2"– 1/2" (drywall lips)
Dimension B – Wood: fireplace width – 1/2"– 1/2" (drywall lips)
Dimension C – Metal: fireplace depth – 1/2” (drywall lip)
Dimension C – Wood: fireplace depth – 1/2” (drywall lip) + 5/8” (type X drywall)
Dimension D – Metal: pipe diameter + 1” right side clearance + 1” left side clearance
Dimension D – Wood: pipe diameter + 1” right side clearance + 1” left side clearance
*If you plan on putting a TV or artwork over the fireplace, use Wood framing values.
Model
Framing
Dimension A
Dimension B
Dimension C
Dimension D
90 TS
Metal*
42-1/16”
38-7/8”
18-15/16”
10”
90 TS
Wood
42-1/16”
38-7/8”
19-9/16”
10”
110 TS
Metal*
42-1/16”
45-15/16”
18-15/16”
10”
110 TS
Wood
42-1/16”
45-15/16”
19-9/16”
10”
22 Lyric Installation Manual: Built-in Models, April 2019
Clearance & Finish Diagrams
General Clearance Requirements
Maintain clearances as shown in the following figures.
Fireplace Recess/Overhang: A recessed fireplace cannot be have a top overhang deeper than 4-1/2”
(including finish materials). This restriction applies to all glass sides in multisided fireplaces as well. Bottom
recess (called “hearth extension”) has no minimum or maximum requirements.
Framing Clearance: Maintain ¼” of space between your framing and the fireplace.

Lyric Installation Manual: Built-in Models, April 2019 23
Clearance to Furniture & Other Combustibles
Furniture and other combustibles are not permitted within 36” of the fireplace glass. 36” clearance only
applies to area directly in front of the fireplace glass. Space above and below fireplace glass is not included in
this clearance requirement. The diagram below shows a Three Side model as an example.
Combustible Clearance Diagram (Plan View)
Inside Corner Clearances
The diagram below shows inside corner options. No combustible material should be placed within
the dimensions shown. This diagram only applies if there is a wall on one or both sides of the
fireplace.
 Loading...