

Page 1

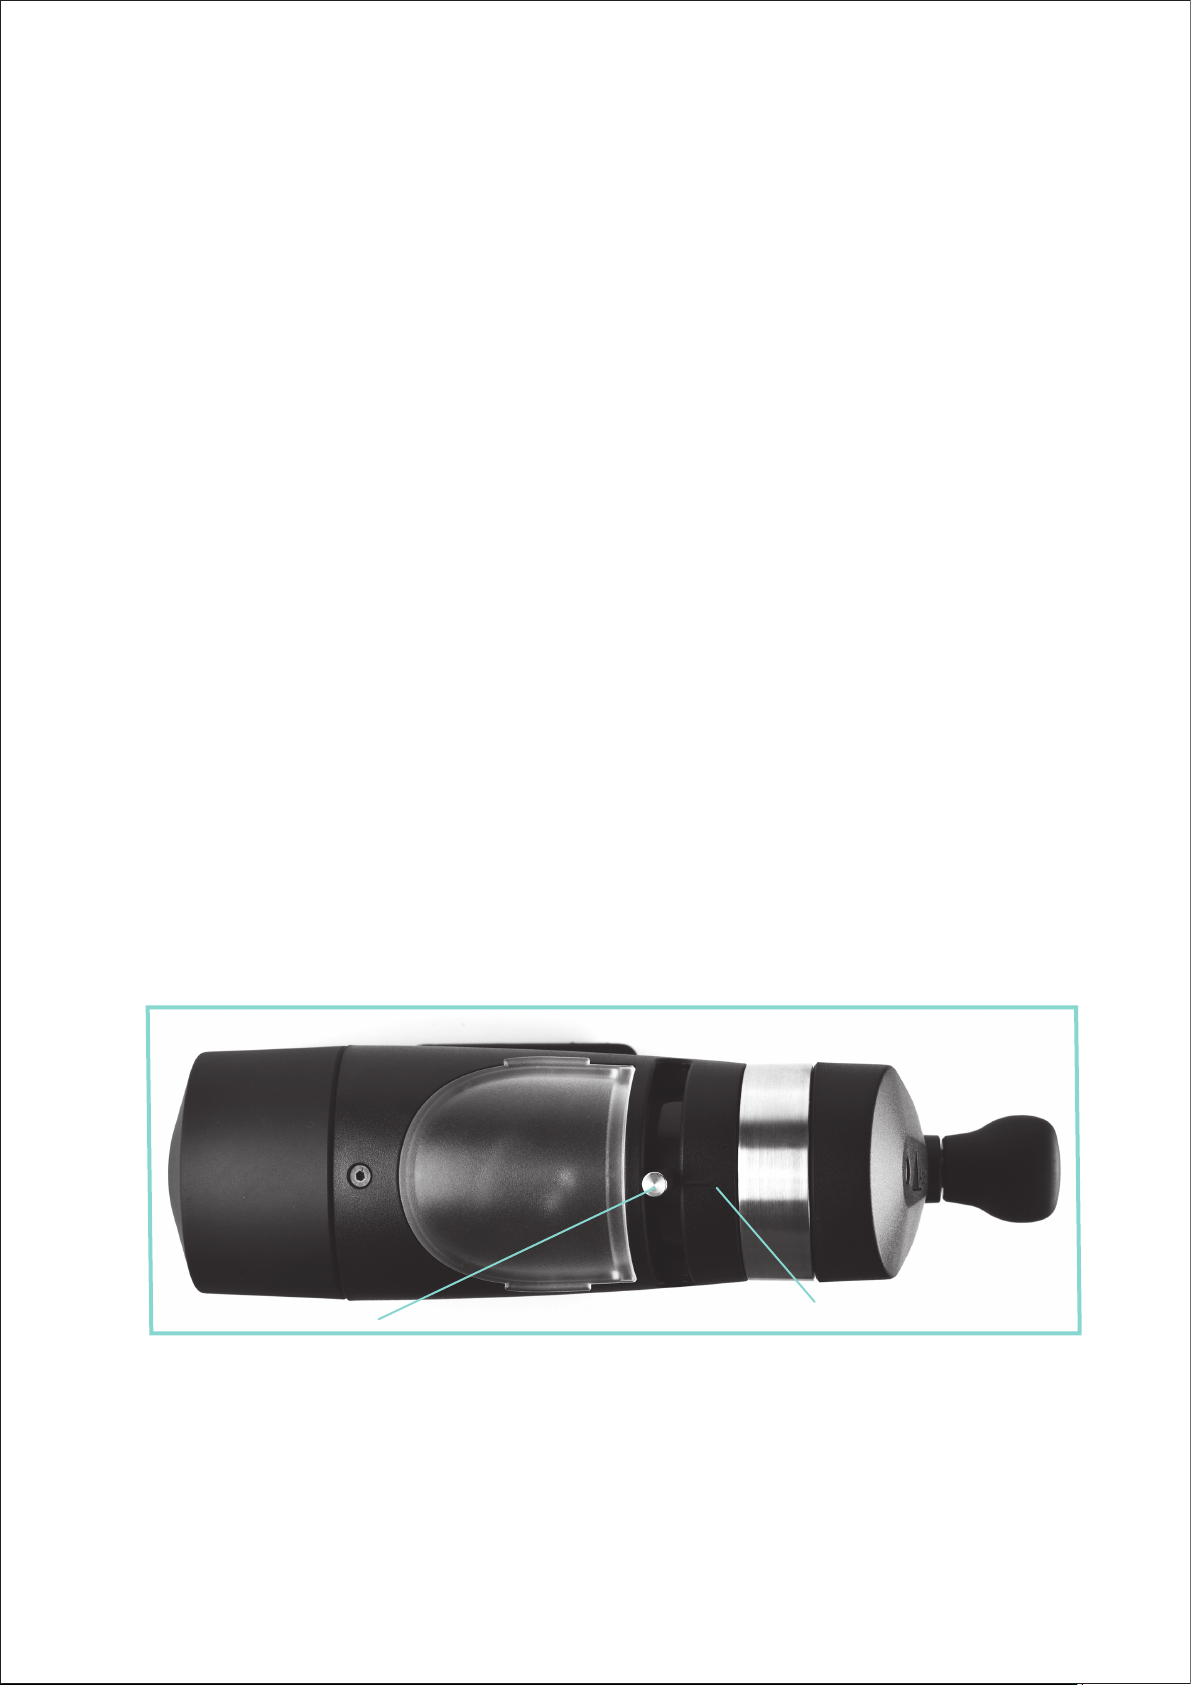
Adjustment Lever
Hopper Cover
Back Cover
Bean
Hopper/
Body Cover
Handle
Knob
Planetary
Gear Box
Grounds Chute
Inner Frame
Catch Glass
Silicone
Base Cover
IMPORTANT
Read Before Grinding:
The OE Apex is unlike other hand coffee grinders.
It uses a Planetary Gear System to provide the needed speed for efficient grinding.
One turn of the handle turns the burr 4 times.
Burr speed is essential to provide the power to grind the beans.
We recommend a handle turn speed of about 120 turns per minute.
As you turn the handle, you are turning the Planetary Gear - NOT the burr.
Unlike direct drive systems found in most hand grinders where 1 handle turn equals 1 burr turn
BRUTE FORCE does not work with the OE Apex Grinder.
If the grinding action stops DO NOT PUSH HARDER ON THE HANDLE.
Just reverse direction of the handle to reposition the beans, and start again, spinning up to your target RPM.
The burrs are bi-directional, and reversing does not affect the burrs or the grind consistency.
Page 2
In the box:
-- OE Apex Manual Coffee Grinder
-- Hand Made Glass Catch Jar
-- Silicone Base Cover
-- Handle with knob
-- Parts Bag containing:
-- Handle Screw
-- 6 Silicone Reusable Sticky Gel Pads
-- 3 L-Key Hex Wrenches: 2.5mm, 3mm, 4mm
-- Anti Static Brush
Set up for use:
Attach the handle using the provided screw, and the large (4mm) hex tool. The handle to shaft
fitting is quite tight - make sure you have the handle aligned to the shaft before pushing it down all
the way. Insert & tighten the handle screw.
From experience with manual coffee grinding, we have found that the ‘holding hand’ does much more
work than the ‘turning hand’. The OE Apex is no different than any other hand grinder in this regard holding the grinder in place is the larger challenge. Depending on the beans you use (roast level, age,
fineness level of the grinding) and your worktop, various approaches can be used:
1. As-is: 4 Silicone feet already in place will stabilize the grinder under many circumstances, in particular
grinding darker roasts (soft beans) and in mid range grind settings. This method requires the most work
with the holding hand, pushing straight down on the grinder to hold it in place while you grind.
2 If using on a smooth worktop or counter, install the 6 reuseable non-marking sticky gel pads on the
bottom of the grinder. This method requires moderate holding hand pressure to hold the grinder in place.
3. Affix the OE Apex to a worktop, or HEAVY cutting board, using bolts or screws through the 4 provided
holes in the metal base. This method provides total stability, and in general, one hand operation.
No holding hand required.
RIGHT hand view
Coarse
-
Adjustment Lever
Fine
Center mark of range
Setting the Grind Size:
Your OE Apex arrives set up for right hand operation... When facing the grinder the handle is on your right
- in this position the finest grind setting is at the front, the coarsest is at the back. There are 20 steps
available for the grind range. From the finest setting to the coarsest setting the burrs will open a total
of 1.5mm. The range is set at the factory and can not be changed by the user. The raised mark on
the outer housing is halfway in the range. Once the burr is loaded with beans it is difficult to move the
grind setting in a finer direction, so set before grinding the beans!
For Left hand operation please see the appropriate section of the manual, and the video
available to show you how to re-wrap the auger spring.
Page 3

Using the OE Apex:
As mentioned in the cover page “Important Read This” section, maintaining an adequate & consistent
handle speed is important for the efficient & satisfying use of the grinder. Depending on your worktop
application, using the grinder is as simple as setting the grind, and grinding the beans.
Here’s a few tips & observations:
When you first begin to grind the beans there will be a short lag of a few turns while the burrs load with
beans and grounds - this is normal.
Our target burr speed is about 500 RPM. Turning the handle about 120 RPM will provide that speed.
There are Metronome videos on Youtube which are VERY helpful to get a feel for this - or you can use a
real life Metronome!
As a rule of thumb, if your grinder is continually stopping you aren’t turning the handle fast enough.
If and when your burrs stop while grinding just reverse the handle direction - 1/4, or 1/2 turn is enough to
reposition the beans, and get a fresh start on your speed. You will get a feel for this fairly quickly!
If the burrs stop, and feel ‘stuck’, rock the handle back & forth to dislodge the beans. The burrs are
bi-directional, and will cut through.
Once again - BRUTE FORCE IS NOT HELPFUL for grinding coffee beans with the OE Apex.
The handle motion can best be described as ‘spinning’ the handle. You’ll find it to be generally effortless
with little feeling of resistence except for the finest, and coarsest settings. This is because on the finest
settings the burrs are fully loaded as you grind, and much of the work of the burrs is expelling the grounds.
On the coarsest settings the number of beans broken per revolution is very high resulting in an increased
feeling of resistence while grinding.
If your worktop installation & beans require the use of your ‘holding hand’ it is best to place your hand in
the center of the grinder body - not on the heel of the grinder. Your hand should cover approximately
the lower half of the hopper cover.
OE Apex Mechanicals
Parts first! The construction of the OE Apex is such that all of the mechanical components are
contained in one main part of the grinder - the Chassis. The Chassis is a die cast aluminum frame
with roller bearings on each end. A precision stainless steel axle is mounted in the roller bearings.
Chassis
Roller
Bearings
The Keyed Sun Gear
of the Planetary Gear Box
is press-fit on the end of the axle.
OE Apex Triangular Prism Tooth Burr Set
Page 4

All of the functional components are either mounted ON the axle, or centered in relation to
the axle. Once assembled, the Chassis and grinding system consists of 4 chambers:
End Plate
Tensioning
Spring
Axle
Needle Bearing
Set
Tensioning
Chamber
Roller
Bearing
(not visible)
Grind
Chamber
78mm Rotating
Burr
Carrier
Burr
Hopper
Chamber
Auger Spring Mount
& Axle Cover Tube
75mm Stationary
Burr
Auger Spring
Needle Bearing
(not visible)
Adjustment
Chamber
Roller
Bearings
(not visible)
Set
Adjustment
Wheel
Adjustment
Ramp
Sun Gear
Mounted on
Axle
Final assembly of the Chassis mounted drive system includes the Grind Chamber Cover, and
Adjustment Chamber Cover / Support.
Grind Chamber
Cover
Integral Chassis
Grounds Chute
Adjustment Chamber
Cover
Please NOTE: We are presenting a lot of information about the mechanics, and internals of the
OE Apex - this is for your information, and NOT an open invitation to disassemble the grinder
beyond
the Deep Cleaning Instructions. If you pull the axle in order to hold the burr set in your hand you
have entered into an area that is purely recreational. You do so at your own risk, and expense, if
you are unable to reassemble it yourself. Pulling the axle is NOT recommended. or endorsed, and
will void your warranty. Don’t do it....
Page 5

The operative speed for the OE Apex is achieved by the use of a Planetary Gear system
mounted on the handle side of the grinder.
Sun Gear
Mounted on
Axle End
Aluminum Gear
Box Outer Housing
Planetary Gears
& Ring Gear
Planetary Gear Assembly
Alignment Pin
Ring Gear Anchor Screw Hole
The Planetary Gear Box on the OE Apex functions to INCREASE the rotational speed of the burr.
The Ring Gear is held stationary to the Housing. The Handle turns the Planet Gears, which then
turn the Sun Gear, resulting in a 1:4 Speed Increase - one turn of the handle turns the burr 4 times.
Cleaning and Maintenance
-- The Adjustment Chamber requires no cleaning or maintenance.
-- The Hopper Chamber can be swept clean with a brush, puffed clean with compressed air,
or vacuumed out.
-- The Tensioning Chamber is isolated from the Grounds Chamber by the Grounds Chamber
Cover and accumulates few, if any, coffee bits.
-- This brings us to the Grind Chamber. You can generally clean any accumulated coffee bits
from the Grind Chamber without disassembly by using compressed air. A rubber bulb hand
puffer with the nozzle directed up through the Grinds Chute works well.
-- The Triangular Prism Tooth burr is made of hardened stainless steel, therefore free of rust, or
other problems. Any retained coffee in the burrs is generally expelled through grinding or
turning the handle while opening/closing the burrs using the Grind Setting Adjuster.
You may desire to manually deep clean the Grind Chamber of the OE Apex grinder. We find
this isn’t generally necessesary, but if you’re motivated to do this task, this is how you do it:
A narrative description of this procedure is that you disassemble the grinder from the handle end.
You remove the Planetary Gear Box (PGB), remove the Outer Cover, detach the Chassis and Inner
Frame from the outer parts of the body, do the cleaning, and put it all back together. What
follows is a step by step guide to this process.
1. Do NOT remove Handle - Leave Handle attached to the Planetary Gear Box (PGB).
2. Remove the Ring Gear Anchor screw - 3mm Hex. Slide the internal PGB Assembly with Handle
attached straight out of the aluminum housing. This has a VERY tight tolerance - slide the PGB STRAIGHT
out of the housing to avoid jamming.
Page 6

3. Remove the 3 screws which hold the PGB Housing to the body. (Note - these are longer than the
Ring Gear Anchor screw. Lift away the Housing and set aside.
4. Remove the Adjustment Lever Pin (unscrew CCW) and remove the small screw on the top of the
plastic Body Cover - 2.5mm Hex.
6. Slide off the plastic Body Cover and remove the Adjustment Chamber Cover.
7. Remove the 3 screws holding the Inner Frame to the Back Cover. WHILE supporting the Chassis with
one hand, remove the single Back Cover external screw (4mm Hex). The Chassis and Inner Frame will
pull out as one unit.
Page 7

8. You now have complete access to the Grind Chamber. Lift off the Grind Chamber Cover, brush,
clean, etc.
9. Assembly is the reverse - Remember to replace the Grind Chamber Cover. Finger tighten the 3
screws of the Inner Frame, fully tighten the Outer Back Cover screw, then finish tightening the inner 3
screws. Place the Adjustment Chamber Cover in position. Install the Body Cover. Install small top
screw in the Body Cover Do NOT overtighten the screw.
10. Install the PGB Outer Housing using the 3 longest screws. Our factory orientation of this part has the
screw hole on the bottom for cosmetic reasons - you can install it with the screw hole on either side
instead for easier future access.
Here is the tricky part to this step - Align the Ring Gear Anchor hole perfectly to the outer Housing hole.
The PGB MUST be inserted precisely and squarely so it will slide in smoothly without binding. Once it is in
the proper position the Planetary Gears must be meshed with the Sun Gear - while holding the Handle/
PGB in place wiggle the Auger back & forth a little bit to mate the gears. The PGB will drop into place
when they mesh. Install the Ring Gear Anchor screw. Install the Adjustment Wheel Lever. You are done!
Setting up for Left Hand operation:
Your grinder will arrive set up for Right hand operation - holding with the left hand, turning the handle with
the right hand. The Auger Spring is wrapped in the Right hand use direction. The burr is bi-directional so
for TRUE Left Hand operation you will need to re-wrap the spring in the opposite direction so that beans
will properly feed into the burrs.
If you are Left handed we assume you have a high level of motivation to undertake this somewhat
difficult task. We also assume you have a reasonable mastery of tools and will proceed safely. This
procedure is easier to do with the help of an assistant acting as a third hand!
Page 8

Referring to the previous section - deep cleaning - proceed through Steps 1-6. This opens up the top
of the grinder so you have access to the Auger Spring screws.
A. Set the grind to the finest setting (this will allow better access to the lower Auger Spring screw).
Loosen and remove the upper Auger Spring screw WHILE holding the end of the spring to prevent it
from snapping back. (2.5mm Hex)
B. Slightly loosen the lower Auger Spring screw just enough so that the spring loop can move under the
screw head. Re-wrap the spring in the opposite direction by turning the Sun Gear/Axle - easiest to turn
this by protecting your fingers - wear glove, a leather pad - the Sun Gear is sharp! This is where an
assistant comes in handy! From the point of origin of the lower Auger Spring screw wrap the spring 2 1/2
times (the upper & lower Auger Spring screws are opposite each other when the spring is wrapped 2 1/2
times). You will need to stretch the spring, which gets especially difficult in the last 1/2 wrap. Insert the
upper Auger Spring screw in the loop of the Auger Spring, and into the Auger Shaft (be sure it is straight
in). Tighten the screw. Check the orientation of the spring, making sure it is evenly wrapped, then
tighten the lower Auger Spring screw.
This is how the Left Hand Auger Spring looks when done:
To reassemble proceed with Deep Cleaning Steps 9 - 10 .
Maintenance
The OE Apex requires very little maintenance:
-- Outer body parts can be wiped with a clean, soft cloth
-- Silicone Base Cover can be washed in mild soap & water
-- Reuseable Silicone Base Gel Pads can be washed in mild soap & water, and air dried
(Make sure both the counter, and base of the grinder are clean before applying gel pads)
We hope you enjoy your grinder, and the coffee you make with it!
Doug & Barb Garrott
Orphan Espresso
11/14/2018
 Loading...