

Page 1

Smartfind G8 AIS
Smartfind G8
Smartfind E8
EPIRB-AIS
USER MANUAL
Page 2

Page 3

This manual is applicable to the Smartfind G8 AIS, Smartfind G8 and Smartfind
ONLY IN EMERGENCY
FALSE ALERTS
ENDANGER LIVES.
1. Remove the EPIRB
completely from its
bracket (left) or
enclosure (right).
The enclosure is
spring loaded to automatically release the
EPIRB if your vessel
sinks.
2. If time permits, lift
the red “ON” cover,
then press the
activation button for 2
seconds.
3. Uncoil the EPIRB’s
lanyard and tie it to the
life raft. Throw the
EPIRB into the water
(it will self-activate if
you did not have time
to press the activation
button).
E8 EPIRBs. The G8 models contain a GNSS receiver for improved positional
accuracy; some parts of this manual are applicable only to the G8 models and are
marked accordingly.
Page 4

Page 5

CONTENTS
1 SAFETY NOTICES ........................................................... 1
1.1 Use ............................................................................................. 1
1.2 Testing, maintenance and disposal ............................................ 1
1.3 Hazards ...................................................................................... 1
1.4 EC Declaration of Conformity ..................................................... 1
1.5 FCC Compliance ........................................................................ 1
1.6 Response time ........................................................................... 1
1.7 Disclaimer ................................................................................... 1
2 MANDATORY REGISTRATION ....................................... 2
2.1 Overview .................................................................................... 2
2.2 How to register ........................................................................... 2
3 DESCRIPTION .................................................................. 3
3.1 EPIRB controls and indicators ................................................... 4
3.1.1 Top view ........................................................................ 4
3.1.2 Back view ...................................................................... 5
3.2 Carry handle ............................................................................... 6
3.3 Manual bracket ........................................................................... 7
3.4 Float-free enclosure ................................................................... 8
3.4.1 Automatic activation ...................................................... 8
3.4.2 Manual activation........................................................... 8
4 EMERGENCY PROCEDURE ............................................ 9
4.1 Abandon ship! ............................................................................ 9
4.1.1 Float-free enclosure..................................................... 10
4.2 Release from manual bracket .................................................. 10
4.3 Release from float-free enclosure ............................................ 11
4.4 Manual activation ..................................................................... 12
4.5 Optimising onboard performance ............................................. 13
4.6 Deactivation .............................................................................. 14
4.7 Stowage ................................................................................... 15
4.7.1 Manual bracket ............................................................ 15
4.7.2 Float-free enclosure..................................................... 16
5 FALSE ALERTS ............................................................. 18
5.1 Notify rescue services .............................................................. 18
5.2 Deactivate the EPIRB............................................................... 18
5.3 Faulty EPIRB ............................................................................ 18
6 INSTALLATION .............................................................. 19
6.1 Manual bracket ......................................................................... 19
6.1.1 Siting ............................................................................ 19
Page 6

6.1.2 Mounting procedure ..................................................... 19
6.1.3 Mounting instruction plate ............................................ 20
6.2 Float-free enclosure .................................................................. 21
6.2.1 Siting ............................................................................ 21
6.2.2 Mounting procedure ..................................................... 22
6.2.3 Mounting instruction plate ............................................ 23
6.2.4 HRU expiry date ........................................................... 23
6.2.5 Marking vessel name ................................................... 23
7 MAINTENANCE ............................................................. 24
7.1 Servicing schedule .................................................................... 24
7.2 Self-test & inspection ................................................................ 25
7.2.1 Short self-test ............................................................... 25
7.2.2 Long self-test (GNSS variants only) ............................ 26
7.3 Mechanical inspection .............................................................. 27
7.4 HRU replacement ..................................................................... 28
7.5 Battery maintenance ................................................................. 31
7.5.1 Battery replacement ..................................................... 31
7.5.2 Battery removal ............................................................ 31
7.6 Transportation ........................................................................... 33
7.7 GMDSS inspections .................................................................. 33
8 END OF LIFE STATEMENT ........................................... 34
8.1 Disposal .................................................................................... 34
9 TECHNICAL SPECIFICATION ....................................... 35
10 PRODUCT WARRANTY ................................................ 36
10.1 Orolia Ltd Warranty Registration .............................................. 36
10.2 Warranty Statement .................................................................. 36
11 HOW DOES IT WORK? ................................................. 38
12 COSPAS-SARSAT SATELLITE SYSTEM ..................... 39
12.1 The Search And Rescue (SAR) process .................................. 39
12.2 Global Navigation Satellite System (GNSS) ............................. 40
12.3 MEOSAR Compatibility Explained ............................................ 40
13 HOW TO REGISTER YOUR EPIRB ............................... 42
13.1 Emergency contact ................................................................... 42
13.2 Registration Information for Australia & New Zealand.............. 43
13.2.1 Advice for EPIRB purchase or transfer ........................ 43
13.3 Online warranty registration ...................................................... 44
13.4 Radio licence ............................................................................ 44
13.5 Sale or transfer ......................................................................... 44
Page 7

1 SAFETY NOTICES
1.1 Use
An EPIRB (Emergency Position Indicating Radio Beacon) is for use in maritime
emergencies and is approved for these contingencies. It is not designed or
recommended for use on land or in the air.
Use the EPIRB only in situations of grave and imminent danger. False alerts
endanger lives. Help to prevent them; understand how to activate and deactivate
your equipment. Intentional false alerts may involve penalties.
Read the complete manual before installing, testing or using the EPIRB.
Ensure the EPIRB is registered with your local authorities (Flag State nation) – see
page 2.
1.2 Testing, maintenance and disposal
Ensure you test the EPIRB monthly – see page 25.
The EPIRB contains no user serviceable parts. The battery pack contains lithium
metal batteries. Do not incinerate, puncture, deform or short-circuit. If you need to
dispose of batteries or the complete EPIRB – see page 34. Return to your dealer
for service – see page 24.
1.3 Hazards
This EPIRB emits radio frequency radiation when activated. It is advisable not to
handle the antenna while the EPIRB is activated.
It is not advisable to stare directly at the strobe lights.
1.4 EC Declaration of Conformity
Hereby Orolia Ltd declares that this EPIRB is in compliance with the essential
requirements and other relevant provisions of the Marine Equipment Directive
(MED) – 96/98/EC. A copy of the Declaration of Conformity can be obtained online
from: http://www.mcmurdomarine.com/documents
1.5 FCC Compliance
This device complies with the GMDSS provisions of Part 80 of the FCC rules.
1.6 Response time
The function of the EPIRB is to send an alert to COSPAS-SARSAT satellites as
described on page 39. How soon an alert is received depends on the positions of
the satellites at the time and can be influenced by overhead obstructions aboard
the vessel. Rescue time following an alert depends on the overall performance of
the Search and Rescue organisations which is outside the control of Orolia Ltd.
1.7 Disclaimer
Orolia Ltd reserves the right to change this specification at any time without notice
and hereby specifically disclaims liability for any consequences of such action.
Page 1
Page 8
2 MANDATORY REGISTRATION
Vessel
Unique
Identity
Number
(UIN)
Country
WARNING!
You must register your EPIRB with the appropriate authorities.
Failure to register may slow the rescue and lead to loss of life.
In the USA failure to register may result in a fine.
In the UK you are legally required to register your EPIRB.
2.1 Overview
Every EPIRB is pre-programmed with a unique identity before it reaches the
customer. This is performed by the manufacturer or, in some cases, the
distributor. The identity includes a 3 digit country code. This is the country that
takes responsibility for storing that particular EPIRB’s registration details. In
most cases, this is the country to which the vessel is flagged. The country
programmed into your EPIRB can be found from its rear identity label. You
must register with this country.
MV BELLANA
EPIRB 1
HEX ID: 1D1400063F81FE0
FLAG 232 G BRITAIN
SERIALISED 000012
CATEGORY 1 – AUTO
Class 2 –20/+55 C (-4/+131 F)
S/N: 701-21221 TAC: 000
When you activate your EPIRB in an emergency, the nearest maritime search
and rescue coordination centre (MRCC) will receive the message and decode
the country code. They will then access the registration database for that
country and expect to find details of your vessel, its radio equipment and who
to contact. If they fail to find this information, this may slow down any rescue.
2.2 How to register
Please refer to page 42 for detailed information about the registration process.
Page 2
Page 9
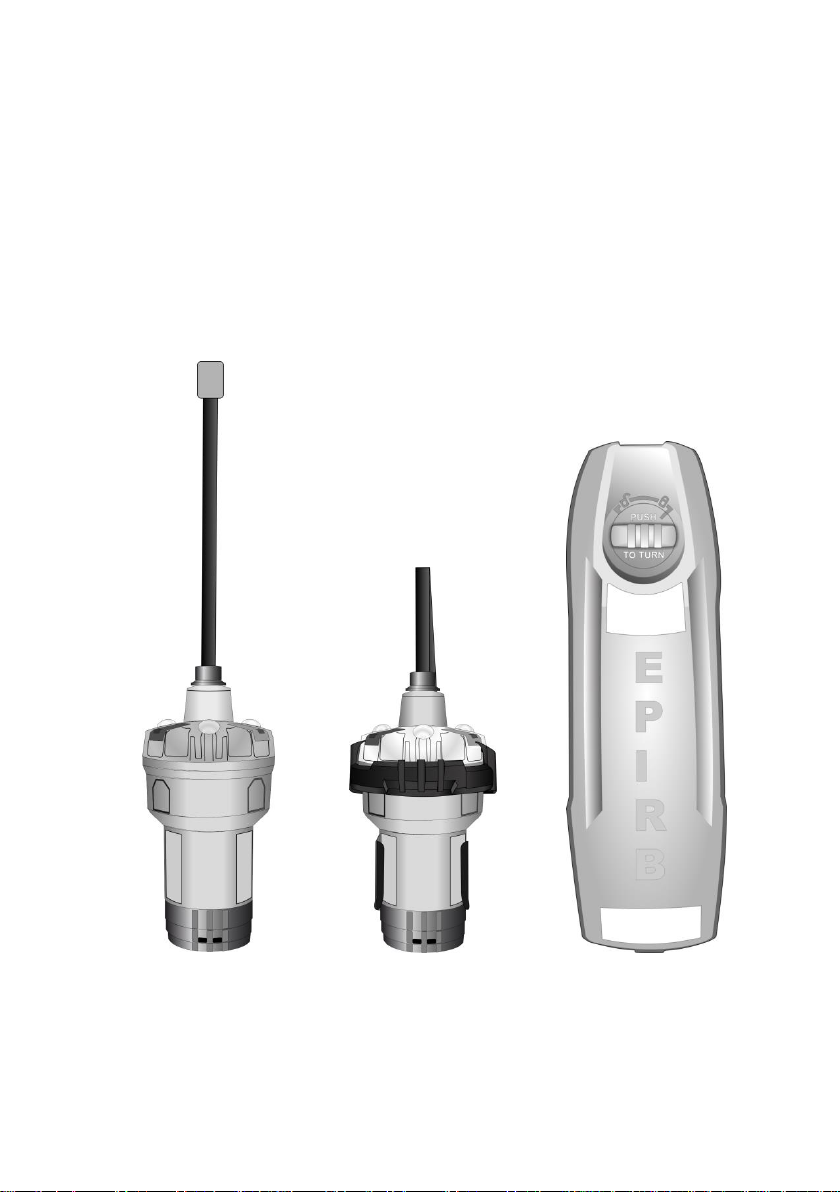
3 DESCRIPTION
This EPIRB is a powerful self-contained distress transmitter and once
activated it will operate for at least 48 hours. It operates best while floating in
water. Although it can be operated on board a vessel or in a life raft, it is not
recommended to do so.
The EPIRB can be mounted to the vessel using one of two options:
Manual bracket, or
Float-free enclosure
EPIRB EPIRB in manual bracket Float-free enclosure
Page 3
Page 10
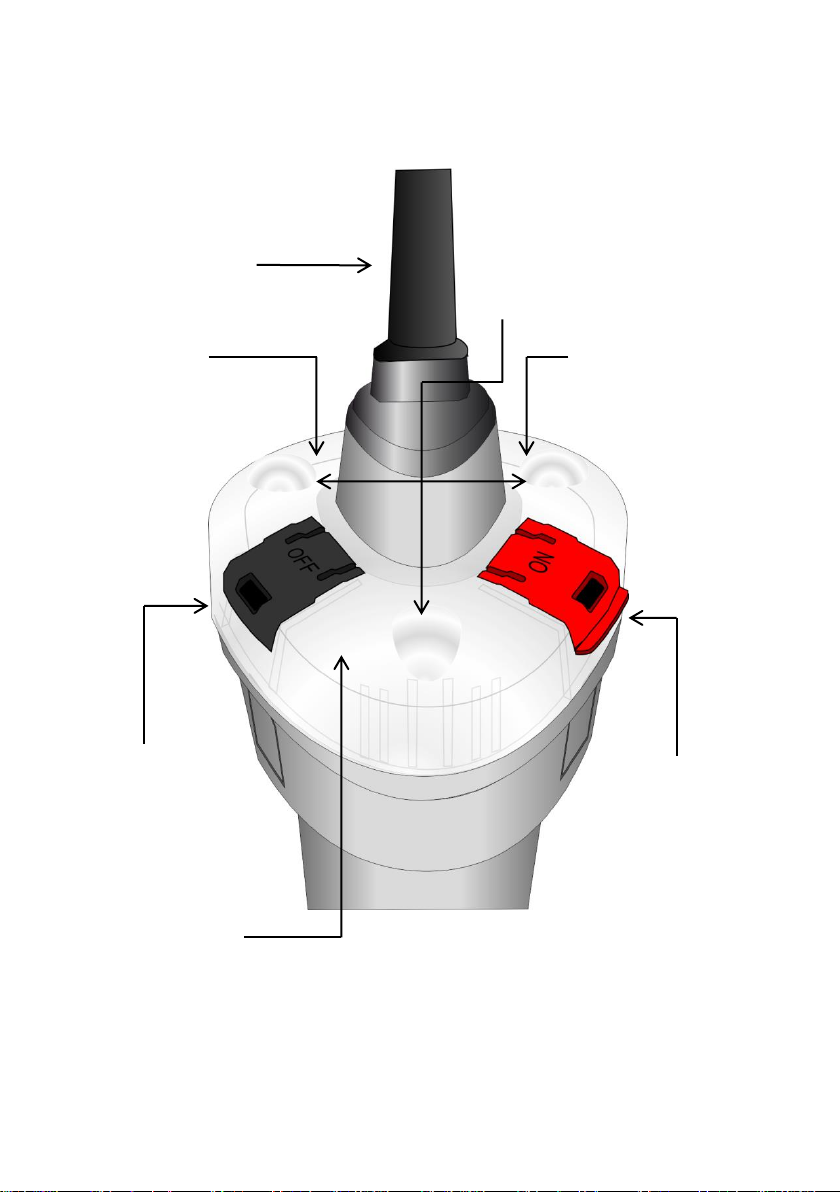
3.1 EPIRB controls and indicators
ON button
Activate EPIRB by
lifting the red cover and
pressing the ON button
for >2 seconds.
OFF button
Deactivate EPIRB
by lifting the grey
cover and pressing
the OFF button for
>2 seconds.
Strobe lights
Three high intensity LEDs.
When EPIRB is activated, the
strobe lights flash, providing a
visual means of locating the
EPIRB.
Green LED
Indicates
correct/normal
function.
Red LED
Slow flash:
acquiring GNSS location.
Rapid flash:
EPIRB malfunction.
Antenna
Must be vertical
and have a clear
view of the sky for
optimum
performance.
GNSS Antenna
(under dome)
Must have a clear view
of the sky for optimum
performance.
3.1.1 Top view
Page 4
Page 11
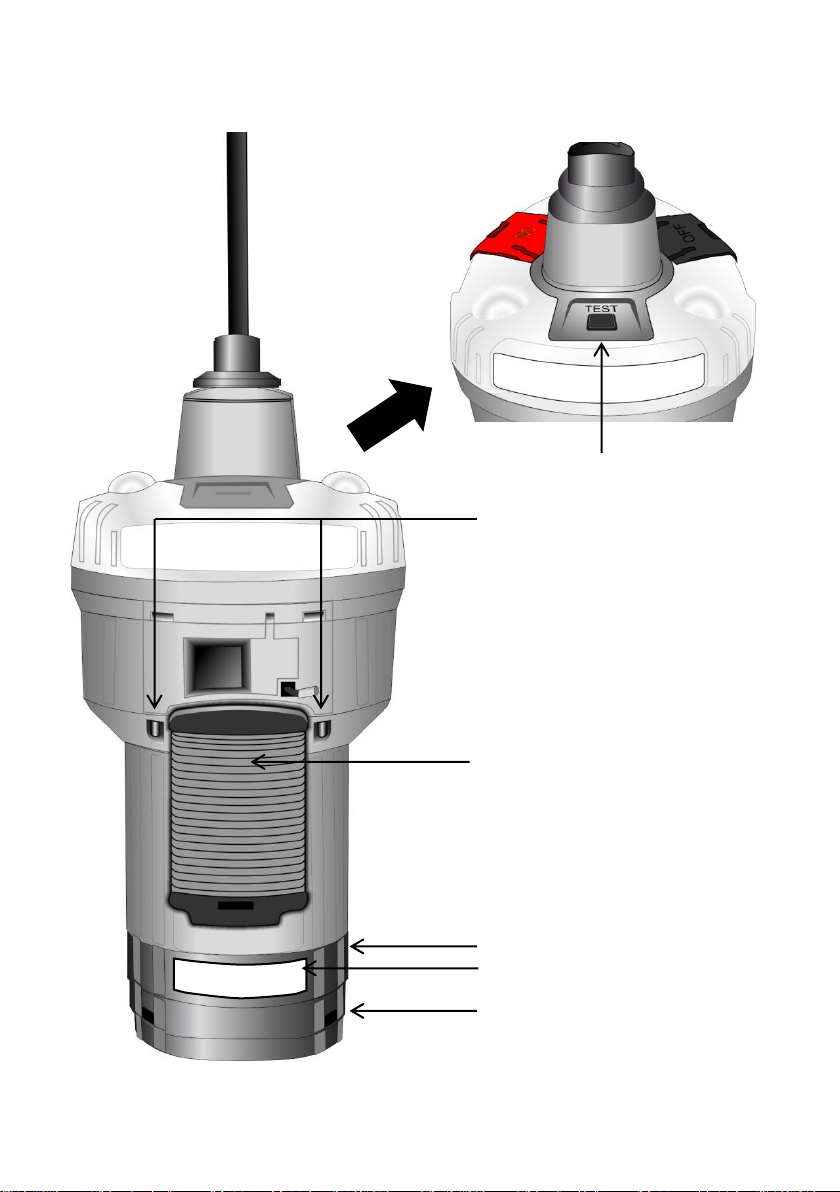
3.1.2 Back view
Test button
Initiates self-test (see page 25).
Sea Contacts
Detects when EPIRB is
immersed in water and
automatically initiates an alert.
Sea contacts are disabled when
the EPIRB is mounted in the
manual bracket, carry-safe
bracket or float-free enclosure.
Lanyard
For best operation, leave the
EPIRB floating in the sea near
the survival craft, as this results
in the optimum performance.
Use the lanyard to secure the
EPIRB to the survival craft (see
page 13).
Battery Case Cover
Battery Expiry Date Label
(see page 31)
Carry Handle Cover
(see page 6)
Page 5
Page 12

3.2 Carry handle
1. Twist the base of the
EPIRB anti-clockwise to
remove the cover.
2. Remove handle
from base.
The carry handle (if fitted) allows hands-free carrying of the EPIRB in an
emergency situation.
3. Adjust the carry handle to secure the EPIRB across the body, around a
shoulder, arm or wrist during emergency evacuation prior to activation.
Page 6
Page 13

3.3 Manual bracket
Removable carrysafe bracket
Bulkhead
dock
Sea contact
deactivating
magnet
If you purchased the manually activated EPIRB variant, this is supplied with a
bulkhead-mounting manual bracket.
The manual bracket should be located in plain view near an emergency exit
(see page 19).
To prevent accidental activation due to contact with water, the manual bracket
contains a magnet which deactivates the sea contacts.
The manual bracket is formed of two parts: a carry-safe bracket which
contains the deactivating magnet and a bulkhead dock, which is permanently
fixed to the bulkhead of the vessel.
The carry-safe bracket allows the EPIRB to be detached and transported in,
for example, a wet grab bag.
WARNING – The EPIRB will NOT be activated by water while it is in the
manual bracket or in its carry-safe bracket. The EPIRB must be removed
from all parts of the manual bracket before it will activate in water.
Page 7
Page 14

3.4 Float-free enclosure
1. Beacon
released when
submerged in
water at <4m.
2. Lever ejects
cover and EPIRB.
3. EPIRB floats to
the surface and
switches on
automatically.
If you purchased the automatically activated variant - also known as the “floatfree” version - then your EPIRB is supplied in a fully protective enclosure.
3.4.1 Automatic activation
The float-free enclosure is spring loaded to automatically release the EPIRB if
your vessel sinks. This automatic release is controlled by a device called a
Hydrostatic Release Unit (HRU) fitted inside the enclosure (see below).
3.4.2 Manual activation
If you need to activate your EPIRB manually, it can be released from the
enclosure (see page 11).
To prevent accidental activation due to contact with water, the float-free
enclosure contains a magnet which deactivates the sea contacts.
Page 8
Page 15

4 EMERGENCY PROCEDURE
An EPIRB is a piece of life saving equipment. Its sole purpose is to call
for help.
It must only be used in situations of grave and imminent danger.
Misuse can involve a severe penalty.
4.1 Abandon ship!
1. If it is safe to do so, release the EPIRB from its mounting bracket or
float-free enclosure as described on pages 10 & 11.
2. If your EPIRB is fitted with a carry handle, use it to secure the EPIRB
around your shoulder, arm or wrist during the evacuation (see page 6).
3. Take the EPIRB to your life raft.
4. Once the life raft is in the water and clear of the sinking vessel, uncoil
the EPIRB’s lanyard and tie it to the life raft.
5. Throw the EPIRB overboard so that it floats several metres away from
the life raft. The EPIRB will operate automatically.
6. For best operation, leave the EPIRB floating in the sea near the survival
craft for optimum performance.
Page 9
Page 16

4.1.1 Float-free enclosure
1. Locate the end of the retaining
strap on the right hand side of
the manual bracket.
2. Push the end of the strap
towards the EPIRB and then
forwards to release the strap.
If there has been no time to retrieve the EPIRB from the float-free enclosure
during evacuation, it will automatically release itself as the vessel sinks. The
EPIRB will float to the surface and start to operate automatically.
The EPIRB is best used to mark the location of survivors, not the accident
scene. If possible, and only if it is safe to do so, recover the EPIRB and tie to
the survival craft using the lanyard.
4.2 Release from manual bracket
3. Open the strap fully.
4. Firmly pull the EPIRB out of the bracket.
WARNING – The antenna will spring up when the EPIRB is released. Be
careful to avoid eye injury.
Page 10
Page 17

4.3 Release from float-free enclosure
1. Locate the
locking dial at
the top of the
enclosure
cover.
2. Push the dial
in and turn anticlockwise to the
unlocked
position.
3. Remove the
cover by pulling
the top away
from the
bulkhead.
4. Pull the
EPIRB out
of the
enclosure.
WARNING – The antenna will spring up when the EPIRB is released. Be
careful to avoid eye injury.
Page 11
Page 18

4.4 Manual activation
1. Locate the ON button on the
top dome under the red cover.
2. Lift the cover, press the ON
button for >2 seconds and
release.
WARNING – There is a tamper-evident seal over the red cover which will
be broken when lifting the cover. If the tamper-evident seal is not intact,
the EPIRB may have been activated previously.
The strobe light will start to flash immediately; however, the EPIRB will not
make any distress transmissions for approximately 50 seconds. This allows
time to turn off the EPIRB if it has been activated accidentally. When the green
indicator starts to flash, distress transmissions have started.
For GNSS-equipped EPIRBs (G8 versions), the EPIRB will also attempt to
determine its position using a GNSS satellite constellation. During this
process, the RED indicator will flash. Once the position has been determined,
the RED indicator will stop flashing.
Page 12
Page 19

4.5 Optimising onboard performance
PLACE THE EPIRB
UPRIGHT, IN THE
OPEN, CLEAR OF
LARGE STRUCTURES.
KEEP THE EPIRB
CLEAR OF
OVERHANGS
AND OVERHEAD
OBSTRUCTIONS.
DO NOT LAY
THE EPIRB
ON ITS SIDE.
DO NOT
SECURE THE
EPIRB
LANYARD TO
THE VESSEL.
DO NOT PLACE
THE EPIRB
UNDER COVER.
The EPIRB is designed and optimised to be used floating in the sea. However,
in emergencies when it is not necessary to evacuate the vessel, you may want
to deploy the EPIRB onboard.
Find a suitable position for the EPIRB according to the following guidelines:
NOTE: Failure to observe these guidelines may affect whether and how
soon an alert is received by the satellite system. Keep the EPIRB upright
at all times (hold it if necessary but do not touch the antenna). The high
intensity strobe lights may cause discomfort if viewed for long periods.
Page 13
Page 20

4.6 Deactivation
1. Locate the OFF button on
the top dome under the grey
cover.
2. Lift the cover, press the OFF
button for >2 seconds and
release.
Once the EPIRB has been activated for a distress situation, it should not be
switched off until the SAR agency directs this.
3. The strobe light and green indicator will stop flashing. If any light continues
to flash, then check that the sea contacts are dry.
It is important to realise that the only time the EPIRB is completely off is when
it is fitted in the manual bracket, carry-safe bracket or float-free enclosure. As
soon as it is removed, the EPIRB will turn on automatically if the sea contacts
(see page 5) are immersed in water.
Although you can control the EPIRB manually with the ON and OFF buttons,
the sea contacts override any manual settings. For the OFF switch to operate
properly, the EPIRB must first be dry so that the sea switch is de-activated.
Page 14
Page 21

4.7 Stowage
3. Slide the EPIRB into the bracket
with the lanyard positioned towards
the rear until it is held securely.
4. Swing the strap closed
and secure the end tab in
the retaining slot.
1. Locate the right hand end of the
manual bracket strap and push it in
and forwards to open the strap.
2. Swing the strap open.
4.7.1 Manual bracket
5. Fold over the antenna and locate the tip in the retaining slot behind the
EPIRB.
Page 15
Page 22

4.7.2 Float-free enclosure
1. Locate the
locking dial.
2. Push the dial in
and turn anticlockwise to the
unlocked position.
3. Remove the cover
by pulling the top away
from the bulkhead.
4. Position the EPIRB in the enclosure
with the lanyard towards the rear.
5. Bend the
antenna
backwards
and retain it in
the recess to
left or right.
6. Engage the
base of the
EPIRB into the
recess in the
lever arm.
Page 16
Page 23

7. Push the EPIRB into the
enclosure to engage the
retaining clip.
8. Refit cover squarely onto
back plate, engaging the
guides at the lower end first.
9. Push and rotate dial clockwise to locked position.
CAUTION: Failure to fit EPIRB correctly may impair its ability to float free
in an emergency.
Page 17
Page 24

5 FALSE ALERTS
Country
Region
Telephone
What to report
USA
Atlantic / Gulf
of Mexico
(757) 398-6390
EPIRB Unique ID (UIN)
Vessel name/ID
Date, time & duration
Cause of activation
Location when activated
Pacific
(510) 437 3700
From any
location
(800) 323 7233
UK
From any
location
01326 317 575
False alerts are a serious problem for the rescue services. About 90% of
EPIRB-initiated distress alerts turn out to be false alerts. If your EPIRB should
cause a false alert, follow the instructions below.
5.1 Notify rescue services
It is most important that you contact the nearest search and rescue authorities
and tell them it was a false alert, so that they can stand down any rescue
services. Use any means at your disposal to make contact. Often this can be
by VHF radio to the local coastguard or mobile phone if you are within coastal
range, but MF/HF DSC and Inmarsat A, B, C, M may also be used.
Useful contacts:
5.2 Deactivate the EPIRB
1. Deactivate the EPIRB following the procedure on page 14.
2. Re-fit the EPIRB to either the manual bracket or float-free enclosure
following the procedure on pages 15 & 16.
5.3 Faulty EPIRB
In the unlikely event that your EPIRB develops a fault and will not turn off
remove the battery pack from the EPIRB (see page 31).
If this is not possible, cut off or fold down the antenna and then wrap the
EPIRB in metal, take it below decks or place in a metal container or locker.
Leave the EPIRB in this condition for 3 days until its battery is dead, then refer
to page 33 for instructions on returning the EPIRB for servicing.
WARNING – Take care when handling the antenna. Handle as little as
possible.
Page 18
Page 25

6 INSTALLATION
260
44
53
130
31
All dimensions in mm
6.1 Manual bracket
6.1.1 Siting
The manual bracket should ideally be sited on a bulkhead in plain view near
an emergency exit. When choosing a suitable mounting position you should
also consider:
Ease of access in an emergency, and
Mount at least 1m from any compass equipment.
6.1.2 Mounting procedure
The manual bracket is supplied with four stainless steel screws. The bracket
mounts against a flat surface using 4 fixing points. Offer the bracket into the
chosen position and mark through the mounting slots and drill four 3mm
diameter holes.
Page 19
Page 26

6.1.3 Mounting instruction plate
70
130
All dimensions in mm
The EPIRB is supplied with a self-adhesive instruction plate which has basic
visual instructions showing how to operate the EPIRB in an emergency.
Mount the instruction plate next to the EPIRB so that it is easily visible in an
emergency.
During vessel maintenance, ensure the plate does not get painted over or
cleaned down with strong degreasing solvents.
Page 20
Page 27

6.2 Float-free enclosure
6.2.1 Siting
The enclosure should be mounted upright against a vertical bulkhead.
Alternatively, it may be mounted horizontally on a flat surface such as a cabin
roof. No other orientations are recommended.
It is critical that you choose a location suitable for automatic deployment. The
EPIRB should be sited so that it can float free regardless of the attitude of the
vessel during or following capsize. An expanse of flat surface is required to
allow the enclosure lid to eject. The wheelhouse top is a favoured position,
although an alternative location should be found if rigging, masts or existing
equipment could affect automatic activation. The EPIRB should also be
accessible so that it can be taken to the life raft if it becomes necessary to
abandon ship.
If the EPIRB is placed on one side of the vessel, or immediately behind the
wheelhouse then the likelihood of correct deployment is much reduced.
Use the recommendations below to choose a suitable mounting position:
DO:
Mount on the outside of the vessel’s structure as high as possible.
Mount close to the vessel’s navigation position.
Consider ease of access in an emergency.
AVOID:
Positions with insufficient space for lid ejection and maintenance.
Positions within 1 m of any compass equipment.
Positions within 2 m of any radar antenna.
Positions with high levels of vibration.
Direct impact from waves.
Siting where damage is likely.
Siting close to exhaust fumes, chemical and oil sources.
Page 21
Page 28

6.2.2 Mounting procedure
44
84
440
254
150
Obstruction free area: 800x500 min
140
440
All dimensions in mm
Mount the back plate on a flat surface using 4 fixing points. Refer to the
illustration for fixing point dimensions or, alternatively, use the back plate of the
enclosure as a marking guide. To do this, push down and turn the cover dial
anti-clockwise then remove the enclosure cover. Note how the EPIRB fits then
remove it to a safe and dry location.
WARNING – The sea contacts are enabled when the EPIRB is removed
from the enclosure.
Page 22
Page 29

The enclosure is supplied with a set of stainless steel fixings. If the rear of the
mounting surface is inaccessible, use self-tapping screws. Offer the back plate
into the chosen position and mark through the mounting holes. Drill
appropriately sized holes where you have marked. You will need a 4mm hex
key to tighten the bolts. Always fit washers under the heads of the bolts to
avoid damaging the plastic.
6.2.3 Mounting instruction plate
The EPIRB is supplied with a rigid plate giving visual instructions on how to
operate the EPIRB in an emergency. Mount this next to your EPIRB as
explained on page 20.
6.2.4 HRU expiry date
It is essential to mark the outside of the enclosure with the expiry date of the
Hydrostatic Release Unit (HRU). The HRU has a limited in-service life which
starts as soon as it is installed on a vessel. Refer to the HRU documentation to
determine the in-service life of the HRU supplied with the enclosure. The
expiry date should be marked on the HRU body and copied onto the label on
the side of the enclosure. The HRU is marked by cutting out the corresponding
dates on its label, as shown on the separate leaflet.
The enclosure should be marked using the alpha-numeric stickers provided,
then covered with the clear adhesive label provided. The preferred date format
is month and year, for example: JUN 2016.
6.2.5 Marking vessel name
In many countries, it is usual to have your EPIRB programmed by your
supplier (see page 2). Your supplier will then mark all the EPIRB labels
accordingly. However, if your EPIRB was purchased in the USA, Canada or
UK then your EPIRB will have all the necessary markings except for vessel
name. In these countries, it is usually left to the customer to mark the vessel
name during installation.
It is strongly recommended (and is mandatory in some countries) that the
vessel name is marked on the rear of the EPIRB itself and also on the
enclosure, if you have one. Use the alpha-numeric stickers provided to mark
the vessel name (or its abbreviation) on the top line of the EPIRB’s rear label
and again on the enclosure label. Protect the markings with a section of the
clear adhesive label provided.
1. Pick off required letter (a small knife blade works well),
2. Apply letter to label – repeat until name is complete, and
3. Cover letters with clear label.
Page 23
Page 30

7 MAINTENANCE
Vessel type
Service Interval
2 years
5 years
10 years
Leisure
voluntary fit
HRU replacement
(if fitted) – see
page 28
Dealer Safety
Check
Dealer Battery
replacement
Commercial
mandated fit
HRU replacement
– see page 28
1st SBM service
2nd SBM service
7.1 Servicing schedule
As an important item of safety equipment, your EPIRB should be checked
regularly according to the following schedule:
NOTE – Shore-based maintenance (SBM) should be carried out in
accordance with intervals specified by the flag Administration and not
exceeding 5 years.
All servicing must be carried out by an Approved Service Agent. Always call
your nearest Approved Service Agent and talk to their customer service
department before returning equipment. You can find your nearest Approved
Service Agent from:
The McMurdo Group website: www.mcmurdogroup.com
Contacting McMurdo Group direct
Contacting a distributor of McMurdo Group products
If the EPIRB has to be returned, the original packaging should be used if
possible (see page 33).
Check your beacon for any damage or wear and tear according to the
manufacturer’s instructions (please refer to www.mcmurdogroup.com for
further details).
Page 24
Page 31

7.2 Self-test & inspection
Indicator
No. of
flashes
Meaning
Strobe
3
Self-test passed – minimal battery usage
EPIRB is OK to use
Strobe
2
Self-test passed – medium battery usage
EPIRB is OK to use; 48 hours operation remaining
Strobe
1
Self-test passed – but battery usage exceeds
recommended limit. Change the battery to ensure
48 hours of operation in an emergency.
Red LED
1
Self-test failed.
Arrange service by an Approved Service Agent
The EPIRB has a built-in self-test
capability that can be used as a
confidence check. This self-test confirms
that the battery is healthy, that the GPS
receiver and distress transmitters are
functional and that the strobe light is
operational. The short self-test should be
performed monthly and not more than 12
times per year. It should be performed
during the first 5 minutes of the hour to
minimise disturbance on the emergency
channel.
7.2.1 Short self-test
1. Press the TEST button for 2
seconds and then release.
2. The green LED will flash once to confirm the short self-test has started.
NOTE – The green LED will also flash when the EPIRB makes a
transmission during normal operation or during a self-test.
3. The EPIRB performs internal checks.
4. The result of the self-test is indicated by the flashing of the white strobe
lights or the red LED according to the following table. The number of
times the strobe lights flash is an indication of the accumulated time the
battery has been in use.
NOTE – Regardless of the battery state, the EPIRB should always be
activated in an emergency – it may still be capable of generating an alert.
Page 25
Page 32

7.2.2 Long self-test (GNSS variants only)
Indicator
No. of
flashes
Meaning
Strobe
3
Long self-test passed – less than 10 tests performed.
Strobe
2
Long self-test passed –10 or more tests performed
Red LED
1
Self-test failed – no position found
A long self-test consumes battery life and can only be performed 20 times per
battery replacement. You should only run a long self-test if you suspect the
GNSS receiver is faulty. Choose a location where the EPIRB may be expected
to acquire a GNSS satellite signal – see page 13.
The long self-test sequence proceeds as follows:
1. Press the TEST button for 10 seconds until the green LED lights for 2
seconds and then release. If the green LED is followed by a long flash
from the red LED, the maximum number of long self-tests has been
exceeded and self-test is immediately terminated.
WARNING – If a rapid sequence of Red LED flashes occurs, the TEST
button has been pressed for too long. Release pressure on the button,
wait 5 seconds, and then repeat the procedure.
If you continue to apply pressure to the button, the beacon remains in a
fault condition, the self-test will not be activated, and it will drain current
from the battery.
2. A short flash of the red LED indicates that the GNSS receiver is
searching for satellite signals and calculating a valid position fix.
3. Once a valid position has been determined, a 406 MHz test
transmission containing the position is sent out. If the EPIRB has AIS
capabilities, a similar test transmission is sent out using the AIS
frequencies.
4. The result of the self-test is indicated by the flashing of the white strobe
lights or the red LED according to the following table. The number of
times the strobe lights flash is an indication of the number of long selftests remaining.
If the EPIRB passes short self-test but fails the long self-test, it is advisable to
have it serviced by an Approved Service Agent. It will still generate an alert in
an emergency but it may not provide precise position information. This may
delay a rescue as the possible search area is much larger.
Page 26
Page 33

WARNING – While the EPIRB is running this self-test it cannot generate a
distress alert. It is therefore recommended that this self-test is performed
only under conditions where an emergency is unlikely to arise.
If necessary, the self-test may be terminated at any time by holding down the
TEST button for 10 seconds.
7.3 Mechanical inspection
It is recommended that a monthly check is carried out to inspect the EPIRB
and its mountings visually for deterioration or damage.
On the EPIRB itself check the following:
Inspect the EPIRB for any obvious damage
Check that the lanyard is not tied to the vessel structure
Check the battery is within its expiry date
Check that the sea contacts are clean and free from paint or grease
Check that the antenna has not been damaged or creased and that it
erects to a vertical position when released.
Check that the beacon is stored such that no pressure can be applied
to the TEST button, and that the covers on the ON and OFF buttons are
closed to ensure the beacon cannot be activated inadvertently.
If you have a manual bracket:
Check the EPIRB is correctly fitted and is secure in its bracket
Check that the two halves of the bracket are securely clipped together
If you have a float-free enclosure:
Check the HRU is within its expiry date
Confirm the cover can be easily removed
Ensure the EPIRB base is correctly fitted into the D-shaped recess and
that the antenna is correctly stowed
If the EPIRB or its mounting needs cleaning, then this should be done using
warm soapy water and a damp (not wet) cloth. Do not use strong detergents or
solvents.
Due to the impact of the marine environment on vessel equipment stored or
regularly exposed to often harsh climate conditions, McMurdo strongly
recommends owners obtain a five- year external health check at an authorised
McMurdo Service Centre. Locations of authorised service dealers can be
found at www.mcmurdogroup.com .
WARNING – Do not paint the EPIRB or its mounting. Do not clean with
detergents or solvents. It is recommended that the EPIRB and its
mounting are removed during vessel cleansing or painting operations.
Page 27
Page 34

7.4 HRU replacement
If you have an EPIRB mounted in a float-free enclosure, then it contains a
Hydrostatic Release Unit (HRU). This has a replacement interval which is
marked on the HRU and on the float-free enclosure (typically every 2 years –
see page 24).
WARNING – Failure to replace the HRU at the required replacement
interval may result in it not actuating correctly and failing to release the
EPIRB in an emergency.
You can obtain a replacement HRU at a local marine store; ask for Orolia Ltd
HRU Replacement Kit (23-134-001B or 23-134-002B). The kit is complete with
HRU and all required accessories including an instruction sheet.
The HRU replacement procedure is as follows:
1. Locate the dial on the enclosure cover, press in and turn dial anticlockwise to the unlocked position and remove the cover (see page 11).
2. Remove the EPIRB from the lever arm and stow it in a dry place (see
page 11).
WARNING – The EPIRB will activate if the sea contacts (see page 5) come
into contact with water.
3. While holding down the lever arm to take up the force of the spring,
push the HRU back then slide upwards out of the slot in the lever arm.
Remove the HRU and slowly release the lever arm.
Page 28
Page 35

4. Assemble the HRU:
HRU Replacement Kit (23-134-002B)
5. Mark the HRU and enclosure cover with the new expiry date.
6. Position the HRU in the hole in the lever arm and push lever arm down.
Engage the HRU flange into the enclosure back plate by pushing back
and sliding down. Look under the spring and check that the flange is
correctly seated.
Page 29
Page 36

7. Re-fit the EPIRB as shown on page 16.
8. Refit the cover and secure by turning the dial clockwise to the locked
position. Check that the cover is seated correctly and is secure.
9. Update expiry date on autohousing label. Remove or cover existing
HRU expiry date. Use sheet (A) to apply new expiry date (as in Step 5)
and then protect new date with clear media (B or C).
Page 30
Page 37

7.5 Battery maintenance
1. Ensure that the EPIRB is powered
down by pressing and holding down
the OFF button for >2 seconds.
The EPIRB is powered by a replaceable battery pack (Orolia Ltd Part No. 23-
270). This is a non-rechargeable sealed unit containing three 3V battery packs
with each pack containing two 1.5V lithium iron disulphide cells.
The battery pack needs to be replaced every 10 years or by its expiry date. If
the EPIRB is covered by SOLAS regulations, then it will need to be changed
every 5 years or as required by any local or ship registration requirements (see
schedule on page 24).
The battery pack expiry date is marked on the battery pack cover (under the
lanyard) and, if you have a float-free enclosure, it is also marked on the base
of the enclosure cover. The battery expiry date should be checked regularly.
You should also replace the battery:
If the EPIRB has been used in an emergency situation, or
When a false activation has occurred and a self-test indicates that less
than 48 hours operating time remains. It is recommended to replace the
battery after any false activation.
Lithium batteries have special disposal requirements. Never incinerate a
lithium battery. Never dispose of one at sea. Your Approved Service Agent will
be able to deal with battery disposal.
NOTE – Regardless of the battery state, the EPIRB should always be
activated in an emergency – it may still be capable of generating an alert.
7.5.1 Battery replacement
If you need to replace the battery pack, please contact your local Approved
Service Agent.
7.5.2 Battery removal
To remove the battery pack:
Page 31
Page 38

2. Twist base of EPIRB
anti-clockwise.
5. Using a 4mm hex key,
unscrew retaining bolt
until loose. Do not
remove at this stage.
6. The battery pack
is held in place by two
waterproof seals. To
release the battery,
pull the cover or screw
firmly.
7. Remove the screw
completely and
dispose of the battery.
3. Remove cover.
4. Untie and remove
carry handle (if fitted).
NOTE – These instructions are provided to allow you to disable a faulty
EPIRB (see page 18). To replace a battery pack, please contact your local
Approved Service Agent.
Page 32
Page 39

7.6 Transportation
Package contents
Classification
EPIRB without battery pack
Non-hazardous
EPIRB and uninstalled battery pack
Class 9 hazardous unless packed in
accordance with special provisions
EPIRB with installed battery pack
Class 9 hazardous
Battery pack only
Class 9 hazardous
For transportation purposes, the hazardous materials classification of EPIRB
units and batteries is as follows:
For further information, please refer to the McMurdo Group website:
www.mcmurdogroup.com .
7.7 GMDSS inspections
If your vessel is subject to GMDSS regulations then you can expect to get
regular visits from ship surveyors enforcing national legislation. They will check
the expiry dates and activate the EPIRB to prove that it is operational and they
will read the identity message stored inside the EPIRB to check that you have
registered it properly.
Leisure vessels are not subject to these inspections. However, in some
countries, passenger and fishing vessels are covered by the legislation.
Page 33
Page 40

8 END OF LIFE STATEMENT
At the end of the EPIRB’s useful life, it is vital that the battery pack be removed
from the main unit to prevent false alarms. False alarms cause expensive
disruption to Search and Rescue services and may endanger lives as a
consequence. It is also necessary that the EPIRB and its battery pack be
disposed of in a manner that does not present a threat of environmental
damage.
8.1 Disposal
The Waste Electrical and Electronic
Equipment (WEEE) Directive aims to
minimise any adverse impact of electronic
equipment on the environment, both during
the product lifetime and when it becomes
waste. Within the European Union this
legislation is mandated by Directive
2012/19/EU, and there is similar legislation in
most other continents. The directive applies
to all electronic products such as IT,
household appliances, portable electronics
etc., and imposes requirements to collect,
treat, recover and recycle each product at its end of life. Electronic end-user
products must also carry a WEEE label (as below) and recovery and recycling
information has to be provided to the recycler.
This EPIRB product contains traces of lithium in the battery pack. In addition it
may contain lead and brominated flame retardants (BFRs), both in the housing
material and circuit boards.
In keeping with the directive, Orolia Ltd strongly recommends that this EPIRB
product and its battery pack be disposed of in a sensible and considerate
manner. For example, do not simply discard the product in the domestic
waste. Instead take it to a civil recycling facility, or contact Orolia Ltd for
advice.
Page 34
Page 41

9 TECHNICAL SPECIFICATION
406 MHz
transmitter
Frequency
406.040 MHz + 1 kHz
Power output
5 W nominal
Modulation
Phase (16K0G1D)
121.5 MHz
transmitter
Frequency
121.5 MHz +3.5 kHz
Power output
70 mW nominal
Modulation
Swept tone AM (3K20A3X)
AIS
transmitter
Frequencies
161.975 MHz (AIS1)
162.025 MHz (AIS2)
Power output
1 W EIRP
Modulation
Phase (16K0GXW)
GNSS receiver
Constellations
GPS, GLONASS, Galileo
Frequencies
1575.42 MHz (GPS, Galileo)
1602.00 MHz (GLONASS)
Sensitivity
-167 dBm minimum
Satellites tracked
72 channel
Strobe light
Type
3 high intensity LEDs
Light output
0.75 cd minimum
Flash rate
23 flashes per minute
Battery
Type
Lithium iron disulphide
Operating life
48 hours minimum
Shelf life
10 years typical in service
Environment
Operating temperature
-20 C to +55 C (-4° F to +131° F)
Storage temperature
-30 C to +70 C (-22° F to +158° F)
Automatic release depth
4 m maximum
Dimensions
(EPIRB)
Weight
710g
Height/Width/Depth
425 x 105 x 105 mm
(incl. antenna)
Length of antenna
225 mm
Dimensions
(Manual bracket)
Weight
110 g
Height/Width/Depth
135 x 125 x 125 mm
Dimensions
(Float-free
enclosure)
Weight
1075 g
Height/Width/Depth
415 x 135 x 135 mm
Standards
COSPAS-SARSAT
C/S T.001 C/S T.007
Europe
MED (wheelmark)
USA
USCG & FCC
International standards
IEC 61097-2
IEC 60945 incl. Corrigendum1 (Portable)
IEC 61108-1 (GNSS variant)
RTCM 11000.4
Industry Canada RSS-287
AS/NZS 4280.1
IMO regulations
A.662(16); A.694(17);
A.810(19); A.814(19)
Page 35
Page 42

10 PRODUCT WARRANTY
10.1 Orolia Ltd Warranty Registration
Congratulations on purchasing your beacon. As standard, your unit has
a one year (12 months) warranty from the date of purchase shown on
your invoice, however, this can be extended by a further four years by
simply registering your unit on-line within 90 days of purchase at:
www.mcmurdogroup.com then follow the REGISTER WARRANTY link at
the top of the page.
10.2 Warranty Statement
Subject to the provisions set out below Orolia Ltd warrants that this product will
be free of defects in materials and workmanship for a period of up to five years
(see above) from the date of purchase. Orolia Ltd will not be liable to the buyer
under the above warranty:
For any defect arising from fair wear and tear, wilful damage,
negligence, abnormal working conditions, failure to follow Orolia Ltd’s
instructions (whether oral or in writing) including a failure to install
properly and/or to use batteries recommended and/or supplied by
Orolia Ltd, misuse or alterations or repair of the product by persons
other than Orolia Ltd or an Approved Service Agent.
For parts, materials or equipment not manufactured by Orolia Ltd in
respect of which the buyer shall only be entitled to the benefit of any
warranty or guarantee given by the manufacturer to Orolia Ltd;
For the battery storage life which is specifically excluded from this
warranty;
If the total price for the product has not been paid.
THE LIMITED WARRANTY STATED ABOVE IS EXCLUSIVE AND IN LIEU
OF ANY OTHER WARRANTY, EXPRESS OR IMPLIED, INCLUDING BUT
NOT LIMITED TO ANY IMPLIED WARRANTY OF MERCHANTABILITY OR
FITNESS FOR A PARTICULAR PURPOSE.
Orolia Ltd will not be liable for indirect, special, incidental or consequential
damages of any kind sustained from any cause. In no event shall Orolia Ltd be
liable for any breach of warranty or other claim in an amount exceeding the
purchase price of the product. This warranty does not affect any statutory
rights of the consumer. In order to be valid, claims must be made under the
above warranty in writing as soon as practicable after discovery of the defect
or failure and within the warranty period referred to above. Proof of purchase
will be required. The claim should be sent together with the product in question
to the address set out below or to an Approved Service Agent. Following a
valid warranty claim Orolia Ltd shall be entitled to repair or replace the product
(or part) in question free of charge, or at Orolia Ltd’s sole discretion to refund
to the buyer the price of the product (or a proportional part of the price). Orolia
Page 36
Page 43

Ltd shall not be liable to a buyer who is not a consumer for any other loss or
damage (whether indirect, special or consequential loss of profit or otherwise)
costs, expenses or other claims for compensation which arise out of or in
connection with this product. In the case of a consumer, Orolia Ltd shall only
be liable where other loss or damage is foreseeable.
Nothing shall limit Orolia Ltd’s liability for death or personal injury caused by its
negligence. This warranty is to be interpreted under English law.
All enquiries relating to this warranty or Approved Service Agents should be
sent to:
Orolia Ltd,
Silver Point,
Airport Service Road,
Portsmouth,
Hampshire,
PO3 5PB
UK
Telephone: Int + 44 (0) 23 9262 3900
Fax: Int + 44 (0) 23 9262 3998
Web: www.mcmurdogroup.com
Email: mservice.mcmurdo@orolia.com
Page 37
Page 44

11 HOW DOES IT WORK?
When you activate the EPIRB, its on board transmitters start broadcasting
distress signals at several frequencies:
A 406 MHz alert signal can be received by the Cospas-Sarsat satellite
system (see page 39). Ground stations track these satellites and
process the distress signals to obtain a location using Doppler location
techniques (see https://www.cospas-sarsat.int/en/21-embedded-
articles/230-doppler-processing ).
A 121.5 MHz transmission can be detected by overflying aircraft and
Search & Rescue (SAR) homing receivers.
For EPIRB models equipped with AIS (SmartFind G8 AIS), an
additional transmission operates at 162 MHz. The AIS message
includes the unit ID, GPS position and a simple text message and is
repeated 8 times per minute using an ‘Impolite AIS Protocol’ giving it
priority over other AIS signals in the vicinity. This signal will typically be
received by vessels with VHF AIS antennae out to a four-mile range
(typical).
With EPIRB models equipped with a GNSS (Global Navigation Satellite
System) receiver (SmartFind G8 AIS / SmartFind G8), the current
position is transmitted as part of the distress signal. GNSS systems
require a clear view of the sky in order to work effectively, because the
receiver needs signals from several satellites to calculate its position. If
the GNSS receiver within the EPIRB cannot determine its position, it
“fails safe” - it does not transmit an inaccurate position - but instead
sends information to indicate that no position is available. Position
information is then dependent on the orbiting satellite system.
The transmissions will continue for a minimum of 48 hours and continue until
the battery is exhausted.
Page 38
Page 45

12 COSPAS-SARSAT SATELLITE SYSTEM
The International Cospas-Sarsat Programme is a satellite-based search and
rescue distress alert detection and information distribution system, best known
for detecting and locating emergency beacons activated by aircraft, ships and
hikers in distress. Since its launch in 1982, Cospas-Sarsat has helped to save
over 40,000 lives.
12.1 The Search And Rescue (SAR) process
The following diagram of the Cospas-Sarsat Ecosystem shows the 5 critical
stages to the search and rescue process.
1. The process begins with the activation of a distress beacon (EPIRBs for
maritime use, PLBs for personal use and ELTs for aviation use) in an
emergency situation, sending out a 406 MHz signal.
2. The Cospas-Sarsat satellite system picks up the signal and transmits it
back to a ground receiving station on Earth. These are called Local User
Terminals or LUTs.
3. The LUT processes the signal to generate a distress alert and relays it to
a Mission Control Center.
Page 39
Page 46

4. The Mission Control Center receives the alert and relays this with location
information to a Rescue Coordination Center, often looking up the unique
beacon ID number to gather information about the registered owner.
5. The Rescue Coordination Center alerts the appropriate emergency
response teams to deploy a rescue effort.
The Cospas-Sarsat System today includes two types of satellites: Low-altitude
Earth orbit (LEOSAR) and Geostationary Earth orbit (GEOSAR), each
contributing respective advantages to detection and location of distress
beacons that have been activated.
The LEOSAR system can locate a beacon without the aid of a GPS, but the
LEOSAR satellites only view a small part of the Earth at any given time and
may require multiple passes of a satellite resulting in delay to the search and
rescue process.
The GEOSAR system constantly covers the entire Earth except the highlatitude (e.g., polar) regions receiving distress alerts across most of the globe.
However, it cannot locate the beacon unless the location is encoded in the
beacon's message from a local navigation receiver such as a GPS.
MEOSAR is an advanced next generation satellite-based technology that is
revolutionising the Cospas-Sarsat ecosystem. Once complete, MEOSAR will
put over 6 times the number of existing Cospas-Sarsat satellites into orbit,
resulting in greater global coverage and more position accuracy.
12.2 Global Navigation Satellite System (GNSS)
GNSS systems such as GPS, Galileo and GLONASS can be used by the
GNSS equipped EPIRB to determine its position with high accuracy. Advanced
GNSS data processing results in fast detection of positioning coordinates and
enhances the accuracy of the emergency location.
12.3 MEOSAR Compatibility Explained
Smartfind G8 AIS, Smartfind G8 and Smartfind E8 EPIRBs are fully
compatible with the Early Operation Capability (EOC) and Full Operating
Capability (FOC) MEOSAR systems and will benefit from the improved
detection and location capabilities of this new infrastructure.
The International Cospas-Sarsat Programme initiated the development and
deployment of a Medium-altitude Earth Orbiting Satellite Search and Rescue
(MEOSAR) System in 2004 to complement and eventually replace the Lowaltitude Earth Orbit SAR Satellites (LEOSAR) deployed from the 1980s
through 2010.
The MEOSAR system employs SAR repeaters on Global Navigation Satellite
Systems (e.g., GPS, Galileo, and Glonass) and provides improved detection,
and independent position locating capability for emergency position indicating
radio beacons (EPIRBs), emergency locator transmitters (ELTs) and personal
locator beacons (PLBs).
Page 40
Page 47

The MEOSAR system should attain Full Operating Capability (FOC) in 2018,
with the anticipated availability of enhanced second generation 406 MHz
Distress Beacons shortly before or after FOC.
A parallel effort to design the next generation Cospas-Sarsat distress beacon
is also underway. The Second Generation Cospas-Sarsat Beacon (SGB) will
be designed to work with the MEOSAR component to provide increased
detection, return link service, enhanced data fields and is targeted for
introduction at MEOSAR FOC, or shortly thereafter.
Further information on MEOSAR and the Cospas- Sarsat network is available
at the McMurdo website www.mcmurdogroup.com .
Page 41
Page 48

13 HOW TO REGISTER YOUR EPIRB
Country
Website address
Australia
www.amsa.gov.au/beacons
New Zealand
www.beacons.org.nz
UK
forms.dft.gov.uk/mca-sar-epirb
USA
www.beaconregistration.noaa.gov
Other (COSPAS-SARSAT)
www.406registration.com
USA Sarsat Beacon Registration
NOAA/Sarsat Beacon Registration,
NSOF, E/SP053,
1315 East West Highway,
Silver Spring,
MD 20910-9684.
Tel 888 212 7283
Fax 301 817 4565
UK EPIRB Registry
HM Coastguard (Southern),
Pendennis Point,
Castle Drive,
Falmouth,
TR11 4WZ.
Tel 01326 211569
Fax 01326 319264
EPIRB registration is now available on-line. This is the preferred method of
registration. The website address for various countries is given below:
Go to the registration website for your country/flag state and follow the
instructions.
The COSPAS-SARSAT website provides registration details for many
countries: www.cospas-sarsat.int
In case on-line registration is not available, three registration forms are
provided: one to be completed immediately and two are for future use. These
forms are pre-printed with your EPIRB’s identity; all you have to do is complete
details of your vessel and provide contact numbers. Wherever possible the
forms are also pre-printed with the correct mailing address and a faxback
number. If your form does not have a mailing address, contact your supplier.
When you have completed the form, you can choose to fax it or mail it.
It is usual to receive confirmation when you register. In Australia, the UK and
USA you will also receive a “Decal” sticker which you must fit to the EPIRB
itself. The Decal is proof of registration - not having a Decal is an offence.
Useful registration contacts are:
13.1 Emergency contact
It is VITAL that the emergency contact information is accurate, particularly
regarding the telephone number, as this will be used to validate an alert. Only
if the beacon registration and approximate location details can be confirmed
will USCG (United States Coast Guard) launch an immediate rescue,
Page 42
Page 49

otherwise there will be a delay whilst further alerts from the same source are
Australian Maritime
Safety Authority
(AMSA)
Beacon Registration Section,
Australian Maritime Safety Authority,
GPO Box 2181,
Canberra City,
ACT 2601
Online registration: www.amsa.gov.au/beacons
Fax: +61 2 9332 6323
Local 1800 406 329
Email: ausbeacon@amsa.gov.au
Phone: +61 2 6279 5766 or 1800 406 406
received and verified.
13.2 Registration Information for Australia & New Zealand
For Australia and New Zealand, the preferred method of registration is online
at www.amsa.gov.au/beacons and www.beacons.org.nz respectively.
13.2.1 Advice for EPIRB purchase or transfer
Registration of 406 MHz satellite EPIRBs with the EPIRB Registration Section
of the national authority* is mandatory because of the global alerting nature of
the COSPAS-SARSAT system. In New Zealand, registration is mandatory for
commercial vessels.
The information provided in the registration is used only for search and rescue
purposes.
Fill in the owner registration card immediately upon completion of the sales
transaction. Mail, fax or email the registration card to the national authority*
immediately. Registration cards are also available on line.
If the beacon is to enter service immediately, complete the registration card
and fax or email the information to the relevant national authority*.
If the beacon is being transferred to a new owner, the current owner is to
inform the national authority* by email, facsimile, letter or telephone of the
name and address of the new owner.
The new owner of the beacon is required to provide the national authority* with
the information as shown on the registration card.
This obligation transfers to all subsequent owners.
*The national authority is the Australian Maritime Safety Authority or the
Rescue Co-ordination Centre New Zealand, as appropriate. Contact details
are:
Page 43
Page 50

Rescue Co-ordination
Centre New Zealand
(RCCNZ)
Rescue Co-ordination Centre New Zealand
PO Box 30050,
Lower Hutt 5040
Online registration: www.beacons.org.nz
Fax: +64 4 577 8041
Email: 406registry@maritimenz.govt.nz
Phone: +64 4 577 8042
USA
Website:
www.fcc.gov/Forms/Form605/605.pdf
Federal Communications Commission
445 12th Street SW
Washington, DC 20554
Tel: 888 225 5322
UK
Spectrum Licensing
Riverside House
2a Southwark Bridge Road
London, SE1 9HA
Website:
services.ofcom.org.uk
Tel: 0300 123 1000 or
020 7981 3131
Fax: 020 7981 3235
Textphone * 0300 123
2024 or 020 7981 3043
E-mail:
spectrum.licensing@ofco
m.org.uk
13.3 Online warranty registration
Please complete the online warranty registration form:
http://info.mcmurdogroup.com/Warranty-Registration.html
Failure to do this may delay any future warranty claim.
13.4 Radio licence
An EPIRB is a radio transmitter and must therefore be added to your radio
licence. If you have been allocated a radio call sign, then you already have a
radio licence for your VHF or MF radio set. You should update your licence to
include your EPIRB. For further details see your licence or use these contact
numbers:
*Please note that these numbers only work with special equipment used by
people who are deaf or hard of hearing.
13.5 Sale or transfer
EPIRBs registered in Australia, Canada, UK and USA do not need to be reprogrammed when transferred to a new vessel. Simply complete another
registration form to inform the authorities of the transfer. Use one of the spare
forms provided or contact Orolia Ltd for a blank form.
Page 44
Page 51

For most other countries, the EPIRB must be re-programmed with either the
new vessel’s Maritime Mobile Station Identity (MMSI) or its radio call sign,
whichever is required by the country controlling the new vessel.
Since the EPIRB identity contains a country code, it follows that changing the
flag state of the vessel also means the EPIRB must be re-programmed.
Programming can be carried out at Orolia Ltd or any of our Approved Service
Agents. You can find your nearest Approved Service Agent via our website:
www.mcmurdogroup.com/where-to-buy
Page 45
Page 52

Orolia Ltd
Silver Point
Airport Service Road
Portsmouth PO3 5PB
United Kingdom
Phone: +44 (0)23 9262 3900
Fax: +44 (0)23 9262 3998
Email: service@mcmurdogroup.com
Website: www.mcmurdogroup.com
23-024-EN Issue A00
An Orolia Group Business
 Loading...