

Orno OR-MA-705: OR-MA-710 Operating And Instalation Instructions

OR-MA-705, OR-MA-710
(PL) Instrukcja obsługi i montażu
(ENG) Operating and instalation instructions
(DE) Bedienungs- und Montageanleitung
(FR) Notice d’utilisation et d’installation
(RU) Инструкция по эксплуатации и установке
ORNO-LOGISTIC Sp. z o.o.
ul. Katowicka 134
43-190 Mikołów
tel. 32 43 43 110
(ENG) IMPORTANT!
Before using the device, read this Service Manual and keep it for future use. Any repair or modification carried out by yourselves results
in loss of guarantee. The manufacturer is not responsible for any damage that can result from improper device installation or operation.
While installing the device, remember that the sensor is activated by the detected motion or heat. To avoid false alarms, place the
sensor in location not exposed to direct sunlight and far from heat sources such as radiators, heaters, light bulbs, etc.
In view of the fact that the technical data are subject to continuous modifications, the manufacturer reserves a right to make changes
to the product characteristics and to introduce different constructional solutions without deterioration of the product parameters or
functional quality.
The latest version of the Manual can be downloaded from www.orno.pl. Any translation/interpretation rights and copyright are reserved
in relation to this Manual.
1. Do not use the device against its intended use.
2. Do not dip the device in water or another fluids.
3. Do not operate the device when its housing is damaged.
4. Do not repair the device by yourselves.
5. Do not use the power unit and batteries in the receiver at the same time!
NOTE! The 24-month’ guarantee includes the factory-sealed product. Do not break the seal off!
(PL) WAŻNE!
Przed rozpoczęciem korzystania z urządzenia, należy zapoznać się z niniejszą instrukcją obsługi oraz zachować ją na przyszłość.
Dokonanie samodzielnych napraw i modyfikacji skutkuje utratą gwarancji. Producent nie odpowiada za uszkodzenia mogące wyniknąć
z nieprawidłowego montażu czy eksploatacji urządzenia. Montując urządzenie należy pamiętać, że czujka ruchu aktywowana jest
poprzez wykrycie ruchu lub ciepła. W celu uniknięcia fałszywych alarmów należy umiejscowić czujnik w miejscu nie narażonym na
bezpośrednie działanie promieni słonecznych oraz z dala od źródeł ciepła takich jak grzejniki, piecyki, żarówki itp.
Z uwagi na fakt, że dane techniczne podlegają ciągłym modyfikacją, Producent zastrzega sobie prawo do dokonywania zmian
dotyczących charakterystyki wyrobu oraz wprowadzania innych rozwiązań konstrukcyjnych nie pogarszających parametrów i walorów
użytkowych produktu.
Najnowsza wersja instrukcji do pobrania na stronie www.orno.pl. Wszelkie prawa do tłumaczenia/interpretowania oraz prawa autorskie
niniejszej instrukcji są zastrzeżone.
1. Nie używaj urządzenia niezgodnie z jego przeznaczeniem.
2. Nie zanurzaj urządzenia w wodzie i innych płynach.
3. Nie obsługuj urządzenia gdy uszkodzona jest obudowa.
4. Nie dokonuj samodzielnych napraw.
5. Nie używaj równocześnie zasilacza i baterii w odbiorniku!
UWAGA! Gwarancja 24-miesięczna obejmuje produkt wyposażony w fabryczną plombę, której nie należy zrywać!
(DE) WICHTIG!
Machen Sie sich mit dem Inhalt der Bedienungsanleitung vertraut, bevor sie mit der Nutzung der Anlage beginnen. Die
Durchführung eigenmächtiger Reparaturen und Modifikationen hat den Verlust der Garantie zur Folge. Der Hersteller haftet für
Beschädigungen nicht, die sich aus der nicht fachgerechten Montage oder Einsatz der Anlage ergeben.
Bei der Montage der Anlage achten Sie darauf, dass der Bewegungsmelder durch die Detektion der Bewegung oder Wärme
aktiviert wird. Um falsche Alarme zu vermeiden, positionieren Sie der Melder am Ort, der den Sonnenstrahlen direkt nicht
ausgesetzt wird und von Wärmequellen wie Heizkörper, Öfen, Lampen usw. ferngehalten wird .
Da technische Daten ständigen Modifikationen unterliegen, behält sich der Hersteller das Recht vor, Änderungen bezüglich
Erzeugnischarakteristik und anderer Konstruktionsänderungen vorzunehmen, die Parameter und Nutzwerte des Produkts nicht
beeinträchtigen.
Die neuste Version der Bedienungsanleitung ist verfügbar zum Download unter www.orno.pl. Alle Rechte auf
Übersetzung/Auslegung sowie Urheberrechte dieser Bedienungsanleitung sind vorbehalten.
1. Benutzen Sie das Gerät ausschließlich zu den in dieser Anweisung beschriebenen Zwecken
2. Tauchen Sie das Gerät nicht ins Wasser oder in andere Flüssigkeiten.
3. Nutzen Sie die Anlage nicht, wenn ihre Gehäuse beschädigt ist.
4. Eigenmächtige Reparaturen sind verboten.
5. Nutzen Sie keine Speiseleitung und Batterie im Empfänger gleichzeitig !
ACHTUNG!
Die 24-monatige Garantie umfasst das Produkt, das mit einer Fabrikplombe ausgestattet ist, die nicht zu entfernen ist.
(FR) IMPORTANT !
Avant d’utiliser l’appareil pour la première fois, lisez cette notice d’utilisation et gardez-la précieusement pour toute utilisation future
de l’appareil. Les réparations et les modifications effectuées par un non professionnel entrainent une perte de garantie. Le fabricant
décline toute responsabilité des dommages qui pourraient résulter d'une mauvaise installation ou exploitation de l'appareil.
Lors de l'installation de l'appareil, notez que le détecteur de mouvement sera activé par la détection d’un mouvement ou de la
chaleur. Afin d’éviter les fausses alarmes, placez le détecteur dans un endroit non exposé aux rayons directs du soleil et loin des
sources de chaleur telles que des radiateurs, des fours, des lampes, etc.
Étant donné que les spécifications techniques peuvent être modifiées, le fabricant se réserve le droit d'apporter des modifications
aux caractéristiques techniques du produit et d'introduire d'autres solutions qui n’ont pas d’impact sur les paramètres techniques et la
facilité d'utilisation de l’appareil.
La dernière version du manuel d’utilisation est disponible en téléchargement libre sur le site internet www.orno.pl. Tous les droits de
traduction/d’interprétation et les droits d'auteur de ce manuel sont réservés.
1. Utiliser l’appareil conformément à sa destination.
2. Ne pas plonger l’appareil dans l’eau ou autres liquides.
3. Ne pas utiliser l’appareil si son cadre est abîmé.
4. Ne pas effectuer des réparations.
5. Ne pas utiliser l’adaptateur secteur et la batterie dans le récepteur !
ATTENTION !
La garantie de 24 mois est valable uniquement si le plombage d’usine n’est pas rompu !
(RU) ВАЖНЫЙ!
Перед началом использования устройства необходимо изучить настоящую инструкцию по эксплуатации и сохранить ее
для будущего использования. Самостоятельный ремонт и модификация приводят к потере гарантии. Производитель не
несет ответственности за повреждения, которые могут возникнуть из-за неправильного монтажа или эксплуатации
устройства. При монтаже устройства следует помнить, что датчик движения активируется путем определения
источника движения или тепла. Во избежание фальшивых сигналов необходимо установить датчик в месте, не
подверженном прямому воздействию солнечных лучей, а также вдали от источников нагрева, например батарей
отопления, печей, ламп накаливания и т.п. Ввиду постоянных модификаций технических данных Производитель
оставляет за собой право вносить изменения в описание изделия и вносить прочие конструкционные изменения, не
влияющие отрицательно на параметры и эксплуатационные качества изделия.
Последняя версия инструкции доступна для скачивания на сайте www.orno.pl. Все права на перевод/интерпретацию и
авторские права настоящей инструкции защищены.
1. Не используйте изделие не по назначению.
2. Не погружайте изделие в воду и другие жидкости.
3. Не используйте устройство с поврежденным корпусом.
4. Не проводите самостоятельных ремонтов.
5. Не используйте одновременно блок питания и батарейки в приемном устройстве!
ВНИМАНИЕ!
Гарантийные обязательства сроком 24 месяца распространяются на устройство с заводской пломбой,
которую запрещено снимать!
ENG
Produced after 29th July 2005 Waste electrical products should not be disposed with household waste. Please recycle where facilities exist.
Check with Your Local Authority or retailer for recycling advice.
PL
Zgodnie z przepisami Ustawy z dnia 29 lipca 2005 r. o ZSEiE zabronione jest umieszczanie łącznie z innymi odpadami zużytego sprzętu
oznakowanego symbolem przekreślonego kosza. Użytkownik, chcąc pozbyć się sprzętu elektronicznego i elektrycznego, jest zobowiązany do
oddania go do punktu zbierania zużytego sprzętu.
DE
Gemäß Vorschriften des Gesetzes vom 29. Juli 2005 über die Entsorgung von Elektro- und Elektronik-Altgeräten ist es verboten, Altgeräte mit
dem durchgestrichenen Mülleimer-Zeichen mit anderen Abfällen zu mischen. Der Benutzer ist verpflichtet, die Elektro- und Elektronik-Altgeräte
bei einer Sammelstelle für die Wiederaufbereitung von Elektro- und Elektronik-Altgeräten abzugeben.
FR
Conformément aux dispositions de la loi du 29 juillet 2005 relatives aux déchets électriques et électroniques, il est interdit de placer l’appareil
usagé avec d'autres déchets usés comportant le symbole d’une poubelle barrée. L’utilisateur, s’il désire jeter son équipement électronique et
électrique, est obligé de le déposer dans un point de collecte d’équipement usagé.
RU
Согласно Закону от 29 июля 2005 г. об отработанных электрических и электронных приборах запрещается помещать вместе с другими
отходами отработанные устройства, маркированные символом перечеркнутого контейнера. Отработанные электрические и электронные
приборы необходимо сдавать в пункты приема отработанных устройств.
CHARACTERISTIC:
The PIR sensor responding to temperature changes within the detection area sends an impulse wirelessly
(with radio waves) to the receiver that warns on motion detected in the protected zone by means of sound
signal (‘ding-dong’, quiet ‘ding-dong’ or alarm) and light signal (LED). IP44 protection level allows the sensor
installation outdoors and in rooms of increased humidity.
NAMES FOR PARTS
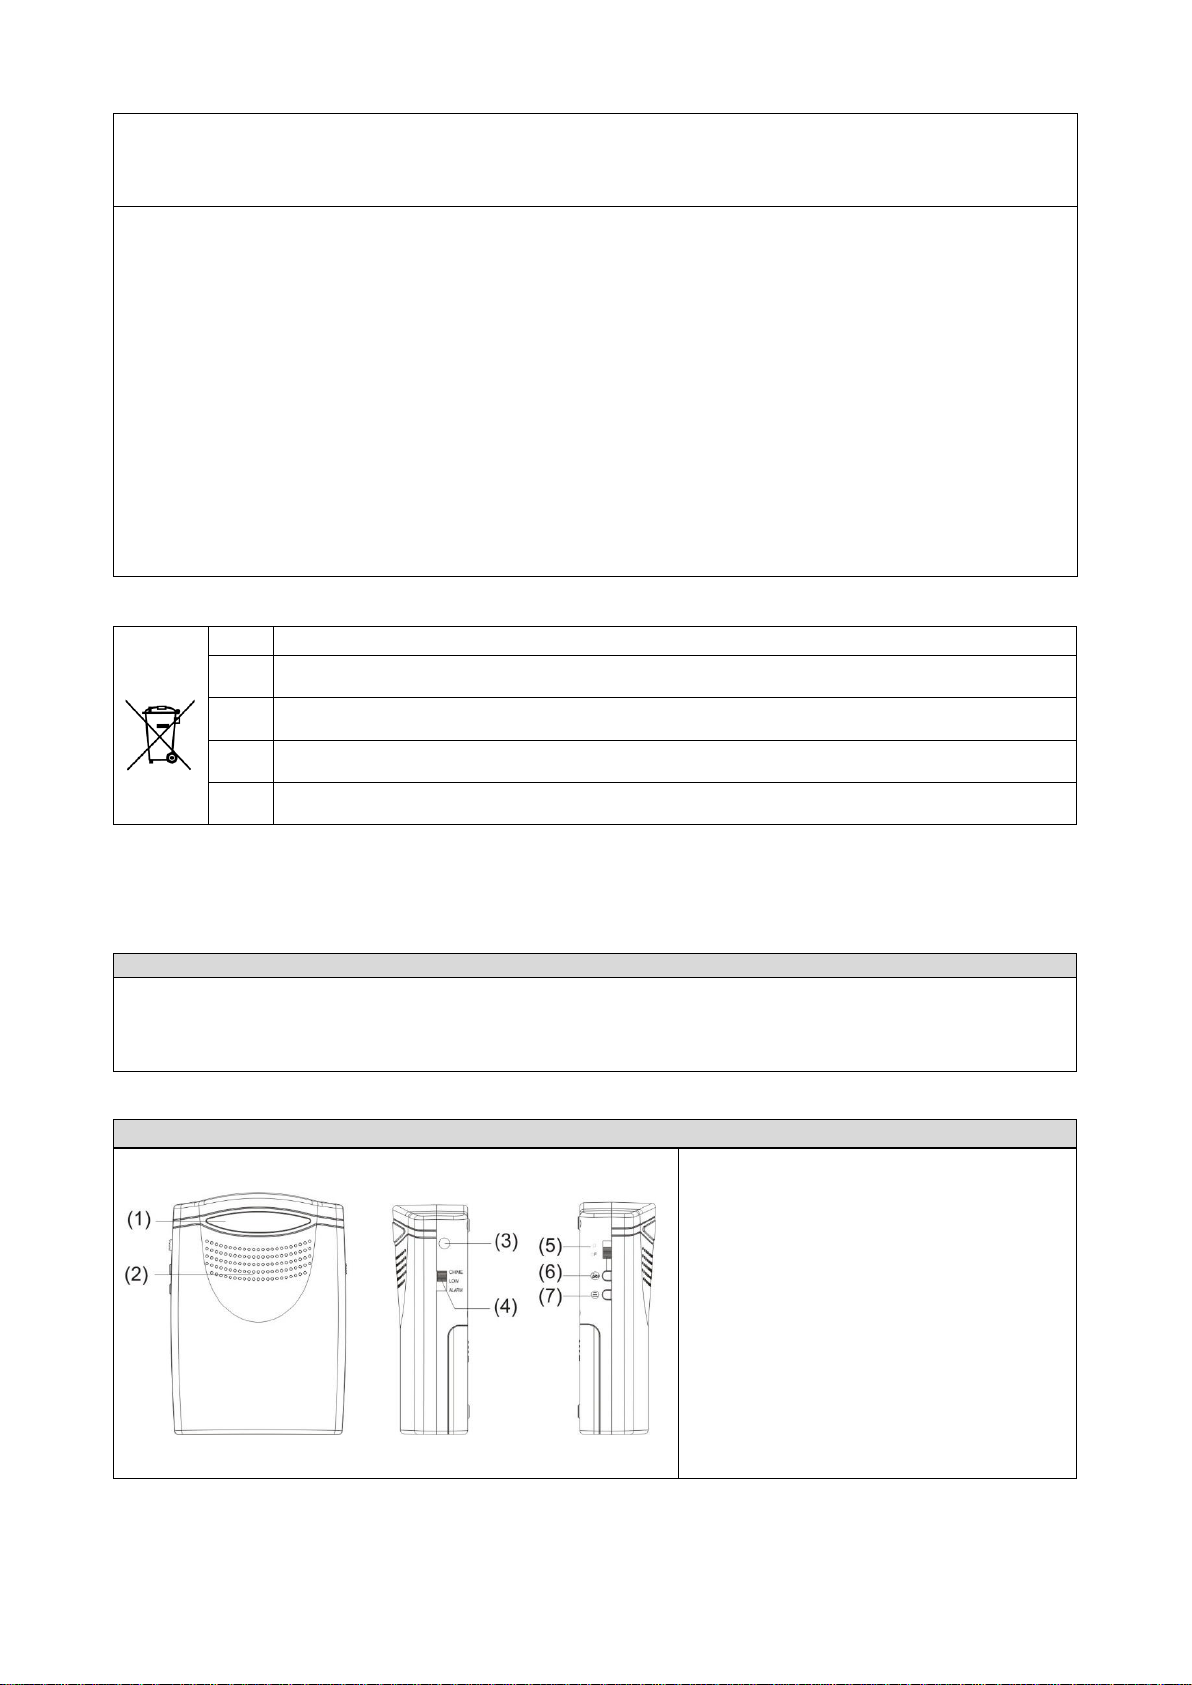
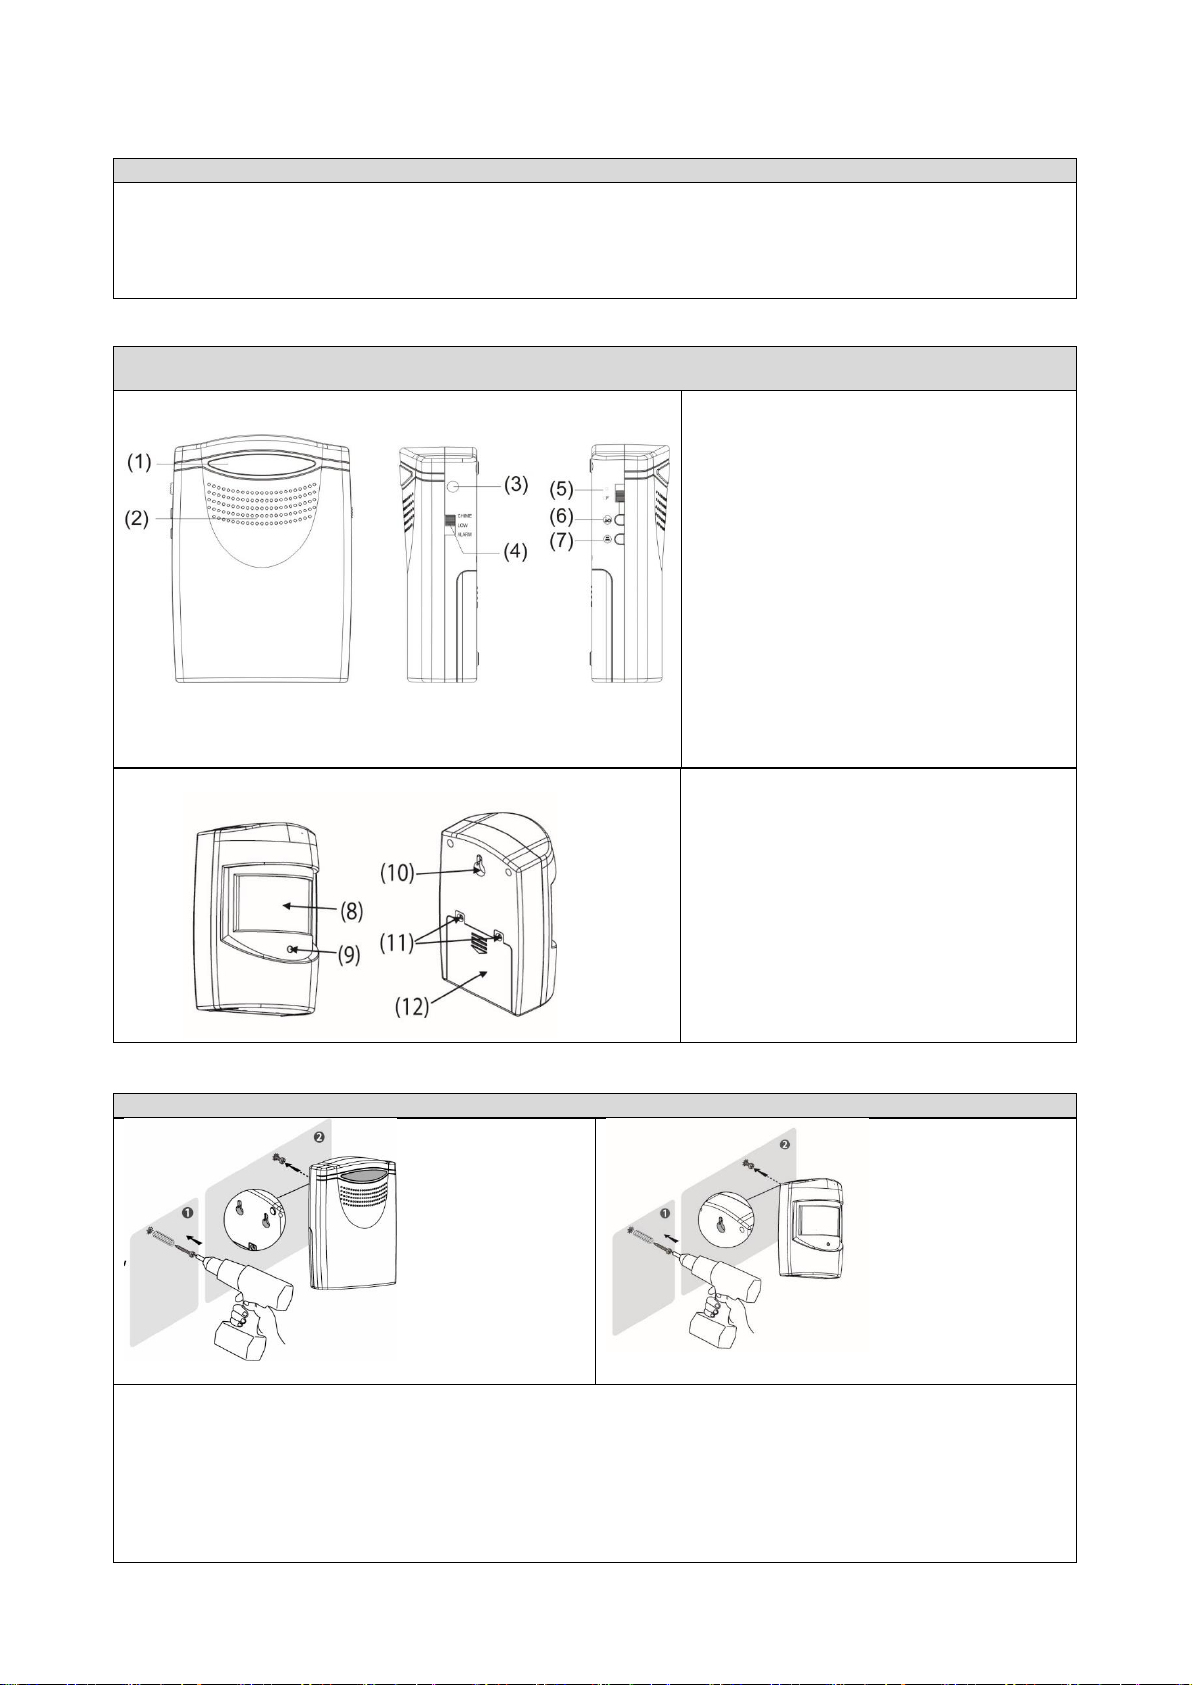
Receiver
rys. 1a
(1) LED Indicator
(2) Speaker
(3) DC 6V Input Jack
(4) Switch for Chime, Low, Alarm
(5) On/Off Switch
(6) Sound-and-Flash Switch Button
(7) Auto-learning Code Button
07/2016
(ENG) Operating and instalation instructions
2

Sensor (transmitter)
rys 1b
(8) PIR
(9) LED Indicator
(10) Holes for hanging on the wall
(11) screws
(12) Cover the battery
WALL MOUNT RECEIVER AND PIR TRANSMITTER
rys. 2
rys. 3
PIR Transmitter Unit
Drill a hole on the wall at your required height.
Insert a wall plug (included) into the hole.
Then insert a screw (included) into the wall plug. Be noted that you should not insert completely the screw into the wall
plug, but keep a suitable length out of the wall surface, which is to hold the transmitter.
Finally you can hang the transmitter.
(Mounting on UPVC or metal doorframe surfaces will reduce the transmitting range.)
Receiver Unit
Drill two holes on the wall at your required height. The distance between the two holes should match the two hanging
holes at the back of the receiver. Then insert two wall plugs (included) into the holes. After that, insert two screws
(included) into the wall plugs. Be noted that you should not insert completely the screws into the wall plug, but keep a
suitable length out of the wall surface, which is to hold the receiver. Finally you can hang the receiver. Avoid positioning
on UPVC Frames, above heat sources (e.g. radiator) or in damp areas such as a kitchen or bathroom.
Installation
Install the PIR transmitter in channels through by cars or on wall of the indoor main channels or key monitoring area.
During installation, pay attention to the followings: avoid direct sunlight; don’t be in face of glass doors and windows;
don’t be opposite to cold and hot air vents or sources; and don’t be opposite to any easy oscillation. The recommended
installation height is 1.0m-1.5m, adjusting the angle to make it face the monitoring area. If a car or a person moves into
the detection range of the PIR transmitter; the PIR transmitter will send a signal to the receiver. The receiver makes
ding-dong or alarm sound after receiving the signal to warn the master.
FUNCTIONS INSTRUCTION
rys. 4a
rys. 4b
3

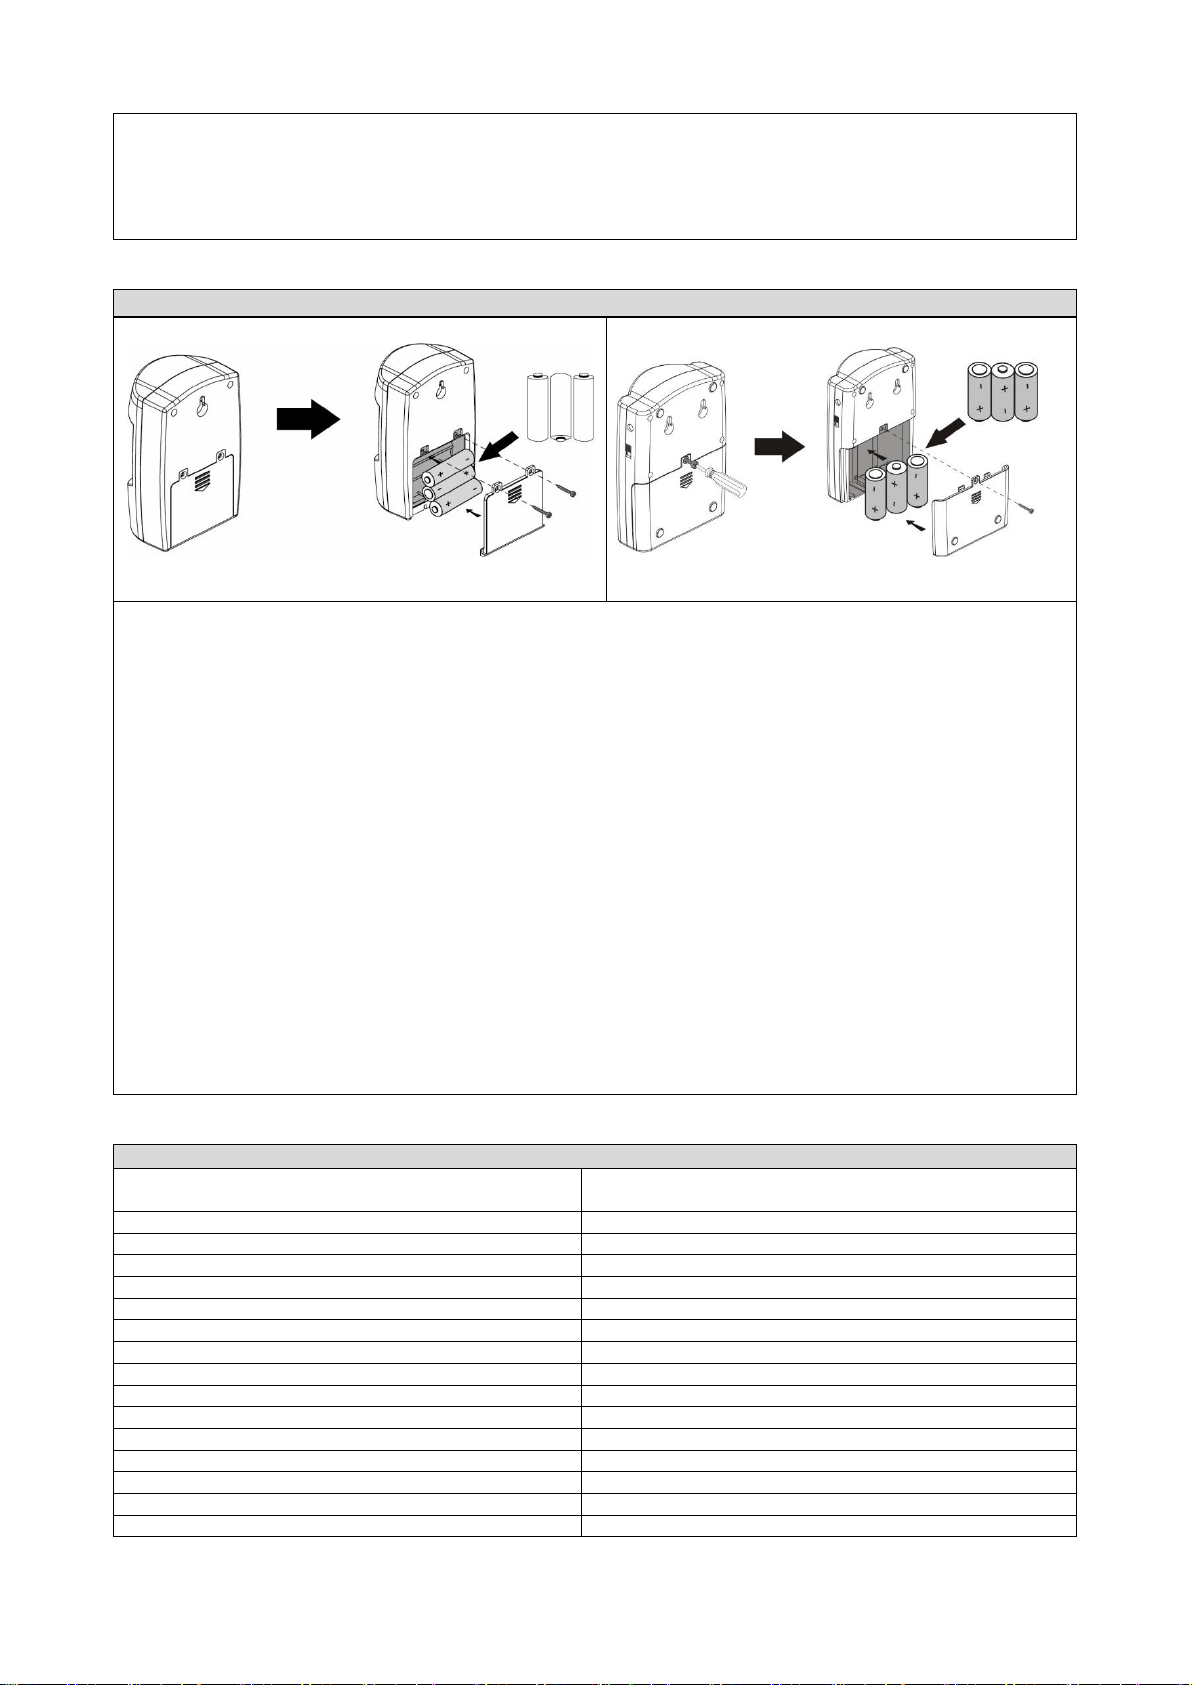
Battery Installation (PIR Transmitter)
1. Remove the screws on the rear of the PIR Transmitter
with a cross-headed screwdriver. Remove
the battery compartment cover.
2. Insert three A A A 1.5 V batteries in the battery
compartment according to the”+ -”marks in the
battery compartment.
3. Replace the compartment cover and secure the screws.
Battery Installation (Receiver)
1. Remove the screws on the rear of the Receiver with a
cross-headed screwdriver. Remove the
battery compartment cover.
2. Insert three C type batteries in the battery
compartment according to the”+ -”marks.
3. Replace the battery compartment cover and secure
the screws.
1. Install the PIR Transmitter with three AAA alkaline batteries. It turns into induction state after 10 seconds power-on,
with induction time interval 5 seconds.
2. Install the receiver with three 1.5V type “C” alkaline batteries or plug the receiver into DC6V 200mA power. Move the
On/Off Switch to the ON position. Maximum 50 codes can be matched and saved in the receiver within 15 seconds.
After 15 seconds, the receiver turns into power saving mode. Note: If there is no code matched and saved within the
first 15s, the receiver can be matched with and save ONLY one code after 15s.
3. When there is a code saved within the receiver, you need not to match the code the second time you turn on the
power, as the receiver will come directly into alarm state or chime state.
4. If you want to add PIR Transmitter or magnetic transmitter, press the auto-learning code button on the side of the
Receiver once, then trigger the PIR Transmitter or magnetic transmitter. The Receiver will sound to indicate that the
transmitter works successfully with the Receiver. (Press the button once can only match one transmitter).
5. Press the auto-learning code button and hold for 5 seconds, you can delete all the information within the receiver. At
the same time, the LED indicator light will flash and receiver sounds.
6. There is a Sound and Flash Switch Button on the side of the receiver. Press this button for three options, working
only with sound, only LED flash, sound and LED flash.2
7. Low voltage indication: normal voltage for the receiver 3.08V±0.1V and for the transmitter 3.08V±0.1V. If lower than
this voltage, the LED indicator light will flash once every second to remind you to change the batteries.
8.There is one Chime-Low-Alarm switch on the side of the receiver. It operates as follows: High Volume Chime/ Low
Volume Chime / Alarm.
9. Move the Chime-Low-Alarm switch to Chime or Low position the receiver will work as a chime. Move the switch to
Alarm position, it will work as an Alarm.
10.The receiver batteries’ lifespan: if a 1.5V C battery with capacity 7800mAh is used, based on average 10 sounds per
day, 80% of the battery capacity available, these three batteries can be used for 20 months.
11.The PIR transmitter batteries’ lifespan: if a 1.5V AAA battery with capacity 1150mAh is used, based on average 10
sounds per day, 80% of the battery capacity available, these three batteries can be used for 12 months.
DANE TECHNICZNE*:
Power Supply (Receiver):
1.5 V C Battery x 3 (not included) or DC 6V (not included)
Power Supply (PIR Transmitter):
3x AAA battery (not included)
Working Current (Receiver Alarming):
<180mA
Working Current (Receiver Chiming):
<200mA
Quiescent Current (Receiver):
<400uA
Working Current (PIR Transmitter):
<15mA
Quiescent Current(PIR Transmitter):
<50uA
Range in open area:
120 m
Ring Volume:
≥95 dB
Sensing Distance:
5-8 m
Sensing Angle:
45 st.
Protection rating::
IP44
Receiver dimensions:
92 x 128 x 41 mm
Transmitter dimensions:
68 x 105 x 42 mm
Receiver net weight:
0,12 kg
Transmiter net weight:
0,06 kg
4
(PL) Instrukcja obsługi i montażu
CHARAKTERYSTYKA:
Urządzenie umożliwia kontrolę drzwi wejściowych, które znajdują się w innym pomieszczeniu lub budynku.
Czujnik ruchu PIR, reagujący na zmiany temperatur w obszarze detekcji, bezprzewodowo (falami
radiowymi) przesyła impuls do odbiornika, który sygnałem dźwiękowym (ding-dong, ding-dong cichy lub
alarm) oraz świetlnym (diody LED) powiadamia o wykryciu ruchu w strefie chronionej. Stopień ochrony IP44
pozwala na montaż czujnika na zewnątrz oraz w pomieszczeniach o podwyższonej wilgotności.
BUDOWA URZĄDZENIA
Odbiornik
rys. 1a
1. Dioda LED
2. Głośnik
3. Wejście na zasilacz DC6V typu jack
4. 3 pozycyjny przełącznik CHIME – ding
dong głośny, LOW – ding dong cichy,
ALARM – dźwięk alarmowy)
5. Włącznik ON/OFF (włącz/wyłącz)
6. Zmiana sygnalizacji PRACY
(dźwiękowo-świetlna lub świetlna)
7. Przycisk learning code (logowanie
dodatkowych czujników)
Czujnik (nadajnik)
rys 1b
8. Czujnik ruchu PIR
9. Dioda LED
10. Otwory do zawieszenia na ścianie
11. Śruby zabezpieczające baterie
12. Osłona kieszeni na baterie
MONTAŻ CZUJNIKA I ODBIORNIKA
rys. 2
rys. 3
Określ lokalizację czujnika i odbiornika. Wybierz lokalizacje bez ukrytych przewodów, które mogłyby stykać się
z wkrętami montażowymi.
Wybierając lokalizację dla czujnika, postępuj według następujących zaleceń:
1. Posługując się osprzętem montażowym (brak w zestawie), zamontuj czujnik na płaskiej powierzchni.
2. Umieść odbiornik w odległości maksymalnie do 120 m od czujnika.
3. Zawieś lub postaw odbiornik na płaskiej powierzchni. Odbiornik nie jest odporny na działanie czynników
atmosferycznych.
5
a. Czujnik ruchu działa na podczerwień i może wykrywać ciepło. Unikaj kierowania czujnika na obszary, gdzie
wytwarzane jest ciepło
b. Czujnik zamontuj co najmniej 1m nad ziemią. Jeżeli jest on umieszczany pod okapem garażu, zadbaj aby nie
był on blokowany przez płytę czołową dachu.
c. W przypadku montowania czujnika na wysokości powyżej 2 m, skieruj go ku dołowi tak, aby obejmował swoim
polem widzenia nadzorowany obszar.
OBSŁUGA
rys. 4a
rys. 4b
1. W kieszeni na baterie czujnika (rys. 4a) umieść trzy baterie alkaliczne AAA. Po 10 sekundach od włączenia
nadajnik uaktywni się.
2. W kieszeni na baterie odbiornika (rys. 4b) umieść trzy baterie alkaliczne 1,5V typu C lub podłącz do zasilacza
DC6V, 200mA (Nie używaj równocześnie zasilacza i baterii w odbiorniku!). Przesuń włącznik na pozycję „ON”.
Maksymalnie 5 kodów może zostać dopasowanych i zapisanych w odbiorniku w ciągu 15 sekund. Po tym
czasie odbiornik przejdzie w tryb oszczędzania energii.
Uwaga: Jeśli w ciągu pierwszych 15 sekund nie zostanie zarejestrowany żaden kod, odbiornik będzie w stanie
dopasować i zapisać tylko jeden kod.
3. Jeśli przy pierwszym uruchomieniu w odbiorniku zostały zapisane kody, nie ma potrzeby wyszukiwać ich przy
kolejnym uruchomieniu. Odbiornik przejdzie od razu w tryb alarmu lub dzwonka.
4. Jeśli chcesz zalogować dodatkowy czujnik ruchu PIR, wciśnij jednokrotnie przycisk learning code umieszczony
z boku odbiornika, a następnie uruchom czujnik. Odbiornik za pomocą sygnału oznajmi, że poprawnie
współpracuje z nadajnikiem. (Wciśnięcie przycisku jeden raz daje możliwość przypisania tylko jednego
nadajnika).
5. Wciśnij przycisk learning code i przytrzymaj przez 5 sekund jeśli chcesz usunąć wszystkie zalogowane czujniki.
W tym samym czasie dioda LED odbiornika będzie dawać sygnały dźwiękowe i świetlne.
6. Z boku odbiornika umieszczony jest przełącznik zmiany sygnalizacji pracy dźwiękowo-świetlna lub świetlna.
7. Wskaźnik niskiego naładowania baterii – gdy konieczna będzie wymiana baterii dioda LED będzie błyskać raz
na sekundę.
8. Odbiornik jest wyposażony w 3-pozycyjny przełącznik trybów dźwięku: CHIME - głośny dzwonek, LOW - cichy
dzwonek, ALARM – dźwięk alarmu.
9. Przy przełączeniu odbiornika w pozycję „głośny dzwonek” lub „cichy dzwonek”, odbiornik pracuje jako
dzwonek. W pozycji „alarm” odbiornik pracuje jako alarm.
DANE TECHNICZNE*:
zasilanie odbiornika:
3 x 1,5V C, LR14 (brak w zestawie)
lub opcjonalnie z zasilacza 6VDC (brak w zestawie)
zasilanie czujnika:
3 x 1,5V AAA (brak w zestawie)
pobór prądu przez odbiornik podczas alarmu:
<180mA
pobór prądu przez odbiornik podczas dzwonka:
<200mA
pobór prądu odbiornika w czasie czuwania:
<400uA
pobór prądu nadajnika w czasie aktywacji:
<15mA
pobór prądu nadajnika w czasie czuwania:
<50uA
zasięg w terenie otwartym:
120 m
poziom głośności:
≥95 dB
zasięg wykrywania ruchu czujnika:
5-8 m
kąt detekcji czujnika:
45 st.
stopień ochrony czujnika:
IP44
wymiary odbiornika:
92 x 128 x 41 mm
wymiary czujnika:
68 x 105 x 42 mm
waga odbiornika:
0,12 kg
waga nadajnika:
0,06 kg
6
 Loading...