


Monitor 10” HLED 1
User manual
No. UM0972220 A 01
11/2015
English
Article No. 0224000
Monitor 10” HLED MR 1
32
UM0972220 A 01
UM0972220 A 01
Contents
User Manual
ORLACO Monitor 10” HLED 1
Manual number UM0972220, Version A 01
Check with Orlaco which language versions are available. This
manual contains user instructions. Used photographs and
illustrations give general information and may differ from the
products you use.
Contact your Orlaco dealer if you have questions, additional
information, or want to make changes that are not described in this
manual.
The camera and monitor systems from Orlaco comply with the
latest CE, ADR, EMC and mirror-directive regulations. All products
are manufactured in accordance with the ISO 9001 quality management, ISO/TS 16949 quality automotive and ISO 14001 environmental management.
For installation Orlaco Monitor 10” HLED MR 1
see Manual IM0973580.
Used abbreviations
ABC = Auto Backlight Control
OSD = On Screen Display
HDR = High Dynamic Range
STND = Standard
LCD = Liquid Cristal Display
CAN = Controller Area Network
Article number ORLACO Monitor 10” HLED 1
This manual describes the operating instructions of the following
ORLACO article numbers. The article numbers can be found on the
label on the back of the Monitors.
HLED 0224000
Version details
Version R1-0. First issue, November 2015.
Version R1-1. Name article changed, March 2016.
Version R1-2. Functions added in Service Menu, October 2016.
Version A 01. Article name changed, Feruary 2017.
Contents Page
1. Quick Reference 4
2. Getting Started 6
2.1. Disclaimer 6
2.2. Description of the Keyboard 6
2.3. Language setting for the OSD menu 6
3. Keyboard 7
3.1. Button 1. 7
3.2. Button 2. Auto LCD Backlight Control/Day/Night settings 7
3.3. Button 3. Setting the contrast 8
3.4. Button 4. Setting the brightness 8
3.5. Button 3 en 4. setting color saturation 8
3.6. Locking buttons 2. 3. 4. 8
4. Using the service menu 9
4.1. Camera settings 9
4.1.1. Mirror 9
4.1.2. Upside down 9
4.1.3. Brightness 9
4.1.4. Contrast 9
4.1.5. Saturation 9
4.1.6. HDR 9
4.2. Camera tags 9
4.3. System settings 10
4.3.1. Language 10
4.3.2. On Screen Display (OSD) 10
4.3.3. Keyboard 10
4.3.4. Power settings 11
4.3.5. CAN bus 11
4.3.6. Scanning. 11
4.3.7. Camera switch 12
4.3.8. LCD Backlight 12
4.3.9. Front camera 12
4.3.10. Default settings 12
4.4. Info 12
5. Using the operator menu 13
5.1. Language 13
5.2. Camera settings 13
6. System overview 14
7. Overview of menus 15
Keyboard Monitor 10” HLED 1
Art. no. 0224000;
Monitor 10” HLED 1
54
UM0972220 A 01
UM0972220 A 01
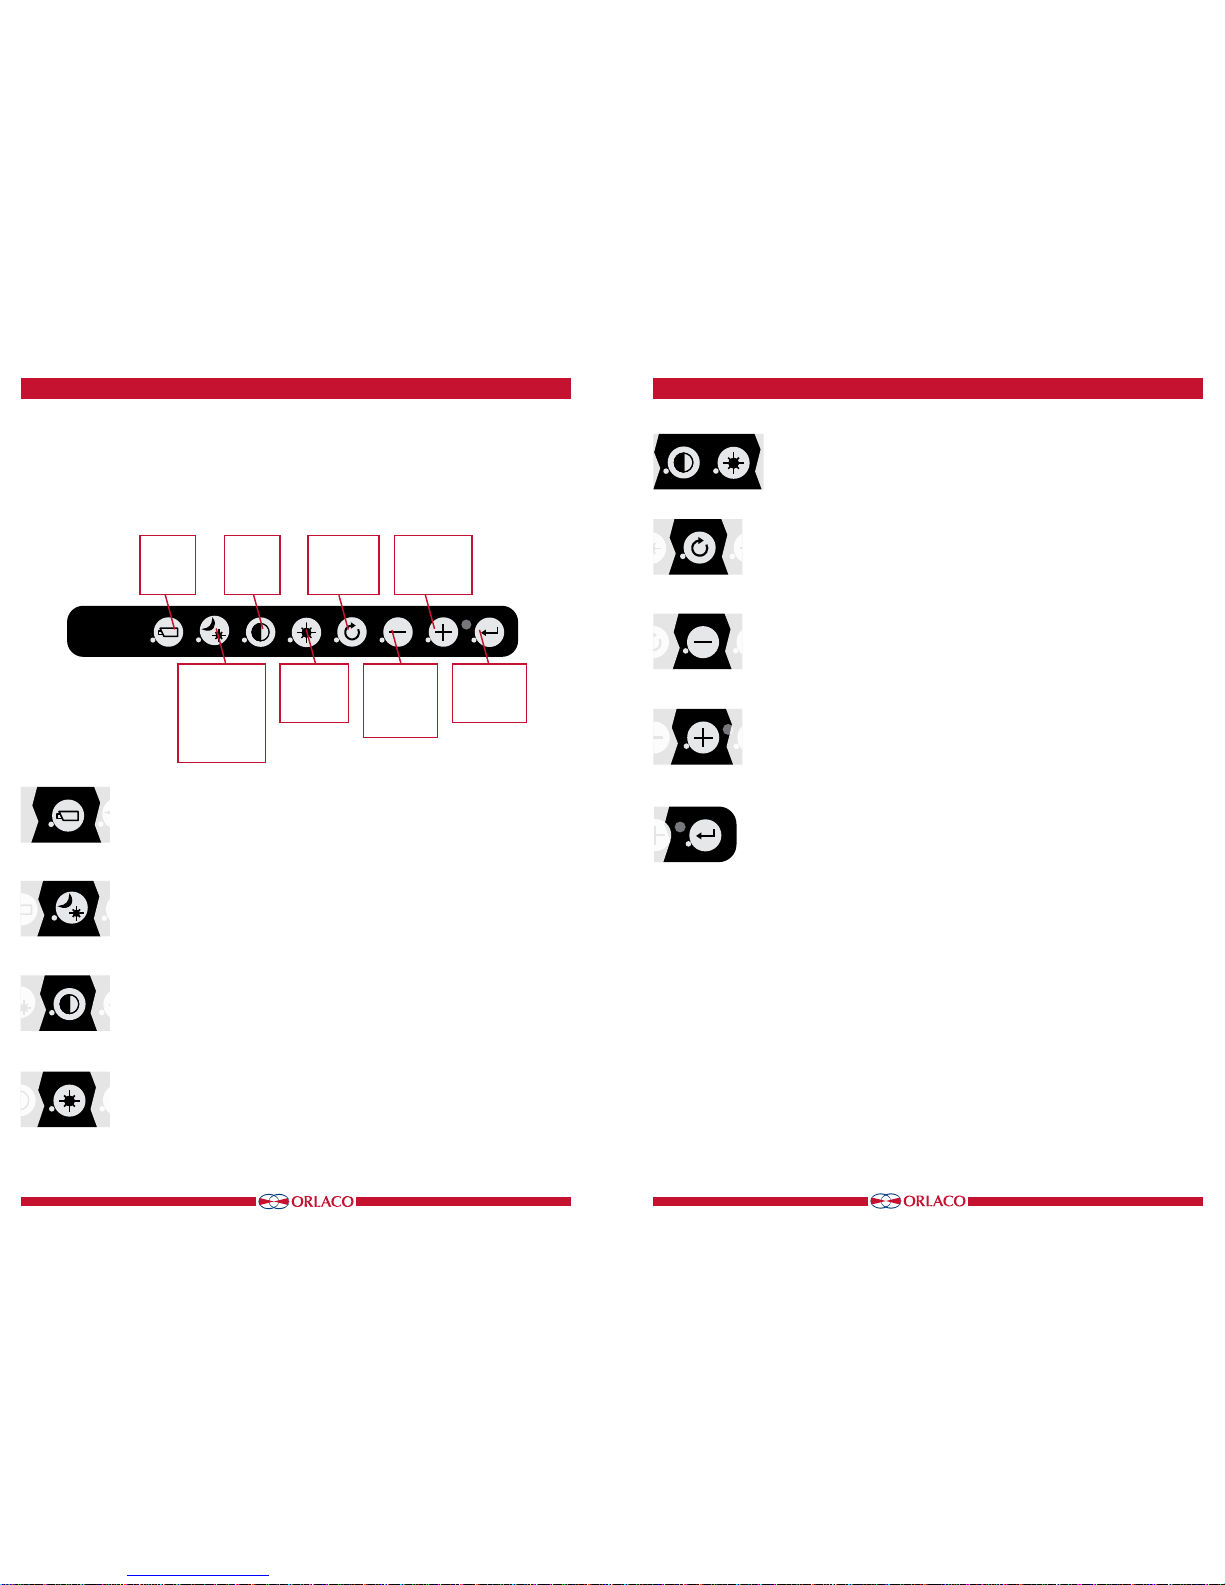
1. Quick Reference
Button 2
Auto backlight
control
day/night
modes
Button 3
Contrast
Button 4
Brightness
Button 5
Option/previous menu
Button 6
Minus select/setting
Button 7
Plus
+
select/setting
Button 8
Enter /
standby
Button 1
Button 1, camera selection
This button has no function because only one camera is connected.
Button 2, auto backlight control day/night settings
Press this button to switch between the auto backlight day and night settings.
Button 3, setting the contrast
Press the button once in order to enable the setting mode. Use the minus and plus
buttons to set the required contrast. Press the button again to disable the setting
mode.
Button 4, setting the brightness
Press the brightness button once in order to enable the setting mode. Set the required
brightness using the minus and plus buttons. Press the button again to disable the
setting mode.
Keyboard
Below is a brief description of the button functions. See sections 3 and 4 for a more detailed explanation.
Button 1
Button 2
Button 3
Button 4
Button 3
Buttons 3 + 4
Button 4
Button 5
Button 6
Button 7
Button 8
Buttons 3 and 4, setting color saturation
Press the contrast (3) and brightness (4) buttons simultaneously to enable the
setting mode. Set the required color saturation using the minus and plus buttons.
Button 5, option/previous menu
Return to the previous menu.
Button 6, minus
Go to the next menu option or move left.
Button 7, plus
Go to the previous menu option or move right.
Button 8, enter
Switch to Standby or in the menus, select or activate the chosen option.
Button 5
Button 6
Button 7
Button 8
76
UM0972220 A 01
UM0972220 A 01
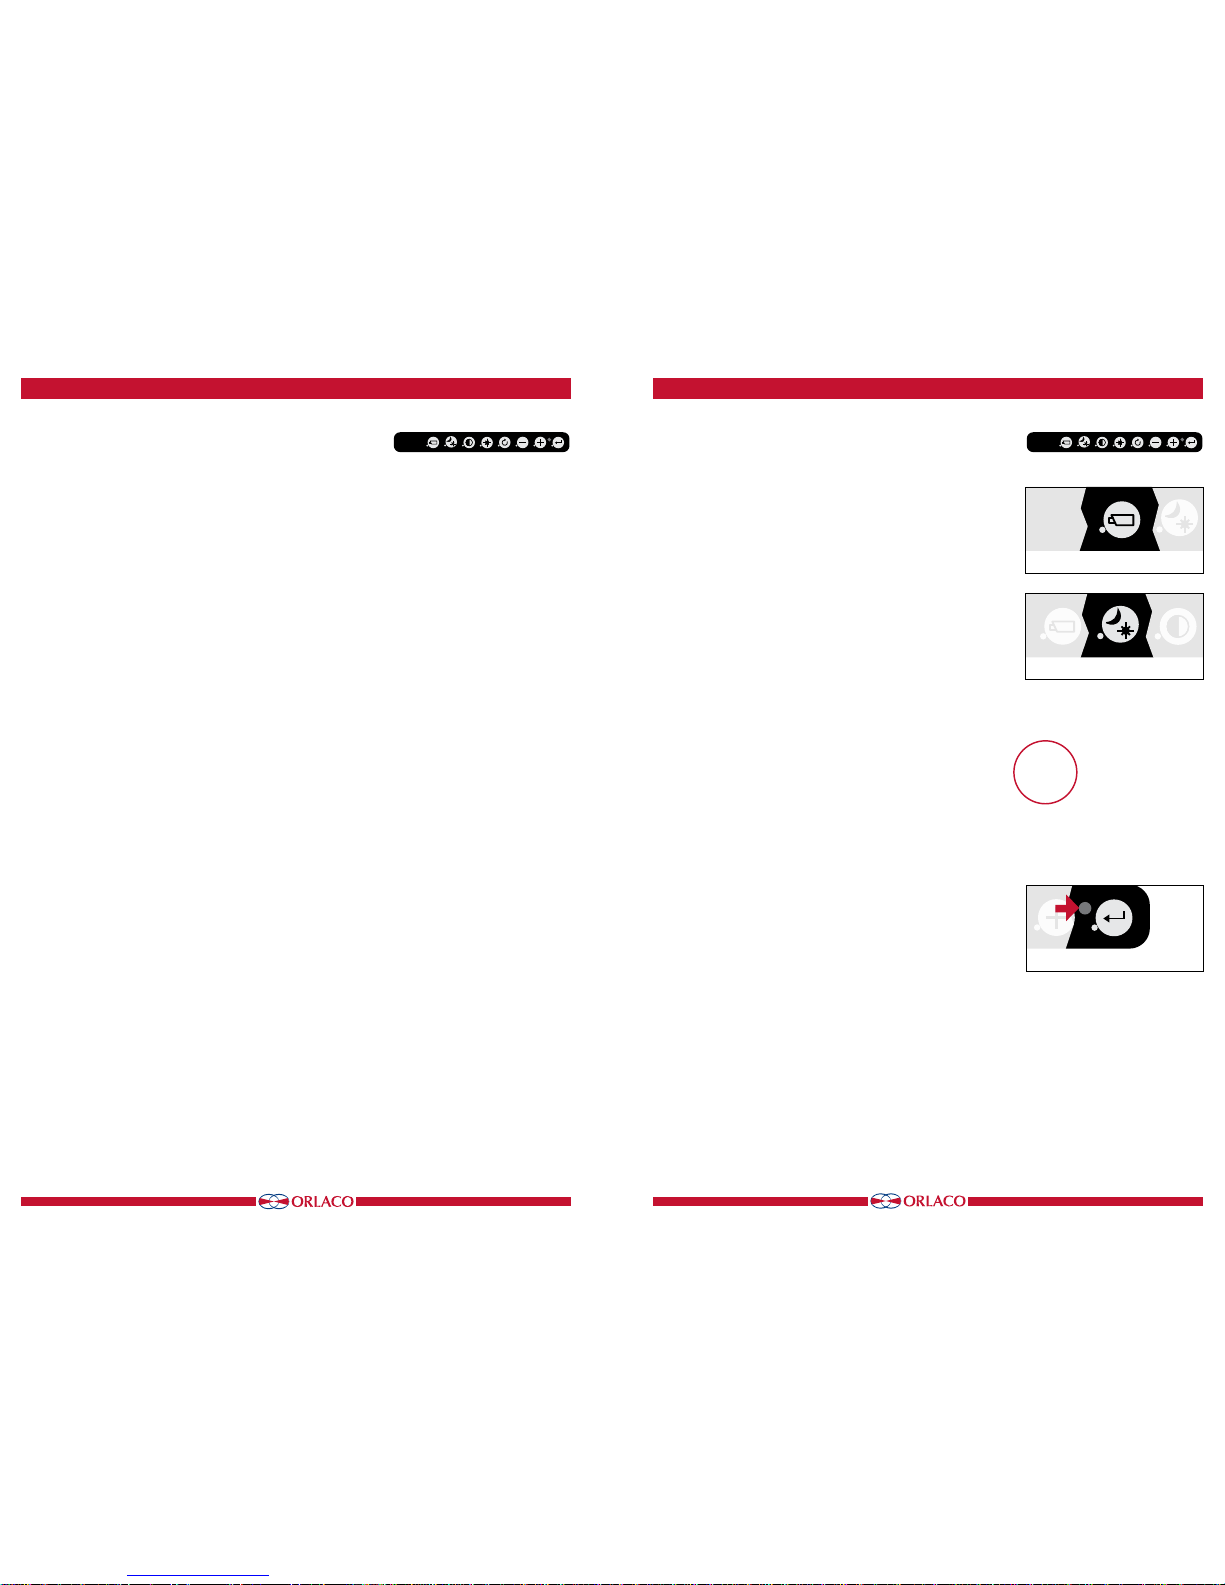
2.1. Disclaimer
When switching on the monitor for the first time, a disclaimer appears in English for 5 seconds (see Figure 1).
Displayed text: Do not operate display functions during safety criti-
cal operations. Objects in the monitor are closer than they appear. If
a different language is subsequently set, the disclaimer text appears
in the set language.
2.2. Description of the keyboard
Button no. 1 = No function
Button no. 2 = Auto LCD backlight control day/night settings
Button no. 3 = Contrast
Button no. 4 = Brightness
Button no. 5 = Option/previous menu
Button no. 6 = Minus selection/setting button (-)
Button no. 7 = Plus selection/setting button (+)
Button no. 8 = Enter/Standby
2.3. Language setting for the OSD (On Screen Display)
menu
The OSD menu language is set as English by default. If you would
like to operate the OSD menu in a different language, open the
service menu → system settings. See section 4 on page 13. The
OSD menu is available in English, Dutch, German, French, Czech,
Hungarian, Italian, Polish, Portuguese, Spanish, Turkish, Swedish,
Finnish, Danish and Norwegian.
Figure 1
Buttons 1 2 3 4 5 6 7 8
2. Getting started
Button 1
3. Keyboard
3.1. Button 1
This button has no function because only one camera is connected.
3.2. Button 2, auto LCD backlight control day/night settings
See figure 4.
Press this button to switch between:
• The ABC mode
• The LCD backlight day setting
• The LCD backlight night setting
The ABC mode controls the backlight between a minimum (adjustable; see also under service menu on page 11) and a maximum
level depending on the intensity of the ambient light. A light sensor
on the keyboard measures the ambient light (see Figure 5). The
ABC mode can also be used to set a red night mode or a blue night
mode (ABC-RED/ABC-BLUE).
In the day and night mode (STND-RED-BLUE) the brightness of the
backlight can be manually set using the minus and plus buttons
(the settings are saved).
Figure 5
Buttons 1 2 3 4 5 6 7 8
Figure 2
Figure 3
Button 1
Button 2
Figure 4
Button 7
Button 8
98
UM0972220 A 01
UM0972220 A 01
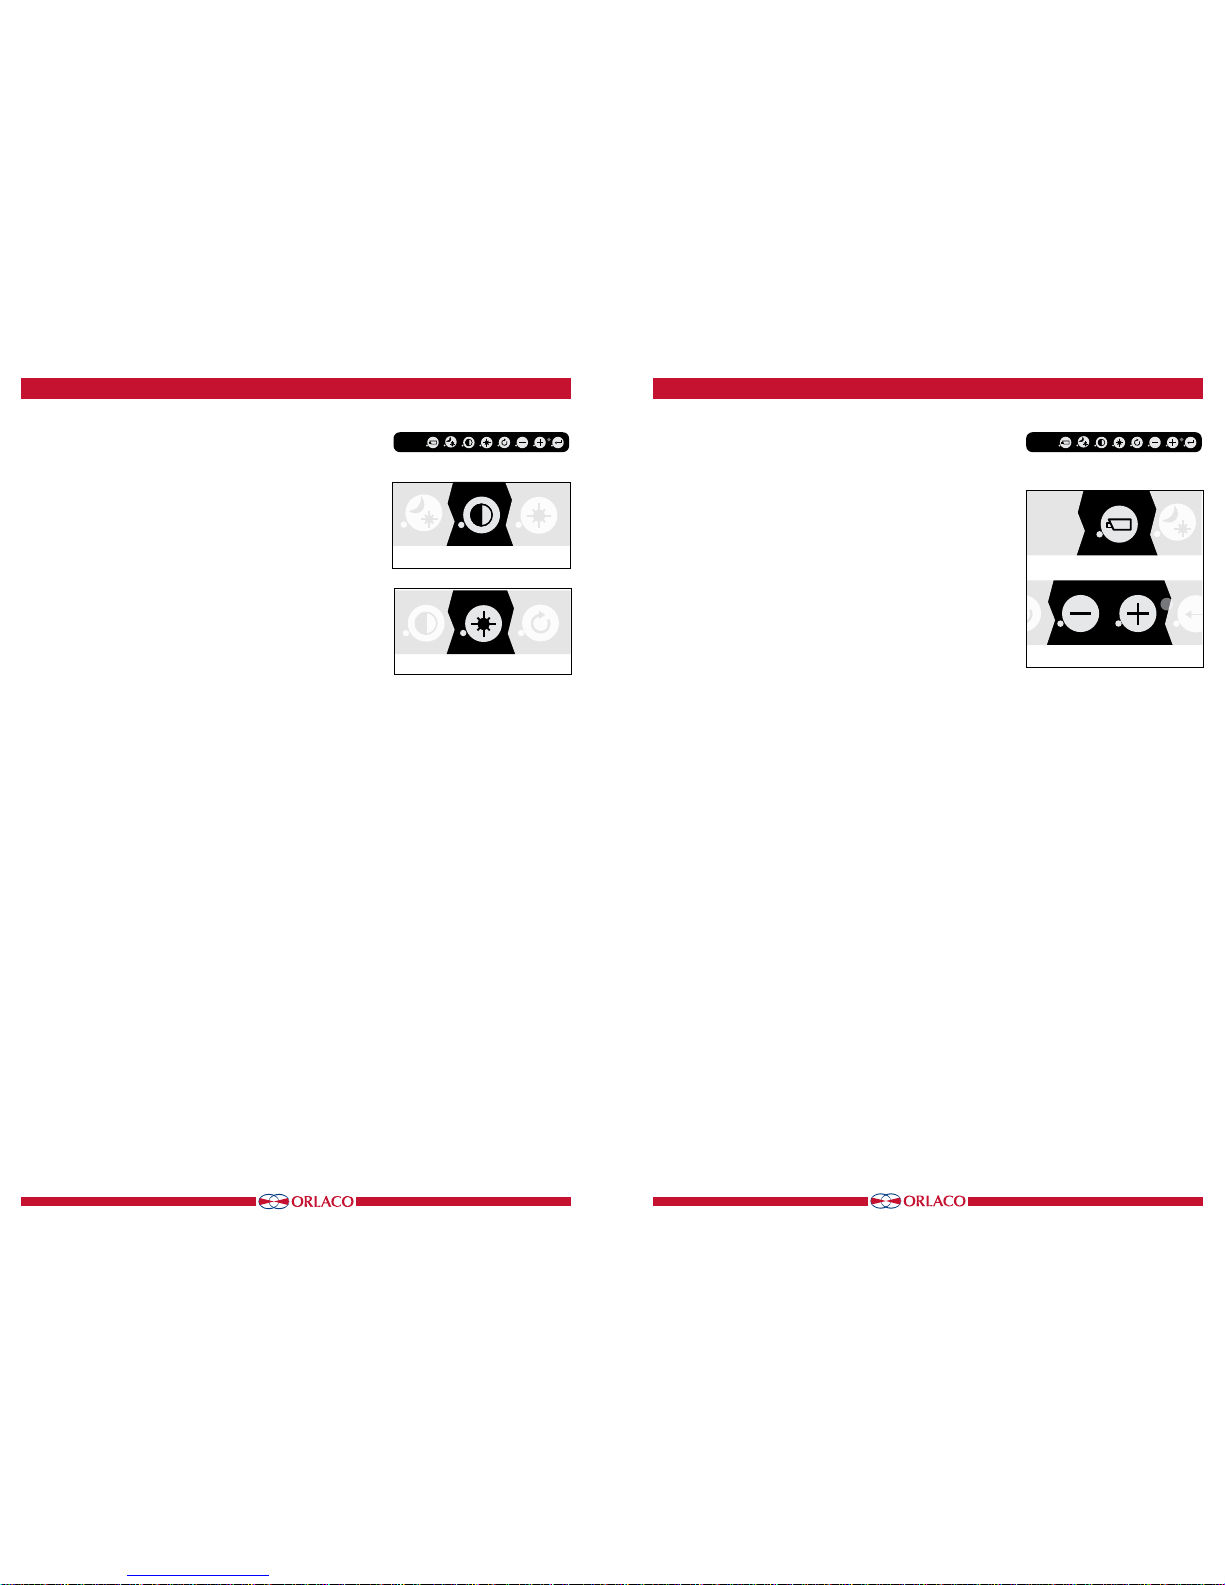
3.3. Button 3, setting the contrast
Press the contrast button (3) once to enable the setting mode
(see Figure 6). Use the minus and plus buttons to set the required
contrast.
3.4. Button 4, setting the brightness
Press the brightness button (4) once to enable the setting mode
(see Figure 7). Set the required brightness using the minus and
plus buttons.
3.5. Buttons 3 and 4, setting color saturation
Press the contrast (3) and brightness (4) buttons simultaneously to
enable the setting mode.
Set the required color saturation using the minus and plus buttons.
3.6. Locking buttons 2, 3 and 4
These buttons can be locked in the service menu (section 4.3.3.
keyboard, see page 10).
3. Keyboard
Figure 7
Figure 6
Button 3
Button 4
Button 2
Button 3
Buttons 1 2 3 4 5 6 7 8
Figure 8
Figure 11
Figure 9
Figure 10
4. Service menu
Buttons 1 2 3 4 5 6 7 8
Buttons 6 + 7
Button 6
Button 7
Button 8
Button 1
Figure 12
4. Using the service menu
To open the service menu, simultaneously press the camera selection button (1), the minus button (6) and the plus button (7) (see
Figure 8). The Monitor (see Figure 9) will appear. The following
buttons are used to navigate through the menus:
5 - Option/previous menu: Return to the previous menu
6 - Minus: Go to the next menu option
7 - Plus: Go to the previous menu option
8 - Enter: Select or enable the chosen option
4.1.
Camera settings
Select camera settings. Press enter to open the 'Camera settings' menu.
Press enter again to activate the cursor in the list of items. Use the mi
nus (6) and plus (7) buttons to select the item to adjust and then confirm
this selection by pressing the enter button. If the selection is an on/off
switch, you can choose between on and off. If the selection is a number,
you can change the value using the minus (6) and plus (7) buttons. Save
the new settings by pressing the enter button (8).
4.1.1. Mirror
Enable this option to reverse the image (left/right).
4.1.2. Upside down
This option flips the image (upside down).
4.1.3. Brightness
The setting for the brightness of the monitor. For direct button
operation: Button 4.
4.1.4. Contrast
The setting for contrast on the monitor. For direct button operation:
Button 3.
4.1.5. Saturation
The color saturation (Color intensity) setting for the camera image.
For direct button operation: Buttons 3+4.
4.1.6 Switch delay
Enable this option if the switchwire is controlled by an intermittent
signal (e.g. from an indicator light).
4.1.7. HDR
Enable this option for the High Dynamic Range camera mode. Turn
on or off.
4.2. Camera tags
See Figure 12. In this menu, names can be given to the camera
input.

1110
UM0972220 A 01
UM0972220 A 01
4.3. System settings (see Figure 13)
4.3.1. Language
See Figure 14. This option opens the language selection menu. The
selected language will be used for all OSD menus. The OSD menu is
available in English, Dutch, German, French, Czech, Hungarian,
Italian, Polish, Portuguese, Spanish, Turkish, Swedish, Finnish,
Danish and Norwegian.
4.3.2. On Screen Display (OSD)
This option opens the OSD settings menu. See Figure 15.
The following can be set in this menu:
OSD time-out
Sets the time (in seconds) that the OSD (camera number/name,
top left) appears on the monitor. Select 'Off' to disable this and
'On' to have this permanently enabled.
Info transparency
Changes the transparency of the camera tag, etc.
Menu transparency
Changes the transparency of the system menu.
Disclaimer transparency
Changes the transparency of the disclaimer when starting up.
OSD menu help
This function enables or disables the automatic text messages
of the OSD help menus. If enabled, help messages automatically
appear in all menus after 10 seconds of inactivity.
4.3.3. Keyboard
This option opens the keyboard menu. See Figure 17.
Keyboard lock
This option opens the settings menu for the keyboard lock. It
is possible to lock various functions in order to prevent any
unwanted changes. See Figure 18.
Figure 13
Figure 14
4. Service menu
Figure 17
Figure 18
Figure 15
Figure 21
4. Service menu
Figure 19
Figure 20
4.3.4. Power settings
See Figure 19. This menu has the following option:
Standby mode
There are three available choices — use the minus and plus buttons to select the various functions.
MNU = With this setting you access the operator menu via the
enter button (8). Select the required setting.
IMM = Immediate standby.
2S = Standby after a delay of 2 seconds.
4.3.5. CAN bus
See Figure 20. This option opens the CAN bus menu. This menu
has the following 5 options:
CAN protocol
This option selects the signal, or CAN protocol, that the Monitor
uses. By default this is Orlaco CAN protocol 1. Other protocols
are customer-specific. The CAN speed is automatically adjusted,
but it can also be set manually once the protocol has been
selected.
CAN speed
This option selects the bit rate of the CAN bus. Available options
are: 100, 125, 200, 250, 500 and 1000 kbit.
Set CAN-ID
The Orlaco CAN protocol has an ID (default 0) to control multiple
monitors via one CAN bus. The ID is inactive when the text is
blue and becomes active when the protocol is set to 1. The CANID can be set from 0-15 where 0 is the default value.
Terminator
Enable/disable the 120 Ω terminator (CAN or RS485) between Rx
and Tx.
4.3.6. LCD backlight
This option opens the backlight submenu for the Monitor 10” HLED.
See Figure 21. This menu has the following 4 options:
LCD backlight mode
This option enables automatic backlight control (ABC). The Monitor automatically adapts its brightness to the ambient light. If
required, a specific day or night brightness can be manually set.
Alternatively, the user can choose to manually adjust the day or
night brightness setting or select a red or blue night mode.
ABC = Standard Automatic Brightness Control
A_B = ABC blue mode
A_R = ABC red mode
DAY = Day mode (can be adjusted between 50–100%)
NIT = Night mode (can be adjusted between 0–50%)
N_B = Night blue mode (can be adjusted between 0–50%),
N_R = Night red mode (can be adjusted between 0–50%)
1312
UM0972220 A 01
UM0972220 A 01
Figure 30
Figure 29
Figure 31
Figure 24
Figure 22
Figure 25
Figure 23
Figure 26
Figure 27
Figure 28
5. Using the operator menu
The operator menu is not available by default due to the keyboard
lock. To disable the lock, refer to system settings on page 15.
Press the minus and plus buttons simultaneously to open the
operator menu. The following buttons are used for navigation:
5 - Option/previous menu:
Return to the previous menu
6 - Minus:
Go to the next menu option
7 - Plus:
Go to the previous menu option
8 - Enter:
Select or enable the chosen option
The following settings can be adjusted (see Figure 29):
Language
Camera settings
5.1. Language
This option opens the language selection menu (see Figure 30).
The selected language will be used for all OSD (On Screen Display)
menus. The OSD menu is available in English, Dutch, German,
French, Czech, Hungarian, Italian, Polish, Portuguese, Spanish,
Turkish, Swedish, Finnish, Danish and Norwegian.
5.2. Camera settings (see Figure 31)
ABC minimum level
This setting determines the minimum brightness the ABC can use
when there is low ambient light.
LCD backlight day
This option allows the day brightness setting to be manually
adjusted (50–100%).
LCD backlight night
This option allows the night brightness setting to be manually
adjusted (0–50%).
4.3.7. Scanning
This option opens the camera scanning submenu. See Figure 22.
This menu has the following options:
Scan sequence
This option selects the cameras from which images are to be
shown in sequence.
Scan interval
This option selects how long a camera image is displayed.
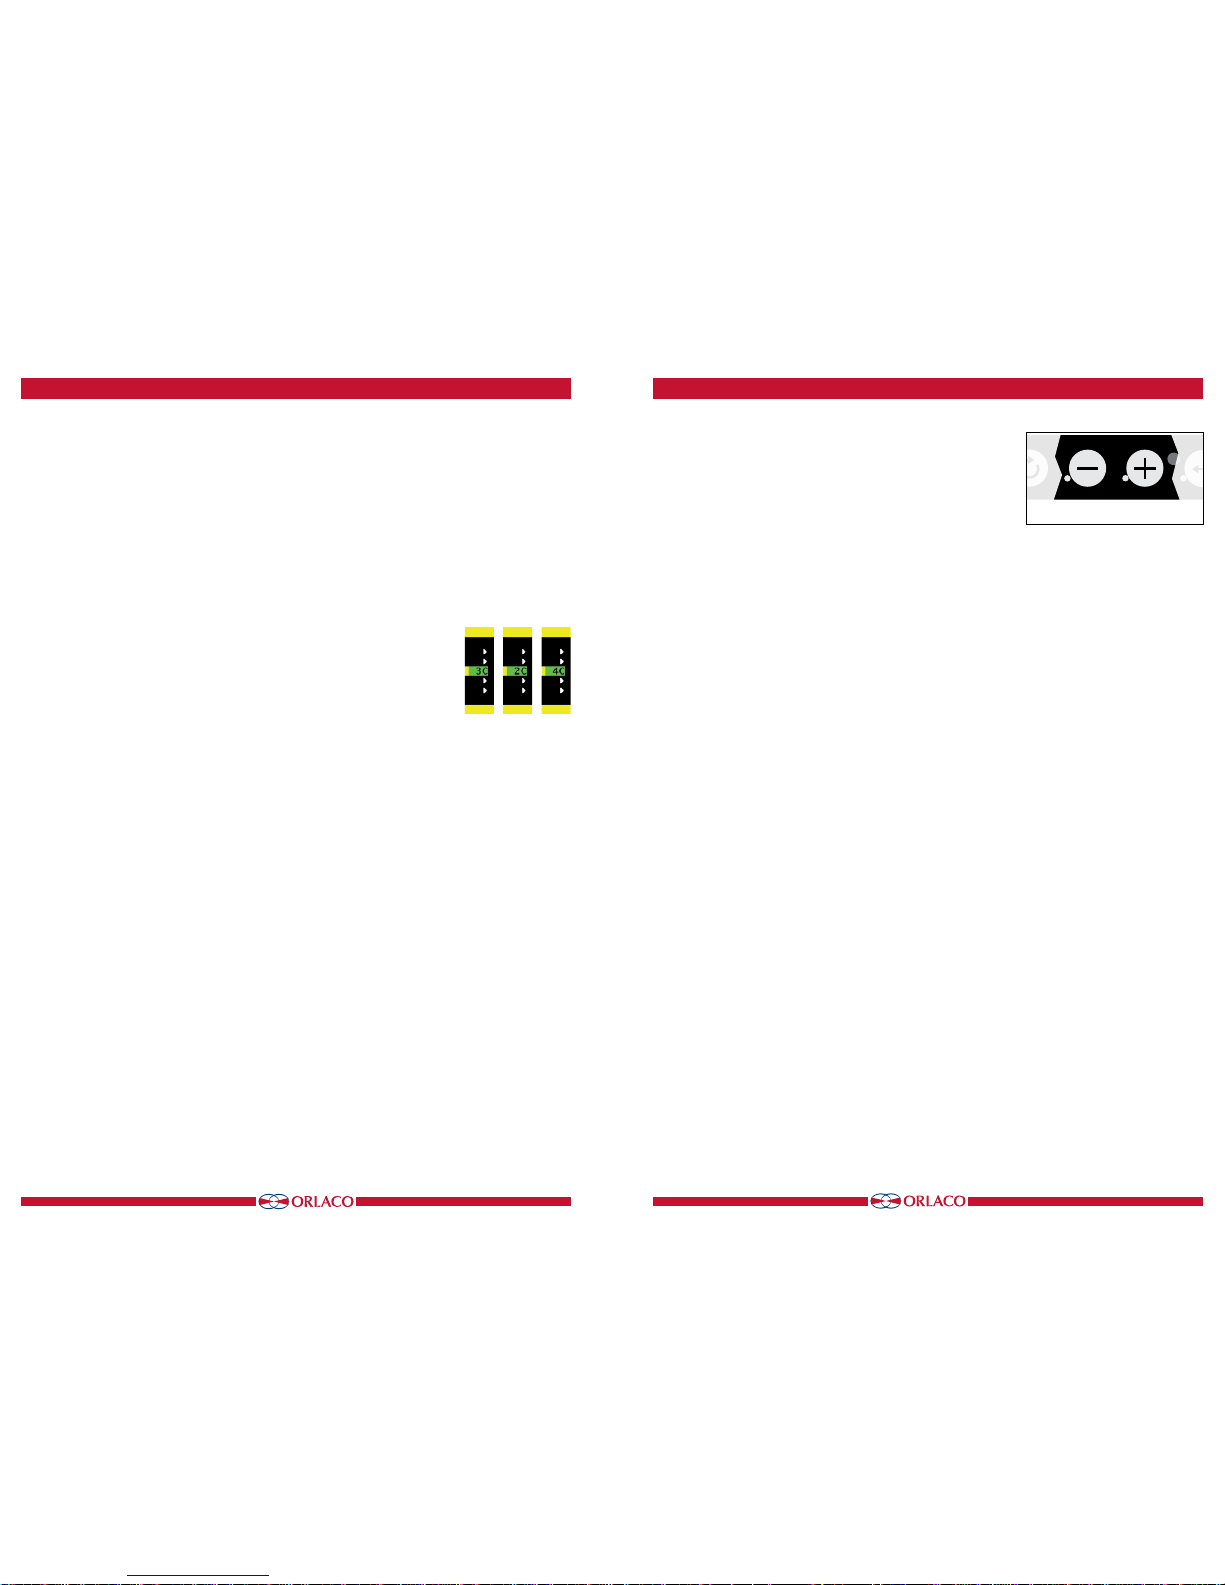
4.3.8. Camera switch
This option configures the type of video switch that is used. See
Figure 23.
‘OFF’ if no camera switch is used → 1 camera system.
‘3C’ for an external UNI camera switch → 3 camera system.
‘2C’ to use the internal switch → 2 camera system.
‘4C’ if a combination of internal and external switches and a 2–4
camera cable are used → 4 camera system.
4.3.9. Front camera
See Frontcam manual 0993850. This option opens the front camera
submenu for the Monitor 10” HLED. This enables the front camera
functionality (a legal obligation).
Function AUX wire, see figure 25.
Defines the function of the AUX1 & AUX2 switching wires (grey
and yellow). Select TCH for the tachometer function (Tacho to
AUX1 and hand brake to AUX2).
Select KEY to block the keyboard fully by activating the wire
AUX1.
4.3.10. Default settings
See figure 26. This option opens the menu to restore the factory
default settings. Select the number of the factory settings that you
require (1 = default Orlaco settings). You can choose between 36
sets of default settings. Contact ORLACO for further information.
Select the option 'Restore defaults' to restore the factory settings.
See figure 26.
4.4. Info
This user manual describes the functions of the software version
indicated on this Monitor (see Figure 27).
4. Service menu 5. Operator menu
Buttons 6 + 7
Button 6
Button 7
Button 8

1514
UM0972220 A 01
UM0972220 A 01
1 camera system
6. System overview 7. Overview of menus
Service menu
Camera- + Minus- and Plus buttons
Operator menu
Language
Camera settings
C1
1
Service menu
Camera settings
Camera tags
System settings
Info
Mirror, Upside down, Brightness, Contrast, Saturation, switch delay, HDR
System settings
Language
On screen display
Keyboard
Power settings
CAN-bus
LCD-Backlight
Scanning
Camera switch
Frontcam
Default settings
ON, OFF, 30sec, 10sec, 3sec
29 positions
29 positions
29 positions
ON/OFF
1M, 500, 250, 200, 125, 100
0 - 15
On screen display
OSD timeout
Info transparency
Menu transparency
Disclaimer transp.
OSD menu help
Keyboard
Keyboard lock
Power settings
Standby mode
CAN-bus
CAN-protocol
CAN-speed
Set CAN-ID
Terminator
IMM, MNU, 2sec
OFF, 1-6 positions
ON/OFF
ON/OFF
0-50
ON/OFF
ABC, A_B, A_R,
NIT, N_B, N_R, DAY
ON/OFF
50-100
ON/OFF
0-50
Keyboard lock
Standby menu
Operator menu
Camera settings
Standby
LCD-backlight
LCD-backlight mode
ABC Minimum level
LCD-backlight day
LCD-backlight night
Operator menu
Minus- and Plus buttons
ON/OFF
OFF 1c, 2c, 3c
1-21
0-100
OFF, TCH, KEY
Frontcam
Enable Frontcam
Invert handbrake
Pulses per meter
AUX wire function
Default settings
Select defaults
Restore defaults
English, Dutch, German, French, Czech, Hungarian,
Italian, Polish, Portuguese, Spanish, Turkish, Swedish, Finnish, Danish and Norwegian.
The operator menu is not available by default due to the keyboard lock.
English, Dutch, German,
French, Czech, Hungarian, Italian, Polish, Portuguese, Spanish, Turkish, Swedish, Finnish, Danish and Norwegian.
2s, 5s, 10s
OFF, 1-2, 1-2-3
Scanning
Scan sequence
Scan interval
OFF, 4c, 2c, 3c,
Power
Monitor HLED
Cable Uni DigiCoax 3m
Set HMOS Camera with bracket
Bracket HMOS CornerEye
Camera HMOS 180°
@

Orlaco is a Manufacturing company that specializes in making cameras and
monitor systems for commercial vehicles, fork-lift trucks, cranes, off shore
and maritime.
Our objective is to design and produce camera systems for the professional
market that improve the drivers’ view and increase operating efficiency.
A
t our facility in Barneveld we locate our design, manufacturing, warehousing
and service department.
Vision is our mission®. Orlaco therefore deploys the development, manufacture, supply and service of camera and Monitor systems that will improve
safety and efficiency of all vehicles, machinery and vessels. Our systems
give the end user a view on each blind spot and will create comfort and
improved working conditions. Our active approach will support market
demands and innovations and will lead to enthusiastic ambassadors in the
market; our customers.
ORLACO
 Loading...