


1
Owner's Manual
1.1

2

3
SAFETY PRECAUTIONS AND INSTRUCTIONS
WARNING
Make sure that the supplied adapter is suitable for the mains voltage in your country.
When using electric products, always follow basic precautions, including the following:
1 Read all of these instructions before using the product.
2 To reduce the risk of injury, close supervision is necessary when the product is used
near children.
3 Do not use this product near water - for example, near a bathtub, washbowl, kitchen
sink, in a wet basement, near a swimming pool, or the like.
4 This product in combination with sound modules, computers and external
amplification and headphones, may be capable of producing sound levels that could
cause permanent hearing loss. Do not operate for a long period of time at a high
volume leve l, or at a level that is uncomfortable. If you experience any hearing loss,
or ringing in your ears, you should consult an audiologist.
5 The product should be located so that its location, or position, does not interfere
with proper ventilation.
6 This product should only be located away from heat sources such as radiators, heat
registers, and other products that cause heat.
7 The product should be connected only to the type of power supply described in the
operating instructions, or as marked on the product.
8 This product may be equipped with a polarized plug. This is a safety feature. If you
are unable to insert the plug into the outlet, contact an electrician to replace your
obsolete outlet. Do not defeat the safety purpose of the plug.
9 The power adapter of the product should be unplugged from the outlet when left
unused for a long period of time.
10 Care should be taken so that objects do not fall, and liquids are not spilled, into the
cabinet through openings.
The product should be serviced by qual ified personnel when
A The power adapter or the plug has been damaged; or
B Objects have fallen, or liquid has been spilled, into the product or
C The product has been exposed to rain or
D The product does not appear to operate normally, or exhibits a marked change in
performance, or
E The product has been dropped, or the cabinet damaged
Do not attempt to service the product beyond that described in the maintenance
instructions. All other servicing should be referred to qualified service personnel.

4
GROUNDING INSTRUCTIONS
This product must be grounded (earthed). If it should malfunction or breakdown, grounding
provides a path of least resistance for electric current to reduce the risk of electric shock .
This product is equipped with a cord having an equipment-grounding conductor and a
grounding plug. The plug must be plugged into an appropriate outlet that is properly
installed and grounded in accordance with the local codes and regulations.
DANGER
Do not modify the plug provided with the product. If it will not fit have a proper outlet
installed by a qualified electrician.
DATA HANDLING
The information contained in the internal memory may sometimes be lost due to incorrect
user action. Make sure to save important data onto USB Stick or Hard Disk. ORLA will not
be responsible for damages caused by data loss.
DISCLAIMER
The information contained in this manual has been very carefully revised. Due to the
constant effort to improve the product, the product specifications might differ to those in the
manual. The specifications are subject to modification without prior notice.
TAKING CARE OF YOUR INSTRUMENT
Your keyboard is a fine instrument and deserves careful treatment. Follow these next few
points carefully to keep it at it’s best for many years.
- Never open the case and touch the internal circuits
- Always switch the power 0FF after use
- Clean with a cloth or a damp sponge. If the dirt is particularly persistent, use a
neutral detergent to remove it. Never use solvents or alcohol
- Do not place your instrument near electric motors, neon or fluorescent lamps as
these may generate disturbances
- In most cases you just need to change the position of the instrument to avoid
interference
- Keep your instrument away from dusty environments, high humidity, and high
temperatures
- Make sure that your local AC mains voltage matches the voltage indicated on the
name plate in the back of the instrument.
- Do not use electrical appliances, neon lights or variable lighting system on the same
AC Mains outlet
- Before turning on the instrument, make sure that your amplifiers and speaker
system are OFF
- Computer controlled instruments can be interrupted by spikes, surges and dropouts
on the power line. If your instrument stops working because of a power line
disturbance, switch it OFF for a few seconds and then switch it back ON.
Never disconnect the power cable without turning OFF the power switch first.
5
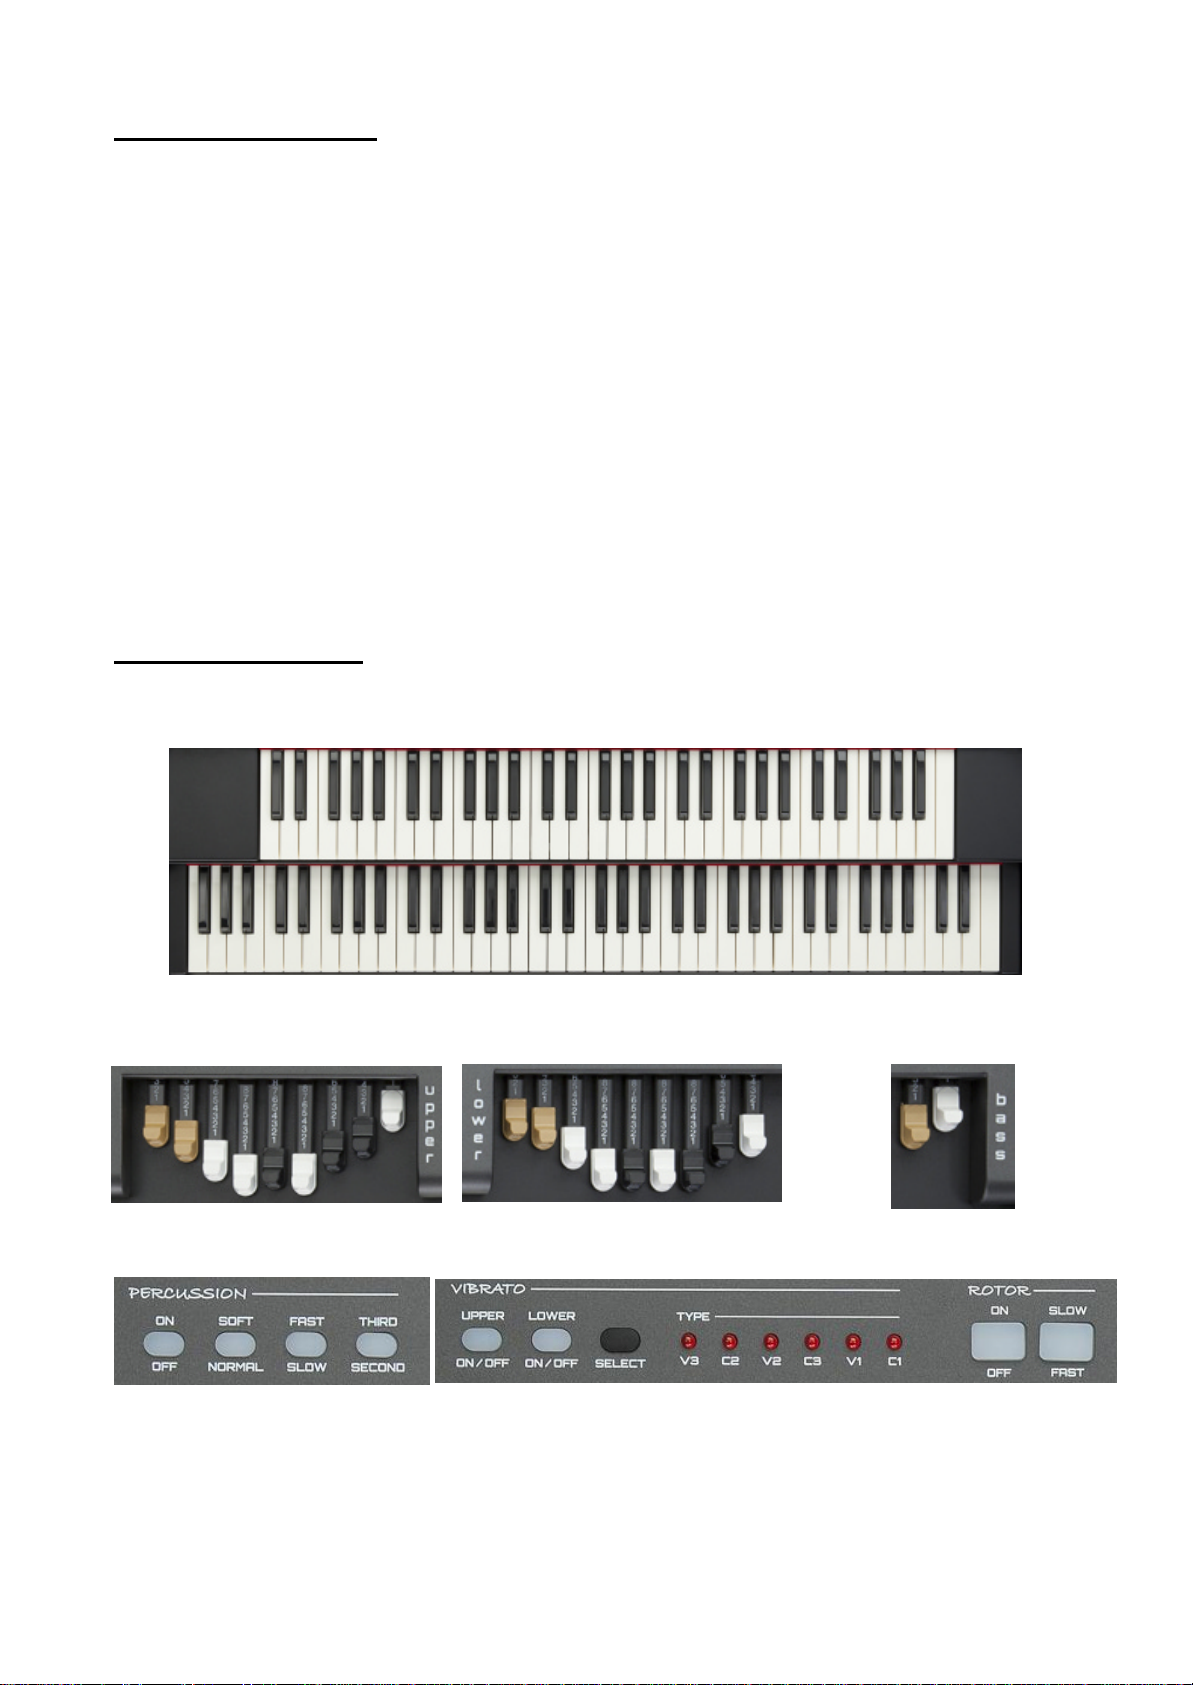
The JamKey Controller
Think about an amazing master keyboard equipped with two premium waterfall keyboards
and all the rotary controls and push button you may need, including two sets of physical
drawbars.
That’s the Jamkey Controller.
The Jamkey simplifies your life. On the left panel, you can find all the necessary controls to
drive a full “tone wheel” organ configuration. On the right panel, there is a wide selection of
programmable buttons and rotary controls.
All the buttons, the rotary controls and even the Drawbar controls can be reprogrammed
using the JamKey Editor that is available for download from the Jamkey web site.
Do you use a computer, an iPad or sound module on stage? The central area of the
JamKey has been designed to easily accommodate your laptop, tablet or sound m odule.
How many “virtual instruments” and computer software do you have? Probably a lot.
How do you control them when you’re on stage?
The JamKey is the answer.
The JamKey Features
Two keyboard configuration offering a 61 note Upper and a 73 note Lower keyboard
utilizing the FATAR keyboard type TP80 waterfall type with touc h sensitivity.
Two sets of Drawbars (Upper and Lower) One set Drawbar for Bass Pedal
Nine dedicated buttons to control Vintage Organ sounds
6
Two wheels for Pitch and Modulation
Seven buttons to transpose
keyboard and pedal sections
8 buttons, 8 pads and 8 rotary controls
which are totally assignable
One Play Bar to control an external Sequencer or DAW (Digital Audio
Workstation)
16 memories to store
your settings (2 banks of
8 patches - Bank A and
Bank B)
7
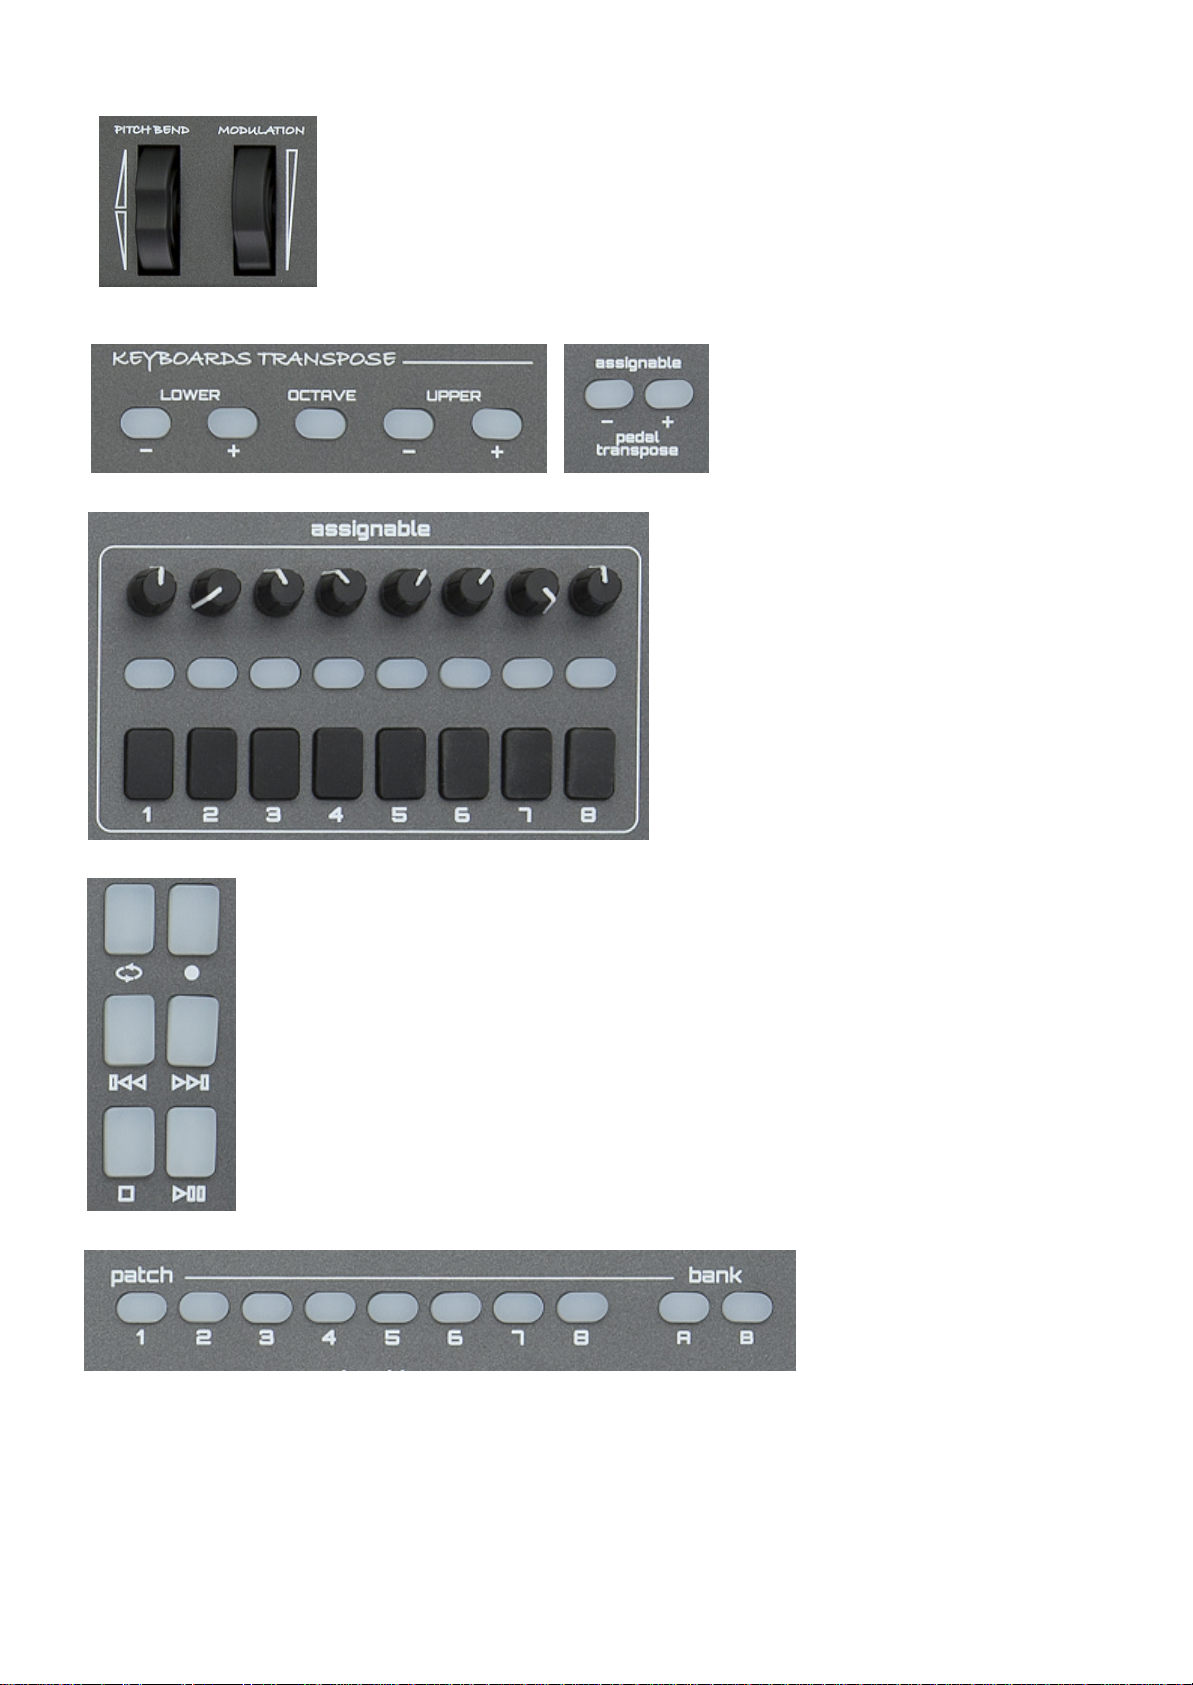
Connections on Rear Panel
2 Sustain Pedal (assignable)
2 Expression Pedal (assignable)
2 Midi Port (IN/Out)
1 USB Midi
1 Switch ON /OFF
1 Led ON/OFF
1 DC IN 9/12V 1A
Go to our site www.jamkey.net and download JamKey Editor
To start your JamKey controller, download the JamKey Editor from the dedicated website
www.jamkey.net , where you can also download the current default Patches and the User
Manual.
What is the purpose of the JamKey Editor?
All the Physical Drawbars, Rotary controls, Buttons and Pads on the JamKey are totally
assignable and can be reprogrammed for different functions using the JamKey Editor.
You can map, assign all controls and store your Patches in the sixteen memory locations
of the instrument.
What is a Patch?
A Patch is an object that describes how MIDI settings are assigned to the various
controllers. By using the Patch system, you can easily change settings that you need for
specific sounds or registrations.
Using the JamKey Editor you can make your own Patch to store and recall directly from
the JamKey. There are sixteen memory locations to store data in two Banks: A (from 1 to
8) and B (from 9 to 16).
You can also store and recall Patches on a computer when connected via USB cable.
It is possible to configure and store a huge array of Patches in this way.
8
Patch Default on JamKey
The JamKey default setting is ready to play a number of sounds according to GM sound
mapping.
Patch Name Memory Bank Location Patch Type Midi Output Rear Panel
1 - JamKey Organ 1 A GM Midi Standard
2 - Rock 2 A GM Midi Standard
3 - Pop 3 A GM Midi Standard
4 - Jazz 4 A GM Midi Standard
5 - HipHop 5 A GM Midi Standard
6 - Funky 6 A GM Midi Standard
7 - Disco 7 A GM Midi Standard
8 - Dance 8 A GM Midi Standard
9 - Empty 01 1B GM Midi Standard
10 – Empty 02 2B GM Midi Standard
11 – Empty 03 3B GM Midi Standard
12 – Empty 04 4B GM Midi Standard
13 – Empty 05 5B GM Midi Standard
14 – Empty 06 6B GM Midi Standard
15 – Empty 07 7B GM Midi Standard
16 – Empty 08 8B GM Midi Standard
Connect the JamKey to a GM Sound Module using a standard midi cable and the default
patches can now be accessed. Use the buttons illustrated below to select the available
sounds for the Upper and Lower keyboards.
4 Upper Voice Selectors
Upper Voice Variation I II III IV
3 Lower Voice Selectors
Lower Voice Variation I II III
1 Upper & 1 Lower Main Voice Selectors
Upper & Lower Upper Lower
Main Voice
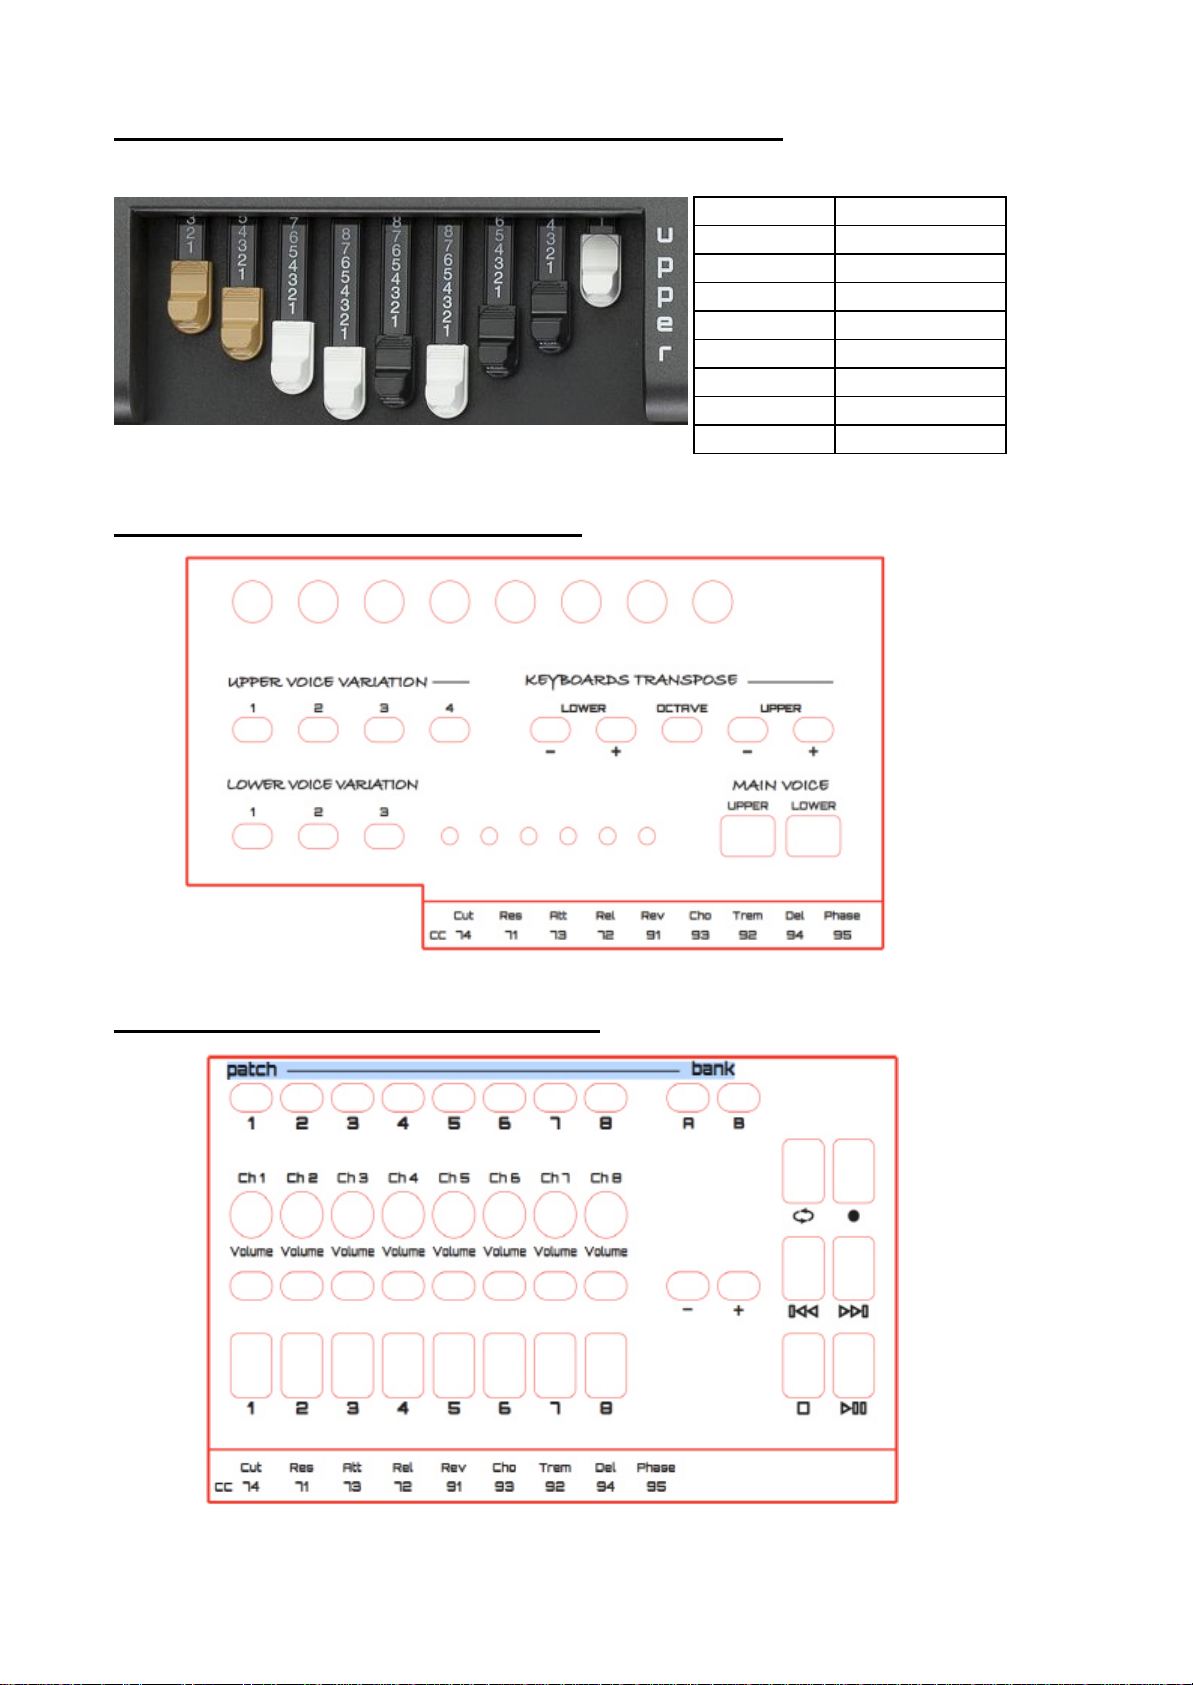
9
Control Change Assignments for Upper & Lower Drawbars
74 71 73 72 91 93 92 94 95
CC 74 Cut OFF
CC 71 Resonance
CC 73 Attack
CC 72 Release
CC 91 Send Reverb
CC 93 Send Chorus
CC 92 Tremolo
CC 94 Delay
CC 95 Phaser
Left Panel Assignments for Default Patch
Right Panel Assignments for Default Patch
10
How to use JamKey Editor
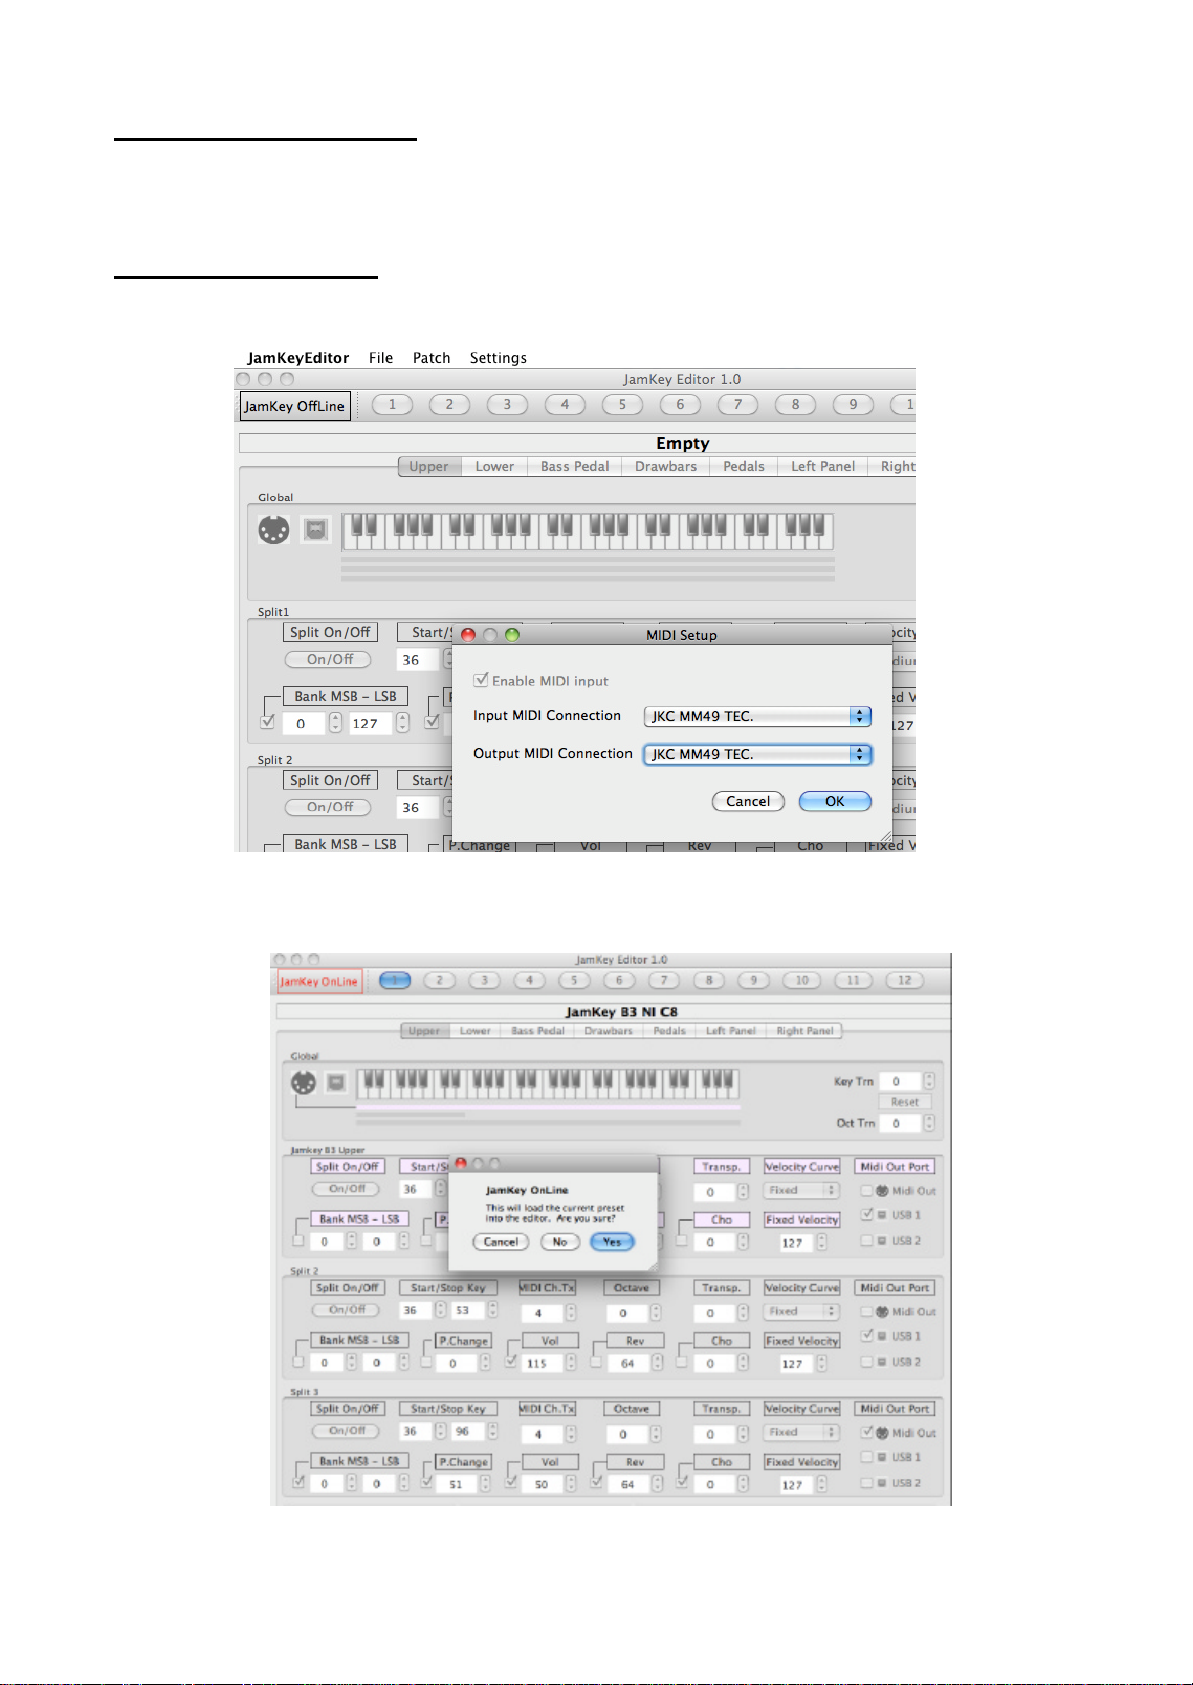
1- Connect a computer to the JamKey via USB cable.
2- Switch ON the JamKey.
3- Open the JamKey Editor on the computer.
Midi Port Assignments
1- Select in the Menu bar on the computer --> Settings ? MIDI
2- Choose “JKC MM49 TEC.” Driver for Input and Output Midi Connections.
The following window appears:

11
“JamKey OnLine” will be indicated in red in the top left corner of the window confirming
that the Editor has been successfully configured.
The following dialog box will be displayed in the centre of the window:
Press “Yes” to load all midi settings for the Patch from the computer to the JamKey.
The Patches will be stored in Bank A and Bank B (1 to 16).
If “No” is selected, an Empty Patch is created and ready to be used.
JamKey Editor Main Header
In this floating menu you can recall and save all sixteen Patches inside the JamKey
memory.
JamKey Editor sections
The JamKey Editor has 7 sections for creating and edit ing Patches.
You can even choose and change the Patch name with a click.
Upper & Lower
Upper refers to the Upper Keyboard.
Lower refers to the Lower Keyboard.
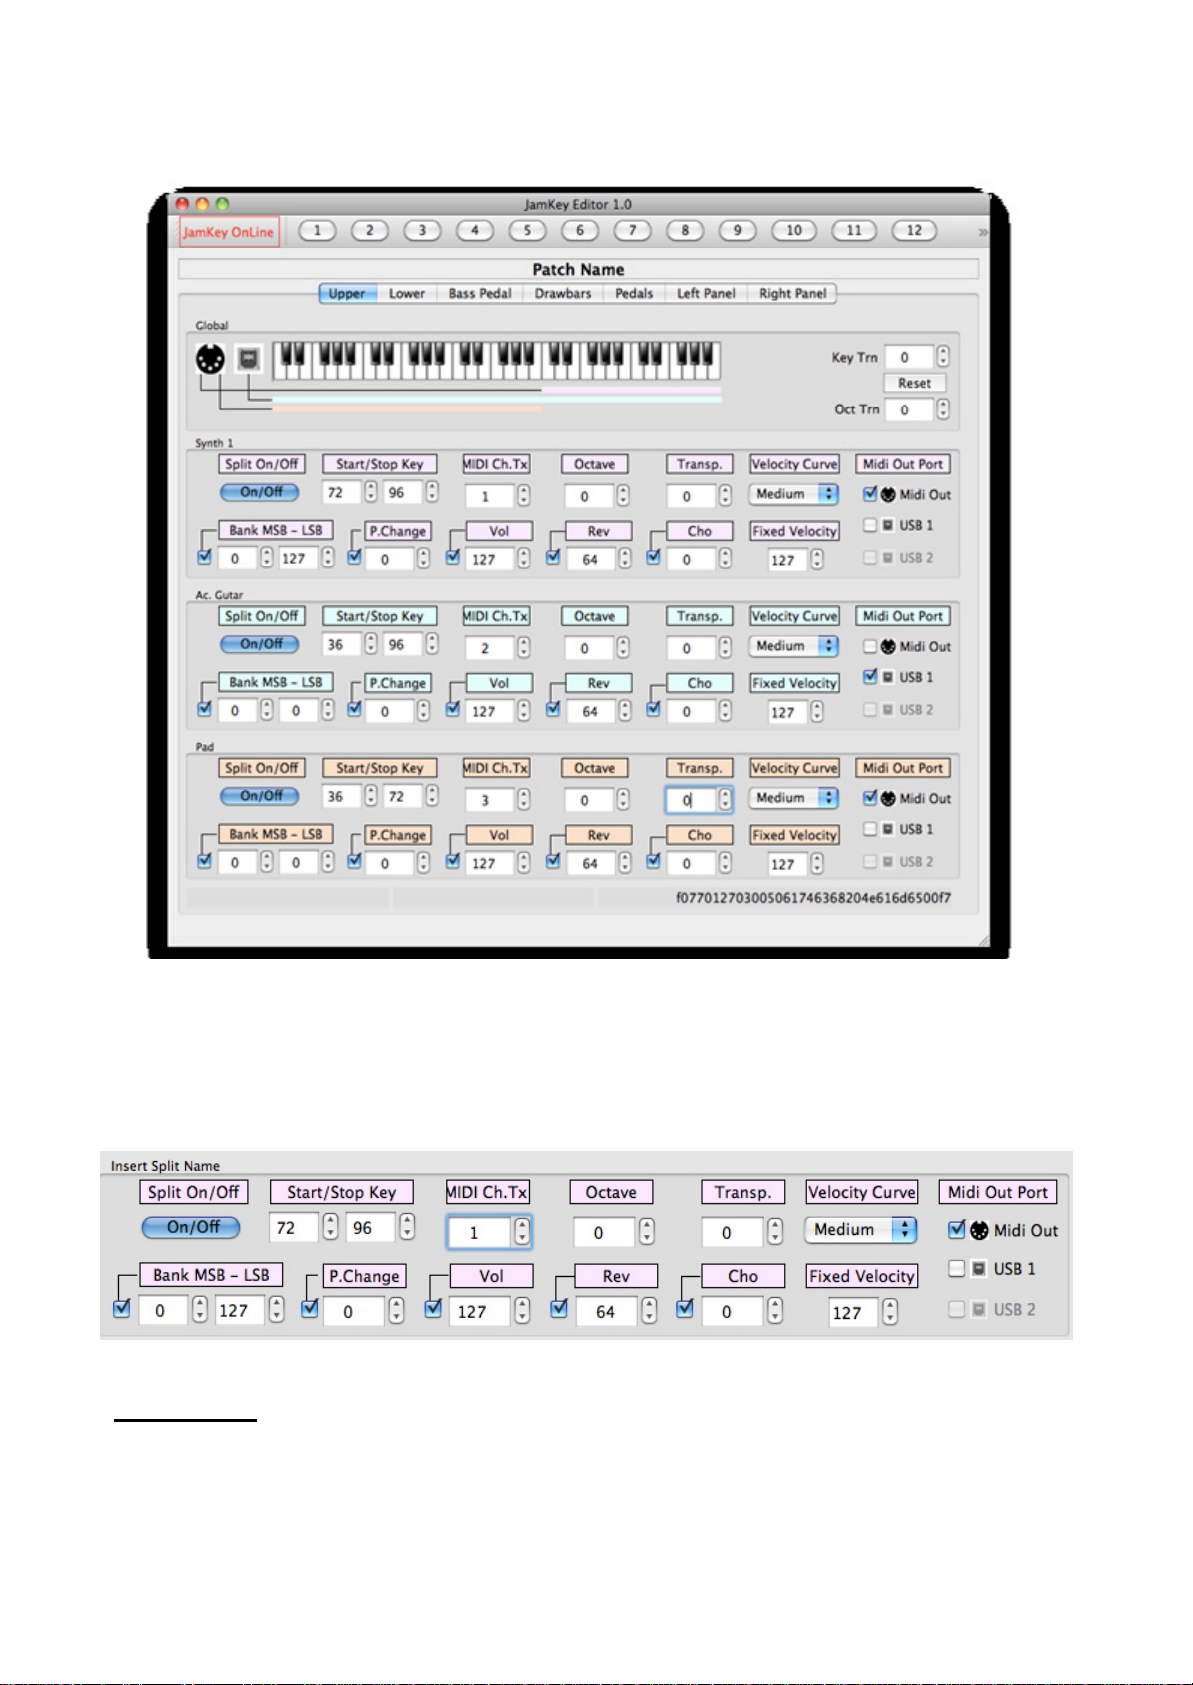
12
There are three sections (Split) available for the Upper and three sections (Split) for the
Lower.
For each Split you can edit the following: Split Name, Split ON/OFF, Start/Stop Key , Midi
Channel, Transmit, Octave Transpose, Semitone Transpose, Velocity Curve, Bank MSB –
LSB.
To activate the following parameters (Program Change, Volume, Send Reverb, Send
Chorus, Fixed Velocity, Midi Out ports (standard Midi Out and USB1 Midi Out ) simply
select the function by ticking the related check box.
Bass Pedal s
You can connect a midi bass pedal board via MIDI IN located in the rear connection panel.
There is one section available for the Bass Pedal and the following parameter can be
edited: Split Name, Split ON/OFF, Start/Stop Key, Midi Channel Transmit, Midi Channel
Receive, Octave Transpose, Semitone Transpose, Velocity Curve, Bank MSB–LSB.
To activate the following parameters: Program Change, Volume, Send Reverb, Send
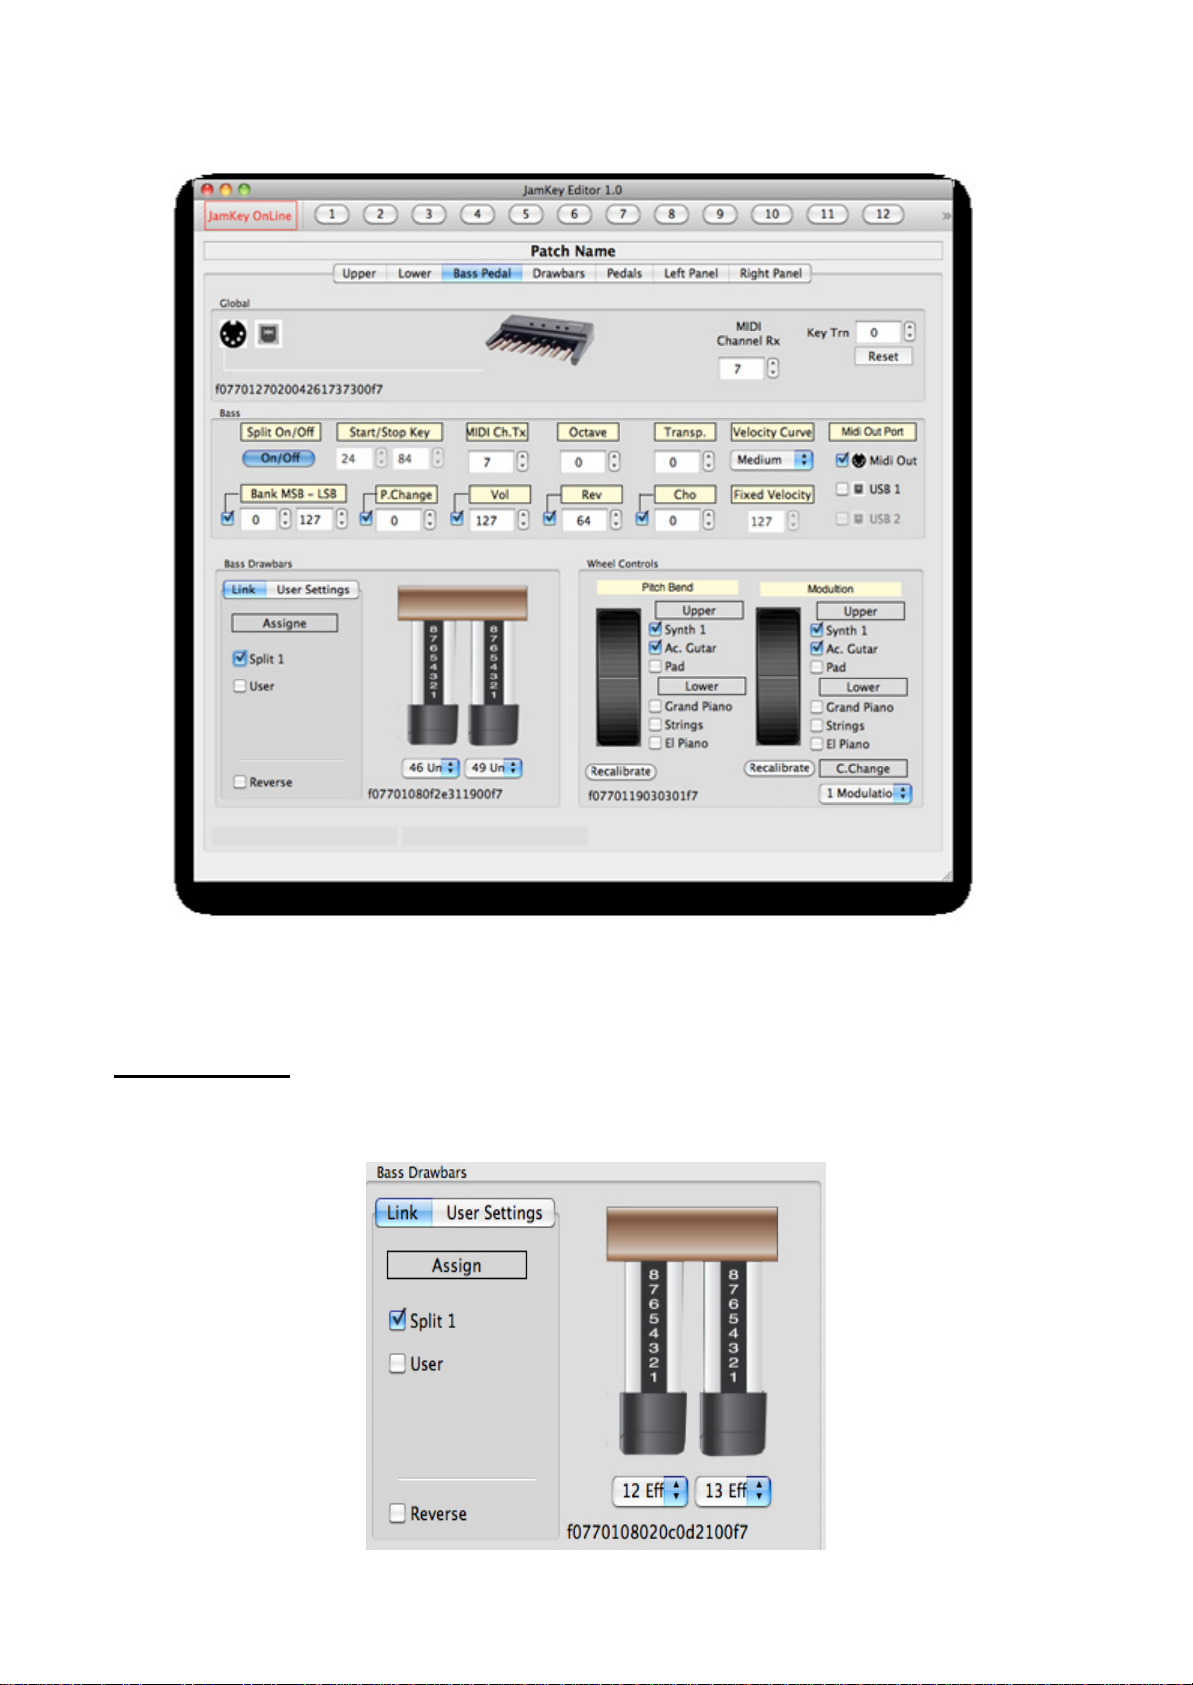
13
Chorus, Fixed Velocity, Midi Out ports (standard Midi Out and USB1 Midi Out ).
Within the Pedal Bass section there are controls for the Bass Drawbars and Wheel
Controls features.
Bass Drawbars
It is possible to select the control change settings for Bass Drawbars from dropdown lists
Split 1 can be linked to the Bass Pedal.

14
It is possible to make User Settings for Bass Drawbars:
- Check the User box ON.
- Select Midi Out and Midi Channel Transmit in the User Setting dialog box.
- You can have two types of Bass Dr awbars assigned at the same time.
Wheel Controls
You can choose to which split to assign the Pitch Bend and Modulation.
If necessary, the wheel controls can be recalibrated.
Press the Recalibrate button and follow the instructions on the screen.
You can select which Control Change can be assigned to the Modulation from the
dropdown list.

15
Drawbars: Upper & Lower
It is possible to assign the desired control change settings for the Upper and Lower
Drawbars from the dropdown list below the Drawbar icons.
You can also link them to the Split 1, 2 and 3 of the Drawbars.
It is possible to make User Settings for Upper and Lower Drawbars:
- Check the User box ON.
- Select Midi Out and Midi Channel Transmit in the User Setting dialog box.
- You can have two types of Drawbars assigned at the same time.

16
Pedals
2 Sustain Pedal s and 2 Expression Pedals can be connected at the same time (in the rear
panel of JamKey)
In the following window you can choose which splits to assign to the Sustain Pedals and
Expression Pedals.
At the bottom of the Pedals icons, you can select from a dropdown list the control change
to assign for each Pedals.
To set the Out channel and the Midi port for each pedal just select User check box to
activate.

17
Left Panel
On the left control panel there are 8 rotary knobs. They are assigned by default to the
Drawbar Organ features but can be reprogrammed for new functions.
The following window indicates how each knob can be assigned new functions from the
related drop down lists.
It is also possible to select Midi Channel and Midi Out port.

18
In the bottom of the Left Panel window 9 tabs are indicated.
They are assigned by default to control specific functions of VST Virtual Organ.
(Vintage Organs by Native Instruments)
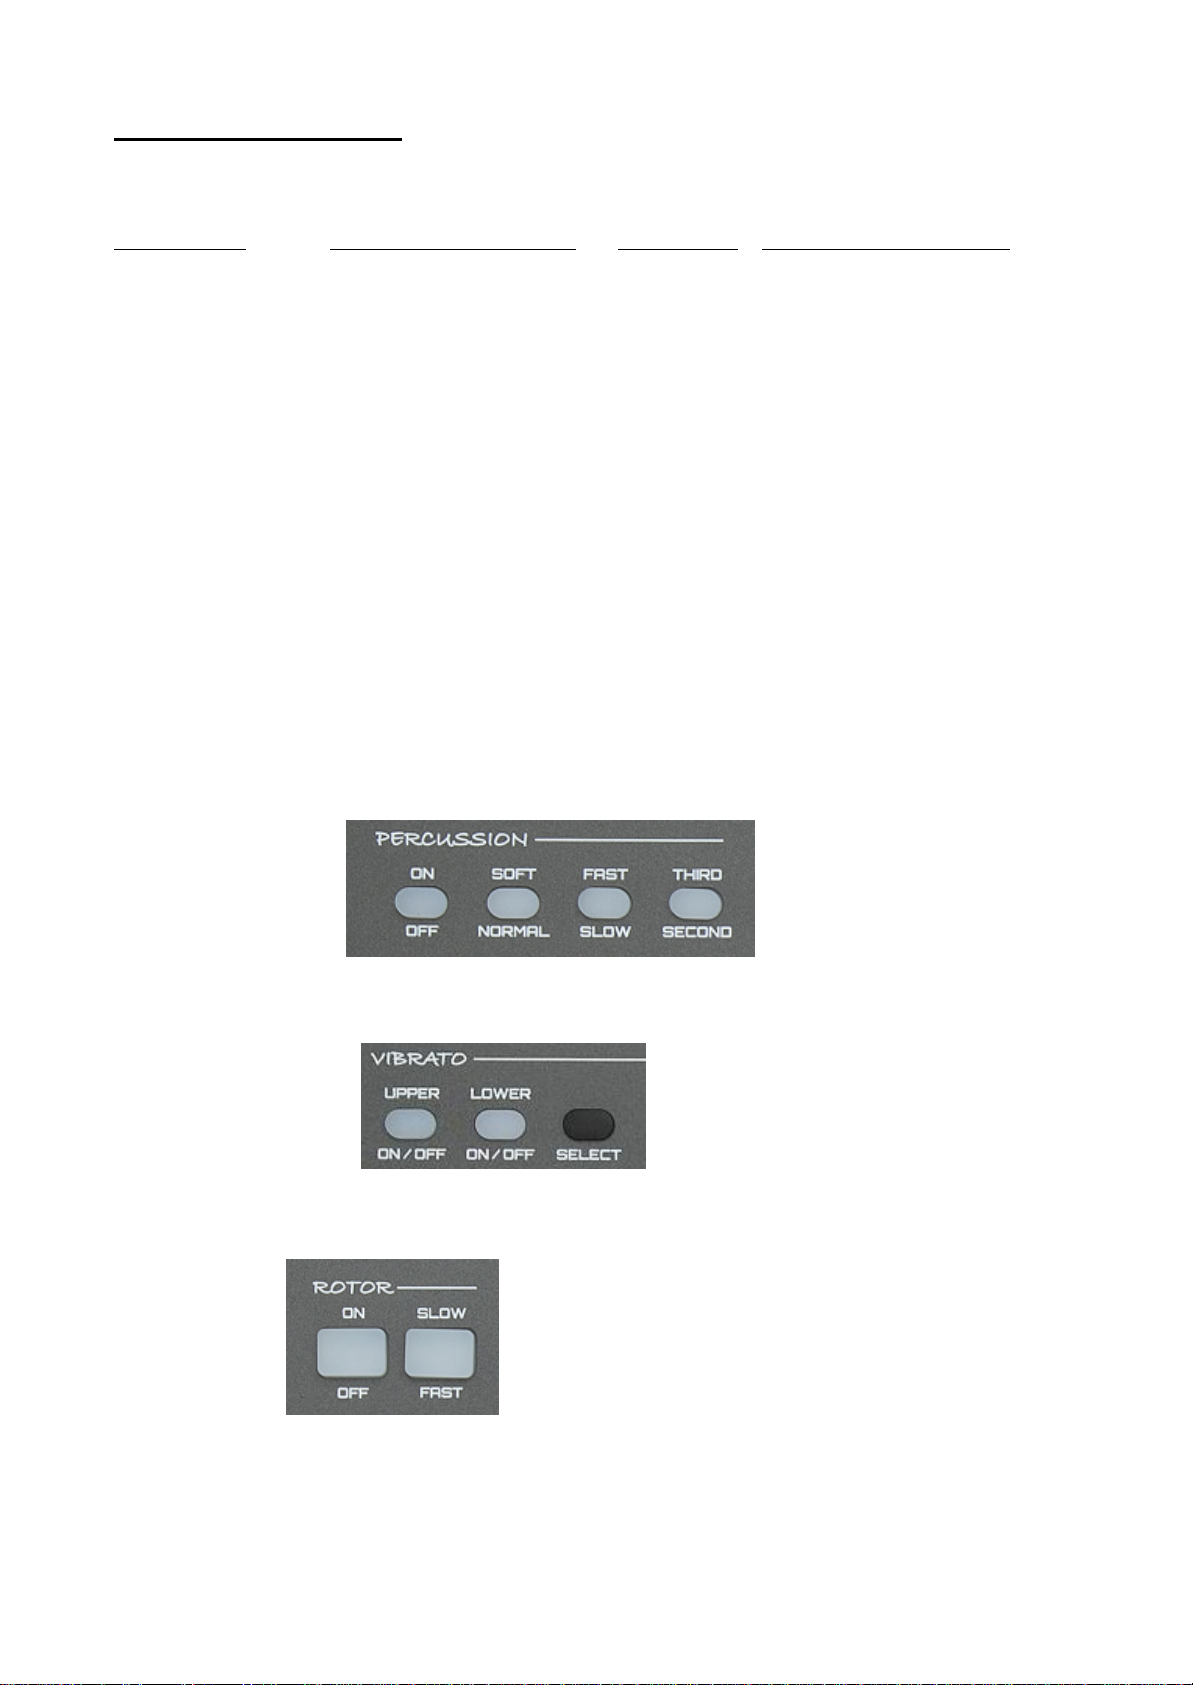
Percussion----------------------------------- On Soft Fast Third
Off Normal Slow Second
Vibrato----------------------------- Rotor-----------------
Upper Lower On Slow
On/Off On/Off Select Off Fast
It is possible to change the default settings for these tabs by switching OFF “JamKey
Default Assignments”.
Double click on a single tab to reassign the setting.

19
Right Panel
On the Right control panel there are 8 rotary knobs. They can be programmed for different
functions.
The following window indicates how each knob can be assigned new functions from the
related drop down lists.
It is also possible to select Midi Channel and Midi Out port.

20
As illustrated below there 16 tabs that can be reprogrammed.
Double click on a single tab to Assign Message and Select Midi Out.
There are some other assignable buttons as illustrated below.
Assignable
These two tabs are assigned by default to control
the Pedal Transpose settings.

21
To reprogram these tabs switch OFF “JamKey Pedal Transposer” and then double click on
a single tab and the following window appears:
Choose Assign Message option and Select Midi Port: Midi Out or USB1 Midi Out.
Play Bar
The Play Bar controls external Sequencer on your DAW.
Double click on a single tab to select the desired function.
Loop Record Rewind Forward Stop Play/Pause
22
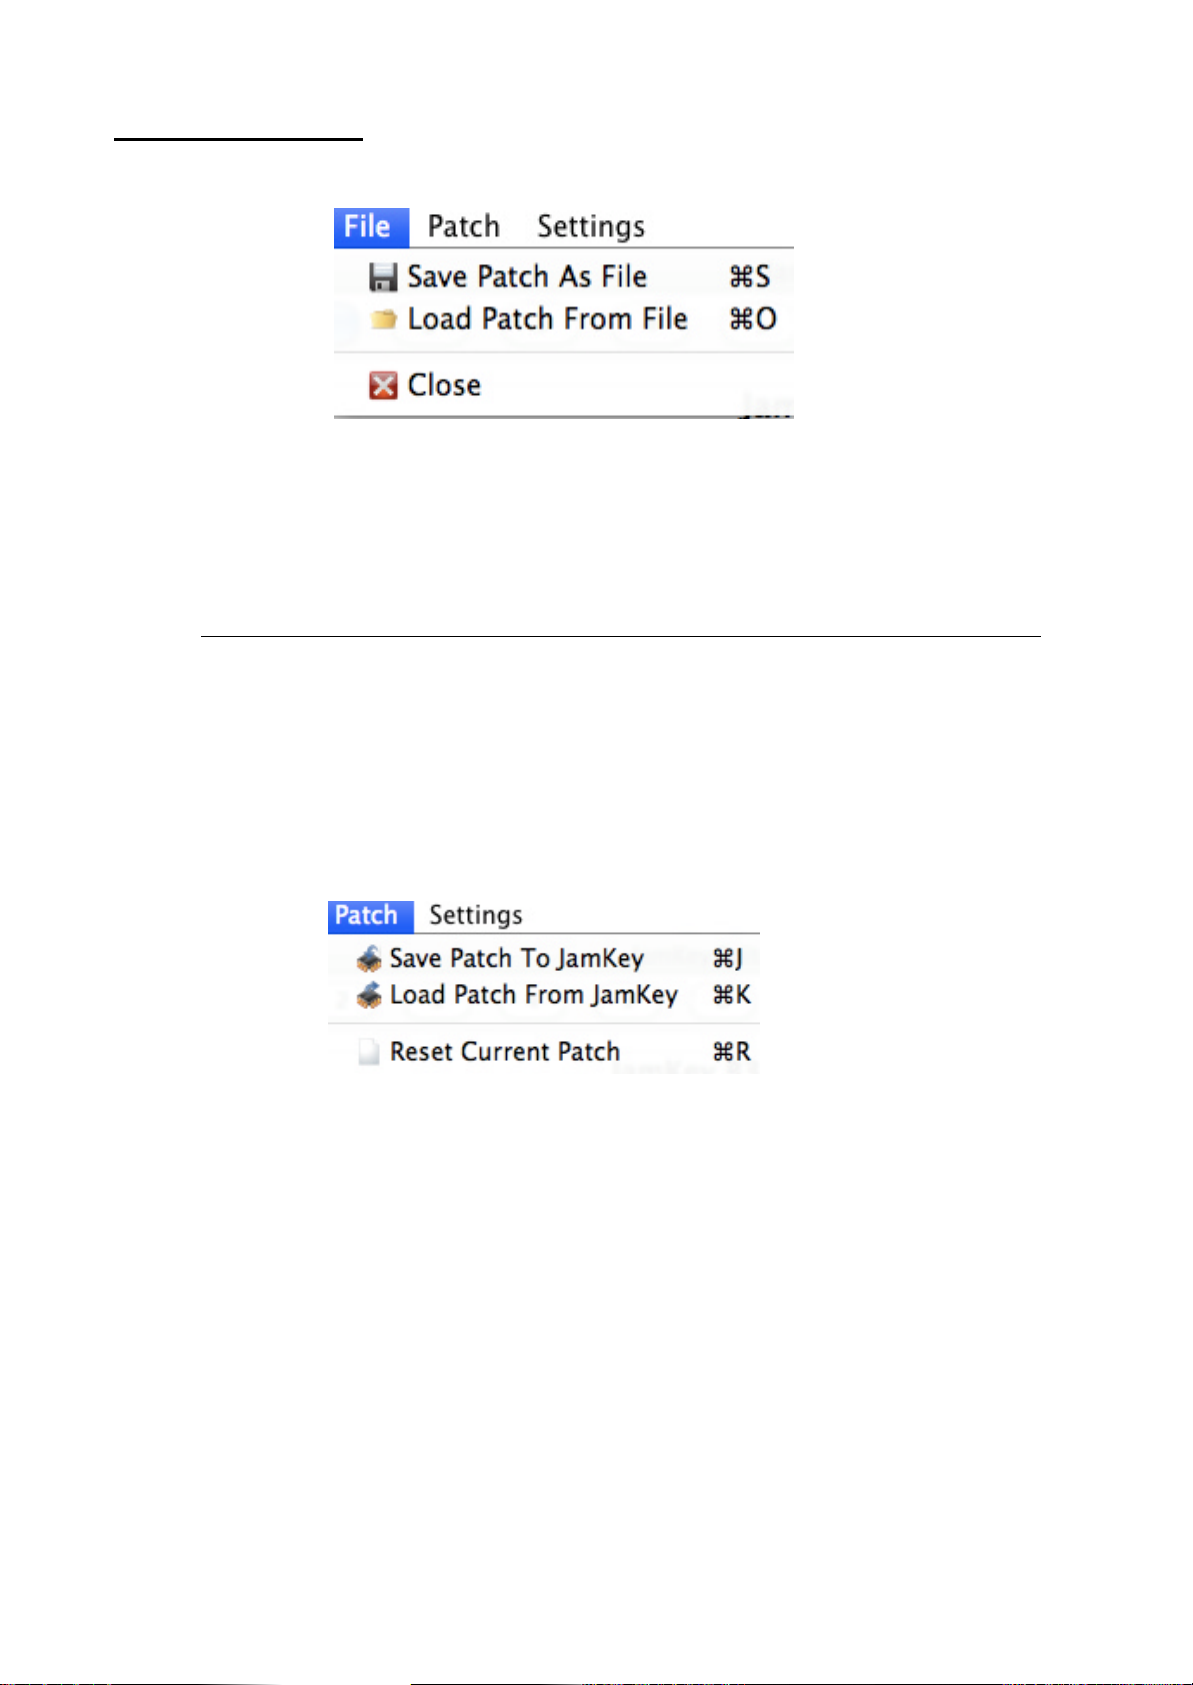
Save and Load Patch
The JamKey Editor has two modes for Saving and Loading Patches:
1- File Menu :
- “Save Patch as File”.
The Save mode allows a sin gle Patch to be saved on the computer.
NOTE : It's very important to save all the Patches on the computer as a Patch Back Up.
- “Load Patch From File”
The Load Patch mode offers the ability to load and use Patches stored in the computer.
It is possible to Load a single Patch from the computer to the internal flash-memory of the
JamKey.
2- Patch Menu:
- “Save Patch To JamKey”
The Save mode allows a single Patch from the JamKey Editor Tool to be saved into the
internal Patch memories ( Bank A 1-8 and Bank B 9-16 ) on the JamKey Keyboard.
- “Load Patch From JamKey”
This mode offers the ability to load the current Patch from the JamKey’s internal memory
to the JamKey Editor Tool on the computer.

23
Creating and Editing Dynamic Curves
The JamKey Editor Tool can modify the Dynamic Curve parameters on the keyboards to
suit personal requirements.
Select the Settings Menu:
Select Dynamic Curve Edit.
There are 5 Dynamic Curves preset in the Editor:
Fixed, Soft, Medium, Hard, Very Hard.
A different curve can be selected for each split in the Patch.
It is also possible to select User and edit a completely new curve according to personal
requirement and save it as “User 1”.

24
Dynamic Curve Editor
How the Dynamic Curve Editor works
The dynamic range (from 1 to 127) is divided into 64 intervals. There is a slider controller
for each interval.
Adjust the 127 values (as illustrated above) on the computer display page to create the
desired curve.
When editing the new curve, test the response in real time by playing the keyboard.
The velocity value of each played key will be displayed in red on the Dynamic Curve Editor
display page.
NOTE: When playing the keyboard in Dynamic Curve Edit mode, there may be a delay in
the corresponding sound whilst the editor is calculating data.
The velocity value associated to the key pressed is detected by calculating the time
between the first and the second contact of each key.
The Low dynamic values are represented on the left side of the screen, while high
dynamic values are shown on the right of the screen.
White and Black Keys Dynamic Curve Edit
All the Dynamic Curves available in the instrument have a different setting for white and
black keys. This is to compensate for the different mechanical leverage of the physical
keys of the instrument.
Select the check box for the desired key type and start editing the relevant dynamic curve.

25
Copy White or Black Keys dynamic curve
It is possible to copy the dynamic curve from the black keys to the white keys:
Select White Key check box and press Copy.
A dialog box will appear: Press Yes.
It is also possible to copy the dynamic curve from the white keys to the black keys:
Select Black Key check box and press Copy.
A dialog box will appear: Press Yes.
Saving the User Dynamic Curve
When the editing of the new Dynamic Curve is complete it is possible to save it in the
internal memory of the JamKey as “User 1” by pressing the “Save as User 1” button.
Loading and Saving Dynamic Curves to a computer
Dynamic Curves can also be loaded/saved to a computer .
Select the desired operation with the Load or Save buttons.
NOTE: When a new Dynamic Curve is loaded from the computer into the JamKey, it will
be loaded and stored as “User 1”. The previous “User 1” Dynamic Curve will be deleted.
Save as many new Dynamic Curves as necessary on the computer for future use.

26
Software Updates
New software updates for the JamKey will be possibly available on the www.jamkey.net
website.
How to install Firmware Update for the JamKey keyboard
The Firmware Update File is a file with extension .bin. It is possible to update the JamKey
using the JamKey Editor function.
1- Download firmware file .bin from our site www.jamkey.net on the computer.
2- Switch OFF the JamKey keyboard.
3- Open the JamKey Editor Tool on the computer.
4- Switch ON the JamKey keyboard holding the tab “Soft/ Normal” on the Left Control
Panel.
The eight programmable Tabs on the Right Control Panel will illuminate in ascending
sequence.
5- Select MIDI from the Settings Menu:
6- Choose Midi Input and Midi Output Connection drop down menu and select:
JKC MM49 TEC.

27
7- A new dialog box appears:
Click the “Software Update” button.
Select the firmware file .bin on the computer and click OK/Open.
8- A dialog box appears and the Update will start:
The Software Update may take some time.
9- When update is completed, the following dialog box will be displayed:

28
Specifications
Double Manual Keyboards - Fatar TP80 Waterfall
Upper 61 keys Touch Sensitive
Lower 73 keys Touch Sensitive
Central platform for locating Lap Top, PC Keyboard, iPad or similar tablet
Vintage Organ Controls :
Physical Drawbars (also assignable as Slider Controls)
2 Sets of 9 Drawbars (Upper and Lower)
1 Set of 2 Drawbars for Bass Pedalboard
Rotary Controls
8 Rotary Controls for Volume, Drive, Click, Reverb, Bass, Frequency, Gain, Treble.
Buttons with LED
4 Led buttons for Percussion (ON/OFF, Volume Soft-Normal, Decay Slow-Fast,
Harmony Second-Third)
3 LED buttons for Vibrato (Upper ON-OFF, Lower ON -OFF, Vibrato Select)
6 LED for Vibrato Type
2 LED Buttons for Rotor (ON-OFF, Slow-Fast)
2 LED Buttons for Upper Keyboard Transpose (Up-Down)
1 LED Button for Octave Keyboard Transpose
2 LED Buttons for Lower Keyboard Transpose (Up-Down)
Assignable Controls:
8 Assignable Rotary Controls
8 Assignable LED Buttons
8 Assignable Pad Controls
Tool Bar Controls & Patch Buttons
6 LED Pads to control external sequencer (Play, Stop, Rec, Rw, Fw, Loop)
8 LED Buttons for Patch memory locations for storing custom setups
2 Wheels for Pitch Bend and Modulation
Connections :
2 Ex pression Pedals - Jacks 1/4 inch assignable
2 Sustain Type Pedals - Jacks 1/4 inch assignable
2 Midi Ports: In, Out
1 USB Midi to Computer
1 Dc Connector
1 Switch ON -OFF

29
JamKey Controller - Black
JamKey Controller - Orange
JamKey Controller - Red

30
All specifications and appearance are subject to change without notice
MM49.pro © 20 13. All rights reserved
 Loading...