


D i g i t a l P i a n o s
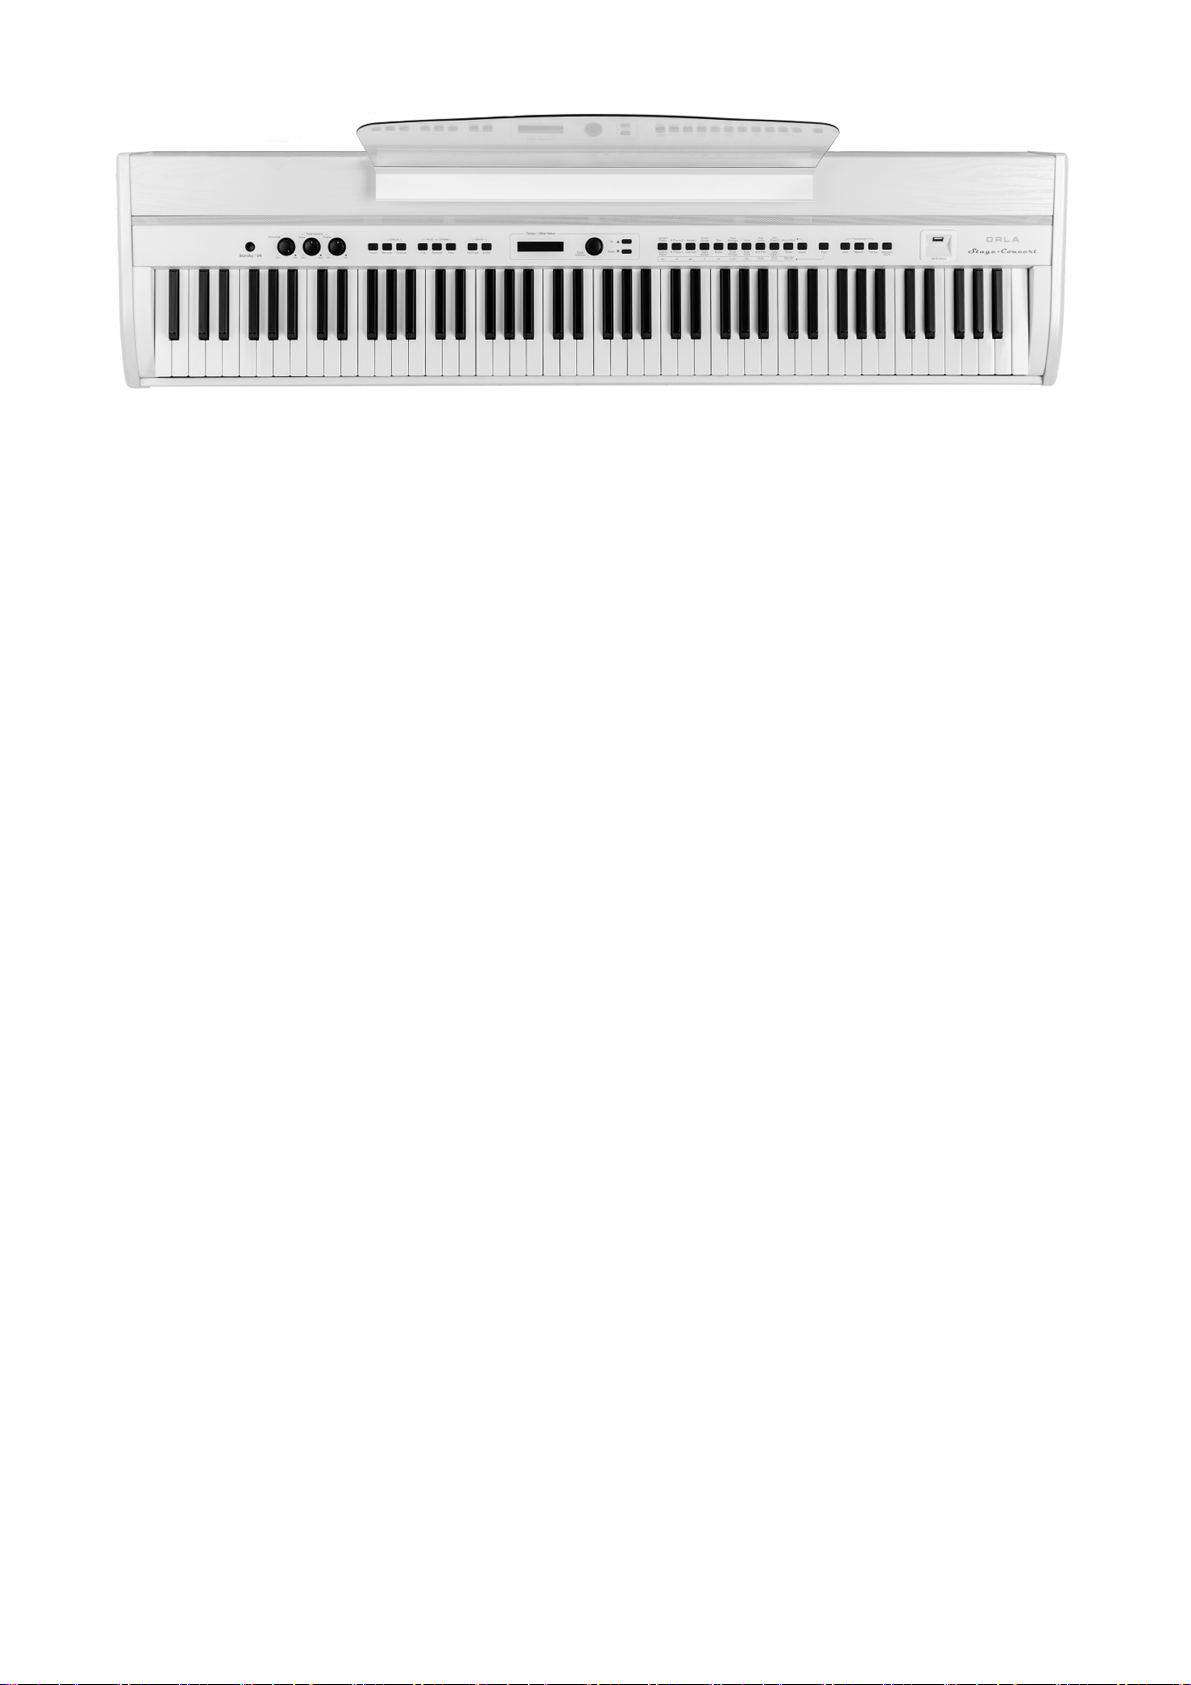
STAGE CONCERT
Portable Piano
CDP 202
Digital Piano
O w n e r 's M a n u a l
Manuale Istruzioni
Bedienungsanleitung
1.0

2

D i g i t a l P i a n o s
STAGE CONCERT
Portable Piano
CDP 202
Digital Piano
O w n e r 's M a n u a l
3

4

SAFETY PRECAUTIONS AND INSTRUCTIONS
WARNING
Make sure that the voltage set is suitable for the instrument (the voltage is indicated next to the AC power
inlet).
When using electric products, always follow basic precautions, including the following:
1 Read all of these instructions before using the product.
2 To reduce the risk of injury, close supervision is necessary when the product is used near children.
3 Do not use this product near water - for example, near a bathtub, washbowl, kitchen sink, in a wet
basement, near a swimming pool, or the like.
4 This product, either alone or in combination with an amplifier and headphones, or speakers may be
capable of producing sound levels that could cause permanent hearing loss Do not operate for a long
period of time at a high volume level, or at a level that is uncomfortable. If you experience any
hearing loss, or ringing in your ears, you should consult an audiologist.
5 The product should be located so that its location, or position, does not interfere with proper
ventilation.
6 This product should only be located away from heat sources such as radiators, heat registers, and
other products that cause heat.
7 The product should be connected only to the type of power supply described in the operating
instructions, or as marked on the product.
8 This product may be equipped with a polarized plug. This is a safety feature. If you are unable to
insert the plug into the outlet, contact an electrician to replace your obsolete outlet. Do not defeat the
safety purpose of the plug.
9 The power-supply cord of the product should be unplugged from the outlet when left unused for a
long period of time When re-plugging unit, turn on the keyboard and leave on for 3-5 hours to
recharge internal battery. The battery may need to be replaced after two or three years of use.
10 Care should be taken so that objects do not fall, and liquids are not spilled, into the cabinet through
openings
11 The product should be serviced by qualified personnel when:
a The power-supply cord or the plug has been damaged; or
b Objects have fallen, or liquid has been spilled, into the product or
c The product has been exposed to rain or
d The product does not appear to operate normally, or exhibits a marked change in
performance, or
e The product has been dropped, or the cabinet damaged
12 Do not attempt to service the product beyond that described in the maintenance instructions.
All other servicing should be referred to qualified service personnel.
5

DANGER
Do not modify the plug provided with the product - if it will not fit - have a proper outlet installed
by a qualified electrician
TEMPO / VALUE DISPLAY
The messages contained in the Display may not always match the display pages They are merely
examples of the many features of the product
DISCLAIMER
The information contained in this manual has been very carefully revised. Due to the constant effort
to improve the product, the product specifications might differ to those in the manual. The
specifications are subject to modification without prior notice.
TAKING CARE OF YOUR DIGITAL PIANO
Your Digital Piano is a fine instrument and deserves the most careful treatment.
Follow carefully the next few points, and it will operate at its best for many years.
- Never open the case and touch the internal circuits.
- Always switch the power Off after use.
- Use a cloth or a damp sponge. If the dirt is particularly persistent, use a neutral detergent to
remove it. Never use solvents or alcohol.
- Do not place your instrument near electric motors, neon or fluorescent lamps as these may
generate disturbances.
- In most cases you just need to change the position of the instrument to avoid interference.
- Keep your instrument away from dusty environments, high humidity, and high temperatures.
- Do not use on the same AC outlet with electrical appliances, neon lights or variable lighting
system.
- Before turning on the instrument, make sure that any external amplifier and speaker system
that you have connected to your piano are turned off.
- Computer controlled instruments can be interrupted by spikes, surges and dropouts on the
power line. If your instrument stops working because of a power line disturbance, switch it
off for a few seconds and then switch it on again.
- Never disconnect the power cable without turning the power switch off.
6
INTRODUCTION
Welcome to the high tech world of electronic instruments. Your piano has been designed and made
using the latest technology and computerized systems, to offer you years of trouble free pleasure.
The new Bluetooth Audio Connection will connect your Smart Phone or Digital tablet to the piano
to wireless transmit your personal music selection. It will transform your instrument giving you the
chance to play with your favorite musicians or singers, will be a great Entertainment Center for the
family. Read this manual carefully in order to fully exploit the potential of your instrument.
The STAGE CONCERT and the CDP202 are unique
products that have available the sounds and the features
of two separate worlds but incorporated into a single
instrument: Orchestral and Pipe Organ sounds.
At power up these instruments are set to play Acoustic
Pianos and Electronic Piano sounds as well as a wide
variation of Orchestral Sound and also available in the
internal sound bank a very large library of extra sounds
that will ensure the best sound for any kind of music.
At a touch of a button, as soon as the PIPE button is
selected, a very nice selection of Pipe Organ sounds,
ranging from Pianissimo to Fortissimo, is available on
the instruments and they will guarantee the best sound
for any type of classical or church music including the possibility to play different voices for the
right and left part of the keyboard.
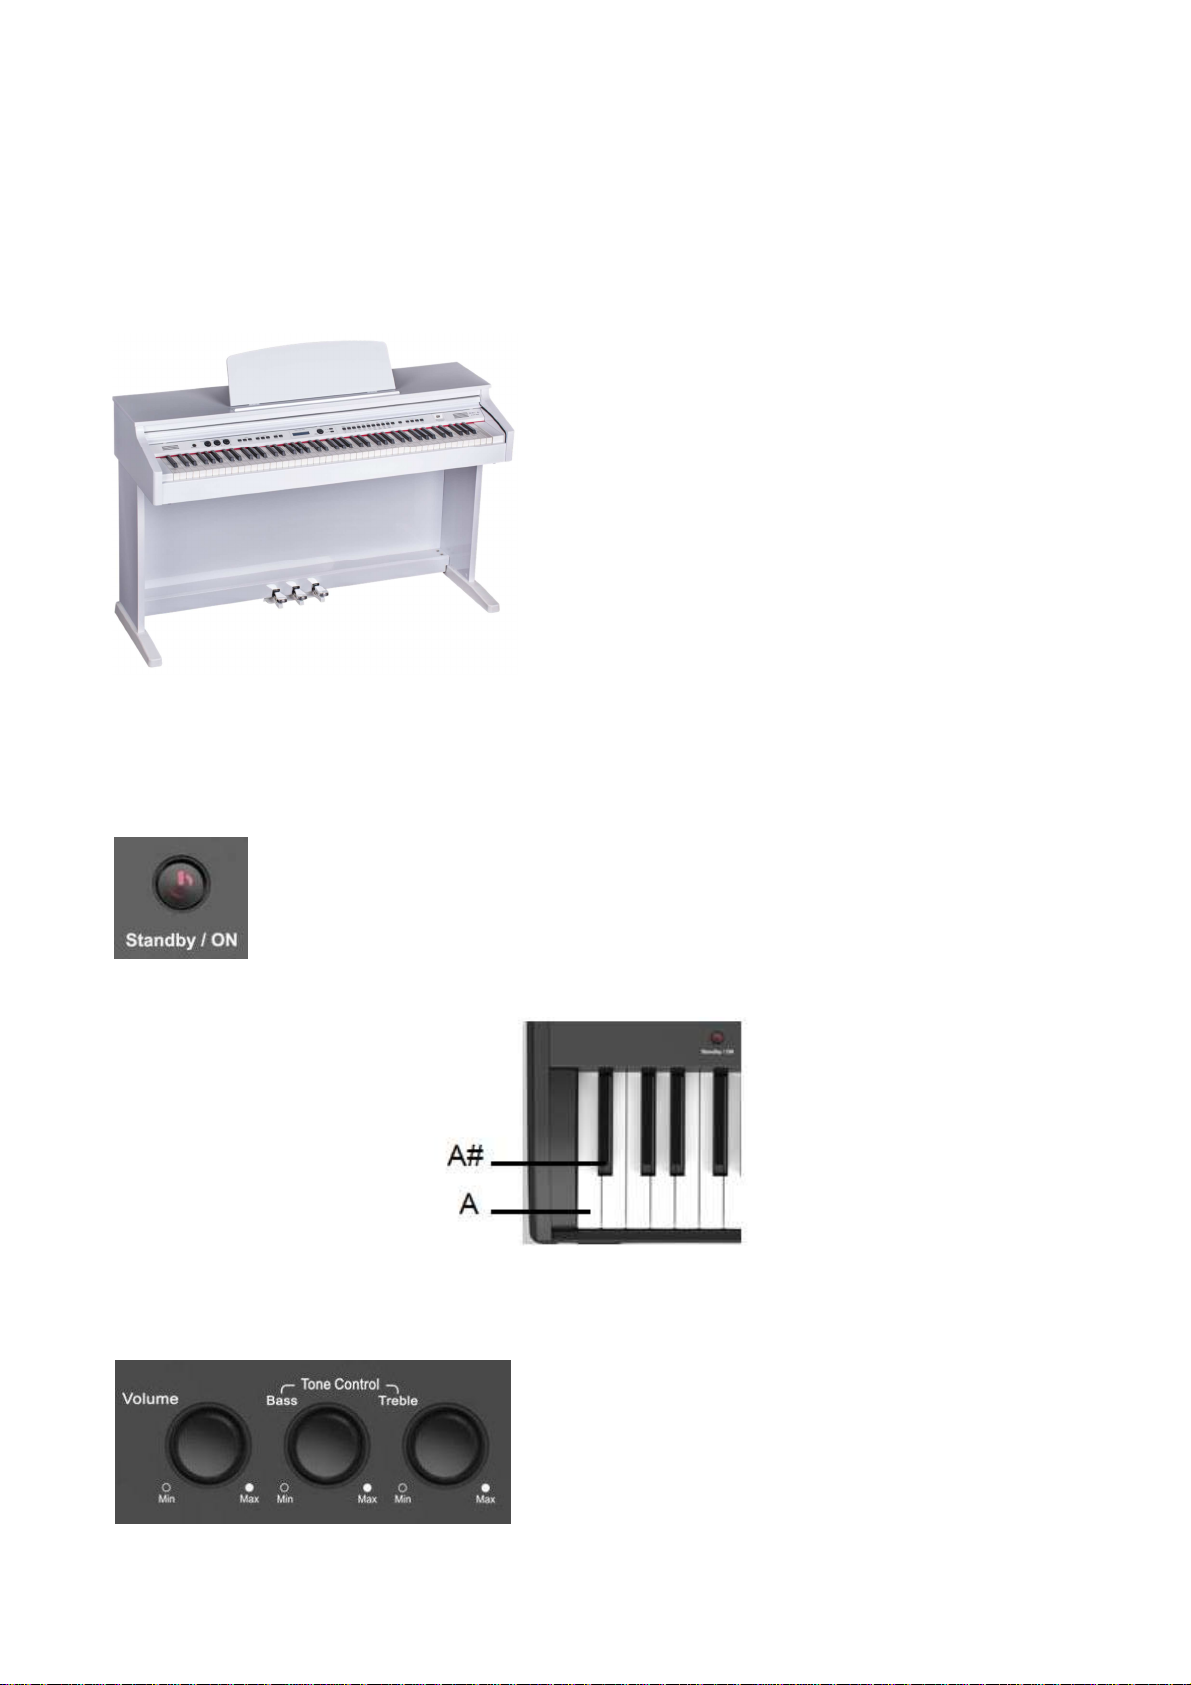
POWER ON
To turn on the instrument simply push the On/Off switch. The default setting will
automatically select the GRAND PIANO voice in the VOICE SECTION.
If the instrument is left switched on for more than 30 minutes without being played,
the Standby control will automatically switch it off.
To deactivate the Auto Standby feature, h
on the left side of the keyboard at the same time and then press the
[STANDBY/ON] switch.
old the first white key and first black key
MASTER VOLUME - TONE CONTROL
The Master Volume control adjusts the overall volume
of the instrument. If the headphone set is connected it
will also adjust the headphone volume. By using the
Bass and Treble controls, it is also possible to adjust the
sound of the instrument, changing it to a mellower or
sharper sound.
7

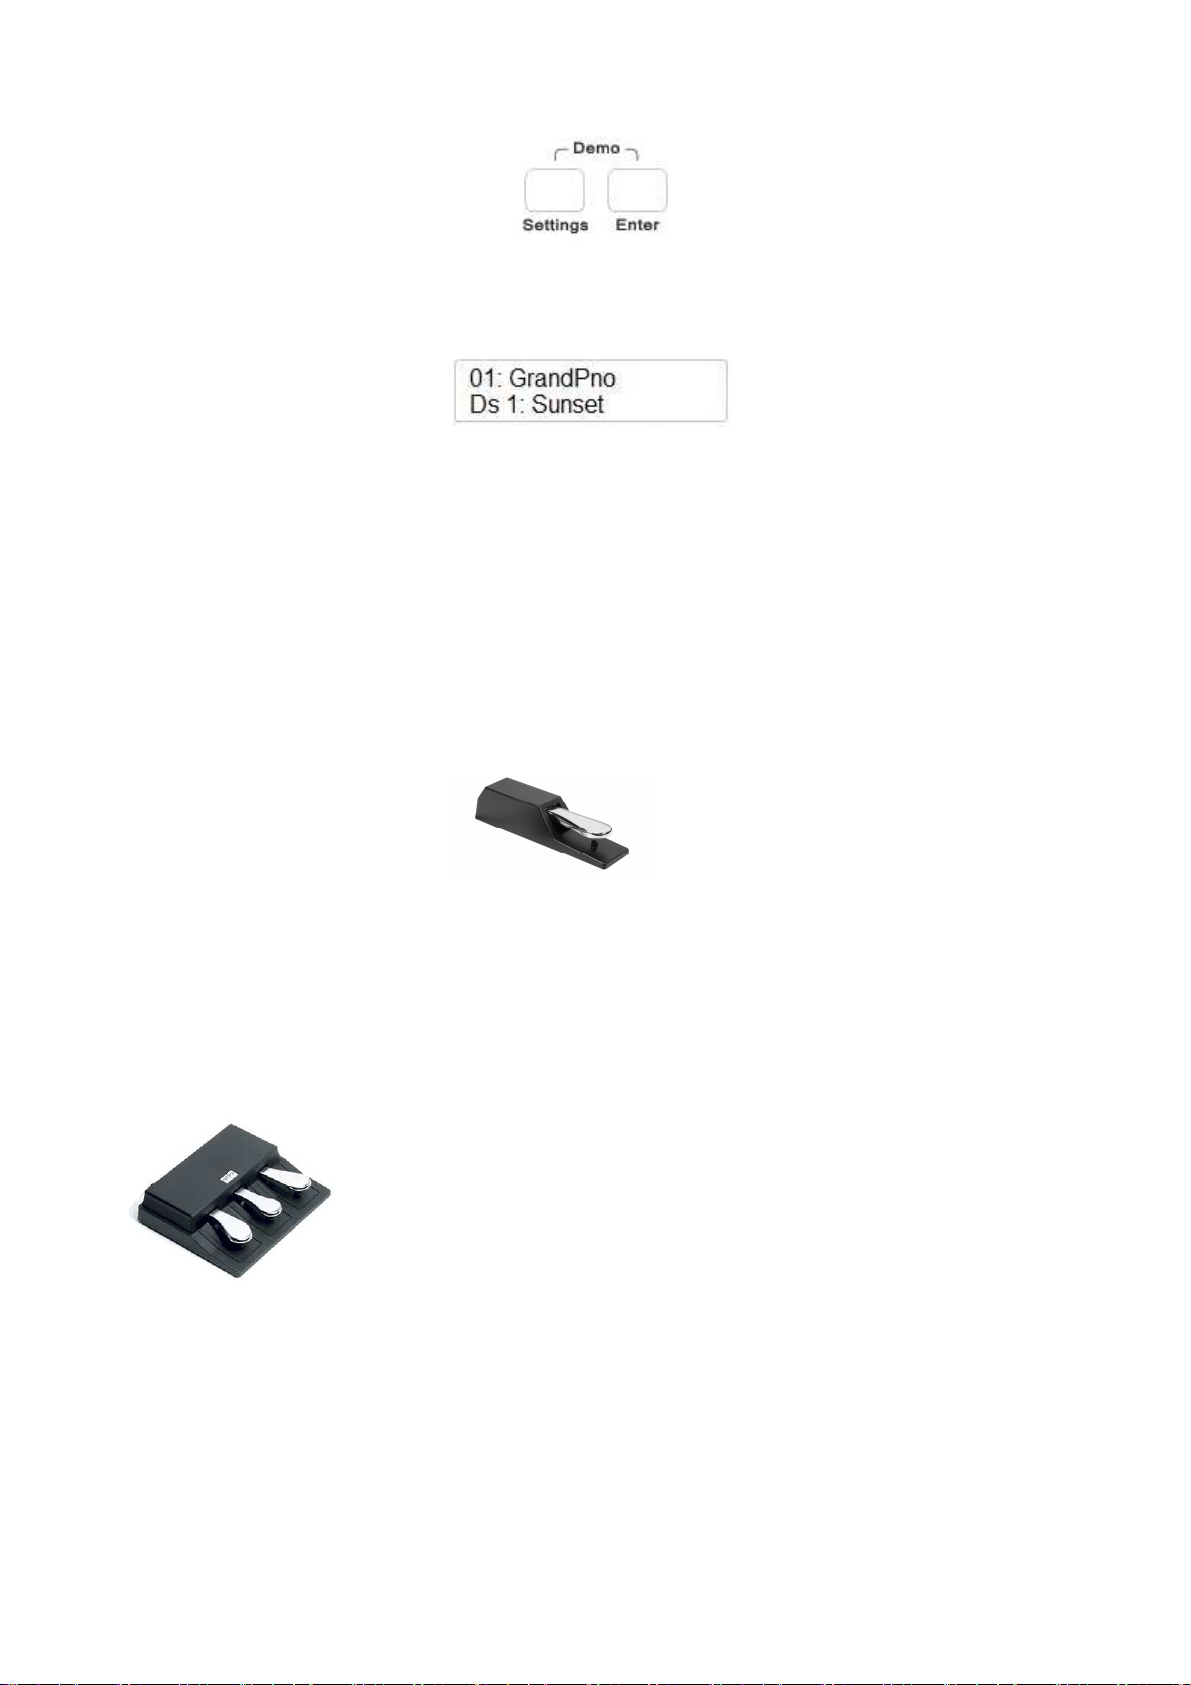
DEMO SONG
There are 36 Demo Songs available in the internal memory. Play the demo selection to fully
understand the potential of the instrument. To activate the DEMO function press at the same time
the SETTINGS and ENTER buttons, located at the right of the control panel. Press these buttons
and the Display will indicate:
This is to indicate Demo Song number 01: Sunset. Use the Data Control wheel to select one of the
36 available Demo Songs.
At the end of the selected Demo Song the instrument will automatically play the next Demo Song.
The Demo function can be exit by pressing the SETTINGS and ENTER buttons again even while
the Demo is playing.
SUSTAIN PEDAL
STAGE CONCERT - it is supplied with a Sustain Pedal. An optional 3 pedal unit is available.
CDP 202 - it is supplied with the 3 pedal unit.
STAGE CONCERT - Sustain Pedal.
Connect the Sustain Pedal to the Pedal Input Sustain/Sostenuto to obtain the Sustain effect when
used. It has the same function as the ''sustain'' pedal on the acoustic piano.
It provides sustain and lets the sound slowly decay after the keys have been released.
SOFT/SOSTENUTO/SUSTAIN PEDAL (optional for Stage Concert)
Insert the mono jack to the Pedal Input Soft/Expression and the stereo jack in the Pedal Input
Sustain/Sostenuto.
Jack mono – Soft/Expression socket
Jack stereo – Sustain/Sostenuto socket
The instrument works now with a set of three pedals giving the following functions:
SOFT: gives the piano voices a ''softer'' sound.
SOSTENUTO: this allows only the notes pressed on the keyboard before the Sostenuto pedal
is activated to sustain and no subsequent notes played afterwards.
SUSTAIN: has the same function as the ''sustain'' pedal on the acoustic piano. It
provides sustain and lets the sound slowly decay after the keys have been
released.
Later in this manual you can see how the three pedals can be programmed to other features if
requested.
8

VOLUME PEDAL
If necessary it is possible to connect a Volume Pedal to the instrument, but it is necessary to
program the instrument.
- Connect the Expression Pedal to the Expression socket in the back of the instrument
- Select several time the SETTINGS button until the display show:
- Press ENTER to confirm and the display show:
- Using the Data Control wheel select Pedal 3
- Press ENTER to confirm and using the Data Control wheel select Pd3-Expression
The expression pedal can now be used on the instrument to control the instrument volume while
playing.
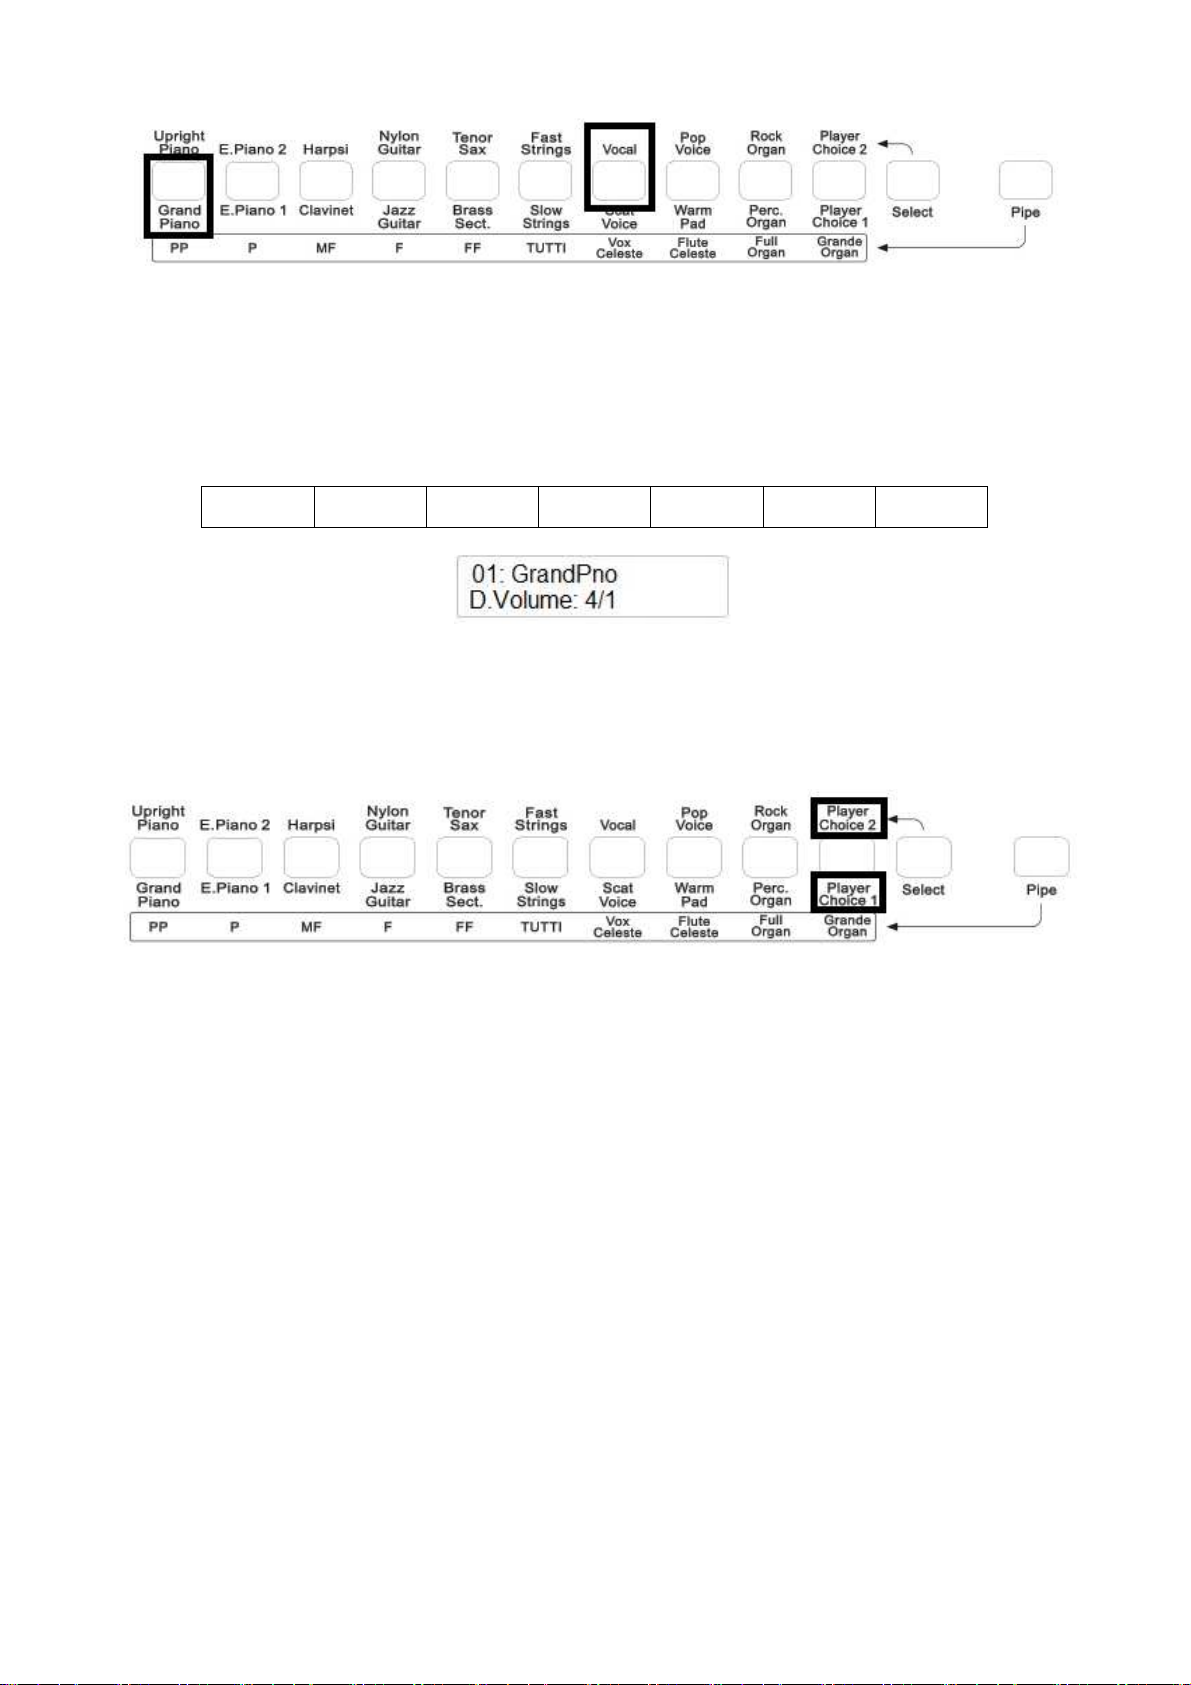
VOICE SECTION
It is possible to select two types of voices in the Stage Concert and CDP 202 models: Orchestral
Voices and Pipe Voices.
ORCHESTRAL VOICE SECTION
The Orchestral Voices are indicated on the control panel below and above the voice select buttons.
To select the voices listed below the voice buttons make sure that the SELECT button is switched
Off.
Press one of the Voice buttons to select the voice you wish to play. Its Led lights up and the display
will indicate the desired voice.
To select the voices listed above the voice buttons make sure that the SELECT button is switched
On.
Press one of the Voice buttons to select the voice you wish to play. Its Led lights up and the display
will show the desired voice.
9

To select the GRAND PIANO voice press the related button
To select the HARPSI voice, press the SELECT button and after the HARPSI voice button.
It is also possible to play two voices at the same time, for example GRAND PIANO and SLOW
STRINGS.
-
-
-
-
To select the GRAND PIANO voice press and hold the related button.
While holding down the GRAND PIANO button also press the SLOW STRINGS button.
The display will indicate SLOW STRINGS for a few seconds and will go back to GRAND
PIANO voice that was the first voice selected.
The two voices are now selected and they can be played at the same time.
It is also possible to play two voices at the same time, selecting them from the top and the bottom
row, for example GRAND PIANO and VOCALS.
-
-
-
To select the GRAND PIANO voice press and hold the related button.
While holding down the GRAND PIANO button also press the SELECT button to select the
upper row.
Release now the SELECT button and while holding the GRAND PIANO button press the
VOCAL button .
10
-
-
The display will indicate VOCAL for a few seconds and will go back to GRAND PIANO
voice that was the first voice selected.
The two voices are now selected and they can be played at the same time.
It is now possible to balance the two voices using the (/\) UP and (\/) Down DATA buttons . Try
the different volume settings as per below table:
4 - 1 4 – 2 4 - 3 4 – 4 3 - 4 2 - 4 1 - 4
PLAYER CHOICE
Using the PLAYER CHOICE buttons it is possible to select any voice from the internal library of
the Stage Concert or CDP 202.
To select the PLAYER CHOICE 1 button just play the related button. To select PLAYER CHOICE
2, press the SELECT button and then press the related button.
The default voice of PLAYER CHOICE 1 is Vibes (nr. 13).
The default voice of PLAYER CHOICE 2 is Accordion (nr. 32).
To select a new voice for PLAYER CHOICE 1 follow the instructions:
-
-
Press the PLAYER CHOICE 1 button.
Use the Data Control wheel to select any of the 142 voices available in the internal sound
library. The PLAYER CHOICE 1 Led is blinking indicating you are selecting a new sound.
-
-
The new selected voice is now loaded in the button.
In order to save the new selected Player Choice for future use, after the instrument is
switched off, it is necessary to save the new selection in a Memory Registration ( we see
later in the manual ).
-
At power off the last selected Player Choice voice will remain in memory until replaced or
until a new registration memory bank is loaded.
11

PIPE VOICE SECTION
To select the Pipe voices it is necessary to press the PIPE button on the RIGHT of the Voice
Section.
When the PIPE button is selected the Pipe Organ Voices will be available. Select them as you
whish and layer them - two voices at the time - to obtain your desired sound.
It is of course possible to layer one of the Pipe Organ Voices together with one of the Orchestral
Voices as we have seen before.
For example, mix the FULL ORGAN voice with the SLOW STRINGS voice – in the lower row -.
Select the FULL ORGAN voice:
While holding down the FULL ORGAN, switch off the PIPE button and press the SLOW
STRINGS button.
The two voices are now selected and they can be played at the same time.
To select an Pipe Sound, for example FLUTE CELESTE, with a sound from the upper row of the
Orchestral Voice section, for example VOCAL:
Select the FLUTE CELESTE voice and while holding it down also press the SELECT button to
access the upper row.
12

Release the SELECT button while still holding down the FLUTE CELESTE button and press now
the VOCAL voice button
The two voices are now selected and they can be played at the same time.
SPLIT
When the SPLIT button is pressed (its Led will start blinking) the instrument automatically splits
the keyboard in two parts and a different voice is automatically selected on the left part of the
keyboard. The SLOW STRINGS Voice is automatically selected to the left part of the keyboard and
the display will indicate:
After a few seconds the SPLIT button Led will stop blinking and the display will indicate:
The instrument is now in Split mode with SLOW STRINGS on the left and GRAND PIANO on the
Right. It is possible to select a different voices for the left section.
To select a new voice press the SPLIT button (its Led is blinking) and select a new voice from the
voice buttons available in the control panel.
After you have selected the voice wait a few seconds until the SPLIT button Led stops blinking.
The new voice is now selected and saved in memory.
In order to save the new selected Split configuration for future use, after the instrument is switched
off, it is necessary to save the new selection in a Memory Registration.
There are 20 voices available in the control panel and each one can be used for the Left Voice.
Using the PLAYER CHOICE 1 and PLAYER CHOICE 2 it is also possible to select any voice
from 142 voices available in the internal library of sounds.
See the full list at the end of the manual.
SPLIT POINT
If necessary it is possible to change the Split Point:
-
Press the SPLIT button and hold it for a few seconds until the display shows:
The number 55 is related to the note midi number.
-
-
To change the Split Point, there two possible solutions:
13

- press the SPLIT button and use the Data Control wheel to set a different value.
or
- press and hold the SPLIT button and select the key where the new Split point is
desired.
-
As soon as the SPLIT button is released, the display will go back to normal mode.
DIGITAL REVERB
The DIGITAL REVERB effects expand the sound of your instrument giving your music a new
dimension. The instrument has 10 different Reverb Type:
1
6
Hall 1
Stage 1
2
7
Hall 2
Stage 2
3
8
Room 1
Plate
4
9
Room 2
Delay
10
5
Room 3
Echo
If the REVERB is selected, it will stay switched ON even if a different voice is selected while
playing.
Soon after the REVERB button is selected, it is possible to select a different reverb effect using the
Data Control wheel.
CHORUS EFFECT
This gives to all the voices of these sections a fuller, rounder and warmer sound.
At Power Up the CHORUS effect will always be switched OFF.
The instrument has 13 different Chorus Type:
1
4
7
10
13
Chorus 1
Chorus 4
Short Delay
Flanger 3
Celeste 3
2
5
8
11
Chorus 2
Feedback
Short Delay Feedback
Celeste 1
3
6
9
12
Chorus 3
Flanger 1
Flanger 2
Celeste 2
Soon after the CHORUS button is selected, it is possible to select a different chorus effect using the
Data Control wheel.
14
TOUCH SENSITIVITY
Just like an acoustic piano, your instrument has an 88 note keyboard with velocity control. This
means the level of the audio signal will be in proportion with the velocity of the key pressed. If you
play soft you will have a quiet sound, while if you play very hard you will have a much louder
sound .
The TOUCH button allows you to select 3 different touch sensitivity curves:
1 - HARD This setting requires the keys to be played quite hard to produce
maximum loudness.
2 - NORMAL This setting produces standard keyboard response. This is the factory default
mode.
3 - SOFT This setting allows maximum volume with light key pressure.
Select the Touch Sensitivity you desired by pressing the TOUCH button and soon after select the
desired touch curve using the Data Control Wheel until the display will indicate it.
At Power Up the NORMAL curve will be automatically switched ON.
Soon after the TOUCH button is selected, it is possible to select a different touch sensitivity curve
using the Data Control wheel.
When TOUCH button is switched Off, the keyboard will play without touch sensitivity at the fixed
midi value of 100 and this midi value can be changed following this procedure:
-
Make sure that the TOUCH Led is switched Off.
-
press the TOUCH button and hold it. The display shows:
-
using the use the Data Control wheel it is possible to change the response from 0 (no sound)
to 127 (maximum volume).
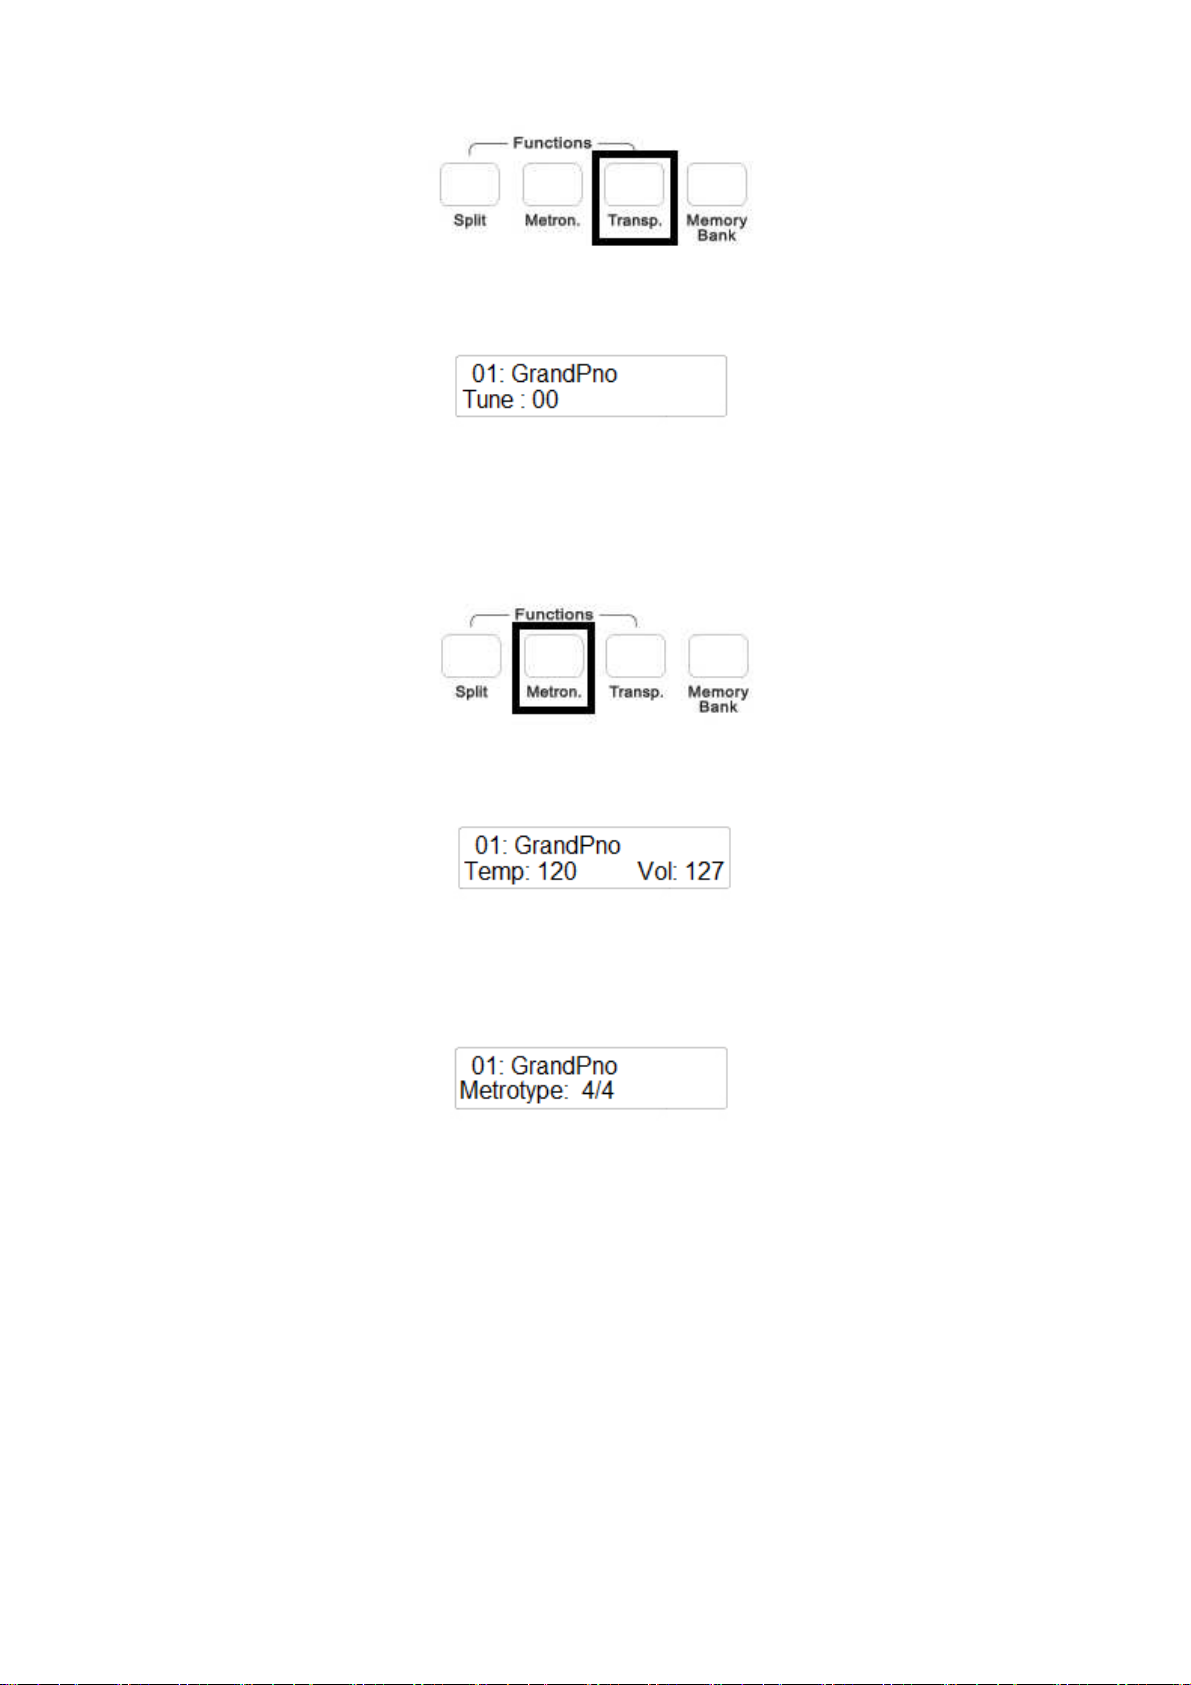
TRANSPOSE
The natural pitch of the instrument is C but can be modified as follows:
-
press the TRANSPOSE button in the FUNCTIONS section.
-
The TRANSPOSE button will start blinking and the display will show:
Using the Data Control wheel it is possible to transpose the instrument in the desired key according
to the following table
C# D D# E F F# G G# A A# B C C# D D# E F F# G G# A A# B C
C
-12 -11 -10 -9 -8 -7 -6
-5 -4 -3 -2 -1 0 1 2 3 4 5 6
7 8 9 10 11 12
To reset the Transpose to C (0) press the (/\) UP and (\/) Down buttons at the same time.
At Power Up the instrument returns automatically to the original tuning.
15
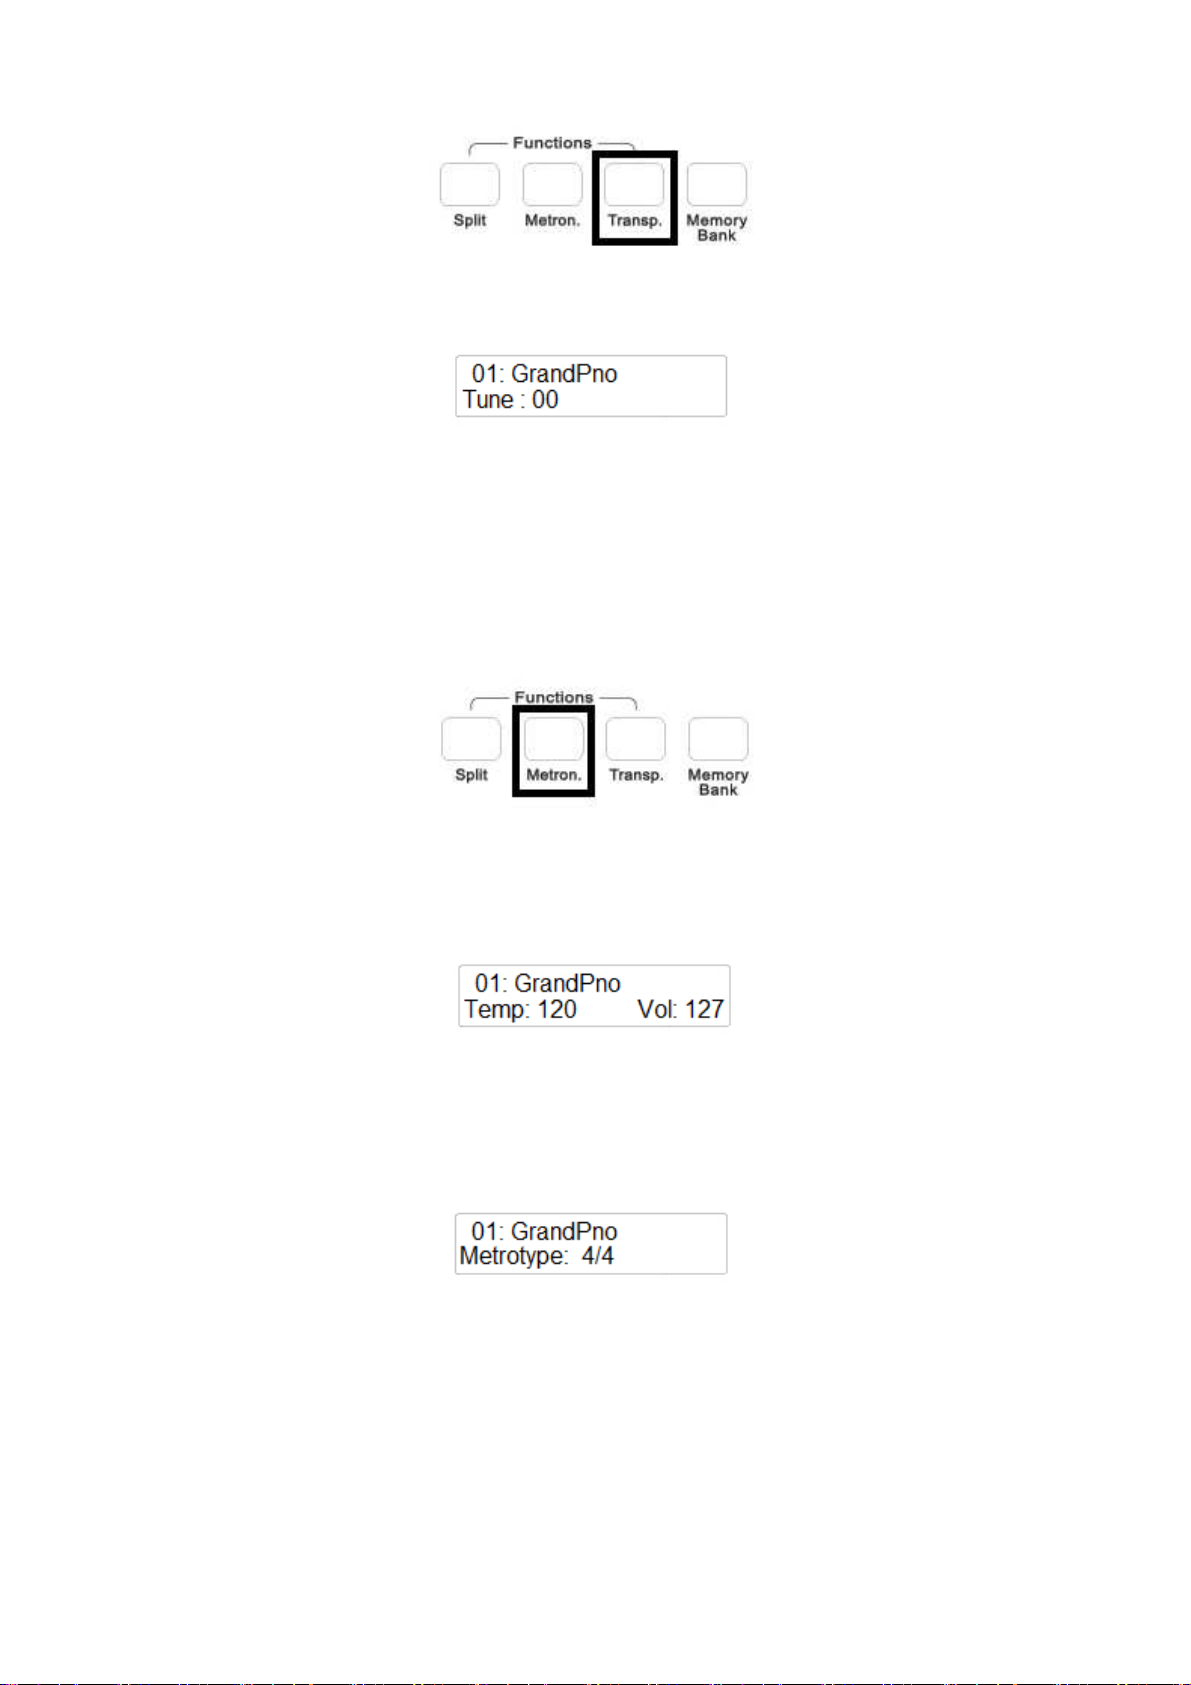
PITCH – Fine Tuning
In those cases where transposition by semitones is not enough, and a more accurate tuning is
necessary, it is still possible to change pitch.
Push and hold the TRANSPOSE button until the display shows:
Using the Data Control wheel it is possible to change the natural pitch of the instrument up to 63
cents and down to 64 cents.
To reset the Pitch of the instrument to Normal, press the (/\) UP and (\/) Down buttons at the same
time.
At Power Up the instrument returns to the original tuning.
METRONOME
To use the METRONOME, push the METRONOME button, and the pulsed beat selected will be
played though the speakers. The beginning of each measure is indicated by a higher sound.
It is possible to change the tempo speed of the Metronome by using the (/\) UP and (\/) Down
buttons.
If you press the (/\) UP and (\/) Down buttons at the same time the Metronome will reset to 120
bpm.
To stop the Metronome, push the METRONOME button again
It is possible to select 12 different Metronome Types.
Press and hold the METRONOME button. The display will show:
There are different Time Signatures available:
Mono Click (1/4), 2/4, 3/4, 4/4, 5/4, 6/4, 3/8, 6/8, 7/8, 9/8, 12/8, 2/2.
Using the Data Control wheel it is possible to change the Metronome Type.
16
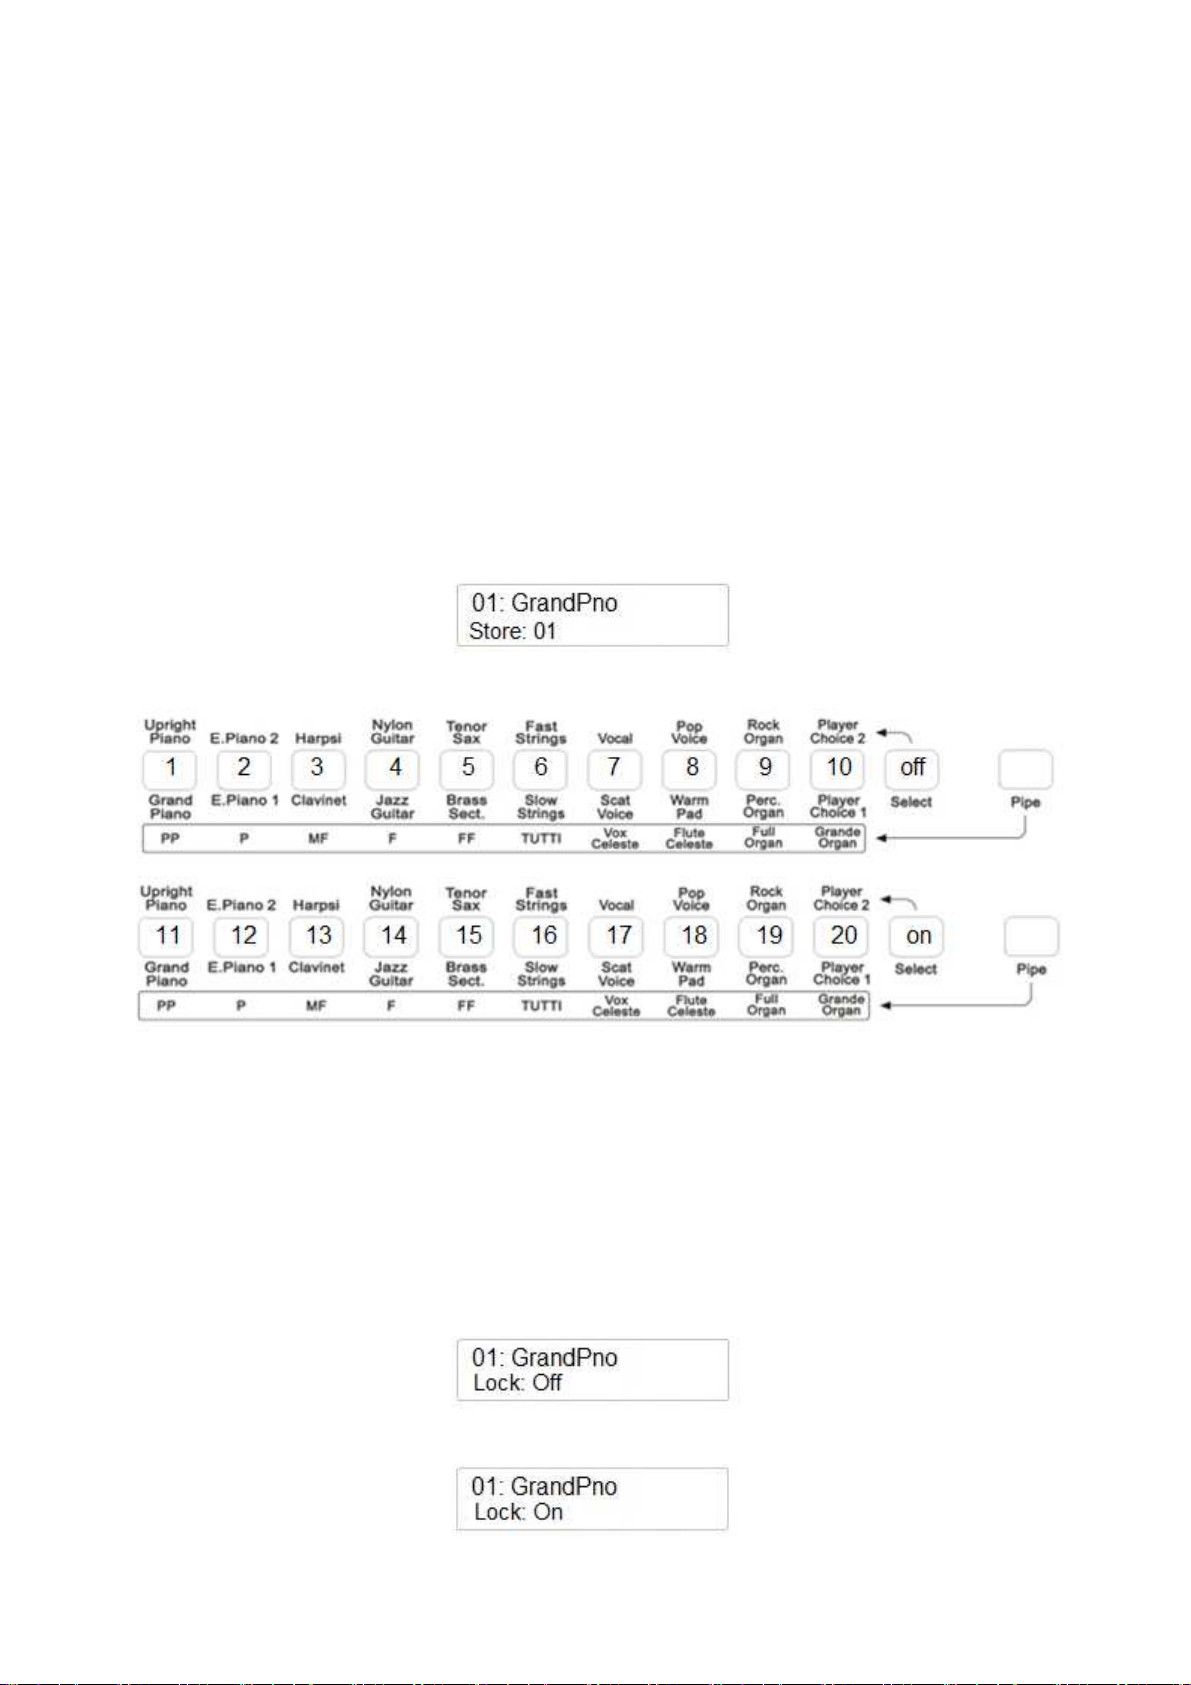
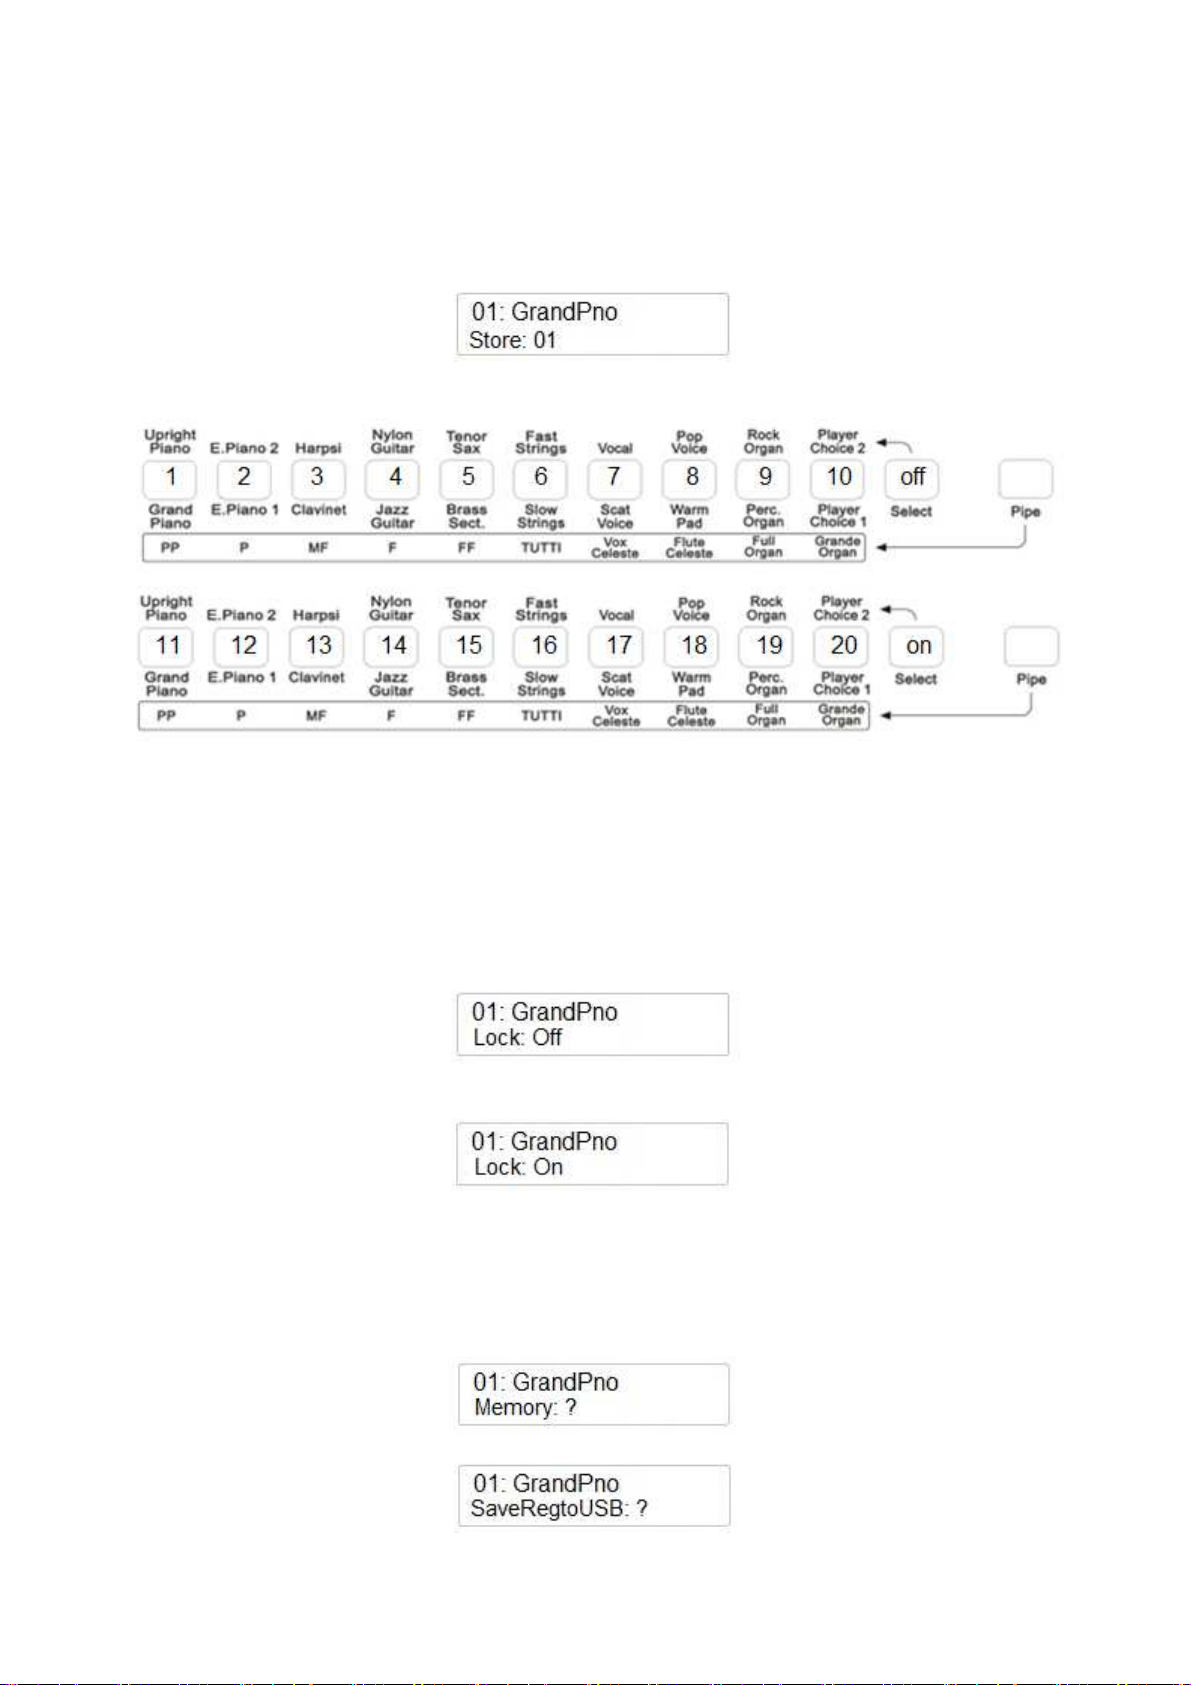
MEMORY BANK – REGISTRATIONS
It is possible to store up to 20 memory registrations in the instrument and recall them at your
convenience. These registrations will be stored in the VOICE BUTTONS and can be recalled when
the MEMORY BANK button is switched on.
These settings will remain in memory even at power off. However at RESET the registration you
have stored in the internal memory will be replaced by the factory settings.
It is possible to save the 20 registrations in each Memory Bank saved in the USB disk. It is possible
to save many Memory Banks in the USB disk.
STORE REGISTRATIONS
Select your favorite voices, with Layer voices or Split voices and desired effects if desired.
When ready, to store the registration follow the next steps.
-
-
Press and hold the MEMORY BANK button
Press the VOICE BUTTON where you want to save the panel registration for a few seconds.
The display will indicate
The VOICE BUTTONS will store the 20 registrations. 10 registration with SELECT button Off,
and 10 registrations with SELECT button On.
Once you have saved your registrations, to recall them just switch the MEMORY BANK Button On
and select the panel settings as you wish.
LOCK ON/OFF
A very useful feature of the instrument is the LOCK function. This allows to lock the LEFT Voice,
the tempo speed when in Play Song mode, and regardless to the changes in the panel registrations,
the left voices and the song tempo will never change.
To select the LOCK feature on or off, just press the MEMORY BANK for a few seconds until the
display shows:
It is possible to change the Lock feature by using the (/\) UP and (\/) Down buttons or the Data
Control wheel.
17

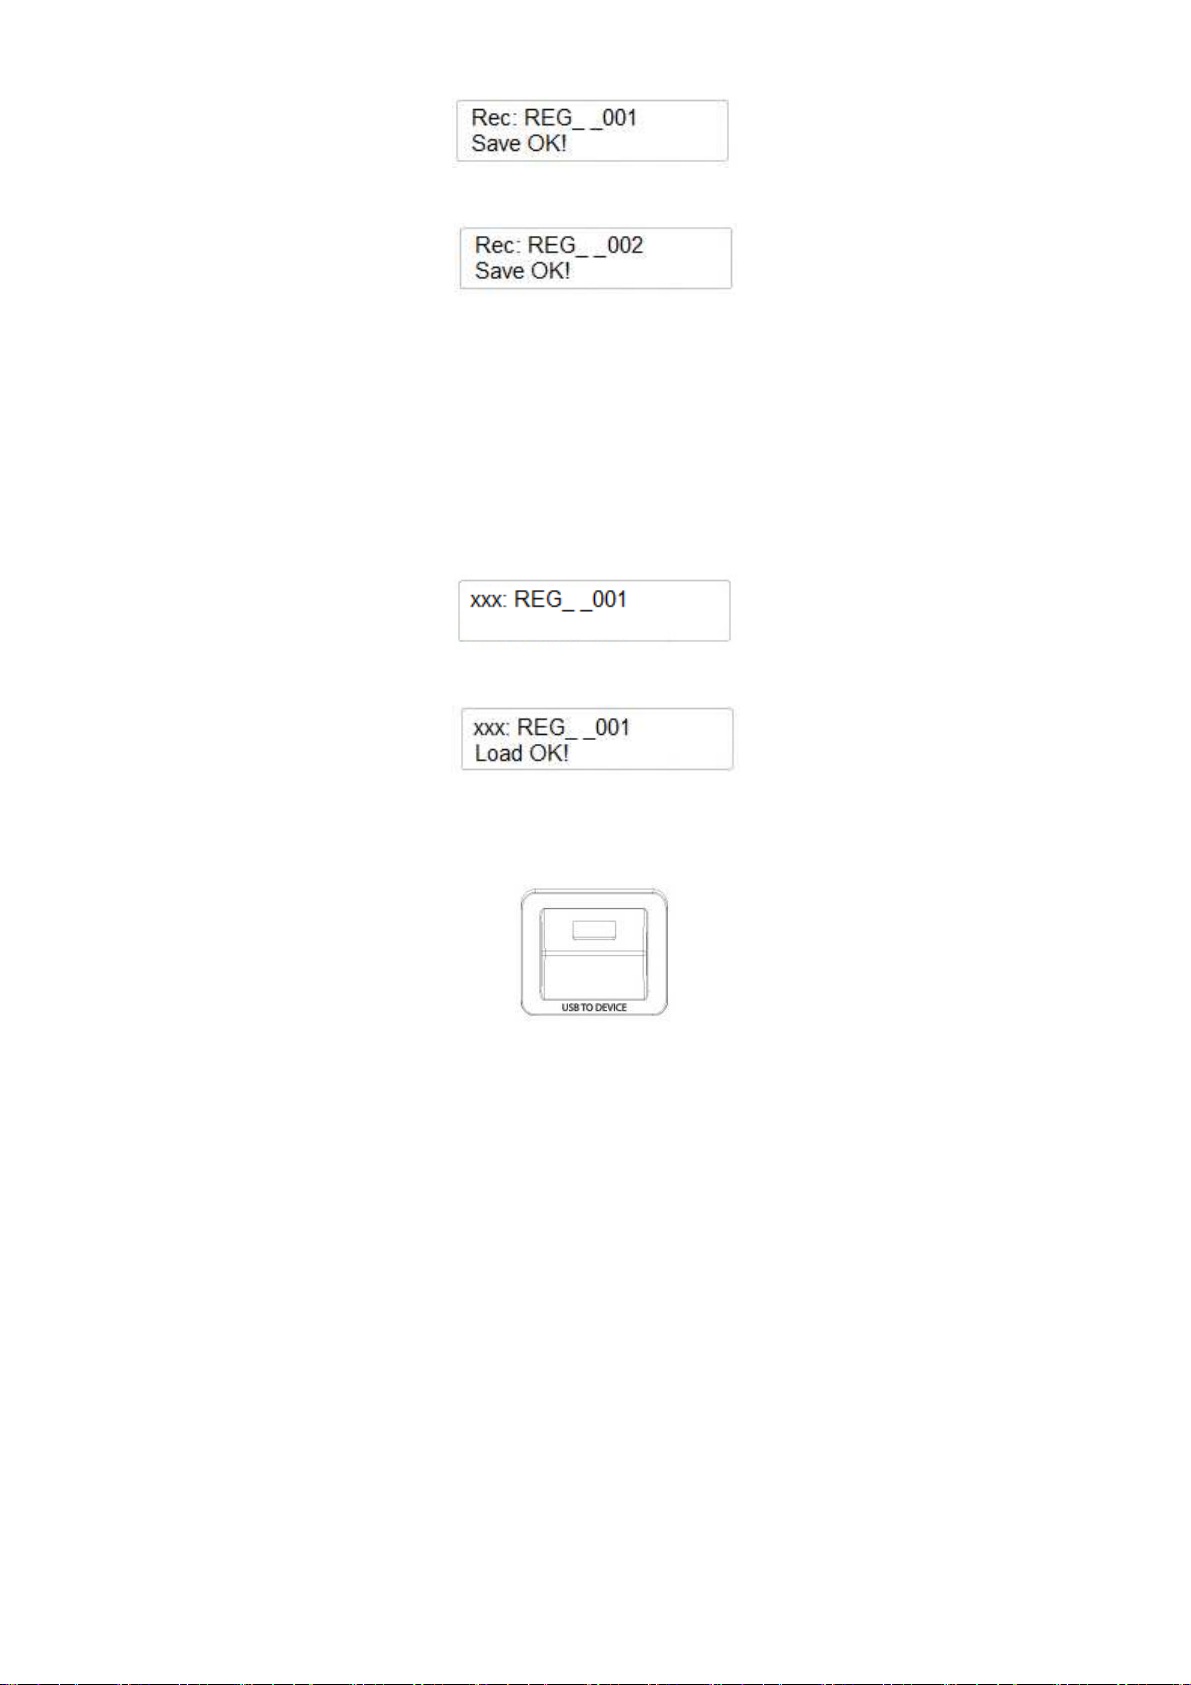
SAVING ON USB DISK THE MEMORY REGISTRATION
Make sure that the USB disk is in its USB socket.
Press the SETTINGS button several times until the display shows:
Select this function by pressing the ENTER button. The display shows:
Press ENTER to confirm and the display will indicate
If you are going to save a new bank of 20 panel registrations, the instrument will save a new bank
as follows:
You can store as many as you need in the USB disk.
LOADING THE MEMORY REGISTRATION FROM USB DISK
To load your panel registrations from USB disk to the internal memory, insert the USB in its socket
and wait a short time until the FILE button is automatically switched On.
Using the Data Control wheel scan the display until you identify your desired panel registration
bank, for example
Press now the PLAY button to confirm the loading and the display will show
The new bank is now saved in the internal memory.
USB DISK
When inserting the USB disk in this slot you will notice that the display will immediately indicate
the first available file stored in the memory. If is a new USB with no data the display will indicate
it.
It is possible to use different type of files in the USB disk:
1 Standard Midi File songs
2 Panel Registrations Settings
The display will show the files in alphabetic order or related to the numbers indicating the files.
Note that when in Play Song Mode, while the clock is running, by changing the song file using the
Data Control wheel, only the song files will be accessed.
18

PLAY MIDI FILES
To play the midi files, insert your USB disk with the files and the display will show the available
files.
Select the desired song file on the display using the DATA CONTROL wheel.
Start the song by pressing the PLAY button. Press PLAY button again to stop the song.
SONG RECORDER – SEQUENCER
The instrument can record songs directly to USB disk. All information and data recorded will be
saved automatically as Standard Midi File.
It is possible to store complete songs in two different systems:
-
-
Single Track
Multi Track
SINGLE TRACK RECORDING
Insert the USB disk (lets start with an empty SUB disk to make things more easy and clear) in the
USB to Device socket.
- Press the RECORD button to start recording - its Led is On -.
- It is possible to start now with or without Metronome, with the selected Time Signature as
seen in the METRONOME paragraph. Start playing your own music as soon as you are
ready, and the Sequencer will start storing the data as soon as the first key is pressed.
- At the end of your recording just press the RECORD button again to store the song.
The display will show:
The instrument will save the song automatically with the name “xxxSONG_yyy”.
NOTE – xxx indicates the number of the song in the USB disk song list, yyy indicates the number
that is identifying the new song.
-
The display will show:
This indicate that your first recorder song ( number 000) is located at position 001 of the
Song List in the USB disk.
19

MULTI TRACK RECORDING
1 Insert the USB disk in the USB to Device socket.
2 Press the RECORD button to start recording your song – its Led will light up.
3 Press the RECORD button again to stop recording and the song will be automatically saved
with its number SONG_000
4
It is now possible to add a second track. Press the FILE and RECORD buttons to access the
MULTI TRACK Recording Mode.
5
The display automatically shows:
The Metronome starts counting for the first bar and as soon as the first recorded tracks starts
playing the display changes and as soon as the first note is played on the keyboard it will
automatically store the new track.
The display shows:
The two recorded tracks will be stored as SONG_001
6 To add more tracks repeat the procedure from point number 4. It is possible to save up to 5
tracks.
NOTE – If you desire to save a song using the Main and the Dual Voice in layer mode together
with the Split Voice and save them as a multi track song in a single file, just press the RECORD
button and start recording, same as in Single Track mode. The instrument will save the file
automatically.
The instrument automatically assign the following tracks:
Track 1……… Main Voice
Track 2……… Split Voice
Track 3……… Dual Voice
20
BLUETOOTH AUDIO CONNECTION
It is possible to connect the instrument to a remote audio device, Smart Phone
or Smart Tablet, using the optional BT1 RECEIVER that can be connected in
the Bluetooth socket in the back of the instrument.
The Bluetooth Audio Connection will connect your Smart Phone or similar
devices to the instrument amplification system and it will to transmit wireless
your personal music selection.
It will transform your instrument, giving you the chance to play with your
favorite musicians or singers, will be a great Entertainment Center for the
family.
1 Insert the BT1 Receiver in the dedicated socket in the back panel and the instrument will
automatically play a few notes automatically a few notes to confirm the BT1 is inserted
in its slot.
2 When the BT1 receiver is ready, its blue Led will be On and flashing quickly for about
5 seconds. Than it will start flashing at a slower speed after the BT1 will match the
Bluetooth device.
3 Find now the BT1 on the Bluetooth device and select it to complete connection.
4 As soon as the connection is completed, the blue Led will stop flashing to indicate the
two devices are successfully connected.
5 Start playing your audio file from Bluetooth device and have fun.
21

SETTINGS AND EXTRA FEATURES
Using the SETTINGS and ENTER buttons it is possible to access to many internal features of the
instrument.
Press the SETTINGS button several times And you will see all the available Setting Pages
available:
-
-
-
-
-
-
Performance: ?
Effect: ?
Pedal Assign: ?
USB Function: ?
Memory: ?
Other Function: ?
Now we enter in the first part of the Setting pages.
PERFORMANCE
Here find the complete list that can be accessed using the (/\) UP and (\/) Down DATA buttons or
the Data Control wheel:
-
-
-
-
-
-
-
-
-
-
-
-
-
-
Main Voice Pan: ?
Split Voice Pan: ?
Dual Voice Pan: ?
Main Voice Volume: ?
Split Voice Volume: ?
Dual Voice Volume: ?
Main Voice Octave: ?
Split Voice Octave: ?
Dual Voice Octave: ?
Arpeggio Type: ?
Twin Feature: ?
Midi In: ?
Midi Out: ?
Local On/Off: ?
MAIN VOICE PAN
Press the SETTINGS button and the display will show:
Press the ENTER button and the display will show:
It is possible to adjust the Pan Value of the Main voice. It is possible to balance the voice more to
the Left or to the Right of the speaker system.
22

Press ENTER again to modify the Main Pan parameters if necessary. The display indicates:
Using the Data Control wheel it is possible to change the Pan Value ( -64/+63). At value 00, the
Pan effect is equally balanced.
SPLIT VOICE PAN
Select the PERFORMANCE page again using the SETTINGS button and press Enter.
Using the Data Control wheel select the next page:
It is possible to adjust the Pan Value of the Split voice. It is possible to balance the voice more to
the Left or to the Right of the speaker system.
Press ENTER again to modify the Split Pan parameters if necessary. The display indicates
Using the Data Control wheel it is possible to change the Pan Value ( -64/+63). At value 00, the
Pan effect is equally balanced.
DUAL VOICE PAN
Select the PERFORMANCE page again using the SETTINGS button and press ENTER.
Using the Data Control wheel select the next page:
It is possible to adjust the Pan Value of the Dual (Layer) voice. It is possible to balance the voice
more to the Left or to the Right of the speaker system.
Press ENTER again to modify the Dual Pan parameters if necessary. The display indicates
Using the Data Control wheel it is possible to change the Pan Value ( -64/+63). At value 00, the
Pan effect is equally balanced.
MAIN VOICE VOLUME
Select the PERFORMANCE page again using the SETTINGS button and press ENTER.
Using the Data Control wheel select the next page:
It is possible to adjust the Volume of the Main voice.
23
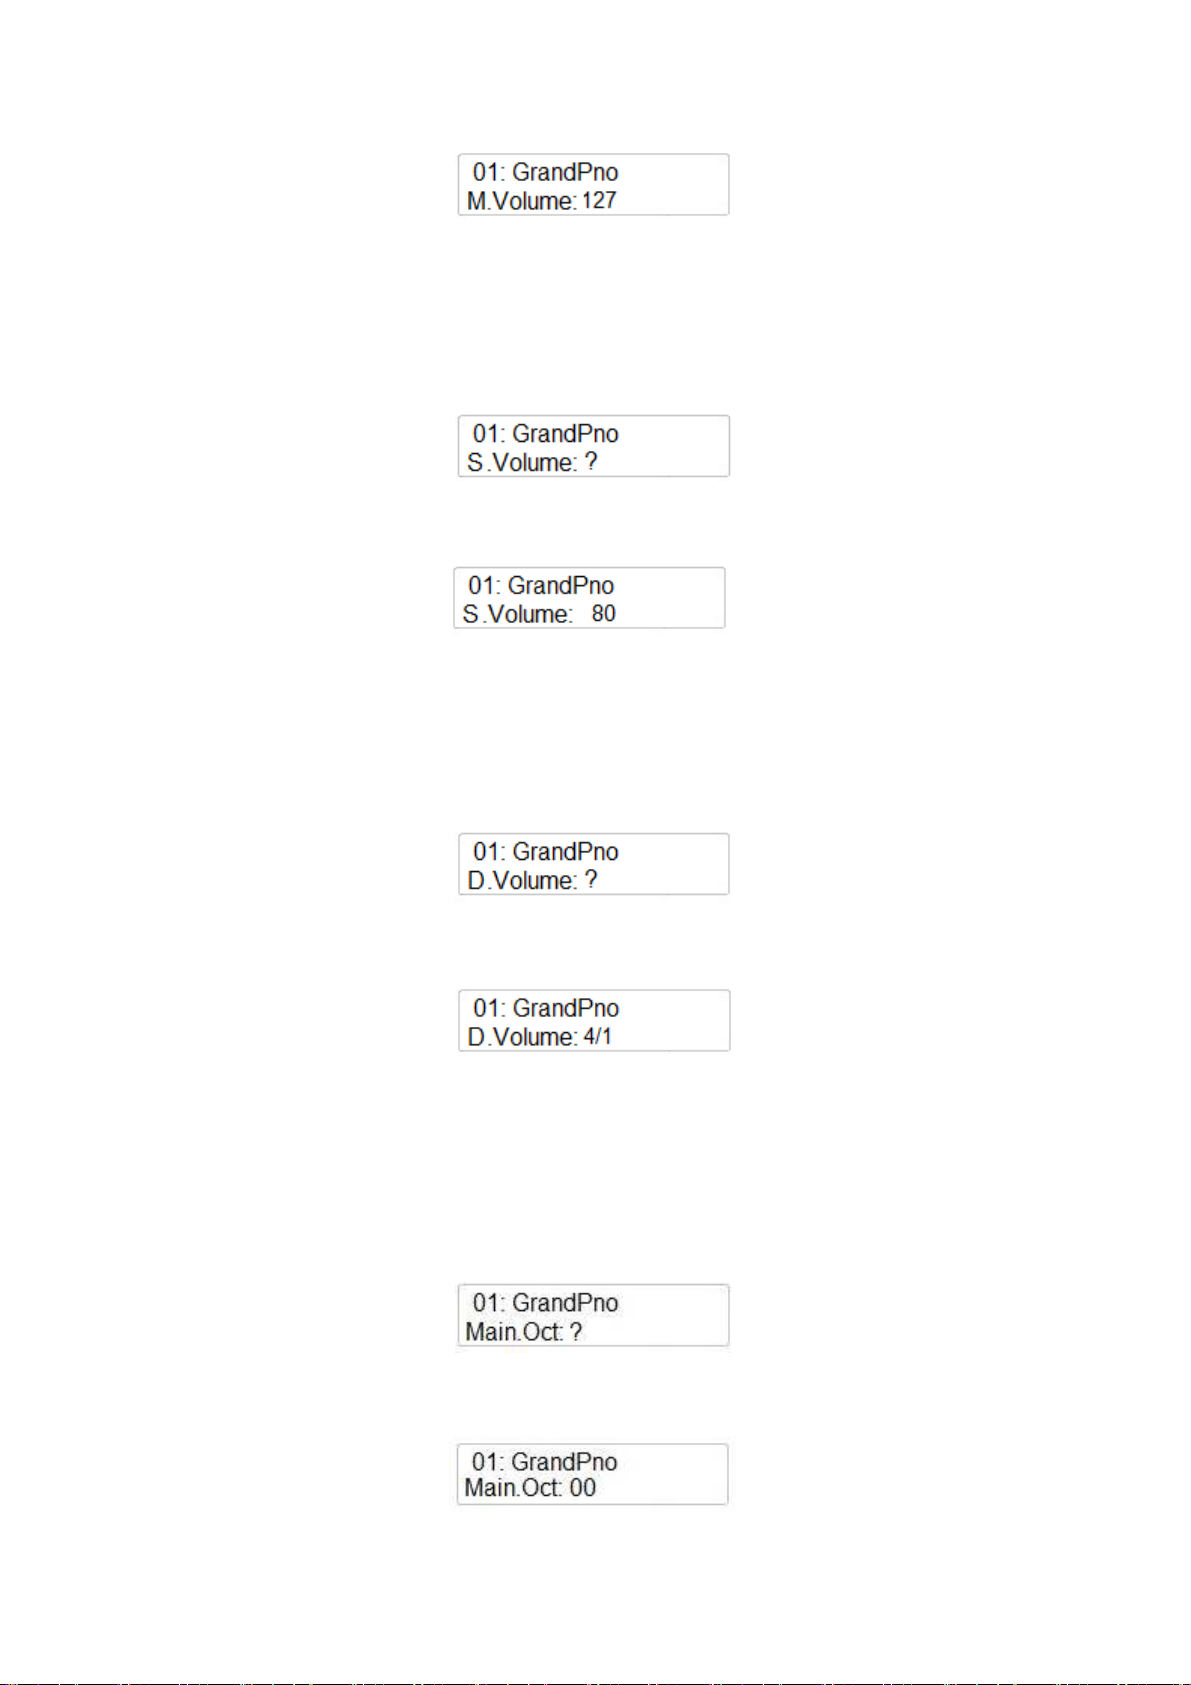
Press ENTER again to modify the Main Volume parameters if necessary. The display indicates
Using the Data Control wheel it is possible to change the Volume of the Main voice, from Max of
127 to Min.00.
SPLIT VOICE VOLUME
Select the PERFORMANCE page again using the SETTINGS button and press ENTER.
Using the Data Control wheel select the next page:
It is possible to adjust the Volume of the Split voice.
Press ENTER again to modify the Split Volume parameters if necessary. The display indicates
Using the Data Control wheel it is possible to change the Volume of the Split voice, from Max of
127 to Min.00.
DUAL VOICE VOLUME
Select the PERFORMANCE page again using the SETTINGS button and press ENTER.
Using the Data Control wheel select the next page:
It is possible to adjust the Volume of the Dual voice.
Press ENTER again to modify the Dual Volume parameters if necessary. The display indicates
Using the Data Control wheel it is possible to change the Volume of the Dual voice, in proportion
to the Main Voice volume.
MAIN VOICE OCTAVE
Select the PERFORMANCE page again using the SETTINGS button and press ENTER.
Using the Data Control wheel select the next page:
It is possible to adjust the Octave of the Main voice.
Press ENTER again to modify the Main Octave parameters if necessary. The display indicates
Using the Data Control wheel it is possible to change the Octave ( -2 / +2 Octaves) of the Main
voice.
24
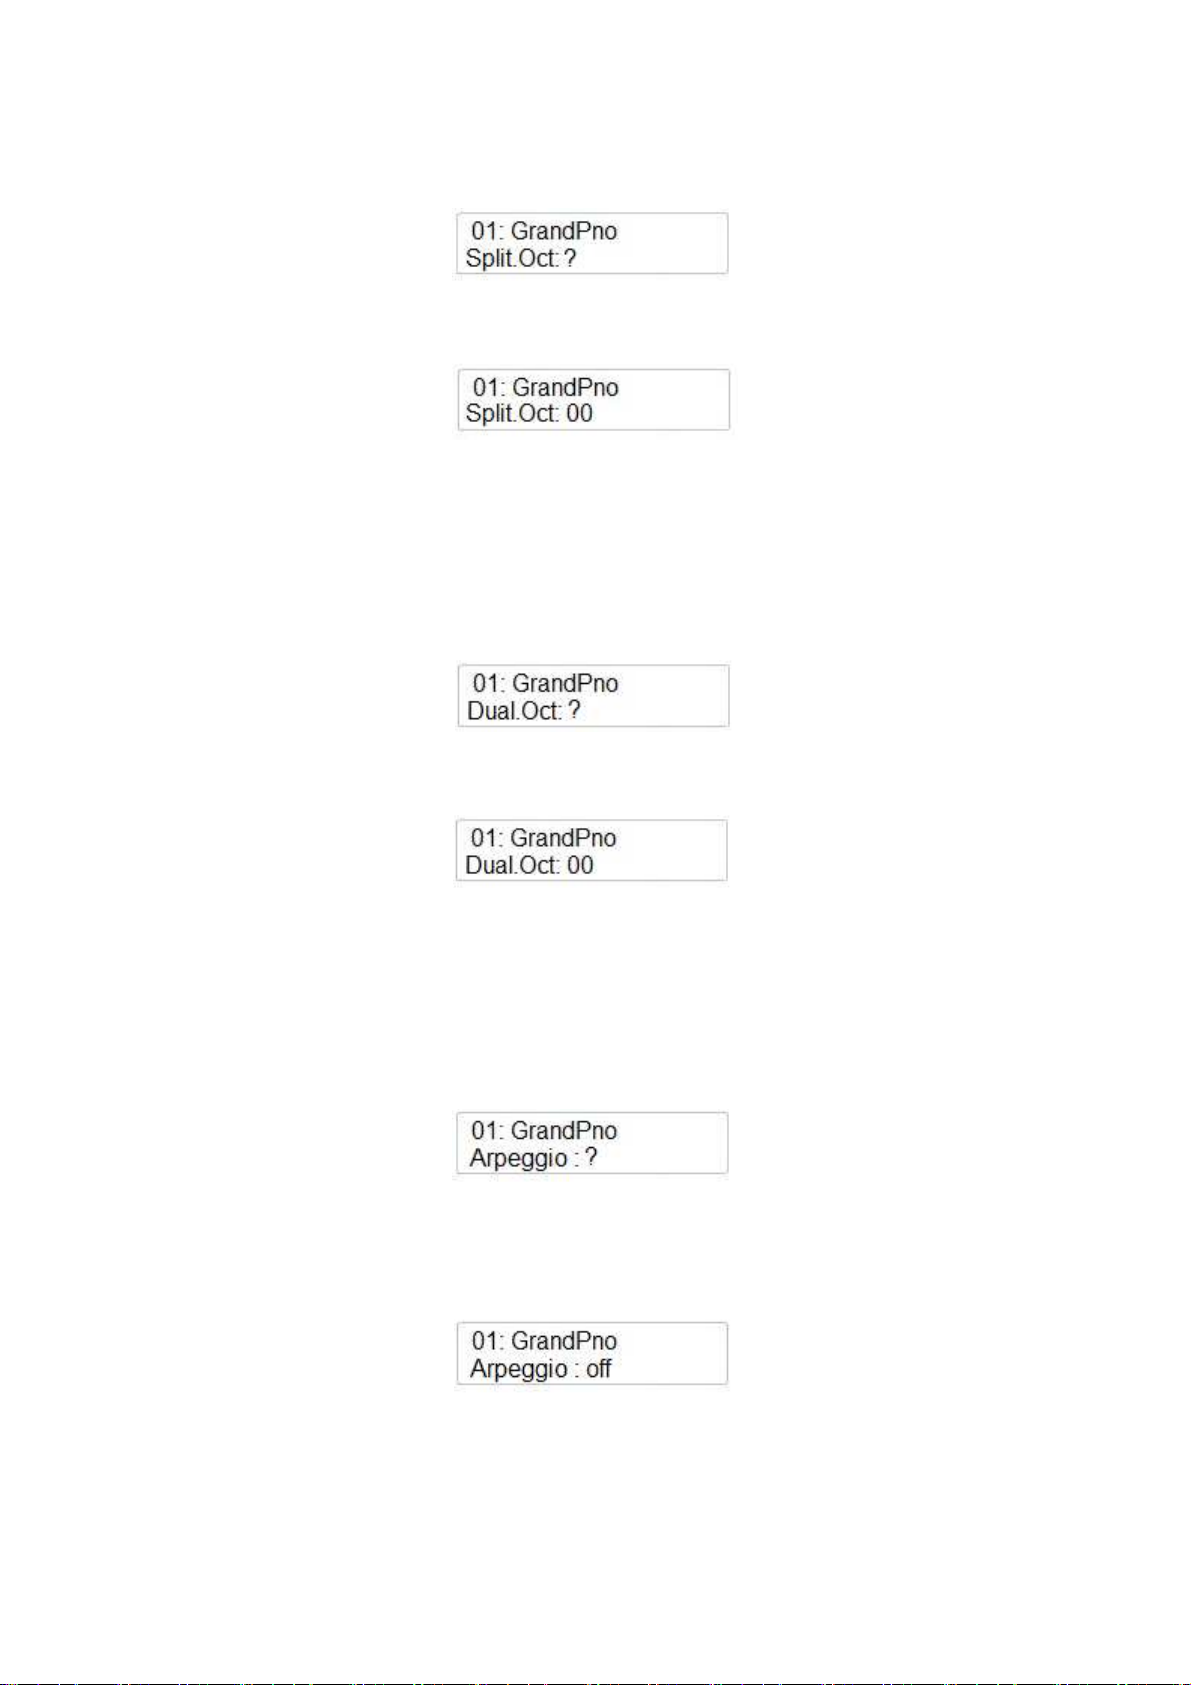
SPLIT VOICE OCTAVE
Select the PERFORMANCE page again using the SETTINGS button and press ENTER.
Using the Data Control wheel select the next page:
It is possible to adjust the Octave of the Split voice.
Press ENTER again to modify the Split voice Octave parameters if necessary. The display indicates
Using the Data Control wheel it is possible to change the Octave ( -2 / +2 Octaves) of the Split
voice.
DUAL VOICE OCTAVE
Select the PERFORMANCE page again using the SETTINGS button and press ENTER.
Using the Data Control wheel select the next page:
It is possible to adjust the Octave of the Dual voice.
Press ENTER again to modify the Dual voice Octave parameters if necessary. The display indicates
Using the Data Control wheel it is possible to change the Octave ( -2 / +2 Octaves) of the Dual
voice.
ARPEGGIO
This feature allows two special arpeggio algorhythm using the Main Voice.
Select the PERFORMANCE page again using the SETTINGS button and press ENTER.
Using the Data Control wheel select the next page:
It is possible to select 2 different types.
Press ENTER again to select the Arpeggio type if necessary. The display indicates
Using the Data Control wheel it is possible to select the Arpeggio type ( 1 or 2).
25
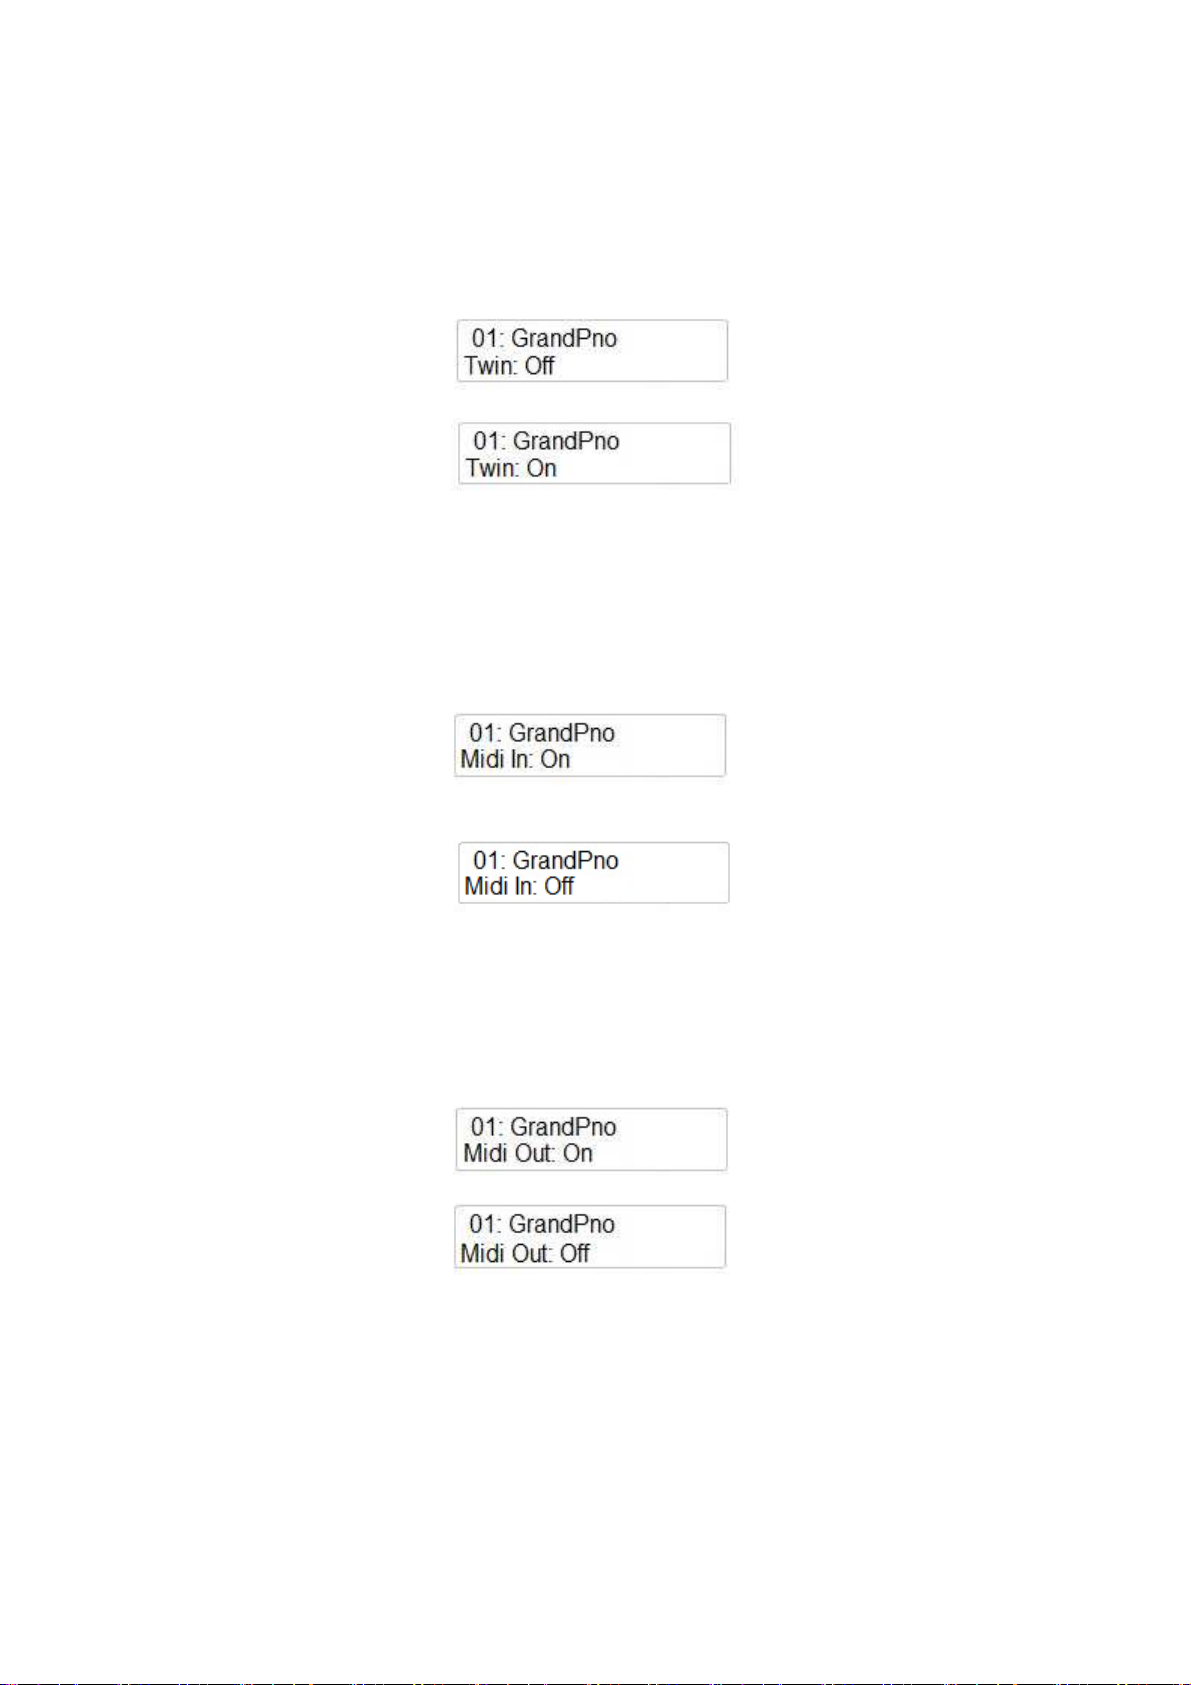
TWIN
This feature offers a special keyboard configuration, very good for practice. Teacher and pupil can
play at the same time the same notes in the same instrument. Twin sets the configuration of the 88
notes of the instrument in two identical half keyboard in the same key and same octave.
Select the PERFORMANCE page again using the SETTINGS button and press ENTER.
Using the Data Control wheel select the next page:
Using the Data Control wheel it is possible to select the Twin mode On or Off.
MIDI IN
This feature allows to set On or Off the Midi In function.
Select the PERFORMANCE page again using the SETTINGS button and press ENTER.
Using the Data Control wheel select the next page:
Using the Data Control wheel it is possible to select the Midi In Off.
MIDI OUT
This feature allows to set On or Off the Midi Out function.
Select the PERFORMANCE page again using the SETTINGS button and press ENTER.
Using the Data Control wheel select the next page:
Using the Data Control wheel it is possible to select the Midi Out Off.
It is also possible to select in which Midi Channel the Midi Out should transmit the Midi Data: from
Ch. 1 to Ch.16.
MIDI LOCAL
The Midi Local On/Off allow to decide if the internal sounds of the instrument will play together
with the external sound controlled by midi.
This feature allows to set On or Off the Midi Local function.
26

Select the PERFORMANCE page again using the SETTINGS button and press ENTER.
Using the Data Control wheel select the next page:
Using the Data Control wheel it is possible to select the Midi Local Off.
Now we enter in the second part of the Setting pages.
Press the Setting button two times to enter the Effects pages.
EFFECTS
Here find the complete list that can be accessed using the (/\) UP and (\/) Down DATA buttons:
-
-
-
-
-
-
-
-
Reverb Type
Main Reverb Volume
Split Reverb Volume
Dual Reverb Volume
Chorus Type
Main Chorus Volume
Split Chorus Volume
Dual Chorus Volume
REVERB TYPE
It is possible to select the Reverb type for the instrument.
As we seen in the manual, there are 10 different types of Reverb effects.
1
6
Hall 1
Stage 1
2
7
Hall 2
Stage 2
3
8
Room 1
Plate
4
9
Room 2
Delay
10
5
Room 3
Echo
Press the SETTINGS button until the display indicate:
Press ENTER to confirm and the display will show the current reverb effect type, for example:
Using the Data Control wheel select the next desired reverb type.
REVERB VOLUME
When in the EFFECT page press the ENTER button to address all the Reverb Volume parameters
for the Main, Split and Dual section. Select them with the ENTER button and adjust the Volume
Value (quantity of Reverb) using the Data Control wheel. Every sound section can have a different
amount of Reverb effect (range 0 – 127).
27

CHORUS TYPE
It is possible to select the Chorus type for the instrument.
As we seen in the manual, there are 13 different types of Reverb effects.
1
4
7
10
13
Chorus 1
Chorus 4
Short Delay
Flanger 3
Celeste 3
2
5
8
11
Chorus 2
Feedback
Short Delay Feedback
Celeste 1
3
6
9
12
Press the SETTINGS button until the display indicate:
Press ENTER to confirm and the display will show
Chorus 3
Flanger 1
Flanger 2
Celeste 2
Using the Data Control wheel select the Chorus Type function:
Press ENTER again and with the Data Control wheel select the desired Chorus type.
It is possible to set also the value of the chorus effect for each section (Main, Dual, Split).
Press the SETTINGS button until the display indicate:
Press ENTER to confirm and the display will show
When in the EFFECT page press the ENTER button to address all the Volume parameters using the
Data Control wheel for the Main, Split and Dual section. Select them with the ENTER button and
adjust the Value (quantity of Chorus) using the Data Control wheel.
28

PEDAL ASSIGN
It is possible to reprogram the 3 pedals of the CDP202 to perform different features if requested.
The Sustain (Pedal 1) and Sostenuto (Pedal 2) pedals can be programmed with the same list of
functions according to the player request. The Soft (Pedal 3) pedal will have a slightly different list
of functions.
PEDAL 1 and 2 ASSIGN
Press the SETTINGS button a few times until you select the Pedal Assign page.
Press the ENTER button to confirm and the display shows:
Press ENTER button to confirm. Using the using the Data Control wheel to select the other Pedal
functions:
Pdl-Null The pedal will have no function
Pdl-Sustain The pedal will work as Sustain/Damper pedal
Pdl-Soft The pedal will work as Soft pedal
Pdl-Sost The pedal will work as Sostenuto pedal
Pdl-Tap The pedal will work as TAP TEMPO button.
Pdl-MemoryUp The pedal will change the Panel Memory Registration to the next one
Pdl-Play The Pedal will be used as the PLAY button for Midi File Playing
When you have addressed the right Pedal Function press ENTER to confirm.
PEDAL 3 ASSIGN
Press the SETTINGS button a few times until you select the Pedal Assign page.
Press the ENTER button to confirm and the display shows:
Select the Pedal 3 page with the Data Control wheel.
Press ENTER button to confirm. Using the (/\) UP and (\/) Down DATA buttons or the Data
Control wheel to select the other Pedal functions:
Pdl-Null The pedal will have no function
Pdl-Sustain The pedal will work as Sustain/Damper pedal
Pdl-Soft The pedal will work as Soft pedal
29

Pdl-Sost The pedal will work as Sostenuto pedal
Expression The pedal socket will be used to control a Volume/Expression pedal
Pdl-Tap The pedal will work as TAP TEMPO button.
Pdl-MemoryUp The pedal will change the Panel Memory Registration to the next one
Pdl-Play The Pedal will be used as the PLAY button for Midi File Playing
When you have addressed the right Pedal Function press ENTER to confirm.
NOTE – In the Stage Concert model, the above pedal features can only be performed using the
optional 3 Pedal assembly.
MIDI PEDAL
This function allows to play a midi pedalboard with the instrument. There are 2 different settings
for the midi pedalboard with two different sounds.
Press the SETTINGS button a few times until you select the Pedal Assign page.
Press the ENTER button to confirm and the display shows:
Select the Midi Pedal with the Data Control wheel
Press ENTER button to confirm. Using the Data Control wheel to select the Midi Pedal functions:
-
-
-
P1 This is selecting a Church Organ Bass voice, good with Pipe voices.
P2 This is selecting a Finger Bass voice, good with Orchestral voices.
Off No voice available.
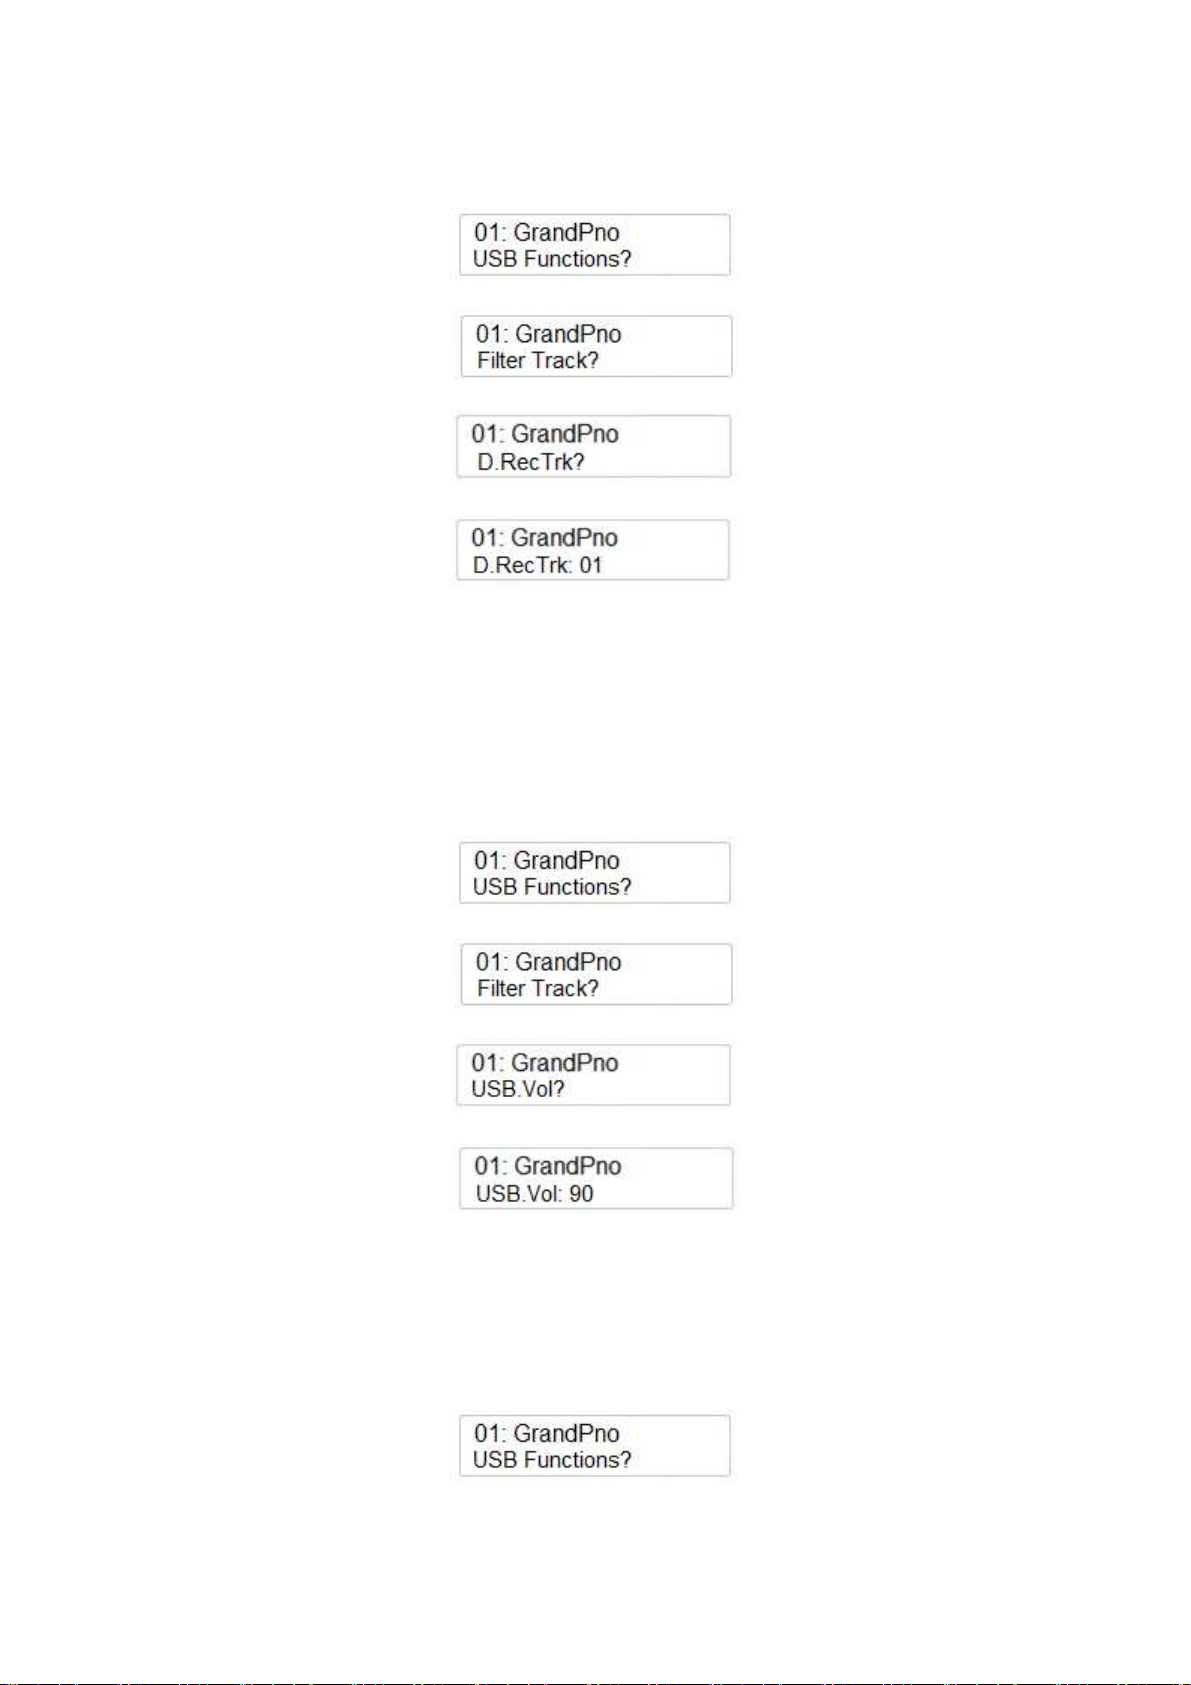
USB FUNCTIONS
In this section we can control the different parameters and functions of the USB Midi Song.
The first function is the Filter Track. This function allows you to mute the various midi tracks of the
song ( it can be from Track 1 to Track 16). This is useful if you want to mute some parts of the song
and play this part yourself.
Press the SETTINGS button a few times until you select USB Function.
Press the ENTER button to confirm and the display shows:
Press the ENTER button to confirm and the display shows:
30

With the Data Control wheel you can now select any of the 16 midi tracks (if all available in the
song). If you want to mute Track 1, press the ENTER button to confirm and the display shows:
Using the Data Control wheel select the Track Filter On/Off.
MAIN VOICE RECORDING TRACK
It is possible to assign a specific Track to the Main Voice section when recording a song.
Press the SETTINGS button a few times until you select USB Function?
Press the ENTER button to confirm and the display shows:
Using the Data Control wheel select the next function that is
Press the ENTER button to confirm and the display shows:
With the Data Control wheel you can now select any of the 16 midi tracks or set the Track Off.
SPLIT VOICE RECORDING TRACK
It is possible to assign a specific Track to the Split Voice section when recording a song.
Press the SETTINGS button a few times until you select USB Function?
Press the ENTER button to confirm and the display shows:
Using the Data Control wheel select the next function that is
Press the ENTER button to confirm and the display shows:
With the Data Control wheel you can now select any of the 16 midi tracks or set the Track Off..
31
DUAL VOICE RECORDING TRACK
It is possible to assign a specific Track to the Dual Voice section when recording a song.
Press the SETTINGS button a few times until you select USB Function?
Press the ENTER button to confirm and the display shows:
Using the Data Control wheel select the next function that is
Press the ENTER button to confirm and the display shows:
With the Data Control wheel you can now select any of the 16 midi tracks or set the Track Off.
USB SONG VOLUME
In order to be able to balance the instrument volume with the song volume it is possible to adjust
the song volume.
Press the SETTINGS button a few times until you select USB Function?
Press the ENTER button to confirm and the display shows:
Using the Data Control wheel select the USB volume
Press the ENTER button to confirm and the display shows:
Using the Data Control wheel adjust the song volume at the right volume (min 0 – max 127).
USB SONG SPEED
If necessary to change the default tempo of the midi song, is possible to adjust the song speed.
Press the SETTINGS button a few times until you select USB Function?
Press the ENTER button to confirm and the display shows:
32
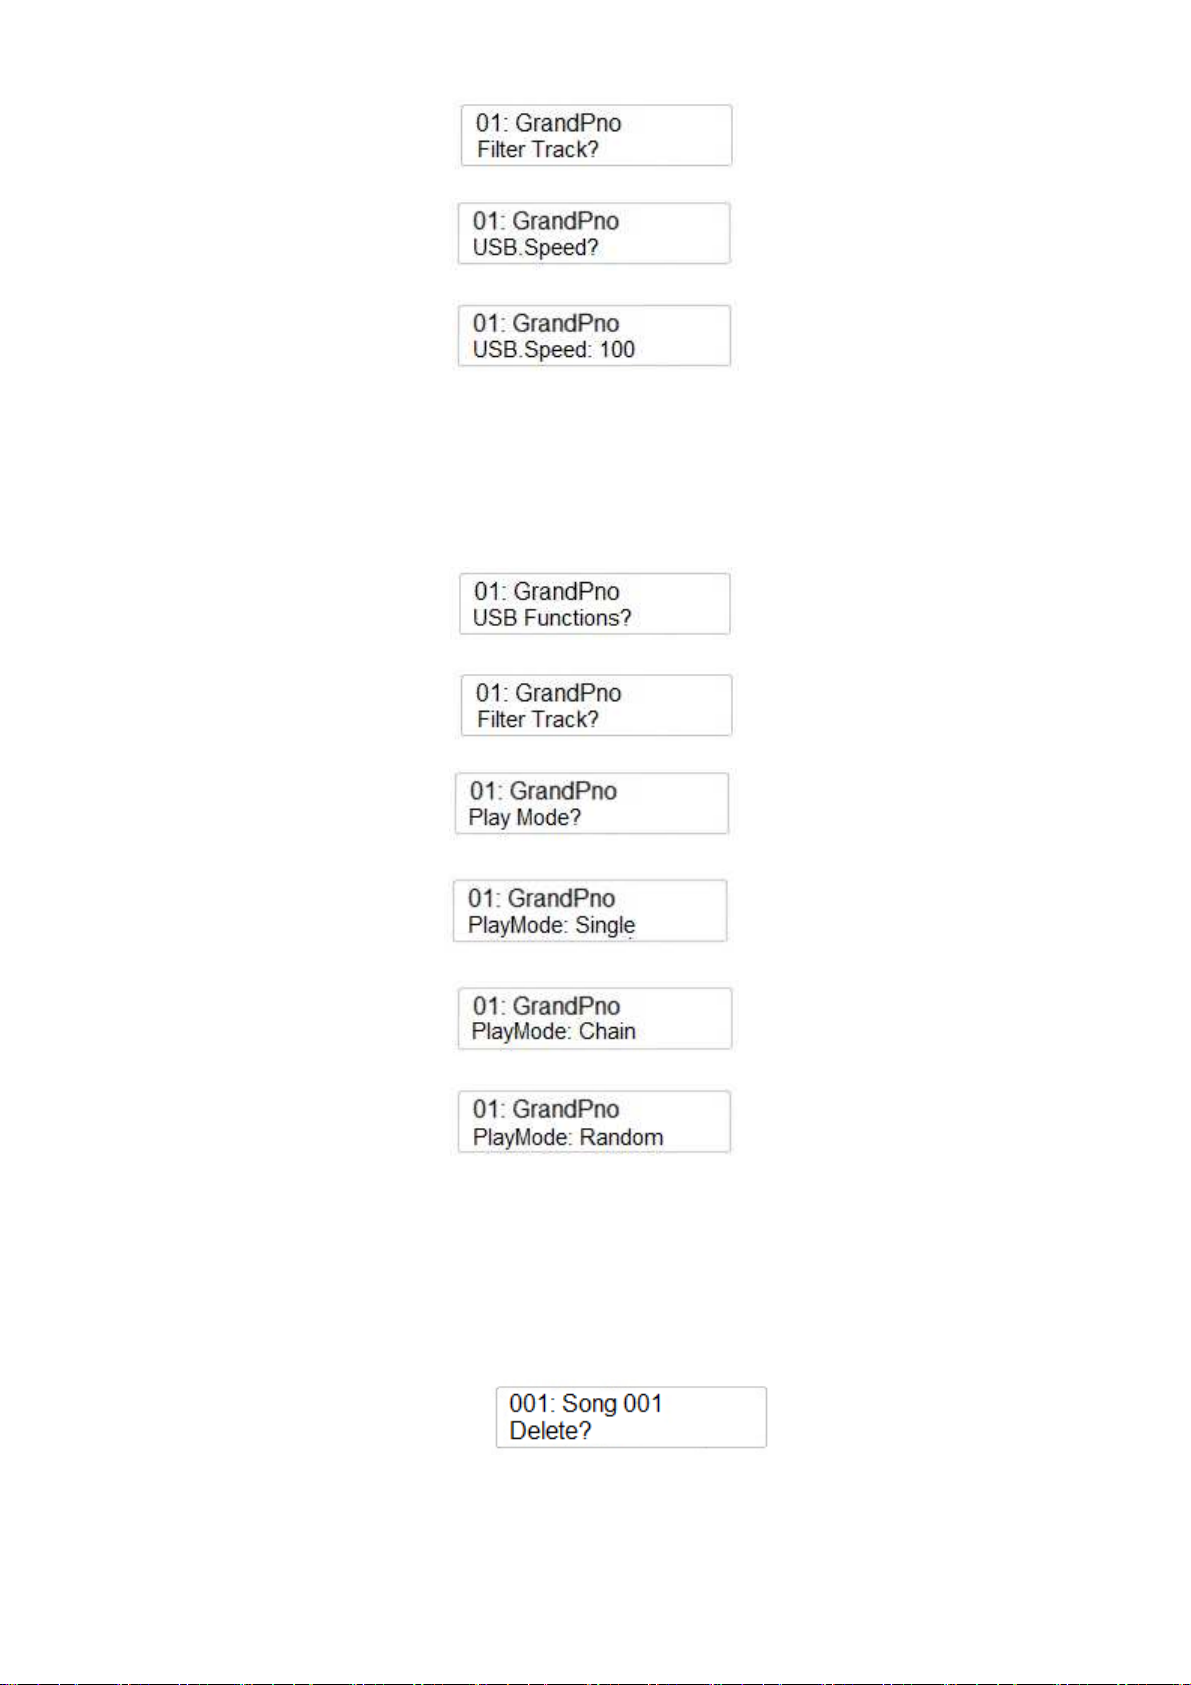
Using the Data Control wheel select the USB Speed
Press the ENTER button to confirm and the display shows:
Using the Data Control wheel adjust the song speed (min 50 – max 200).
PLAY MODE
It is possible to decide if the song should play One At The Time, in Chain Mode or Random Play.
Press the SETTINGS button a few times until you select USB Function?
Press the ENTER button to confirm and the display shows:
Using the Data Control wheel select the Play Mode
Press the ENTER button to confirm and the display shows:
Using the Data Control wheel select the Play Mode type
or
DELETE FILES
In case is necessary to delete some files from the USB Disk the DELETE function is available.
-
-
-
Make sure that the USB disk is in its USB socket.
Select the file you wish to delete on the display – for example SONG 001
Press the RECORD and PLAY buttons to access the DELETE function. The display show:
-
-
Press the (/\) UP DATA button to Delete the file.
If for any reason at this point you decide not to delete the file anymore, press the (\/) Down
DATA buttons to exit the function.
33
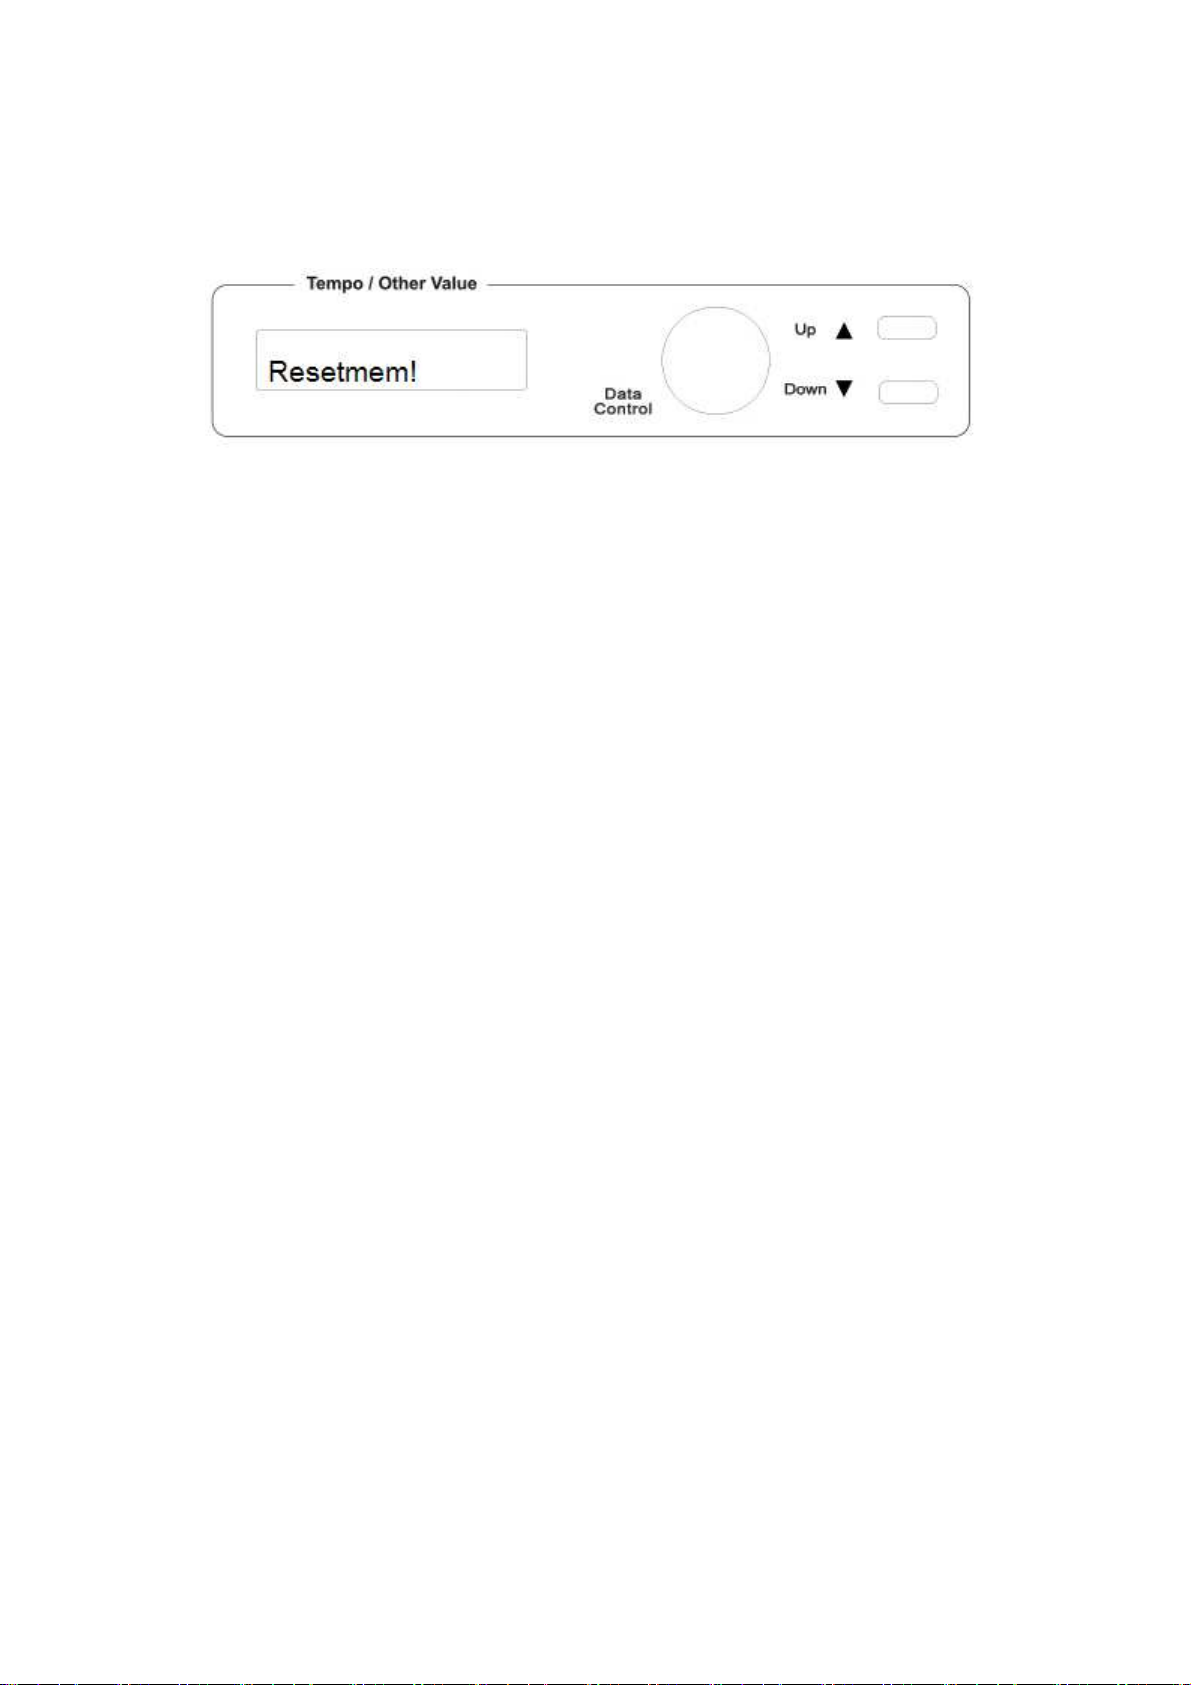
RESET MEMORY
If it should be necessary to completely erase the internal RAM memory, a very simple reset feature
is provided.
1 - Make sure that the instrument is switched off.
2 - Press and hold the (/\) UP and (\/) Down DATA buttons
3 - Switch on the instrument while holding the (/\) and (\/) buttons down.
4 - The display shows: Resetmem!
Do not reset the instrument if it is not necessary. All your information you have programmed will
be automatically erased from the internal RAM memory.
The factory set programs will be automatically restored.
34
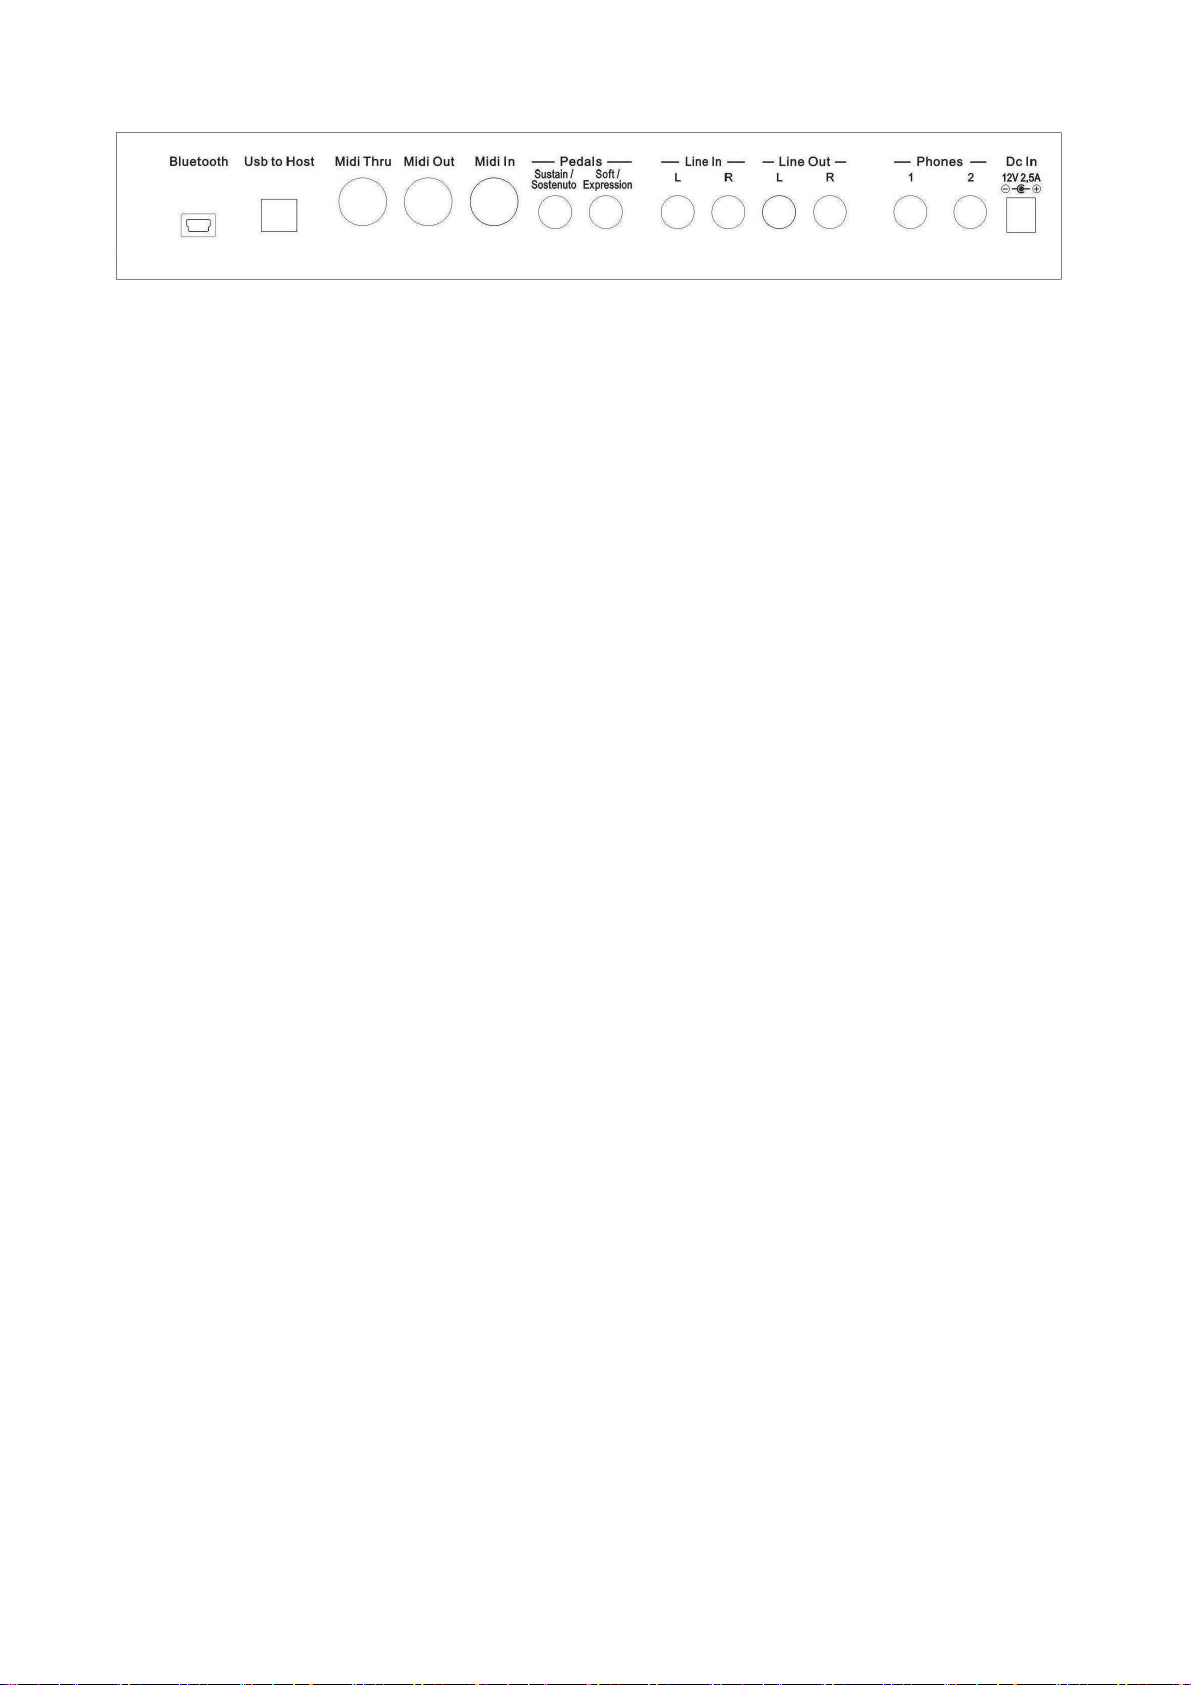
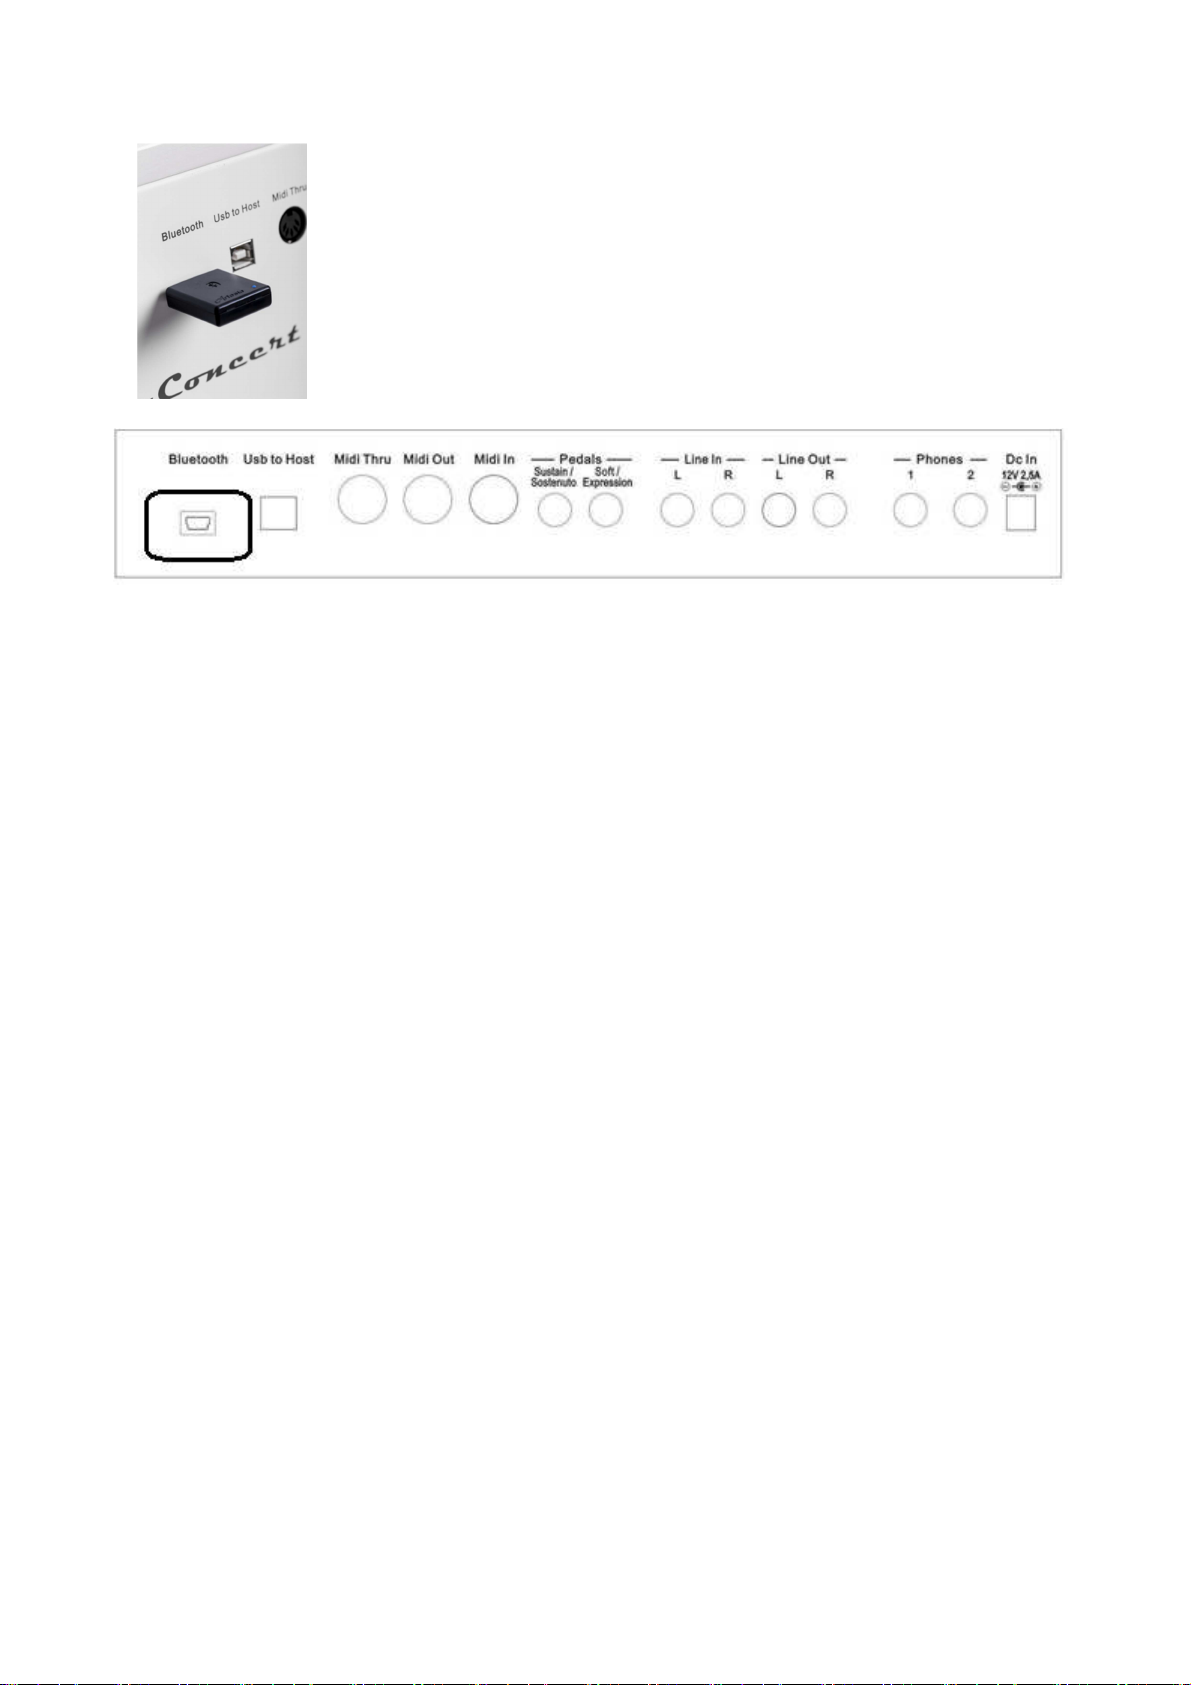
CONNECTIONS
BLUETOOTH
This is the socket where to insert the Bluetooth Receiver unit that allows to connect a Bluetooth transmitting
unit (smart phone, tablet, etc) to the instrument audio system.
USB TO COMPUTER
It is possible to connect the instrument to a computer using the USB port located in the back panel of the
instrument and control the Midi parameters.
MIDI CONNECTIONS
The Midi IN connector receives the Midi data from an external Midi device which can be used to control the
instrument. The Midi THRU connector retransmits any data from the Midi IN directly to other Midi devices.
The Midi OUT connector transmits Midi data generated by the instrument to other Midi devices.
PEDALS
These two jack plugs are used to connect the pedals available with the instrument. They can be switch pedals
for the piano functions but it is also possible to use a Volume pedal.
STAGE CONCERT – it is supplied with a Sustain Pedal. Connect it to the Pedal Input
Sustain/Sostenuto obtain the Sustain effect when used.
CDP202 – It is supplied with a complete set of 3 pedals. Insert the mono jack to the Pedal Input
Soft/Expression and the stereo jack in the Pedal Input Sustain/Sostenuto.
NOTE – The STAGE CONCERT can also use a set of 3 pedals (optional). Same connection as in
CDP202.
VOLUME PEDAL – Connect the volume pedal to the Soft/Expression Pedal Input (it is necessary
to configure the instrument – see Pedal 3 assign paragraph.).
LINE IN SOCKETS
There are two inputs (Left and Right) and they are used to send the audio signal of an external instrument to
the internal amplifier.
LINE OUT SOCKETS
There are two outputs (Left and Right) and they are used to send the audio signal out an external amplifier,
mixer console or recording equipment. To connect the instrument in Stereo to an external amplification
system connect both Left and Right outputs.
HEADPHONES
Two headphone set can be plugged in for private practice. They disconnect the speaker system and allow
you to play without disturbing the others being disturbed by outside noise.
DC IN SOCKET
This is the connection to power. Connect the adapter to this socket to power the instrument. Use only
original adapter.
35

36

D i g i t a l P i a n o s
STAGE CONCERT
Portable Piano
CDP 202
Digital Piano
Manuale Istruzioni
37

ISTRUZIONI E MISURE DI SICUREZZA
AVVISO IMPORTANTE
Accertarsi che il voltaggio impostato sia adatto allo strumento (il voltaggio è indicato a fianco della
presa di corrente).
Quando si utilizza un'apparecchiatura elettrica, si devono sempre rispettare le basilari norme di
sicurezza, tra cui:
1 Leggere le istruzioni prima di utilizzare lo strumento.
2 Per ridurre il rischio di incidenti, occorre prestare particolare attenzione quando lo strumento
viene utilizzato in presenza di bambini.
3 Non utilizzare il prodotto in prossimità di acqua, ad esempio vicino ad una vasca da bagno,
ad un lavandino o un lavabo, in un seminterrato umido, vicino ad una piscina o simili.
4 Il prodotto, utilizzato da solo o in combinazione con un amplificatore e cuffie oppure
altoparlanti, può produrre livelli sonori che potrebbero arrecare danni permanenti all'udito.
Non utilizzare a lungo lo strumento a volume elevato o ad un volume comunque
intollerabile. In caso di insorgenza di deficit uditivo o di ronzio alle orecchie, consultare uno
specialista.
5 Collocare lo strumento in modo tale che sia possibile un'adeguata ventilazione.
6 Lo strumento deve essere collocato lontano da fonti di calore come radiatori, diffusori di aria
calda e altri dispositivi che producono calore.
7 Lo strumento deve essere esclusivamente collegato all'alimentazione specificata nel manuale
o indicata sullo strumento.
8 Questo prodotto può essere dotato di spina polarizzata. Si tratta di un dispositivo di
sicurezza. Se non siete in grado di inserire la spina nella presa, rivolgetevi ad un elettricista
per sostituire la vecchia presa. Non rinunciate agli scopi di sicurezza della spina.
9 Il cavo di alimentazione dello strumento dovrebbe essere scollegato dalla presa della
corrente in caso di inutilizzo per un lungo periodo di tempo. Quando si ricollega l'unità,
accendere la tastiera e lasciarla accesa per 3-5 ore per ricaricare la batteria interna. La
batteria può dover essere sostituita dopo due o tre anni di utilizzo.
10 Fare attenzione a non far cadere oggetti o liquidi, che potrebbero penetrare nello strumento
attraverso le fessure.
11 La manutenzione deve essere effettuata da personale qualificato nei seguenti casi:
a sono stati danneggiati il cavo di alimentazione e la spina;
b sono caduti oggetti o liquidi all'interno dello strumento;
c lo strumento è rimasto esposto alla pioggia;
d lo strumento non sembra funzionare in modo corretto oppure le sue prestazioni
risultano notevolmente alterate;
e il prodotto è caduto o la struttura esterna è stata danneggiata.
12 Limitatevi a seguire le istruzioni sopra elencate. Ogni altro tipo di intervento deve essere fatto
da personale qualificato.
38
ATTENZIONE
Non modificare la spina fornita con lo strumento. Qualora non fosse adatta, far installare
un'adeguata presa della corrente da un elettricista qualificato.
DISPLAY MULTI-INFORMAZIONI
I messaggi visualizzati sul Display multi-informazioni possono non corrispondere sempre alle
pagine relative al display. Si tratta solamente di esempi delle numerose funzioni dello strumento.
CLAUSOLA ESONERATIVA
Le informazioni contenute in questo manuale sono state revisionate molto attentamente. A causa del
continuo impegno volto a migliorare lo strumento, le specifiche dello strumento potrebbero essere
diverse da quelle indicate nel manuale. Tali specifiche sono soggette a variazioni senza preavviso.
CURA E MANUTENZIONE DELLO STRUMENTO
La tastiera da Voi acquistata è uno strumento di qualità e merita di essere trattata con cura. Vi
preghiamo di seguire attentamente le poche avvertenze sotto elencate per conservarla al meglio per
molti anni.
- Non aprire mai lo strumento e non toccare mai i circuiti interni.
- Spegnere sempre lo strumento dopo l'uso tramite l'apposito interruttore.
- Pulire lo strumento con un panno o una spugna umida. In caso di sporco particolarmente
ostinato, usare un detergente neutro. Non usare mai solventi o alcool.
- Non collocare lo strumento vicino a motori elettrici, lampade al neon o a fluorescenza in
quanto potrebbero creare disturbi. Nella maggior parte dei casi, per evitare interferenze, è
sufficiente cambiare posizione allo strumento.
- Tenere lo strumento al riparo da polvere, umidità e temperature elevate.
- Accertarsi che il voltaggio della rete locale corrisponda a quello indicato sulla targa posta
nella parte posteriore dello strumento. Collegare il cavo di alimentazione alla presa di
corrente.
- Non collegare elettrodomestici, luci al neon o sistemi di lampade alogene alla stessa presa di
corrente.
- Nel caso di strumenti computerizzati, picchi, sovratensioni transitorie e cadute di tensione
possono provocare interruzioni. Se lo strumento smette di funzionare a causa di un disturbo
della linea elettrica, spegnerlo per alcuni secondi e poi riaccenderlo.
-
Non scollegare mai il cavo di alimentazione senza aver prima spento lo strumento mediante
l'apposito interruttore.
39

INTRODUZIONE
Benvenuti nel mondo hi-tech degli strumenti elettronici. Lo strumento è stato progettato e realizzato
utilizzando le più recenti tecnologie e sistemi computerizzati per offrire anni di svago senza
problemi.
La connessione Bluetooth vi permetterà di collegare il vostro Smart Phone o Tablet Digitale allo
strumento e di suonare la vostra musica preferita. Potrete così trasformare il vostro piano digitale in
un centro di intrattenimento per la famiglia e suonare i vostri brani assieme ai vostri gruppi o
cantanti preferiti.
Leggere con attenzione questo manuale in modo da poter sfruttare al massimo le qualità dello
strumento.
Lo STAGE CONCERT ed il CDP202 sono prodotti
unici, che offrono il meglio di due mondi diversi nello
stesso prodotto: Suoni Orchestrali e Suoni di Organo
Canne.
All’accensione questi strumenti sono presettati per
suonare voci di Piano Acustico o Piano Elettrico e una
vasta gamma di altri suoni Orchestrali, ma anche una
selezioni di timbri tali da assicurare la migliore sonorità
per qualsiasi tipo di musica.
Ma sarà sufficiente premere il pulsante PIPE e lo
strumento si trasformerà in uno straordinario strumento
per suonare brani per organo a canne, con una selezione
di suoni da Pianissimo a Fortissimo, ed altri presets che garantiranno il suono di organo a canne
preferito, con la possibilità di miscelare ed utilizzarli per la parte destra o sinistra della tastiera.
ACCENSIONE
Per accendere lo strumento premere l'interruttore On/Off. Lo strumento seleziona
automaticamente il suono GRAND PIANO nella sezione Voice.
Se lo strumento rimane acceso per di 30 minuti senza essere utilizzato, il controllo di
standby lo farà spegnere automaticamente.
Per disattivare il controllo Auto Standby, tenere premuti il primo tasto bianco ed il
primo tasto nero alla sinistra della tastiera e premere allo stesso tempo l’interruttore
STANDBY/ON.
VOLUME MASTER – TONE CONTROL
Il controllo MASTER VOLUME regola il volume
generale dello strumento. Se sono collegate le cuffie
regola anche il loro volume.
Usando i controlli Bass e Treble è possibile cambiare il
suono dello strumento per renderlo più dolce o più
brillante.
40
DEMO SONG
Lo strumento dispone di 36 brani demo che spaziano attraverso diversi stili musicali. Ascoltate le
demo per capire appieno le potenzialità dello strumento. Per attivare la funzione DEMO, premere
allo stesso tempo i pulsanti SETTINGS e ENTER, situati alla sinistra del pannello di controllo. Il
display indica:
Il primo brano demo è indicato come Demo Song 01: Sunset.
Tramite il potenziometro Data Control selezionate i 36 brani demo disponibili. Alla fine della demo
selezionata lo strumento suona automaticamente la demo successiva.
Per uscire dalla funzione DEMO premere di nuovo i pulsanti SETTINGS e ENTER
contemporaneamente.
PEDALE SUSTAIN
STAGE CONCERT - è dotato di un pedale Sustain di serie. Un pedale a 3 leve è opzionale.
CDP 202 - è fornito con il set completo di 3 pedali.
STAGE CONCERT - Pedale Sustain.
Collegare il pedale Sustain alla presa jack Pedal - Sustain/Sostenuto (nel pannello posteriore).
Il pedale ora avrà la stessa funzione del 'Pedale Sustain' che troviamo sul piano acustico.
Questo pedale permette al suono di decadere lentamente dopo che i tasti sono stati rilasciati.
PEDALE a 3 leve - SOFT/SOSTENUTO/SUSTAIN (opzionale per Stage Concert)
Collegare il pedale alle presa jack Pedal - Sustain/Sostenuto e Soft/Expression.
Jack mono – presa jack Soft/Expression.
Jack stereo – presa jack Sustain/Sostenuto
Lo strumento funziona ora con una serie di tre pedali che danno le seguenti funzioni:
SOFT - ha la funzione di rendere più morbido il suono del piano.
SOSTENUTO - ha la funzione di sostenere solo quelle note suonate prima che il pedale
venga premuto e non le note suonate in seguito.
SUSTAIN - ha la stessa funzione del pedale del sostegno dei pianoforti acustici, ossia
permette di mantenere e far decadere lentamente il suono dopo il rilascio dei
tasti.
Più avanti nel manuale vedremo come riprogrammare le funzioni dei tre pedali se necessario.
41

PEDALE VOLUME
Se necessario, è possibile collegare un pedale volume allo strumento, ma è necessario programmare
lo strumento prima di utilizzarlo.
- Collegare il pedale di espressione alla presa jack Expression situata nel pannello posteriore.
- Premere diverse volte il pulsante SETTINGS fino a che il display indica
- Premere ENTER per confermare ed il display indica:
- Tramite il potenziometro Data Control selezionare Pedal 3
- Premere ENTER per confermare e tramite il potenziometro Data Control selezionare
Pd3-Expression
Il pedale di espressione/volume può essere ora usato per controllare il volume dello strumento in
tempo reale.
VOICE SECTION
Tramite questi pulsanti è possibile selezionare due tipi diversi di suoni, sia sullo Stage Concert e sia
sul CDP 202: Orchestral Voices and Pipe Voices.
ORCHESTRAL VOICE SECTION
Le voci disponibili per la sezione Orchestral Voices sono indicate sul pannello di controllo sia sotto
che sopra i pulsanti per la selezione delle voci.
Per selezionare le voci indicate sotto i pulsanti assicuratevi che il pulsante SELECT sia spento.
Per selezionare il suono desiderato premere il pulsante relativo. Il suo Led si accende ed il display
indica la selezione.
42

Per selezionare le voci indicate sopra i pulsanti assicuratevi che il pulsante SELECT sia acceso.
Per selezionare il suono desiderato premere il pulsante relativo. Il suo Led si accende ed il display
indica la selezione.
Per selezionare il suono GRAND PIANO premere il pulsante relativo.
Per selezionare il suono HARPSI, premere SELECT e di seguito il pulsante HARPSI.
E’ possibile suonare due suoni allo stesso tempo, per esempio GRAND PIANO e SLOW
STRINGS.
- Per selezionare il suono GRAND PIANO premere e mantenere premuto il pulsante relativo.
- Tenendo premuto il pulsante GRAND PIANO premere anche il pulsante SLOW STRINGS.
- Il display indica ora brevemente SLOW STRINGS e quindi ritorna a GRAND PIANO, il
primo suono selezionato.
- I due suoni sono ora selezionati e possono essere suonati contemporaneamente.
Ovviamente è possibile selezionare due suoni diversi, uno dalla fila inferiore ed uno dalla fila
superiore, allo stesso tempo, per esempio GRAND PIANO e VOCALS.
- Per selezionare il suono GRAND PIANO premere e mantenere premuto il pulsante relativo.
- Tenendo premuto il pulsante GRAND PIANO premere anche il pulsante SELECT per
selezionare la fila di suoni superiore.
- Rilasciare ora il pulsante SELECT e mentre mantenete premuto il pulsante GRAND PIANO
premere ora il pulsante VOCAL.
43

- Il display indica brevemente VOCAL e quindi ritorna a GRAND PIANO, il primo suono
selezionato.
- I due suoni sono ora selezionati e possono essere suonati contemporaneamente.
E’ possibile ora bilanciare i due suoni utilizzando i pulsanti (/\) UP e (\/) Down. Provare le diverse
impostazioni del volume come da tabella seguente:
4 - 1 4 – 2 4 - 3 4 – 4 3 - 4 2 - 4 1 - 4
PLAYER CHOICE 1 – 2
In questi due pulsanti è possibile memorizzare un nuovo suono a scelta dalla libreria interna dello
strumento.
Se il pulsante SELECT è spento, è possibile selezionare PLAYER CHOICE 1, se il pulsante
SELECT è acceso, è possibile selezionare PLAYER CHOICE 2.
Il suono preselezionato per PLAYER CHOICE 1 è Vibes (nr.13).
Il suono preselezionato per PLAYER CHOICE 2 è Accordion (nr.32).
Per selezionare un nuovo suono per PLAYER CHOICE 1 seguire le seguenti indicazioni :
- Premere il pulsante PLAYER CHOICE 1
- Tramite il potenziometro DATA CONTROL selezionare uno dei 142 suoni disponibili nella
memoria interna. Il Led PLAYER CHOICE inizia a lampeggiare per indicare che si sta
selezionando un nuovo suono.
- Il nuovo suono è ora salvato e rimarrà in memoria anche dopo lo spegnimento dello
strumento.
- Per poter salvare il nuovo suono PLAYER CHOICE 1 per un utilizzo futuro, è necessario
salvare la nuova configurazione in una MEMORY (come vedremo più avanti nel manuale).
44

PIPE VOICE SECTION
Per selezionare i suoni di Organo a Canne, è necessario premere il pulsante PIPE alla destra della
Voice Section.
Non appena il pulsante PIPE viene premuto, tutte le voci di Organo a Canne saranno disponibili.
Selezionatele a piacimento – anche due alla volta – per creare i suoni che desiderate.
E’ inoltre possibile miscelare una delle voci della sezione PIPE con una dei suoni della sezione
ORCHESTRAL.
Per esempio, misceliamo ora FULL ORGAN con il suono SLOW STRINGS, nella fila inferiore
della ORCHESTRAL VOICE SECTION.
Selezionate FULL ORGAN :
Mentre state premendo il pulsante FULL ORGAN spegnete il pulsante SELECT e premete il
pulsante PIPE, premere poi il pulsante relativo a SLOW STRINGS.
I due suoni sono ora selezionati e possono essere suonati allo stesso tempo.
Per selezionare ora una delle voci della sezione PIPE, per esempio FLUTE CELESTE, con uno dei
suoni della fila superiore della ORCHESTRAL VOICE SECTION, per esempio VOCAL :
Selezionate FLUTE CELESTE e mantenetelo premuto. Premere ora il pulsante SELECT per
accedere alla selezione dei suoni della fila superiore.
45

Rilasciare ora il pulsante SELECT mentre state ancora premendo il pulsante FLUTE CELESTE e
premete ora il pulsante VOCAL.
I due suoni sono ora selezionati e si possono suonare simultaneamente.
SPLIT
Appena il pulsante SPLIT viene premuto il suo Led inizia a lampeggiare e la tastiera dello
strumento si divide automaticamente in due sezioni ed un suono viene automaticamente selezionato
per la sezione sinistra. Il timbro di default per la sezione SPLIT è SLOW STRINGS.
Il display indica :
Dopo pochi secondi il Led dello SPLIT smette di lampeggiare ed il display indica :
Lo strumento è ora in modalità Split con il suono SLOW STRINGS a sinistra ed il suono GRAND
PIANO a destra. E’ possibile selezionare un suono differente anche per la sezione SPLIT.
Per selezionare un nuovo suono per la sinistra dello strumento premere il pulsante SPLIT (il suo
Led lampeggia) e selezionare un nuovo suono premendo uno dei pulsanti relativi ai suoni
disponibili sul pannello.
Appena selezionato il nuovo suono, aspettate un secondo o due fino a che il pulsante SPLIT non
smette di lampeggiare. A questo punto il nuovo suono è selezionato.
Per poter salvare il nuovo suono SPLIT per un utilizzo futuro, è necessario salvare la nuova
configurazione in una MEMORY (come vedremo più avanti nel manuale).
Ci sono 20 suoni disponibili sul pannello di controllo ed ognuno può essere usato per la parte
sinistra della tastiera.
Utilizzando i pulsanti Player Choice 1 e 2 è possibile selezionare uno qualsiasi dei 142 suoni
contenuti nella memoria interna dello strumento.
Trovate la lista completa alla fine di questo manuale.
SPLIT POINT
Se necessario, è possibile cambiare il punto di SPLIT.
- Premere il pulsante SPLIT e mantenerlo premuto per alcuni secondi fino a che il display
indica :
46

- Il numero 55 è relativo al numero Midi della nota.
- Per cambiare il punto di Split, ci sono due alternative :
- Premere il pulsante SPLIT e tramite il potenziometro Data Control cambiare il numero
relativo alla nota
oppure
- Premere e mantenere premuto il pulsante SPLIT e selezionare il nuovo punto di split
premendo direttamente il tasto sulla tastiera.
- Appena il pulsante SPLIT viene rilasciato, il display ritorna alle funzioni normali.
DIGITAL REVERB
Il DIGITAL REVERB riproduce l’effetto acustico che si otterrebbe suonando lo strumento in
diversi tipi di ambiente. Ci sono 10 differenti tipi di riverbero.
1
6
Hall 1
Stage 1
2
7
Hall 2
Stage 2
3
8
Room 1
Plate
4
9
Room 2
Delay
10
5
Room 3
Echo
Se il riverbero è selezionato ON, rimarrà attivato anche quando si selezionerà un nuovo suono.
Quando il pulsante del riverbero viene premuto per essere attivato, sarà possibile selezionare
qualsiasi dei tipi di riverbero tramite il potenziometro Data Control.
CHORUS EFFECT
L’effetto CHORUS rende il suono dello strumento più pieno, caldo e ricco.
All’accensione dello strumento CHORUS non è mai attivo.
Ci sono 13 diversi tipi di chorus:
1
4
7
10
13
Chorus 1
Chorus 4
Short Delay
Flanger 3
Celeste 3
2
5
8
11
Chorus 2
Feedback
Short Delay Feedback
Celeste 1
3
6
9
12
Chorus 3
Flanger 1
Flanger 2
Celeste 2
Quando il pulsante del chorus viene premuto per essere attivato, sarà possibile selezionare qualsiasi
dei tipi di chorus tramite il potenziometro Data Control.
47
TOUCH SENSITIVITY
Proprio come in un pianoforte acustico, il vostro strumento ha una tastiera 88 tasti con il controllo
della velocità (dinamica al tocco). Ciò significa che il livello del segnale audio sarà in proporzione
alla velocità del tasto premuto. Se si suona in modo morbido si avrà un suono dolce, mentre se si
suona con maggiore intensità si avrà un suono molto più forte.
Il pulsante TOUCH permette di selezionare 3 diverse curve di sensibilità di tocco:
1 - HARD è necessario premere con forza per ottenere il massimo del volume.
2 - NORMAL riproduce la risposta standard dei piani acustici ed è l'impostazione
predefinita
3 - SOFT consente di ottenere il massimo volume con una lieve pressione dei tasti.
Per selezionare la dinamica desiderata premere il pulsante TOUCH e selezionare tramite il
potenziometro Data Control fino a che il display non indica la curva desiderata.
Se nessun led è acceso la tastiera sarà impostata a NO TOUCH SENSITIVITY.
All'accensione la curva NORMAL verrà attivata automaticamente.
Quando il Led del pulsante TOUCH è spento, la tastiera suona senza sensibilità al tocco, al valore
midi fisso pari a 100.
Questo valore midi può essere modificato seguendo questa procedura:
- Assicurarsi che i LED del TOUCH siano spenti.
- Premere il tasto TOUCH e tenerlo premuto. Il display visualizza:
Tramite il potenziometro Data Control è possibile cambiare il valore da 0 a 127.
TRANSPOSE
L’intonazione dello strumento è in DO ma se necessario è possibile modificarla:
- Premere il pulsante TRANSPOSE nella sezione FUNCTIONS.
- Il pulsante TRANSPOSE inizia a lampeggiare ed il display indica :
Tramite il potenziometro Data Control è possibile cambiare l’intonazione dello strumento nella
nuova tonalità desiderata in base alla seguente tabella:
C# D D# E F F# G G# A A# B C C# D D# E F F# G G# A A# B C
C
-12 -11 -10 -9 -8 -7 -6 -5 -4 -3 -2 -1 0 1 2 3 4 5 6 7 8 9 10 11 12
E’ possibile ripristinare la chiave naturale DO ( C ) premendo i pulsanti the (/\) UP e (\/) Down allo
stesso tempo.
All'accensione lo strumento torna automaticamente alla intonazione DO ( C ) originale.
48
INTONAZIONE FINE - PITCH
Nei casi in cui la trasposizione per semitoni non sia sufficiente, e una intonazione più accurata sia
necessaria, è ancora possibile cambiare il Pitch.
Premere e mantenere premuto il tasto TRANSPOSE, ed il display indica:
Tramite il potenziometro Data Control è possibile cambiare Pitch dello strumento (-64 / +63)
Premere i pulsanti the (/\) UP e (\/) DOWN allo stesso tempo per tornare alla normale intonazione.
All'accensione lo strumento torna al Pitch naturale dello strumento.
METRONOME
Per usare il metronomo, premere il pulsante METRONOME, e il tipo di metronomo impostato
inizia a scandire il tempo.
E 'possibile modificare la velocità tempo del metronomo usando i pulsanti Up (/\) e Down (\/).
Premere i pulsanti the (/\) UP e (\/) DOWN allo stesso tempo per selezionare Tempo 120 standard.
Per arrestare il metronomo, premere di nuovo il pulsante METRONOME.
E’ possibile selezionare 12 differenti tipi di metronomo.
Premere e mantenere premuto il pulsante METRONOME. Il display indica
Sono disponibili diversi tipi di Time Signature per il Metronomo:
Mono Click (1/4), 2/4, 3/4, 4/4, 5/4, 6/4, 3/8, 6/8, 7/8, 9/8, 12/8, 2/2.
Tramite il potenziometro Data Control è possibile selezionare il tipo di Metronomo desiderato.
MEMORY BANK – MEMORIE DI PANNELLO
E’ possibile memorizzare fino a 20 Memorie di Pannello sullo strumento e richiamarle quando
richiesto. Queste Memorie possono essere memorizzate tramite i pulsanti della sezione VOICE e
richiamate quando il pulsante MEMORY BANK è acceso.
Questi settaggi rimarranno in memoria anche dopo che lo strumento verrà spento. Ricordare che, se
si effettua il RESET dello strumento, le memorie da voi memorizzate verranno cancellate e
sostituite automaticamente dalle memorie presettate di fabbrica.
Si possono memorizzare 20 presets in ogni Memory Bank ed ogni memory Bank può essere salvato
su disco USB. Si possono salvare molteplici memory Bank su disco USB.
49
SALVARE LE MEMORIE DI PANNELLO
Selezionare i vostri suoni preferiti, con funzione Dual, Split e con gli effetti desiderati.
Quando pronti, salvate le vostre memorie di pannello come di seguito indicato :
- Premere e mantenere premuto il pulsante MEMORY BANK
- Premere ora per qualche secondo il pulsante relativo alla posizione dove volete memorizzare
il vostro settaggio nella sezione VOICE.
- Il display indica :
E’ possibile memorizzare 20 diversi settaggi. 10 con il pulsante SELECT spento, 10 con il pulsante
SELECT acceso.
Una volta salvate le vostre registrazioni, sarà sufficiente premere il pulsante MEMORY BANK On.
LOCK ON/OFF
Una funzione molto utile è la funzione LOCK. Questa vi permette di fissare il suono relativo alla
sezione Left Voice, la velocita del Metronomo (Tempo) in modo che questi non cambino mai,
anche se si utilizzano MEMORY BANK diversi.
Per selezionare LOCK premere il pulsante MEMORY BANK per alcuni secondi fino a che il
display indica:
E possibile selezionare la funzione LOCK On o Off con i pulsanti Up (/\) e Down (\/) o tramite il
potenziometro Data Control.
SALVARE LE MEMORIE DI PANNELLO SU DISCO USB
Assicuratevi che il disco USB sia inserito nell’apposita presa.
Premere SETTINGS alcune volte fino a che il display indica :
Selezionare la funzione premendo il pulsante ENTER. Il display indica :
Premere ENTER per confermare ed il display indica :
50
Quando si memorizzerà un secondo banco di 20 memorie lo strumento provvederà a salvarlo con un
nuovo numero :
E’ possibile memorizzare molti MEMORY BANK nella memoria USB.
CARICARE NUOVI MEMORY BANK DALLA MEMORIA USB
Per caricare una memoria di pannello dalla USB alla memoria interna dello strumento, inserite il
disco USB nell’apposita presa ed aspettate fino a che il pulsante FILE non verrà automaticamente
acceso.
Usando il potenziometro Data Control cercate sul display fino a trovare il file che desiderate
caricare nella memoria dello strumento, per esempio
Premete ora il pulsante PLAY per confermare la scelta ed effettuare l’effettiva operazione di carico
dei dati. Il display indica :
Il nuovo banco di memorie è ora caricato sullo strumento.
DISCO USB
Quando il disco USB viene inserito nella presa apposita il display indica immediatamente il primo
file disponibile in memoria. Se si usasse una USB vuota e senza dati, il display indicherebbe NO
FILES.
E’ possibile usare due tipi di files su disco USB :
1 Brani musicali in formato Standard Midi
2 Memorie di pannello.
Il display mostrerà i files disponibili in ordine alfabetico o in base al numero di riferimento.
Ricordate che quando si sta suonando un brano musicale – a clock in movimento – il display
indicherà solamente i brani Standard Midi e non i MEMORY BANK.
NOTA – ricordare che i file contenuti nella memoria USB non debbono essere contenuti all’interno
di cartelle ma solo come file singoli.
51

SUONARE BRANI STANDARD MIDI
Per suonare un brano musicale, inserite il disco USB ed il display mostra i file disponibili.
Selezionare il brano desiderato sul display tramite il potenziometro Data Control.
Iniziare a suonare il brano premendo il pulsante PLAY. Premere di nuovo PLAY per fermare il
brano.
SEQUENCER –REGISTRARE UN BRANO MUSICALE
Lo strumento può registrare brani musicali direttamente su disco USB. Tutte le informazioni e tutti i
dati verranno salvati automaticamente in formato Standard Midi.
E’ possibile memorizzare i vostri brani in due modi :
- a Traccia Singola
- in formato Multi Traccia
REGISTRAZIONE IN TRACCIA SINGOLA
Inserire un disco USB (iniziamo con un disco vuoto per facilitare le cose) nell’apposita presa.
- Premere il pulsante RECORD per iniziare la registrazione – il suo Led si accende -.
- E’ possibile iniziare con o senza il Metronomo, con il tipo di metronomo selezionato come
visto al paragrafo Metronomo. Iniziate a suonare la vostra musica ed il Sequencer interno
inizierà a memorizzare i dati non appena il primo tasto verrà suonato.
- Alla fine della registrazione del vostro brano premere il pulsante RECORD per memorizzare
i dati. Il display indica :
Lo strumento memorizzerà il brano automaticamente con il nome « xxxSONG_yyy ».
NOTA – xxx indica il numero della song come memorizzata nella lista nel disco USB, yyy indica il
numero che identifica il nuovo brano.
- Il display indica :
Questo indica anche la vostra prima canzone registrata (numero 000) è memorizzata alla
posizione 001 della Song List del disco USB.
52

REGISTRAZIONE MULTI TRACCIA
1 Inserire il disco USB nell’apposita presa
2 Premere il pulsante RECORD per iniziare la registrazione – il suo Led si accende -..
3 Premere il pulsante RECORD per fermare la registrazione ed il vostro brano verrà
salvato automaticamente come SONG_000
4 E’ ora possibile aggiungere una seconda traccia di registrazione. Premere il pulsante
FILE e il pulsante RECORD contemporaneamente per accedere alla registrazione
MULTI TRACK (Multi Traccia).
5 Il display indica :
6 Il Metronomo inizia con la prima misura e quando la prima traccia appena registrata
inizia a suonare, non appena la prima nota viene suonata sulla tastiera, memorizzerà
automaticamente la nuova traccia. Il display indica :
Le due tracce memorizzate verranno salvate come SONG_001
7 Per aggiungere nuove tracce ripetere la procedura dal punto 4. E’ possibile salvare fino a
5 tracce separate.
NOTA – se desiderate salvare una brano usando la sezione Main e Dual in modalità Layer insieme
con il suono della sezione Split e salvare il tutto come file Multi Track in un singolo file, premere il
pulsante RECORD ed iniziate la registrazione, come già spiegato per la registrazione in Traccia
Singola. Lo strumento salverà il brano in modo automatico come segue :
Track 1……… Main Voice
Track 2……….Split Voice
Track 3……….Dual Voice
53
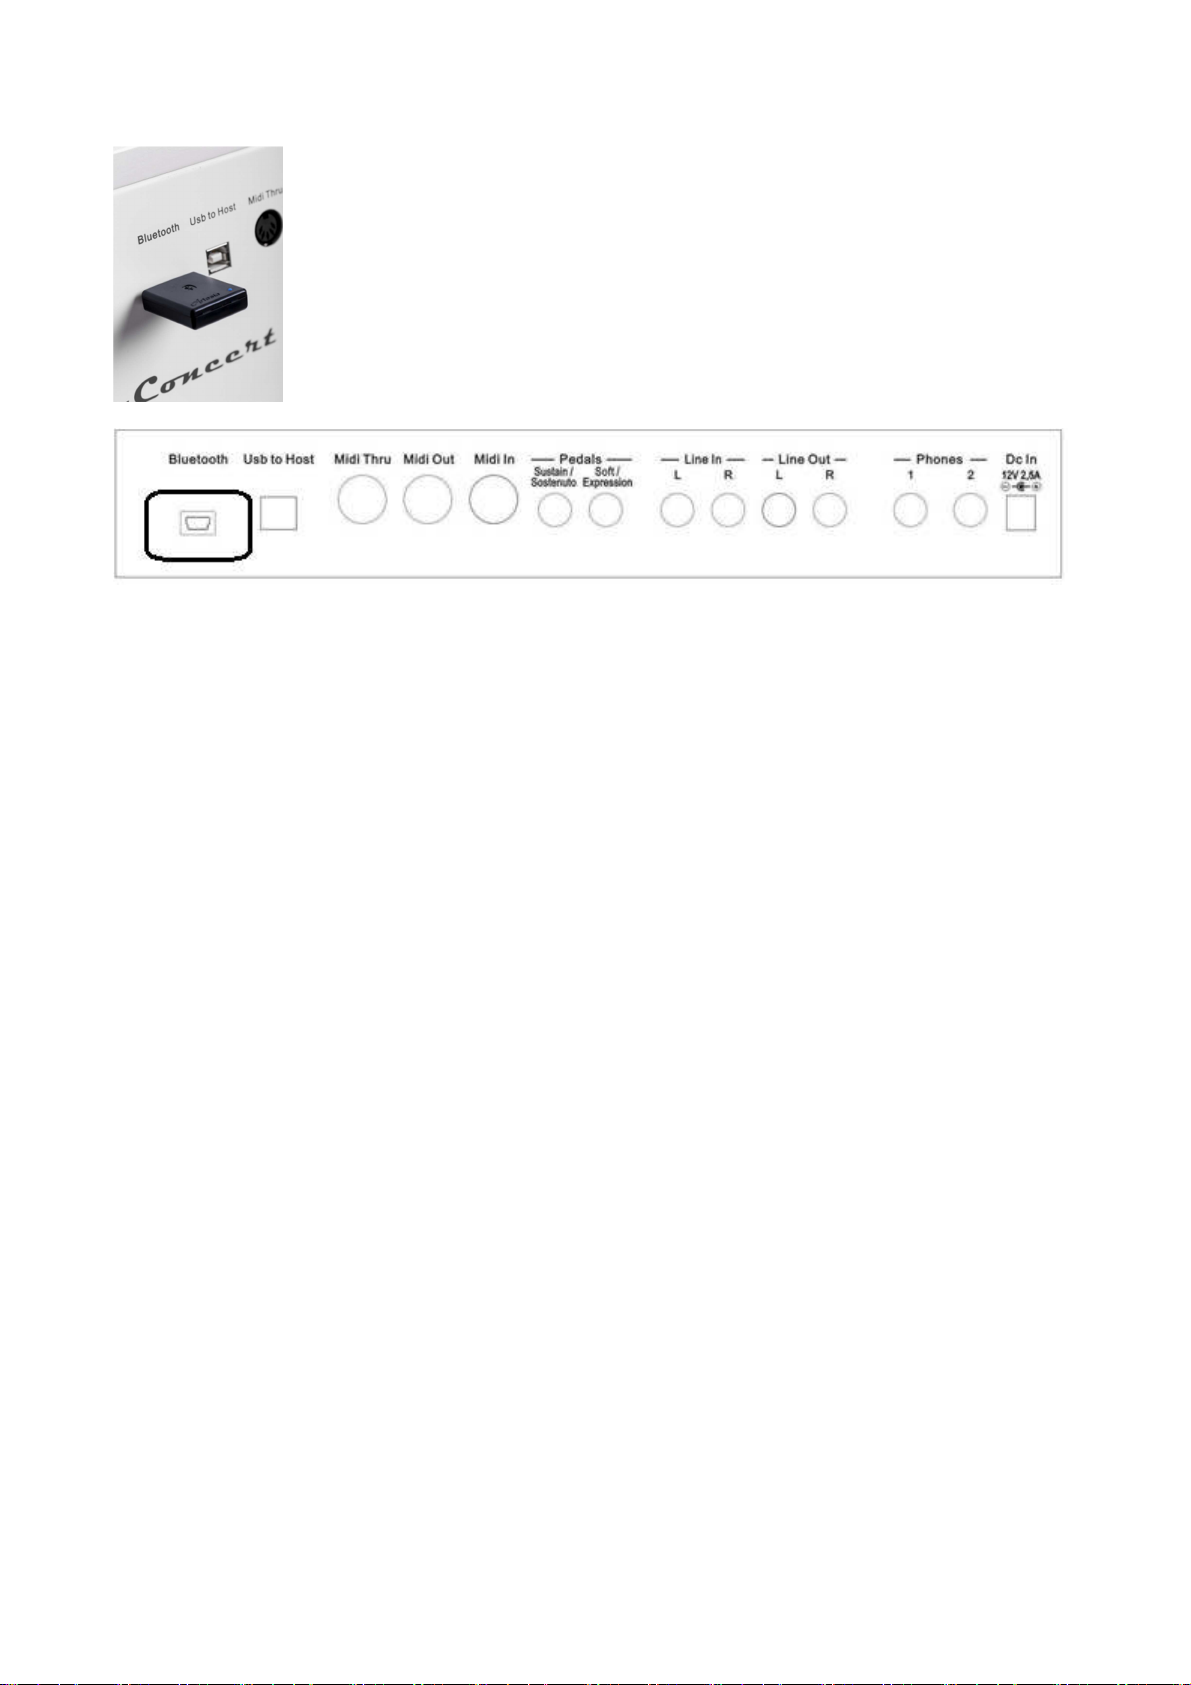
CONNESSIONE AUDIO BLUETOOTH
È possibile collegare lo strumento ad un dispositivo audio remoto, SmartPhone
o Smart Tablet, utilizzando il RICEVITORE BT1 opzionale che può essere
collegato alla presa Bluetooth nella parte posteriore dello strumento.
La connessione Bluetooth Audio collegherà il vostro SmartPhone o dispositivi
similari al sistema di amplificazione dello strumento e trasmetterà, senza fili, la
tua selezione musicale personale.
Trasformerà il vostro strumento, dandovi la possibilità di suonare con i vostri
musicisti o cantanti preferiti, sarà dunque un grande centro di intrattenimento
per la famiglia.
1 Inserite il ricevitore BT1 nella presa dedicata nel pannello posteriore ed una breve
sequenza di note confermerà che BT1 è stato inserito.
2 Quando il ricevitore BT1 sarà pronto, il suo Led di colore Blu incomincia a lampeggiare
velocemente per circa 5 secondi. Noterete che la velocità del lampeggio diminuisce dopo
il collegamento con il vostro dispositivo.
3 Cercare ora BT1 sul vostro smartphone o tablet e selezionatelo per completare il
collegamento.
4 Appena il collegamento è completato il Led di BT1 smette di lampeggiare e conferma
l’avvenuto collegamento.
5 Iniziate ora a suonare i vostri brani da smartphone o da tablet e buon divertimento.
54
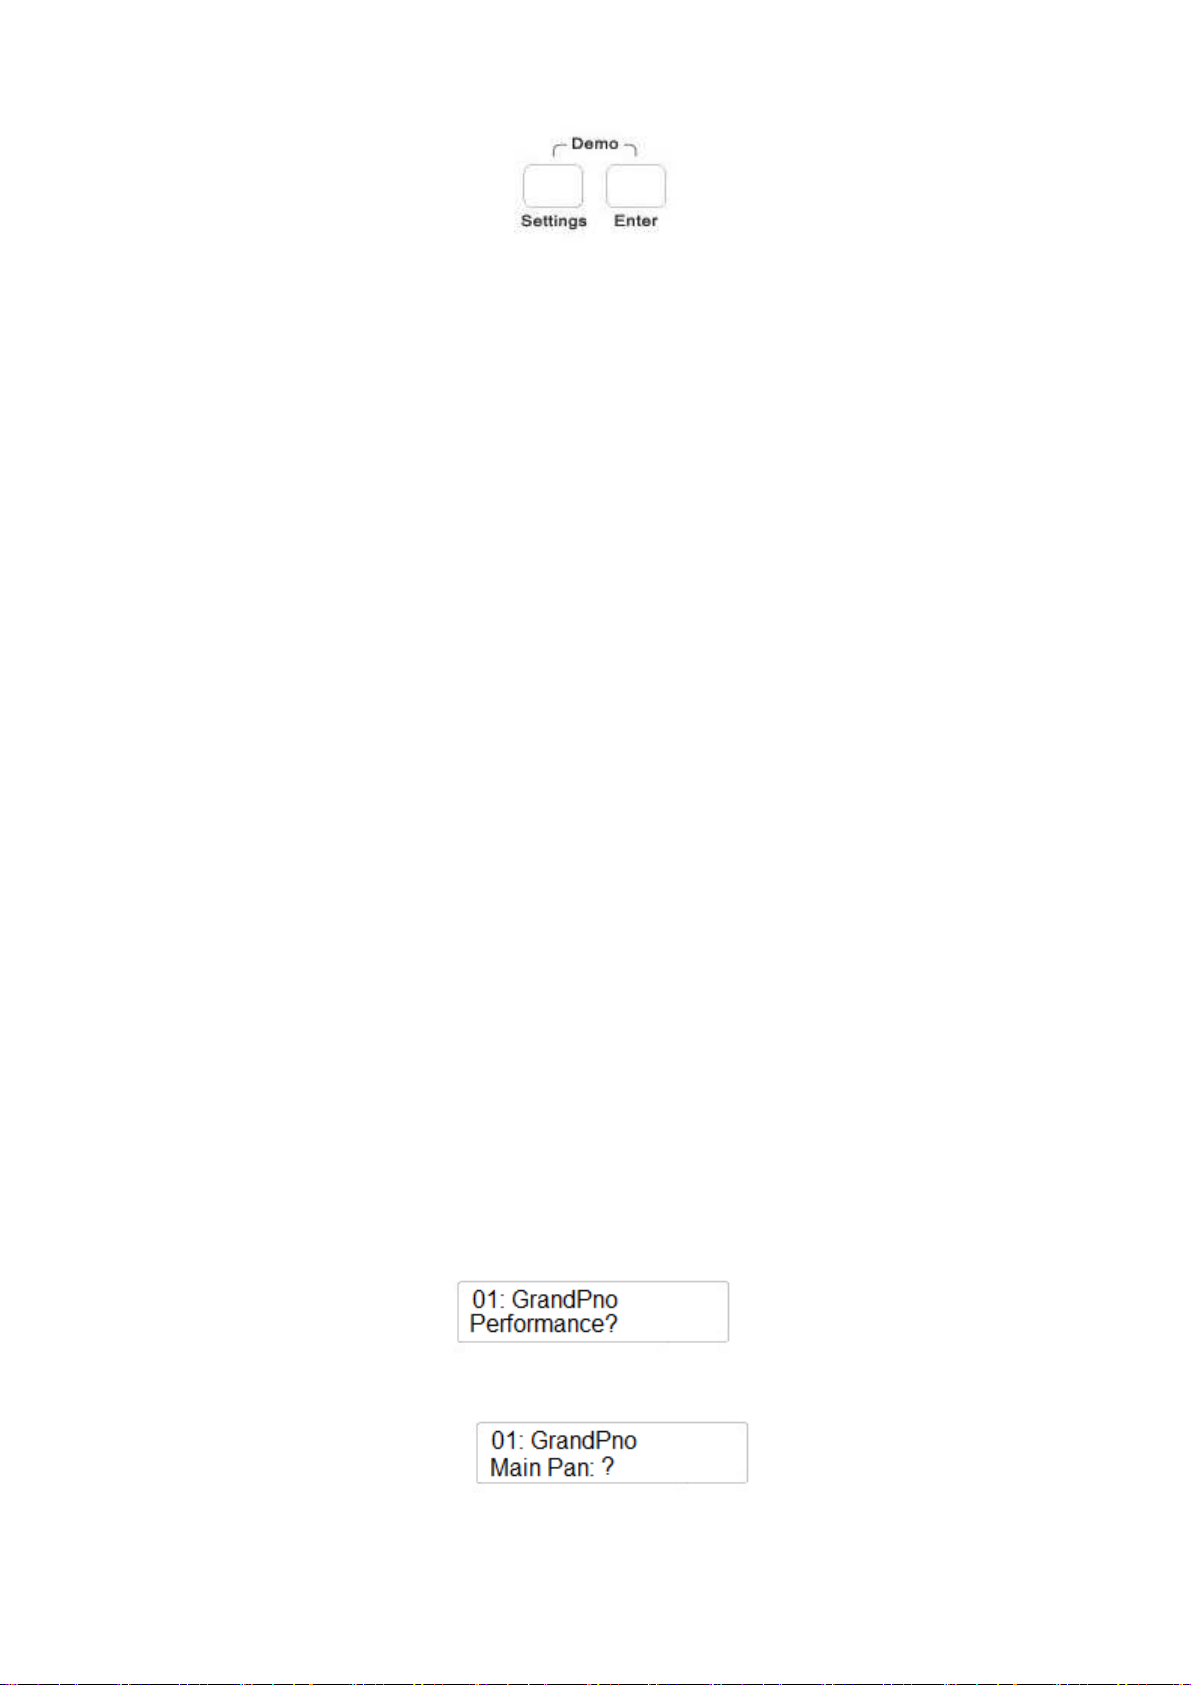
SETTINGS E FUNZIONI SPECIALI
Tramite i pulsanti SETTINGS e ENTER è possibile accedere alle molte specifiche interne dello
strumento.
Premere SETTINGS alcune volte per accedere alle molte pagine disponibili:
- Performance: ?
- Effect: ?
- Pedal Assign: ?
- USB Function: ?
- Memory: ?
- Other Function: ?
Iniziamo ad esplorare le pagine SETTINGS.
PERFORMANCE
Di seguito trovate l’elenco completo delle funzioni che possono essere selezionate tramite i pulsanti
Up (/\) e Down (\/) o tramite il potenziometro Data Control:
-
-
-
-
-
-
-
-
-
-
-
-
-
-
Main Voice Pan: ?
Split Voice Pan: ?
Dual Voice Pan: ?
Main Voice Volume: ?
Split Voice Volume: ?
Dual Voice Volume: ?
Main Voice Octave: ?
Split Voice Octave: ?
Dual Voice Octave: ?
Arpeggio Type: ?
Twin Feature: ?
Midi In: ?
Midi Out: ?
Local On/Off: ?
MAIN VOICE PAN
Premere il pulsante SETTINGS ed il display indica:
Premere il pulsante ENTER ed il display indica
E’ possibile modificare il valore PAN della sezione MAIN VOICE. Con questa funzione è possibile
bilanciare il suono MAIN più a destra o più a sinistra sugli altoparlanti.
55
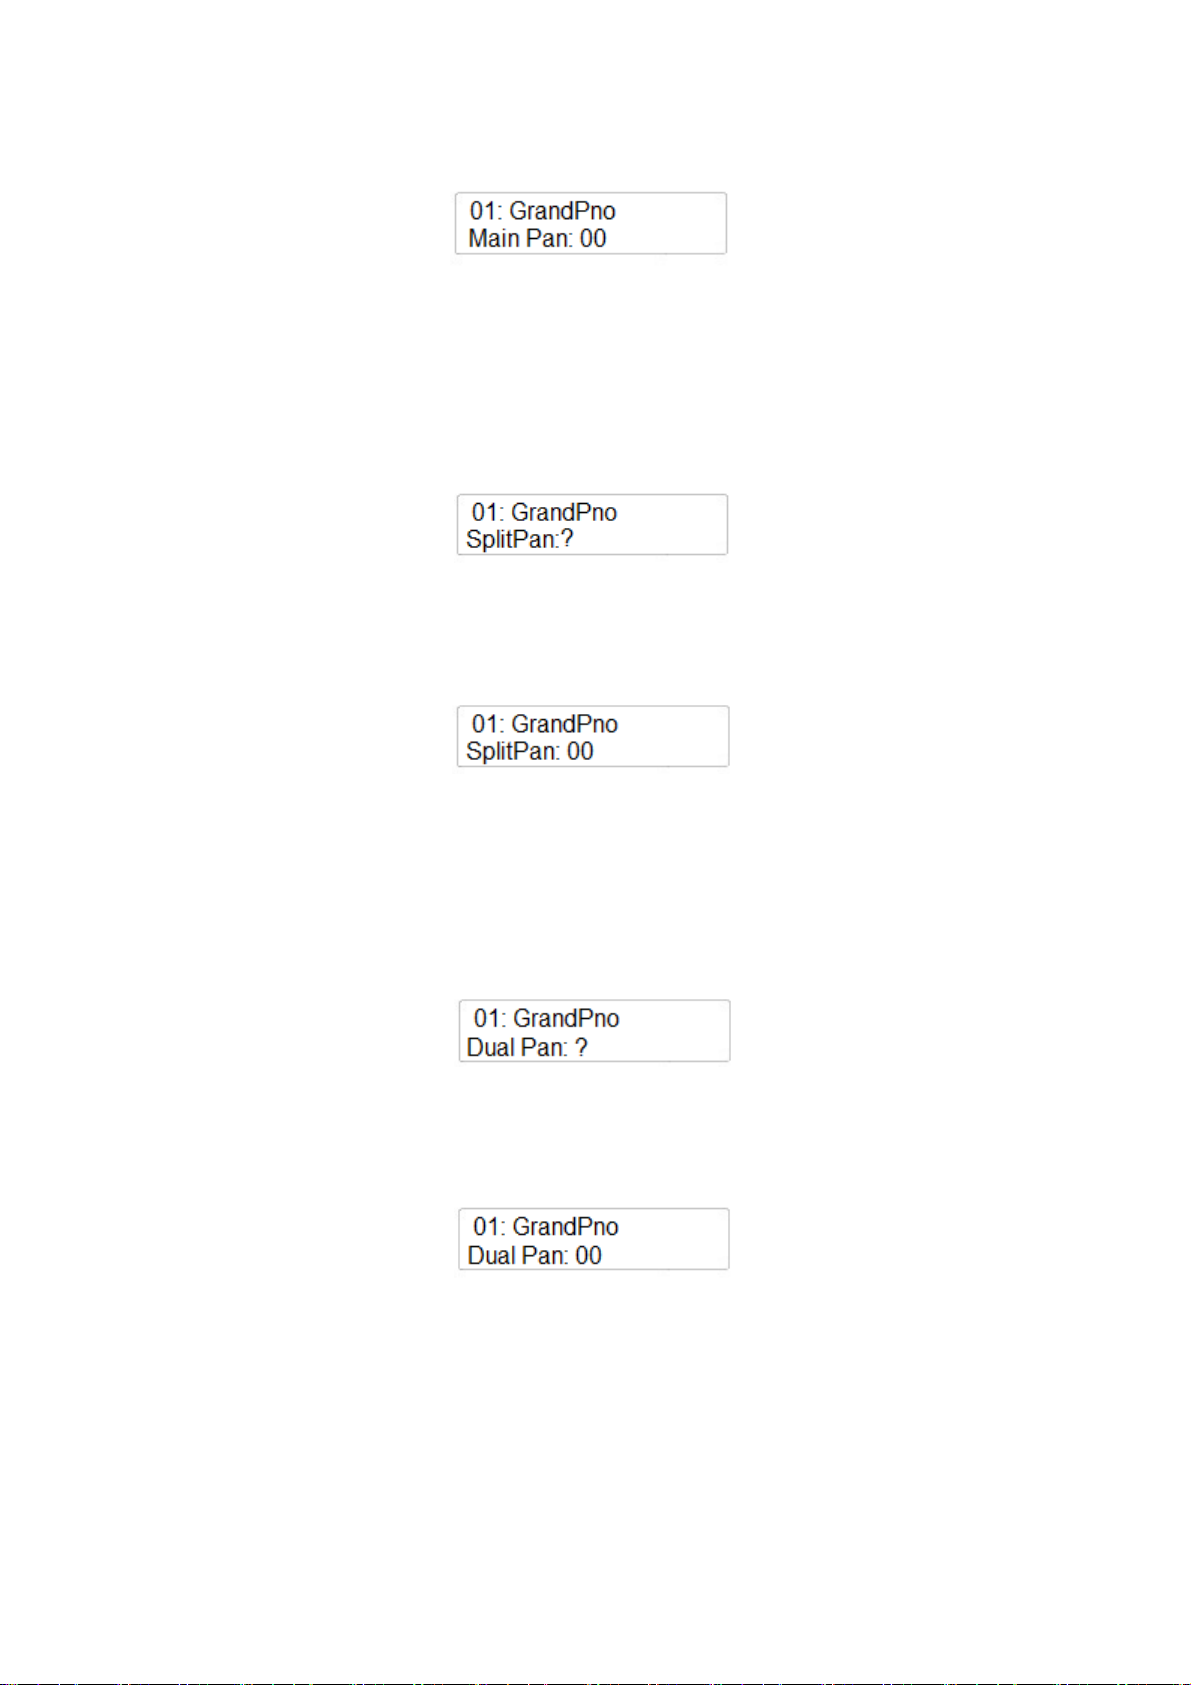
Premere ENTER di nuovo per modificare i parametri di MAIN PAN se necessario. Il display
indica :
Tramite il potenziometro Data Control è possibile cambiare il valore PAN (-64 / +63). A valore 0 il
PAN è bilanciato al centro degli altoparlanti.
SPLIT VOICE PAN
Selezionare di nuovo la pagina PERFORMANCE tramite il pulsante SETTINGS e premere
ENTER.
Tramite il potenziometro Data Control selezionare la pagina successiva:
E’ possibile modificare il valore PAN della sezione SPLIT VOICE. Con questa funzione è possibile
bilanciare il suono SPLIT più a destra o più a sinistra sugli altoparlanti.
Premere ENTER di nuovo per modificare i parametri di SPLIT PAN se necessario. Il display
indica :
Tramite il potenziometro Data Control è possibile cambiare il valore PAN (-64 / +63). A valore 0 il
PAN è bilanciato al centro degli altoparlanti.
DUAL VOICE PAN
Selezionare di nuovo la pagina PERFORMANCE tramite il pulsante SETTINGS e premere
ENTER.
Tramite il potenziometro Data Control selezionare la pagina successiva:
E’ possibile modificare il valore PAN della sezione DUAL VOICE. Con questa funzione è possibile
bilanciare il suono DUAL più a destra o più a sinistra sugli altoparlanti.
Premere ENTER di nuovo per modificare i parametri di DUAL PAN se necessario. Il display
indica :
Tramite il potenziometro Data Control è possibile cambiare il valore PAN (-64 / +63). A valore 0 il
PAN è bilanciato al centro degli altoparlanti.
MAIN VOICE VOLUME
Selezionare di nuovo la pagina PERFORMANCE tramite il pulsante SETTINGS e premere
ENTER.
Tramite il potenziometro Data Control selezionare la pagina successiva:
56

E’ possibile modificare il valore del VOLUME della sezione MAIN VOICE.
Premere ENTER di nuovo per modificare i parametri di MAIN VOLUME se necessario. Il display
indica :
Tramite il potenziometro Data Control è possibile cambiare il valore del Volume ( min.00 / max.
127).
SPLIT VOICE VOLUME
Selezionare di nuovo la pagina PERFORMANCE tramite il pulsante SETTINGS e premere
ENTER.
Tramite il potenziometro Data Control selezionare la pagina successiva:
E’ possibile modificare il valore del VOLUME della sezione SPLIT VOICE.
Premere ENTER di nuovo per modificare i parametri di SPLIT VOLUME se necessario. Il display
indica :
Tramite il potenziometro Data Control è possibile cambiare il valore del Volume ( min.00 / max.
127).
DUAL VOICE VOLUME
Selezionare di nuovo la pagina PERFORMANCE tramite il pulsante SETTINGS e premere
ENTER.
Tramite il potenziometro Data Control selezionare la pagina successiva:
E’ possibile modificare il valore del VOLUME della sezione DUAL VOICE.
Premere ENTER di nuovo per modificare i parametri di DUAL VOLUME se necessario. Il display
indica :
Tramite il potenziometro Data Control è possibile cambiare il valore del Volume DUAL VOICE in
proporzione al volume MAIN VOICE.
MAIN VOICE OCTAVE
Selezionare di nuovo la pagina PERFORMANCE tramite il pulsante SETTINGS e premere
ENTER.
Tramite il potenziometro Data Control selezionare la pagina successiva:
57

E’ possibile modificare l’ottava della sezione MAIN VOICE.
Premere ENTER di nuovo per modificare i parametri di MAIN OCTAVE se necessario. Il display
indica :
Tramite il potenziometro Data Control è possibile cambiare la MAIN OCTAVE (-2 / + 2 ottave).
SPLIT VOICE OCTAVE
Selezionare di nuovo la pagina PERFORMANCE tramite il pulsante SETTINGS e premere
ENTER.
Tramite il potenziometro Data Control selezionare la pagina successiva:
E’ possibile modificare l’ottava della sezione SPLIT VOICE.
Premere ENTER di nuovo per modificare i parametri di SPLIT OCTAVE se necessario. Il display
indica :
Tramite il potenziometro Data Control è possibile cambiare la SPLIT OCTAVE (-2 / + 2 ottave).
DUAL VOICE OCTAVE
Selezionare di nuovo la pagina PERFORMANCE tramite il pulsante SETTINGS e premere
ENTER.
Tramite il potenziometro Data Control selezionare la pagina successiva:
E’ possibile modificare l’ottava della sezione DUAL VOICE.
Premere ENTER di nuovo per modificare i parametri di DUAL OCTAVE se necessario. Il display
indica :
Tramite il potenziometro Data Control è possibile cambiare la DUAL OCTAVE (-2 / + 2 ottave).
ARPEGGIO
Lo strumento permette un arpeggio automatico per la sezione Main Voice.
Selezionare la pagina PERFORMANCE tramite il pulsante SETTINGS e premere ENTER.
Tramite il potenziometro Data Control selezionare la pagina successiva:
58
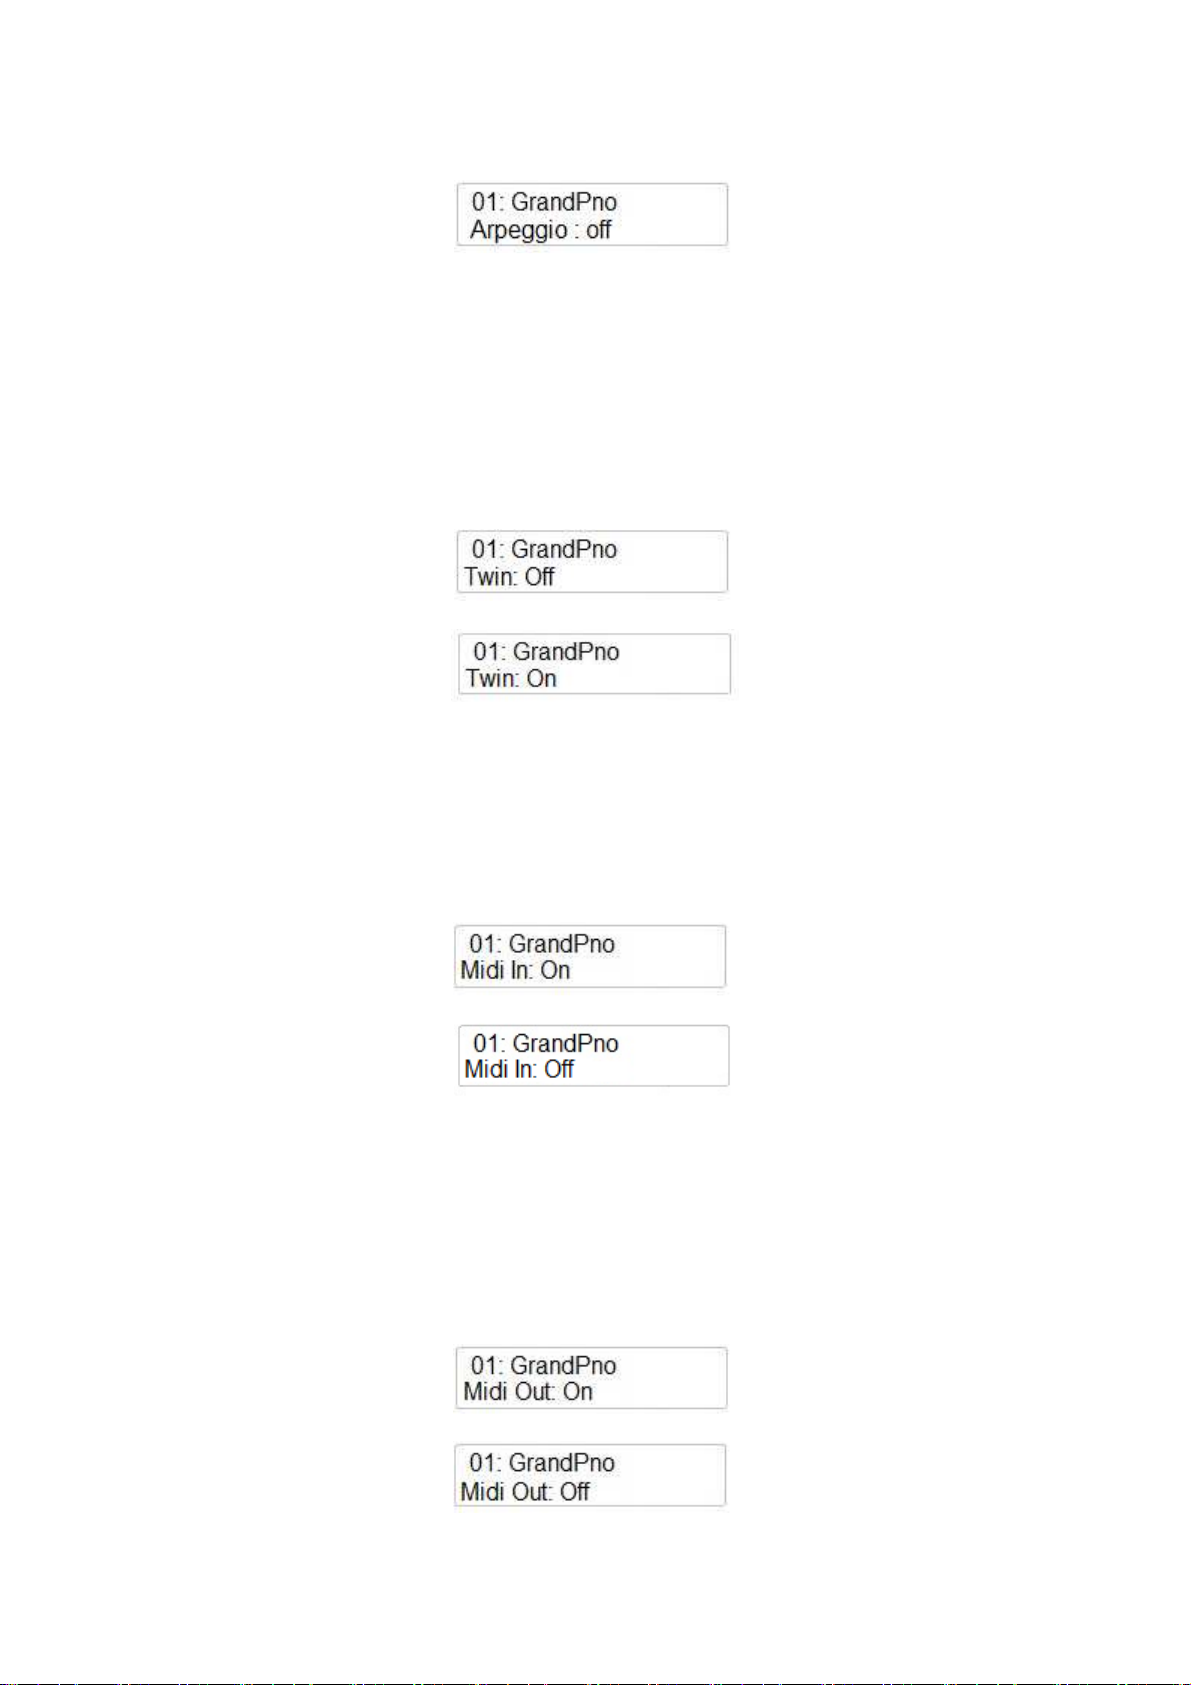
E’ possibile selezionare due tipi di arpeggio .
Premere ENTER per selezionare il tipo di arpeggio. Il display indica :
Tramite il potenziometro Data Control è possibile selezionare Arpeggio 1 o Arpeggio 2.
TWIN
Questa configurazione è molto utile per la pratica di brani musicali. Maestro e allievo possono
suonare allo stesso tempo le stesse note nello stesso strumento. La funzione TWIN permette di
configurare le 88 note dello strumento in due metà uguali della tastiera nella stessa ottava.
Selezionare la pagina PERFORMANCE tramite il pulsante SETTINGS e premere ENTER.
Tramite il potenziometro Data Control selezionare la pagina successiva:
Tramite il potenziometro Data Control è possibile selezionare Arpeggio 1 o Arpeggio 2.
MIDI IN
E’ possibile settare il Midi In On o Off.
Selezionare di nuovo la pagina PERFORMANCE tramite il pulsante SETTINGS e premere
ENTER.
Tramite il potenziometro Data Control selezionare la pagina successiva:
Tramite il potenziometro Data Control è possibile selezionare il Midi In Off:
MIDI OUT
E’ possibile settare il Midi Out On o Off.
Selezionare di nuovo la pagina PERFORMANCE tramite il pulsante SETTINGS e premere
ENTER.
Tramite il potenziometro Data Control selezionare la pagina successiva:
Tramite il potenziometro Data Control è possibile selezionare il Midi Out Off:
Tramite Data Control è possibile anche selezionare il canale Midi Out su cui trasmettere le
informazioni midi, da Canale 1 a Canale 16.
59

MIDI LOCAL
Il controllo Midi Local On/Off permette di decidere se far suonare i suoni interni dello strumento
assieme ai suoni controllati via Midi Out oppure no.
Possiamo decidere se settare il controllo LOCAL On oppure Off.
Selezionare di nuovo la pagina PERFORMANCE tramite il pulsante SETTINGS e premere
ENTER.
Tramite il potenziometro Data Control selezionare la pagina successiva:
Tramite il potenziometro Data Control selezionare Midi Local Off.
Stiamo ora per entrare nella seconda parte delle pagine SETTINGS. Premere il pulsante
SETTINGS per entrare nelle pagine EFFECTS.
EFFECTS
Questo è l’elenco completo delle pagine Effects che possono essere attivate tramite i pulsanti Up
(/\) e Down (\/).
-
-
-
-
-
-
-
-
Reverb Type
Main Reverb Volume
Split Reverb Volume
Dual Reverb Volume
Chorus Type
Main Chorus Volume
Split Chorus Volume
Dual Chorus Volume
TIPO DI RIVERBERO
E’ possibile selezionare il tipo di riverbero desiderato da un elenco di 10 diversi tipi di effetto.
1
6
Hall 1
Stage 1
2
7
Hall 2
Stage 2
3
8
Room 1
Plate
4
9
Room 2
Delay
10
5
Room 3
Echo
Premere il pulsante SETTINGS ed il display indica:
Premere ENTER per confermare ed il display indica il tipo di riverbero selezionato, per esempio:
Tramite il potenziometro Data Control selezionare il nuovo tipo di reverbero desiderato.
60

REVERB VOLUME – QUANTITA’ DI RIVERBERO
Non appena vi trovate nella pagina EFFECT, premete il pulsante ENTER per accedere ai parametri
di REVERB VOLUME per le sezioni Main. Split e Dual. Selezionare la sezione desiderata tramite
il pulsante ENTER e regolare la quantità del riverbero tramite il potenziometro Data Control.
Ognuna delle sezioni può avere una quantità di riverbero differente (00 – 127).
CHORUS TYPE
E’ possibile selezionare il tipo di Chorus desiderato da un elenco di 13 diversi tipi di effetto.
1
4
7
10
13
Chorus 1
Chorus 4
Short Delay
Flanger 3
Celeste 3
2
5
8
11
Chorus 2
Feedback
Short Delay Feedback
Celeste 1
3
6
9
12
Chorus 3
Flanger 1
Flanger 2
Celeste 2
Premere il pulsante SETTINGS fino a che il display indica:
Premere ENTER per confermare ed il display indica:
Tramite il potenziometro Data Control selezionare il nuovo tipo di reverbero desiderato.
Premere ENTER e tramite il potenziometro Data Control selezionare il tipo di Chorus.
E’ possibile selezionare il valore del chorus per ogni sezione (Main, Split e Dual).
Premere il pulsante SETTINGS fino a che il display indica :
Premere ENTER per confermare ed il display indica :
Quando nella pagina EFFECT, premere ENTER per aggiornare i parametri tramite il potenziometro
Data Control per le sezioni Main, Split e Dual.
61

PEDAL ASSIGN
E’ possibile riprogrammare le funzioni di default dei 3 pedali del modello CDP202
Il pedale Sustain (Pedale 1) ed il pedale Sostenuto (Pedale 2) possono essere riprogrammati per
accedere ad una numero di funzioni diverse. Il pedale Soft (Pedale 3) fa riferimento ad un elenco di
funzioni extra leggermente differente.
PROGRAMMARE IL PEDALE 1 ED IL PEDALE 2
Premere il pulsante SETTINGS fino a selezionare la pagina PEDAL Assign :
Premere il pulsante ENTER per confermare ed il display indica :
Premere ENTER per confermare. Tramite il potenziometro Data Control selezionare il nuovo tipo
di settaggio per il Pedale 1 dalla lista seguente:
Pdl-Null Il pedale non è attivo
Pdl-Sustain Il pedale ha la funzione Sustain/Damper
Pdl-Soft Il pedale ha la funzione Soft
Pdl-Sost Il pedale ha la funzione Sostenuto
Pdl-Tap Il pedale ha la funzione TAP TEMPO
Pdl-MemoryUp Il pedale ha la funzione Panel Memory Registration Up
Pdl-Play Il pedale ha la funzione PLAY per suonare le song Midi File
Una volta selezionata la nuova funzione per Pedale 1 premere ENTER per confermare la scelta.
PROGRAMMARE IL PEDALE 3
Premere il pulsante SETTINGS fino a selezionare la pagina PEDAL Assign:?
Premere il pulsante ENTER per confermare ed il display indica :
Tramite il potenziometro Data Control selezionare il Pedale 3 sul display:
Premere ENTER per confermare.
62

Tramite il potenziometro Data Control selezionare il nuovo tipo di settaggio per il Pedale 3 dalla
lista seguente:
Pdl-Null Il pedale non è attivo
Pdl-Sustain Il pedale ha la funzione Sustain/Damper
Pdl-Soft Il pedale ha la funzione Soft
Pdl-Sost Il pedale ha la funzione Sostenuto
Expression La presa del pedale sarà usata per controllare il pedale Volume/Expression
Pdl-Tap Il pedale ha la funzione TAP TEMPO
Pdl-MemoryUp Il pedale ha la funzione Panel Memory Registration Up
Pdl-Play Il pedale ha la funzione PLAY per suonare le song Midi File
Una volta selezionata la nuova funzione per Pedale 3 premere ENTER per confermare la scelta.
NOTA – Nel caso del modello STAGE CONCERT, le programmazioni di cui sopra possono essere
effettuate utilizzando il Pedale Opzionale a 3 leve.
MIDI PEDAL
Questa funzione permette di collegare una Pedaliera BASSI Midi allo strumento. Ci sono e2 diversi
tipi di settaggi per due suoni differenti.
Premere SETTINGS fino a che il display indica :
Premere ENTER per confermare ed il display indica :
Tramite il potenziometro Data Control selezionare Midi Pedal.
Premere ENTER per confermare. Tramite il potenziometro Data Control selezionare il settaggio
Midi Pedal desiderato.
-
-
P1 Questo settaggio seleziona un timbro di Basso da Chiesa, ottimo con le voci PIPE.
P2 Questo settaggio seleziona un timbro di Basso FINGER, ottimo con le voci
ORCHESTRAL.
-
Off La funzione Bass Pedalboard non è attiva.
FUNZIONI USB
In questa sezione possiamo controllare i vari parametri e funzioni della USB Midi Song
La prima funzione è FILTER TRACK che permette di mettere in MUTE (silenziare) la varie tracce
midi del brano midi (da traccia 1 a traccia 16). Questa funzione è molto utile se si desidera
silenziare (Track Off) alcune tracce della song midi e suonarle manualmente.
Premere il pulsante SETTINGS fino a selezionare la funzione USB.
63
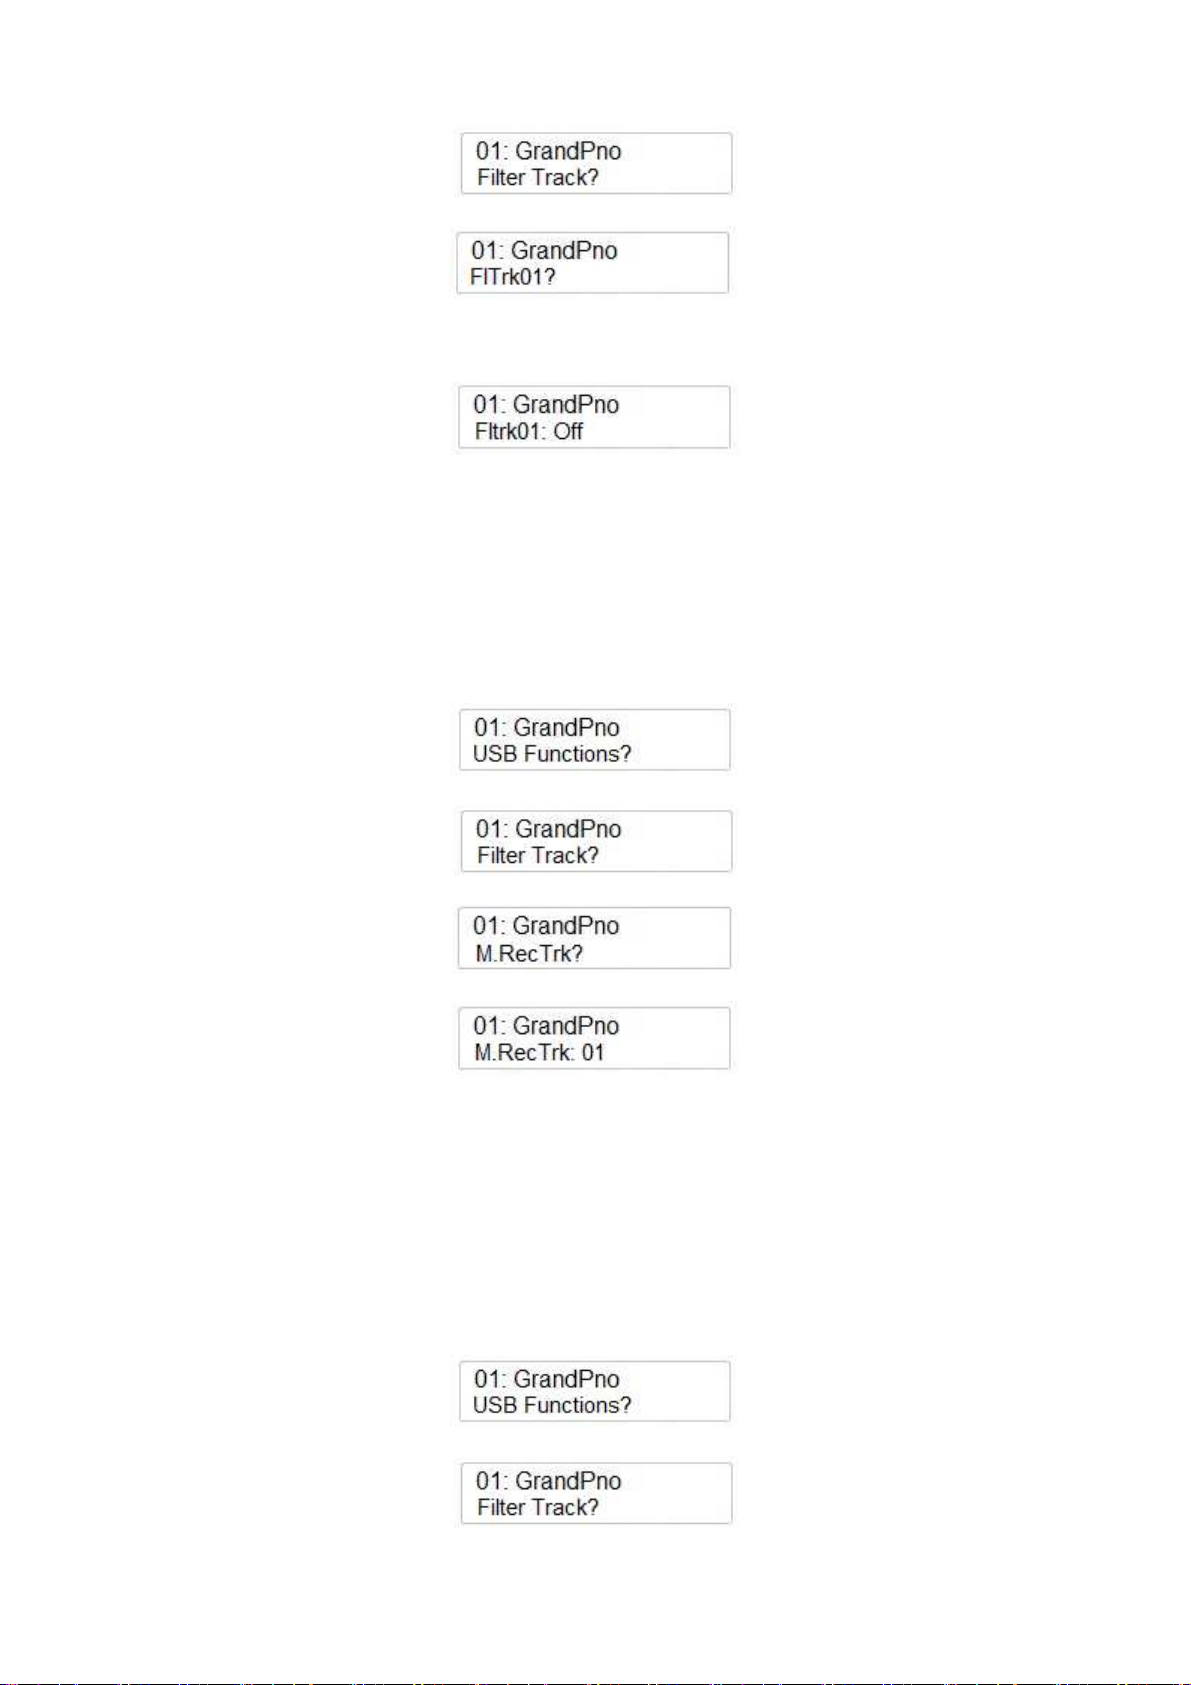
Premere ENTER per confermare ed il display indica:
Premere ancora ENTER ed il display indica ora:
Tramite il potenziometro Data Control è ora possibile selezionare qualsiasi dei 16 canali midi della
song (se tutti e 16 sono disponibili) e silenziarli.
Se si vuole mettere in MUTE il Canale Midi (Track) 1 premere ENTER ed il display indica:
Tramite il potenziometro Data Control è ora possibile selezionare Track Filter On/Off.
MAIN VOICE RECORDING TRACK
E’ possibile assegnare una Traccia specifica alla sezione MAIN VOICES quando si registra una
song.
Premere il pulsante SETTINGS fino a raggiungere la pagina USB Functions?
Premere ENTER ed il display indica
Tramite il potenziometro Data Control è ora possibile selezionare la funzione seguente
Premere ENTER ed il display indica
Tramite il potenziometro Data Control è ora possibile selezionare qualsiasi delle 16 tracce midi o
selezionare Track Off.
SPLIT VOICE RECORDING TRACK
E’ possibile assegnare una Traccia specifica alla sezione SPLIT VOICES quando si registra una
song.
Premere il pulsante SETTINGS fino a raggiungere la pagina USB Functions?
Premere ENTER ed il display indica
Tramite il potenziometro Data Control è ora possibile selezionare la funzione seguente
64

Premere ENTER ed il display indica
Tramite il potenziometro Data Control è ora possibile selezionare qualsiasi delle 16 tracce midi o
selezionare Track Off.
DUAL VOICE RECORDING TRACK
E’ possibile assegnare una Traccia specifica alla sezione DUAL VOICES quando si registra una
song.
Premere il pulsante SETTINGS fino a raggiungere la pagina USB Functions?
Premere ENTER ed il display indica
Tramite il potenziometro Data Control è ora possibile selezionare la funzione seguente
Premere ENTER ed il display indica
Tramite il potenziometro Data Control è ora possibile selezionare qualsiasi delle 16 tracce midi o
selezionare Track Off.
USB SONG VOLUME
Se necessario è possibile bilanciare il volume della song con il volume dello strumento
Premere il pulsante SETTINGS fino a raggiungere la pagina USB Functions ?
Premere ENTER per confermare ed il display indica
Tramite il potenziometro Data Control selezionare USB Volume
Premere ENTER per confermare ed il display indica
65
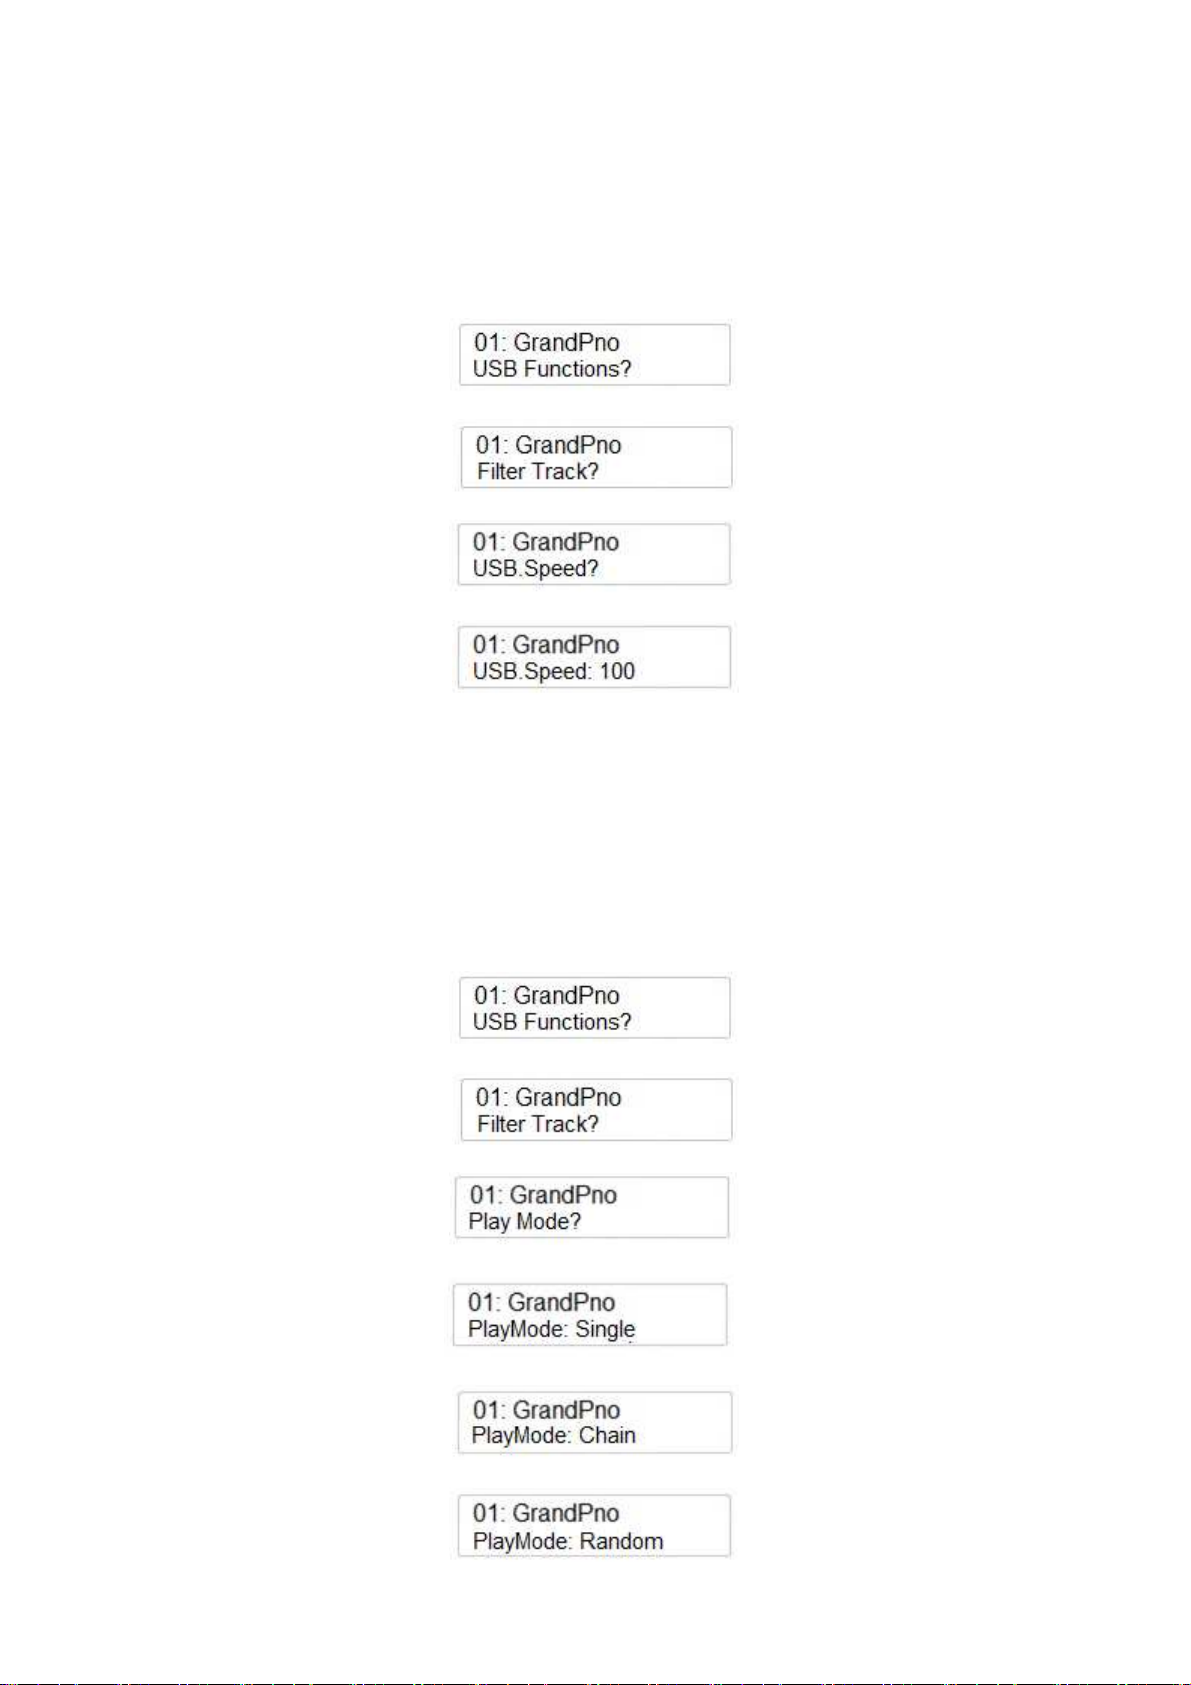
Tramite il potenziometro Data Control regolare il Volume della Song USB come si desidera (Min 0
/ Max 127)
TEMPO SPEED USB SONG
Se necessario è possibile cambiare il tempo della Song Midi.
Premere il pulsante SETTINGS fino a selezionare USB Functions ?
Premere ENTER per confermare ed il display indica
Tramite il potenziometro Data Control selezionare USB Speed
Premere ENTER ed il display indica
Tramite il potenziometro Data Control regolare ora il tempo della song (min 50 – max 200).
PLAY MODE
E’ possibile decidere se le Song Midi contenute nel disco USB debbano essere suonate una alla
volta, una dietro l’altra ordinate come in memoria USB (CHAIN) o una dopo l’altra ma senza
seguire l’ordine in cui sono nella memoria USB (RANDOM).
Premere SETTINGS fino alla pagina USB Functions?
Premere ENTER per confermare ed il display indica
Tramite il potenziometro Data Control selezionare PLAY MODE
Premere ENTER ed il display indica
Tramite il potenziometro Data Control selezionare il PLAY MODE desiderato
oppure
66
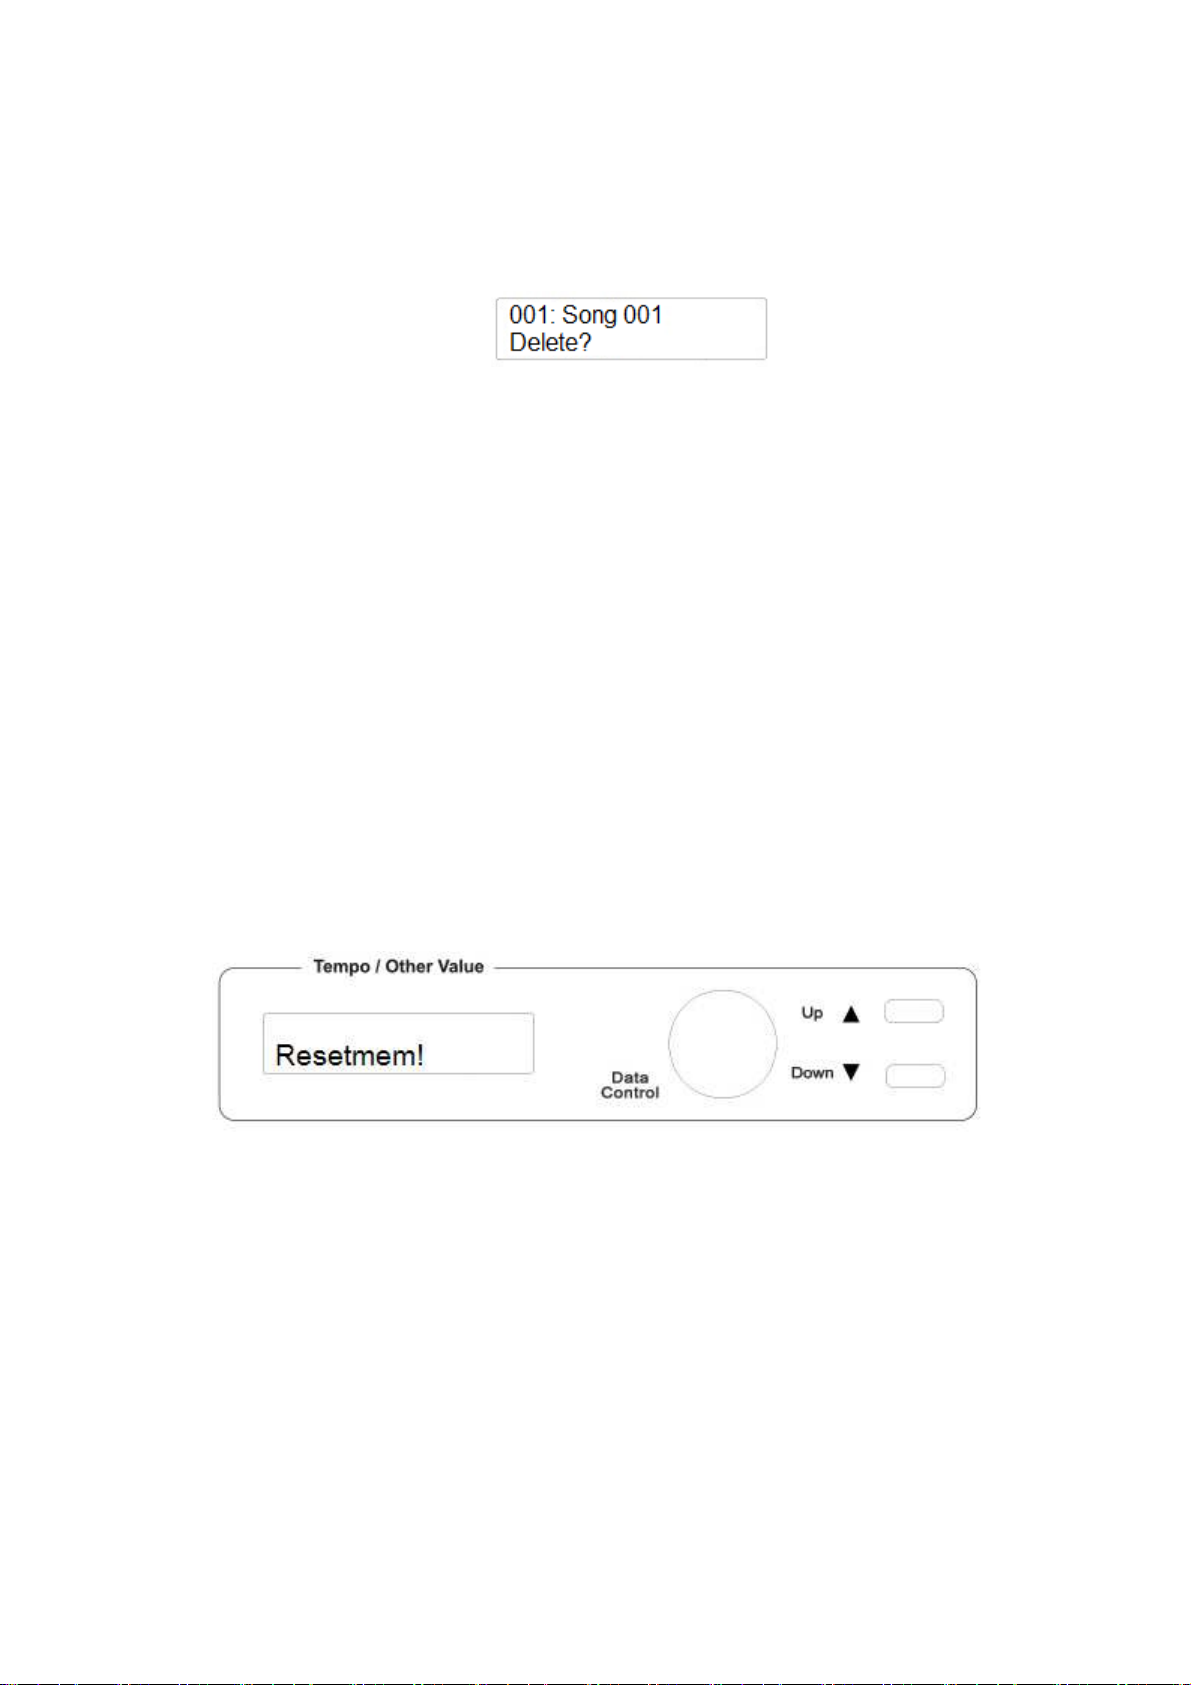
CANCELLARE I FILES
Nel caso sia necessario cancellare alcuni dei files contenuti nella memoria USB, è disponibile la
funzione DELETE.
-
-
-
Assicuratevi che il disco USB sia inserito nell’apposita sede.
Selezionare il file che si desidera cancellare – per esempio SONG 001
Premere contemporaneamente i pulsanti RECORD e PLAY per accedere alla funzione
DELETE. Il display indica
-
-
Premere il pulsante (/\) UP per cancellare il file.
Se a questo punto decidete invece di non cancellare più il file selezionato premere il
pulsante (\/) Down per uscire dalla funzione.
-
RESET
Se dovesse essere necessario cancellare completamente la memoria interna RAM, è previsto un
dispositivo di ripristino molto semplice.
1 - Assicurarsi che lo strumento sia spento.
2 - Tenere premuti contemporaneamente i pulsanti Up (/\) e Down (\/).
3 - Accendere lo strumento tenendo premuto i due pulsanti Up (/\) e Down (\/).
4 - Il display visualizzerà Resetmem!
Non resettare lo strumento se non è necessario. Tutte le informazioni che sono state salvate
verranno cancellate automaticamente dalla memoria interna RAM. I programmi di Default vengono
ripristinati automaticamente.
67

CONNESSIONI
BLUETOOTH
Questa è la presa in cui inserire l'unità di ricezione Bluetooth che consente di collegare un'unità di
trasmissione Bluetooth (smartphone, tablet, ecc) con il sistema audio dello strumento.
USB HOST
È possibile collegare lo strumento ad un computer mediante la porta USB situata sul pannello posteriore
dello strumento e controllare i parametri MIDI.
CONNESSIONI MIDI
Il MIDI IN riceve i dati MIDI da un dispositivo MIDI esterno che può essere utilizzato per controllare lo
strumento. Il Midi THRU ritrasmette qualsiasi dato dal Midi IN direttamente ad altri dispositivi MIDI. Il
connettore MIDI OUT trasmette i dati MIDI generati dallo strumento ad altri dispositivi MIDI.
PEDALI
Queste due prese jack sono utilizzate per collegare i pedali disponibili con lo strumento. Queste prese si
possono utilizzare per i tre pedali del pianoforte e in alternativa anche per un pedale volume.
STAGE CONCERT - è dotato di un pedale sustain di serie. Collegate il suo jack alla presa Pedal
Input Sustain/Sostenuto per ottenere l'effetto Sustain quando il pedale viene utilizzato.
CDP 202 – è dotato di una serie completa di 3 pedali. Inserire il jack mono del pedale nella presa
Soft/Expression e il jack stereo del pedale nella presa Sustain/Sostenuto.
NOTA - Lo STAGE CONCERT può anche usare un pedale a 3 leve (opzionale).
Stessa connessione come in CDP 202.
VOLUME PEDALE - Collegare il pedale volume nella presa jack Soft/Expression (configurare lo
strumento).
PRESA - LINE IN
Ci sono due ingressi (Left e Right) e sono utilizzati per inviare il segnale audio di uno strumento esterno
all'amplificatore interno.
PRESA – LINE OUT
Ci sono due uscite (Left e Right) e vengono utilizzate per inviare il segnale audio ad un apparecchio
amplificatore esterno (console mixer o registratore). Per collegare lo strumento in stereo ad un sistema di
amplificazione esterno collegare entrambe le uscite, Left e Right.
CUFFIA
Possono essere collegate due cuffie audio. Esse scollegheranno il sistema di altoparlanti e permetteranno di
suonare senza disturbare gli altri e senza essere disturbati dai rumori esterni.
PRESA di CORRENTE – DC IN
Questo è il collegamento dell'alimentazione. Collegare l'adattatore a questa presa per alimentare lo
strumento. Usare solo l’adattatore originale.
68

69

D i g i t a l P i a n o s
STAGE CONCERT
Stage Piano
CDP 202
Digital Piano
Bedienungsanleitung
70

SICHERHEITSHINWEISE UND ANWEISUNGEN
Bei der Benutzung elektrischer Apparate immer grundlegende Vorsichtsmaßregeln und
Sicherheitshinweise beachten:
1. Lesen Sie die Betriebsanleitung, bevor Sie das Gerät benutzen.
2. Um Verletzungsgefahr zu reduzieren, Kinder nie unbeaufsichtigt in der Nähe des
eingeschalteten Instruments lassen.
3. Das Gerät nicht in der Nähe von Wasser benutzen – bzw. halten Sie Wasser fern vom
Instrument - wie offene Getränke, Flaschen, Blumenvasen…
4. Dieses Instrument kann - entweder alleine oder in Verbindung mit einem Verstärker und
Kopfhörern oder Lautsprechern - in höheren Lautstärkebereichen dauerhafte Schäden am Gehör
hervorrufen. Benutzen Sie das Gerät nicht während einer längeren Zeit mit zu hoher Lautstärke.
Sollten Sie trotzdem Beeinträchtigungen Ihres Gehörs oder Anzeichen eines Tinnitus feststellen,
suchen Sie einen Arzt auf.
5. Das Gerät sollte so platziert sein, dass eine ausreichende Belüftung garantiert ist.
6. Das Gerät nicht in der Nähe von Wärmequellen - wie Heizkörpern - aufstellen und
aufbewahren.
7. Das Gerät nur an geeignete Stromquellen anschließen. Angaben hierzu finden Sie in der
Gebrauchsanweisung oder direkt am Gerät.
8. Falls das Gerät mit einem für die Steckdosen Ihres Landes unpassenden Steckernetzteil geliefert
wird (z.B. Polstecker), muss ein Fachmann zu Rate gezogen werden. Keine eigenhändigen
Änderungen am Netzanschluss vornehmen!
9. Sollte das Gerät längere Zeit ungenutzt bleiben, trennen Sie es zur Sicherheit vom Stromnetz.
Bei erneuter Benutzung schließen Sie das Gerät am Stromnetz wieder an und schalten es ein.
Nach 3-5 Stunden ist der interne Puffer-Akku wieder aufgeladen. Nach etwa 2-3 Jahren kann es
nötig sein, den Akku zu erneuern.
10. Achten Sie darauf, dass keine kleinen Gegenstände oder Flüssigkeiten in das Gerät gelangen.
11. Das Gerät sollte durch Fachpersonal gewartet werden, wenn:
a) das Netzteil, dessen Stromkabel oder die Netzteilbuchse beschädigt wurden oder
b) kleine Objekte oder Flüssigkeiten in das Gerät gelangt sind oder
c) das Gerät Regen ausgesetzt wurde oder
d) das Gerät eine Funktionsstörung aufweist oder
e) das Gerät fallen gelassen wurde bzw. hingefallen ist oder das Gehäuse beschädigt wurde.
12. Versuchen Sie nicht, das Produkt über die in dieser Anleitung beschriebenen Schritte zu
modifizieren und zu warten. Alle Instandhaltungsarbeiten müssen von qualifizierten Fachleuten
durchgeführt werden.
71
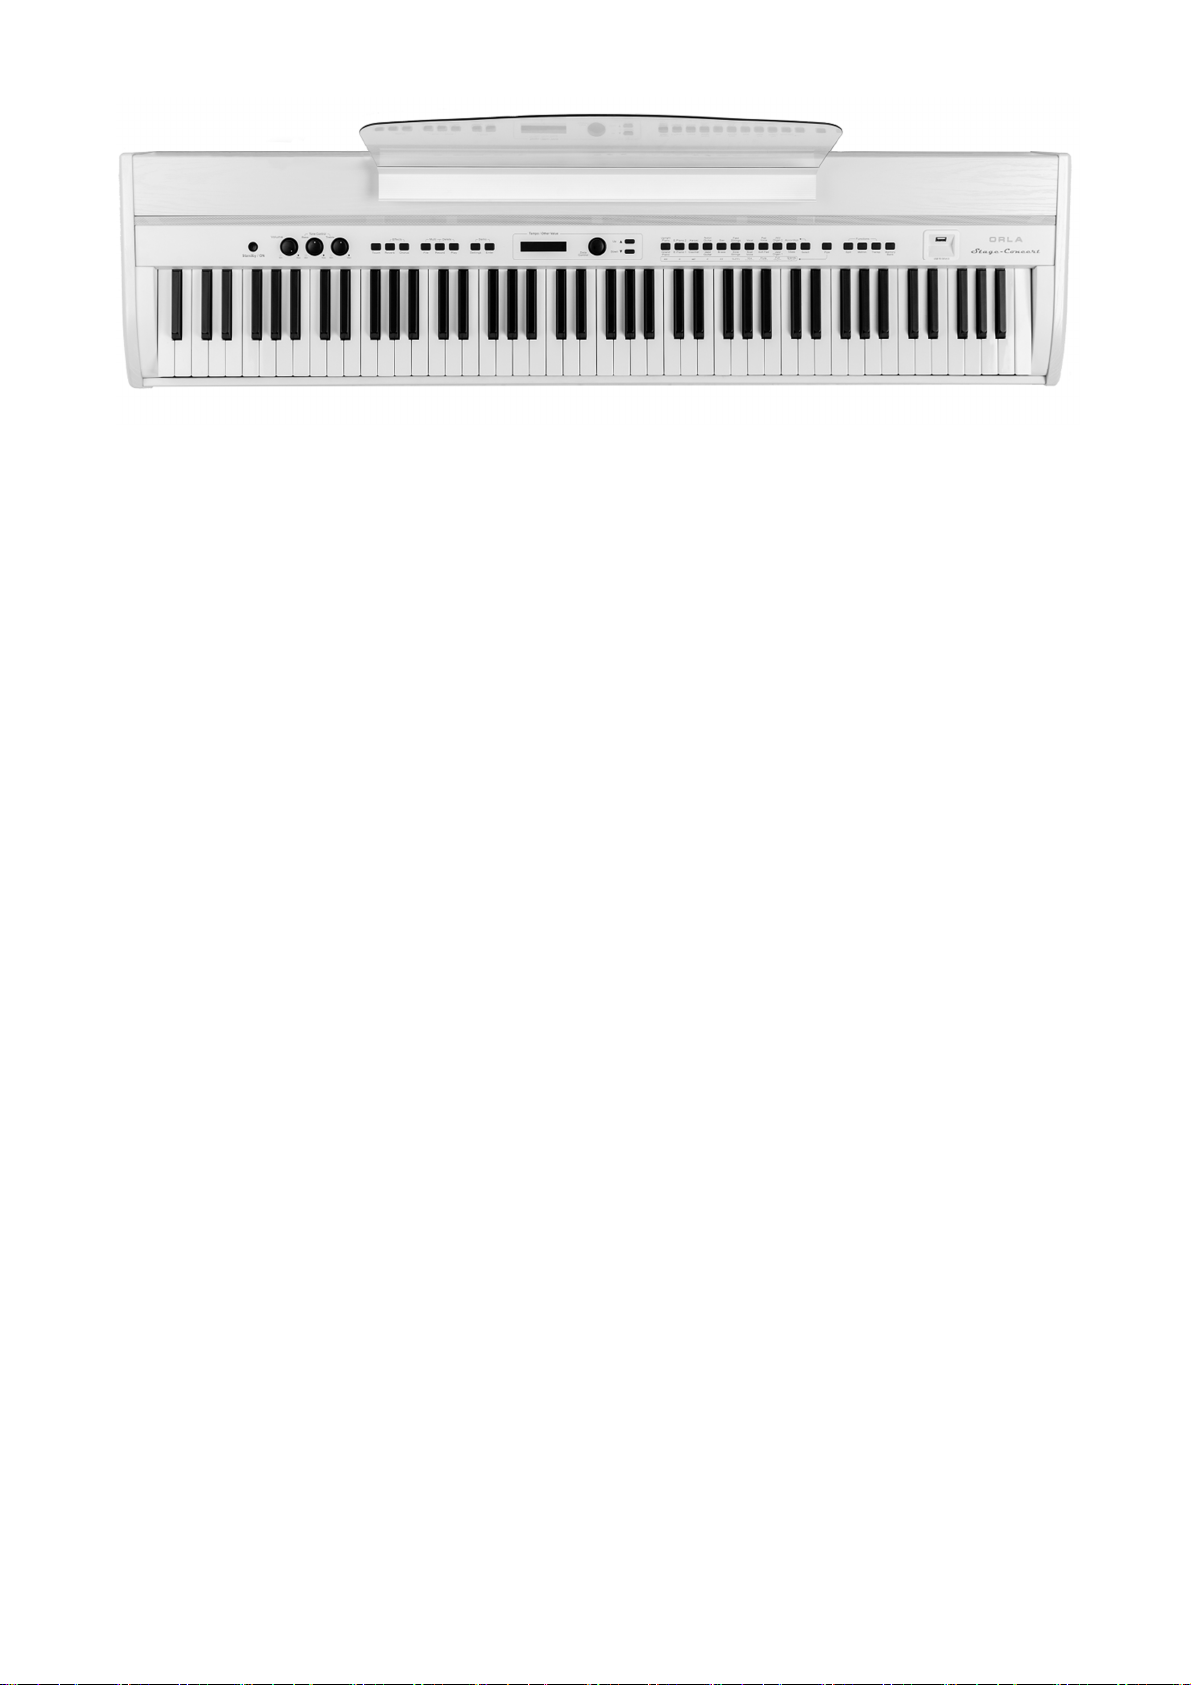
WIE SIE IHR DIGITAL PIANO BEHANDELN…
Ihr Digital-Piano ist ein wertvolles Instrument und verdient eine sorgfältige Behandlung.
Beachten Sie auch die nächsten Punkte und es wird Sie problemlos viele Jahre begleiten.
- Verwenden Sie zum Säubern ein Tuch oder einem feuchten Schwamm. Wenn der Schmutz
besonders hartnäckig ist, verwenden Sie ein neutrales Reinigungsmittel. Verwenden Sie keine
Lösungsmittel oder Alkohol.
- Halten Sie Ihr Gerät fern von staubiger Umgebung, hoher Luftfeuchtigkeit und extrem hohen
Temperaturen/Sonneneinstrahlung.
- Halten Sie das Instrument wo möglich fern von Elektromotoren oder Leuchtstofflampen, da
manche von diesen Störungen erzeugen können.
- Vermeiden Sie auf der gleichen Netzsteckdose Elektrogeräte, Neonlampen oder Lichtsysteme.
- In den meisten Fällen brauchen Sie nur auf die Position des Instruments verändern, um
Störungen zu vermeiden.
- Vor dem Einschalten des Gerätes ist sicherzustellen, dass alle externen Verstärker und
Lautsprecher-Systeme, an die Ihr Digital-Piano angeschlossen ist, ausgeschaltet sind.
- Computergesteuerte Geräte, wie auch dieses Digitalpiano, können durch Spannungsspitzen,
Überspannungen und kurzzeitigen Stromausfall abstürzen. Wenn Ihr Gerät nicht mehr aufgrund
einer Stromleitungsstörung funktioniert, schalten Sie es für ein paar Sekunden aus und dann
wieder ein.
- Entfernen Sie das Netzteil nicht, ohne erst das Instrument mit dem Netzschalter auszuschalten.
- Schalten Sie immer das Gerät nach Gebrauch aus.
ANZEIGEWERTE IN ABBILDUNGEN DIESER ANLEITUNG
Die Abbildungen dieser Anleitung enthalten manchmal beispielhafte Angaben, die nicht immer
gleich mit den momentan angezeigten auf Ihrem Instrument übereinstimmen müssen.
HAFTUNGSAUSSCHLUSS
Die in diesem Handbuch enthaltenen Informationen wurden sorgfältig bearbeitet. Wir bemühen uns
ständig Produkte zu verbessern. So können die Produktspezifikationen von der Betriebsanleitung
abweichen. Spezifikationen können jederzeit ohne vorherige Ankündigung geändert werden.
72

EINFÜHRUNG
Willkommen in der High-Tech-Welt elektronischer Musikinstrumente. Ihr CDP 202 bzw. STAGE
CONCERT Digital-Piano haben wir mit neuesten Technologien entwickelt und mit ausgesuchten
Komponenten hergestellt, damit es Ihnen viele Jahre störungsfreie Freude bereiten wird.
Die neue Bluetooth-Audioverbindung ermöglicht es, dass Sie z.B. Ihre Musikdateien vom
Smartphone oder Tablet drahtlos auf das Piano übertragen können. So werden Sie Ihr Instrument als
Musikanlage nutzen können, zu Ihren Lieblingssongs dazu spielen. Sie können sich etwas
vorspielen lassen, zusammenspielen - Ihr Instrument wird zur Musikanlage für die ganze Familie.
Lesen Sie dieses Handbuch sorgfältig und Sie werden das ganze Potential Ihres Instruments
bedienen können.
Das STAGE CONCERT und das CDP202 sind in ihrer
Art einzigartig, verbinden sie doch Features und Klänge
zweier Klangwelten in einem Instrument: Orchestrale
Klänge und Pfeifenorgelklänge.
Beim Einschalten des Instruments sind zunächst die
Klavier- und E-Piano-Klänge eingestellt, sowie eine
breite Auswahl an orchestralen Sounds. Im internen
Speicher befindet sich eine weitere Bibliothek an
Sounds, die sich für nahezu jede Art von Musik eignen.
Auf einen Tastendruck – sobald die PIPE-Taste
gedrückt wird, steht eine schöne Auswahl klassischer
Pfeifenorgelklänge zur Verfügung, vom Pianissimo bis
volles Werk Fortissimo lässt sich jede Art von Kirchenmusik eindrucksvoll spielen. Auch
unterschiedliche Klänge lassen sich bei der großen Tastatur aufteilen und spielen.
POWER ON | EINSCHALTEN
Schalten Sie das Instrument mit der STANDBY ON- Taste ein (das Netzteil sollte
mit dem Instrument und dem Stromnetz verbunden sein). Mit dem Einschalten wird
das Instrument automatisch auf den PIANO 1 Klang eingestellt.
Mit der gleichen Taste schalten Sie das Instrument auch wieder aus.
Wird das eingeschaltete Instrument länger als 30 Minuten nicht benutzt,
schaltet die Standby-Kontrolle das Instrument automatisch aus. Diese AutoStandby-Funktion läßt sich auch ausschalten, indem Sie die erste weiße und
erste schwarze Klaviertaste auf der linken Seite gleichzeitig mit der
STANDBY ON-Taste drücken.
MASTER VOLUME - TONE CONTROL
Der Master-Volume-Regler bestimmt die
Gesamtlautstärke des Instruments. Wenn ein KopfhörerSet angeschlossen ist, wird damit auch die
Kopfhörerlautstärke eingestellt. Mit den Bass und Treble
Reglern kann der Gesamtsound des Instruments
beeinflusst werden – von einem dunklen weichen bis zu
einem hellen präzisen Klang.
73

DEMO SONG
Im eingebauten Speicher sind 36 Demo Songs verfügbar. Machen Sie sich mit dem Potential des
Instruments vertraut, indem Sie die Demosongs abspielen: Aktivieren Sie die DEMO Funktion,
indem Sie gleichzeitig die Tasten SETTINGS und ENTER drücken, die Sie auf der rechten Seite
finden. Wenn Sie beide Tasten drücken, zeigt die Anzeige:
Der Demo Song Nummer 01: Sunset. Benutzen Sie den DATA CONTROL-Regler, um einen der
36 vorhandenen Demosongs auszuwählen. Am Ende eines Demosongs wird automatisch der
nächste Demosong spielen. Die Wiedergabe kann jederzeit beendet werden, indem wiederum die
beiden Tasten SETTINGS und ENTER gleichzeitig gedrückt werden.
SUSTAIN PEDAL
Das STAGE CONCERT besitzt ein mitgeliefertes Sustain-Pedal. Ein 3-Tasten-Pedal ist optional
erhältlich. Das CDP 202 – hat ab Werk bereits ein 3-Tasten-Pedal eingebaut.
STAGE CONCERT - Sustain Pedal.
Verbinden Sie das Sustain-Pedal mit der Pedaleingangsbuchse SUSTAIN/SOSTENUTO.
Wenn Sie das Pedal gedrückt halten und dabei Töne auf Ihrem Instrument spielen, so werden die
Töne gehalten, bis Sie das Pedal wieder loslassen.
SOFT/SOSTENUTO/SUSTAIN PEDAL (optional beim Stage Concert, eingebaut im CDP 202)
Stecken Sie den Mono-Stecker in die Pedaleingangsbuchse SOFT und den Stereo-Stecker in die
Pedaleingangsbuche SUSTAIN/SOSTENUTO.
Das Instrument verfügt damit über folgende Funktionen (Links/Mitte/Rechts):
SOFT: Gibt dem Instrument einen “weicheren'' Klang.
SOSTENUTO: Hält nur den/die Töne, deren Tasten beim Tritt auf das Pedal gedrückt waren.
Die nachfolgenden Töne hält es nicht.
SUSTAIN: Alle Töne die gespielt werden, werden gehalten, solange das Pedal gedrückt
wird.
An weiterer Stelle im Handbuch wird beschrieben, wie Sie die drei Pedale auch nach Wunsch mit
anderen Funktionen belegen können.
74
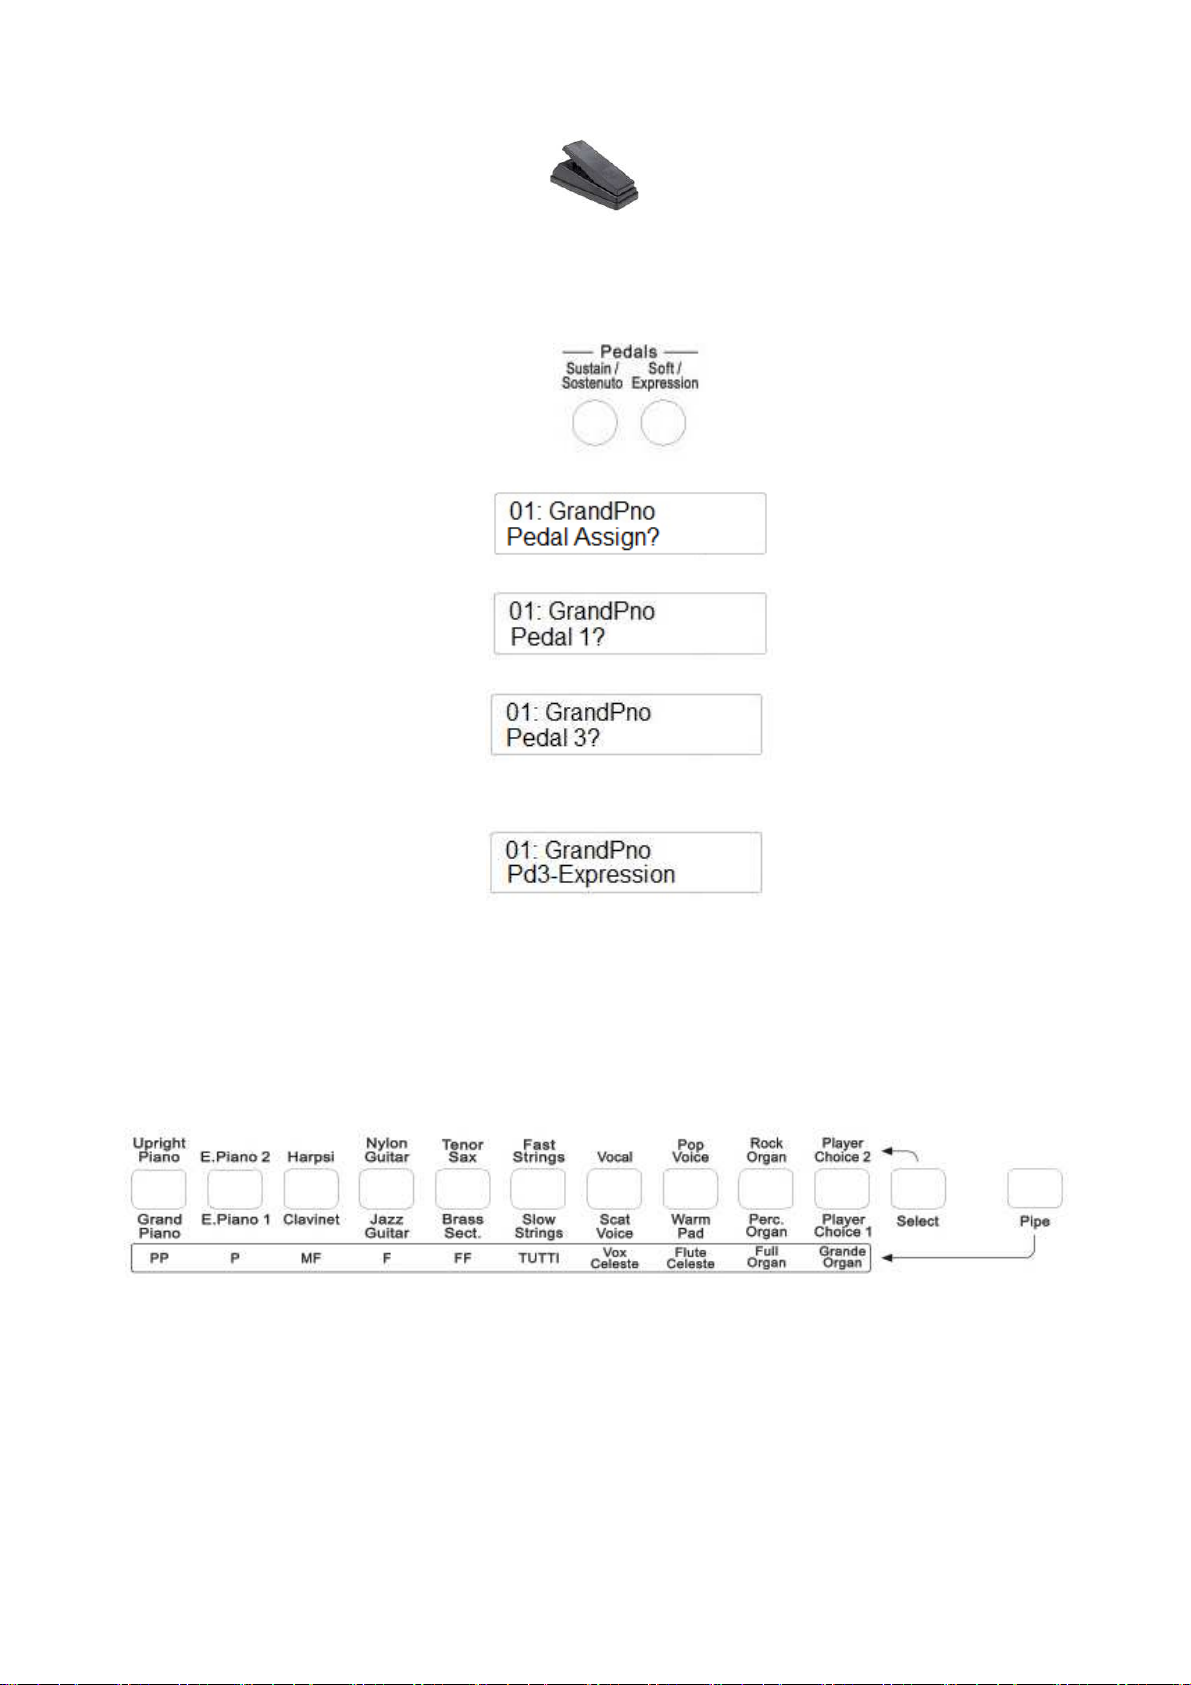
VOLUME PEDAL | EINRICHTUNG
Wenn gewünscht, kann ein Pedal zum Regulieren der Lautstärke angeschlossen werden.
Um die Parameter eines Pedals einzustellen, folgen Sie bitte dieser Abfolge:
- Stecken Sie den Stecker des Pedals in die Expression Buchse an der Rückseite des
Instruments.
- Drücken Sie mehrfach die SETTINGS Taste bis zur Anzeige:
- Drücken Sie die ENTER Taste und die Anzeige wechselt auf:
- Mit dem DATA CONTROL Regler wählen Sie Pedal 3:
- Drücken Sie wiederum ENTER. So bestätigen Sie die Auswahl und wählen dann mit dem
Data Control Regler Pd3-Expression:
Das Lautstärkepedal kann nun mit dem Instrument verwendet und die Lautstärke auch während des
Spiels variiert werden.
KLANG AUSWAHLBEREICH
Sie können mit dem Stage Concert und dem CDP 202 zwei Klangwelten aufrufen: typische
Digitalpiano-Sounds und eine sorgfältige Auswahl an Pfeifenorgel-Stimmen.
75

DIE DIGITALPIANO AUSWAHL
Die Namen der verschiedenen Klänge finden Sie oberhalb und unterhalb der Tasten beschriftet.
Wenn Sie einen Klang auswählen wollen, der unter den Tasten der Klangauswahl steht,
vergewissern Sie sich, dass die SELECT Taste nicht leuchtet, also auf AUS steht.
Wenn Sie einen Klang auswählen wollen, der über den Tasten der Klangauswahl steht,
vergewissern Sie sich, dass die SELECT Taste leuchtet, also auf EIN steht.
Drücken Sie z.B. die Taste GRAND PIANO und achten Sie darauf, dass Select Taste nicht leuchtet.
Wollen Sie HARPSI auswählen, drücken Sie zuerst die SELECT Taste, dann die HARPSI Taste.
Sie können auch zwei Klänge gleichzeitig spielen, z.B. GRANDPIANO und SLOW STRINGS.
-
-
Wählen Sie GRAND PIANO und halten Sie die entsprechende Taste gedrückt.
Während Sie die GRAND PIANO Taste gedrückt halten, drücken Sie die SLOW STRINGS
Taste.
-
Die Anzeige wird für wenige Sekunden SLOW STRINGS anzeigen und dann zu dem Klang
zurückkehren, der zuerst ausgewählt wurde, in diesem Fall also GRAND PIANO.
-
Beide Klänge sind nun ausgewählt und können gleichzeitig zusammen gespielt werden.
Es ist natürlich ebenso möglich, zwei Klänge zu spielen, die aus oberer und unterer Reihe
ausgewählt werden, z.B. GRAND PIANO und VOCAL.
- Wählen Sie GRAND PIANO und halten Sie die entsprechende Taste gedrückt.
- Während Sie die GRAND PIANO Taste gedrückt halten, drücken Sie SELECT-Taste, um
die obere Reihe auszuwählen.
- Lassen Sie nun die SELECT-Taste los und drücken die VOCAL-Taste.
76

-
Die Anzeige wird für wenige Sekunden VOCAL anzeigen und dann zu dem Klang
zurückkehren, der zuerst ausgewählt wurde, in diesem Fall also GRAND PIANO.
-
Beide Klänge sind nun ausgewählt und können gleichzeitig zusammen gespielt werden.
Jetzt können Sie den beiden Klängen unterschiedliche Lautstärke-Anteile zuweisen, sie mit den (/\)
UP und (\/) DOWN TASTEN abmischen. Versuchen sie unterschiedliche Lautstärke-Einstellungen
wie in der nachstehenden Tabelle gezeigt:
4 - 1 4 – 2 4 - 3 4 – 4 3 - 4 2 - 4 1 - 4
PLAYER CHOICE
Mit der PLAYER CHOICE Taste können Sie bis zu zwei selbstgewählte Klänge aus der internen
Klangbibliothek auf die Taste legen.
Um PLAYER CHOICE 1 auszuwählen, drücken Sie einfach auf die Taste.
Um PLAYER CHOICE 2 auszuwählen, drücken Sie zuerst die SELECT Taste.
Die Standardeinstellung für PLAYER CHOICE 1 ist der Klang Vibes (Nr. 13)
Die Standardeinstellung für PLAYER CHOICE 2 ist der Klang Accordion (Nr. 32).
Wenn Sie einen neuen Klang für PLAYER CHOICE 1 auswählen wollen:
-
-
Drücken Sie die PLAYER CHOICE 1 Taste.
Benutzen Sie den Data Control Regler, um einen der 142 verfügbaren Sounds der internen
Klangbibliothek auszuwählen.
-
Die PLAYER CHOICE 1 LED blinkt und zeigt damit an, dass Sie einen neuen Sound
auswählen.
-
-
Der neue Sound wird auf die Taste gelegt.
Damit diese Auswahl dauerhaft auch nach dem Ausschalten des Instruments erhalten bleibt,
muss die Einstellung in einer Memory Registrierung gespeichert werden (siehe an anderer
Stelle im Handbuch).
-
Beim Ausschalten wird Ihre Auswahl dann dauerhaft gespeichert bis die Einstellung
geändert oder durch eine neue Speicherbank ersetzt wird.
77

DIE PFEIFENORGEL AUSWAHL
Um die Pfeifenorgel-Klänge auszuwählen, drücken Sie die PIPE Taste rechts.
Ist die PIPE Taste gedrückt, stehen alle Pfeifenorgelklänge zur Verfügung. Sie können sie einzeln
auswählen oder auch mit einem anderen Pfeifenorgelklang zusammenlegen (layern).
Sie können auch eine Pfeifenorgelstimme zusammen mit einem Digitalpiano-Klang auf die gleiche
Art und Weise wie zuvor beschrieben zusammenlegen.
Wenn Sie z.B. FULL ORGAN mit dem SLOW STRINGS Sound mischen wollen – also Klänge aus
der unteren Reihe -
Drücken Sie die FULL ORGAN Taste:
Während Sie die FULL ORGAN Taste gedrückt halten, schalten Sie die PIPE Taste aus und
drücken danach die SLOW STRINGS Taste.
Beide Sounds sind jetzt ausgewählt und können gleichzeitig gespielt werden.
Wenn Sie z.B. FLUTE CELESTE mit VOCAL mischen wollen – einem Sound aus der oberen
Reihe:
Drücken Sie die FLUTE CELESTE Taste und während Sie diese gedrückt halten, drücken Sie
gleichzeitig auch die SELECT Taste, um an die obere Reihe zu gelangen:
.
78

Halten Sie die FLUTE CELESTE Taste weiterhin gedrückt, lassen aber die Select Taste los und
drücken nunmehr die VOCAL Taste:
Beide Sounds sind jetzt ausgewählt und können gleichzeitig gespielt werden.
SPLIT
Wird die SPLIT Taste gedrückt (die LED beginnt zu blinken), teilt das Instrument die Tastatur in
zwei Bereiche und ein anderer Klang wird automatisch dem linken Bereich der Tastatur
zugewiesen. Der SLOW STRINGS Klang wird automatisch gewählt und die Anzeige wird so
aussehen:
Kurz danach wird die LED der SPLIT-Taste aufhören zu blinken und die Anzeige sieht so aus:
Das Instrument ist nun im SPLIT Modus mit den Klängen SLOW STRINGS im linken Bereich
und GRAND PIANO im rechten Bereich.
Um einen anderen Klang auszuwählen, drücken Sie die SPLIT Taste (es blinkt die LED) und
wählen einen neuen Klang von den verfügbaren Tasten aus.
Warten Sie ein paar Sekunden bis die SPLIT –Tasten–LED aufhört zu blinken.
Die Klangauswahl ist nunmehr ausgewählt und temporär gespeichert.
Wenn Sie diese Split-Auswahl dauerhaft abspeichern wollen, auch wenn das Instrument
ausgeschaltet wurde, wird es notwendig, dass Sie diese Einstellung in einer Memory Registration
(weiter hinten im Handbuch beschrieben) speichern.
Sie haben also 20 Klänge auf den Tasten verfügbar und genauso können Sie auch PLAYER
CHOICE 1 und PLAYER CHOICE 2 Klänge auswählen, um einen der 142 Klänge der internen
Soundbibliothek einzusetzen. Siehe die Auflistung am Ende des Handbuchs.
79

SPLITPUNKT
Wenn nötig, können Sie den Splitpunkt verändern, also die Taste bestimmen, wo der linke Bereich
und der rechte Bereich geteilt werden.
- Drücken Sie die SPLIT Taste für mehrere Sekunden, bis die Anzeige wechselt und so
aussieht:
- Die Anzeige verweist mit der Zahl 55 auf die MIDI Notennummer.
Um den Splitpunkt zu ändern, gibt es zwei Möglichkeiten:
a) Drücken Sie die SPLIT Taste und verwenden den DATA CONTROL Regler, um einen
anderen Wert zu setzen
b) Drücken und halten Sie die SPLIT Taste und drücken Sie eine Taste auf der Klaviatur.
Sobald Sie die SPLIT Taste loslassen, geht die Anzeige wieder zurück zur Normalansicht.
DIGITAL REVERB
Die DIGITAL REVERB Effekte erweitern die Klänge Ihres Instruments um eine räumliche
Dimension. Das Instrument besitzt 10 unterschiedliche Nachhall-Typen:
1
6
Hall 1
Stage 1
2
7
Hall 2
Stage 2
3
8
Room 1
Plate
4
9
Room 2
Delay
10
5
Room 3
Echo
Wird der REVERB Effekt eingeschaltet, bleibt er auch bei einem Klangwechsel während des Spiels
erhalten. Es ist möglich, dass für jeden Klang des Instruments auch ein gewünschter REVERB
Effekt ausgewählt wird, der bis zum Ausschalten des Instruments erhalten bleibt.
Kurz nachdem REVERB eingeschaltet wird, kann der gewünschte Effekt mit dem DATA
CONTROL Regler ausgewählt werden.
CHORUS EFFECT
Dieser gibt allen Klängen einen volleren, abgerundeten und wärmeren Klang.
Beim Einschalten des Instruments wird die CHORUS Taste immer ausgeschaltet sein.
Das Instrument besitzt 13 unterschiedliche CHORUS-Typen:
1
4
7
10
13
Chorus 1
Chorus 4
Short Delay
Flanger 3
Celeste 3
2
5
8
11
Chorus 2
Feedback
Short Delay Feedback
Celeste 1
3
6
9
12
Chorus 3
Flanger 1
Flanger 2
Celeste 2
80
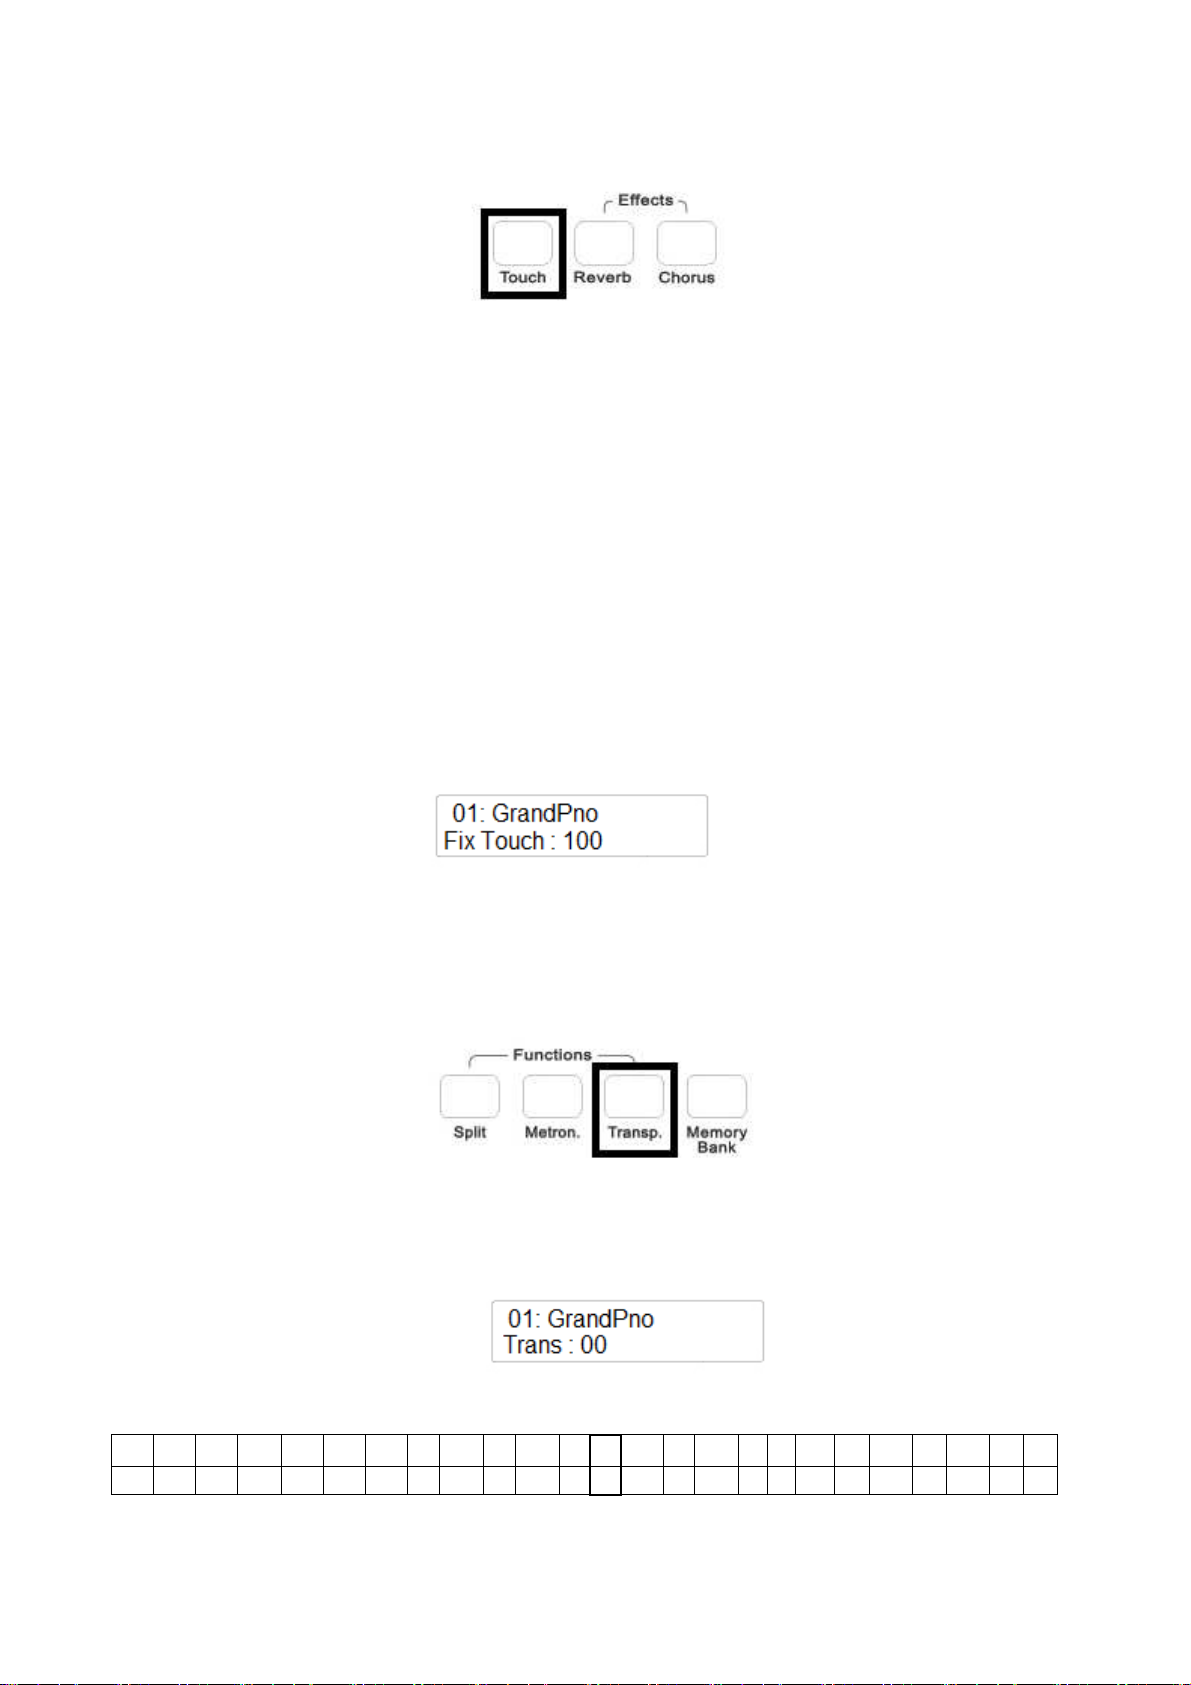
Kurz nachdem CHORUS eingeschaltet wird, kann der gewünschte Effekt mit dem Data Control
Regler ausgewählt werden.
TOUCH SENSITIVITY | ANSCHLAGDYNAMIK
Wie bei einem akustischen Klavier hat Ihr Instrument eine 88-Tasten Klaviatur mit
Anschlagdynamik. Das heißt, die Lautstärke des Audiosignals ist abhängig von der
Geschwindigkeit, mit der eine Taste gedrückt wird. Spielen Sie mit einem langsamen Anschlag,
bekommen Sie einen leiseren Ton, spielen Sie mit hartem Anschlag wird der Ton lauter. Die
TOUCH SENSE Taste bietet Ihnen 3 unterschiedliche Anschlagsdynamik-Kurven:
1 - HARD Diese Einstellung erfordert einen harten Anschlag der Tasten, um maximale
Lautstärke zu erzielen.
2 - NORMAL Diese Einstellung entspricht dem üblichen Tastaturanschlagsverhalten.
3 - SOFT Diese Einstellung ermöglicht maximale Lautstärke bei leichtem Anschlag.
Wählen Sie Ihr bevorzugtes Anschlagdynamikverhalten, indem Sie die TOUCH Taste drücken und
kurz darauf mit dem DATA CONTROL Regler den entsprechenden Wert eingeben. Beim
Einschalten des Instruments ist die Anschlagdynamik automatisch auf NORMAL gestellt.
Wird die TOUCH Taste kurz hintereinander gedrückt, können Sie die Anschlagdynamik auch auf
einen fixen Festwert einstellen.
-
Mit dem DATA CONTROL Regler können Sie den Wert von 0 (kein Sound) bis 127
(Maximallautstärke) einstellen.
TRANSPONIEREN
Sie können die natürliche Transponierung (C) Ihres Instruments nach oben oder unten verändern.
- Drücken Sie die TRANSPOSE Taste im Bereich FUNCTIONS.
- Die TRANSPOSE Taste beginnt zu blinken und es erscheint die Anzeige:
Mit dem DATA CONTROL Regler können Sie das Instrument anhand folgender Tabelle bis zu
einer Oktave auf und ab transponieren.
C C# D D# E F F# G G# A A# B C C# D D# E F F# G G# A A# B C
-12 -11 -10 -9 -8 -7 -6 -5 -4 -3 -2 -1 0 1 2 3 4 5 6 7 8 9 10 11 12
Beim Neueinschalten kehrt das Instrument automatisch wieder in seine Grundstimmung zurück.
81

PITCH | DIE FEINSTIMMUNG
In den Fällen, wo das Transponieren in Halbtonschritten nicht ausreicht und eine noch genauere
Feinstimmung erforderlich wird, passen Sie die Tonhöhe wie folgt an:
- Drücken Sie die TRANSPOSE Taste bis die Anzeige wie folgt aussieht:
- Mit dem DATA CONTROL Regler können Sie die Stimmung um 63 cent aufwärts
- und um 64 cent abwärts regeln.
Beim Neueinschalten kehrt das Instrument automatisch wieder in seine Grundstimmung zurück.
METRONOM
Um das Metronom zu verwenden, drücken Sie die METRONOM TASTE und Sie hören einen
gepulsten Metronomschlag durch die Lautsprecher. Der Beginn eines Taktes wird durch einen
höheren Klang verdeutlicht. Sie können das Tempo mit den (/\) UP und (\/) DOWN TASTEN
verändern. Sie stoppen das Metronom, indem Sie die METRONOM-Taste erneut betätigen.
Sie haben die Auswahl von bis zu 12 Einstellungen – halten Sie die METRONOM Taste gedrückt
und mit dem DATA CONTROL Regler können Sie ein passendes Metronom auswählen:
Das Metronom startet mit einer ausgewählten Taktart. Sie haben verschiedene Taktarten zur
Auswahl: Mono Click (1/4), 2/4, 3/4, 4/4, 5/4, 6/4, 3/8, 6/8, 7/8, 9/8, 12/8, 2/2.
MEMORY BANK – Speichern von Registrierungen
Man kann bis zu 20 Registrierungen im Instrument speichern und diese Einstellungen nach
Belieben wieder aufrufen. Diese Einstellungen werden auf den SOUND-TASTEN abgelegt und
wiederum abgerufen, wenn die MEMORY BANK Taste eingeschaltet wird.
Diese Einstellungen bleiben auch nach dem Ausschalten des Instruments erhalten. Wenn allerdings
ein RESET am Instrument durchgeführt wird, gehen auch diese Einstellungen verloren und die
Werkseinstellungen werden wieder aufgerufen.
Jede Memory Bank (Speicherbank) kann bis zu 20 Einstellungen speichern - diese Memory Banks
können auf einem USB Datenträger beliebig oft gespeichert werden.
82
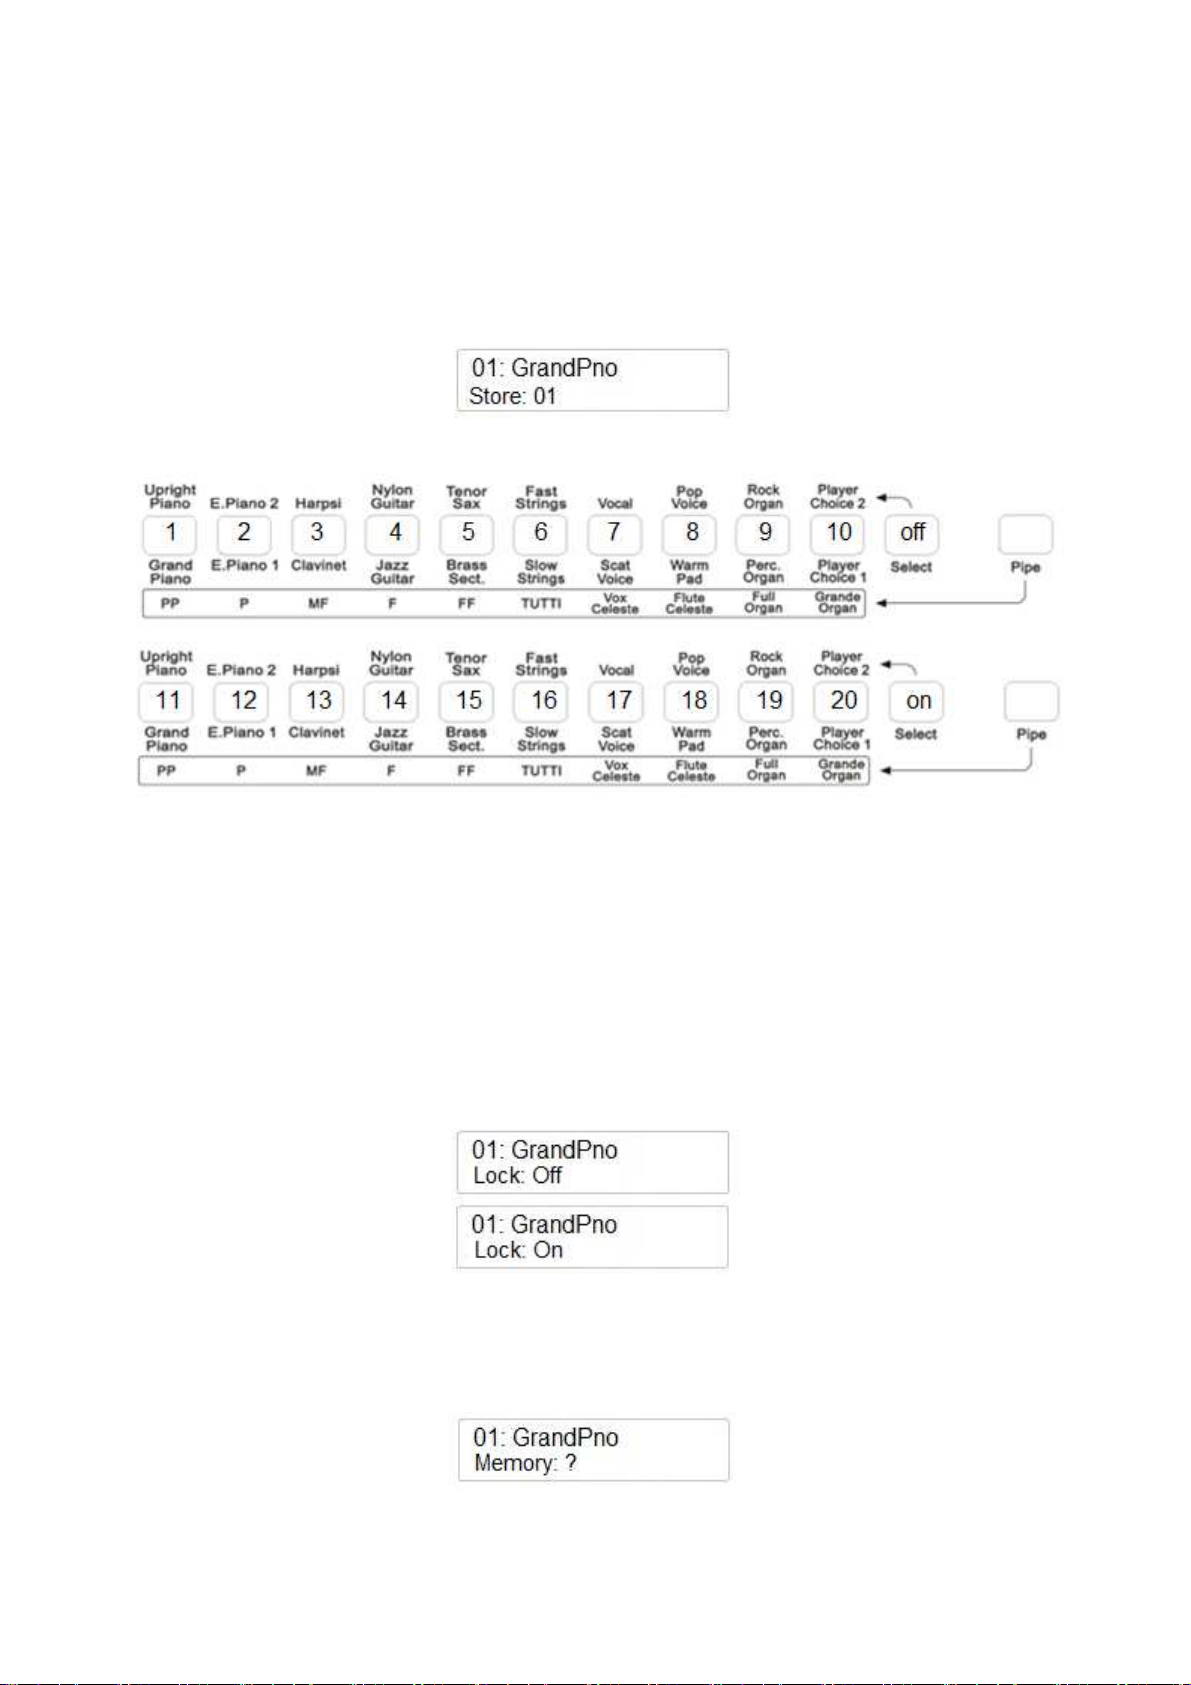
REGISTRIERUNGEN SPEICHERN
Wählen Sie Ihre Lieblingseinstellungen aus, mit Layer und/oder Split-Einstellungen, oder auch mit
z.B. dem gewünschten Effekt. Wenn alles wie gewünscht eingestellt ist, folgen Sie den folgenden
Schritten:
-
-
Drücken und halten Sie die MEMORY BANK Taste.
Drücken Sie zusätzlich für mehrere Sekunden die SOUND-TASTE auf der Sie die
Registrierung ablegen wollen. Die Anzeige wird dann beispielsweise zeigen:
Die SOUND-TASTEN speichern 20 Registrierungen – davon 10 mit der SELECT Taste
eingeschaltet und 10 mit der SELECT Taste ausgeschaltet.
Sobald Sie Ihre eigenen Einstellungen vorgenommen haben, schalten Sie nur noch die MEMORY
BANK Taste ein und die gewünschte Registrierung auf der jeweiligen SOUND-TASTE auswählen.
LOCK ON/OFF
Es kann sehr hilfreich sein, die LOCK-Funktion zu nutzen. Damit können Sie verschiedene
Einstellungen blockieren und festmachen, wie z.B. die linke Stimme, das Tempo im
Wiedergabemodus – unabhängig von den unterschiedlichen Registrierungen der MEMORY
BANK. Um LOCK ON bzw. OFF zu schalten, drücken Sie die MEMORY BANK Taste und
benutzen die /\) UP und (\/) DOWN Tasten oder den DATA CONTROL Regler.
SPEICHERN VON REGISTRIERUNGEN AUF USB-DATENTRÄGER
Zuerst stecken Sie einen USB-Datenträger in die USB-Buchse auf dem Bedienfeld.
Drücken Sie die SETTINGS Taste mehrfach bis die Anzeige wie folgt aussieht:
Wählen Sie diese Funktion aus, indem Sie die ENTER Taste drücken:
83
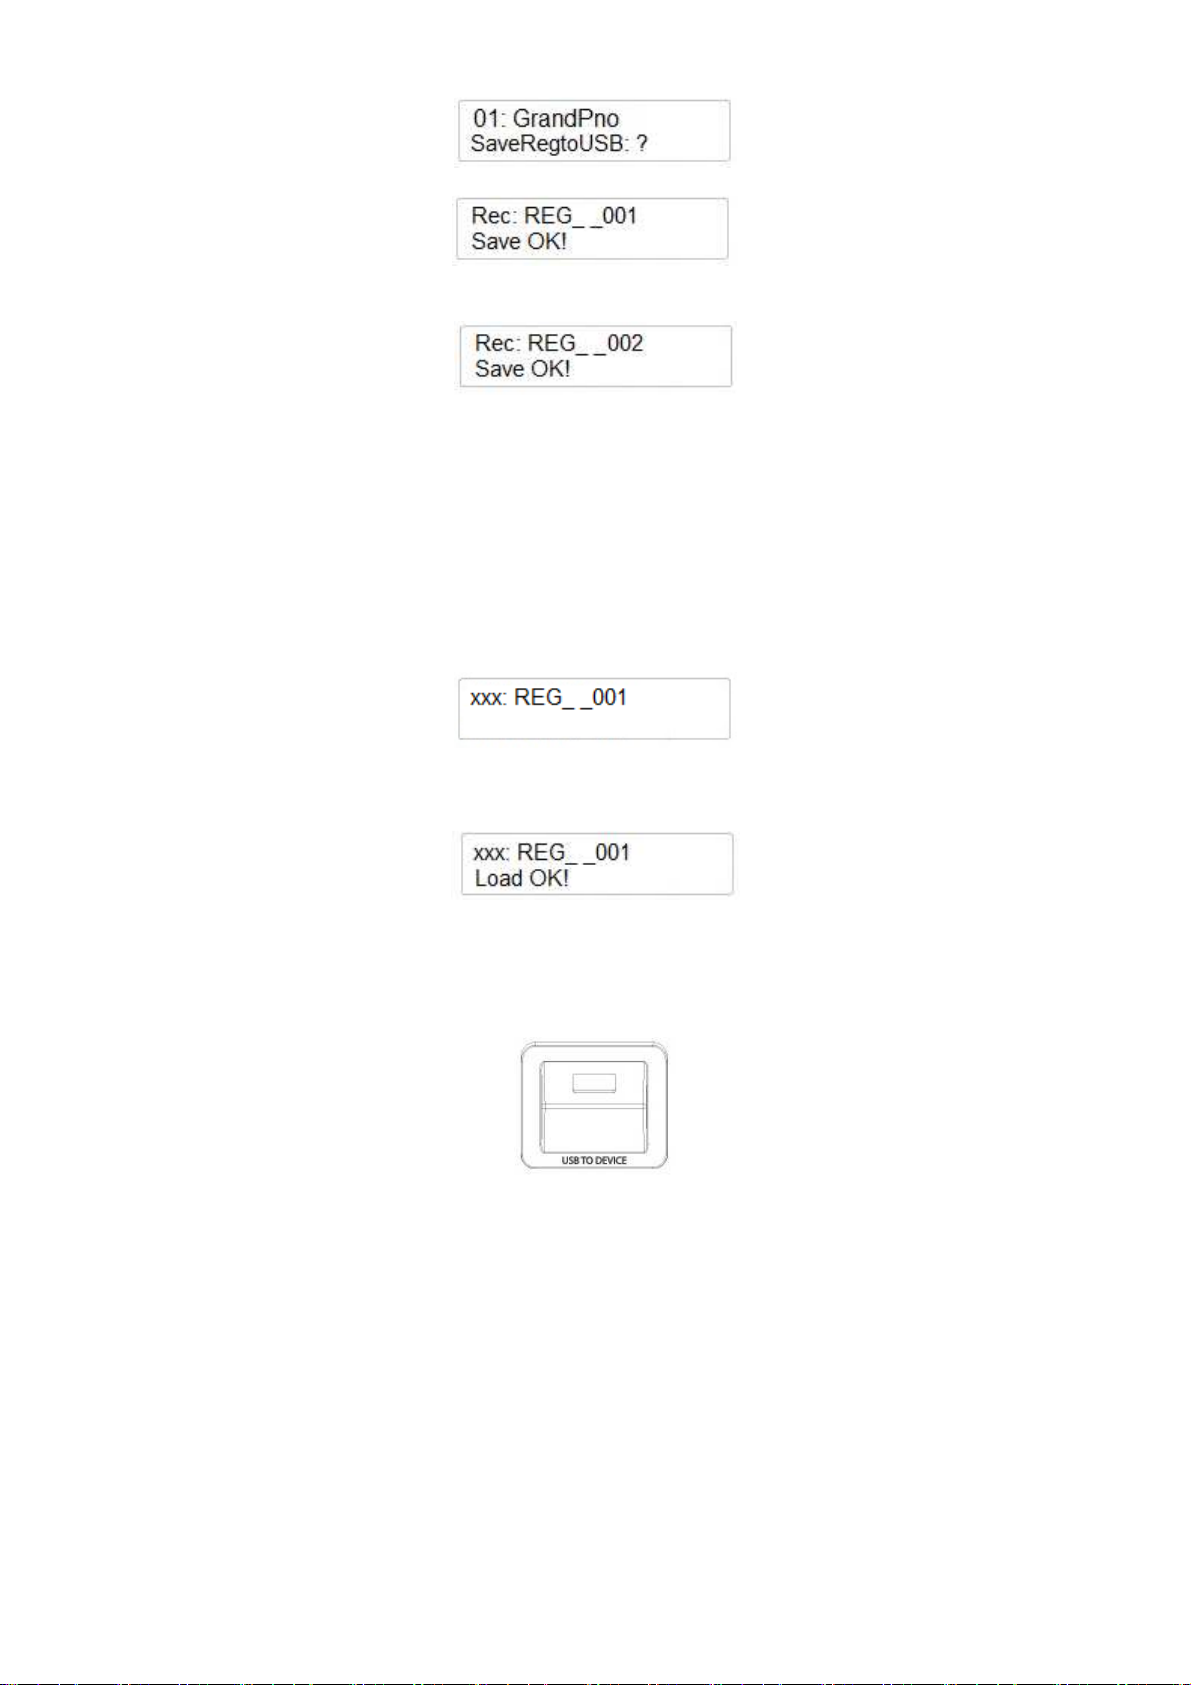
Drücken Sie wiederum ENTER zum Speichern und die Anzeige antwortet mit:
Wenn Sie eine weitere Memory Bank mit 20 Registrierungen speichern, wird das Instrument diese
wie folgt speichern:
Sie können so viele Memory Banks davon speichern, wie notwendig werden.
LADEN VON REGISTRIERUNGEN VOM USB-DATENTRÄGER
Um wiederum Registrierungen einer MEMORY BANK in das Instrument zu laden, stecken Sie
zunächst den USB-Datenträger in die USB-Buchse und warten einen Moment, bis die FILE Taste
automatisch auf ON geschaltet ist. Mit dem DATA CONTROL Regler können Sie nun die
Registrierungsdatei REG_ _ 001 oder eine andere auffinden und aufrufen.
Drücken Sie die PLAY Taste, um das Laden zu bestätigen und die Anzeige wechselt auf:
Nun ist diese MEMORY BANK mit 20 Registrierungen in den internen Speicher geladen.
USB DISK
Beim Einsetzen eines USB-Laufwerks in die USB-Buchse werden Sie feststellen, dass die Anzeige
sofort die erste MIDI Datei im vorhandenen Verzeichnis anzeigen wird.
Es ist möglich, verschiedene Arten von Dateien vom USB-Datenträger zu laden:
1. Standard MIDI File-Songs
2. Bedienfeld-Registrierungen
Die Anzeige zeigt Dateien in alphabetischer Reihenfolge an, oder Zahlen die sich auf die Dateien
beziehen. Bitte beachten Sie - im PLAY SONG Modus werden mit dem DATA CONTROL Regler
nur Songdateien angezeigt.
84
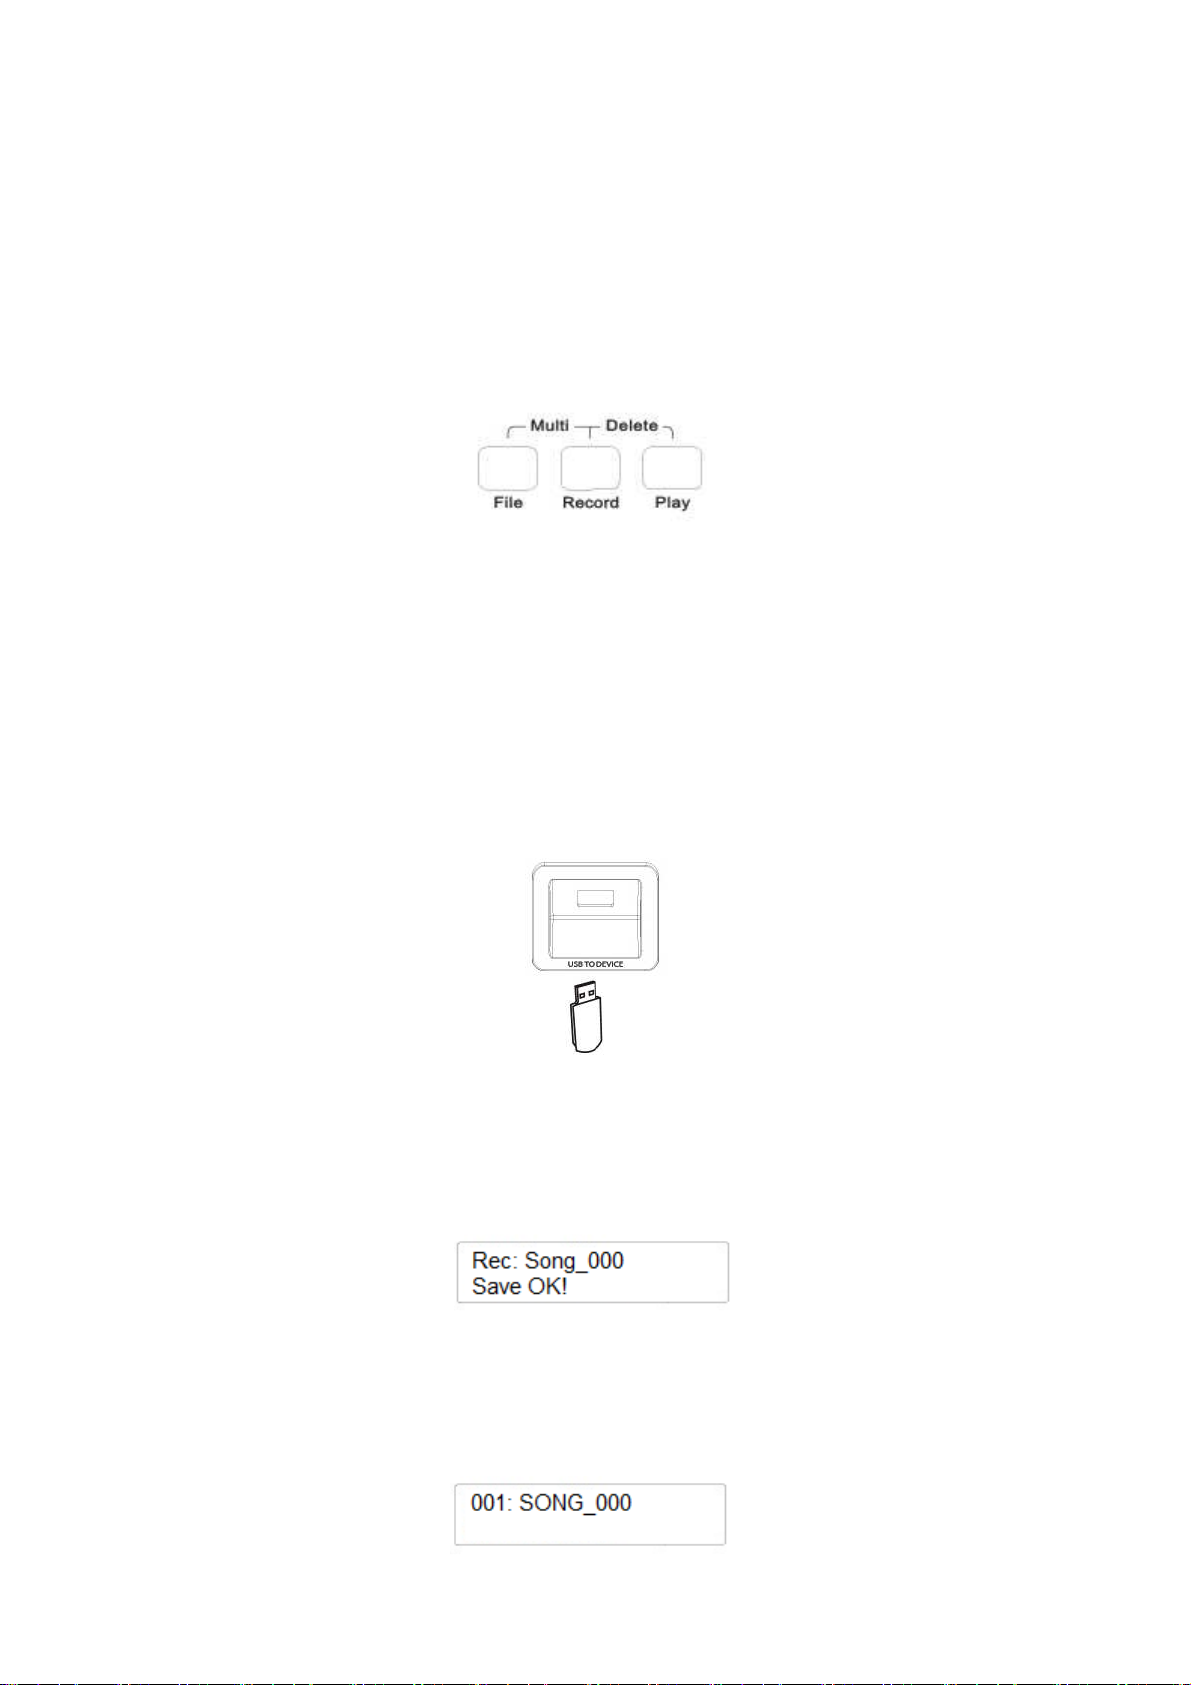
WIEDERGABE MIDI DATEIEN
Um MIDI-Dateien abzuspielen, stecken Sie einen USB-Datenträger ein und in der Anzeige wird die
erste Datei sichtbar. Wählen Sie mit dem DATA CONTROL Regler die gewünschte Datei aus.
Starten Sie die Wiedergabe mit der PLAY Taste, drücken Sie wiederum die PLAY Taste um die
Wiedergabe anzuhalten.
SONG RECORDER – SEQUENZER
Das Instrument kann Songs direkt auf den USB-Datenträger aufzeichnen. Alle Noteninformationen
und Daten werden automatisch in einer Standard MIDI Datei gespeichert.
Es ist möglich, in zwei verschiedene Arten zu speichern:
-
-
Einzelspuraufnahme - Single Track
Mehrspuraufnahme - Multi Track
EINZELSPURAUFNAHME
Stecken Sie einen USB-Datenträger in die USB-Buchse auf dem Bedienfeld. (in der Annahme, dass
der Datenträger noch leer ist):
- Drücken Sie die RECORD Taste, um mit der Aufnahme zu beginnen. Die LED leuchtet.
- Sie können jetzt mit oder ohne Metronom und in der gewünschten Taktart starten (siehe
Abschnitt Metronom). Sobald Sie bereit sind, spielen Sie Ihre Musik ein – der Sequenzer
startet, sobald Sie die erste Taste gespielt haben.
- Zum Ende der Aufnahme drücken Sie die RECORD Taste erneut und Ihre Aufnahme wird
gespeichert.
Das Instrument speichert automatisch mit den Namen “xxxSONG_yyy”.
HINWEIS – xxx ist die Nummer des Songs auf dem USB-Datenträger, yyy die Nummer, die die
neue Aufnahme identifiziert.
-
Die Anzeige sieht dann wie folgt aus:
85

MEHRSPURAUFNAHME
-
-
-
Stecken Sie einen USB-Datenträger in die USB-Buchse auf dem Bedienfeld.
Drücken Sie die RECORD Taste, um mit der Aufnahme zu beginnen.
Zum Ende der Aufnahme drücken Sie die RECORD Taste erneut und Ihre Aufnahme wird
gespeichert mit SONG_000
-
Jetzt können Sie eine weitere Spur hinzufügen. Drücken Sie die FILE Taste und die
RECORD Taste, um in den Mehrspuraufnahme-Modus zu gelangen.
-
Die Anzeige sieht dann wie folgt aus:
Das Metronom startet mit dem ersten Takt und sobald die erste Spur wiedergegeben wird,
wechselt die Anzeige und Sie können mit der Aufnahme beginnen, die Nummer 001 wird
automatisch zugewiesen.
Die Anzeige sieht dann wie folgt aus:
Die beiden Spuren werden als SONG_001 gespeichert.
Weitere Spuren können so schrittweise hinzugefügt werden. Bis zu 5 Spuren können so
gespeichert werden.
HINWEIS – Wenn Sie eine Aufnahme mit Haupt- und Doppelklang im Layer Modus speichern
wollen und diese in einer Mehrspuraufnahme in einer Datei unterbringen wollen, dann drücken
Sie einfach die RECORD Taste und starten die Aufnahme, wie bei der Einzelspuraufnahme.
Das Instrument wird die Datei automatisch richtig speichern und folgende Spurzuweisung
vornehmen:
Track 1……… Main Voice
Track 2……… Split Voice
Track 3……… Dual Voice
86

BLUETOOTH AUDIO VERBINDUNG
Sie können jetzt Ihr Instrument auch zur Musikwiedergabe Ihrer Bluetoothfähigen Audiogeräte, wie z.B. alle gängigen Smartphone und Tablet-Computer
verwenden.
Dazu stecken Sie den optionalen BT1-Receiver in die Bluetooth-Buchse an der
Rückseite Ihres Instruments. Folgen Sie den Anweisungen zum Verbinden von
Audiogeräten Ihres Smartphones oder Tablets (bzw. jedes andere Bluetoothfähige Gerät), und Sie gewinnen eine ausgezeichnete Musikwiedergabe über Ihr
Digital Piano. Nutzen Sie diese Möglichkeit, um z.B. zu Ihrer Lieblingsmusik
dazu zu spielen.
- Stecken Sie den BT1-Receiver in die vorgesehene Buchse an der Rückseite Ihres
Instruments.
- Sobald der Receiver empfangsbereit ist, wird seine blaue LED für etwa 5 Sekunden
schneller blinken. Die LED wird etwas langsamer blinken, sobald der BT1 sich mit Ihrem
Bluetooth-Gerät verbunden hat.
- Finden Sie nun den BT1 auf Ihrem Bluetooth-Gerät und wählen es aus, damit die
Verbindung hergestellt werden kann.
- Sobald die Verbindung hergestellt ist, beendet die blaue LED ihr Blinken und zeigt an, dass
die beiden Geräte erfolgreich verbunden sind.
- Jetzt können Sie Ihre Audiodateien Ihres Bluetooth-Geräts am Instrument hören. Viel Spaß!
87
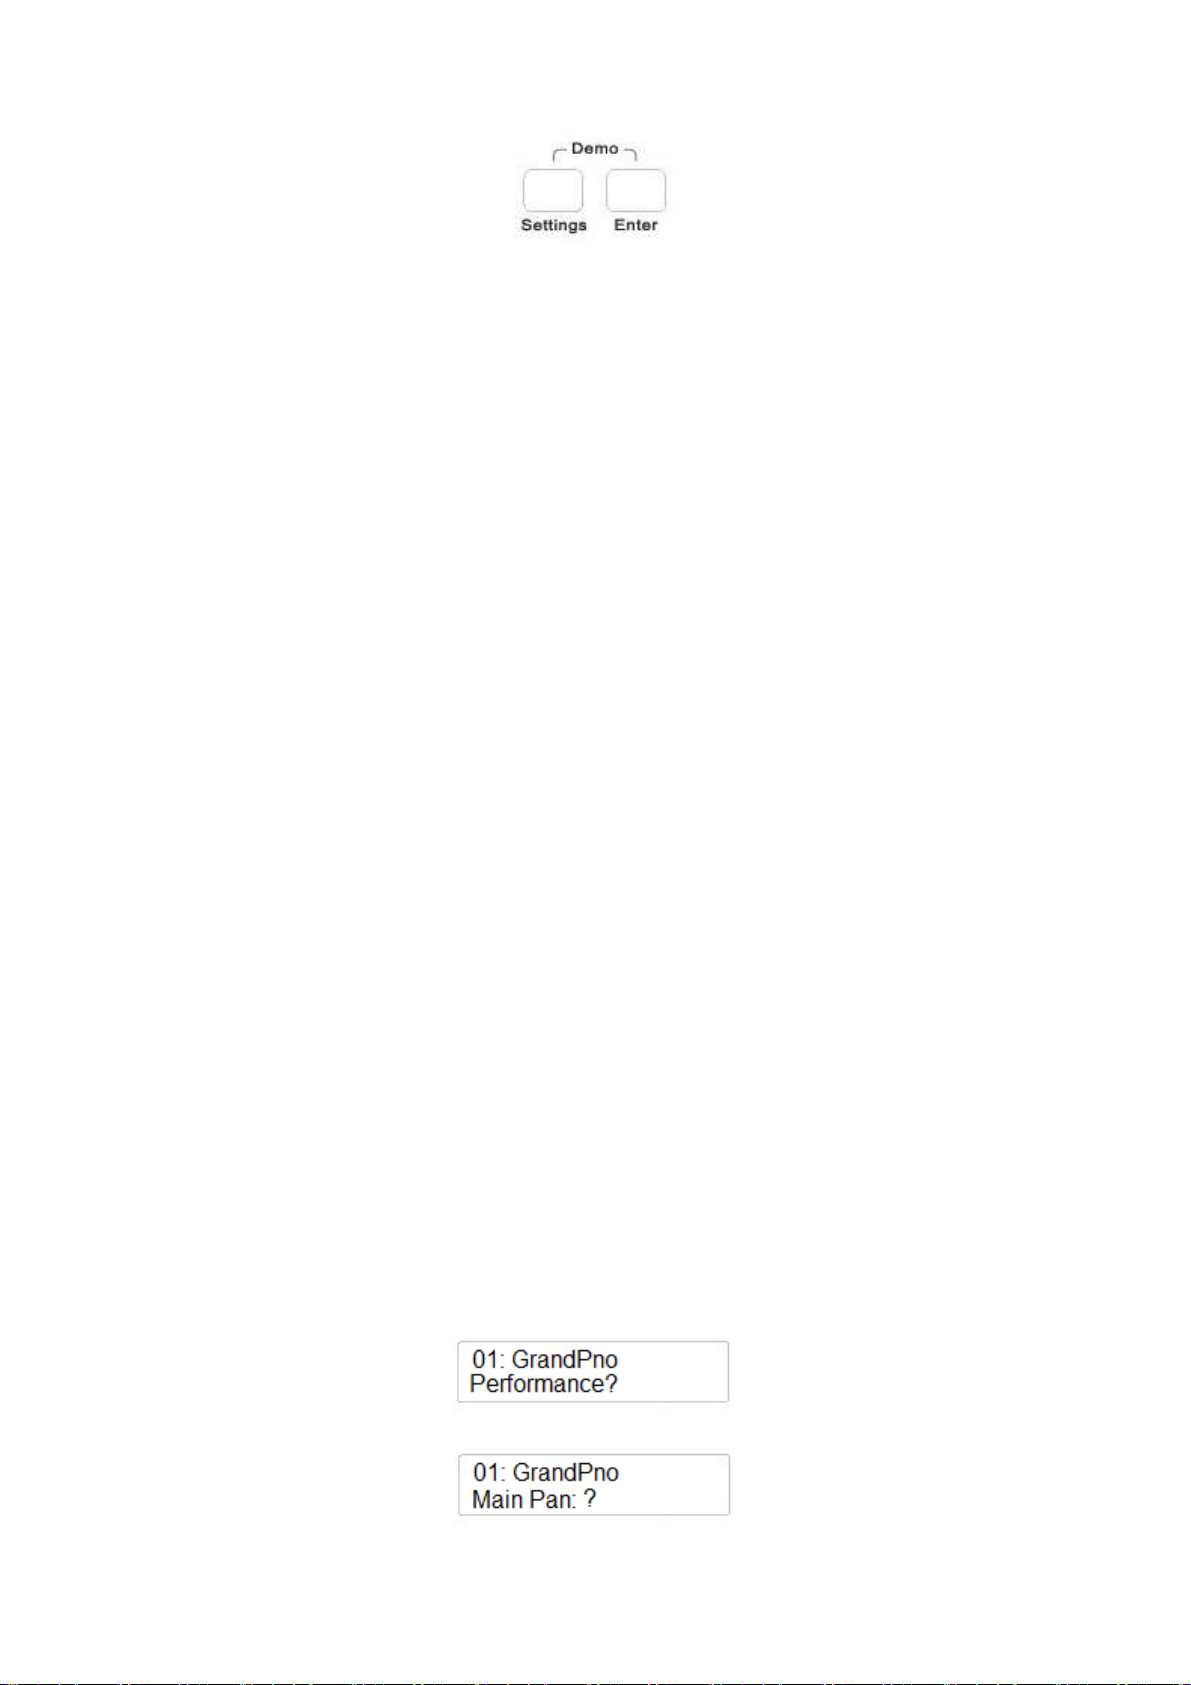
EINSTELLUNGEN UND WEITERE FUNKTIONEN
Mit der SETTINGS Taste und der ENTER Taste haben Sie Zugang zu weiteren eingebauten
Features des Instruments.
Drücken Sie mehrfach die SETTINGS Taste und Sie sehen die vielen verschiedenen
Einstellungsseiten:
-
-
-
-
-
-
Mit der ENTER Taste kommen Sie in den ersten Teil der Einstellungsseiten:
PERFORMANCE
Hier sehen Sie die komplette Liste aller Parameter, die über die (/\) UP und (\/) Down Tasten oder
über den DATA CONTROL Regler eingestellt werden können:
-
-
-
-
-
-
-
-
-
-
-
-
-
-
MAIN VOICE PAN
Drücken Sie die SETTINGS Taste und die Anzeige sieht wie folgt aus:
Performance: ?
Effect: ?
Pedal Assign: ?
USB Function: ?
Memory: ?
Other Function: ?
Main Voice Pan: ?
Split Voice Pan: ?
Dual Voice Pan: ?
Main Voice Volume: ?
Split Voice Volume: ?
Dual Voice Volume: ?
Main Voice Octave: ?
Split Voice Octave: ?
Dual Voice Octave: ?
Arpeggio Type: ?
Twin Feature: ?
Midi In: ?
Midi Out: ?
Local On/Off: ?
Drücken Sie die ENTER Taste und die Anzeige sieht wie folgt aus:
88

Es ist möglich den PAN-Wert des Hauptklangs anzupassen. Sie können den Klang mehr links oder
rechts im Lautsprechersystem positionieren. Drücken Sie wiederum die ENTER Taste, um die Main
Pan Werte wenn nötig anzupassen:
Mit dem DATA CONTROL Regler können Sie den Wert zwischen -64 und + 63 einstellen, der
Wert 00 entspricht einer mittigen Einstellung.
SPLIT VOICE PAN
Gehen Sie wiederum auf die PERFORMANCE Seite mit der SETTINGS Taste und drücken auf
ENTER. Mit dem DATA CONTROL Regler wählen Sie die nächste Seite aus:
Sie können die Balance des Split-Klangs beeinflussen. Sie können den Klang mehr links oder
rechts im Lautsprechersystem positionieren.
Drücken Sie wiederum die ENTER Taste, um die Split Pan Werte wenn nötig anzupassen:
Mit dem DATA CONTROL Regler können Sie den Wert zwischen -64 und + 63 einstellen, der
Wert 00 entspricht einer mittigen Einstellung.
DUAL VOICE PAN
Gehen Sie wiederum auf die PERFORMANCE Seite mit der SETTINGS Taste und drücken auf
ENTER. Mit dem DATA CONTROL Regler wählen Sie die nächste Seite aus:
Sie können die Balance des Dual-Layer Klangs beeinflussen. Sie können den Klang mehr links
oder rechts im Lautsprechersystem positionieren.
Drücken Sie wiederum die ENTER Taste, um die Dual Pan Werte wenn nötig anzupassen:
Mit dem DATA CONTROL Regler können Sie den Wert zwischen -64 und + 63 einstellen, der
Wert 00 entspricht einer mittigen Einstellung.
MAIN VOICE VOLUME – LAUTSTÄRKE DES HAUPTKLANGS
Gehen Sie wiederum auf die PERFORMANCE Seite mit der SETTINGS Taste und drücken auf
ENTER. Mit dem DATA CONTROL Regler wählen Sie die nächste Seite aus:
Hier können Sie die Lautstärke des Hauptklangs festlegen.
Drücken Sie wiederum die ENTER Taste, um die Lautstärke-Werte wenn nötig anzupassen:
89

Mit dem DATA CONTROL Regler können Sie den Lautstärke-Wert zwischen maximal 127 und
minimal 00 einstellen.
SPLIT VOICE VOLUME - LAUTSTÄRKE DES SPLITKLANGS
Gehen Sie wiederum auf die PERFORMANCE Seite mit der SETTINGS Taste und drücken auf
ENTER. Mit dem DATA CONTROL Regler wählen Sie die nächste Seite aus:
Hier können Sie die Lautstärke des Split-Klangs festlegen.
Drücken Sie wiederum die ENTER Taste, um den Lautstärke-Wert des Split-Klangs wenn nötig
anzupassen:
Mit dem DATA CONTROL Regler können Sie den Lautstärke-Wert zwischen maximal 127 und
minimal 00 einstellen.
DUAL VOICE VOLUME LAUTSTÄRKE DES DUALKLANGS
Gehen Sie wiederum auf die PERFORMANCE Seite mit der SETTINGS Taste und drücken auf
ENTER. Mit dem DATA CONTROL Regler wählen Sie die nächste Seite aus:
Hier können Sie die Lautstärke des Dualklangs-Klangs festlegen.
Drücken Sie wiederum die ENTER Taste, um den Lautstärke-Wert des Split-Klangs wenn nötig
anzupassen:
Mit dem DATA CONTROL Regler können Sie den Lautstärke-Wert proportional zum
Lautstärkewert des Hauptklangs verändern.
MAIN VOICE OCTAVE – OKTAVIERUNG DES HAUPTKLANGS
Gehen Sie wiederum auf die PERFORMANCE Seite mit der SETTINGS Taste und drücken auf
ENTER. Mit dem DATA CONTROL Regler wählen Sie die nächste Seite aus:
Hier können Sie die Oktavierung des Hauptklangs festlegen.
Drücken Sie wiederum die ENTER Taste, um die Oktavierung des Haupt-Klangs wenn nötig
anzupassen:
90

Mit dem DATA CONTROL Regler können Sie den Hauptklang oktavweise um ( -2 / +2 Oktaven)
transponieren.
SPLIT VOICE OCTAVE – OKTAVIERUNG DES SPLITKLANGS
Gehen Sie wiederum auf die PERFORMANCE Seite mit der SETTINGS Taste und drücken auf
ENTER. Mit dem DATA CONTROL Regler wählen Sie die nächste Seite aus:
Hier können Sie die Oktavierung des Split-Klangs festlegen.
Drücken Sie wiederum die ENTER Taste, um die Oktavierung des Split-Klangs wenn nötig
anzupassen:
Mit dem DATA CONTROL Regler können Sie den Split-Klang oktavweise um ( -2 / +2 Oktaven)
transponieren.
DUAL VOICE OCTAVE – OKTAVIERUNG DES DUALKLANGS
Gehen Sie wiederum auf die PERFORMANCE Seite mit der SETTINGS Taste und drücken auf
ENTER. Mit dem DATA CONTROL Regler wählen Sie die nächste Seite aus:
Hier können Sie die Oktavierung des Dual-Klangs festlegen.
Drücken Sie wiederum die ENTER Taste, um die Oktavierung des Dual-Klangs wenn nötig
anzupassen:
Mit dem DATA CONTROL Regler können Sie den Dual-Klang oktavweise um ( -2 / +2 Oktaven)
transponieren.
ARPEGGIO
Diese Funktion erlaubt zwei verschiedene Arpeggio-Algorithmen für den Haupt-Klang.
Gehen Sie wiederum auf die PERFORMANCE Seite mit der SETTINGS Taste und drücken auf
ENTER. Mit dem DATA CONTROL Regler wählen Sie die nächste Seite aus:
Sie können 2 Typen auswählen. Drücken Sie wiederum die ENTER Taste, um die Arpeggios falls
gewünscht, einzustellen:
Mit dem DATA CONTROL Regler können Sie das Arpeggio ( 1 oder 2) auswählen.
91

TWIN
Diese Einstellung eignet sich sehr gut zum Üben zu zweit. Schüler und Lehrer können die gleichen
Noten auf dem Instrument spielen. Es ist eine einfache Möglichkeit, die 88 Tasten des Instruments
in zwei Teile zu halbieren und jedem Bereich die gleiche Tonhöhe und Oktavlage zuzuweisen.
Gehen Sie wiederum auf die PERFORMANCE Seite mit der SETTINGS Taste und drücken auf
ENTER. Mit dem DATA CONTROL Regler wählen Sie die nächste Seite aus:
Mit dem DATA CONTROL Regler können Sie den Twin Modus On oder Off schalten
MIDI IN
Diese Einstellung kann MIDI IN ein- und ausschalten. (Hiermit kontrollieren Sie, ob über
angeschlossene MIDI- oder USB-Buchsen MIDI Daten das Instrument „bespielen“ dürfen.)
Gehen Sie wiederum auf die PERFORMANCE Seite mit der SETTINGS Taste und drücken auf
ENTER. Mit dem DATA CONTROL Regler wählen Sie die nächste Seite aus:
Mit dem DATA CONTROL Regler können Sie MIDI IN ein- oder ausschalten.
MIDI OUT
Diese Einstellung kann MIDI OUT ein- und ausschalten. (Hiermit kontrollieren Sie, ob über
angeschlossene MIDI- oder USB-Buchsen MIDI-Daten das Instrument „verlassen“ dürfen.)
Gehen Sie wiederum auf die PERFORMANCE Seite mit der SETTINGS Taste und drücken auf
ENTER. Mit dem DATA CONTROL Regler wählen Sie die nächste Seite aus:
Mit dem DATA CONTROL Regler können Sie MIDI OUT ein- oder ausschalten.
Es ist ebenso möglich auszuwählen, welcher MIDI-Kanal die MIDI-Daten aussenden soll: von
Kanal 1 bis Kanal16.
MIDI LOCAL ON oder OFF
Diese Einstellung kann MIDI LOCAL ON oder OFF schalten. Schaltet die interne Klangerzeugung
ab, um z.B. nur externe Instrumente über MIDI zu bespielen.
Gehen Sie wiederum auf die PERFORMANCE Seite mit der SETTINGS Taste und drücken auf
ENTER. Mit dem DATA CONTROL Regler wählen Sie die nächste Seite aus:
Mit dem DATA CONTROL Regler können Sie MIDI LOCAL OFF oder ON schalten.
92

EFFEKTE
Nun betrachten wir den zweiten Teil der Einstellungsseiten. Drücken Sie die SETTINGS Taste
zweimal, um zu den Effekteinstellungen zu gelangen. Hier die komplette Liste aller Parameter, die
mit den (/\) UP und (\/) DOWN Tasten eingestellt werden können:
-
-
-
-
-
-
-
-
Reverb Type
Main Reverb Volume
Split Reverb Volume
Dual Reverb Volume
Chorus Type
Main Chorus Volume
Split Chorus Volume
Dual Chorus Volume
REVERB TYPE
Hier können Sie die Hallart für das Instrument einstellen. Wie bereits beschrieben, stehen 10
Halltypen zur Verfügung.
1
6
Hall 1
Stage 1
2
7
Hall 2
Stage 2
3
8
Room 1
Plate
4
9
Room 2
Delay
10
5
Room 3
Echo
Drücken Sie die SETTINGS Taste bis die Anzeige erscheint:
Drücken Sie zur Bestätigung die ENTER Taste und die Anzeige zeigt den momentan eingestellten
Effekttyp – beispielsweise:
Mit dem DATA CONTROL Regler wählen Sie den gewünschten Reverb-Typ aus.
REVERB VOLUME
Wenn Sie bereits auf der EFFECT Seite sind, drücken Sie die Taste ENTER, um alle Hall
Lautstärke-Parameter für die Haupt-, Split- und Dual-Klänge einzustellen.
Diese werden mit der ENTER Taste ausgewählt und mit einem Volume-Wert (dem Hallanteil)
versehen. Jeder der Klänge kann mit dem DATA CONTROL Regler einen unterschiedlichen HallAnteil bekommen (einstellbar von 0 – 127).
93

CHORUS TYPE
Hier können Sie die Chorusarten für das Instrument einstellen. Wie bereits beschrieben, stehen 13
Chorus-Einstellungen zur Verfügung.
1
4
7
10
13
Chorus 1
Chorus 4
Short Delay
Flanger 3
Celeste 3
2
5
8
11
Chorus 2
Feedback
Short Delay Feedback
Celeste 1
3
6
9
12
Chorus 3
Flanger 1
Flanger 2
Celeste 2
Drücken Sie die SETTINGS Taste bis die Anzeige erscheint:
Drücken Sie zur Bestätigung die ENTER Taste und die Anzeige zeigt:
Mit dem DATA CONTROL Regler wählen Sie den gewünschten Chorus-Typ aus:
Auch hier können Sie den Chorus-Effekt für die Haupt-, Split- und Dual-Klänge einstellen.
CHORUS VOLUME
Wenn Sie bereits auf der EFFECT Seite sind, drücken Sie die Taste ENTER, um alle CHORUS
Lautstärke-Parameter für die Haupt-, Split- und Dual-Klänge einzustellen.
Diese werden mit der ENTER Taste ausgewählt und mit einem Volume-Wert (dem CHORUSAnteil) versehen. Jeder der Klänge kann mit dem DATA CONTROL Regler einen
unterschiedlichen CHORUS-Anteil bekommen (einstellbar von 0 – 127).
94

PEDAL ZUWEISUNG
Es ist möglich, dass Sie den 3 Pedalen des CDP202 unterschiedliche und in manchen Fällen sehr
interessante und hilfreiche Funktionen zuweisen können. Beim Stage Concert sind diese Funktionen
ebenfalls verfügbar, wenn ein optional lieferbares 3er-Pedal angeschlossen wird.
Dem Sustain (Pedal 1) und dem Sostenuto (Pedal 2) können aus der gleichen Liste Funktionen
zugewiesen werden, das Soft (Pedal 3) Pedal weicht etwas davon ab.
PEDAL 1 UND 2 ZUWEISUNG
Drücken Sie die FUNCTION Taste mehrmals, bis Sie die PedalAssign? -Seite sehen.
Drücken Sie zur Bestätigung die ENTER Taste und die Anzeige sieht wie folgt aus:
Drücken Sie wiederum die ENTER Taste. Mit dem DATA CONTROL Regler wählen Sie die
gewünschte Pedalfunktion aus.
Pdl-Null Das Pedal hat keine Funktion.
Pdl-Sustain Das Pedal arbeitet als Sustain/Halte-Pedal.
Pdl-Soft Das Pedal arbeitet als Soft-Pedal.
Pdl-Sost Das Pedal arbeitet als Sostenuto-Pedal.
Pdl-Tap Das Pedal arbeitet als TAP TEMPO Taster.
Pdl-MemoryUp Das Pedal schaltet die Panel Memory Registration zur nächsten.
Pdl-Play Das Pedal schaltet wie die PLAY Taste die MIDI-Datei Wiedergabe.
Drücken Sie nach der gewünschten Auswahl zur Bestätigung die ENTER Taste.
PEDAL 3 ZUWEISUNG
Drücken Sie die FUNCTION Taste mehrmals, bis Sie zur PedalAssign? –Funktion gelangen.
Drücken Sie zur Bestätigung die ENTER Taste und die Anzeige sieht wie folgt aus:
Mit dem DATA CONTROL Regler wählen Sie Pedal 3 aus und drücken die ENTER Taste.
Mit dem DATA CONTROL Regler wählen Sie dann die gewünschte Pedalfunktion aus.
Pdl-Null Das Pedal hat keine Funktion.
Pdl-Sustain Das Pedal arbeitet als Sustain/Halte-Pedal.
Pdl-Soft Das Pedal arbeitet als Soft-Pedal.
Pdl-Sost Das Pedal arbeitet als Sostenuto-Pedal.
Expression ANSTELLE des Pedals wird an die Pedal 3 Buchse
ein Volume/Expression Pedal angeschlossen.
95
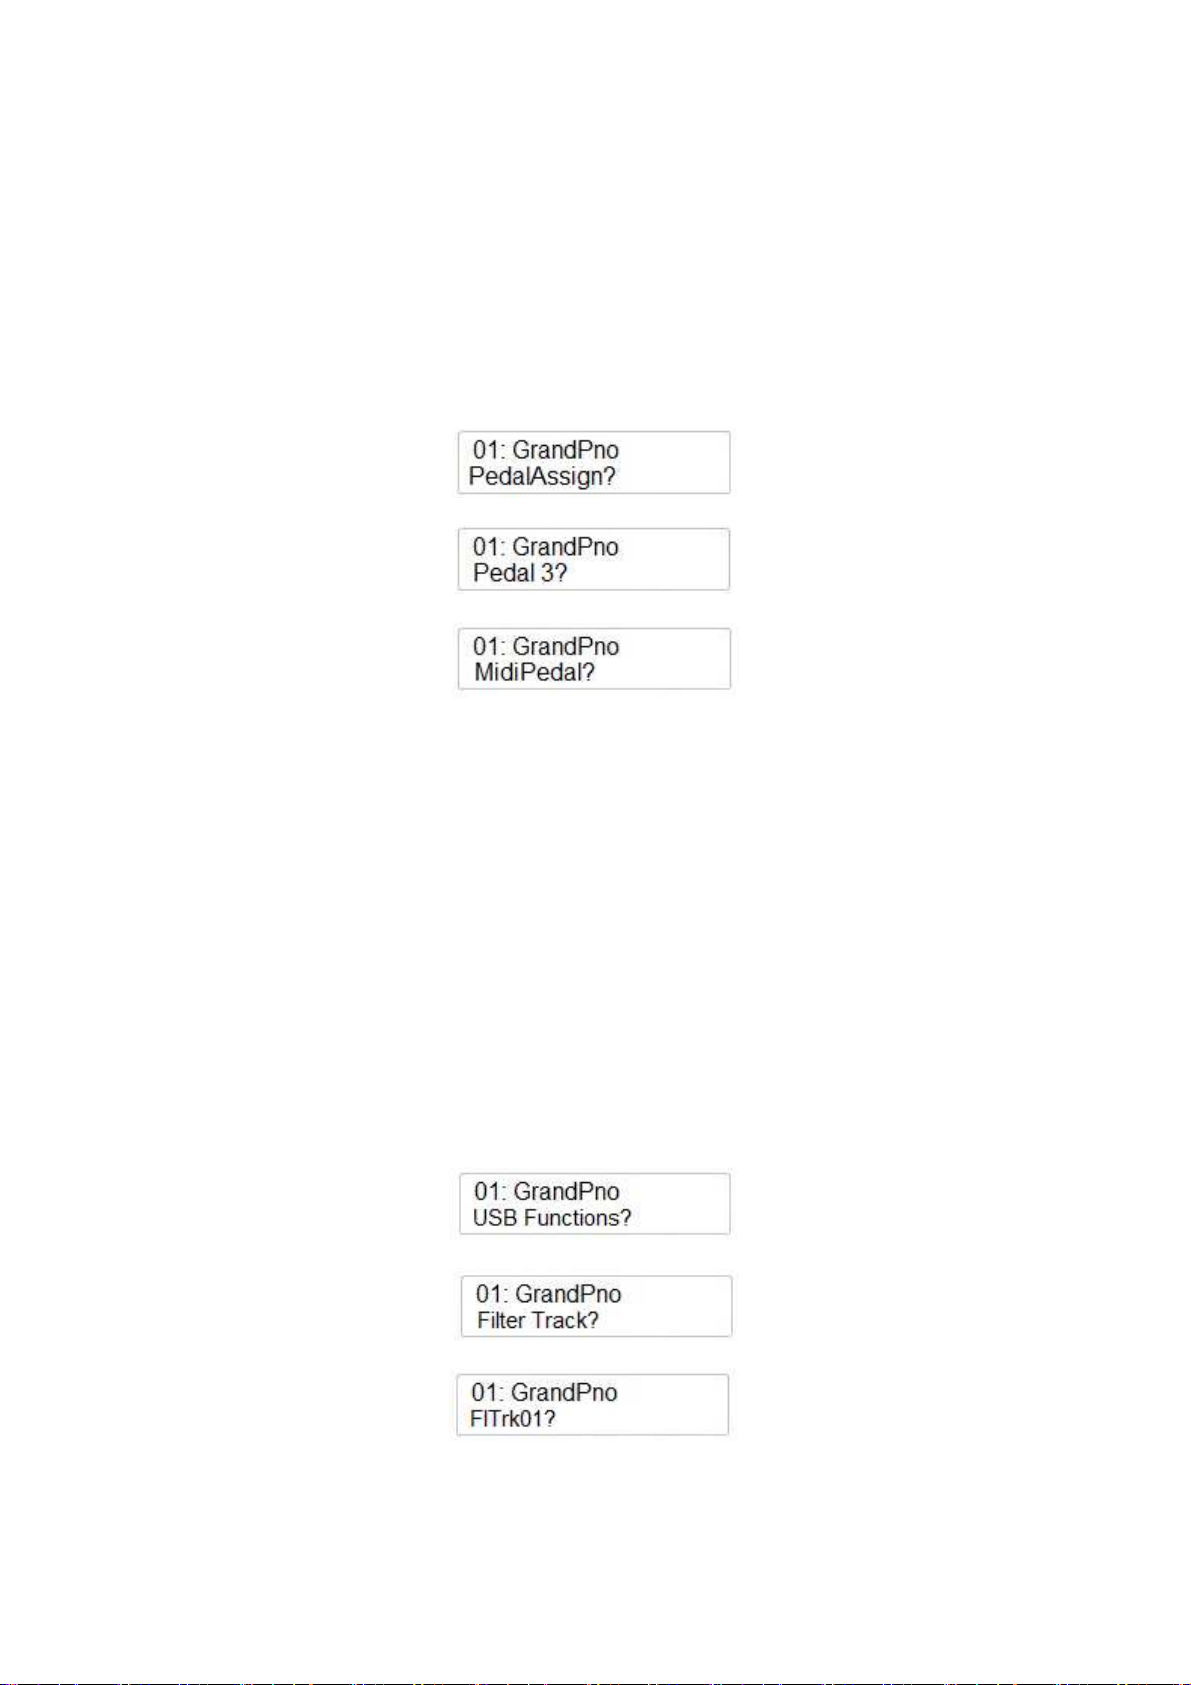
Pdl-Tap Das Pedal arbeitet als TAP TEMPO Taster.
Pdl-MemoryUp Das Pedal schaltet die Panel Memory Registration zur nächsten.
Pdl-Play Das Pedal schaltet wie die PLAY Taste die MIDI-Datei Wiedergabe.
Drücken Sie nach der gewünschten Auswahl zur Bestätigung die ENTER Taste.
MIDI-PEDAL
Mit dieser Funktion können Sie ein MIDI-Pedal an das Instrument anschließen. Sie können aus
zwei Einstellungen und zwei unterschiedlichen Klangzuweisungen auswählen.
Drücken Sie die FUNCTION Taste mehrmals, bis Sie zur PedalAssign? –Funktion gelangen.
Drücken Sie zur Bestätigung die ENTER Taste und die Anzeige sieht wie folgt aus:
Wählen Sie mit dem DATA CONTROL Regler MidiPedal? aus:
Drücken Sie wiederum die ENTER Taste. Mit dem DATA CONTROL Regler wählen Sie die
gewünschte MIDI-Pedalfunktion aus.
-
-
-
P1 Dies wählt einen Kirchenorgel-Bass-Klang, passend für Pfeifenorgel-Spiel.
P2 Dies wählt einen gezupften Bass-Klang, passend für Digitalpiano-Klänge.
Off Abgeschaltet - kein Klang.
USB FUNKTIONEN
In diesem Abschnitt erfahren Sie mehr, wie Sie die verschiedenen Parameter und Funktionen einer
MIDI-Datei auf dem USB-Datenträger beeinflussen können.
Die erste Funktion ist der Filter Track (Spuren herausfiltern). Diese Funktion ermöglicht, mehrere
MIDI-Spuren (von Track 1 bis 16) in einem Song stumm zu schalten, zum Beispiel, damit Sie diese
selbst spielen können.
Drücken Sie die FUNCTION Taste mehrmals, bis Sie zu USB Functions?-gelangen.
Drücken Sie zur Bestätigung die ENTER Taste und die Anzeige sieht wie folgt aus:
Drücken Sie zur Bestätigung die ENTER Taste und die Anzeige sieht wie folgt aus:
Mit dem DATA CONTROL Regler können Sie nun jede der 16 MIDI-Tracks auswählen (sofern
überhaupt vorhanden). Wenn Sie z.B.Track1 stummschalten wollen, drücken Sie die ENTER Taste
und die Anzeige sieht wie folgt aus:
96
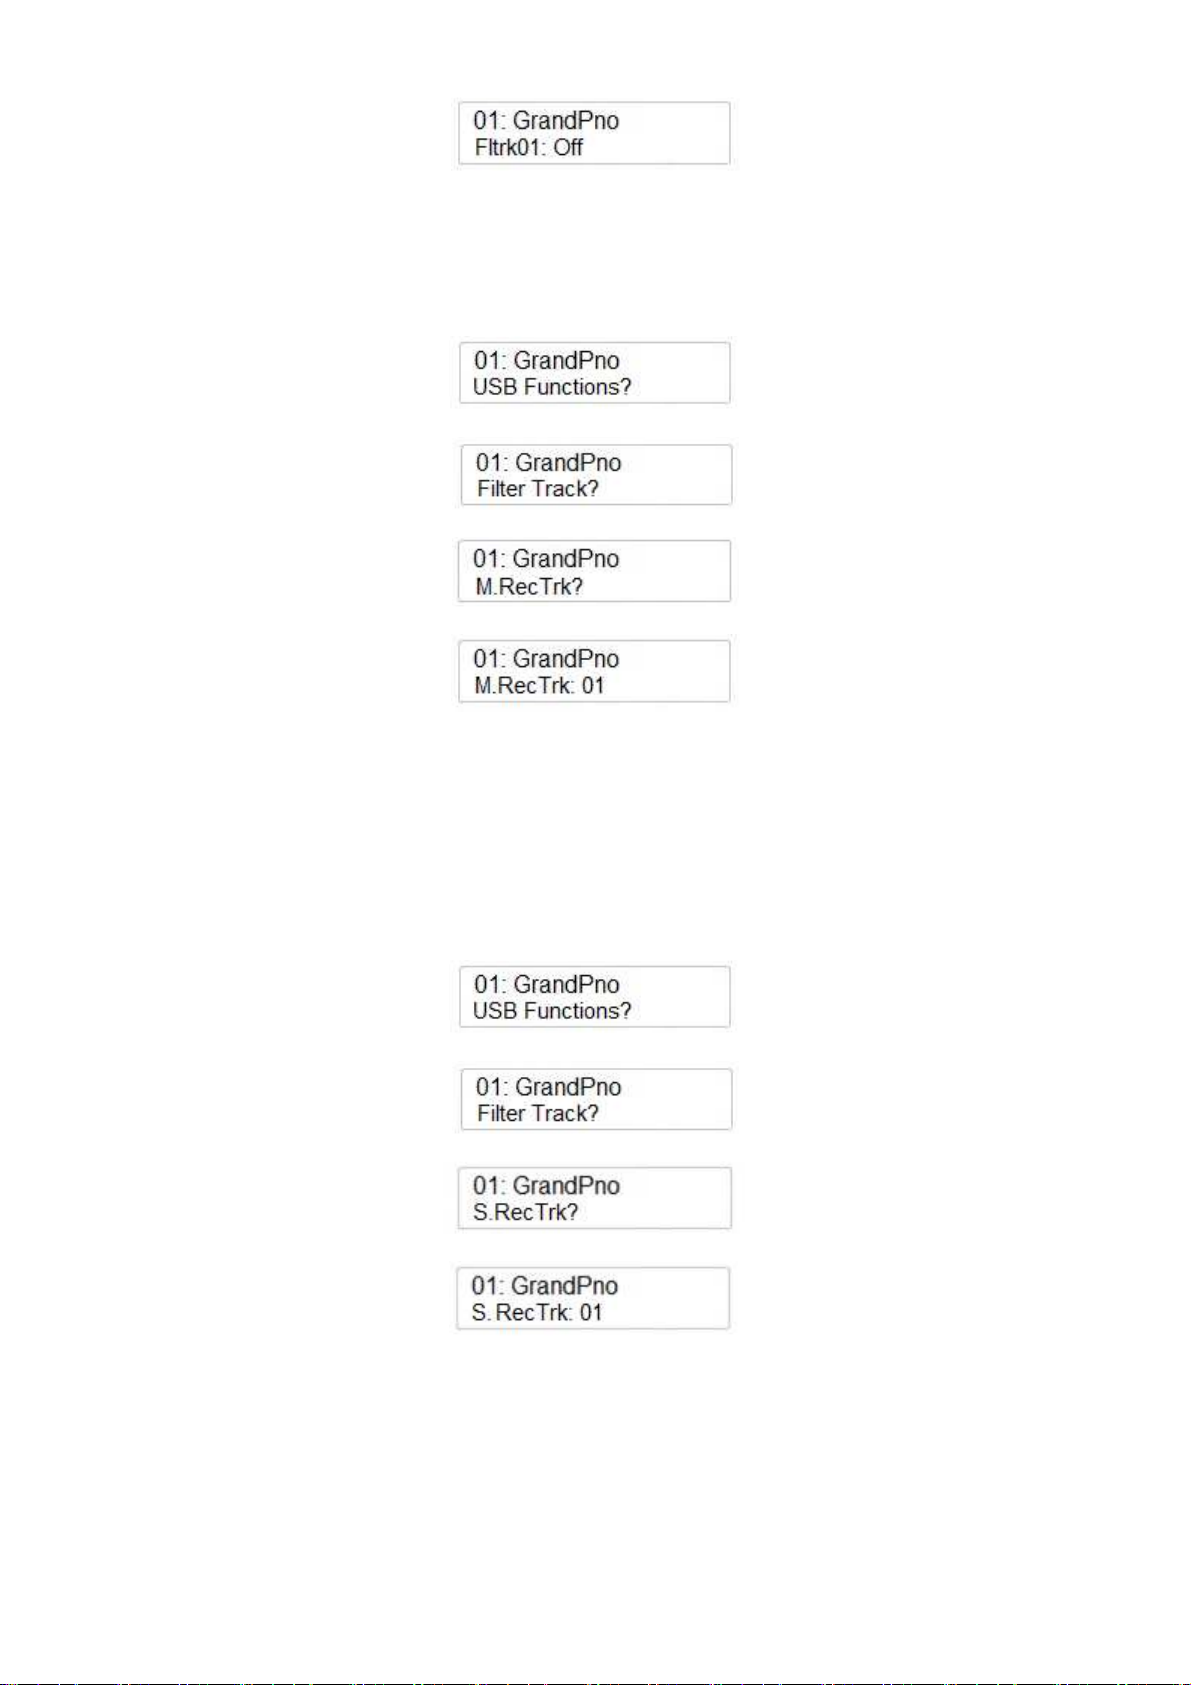
Mit dem DATA CONTROL Regler können Sie den Track Filter auf On/Off stellen.
MAIN VOICE RECORDING TRACK – DIE AUFNAHMESPUR HAUPT-KLANG
Sie können einen bestimmten Track auswählen, in dem Sie Ihr Spiel aufnehmen wollen.
Drücken Sie die FUNCTION Taste mehrmals, bis Sie zu USB Functions?-gelangen.
Drücken Sie zur Bestätigung die ENTER Taste und die Anzeige sieht wie folgt aus:
Mit dem DATA CONTROL Regler können Sie nun die nächste Funktion auswählen:
Drücken Sie zur Bestätigung die ENTER Taste und die Anzeige sieht wie folgt aus:
Mit dem DATA CONTROL Regler können Sie nun jeden der 16 MIDI-Tracks auswählen oder sie
schalten die Funktion aus (Off).
SPLIT VOICE RECORDING TRACK – DIE AUFNAHMESPUR SPLIT-KLANG
Sie können einen bestimmten Track für den Split-Klang auswählen, der bei Ihrem Spiel
aufgenommen werden soll.
Drücken Sie die FUNCTION Taste mehrmals, bis Sie zu USB Functions?-gelangen.
Drücken Sie zur Bestätigung die ENTER Taste und die Anzeige sieht wie folgt aus:
Mit dem DATA CONTROL Regler können Sie nun die nächste Funktion auswählen:
Drücken Sie zur Bestätigung die ENTER Taste und die Anzeige sieht wie folgt aus:
Mit dem DATA CONTROL Regler können Sie nun jeden der 16 MIDI-Tracks auswählen oder sie
schalten die Funktion aus (Off)
DUAL VOICE RECORDING TRACK – DIE AUFNAHMESPUR DUAL-KLANG
Sie können einen bestimmten Track für den Dual-Klang auswählen, der bei Ihrem Spiel
aufgenommen werden soll. Drücken Sie die FUNCTION Taste mehrmals, bis Sie zu USB
Functions?-gelangen.
97
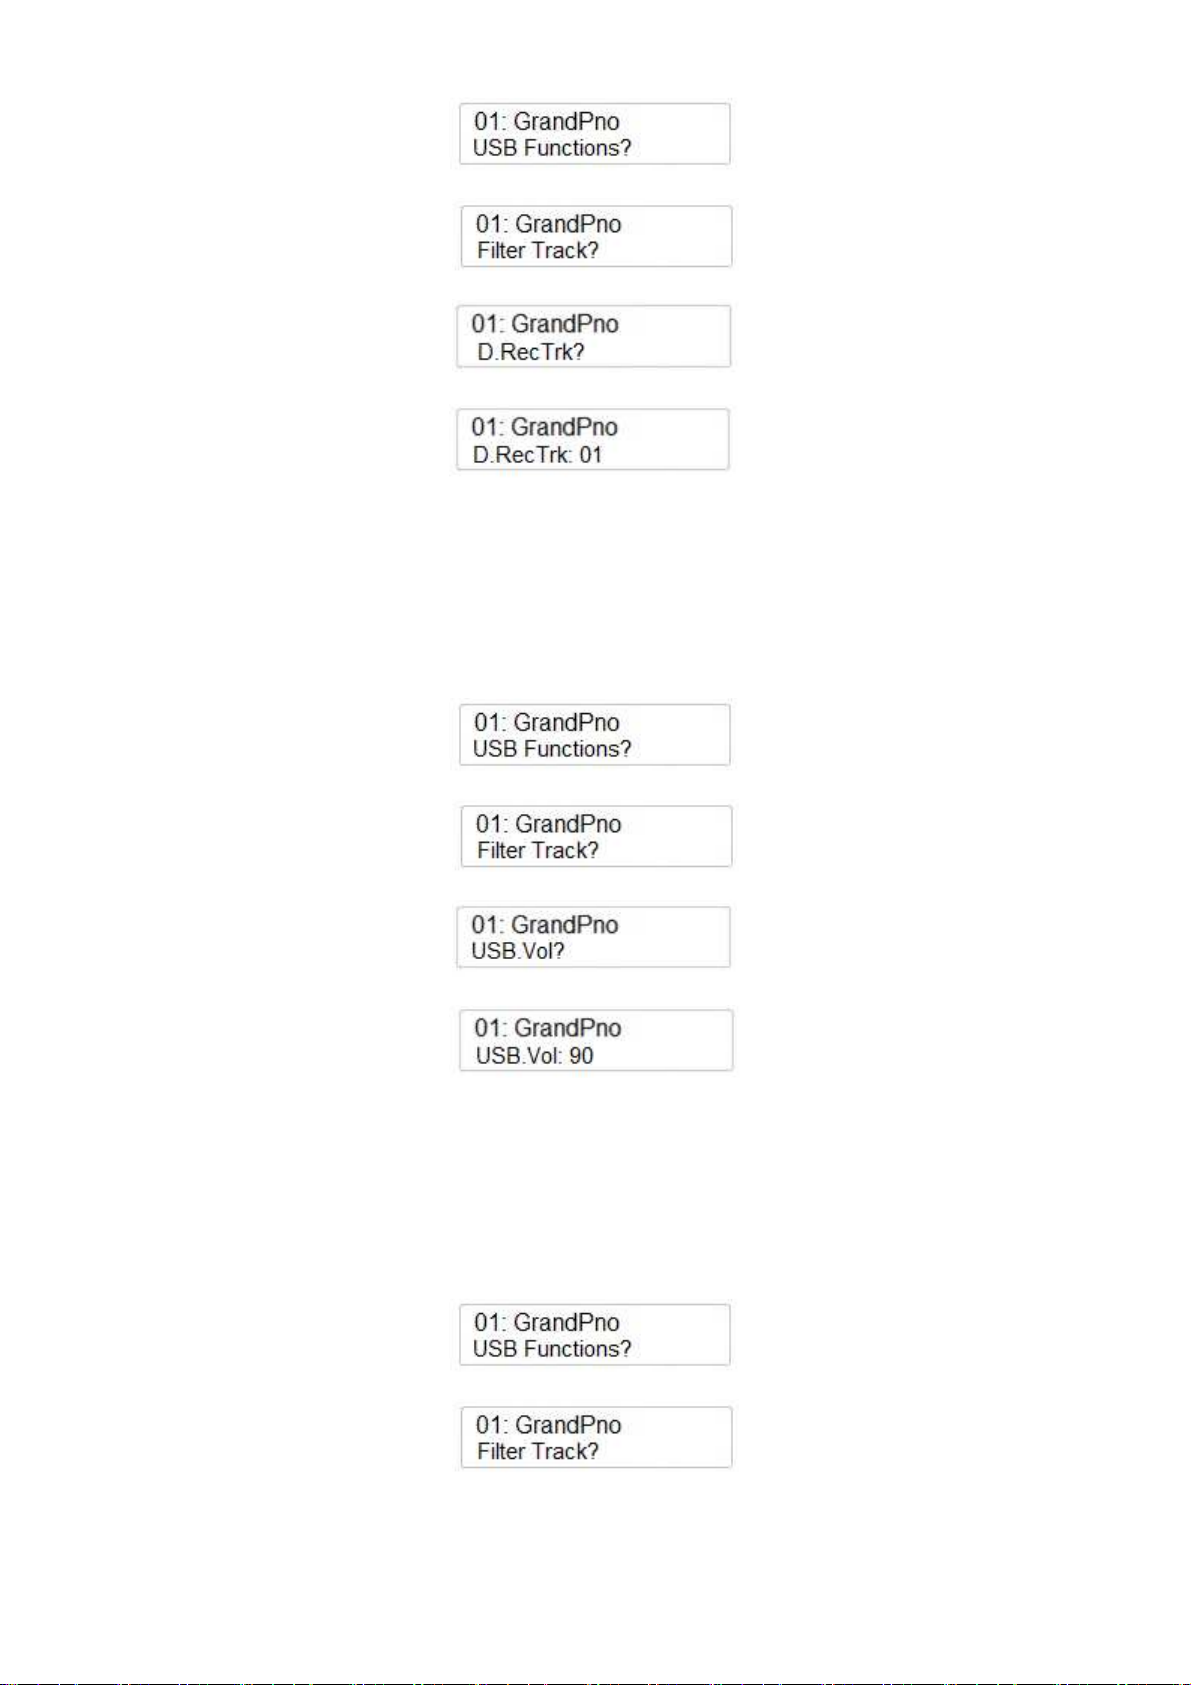
Drücken Sie zur Bestätigung die ENTER Taste und die Anzeige sieht wie folgt aus:
Mit dem DATA CONTROL Regler können Sie nun die nächste Funktion auswählen:
Drücken Sie zur Bestätigung die ENTER Taste und die Anzeige sieht wie folgt aus:
Mit dem DATA CONTROL Regler können Sie nun jeden der 16 MIDI-Tracks auswählen oder sie
schalten die Funktion aus (Off)
USB SONG LAUTSTÄRKE
Damit Sie die Lautstärke des Instruments mit der Lautstärke eines MIDI-Songs in Einklang bringen
können, läßt sich die Gesamtlautstärke eines MIDI-Songs einstellen. Drücken Sie die FUNCTION
Taste mehrmals, bis Sie zu USB Functions?-gelangen.
Drücken Sie zur Bestätigung die ENTER Taste und die Anzeige sieht wie folgt aus:
Mit dem DATA CONTROL Regler können Sie nun die nächste Funktion auswählen:
Drücken Sie zur Bestätigung die ENTER Taste und die Anzeige sieht wie folgt aus:
Mit dem DATA CONTROL Regler können Sie nun die Lautstärke des MIDI-Songs einstellen
(min 0 – max 127).
USB SONG SPEED – ABSPIELGESCHWINDIGKEIT ANPASSEN
Falls notwendig oder zum Üben hilfreich, können Sie auch das Abspieltempo des MIDI-Songs
Ihren Erfordernissen anpassen. Drücken Sie die FUNCTION Taste mehrmals, bis Sie zu USB
Functions?-gelangen.
Drücken Sie zur Bestätigung die ENTER Taste und die Anzeige sieht wie folgt aus:
Mit dem DATA CONTROL Regler können Sie nun die nächste Funktion auswählen:
98

Drücken Sie zur Bestätigung die ENTER Taste und die Anzeige sieht wie folgt aus:
Mit dem DATA CONTROL Regler können Sie nun die das Gesamttempo des Songs einstellen
(min 50 – max 200 bpm – beats pro Minute).
PLAY MODE – WIEDERGABEOPTIONEN
Sie können die Reihenfolge in der Wiedergabe mehrerer Songs beinflussen. Ob einmal (one at a
time) , verkettet hintereinander (Chain) oder in zufälliger Reihenfolge (Random).
Drücken Sie die FUNCTION Taste mehrmals, bis Sie zur USB Function?-gelangen.
Drücken Sie zur Bestätigung die ENTER Taste und die Anzeige sieht wie folgt aus:
Mit dem DATA CONTROL Regler können Sie nun die folgende Funktion auswählen:
Drücken Sie zur Bestätigung die ENTER Taste und die Anzeige sieht wie folgt aus:
Mit dem DATA CONTROL Regler können Sie nun diese oder die beiden anderen
Wiedergabeoptionen auswählen - und dann mit ENTER Taste abschließen.
oder
DELETE FILES – MIDI DATEIEN LÖSCHEN
Sollte es einmal notwendig sein, eine MIDI-Datei vom USB-Datenträger zu löschen, können Sie
dies auch am Instrument vornehmen.
-
-
-
Der USB-Datenträger muss natürlich in der USB-Buchse stecken.
Wählen Sie den zu löschenden Song in der Anzeige aus. – zB. SONG 001
Drücken Sie zugleich die RECORD und PLAY Tasten, um an die DELETE-Funktion zu
kommen:
-
-
Drücken Sie die (/\) UP Taste, um die Datei zu löschen.
Sollten Sie den Vorgang abbrechen wollen, können Sie dies mit der (\/) Down Taste tun.
99

100
 Loading...