

Orion Welders - mPulse Getting Started
Follow these steps before welding. ese are also great
troubleshooting steps to follow if you feel like your welds are not
consistent or not looking the way you think they should.
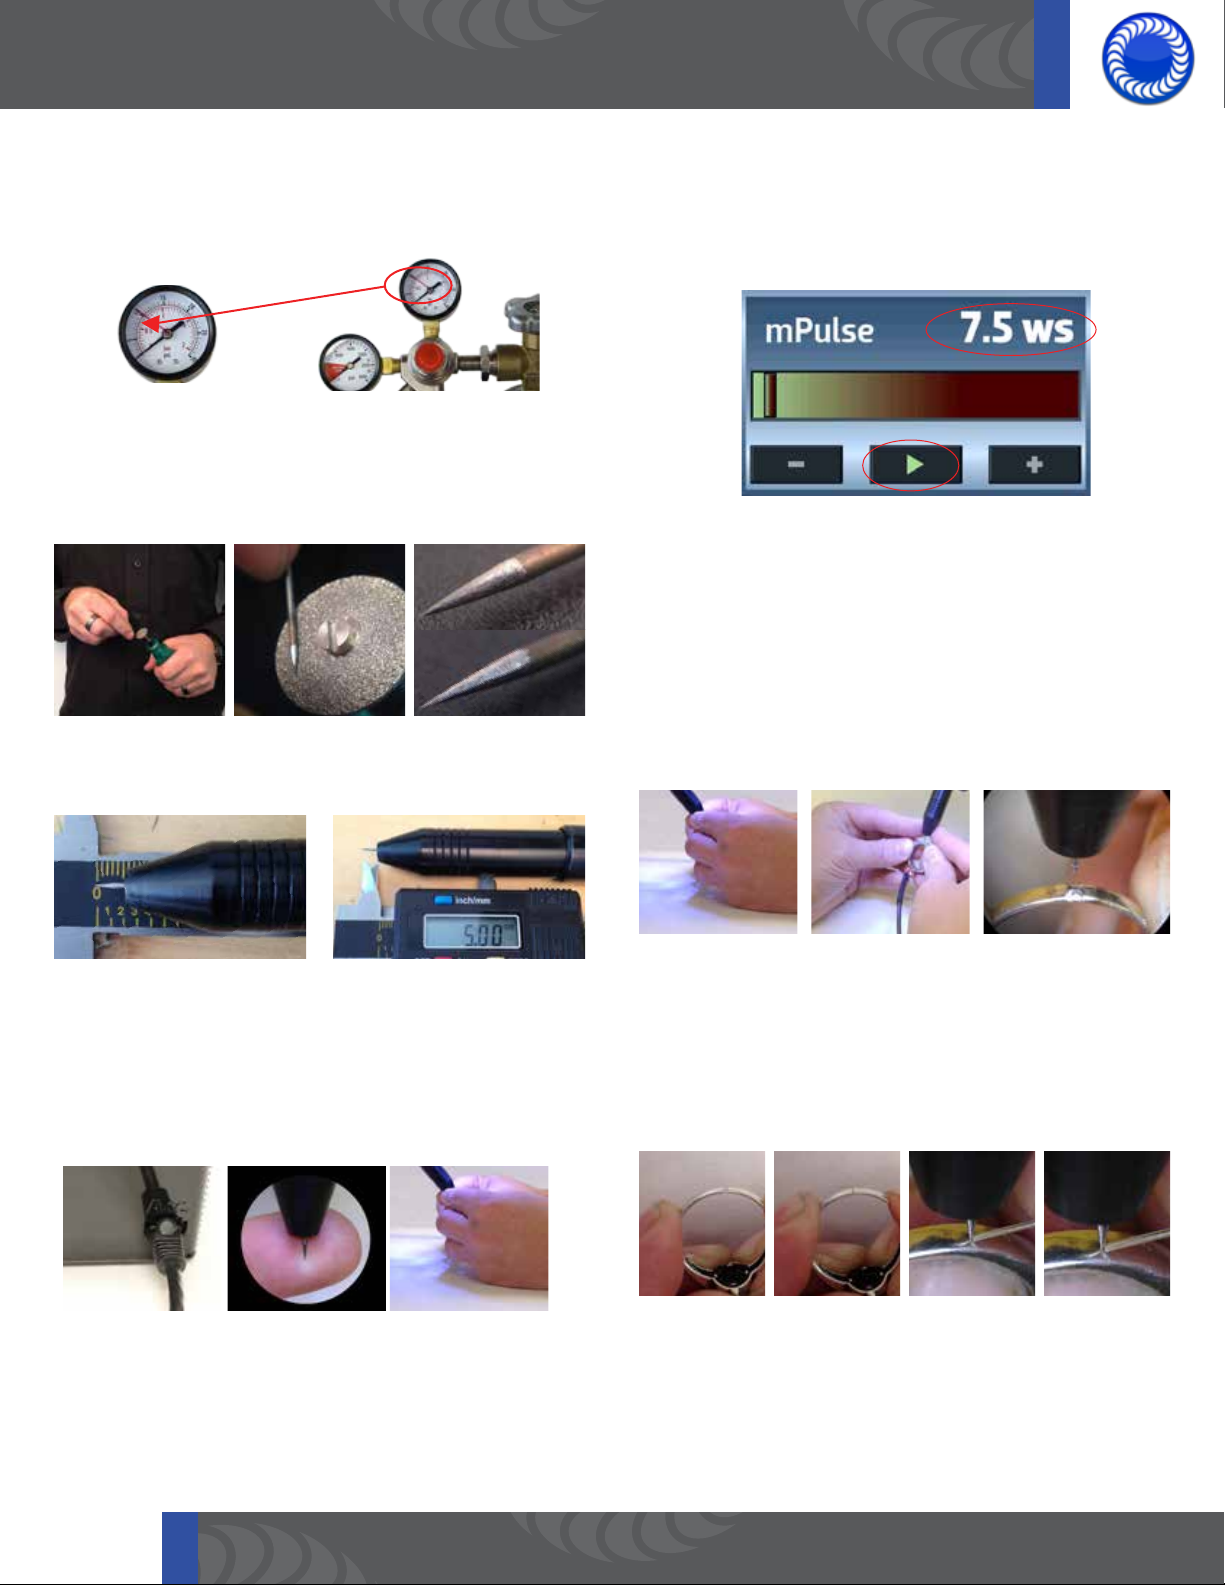
STEP 1: Check the Gas Pressure
• Gas is at 8 - 12 psi
STEP 2: Shape the Electrode
• Hold the dremel in one hand (close to the body for support)
and the electrode in the other hand.
• Place the electrode on the diamond disk at a 45 degree angle
and spin it to sharpen.
• Make sure the striations in the electrode are horizontal.
STEP 3: Verify Electrode Length
• e electrode should stick out of the Stylus Cone 4 - 6 mm
(1/8 - 1/4”). Make sure the Stylus Cone is pushed in all the
way (you will feel it click into place and bottom-out).
STEP 5: Welder Settings and when to use the Reset Button
• Before beginning any weld, double check the energy level.
• Verify Energy and that the play button is showing before
beginning a weld. *Settings on p.2
STEP6: How to Touch the Electrode to the Work piece
• Clip the alligator clip to the workpiece.
• Rest your hands on the table under the darkening lens.
• Position the work piece so that it is right under the electrode
then look through the lens.
• Lightly lift your fingers up and touch the work piece to the
electrode (the electrode will retract after it is touched).
• Hold the work piece steady after touching the electrode - if
you pull the work piece away after touching the electrode, it
will not weld. If you follow the electrode with the work piece
while it is retracting, the electrode will stick to the work piece.
STEP 4: Verify the Darkening Lens Setup
• Darkening Lens cable is securely connected to the welder.
• Electrode is centered in your field of view and in focus.
• Electrode is at a height where you can rest your hands on the
baseplate and lift your work piece up with your fingers.
STEP7: How to Set up the Work pieces for Welding.
• When closing a jump ring, or welding two pieces together;
make sure the two sides are pushed together and flush
before welding.
• When adding material, touch the wire to the work piece at a
45-degree angle then enter the electrode in at a 90-degree
angle. Touch the electrode between the work piece and the
wire.
OrionWelders.com

Orion Welders - mPulse
General Settings for specific metals and applications Specifications
Remember:
2. The image to the right is an example of what a blunt electrode should look like:
1. When in doubt, start with your energy lower then work your way up.
General Settings - 26 AWG wire/chain/jump ring
Metal Tip Shape Energy Notes
14k Gold Sharp 10 ws
24k Gold Sharp 7.5 ws
Silver Sharp 10 ws
Platinum Sharp 10 ws
Stainless Steel Sharp 7.5 ws
Palladium Sharp 7.5 ws
Titanium Sharp 10 ws
Brass Sharp 10 ws
Butt weld with 90 degree
electrode angle
General Settings - 0.5mm thick Ring
Metal Tip Shape Energy Notes
14k Gold Sharp 12.5 ws
24k Gold Sharp 10 ws
Silver Sharp 17.5 ws
Platinum Sharp 15 ws
Stainless Steel Sharp 15 ws
Palladium Sharp 15 ws
Titanium Sharp 15 ws
Brass Sharp 15 ws
Butt weld with 90 degree
electrode angle
General Settings - 2mm thick Ring
Metal Tip Shape Energy Notes
14k Gold Sharp 30 ws
24k Gold Sharp 30 ws
Silver Blunt 30 ws
Platinum Sharp 30 ws
Stainless Steel Sharp 30 ws
Palladium Sharp 30 ws
Titanium Sharp 30 ws
Brass Sharp 30 ws
Butt weld with 90 degree
electrode angle
General Settings - Earring Post
Metal Tip Shape Energy Notes
14k Gold Sharp 10 ws
24k Gold Sharp 10 ws
Silver Sharp 12.5 ws
Platinum Sharp 12.5 ws
Stainless Steel Sharp 7.5 ws
Palladium Sharp 7.5 ws
Titanium Sharp 12.5 ws
Brass Sharp 10 ws
T joint with 45 degree
electrode angle
General Settings - 1mm thick Ring
Metal Tip Shape Energy Notes
14k Gold Sharp 22.5 ws
24k Gold Sharp 20 ws
Silver Semi Blunt 30 ws
Platinum Sharp 25 ws
Stainless Steel Sharp 22.5 ws
Palladium Sharp 20 ws
Titanium Sharp 25 ws
Brass Sharp 25 ws
General Settings - Add Material (30 AWG laser wire)
Metal Tip Shape Energy Notes
14k Gold Sharp 12.5 ws
24k Gold Sharp 12.5 ws
Silver Sharp 15 ws
Platinum Sharp 15 ws
Stainless Steel Sharp 10 ws
Palladium Sharp 10 ws
Titanium Sharp 15 ws
Brass Sharp 12.5 ws
Butt weld with 90 degree
electrode angle
Wire at 45 degree angle.
Electrode touching work
piece next to wire.
General Settings - Add Material (24 AWG wire)
Metal Tip Shape Energy Notes
14k Gold Sharp 17.5 ws
24k Gold Sharp 15 ws
Silver Sharp 20 ws
Platinum Sharp 20 ws
Stainless Steel Sharp 15 ws
Palladium Sharp 15 ws
Titanium Sharp 20 ws
Brass Sharp 17.5 ws
Wire at 45 degree angle.
Electrode touching work
piece next to wire.
Orion Welders
1-877-786-9353
1693 American Way #5
Payson, UT 84651 USA
General Settings - Retip Prong (26 AWG wire)
Metal Tip Shape Energy Notes
14k Gold Sharp 10 ws
24k Gold Sharp 7.5 ws
Silver Sharp 10 ws
Platinum Sharp 10 ws
Stainless Steel Sharp 7.5 ws
Palladium Sharp 7.5 ws
Titanium Sharp 10 ws
Brass Sharp 10 ws
The above method will allow the user to attach the wire to the
prong tip. If the user desires to add metal to the tip without
the wire staying attched, use a 30 AWG wire and position the
electrode and 30 AWG wire as seen in the picture to the right.
This method will allow the user to add a little bit of metal at a
time, covering the top of the prong with every weld.
Butt weld with 90 degree
OrionWelders.com
electrode angle
Wire at 45 degree angle.
Electrode touching work
piece next to wire.
 Loading...