

ORION TELESCOPES & BINOCULARS SpaceProbe 3, 9035 Altazimuth Reflecting Telescope, 965 Eyepiece Version, SpaceProbe 3 9835, SpaceProbe 3"" 9035 Instruction Manual
Page 1

IN 074 Rev. A 0998
Providing Exceptional Consumer Optical Products Since 1975
Customer Support (800) 676-1343
E-mail: support@telescope.com
Corporate Offices (831) 763-7000
P.O. Box 1815, Santa Cruz, CA 95061
INSTRUCTION MANUAL
Orion
®
SpaceProbe
™
3"
#9035 Altazimuth Reflecting Telescope
.965" Eyepiece Version
Page 2
2
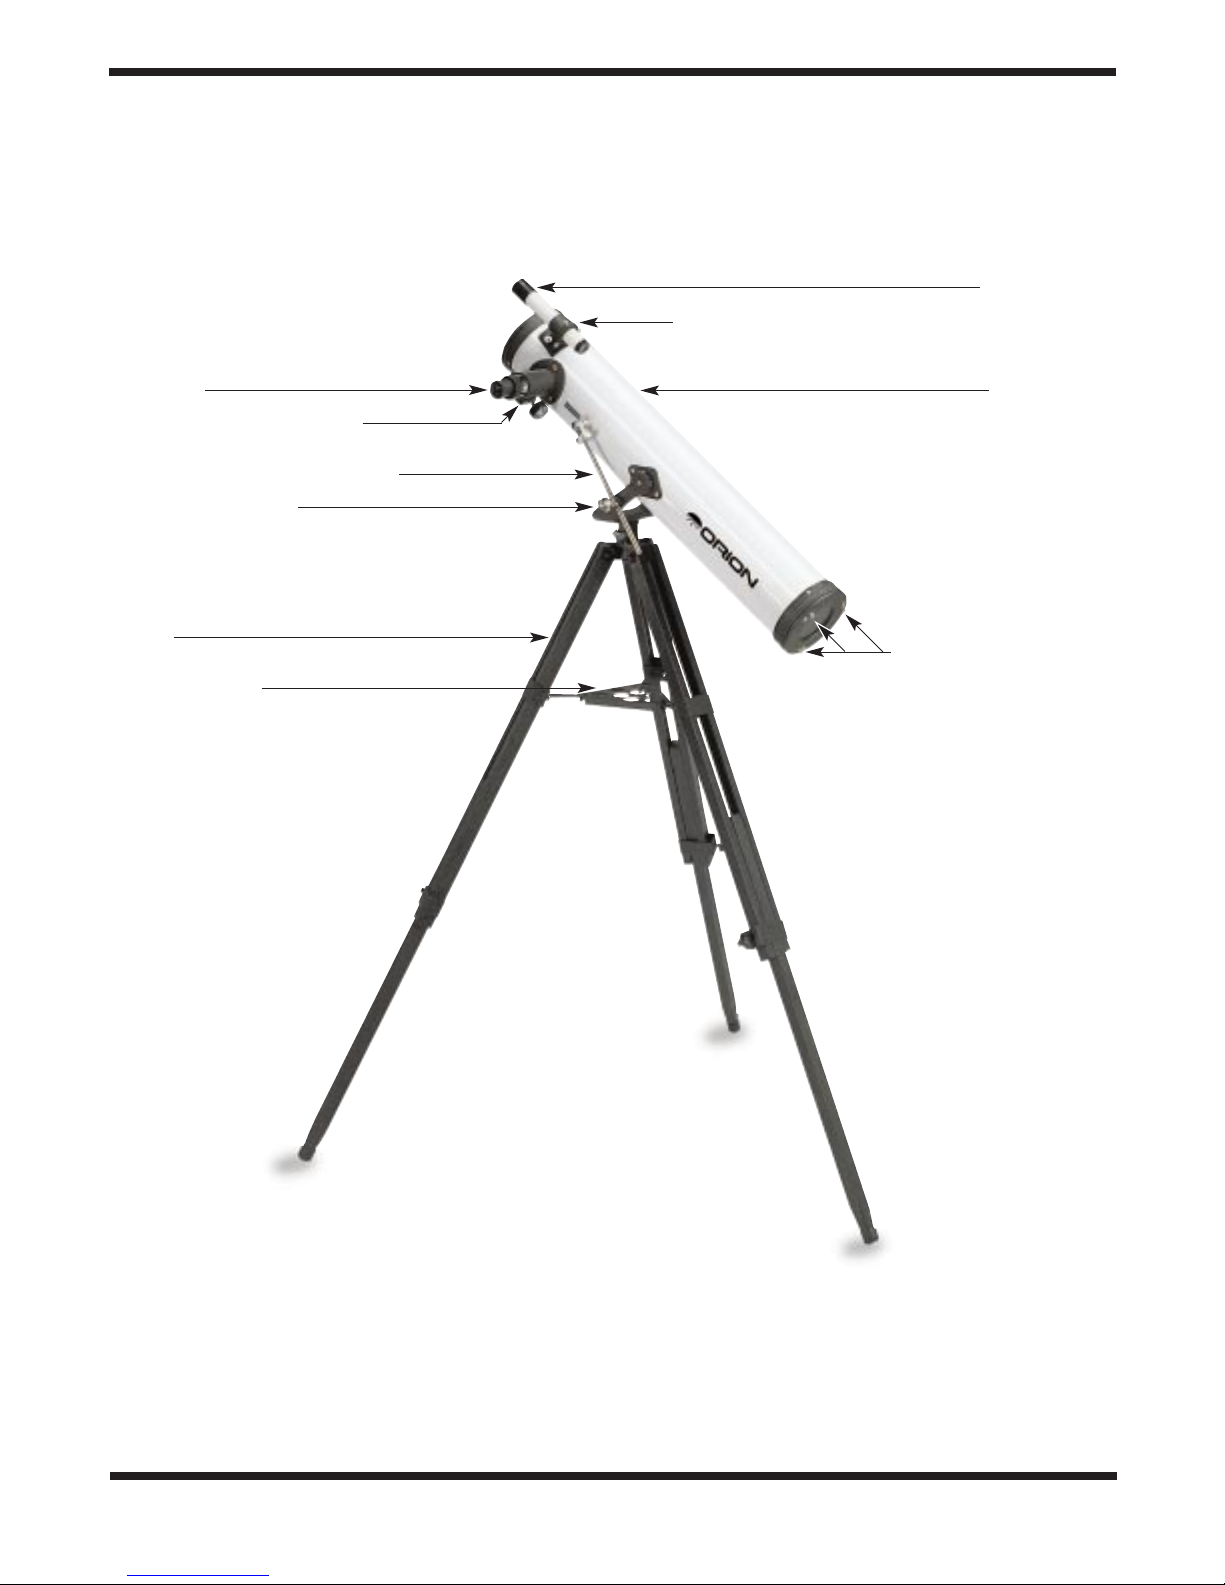
Eyepiece
Rack-and-Pinion Focuser
Altitude Micro-Motion Control
Altitude Lock Knob
Tripod
Accessory Tray
Finder Scope
Finder Scope Bracket with Alignment Screws
Optical Tube
Collimation Screws (3)
Figure 1. SpaceProbe 3" Altazimuth Parts Diagram
Page 3

3
C
ongratulations on your purchase of a precision Orion telescope.
Your new SpaceProbe 3" Altazimuth
Reflector is a terrific starter instrument for exploring some of the many exotic wonders our universe has
to offer . Designed to be lightweight and easy to use, this telescope will provide many hours of enjoyment
for the whole family. It is your ticket to a visual voyage into space, which you will soon find out contains
much more than just pinpoint stars.
With the SpaceProbe 3" you’ll marvel at the stunning variety of mountains, craters, and valleys on the
surface of our nearest celestial neighbor, the Moon. Looking farther out into the solar system, you’ll be
awed by Saturn’s rings and by the perpetual dance of Jupiter’s brightest moons. And gazing still farther
into space, you’ll be able to locate dozens of mind-boggling “deep-sky” objects—sparkling star clusters,
glowing nebulas, and incredibly distant galaxies—that will dazzle and amaze you.
If you have never used a telescope before, we would like to welcome you to amateur astronomy, which
we hope will become a lifelong hobby for you. Take some time to familiarize yourself with the night sky.
Learn to recognize the patterns of stars in the major constellations; a star wheel, or planisphere, available from nature stores or astronomical suppliers, will greatly help. With a little practice, a little patience,
and a reasonably dark sky away from city lights, you’ll find your telescope to be a never-ending source
of wonder, exploration, and relaxation.
Table of Contents
1. Terminology.......................................................................................................................... 3
2. Parts List............................................................................................................................... 4
3. Getting Started..................................................................................................................... 4
4. Using Your Telescope........................................................................................................... 4
5. Observing Tips and Techniques........................................................................................... 5
6. Astronomical Viewing........................................................................................................... 5
7. Collimating the Optics (Aligning the Mirrors)........................................................................ 6
8. Care and Maintenance........................................................................................................... 7
9. Specifications.......................................................................................................................... 7
WARNING:
Never look directly at the
Sun through your telescope or its finder
scope—even for an instant—without
a professionally made solar filter that
completely covers the front of the
instrument, or permanent eye damage
could result. Be sure to also cover
the front of the finder scope with aluminum
foil or another opaque material to prevent
physical damage to the internal
components of the scope itself as well as to
your eye. Young children should use this
telescope only with adult supervision.
1. Terminology
Altazimuth Mount A simple type of telescope mount that
allows the telescope to be moved in two perpendicular directions: up and down (altitude) and sideways (azimuth).
Eyepiece A lens-containing piece that magnifies the image
formed by the telescope and allows your eye to focus on it.
Eyepieces of different focal lengths will produce different
magnification factors.
Finder Scope A small, low-power telescope with crosshairs,
mounted on the optical tube to aid in pointing the telescope.
Its wide field of view greatly reduces the work of finding a faint
object in the main eyepiece of the telescope.
Altitude micro-motionA threaded rod that is anchored to the
altazimuth mount (or slow-motion) control on one end and to
the telescope tube on the other. Athumbwheel on the rod can
be turned to slowly lengthen or shorten its length, resulting in
minute changes in the pointing altitude of the telescope.
Optical Tube The main body of the telescope that holds the optics.
Primary Mirror The large, curved mirror located at the back
end of the optical tube.
Page 4

4
Primary Mirror Cell The mechanical holder for the primary
mirror, with alignment adjusting bolts that allow exact positioning (tilt) of the primary mirror.
Rack-and-Pinion Focuser A type of focusing device that
employs a grooved “rack” and a meshing pinion gear to move
the eyepiece-holding drawtube in and out, thereby allowing
adjustment of the image focus.
Secondary Mirror The small, elliptical-shaped, flat optical
mirror, located inside the optical tube beneath the focuser,
that diverts light sideways into the focuser tube.
Secondary Mirror Holder The mechanical holder for the secondary mirror; usually a single stalk or a multi-vane “spider.”
2. Parts List
1 Optical tube assembly with altazimuth yoke mount and
altitude micro-motion control bar attached
1 Altitude lock knob
1 5x24 achromatic finder scope with mounting bracket and
bolts
1 20mm (35x) Kellner eyepiece (.965")
1 Optical tube dust cap
3 Adjustable wood tripod legs; 3 leg bolts with large wing
nuts and washers
1 Accessory tray; 3 small wing nuts and washers
3. Getting Started
Unpacking Your Telescope
Compare the labeled diagram of the telescope and accessories to the contents in the box you have just opened. Make
sure all the parts are present. Keep the original shipping box
in case you should need to return the telescope to Orion for
warranty repair service. The box also makes a very good container for storing the telescope when it is not in use.
Assembly
This telescope comes largely preassembled. All that is
needed is to attach the tripod legs, accessory tray, and
finder scope.
The tripod legs attach to the aluminum base of the altazimuth
mount. Attach a leg to each of the three flanges by aligning
the hole in the leg with the holes in the flange and inserting
the long bolt through the holes. Place a washer over the
threaded end of the bolt and then thread on a large wing nut.
Note that the hinged metal plate on each tripod leg should
face inward, not outward, when the legs are properly oriented. Do not tighten the wing nuts completely just yet. Next,
spread the legs apart and attach the accessory tray to the
hinged plates on the legs with the small screws, wing nuts,
and washers provided. Spread the legs apart as far as they
will go and tighten the wing nuts. Now, return to the joints
where the legs attach to the altazimuth mount and tighten the
large wing nuts.
Screw on the altitude lock bolt. When it’s tight, it prevents the
altitude control bar from moving.
The finder scope will be mounted on the front end of the optical tube next to the focuser. Before removing the two nuts
from the mounting screws, place your hand inside the telescope tube and hold the small bar on which the screws are
mounted.
If you do not do this, the piece could drop off and
damage the primary or secondary mirror.
With the optical tube
in a horizontal position (parallel to the ground), remove the two
nuts and install the finder scope, then replace the nuts.
Finally, place the eyepiece into the focuser drawtube and secure
it in place with the knurled setscrew. The telescope is now nearly
ready for “first light.” The one final adjustment needed will be to
align the finder scope to the main telescope’s optical system.
Aligning the Finder Scope
Having a finder scope makes it easy to locate objects in the
night sky. It provides low power and a wide field of view with
which to home in on objects of interest. When the finder
scope is properly aligned with the main telescope, an object
that is centered on the crosshairs of the finder scope will
appear right in the center of your telescope’s eyepiece.
The finder scope and the telescope should be aligned to point
to exactly the same spot in the sky. Alignment is easiest to do
in daylight hours, before your observing session. First, make
sure the eyepiece has been inserted in the focuser. Choose
a tree, telephone pole, street sign—anything that is far off in
the distance, at least 200 yards away. Put that image in the
center of the field of your telescope’s eyepiece. Now, where
is it in your finder scope’s field of view? Hopefully, the image
will be visible in the finder scope and some simple adjustments of the three alignment screws of the finder scope
mounting bracket will put the image dead center at the intersection of the crosshairs. (Note that the image will appear
upside down in the finder scope. This is normal.) By loosening one alignment screw and tightening another, you can
change the line of sight of the finder scope. Continue making
adjustments to the alignment screws until the image in both
the finder scope and the telescope’s eyepiece is exactly centered. Check the alignment by moving the telescope to
another object and fixing the finder scope crosshairs on the
exact point you want to look at. Then look through the telescope’s eyepiece to see if that point is in the middle of the
telescope’s field of view. If it is, the job is done. If not, make
the necessary adjustments to the finder scope alignment until
the two images match up.
Finder scopes often come out of alignment during transportation from site to site, so check the alignment before each
observing session. One way to help minimize any misalignment is to keep the bolts that attach the finder scope bracket
to the main telescope tube fairly tight.
4. Using Your Telescope
Transporting the Telescope
The SpaceProbe 3" is a highly portable telescope—easy to
take wherever you want to do your observing. You’ll be
Page 5

5
amazed at how much better the view is from dark country
skies compared to the view from light-polluted city or suburban skies. (Brighter objects, such as the Moon and planets,
aren’t affected much by city lights, however.) Don’t be afraid
to load the telescope into your car for a trip to the hills. As
long as the telescope doesn’t bounce around too much, it
won’t get damaged in transit.
Setup and Field Use
When selecting a location for observing, be sure to place the
telescope as far away as possible from direct artificial light
such as streetlights, porch lights, and automobile headlights.
The glare from these lights will greatly impair your night
vision. The telescope should be set up on a relatively level
surface. A grass or dirt surface is preferable to asphalt,
because asphalt radiates more heat at night, which disturbs
the air and compromises your view.
Focusing
Slowly turn one of the two focusing knobs back and forth to
bring the object you’re viewing into sharp focus. For viewing
nebulas and galaxies, which appear faint and “fuzzy,” it’ s best
to focus on stars in the same field of view. You’ll know the
deep-sky object is in focus when the stars around it appear
as sharp pinpoints.
5. Observing Tips and
Techniques
Seeing Limitations
Atmospheric conditions vary significantly from night to night.
“Seeing” refers to the steadiness of the air at a given time. In
conditions of poor seeing, atmospheric turbulence causes
objects viewed through the telescope to “boil.” If, when you
look up at the sky with just your eyes, the stars are twinkling
noticeably, seeing is bad and you will be limited to viewing
with low powers (bad seeing affects images at high powers
more severely). Planetary observing may also be very limited. Make sure you are not looking over buildings or any other
source of heat; that will also cause the image to become distorted. In conditions of good seeing, star twinkling is minimal
and images appear steady in the telescope’s field of view.
Cooling Your Telescope
All optical instruments need time to reach “thermal equilibrium.” When moved from a warm indoor location into the
cooler nighttime air, a telescope’s optics must cool to the outdoor temperature to achieve optimal image quality. The
bigger the instrument and the larger the temperature
change, the more time is needed for the optics to equilibrate.
For your SpaceProbe telescope, allow about an hour before
you start observing. In very cold climates (below freezing), it
is essential to store the telescope as cold as possible to minimize equilibration time. If the scope has to adjust to more
than a 40° temperature change, allow two to four hours.
Do You Wear Eyeglasses?
If you wear eyeglasses, you may be able to keep them on
while you observe if your eyepieces have enough eye relief
to allow you to see the whole field of view. You can try this by
looking through the eyepiece first with your glasses on and
then with them off, and see if the glasses restrict the view to
only a portion of the full field. If they do, you can easily
observe with your glasses off by just refocusing the telescope
the needed amount.
Let Your Eyes Adapt to the Darkness
Don’t expect to go from a lighted house into the darkness of
the outdoors at night and immediately see faint nebulas,
galaxies, and star clusters—or even very many stars, for that
matter. Your eyes take about 30 minutes to reach perhaps
80% of their full dark-adapted sensitivity. Many observers
notice improvements after several
hours
in total darkness. As
your eyes become dark-adapted, more stars will glimmer into
view and you’ll be able to see fainter details in objects you
view. Exposing your eyes to very bright daylight for extended
periods of time can adversely affect your night vision for days.
So give your eyes a while to get used to the dark before you
begin observing.
To see what you’re doing in the darkness, use a red-filtered
flashlight rather than a white light. Red light does not ruin your
eyes’ dark adaptation like white light does. A flashlight with a
red LED light is ideal, or you can cover the front of a regular
incandescent flashlight with red cellophane or paper. Beware,
too, that nearby porch lights, streetlights and automobile
headlights will ruin your night vision.
6. Astronomical Viewing
How to Find Interesting Celestial Objects
To find celestial objects with your telescope, you first need to
become reasonably familiar with the night sky. Unless you
know how to recognize the constellation Orion, for instance,
you won’t have much luck locating the Orion Nebula. A simple planisphere, or star wheel, can be a valuable tool for
learning the constellations and seeing which ones are visible
in the sky on a given night.
A good star chart or atlas can come in very handy for helping
find objects among the dizzying multitude of stars overhead.
Except for the Moon and the brighter planets, it’s pretty timeconsuming and frustrating to hunt for objects randomly,
without knowing where to look. You should have specific targets in mind before you begin looking through the eyepiece.
Start with a basic star atlas, one that shows stars no fainter
than 5th or 6th magnitude. In addition to stars, the atlas will
show the positions of a number of interesting deep-sky
objects, with different symbols representing the different types
of objects, such as galaxies, open star clusters, globular clusters, diffuse nebulas, and planetary nebulas. So, for example,
your atlas might show a globular cluster sitting just above the
lid of the “Teapot” pattern of stars in Sagittarius. You then
know to point your telescope in that direction to home in on the
cluster, which happens to be 7th-magnitude M28.
Page 6

6
So, once you’ve identified an object you’d like to observe
from the star chart, loosen the azimuth and altitude lock bolts
so the telescope moves freely. Look through the finder scope
and move the main telescope to the part of the sky where the
object should lie and see if you can see it in the finder. You
may have to sweep the telescope side to side or up and down
a bit until you spot it. You can tighten the altitude lock knob
and rotate the altitude micro-motion knob to move the telescope slowly up or down. Note that this knob has a limited
range of movement. If you reach the end of travel, loosen the
altitude lock bolt and rotate the knob back a few turns, then
tighten the lock bolt again.
Center the object on the crosshairs of the finder scope, then
tighten the azimuth and altitude lock bolts. Look into the telescope eyepiece. The object should be there. If it isn’t, or if the
object is too faint to see with the finder scope, use it to aim the
telescope to the approximate position where the object ought
to be, then sweep the area in small increments with the telescope while looking through the eyepiece.
The Moon
Our nearest celestial neighbor, the Moon, is the easiest and
yet one of the most interesting subjects to observe with your
new telescope. The best time to look is when the Moon is in
a partial phase, not when it is full or nearly full. The shadows
cast along the “terminator,” the border between the lit part of
the surface and the shadow, help bring out the relief and
detail of craters, mountains, and other features. You may
want to try using higher magnifications to see even smaller
detail.
The Planets
The major planets—Venus, Mars, Jupiter, and Saturn—are
the brightest objects visible in the night sky after the Moon.
While the positions of the stars remain fixed relative to each
other, the positions of the planets are constantly changing.
Some daily newspapers, the magazines
Sky & Telescope
and
Astronomy
, and Abrams Planetarium’s Sky Calendar will tell you
the location of the planets in the sky and the times they are visible. Since planets are quite small, optional high-power
eyepieces are recommended, and often needed, for detailed
observations.
JUPITER The largest planet, Jupiter, is a great subject for the
SpaceProbe 3". You can see the disk of the giant planet and
watch the ever-changing positions of its four largest moons,
Io, Callisto, Europa, and Ganymede. Higher-power eyepieces
should bring out the cloud bands and perhaps even the Great
Red Spot (which has faded in recent years).
SATURN The ringed planet is a breathtaking sight. The tilt of
the rings relative to our line of sight varies over a period of
many years. Sometimes they are oriented edge-on and are
entirely invisible, as they were briefly in 1995! At other times,
they are broadside and easily seen as giant “ears” on each
side of Saturn’s disk. Asteady night is necessary for a good
view. You will probably see a bright “star” close by, which is
Saturn’s brightest moon, Titan.
VENUS At its brightest, Venus is the most luminous object in
the sky after the Sun and the Moon. Ironically, it will appear
as a thin crescent when it is brightest. It never strays very far
from the morning or evening horizon, being close to the Sun
in its orbit. Sometimes Venus is even visible to the naked eye
during full daylight! No surface markings can be seen on
Venus, as it is always covered with dense clouds.
MARS The red planet makes its closest approach to Earth
every two years (March 1997, April 1999). During close
approaches you’ll see a red disk, and may be able to see the
polar ice cap. To see surface detail on Mars, you will need a
high-power eyepiece and a very steady night!
The Stars
Stars will appear like twinkling points of light. Even very powerful telescopes cannot magnify stars to appear as more than
points of light. You can, however, enjoy the different colors of
the stars and locate many double and multiple star systems.
The famous “Double-Double” in Lyra and the striking color
contrast of the double star Alberio in Cygnus are favorites.
Deep-Sky Objects
Under dark skies, you can observe fascinating deep-sky
objects, including emission and reflection nebulas, open and
globular star clusters, and galaxies in a variety of shapes and
sizes. Many of the objects will appear as faint smudges, but
with persistent study more detail can usually be teased out.
Don’t expect these objects to appear like the photographs in
magazines; our eyes are not sensitive enough to see much
color in celestial objects, except for a few of the brightest ones.
Consult a planisphere, observing guide, or star atlas to find out
what deep-sky objects are well placed for viewing (as high
overhead as possible) at the date and time you are observing.
7. Collimating the Optics
(Aligning the Mirrors)
The telescope’s primary and secondary mirrors have been
collimated at the factory and locked into place. Y ou should not
have to adjust them unless they were knocked out of alignment during shipment or bounced around in your vehicle
during transport. By doing a simple star test, you can determine whether your telescope needs to be collimated.
Star Testing Your Telescope
With the telescope cooled to the outdoor temperature, center
a bright star in the field of view of a high-power eyepiece. Now,
defocus the star image until it becomes a large circle of light
filling about one-tenth of the field of view. A black “hole” will
appear in the circle, like a hole in a doughnut; that’s the shadow of the secondary mirror. The hole will be exactly centered
in the “doughnut” if the telescope is in proper collimation. If the
hole is off-center, the telescope is not properly collimated and
some adjusting of the mirrors will be necessary.
Remove the eyepiece and look directly through the focuser at
the secondary (diagonal) mirror. The reflection of the primary
mirror should be precisely centered in the secondary mirror
Page 7

7
(ignore the dark reflection of the secondary mirror holder). If
it is not, adjust the three Phillips-head screws on the secondary mirror mount (you will need a Phillips screwdriver) until
the perimeter of the main mirror fits neatly within the outline
of the secondary mirror.
Now, the dark reflection of the secondary mirror holder in the
primary mirror will likely appear off-center, so you’ll need to
adjust the tilt of the primary mirror. This is done by adjusting
the three Phillips-head screws protruding from the back end of
the telescope. These are the collimation screws. Next to the
collimation screws you’ll see three other Phillips-head screws
whose heads are flat against the telescope. These screws
lock the mirror position and should be loosened a half turn or
so before adjusting the collimation screws. Turn any one of the
collimating screws no more than one-quarter turn at a time,
then recheck the mirror alignment. If it’s worse, turn the screw
in the opposite direction or try a different collimation screw. If
the screw is completely tight and will not turn further, loosen
the other two collimation screws. Loosening them too much
will move the main mirror too far forward, unbalancing the telescope. Only a small adjustment should be needed! You
should be able to get the secondary mirror holder silhouette
centered in the reflection of the primary mirror, which you
already centered in the secondary mirror. When the adjustment is complete, tighten the three mirror locking screws to fix
the primary mirror in position.
8. Care and Maintenance
Care of the Mount and Tube Assembly
Give your telescope reasonable care and it will last a lifetime.
Store it indoors or in a dry garage. Do not leave the telescope
outside except when using it. Keep it covered with a plastic
tarp or drop cloth to keep dust and dirt off. The optical tube is
aluminum and has a smooth painted surface that should
resist scratches and smudges. If a scratch does appear on
the tube, it will not harm the telescope. If you wish, you can
apply some white auto touch-up paint to the scratch.
Smudges can be wiped off with standard household cleaners
such as Windex or Formula 409.
Care of the Optics
Any quality optical lens cleaning tissue and optical lens cleaning fluid specifically designed for multi-coated optics can be
used to clean the exposed lenses of your eyepieces or finder
scope. Never use regular glass cleaner or cleaning fluid
designed for eyeglasses. Before cleaning with fluid and tissue,
however, blow any loose particles off the lens with a blower
bulb or compressed air. Then apply some cleaning fluid to a
tissue, never directly on the optics. Wipe the lens
gently
in a
circular motion, then remove any excess fluid with a fresh lens
tissue. Oily fingerprints and smudges may be removed using
this method. Use caution; rubbing too hard may scratch the
lens. On larger lenses, clean only a small area at a time, using
a fresh lens tissue on each area. Never reuse tissues. Also, do
not take eyepieces apart to clean them.
Cleaning Mirrors
You should not have to clean your telescope’s mirrors very
often; normally once every few years. Covering your telescope will prevent the mirrors from getting dirty. Improper
cleaning can scratch mirror coatings, so the fewer times you
have to clean the mirrors the better. Keep in mind that small
specks of dust or flecks of paint have virtually no effect on the
visual performance of the telescope.
The large primary mirror and the elliptical secondary mirror of
your telescope are front-surface aluminized and overcoated
with hard silicon monoxide, which prevents the aluminum
from oxidizing. These coatings normally last through many
years of use before requiring recoating (which is easily done).
The secondary mirror is more likely to require cleaning, because
it is right up near the eyepiece. First blow or brush the lens to
remove any dust (do not use canned compressed air as it contains compounds harmful to first-surface mirrors), then clean the
mirror surface with ordinary lens fluid and cleaning tissue. Be
extra gentle so as not to rub grit into the coating. (Very tiny, barely visible “sleeks” are not unusual and do not affect
performance.)
T o clean the primary mirror , carefully remove the mirror cell from
the telescope. Do not attempt to remove the mirror from the
cell—it has been secured in place by both clamps and adhesive. Be careful not to touch the front surface of the mirror with
your fingers! Set the mirror on a clean, soft towel. Fill a clean
sink, free of abrasive cleanser, with room-temperature water, a
few drops of liquid dishwashing detergent, and if possible, a
capful of rubbing alcohol. Submerge the mirror (aluminized face
up) in the water and let it soak for several minutes (or hours if
it’s a very dirty mirror). Wipe the mirror under water with clean
cotton balls, using extremely light pressure and stroking in
straight lines across the surface. Use one ball for each wipe
across the mirror. Then rinse the mirror under a stream of lukewarm water. Any particles on the surface can be swabbed
gently with a series of clean cotton balls, each used just one
time. Dry the mirror in a stream of air (a “blower bulb” works
great), and remove any stray drops of water with the corner of
a paper towel. Water will run off a clean surface. Dry the cell and
exposed surfaces with a towel. Cover the mirror surface with
Kleenex, and leave the entire assembly in a warm area until it
is completely dry before reassembling the telescope.
9. Specifications
Primary mirror: 3" (76mm) diameter, aluminized and overcoated with silicon monoxide
Focal length: 700mm
Focal ratio: f/9.2
Magnification: 35x with 20mm eyepiece
Finder scope: 5x magnification, achromatic
Eyepiece: 20mm Kellner, fully coated
Page 8

One-Year Limited Warranty
This Orion SpaceProbe 3" Altazimuth Reflector is warranted against defects in materials or
workmanship for a period of one year from the date of purchase. This warranty is for the
benefit of the original retail purchaser only. During this warranty period Orion Telescopes &
Binoculars will repair or replace, at Orion’s option, any warranted instrument that proves to be
defective, provided it is returned postage paid to: Orion Warranty Repair, 89 Hangar Way,
Watsonville, CA 95076. If the product is not registered, proof of purchase (such as a copy of
the original invoice) is required.
This warranty does not apply if, in Orion’s judgment, the instrument has been abused, mishandled, or modified, nor does it apply to normal wear and tear. This warranty gives you specific
legal rights, and you may also have other rights, which vary from state to state. For further warranty service information, contact: Customer Service Department, Orion Telescopes &
Binoculars, P. O. Box 1815, Santa Cruz, CA 95061; (800) 676-1343.
Orion Telescopes & Binoculars
Post Office Box 1815, Santa Cruz, CA 95061
Customer Support Help Line (800) 676-1343 • Day or Evening
 Loading...