

Orion Technology OR-P5020 User Manual
1. Full HD(1920x1080P) image via HD-SDI interface with conventional
coaxial connection
2. Defog : Defog technology enhances visibility in real-time in fog,
smoke, lowlight, dust and etc. conditions
3. Smart IR : When IR LED is t urned on in B/W, the objects can be
clearly identified due to the function that decreases screen
saturation of objects within a short distance
4. Adopted Smart DNR technology, It reduces noise efficiently in low
light condition
5. Provide Max. 64X digital zoom
6. Support 8 different privacy zone
7. This camera is i ncredibly flexible to install with its 3-axis camera
construction, which makes the camera ceiling, wall or slope
mountable
8. This product is "waterproof" to resist rain, snow and other weather
factors(IP67)
9. 50M range visible in total darkness with 70pcs of IR LEDs.(Indoor)
10. Multi-language full OSD support
1. Please study the instruction manual before your applications and
keep it for your future reference.
2. Do not flash LED light directly on the eyes when LEDs are on.
3. Do not install the camera on a unstable surface.
It will cause falling or other hazards.
4. Do not use improper power, it could cause f ire or electric shock.
(Use the AC adaptor 12V DC regulated,1.5A)
5. Do not disassemble or re-model the camera, it could cause fire,
electric shock or other hazards.
6. Stop using the camera when you find a malfunction like smoke or
unusual heat, it c ould cause fire or electric shock.
7. Due to the possibility of water leakage, do not cut or peel off the
cable. In case you cut or peel off the cable, the warranty will be void.
8. Do not adhere dangerous articles to the camera.
CAUTION
FEATURE
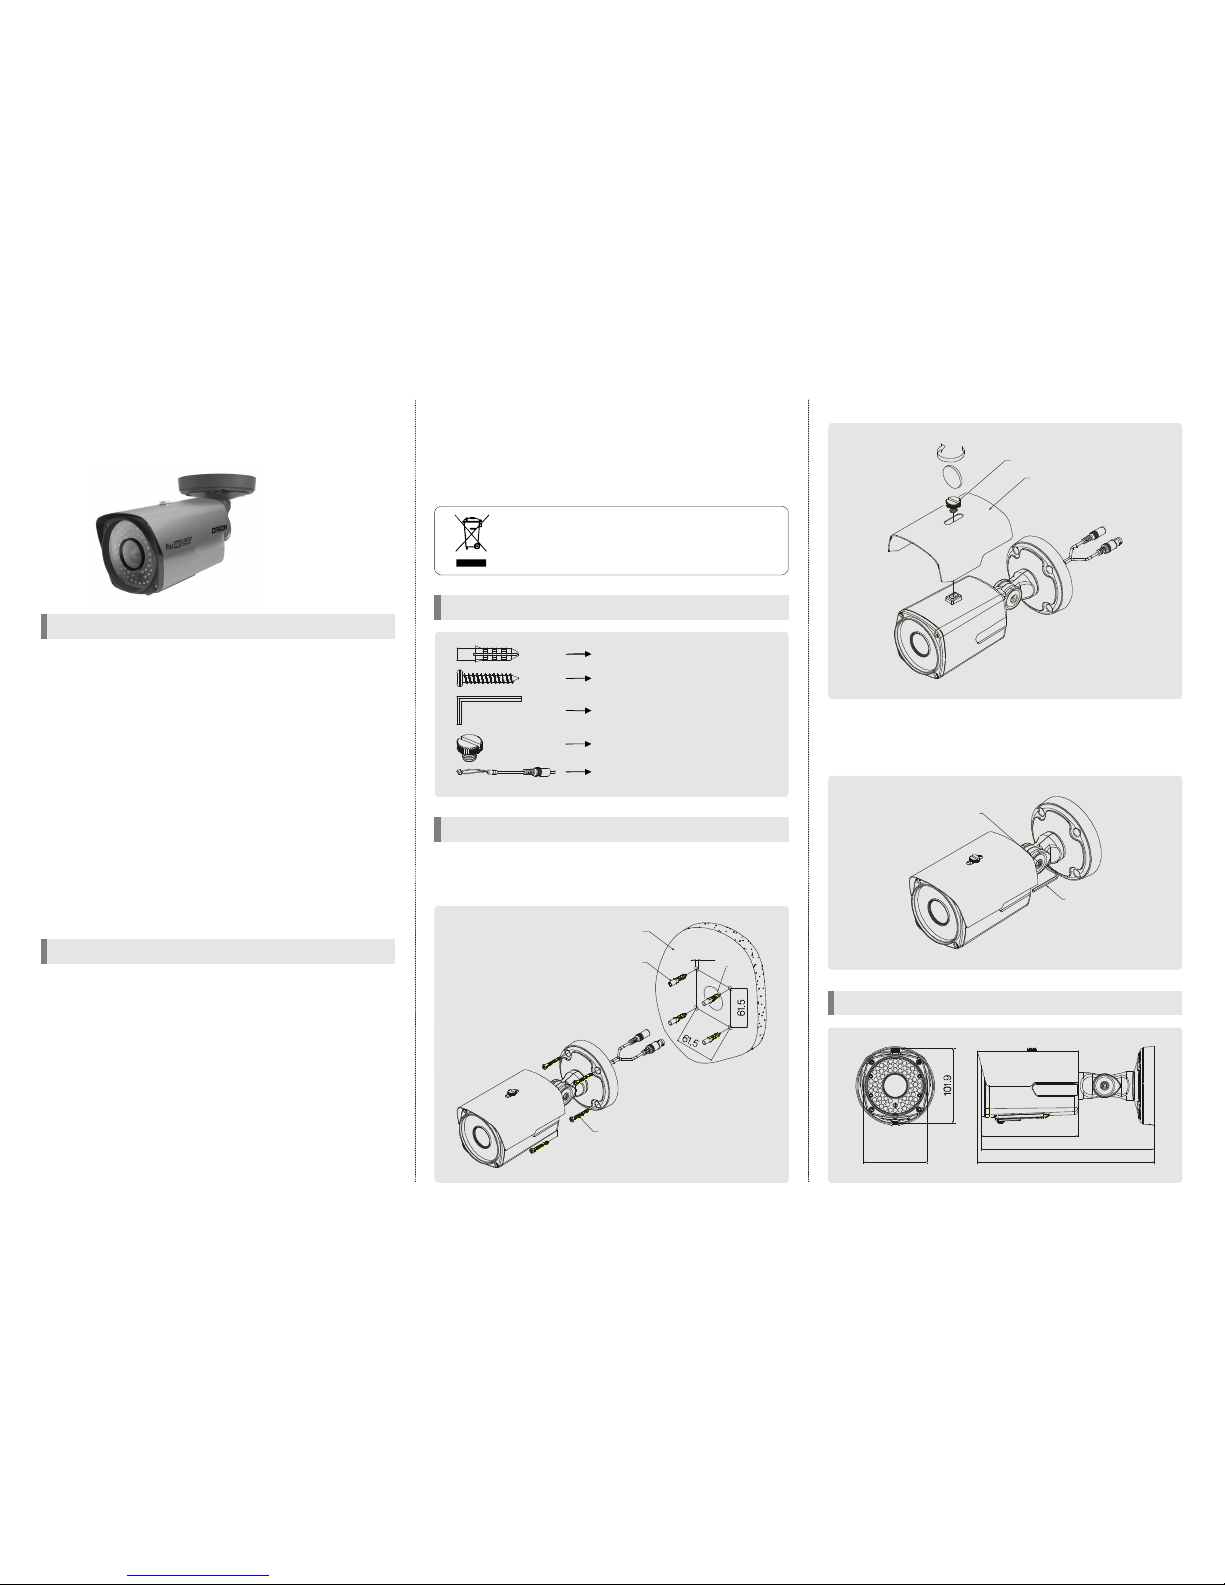
4. Attach the sunvisor and fix the sunvisor fixing bolt.
5. Loosen the bolt by using the 3mm wrench included.
6. Face the direction of the camera to monitor.
7. Tighten the bolt to completeadjustment.
DIMENSION
8. Do not adhere dangerous articles to the camera.
9. Pleaseusethe camerau nit withingiventemperature and electricitylimit.
10. Please make sure that installation should be done by qualified
service person only.
11. Do not disassemble the unit by yourself. When there is problem
with the unit please contact after-sale service center or the shop
where you bought.
1. Make a hole of Ø25mm in diameter for passing cable.
2. Drill four holes on the wall or ceiling and insert the anchors.
3. Arrange the cables and fix the screws.
86.4
131.3
236
241.1
BOLT
SUNVISOR
WRENCH
BOLT
HOW TO INSTALL
ACCESSORIES
ANCHOR 6x30,4EA
SCREW 4x35 TP1 PAN SUS, 4EA
WRENCH 3mm L TYPE, 1EA
SUNVISOR BOLT, 1EA
Extra video output cable for installation
,
1EA(option)
If the product is to be put o ut of operation definitively,
take it to a local recycling plant for a disposal which
is not harmful to the environment.
Ø6
Ø25
WALL
ANCHOR 6x30,4EA
SCREW Tp1 4x35, 4EA
IR WATERPROOF HD-SDI CAMERA
OR-P5020
MANUAL
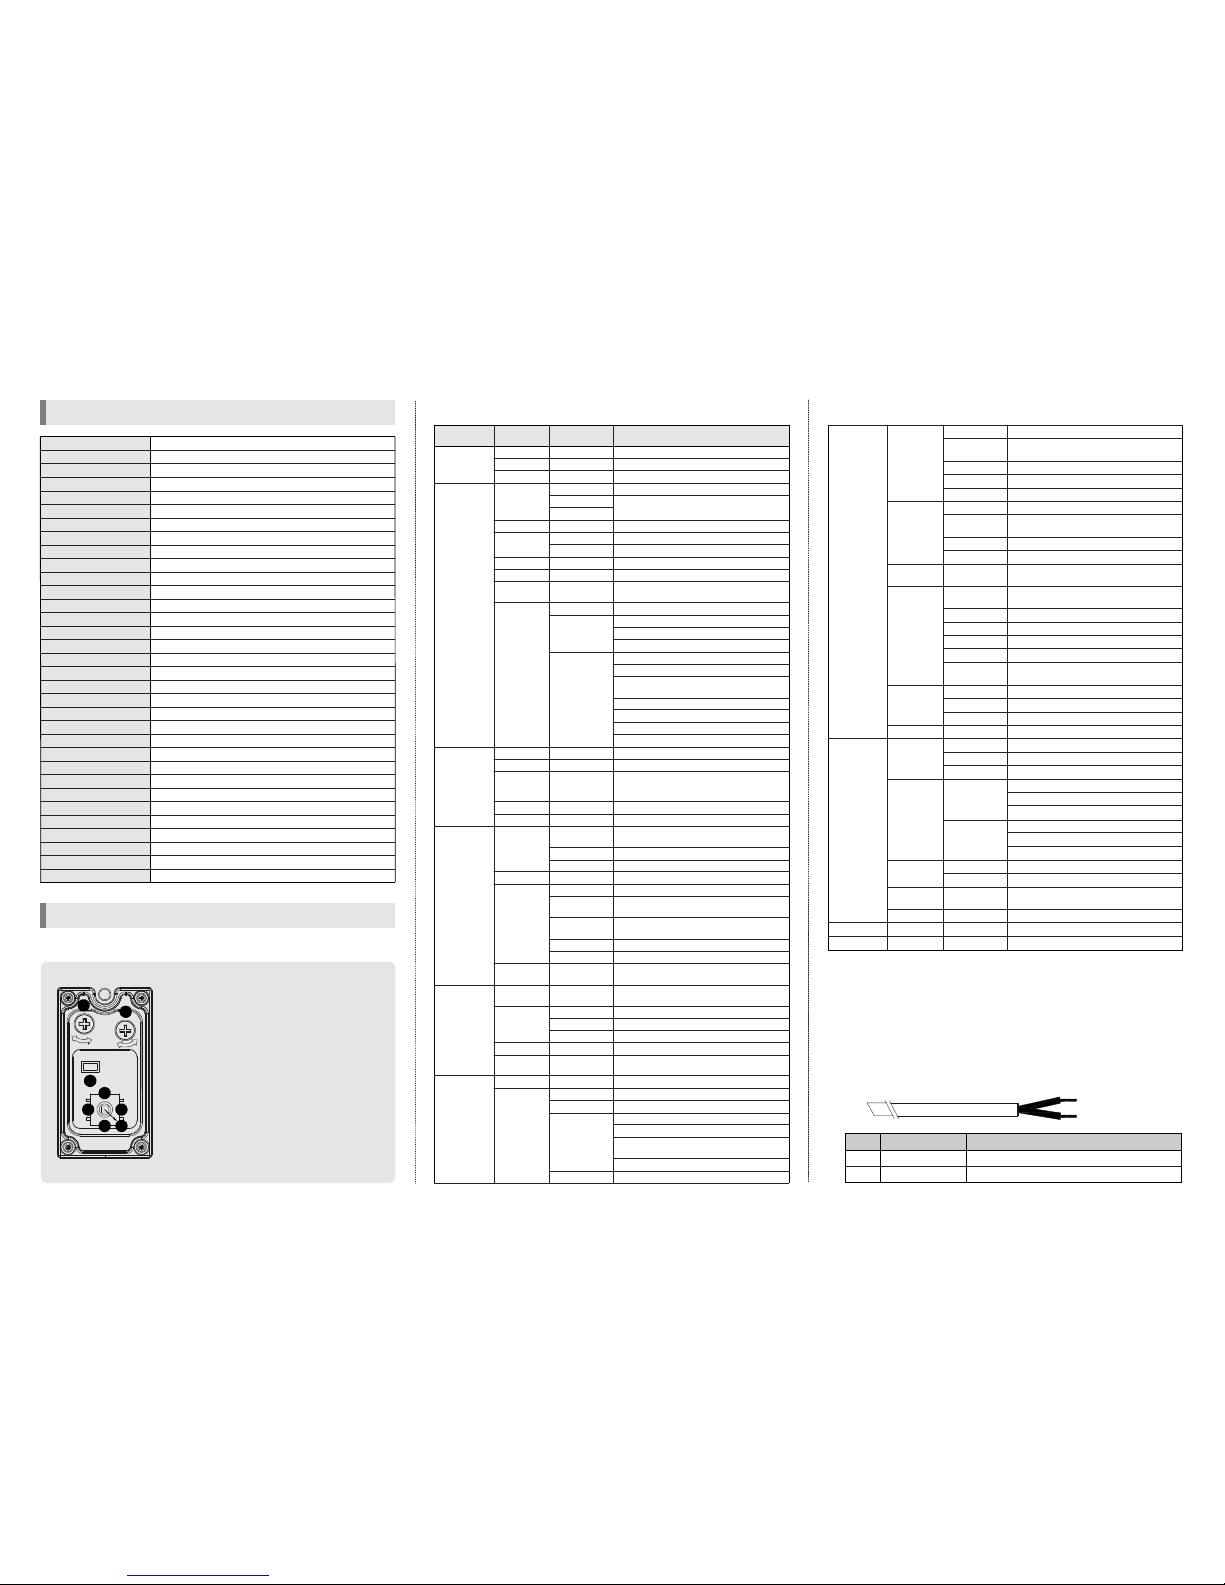
①ENTER :
②UP, ③DOWN :
④LEFT, ⑤RIGHT :
⑥FOCUS, ⑦ZOOM :
⑧EXT. VIDEO :
Used to access the menu and
confirm selection.
Used to move the cursor
to up or down.
Used tomovethe cursor
toleft or right andchange the value.
Use a '+' type driver
for adjusting zoom and focus.(In case of
operation Focus/Zoom, don't put stress
excessively.)
Extra video output terminal
forinstallation. The cable is option.
3B25417A
2. OSD menu structure
※All specificationis subject to change without noticeto improve thequality.
SPECIFICATION
FUNCTION SETTING
1. How to use the jog lever
Z
EXT.VIDEO
F
7
6
8
2
5134
*OSD menu& Focus/Zoom adjustment direction
1. Unfasten the screwof the bottom door
2. Adjustthe jog lever &Focus/Zoom trimmers
3. Tightenthe screw of thebottom door
Function
settingmen u
MOTION
PRIVACY
LANGUAGE
DEFECT
RS485
VERSION
SHARPNESS
MONITOR
OSD
LSC
NTSC/PAL
FACTORY
SELECT
DISPLAY
SENSITIVITY
MOTION VIEW
DEFAULT
SELECT
DISPLAY
COLOR
DEFAULT
ENG, JPN,
CHN1,CHN2
LIVE DPC
LEVEL
STATIC DPC
START
LEVEL
SENS-UP
CAM ID
ID DISPLAY
BAUDRATE
SHARPNESS
LEVEL
RESOLUTION
CRT
LCD
TEXT OLOR
OUTLINE
Select themotion detectionzone(1~3)
Display the zone or not and adjust the size &
position
Motiondetection sensitivitysetting
Select notificationmethod of motion detection
Reset thesetting of MotionDetection
Select theprivacy zone(1~8)
Display the zone or not and adjust the size &
position
Select themask color
Reset thesetting of PRIVACY
Select thelanguage
(English,Japanese, Chinese1, Chinese 2)
Defective pixel compensation reflect real time
or not
LIVE DPC LEVELsetting
Appointthe defectivepixel or not
Start defective pixelscompensation
STATIC DPC LEVELsetting
SENSE-UPlimit setting when finding defective
pixels
Select thecamera IDfor RS-485communication
Displaythe CAM ID on the screen
Select baudrate
Firmware versiondisplay
Sharpness functionO N/ OFF
Increasing this valuesharpens objectedges
Enhancesthe image quality
Black Level : Contrast adjustable
Blue Gain: Blue gain adjustable
Red Gain: Red gain adjustable
Gamma : Gammaadjustable
Blue Gain: Blue gain adjustable
Red Gain: Red gain adjustable
OSD colorselection
OSD outline
Use the brightnesscompensation of four lens'
corners(LSC) or not
NTSC/PAL selection
Reset your camerato factory default condition
Escapethe menu
AUTO
X2~X60
AUTO/OFF
X2~X60
1~100
OFF, LOW,
MIDDLE, HIGH
OFF
BLC
HSBLC
DELAY
D→N(CDS)
N→D(CDS)
BURST
IR SMART
IR LED
IR PWM
S-LEVEL
E-LEVEL
FREEZE
MIRROR
D-ZOOM
NEG.IMAGE
Vari-focalauto iris DC lens
Vari-focalauto iris VIDEO lens
Fixed focal lens
Shutterspeed auto adjustable
Select shutter speed manually
AGC level selectable
Using senseup when it is low luminance
Sense up limit setup(X2~X60)
Adjustthe brightness
WidenDYNAMIC RANGEby gammaadjustment
Enhancesvisibility in fog, smoke,lowlight, dust
etc.conditions
Deactivates the BackLight function
Gain : BLCLEVEL setup
Area : BLC area setup
Default: Reset the settingof BLC
Hight lightSuppress BLCsetting
Select : SelectHSBLC zone(1~4)
Display : Display the zone or not and adjust
the size& position
Level: Level adjust
Mode: Use thefunctionat nightonly or allday
BlackMask : Thefunctionactivate/ deactivate
Default: Reset the settingof HSBLC
Adjustthe white balance manually
Adjustthe white balance automatically
Move the camera lens toward to white paper
then press the set button to find the optimal
white balance for current environment
Optimized White balance forI ndoor
Optimized White balance forO utdoor
Select the duration time about changing the
day ↔ nightmode(0~60)
Not adjustable
Not adjustable
Fixed atcolor(LED OFF)
Fixed atB/W
Determines whetherto transmitthe burstsignal
or notin B/Wmode
Decreases screen saturation of objects within
a short range
IR LED ON/OFFcontrol
IR LED outputlevel adjustable
Day & Night can be changed using external
signal(Not available)
Reducing noise by arithmetic processing of
pixels around
Reducingnoise byarithmetic processingof time
Start level of 3DNR function
End level of 3DNR function
Noise Reduction sensitivity
Noise reduction activates depending on the
circumstances
Displaythe camera name on thescreen
Still image
Flip thepicture horizontally and/orvertically
PIP :Display the Picturei nPicture imageor not
D-Zoom :Use a digital zoomo fX2 ~ X64
Pan&Tilt : Zoomed in image can be moved to
horizontal & vertical
Default: Reset the settingof Digital ZOOM
NEGATIVE image
1. LENS
2. EXPOSURE
3. WHITEBAL.
4. DAY&NIGHT
5. NR
6. SPECIAL
6. SPECIAL
7. ADJUST
8. RESET
9. EXIT
LOW, MIDDLE, HIGH
OFF, LOW, MIDDLE, HIGH
OR-P5020
1/3" 2.1Megapixel CMOS
Progressive Scan
1944(H) x 1092(V)Pixel
50dB or More
1080P(1920x 1080) 30fps
HD-SDI / 1.0 Vp-p(75Ω, Composite),NTSC/PAL(Selectable)
1.0Lux(Color),0.5Lux(BW), 0.02Lux(Sens-up x60)
1/25 ~ 1/50,000sec
AWB/ AWC-SET/ MANUAL / INDOOR / OUTDOOR
BLC / HSBLC/ OFF
LOW/ MIDDLE / HIGH/ OFF
LOW / MIDDLE /HIGH
SHARPNESS / MONITOR/ LSC / NTSC/PAL
English, Japanese, Chinese(Selectable)
ICR(AUTO / COLOR /BW)
2DNR / 3DNR / SMART NR
ON / OFF(X2 ~ X64)
ON / OFF(8 ZoneSelectable)
ON / OFF(3 Zone Selectable)
LIVE DPC / STATIC DPC
ON / OFF(Selectable limit~ X60)
FREEZE/ MIRROR / D-ZOOM/ NEG.IMAGE
RS - 485(Baud Rate : 2400~ 38400)
Pelco-D
Vari-focal autoiris lens
12V DC/24V AC Dual voltage
Max.1A(at 12V DC, 24V AC): LED ON
Yes
-10℃ ~ 50℃
-20℃ ~ 60℃
86.4(W) x 101.9(H) x 131.3(D)mm
Approx. 1kg
Model No.
Image Sensor
Effective Pixel
PrivacyZone
Communication
PowerSupply
ScanningSystem
S/N Ratio
Video Output Mode
Video Output Level
Min. Illumination
ShutterSpeed
White Balance
Backlight
ACCE(DWDR)
AGC
Adjustment
OSD
Day & Night
2D/3D-NR
DigitalZoom / PIP
Motion Detection
DefectPixel Compensation
Sense-up
D-Effect
Protocol
Lens
CurrentConsumption
Fan/Feater
Operation Temp.
Preservation Temp.
Dimension
Weight
A : ORANGE(RX +)
B : WHITE(RX -)
Function
RX +
RX -
Remark
RS-485A
RS-485B
o.
A
B
N
3. How to control through RS-485 communication
4. Cable array
1) Match the camera with controller's ID,baudrate and protocol
2) Up, Down, Left and right of Jog leveris same as Up, Down, Left and
right of RS-485 controller
3) Enter of Jog lever is the same as menu key or IRIS open key of RS485 controller
Selectme nu ContentsSub menu
1/30(1/25)~1/50000
DC
VIDEO(N/A)
MANUAL
SHUTTER
AGC
SENSE-UP
BRIGHTNESS
ACCE
DEFOG
BACKLIGHT
MANUAL
ATW
AWC→SET
INDOOR
OUTDOOR
AUTO
COLOR
B/W
EXT
2DNR
3DNR
LEVEL
SMART NR
CAM TITLE
D-EFFECT
 Loading...