

OR-7400SD DVR Quick Guide
1. Start installation
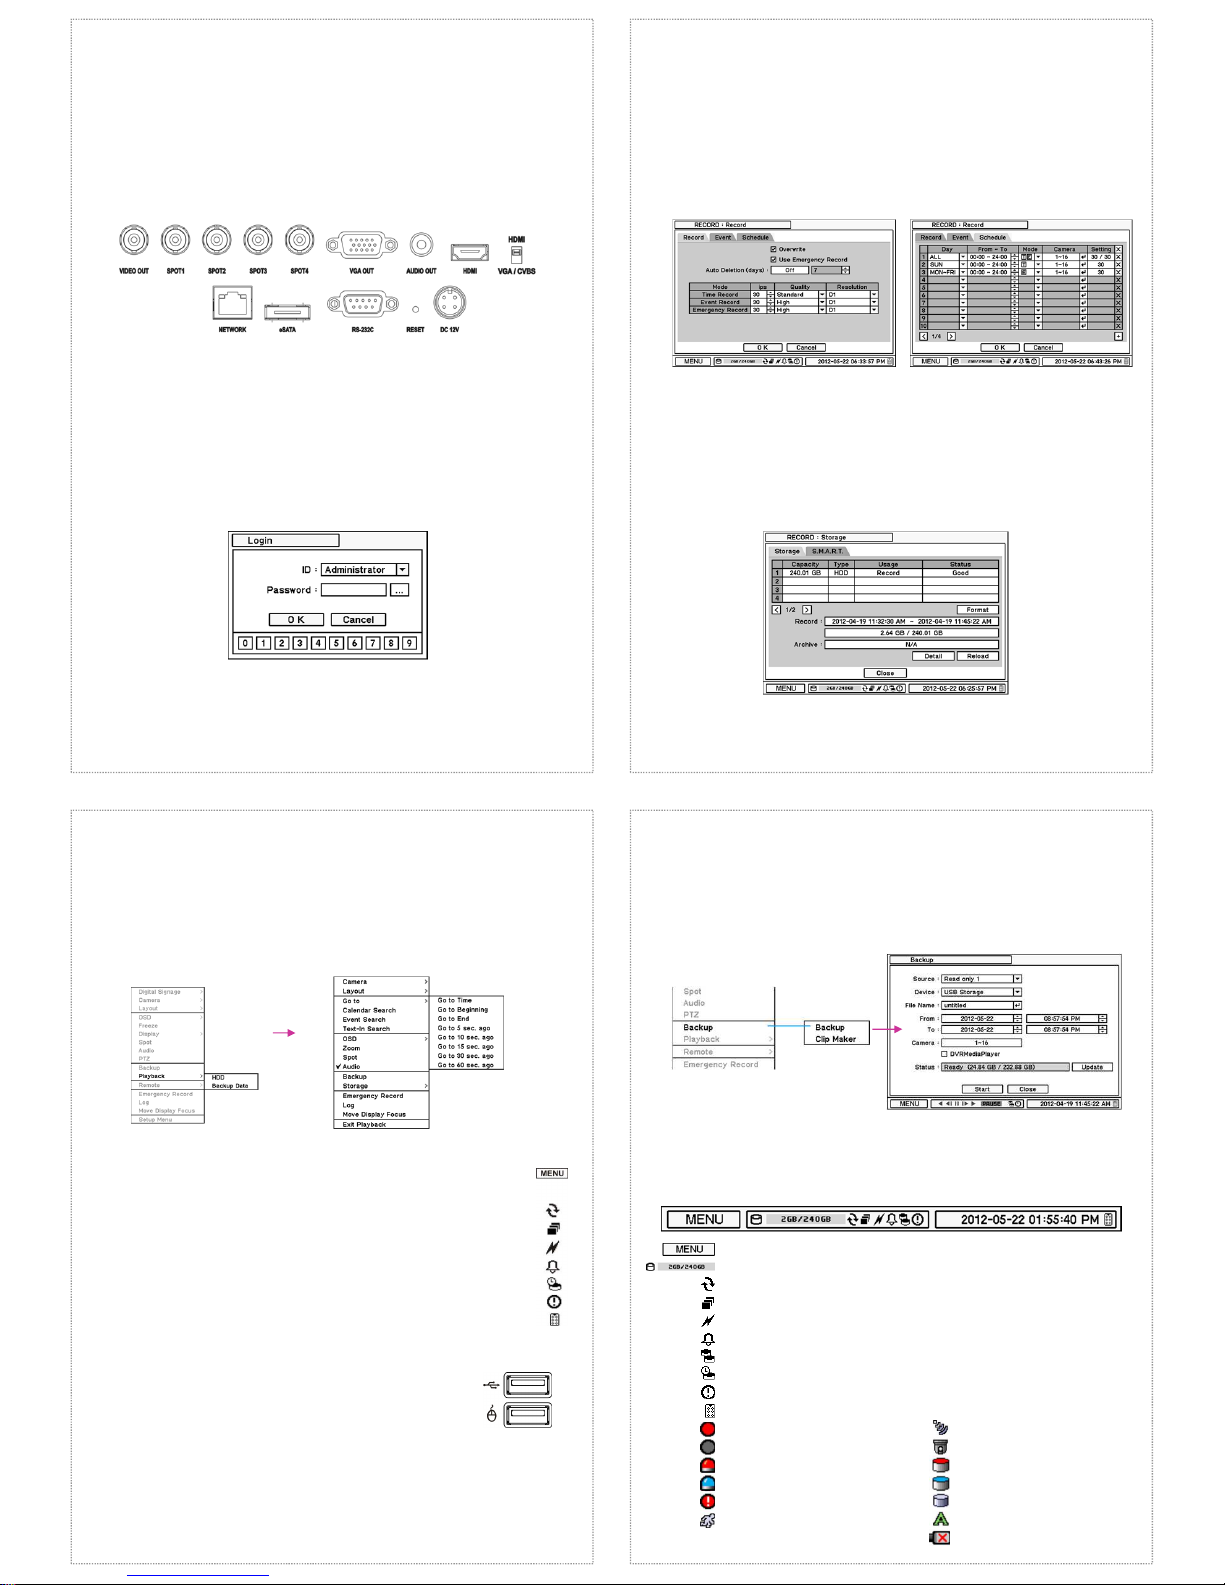
• Connect camera and monitor cable. When use CRT monitor, connect to ‘Video out’
with BNC connector, when use VGA monitor, connect on to ‘VGA OUT’.
When use HDMI monitor, connect to ‘HDMI’ port.
• Need to adjust switch when use HDMI monitor.
• Connect power supply on product. System powers on automatically.
This quick guide describes about 8, 16channel DVR. Each number of Camera, Audio,
Alarm and Sensor are vary.
Manual is based on 16channel DVR.
2. Login
• To enter DVR setup menu, you need ID & password.
• Factory default value is ID: Administrator / Password : None
• User should set password after login. No initial password is set when it is released. To
Change password, go to MENU > System > User and change or set password..
3. Record setup
• DVR starts recording when system starts. Default recording setup is maximum
recording speed and standard picture quality. For more detail recording setup is
available on following menu.
• For more details, see product manual 2-4-2. MENU > Recording > Recording setup.
a. Use manufacture recommended HDDs for best product working.
b. HDD format is necessary before start recording.
For more details about format, see manual 2-4-1. MENU > Recording > Storage.
*Caution
4. Playback
• Press ‘PLAYBACK’ button on front or select from popup menu by mouse.
Click right mouse button in
surveillance mode and it
changes to playback mode as
follows.
Change to playback
mode and press ‘MENU’
button.
• User can search as following ways in playback popup menu.
a. Go to Time(Search by time): Set specific date and time to playback.
i. Got to Beginning: Move to the first of recorded data.
ii. Got to End: Move to the end of recorded data.
b. Calendar search: Select date to search recorded data.
c. Event Search: Use event list to search & playback recorded data.
d. Text in Search: Search playback data by text input such as POS/ATM .
Front USB port can be used as 3 usage as follows.
a. Backup recorded data by USB storage
b. Control DVR with USB mouse connection.
(Use only mouse port in DVR front.)
c. Import/Export DVR setup value through USB memory.
*USB Port
5. Backup
• Press BACKUP button or use popup menu by mouse. Select backup in popup menu and
enter Backup mode.
•Use USB media such as USB flash memory, USB external HDD to backup recorded data.
Before return to backup menu, connect USB media first.
• For more details, see user’s maual 4. Backup part.
• OSD Icons
: Time laps recording
: Stop Recording
: Event recording
: Pre event recording
: Emergency Recording (E.REC)
: Motion detection
: Sensor detection
: PTZ camera
: Backup
: Clipmaker
: Instant backup
: Text in
: Video Loss
: Press this menu button to open main menu.
: Display HDD usage.
: Turns on when system overwrite HDD.
: Sequencial surveillance mode.
: Turns on when remote s.w is connected.
: Turns on when there is alarm event.
: Shows system is on Mirroring.
: Shows system is on Archiving.
: Shows system is on emergency recording mode.
: Remote control is on operating.

Using Remote Software
1. STARTING THE SOFTWARE
*Note
: Before using the remote software, refer to a customer card in the package
to download the software. Please install the software on your PC once you download it.
Double click on program icon on PC to run the remote software.
Main screen of the remote software appears as shown below.
*Note
: A minimum resolution should be more than 1024 x 620; and a recommendable
one is over 1280 x 1024.
The Log In window will appear when the remote software starts. Select user level as each
user will have different authority level over the system control depend on the pre set up.
Enter OK once the user level is selected as the default password is ‘none’.
2. HOW TO USE REMOTE SOFTWARE
Connect
Disconnect
Setup
Playback Control
Change Display Page
Display Mode
Full Screen
PlaybackLive
Close
Audio Volume
Voice Transmission
Calendar Search
Screenshot
Sequence
Event Search
Text-In Search
Unfold Site List Unfold Tool Panel
•Live: Click the image to enter the live mode.
•Playback: Click the image to enter the playback mode.
•Connect / Disconnect: Click button to connect a site as live or playback mode.
•Playback Control: Use buttons to control playback images.
•Display Mode: Select display modes. (1, 4, 9, 16, 25, 36, 49, 64 and full screen)
•Change Display Page: Change Display Mode to Previous or Next page in camera order.
•Voice Transmission: Click button to transmit remote voice to the local DVR.
•Screenshot: Capture the current screen and save it as a image file.
•Sequence: Display images on pre selected sites in sequence mode.
•Setup: To change set up on the Remote Software or a remote DVR.
•Audio Volume: Click Audio icon to select audio volume and mute options.
Select a camera to receive Audio of the selected camera (highlighted in border lines)
•Full Screen: Display image on full screen mode.
•Close: Click the icon to close the software
Calendar Search
Fold Calendar Search Panel
Event Search
Text-In Search
3. REMOTE PLAYBACK
Playback Control Button
Beginning
Reverse Play / Rewind
Step Backward
Stop
Step Forward
Play / Fast Forward
End
Click on icon to display time search window.
Enter specific time to search the data
Click on icon refresh and update the calendar info.
4. SITE SET UP
Click Connect button to display registered remote locations or add new locations.
Click Add button to add remote location and required information.
Click OK to save information and complete the registration.
*Note
: Layout can be changed after begin connected using the display option on the menu.
The DVR and the Remote Software on PC start searching each other once they are
on the same local network. The Auto Detection menu shows the DVRS detected on the
same local network.
*Note
: Auto Detection finds DVRs on the local network automatically. To use this function,
Apple® Bonjour® needs to be installed in PC. Please refer to http://www.apple.com/bonjour
for more details and download.
5. FAVORITE SET UP
Favorite function allows multi site management. Up to 64 different cameras and sites can
be monitored and managed on one screen. Select Favorite tap.
Click “Add” button to group multiple sties as one favorite group. Enter the group name and
description. Up to 64 different cameras or sites can be grouped and displayed together.
Select sites and cameras from the drop down list by clicking button.
*Note
: Sites should be registered under ‘Site’ menu before setting the favorite.
6. REMOTE UPGRADE
The system upgrade can be done through the remote software on PC.
• Click on and Remote Setup to enter remote setup menu.
• Select Information under System.
• Click Upgrade next to software version to find a file for upgrade
• Select the file location and the file to upgrade the system.
*Note
: Please do not close down the remote software or power off a computer until
the system upgrade is completed.
 Loading...