

ORION ELECTRIC M2C3B Users Manual
Timer recording
Timer recording can be programmed on-screen with the remote control.
The built-in timer allows automatic unattended recording of up to 8
programs within 1 month.
Timer recording
DVD/VCR
TAPE EJECT
2, 3
1-3
CANCEL
1, 5
TIMER REC
Preparation:
• Press DVD/VCR to select the VCR mode.
• Load a cassette tape with the erase prevention tab
intact.
• Check the time and date are correct
24
.
Example: Program a timer recording for the 26th day,
channel 125
(CATV), 11:00 - 11:30 PM on timer program
number 1 (Tape speed: SLP).
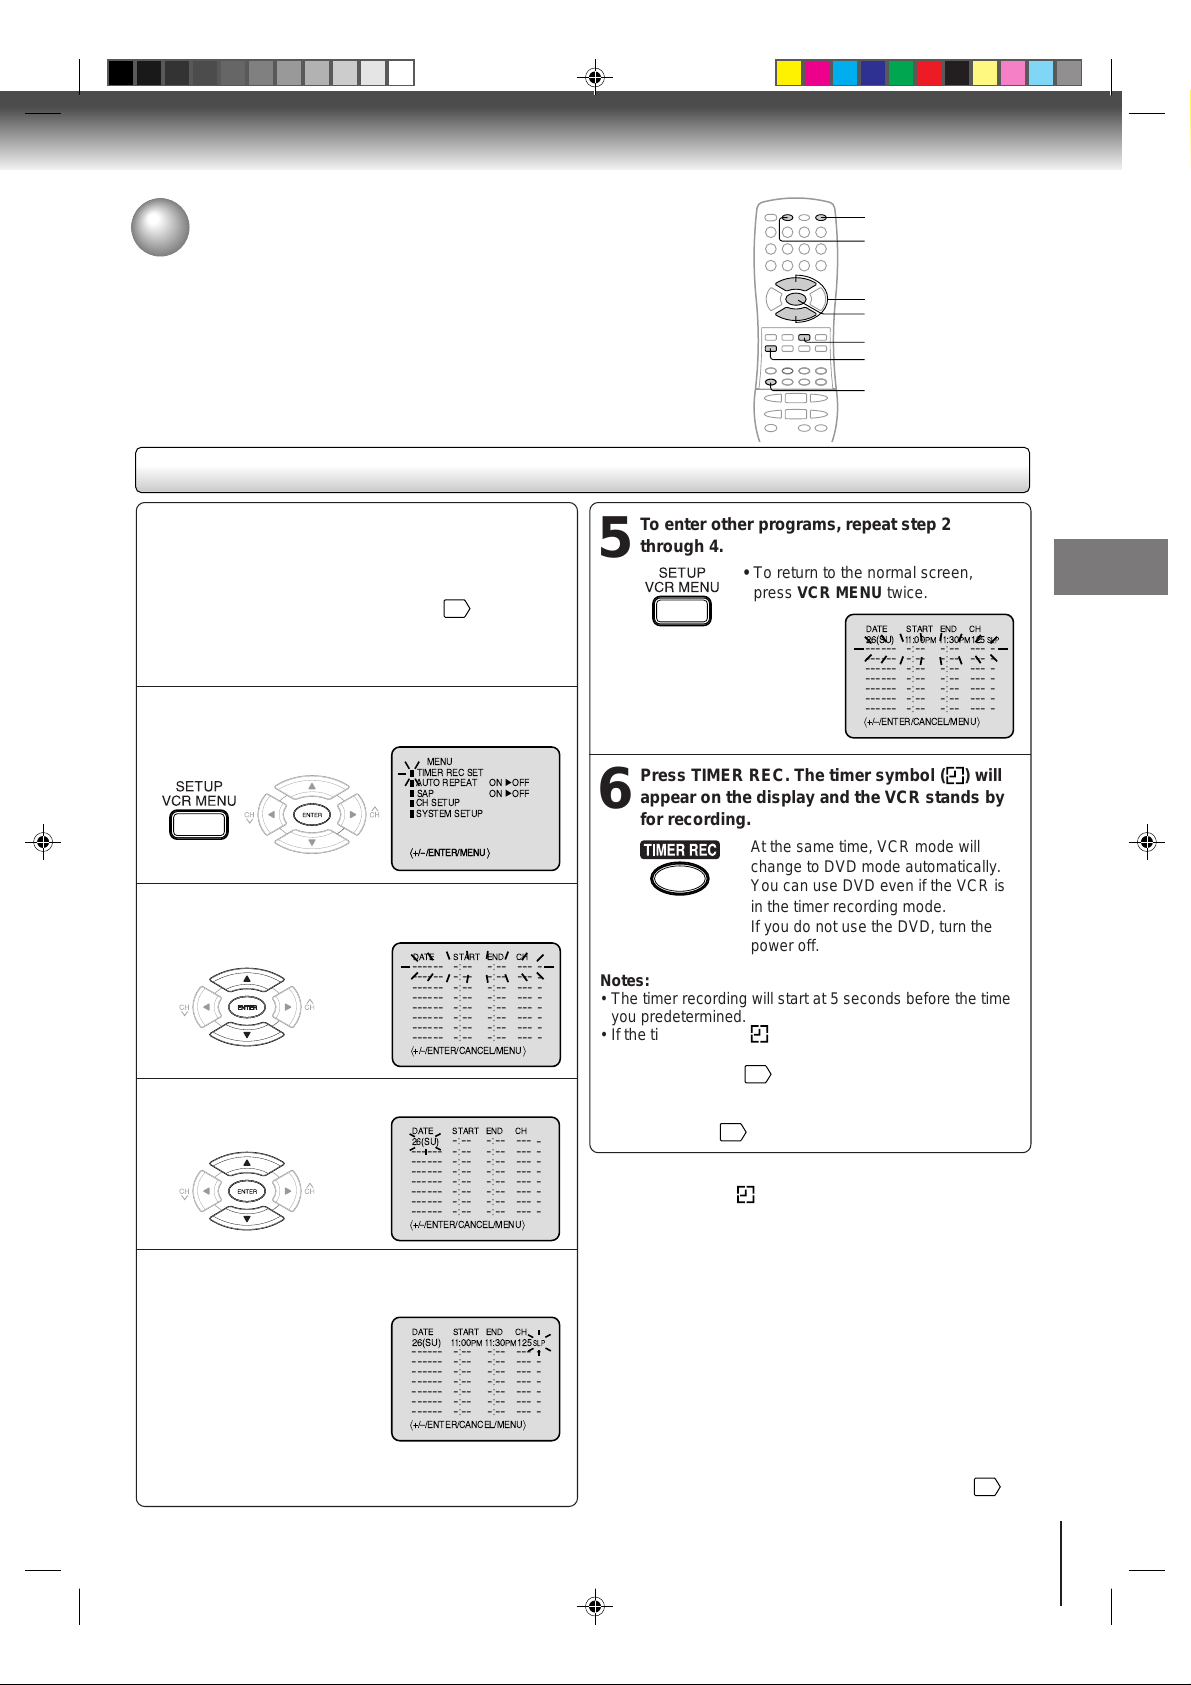
Press VCR MENU. Select “TIMER REC SET”,
then press ENTER.
1
TRACKING/ SET +
TRACKING/ SET –
MENU
TIMER REC SET
AUTO REPEAT
SAP
CH SETUP
SYSTEM SETUP
á+/-
/ENTER/MENU
/ENTER/MENU
ON OFF
ON OFF
ñá+/-
ñ
Press SET + or – to select one of the program
line, then press ENTER.
2
TRACKING/ SET +
TRACKING/ SET –
DATE START END CH
Ð Ð Ð Ð Ð Ð Ð : Ð Ð Ð : Ð Ð Ð Ð Ð
Ð Ð Ð Ð Ð Ð Ð : Ð Ð Ð : Ð Ð Ð Ð Ð
Ð Ð Ð Ð Ð Ð Ð : Ð Ð Ð : Ð Ð Ð Ð Ð
Ð Ð Ð Ð Ð Ð Ð : Ð Ð Ð : Ð Ð Ð Ð Ð
Ð Ð Ð Ð Ð Ð Ð : Ð Ð Ð : Ð Ð Ð Ð Ð
Ð Ð Ð Ð Ð Ð Ð : Ð Ð Ð : Ð Ð Ð Ð Ð
Ð Ð Ð Ð Ð Ð Ð : Ð Ð Ð : Ð Ð Ð Ð Ð
Ð Ð Ð Ð Ð Ð Ð : Ð Ð Ð : Ð Ð Ð Ð Ð
á+/Ð
/ENTER/CANCEL/MENU
Ð
Ð
Ð
Ð
Ð
Ð
Ð
Ð
ñ
Press SET + or – to select the date, then press
ENTER.
3
TRACKING/ SET +
TRACKING/ SET –
DATE START END CH
Ð : Ð Ð Ð : Ð Ð Ð Ð Ð
26(SU)
Ð Ð Ð Ð Ð Ð Ð : Ð Ð Ð : Ð Ð Ð Ð Ð
Ð Ð Ð Ð Ð Ð Ð : Ð Ð Ð : Ð Ð Ð Ð Ð
Ð Ð Ð Ð Ð Ð Ð : Ð Ð Ð : Ð Ð Ð Ð Ð
Ð Ð Ð Ð Ð Ð Ð : Ð Ð Ð : Ð Ð Ð Ð Ð
Ð Ð Ð Ð Ð Ð Ð : Ð Ð Ð : Ð Ð Ð Ð Ð
Ð Ð Ð Ð Ð Ð Ð : Ð Ð Ð : Ð Ð Ð Ð Ð
Ð Ð Ð Ð Ð Ð Ð : Ð Ð Ð : Ð Ð Ð Ð Ð
á+/Ð
/ENTER/CANCEL/MENU
Ð
Ð
Ð
Ð
Ð
Ð
Ð
Ð
ñ
Set the start time, end time, channel and tape
speed as in step 3.
4
Notes:
DATE START END CH
26(SU)11:00PM11
Ð Ð Ð Ð Ð Ð Ð : Ð Ð Ð : Ð Ð Ð Ð Ð
Ð Ð Ð Ð Ð Ð Ð : Ð Ð Ð : Ð Ð Ð Ð Ð
Ð Ð Ð Ð Ð Ð Ð : Ð Ð Ð : Ð Ð Ð Ð Ð
Ð Ð Ð Ð Ð Ð Ð : Ð Ð Ð : Ð Ð Ð Ð Ð
Ð Ð Ð Ð Ð Ð Ð : Ð Ð Ð : Ð Ð Ð Ð Ð
Ð Ð Ð Ð Ð Ð Ð : Ð Ð Ð : Ð Ð Ð Ð Ð
Ð Ð Ð Ð Ð Ð Ð : Ð Ð Ð : Ð Ð Ð Ð Ð
á
+/Ð/ENTER/CANCEL/MENU
:30PM125
SLP
Ð
Ð
Ð
Ð
Ð
Ð
Ð
ñ
• Press CANCEL to move cursor backward for correction.
• To record from external source set the channel to "L1" or
"L2". "L1" or "L2" will appear next to CH 125 (or 69).
To enter other programs, repeat step 2
through 4.
5
• To return to the normal screen,
press VCR MENU twice.
DATE START END CH
26(SU)11:00PM11
Ð Ð Ð Ð Ð Ð Ð : Ð Ð Ð : Ð Ð Ð Ð Ð
Ð Ð Ð Ð Ð Ð Ð : Ð Ð Ð : Ð Ð Ð Ð Ð
Ð Ð Ð Ð Ð Ð Ð : Ð Ð Ð : Ð Ð Ð Ð Ð
Ð Ð Ð Ð Ð Ð Ð : Ð Ð Ð : Ð Ð Ð Ð Ð
Ð Ð Ð Ð Ð Ð Ð : Ð Ð Ð : Ð Ð Ð Ð Ð
Ð Ð Ð Ð Ð Ð Ð : Ð Ð Ð : Ð Ð Ð Ð Ð
Ð Ð Ð Ð Ð Ð Ð : Ð Ð Ð : Ð Ð Ð Ð Ð
á
+/Ð/ENTER/CANCEL/MENU
:30PM125
SLP
Ð
Ð
Ð
Ð
Ð
Ð
Ð
ñ
Press TIMER REC. The timer symbol ( ) will
appear on the display and the VCR stands by
6
for recording.
At the same time, VCR mode will
change to DVD mode automatically.
You can use DVD even if the VCR is
in the timer recording mode.
If you do not use the DVD, turn the
power off.
Notes:
• The timer recording will start at 5 seconds before the time
you predetermined.
• If the timer symbol( ) does not appear on the display in
spite of the pressing of TIMER REC, the cassette may not
have been loaded.
29
• If the cassette is ejected in spite of the pressing of TIMER
REC, the erase prevention tab of the cassette may have
been removed.
29
Notes:
• If the timer symbol ( ) blinks when the timer recording ended,
the TV program has not been completely recorded because of
an insufficient tape length. Press TIMER REC to cancel the
timer program or press TAPE EJECT to remove the cassette
tape.
• During timer recording standby mode, the VCR mode cannot be
operated. To use the VCR, press TIMER REC at first, then press
DVD/VCR to change to VCR mode. After you use the VCR,
press TIMER REC again to put the VCR into timer recording
standby mode.
• If you press TIMER REC during timer recording, the recording
operation will be interrupted. If you press TIMER REC again
within the programmed time, the recording operation will start
again.
• After a power failure or disconnection of the power plug, all
programmed recording settings and time display will be lost
upon resumption of power. In this case, reset the clock
24
and
reprogram any timer recording.
37
Recording (VCR)
2C31101A (E)p26-37 11/22/02, 15:4337
Recording (VCR)
Timer recording (continued)
Setting procedure
To set daily/weekly timer
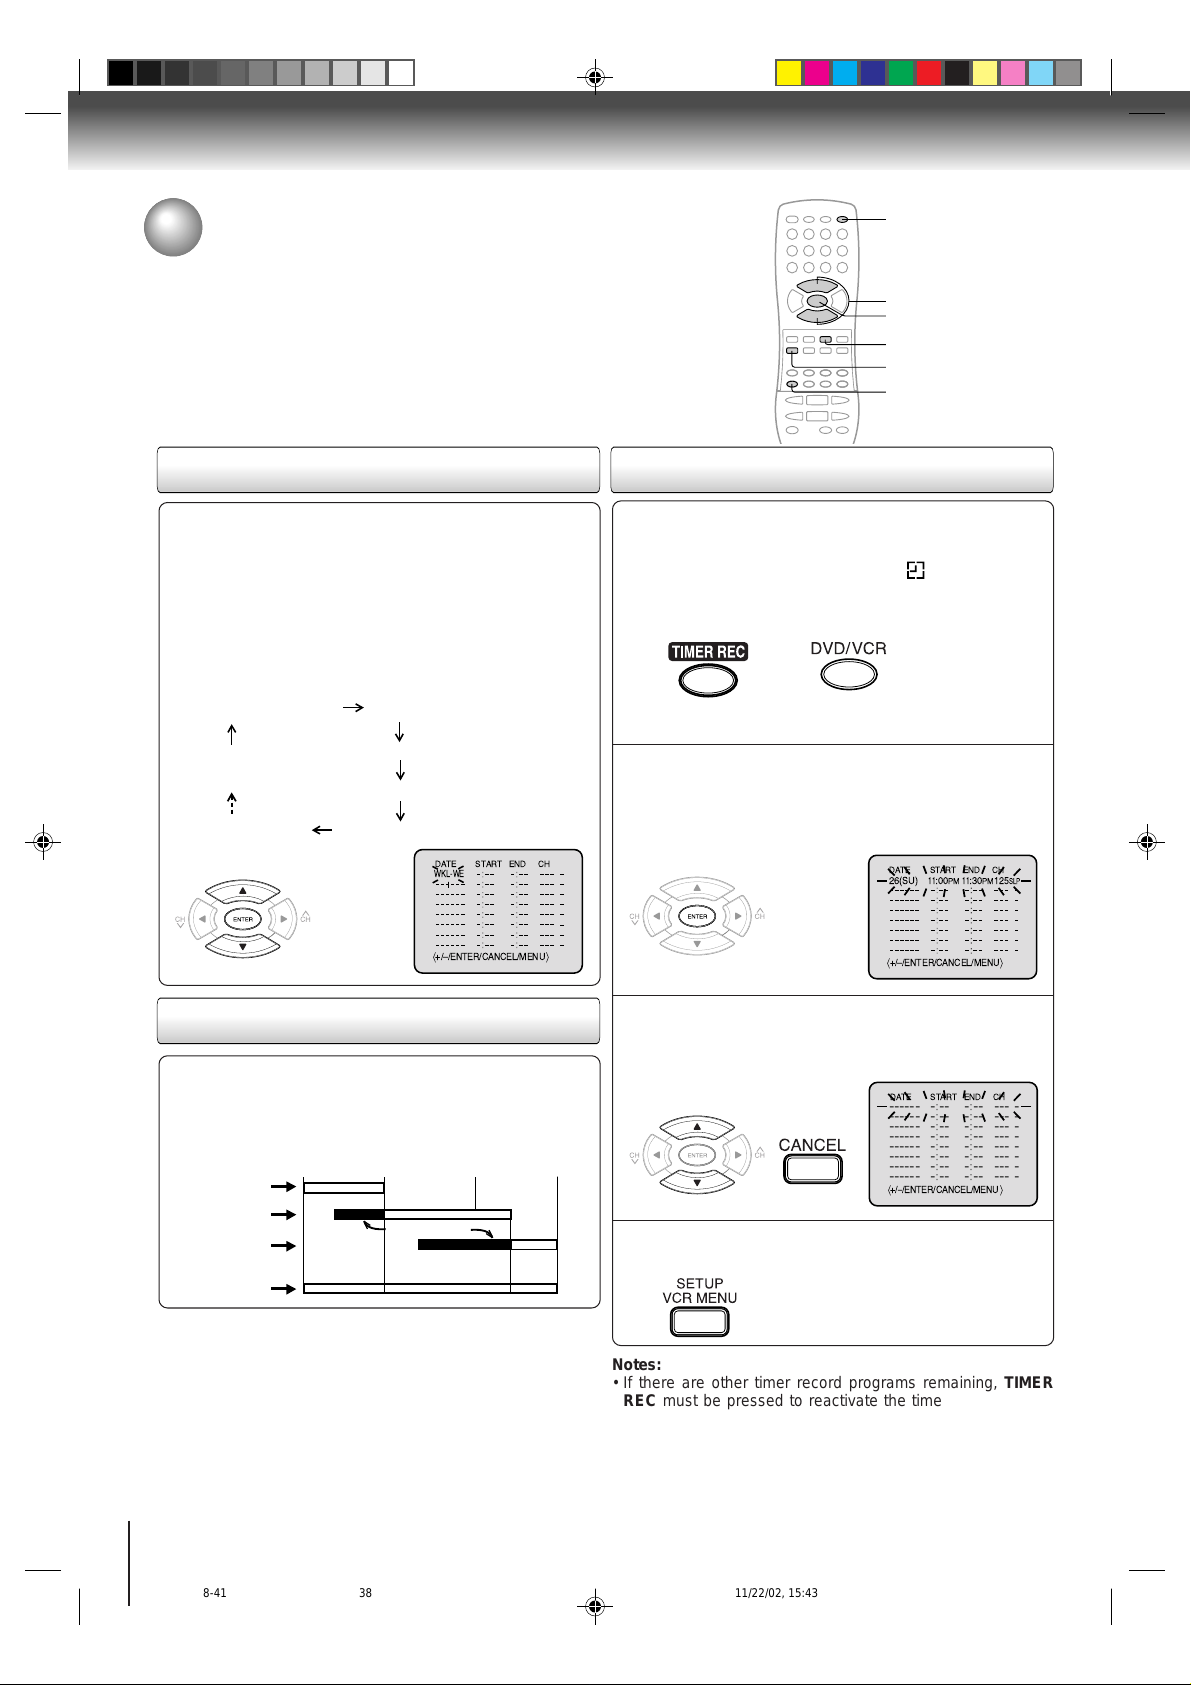
Weekly (e.g. WKL-TU: each Tuesday) or daily (e.g. MOSA: Monday to Saturday) Timer recording
Follow the procedure of timer recording on the previous
page. At step 3 press SET + or – repeatedly until the
desired setting appears. Then press ENTER.
When you press SET – repeatedly, the
DATE indicator will change as follows, in
this case the day is Friday.
The current day (Friday) SU-SA (Sunday to Saturday)
One month later
minus one day
WKL-WE WKL-TH (Weekly Thursday)
(Weekly Wednesday)
TRACKING/ SET +
MO-SA (Monday to Saturday)
MO-FR (Monday to Friday)
DATE START END CH
WKL-WE
DVD/VCR
SET +/–
ENTER
CANCEL
VCR MENU
TIMER REC
To confirm or cancel a program
If the Timer has been activated, press TIMER
REC to deactivate the Timer.
1
To confirm Timer program:
At step 1 on the previous page select “TIMER REC
2
SET” and press ENTER.
The timer program list will appear on the screen.
TRACKING/ SET +
The timer symbol ( ) will
disappear. Then press DVD/VCR to
change to VCR mode.
DATE START END CH
26(SU)11:00PM11
:30PM125
SLP
TRACKING/ SET –
+/Ð/ENTER/CANCEL/MENU
ñ
á
If the programs overlap another
Do not overlap timer programs as portions of the
conflicting programs will be lost. The first recording
time has priority over the next recording time as shown
in the diagram below.
Program 1
Program 2
Program 3
Recording
Control Settings
8 : 00
Notes:
• The daily/weekly recording can be made continuously until the
recording is canceled or the tape reaches the end.
• During timer recording the automatic rewinding mechanism
does not function.
Prog.1
9 : 00
Deleted Parts
Non Recorded Portion Parts
Prog.2 Prog.3
10 : 00
11 : 00
TRACKING/ SET –
á
+/Ð/ENTER/CANCEL/MENU
ñ
To cancel Timer program:
Press SET + or – to select the unwanted program,
3
then press CANCEL to cancel the program.
DATE START END CH
TRACKING/ SET +
TRACKING/ SET –
Ð Ð Ð Ð Ð Ð Ð : Ð Ð Ð : Ð Ð Ð Ð Ð
Ð Ð Ð Ð Ð Ð Ð : Ð Ð Ð : Ð Ð Ð Ð Ð
Ð Ð Ð Ð Ð Ð Ð : Ð Ð Ð : Ð Ð Ð Ð Ð
Ð Ð Ð Ð Ð Ð Ð : Ð Ð Ð : Ð Ð Ð Ð Ð
Ð Ð Ð Ð Ð Ð Ð : Ð Ð Ð : Ð Ð Ð Ð Ð
Ð Ð Ð Ð Ð Ð Ð : Ð Ð Ð : Ð Ð Ð Ð Ð
Ð Ð Ð Ð Ð Ð Ð : Ð Ð Ð : Ð Ð Ð Ð Ð
Ð Ð Ð Ð Ð Ð Ð : Ð Ð Ð : Ð Ð Ð Ð Ð
á+/Ð
/ENTER/CANCEL/MENU
Ð
Ð
Ð
Ð
Ð
Ð
Ð
Ð
ñ
Press VCR MENU repeatedly until the menu
screen is cleared.
4
Notes:
• If there are other timer record programs remaining, TIMER
REC must be pressed to reactivate the timer, otherwise the
remaining timer record programs will be ignored.
• You cannot confirm the Timer program during timer recording
operation.
• You can correct or cancel a programmed setting in program
confirm mode.
38
2C31101A (E)p38-41 11/22/02, 15:4338
Other functions (VCR)
Stereo recording and playback /
Separate Audio Program (SAP)
Stereo recording and playback
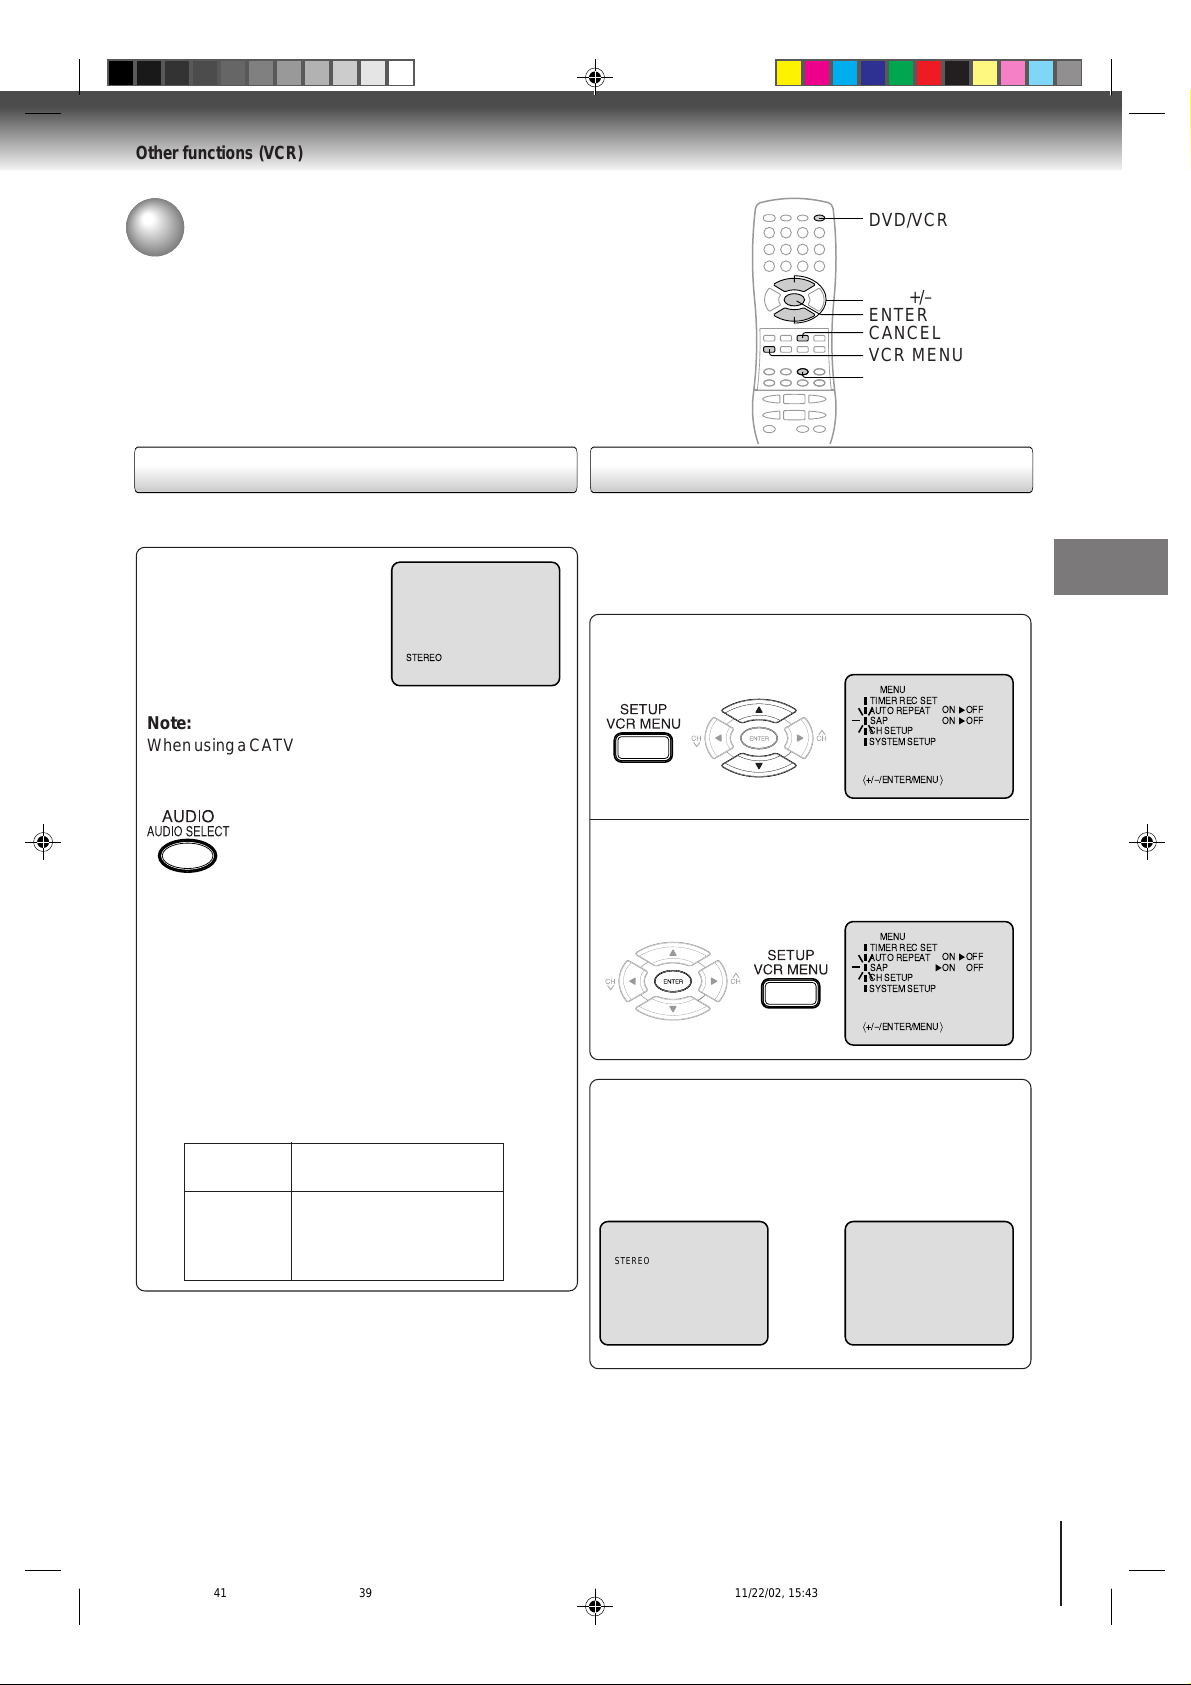
The VHS Hi-Fi audio system permits high fidelity recording of MTS STEREO TV broadcasts.
When a MTS STEREO broadcast is received, “STEREO” will
appear on the screen for about
4 seconds and the program can
be viewed or recorded in stereo.
The Hi-Fi stereo recording procedure is the same as for normal
recordings.
Note:
When using a CATV system, stereo TV programs may be
transmitted over a mono cable channel. In this case
"STEREO" will not appear and the sound will be in mono.
STEREO
DVD/VCR
SET +/–
ENTER
CANCEL
VCR MENU
AUDIO SELECT
Separate Audio Program (SAP)
Your DVD/VCR is fitted with a SAP broadcast system which
enables you to switch to a separate audio program when
viewing a selected channel.
This function applies only when the program is broadcast in
multi-languages through the SAP broadcast system.
Press VCR MENU. Then press SET + or – to
select "SAP".
1
TRACKING/ SET +
TRACKING/ SET –
MENU
TIMER REC SET
AUTO REPEAT
SAP
CH SETUP
SYSTEM SETUP
á+/-
/ENTER/MENU
ON OFF
ON OFF
ñ
Other functions (VCR)
Recording (VCR)
Output selection
When viewing an MTS stereo TV program, or playing a
prerecorded VHS Hi-Fi stereo videotape, press AUDIO
SELECT to select how the audio will be heard through
the speakers. Normally set to the Hi-Fi stereo position,
this button can be set to the MONO position if the stereo
broadcast or videotape audio is of poor quality. The "R"
and "L" positions allow the audio from the Right or Left HiFi channel to be heard over both TV speakers. This
button has no effect when viewing a MONO videotape or
TV program. Each time when you press the button,
OUTPUT SELECTION display appears on the screen for
several seconds. Refer to the char t below.
OUTPUT
SELECTION
STEREO
L CH
R CH
MONO
SOUND HEARD ON BOTH
SPEAKERS
STEREO
LEFT CHANNEL AUDIO
RIGHT CHANNEL AUDIO
MONO
Press ENTER to select “ON”.
2
Then press VCR MENU until the
menu screen is cleared.
TRACKING/ SET +
TRACKING/ SET –
MENU
TIMER REC SET
AUTO REPEAT
SAP
CH SETUP
SYSTEM SETUP
á+/-
/ENTER/MENU
ON OFF
ON OFF
ñ
Listening to SAP
When the VCR is turned on or a channel selection is
made, make certain the letters "SAP" appears on the
screen for about 4 seconds. This means that the "Separate Audio Program" broadcasting is available.
STEREO SAP SAP
OR
Notes:
• When playing back a tape that is not recorded in Hi-Fi stereo
mode, the audio will automatically be monaural.
• When listening to a VHS Hi-Fi video tape or MTS broadcast
through the VHF/UHF jack (Audio/Video cable not connected),
the sound will be monaural.
2C31101A (E)p38-41 11/22/02, 15:4339
39

Other functions (VCR)
Duplicating a video tape
If you connect the DVD/VCR to another VCR or Camcorder, you can duplicate
a previously recorded tape. Make all connections before turning on the power.
Duplicating a video tape
Preparation:
• Turn ON the TV and select the corresponding video
input.
• Press DVD/VCR to select the VCR mode. (The VCR
indicator will light.)
• Load a cassette tape with the erase prevention tab
intact.
• Load a previously recorded tape into the playback
VCR or Camcorder.
Press SP/SLP to select the desired tape speed
SP or SLP.
1
It is recommended that you set the
tape speed to the SP mode on the
recording VCR for best results.
Connection with second VCR
To VIDEO OUT
AUDIO/VIDEO cable (supplied)
DVD/VCR
2
4
1
5
Playback VCR
To AUDIO (R) OUT
To AUDIO (L) OUT
Recording VCR
Press INPUT SELECT once or twice to select
AUDIO/VIDEO input position.
2
"L1" or "L2" will appear in the display.
L1: on the rear panel
L2: on the front panel
Press PLAY on the playback VCR or Camcorder.
3
Press REC on the recording VCR.
4
The duplicating process begins.
Press STOP after duplicating a video tape.
5
To VIDEO IN
Connection with Camcorder
Playback Camcorder
To AUDIO (R) IN
To AUDIO (L) IN
To VIDEO IN
For duplicating a previously recorded tape from a
camcorder, follow the camcorder manufacturer’s
instructions. A typical camcorder dubbing hookup is
shown above.
To AUDIO (R) IN
To AUDIO (L) IN
To AV Jack
Recording VCR
AUDIO/VIDEO cable (not supplied)
40
2C31101A (E)p38-41 11/22/02, 15:4340
Other functions (VCR)
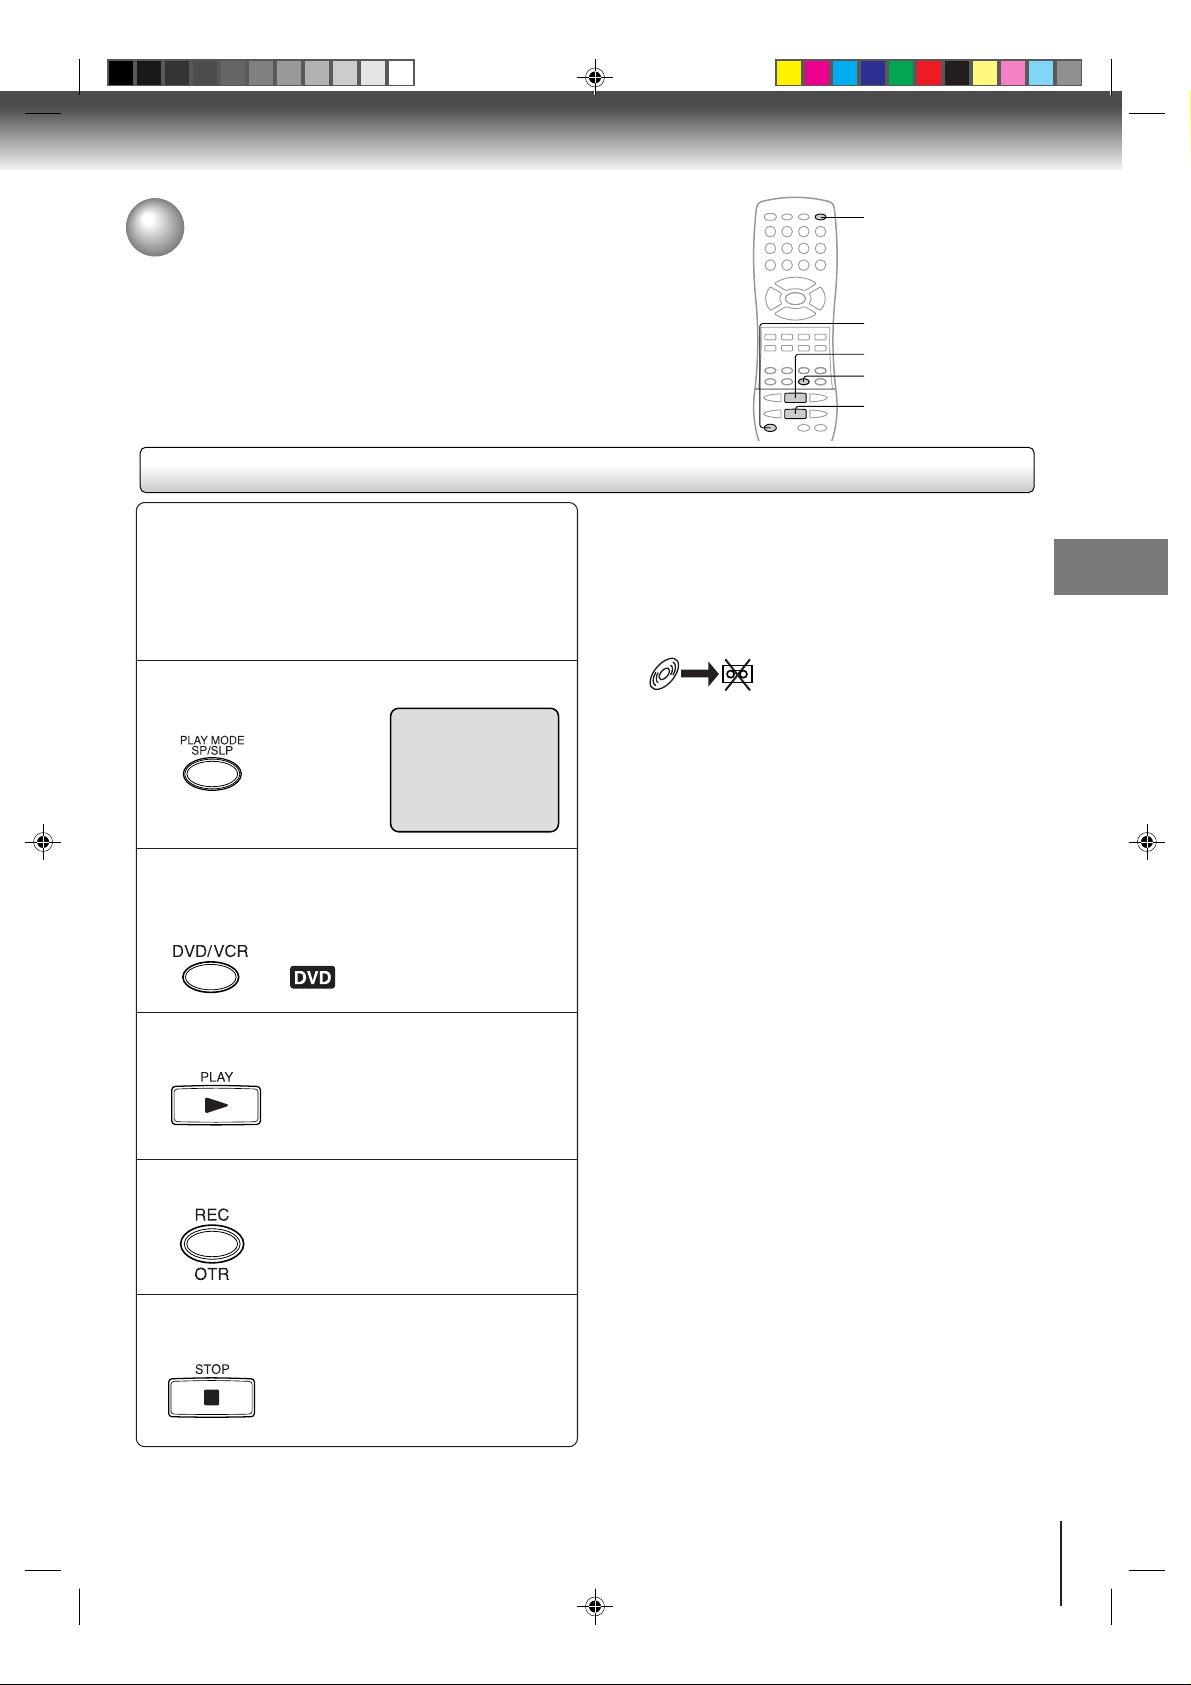
Recording a DVD/CD disc
You can record disc material in DVD, A udio CD , etc. onto a Video
tape with this DVD/VCR.
Duplicating a DVD or CD disc
Preparation:
• Turn ON the TV and select the corresponding video
input.
• Press DVD/VCR to select the VCR mode. (The VCR
indicator will light.)
•
Load a cassette tape with the erase prevention tab intact.
• Load a DVD/CD disc.
Press SP/SLP to select the desired tape speed
SP or SLP.
1
2
4
3
1
5
Notes:
• You may not be able to record the beginning of the disc.
Begin VCR recording once program playback commances
on the DVD.
• You can not record discs encorded with copy guard
function. The following icon and text will show up on the
TV screen.
DISC IS COPY PROTECTED
Other functions (VCR)
Press DVD/VCR to select the DVD mode.
2
Press PLAY to star t playback.
The DVD indicator will light.
3
Press REC to start recording.
4
Press STOP if you finish recording.
5
The DVD/VCR will change to the
VCR mode automatically and the
playback picture or sound will be
duplicated on the video cassette
tape.
If you wish to stop a DVD/CD disc,
press DVD/VCR to change the DVD
mode, then press STOP.
00 : 00 : 00 SP
2C31101A (E)p38-41 11/22/02, 15:4341
41
Basic playback (DVD)
Playing a disc
This section shows you the basics on how to play a disc.
CAUTION
Keep your fingers well clear of the disc tray as it is closing.
Neglecting to do so may cause serious personal injury.
4
,
5
3
1
DVD
VCD
Basic playback
CD
Preparations:
• When you want to view a disc, turn on the TV and select the corresponding video input connected to the DVD/VCR. This
may include S-video or component video inputs which are exclusive to DVD playback.
• When you want to enjoy the sound of discs from the audio system, turn on the audio system and select the input connected
to the DVD/VCR.
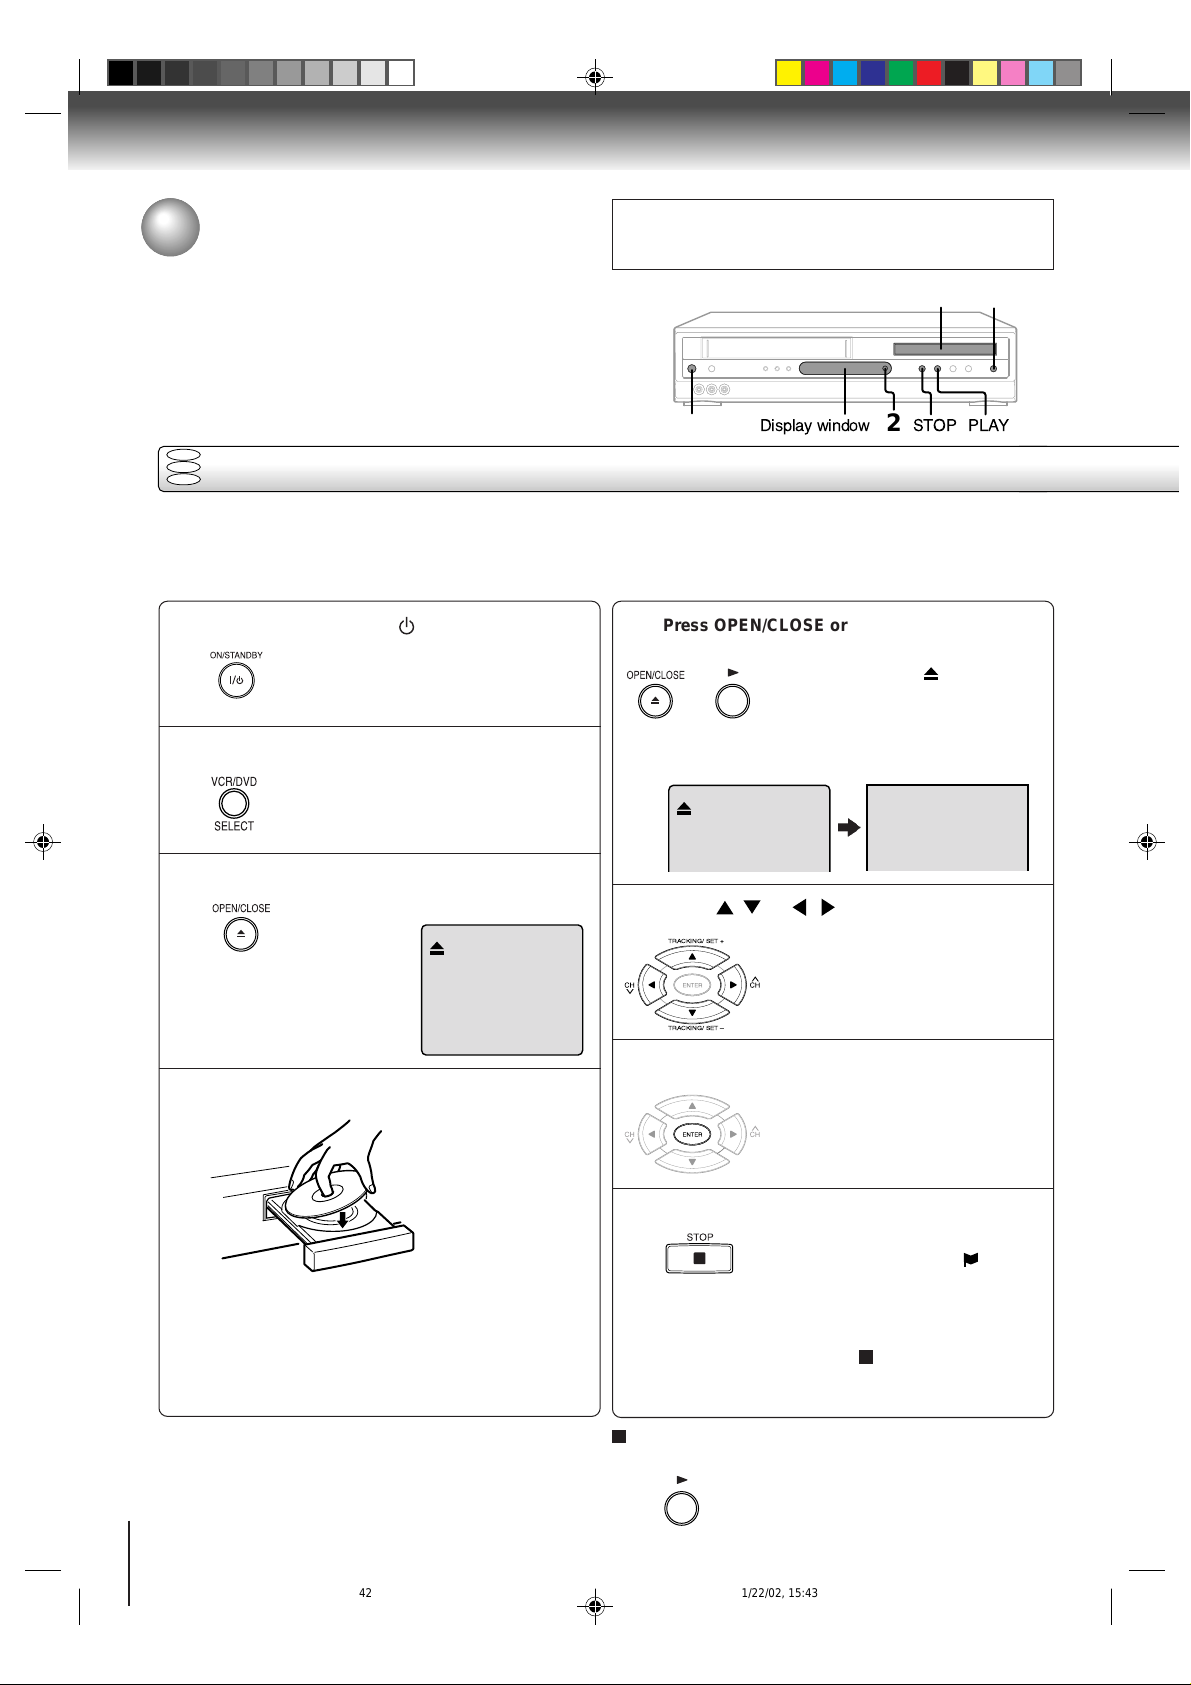
Press ON/STANDBY (I / ).
1
Press DVD/VCR to select the DVD mode.
2
Press OPEN/CLOSE.
3
The DVD/VCR turns on.
The DVD indicator will light.
The disc tray opens.
Press OPEN/CLOSE or PLAY on the unit.
5
OR
• A menu screen will appear on the TV screen, if
the disc has a menu feature.
Press / or / to select title.
6
TRA CKING/ SE T +
Display window STOP PLAY
The disc tray closes automatically.
On the TV-screen,
“Reading” and then playback
commences.
2
changes to
Reading
Place the disc on the disc tray.
4
• There are two different disc sizes. Place the disc
in the correct guide on the disc tray. If the disc is
out of the guide, it may damage the disc and
cause the DVD/VCR to malfunction.
• Do not place a disc which is unplayable in this
DVD/VCR.
42
2C31101A (E)p42-45 11/22/02, 15:4342
With the playback
side down
TRA CKING/ SE T Ð
Press ENTER.
TRA CKING / SET +
7
TRA CKING / SET –
Press STOP to end playback.
8
To start playback in the stop mode
Press PLAY.
• Title is selected and play
commences.
• The unit records the stopped point,
depending on the disc. “
appears on the screen. Press
PLAY
to resume playback (from
the scene point).
• If you press STOP again or unload
the disc (“
screen.), the unit will clear the
stopped point.
” appears on the
”
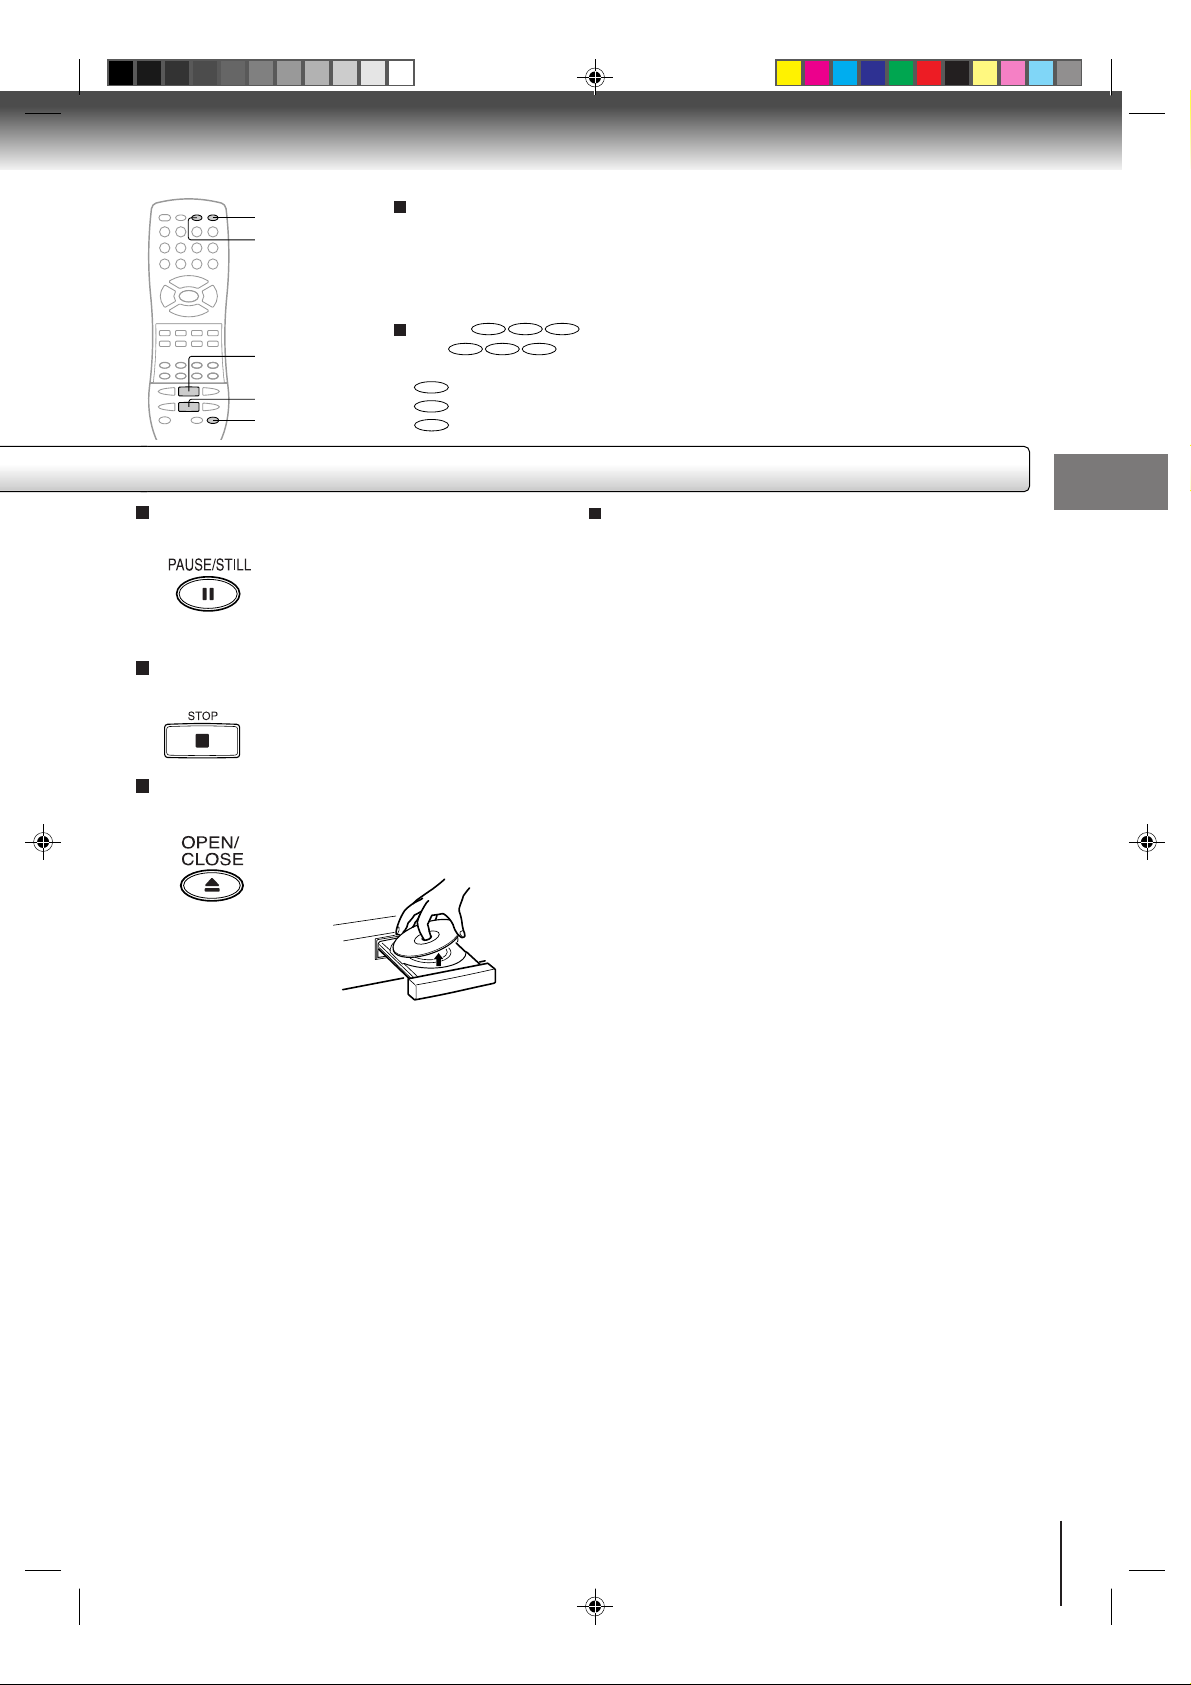
DVD/VCR
OPEN/CLOSE
PLAY
STOP
PAUSE/STILL
To obtain a higher quality picture
Occasionally, some picture noise not usually visible during a normal broadcast
may appear on the TV screen while playing a DVD video disc because the high
resolution pictures on these discs include a lot of information. While the amount of
noise depends on the TV you use with this DVD/VCR, you should generally
reduce the sharpness adjustment on your TV when viewing DVD video discs.
About
The
function described under that heading.
DVD VCD CD
DVD VCD CD
DVD
: You can use this function with DVD video discs.
VCD
: You can use this function with VIDEO CDs.
CD
: You can use this function with audio CDs and CD-R/RW CDs.
icons on the heading bar show the playable discs for the
To pause playback (still mode)
Press PAUSE/STILL during playback.
To resume normal playback, press
the PLAY button.
• The sound is muted during still
mode.
To stop playback
Press STOP.
Playing a Disc while the VCR section is
recording or standing by for timer recording
1) Start to record.
Follow step 1~5 on page 34.
• If the DVD/VCR is standing by for recording, turn on
the DVD/VCR.
2) Press DVD/VCR to select DVD mode. The DVD
indicator will light.
3) Play a disc.
Follow step 3 ~ step 5 on page 42.
•Press PLAY if the DVD/VCR does not start to play a
disc automatically.
4) Stop to play.
To remove the disc
Press STOP to stop play back a disc.
Press OPEN/CLOSE.
Remove the disc after the disc tray
opens completely.
Be sure to press the OPEN/CLOSE button to close
the disc tray after you remove the disc.
Notes:
• If a non-compatible disc is loaded, "Incorrect Disc", "Region Code Error" or "Parental Error" will appear on the TV
screen according to the type of loaded disc. In this case, check your disc again (See pages 8 and 60).
• Some discs may take a minute or so to start playback.
• When you set a single-faced disc label downwards (ie. the wrong way up) and press the OPEN/CLOSE button or the
PLAY button on the unit, "Reading" will appear on the display for 40 seconds and then "Incorrect Disc" will continue to
be displayed.
• Some playback operations of DVDs may be intentionally fixed by software producers. Since this unit plays DVDs
according to the disc contents the software producers designed, some playback features may not be available. Also
refer to the instructions supplied with the DVDs.
• When playing DTS-encoded Audio CDs, excessive noise will be heard from the analogue stereo outputs. To avoid
possible damage to the audio system, the consumer should take proper precautions when the analogue stereo
outputs of the DVD player are connected to an amplification system.
• Do not move the DVD/VCR during playback. Doing so may damage the disc.
• Use the OPEN/CLOSE button to open and close the disc tray. Do not push the disc tray while it is moving. Doing so
may cause the DVD/VCR to malfunction.
• Do not push up on the disc tray or put any objects other than discs on the disc tray. Doing so may cause the DVD/
VCR to malfunction.
• In many instances, a menu screen will appear after playback of a movie is completed. Prolonged display of an onscreen menu may damage your television set, permanently etching that image onto its screen. To avoid this, be sure
to press the STOP button on your remote control once the movie is completed.
• During the DVD playback if you change the operating mode from DVD to VCR, the DVD will continue to play back the
disc and stop after about 5 minutes.
• There may be a slight delay between you pressing the button and the function activating.
Basic playback (DVD)
2C31101A (E)p42-45 11/22/02, 15:4343
43
Basic playback (DVD)
Playing a disc (continued)
You can play discs at various speeds.
DVD
VCD
Playing in fast reverse or fast forward directions
CD
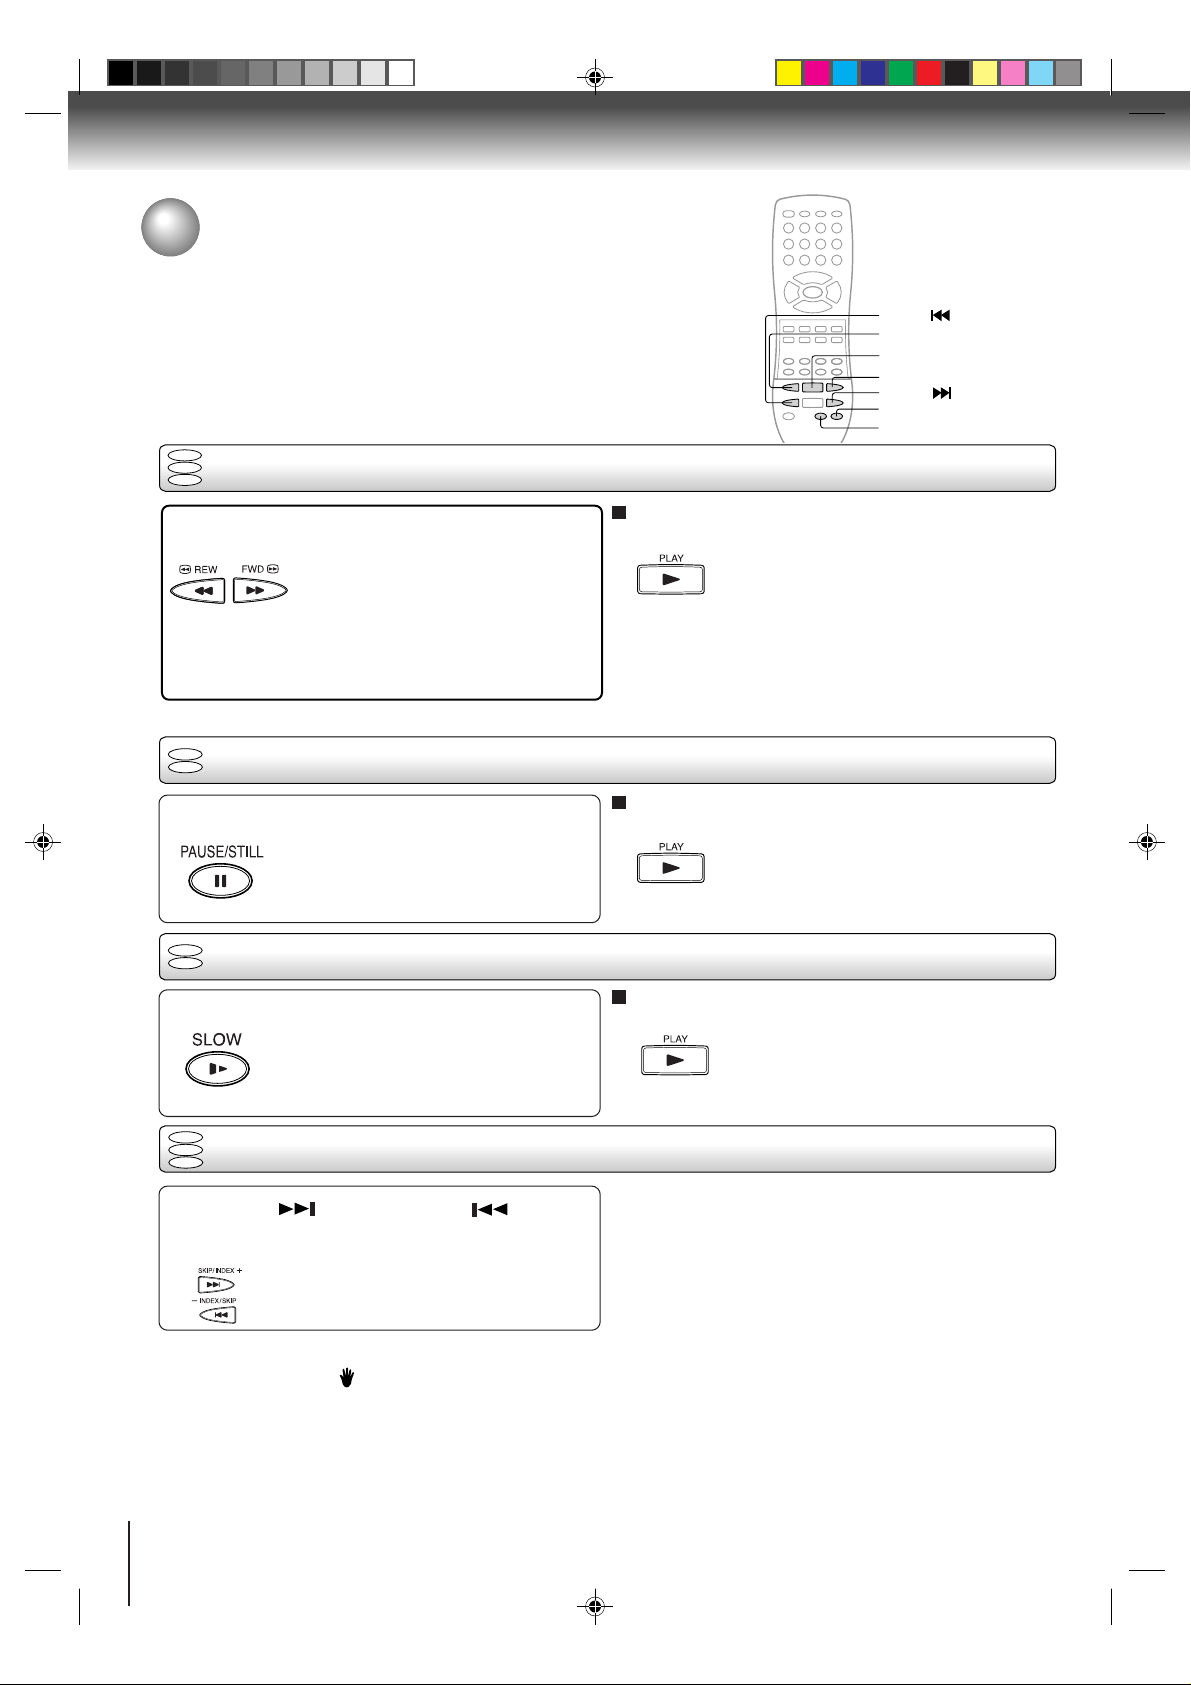
SKIP
REW
PLAY
FWD
SKIP
PAUSE/STILL
SLOW
Press REW or FWD during playback.
REW: Fast reverse playback
FWD: Fast forward playback
Each time you press the REW or
FWD button, the playback speed
changes.
DVD
Playing frame by frame
VCD
Press PAUSE/STILL during still playback.
Each time you press the PAUSE/
STILL button, the picture advances
one frame.
DVD
Playing in slow-motion
VCD
Press SLOW during playback.
Each time you press the SLOW
button, the slow-motion speed
changes.
DVD
VCD
Locating a chapter or track
CD
To resume normal playback
Press PLAY.
Notes:
• The DVD/VCR mutes sound and subtitles during
reverse and f orward scan of DVD video discs.
However, the DVD/VCR plays sound during fast
forward or fast reverse play of audio CDs.
• The playback speed may differ depending on the disc.
T o resume normal playback
Press PLAY.
Note:
The sound is muted during frame by frame playback.
To resume normal playback
Press PLAY.
Note:
The sound is muted during slow-motion playback.
Press SKIP( ) Forward or SKIP( ) Reverse
during playback to locate a chapter that you
want to watch.
Each time you press the button, a
chapter or track is skipped.
Notes:
• A “Prohibition” symbol may appear at the upper left of the screen. This symbol means either the feature y ou tried is not
available on the disc , or the DVD/VCR can not access the feature at this time. This does not indicate a prob lem with the
DVD/VCR.
• The unit is capable of holding a still video image or On screen display image on your television screen indefinitely. If you
leave the still video image or On screen display image displayed on your TV for an extended period of time, you risk
permanent damage to your television screen. Projection televisions are very susceptible.
44
2C31101A (E)p42-45 11/22/02, 15:4344
Advanced playback (DVD)
MP3/WMA/JPEG playback
This player can play back the MP3/WMA/JPEG-data which has been recorded
on CD-R or CD-RW. To produce the MP3/WMA/JPEG-data, you need a
Windows-PC with CD-ROM drive and a MP3/WMA/JPEG-encoding Software
(not supplied).
The Apple-HFS-System can not be played.
CD
MP3/WMA Playback
OPEN/CLOSE
0-9
ENTER
▲/ ▼/ /
PLAY
STOP
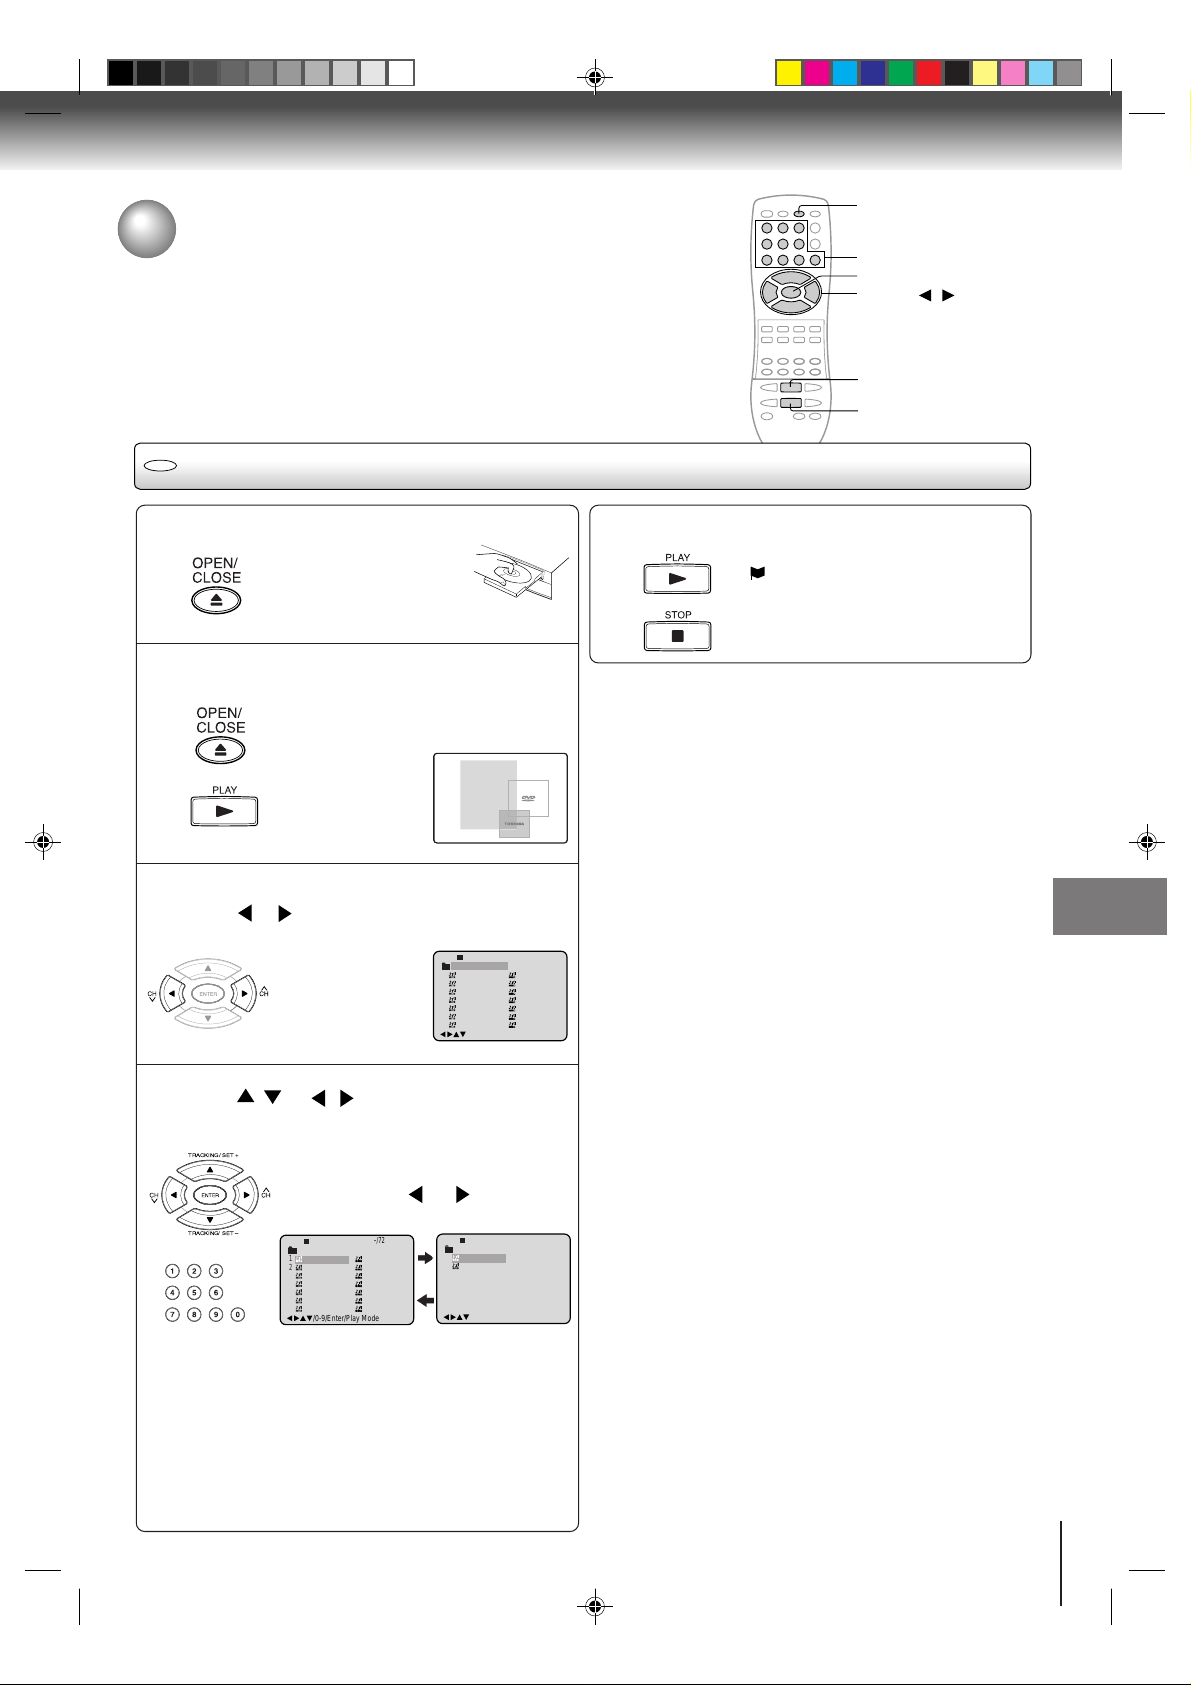
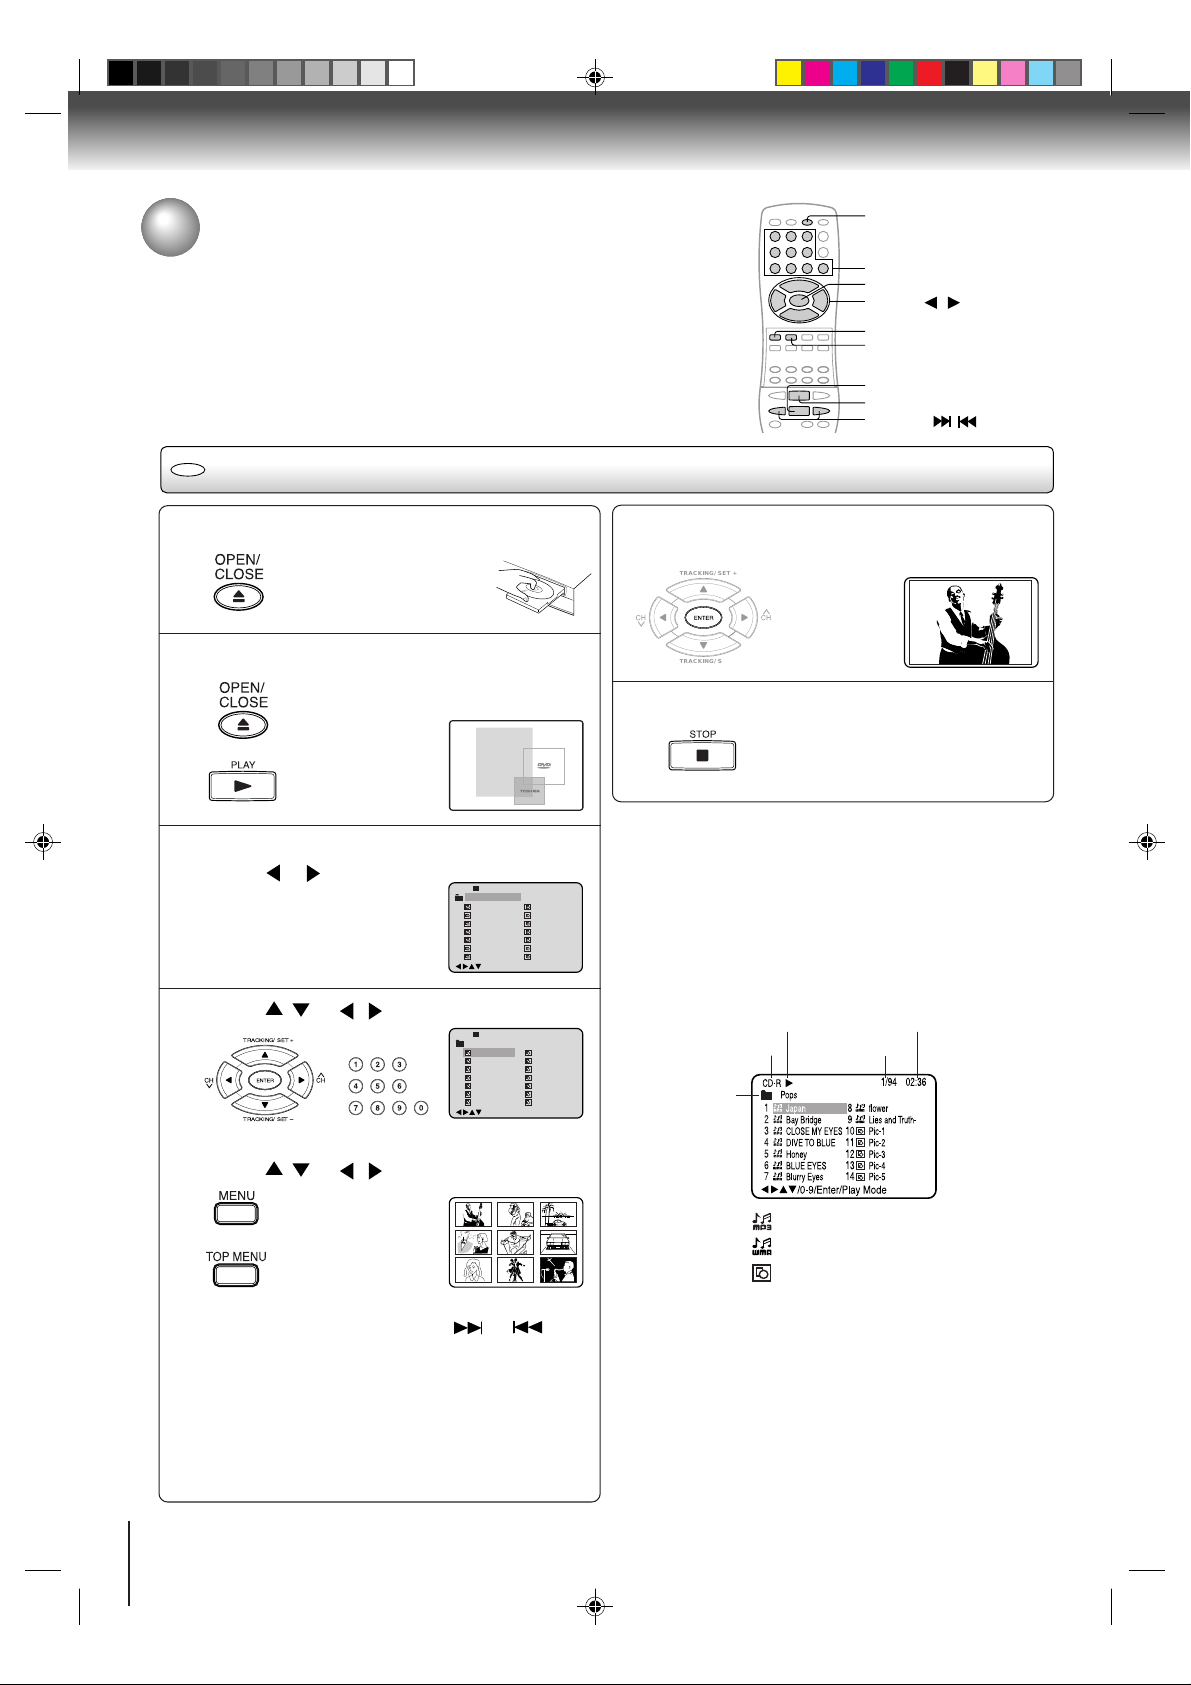
Press OPEN/CLOSE.
1
The disc tray will open.
Place a disc on which MP3
or WMA files have been
recorded onto the tray.
Press OPEN/CLOSE or PLAY.
2
The disc tray closes automatically.
On the TV-screen,“Reading” will appear.
Reading will take as
much time as the
number of file.
A file menu screen will appear on the TV screen.
3
Press
TRACKING/ SET +
TRACKING/ SET –
or to select folder.
Press / or / or Number keys to select
4
the desired file, then press ENTER.
The file is selected and play commences.
TRACKING/SET +
• In case the folder includes more than
15 tracks, press
next file list.
TRACKING/SET Ð
CD-R
Pops
1
Japan
2
Bay Bridge
3
CLOSE MY EYES
4
DIVE TO BLUE
5
Honey
6
BLUE EYES13Welcome party
7
Blurry Eyes14Thailand
8
9
10
11
12
/0-9/Enter/Play Mode
-
/72
flower
Lies and Truthwinter fall
Rain
Strawberry
• When PLAY has been pressed after
displaying the file menu, or when the
disc tray has been closed after pressing
PLAY in step 2, playback begins
automatically starting from the first file.
In this case, if the first file is an MP3/
WMA file, only MP3/WMA files are
played back in order.
If the first file is a JPEG file, the first
JPEG file is played back.
Reading
welcome
CD-R
1
2
3
4
5
6
7
or to display
CD-R
--:--
15
16
-
8
9
10
11
12
/72
flower
Lies and Truthwinter fall
Rain
Strawberry
-
Pops
Japan
Bay Bridge
CLOSE MY EYES
DIVE TO BLUE
Honey
BLUE EYES13Welcome party
Blurry Eyes14Thailand
/0-9/Enter/Play Mode
Pops
Mother
Hold Your Last
/0-9/Enter/Play Mode
Press STOP to end playback.
5
• The unit records the stopped point.
“ ” appears on the screen. Press
PLAY to resume playback (from the
scene point).
• If you press STOP again or unload the
disc, the unit will clear the stopped point.
Notes:
• During MP3/WMA/JPEG-Playback, you can not use SEARCH,
A-B Repeat functions.
• You can use Repeat (Track or All), Random functions and
Program playback for MP3/WMA/JPEG CD Playback. (See
page 52 and 53.)
MP3/WMA/JPEG CD Information
Limitations on MP3/WMA/JPEG CD playback
• MP3/WMA/JPEG CD is the disc that is standardized by
ISO9660, its file name must include 3-digits extension
letters, “mp3”, ”wma”, “jpg”.
• The directory and file names of the MP3/WMA/JPEG CD
must be correspond to the ISO standardized files.
• This unit can read 200 files per disc. If one directory has
more than 200 files, it reads up to 200 files, the remaining
files will be omitted.
--:--
• The unit is able to recognize up to a maximum of 50
directories per disc.
• MP3/WMA CDs cannot be used for playback for the
purpose of recording.
• As for multi-session disc, only the first session can be
played.
• If the CD has both audio tracks and MP3/WMA/JPEG files,
only audio tracks are played.
• It may take more than one minute for this unit to read MP3/
WMA/JPEG files depending on its structure.
• Music recorded by “Joliet Recording Specification” can be
played back, the file name is displayed (within 16 letters) on
the screen. Long file names will be condensed.
• The music files recorded by “Hierarchical File System”
(HFS) cannot be played.
• The unit can play back baseline and progressive JPEG files.
Limitations on display
/72
--:--
• The maximum number for display is 16 letters. Available
letters for display are the following: capital or small
alphabets of A through Z, numbers of 0 through 9, and _
(under score).
• Other letters than those above are replaced in hyphen.
Notes on MP3/WMA/JPEG files
To play back MP3/WMA/JPEG CD in the recorded order,
1. Use MP3/WMA/JPEG software that records data
alphabetically or numerically.
2. Name each file including two-digit or three-digit number
(e.g. "01" "02" or "001" "002").
3. Refrain from making too many sub-folders.
CAUTION:
• Some MP3/WMA/JPEG CDs can not be played back
depending on the recording conditions.
• The CD-R/RW that has no music data or non-MP3/WMA/
JPEG files can not be played back.
Basic playback (DVD)
Advanced playback (DVD)
45
2C31101A (E)p42-45 11/22/02, 15:4345
Advanced playback (DVD)
MP3/WMA/JPEG playback (continued)
You can select your desired JPEG file on the file menu and picture menu.
The selected JPEG file is automatically adjusted to the TV screen. (When the
aspect ratio of the JPEG file is different to your TV screen, the black bar will
appear at the top and bottom, or the both sides of the TV screen.
CD
JPEG CD playback
Press OPEN/CLOSE.
1
The disc tray will open.
Place a disc on which
JPEG files have been
recorded onto the tray.
Press OPEN/CLOSE or PLAY.
2
The disc tray closes automatically.
On the TV-screen, “Reading” will appear.
Reading will take
as much time as
the number of file.
Reading
welcome
Press ENTER.
5
TRACKING/ SET +
TRACKING/ SET –
Press STOP to end playback.
6
OPEN/CLOSE
0-9
ENTER
▲/▼ /
/
TOP MENU
MENU
STOP
PLAY
INDEX /
The selected picture appears on the TV
screen.
The file menu appears on the TV
screen.
If you want to watch the other file,
repeat steps 4-5.
A file menu screen will appear on the TV screen.
3
Press
or to select folder.
CD-R
Collection
1
Pic-1
2
Pic-2
3
Pic-3
4
Pic-4
5
Pic-5
6
Pic-6
7
Pic-7
Press / or / or Number keys to select
the desired file.
4
TRACKING/SET +
TRACKING/SET Ð
To display a picture menu, press MENU.
(To return to a file menu, press TOP MENU.)
Press
/ or / to select the desired file.
CD-R
Collection
1
Pic-1
2
Pic-2
3
Pic-3
4
Pic-4
5
Pic-5
6
Pic-6
7
Pic-7
• To display next list, press SKIP
• When PLAY has been pressed after displaying the
file menu, or when the disc tray has been closed
after pressing PLAY in step 2, playback begins
automatically starting from the first file. In this
case, if the first file is a JPEG file, the first JPEG
file is played back. If the first file is an MP3/WMA
file, only MP3/WMA files are played back in order.
-
/36
8
Pic-8
9
Pic-9
10
Pic-10
11
Pic-11
12
Pic-12
13
Pic-13
14
Pic-14
/0-9/Enter/Play Mode/MENU
-
/36
8
Pic-8
9
Pic-9
10
Pic-10
11
Pic-11
12
Pic-12
13
Pic-13
14
Pic-14
/0-9/Enter/Play Mode/MENU
or .
Notes:
• The picture menu is displayed when the FUJICOLOR CD or
the Kodak Picture CD are play ed. To display the file menu press
TOP MENU.
• In the case of a CD containing a mixture of MP3, WMA and
JPEG files, the files are played back by selecting them from
the file menu.
File menu information
Media type
Operation
File number
Elapsed time
Folder
: Indicates MP3 file
: Indicates WMA file
: Indicates JPEG file
46
2C31101A (E)p46-47 11/22/02, 15:4346

CD
Setting the JPEG Interval
ENTER
▲/▼ /
SETUP
/
You can continuously play back all JPEG files automatically.
After the setting below, start playing the disc on which JPEG files have been recorded.
Press SETUP in the stop mode. Press or to
select “Picture”, then press ENTER.
1
Language Picture Parental OtherSound
TRACKING/ SET +
TRACKING/ SET –
/Enter/Setup/Return
To make SETUP screen disappear, press SETUP.
4
Press or to select “JPEG Interval”.
2
TRACKING/ SET +
TRACKING/ SET –
Language Picture Parental OtherSound
16:9
Tv Screen
On
Display
Off
JPEG Interval
All
Select Files
/Enter/Setup/Return
Press ENTER. Press or to select your desired time, then press ENTER.
3
TRACKING/ SET +
TRACKING/ SET –
Language Picture Parental OtherSound
16:9
Tv Screen
On
Display
5 Seconds
JPEG Interval
All
Select Files
/Enter/Setup/Return
Off:
Plays back one file at a time.
5 Seconds:
Plays back images in the form of a slide show at 5
second intervals.
10 Seconds:
Plays back images in the form of a slide show at 10
second intervals.
15 Seconds:
Plays back images in the form of a slide show in 15
second intervals.
Basic playback (DVD)
Advanced playback (DVD)
2C31101A (E)p46-47 11/22/02, 15:4347
47
 Loading...