

Page 1
Orion® SkyView™ AZ
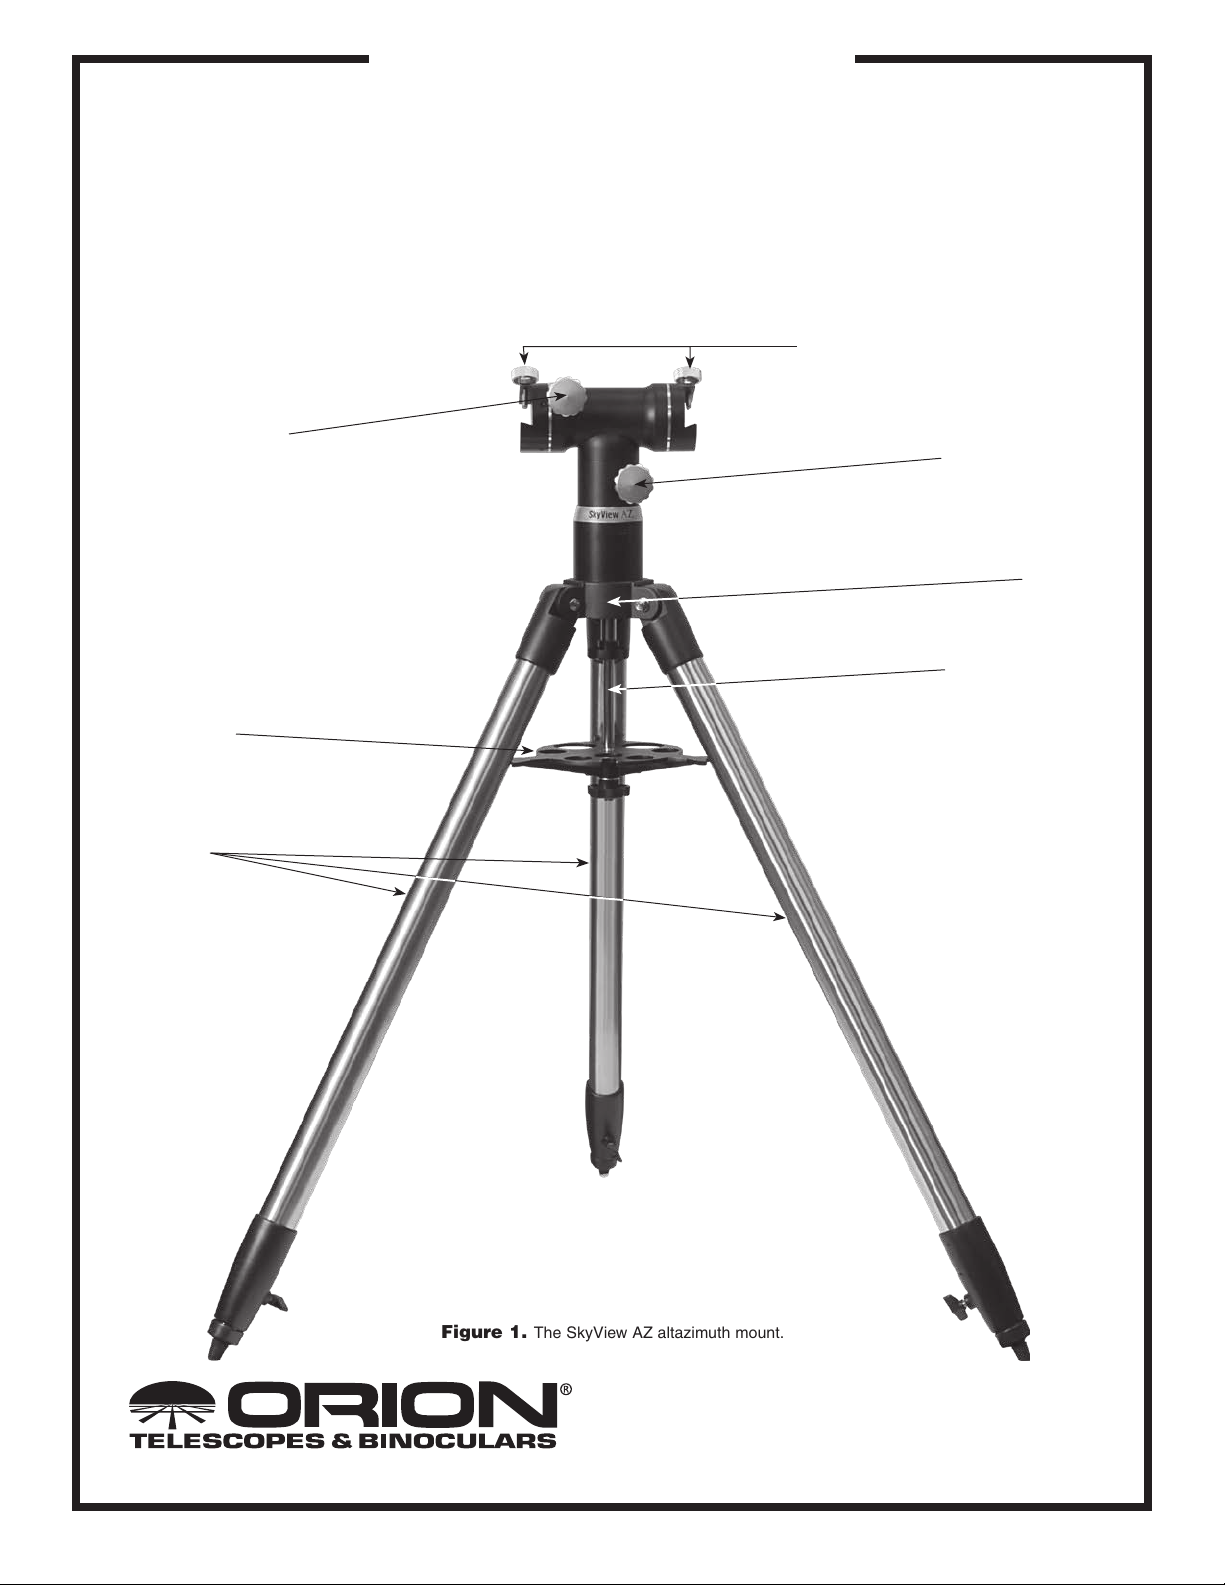
Altitude tension knob
INSTRUCTION MANUAL
Altazimuth Mount
#9017
Dovetail holder thumbscrews and safety
thumbscrews
Azimuth tension knob
Tripod head
Accessory tray
Tripod legs
Central support shaft
Figure 1. The SkyView AZ altazimuth mount.
Providing Exceptional Consumer Optical Products Since 1975
Customer Support (800)-676-1343
E-mail: support@telescope.com
Corporate Offices (831)‑763‑7000
89 Hangar Way, Watsonville, CA 95076
IN 331 Rev. B 02/09
Page 2
Congratulations on your purchase of a quality Orion product. Your SkyView AZ Altazimuth Mount is a sturdy observing
platform that allows you to mount and view through up to two telescopes. This extremely versatile mount is an excellent addition to any amateur astronomers’ arsenal.
The simple design makes setting up and using the SkyView AZ mount very easy. Both axes of motion feature large knurled
tension adjustment knobs which provide smooth telescope pointing, even when making very small, precise positional adjustments. Great for daytime terrestrial or nighttime astronomical applications, you’ll find yourself observing more and fussing with
equipment less when using the SkyView AZ. Star-party attendees can utilize the SkyView AZ mount’s dual dovetail holders to
mount two telescopes at once for crowd-pleasing performance.
These instructions will help you set-up, properly use, and care for your mount. Please read them over thoroughly before getting
started.
1. Parts List
Qty. Description
1 Tripod
1 Accessory tray
1 Mount
1 Hex key (2mm)
2. Assembly
Carefully open all of the boxes in the shipping container.
Make sure all the parts listed in the Parts List are present.
Save the boxes and packaging material. In the unlikely event
that you need to return the mount, you must use the original
packaging.
Initially assembly of the mount should only take about 10-15
minutes. No tools are needed. Refer to Figure 1 during
assembly.
1. Stand the tripod upright and spread the legs out as far
as they will go. Keep the tripod legs at their shortest (fully
retracted) length, for now; you can extend them to a more
desirable length later, after the mount is fully assembled.
2. Place the base of the SkyView AZ mount onto the tripod
head. The base of the mount will register with the tripod
head.
3. Thread the central support shaft upwards into the mount
until tight. This will secure the SkyView AZ mount head to
the tripod.
4. Remove the knob and washer from the bottom of the center support shaft. Slide the tripod support tray up the bottom of the central support shaft until the three tray arms
contact the legs of the tripod. The flat side of the accessory tray should be facing up. Make sure the “V” of each
tray arm is against a tripod leg. Place the knob washer on
the center support shaft against the tray, and follow it by
threading the securing knob all the way up the center support shaft until it is tight against the tray. The tripod support
tray provides additional stability for the tripod, and holds
up to five 1.25" eyepieces and two 2" eyepieces.
Your SkyView AZ mount is now fully assembled, and should
resemble Figure 1. All that is left is to connect your telescope(s)
to the mount.
3. Connecting a Telescope
The SkyView AZ mount features two dovetail holders which
allow two separate telescopes to be mounted. To connect
a telescope, a dovetail mounting bar is required. Some
telescopes have this dovetail bar directly attached to the telescope tube. For other telescopes, tube rings will be required to
couple the dovetail bar to the tube. Dovetail mounting bars and
tube rings are both available from Orion. Additionally, if your
telescope has a ¼”-20 threaded mounting hole, Orion offers a
dovetail adapter that will thread into this hole (Figure 2).
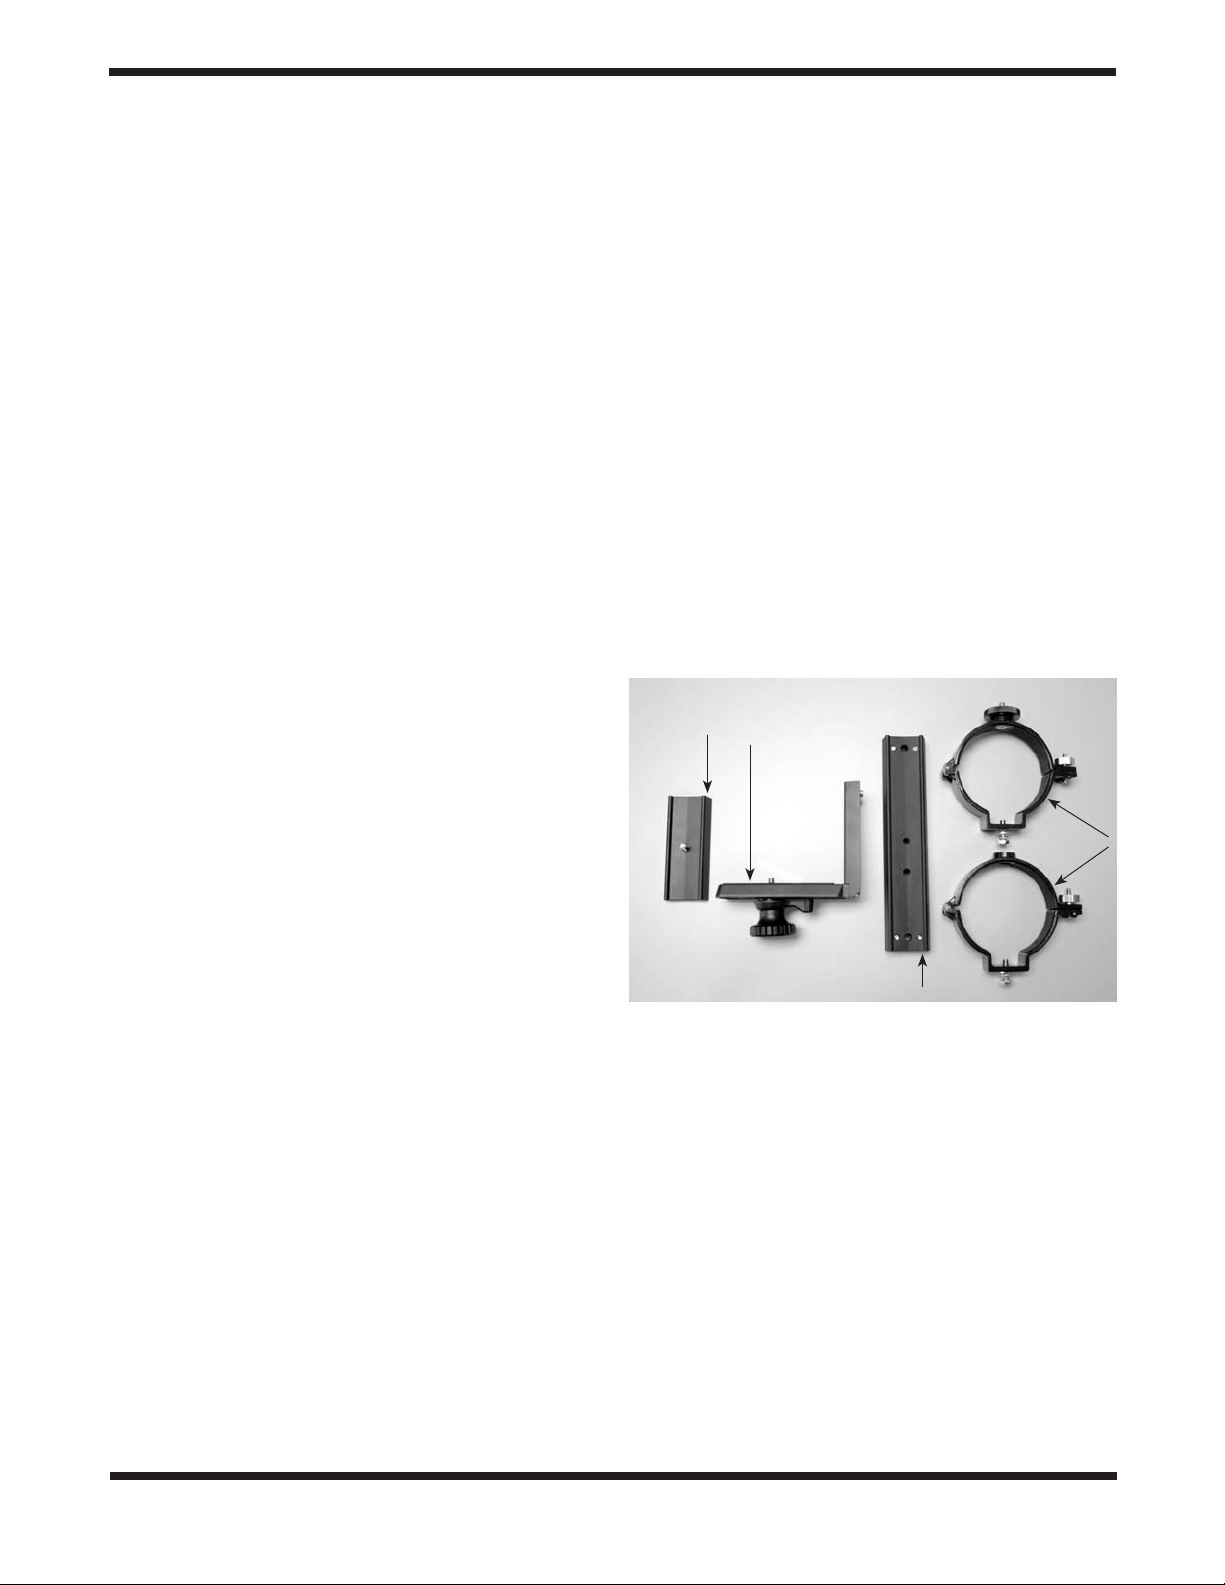
1⁄4"-20
Dovetail
adapter
Figure 2. Orion offers a variety of optional mounting bars, ¼”-20
adapters, and tube rings
Once you have a dovetail mounting bar on your telescope
tube, connecting the telescope to the mount is exceptionally
easy. First, unthread the knurled thumbscrew and smaller
safety thumbscrew of the preferred dovetail holder until the
tips are flush with the interior wall. Then, insert the telescope’s dovetail mounting bar into the preferred dovetail
holder, and tighten the two thumbscrews firmly.
1⁄4"-20
Dovetail
L-adapter
Tube rings
Dovetail mounting bar
2
Page 3

Note: If you have a telescope with a dovetail mounting bar
attached directly to the tube, or you are using the ¼"-20
dovetail adapter, the finderscope may be oriented in an awkward position when connected to the SkyView AZ. In most
cases, this should not cause any problems in actual usage.
If you wish to orient the telescope differently, you will need
to purchase optional accessories such as tube rings and a
dovetail mounting bar so the tube can be rotated within the
rings, or a ¼"-20 dovetail L-adapter (Figure 2). It is likely you
will also need to remove the mounting bar connected directly
to the telescope tube.
Each dovetail holder of the SkyView AZ mount was designed
to be used with telescope optical tube assemblies weighing
up to 25 lbs. The mount may not provide adequate stability if
the mounted telescope exceeds 25 lbs.
An innovative feature of the SkyView AZ mount is its capacity to support two telescopes at once. This feature can be
extremely useful when observing a celestial object that
offers pleasing wide-field and high-magnification views. For
example, one could mount a wide-field, low-focal length
telescope on one of the dovetail holders, and a narrow-field,
long focal-length telescope on the other to yield both wideangle and high-magnification views of the same object. This
can be extremely useful when viewing with a large number
of people.
For optimum up-and-down motion, each mounted telescope
should be balanced front-to-back when positioned horizontally. You can balance the telescope by loosening the thumb
screws slightly, and moving the dovetail bar slightly forward
or back in the dovetail holder. If you are using tube rings,
you can move the telescope tube forward or back in the tube
rings. When the telescope doesn’t move up-and-down by
itself when the altitude tensioning knob is not very tight, you
have achieved good balance. If balancing two telescopes of
significantly different weight, it is more critical that the heavier telescope be well-balanced.
If the relative orientation of the SkyView AZ mount dovetail
holders requires adjustment, the included 2mm hex key can
be used. If you intend to align the dovetail holders so the
mounted telescopes point to the same area, it is a good idea
to have two telescopes mounted during the re-orientation
process to ensure proper alignment. Alignment is best done
during daylight hours.
Follow the instructions below to re-orient the dovetail holder:
1. Find the adjustable dovetail holder with four small dovetail
holder adjustment set-screws (Figure 3).
2. Locate an object such as the top of a telephone pole or a
street sign that is at least a quarter-mile away. Move the
telescope mounted on the non-adjustable dovetail holder
Safety thumbscrew
Dovetail holder
adjustment setscrews (4)
Dovetail holder
Safety thimbscrew
Dovetail holder
Dovetail holder thumbscrews
Altitude tension knob
Azimuth tension
knob
Figure 3. The SkyView AZ mount head.
3
Page 4

so the target object appears in the center of the field of
view when you look into the eyepiece.
3. Tighten the altitude and azimuth tensioning knobs.
4. Gently grasp the telescope mounted in the adjustable
dovetail holder. Use the included 2mm hex key to loosen
the four dovetail holder adjustment set screws by a few
turns each while grasping the mounted telescope.
5. Reposition the telescope and dovetail holder up-and-down
so it matches the orientation of the other mounted telescope, and tighten all four dovetail holder adjustment setscrews.
6. Look into the eyepiece of both telescopes to confirm proper
alignment.
4. Using the SkyView AZ
Mount
The SkyView AZ mount allows motion of the telescope in
two axes: altitude (up-and-down) and azimuth (left-to-right).
Hence, the SkyView AZ is an “altazimuth” mount. Simply
move the telescope up-or-down and left-to-right with a gentle
pushing or pulling motion to adjust position.
If the motion of one or both of the axes is too loose or too
tight, you can adjust the tension by tightening or loosening
the large knurled tension knobs (Figure 3). You should be
able to adjust these knobs so that even the smallest motions
of the mount are very smooth. If the motion on the altitude
axis is not smooth no matter how the altitude tension knob is
adjusted, then you will need to better balance the telescope
front-to-back.
For heavier telescopes, we recommend extending the tripod
legs in order to give the mount a wider stance; this will prevent the mount from becoming “tippy”.
Tracking Celestial Objects
Celestial objects appear to move slowly across the sky
because of the rotation of the Earth on its polar axis. When
you observe an object through your telescope, you’ll see
it drift gradually across the field of view. To keep the object
centered in the field, gently move the mounted telescope as
needed with your hands. For these small, precise movements,
you may need to readjust one or both tensioning knobs. Keep
in mind that objects will appear to move faster at higher magnifications, when the field of view is narrower.
5. Care and Maintenance
If you give your SkyView AZ mount reasonable care, it will
last a lifetime. Store it in a clean, dry, dust-free place. Do not
store the mount outdoors, although storage in a garage or
shed is OK.
Your mount requires very little mechanical maintenance. The
mount is constructed of aluminum and has a black anodized
finish that is fairly scratch-resistant. If a scratch does appear,
it will not harm the mount. Dust, dirt, or moisture on the mount
should be wiped off with a soft cloth. If the mount needs more
extensive cleaning, use a household surface cleaning fluid.
When transporting the mount to an observing location, we
recommend removing accessory tray and folding the tripod
legs together. For extra portability, you can also remove the
SkyView AZ mount entirely from the tripod; simply unthread
the central support shaft under the tripod head. To protect
your mount during transport, Orion offers optional soft padded carry cases. Visit www.OrionTelescopes.com for details.
6. Specifications
Mount: Altazimuth, dual-dovetail
holder equipped
Material: Black anodized aluminum
Maximum load capacity: Approximately 25lbs.
(per dovetail holder)
Axis tensioning: Via knurled knobs
Telescope connection: Requires Orion dovetail bar
(Optional)
Tripod: Steel legs, adjustable height,
includes accessory tray
Assembled weight: 19 lbs. 8 oz.
One-Year Limited Warranty
This Orion SkyView AZ Dual-Altazimuth Mount is warranted against defects in materials or workmanship for a period of one year
from the date of purchase. This warranty is for the benefit of the original retail purchaser only. During this warranty period Orion
Telescopes & Binoculars will repair or replace, at Orion’s option, any warranted instrument that proves to be defective, provided it is
returned postage paid to: Orion Warranty Repair, 89 Hangar Way, Watsonville, CA 95076. If the product is not registered, proof of
purchase (such as a copy of the original invoice) is required.
This warranty does not apply if, in Orion’s judgment, the instrument has been abused, mishandled, or modified, nor does it apply
to normal wear and tear. This warranty gives you specific legal rights, and you may also have other rights, which vary from state to
state. For further warranty service information, contact: Customer Service Department, Orion Telescopes & Binoculars, 89 Hangar
Way, Watsonville, CA. 95076; (800)-676-1343.
4
 Loading...