

Page 1
3228
STEREO CD RADIO
INSTRUCTIONS MANUAL
Page 2
FEATURES AND CONTROLS NE-3228
3
4
5
1
6
7
8
9
10
11
2
12
14
16
18
13
15
17
19
20
26
22
23
24
27
29
28
30
21
25
32
31
Page 3
To achieve the utmost in enjoyment and performance, and in order to become familiar with its features,
please read this manual carefully before attempting to operate the unit , this will assure you years of
faithful, trouble free performance and listening pleasure.
Important Notes
This safety and operating instruction should be retained for future reference.
*
Avoid installing the unit in locations described below:
*
- Places exposed to direct sunlight or close to heat radiating appliances such as electric heaters.
- On top of other stereo equipment that radiate too much heat.
- Places blocking ventilation or dusty places.
- Places subject to constant vibration.
- Humid or moist places.
Make sure not to obstruct the ventilation openings.
*
Operate turning controls and switches as instructed in the manual.
*
Before turning on the power for the first time, make sure the power cord is properly installed.
*
Store your CD in a cool area to avoid damage from heat.
*
For safety reasons, do not remove any covers or attempt to gain access to the inside of the product.
Refer any servicing to qualified personal.
D
o not attempt to remove any screws, or open the casing of the unit; there are no user serviceable
parts inside, refer all servicing to qualified service personal.
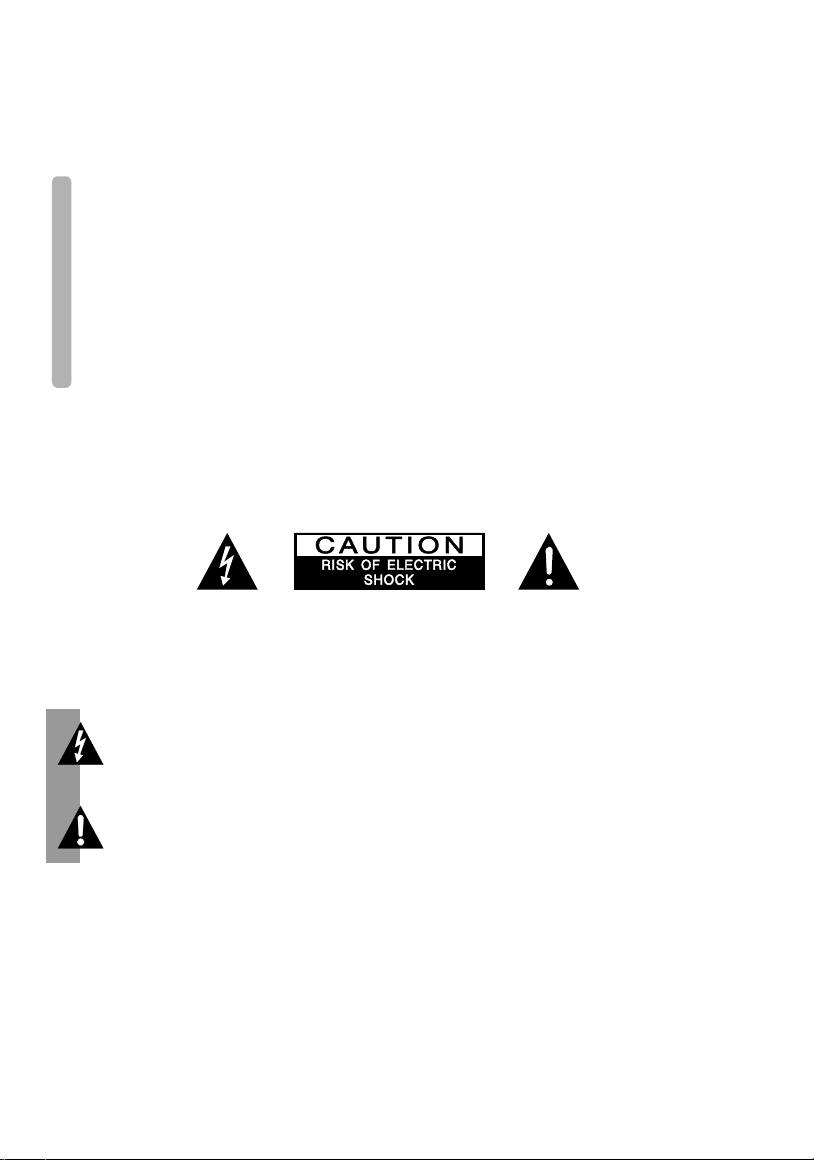
CAUTION :
DANGEROUS VOLTAGE
ATTENTION
WARNING :TO PREVENT FIRE OR SHOCK HAZARD, DO NOT EXPOSE THIS APPLIANCE TO
DRIPPING OR SPLASHING.
Note:
This unit will become warm when used for a long period of time. This is normal and does not indicate a
problem with the unit.
This CD player includes micro-processors which may malfunction as a result of external electrical
interference or noise. If the CD player is not working properly, disconnect the power source and then
reconnect it.
TO REDUCE THE RISK OF ELECTRIC SHOCK DO NOT REMOVE COVER(OR BACK),
NO USER SERVICEABLE PARTS INSIDE, REFER SERVICING TO QUALIFIED SERVICE
PERSONAL.
Conductor dangerous voltage, that may be of sufficient magnitude to constitute a risk of
electric shock to persons is present within this product's enclosure.
The owner's manual contains important operating and maintenance instructions, for your
safety, it is necessary to refer to the manual.
UK-1
Page 4

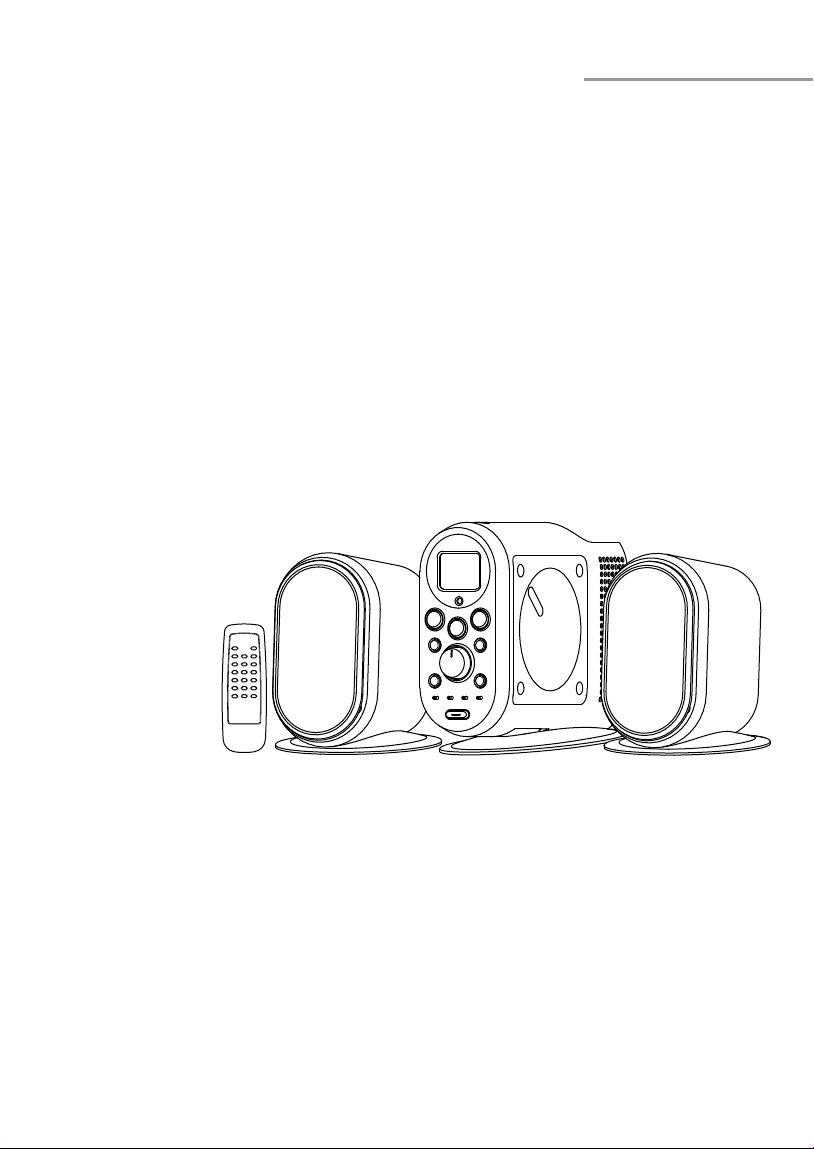
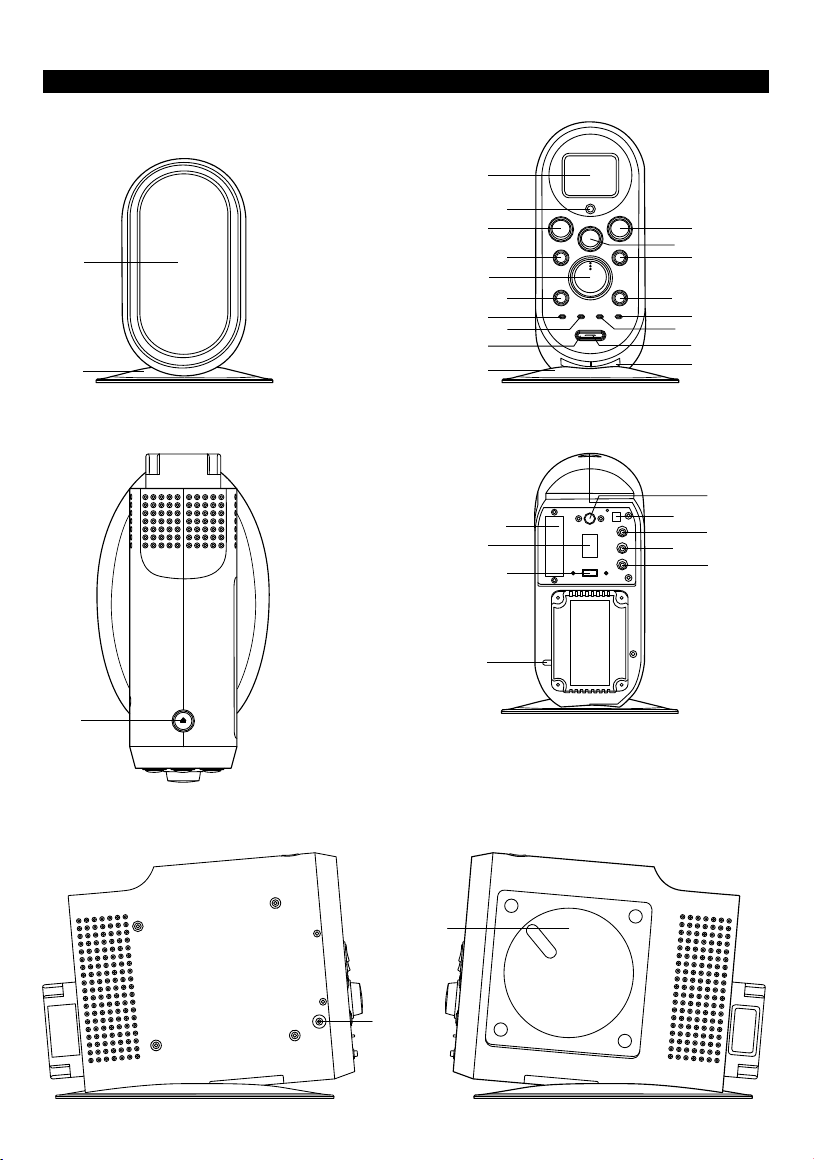
FEATURES AND CONTROLS
1. SPEAKER BOX
2. SPEAKER BASE
3. LCD DISPLAY
4. IR SENSOR
5. TUNER BUTTON
6. STOP/BAND BUTTON
7. VOLUME KNOB
8. SKIP/TUNING/SEARCH DOWN BUTTON
9. STEREO/MONO BUTTON
10. REPEAT/MEMORY BUTTON
11. STAND-BY BUTTON
12. MAIN BASE
13. AUX BUTTON
14. CD BUTTON
15. PLAY/PAUSE BUTTON
16. SKIP/TUNING/SEARCH UP BUTTON
REMOTE CONTROL
1. STAND-BY BUTTON
2. FUNCTION BUTTON
3.SKIP/TUNING/SEARCH DOWN BUTTON
4. REPEAT/M-UP BUTTON
5.MEMORY/C-ADJ BUTTON
6. EQ BUTTON
7. MUTE BUTTON
8. CD DOOR OPEN/CLOSE BUTTON
9. PLAY/PAUSE BUTTON
10. SNOOZE BUTTON
11. SKIP/SEARCH/TUNING UP BUTTON
12. STOP/BAND BUTTON
13. RANDOM BUTTON
14. INTRO BUTTON
15. MODE/REMAIN BUTTON
16. TIMER BUTTON
17. X-BASS BUTTON
18. SLEEP BUTTON
19. VOLUME DOWN BUTTON
20. VOLUME UP BUTTON
17. MODE/REMAIN BUTTON
18. PROGRAM/C-ADJ BUTTON
19. STAND-BY INDICATOR
20. BATTERY DOOR
21. CD DOOR OPEN/CLOSE BUTTON
22. SPEAKER TERMINALS
23. AC POWER MAIN SWITCH
24. DUAL VOLTAGE SWITCH(OPTIONAL)
25. AC POWER CORD
26. 75 OHM ANTENNA JACK(OPTIONAL)
27. AM ANTENNA JACK(OPTIONAL)
28. AUX INPUT(LEFT)
29. AUX INPUT(RIGHT)
30. SUB WOOFER OUT(OPTIONAL)
31. PHONE JACK
32. CD DOOR
1
2
3
4
5
6
7
10
12
14
16
18
20
8
9
11
13
15
17
19
PUTTING THE BATTERIES INTO
THE REMOTE CONTROL UNIT
Press on the side of the compartment cover, take the
cover off to open the compartment. Place the two
(UM3), (AA), (1.5V) batteries in the remote
control according to the polarity markings ("+" and "
- ") inside the compartment and on the batteries.
Place the cover over the compartment, press down
lightly, until it snaps on.
NOTE : Remove the batteries from the remote
control if not in use for long period of the time. Do
not mix normal batteries with rechargeable batteries,
when the batteries become weak, remote control will
not function and replace with new batteries.
UK-2
**BATTERIES NOT INCLUDED**
1
2
Page 5

INSTALLING THE SYSTEM
1. Speakers Connection
Extend the SPEAKER WIRES and connect them
to the SPEAKER TERMINALS.
2. Power Cord Connection
Before using , connect the AC Power Cord to
the AC outlet , then turn on the main switch
of the unit.
LL
RR
LL
AC MAIN POWER SWITCH
OPERATING THE UNIT
When you first plug the unit into the AC outlet , the
unit will be in standby mode , You can press the
STAND-BY button on the unit ( or on the remote control )
to switch the unit ON and OFF. Pull the AC plug out of
the wall socket if you want to switch off completely.
POWER/STANDBY
1. Press the STAND-BY button on the unit (or remote) to switch the unit on.
2. Select the sound source ( CD , TUNER or AUX ) by pressing corresponding function key.
The corresponding display will light up. (Note: Use remote pressing FUNCTION key selection)
3. Adjust the volume with the VOLUME ( UP or DOWN ) button.
4. Set the present equalizer ( classic , rock or pop) with the EQ button on the remote.
5. Press the STAND-BY button again to switch off the unit.
RR
AC CORD
CLOCK SETTING
Unit on STANDBY position
1. Press & hold MEMORY / C-ADJ. button until time display 24-hour digit flash.(F.1)
2. Press TUNING / SKIP / SEARCH UP or DOWN button to adjust 24-hour or 12-hour digit.(F.2)
3. Press MEMORY / C-ADJ. button again, time display hour or minute digit flash, press TUNING / SKIP /
SEARCH UP or DOWN button to adjust hour or minute digit. (F.3)(F.4)
4. Press the MEMORY/C-ADJ.button again to confirm the clock setting.
F. 1
F. 2
F. 3
F. 4
TIMER SETTING
1. Press the POWER / STANDBY button to put the machine in the standby mode, check standby is lit.
2. Briefly press the MODE / REMAIN button , the "TIMER " symbol will flash. Each enable state as
shown above is cleared when the key is not pushed for 10 second. While the "TIMER " symbol is
flashing, press the MEMORY / C-ADJ button for 3 seconds the hour digits flash. Press on one of the
TUNING/SKIP buttons to set the hour. Press the MEMORY/C-ADJ button, the minute digits flash.
Press on one of the TUNING/SKIP buttons to set the minutes. Press the MEMORY/C-ADJ button
again to validate the time. The "TIMER " symbol switches off. (F.5) (F.6) (F.7)
3. Press TIMER button (on the remote) to validate the timer function. The activation time for the timer is
shown for a few seconds, then the machine again displays the actual time.
4. In the TIMER ON mode, the initial volume level is equal to last turn off volume level.
UK-3
Page 6

SNOOZE SETTING (REMOTE CONTROL ONLY)
1. Press the SNOOZE button in the TIME ON mode , the system will be switched to
the STANDBY mode and " SNOOZE " appears on the display.(F.8)
2. Five minutes later, the system will be switched on automatically to reach TIMER ON mode and
start playing , then "TIMER " is flashing on the display.
3. The system will be switched off automatically one hour later.
F. 5 F. 6
F. 7
F. 8
TO SET SLEEP FUNCTION (REMOTE CONTROL ONLY)
1. If you want to fall asleep to music, press the SLEEP button .
2. You may adjust the Radio or CD player's sleep function to play from 90, 80, 70 up to 10 minutes
of music before shutting itself off automatically.
RADIO OPERATION
1. Press the TUNER button to select the Radio operation.
2. Waveband range will appear on the display.
3. Select the desired waveband with the STOP/BAND button.
Manual tuning
1. To tune for weak stations, use manual tuning by pressing TUNING / SKIP / SEARCH UP or DOWN
button continuously until you read the correct frequency or the reception is at its best.
2. When you want to select FM stereo station, press the FM ST/ MODE button / indicator first . When
you receive a FM stereo station the " " indicator appears on the display, you
can receiving FM stereo transmission .(F.9)
3. When you press the FM ST/ MODE button again , the FM STEREO indicator will turn off & in MONO
FM status.(F.10)
Note:
When the FM stereo signal is weak the sound may be of poor quality. If this happens switch the FM
selection mode to the MONO position , the interference will be less but the reception will be
monophonic.
F. 9
F.10
Automatic tuning
1. Press the TUNING / SKIP / SEARCH UP or DOWN button for a second or more, then release
the button. The tuner will automatically search for the first station of sufficient signal strength.
2. Repeat the above procedure if you wish to select another station.
UK-4
Page 7

Programming preset stations
You can also preset stations of your choice and store up to 10 AM and 10 FM stations
in its memory. To store your selected broadcasting stations:
1. Press the STOP / BAND button to toggle between AM and FM to make your selection.
2. Tune to the required station.
3. Press the MEMO / C-ADJ button.(F.11)
4. Press the REPEAT / M-UP button to your desired station number.(F.12)
5. Press the MEMO / C-ADJ again to confirm your selection.
6. To program more stations into memory, repeat the above steps 2 to 5.
7. To change the stored preset stations, repeat the above steps 2 to 5.
Notes:
1. In the radio mode, when frequency is displayed, this button is use for setting of memory writing
enable state for 10 seconds.
2. Storing a new station into a preset location will erase the previously stored station in that
location.
3. Power off / failure or power cord disconnection will clear the memory of all preset stations.
Perform the stations presetting procedures again to store the stations.
F.11
Selecting the Preset Stations
1. Press the STOP/BAND button to select the desired AM/FM stations.
2. Press REPEAT/M-UP button to select the desired preset station number.
3. The numeric location of that preset station is displayed along with the corresponding frequency.
FM Antenna
Locate the FM antenna wire for better FM reception.
F.12
UK-5
Page 8

LISTENING TO COMPACT DISC (CD)
Press the CD button to select the CD operation.(F.13)
Press the OPEN/CLOSE button to open the CD compartment(F.14), insert the disk with the printed face
to the outside, again press the OPEN/CLOSE button to close the CD compartment.
F.13 F.14
Playing The Entire CD
1. Playback will start by pressing PLAY / PAUSE , the indicator then appears. Playback start with the
first track , The display shown the current track number and its elapsed time.(F.15)
2. To interrupt playback , press PLAY/PAUSE . The time elapse indicator will flash. (F.16)
3. To resume playback, press PLAY/PAUSE again.
4. To stop playback, press STOP/BAND.
Selecting A Different Track During Play
1. Press TUNING / SKIP / SEARCH UP or DOWN button on the unit (or remote)until the required
track number appears on the display. (F.17)
2. Release the button, Play back will be started from this track.(F.18)
3. Press the TUNING /SKIP / SEARCH UP ONCE, the next track number will be appeared and
started to play.
4. Press the TUNING /SKIP / SEARCH DOWN ONCE, the track that is currently playing will be
started from the beginning.
F.15 F.16 F.17 F.18
Repeat play
1. When playing CD, if you desire to repeat the same track only, press REPEAT / M-UP button
once and the "REPEAT" indicator will light up and flash .(F.19)
2. When playing CD , If repeat all , press the REPEAT / M-UP button twice and the " REPEAT "
indicator will light up and not flash.(F.20)
3. To cancel repeat play, press the STOP/BAND button or press the REPEAT / M-UP button until
the " REPEAT " indicator disappeared.
Random play
1. Press the RANDOM button once, and the "RANDOM" indicator will light up, and start playing.
The tracks will be played randomly.(F.21)
3. Press RANDOM button again to clear the random mode.
F.19 F.20 F.21
UK-6
Page 9

Stopping play
1. Press STOP/BAND button if you wish to stop play. The disc and track number which can be
played will now appear on the display.(F.22)
2. Open the CD door on the unit to remove the CD .
Programming the CD player
By programming the CD player, you can play up to 20 tracks in any desired order. (possible only
when the CD is in stop mode.)
1. Place the disc to be programmed into the CD compartment. Press MEMO / C-ADJ. button.
2. The display will show MEMORY TRACK and P-01.(F.23)
3. Use TUNING / SKIP / SEARCH UP or DOWN button to select the first track to be programmed.
4. When the desired track appears on the display, press MEMO / C-ADJ. button again.
5. The display will show MEMORY TRACK and P-02.(F.24)
6. Repeat this procedure to select other tracks that you wish to program from the disc into the
memory.
7. Press PLAY / PAUSE.
8. Play starts with the first track of the program.(F.25)
9. When all tracks have been played , the display shows the number of tracks and the playing
time of the CD song.
F.23 F.24 F.25 F.22
Erasing a program
A program is erased if you :
Press MEMORY / C-ADJ. button, then STOP /BAND button in stop mode. Or Switch the unit OFF. Or
Opening the CD door.
Note : In setting a new program , the existing one will be cleared.
MODE/REMAIN SETTING
Press MODE/REMAIN button changing the display as shown below.
1. In the radio mode : Frequency display >> Clock display >> Timer ON time .
2. In the CD mode :
(During play) Playing time display >> Remaining time display >> Clock display
>> Timer ON time .
(During stop) Total tracks and time display >> Clock display >> Timer ON time .
PRESET EQ (REMOTE CONTROL ONLY)
Press the PRESET EQ button , and LCD indicator will display CLASSIC or ROCK or POP
in sequence of every press.(F.26)(F.27)(F.28)
F.26 F.27 F.28
UK-7
Page 10

MUTE (REMOTE CONTROL ONLY)
1. If you press the MUTE button, the "mute" indicator will be displayed & the audio output will be
temporary terminated.
2. Press MUTE button again, the "mute" indicator will be off & the audio output will be back to
normal.
AUX INPUT
1. Press the AUX button once and the "AUX" indicator light up on the display.(F.29)
Analog sound signals can be input through the RCA input jacks at the back of the unit.
2. Use a cable with RCA jacks to connect to other audio equipment (turn table, LCD players,
VCRs, etc.)
INTRO PLAY (REMOTE CONTROL ONLY)
1. During the stop condition, pressing the INTRO button (on the remote) to start the intro playing .
And the "INTRO" indicator appears on the display. After that the 10 second of each song will be
played.(F.30)
2. To cancel intro play, press the button again, the "INTRO" indicator disappeared, and the CD will
change to the normal playing mode.
F.29
F.30
SUPER BASS (REMOTE CONTROL ONLY)
Press the X-BASS button on the remote, the bass sound is enhanced. If it is in the EQ mode,
the first X-BASS depress will reset the EQ to normal, and you need to press the X-BASS
again to activate the X-BASS.
OPEN/CLOSE CD DOOR
1. Press OPEN/CLOSE button on the unit or the remote, the cd door will be opened.
2.Then press OPEN/CLOSE button again, the cd door closed.
LISTEN TO THE MUSIC BY USING HEADPHONE
A stereo headphone jack is provided for private listening . To listen to the unit with headphones (not
included ) insert the 3.5mm mini-stereo plug from the headphones into the PHONES jack on the
left side. The extemal speakers are automatically disconnected when headphones are in use.
MEMORY BACK-UP
To back-up the memory of the main CPU, insert 1.5V x 3, UM-3, AA or equivalent batteries into the
battery compartment.
UK-8
Page 11

COMPACT DISC
1. Always use a compact discs bearing the mark as shown.
2. Notes on handling discs
Removing the disc from its storage case and loading it.
* Do not touch the reflective recorded surface.
* Do not stick paper or write anything on the surface.
* Do not bend the disc.
3. Storage
* Store the disc in its case.
* Do not expose discs to direct sunlight or high temperatures, high humidity or dusty
places.
4. Cleaning a disc
* Should the disc become soiled, wipe off dust, dirt and fingerprints with a soft cloth.
* The disc should be cleaned from the centre to the edge.
FROM THE CENTRE TO THE EDGE
CORRECT
INCORRECT
* Never use benzene, thinners, record cleaner fluid or anti static spray.
* Be sure to close the CD door so the lens is not contaminated by dust.
* Do not touch the lens.
UK-9
Page 12

MULTI FUNCTION DISPLAY
A. TRACK NUMBER INDICATOR
B. TUNER BAND INDICATOR
C. FREQUENCY/TIME INDICATOR
D. STEREO INDICATOR
D
B
A
SPECIFICATION
POWER SUPPLY : 230V~50Hz
OUTPUT POWER : 5 Watts x 2
UNIT DIMENSION : 150 (L) x 288 (W) x 221 (H) mm
SPEAKER BOX DIMENSION : 150 (L) x 232 (W) x 192 (H) mm
RADIO SECTION
FREQUENCY RANGE : FM 87.5 - 108 MHz
AM 522 - 1620 kHz
COMPACT DISC SECTION
OPTICAL PICKUP : 3 - BEAM LASER
FREQUENCY RESPONSE : 100Hz - 16kHz
C
SPECIFICATION SUBJECT TO CHANGE WITHOUT FURTHER NOTICE.
Dripping warning : " The product shall not be exposed to dripping or splashing and that no objects
filled with liquids, such as vases, shall be placed on the product."
Ventilation warning : " The normal ventilation of the product shall not be impeded for intended use."
UK-10
 Loading...