

Page 1
INSTRUCTION MANUAL
Orion®
GoScope™ 70
#9794 Portable Altazimuth Refractor Telescope
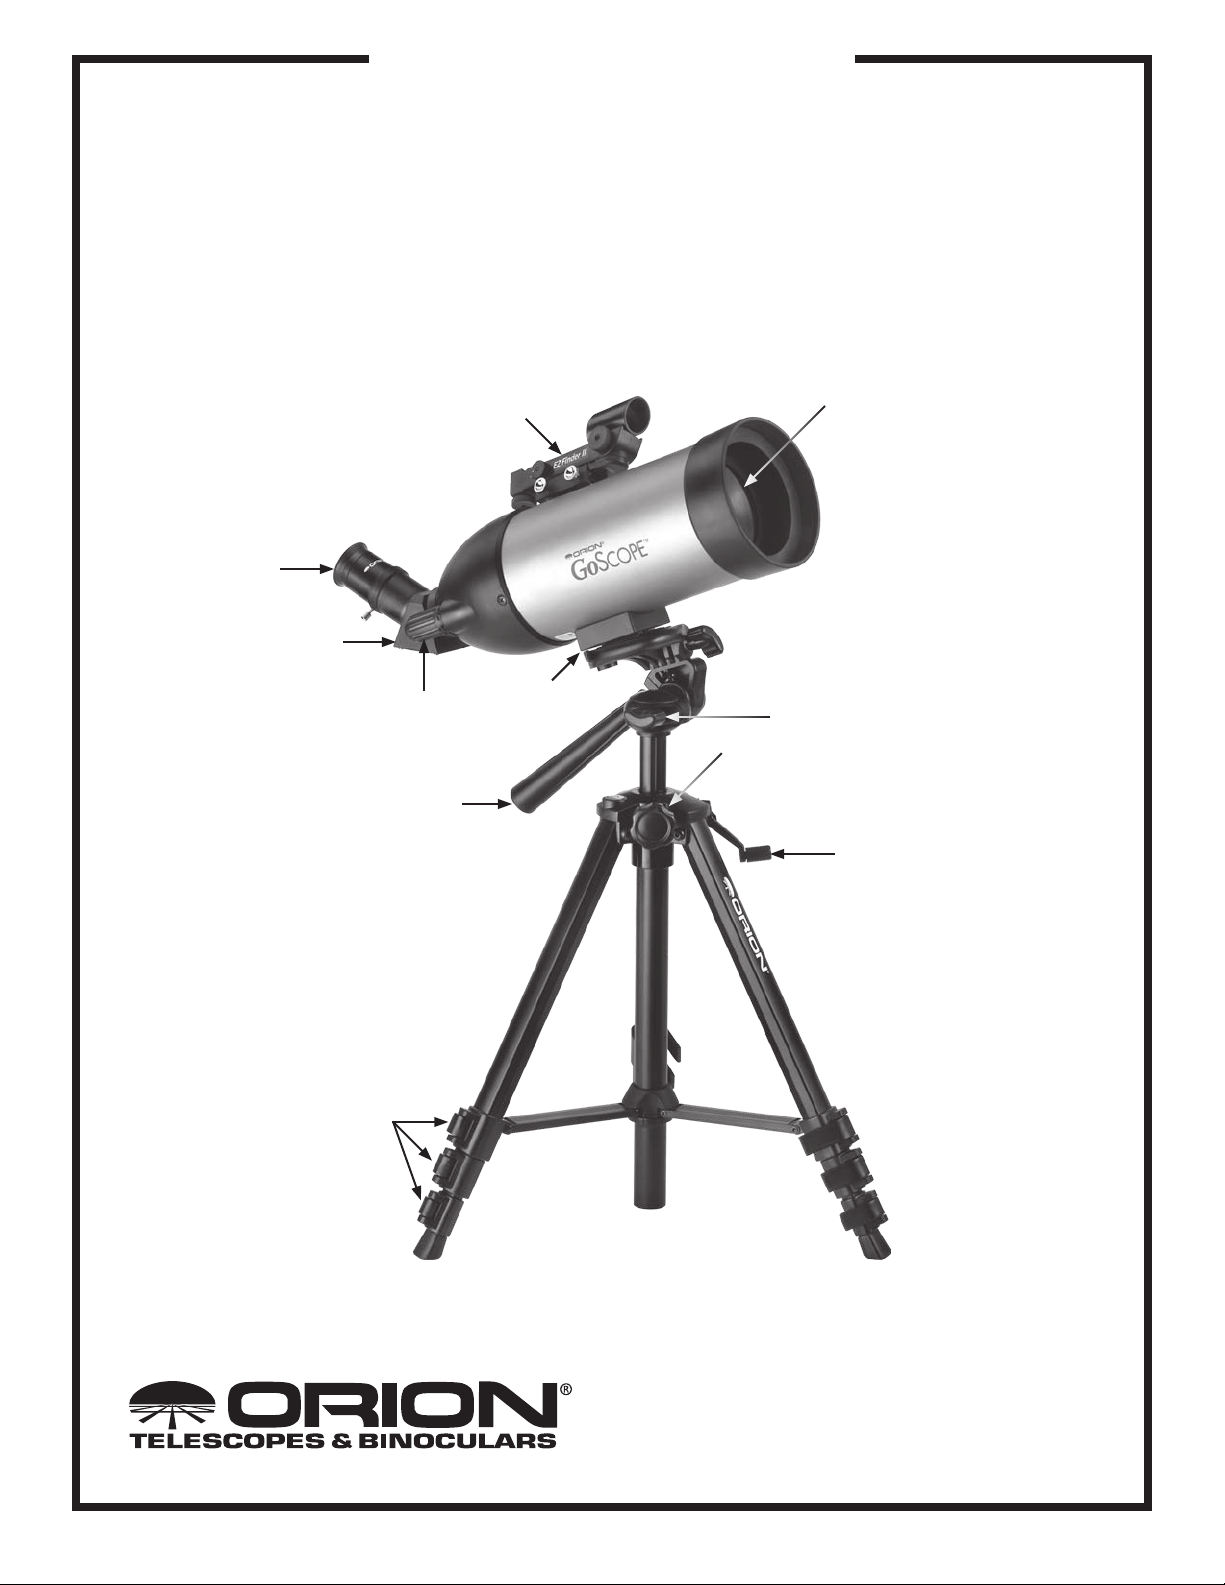
Eyepiece
Diagonal
Focus
knob
Handle
EZ Finder II
reflex sight
Mounting
block
Objective lens
Azimuth
lock knob
Elevator shaft
lock knob
Elevator shaft
adjustment crank
Leg clamp
Figure 1. The GoScope 70.
Providing Exceptional Consumer Optical Products Since 1975
Customer Support (800)-676-1343
E-mail: support@telescope.com
Corporate Offices (831)‑763‑7000
89 Hangar Way, Watsonville, CA 95076
IN 255 Rev. D 01/09
Page 2
Congratulations on your purchase of an Orion telescope. Your new GoScope 70 is the most portable
telescope system ever developed by Orion. Since it fits completely in its included backpack case, you
can take the GoScope on camping trips, day hikes, the beach, sporting events, vacations, and anywhere
else you want to bring it. Great for daytime spotting or nighttime stargazing, the GoScope offers the entire
family new worlds of fun.
These instructions will help you set up, properly use and care for your telescope. Please read them over
thoroughly before getting started.
Parts List
Optical tube assembly
Tripod
45° erect-image diagonal
20mm eyepiece
10mm eyepiece
EZ Finder II reflex sight
Objective lens cover
Backpack carry case
Quick-release
lever
Quick-release
shoe
WARNING: Never look directly at the Sun through
your telescope—even for an instant—without a
professionally made solar filter that completely
covers the front of the instrument, or permanent
eye damage could result. Young children should
use this telescope only with adult supervision.
Assembly
Carefully remove all of the items from the shipping box. Make
sure all the parts listed in the parts list are present. Save all
boxes and packaging material. In the unlikely event you need to
return the telescope, you should use the original packaging.
Assembling the telescope is very easy and quick to do. No
tools are required. During assembly (and anytime for that matter), do not touch the any of the lenses of the telescope, eyepieces, or finder scope with your fingers. The optical surfaces
can become dirty or damaged if touched. Never remove any
lens assembly from its housing for any reason, or the product
warranty and return policy will be voided.
Refer to Figure 1 during assembly.
1. Spread the legs of the tripod, and extend them to the
desired length. Extend the legs by disengaging the leg
clamps and pulling the leg sections out. Re-engage the
clamps when done.
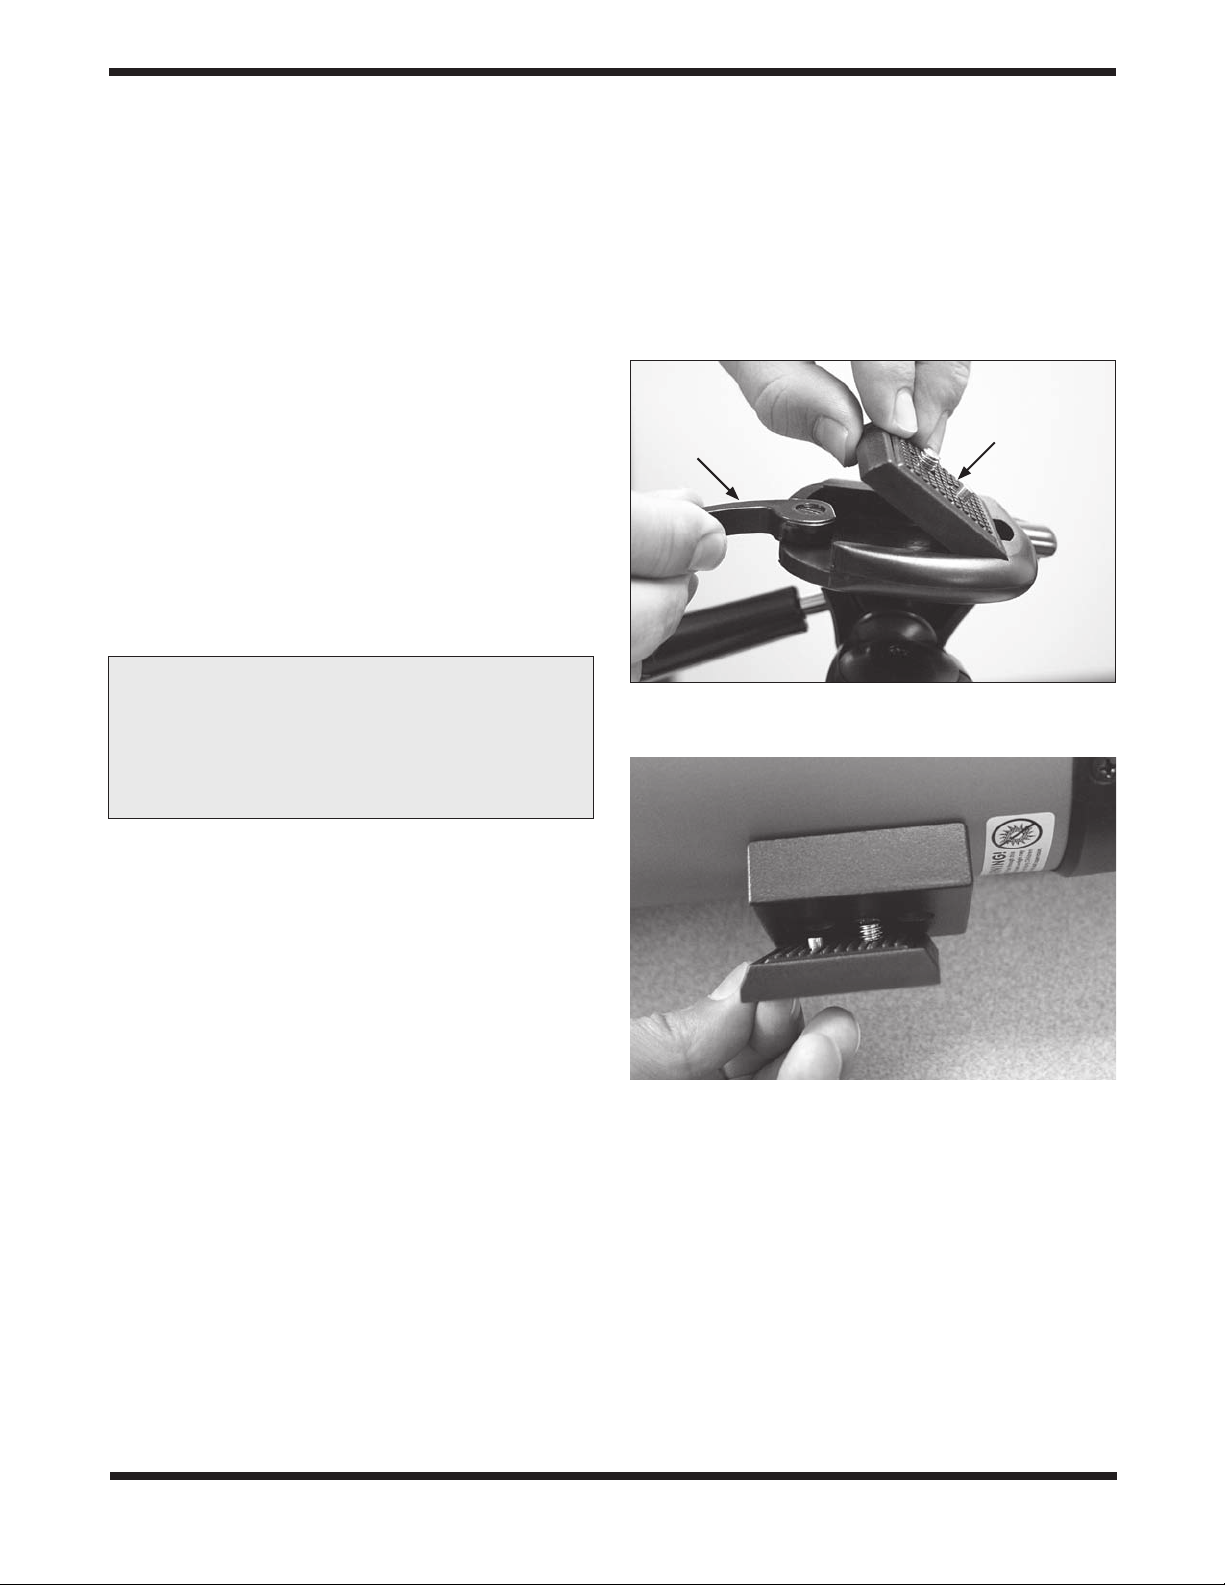
2. Remove the quick-release shoe from the top of the tripod. To do this, you must first push the quick-release lever
(Figure 2a).
3. Attach the quick-release shoe to the mounting block on the
GoScope optical tube (Figure 2b). Thread the stud on the
shoe into the threaded hole in the mounting block. Use the
knurled edge of the screw on the underside of the shoe to
Figure 2a. Remove the quick-release shoe from the tripod by
pushing the quick-release lever while simultaneously lifting the quick
release shoe with the other hand.
Figure 2b. Orient the quick-release shoe relative to the
mounting block as shown.
secure it to the tube. You can use a small flathead screw
driver or the edge of a coin to firmly tighten the connection.
4. Attach the 45° erect-image diagonal to the optical tube.
First remove the caps from the diagonal and unthread
the cover on the rear of the GoScope. The knurled ring
on the diagonal connects to the threads on the rear of the
GoScope (Figure 3). Tighten this ring firmly. If you wish
to change the orientation of the diagonal for a more comfortable viewing angle, you must first loosen the knurled
ring on the diagonal. Rotate the diagonal to the desired
viewing angle, and retighten the knurled ring to lock the
diagonal into place.
2
2
Page 3
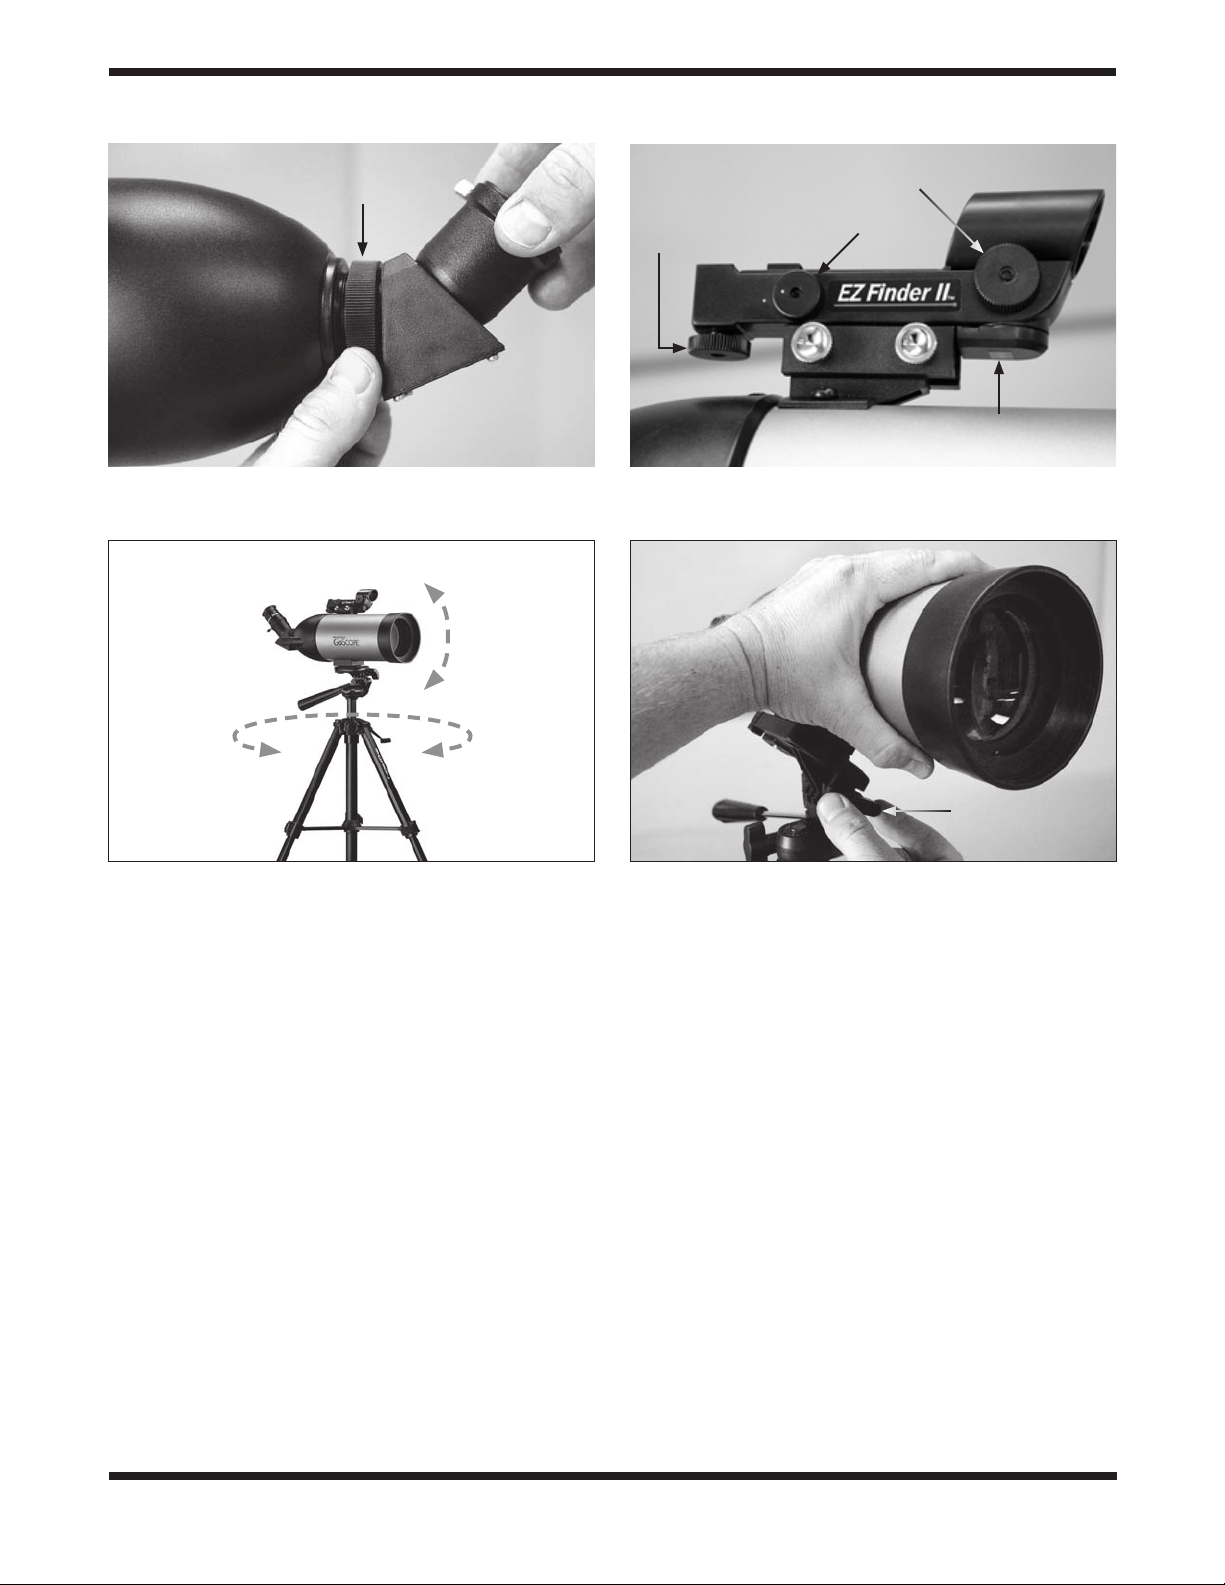
Knurled ring
Altitude
adjustment
knob
Azimuth adjustment
knob
Power knob
Battery
cover
Figure 3.
threads on the rear of the GoScope. To change the viewing angle,
loosen the knurled ring, rotate the diagonal, then retighten the ring.
Figure 5. The GoScope tripod moves about two axes of motion:
altitude (up-and-down) and azimuth (left-to-right).
5. Insert the 20mm eyepiece into the diagonal (remove the
caps from the eyepiece). Secure the eyepiece with the
thumbscrew on the diagonal.
6. Connect the EZ Finder II reflex sight to its bracket on the
telescope tube. Loosen the two knurled silver thumbscrews
on the reflex sight, and slide its base onto the rail on top
of the bracket. The reflex sight should be oriented on the
GoScope as shown in Figure 4. Retighten the knurled silver thumbscrews so the EZ Finder II is firmly connected to
its bracket.
7. Re-connect the tripod’s quick-release shoe, now with the
GoScope attached, to the tripod. Push the quick-release
lever to allow the shoe to seat onto the tripod head.
Your telescope is now fully assembled and should resemble
Figure 1.
The knurled ring of the diagonal connects to the
Altitude
Azimuth
Using the Tripod
The tripod allows motion of the telescope either left-to-right
(azimuth) or up-and-down (altitude) (Figure 5). To move the
telescope in azimuth, first loosen the azimuth lock knob
(Figure 1). You do not need to completely loosen this knob,
Figure 4. The EZ Finder II reflex sight.
Third axis
lock knob
Figure 6. The tripod’s third axis of motion is rarely, if ever, used.
as having some tension makes pointing the telescope easier.
To move the telescope in altitude, first rotate the tripod handle
(Figure 1) counterclockwise. Again, do not completely loosen
the handle, or the telescope will move too freely and become
difficult to point.
Once the telescope is pointing where you wish, you can retighten the azimuth lock knob and rotate the handle clockwise
to lock the tripod position into place.
For additional tripod height, you can extend the elevator shaft
of the tripod. First loosen the elevator shaft lock knob, and use
the hand crank to raise or lower the telescope to the desired
height (Figure 1). Tighten the lock knob firmly when done.
The tripod also has a third axis of motion, as the telescope
can be rotated 90° to the left about the axis parallel to the
telescope’s body. Because this is a photo tripod, this feature allows you to rotate a camera from portrait to landscape
mode. This feature will rarely, if ever, be used with a telescope. However, if you wish to rotate the telescope in this
way, first loosen the third axis lock knob (Figure 6), make your
adjustment and retighten the knob.
3
Page 4

Focusing the Telescope
With the 20mm eyepiece inserted into the diagonal, move the
telescope so the front end is pointing in the general direction of an object at least 1/4-mile away. Now with your fingers,
slowly rotate the focus knob until the object comes into sharp
focus. Go a little bit beyond sharp focus until the image starts
to blur again, then reverse the rotation of the knob, just to
make sure you’ve hit the exact focus point.
Do You Wear Eyeglasses?
If you wear eyeglasses, you may be able to keep them on
while you observe. In order to do this, the eyepiece must have
enough “eye relief” to allow you to see the entire field of view
with glasses on. You can try this by looking through the eyepiece first with your glasses on and then with them off, and
see if the glasses restrict the view to only a portion of the full
field. Fold down the rubber eyeguard on the eyepiece in order
to get your glasses (and eye) as close to the eyepiece lens as
possible. If the glasses do restrict the field of view, you may
be able to observe with your glasses off by just refocusing the
telescope by the needed amount.
If your eyes are astigmatic, images will probably appear the
best with glasses on. This is because a telescope’s focuser
can accommodate for nearsightedness or farsightedness,
but not astigmatism. If you have to wear your glasses while
observing and cannot see the entire field of view, you may
want to consider purchasing additional eyepieces that have
longer eye relief.
Operating the EZ Finder II
Reflex Sight
The EZ Finder II reflex sight (Figure 4) makes pointing your
telescope almost as easy as pointing your finger! It’s a nonmagnifying aiming device that superimposes a tiny red dot on
the sky, showing exactly where the telescope is pointed.
The EZ Finder II works by projecting a tiny red dot (it’s not
a laser beam) onto a lens mounted in the front of the unit.
When you look through the reflex sight, the red dot will appear
to float in space. The red dot is produced by a light-emitting
diode (LED) near the rear of the sight. A 3-volt lithium battery
provides the power for the diode.
Remove the clear plastic tab near the battery cover; this tab
prevents the batteries from accidentally being drained during
shipment. Turn the power knob clockwise until you hear the
“click” indicating that power has been turned on. Look through
the back of the reflex sight with both eyes open to see the red
dot. Position your eye at a comfortable distance from the back
of the sight. The intensity of the dot is adjusted by turning the
power knob. For best results when stargazing, use the dimmest possible setting that allows you to see the dot without difficulty. Typically a dimmer setting is used under dark skies and
a bright setting is used under light-polluted skies or daylight.
At the end of your observing session, be sure to turn the
power knob counterclockwise until it clicks off. When the two
white dots on the EZ Finder II’s body and power knob are
lined up, the EZ Finder II is turned off.
Aligning the EZ Finder II Reflex Sight
When the EZ Finder II is properly aligned with the telescope,
an object that is centered on reflex sight’s red dot should also
appear in the center of the field of view of the telescope’s eyepiece. Alignment of the sight is easiest during daylight, before
observing at night.
1. Aim the telescope at a distant object such as a telephone
pole or roof chimney and center it in the telescope’s eyepiece. The object should be at least 1/4 mile away. Now,
with the EZ Finder II turned on, look though it. The object
will appear in the field of view near the red dot.
2. Without moving the main telescope, use the EZ Finder
II’s azimuth (left/right) and altitude (up/down) adjustment
knobs (Figure 4) to center the red dot on the object in the
eyepiece.
3. When the red dot is centered on the distant object, check
to make sure that the object is still centered in the telescope’s field of view. If not, re-center it and adjust the EZ
Finder II’s alignment again. When the object is centered
in the eyepiece and on the reflex sight’s red dot, the EZ
Finder II is properly aligned with the telescope and is
ready to be used.
The EZ Finder II alignment should be checked before every
observing session. Choose any distant target (during the day)
or bright star (at night), center the object in the telescope’s
eyepiece, then adjust the knobs until the object is centered on
the red dot of the reflex sight.
Replacing the Battery
Should the battery ever die, replacement 3-volt lithium batteries are available from many retail outlets. Remove the old battery by inserting a small flat-head screwdriver into the slot on
the battery cover (Figure 4) and gently prying open the cover.
Then carefully pull back on the retaining clip and remove the
old battery. Do not over bend the retaining clip. Then slide the
new battery under the battery lead with the positive (+) side
facing down and replace the battery cover.
Magnification & Eyepieces
Magnification, or power, is determined by the focal length of
the telescope and the focal length of the eyepiece being used.
Therefore, by using eyepieces of different focal lengths, the
resultant magnification can be varied. It is quite common for
an observer to own five or more eyepieces to access a wide
range of magnifications. This allows the observer to choose
the best eyepiece to use depending on the object being
viewed. The GoScope comes with two eyepieces, which will
suffice nicely to get started.
Magnification is calculated as follows:
Telescope Focal Length
Eyepiece Focal Length
= Magnification
4
Page 5

For example, the GoScope has a focal length of 350mm,
which when used with the supplied 20mm eyepiece yields:
350mm
20mm
The magnification provided by the 10mm eyepiece is:
350mm
10mm
The maximum attainable magnification for a telescope is
directly related to how much light it can gather. The larger the
aperture, the more magnification is possible. In general a figure of 2x per millimeter of aperture is the maximum attainable
for most telescopes. Your GoScope has an aperture of 70 millimeters, so the maximum magnification would be about 140x.
This level of magnification assumes you have ideal conditions
for viewing.
Keep in mind that as you increase magnification, the brightness of the object viewed will decrease; this is an inherent
principle of the laws of physics and cannot be avoided. If magnification is doubled, an image appears four times dimmer.
If magnification is tripled, image brightness is reduced by a
factor of nine!
Start by centering the object you wish to see in the 20mm
eyepiece. Then you may want to increase the magnification to
get a closer view. If the object is off-center (i.e., it is near the
edge of the field of view) you will lose it when you increase
magnification, since the field of view will be narrower with the
higher-powered eyepiece.
To change eyepieces, first loosen the securing thumbscrew
on the diagonal. Then carefully lift the eyepiece out of the
holder. Do not tug or pull the eyepiece to the side, as this will
knock the telescope off its target. Replace the eyepiece with
the new one by sliding it gently into the holder. Re-tighten the
thumbscrew, and refocus for your new magnification.
= 17.5x
= 35x
Terrestrial Viewing
Most users will use their GoScope extensively for viewing terrestrial (Earth-based) objects during daylight hours. It excels
for viewing birds, wildlife, sporting events, vistas, or anything
else you want to see close-up.
Remember to aim well clear of the Sun, unless the front of
the telescope is fitted with a professionally made solar filter
(available from Orion). Otherwise, permanent eye damage
could result. Children should use the GoScope only with adult
supervision.
Astronomical Observation
The GoScope also is a good telescope for casual stargazing.
It can show much more than what is visible on Earth during
the day. Once the Sun sets, there are literally thousands of
objects in the night sky that can be inspected more closely.
For many, this will be the first foray into the exciting world of
amateur astronomy. The following information and observing
tips will help you get started.
Choosing an Observing Site
When selecting a location for observing, get as far away as
possible from direct artificial light such as street lights, porch
lights, and automobile headlights. The glare from these lights
will greatly impair your dark-adapted night vision. Set up on
a grass or dirt surface, not asphalt, because asphalt radiates
heat which disturbs the surrounding air and degrades the
images seen through the telescope. Avoid viewing over rooftops and chimneys, as they often have warm air currents rising from them. Similarly, avoid observing from indoors through
an open (or closed) window, because the temperature difference between the indoor and outdoor air will cause image
blurring and distortion.
If at all possible, escape the light-polluted city sky and head
for darker country skies. You’ll be amazed at how many more
stars and deep-sky objects are visible in a dark sky!
“Seeing” and Transparency
Atmospheric conditions vary significantly from night to night.
“Seeing” refers to the steadiness of the Earth’s atmosphere
at a given time. In conditions of poor seeing, atmospheric
turbulence causes objects viewed through the telescope to
“boil”. If you look up at the sky with your eyes, and the stars
are twinkling noticeably, then the seeing is bad and you will
be limited to viewing with low magnifications. Planetary and
Moon observing may also be poor.
In conditions of good seeing, star twinkling is minimal and
images appear steady in the eyepiece. Seeing is best overhead, worst at the horizon. Also, seeing generally gets better
after midnight, when much of the heat absorbed by the Earth
during the day has radiated off into space.
Especially impor tant for observing faint objects is good
“transparency” – air free of moisture, smoke, and dust. All
tend to scatter light, which reduces an object’s brightness.
Transparency is judged by the magnitude (brightness) of the
faintest stars you can see with the unaided eye (6th magnitude or fainter is desirable).
Cooling the Telescope
All optical instruments need time to reach “thermal equilibrium.” The bigger the instrument and the larger the temperature
change, the more time is needed. For optimal performance,
allow at least 30 minutes for your telescope to cool to the temperature outdoors.
Let Your Eyes Dark-Adapt
Don’t expect to go from a lighted house into the darkness of
the outdoors at night and immediately see faint nebulas, galaxies, and star clusters—or even many stars, for that matter.
Your eyes take about 30 minutes to reach perhaps 80% of
their full dark-adapted sensitivity. As your eyes become darkadapted, more stars will glimmer into view and you’ll be able
to see fainter details in objects you view in your telescope.
5
Page 6

To see what you’re doing in the darkness, use a red-filtered
flashlight rather than a white light. Red light does not spoil
your eyes’ dark adaptation like white light does. A flashlight
with a red LED light is ideal, or you can cover the front of a
regular incandescent flashlight with red cellophane or paper.
Be aware, that nearby porch and streetlights and car headlights will ruin your night vision too.
Tracking Celestial Objects
When you observe a celestial object through the telescope,
you’ll see it drift slowly across the field of view. This is due to
the rotation of the Earth. To keep it in the field, you will need
to periodically update the telescope’s position in altitude and
azimuth. Objects will appear to move faster at higher magnifications, because the field of view is narrower.
What to Expect
So what will you see with your telescope? You should be able
to see bands on Jupiter, the rings of Saturn, craters on the
Moon, the waxing and waning of Venus, and many bright
deep-sky objects. Do not expect to see color as you do in
NASA photos, since those are taken with long-exposure cameras and have “false color” added. Our eyes are not sensitive
enough to see color in deep-sky objects except in a few of the
brightest ones.
Objects to Observe
Now that you are all set up and ready to go, one critical decision must be made: what to look at?
A. The Moon
With its rocky surface, the Moon is one of the easiest and most
interesting targets to view with your telescope. Lunar craters,
marias, and even mountain ranges can all be clearly seen
from a distance of 238,000 miles away! With its ever-changing
phases, you’ll get a new view of the Moon every night. The
best time to observe our one and only natural satellite is during a partial phase, that is, when the Moon is NOT full. During
partial phases, shadows are cast on the surface, which reveal
more detail, especially right along the border between the
dark and light portions of the disk (called the “terminator”). A
full Moon is too bright and devoid of surface shadows to yield
a pleasing view. Make sure to observe the Moon when it is
well above the horizon to get the sharpest images.
Use an optional Moon filter to dim the Moon when it is very
bright. It simply threads onto the bottom of the eyepieces (you
must first remove the eyepiece from the focuser to attach a
filter). You’ll find that the Moon filter improves viewing comfort, and also helps to bring out subtle features on the lunar
surface.
B. The Planets
The planets don’t stay put like the stars, so to find them you
should refer to Sky Calendar at OrionTelescopes.com, or to
char ts published monthly in Astronomy, Sky & Telescope,
or other astronomy magazines. Venus, Mars, Jupiter, and
Saturn are the brightest objects in the sky after the Sun and
the Moon. Other planets may be visible but will likely appear
star-like. Because planets are quite small in apparent size,
optional higher-power eyepieces are recommended and often
needed for detailed observations. Not all the planets are generally visible at any one time.
C. The Stars
Stars will appear like twinkling points of light. Even powerful
telescopes cannot magnify stars to appear as more than a
point of light. You can, however, enjoy the different colors of
the stars and locate many pretty double and multiple stars.
The famous “Double-Double” in the constellation Lyra and the
gorgeous two-color double star Albireo in Cygnus are favorites. Defocusing a star slightly can help bring out its color.
D. Deep-Sky Objects
Under dark skies, you can observe a wealth of fascinating
deep-sky objects, including gaseous nebulas, open and globular star clusters, and a variety of different types of galaxies.
Most deep-sky objects are very faint, so it is important that
you find an observing site well away from light pollution.
To find deep-sky objects with your telescope, you first need
to become reasonably familiar with the night sky. Unless you
know how to recognize the constellation Orion, for instance,
you won’t have much luck locating the Orion Nebula. A simple
planisphere, or star wheel, can be a valuable tool for learning
the constellations and seeing which ones are visible in the
sky on a given night. Once you have identified a few constellations, a good star chart or atlas will come in handy for helping
locate interesting deep-sky objects to view within the constellations.
Do not expect these subjects to appear like the photographs
you see in books and magazines; most will look like dim gray
smudges. Our eyes are not sensitive enough to see color in
deep-sky objects except in a few of the brightest ones. But as
you become more experienced and your observing skills get
sharper, you will be able to ferret out more and more subtle
details and structure.
Transporting the Telescope
The GoScope was designed for observers who want a telescope that is easy to transport. The entire telescope, including
the optical tube and tripod, will fit into the provided backpack
carry case. This makes the GoScope incredibly portable.
To use the backpack, you will need to disassemble the telescope system from the tripod. Remove the EZ Finder II from
its bracket and place it into the front pocket of the backpack.
Unthread the diagonal from the telescope and place it and
the eyepieces into the front pocket too (Figure 7a). Disengage
the quick-release shoe from the tripod, and remove the optical tube from the tripod. Place the tube into one of the main
compartments of the backpack. Retract the tripod legs and
elevator shaft, and place the tripod into the other backpack
compartment (Figure 7b). Your GoScope is now ready to go!
It is a good idea to place all caps and dust covers on the optical tube, diagonal, and eyepieces before placing them into
the backpack. This ensures the optical surfaces will remain
clean and dust-free.
6
Page 7

Care and Maintenance
If you give your telescope reasonable care, it will last a lifetime. Store it in a clean, dry, dust-free place, safe from rapid
changes in temperature and humidity. Do not store the telescope outdoors, although storage in a garage or shed is OK.
Keep the dust caps and covers on when not in use.
Cleaning Lenses
Any quality optical lens cleaning tissue and optical lens cleaning fluid specifically designed for multi-coated optics can be
used to clean the exterior lens surfaces of the GoScope’s
objective lens, eyepiece, and reflex sight. Never use regular
glass cleaner or cleaning fluid designed for eyeglasses. Before
cleaning with fluid and tissue, blow any loose particles off the
lens with a blower bulb or compressed air. Then apply some
cleaning fluid to a tissue, never directly on the optics. Wipe the
lens gently in a circular motion, then remove any excess fluid
with a fresh lens tissue. Oily fingerprints and smudges may
be removed using this method. Use caution; rubbing too hard
may scratch the lens. For the large surface of the objective
lens, clean only a small area at a time, using a fresh lens tissue on each area. Never reuse tissues.
Specifications
Figure 7a.
and transported in the outer pocket.
The supplied GoScope accessories can be stored
Objective lens: Achromatic, air-spaced, fully coated
Aperture: 70mm
Focal length: 350mm
Focal ratio: f/5
Diagonal: 45° correct-image prism, accepts
1.25" eyepieces
Eyepieces: 20mm eyepiece (17.5x) and 10mm
eyepiece (35x), fully coated, 1.25",
threaded for Orion filters
Finder scope: EZ Finder II reflex sight
Tripod: 3-way pan head, adjustable height
Tripod height range: 15.5" to 52.5"
Case: Backpack carry case included
Total weight: 5 lbs. 13.5 oz.
Figure 7b. The GoScope disassembled and in its backpack
carry case.
7
Page 8

One-Year Limited Warranty
This Orion GoScope 70 is warranted against defects in materials or workmanship for a period of one
year from the date of purchase. This warranty is for the benefit of the original retail purchaser only.
During this warranty period Orion Telescopes & Binoculars will repair or replace, at Orion’s option,
any warranted instrument that proves to be defective, provided it is returned postage paid to: Orion
Warranty Repair, 89 Hangar Way, Watsonville, CA 95076. If the product is not registered, proof of
purchase (such as a copy of the original invoice) is required.
This warranty does not apply if, in Orion’s judgment, the instrument has been abused, mishandled,
or modified, nor does it apply to normal wear and tear. This warranty gives you specific legal rights,
and you may also have other rights, which vary from state to state. For further warranty service information, contact: Customer Service Department, Orion Telescopes & Binoculars, 89 Hangar Way,
Watsonville, CA 95076; (800)-676-1343.
Orion Telescopes & Binoculars
89 Hangar Way, Watsonville, CA 95076
Customer Support Help Line (800)‑676‑1343 • Day or Evening
8
 Loading...