

Page 1

INSTRUCTION MANUAL
Orion® StarShoot™ G3
Deep Space Imaging Cameras
Color #53082, Monochrome #53083
Providing Exceptional Consumer Optical Products Since 1975
OrionTelescopes.com
Customer Support (800) 676-1343
E-mail: support@telescope.com
Corporate Offices (831) 763-7000
89 Hangar Way, Watsonville, CA 95076
© 2011 Orion Telescopes & Binoculars
IN 400 Rev. B 11/11
Page 2

DC power cable
with lighter plug
StarShoot G3
Deep Space
Imaging Camera
1.2 5"
Nosepiece
2" Mounting base
Standard 1.25"
filter threads
(M28.4x0.6 )
T-threads
(M42x0.75)
USB cable
Dust cap 1.2 5"
Figure 1. StarShoot G3 Imaging Camera and included items.
Contents
1. Introduction ......................2
1.1. The StarShoot G3 .............3
1.2. Feature Highlights .............3
2. Getting Started ...................4
2.1.PartsList. . . . . . . . . . . . . . . . 4
2.2. System Requirements ..........4
2.3. Software and Driver Installation ..5
3. Software Walk‑Through ............6
3.1 Camera Control ............. 6
3.2 Capture ...................7
3.3 Histogram .................9
3.4. Analysis ................. 10
4. Astronomical Imaging .............11
4.1. F ocus i n g ...................11
4.2. Using the Thermoelectric Cooler
(TEC) ......................12
4.3. Imaging Deep Sky Objects .....14
5. Image Processing ................17
5.1 Save and Export ..............19
6. Using the StarShoot G3 as an
Autoguider ......................20
7. Optional Accessories ..............21
8. Specifications ...................22
nosepiece
(removeable)
1. Introduction
Welcome to the exciting world
of astro-imaging. Your new
StarShoot G3 Deep Space
Imaging camera is capable of
capturing impressive celestial
objects like galaxies, star clusters, and nebulae, as well as
the planets, Moon, and the Sun
(with an optional solar filter).
Additionally, the StarShoot G3
can be used as a dedicated
autogudier for any other astroimaging camera you might use
like a DSLR camera or large
array CCD camera. This manual will show you how to install
and use your new StarShoot
G3. In a short time, you will
be capturing astrophotos and
sharing them with friends, family, and the world!
Software CD
T-threads
Figure 2.1. The G3 can be connected
to your telescope in three different ways,
1.25", 2", or T-thread.
1.1. The StarShoot G3
The StarShoot G3 is an astronomical imaging CCD camera with a 16-bit image
output and a regulated thermoelectric cooler to enable maximum imaging performance. Both the G3 Color and G3 Monochrome are very sensitive and capable
of detecting faint deep sky objects in a short exposure; and longer exposures
can reveal extremely deep fields with subtle nebulosity and galaxies in the
background.
You may also choose to use the G3 as a dedicated autoguider. The highly sensitive, low noise, 16-bit camera allows faint guide stars to be detected. The onboard autoguiding output allows you to connect the autoguide cable directly from
the camera to your ST-4 compatible mount.
1.2. Feature Highlights
• Simpleinterface:A USB port is all that’s needed to connect the G3 to your
computer (Figure 3). The power port is used to power the thermoelectric
cooler, which is recommended for the best imaging performance.
• Regulatedcooling:Enables you to set the exact temperature within the
cooling range of the camera. This allows you to take calibration images like
dark frames at the exact same temperature as your light frames, making
for the cleanest images possible. Additionally, since you can match the
CCD temperature at any time (within the range of the cooler), you have the
freedom to take dark frames when it’s most convenient for you, so you don’t
have to use up valuable imaging time to take dark frames.
• Vibration-freeMagLevCoolingFan:This essential component of the
cooling system vents out the head generated by the TEC.
• Autoguideroutput:(Figure 3)When used as an autoguider, the G3
can connect the autoguider relays directly from the camera body to your
equatorial mount. This eliminates the need to relay an additional adapter
from your PC.
Figure 2.2. Standard 1.25" filter
threads add versatility to allow additional
accessories to be used.
2 3
Page 3

2. Getting
Cooling fan
Started
2.1.PartsList(Figure 1)
• StarShoot G3 Deep Space
Imaging Camera
• USB Cable
• DC power cable with lighter plug
• Software CD
• Removable 1.25" nosepiece
(threaded to camera)
• Dust cap for 1.25" nosepiece
2.2. System Requirements
Telescope
The StarShoot G3 fits any telescope equipped with 1.25" or 2" focusers, or it can
also fit to any focuser or camera adapter with male T-threads (M42 x 0.75). Refer
to Figures 2.1 and 2.2.
Caution: Be sure to always firmly tighten the thumbscrew(s) that secure the
StarShoot G3 in the telescope focuser, or it could fall out and onto the ground!
If your telescope has T-threads for direct camera attachment, a more secure
connection can be made. First, unthread the nosepiece from the G3. This
exposes the camera’s T-threads. Then, simply thread the camera onto your telescope (Figure 2.2).
BackfocusRequirement
The G3 only requires 3.5mm of inward focus travel (also sometimes called
backfocus) when connecting it to a 2" focuser on your telescope. If using
the 1.25" nosepiece, the backfocus is 23mm; if connected via T-threads the
backfocus is 19mm.
Mount
Deep sky imaging with the G3 requires an equatorial mount with a right
ascension (R.A.) motor drive. The goal for your mount is to seamlessly track the
apparent movement of the sky as the Earth rotates. The tracking must be very
accurate, or the object you want to image will drift and blur across the camera’s
field of view while the exposure is taken. Even a small amount of drift will cause
a star to look oblong instead of a round point. We recommend using a highquality equatorial mount which utilizes periodic error correction (PEC) or has the
ability to interface with an autoguider.
Autoguider
relay port
Power port (for
TEC and fan only)
Figure 3. The USB, power, and
autoguider ports.
USB port
Computer
The G3 requires a PC to operate the
camera. For astro-imaging in the field
at night, a laptop computer is highly
recommended. The included software
is Camera Studio which requires
Windows XP, Vista or Windows 7 to
operate.
The following hardware is also
required:
• Processor – 700 MHz speed or
higher, Pentium
™
III equivalent or
Figure 4.1.
higher
• Recommended minimum memory
size is 512 MB.
• Disk Space – 55 MB for software
installation, 500 GB or more to
store images is recommended.
• Video Display – 800 X 600 or
higher, 16-bit color or higher.
• Mouse
• High-speed USB 2.0 port
Figure 4.2.
Power
The StarShoot G3’s thermoelectric cooler (TEC) requires 12 volts DC (12VDC)
with approximately 1 ampere of current. The camera itself can operate without
the cooler just by connecting to the computer’s USB port. For the best imaging
performance, we recommend using the TEC. The supplied 12V power cable will
plug into a cigarette style socket commonly available on power supplies or field
batteries available from Orion. If you have access to an AC outlet at your imaging site, you can use a 110VAC to 12VDC adapter for the camera, available
from Orion.
2.3. Software and Driver Installation
Before the camera can be used, the software and camera drivers must be
installed onto your computer. Turn on your computer and allow the Windows
operating system to load as normal. Insert the included software CD into your
computer’s CD-ROM drive, and the OrionG3SetupWizardwill appear (Figure
4.1). This allows you to install the camera drivers, Camera Studio software,
ASCOM drivers, and any additional prerequisites you may need. The wizard will
automatically detect which prerequisites you need and prompt you to install them
(Figure 4.2).
4 5
Page 4

Once your prerequisites have been
installed, you will be prompted to
install the G3 ASCOM driver and
Camera Studio software (Figure 4.3).
Note that ASCOM is only required
if you intend to use the camera in
another program, such as Nebulosity
and MaxIm DL, or if you wish to use
the camera as an autoguider. Click
OrionCameraStudioApplication to
install the software.
Do no plug the StarShoot G3 camera
into your computer until you have completed the software and driver installation.
ConnectingtheCameratothePC
After the software and drivers have
been installed, connect the camera to
the USB port on your computer using
the supplied USB cable. You do not
need to plug in external power yet.
Windows will automatically detect the
camera and install it onto your computer. Wait for the message to appear,
DeviceInstalledSuccessfully.
Figure 4.3.
Figure 5. Camera Control window.
3. Software
Walk-Through
Camera Studio is an easy to use yet comprehensive imaging program that
controls your G3 for image capture, and provides the processing tools to
assemble your image and export it. The following section of the manual will walk
you through the basic features of the software – CameraControl, Capture,
Calibrate, Process and Save&Export.
3.1 Camera Control (Figure 5)
The CameraControl tab first appears on the right hand side of the screen when
you open CameraStudio. This tab allows you to connect to the camera, activate
the cooler and set the cooling temperature, adjust the gain and offset (not recommended), or enable faster readout for quick image downloads.
Connect/Disconnect
Connects the G3 and instantly displays the CCD temperature. The G3
camera must be plugged into your PC
before you click Connect.
Cooling
The CCDTemperature will always
display while the camera is connected.
To use the TEC, plug the 12V power
cable from your power source (field
battery or other) to the G3 camera.
The fan will automatically power on.
Click CoolerOn. Set the Target(°C)
to approximately 7°C lower than the
current CCD temperature reading. Do
not click CoolerOn until external power has been plugged into the G3.
Gain
This feature allows you to manually adjust the analog gain and offset. The
default values have been selected for your camera and should normally not need
adjustment. However, you may make adjustments to customize your settings.
Default values are Offset 127 and Gain185.
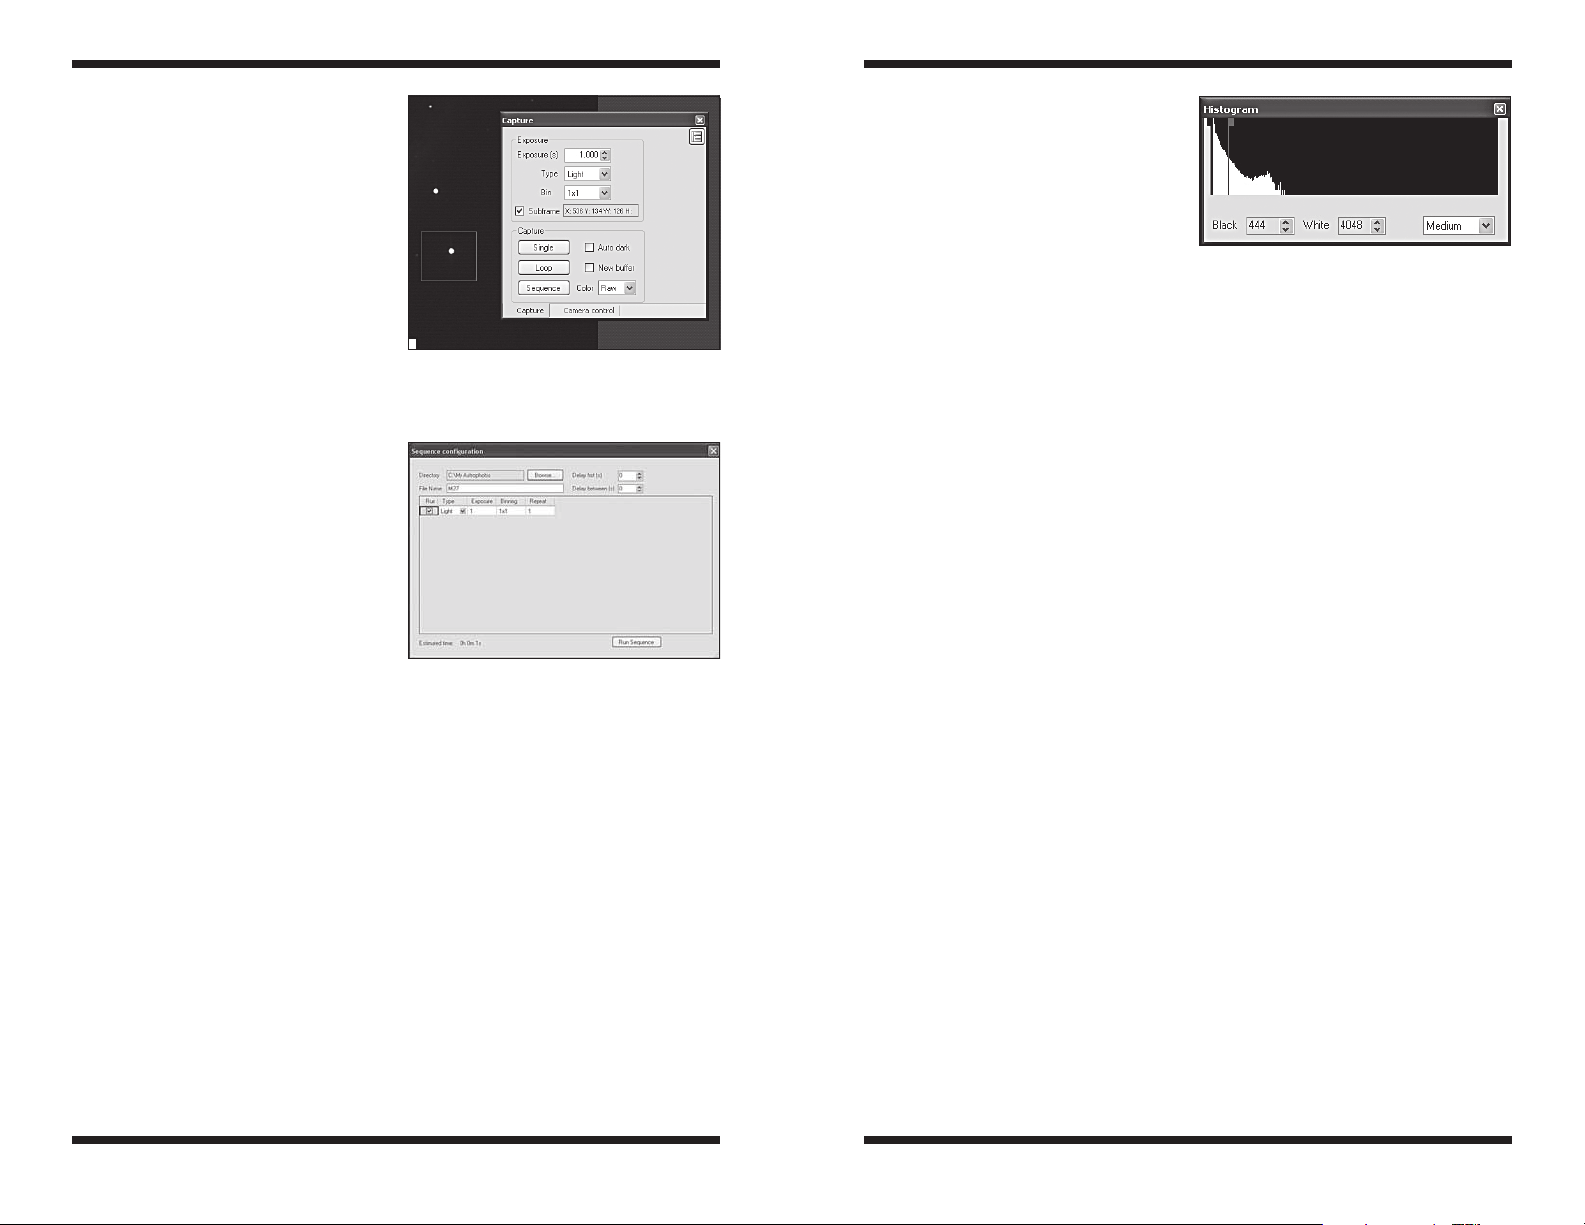
3.2 Capture (Figure 6)
The Capture tab sets your exposure time, exposure type, save path, subframing,
and other options.
Exposure
Set the exposure time in seconds. You can also specify fractions of seconds, like
0.5 seconds or 1.75 seconds, for example.
Type
Choose from Light, Dark, Flat, and Bias. Most of the time you will only need to
choose from Light and Dark frames, but for the best results, you can also take
Flat frames. See “Astronomical Imaging – Dark Frames, Flat Fields”. To start
imaging or focusing, take Light frames.
Bin
You can bin 1x1, 1x2, 2x1, and 2x2. For most imaging, you should always keep
the setting at 1x1, which provides the full resolution of the camera. Binning 1x2
or 2x2 for example, will group the pixels together to collect more light at the
expense of resolution. 1x2 will group 2 vertical pixels for every 1 horizontal pixel,
2x2 will group 2 horizontal and 2 vertical pixels, and is most commonly used to
quickly find and frame a celestial object. Binning in these modes provides faster
download times and greater sensitivity.
Figure 6. Capture window.
6 7
Page 5
Subframe
You can selectively download a
segment of the whole field of view
to provide extremely fast download
times. This is useful for focusing since
you typically just concentrate on
one star. Click and drag the mouse
across part of the image to form a
square (Figure 7), then check the
Subframe box. The subframe size and
coordinates will also be displayed in
the Subframe dialog.
Note: Make sure the Subframe box is
unchecked when you start capturing
your astrophotos, or you could unin-
Figure 7. Subframing a small area
speeds up the download time and allows
you to concentrate on one area of the chip;
ideal for focusing.
tentionally subframe your images into
a small square!
Capture–Single
Takes a single exposure only. The
exposure length will be determined by
the Exposure value in seconds you
entered.
Capture–Loop
Continuously takes exposures until you
press Stop. The Stop button will only
appear a single or looping exposure.
The Loop is useful for focusing when
Figure 8. The Sequence dialog allows
you to set your exposure then automatically
image while you are away from the
computer.
you are at the telescope and wish to
monitor the focusing progress on your
monitor.
Capture–Sequence
Automatically capture and save images. This is a very convenient feature.
It allows you to save your images while you sleep or do other tasks. In the
Sequence window (Figure 8), you can set your destination Directory to save
your images to, as well as specify the same parameters you would in the
Capture tab, like Exposure, Type, and Bin. In the Sequence window you
can also specify Repeat, to set the total number of exposures you want to
automatically capture. Click RunSequence when you are ready to begin.
Capture–Color:Raw,YCbCr,RGB
(forStarShootG3Coloronly)
These modes determine what kind
of images will be captured. If you are
using the StarShoot G3 Color, we
recommend always capturing in Raw
to allow for image calibration later
(See “Image Processing – Calibrate
Raws”). The image will appear black
and white at first, but can later be
Figure 9. The sliders on the Histogram
can be adjusted to reveal lighter or darker
depths of the image.
converted to color. But for quick
imaging to instantly get color, you can select YCbCr (the most natural color from
the camera), or software-processed RGB.
Note: The StarShoot G3 Monochrome will have this feature disabled since the
images can only be captured in monochrome.
Capture–Autodark
If you save a dark frame you can optionally check the Autodark box to
automatically calibrate the saved dark frame each time you capture an image.
While this can be convenient, we recommend keeping this feature off under
normal use, since enabling it permanently affects the raw data you capture.
Capture–Newbuffer
Check this box to display a new window each time a new image is captured. This
is useful to compare or keep the image open without saving it. Keep in mind that
more images will consume more system memory. The Newbuffer box should be
left unchecked during multiple looping exposures or long sequences.
3.3 Histogram (Figure 9)
The Histogramwindow displays how the bright and dark pixels are distributed
in your image. You can make all the adjustments to the Histrogram you want to
reveal the details within the image, and it will not affect the image data, only the
way it is displayed. Choose the presets like Medium, or drag the light and dark
markers manually to adjust the image on your screen. Your computer monitor
only displays 8-bits of depth from black to white, whereas your StarShoot G3
camera takes images with 16 bits of depth. That’s the difference between 255
counts and 65,535 counts! So you need to check the Histogramto see how
much image detail you really have.
8 9
Page 6
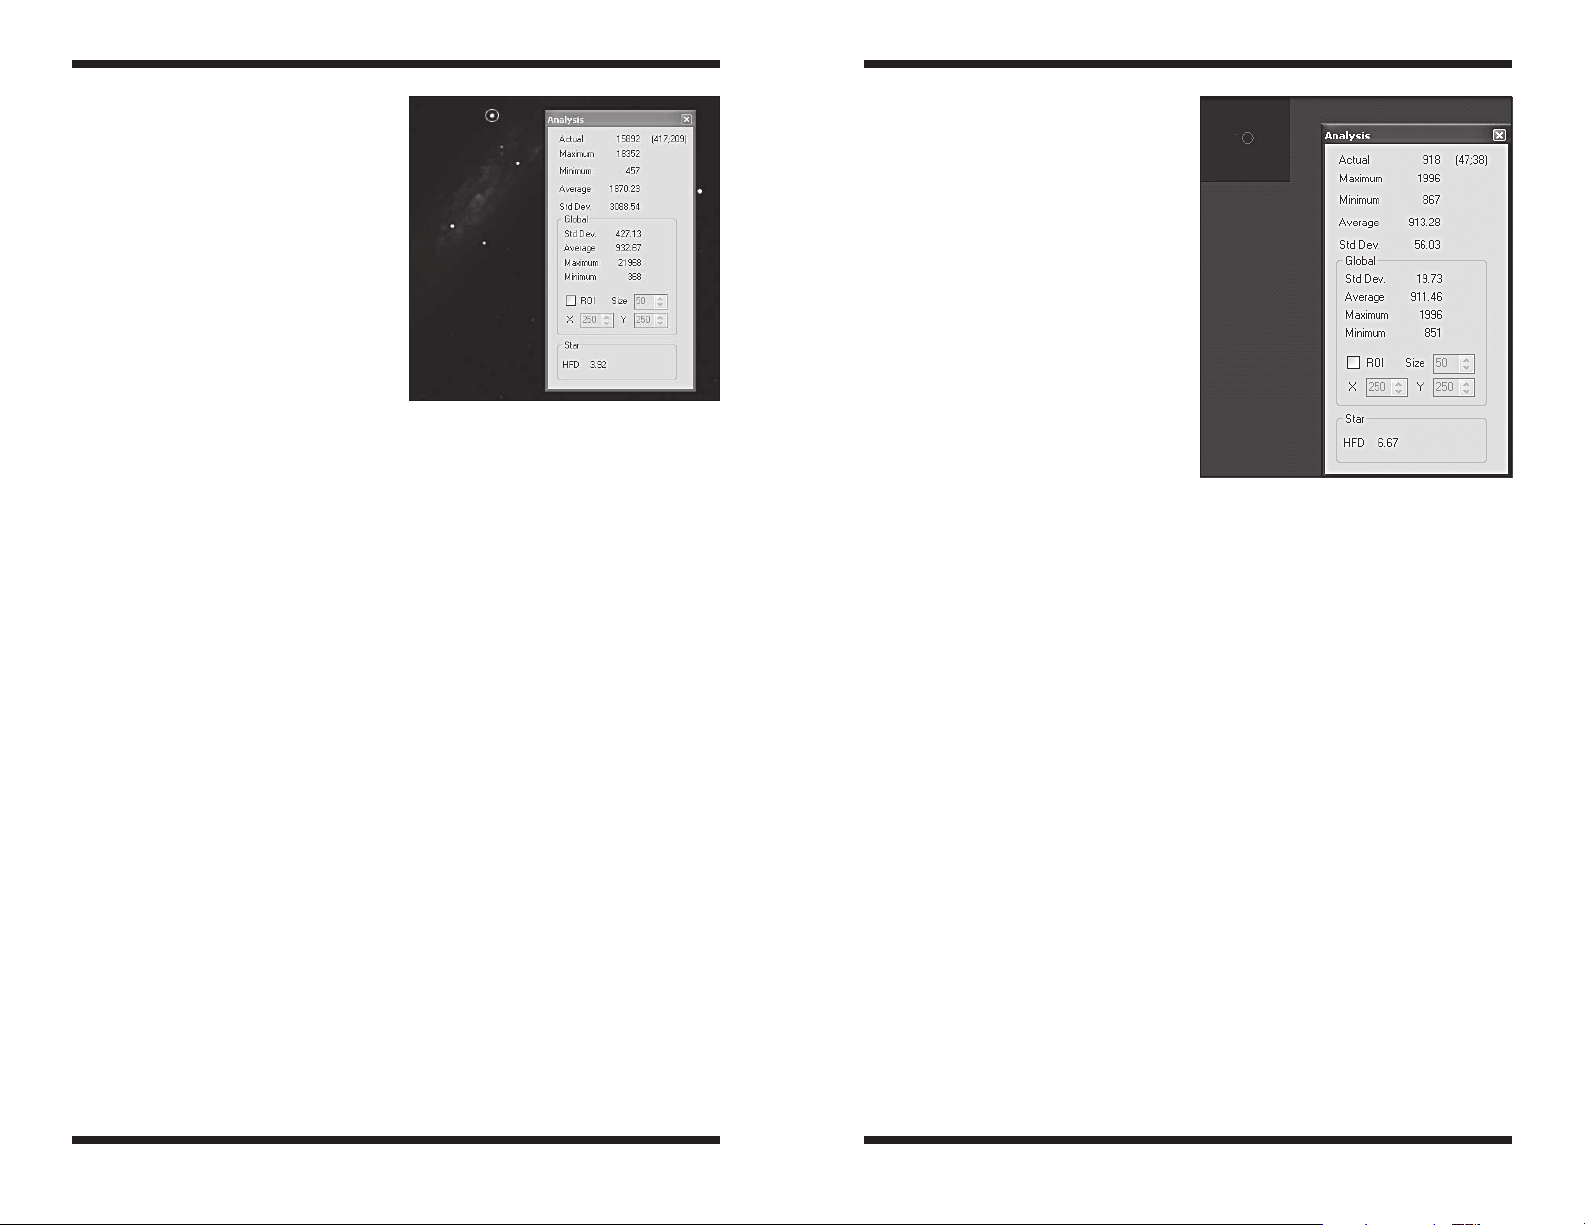
3.4. Analysis (Figure 10)
The Analysiswindow displays
quantitative data from the image
pertaining to pixel brightness and star
diameter. Your mouse cursor position
will focus on that region of the image
for the Analysisdisplay (Figure 10).
The information displayed is very
useful, but for beginning astro-imagers,
concentrate mainly on getting the
smallest HFD possible when focusing
on a star.
Actual
Displays the brightness value of the
pixel your mouse cursor is pointing at
(Figure 10). This value is known as
an Analog to Digital Unit (ADU). The
camera can theoretically get as high
as 65535 ADUs in value. The image
will start to saturate (or overexpose) at around 50,000 ADU. This demonstrates
the large range in brightness that 16 bits of data has, and is one of the reasons
the StarShoot G3 can capture dynamic images with faint detail.
Maximum
Displays the highest ADU pixel value for the immediate area.
Minimum
Displays the lowest ADU pixel value for the immediate area.
Average
Displays the average ADU pixel value for the immediate area. This is useful
to see the general value of an area without letting a hot pixel throw off your
reading.
StdDev
Displays the standard deviation for the immediate area.
Global
Displays the StdDev., Average, Maximum, Minimum pixel values for the entire
image.
Star
Pay attention to the Half-Flux Diameter (HFD) value when pointing the mouse
cursor at a star (Figure 10), to determine the best focus. The smaller the HFD,
the better the focus.
Figure 10. The Analysis window displays
useful data about your image. Hovering the
mouse over a star will also display the HFD
value which indicates the star diameter for
best focus.
The following sections will describe
more software features which you
will encounter during your imaging
session, and later on when you are
ready to process your images.
4. Astronomical
Imaging
Now that you have familiarized
yourself with the basic functions of the
camera and software, you are ready
to begin using the StarShoot G3 to
capture images!
4.1. Focusing
Focusing the CCD camera is one of
the most critical parts of imaging. It
can be challenging, but Camera Studio
has some helpful features which will
assist you when focusing your G3. Before focusing, make sure your mount is
polar aligned and tracking. For best results, we recommend focusing on a star
at least 30° above the horizon (or higher). Follow these steps to achieve an
accurate focus:
1. Find and center a moderately bright star through your finder scope. Try to
find a star around magnitude 4 or 5. If you are not using an optical finder
or just using your unaided eye, the star should look relatively faint. This is
important because brighter stars will easily over saturate the camera and
compromise the focus accuracy.
2. Center your telescope on the star using an eyepiece. Make sure the right
ascension (R.A.) tracking motor is engaged on your mount.
3. Replace the eyepiece with the G3.
4. Connect the G3 to your computer and open Camera Studio. In the Camera
Control tab, click Connect.
5. Go to the Capture tab, set the Exposure to 1 second and click Single. You
should see the out of focus star in the image. If you do not see anything,
you need to increase the exposure time.
6. Draw a small box around the unfocused star with your mouse (hold-click
and drag the mouse cursor around the star to draw the box, Figure 11).
Check the Subframe box.
7. In the Capturetab, click Loop. The camera will only download the area you
previously selected, which makes each image download significantly faster
Figure 11. Create a subframe around the
star you want to focus on.
10 11
Page 7
than the whole frame. The exposures will display continuously. Adjust the
focuser as needed to get the sharpest looking star.
8. Once the star looks sharp, hover the mouse cursor over the star and pay
attention to the HFDvalue. Make additional adjustments to the focuser if
needed to achieve the smallest HFD possible.
Be sure to uncheck the Subframe box once you are done focusing.
Note: If the G3 is grossly out of focus, no object will appear in the image, not
even a blur. Increase the exposure time if needed and patiently move through
the focus range of your telescope until you see the centered star come into view.
4.2. Using the Thermoelectric Cooler (TEC)
The StarShoot G3’s cooling system was designed to reduce the noise in your
astro-images. All digital cameras, whether CCD or CMOS have inherent noise.
Taking longer exposures at night on a target that is very faint will have little
signal, so the noise will be more apparent.
Cooling the CCD camera suppresses the most prominent noise, the thermal
noise. You will see bright pixels in most of the images you capture. These
bright pixels, and a lot of the noise you see will be reduced by activating the
thermoelectric cooler (TEC).
Just as importantly, the noise stays fairly consistent at the same temperature.
You should take your dark frames (see “Dark Frames” in Section 4.3) at the
same temperature as your light frames, which will remove most of the nose
effectively.
The StarShoot G3 can cool the CCD to about 10°C below the ambient
temperature. But remember that the ambient temperature changes and you want
to have enough cooling capacity to take dark frames at the same temperature
later.
To set the cooler:
1. With the G3 already connected to your computer, plug the 12V power
source into the G3’s power port. The fan will immediately power on.
2. Click Connectin the CameraControltab if you have not already done so.
3. Click CoolerOn, and the CCD temperature will begin to drop.
4. Enter a target temperature for the CCD in Target(°C), and remember you
can only cool to about 10°C cooler than the outside air temperature. The
CCD temperature will naturally
heat up on its own. To start with,
set the Target(°C) to about
7°C lower than the current
CCDTemperature, to allow
yourself some margin for outdoor
temperature changes. (Figure 12)
5. Let the camera temperature
stabilize. You can resume imaging
while this takes place. It’s
common for the CCD temperature
to fluctuate to within about 1°C of
your target temperature.
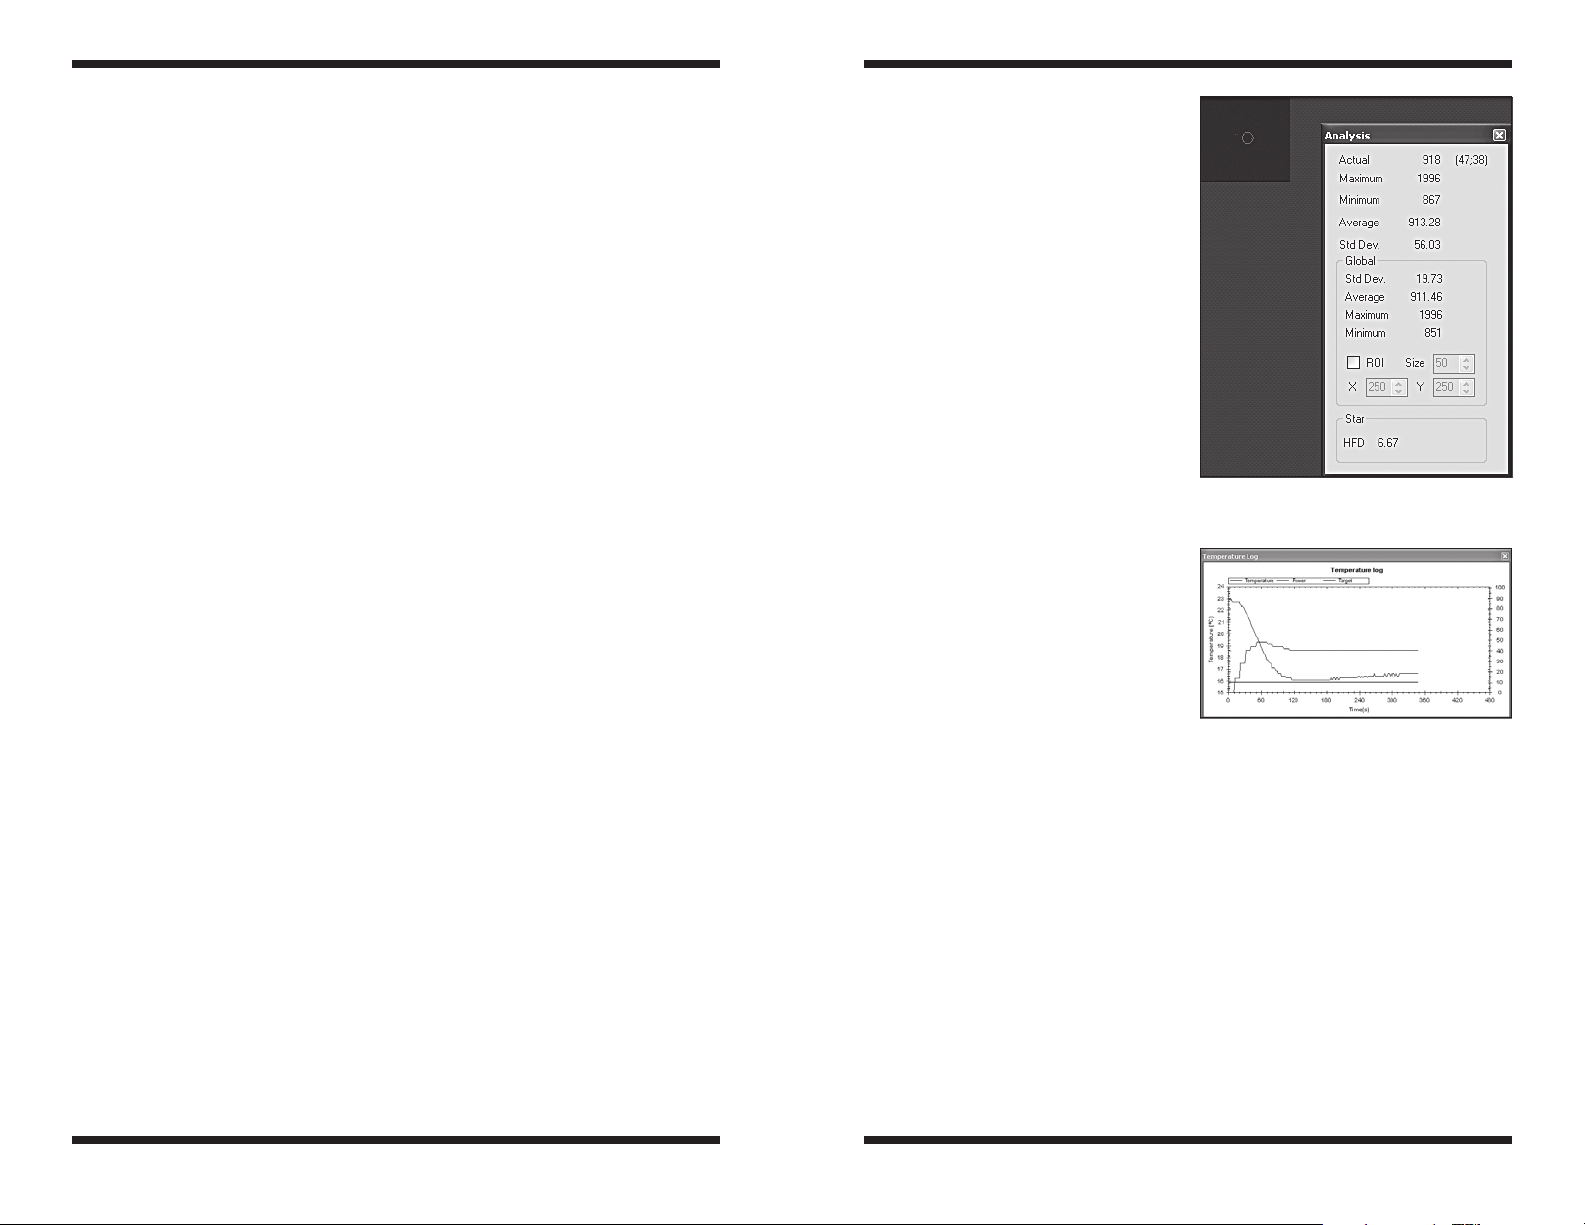
You can view the TemperatureLog
(Figure 13) to monitor the status of
the cooling system. Go to the Camera
menu, and click TemperatureLog
If the cooler power remains at 100%
after 20 minutes, you need to reduce
the target temperature. Most of the
Figure 12. Monitor the CCD temperature
and determine the best target temperature
to set.
time you can simply monitor the CCD
temperature by looking at the CCD
Temperature in the CameraControl
tab.
Note: Being able to match the light
and dark frame temperature is more
important than trying to cool the CCD
more than the TEC will allow. Matching
the dark frame temperature to your
light frames ensures a very effective
calibration to remove unwanted noise
Figure 13. The temperature log can help
you determine how much margin you have
to cool the camera based on the cooler
power and current CCD temperature.
from your images.
Additionally, you will notice the CCD temperature will rise if multiple fast exposures are taken in succession. This is normal and the temperature will drop back
to your target temperature shortly.
12 13
Page 8

4.3. Imaging Deep Sky Objects
Capturing impressive images of deep sky objects, such as galaxies, nebulae,
and star clusters, require relatively long exposures. You will take several
individual images and stack them together to form one high-quality resultant
image.
Very accurate polar alignment is essential for deep sky imaging. Stars will streak
across the field of view without precise polar alignment and tracking. Longer
exposures of 60 seconds or more also require autoguiding with a separate
camera. The Orion StarShoot AutoGuider (available separately from Orion) can
be operated with the G3 in PHD Guiding.
To start:
1. Acquire and center the deep sky object into the field of view of your
eyepiece. If you are using a mount with an accurate computerized go-to
system, you can keep the camera installed in your telescope’s focuser
without using the eyepiece.
2. Remove the eyepiece and replace it with the G3 camera.
3. Focus the camera as outlined in Section 4.1. If necessary, move the
telescope to a nearby star to determine the best focus.
For best results we recommend selecting Raw in the pull down menu next to the
Color label in the Capture tab (Figure 6). For StarShoot G3 Monochrome users,
no special selection is needed, all images will be raw.
4. In the Capturetab, set the Exposurevalue to around 10-20 seconds and
click Start. After the image downloads check to see if the deep sky object
is centered well in your camera. Adjust the camera orientation if needed,
keeping in mind that you may have to refocus the camera after making
the adjustment. Reposition the telescope if needed to center the deep sky
object.
5. Click Sequence and set the Directorysave path, and FileNamefor your
images as well as your exposure details (Figure 8). For most deep sky
imaging, set:
Run:Always check on
Type:Light1x1
Exposure:Greater than 30 seconds (to your choosing)
Binning:1x1,
Repeat:multiple exposures, we recommend more than 5.
6. Click the RunSequence and the G3 will immediately begin the sequence
of exposures. A naming convention is assigned to your FileName. If you
called your image Dumbbell and you are capturing 10 images, the sequence
will save them in your specified directory as Dumbbell1L1.fit, Dumbbell2L1.
fit, Dumbbell3L1.fit and so on.
Naming conventions are most
important for StarShoot G3
Monochrome users who may be using
LRGB or narrowband filters. Change
your file name to indicate what filter
you are imaging through. For example,
Dummbell_Luminance, or Dummbell_
Red, etc.
DarkFrames
Dark frames are images taken with
no light coming into the camera. A
dark frame is typically taken with the
telescope’s objective capped. The
only data in the image is the inherent
camera oise (Figure 14). The noise
contains the dark current, read noise
(noise introduced during camera
readout and download) and hot pixels
Figure 14. A dark frame contains the
thermal and background noise, as well as
any read noise. The same noise appears
in your “light” images. Dark frames isolate
the noise so it can later be subtracted from
your “light” images.
(bright dots in the image). All of this
noise exists in your raw astro-image too, which distracts from the detail you want
to see. To eliminate most of the camera noise, you can take several dark frames,
average them, then subtract them from your astro-images, also called, “light”
images.
Note: Make sure the CCD temperature is the same as was when took your light
frames.
To take dark frames for subtraction from “light” images:
1. Set the ExposureType to Dark in the Capture tab. Or if you are taking
a sequence of images, set the Typein the Sequencewindow to Dark,
this will also assign a “D” suffix to your saved file name so you can easily
identify your darks later.
Note to StarShoot G3 Color users: You must take Raw Light frames in
monochrome BEFORE converting to color in order to utilize dark frames.
2. Use the same exposure time as the light images you have or will take. If
your light image is 60 seconds, the dark frame must also be 60 seconds.
3. Click Start or RunSequence if you are taking several darks. Camera
Studio will remind you to cover your telescope. Remember to always cover
your telescope before taking a dark – and be sure to uncover it again when
taking light frames.
FlatFields
A flat field is an image taken with uniform featureless light entering the
telescope, such as a blue sky in the early morning or after sunset. Flat fields
solve a number of issues in your astro-images. However, for the beginner astro-
14 15
Page 9

imager, you may choose to skip this
step for the time being.
Vignetting
Vignetting (Figure 15.1) in a
telescope reveals edge-darkening in
the astroimage. The sensitive CCD
chip can easily detect vignetting
through a telescope, even specialized
astrographs. Vignetting is more
apparent when the telescope’s
illuminated field is not large enough
to illuminate the full area of the CCD
chip. As a result, more light is detected
in the center of the image compared to
Figure 15.1. Larger format CCD cameras
like the Parsec reveal vignetting through
most telescopes. Vignetting occurs when
the edge of the image plane has less
illumination than the center.
the edge. In general, vignetting should
not be a problem on the ½" format
CCD inside the G3.
Dust and Particles
Dust and particles (Figure 15.2)
will inevitably show up in your raw
astroimages. Large particles on the
CCD optical window sometimes look
like unfocused circles or doughnuts in
your images. It’s too late to clean your
camera if you are already imaging in
the field at night. And even when the
Figure 15.2. Dust or other particles on
the camera’s optical window can show up
as distracting dark shapes in your images.
camera is clean, dust usually finds a
way to show up in your images.
To take a flat field image:
1. Ensure that the telescope is focused and ready for astro-imaging.
2. Point the telescope at a uniform and featureless light source, like the sky
at dusk or dawn, or a blank white sheet of paper. Make sure the camera
orientation is exactly the same as it is or was for astro-imaging (Although
the telescope is pointing at a featureless surface, the focus and orientation
must be set as it normally would be for astro-images.)
3. Set the ExposureType to Flat in the Capture tab. Or if you are taking a
sequence of images, set the Typein the Sequencewindow to Flat, this will
also assign a “F” suffix to your saved file name so you can easily identify
your flats later.
4. Set the Exposure valueto 0.1 seconds for now and click Start or Run
Sequence. Looking at the Global section of the Analysiswindow, you want
theMaximumto read somewhere
around 10,000-15,000. Adjust the
exposure time as needed until the
Maximumis close to this range.
It’s a good idea to take several flat
frames and try different exposure
times until you find the correct
exposure. If you are taking your
flats near dusk or dawn, the sky
brightness will change rapidly.
Figure 16. The Combine Images window
allows StarShoot G3 Monochrome users to
5. Image
calibrate, align, all in a streamlined task.
Processing
After you have captured your astroimages (with or without dark frames),
you will need to:
1. Calibrate Raws
2. Convert to Color (only applicable
to StarShoot G3 Color)
3. Align
4. Combine
If you are using the StarShoot G3
Monochrome, all of these steps can
be performed in the CombineImages
window (Figure 16). For StarShoot
G3 Color users, the calibration and color conversion should be done separately
before proceeding to align and stack.
Calibrate Raws
1. Open your saved astro-images. They should be saved as Raw to enable the
following steps. Do not convert your raws to color yet.
2. Go to the Processmenu and select Calibrate. The Calibration windowwill
appear (Figure 17).
3. Click AddFiles and select your saved dark frames and flat fields if
applicable.
4. Click Calibrateallles, and you will notice most of the hot pixels and noise
should disappear from your images.
Figure 17. The Calibration window
lets you select your darks and flats (if
applicable). Bias frames are not typically
needed if you have dark frames.
16 17
Page 10

Convert to Color (For the StarShoot
G3 Color only)
1. With your calibrated images still
open, goto the Process menu
and select Color, then CMYG
Rawconversion. We recommend
using the default values (Figure
18), but you may adjust them to
your liking.
2. Click apply to complete the color
conversion.
Align
1. With your images still open, goto
the Process menu and select
Align. The AlignImages window
will appear.
Figure 18. For G3 Color users: Convert
CMYG Raw is the best way to convert raw
images to color.
2. Select AutoStarmatching and
clickAlign. The images should
automatically align. If they do not
appear to align correctly when
they are combined later, you can
manually align the images by
selecting Translation(Manual)
and select a star in each image to
align to by clicking StartManual
StarPick (Figure 19).
Combine
1. With your images still open, goto
the Process menu and select
Combine. The CombineImages
Figure 19. Manual Star Pick can be used
if you have difficulty aligning your images
with the automatic methods.
window will appear (Figure 16).
2. Since you have already calibrated and aligned your images, proceed to the
Stack tab.Remember that if you are using the StarShoot G3 Monochrome,
you can perform all of these tasks in each of the tabs of the Combine
Images window.
3. Select AddImages, then SelectAll,then Apply (Figure 20).
4. Proceed to the Stacktab. Keep the default settings. We recommend Sigma
Reject which is effective at removing unwanted leftover hot pixels, satellite
trails, or other unwanted artifacts from your image.
5. Click Combine, and your resultant image will appear. If the image did
not appear to combine correctly, go back to the Align tab and try to use
a different alignment method.
Normally the AutoStarmatching
is the easiest method.
Getting a Color Image with the
G3 Monochrome
The G3 Monochrome requires capturing images through a series of filters,
such as Luminance, Red, Green and
Blue filters to obtain a color image,
or with specialized narrowband filters.
The image processing program ultimately wants to have image data for
Red, Green and Blue.
Figure 20. Select the open images to
align.
Camera Studio allows you to export 16
bit TIFF files or the raw FIT files to your favorite post image processing program
such as Photoshop. Save and export each of your color channel images from the
Monochrome G3. If you used LRGB filters, export each of the LRGB images to a
program like Photoshop. Before exporting, align and combine each of the LRGB
images individually, then align the LRGB together, but do not combine them yet.
Add the RGB images to a new RGB layer in Photoshop or similar program that
uses layers. Assign your red image (which will still look monochrome) to the red
channel, green to the green channel, and blue to the blue channel. The image
should then appear in color. then add the L (luminance) layer and select “color”
in the layer mode. This can also be performed in freeware programs like Paint.
Net. Import the luminance layer and select “color” in the layer mode. The image
detail will come from your luminance image, and all color detail will come from
your RGB images. There are several different ways to process the color this way,
especially if you use narrowband filters. This give you complete control over the
color balance in your image.
Donald Waid of “Waid Observatory” provides an excellent step-by-step video
tutorial of LRGB processing in Photoshop (or similar program that uses layers).
Visit www.waid-observatory.com/article-LRGB.html.
5.1 Save and Export
Always save your work in the native .FIT format which will preserve all of the
image data you worked on. .FIT is a common file format for CCD imaging, and
is understood by many other image editing programs, including plugins that are
available for Adobe Photoshop.
You may choose to edit your image further. Camera Studio has several other
image enhancement features, such as sharpening, low pass filters, Gaussian
blur filters as well as color balance adjustments to enhance your image. Explore
these features in the Process menu. But always save your original FIT file.
Choose SaveAs in the File menu to save different versions of your edited work.
18 19
Page 11
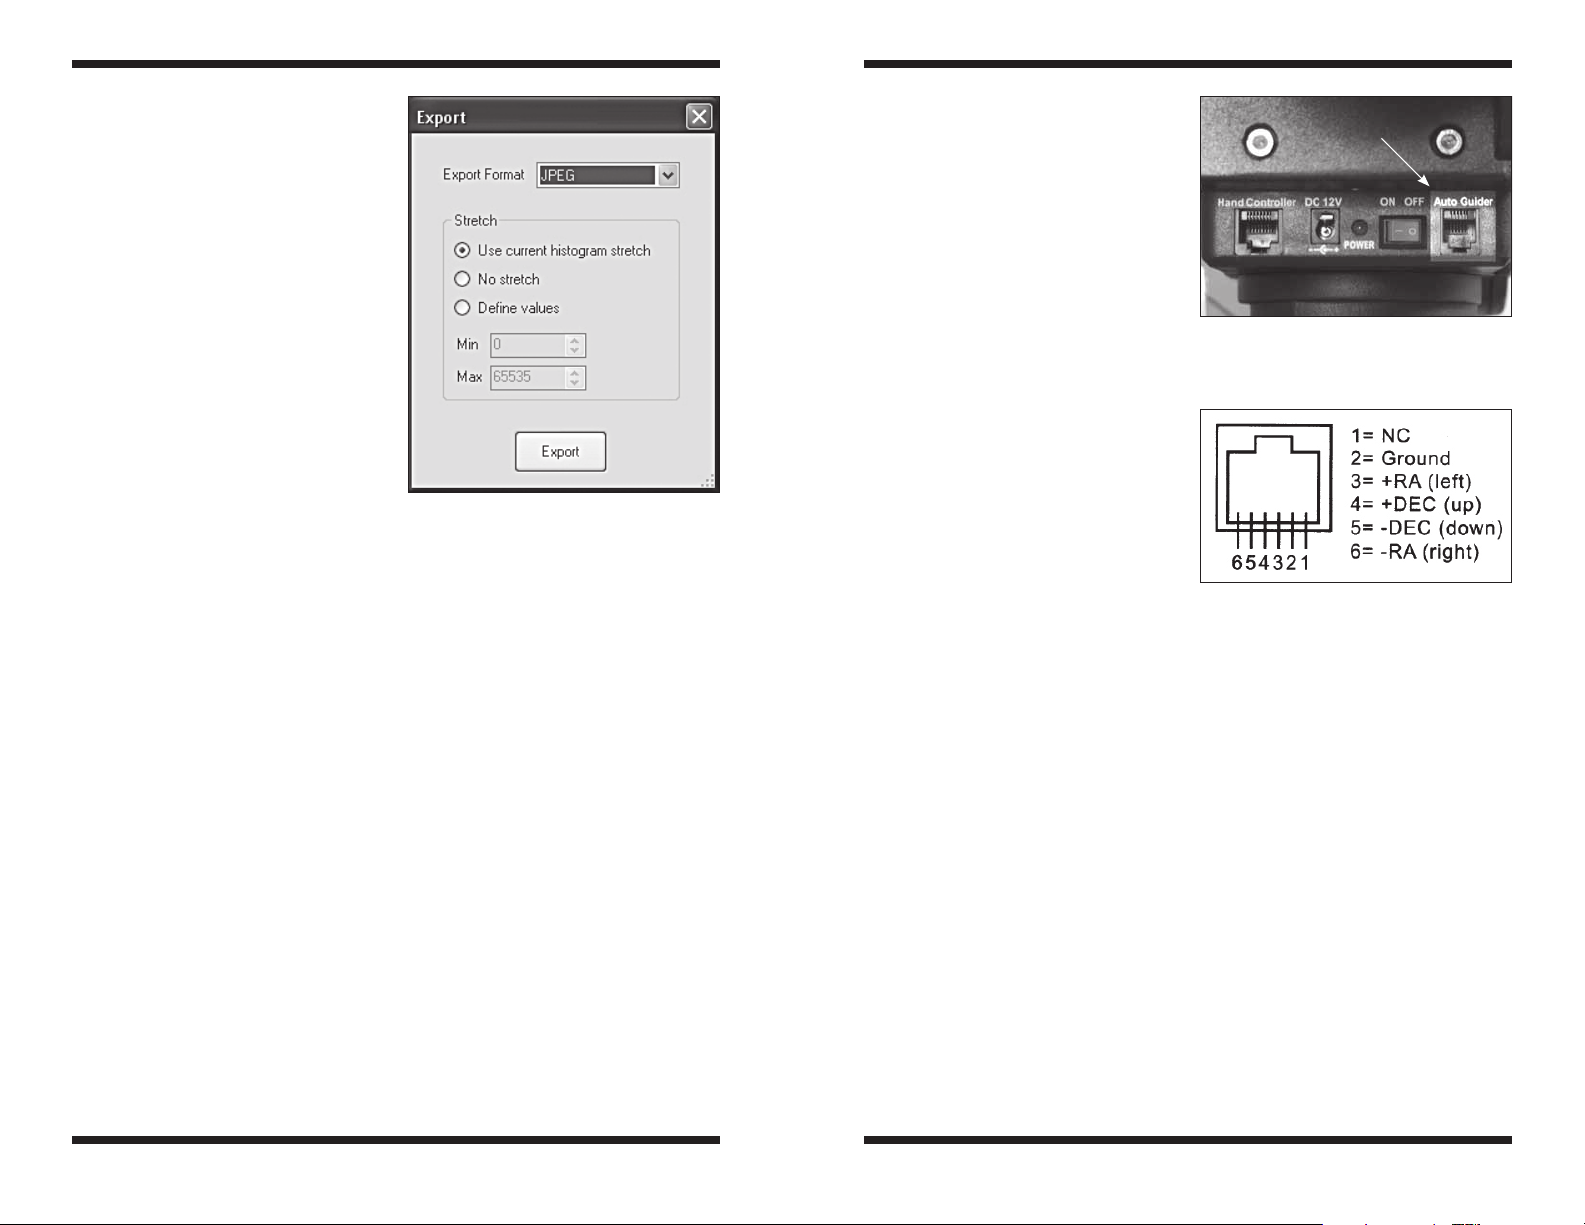
If you have completed and saved
your astro-image and wish to export
it in a common JPEG or TIFF file
format, choose Export from the File
menu. The Export window will appear
(Figure 21).
JPEG
Choose JPEG if you want a smaller
file size. JPEGs are saved in 8-bits of
depth only, so you should specify the
histogram stretch you want. Choosing
NoStretch in JPEG will not work
properly, since you will be throwing
away most of the dynamic range of the
image. Instead, adjust the histogram
until the image looks to your liking,
then choose Usecurrenthistogram
stretch. This will save the JPEG
image to look exactly as it does no
your screen.
TIFF
TIFFs are saved in 16 bits and are a good choice to export your image to
Photoshop for additional image editing.
When you have made your selection for Export, click Export and specify the file
name and folder destination, then click Save.
Figure 21. Choose your file format and
export settings to export your image as a
TIFF or JPEG.
6. Using the StarShoot G3 as an
Autoguider
The StarShoot G3 also functions as a very high performance autoguider.
Use the included ASCOM drivers for the camera to operate it in any number of
ASCOM compatible programs. We recommend PHDGuiding,which is freeware
and rated as one of the best autoguiding software programs available. Visit
www.stark-labs.com/downloads.html
We recommend setting the camera to
bin 2x2 when autoguiding, especially
for StarShoot G3 Color users. Using
the TEC will reduce the noise, but
is generally not a requirement for
autoguiding. You can save power and
leave the TEC off while autoguiding.
Connect a standard RJ-12 cable from
the G3’s autoguider relay port to the
ST-4 compatible autoguider port on
your equatorial mount (Figures 22.1
and 22.2). Connect the G3 to the USB
on you computer as you normally
would, and operate the camera with
an ASCOM compatible program like
PHD Guiding.
Figure 22.1. The G3 works with any
mount equipped with an ST-4 compatible
autoguide port, shown here on the Sirius
EQ-G mount.
Auto guider port
7. Optional
Accessories
FortheStarShootG3Monochrome
We recommend Orion 1.25" LRGB
imaging filters and a filter wheel to
capture high quality color images.
FortheStarShootG3Color
An optional IR-blocking filter can be threaded to the G3 camera body to block
the IR. This can help sharpen your images, and is especially helpful when used
with some refractors which may allow more unfocused IR light to create color
halos around bright stars.
Both cameras can benefit from a USB extension cable, available from Orion.
We recommend a portable field battery to power the TEC.
Figure 22.2. This is the pin diagram for
the G3 and ST-4 compatible mounts.
20 21
Page 12

8. Specifications
StarShootG3Color
®
CCD Sensor: Sony
ICX419AKL Color
Sensor format: 1/2"
Pixel array: 752 x 582 (437,664 total)
Pixel size: 8.6µm x 8.3µm
Exposure range: Indefinite
A/D conversion: 16 bit
Binning: 1x1, 1x2, 2x1, and 2x2
Read Noise: Approximately 9e-
Thermoelectric cooling: 10°C below ambient temperature, sealed dry air
chamber to prevent CCD icing
Operating Power Range: 10VDC to 13.8VDC
Camera current draw: Approximately 1A (at 12VDC) with TEC on
USB connection: 2.0 High speed
IR-cut filter: No
Optical window: Fully coated with anti-reflection coatings
Backfocus: 3.5mm via 2" attachment
23mm via 1.25" nosepiece attachment
19mm via T-thread attachment
Weight: 12 oz.
Autoguider capability: Yes
Mounting: 1.25" nosepiece, 2" nosepiece or T-thread
StarShootG3Monochrome
®
CCD Sensor: Sony
ICX419ALL Monochrome
Sensor format: 1/2"
Pixel array: 752 x 582 (437,664 total)
Pixel size: 8.6µm x 8.3µm
Exposure range: Indefinite
A/D conversion: 16 bit
Binning: 1x1, 1x2, 2x1, and 2x2
Read Noise: Approximately 9e-
Thermoelectric cooling: 10°C below ambient temperature, sealed dry air
chamber to prevent CCD icing
Operating Power Range: 10VDC to 13.8VDC
Camera current draw: Approximately 1A (at 12VDC) with TEC on
USB connection: 2.0 High speed
IR-cut filter: No
Optical window: Fully coated with anti-reflection coatings
Backfocus: 3.5mm via 2" attachment
23mm via 1.25" nosepiece attachment
19mm via T-thread attachment
Weight: 12 oz.
Autoguider capability: Yes
Mounting: 1.25" nosepiece, 2" nosepiece or T-thread
22 23
Page 13

This device complies with Part 15 of the FCC Rules. Operation is subject to the
following two conditions: (1) this device may not cause harmful interference, and
(2) this device must accept any interference received, including interference that
may cause undesired operation.
Changes of modifications not expressly approved by the party responsible for
compliance could void the user’s authority to operate the equipment.
Note: This equipment has been tested and found to comply with the limits for a
Class B digital device, pursuant to Part 15 of the FCC Rules. These limits are
designed to provide reasonable protection against harmful interference in a
residential installation. This equipment generates, uses and can radiate radio frequency energy and, if not installed and used in accordance with the instructions,
may cause harmful interference to radio communications. However, there is no
guarantee that interference will not occur in a particular installation. If this equipment does cause harmful interference to radio or television reception, which can
be determined by turning the equipment off and on, the user is encouraged to
try to correct the interference by one or more of the following measures:
Reorient or relocate the receiving antenna.
Increase the separation between the equipment and receiver.
Connect the equipment into an output on a circuit different from that to which the
receiver in connected.
Consult the dealer or an experienced radio/TV technician for help.
A shielded cable must be used when connecting a peripheral to the serial ports.
One-Year Limited Warranty
This Orion StarShoot G3 Deep Space Imaging Camera is warranted against defects in materials or workmanship for a period of one year from the date of purchase. This warranty is for
the benefit of the original retail purchaser only. During this warranty period Orion Telescopes
& Binoculars will repair or replace, at Orion’s option, any warranted instrument that proves to
be defective, provided it is returned postage paid to: Orion Warranty Repair, 89 Hangar Way,
Watsonville, CA 95076. If the product is not registered, proof of purchase (such as a copy of
the original invoice) is required.
This warranty does not apply if, in Orion’s judgment, the instrument has been abused,
mishandled, or modified, nor does it apply to normal wear and tear. This warranty gives
you specific legal rights, and you may also have other rights, which vary from state to state.
For further warranty service information, contact: Customer Service Department, Orion
Telescopes & Binoculars, 89 Hangar Way, Watsonville, CA 95076; (800) 676-1343.
OrionTelescopes.com
89 Hangar Way, Watsonville, CA 95076
Customer Support Help Line (800) 676-1343
© 2011 Orion Telescopes & Binoculars
 Loading...