

Page 1
Installation and User’s Guide
1/2.8” 3.4 Mega Pixel CMOS SENSITIVE DAY/NIGHT HD CCTV
CHDC-34BSDC
HD CCTV CAMERA
Installation and User’s Guide
http://www.orionimages.com
All contents of this document may change without prior notice, and actual product appearance may differ
from that depicted herein
Page 2

http://www.orionimages.com
Installation and User’s Guide
THANK YOU FOR CHOOSING ORION
Thank you for choosing ORION Images high quality HD CCTV Camera.
Please read this instruction manual carefully to keep your ORION Images product at peak performance
for longer service duration. All ORION Images products are designed and manufactured with utmost
care and craftsmanship to provide long life and high quality performance, if it is properly used and
maintained as outlined in this manual. This high performance HD CCTV camera is equipped with a
1/2.8” FHD CMOS sensor, which has extremely wide range of uses in many different applications and
conditions.
CONTENTS OF CHDC-34BSDC MANUAL
1. Handling precautions………………………………………………………………......
Pg4
2. General…………………………………………………………………………………..
3. Package of Content…………………………………………………………………….
4. Name of functions of each parts……………………………………………………….
5. Installation………………………………………………………………………………..
6. Function & operation …………………………………………………………………...
Pg4
Pg4
Pg5-6
Pg7-9
Pg10-19
7. Trouble shooting ………………………………………………………………………..
8. Specifications …………………………………………………………………………...
9. Outline dimension ……………………………………………………………………..
10. Warranty & after sale service …………………………………………………………
Pg20
Pg21
Pg22
Pg23
2
7300 Bolsa Avenue, Westminster CA 92683 / Tel: 714-766-6300 / Fax: 714-766-6310
pg2
Page 3
quip
http://www.orionimages.com
Installation and User’s Guide
The exclamation point within an equilateral triangle is intended to alert the user to
the presence of important operating and maintenance (servicing) instructions in the
literature accompanying the appliance.
CAUTION
NOTE:
This equipment has been tested and found to comply with the limits for a Class A digital device.
Pursuant to Part 15 of the FCC Rules. These limits are designed to provide reasonable protection
against harmful interference in a residential installation. This equipment generates, uses and can
radiate radio frequency energy and, if not installed and used in accordance with the instructions,
may cause harmful interference to radio communication. However, there is no guarantee that
interference will not occur in a particular installation. If this equipment does cause harmful
interference to radio or television reception, which can be determined by turning the equipment off
and on, the user is encouraged to correct the interference by one or more of the following measures.
CAUTION:
ANY CHANGES OR MODIFICATIONS NOT EXPRESSLY APPROVED BY THE PART
RESPONSIBLE FOR COMPLIANCE COULD VOID THE USERS AUTHORITY TO OPERATE THE
EQUIPMENT.
Instructions for Disposal of Electrical and Electronic Equipment in Private Households
By ensuring this product is disposed of correctly, you will help prevent possible negative consequences
for the environment and human health which could otherwise caused by inappropriate handling of this
product. The correct recycling of materials will help to conserve natural resources.
For more detailed information about recycling of this product, please contact your local city authority, your
household waste disposal service or the place where you purchased the product.
Disposal of used Electric and Electronic Equipment (Applicable in the European
Union and other European countries with waste recycling, disposal and
collection regulations)
This symbol on the product, or in the related documents in the package, indicates that
this product shall not be treated as normal household waste. Instead, it should be
taken to a proper applicable collection point or depot for the recycling of electrical and
electronic e
ment.
3
7300 Bolsa Avenue, Westminster CA 92683 / Tel: 714-766-6300 / Fax: 714-766-6310
pg3
Page 4
A
http://www.orionimages.com
1. HANDLING PRECAUTIONS
Installation and User’s Guide
z Do not install the camera in a water-splashed or highly humid environment.
z Do not use the camera where the ambient temperature drops below -10° C or rises above +50° C. The
images and component parts may be adversely affected or the camera may not function correctly.
z Never open the camera case because there are precision electrical and electronic components inside
and an accident may results.
z Do not put anything metallic or any other foreign substances through the vent, as a fire or electric
shock may result.
z Be sure to turn off the power before installing or making connections.
z Do not install the camera in places exposed to heat, vibrations and shock.
z Be careful not to drop or give a strong shock to the camera while transporting it.
z Do not touch the image sensor.
z Do not orientate the camera directly towards the sun.
z Some types of lenses may hunt in adverse light conditions. In such cases please re-adjust the lens in
line with the instructions in the manual.
z Because of the characteristics of the digital image device, images may look unnatural at high
temperatures, this does not mean the camera is faulty.
2. GENERAL
This HD CCTV Camera is provided with a High performance 1/2.8 inch 3.4M CMOS sensor. The
camera features a highly sensitive with high resolution, and is equipped with digital DAY/NIGHT
function, intelligent back-light compensation by which you can achieve proper Back Light
Compensation, Automatic iris control, Crystal controlled internal sync lock system, Various modes of
convenient Automatic while balancing, mirror image, private mask function, motion detection, camera
setup and control is also possible locally on the camera real panel, or remote via RS-485 and this
setup data is stored in the built-in non-volatile memory. The camera is best suited for HD CCTV
surveillance purposes, from single camera operation to large scale integrated systems for visual
information management.
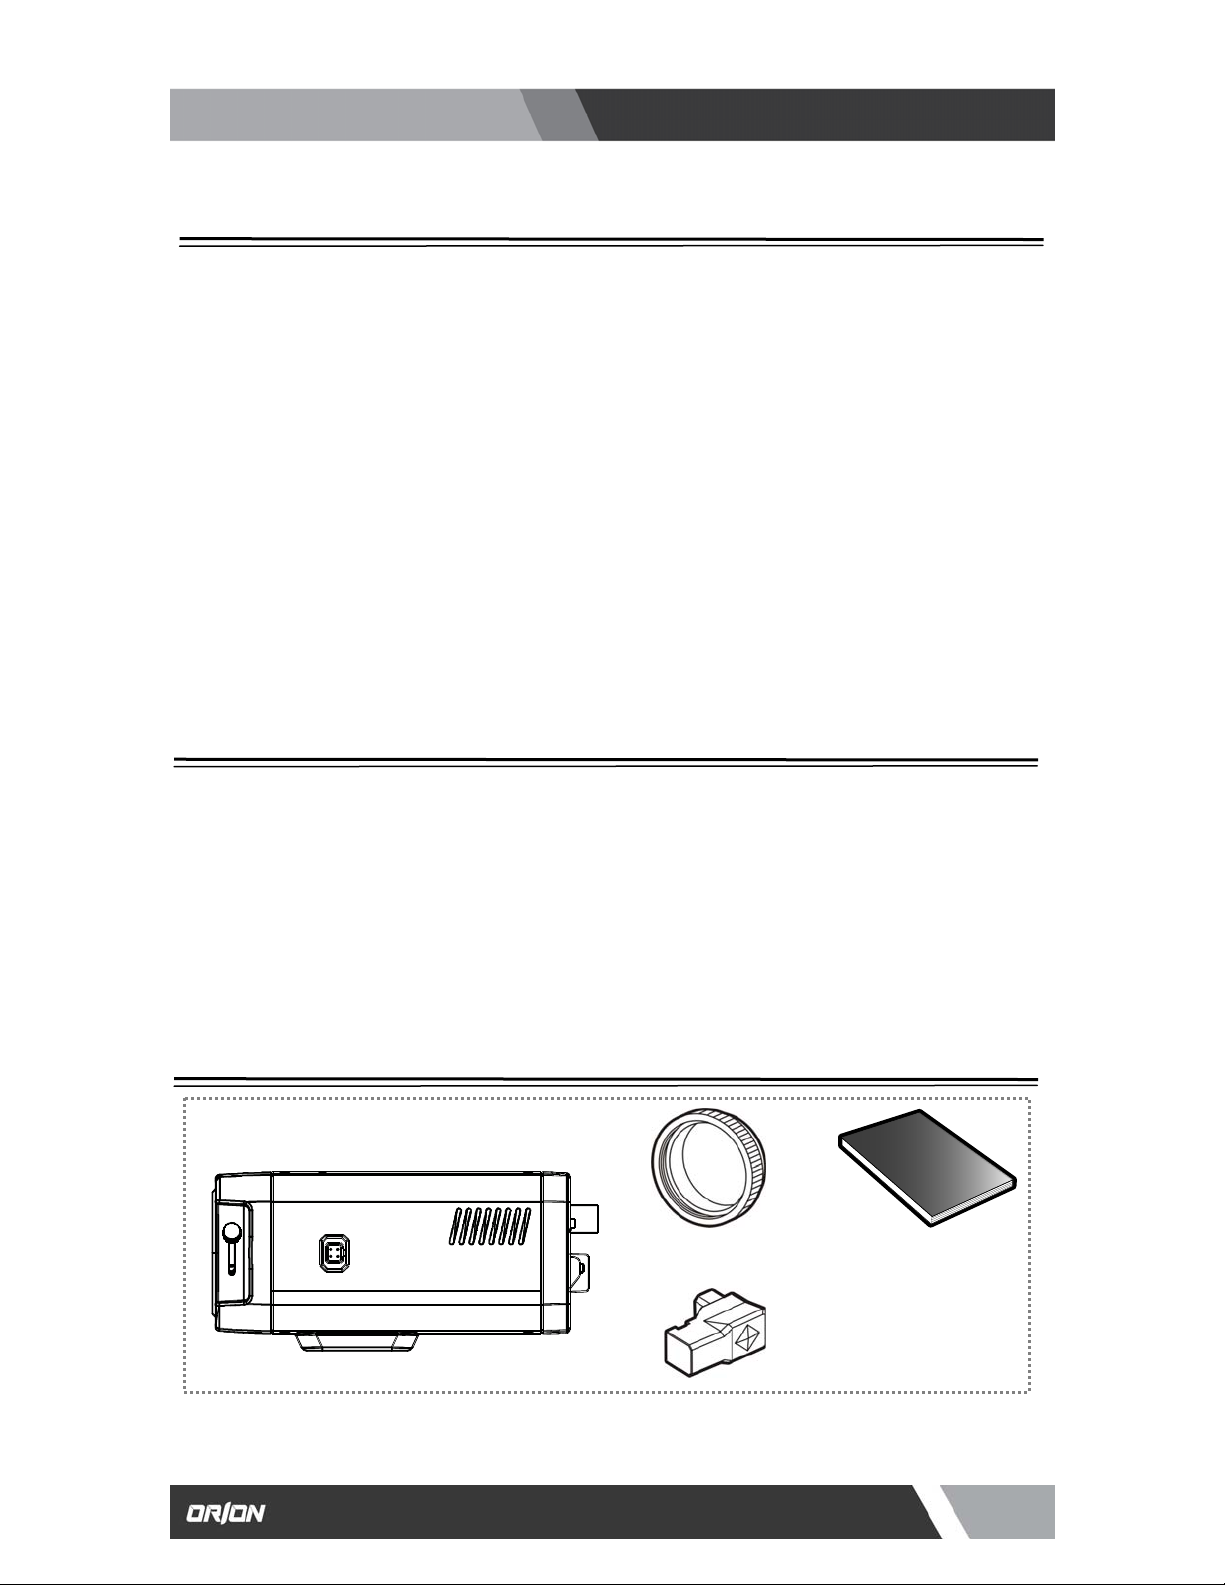
3. PACKAGE OF CONTENT
CHDC-34BSDC Camera x 1
Manual x 1 C-Mount Ring x 1
uto Iris Plug x 1
4
7300 Bolsa Avenue, Westminster CA 92683 / Tel: 714-766-6300 / Fax: 714-766-6310
pg4
Page 5
http://www.orionimages.com
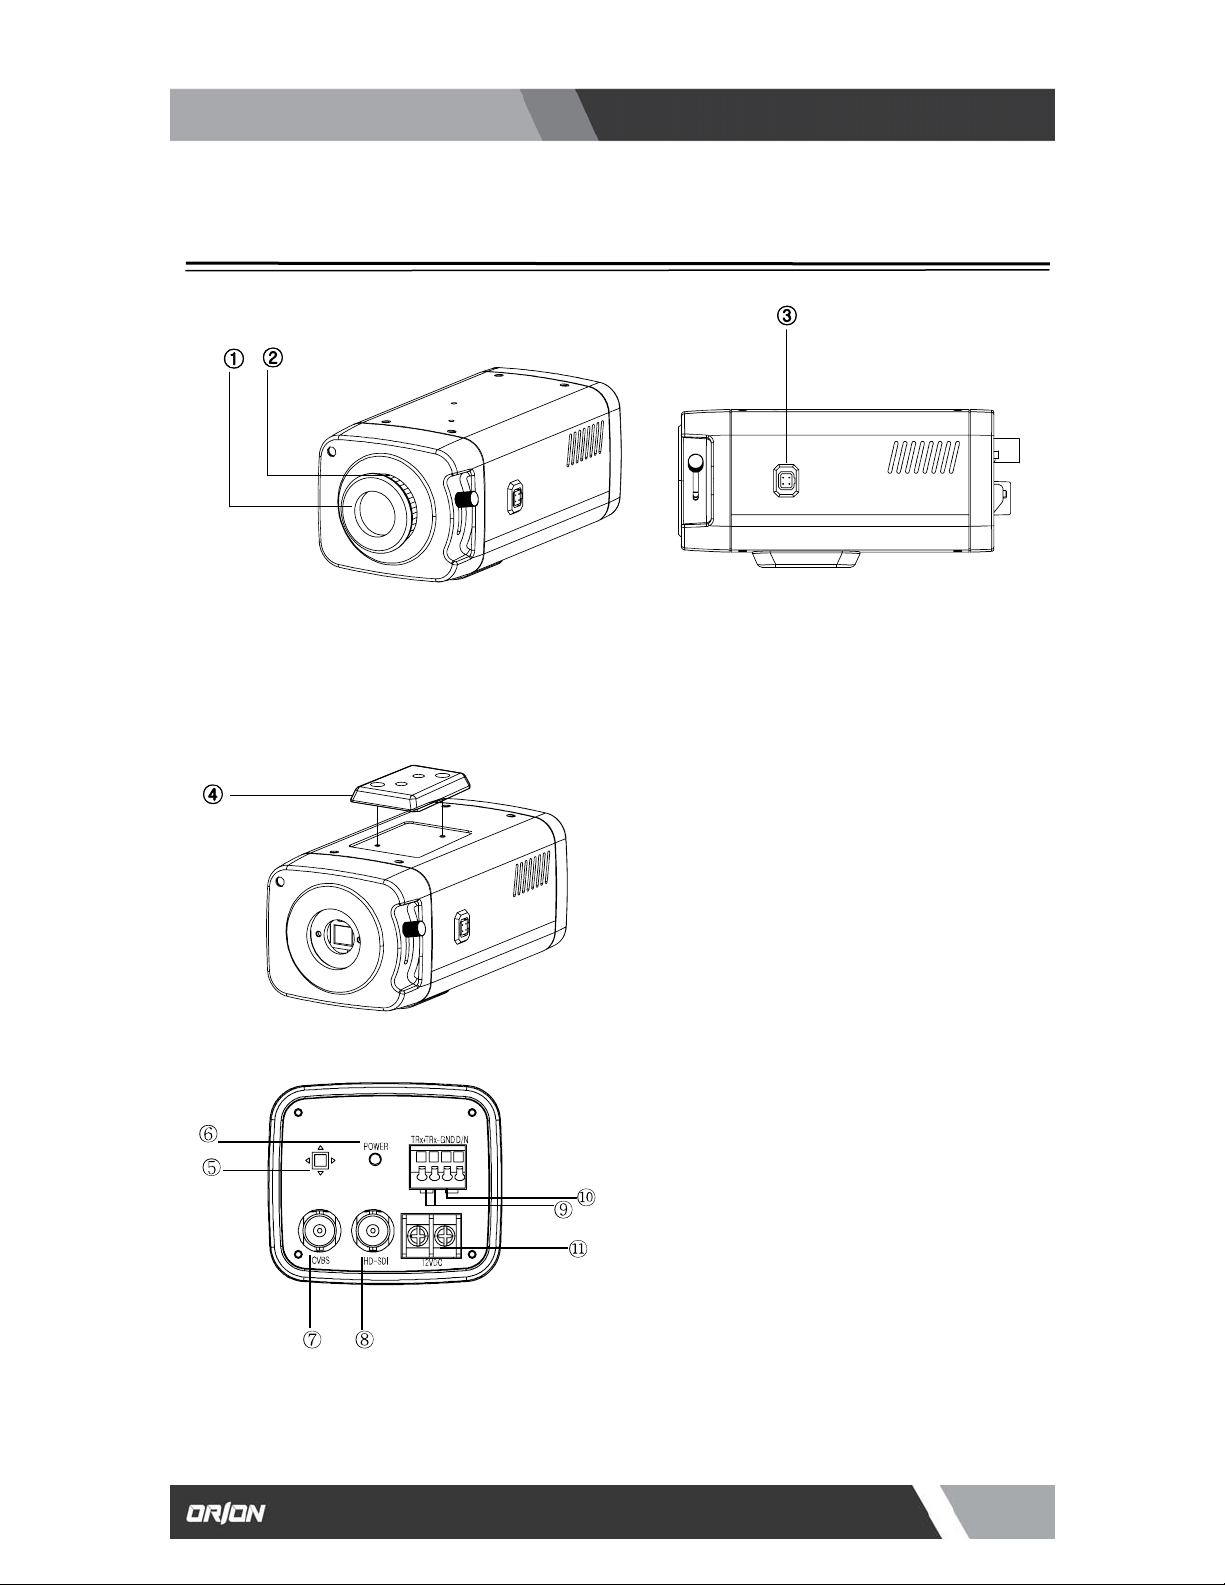
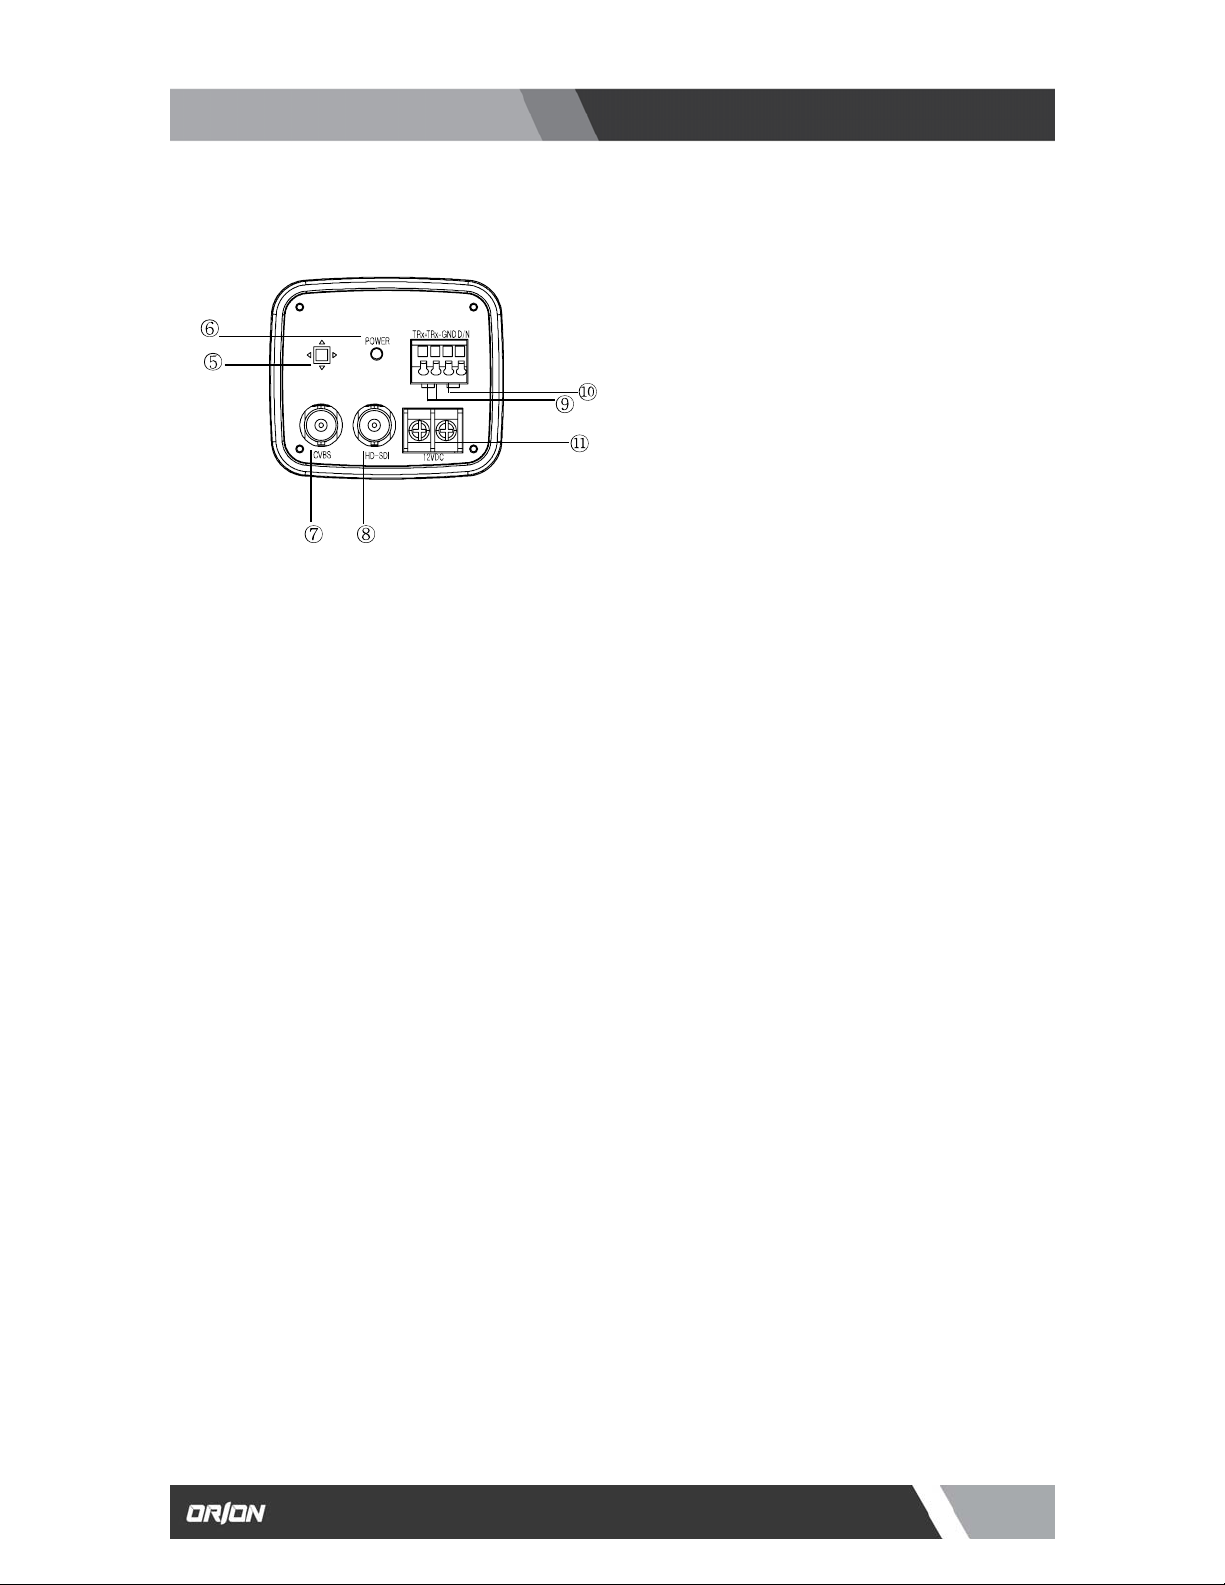
4. NAME & FUNCTIONS OF EACH PART
① Protective cover
② C-Mount lens adaptor
③ DC Iris Jack for DC Auto Iris Lens
④ Mounting Bracket Holder
Mounting bracket holder can be separated and
attached on the bottom side as well. Please use
the supplied clamp screws only to change the
position than 5mm depth can cause a serious
damage to the inside of this camera.
⑤ OSD Control button
⑥ Power indicator LED
Lamp is on when the power is being supplied.
⑦ CVBS output (BNC Female)
Connect coaxial cable for composite video
signal out.
⑧ HD-SDI output (BNC Female)
Connect coaxial cable for HD-SDI signal
video signal out.
NOTE : HD-SDI and CVBS output can be used
simultaneously
Installation and User’s Guide
5
7300 Bolsa Avenue, Westminster CA 92683 / Tel: 714-766-6300 / Fax: 714-766-6310
pg5
Page 6
http://www.orionimages.com
Installation and User’s Guide
⑨ RS-485 Control port
You can control SETUP menu through
this port by using external controllers like
a remote controller that RS-485
Communication is supported.
⑩ Day & Night Out port
This unit can be synchronized by an
External IR LED kit through this port.
Low : CDS sensor off ( LED off)
High : CDS sensor On ( LED on)
⑪ Power input terminal
Connect to the power source.
Polarity of the power is self- configured.
(Non-polarity).
6
7300 Bolsa Avenue, Westminster CA 92683 / Tel: 714-766-6300 / Fax: 714-766-6310
pg6
Page 7
http://www.orionimages.com
5. INSTALLATION
Installation and User’s Guide
5-1. Lens
Lens is not supplied with the unit. C-Mount or CS-Mount type of lens is available.
Please select a lens that has a good F-Stop number in order to get the best picture quality. Use of DC auto
iris lens is recommended to achieve the best results for operating this product effectively.
☞ Caution
Please make sure the surface of the lens is always clear. Clean dirt or water drops with soft cloth in order to
avoid the picture blooming or reflection.
☞ NOTE
To get the best image quality, please use recommended lenses from the manufacturer or camera supplier.
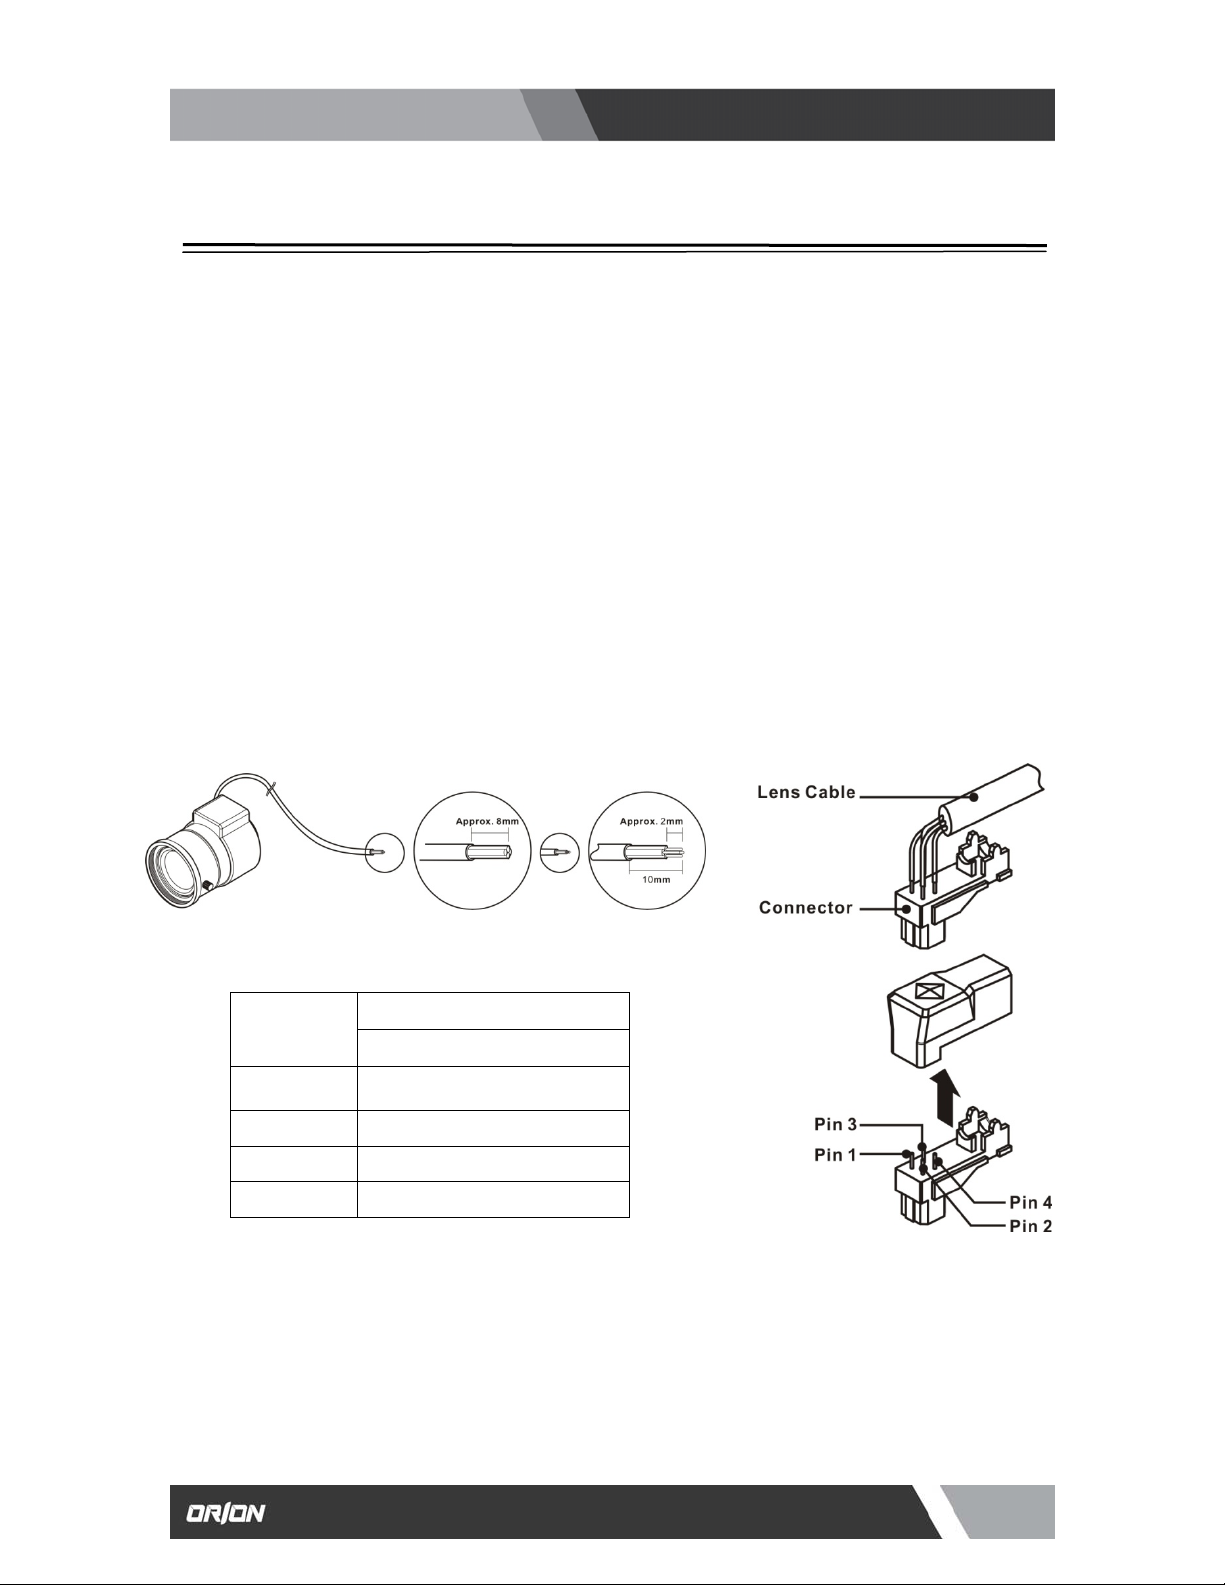
5-2. When using an Auto IRIS Lens (DC Drive)
1. Please take off the sleeve outer cable of the lens by 10mm.
2. Please take off the sleeve inner cable of the lens by 2mm.
Pin No.
Lens
DC
No.1 Pin Damping -
No.2 Pin
No.3 Pin
No.4 Pin
Damping +
Drive +
Drive -
3. Solder the wires on the pin-connector (iris-jack) supplied with the lens according to the pin configuration as
shown in the drawing.
4. Assemble the lens.
5. Connect the Auto Iris jack.
7
7300 Bolsa Avenue, Westminster CA 92683 / Tel: 714-766-6300 / Fax: 714-766-6310
pg7
Page 8

http://www.orionimages.com
5-3. When using a C-mount Lens
Please assemble C-Mount adaptor.
C-Mount adaptor is included in the package.
Fix the lens by turning it clockwise.
5-4. When using a CS-mount Lens
Take off the Protection cover.
Take off the C-MOUNT adaptor.
Assemble the CS-MOUNT lens by turning it clockwise.
- When used with an Auto Iris lens, please insert the
iris jack into the Iris socket which is located on the
right side of the camera.
- Please set the lens mode by using OSD Switch on
the back of the camera depending on the type of
selected lens.
☞ Caution
z Use the lens as shown in the picture here.
z When the lens is out of the spec, it could damage the camera inside
or may not be correctly fit with the camera.
z Use the lens less than 450g. Heavier lens can damage the camera.
Installation and User’s Guide
8
7300 Bolsa Avenue, Westminster CA 92683 / Tel: 714-766-6300 / Fax: 714-766-6310
pg8
Page 9

http://www.orionimages.com
Installation and User’s Guide
5-5. Application of HD-SDI output
Impedance alliance in the system connection.
Make sure to connect the cable with the power off. Please locate the impedance switches of each equipment
as instructed. Locate the switch to Hi-z position for the interim equipments. Locate the switch to 75 for the
last equipment.
5-6. Power
Please make sure to use a UL/CE approved and 12VDC/450mA regulated power supply.
9
7300 Bolsa Avenue, Westminster CA 92683 / Tel: 714-766-6300 / Fax: 714-766-6310
pg9
Page 10

http://www.orionimages.com
6. FUNCTION AND OPERATION
6-1. On Screen Menu
MAIN MENU
Installation and User’s Guide
VIDEO OUT
AUTO MENU
DAY/NIGHT
AWB
AE
PRIVACY
EFFECT
SYSTEM
INITIALIZE FACTORY INIT RETURN
EXIT SAVE/EXIT EXIT RETURN
VIDEO OUTSIZE
NORMAL
AUTO/COLOR/IR
(ATW)/PUSH/HOLD
TRACK/USER/8000K/
6000K/4200K/3200K
IRIS
ATR-EX(WDR)
DSS
AREA NUMBER
MASK POSITION
COLOR ADJUST
2DNR
CAMERA ID
FIRMWARE
FRAME RATE CVBS OUT MODE
50HZ INDOOR 60HZ INDOOR OUTDOOR
D TO N LEVEL
N TO D LEVEL
RED BLUE AWB RESET
DC IRIS
BLC/FLC
MASK DEFINE
PRIVACY RESET
SHARPNESS
3DNR
ID DISPLAY
485 TERM
D TO N TIME
N TO D TIME
BRIGHTNESS
LSC
MASK PATTERN
CONTRAST
EFFECT RESET
CAMERA NAME
BAUD RATE
D/N RESET
FLICKERLESS
AGC
AE RESET
MASK SIZE
REVERSAL
NAME DISPLAY
SYSTEM RESET
SAVE/
RETURN
RETURN
RETURN
RETURN
RETURN
RETURN
RETURN
RETURN
10
7300 Bolsa Avenue, Westminster CA 92683 / Tel: 714-766-6300 / Fax: 714-766-6310
pg10
Page 11

http://www.orionimages.com
Installation and User’s Guide
6-2. Setting Up the Menu
Settings can be made using the OSD Switch located on the back of the camera.
1. Press the button to access the SETUP mode.
The SETUP menu is displayed on the monitor.
2. Please select any function you wish to activate by using
the UP/DOWN selections.
The cursor can be moved up or down by using the
UP/DOWN selections.
Position the cursor to point to the function you wish to
operate.
* MAIN-menu : Use UP/ DOWN selections. / SUB-menu : Use LEFT/ RIGHT selection
3. Change the status of the selected feature using the LEFT/RIGHT selections.
When the LEFT or RIGHT selection is done, available values and modes are displayed in order.
Please keep the selection until you get to the mode you wish to operate.
4. When completed, move the cursor indicator to ‘EXIT’ position and press the Button to finish the setting.
NOTE
☞
If appears at the mode you wish to operate, it means that there is a sub-menu which can be selected by OSD Switch
11
7300 Bolsa Avenue, Westminster CA 92683 / Tel: 714-766-6300 / Fax: 714-766-6310
pg11
Page 12

http://www.orionimages.com
Installation and User’s Guide
6-3. VIDEO OUT
(1) VIDEO OUTSIZE
z VIDEO OUTSIZE can be set to 1080P, 1080i, 720P
According
to Local Regulation.
(2) FRAME RATE
z Six modes of 60/59.94/50/30/29.97/25 can be selected
(3) CVBS OUT MODE
z CVBS output can be set to NTSC or PAL according
to local TV standard
☞
NOTE
In case of 1080i mode, only 3 types of Frame rate are available and they are 60/50/59.94 respectively.
When you use 1080P 60 mode, please check your DVR or related HD devices first whether they support this mode or not.
( In this mode, cable connection distance is less than half of 1080P 30 mode.)
6-4. AUTO MENU
(1) NORMAL
z Sets as initial factory default value.
(2) 50HZ INDOOR
z For indoor use in 50HZ (PAL) environment.
(In this mode, i.e. 50HZ INDOOR MODE, FLICKERLESS
changes automatically into 50HZ mode from initial
OFF mode)
(3) 60HZ INDOOR
z For indoor use in 50HZ (PAL) environment.
(In this mode, i.e. 60HZ INDOOR MODE, FLICKERLESS
changes automatically into 60HZ mode from initial
OFF mode.)
(4) OUTDOOR
z For outdoor use.
(In this mode, i.e. OUTDOOR MODE, AWB changes
automatically into PUSH mode from initial ATW mode.)
12
7300 Bolsa Avenue, Westminster CA 92683 / Tel: 714-766-6300 / Fax: 714-766-6310
pg12
Page 13

http://www.orionimages.com
(5) AUTOSET RESET
z When set as ON and press SET KEY, it turns into AUTOSET NORMAL MODE automatically,
which means initial factory reset.
6-5. DAY / NIGHT
You can display pictures in Color/IR MODE/AUTO.
(1) DAY/NIGHT MODE
1. Please position the cursor on ‘DAY/NIGHT’ on the
SETUP menu by using the UP and DOWN selections.
2. Please select the mode you wish to operate by using the
LEFT and RIGHT selections.
z COLOR : The picture is always displayed in color.
z IR : The mode is switched to ‘DAY’ in a normal
environment, but switches into ‘NIGHT’ mode
when ambient illumination is low.
☞ NOTE
set in this mode.
☞ NOTE
(2) D TO N LEVEL
z Sets the level of illumination in which COLOR mode
(3) N TO D LEVEL
z Sets the level of illumination in which B/W mode is turned into COLOR mode.
(4) D TO N TIME
z Sets the switching time from COLOR mode into B/W mode when the level of illumination has
(5) N TO D TIME
z Sets the switching time from B/W mode into COLOR mode when the level of illumination has
True Day & Night cameras with CDS & ICR are to be
z
AUTO: Automatically turns between Day and Night Mode according to AGC operation.
Day & Night cameras without CDS & ICR are to be set in this mode.
is turned into B/W mode.
(This menu is not activated in case of IR MODE)
(This menu is not activated in case of IR MODE)
come to D TO N LEVEL.
(Not activated in case of IR MODE)
come to N TO D LEVEL.
(Not activated in case of IR MODE)
Installation and User’s Guide
13
7300 Bolsa Avenue, Westminster CA 92683 / Tel: 714-766-6300 / Fax: 714-766-6310
pg13
Page 14

http://www.orionimages.com
Installation and User’s Guide
(6) D/N RESET
z Resets all setting of DAY/NIGHT menu into initial factory default value.
(7) RETURN
z Returns to the MAIN MENU
6-6. AWB (Auto White Balance)
This is useful when the cameras are installed in different artificial
lighting conditions where a standard ‘White Balance’ condition is
not suitable for all.
(1) AWB MODE
A. Please position the cursor on ‘AWB’ on the
(2) ATW (Auto Tracking White Balance)
(3) PUSH MODE
(4) HOLD MODE
(5) TRACK MODE
(6) USER MODE
SETUP menu by using the UP and DOWN selections.
B. Please select the mode you wish to operate by using the
LEFT or RIGHT selection.
C. Please select one of the 8 modes below.
z IN : This mode can be used within the color temperature range of 2,500˚K~7000˚K
z OUT : This mode can be used within the color temperature range of 1,800˚K~10,500˚K
NOTE :☞
This mode can be used within the color temperature range of 1,800˚K~10,500˚K
NOTE :☞
This mode is used to fix AWB in a specific environment.
NOTE :☞
yellow cars on the express road and when environment is volatile so much, HOLD MODE is strongly
rcecommended.
Sets some specific range of color temperature. (23 types of color temperature can be set within
1,500˚K~15,000˚K range).
USER MODE is suitable for enhanced users who want to set red and/or blue value manually
according to user’s environment.
Please change to manual adjustment mode and press OSD Switch.
Set the appropriate color temperature, and then increase or decrease the red and blue color values
while monitoring the color changes on the screen.
z RED : Adjust the level between 00 ~ 50(Default 17)
z BLUE : Adjust the level between 00 ~ 50(Default 40)
In case of indoor use, ATW(IN) mode is higly recommended.
In case of outdoor use, PUSH mode is recommended
W hen there are drastic movements of some specific colored features such as red, blue, green or
14
7300 Bolsa Avenue, Westminster CA 92683 / Tel: 714-766-6300 / Fax: 714-766-6310
pg14
Page 15

http://www.orionimages.com
Installation and User’s Guide
(7) 8,000˚K/6,000˚K/4,200˚K/3,200˚K MODE
z 8,000˚K : Shade
z 6,000˚K : Cloudy weather
z 4,200˚K : Fluorescent light
z 3,200˚K : Electric light blub
(8) AWB RESET
z Resets all setting of AWB menu into initial factory reset value.
(9) RETURN
z Returns to the MAIN MENU.
6-7. AE (Auto Exposure)
(1) IRIS MODE
z DC : Selects DC drive auto iris lens.
z ESC : Selects manual iris lens
z AE HOLD : Fixes the change of the brightness.
(This mode is useful when lots of motions are detected
on the monitor)
(2) DC IRIS LEVEL
Adjusts the mechanical Iris lens in 00 ~ 50(Default22)
(3) BRIGHTNESS
Adjusts the brightness in 00 ~ 30(Default 07)
(4) FLICKERLESS
This is used only when there is a difference in frequency between
the power system (50Hz) and TV system (60Hz). In this case,
flicker is occurred on the monitor. In most countries other than Japan, FLICKERLESS mode is not
necessary.
NOTE :☞
(6) ATR-EX (WDR)
This mode functions like WDR.
3 modes of Off/Low/Mid/High can be selected.
Wide Dynamic Range Performance
In general, it is very hard to see objects inside the buildings, etc
in case that there comes strong light from the outside.
By using ATR-EX(WDR) mode, the difference in brightness between
the bright area and the dark area can be minimized and
consequently those objects inside and outside of the buildings or
windows can be seen all together even though there is strong
light or backlight from the outside.
When ATR-EX(WDR) is ON, DC IRIS LEVEL, BRIGHTNESS, BLC menu’s are all inactivated.
NOTE :☞ This mode is recommended for those environment with backlight or shade.
When the power system (50Hz) and the TV system(60Hz) are different,
¾ ‘Flickerless on’ mode is recommended for indoor use.
¾ ‘Flickerless off’ mode is recommended for outdoor use.
15
7300 Bolsa Avenue, Westminster CA 92683 / Tel: 714-766-6300 / Fax: 714-766-6310
pg15
Page 16

http://www.orionimages.com
(6) BLC (Back Light Compensation)
Enables a user to directly select a desired area from a picture,
and to view the area more clearly even under backlight
environment.
z BLC : Used for backlight environment.
(Indoor objects can be seen)
z FLC : Compensates the saturation of image when camera
faces toward the same direction as sunlight.
(7) LSC (Lens Shading Correction)
Adjust the LEVEL 00 ~ 50(Default 00) Compensates for the
shading of the lens.
NOTE :☞ This function will be provided soon in next version.
(8) AGC (Auto Gain Control)
The higher the gain level is, the brighter the screen becomes.
But the higher gain level causes more noise.
z LOW : Allows automatic gain control from 0 to 20dB.
z MIDDLE : Allows automatic gain control from 0 to 30dB.
z HIGH : Allows automatic gain control from 0 to 42dB.
(9) DSS (Digital Slow Shutter)
This is an electronically activated function to improve the
sensitivity for viewing low light condition in addition to the original
sensitivity from the sensor itself.
Shutter level is adjustable x2 times.
At night, DSS is set to x2 automatically.
NOTE :☞
This function will be provided soon in next version
(10) AE RESET
Resets all settings of AE menu into the initial factory
default value.
(11) RETURN
Returns to the MAIN MENU.
6-8. PRIVACY
Masks the areas you want to hide on the screen.
Installation and User’s Guide
16
7300 Bolsa Avenue, Westminster CA 92683 / Tel: 714-766-6300 / Fax: 714-766-6310
pg16
Page 17

http://www.orionimages.com
(1) AREA NUMBER
You can select up to 4 PRIVACY areas.
(2) MASK DEFINE
Determines whether to use the MASK or not.
(3) MASK PATTERN
Defines the Mask Color or type.
z 6 types of BLACK/RED/GREEN/BLUE/YELLOR/MOSAIC are selectable.
(4) MASK SIZE
By moving the cursor LEFT/RIGHT, TOP/BOTTOM, the size of masking area can be determined..
(5) MASK POSITION
Adjust vertical and horizontal position of masking area.
(6) PRIVACY RESET
Resets all setting of PRIVACY menu.
(7) RETURN
Returns to the MAIN MENU.
6-9. EFFECT
Masks the areas you want to hide on the screen.
(1) COLOR ADJUST
z COLOR GAIN : Adjusts the COLOR GAIN
level in 00 ~ 50(Default 25)
z COLOR HUE : Adjusts the COLOR HUE
level in 00 ~ 50(Default 25)
NOTE :☞ This function enables user to adjust the variation of
Color Gain on the monitor when installing camera.
(2) SHARPNESS
Adjusts the SHARPNESS level in 00 ~ 50(Default 25)
(3) CONTRAST
Adjusts the CONTRAST level in 00 ~ 50(Default 25)
(4) REVERSAL
Enables either normal image (NORMAL), mirrored
Image ( MIR), vertically reversed image ( VER), vertically
reversed and mirrored image( FLIP).
Installation and User’s Guide
17
7300 Bolsa Avenue, Westminster CA 92683 / Tel: 714-766-6300 / Fax: 714-766-6310
pg17
Page 18

http://www.orionimages.com
Installation and User’s Guide
(5) 2DNR
Cuts off the noise in low light condition.
z 4 modes of OFF/LOW/MID/HIGH are available.
NOTE :☞
Higher 2DNR level reduces more low light noise but deteriorates resolution as well.
(6) 3DNR
Cuts off the noise in low light condition
z 4 modes of OFF/LOW/MID/HIGH are available.
NOTE :☞
This function will be provided soon in the next firmware version.
Higher 3DNR level reduces more low light noise but it can cause ghost effect as well.
(7) EFFECT RESET
Resets all setting of EFFECT menu into initial factory default.
(8) RETURN
Returns to the MAIN MENU
6-10. SYSTEM
(1) CAMERA ID
Determines the camera ID number in 001 ~ 255
(Default 001)
(2) ID DISPLAY
Defines the location where camera ID is displayed
on the screen. 4 location of top, bottom, left and right can
be selected.
(3) CAMERA NAME
Defines camera name. When ‘Name Display’ is on,
this text will Be shown on the screen.
(4) NAME DISPLAY
If you enter a title for this, that will appear on the monitor.
A. Please position the cursor on ‘NAME DISPLAY’ by
moving UP or DOWN direction
B. Then, select ‘ON’ by using the LEFT and RIGHT
selection. When you press the button to complete
‘ON’, then ‘CAMER A NAME’ will be displayed.
NOTE :☞
C. Up to 10 letters are available for the NAME
DISPLAY.
① Please move the cursor to the letter to
choose by using the UP and DOWN selections.
② Set an ID from 0,1,~8,9, A,B, ~Y,Z by
using the UP, DOWN, LEFT and RIGHT
selections.
18
7300 Bolsa Avenue, Westminster CA 92683 / Tel: 714-766-6300 / Fax: 714-766-6310
If ‘OFF’ is selected, the NAME DISPLAY does not appear on the monitor even if it has been input.
pg18
Page 19

http://www.orionimages.com
③ Lock in the letters by using the button.
When the letter is locked in, the cursor
moves to the next space.
④ Please repeat the above to input NAME DISPLAY.
D. When a name has been chosen, please select a position for the name to display.
① Please move the cursor onto ’POSITION’ and then press the button.
② The name will appear at the top right corner.
③ Please find the position you wish to display the name by using the 4 directional
selections, and then press the button to finish.
E. Camera Name Input process is finished if user selects ‘RETURN’ and presses OSD switch.
(5) FIRMWARE
Shows firmware version of this camera unit.
(6) 485 TERM
RS485 Function ON/OFF
(7) BAUD RATE
Selects baud rate for RS485 communication among 2400/ 4800/ 9600. (Default: 9600)
(8) SYSTEM RESET
Resets all setting of SYSTEM menu.
CAMERA ID, 485 TERM settings are not initialized.
(9) RETURN
Returns to the MAIN MENU.
6-11. INITIALIZE
Resets the camera setting to the factory defaults.
CAMERA ID, 485 TERM settings are not initialized.
6-12. EXIT
Installation and User’s Guide
z SAVE/EXIT
Saves the current settings and exits the menu.
z EXIT
Not saves the current settings and exits the menu.
z RETURN
Returns to the MAIN MENU.
19
7300 Bolsa Avenue, Westminster CA 92683 / Tel: 714-766-6300 / Fax: 714-766-6310
pg19
Page 20

http://www.orionimages.com
Installation and User’s Guide
7. TROUBLE SHOOTING
If there are problems in operating, please refer to the checklist below. If the problem persists, please contact
the agent where this product is purchased.
PROBLEMS Troubleshooting Tip
1. Please check that the power cord and line connection between the camera and
Nothing appears on the screen
the monitor are fixed properly.
2. Please check that you have properly connected VIDEO cable to the VIDEO
output jack of the camera
1. Is lens stained with dirt? Clean your lens with soft, clean cloth
The image on the screen is dim
The image on the screen is dark
The camera is not working
properly, and the surface of the
camera is hot.
Color is not correct Please check the setting of AWB menu
The screen flickers continually Please check that direction of camera turns toward the Sun.
RS-485
communication fails.
2. Set the monitor to proper condition.
3. If the camera is exposed to too strong light, change the camera position.
1. Adjust the contrast feature of the monitor.
2. If you have an interim device, set the 75 / Hi-z properly.
Please check that you have properly connected the camera to an appropriate
power source.
Please check the polarity between RS-485 Control Port and RS-485 cable.
485 Control Board Connection Port RS-485 Control Port
(+)CONNECTION TERMINAL(TRX+) 485+
(-)CONNECTION TERMINAL(TRX-) 485-
Please check the RS-485 Communication establishment initial value
*RS-485 Communication establishment initial value
Item Camera ID BAUD RATE UART MODE RET PKT
Initial value 001 9600 8-NONE-1 ENABLE
We recommend that you make ground connect between camera and controller in
order to maintain safety communication control.
20
7300 Bolsa Avenue, Westminster CA 92683 / Tel: 714-766-6300 / Fax: 714-766-6310
pg20
Page 21

http://www.orionimages.com
8. SPECIFICATIONS
CHDC-34BSDC
Image Sensor Sony 1/2.8 inch progressive scan CMOS, 3MegaPixel
Total Pixels 2144(H) x 1588(V) 3.4 Megapixel
Effective Pixels 2096(H) x 1561(V) 3.27 Megapixel
Scanning System Progressive Scan
Horizontal More than 1100 TVL
S/N Ratio More than 52dB
Min. Illumination 1.0 Lux with DSSX2 (F1.2, 30IRE, AGC On)
Shutter Speed 1/30s Default,(Long Exposure Mode, ~1Sec)
Video Output
Video Output Format 2.97G/s, 3G-SDI Output (SMPTE 424M)
AV Output 1V p-p Composite. 75 Ohms
Digital Output SDI Output
Day & Night D/N Output Port, ICR
Serial Port RS485
Lens C/CS Mount Lens
Lens Control DC IRIS Lens
Power Source DC 12V (9~19V)
Power Consumption 440mA / DC12V ( 5.3W)
Operating Temperature -10°C ~ 50°C
Storage Temperature -20°C ~ 70°C
Operating Humidity Under 90% Non-condensing
Measurement (inch) 2.6(W) x 2.24(V) x 4.96(L)
Weight (Approx.) 700g
Installation and User’s Guide
1920 x 1080P 60/50/30/25/59.94/29.97, 1920x 1080i 60/50/59.94/
1280x 720P 60/50/30/25//59.94/29.97 (Mode Select)
OSD
Video Mode / D&N / AWB / AE /Privacy Mask / Flickerless /
Brightness / Sharpness / Mirror & Flip / DSS/DNR, etc.
* Design and specifications are subject to change without notice
21
7300 Bolsa Avenue, Westminster CA 92683 / Tel: 714-766-6300 / Fax: 714-766-6310
pg21
Page 22

http://www.orionimages.com
9. OUTLINE DIMENSION
Front View
Top View
Rear View
Installation and User’s Guide
Unit: Inch
Side View
22
7300 Bolsa Avenue, Westminster CA 92683 / Tel: 714-766-6300 / Fax: 714-766-6310
pg22
Page 23

http://www.orionimages.com
Installation and User’s Guide
10. WARRANTY & AFTER-SALE SERVICE
Warranty accompanies this product. Read and fill out the warranty card that you have
received at your dealer. Keep this card in a safe place.
z Please consult ORION Images Corporation or your dealer for full warranty information. Your dealer
will repair or replace free of charge within the warranty period according to the warranty coverage.
z For repairs after the expiration of the warranty period, consult your dealer or sales representative. It
will first be judged whether the fault is repairable or not. Charged servicing will then be made upon
request of the user.
z Before you ask for servicing, please ensure you read the instruction Manual. If the unit still fails,
take note of the model number, date of purchase, problem, etc. In detail, and inform your dealer or
sales representative.
z If you have questions about the after-sale service, contact your dealer or sales representative.
* We suggest you ask for preventive inspection as soon as possible.
Contact ORION Images :
In the event of missing and/or damage equipment, or technical questions, the following
information can help in the completion of the installation.
Address: 7300 Bolsa Avenue, Westminster, CA 92683
Tel: 714-766-6300 / Fax: 714-766-6310
Email: rma@orionimages.com
Website: http://www.orionimages.com
23
7300 Bolsa Avenue, Westminster CA 92683 / Tel: 714-766-6300 / Fax: 714-766-6310
pg23
 Loading...