

Page 1
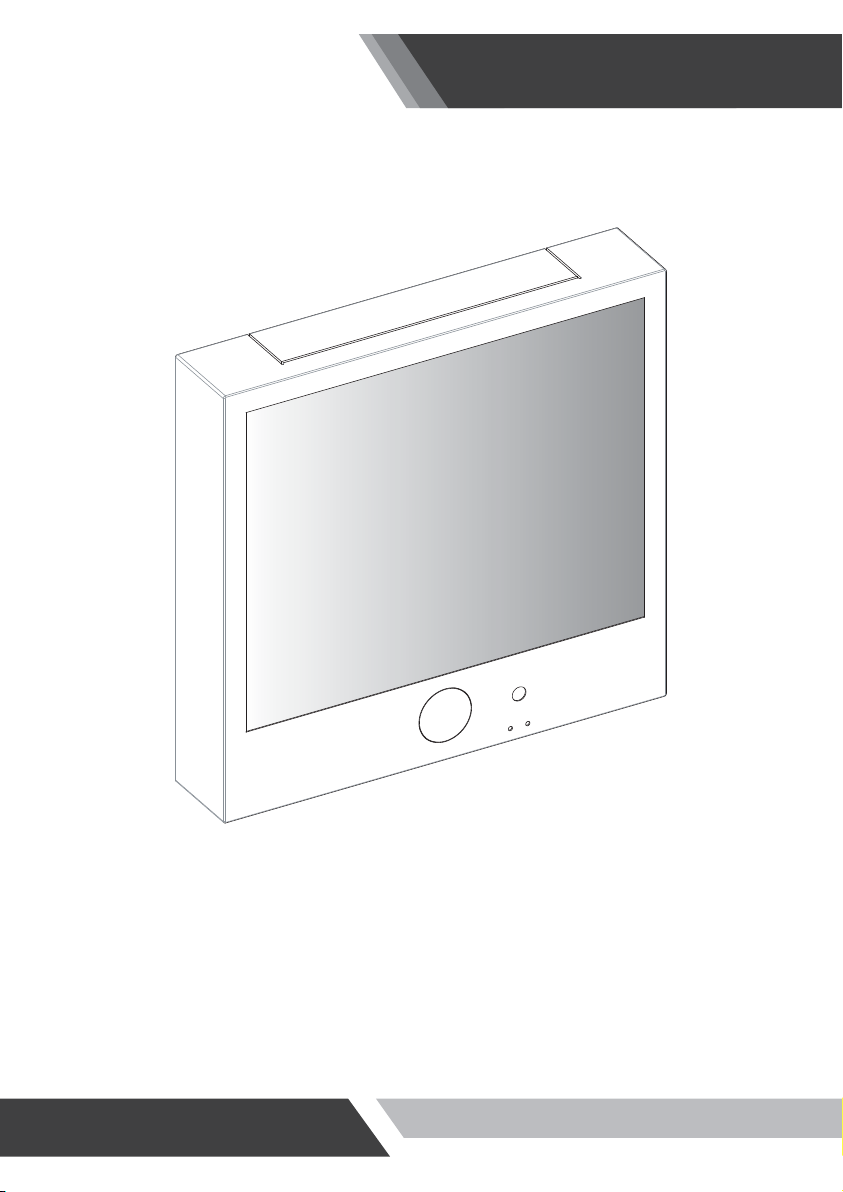
Installation and User's Guide
PUBLIC VIEW MONITOR SERIES
(10~32 inches)
Page 2
Installation and User's Guide
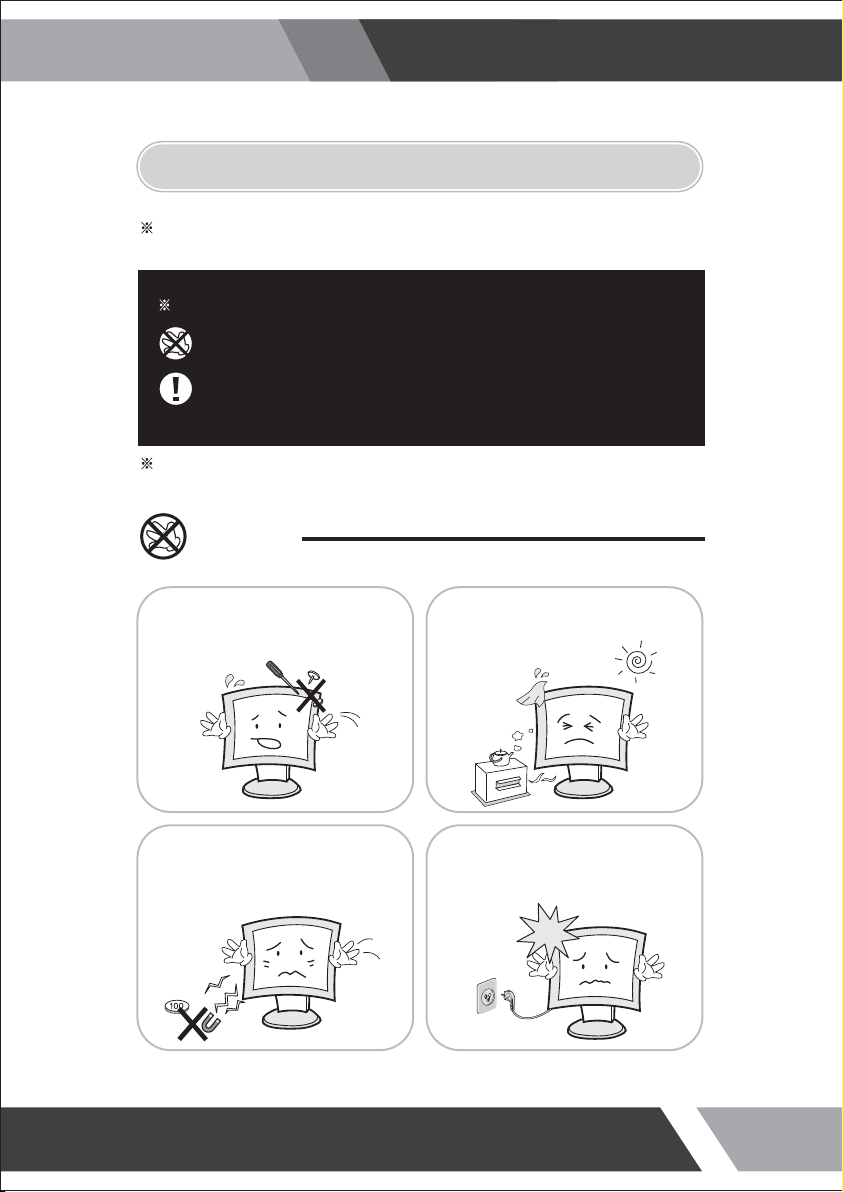
1. SAFETY INSTRUCTION
Follow this safety instruction to use the monitor properly and prevent the damages.
This safety instruction has “Warning” & “Caution” as below
Warning -
Caution -
If the user does not follow this instruction,
it may cause the serious damage to the user.
If the user does not follow this instruction, it may cause the slight
damage to the user or cause some damages to the monitor.
Keep this user’s guide book for later use.
Warning
Never remove the back over and
touch the inside of the monitor.
If you need a service, please
contact the service center.
Never push objects of any kind into
this product as they may result in
a risk of fire or electric shock.
Keep away the monitor from the
direct sunlight and a heating appliance.
Connect the power code to the wall
outlet tightly. If the power code or plug
are defective and the wall outlet is not
tight, please do not use them.
2
Page 3
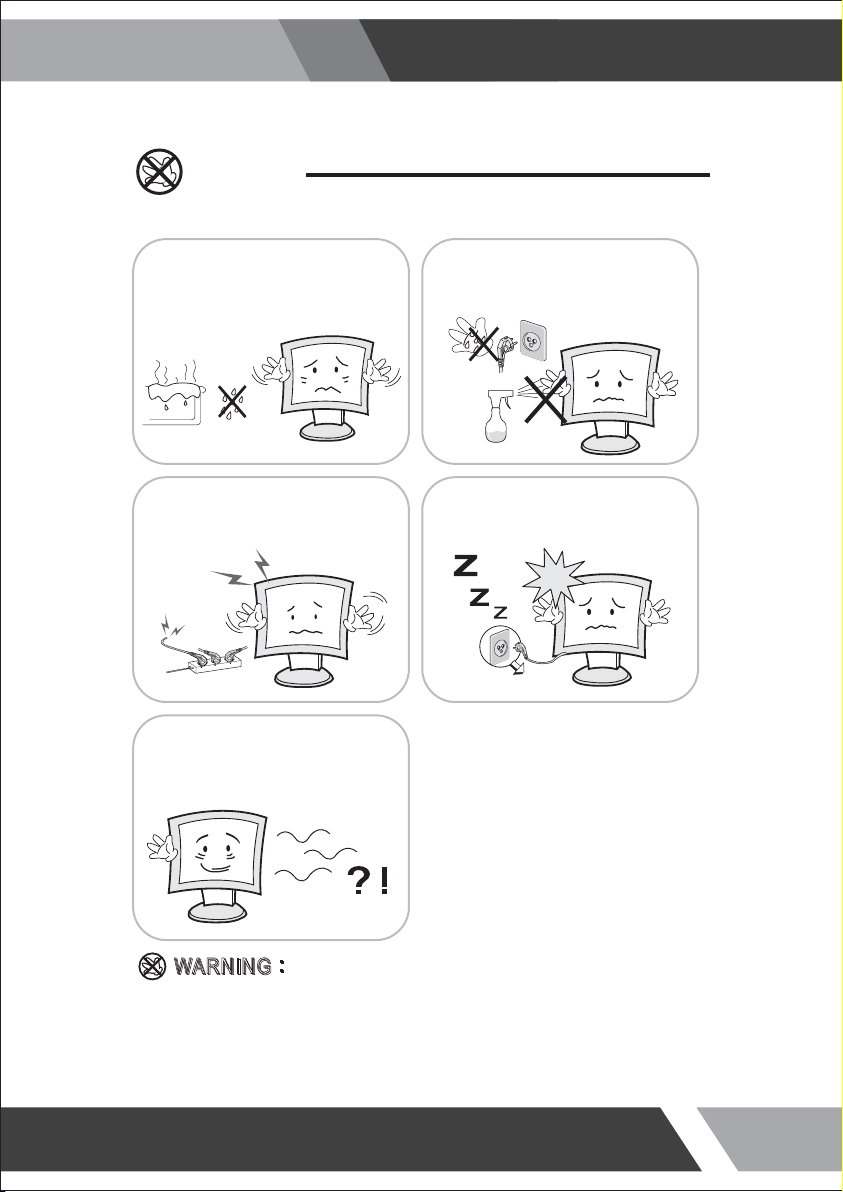
Warning
Installation and User's Guide
Do not install this monitor on the outside
and near water. If may cause damage to
the product, electric shock and fire.
When lightning and thundering, unplug the
monitor from the wall outlet and never touch
it.
When smoking and noising from the monitor,
unplug the product from the wall outlet and
contact a service center.
For cleaning do not use liquid cleaners.
Never touch the power plug with wet-hands.
Unplug this product from the wall outlet, when
It does not operate for a long time.
:
:
IIN
N
How to fix
G
G
A
W
RNN
A
W
R
Do not open this product as it contains high voltage inside.
It may create an electric shock.
It the user disassembles and remove the back cover, it does not make sure
to make up for the damages and do a service and exchange the monitor.
3
Page 4
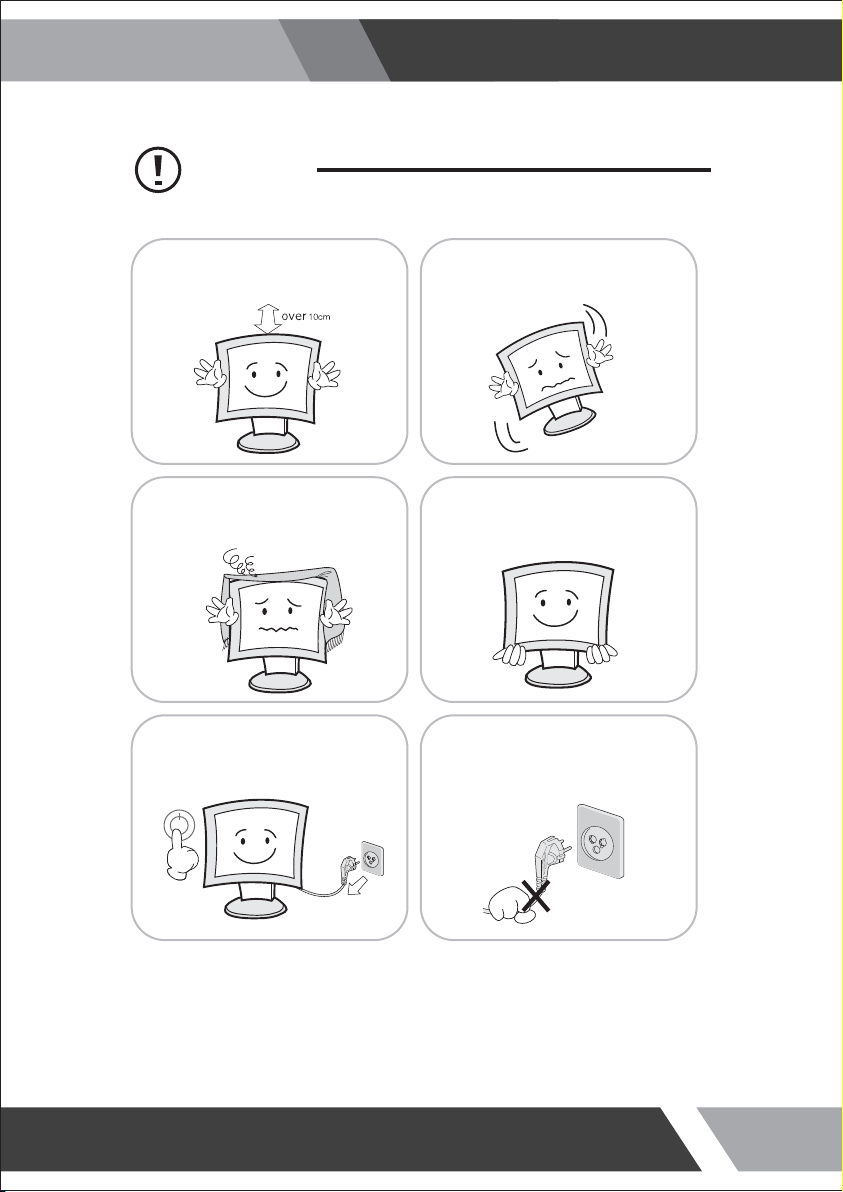
Cautions
Installation and User's Guide
Install this monitor some distance
From the wall and do not install unless
Proper ventilation is provided.
The openings must not be blocked by
curtain, rug or other similar surface.
Before carrying the monitor, tum it off and
Unplug the signal cables and the power code
From the wall outlet.
Place this product on a stable place.
If not, it may fall, causing serious
Damages to the monitor and people.
When carrying this monitor, be careful
not to damage the panel and drop it
It may cause some trouble.
Take the power plug out from the wall
outlet.
Do not pull the cable. It may snap the innerwires and cause overheating and fire.
4
Page 5
Cautions
Installation and User's Guide
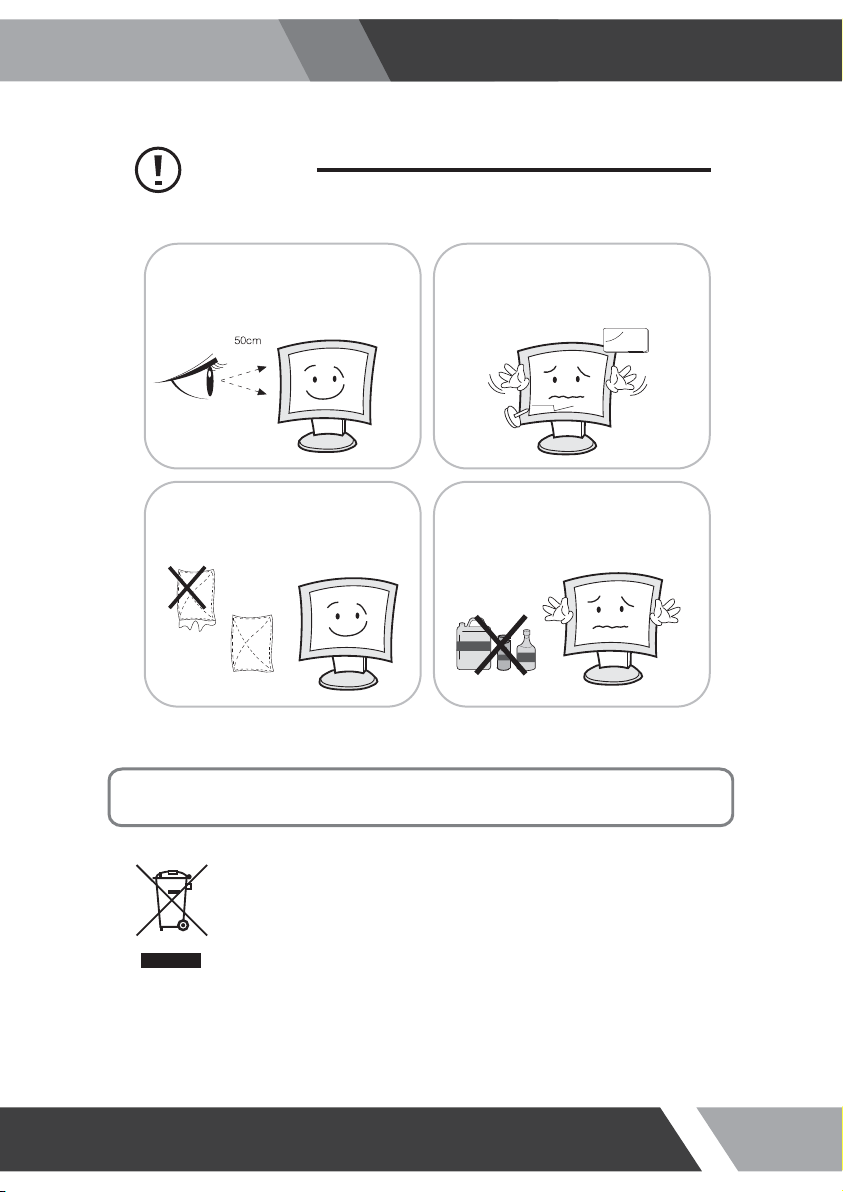
Install this monitor about 50cm far from
the eyes and an angle of 0~15 degrees
below eyes. Too close installation may
cause having weak sight.
For cleaning, unplug the monitor from the
Wall outlet. Do net use the liquid cloth.
Use the soft cloth.
Do not press the LCD panel with hands or
the sharpened material hardly.
Do not use the chemical liquid for cleaning.
It may cause fading and breakage.
WARNING: TO REDUCE THE RISK OF ELECTRIC SHOCK, DO NOT EXPOSE
THIS EQUIPMENT TO RAIN OR WATER.
Instructions for Disposal of Electrical and Electronic Equipment in Private
Households
Disposal of used Electrical and Electronic Equipment
(Applicable in the European Union and other European countries with garbage separate
disposal and collection methods)
This symbol on the product, or in the related documents in the package, indicates that this
product shall not be treated as normal household waste. Instead, it should be taken to a proper
applicable collection point or depot for the recycling of electrical and electronic equipment.
By ensuring this product is disposed of correctly, you will help prevent possible negative consequences for
the environment and human health, which could otherwise be caused by inappropriate waste handling of
this product. The recycling of materials will help to conserve natural resources.
For more detailed information about recycling of this product, please contact your local city authority, your
household waste disposal service or the place where you purchased the product.
5
Page 6

Installation and User's Guide
g
2. FCC RF INTERFERENCE STATEMENT
N
TE
This equipment has been tested and found to comply with the limits for a Class A digital device, pursuant
to Part 15 of the FCC Rules. These limits are designed to provide reasonable protection against harmful
interference in a residential installation. This equipment generates, uses and can radiate radio frequency
energy and, if not installed and used in accordance with the instructions, may cause harmful
interference to radio communications. However, there is no guarantee that interfere
particular installation. If this equipment does cause harmful interference to radio or television reception
which can be determined by turning the equipment off and on, the user is encouraged to try to correct
the interference by one or more of the following measures.
Reorient or relocate the receiving antenna.
Increase the separation between the equipment and receiver.
Connect the equipment into an outlet on a circuit different from that to which the receiver
is connected.
Consult the dealer or an experienced radio, TV technician for help.
Only shielded interface cable should be used.
Finally, any changes or modifications to the equipment by the user not expressly approved by the
grantee or manufacturer could void the users authority to operate such equipment.
nc
e will not occur in a
DOC COMPLIANCE NOTICE
This digital apparatus does not exceed the Class A limits for radio noise emissions from digital apparatus
set out in the radio interference re
ulation of Canadian Department of communications.
6
Page 7

Installation and User's Guide
TABLE OF CONTENTS
1. SAFETY INSTRUCTION
1-1 Warning
1-2 Caution
2. FCC STATEMENT
3. INSTALLATION
3-1 Parts
3-2 How to Install
4. OSD MENU SETTING
4-1 Mode Setting
4-2 Menu Setting (CAMERA, VIDEO Mode)
4-3 Menu Setting (VGA Mode)
4-4 Menu Setting (HDMI Mode)
4-5 Camera Setting
5. FEATURES
6. TROUBLESHOOTING
2
6
8
12
33
34
7
Page 8
3. INSTALLATION
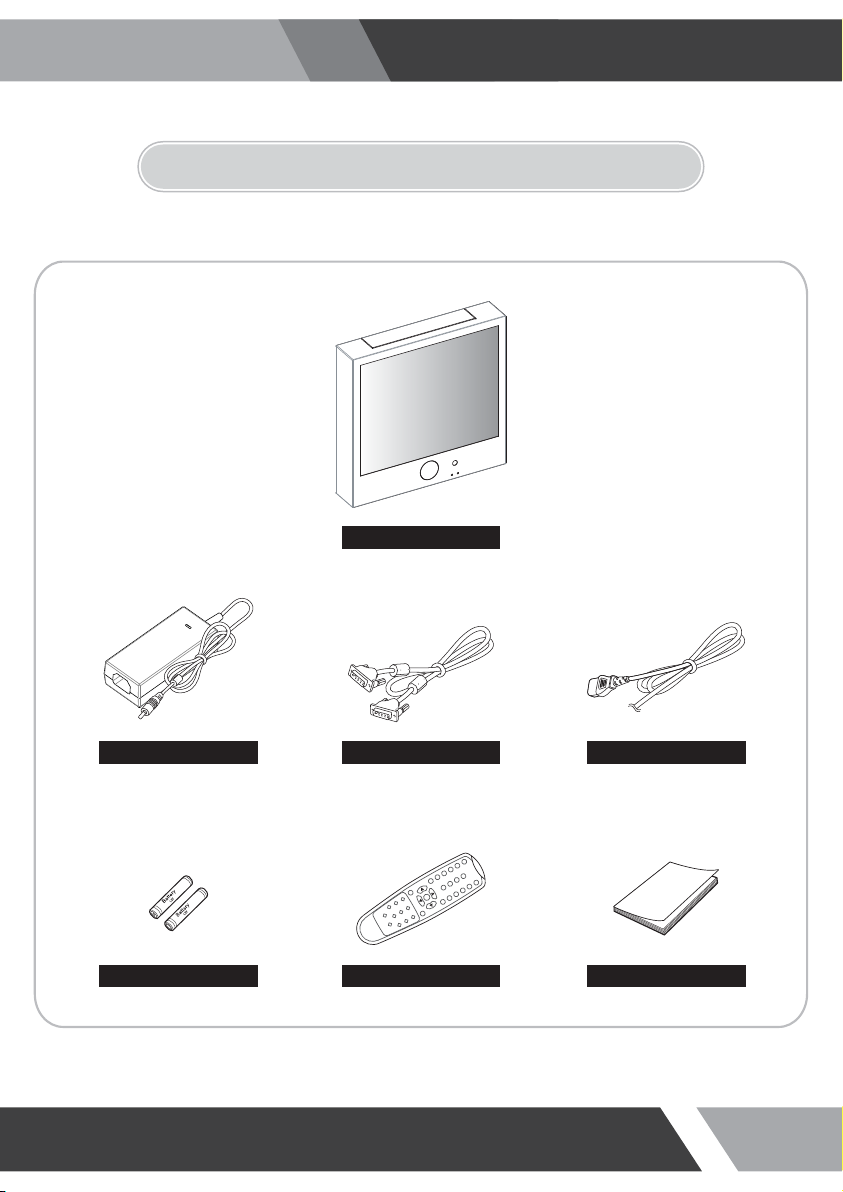
3-1 Parts
Installation and User's Guide
LCD Monitor
Adapter (10" only)
Battery User Manual
VGA Cable Power Cable
Remote Controller
8
Page 9
3-2 How to Install
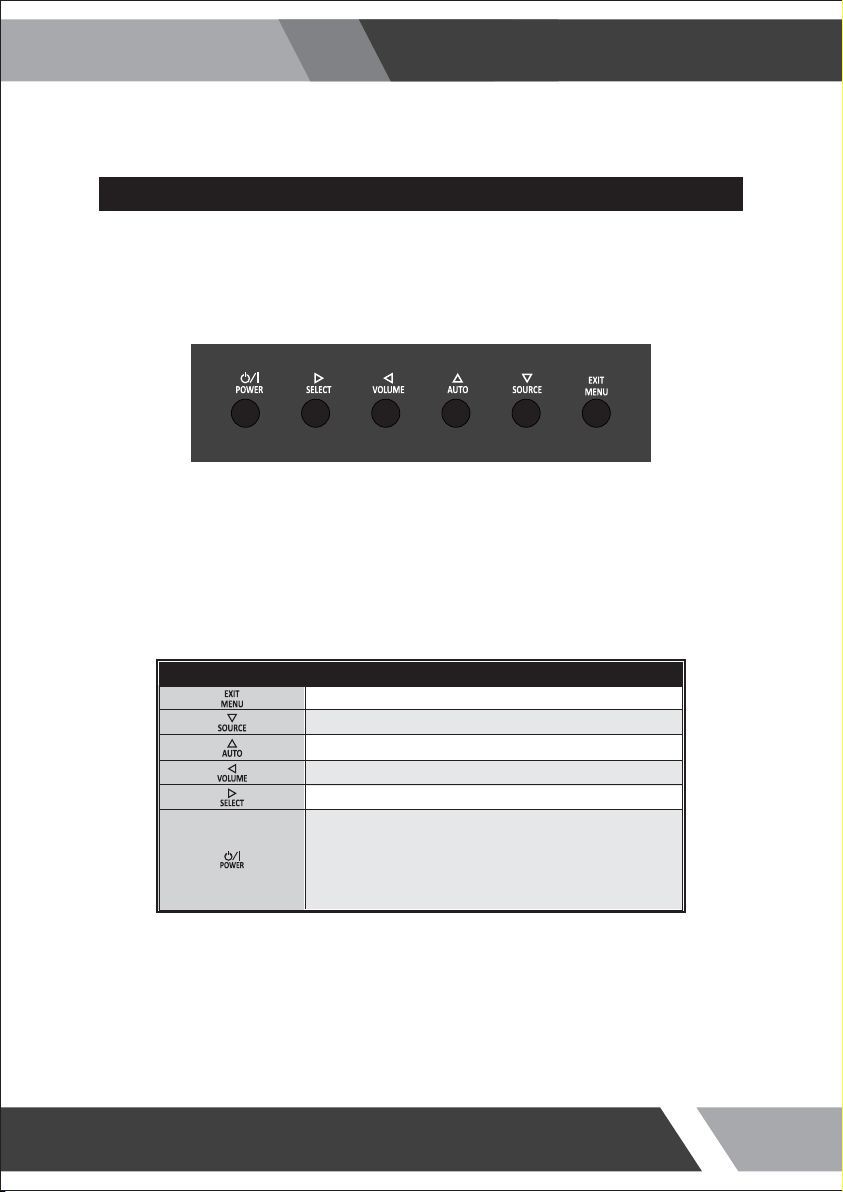
KEY BUTTON
Installation and User's Guide
SHORT KEY FUNCTION
OSD Key Function
Activates and exit the OSD
Select input source, and select the OSD menu
Move the OSD menu and auto adjustment of RGB source
Decrease the level of volume and move the previous menu
Increase the level of volume and select rhe OSD menu
Turns the power ON or OFF. There will be a few seconds
delay before the display appears. The power LED (next to the
power switch) lights with green when the power is turned ON.
The power is turned off by pressing the power switch again
and the power LED goes red.
9
Page 10
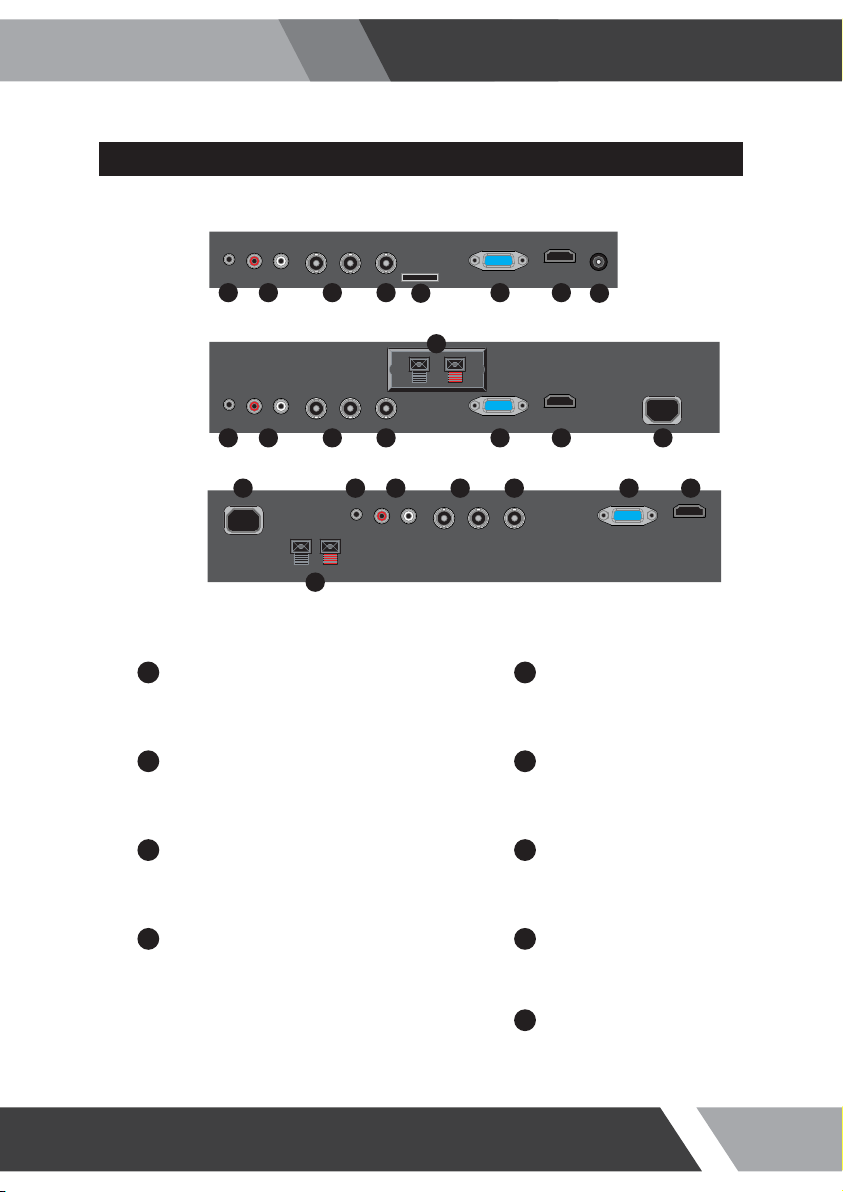
CONNECTION
10 inches
19, 23 inches
Installation and User's Guide
3567 4
8
2
89
20, 27, 32 inches
1
2
3 7
4 8
1 23567
AC POWER
AC100~240V input
HDMI
HDMI signal input
VGA
VGA (PC RGB) signal input
CAMERA OUT
CAMERA signal looping out
4
4
8
5
VIDEO IN / OUT
VIDEO signal input / looping out
6
AUDIO (VIDEO)
Stereo audio input for VIDEO or S-VIDEO
123567
AUDIO (PC)
Stereo audio input for VGA
DC POWER
DC power input
9
MICRO SD CARD (Option)
Micro SD Memory card slot
10
Page 11
Installation and User's Guide
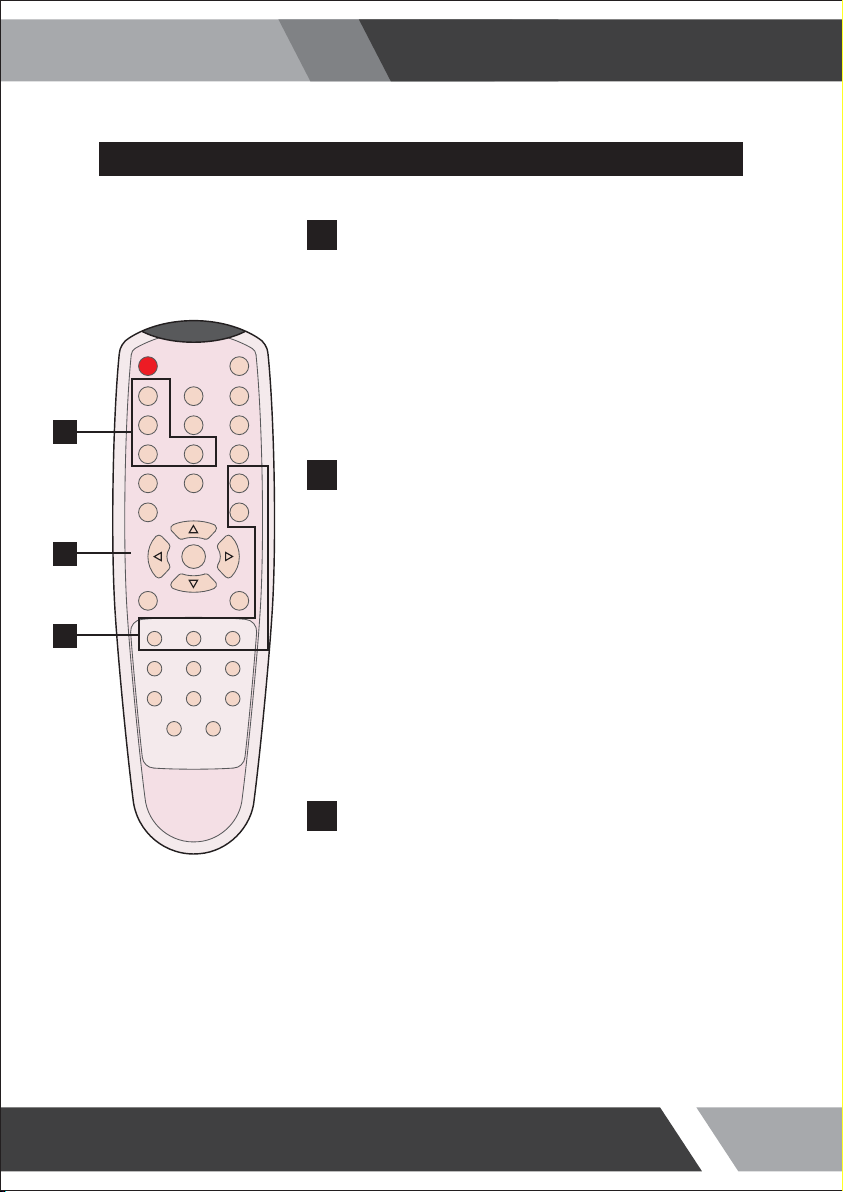
REMOTE CONTROLLER
MODE SELECT MENU
A
CAMERA
Select CAMERA mode
VGA (RGB)
POWER MUTE
VIDEO
VGA
AUTO COLOR TEMP
A
CAMERA
HDMI
SCAN MODE PIP
S.SET
Select VGA mode
OSD CONTROL MENU
B
POWER
B
C
VOL- VOL+
MENU/EXIT
P.INPUT P.LOCATION P.SIZE
KEY LOCK
Turn ON / OFF the monitor
AUTO
Auto adjust position of the screen (in VGA mode)
SCAN MODE
Select the scan mode of the screen
MENU / EXIT
Activate and exit the OSD menu
VIDEO
Select VIDEO mode
HDMI
Select HDMI mode
MUTE
Turn ON / OFF the sound
COLOR TEMPERATURE
Select color temperature of the screen
VOL- / VOL+
Increase / Decrease the volume level
KEY LOCK
Locking the button (Prevent operation)
PIP CONTROL MENU
C
S. SET
Select between main and PIP audio input
P. INPUT
Select an input source for PIP mode
P. SIZE
Select a size for PIP mode
PIP
Activates PIP/PBP mode
P. LOCATION
Select a location for PIP mode
11
Page 12

4. OSD MENU SETTING
4-1 Mode Setting
Installation and User's Guide
CAMERA
VIDEO
RGB PC
√
HDMI
INPUT
1.
Use SOURCE button and then / button to move the
source.
2.
Press the button to select the source.
3.
Press the MENU/EXIT button to exit the INPUT menu.
▼/▲:MOVE ▶:ENTER
Inputs can be set to CAMERA, VIDEO, RGB PC & HDMI mode
CAMERA
Select CAMERA mode
RGB PC
Select VGA mode
VIDEO
Select VIDEO mode
HDM
Select HDMI mode
12
Page 13

4-2 Menu Setting (CAMERA, VIDEO Mode)
PICTURE
PICTURE
PICTURE
CONTRAST
BRIGHTNESS
SCREEN
COLOR
TINT
SHARPNESS
SETUP
COLOR TEMP ◀ MEDIUM
RED
RGB
GREEN
SETUP
BLUE
SCAN MODE ◀ FULL
CYCLE
SETUP
PVM
SETUP
▼/▲ : MOVE ◀/▶ : ADJUST ▶ : ENTER MENU : EXIT VER : *.*
Installation and User's Guide
1.
Press the MENU/EXIT key to access menu.
2.
60%
50%
50%
50%
50%
▶
50%
50%
50%
▶
Use the & arrow to highlight a selection.
3.
Press the /SELECT to choose an item.
4.
Use the & arrow to highlight a selection.
5.
Use the & arrow to adjust the setting on a
selected item.
CONTRAST : Adjust visual color contrast
BRIGHTNESS : Adjust color brightness
COLOR : Adjust visual color of screen TINT : Adjust tint of color
SHARPNESS : Adjust sharpness of screen
SCAN MODE :
Select the scan mode of the screen
COLOR TEMP : Switch color temperature of screen
CONTRAST BRIGHTNESS
PICTURE
PICTURE
CONTRAST
BRIGHTNESS
SCREEN
COLOR
TINT
SHARPNESS
SETUP
COLOR TEMP ◀ MEDIUM
RED
RGB
GREEN
SETUP
BLUE
SCAN MODE ◀ FULL
CYCLE
SETUP
PVM
SETUP
▼/▲ : MOVE ◀/▶ : ADJUST ▶ : ENTER MENU : EXIT VER : *.*
60%
50%
50%
50%
50%
▶
50%
50%
50%
▶
PICTURE
PICTURE
CONTRAST
BRIGHTNESS
SCREEN
COLOR
TINT
SHARPNESS
SETUP
COLOR TEMP ◀ MEDIUM
RED
RGB
GREEN
SETUP
BLUE
SCAN MODE ◀ FULL
CYCLE
SETUP
PVM
SETUP
▼/▲ : MOVE ◀/▶ : ADJUST ▶ : ENTER MENU : EXIT VER : *.*
▶
▶
60%
50%
50%
50%
50%
50%
50%
50%
Default setting is 60% and adjustable from range of 0 to 100% Default setting is 50% and adjustable from range of 0 to 100%
13
Page 14

COLOR TINT
Installation and User's Guide
PICTURE
PICTURE
CONTRAST
BRIGHTNESS
SCREEN
COLOR
TINT
SHARPNESS
SETUP
COLOR TEMP ◀ MEDIUM
RED
RGB
GREEN
SETUP
BLUE
SCAN MODE ◀ FULL
CYCLE
SETUP
PVM
SETUP
▼/▲ : MOVE ◀/▶ : ADJUST ▶ : ENTER MENU : EXIT VER : *.*
60%
50%
50%
50%
50%
▶
50%
50%
50%
▶
PICTURE
PICTURE
CONTRAST
BRIGHTNESS
SCREEN
COLOR
TINT
SHARPNESS
SETUP
COLOR TEMP ◀ MEDIUM
RED
RGB
GREEN
SETUP
BLUE
SCAN MODE ◀ FULL
CYCLE
SETUP
PVM
SETUP
▼/▲ : MOVE ◀/▶ : ADJUST ▶ : ENTER MENU : EXIT VER : *.*
▶
▶
60%
50%
50%
50%
50%
50%
50%
50%
Default setting is 50% and adjustable from range of 0 to 100% Default setting is 50% and adjustable from range of 0 to 100%
SHARPNESS COLOR TEMP
PICTURE
PICTURE
CONTRAST
BRIGHTNESS
SCREEN
COLOR
TINT
SHARPNESS
SETUP
COLOR TEMP ◀ MEDIUM
RED
RGB
GREEN
SETUP
BLUE
SCAN MODE ◀ FULL
CYCLE
SETUP
PVM
SETUP
▼/▲ : MOVE ◀/▶ : ADJUST ▶ : ENTER MENU : EXIT VER : *.*
60%
50%
50%
50%
50%
▶
50%
50%
50%
▶
PICTURE
PICTURE
CONTRAST
BRIGHTNESS
SCREEN
COLOR
TINT
SHARPNESS
SETUP
COLOR TEMP ◀ MEDIUM
RED
RGB
GREEN
SETUP
BLUE
SCAN MODE ◀ FULL
CYCLE
SETUP
PVM
SETUP
▼/▲ : MOVE ◀/▶ : ADJUST ▶ : ENTER MENU : EXIT VER : *.*
▶
▶
60%
50%
50%
50%
50%
50%
50%
50%
Default setting is 50% and adjustable from range of 0 to 100% Default setting is MEDIUM and switch to WARM, USER and
COOL color temperature options
USER - Default setting of RED, GREEN, BLUE is 50% and
adjustable from range of 0 to 100%
14
Page 15

SCAN MODE
PICTURE
PICTURE
CONTRAST
BRIGHTNESS
SCREEN
COLOR
TINT
SHARPNESS
SETUP
COLOR TEMP ◀ MEDIUM
RED
RGB
GREEN
SETUP
BLUE
SCAN MODE ◀ FULL
CYCLE
SETUP
PVM
SETUP
▼/▲ : MOVE ◀/▶ : ADJUST ▶ : ENTER MENU : EXIT VER : *.*
60%
50%
50%
50%
50%
▶
50%
50%
50%
▶
Default setting is FULL, switch to UNDER and OVER scan
mode options
Installation and User's Guide
15
Page 16

Installation and User's Guide
SETUP
1.
SETUP
PICTURE
INPUT
LANGUAGE
SCREEN
SOUND MUTE
BUTTON LOCK
NOISE REDUCTION
SETUP
OSD TIME
DEFAULT
RGB
SETUP
CYCLE
SETUP
PVM
SETUP
▼/▲ : MOVE ◀/▶ : ADJUST ▶ : ENTER MENU : EXIT VER : *.*
◀ CAMERA
◀ ENGLISH
◀ OFF
◀ OFF
◀ ON
▶
▶
▶
▶
▶
▶
15s
INPUT : Select an input source for main screen LANGUAGE : Set to different language mode
SOUND MUTE : Turn on/off the sound BUTTON LOCK : Locking the button (Prevent operation)
NOISE REDUCTION : Set a noise reduction mode OSD TIME : Set a time duration of OSD menu
DEFAULT : Factory default setting
Press the MENU/EXIT key to access menu.
2.
Use the & arrow to highlight a selection.
3.
Press the /SELECT to choose an item.
4.
Use the & arrow to highlight a selection.
5.
Use the & arrow to adjust the setting on a
selected item.
INPUT LANGUAGE
SETUP
PICTURE
INPUT
LANGUAGE
SCREEN
SOUND MUTE
BUTTON LOCK
NOISE REDUCTION
SETUP
OSD TIME
DEFAULT
RGB
SETUP
CYCLE
SETUP
PVM
SETUP
▼/▲ : MOVE ◀/▶ : ADJUST ▶ : ENTER MENU : EXIT VER : *.*
◀ CAMERA
◀ ENGLISH
◀ OFF
◀ OFF
◀ ON
▶
▶
▶
▶
▶
▶
Inputs can be set to CAMERA, VIDEO, RGB PC, and
HDMI mode
15s
PICTURE
INPUT
LANGUAGE
SCREEN
SOUND MUTE
BUTTON LOCK
NOISE REDUCTION
SETUP
OSD TIME
DEFAULT
RGB
SETUP
CYCLE
SETUP
PVM
SETUP
▼/▲ : MOVE ◀/▶ : ADJUST ▶ : ENTER MENU : EXIT VER : *.*
Default setting is ENGLISH and language setting can be set
to ITALIAN, FRENCH, SPANISH and GERMAN
SETUP
◀ CAMERA
◀ ENGLISH
◀ OFF
◀ OFF
◀ ON
▶
▶
▶
▶
▶
▶
15s
16
Page 17

Installation and User's Guide
SOUND MUTE BUTTON LOCK
SETUP
PICTURE
INPUT
LANGUAGE
SCREEN
SOUND MUTE
BUTTON LOCK
NOISE REDUCTION
SETUP
OSD TIME
DEFAULT
RGB
SETUP
CYCLE
SETUP
PVM
SETUP
▼/▲ : MOVE ◀/▶ : ADJUST ▶ : ENTER MENU : EXIT VER : *.*
◀ CAMERA
◀ ENGLISH
◀ OFF
◀ OFF
◀ ON
▶
▶
▶
▶
▶
▶
15s
Default setting is OFF and switch to ON sound mute option
PICTURE
SCREEN
SETUP
RGB
SETUP
CYCLE
SETUP
PVM
SETUP
▼/▲ : MOVE ◀/▶ : ADJUST ▶ : ENTER MENU : EXIT VER : *.*
Default setting is OFF and switch to ON button lock option
Release the lock - Press KEY LOCK button on the remote control
- Press & button on the key pad
NOISE REDUCTION OSD TIME
SETUP
PICTURE
INPUT
LANGUAGE
SCREEN
SOUND MUTE
BUTTON LOCK
NOISE REDUCTION
SETUP
OSD TIME
DEFAULT
RGB
SETUP
CYCLE
SETUP
PVM
SETUP
▼/▲ : MOVE ◀/▶ : ADJUST ▶ : ENTER MENU : EXIT VER : *.*
◀ CAMERA
◀ ENGLISH
◀ OFF
◀ OFF
◀ ON
▶
▶
▶
▶
▶
▶
15s
Default setting is ON and switch to OFF noise reduction option
PICTURE
SCREEN
SETUP
RGB
SETUP
CYCLE
SETUP
PVM
SETUP
▼/▲ : MOVE ◀/▶ : ADJUST ▶ : ENTER MENU : EXIT VER : *.*
Default setting is 15s and adjustable from range of 5 to 30s
SETUP
INPUT
LANGUAGE
SOUND MUTE
BUTTON LOCK
NOISE REDUCTION
OSD TIME
DEFAULT
SETUP
INPUT
LANGUAGE
SOUND MUTE
BUTTON LOCK
NOISE REDUCTION
OSD TIME
DEFAULT
◀ CAMERA
◀ ENGLISH
◀ OFF
◀ OFF
◀ ON
▶
◀ CAMERA
◀ ENGLISH
◀ OFF
◀ OFF
◀ ON
▶
▶
▶
▶
▶
▶
15s
▶
▶
▶
▶
▶
15s
17
Page 18

DEFAULT
SETUP
PICTURE
INPUT
LANGUAGE
SCREEN
SOUND MUTE
BUTTON LOCK
NOISE REDUCTION
SETUP
OSD TIME
DEFAULT
RGB
SETUP
CYCLE
SETUP
PVM
SETUP
▼/▲ : MOVE ◀/▶ : ADJUST ▶ : ENTER MENU : EXIT VER : *.*
◀ CAMERA
◀ ENGLISH
◀ OFF
◀ OFF
◀ ON
▶
DEFAULT is set OSD menu to factory default
Installation and User's Guide
▶
▶
▶
▶
▶
15s
18
Page 19

Installation and User's Guide
CYCLE SETUP
Press the MENU/EXIT key to access menu.
CYCLE SETUP
PICTURE
CYCLE TIME
CYCLE
SCREEN
CAMERA
VIDEO
RGB PC
SETUP
HDMI
RGB
SETUP
CYCLE
SETUP
PVM
SETUP
▼/▲ : MOVE ◀/▶ : ADJUST ▶ : ENTER MENU : EXIT VER : *.*
◀ OFF
◀ OFF
◀ OFF
◀ OFF
◀ OFF
10s
▶
▶
▶
▶
▶
CYCLE TIME : Adjust cycle time to displayed on the screen CYCLE : Selected mode keep change continuously
CYCLE TIME CYCLE
1.
Use the & arrow to highlight a selection.
2.
Press the /SELECT to choose an item.
3.
Use the & arrow to highlight a selection.
4.
Use the & arrow to adjust the setting on a
5.
selected item.
CYCLE SETUP
PICTURE
CYCLE TIME
CYCLE
SCREEN
CAMERA
VIDEO
RGB PC
SETUP
HDMI
RGB
SETUP
CYCLE
SETUP
PVM
SETUP
▼/▲ : MOVE ◀/▶ : ADJUST ▶ : ENTER MENU : EXIT VER : *.*
◀ OFF
◀ OFF
◀ OFF
◀ OFF
◀ OFF
10s
▶
▶
▶
▶
▶
Default setting is 10s and adjustable from range of 10 to 30s
CYCLE SETUP
PICTURE
CYCLE TIME
CYCLE
SCREEN
CAMERA
VIDEO
RGB PC
SETUP
HDMI
RGB
SETUP
CYCLE
SETUP
PVM
SETUP
▼/▲ : MOVE ◀/▶ : ADJUST ▶ : ENTER MENU : EXIT VER : *.*
◀ OFF
◀ OFF
◀ OFF
◀ OFF
◀ OFF
Default setting is OFF and switch to ON cycle option
10s
▶
▶
▶
▶
▶
19
Page 20

Installation and User's Guide
PVM SETUP
Press the MENU/EXIT key to access menu.
PVM SETUP
PICTURE
MOTION MODE
MOTION INPUT
SCREEN
SETUP
RGB
SETUP
CYCLE
SETUP
PVM
SETUP
▼/▲ : MOVE ◀/▶ : ADJUST ▶ : ENTER MENU : EXIT VER : *.*
◀ OFF
◀ CAMERA
▶
▶
MOTION MODE : Set the PIR sensor mode
MOTION INPUT : Select the input source of PIR sensor mode
MOTION MODE MOTION INPUT
1.
Use the & arrow to highlight a selection.
2.
Press the /SELECT to choose an item.
3.
Use the & arrow to highlight a selection.
4.
Use the & arrow to adjust the setting on a
5.
selected item.
PVM SETUP
PICTURE
MOTION MODE
MOTION INPUT
SCREEN
SETUP
RGB
SETUP
CYCLE
SETUP
PVM
SETUP
▼/▲ : MOVE ◀/▶ : ADJUST ▶ : ENTER MENU : EXIT VER : *.*
◀ OFF
◀ CAMERA
▶
▶
Default setting is OFF and switch to FULL mode options
PVM SETUP
PICTURE
MOTION MODE
MOTION INPUT
SCREEN
SETUP
RGB
SETUP
CYCLE
SETUP
PVM
SETUP
▼/▲ : MOVE ◀/▶ : ADJUST ▶ : ENTER MENU : EXIT VER : *.*
◀ OFF
◀ CAMERA
▶
▶
Inputs can be set to CAMERA, VIDEO, RGB PC and HDMI
mode
20
Page 21

4-3 Menu Setting (VGA Mode)
PICTURE
PICTURE
PICTURE
CONTRAST
BRIGHTNESS
SCREEN
COLOR
TINT
SHARPNESS
SETUP
COLOR TEMP ◀ MEDIUM
RED
RGB
GREEN
SETUP
BLUE
SCAN MODE ◀ FULL
CYCLE
SETUP
PVM
SETUP
▼/▲ : MOVE ◀/▶ : ADJUST ▶ : ENTER MENU : EXIT VER : *.*
Installation and User's Guide
1.
Press the MENU/EXIT key to access menu.
2.
60%
50%
50%
50%
50%
▶
50%
50%
50%
▶
Use the & arrow to highlight a selection.
3.
Press the /SELECT to choose an item.
4.
Use the & arrow to highlight a selection.
5.
Use the & arrow to adjust the setting on a
selected item.
CONTRAST : Adjust visual color contrast
BRIGHTNESS : Adjust color brightness
COLOR TEMP : Switch color temperature of screen
CONTRAST BRIGHTNESS
PICTURE
PICTURE
CONTRAST
BRIGHTNESS
SCREEN
COLOR
TINT
SHARPNESS
SETUP
COLOR TEMP ◀ MEDIUM
RED
RGB
GREEN
SETUP
BLUE
SCAN MODE ◀ FULL
CYCLE
SETUP
PVM
SETUP
▼/▲ : MOVE ◀/▶ : ADJUST ▶ : ENTER MENU : EXIT VER : *.*
60%
50%
50%
50%
50%
▶
50%
50%
50%
▶
PICTURE
PICTURE
CONTRAST
BRIGHTNESS
SCREEN
COLOR
TINT
SHARPNESS
SETUP
COLOR TEMP ◀ MEDIUM
RED
RGB
GREEN
SETUP
BLUE
SCAN MODE ◀ FULL
CYCLE
SETUP
PVM
SETUP
▼/▲ : MOVE ◀/▶ : ADJUST ▶ : ENTER MENU : EXIT VER : *.*
60%
50%
50%
50%
50%
▶
50%
50%
50%
▶
Default setting is 60% and adjustable from range of 0 to 100% Default setting is 50% and adjustable from range of 0 to 100%
21
Page 22

COLOR TEMP
PICTURE
PICTURE
CONTRAST
BRIGHTNESS
SCREEN
COLOR
TINT
SHARPNESS
SETUP
COLOR TEMP ◀ MEDIUM
RED
RGB
GREEN
SETUP
BLUE
SCAN MODE ◀ FULL
CYCLE
SETUP
PVM
SETUP
▼/▲ : MOVE ◀/▶ : ADJUST ▶ : ENTER MENU : EXIT VER : *.*
60%
50%
50%
50%
50%
▶
50%
50%
50%
▶
Default setting is MEDIUM and switch to WARM, USER and
COOL color temperature options
USER - Default setting of RED, GREEN, BLUE is 50% and
adjustable from range of 0 to 100%
Installation and User's Guide
SCREEN
SCREEN
PICTURE
PIP
PIP INPUT
SCREEN
PIP SIZE
PIP R/T
SETUP
RGB
SETUP
CYCLE
SETUP
PVM
SETUP
▼/▲ : MOVE ◀/▶ : ADJUST ▶ : ENTER MENU : EXIT VER : *.*
PIP : Activates PIP/PBP mode
◀ OFF
◀ VIDEO
◀ SMALL
◀ R/B
1.
Press the MENU/EXIT key to access menu.
▶
▶
▶
▶
2.
Use the & arrow to highlight a selection.
3.
Press the /SELECT to choose an item.
4.
Use the & arrow to highlight a selection.
5.
Use the & arrow to adjust the setting on a
selected item.
22
Page 23

PIP
SCREEN
PICTURE
PIP
PIP INPUT
SCREEN
PIP SIZE
PIP R/T
SETUP
RGB
SETUP
CYCLE
SETUP
PVM
SETUP
▼/▲ : MOVE ◀/▶ : ADJUST ▶ : ENTER MENU : EXIT VER : *.*
◀ OFF
◀ VIDEO
◀ SMALL
◀ R/B
▶
▶
▶
▶
Default setting is OFF and switch to ON, DW1 and DW2
PIP/PBP mode options
ON- PIP INPUT : Select an input source for PIP mode
(CAMERA, VIDEO)
PIP SIZE : Select a size for PIP mode
(SMALL, NORMAL, LARGE)
PIP R/T : Select a location for PIP mode
(R/B, L/B, R/T, L/T)
Installation and User's Guide
SETUP
SETUP
PICTURE
INPUT
LANGUAGE
SCREEN
SOUND MUTE
BUTTON LOCK
NOISE REDUCTION
SETUP
OSD TIME
DEFAULT
RGB
SETUP
CYCLE
SETUP
PVM
SETUP
▼/▲ : MOVE ◀/▶ : ADJUST ▶ : ENTER MENU : EXIT VER : *.*
This function of each menu is listed page 16
Please refer to page 16 for SETUP menu
◀ CAMERA
◀ ENGLISH
◀ OFF
◀ OFF
◀ ON
▶
1.
Press the MENU/EXIT key to access menu.
▶
▶
▶
▶
▶
15s
2.
Use the & arrow to highlight a selection.
3.
Press the /SELECT to choose an item.
4.
Use the & arrow to highlight a selection.
5.
Use the & arrow to adjust the setting on a
selected item.
23
Page 24

Installation and User's Guide
RGB SETUP
Press the MENU/EXIT key to access menu.
RGB SETUP
PICTURE
H-POSITION
V-POSITION
SCREEN
CLOCK
PHASE
AUTO ADJUST
SETUP
POWER SAVING
AUTO REPEAT
RGB
SETUP
CYCLE
SETUP
PVM
SETUP
▼/▲ : MOVE ◀/▶ : ADJUST ▶ : ENTER MENU : EXIT VER : *.*
▶
◀ OFF
◀ OFF
100%
▶
▶
H-POSITION : Adjust horizontal position of monitor V-POSITION : Adjust vertical position of monitor
CLOCK : Adjust clock of monitor PHASE : Adjust phase of monitor
AUTO ADJUST : Auto adjust position of screen POWER SAVING : Power saving mode
AUTO REPEAT : Adjust auto repeat of monitor
1.
Use the & arrow to highlight a selection.
2.
0%
0%
0%
Press the /SELECT to choose an item.
3.
Use the & arrow to highlight a selection.
4.
Use the & arrow to adjust the setting on a
5.
selected item.
H-POSITION V-POSITION
RGB SETUP
PICTURE
H-POSITION
V-POSITION
SCREEN
CLOCK
PHASE
AUTO ADJUST
SETUP
POWER SAVING
AUTO REPEAT
RGB
SETUP
CYCLE
SETUP
PVM
SETUP
▼/▲ : MOVE ◀/▶ : ADJUST ▶ : ENTER MENU : EXIT VER : *.*
▶
◀ OFF
◀ OFF
100%
0%
0%
0%
▶
▶
Can be set between 0 to 100% horizontal position of monitor
by manually
PICTURE
H-POSITION
V-POSITION
SCREEN
CLOCK
PHASE
AUTO ADJUST
SETUP
POWER SAVING
AUTO REPEAT
RGB
SETUP
CYCLE
SETUP
PVM
SETUP
▼/▲ : MOVE ◀/▶ : ADJUST ▶ : ENTER MENU : EXIT VER : *.*
Can be set between 0 to 100% vertical position of monitor
by manually
RGB SETUP
▶
◀ OFF
◀ OFF
100%
0%
0%
0%
▶
▶
24
Page 25

CLOCK PHASE
Installation and User's Guide
RGB SETUP
PICTURE
H-POSITION
V-POSITION
SCREEN
CLOCK
PHASE
AUTO ADJUST
SETUP
POWER SAVING
AUTO REPEAT
RGB
SETUP
CYCLE
SETUP
PVM
SETUP
▼/▲ : MOVE ◀/▶ : ADJUST ▶ : ENTER MENU : EXIT VER : *.*
▶
◀ OFF
◀ OFF
100%
0%
0%
0%
▶
▶
RGB SETUP
PICTURE
H-POSITION
V-POSITION
SCREEN
CLOCK
PHASE
AUTO ADJUST
SETUP
POWER SAVING
AUTO REPEAT
RGB
SETUP
CYCLE
SETUP
PVM
SETUP
▼/▲ : MOVE ◀/▶ : ADJUST ▶ : ENTER MENU : EXIT VER : *.*
Can be set between 0 to 100% phase of monitor by manuallyCan be set between 0 to 100% clock of monitor by manually
AUTO ADJUST POWER SAVING
RGB SETUP
PICTURE
H-POSITION
V-POSITION
SCREEN
CLOCK
PHASE
AUTO ADJUST
SETUP
POWER SAVING
AUTO REPEAT
RGB
SETUP
CYCLE
SETUP
PVM
SETUP
▼/▲ : MOVE ◀/▶ : ADJUST ▶ : ENTER MENU : EXIT VER : *.*
▶
◀ OFF
◀ OFF
100%
0%
0%
0%
▶
▶
RGB SETUP
PICTURE
H-POSITION
V-POSITION
SCREEN
CLOCK
PHASE
AUTO ADJUST
SETUP
POWER SAVING
AUTO REPEAT
RGB
SETUP
CYCLE
SETUP
PVM
SETUP
▼/▲ : MOVE ◀/▶ : ADJUST ▶ : ENTER MENU : EXIT VER : *.*
Default setting is OFF and switch to ON power saving modeAuto adjust position and image of screen
▶
◀ OFF
◀ OFF
▶
◀ OFF
◀ OFF
100%
0%
0%
0%
▶
▶
100%
0%
0%
0%
▶
▶
AUTO REPEAT
RGB SETUP
PICTURE
H-POSITION
V-POSITION
SCREEN
CLOCK
PHASE
AUTO ADJUST
SETUP
POWER SAVING
AUTO REPEAT
RGB
SETUP
CYCLE
SETUP
PVM
SETUP
▼/▲ : MOVE ◀/▶ : ADJUST ▶ : ENTER MENU : EXIT VER : *.*
▶
◀ OFF
◀ OFF
100%
0%
0%
0%
▶
▶
Default setting is OFF and switch to ON auto repeat mode
25
Page 26

CYCLE SETUP
CYCLE SETUP
PICTURE
CYCLE TIME
CYCLE
SCREEN
CAMERA
VIDEO
RGB PC
SETUP
HDMI
RGB
SETUP
CYCLE
SETUP
PVM
SETUP
▼/▲ : MOVE ◀/▶ : ADJUST ▶ : ENTER MENU : EXIT VER : *.*
This function of each menu is listed page 19
Please refer to page 19 for CYCLE SETUP menu
◀ OFF
◀ OFF
◀ OFF
◀ OFF
◀ OFF
Installation and User's Guide
Press the MENU/EXIT key to access menu.
1.
10s
▶
▶
▶
▶
▶
Use the & arrow to highlight a selection.
2.
Press the /SELECT to choose an item.
3.
Use the & arrow to highlight a selection.
4.
Use the & arrow to adjust the setting on a
5.
selected item.
PVM SETUP
Press the MENU/EXIT key to access menu.
PVM SETUP
PICTURE
MOTION MODE
MOTION INPUT
SCREEN
SETUP
RGB
SETUP
CYCLE
SETUP
PVM
SETUP
▼/▲ : MOVE ◀/▶ : ADJUST ▶ : ENTER MENU : EXIT VER : *.*
◀ OFF
◀ CAMERA
▶
▶
MOTION MODE : Set the PIR sensor mode
MOTION INPUT : Select the input source of PIR sensor mode
1.
Use the & arrow to highlight a selection.
2.
Press the /SELECT to choose an item.
3.
Use the & arrow to highlight a selection.
4.
Use the & arrow to adjust the setting on a
5.
selected item.
26
Page 27

Installation and User's Guide
MOTION MODE MOTION INPUT
PVM SETUP
PICTURE
MOTION MODE
MOTION INPUT
SCREEN
SETUP
RGB
SETUP
CYCLE
SETUP
PVM
SETUP
▼/▲ : MOVE ◀/▶ : ADJUST ▶ : ENTER MENU : EXIT VER : *.*
◀ OFF
◀ CAMERA
▶
▶
Default setting is OFF and switch to FULL, PIP, DW1 and
DW2 mode options
VGA / DVI / HDMI Mode Tables
VGA Mode
MODE
VGA
SVGA 800X600 50 / 60 / 72 / 75
XGA 1024X768 50 / 60 / 75
SXGA 1280X1024 50 / 60 / 75
RESOLUTION VERTICAL FREQUENCY (Hz)
720X400 70
640X480 60 / 72 75
PVM SETUP
PICTURE
MOTION MODE
MOTION INPUT
SCREEN
SETUP
RGB
SETUP
CYCLE
SETUP
PVM
SETUP
▼/▲ : MOVE ◀/▶ : ADJUST ▶ : ENTER MENU : EXIT VER : *.*
◀ OFF
◀ CAMERA
▶
▶
Inputs can be set to CAMERA, VIDEO, RGB PC and HDMI
mode
HDMI Mode
EDTV 480i
EDTV 576i
SDTV 480p
RESOLUTION VERTICAL FREQUENCY (Hz)MODE
720X480 30
720X576 25
720X480 60
SDTV 576p 720X576 60
HDTV 720p 1280X720 50 / 60
HDTV 1080i 1920X1080 30 / 25
HDTV 1080p 1920X1080 50 / 60
Note : Not all resolutions generated by your video source are available on the monitor.
27
Page 28

4-4 Menu Setting (HDMI Mode)
PICTURE
PICTURE
PICTURE
CONTRAST
BRIGHTNESS
SCREEN
COLOR
TINT
SHARPNESS
SETUP
COLOR TEMP ◀ MEDIUM
RED
RGB
GREEN
SETUP
BLUE
SCAN MODE ◀ FULL
CYCLE
SETUP
PVM
SETUP
▼/▲ : MOVE ◀/▶ : ADJUST ▶ : ENTER MENU : EXIT VER : *.*
Installation and User's Guide
1.
Press the MENU/EXIT key to access menu.
2.
60%
50%
50%
50%
50%
▶
50%
50%
50%
▶
Use the & arrow to highlight a selection.
3.
Press the /SELECT to choose an item.
4.
Use the & arrow to highlight a selection.
5.
Use the & arrow to adjust the setting on a
selected item.
CONTRAST : Adjust visual color contrast
BRIGHTNESS : Adjust color brightness
COLOR : Adjust visual color of screen TINT : Adjust tint of color
SHARPNESS : Adjust sharpness of screen COLOR TEMP : Switch color temperature of screen
CONTRAST BRIGHTNESS
PICTURE
PICTURE
CONTRAST
BRIGHTNESS
SCREEN
COLOR
TINT
SHARPNESS
SETUP
COLOR TEMP ◀ MEDIUM
RED
RGB
GREEN
SETUP
BLUE
SCAN MODE ◀ FULL
CYCLE
SETUP
PVM
SETUP
▼/▲ : MOVE ◀/▶ : ADJUST ▶ : ENTER MENU : EXIT VER : *.*
60%
50%
50%
50%
50%
▶
50%
50%
50%
▶
PICTURE
PICTURE
CONTRAST
BRIGHTNESS
SCREEN
COLOR
TINT
SHARPNESS
SETUP
COLOR TEMP ◀ MEDIUM
RED
RGB
GREEN
SETUP
BLUE
SCAN MODE ◀ FULL
CYCLE
SETUP
PVM
SETUP
▼/▲ : MOVE ◀/▶ : ADJUST ▶ : ENTER MENU : EXIT VER : *.*
60%
50%
50%
50%
50%
▶
50%
50%
50%
▶
Default setting is 60% and adjustable from range of 0 to 100% Default setting is 50% and adjustable from range of 0 to 100%
28
Page 29

COLOR TINT
Installation and User's Guide
PICTURE
PICTURE
CONTRAST
BRIGHTNESS
SCREEN
COLOR
TINT
SHARPNESS
SETUP
COLOR TEMP ◀ MEDIUM
RED
RGB
GREEN
SETUP
BLUE
SCAN MODE ◀ FULL
CYCLE
SETUP
PVM
SETUP
▼/▲ : MOVE ◀/▶ : ADJUST ▶ : ENTER MENU : EXIT VER : *.*
60%
50%
50%
50%
50%
▶
50%
50%
50%
▶
PICTURE
PICTURE
CONTRAST
BRIGHTNESS
SCREEN
COLOR
TINT
SHARPNESS
SETUP
COLOR TEMP ◀ MEDIUM
RED
RGB
GREEN
SETUP
BLUE
SCAN MODE ◀ FULL
CYCLE
SETUP
PVM
SETUP
▼/▲ : MOVE ◀/▶ : ADJUST ▶ : ENTER MENU : EXIT VER : *.*
60%
50%
50%
50%
50%
▶
50%
50%
50%
▶
Default setting is 50% and adjustable from range of 0 to 100% Default setting is 50% and adjustable from range of 0 to 100%
SHARPNESS COLOR TEMP
PICTURE
PICTURE
CONTRAST
BRIGHTNESS
SCREEN
COLOR
TINT
SHARPNESS
SETUP
COLOR TEMP ◀ MEDIUM
RED
RGB
GREEN
SETUP
BLUE
SCAN MODE ◀ FULL
CYCLE
SETUP
PVM
SETUP
▼/▲ : MOVE ◀/▶ : ADJUST ▶ : ENTER MENU : EXIT VER : *.*
60%
50%
50%
50%
50%
▶
50%
50%
50%
▶
PICTURE
PICTURE
CONTRAST
BRIGHTNESS
SCREEN
COLOR
TINT
SHARPNESS
SETUP
COLOR TEMP ◀ MEDIUM
RED
RGB
GREEN
SETUP
BLUE
SCAN MODE ◀ FULL
CYCLE
SETUP
PVM
SETUP
▼/▲ : MOVE ◀/▶ : ADJUST ▶ : ENTER MENU : EXIT VER : *.*
60%
50%
50%
50%
50%
▶
50%
50%
50%
▶
Default setting is 50% and adjustable from range of 0 to 100% Default setting is MEDIUM and switch to WARM, USER and
COOL color temperature options
USER - Default setting of RED, GREEN, BLUE is 50% and
adjustable from range of 0 to 100%
29
Page 30

SCREEN
SCREEN
PICTURE
PIP
PIP INPUT
SCREEN
PIP SIZE
PIP R/T
SETUP
RGB
SETUP
CYCLE
SETUP
PVM
SETUP
▼/▲ : MOVE ◀/▶ : ADJUST ▶ : ENTER MENU : EXIT VER : *.*
◀ OFF
◀ VIDEO
◀ SMALL
◀ R/B
This function of each menu is listed page 22
Please refer to page 22 for SCREEN menu
SETUP
Installation and User's Guide
1.
Press the MENU/EXIT key to access menu.
▶
▶
▶
▶
2.
Use the & arrow to highlight a selection.
3.
Press the /SELECT to choose an item.
4.
Use the & arrow to highlight a selection.
5.
Use the & arrow to adjust the setting on a
selected item.
SETUP
PICTURE
INPUT
LANGUAGE
SCREEN
SOUND MUTE
BUTTON LOCK
NOISE REDUCTION
SETUP
OSD TIME
DEFAULT
RGB
SETUP
CYCLE
SETUP
PVM
SETUP
▼/▲ : MOVE ◀/▶ : ADJUST ▶ : ENTER MENU : EXIT VER : *.*
◀ CAMERA
◀ ENGLISH
◀ OFF
◀ OFF
◀ ON
▶
This function of each menu is listed page 16
Please refer to page 16 for SETUP menu
1.
Press the MENU/EXIT key to access menu.
▶
▶
▶
▶
▶
15s
2.
Use the & arrow to highlight a selection.
3.
Press the /SELECT to choose an item.
4.
Use the & arrow to highlight a selection.
5.
Use the & arrow to adjust the setting on a
selected item.
30
Page 31

CYCLE SETUP
CYCLE SETUP
PICTURE
CYCLE TIME
CYCLE
SCREEN
CAMERA
VIDEO
RGB PC
SETUP
HDMI
RGB
SETUP
CYCLE
SETUP
PVM
SETUP
▼/▲ : MOVE ◀/▶ : ADJUST ▶ : ENTER MENU : EXIT VER : *.*
◀ OFF
◀ OFF
◀ OFF
◀ OFF
◀ OFF
This function of each menu is listed page 19
Please refer to page 19 for CYCLE SETUP menu
PVM SETUP
Installation and User's Guide
Press the MENU/EXIT key to access menu.
1.
10s
▶
▶
▶
▶
▶
Use the & arrow to highlight a selection.
2.
Press the /SELECT to choose an item.
3.
Use the & arrow to highlight a selection.
4.
Use the & arrow to adjust the setting on a
5.
selected item.
PVM SETUP
PICTURE
MOTION MODE
MOTION INPUT
SCREEN
SETUP
RGB
SETUP
CYCLE
SETUP
PVM
SETUP
▼/▲ : MOVE ◀/▶ : ADJUST ▶ : ENTER MENU : EXIT VER : *.*
◀ OFF
◀ CAMERA
This function of each menu is listed page 26
Please refer to page 26 for PVM SETUP menu
Press the MENU/EXIT key to access menu.
1.
▶
▶
Use the & arrow to highlight a selection.
2.
Press the /SELECT to choose an item.
3.
Use the & arrow to highlight a selection.
4.
Use the & arrow to adjust the setting on a
5.
selected item.
31
Page 32

4-5 Camera Setting
Installation and User's Guide
EXPOSURE
DAY / NIGHT
WHITE BAL.
MONITOR
IMAGE
DNR
MOTION
SYSTEM
EXIT
DAY / NIGHT / EXTERN / CDS / AUTO
GAMMA
CHROMA
SHARPNESS
SHADING
PED. LV.
BACKLIGHT
CONTRAST
POSI / NEGA
H-MIRROR
PRIVACY
CAM TITLE
CAM ID
ID DISP.
SYNC
BAUDRATE
COAXIAL
LANGUAGE
SPECIAL
ELC/ALC
ATW / PUSH / MANUAL
0.45~0.65
Adjustable
Adjustable
Adjustable
Adjustable
OFF / BLC / HLC
OFF / D-WDR / DEFOG
Selectable
OFF / ON
OFF / ON
OFF / LOW / MIDDLE / HIGH
OFF / ON
OFF / ON
Adjustable
OFF / ON
INT / L.L
2400 / 4800 / 9600 / 57600 / 115200
SPC300 / 15BIT / 32BIT
ENG / CHI
DEFECT DET.
FONT COLOR
SAVE / INITIAL
START
Selectable
32
Page 33

5. FEATURE
Installation and User's Guide
Screen Size 19.0 inches 20.1 inches 23.0 inches 31.6 inches
Resoluti on 1280*1024 pixels 1600*1200 pixels
Pixel Pitch 0.294*0.294 mm 0.255*0.255 mm 0.265*0.265 mm 0.364*0.364 mm
Brightness 250 cd/m^2 300 cd/m^2 250 cd/m^2 360 cd/m^2
Displa y
Interface
Audio Built in Speak ers Y (7.5W*2)
Transmitt er Remo te Control
Features
Special
Camera
Dimension Outline Dim ension (w Stand) 16.54*3.15*15.94 inches 18.03*3.15*16.44 inches 21.97*3.15*15.61 inches 29.61
Cabinet
Power Electrical Ratings AC 100~240 V (50/60Hz)
Circumstance
Mounts
Contrast R atio
Aspect Ratio 5:4 4:3
Viewing Angle (H/V) 170/160 degrees 178/178 degrees 178/178 degrees170/160 degrees
Displa y Color
Respo nse Time 5 ms 6 ms 5 ms
ystem
Video S
Panel Life Time (hours) 3
Video In/Out (BNC Type)
VGA In (15Pin D-Sub)
HDMI In
Audio In (RCA Type)
PC Stereo In
Multi Disp lay Function
Filter Type
Deinterlacing
Noise reductio n
Auto source sequencing
Multi Lingual Language
Motion Detection
Camera T ype
Mechanical Design
Image Sensor
S/N Ratio
Resoluti on
itivity (Normal/DSS)
Sens
Cabinet color Black
Cabinet Mat erial Electro- Galvanized Steel
Operating Temp erature
Storage Temper ature -20~60 celsi us
VESA Mounts Size
Ceiling Mo unt
Wall
10 inches
9.7 inches
1024*768 pixels
0.192*0.192 mm
350 cd/m^2
600:1
4:3
160/160 degrees
262,144
35 ms
10,000 hours
DVR Option
Digital WDR
Pin
Hole Camera
1/3" 520K Color CCD
>50dB
700 TV Lines (906H)
Min. 0.1 Lux
9.33*1.97*8.27 inches
75*75 mm
SIDE MOUNT(1/4-20), CMK-01
19 inches 20 inches 23 inches 32 inches
800:11000:1 1000:1 1400:1
16.7 millio n
0,000 hours 45,000 hours 30,000 hours 50,000 hours
-20~60 celsius
WB-5, 10, 30, 31
1/2 (Included Cam Out)
Y (1W*2)
Eng, Spa, Fre, Ger, Ita
100*100 mm
CMK-01
NTSC/PAL
1
1
1
1
Y
PIP
3D Comb Filter
Y
Y
Y
PIR Motion Sensor
Tilt Swivel Camera
SONY Super HAD CCD
1/3"
Horizontal : 650 TV Lines
0.05 /0.0001 Lux
0~50 celsius
WDR
>52dB
27 inches
27.0 inches
1920*1080 pixels
0.311*0.311 mm
250 cd/m^2
16:9
8 ms
25.79*3.15*17.85 inches
-20~65 celsius
200*200 mm
CMK-01 wit h FMA-01
WB-2642
*3.15*20.28 inches
33
Page 34

Installation and User's Guide
6. TROUBLESHOOTING
* When the following troubles are occurred, follow the trouble shooting. Before contacting a
service center.
Troubleshooting
The screen doesn’t
show up
The screen is too light
or to dark
The screen size is not fit
for the PC signal
The screen color shows
strange in the PC signal
Troubleshooting Tip
1. Make sure if the power supply is connected property
2. Turn on the power.
3. Select the input signal right for the connected port.
Control the BRIGHTNESS
Press the AUTO key among keys in the front.
(It is used only in the PC signal)
In the FUNCTION menu of OSD menu, perform the
AUTOADJUST.
34
Page 35

Page 36

 Loading...