

Page 1
INSTRUCTION MANUAL
Orion Deluxe Mini 50mm Guide Scope
with Helical Focuser
#13022
Providing Exceptional Consumer Optical Products Since 1975
OrionTelescopes.com
Customer Support (800) 676-1343
E-mail: support@telescope.com
Corporate Offices (831) 763-7000
89 Hangar Way, Watsonville, CA 95076
© 2011 Orion Telescopes & Binoculars
IN 468 Rev. A 12/12
Page 2
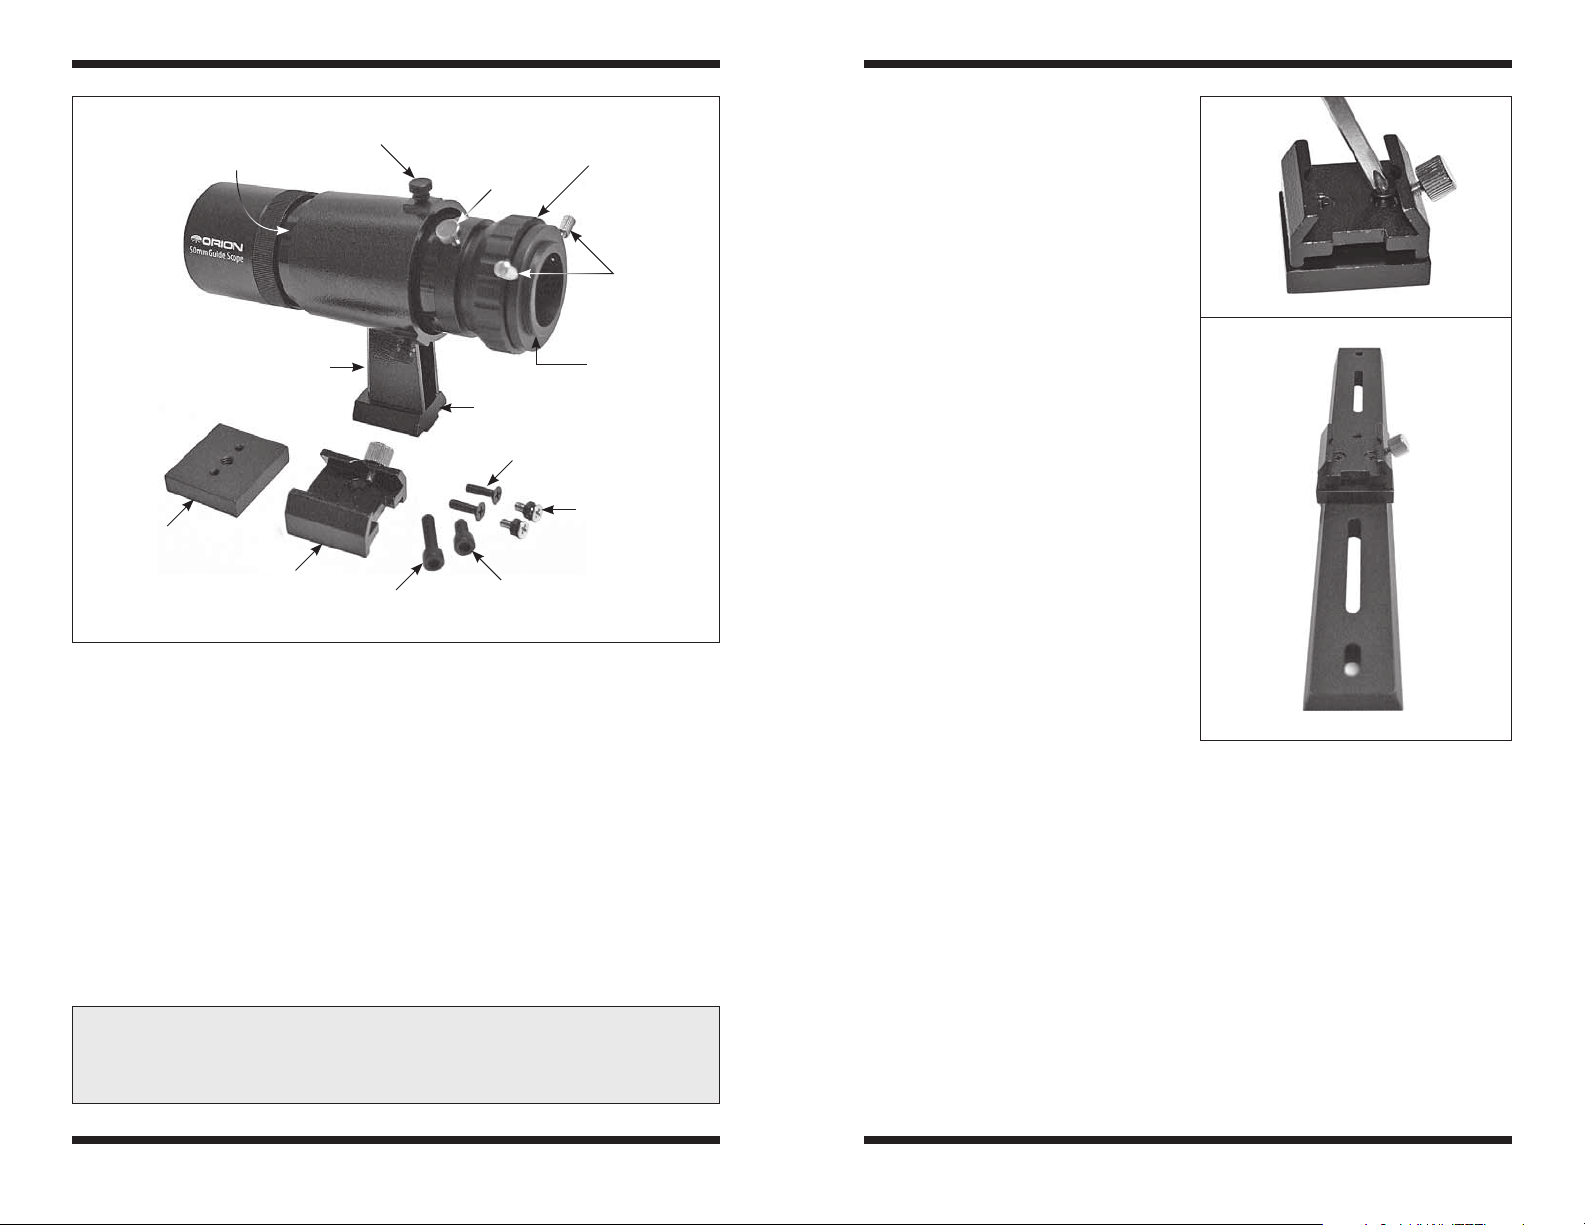
Adapter plate
Rubber
O-ring
Dovetail base
(shoe)
Guide scope
thumbscrews (x3)
Dovetail
bracket
1/4"-20 x 1"
socket screw
Focus lock
thumbscrew
Dovetail foot
8-32 x 5/8" screws
1/4"-20 x 1/2"
socket screw
Focus
adjustment
ring
Camera/
eyepiece
thumbscrews
T-threads
8-32 x 5/8"
screws with nuts
Parts List
1 50mm guide scope optical tube with
precision helical focuser
1 Dovetail finder scope bracket,
aluminum
1 Dovetail base (shoe), aluminum
2 #8-32 x 3/8" Phillips head screws,
and 2 hex nuts
2 #8-32 x 5/8" Phillips head screws
1 Adapter plate
1 Socket head screw, ¼"-20 x 1"
1 Socket head screw, ¼"-20 x 1/2"
Assembly
The Deluxe Mini 50mm Guide Scope
with Helical Focuser (DMGS) comes
fully assembled and mounted in the
dovetail bracket. Refer to Figure 1 to
familiarize yourself with the features
and parts of the guide scope.
a.
Figure 1. The Deluxe Mini 50mm Guide Scope with Helical Focuser and included
components
Mounting the Deluxe Mini
Guide Scope
The DMGS’s mounting bracket has a
Congratulations on your purchase of the Orion Deluxe Mini 50mm Guide Scope
with Helical Focuser. It’s a wonderfully versatile, compact, and lightweight guide
scope designed for use with the Orion StarShoot AutoGuider, Orion StarShoot
Planetary Imager & AutoGuider, or similar small-chip CCD cameras. It’s ideal
for guiding long-exposure astrophotographs with short to medium focal length
telescopes up to about 1500mm focal length. This deluxe model features a
machined, “non-rotating” helical focuser that enables the user to quickly achieve
sharp focus of guide stars with your autoguiding camera. The guide scope’s
bright, wide-field optics serve up lots of potential guide stars on your autoguider’s CCD sensor, and it’s small enough to stash in an accessory case! What’s
more, this scope can also function as a 50mm illuminated finder scope, with the
addition of the optional #8450 Orion 12.5mm Illuminated Plössl eyepiece!
dovetail foot that fits the Orion dovetail
finder scope base included on many
Orion telescopes. The guide scope
also comes with a separate dovetail
base, or shoe (Orion part #7214),
with two #8-32 x 3/8" flat Phillips-head
screws and two hex nuts, for custom
installations.
To mount the DMGS on a dovetail plate such as Orion’s Wide or Narrow
Universal mounting plates, or similar plates produced under other brand names,
we’ve included an adapter plate that makes it easy (Figure 1). The DMGS can
then be piggybacked on top of your main instrument’s tube rings, or on a side-
b.
Figure 2. a) The dovetail shoe threads
into the adapter plate with two screws.
b) The adapter plate attaches to an
optional dovetail bar with one of the
included socket head cap screws.
by-side plate, for autoguiding.
WARNING: Never look directly at the Sun through your telescope or its finder
scope – even for an instant – without a professionally made solar filter that completely covers the front of the instrument, or permanent eye damage could result.
Young children should use this telescope only with adult supervision.
On the adapter plate there are three threaded holes. The two outer holes are for
attaching the dovetail base to the adapter plate using the two included #8-32 x
5/8" Phillips head screws (Figure 2a). (These are the longer of the four #8-32
screws.) Once the dovetail base is securely attached, you can mount the adapter
2 3
Page 3

focuser. Figure 4b shows the Orion
StarShoot AutoGuider being threaded
onto the T-threads of the helical
focuser, and then fully installed (Figure
4c). Using the T-threads is the most
secure mode of camera attachment.
Focus adjustment ring
a.
Figure 3. a) Installing the DMGS on an optional dovetail bar. b) Ready for mounting on
telescope tube rings or side-by-side saddle.
Autoguider
nosepiece
Thumbscrews
a. b.
Figure 4. a) An autoguider with a 1.25"
nosepiece can be inserted into the focuser
and secured with the two thumbscrews.
b) Threading an autoguider directly onto
the T-threads is the most secure mode of
attachment. c) The StarShoot AutoGuider
makes a perfect match for the DMGS.
b.
T-threads
c.
plate onto a dovetail mounting plate (Figure 2b) by inserting one of the supplied
1/4"-20 socket head screws up through an unthreaded hole or slot in the dovetail
plate and into the ¼"-20 hole in the center of the adapter plate. Tighten with a
3/16" Allen wrench (user supplied). We have provided two different socket head
screws for your convenience, one is ½" long, the other 1" long. Choose the one
that best fits your mounting plate. Figure 3 shows the DMGS being mounted on
an optional Orion narrow dovetail plate.
Attaching Your Autoguiding Camera
A guide camera can be coupled to the focuser either by a) inserting the
camera’s 1.25" nosepiece into the focuser as far as it will go and securing it with
the two thumbscrews (Figure 4a), or b) if your camera is equipped with female
T-threads, by threading the camera directly onto the male T-thread flange of the
Focusing with the Deluxe Mini
Guide Scope
The DMGS features a precision helical
focuser that makes it easy to focus
your guide stars quickly and precisely
Figure 5. Rotate the focus adjustment
ring until guide stars come into focus.
Focus lock
thumbscrew
(Figure 5). The focuser, made of
machined, anodized aluminum, is the
“non-rotating” variety, meaning the
guide camera does not rotate when
focus is adjusted, but rather moves
in or out in fixed orientation, which is
important for hassle-free focusing. You
don’t want stars rotating in the field
of view when you’re trying to focus!
Drawtube travel is 12mm and the
motion is extremely smooth and fine
– less than 1mm of travel per one full
rotation of the helical focusing ring.
Make sure your autoguider camera
is powered on and connected to your
laptop computer, and that the software
you will use for autoguiding is up and
Illuminated
Plössl eyepiece
Figure 6. With the addition of an optional
Orion 12.5mm Illuminated Pössl Eyepiece,
the DMGS doubles as a crosshair
finder scope.
running. Also, make sure the focus lock
thumbscrew (see Figure 5) is not tightened down. With the imaging software
set to take continuous exposures, rotate the grooved focusing adjustment ring
clockwise or counterclockwise while you watch the stars or reference numbers
(e.g., FWHM) on your laptop screen. When the stars are reasonably sharp, or
you’ve reached approximately the lowest FWHM, you’re done!
Once focus is achieved, the focus lock thumbscrew can be lightly tightened to
ensure the drawtube remains set at that position, although this may not even be
necessary. There’s no need to tighten this thumbscrew firmly since most guide
cameras are relatively lightweight, and doing so could put sideways pressure on
the drawtube that might knock your carefully set focus off a bit.
For best results we recommend focusing the guide camera at the beginning of
your imaging session, following the focusing procedures in the imaging software
you use for astrophotography, such as MaxIm DL, PHD Guiding, or Images Plus.
4 5
Page 4

Aiming the Deluxe Mini Guide Scope
The DMGS is mounted in a dovetail bracket that has three black thumbscrews
to secure the guide scope tube in place. The tube is secured to the front of the
bracket with a rubber O-ring. Although you may never need to do it in order to
find a guide star, you can adjust the direction the guide scope is pointed within
the bracket by alternately loosening and tightening the three thumbscrews. Just
make sure that all three thumbscrews are tightened before you begin guiding. Do
not over-tighten them, however, or you could strip the screw threads.
Using the Deluxe Mini Guide Scope as a Finder Scope
The DMGS can double as a 50mm illuminated finder scope with the addition of
the optional Orion 12.5mm Illuminated Plössl eyepiece (Figure 6). Some other
1.25" telescope eyepieces may also work, while others may not reach focus
when inserted all the way into the focuser. (With some eyepieces, backing them
out a few millimeters and securing the barrel with the two thumbscrews will allow
you to achieve focus. A 1.25" parfocal ring can assist in setting the focus position
on the eyepiece barrel, if desired.) But the 12.5mm Illuminated Plössl comes
in very handy because it has a double crosshair reticle that is illuminated by a
red LED with adjustable brightness. Magnification with this eyepiece is 13x. If a
lower magnification is desired, a longer focal length eyepiece can be used. For
example, a 20mm eyepiece will yield 8.1x magnification.
Caring for the Deluxe Mini Guide Scope
To keep dust from getting inside the guide scope and from accumulating on the
objective lens, keep the front and rear caps installed when the guide scope is
not in use. We recommend storing the guide scope in a padded accessory case.
Cleaning the Lens
Although it shouldn’t need cleaning very often, you can clean the front lens of
the guide scope with any quality optical lens cleaning tissue and optical lens
cleaning fluid designed for multi-coated optics. Never use regular glass cleaner
or cleaning fluid designed for eyeglasses. Before cleaning with fluid and tissue,
eject any loose particles from the lens with a blower bulb, compressed air, or a
soft brush such as a LensPen. Then apply some cleaning fluid to a lens tissue,
never directly on the optics. Wipe the lens gently in a circular motion, then
remove any excess fluid with a fresh lens tissue. Oily fingerprints and smudges
can be removed using this method. Use caution, as rubbing too hard may
scratch the lens. Never re-use the same tissue.
Specifications
Aperture: 50mm
Type: Achromat (doublet)
Focal length: 162mm
Lens coating: Multi-coated
Focuser: Helical, non-rotating
Focuser material: machined aluminum
Focus travel: 12mm
Camera attachment: Via T-threads or nosepiece holder
Length: 6-13/16 inches
Weight: 19.2 oz.
6 7
Page 5

One-Year Limited Warranty
This Orion Deluxe Mini 50mm Guide Scope is warranted against defects in materials or workmanship for a period of one year from the date of purchase. This warranty is for the benefit of
the original retail purchaser only. During this warranty period Orion Telescopes & Binoculars
will repair or replace, at Orion’s option, any warranted instrument that proves to be defective,
provided it is returned postage paid to: Orion Warranty Repair, 89 Hangar Way, Watsonville,
CA 95076. If the product is not registered, proof of purchase (such as a copy of the original
invoice) is required.
This warranty does not apply if, in Orion’s judgment, the instrument has been abused, mishandled, or modified, nor does it apply to normal wear and tear. This warranty gives you
specific legal rights, and you may also have other rights, which vary from state to state. For
further warranty service information, contact: Customer Service Department, Orion Telescopes
& Binoculars, 89 Hangar Way, Watsonville, CA 95076; (800) 676-1343.
OrionTelescopes.com
89 Hangar Way, Watsonville, CA 95076
Customer Support Help Line (800) 676-1343
© 2012 Orion Telescopes & Binoculars
 Loading...