

Page 1
Page 2

Table of Contents
Table of Contents
1 About ORiNOCO
Kit Contents 1-1
ORiNOCO Network Scenarios 1-3
■ Peer-to-Peer Workgroup 1-4
■ Home Networking 1-5
■ Enterprise Networking 1-6
■ It’s Easy 1-8
ORiNOCO PC Card Features 1-9
■ ORiNOCO PC Card Types 1-10
About the Software CD-ROM 1-12
■ ORiNOCO Adapter Cards 1-15
Finding Information 1-16
2 Installation for Windows
Introduction 2-1
Insert your ORiNOCO PC Card 2-5
i
ORiNOCO PC Card - Getting Started
i
Page 3

Table of Contents
Install Drivers 2-6
■ Before You Start the Installation 2-6
■ What You Need to Know 2-6
■ Driver Installation for Windows 95/ 98 2-7
■ Windows Network Properties 2-9
Set Basic Parameters 2-11
■ Basic Settings for Enterprise Networks 2-13
■ Basic Settings for Residential Gat eways 2-15
■ Basic Settings for Peer-to-Peer Workgroups 2-17
Finish the Installation 2-19
■ After Restarting Y our Comput er 2-20
3 Working with ORiNOCO and Windows
Introduction 3-1
Using your PC Card 3-2
■ Radio Antennas 3-2
■ Removing the PC Card 3-2
■ Maintenance of your PC Card 3-4
View Other Computers 3-5
Using the Client Manager 3-7
■ View Wireless Link Quality 3-7
■ View/Modify PC Card Settings 3-9
Finding More Information 3-11
ii
ORiNOCO PC Card - Getting Started
Page 4

A Card Specifications
Physical Specifications A-1
Networking Characteristics A-2
Radio Characteristics A-3
■ Supported Frequency Sub-bands A-9
B Troubleshooting
Introduction B-1
Common Troubleshooting Tips B-2
■ LED Activity B-2
■ Can Not Connect To The Network B-4
■ LEDs Work But Can’t Connect to Network B-5
Table of Contents
W Warranty Repair Card
About Warranty and Repair W-1
Limited Warranty W-2
Technical Support
iiiiii
ORiNOCO PC Card - Getting Started
iii
Page 5

Page 6
About ORiNOCO
1
Kit Contents 1
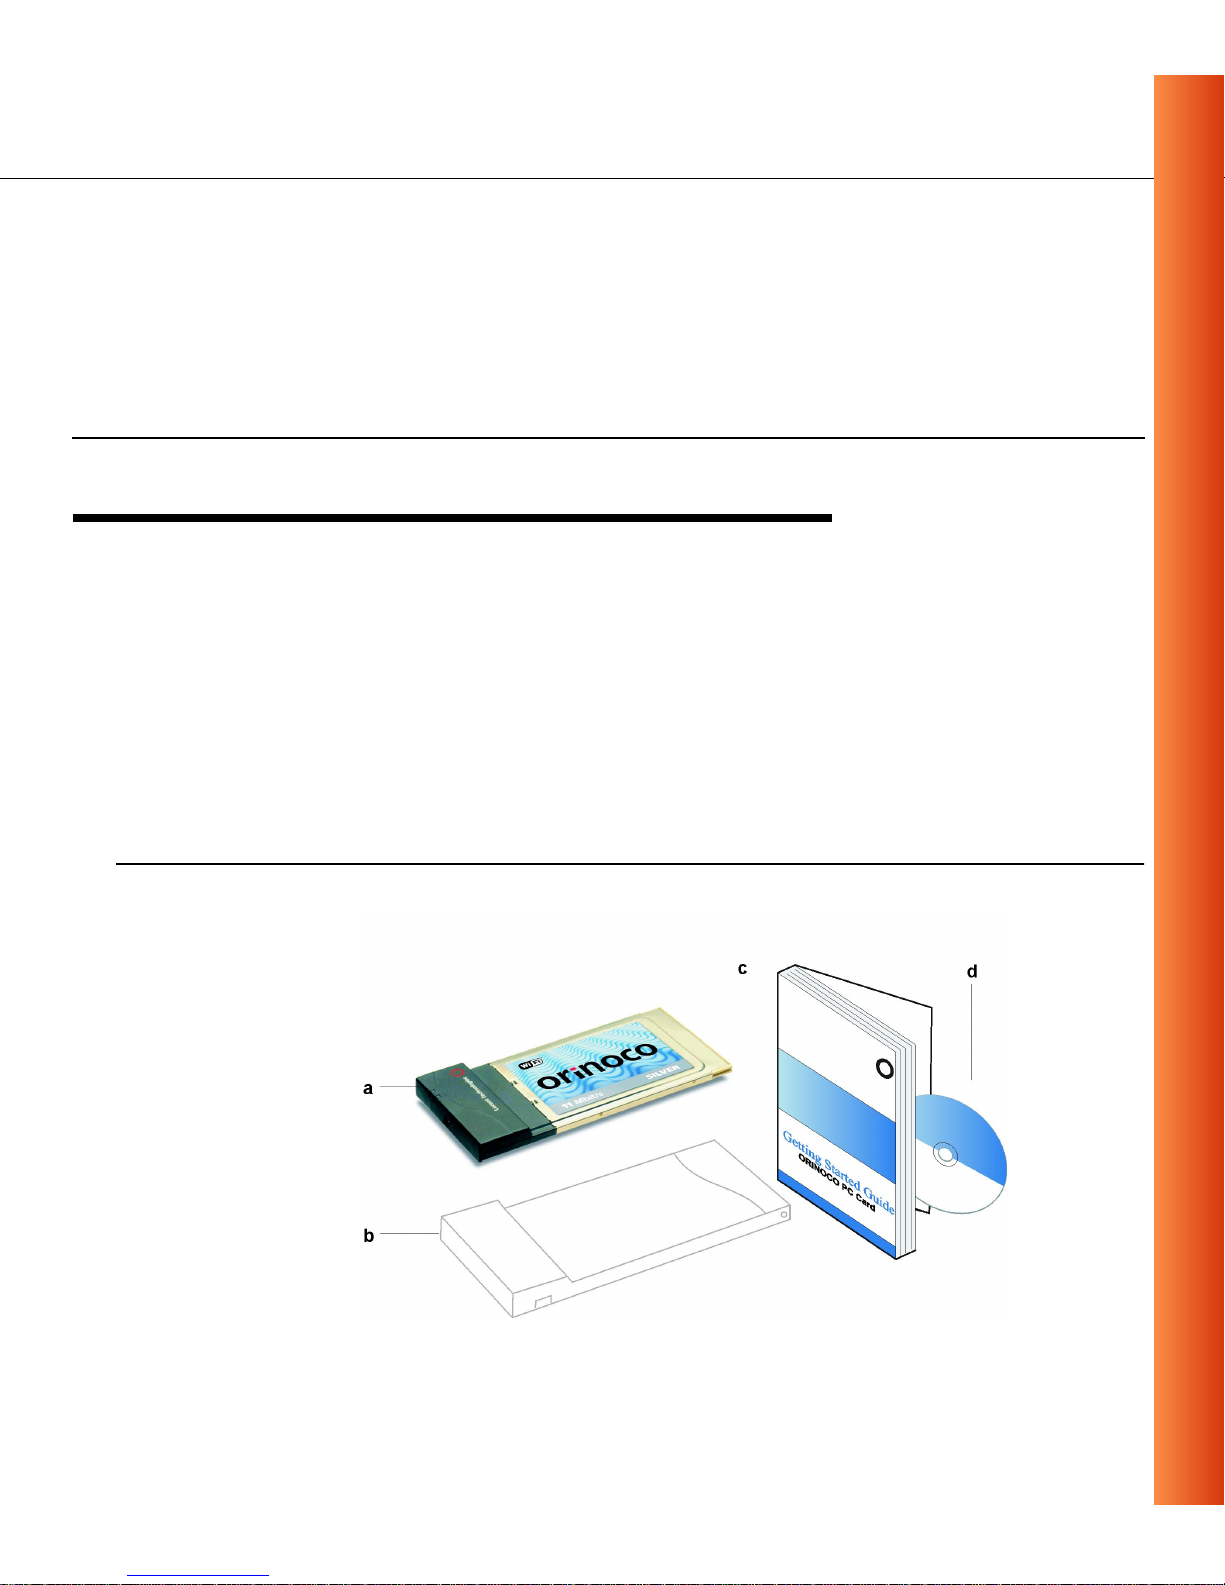
The ORiNOCO PC Card kit includes the items as pictured in Figure 1-1:
a. One ORiNOCO PC Card.
b. Transparen t protective casing
(for storing your PC Card while not in use).
c. The “ORINOCO PC Card - Getting Started” g uide.
d. The ORiNOCO Software CD-ROM.
Figure 1-1 ORiNOCO Kit Contents
ORiNOCO PC Card - Getting Started
1-1
Page 7

About ORiNOCO - Kit Contents
The printed document “ORINOCO PC Card - Getting Started” is an abstract
of the “ORINOCO PC Card - User’s Guide” that is available in Adobe’s
Acrobat Portable Document File (*.pdf) format on the ORiNOCO Software
CD-ROM. This printed copy will help you installing your ORiNOCO PC Card
usingthe minimum setof parameters. Fordetailed information youmay wish
to consult the “ORINOCO PC Card - User’s Guide”.
NOTE:
In orde r to extend the life of the PC Card hardware it is advised to
storethecardintheprotectivecasingwhenevercarryingthe
computer on travel without operating the device.
1-2
ORiNOCO PC Card - Getting Started
Page 8

About ORiNOCO - ORiNOCO Network Scenarios
ORiNOCO Network Scenarios 1
The ORiNOCO PC Card Kit enables you to:
■ Connect your compute r to a Peer-to-Peer workgroup of wireless
computing devices (see Figure 1-2 on page 1-4).
■ Connect your compute r to a Small Office/Home Office (SOHO) network
that includes a Lucent Technologies Residential Gateway (RG) access
point (see Figure 1-3 on page 1-5).
■ Connect your computer to a Local Area Network (LAN) Infrastructure
that includes Lucent Technologies ORiNOCO WavePOINT-II APs
(Access Points), or other IEEE 80 2.11 compliant LAN systems (see
Figure 1-4 on page 1-6 and Figure 1-5 on page 1-7).
■ Expand th e capabilities of your WavePOINT-II APs, to support wireless
devices that have b een equipped with ORiNOCO PC Cards.
ORiNOCO PC Card - Getting Started
1-3
Page 9
About ORiNOCO - ORiN OCO Network Scenarios
Peer-to-Peer Workgroup 1
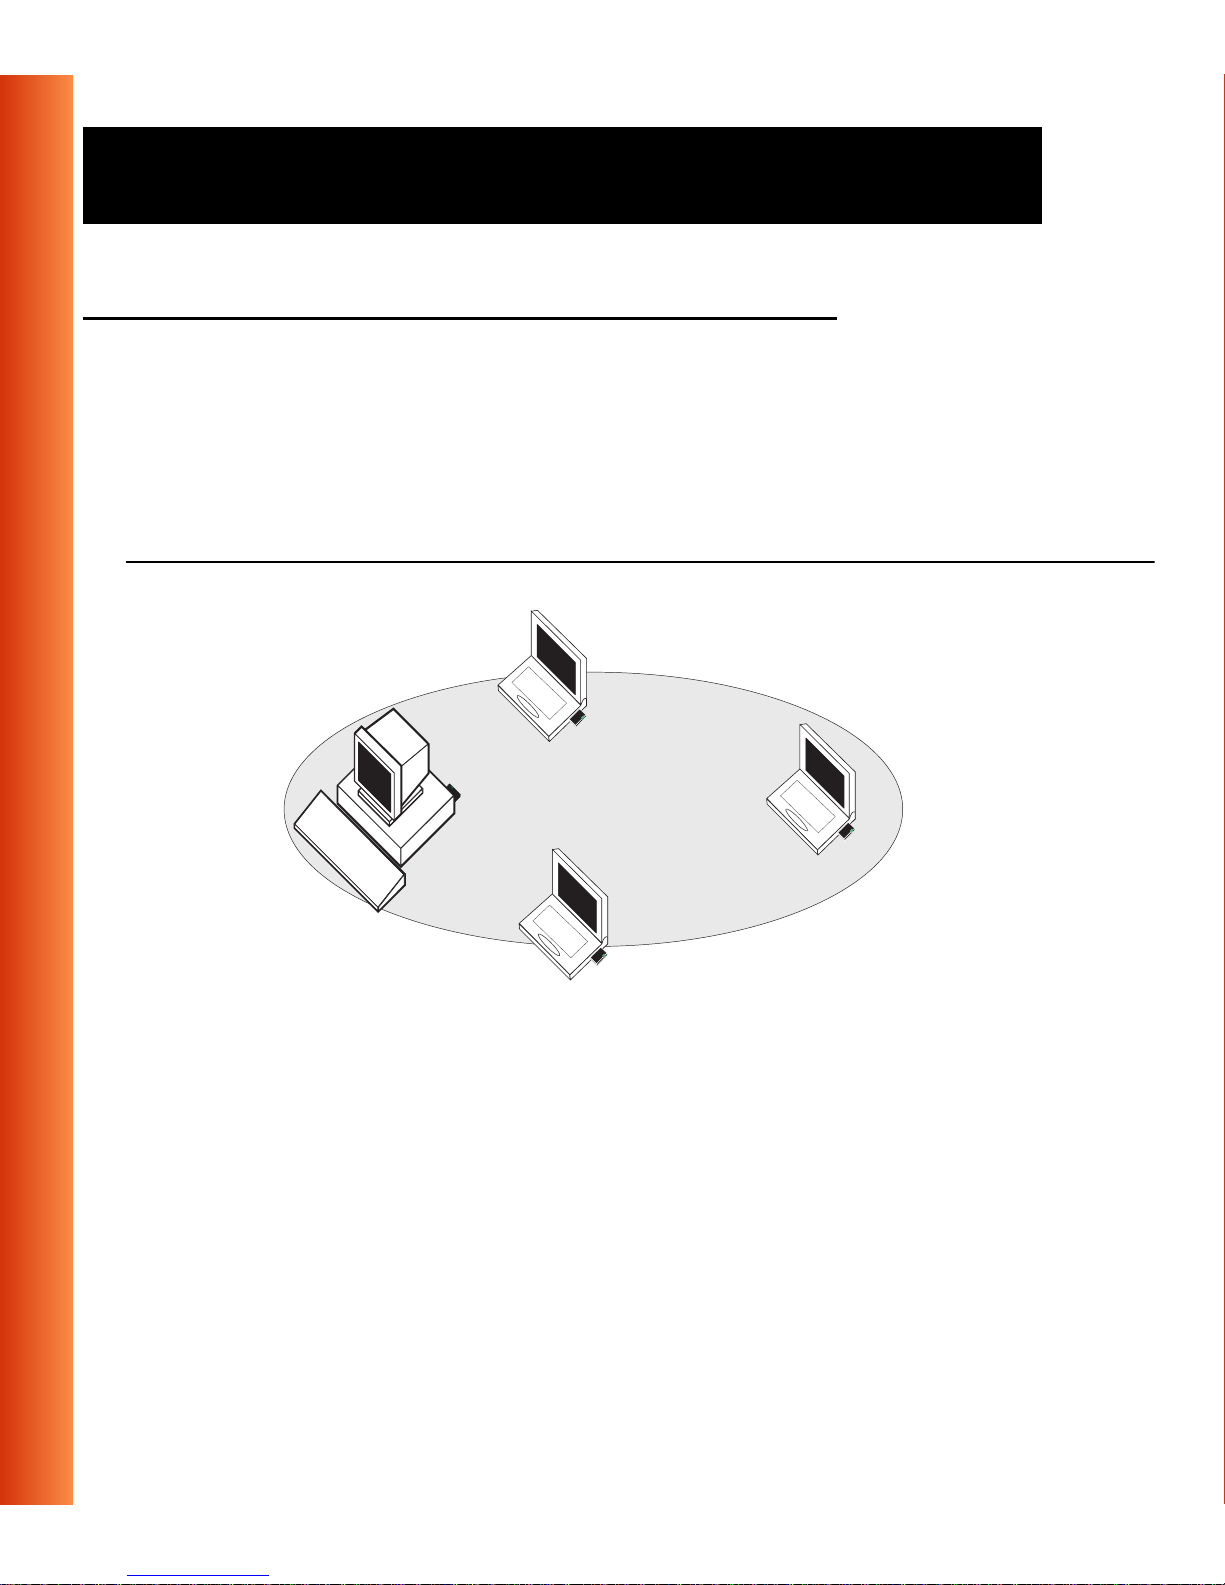
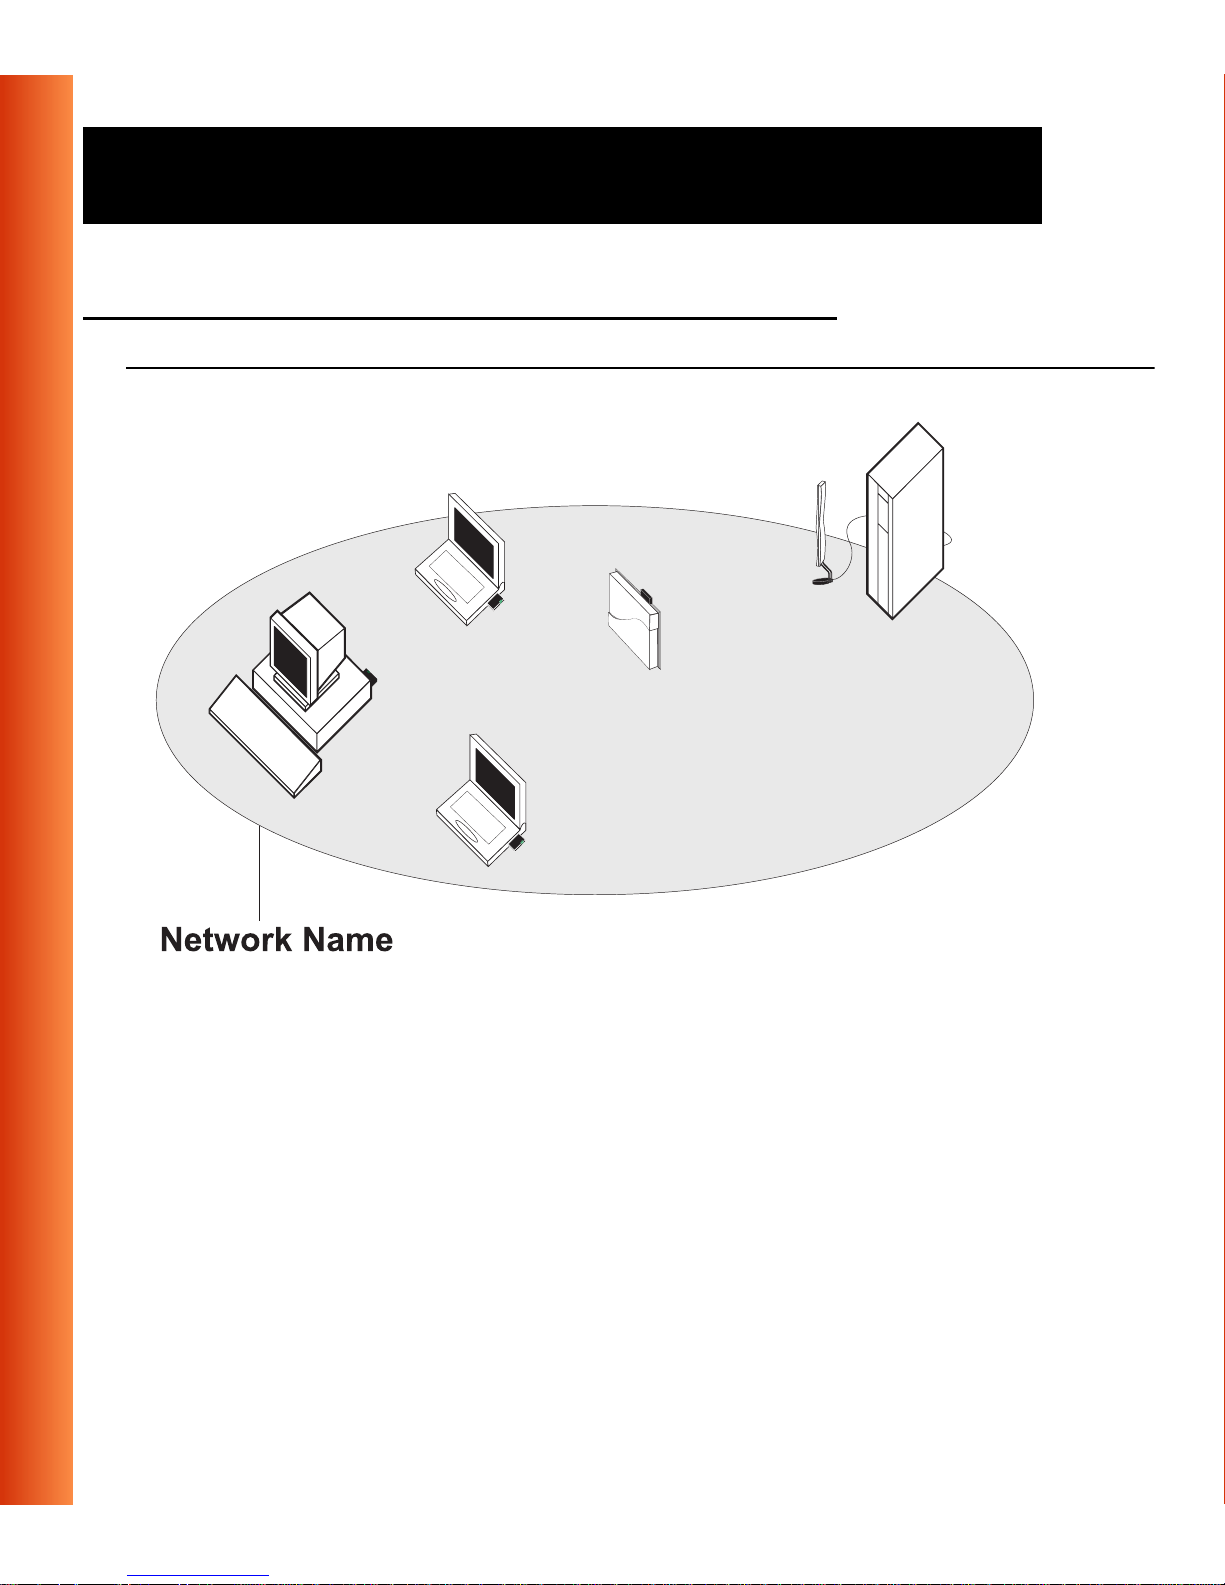
The Peer-to-Peer workgroup configuration enables you to quickly set up a
small wi reless workgroup, where the workgroup participants can exchange
files using features like “Files and Printer Sharing” as supported by Microsoft
Networking.
Figure 1-2 Peer-to-Peer Wireless Workgroup
You can use this option to setup a temporary or ad-hoc network in
environment s where no access points are available (for exampl e in Small
Office/Home Office (SOHO) environments).
As long as the stations are within range of one another, this is the easiest
and least expensive way to set up a wireless network.
1-4
ORiNOCO PC Card - Getting Started
Page 10
About ORiNOCO - ORiNOCO Network Scenarios
Home Networking 1
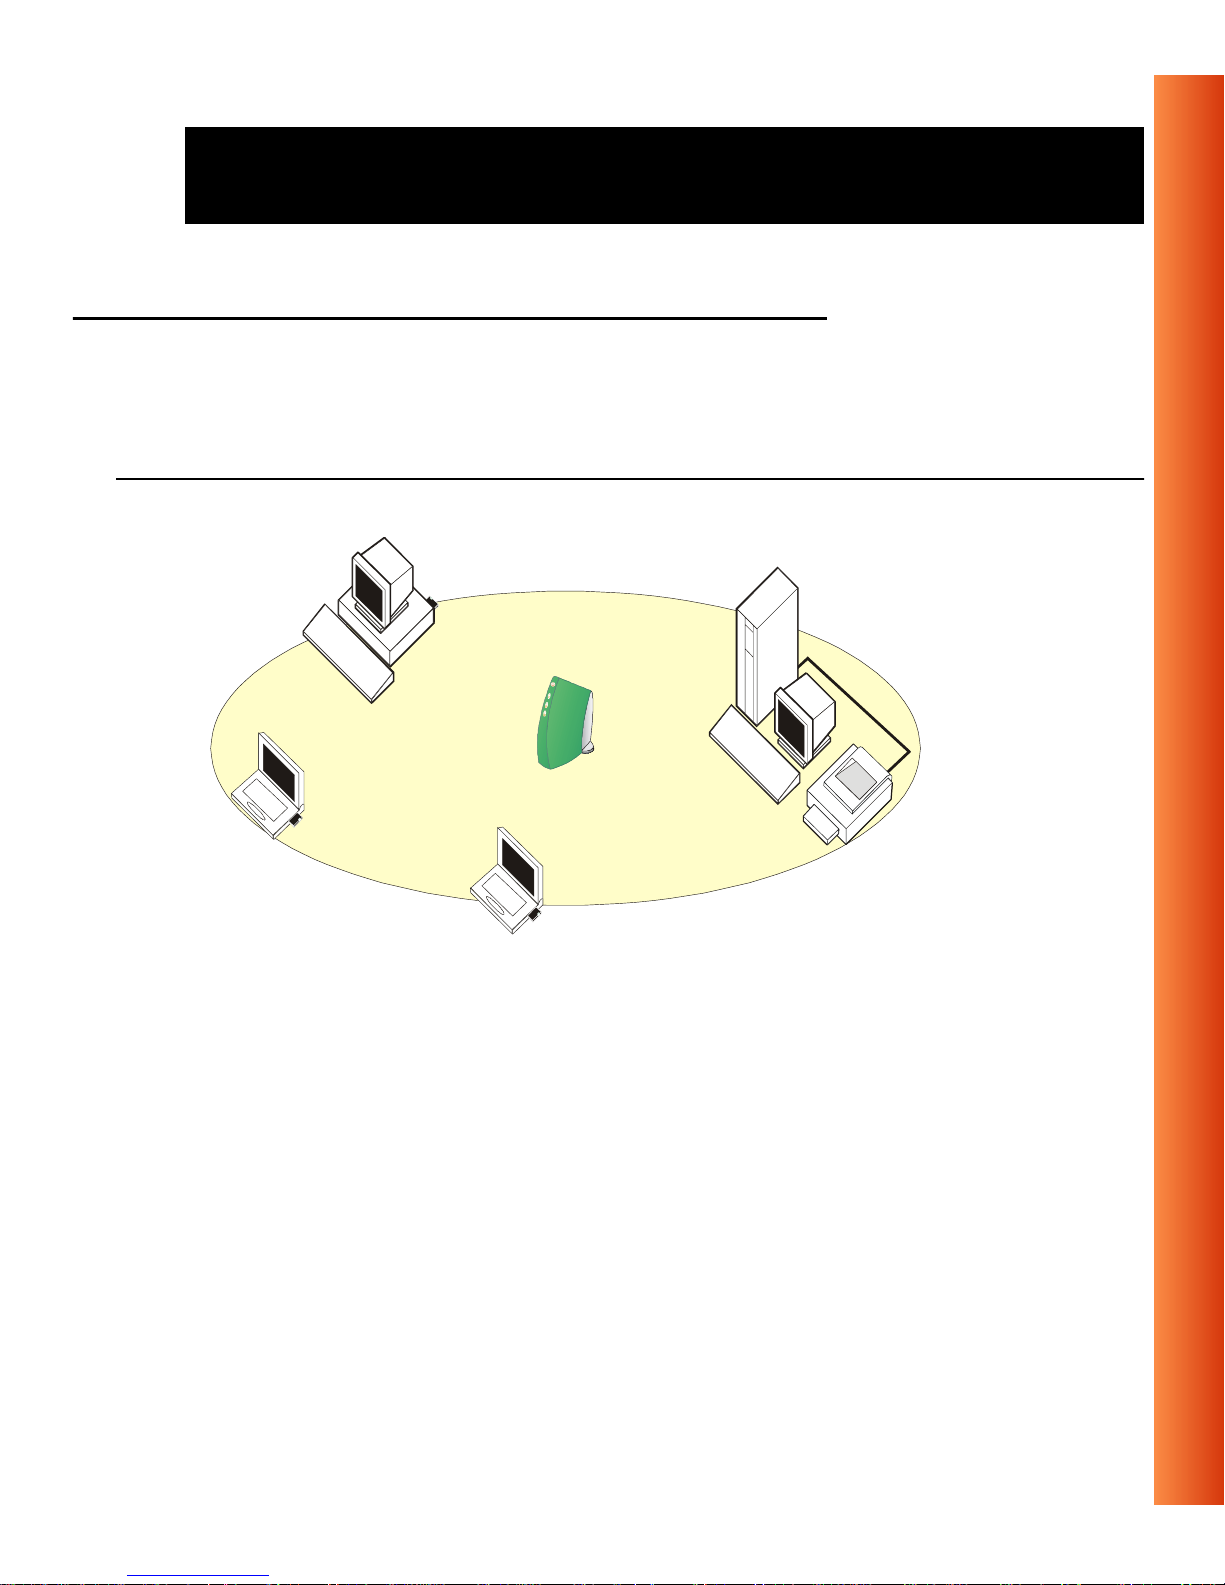
With the Lucent Technologies ORiNOCO Residential Gateway (RG),
wireless access to the Internet or other computers is at your fingertips.
Figure 1-3 Connect to a Residential Gateway (RG)
All you n eed to do is connect the wireless computers to the ORiNOCO
Residential Gateway (RG), and you are ready to:
■ Share files and printers, and
■ Access th e Internet via the built-in modem of the RG.
Optionally the RG allows you to connect your wireless stations to previously
installed wired computers and/or an external cable, an xD SL or a ISDN
modem.
ORiNOCO PC Card - Getting Started
1-5
Page 11
About ORiNOCO - ORiN OCO Network Scenarios
Enterprise Networking 1
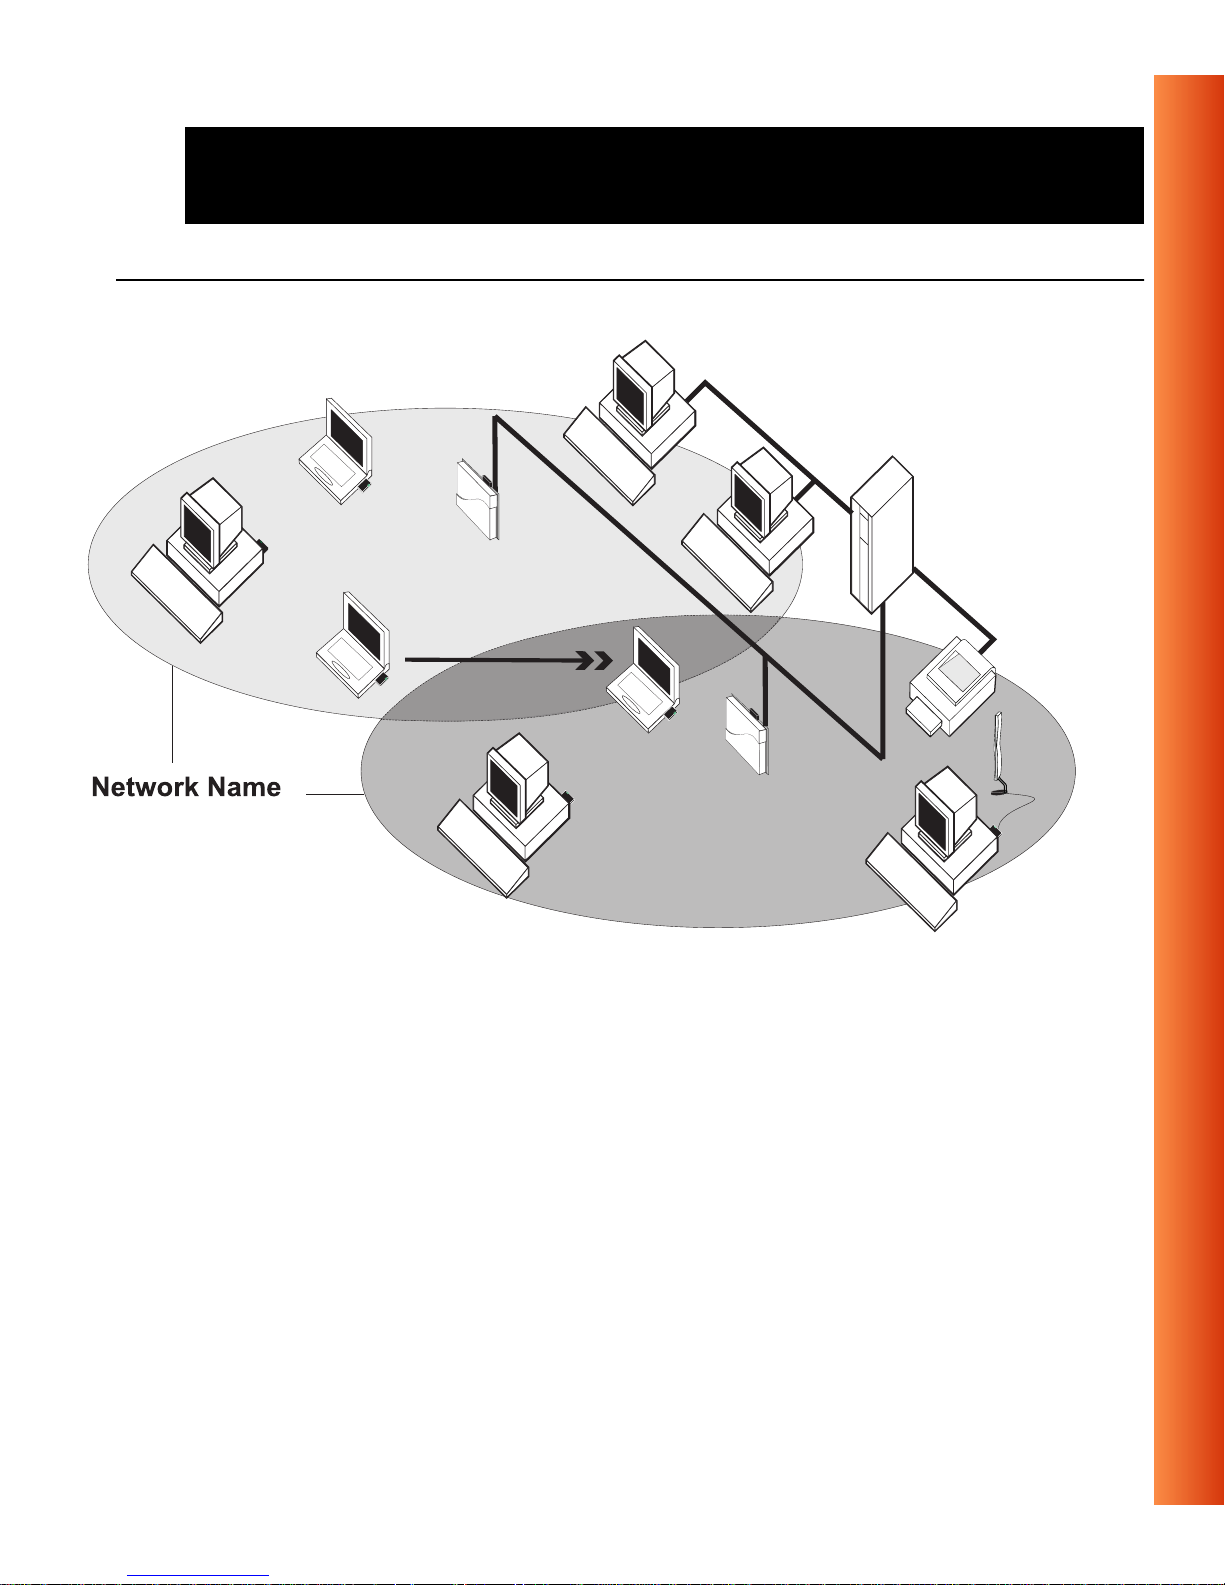
Figure 1-4 Stand Alone Wireless LAN
With the ORiNOCO WavePOINT-II AP you can connect to a corporate Local
Area Network (LAN) infrastructure to have wirel ess access to all network
facilities.
LAN Infrastructures may either be:
■ Stand-alone wireless LANs as pi ctured in Figure 1-4.
■ Wireless network infrastructures connected to an existing Ethernet
network as pictured in Figure 1-5 on page 1-7.
1-6
ORiNOCO PC Card - Getting Started
Page 12
About ORiNOCO - ORiNOCO Network Scenarios
Figure 1-5 LAN Infrastructure
ORiNOCO PC Card - Getting Started
1-7
Page 13

About ORiNOCO - ORiN OCO Network Scenarios
It’s Easy 1
The ORiNOCO PC Card functions like any standard wired Ethernet card, but
ORiNOCO does not need any wires!
Where an Ethe rnet card requires a cable connection to a hub and /or patch
panel, the cable physically ties you down to the location of the wired
connection.
ORiNOCO allows you to connect your computer to a Local Area Network
(LAN) system from anywhere within the wireless coverage area. Expanding
or re-designing your netwo rk is easy: Add or relocate WavePOINT-II APs,
power-up your (new) ORiNOCO computers, and you’re done!
1-8
Unlike Ethernet, ORiNOCO will enable you to roam throughout the network
while remaining connected to the LAN.
NOTE:
The ORiNOCO PC Card is a radio product. Refer to the flyer
“Information to the User” for regulatory information that may apply in
your country.
ORiNOCO PC Card - Getting Started
Page 14
About ORiNOCO - ORiNOCO PC Card Features
ORiNOCO PC Card Features 1
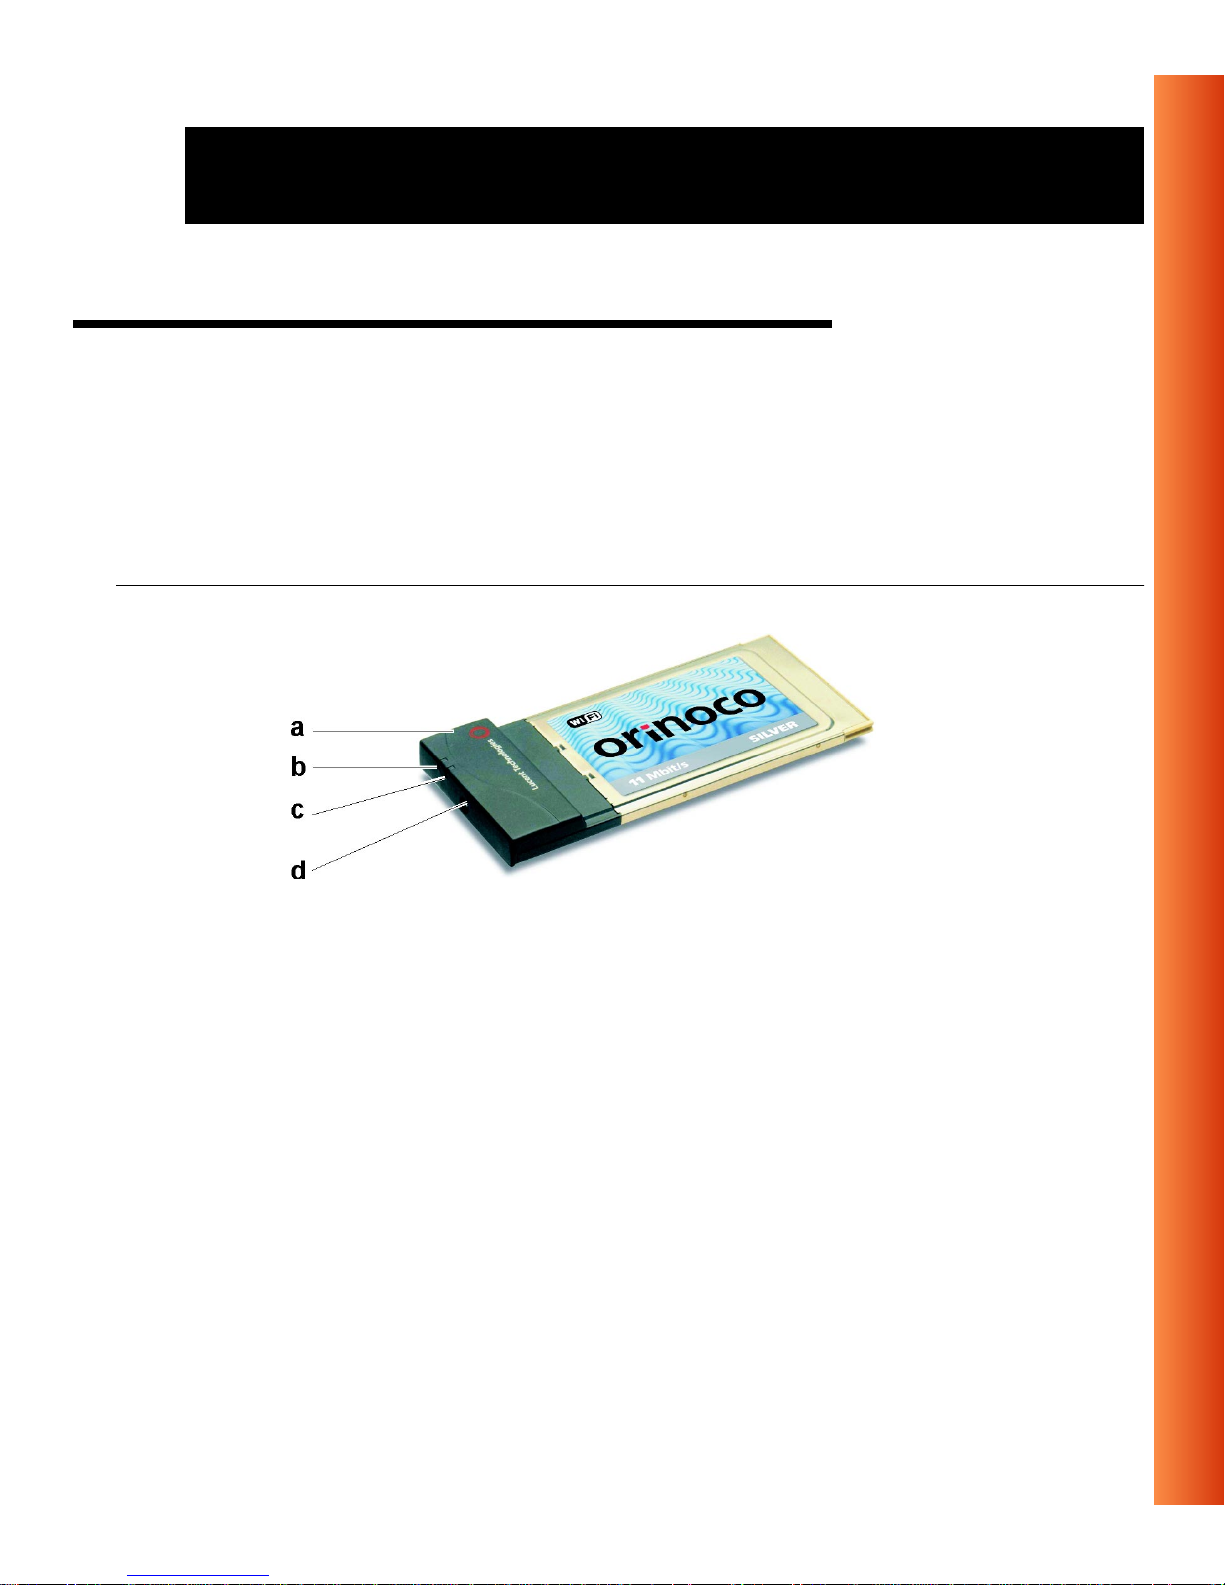
The ORiNOCO PC Card is a wireless network PC Ca rd that fits into a ny
standard PC Card Type II slot.
The ORiNOCO PC Card has two LED i ndicators an d two integrated
antennas. Optionally you can use the ORiNOCO PC C ard in combination
with an external antenna.
Figure 1-6 The ORiNOCO PC Card
a. Integrated Antennas
b. Transmit/ Receive LED
■ Off - No wireless activity
■ Blinking - Sens ing/transmitting wireless data
c. Power ON/OFF LED
■ Solid Green - standard operational mode
■ Blinking Green - Power Management mode
d. Connector for optional External Antenna (see the ORINOCO PC Card -
User’s Guide provided on the CD-ROM for more information).
ORiNOCO PC Card - Getting Started
1-9
Page 15

About ORiNOCO - ORiNOCO P C Card Features
ORiNOCO PC Card Types 1
The ORiNOCO PC Card is a wireless network PC Card that co mplies with
the IEEE 802.11 standard on wireless LANs (Revision B). The ORINOCO
PC Card supports data rates up to 11 Mbit/s and is available in two varia nts:
■ ORiNOCO Silver Label, and
■ ORiNOCO Gold Label.
Both types of ORiNOCO PC Cards are:
■ Wi-Fi (Wireless Fidelity) certified by the Wireless Ethernet
Compatibility Alliance (WECA). This means that your
ORiNOCO hardware will communicate w ith other vendors’
1-10
IEEE 802.11 compliant wireless LAN products.
■ Fully compatible with any other wireless LAN system based
on Direct Sequence Spread Spectrum (DSSS) radio technology that
complies with the “IEEE 802.11 standard on wireless LANs (Revision
B)”.
■ Backwards compat ible with any other previously released model of the
WaveLAN/IEEE product family.
ORiNOCO PC Card - Getting Started
Page 16

About ORiNOCO - ORiNOCO PC Card Features
Silver Label Cards 1
The ORiNOCO Silver PC Cards suppor ts the following wireless LAN
features:
■ Automatic Transmit Rate Select mechanism in the transmit range of 11,
5.5, 2 and 1 Mbit/s.
■ Frequency Channel Select ion (2.4 GHz).
■ Roaming over multiple channels.
■ Card Power Management.
■ Wired Equivalent Privacy (WEP) data encryption, based on the 64 bit
RC4 encryption algorithm as defined in the IEEE 802.11 standard on
wireless LANs.
These features are described in more detail in the ORINOCO PC Card -
User’s Guide provided o n the CD-ROM.
Gold Label Car ds 1
The ORiNOCO Gold PC Cards support the same functionality as the
ORiNOCO Silver cards. The Gold card however provides an enhanced type
of WEP data encryption, based on the 128 b it RC4 algorithm.
NOTE:
The ORiNOCO Gold PC Card may n ot be marketed in all parts of
the world, subject to national legislation or local regulations. For
availability in your country, please consult your authorized
ORiNOCO Reseller.
ORiNOCO PC Card - Getting Started
1-11
Page 17

About ORiNOCO - About the Software CD-ROM
About the Software CD-ROM 1
The ORiNOCO software CD-ROM contains both software and
documentation for all ORiNOCO products in indoor environments.
If you wish to install ORiNOCO driver software,turn to Chapter 2 ”Installation
for Windows” and follow the instru ctions as descr ibed for installing your
ORiNOCO PC Card.
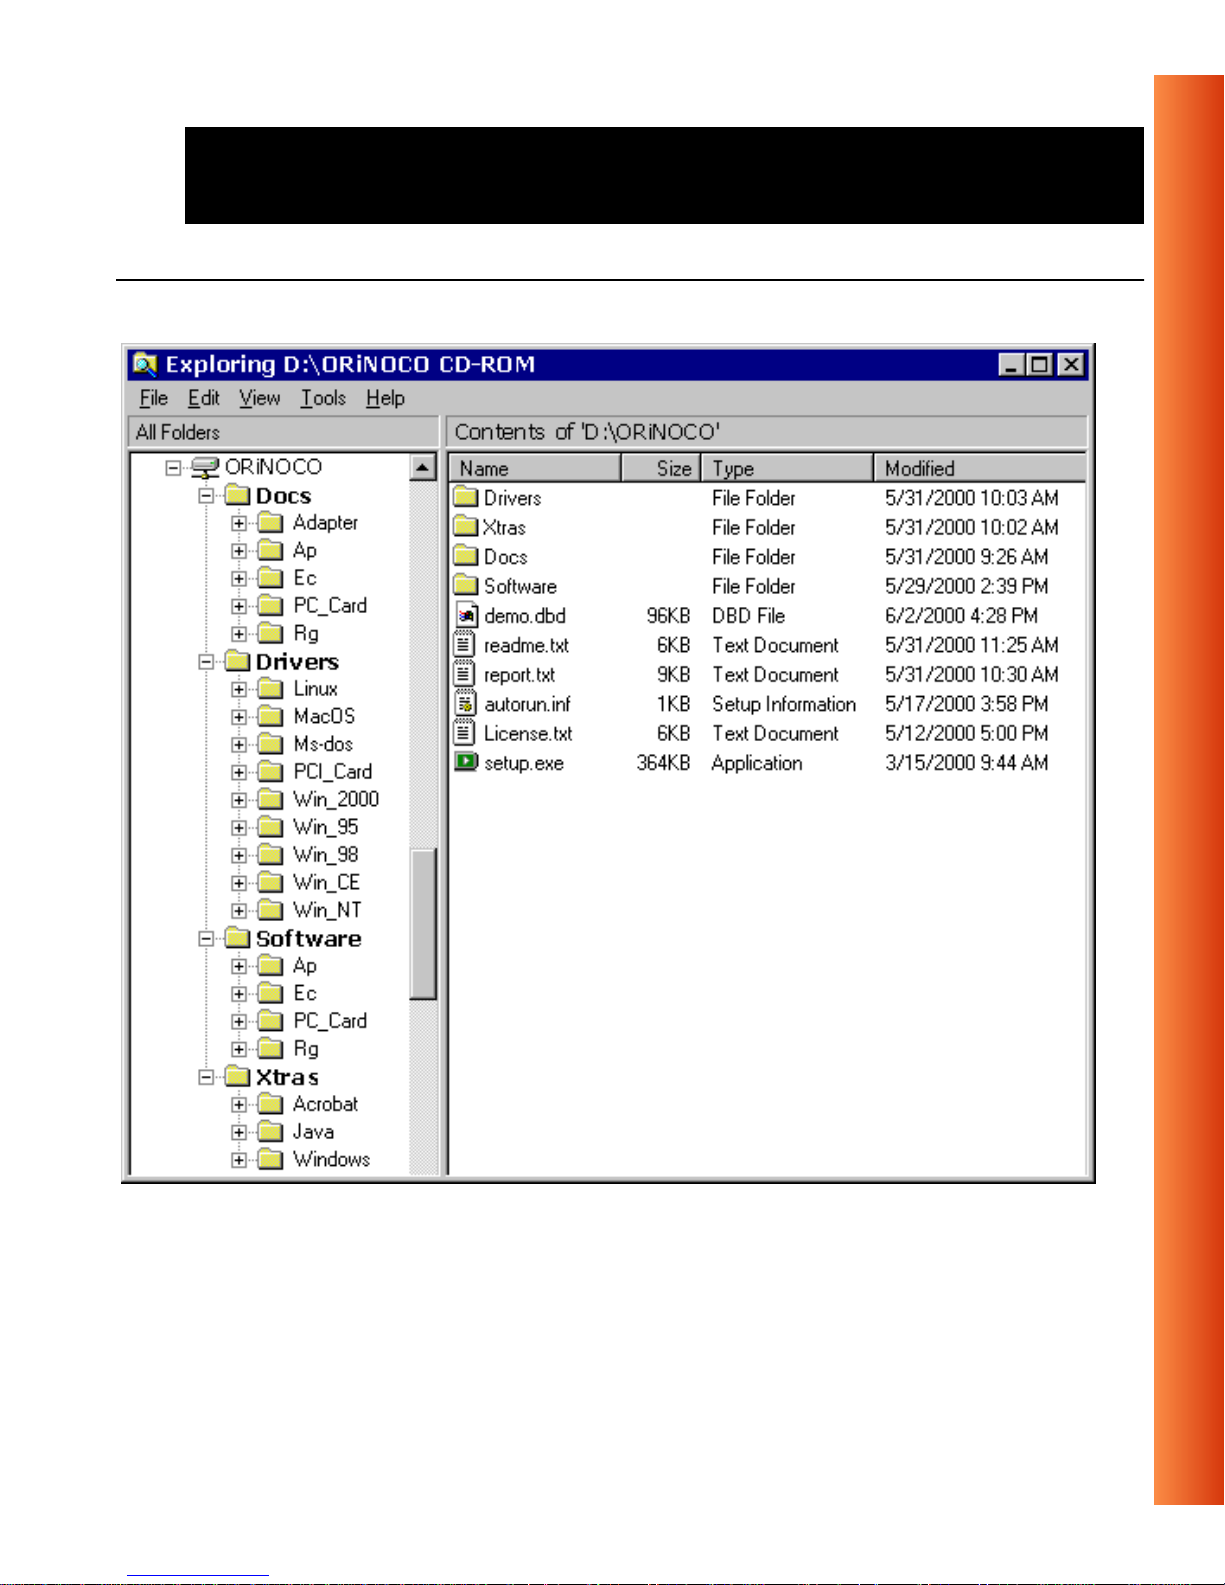
If you would like to explore the contents of the CD-ROM, the contents map
as pictured in Figure 1-7 on page 1-13, may help you find the items you are
looking for:
■ ORiNOCO User Gui des and other reference documents are located in
“D:\Docs\”
1
.
1-12
■ Software for ORiNOCO client stations and/or infrastructure products,
such as the WavePOINT-II APs, are located in “D:\Software\”
1
NOTE:
Priortocopyingorinstallingthesoftware,youareadvisedtoread
the Sof tware License Agreement “License.txt”, located in the root
folder of the CD-ROM. B y installing, copying or using the ORiNOCO
software, you are consenting to be bound by this agreement. If you
do not agree to all of the terms of the Software License Agreement,
do not download, copy or install the ORiNOCO software.
1 The drive letter of your CD-ROM drive may differ from this example.
ORiNOCO PC Card - Getting Started
.
Page 18
About OR iNOCO - A bout the Software CD-ROM
Figure 1-7 Contents of the Software CD-ROM
ORiNOCO PC Card - Getting Started
1-13
Page 19

About ORiNOCO - About the Software CD-ROM
NOTE:
It is the policy of Lucent Technologies to improve products as new
technology, components, software and firmware become available.
Before you proceed with the installation of this product, we
recommend you to consult the ORiNOCO website to:
■ Verify if newer versions of the software that was shipped with
your product are available.
■ Download and install the lat est software with your purc hased
product.
You can download the latest sof tware and documentati on from t he
ORiNOCO website at:
http://www.lucent.com/orinoco.
Looking again at Figure 1-7 on page 1-13 you will see that the CD-ROM also
includes a folder named “Xtras”. This folder contains additional tools, that
may help you install and manage your ORiNOCO Network.
The folder “Acrobat” includes a copy of the
Adobe Acrobat Reader ®,
required to view and/or print the ORiNOCO user documentation included on
this CD-ROM.
NOTE:
The Adobe Acroba t Reader is owned by and licensed from Adobe
Systems Incor porated. This software is provided “as is.”
1-14
ORiNOCO PC Card - Getting Started
Page 20

About OR iNOCO - A bout the Software CD-ROM
Lucent makes no warranty or representation, express or implied,
relating to the completeness, reliability, effectiveness, accuracy,
performance, or operation of the Adobe software, or as to its
suitability, merchantability or fitness for a particular purpose or
against i nfringement of intellectual property rights of any party.
For more information about Adobe Acrobat software, please consult
the Adobe Website at: “http:\\www.adobe.com\acrobat”
ORiNOCO Adapter Cards 1
The Lucent Techn ologies ORiNOCO solution has been based upon a single
wireless PC Card that can be used in a variety of computing systems.
Optionally available are the following adapters for computer systems that do
not have a PC Card Type II slot :
■ ISA and PCI adapter cards, that enable you to use the ORiNOCO
PC Card inside desktop com puters
■ WaveLAN/EC and WaveLAN/EC-S
1
devices, that allow you to connect
computer with a standard 10Base-T interface to your ORiNOCO
network.
1 The Wa veLAN/EC-S features an additional Serial Port.
ORiNOCO PC Card - Getting Started
1-15
Page 21
About ORiNOCO - Finding Information
Finding Information 1
This printed document was designed to give you a brief introduction about
the ORINOCO PC Card and the ORiNOCO wireless network system.
In this printed document you will find the most important information to get
your ORiNOCO network up and running, with a minimum set of parameters
for the MS-Windows 95/98 operating systems.
NOTE:
For installing procedures using other o perating systems than
Windows 95/98 please refer to the ORINOCO PC Card - User’s
Guide on the ORiNOCO Software CD-ROM.
1-16
The ORINOCO PC Card - User’s Guide on the ORiNOCO Software CDROM, also describes:
■ Advanced ORiNOCO parameters (required for special situations only).
■ Extensive Troubleshooting information, beyond the basic hints provided
in Appendix B ”Troubleshooting” of this manual.
Alternatively you can consult the on-line help docum entation for the
ORiNOCO drivers and/or tools by:
■ Clicking the button on your screen, or
■ Pressing the function key on your keyboard.
F1
ORiNOCO PC Card - Getting Started
Page 22

About ORiNOCO - Finding Information
To view or print the “ORINOCO PC Card - User’s Guide” you will need the
Adobe Acrobat Reader. A copy of this software is included on the ORiNOCO
Software CD-ROM.
ORiNOCO PC Card - Getting Started
1-17
Page 23

About ORiNOCO - Finding Information
1-18
ORiNOCO PC Card - Getting Started
Page 24

Installation for Windows
2
Introduction 2
The complete installa tion of your PC Card and the necessary drivers (for
Windows 95/98) consist of the following steps:
1. Insert the ORiNOCO Software CD-ROM and install the Client Manager
software by clicking the
the CD-ROM. (see page 2-3).
2. Insert your ORiNOCO PC Card (see page 2-5).
3. Install drivers (see p age 2-6).
4. Set basic parameters (see page 2-11).
5. Finish installation (see page 2-19).
This chapter describes the installation of the ORiNOCO PC Card for
Microsoft Windows 95 and 98 operating systems only. For other operating
systems please consult the following appendices of the ORINOCO PC Card
- User’s Guide provided on the CD-ROM:
Document Operating System
■ Appendix C Windows CE
■ Appendix D DOS
Install Software button on the start-up screen of
■ Appendix E Apple/MAC OS
ORiNOCO PC Card - Getting Started
2-1
Page 25

Installation for Windows - Introduction
Document Operating System
■ Appendix C Windows CE
■ Appendix F Windows NT
■ Readme.txt L inux
Installation procedures for other operating systems are described in the
online ORINOCO PC Card - User’s Guide provided on the ORiNOCO
CD-ROM.
To view and/or print this document in Adobe’s Acrobat Portable Document
File format (*.pdf) you will need to install the Ad obe A crobat Reader
software.YoucanfindacopyofthissoftwareintheCD-ROMfolder:
“D:\Xtras\Acrobat”
1
2-2
NOTE:
If you intend to use the ORiNOCO PC Card in a ORiNOCO
WavePOINT-II AP (Ac cess Point), please refer to the User
Documentation that was shipped with the device. Alternatively you
can download these documents from the ORiNOCO website at:
http://www.lucent.com/orinoco.
1 Where “D:\” represents the drive letter of your CD-ROM drive.
ORiNOCO PC Card - Getting Started
Page 26

Installation for Windows - Introduction
Installing the Client Manager S oftware 2
The ORiNOCO Client Manager program is a software tool that you can use
to check the quality of your network connection.
NOTE:
It is not mandat ory to install the Client Manager program in order to
establish a network connection, but it provides you with more
options to:
- View/change the settings of your network connection.
- Monit or your network connection.
To install the Client Manager software, proceed as follows:
1. Insert the ORiNOCO so ftware CD-ROM that came with your PC Card kit
in your CD-ROM drive.
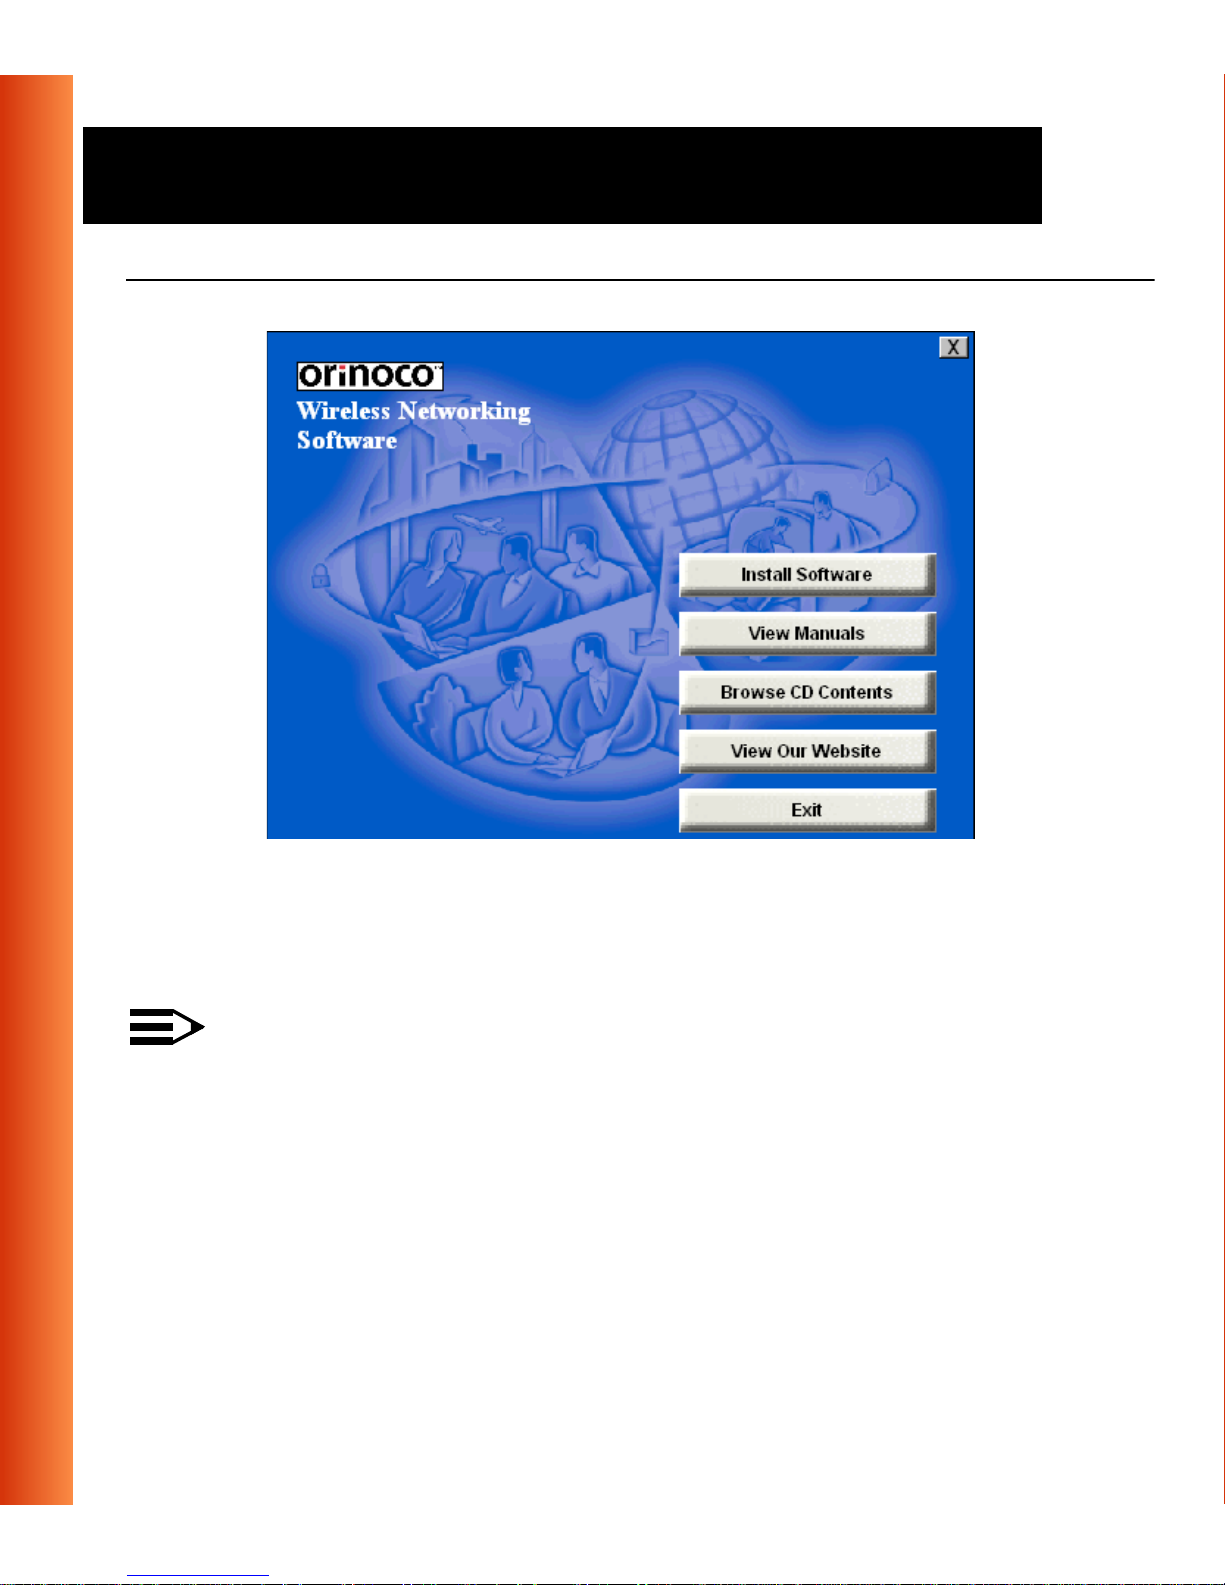
Your op erating system will automatically start the CD and display the
menu pictur ed in Figure 2-1 on page 2-4.
ORiNOCO PC Card - Getting Started
2-3
Page 27
Installation for Windows - Introduction
Figure 2-1 Start-Up S creen ORiNOCO Software CD-ROM
2-4
2. Select button
3. Select
Install Client Manager.
Install Software.
4. Follow the instructions on your screen.
NOTE:
If the CD-ROM does not start automatically:
1. Click the Windows
2. Select
Run
3. Browse to the CD-ROM
4. Select the file “setup.exe”.
ORiNOCO PC Card - Getting Started
Start button
Page 28
Installation for Windows - Ins ert your ORiNOCO PC Card
Insert your ORiNOCO PC Card 2
1. Unpackyour ORiNOCO P C C ard kit and verify that all items are present,
as described in “Kit Contents” on page 1-1.
If any of the items described appear to be damaged or missing, please
contact your supplier.
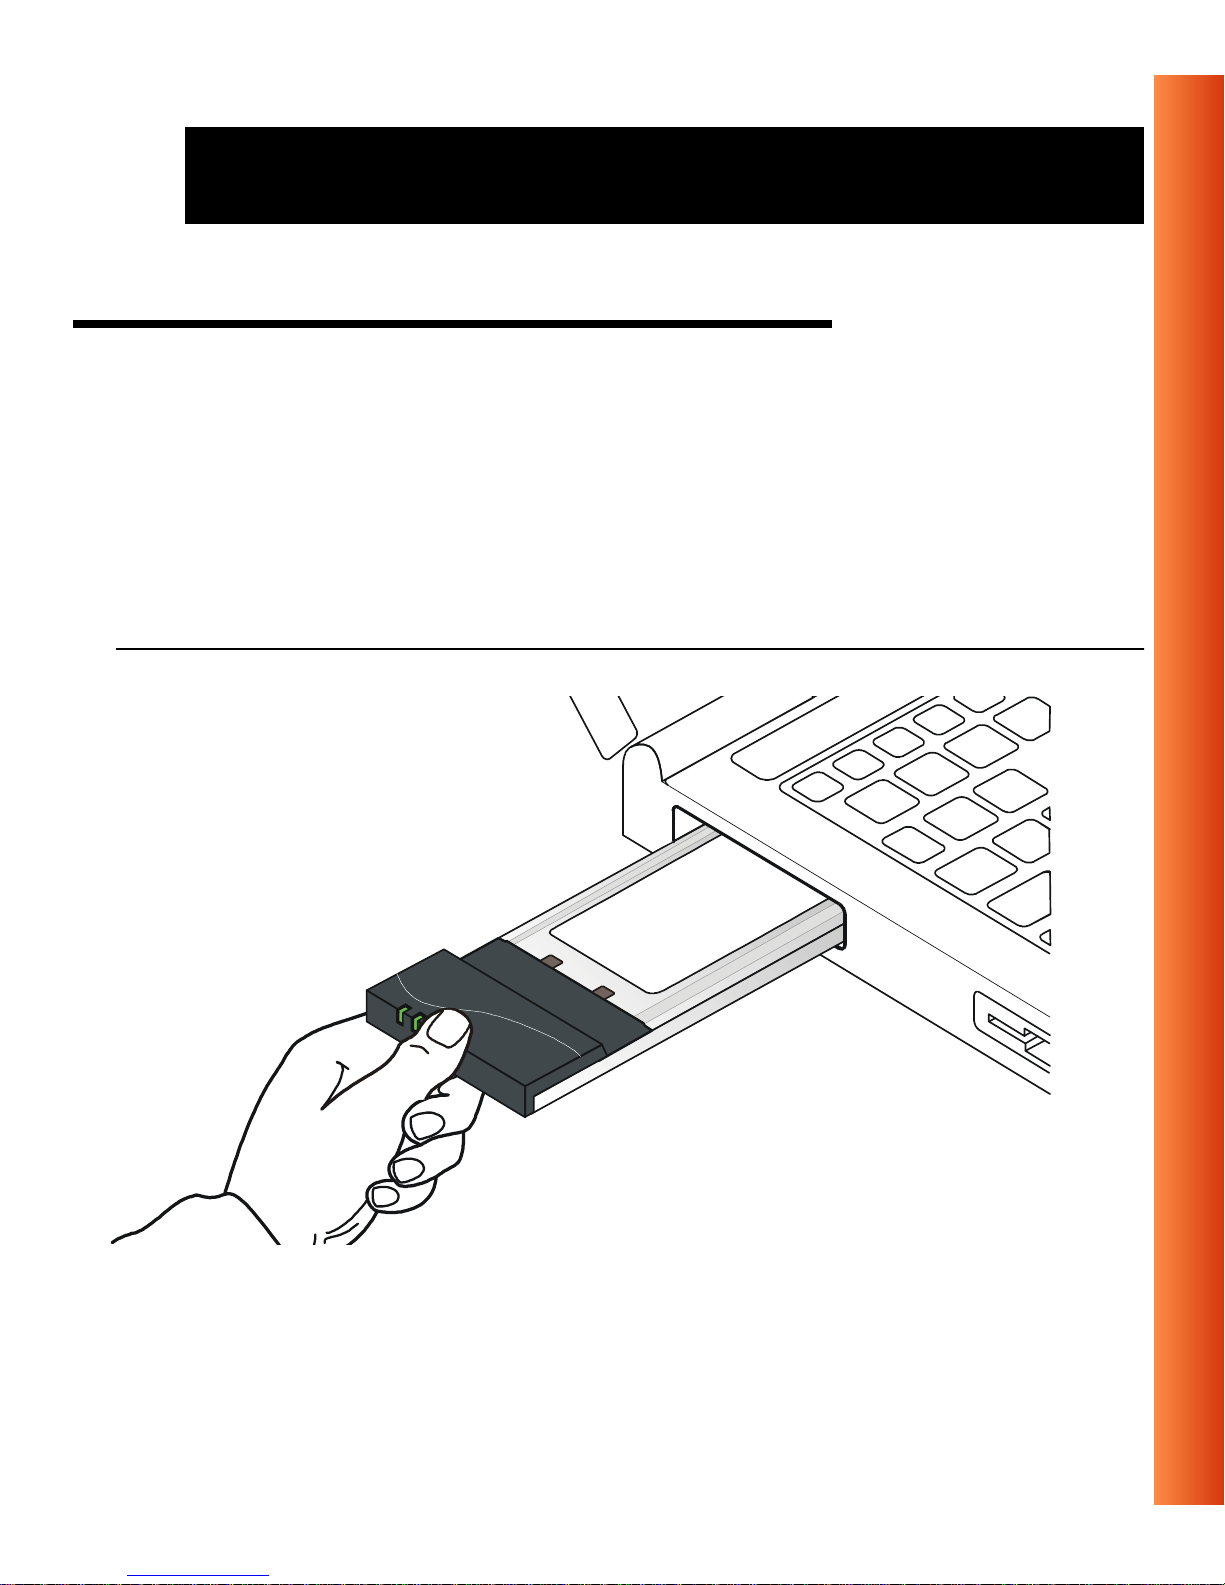
2. Insert the ORiNOCO PC Card into the PC Card slot of your computer as
pictured in Figure 2-2.
Figure 2-2 Inserting the PC Card into Your Computer
IfyouwanttoinstallthePCCardintoadesktopcomputer,usean
ISA Adapter or PCI Adapter.
ORiNOCO PC Card - Getting Started
2-5
Page 29

Installation for Windows - Install Drivers
Install Drivers 2
Before You Start the In stallation 2
Beforeyoustarttheinstallation,youareadvisedtokeeptheWindows
CD-ROM or software diskettes close at ha nd. If your computer came with a
factory-installed W indows operating system, these files will be stored on
your computer’s hard disk, in the form of cabinet (*.ca b) files.
NOTE:
If you are upgrading from an earlier version of the ORiNOCO
Miniport driver, please read Appendix B of the ORINOCO PC Card -
2-6
User’s Guide provided on the ORiNO CO Software CD-ROM.
WhatYouNeedtoKnow 2
Installing a ORiNOCO PC Card requires the same level of expertise that you
would need to install a standard Eth ernet network a dapter card. It is
assumed that you have a working knowledge of stan dard Windows 95/98
operations and of installing network adapter cards. Refer to the Windows
Help when necessary (on the Windows task bar, press the
select
Help).
ORiNOCO PC Card - Getting Started
Start button and
Page 30

Installation for Windows - Install Drivers
Driver Installation for Windows 95/98 2
Windows 95/98 operating systems support “Plug & Play”for PC Cards. Once
you insert the ORiNOCO PC Card into your computer, these operating
systems will automatically:
■ Detect the card, and enable the ORiNOCO Driver, or
■ Start the Add New Hardware wi zard and prompt you to install the driver,
when the operating system cannot find the required driver.
This would typically occur when inserting the ORiNOCO PC Ca rd into
your computer for the very first time.
To install the driver proceed as follows:
1. IfWindowsstartstheAdd New Hardware wizard follow the instructions of
the
New Ha rdware Found wizardtoinstallthedrivers.
■ When you are prompted to locate the driver installation files:
— Select the ORiNOCO CD-ROM that was included with your
PC Card kit and.
— If you downloaded the drivers from the ORiNOCO web site
navigate to the folder that matches your Operating system.
Windows 95:D:\Drivers\Win_95
Windows 98:D:\Drivers\Win_98
Windows 2000:D:\Drivers\Win_2000
When finished installing the drivers, Windows automatically opens the
Add/Edit Configuration Profile window.
ORiNOCO PC Card - Getting Started
2-7
Page 31

Installation for Windows - Install Drivers
2. Continue wi th setting the basic parameters as described on page 2-11.
NOTE:
If your computer does not detect the n ew hardware consult
Appendix B.
2-8
ORiNOCO PC Card - Getting Started
Page 32
Installation for Windows - Install Drivers
Windows Network Properties 2
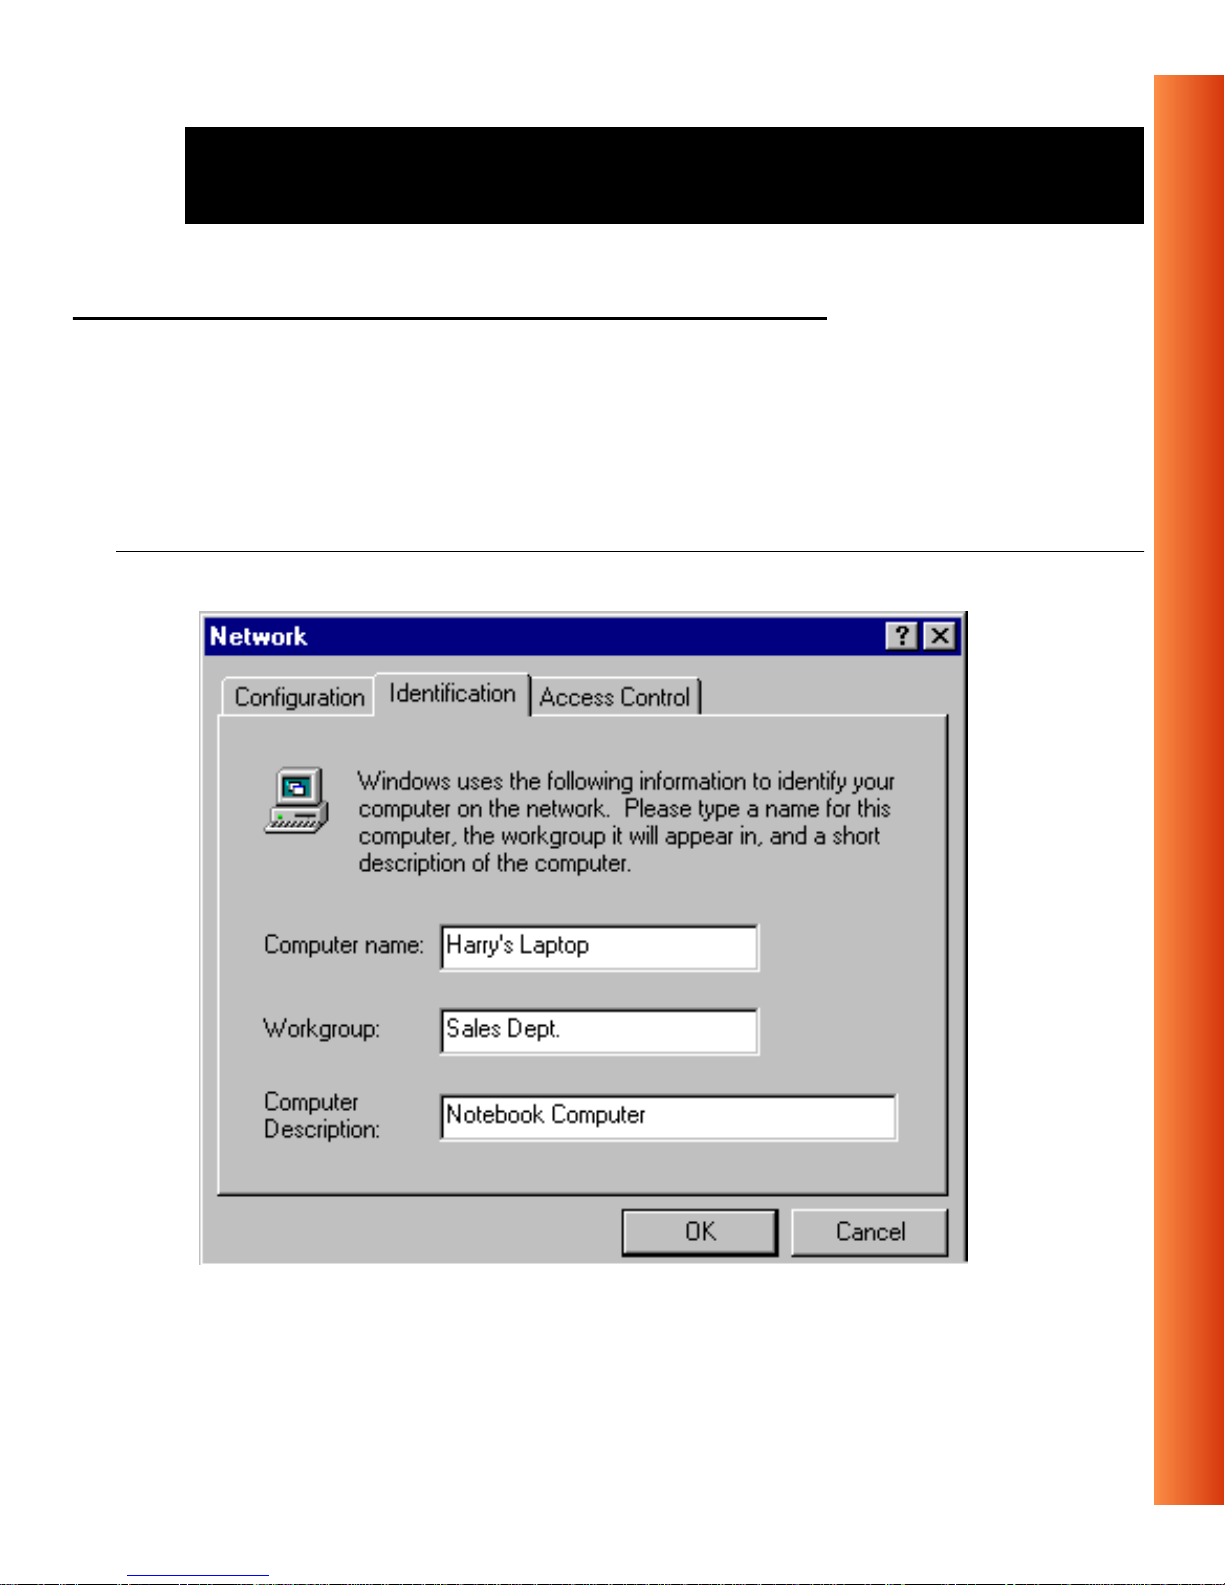
If this is the very first time that Networking support is installed onto your
computer, the Windows operating system will prompt you to enter a
computer and workgroup name. These names will be used to identify your
computer on the Microsoft Network Neighborhood.
Figure 2-3 Windows Network Identification Properties
ORiNOCO PC Card - Getting Started
2-9
Page 33

Installation for Windows - Install Drivers
NOTE:
The screen displayed in Figure 2-3 on page 2-9 will not app ear if
network support had not been installed. If so, move to page 2-11
and proceed with setting the basic parameters.
1. The wind ow will pop-up automatically.
2. In the
Computer Name field, enter a unique name for your computer.
3. In the Workgroup field, enter the name of your w orkgroup.
4. (Optional) Provide a description of the computer in the
Description
field.
Computer
For more information about setting your Windows Network Properties,
consult your Windows documenta tion or the Windows on-line help
information.
2-10
ORiNOCO PC Card - Getting Started
Page 34
Installati on for Wi ndows - Set Basic Parame ters
Set Basic Parameters 2
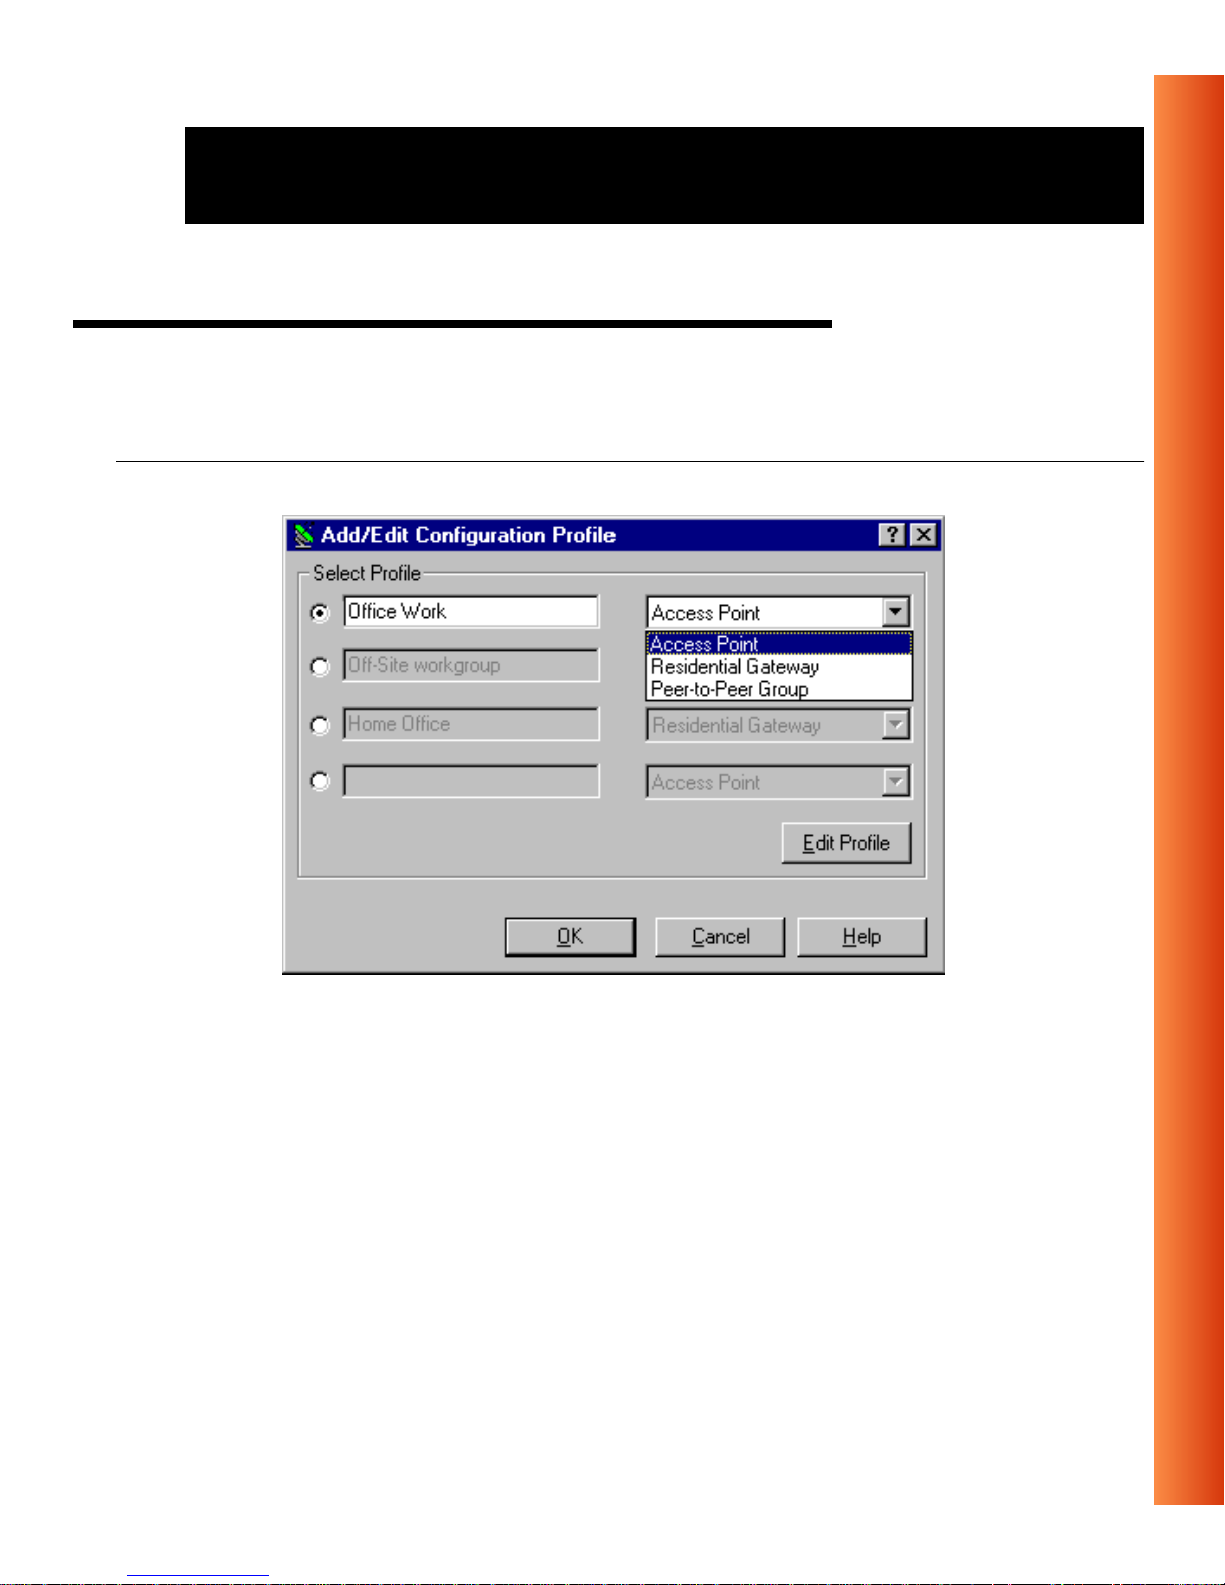
After installing the d r ivers, Windows will open the Add/Edit Configuration
Profile window for your ORiNOCO PC Card as pictured in Figure 2-4.
Figure 2-4 Add/Edit Configuration Profile window
The Add/Edit Configuration Profile window enables you to specify one or
more network connection profiles.
For example you can setup profiles for:
■ Office, to connect to an Enterprise Network via an Access Point.
■ Workgroup Com put ing , to share files with colleagues or friends in
small Peer-to-Peer workgroups without access point.
■ Home, to connect to a Residential Gateway (RG) that provides access to
the Internet or your home printers.
ORiNOCO PC Card - Getting Started
2-11
Page 35

Installati on for Wi ndows - Set Basi c Parame ters
For more information about the di fferent types of networks, refer to
“ORiNOCO Network Scenarios” on page 1-3.
To connect your computer to a wireless network you will need to:
1. Assign a name to the network connection profile
2. Use the pull-down menu on the right to select howyouwish to connect to
the wireless network.
3. Click the Edit Profile button to view/modify the parameters for the
selected profile.
For first-time installations, you are advised to setup the single profile using
only the Basic Settings.
2-12
NOTE:
The number and type of pa rameters you need to specify may differ
according to the selected connection type. See page 2-13 for
Access Point connection settings and page 2-15 for the Residential
Gateway connection settings.
For information about various option press the key or click the
button.
ORiNOCO PC Card - Getting Started
F1
Help
Page 36
Installati on for Wi ndows - Set Basic Parame ters
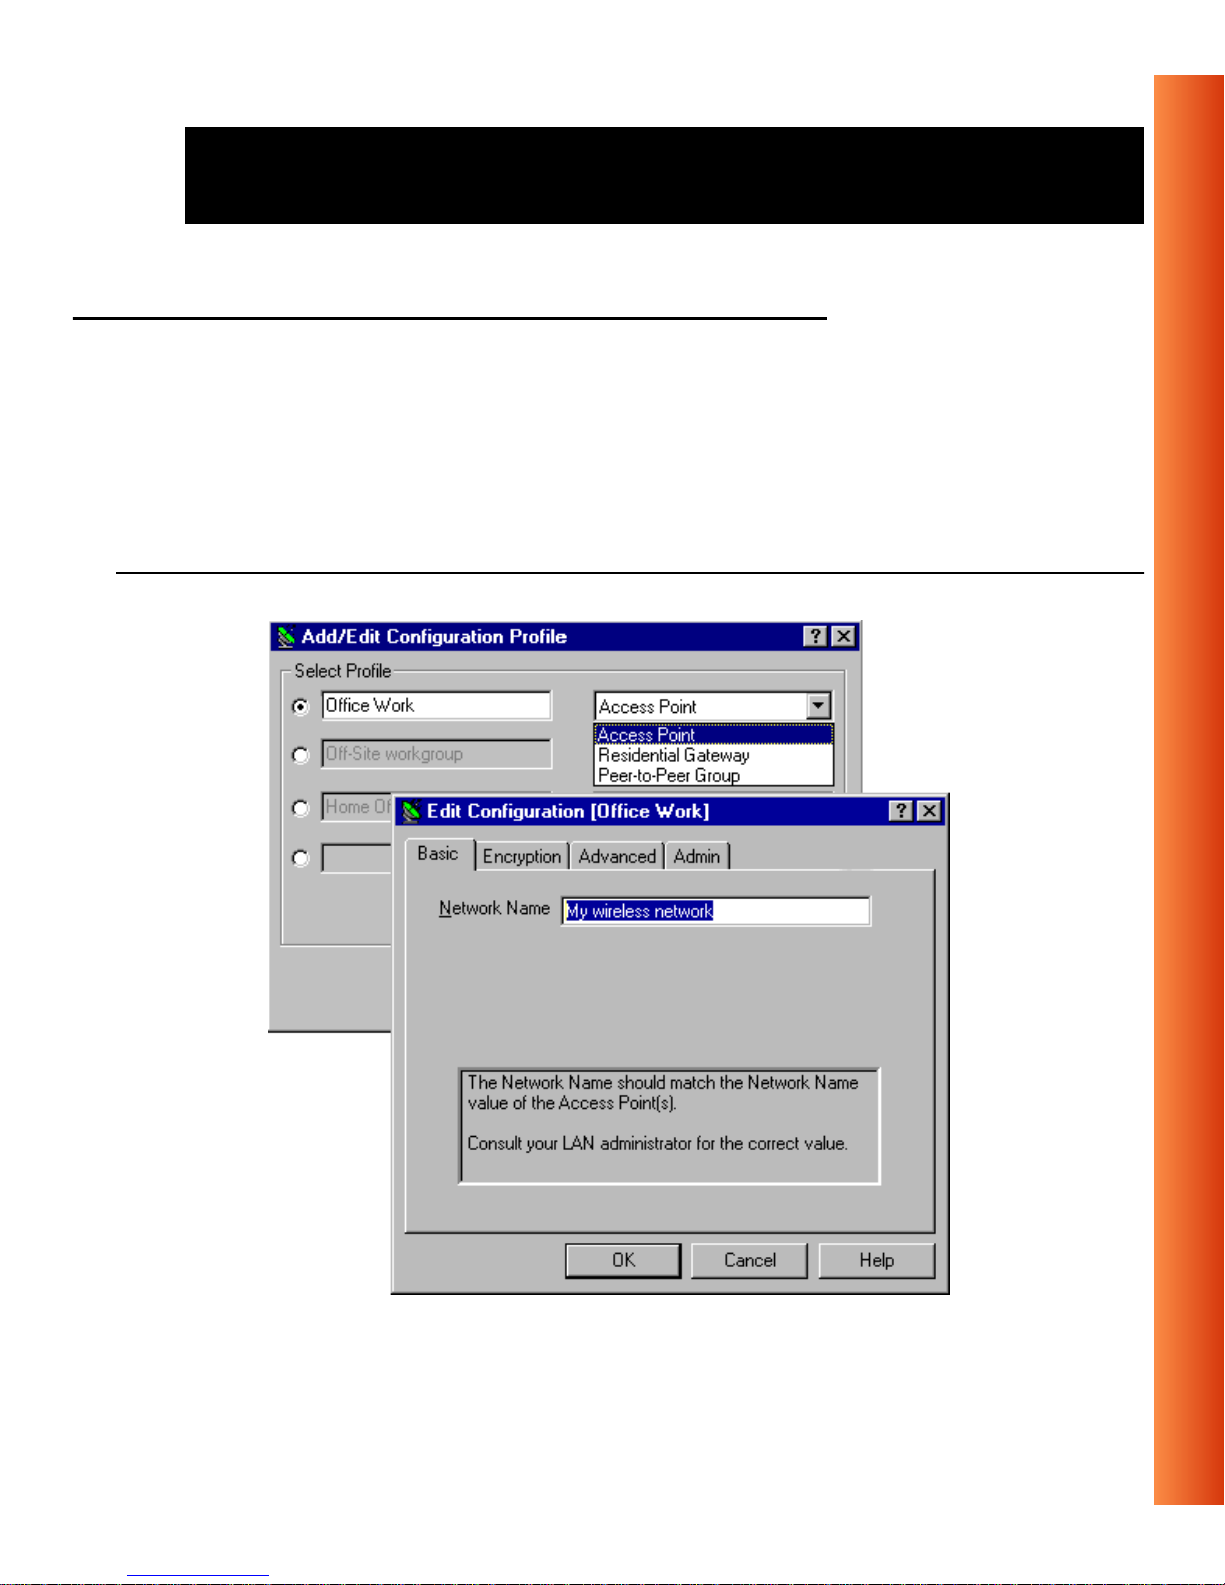
Basic Settings for Enterprise Networks 2
If you wish to connect to an Enterprise Network, use the Add/Edit
Configuration Profile window to:
■ Select to connect to an Access Point.
■ Set the correct Network Name.
Figure 2-5 Edit Configuration window
ORiNOCO PC Card - Getting Started
2-13
Page 37

Installati on for Wi ndows - Set Basi c Parame ters
1. In the field Network Name define the name of the wireless network to
which you want to connect. You can either use:
■ The value “ANY”
To connect to any ORiNOCO network in the v icinity of your
computer.
■ An “exact” value to connect to
Consult your LAN Administrator for the value that applies to your
network.
The Network Name can be any alphanumeric string in the range of
“a” to “z”, “A” to “Z” and “0” to “9” with a maximum of 32 characters
(case-sensitive).
2. Click
OK to confirm and return to the Add/Edit Configuration Profile
window.
3. Click
OK again to finish with the installation as described on page 2-19.
The ORiNOCO Edit Con figuration window, also provides you the possibility
to change other parameters (Encryption, Advanced and Admin parameters).
These p arameters are described in the on-line help file of the drivers, and in
Chapter 4 of the on-line “ORiNOCO PC Card User’s Guide” on the
ORiNOCO Software CD-ROM.
You are advised to leave these parameters to their default settings, unless
there are special situations, for example, upon advice of an ORiNOCO
expert.
2-14
ORiNOCO PC Card - Getting Started
Page 38
Installati on for Wi ndows - Set Basic Parame ters
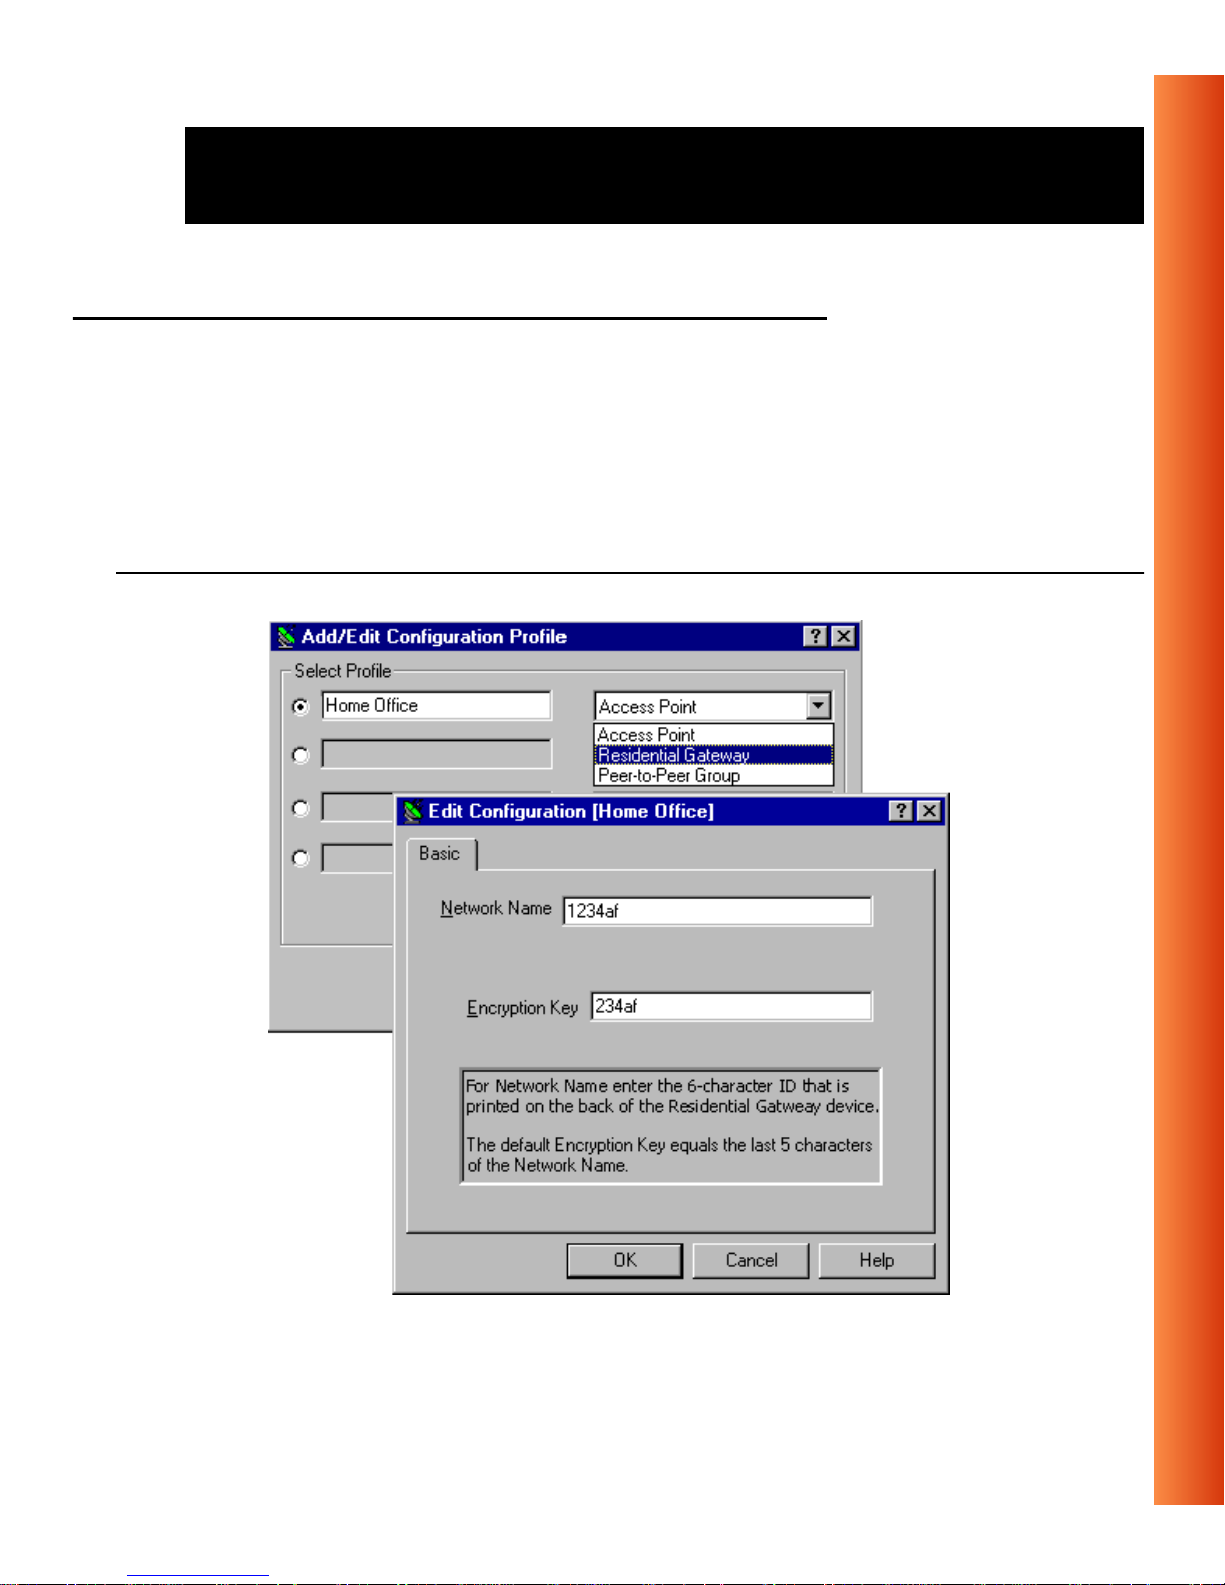
Basic Settings for Residential Gateways2
If youwish to connect to a Home Network via a Residential Gateway, use the
Add/Edit Configuration Profile window to:
■ Select to connect to a Residential Gateway.
■ Set the correct Network Name and Encryption Key.
Figure 2-6 Edit Configuration window: Residential Gateway
ORiNOCO PC Card - Getting Started
2-15
Page 39

Installati on for Wi ndows - Set Basi c Parame ters
1. In the field Network Name enter the 6-character RG ID to define the
name of the wireless network to which you want to connect.
The Network Name has to match theunique RG ID (which can be found
on the device).
2. In the
Encryption Key field enter the last 5 digits of the RG ID (default).
NOTE:
If you changed the default Encryption Key on the Residential
Gateway (RG) you will need to enter the new value here as well.
3. Click OK to confirm and return to the Add/Edit Configuration Profile
window.
4. Click
OK again to finish the installation as described on page 2-19.
2-16
ORiNOCO PC Card - Getting Started
Page 40
Installati on for Wi ndows - Set Basic Parame ters
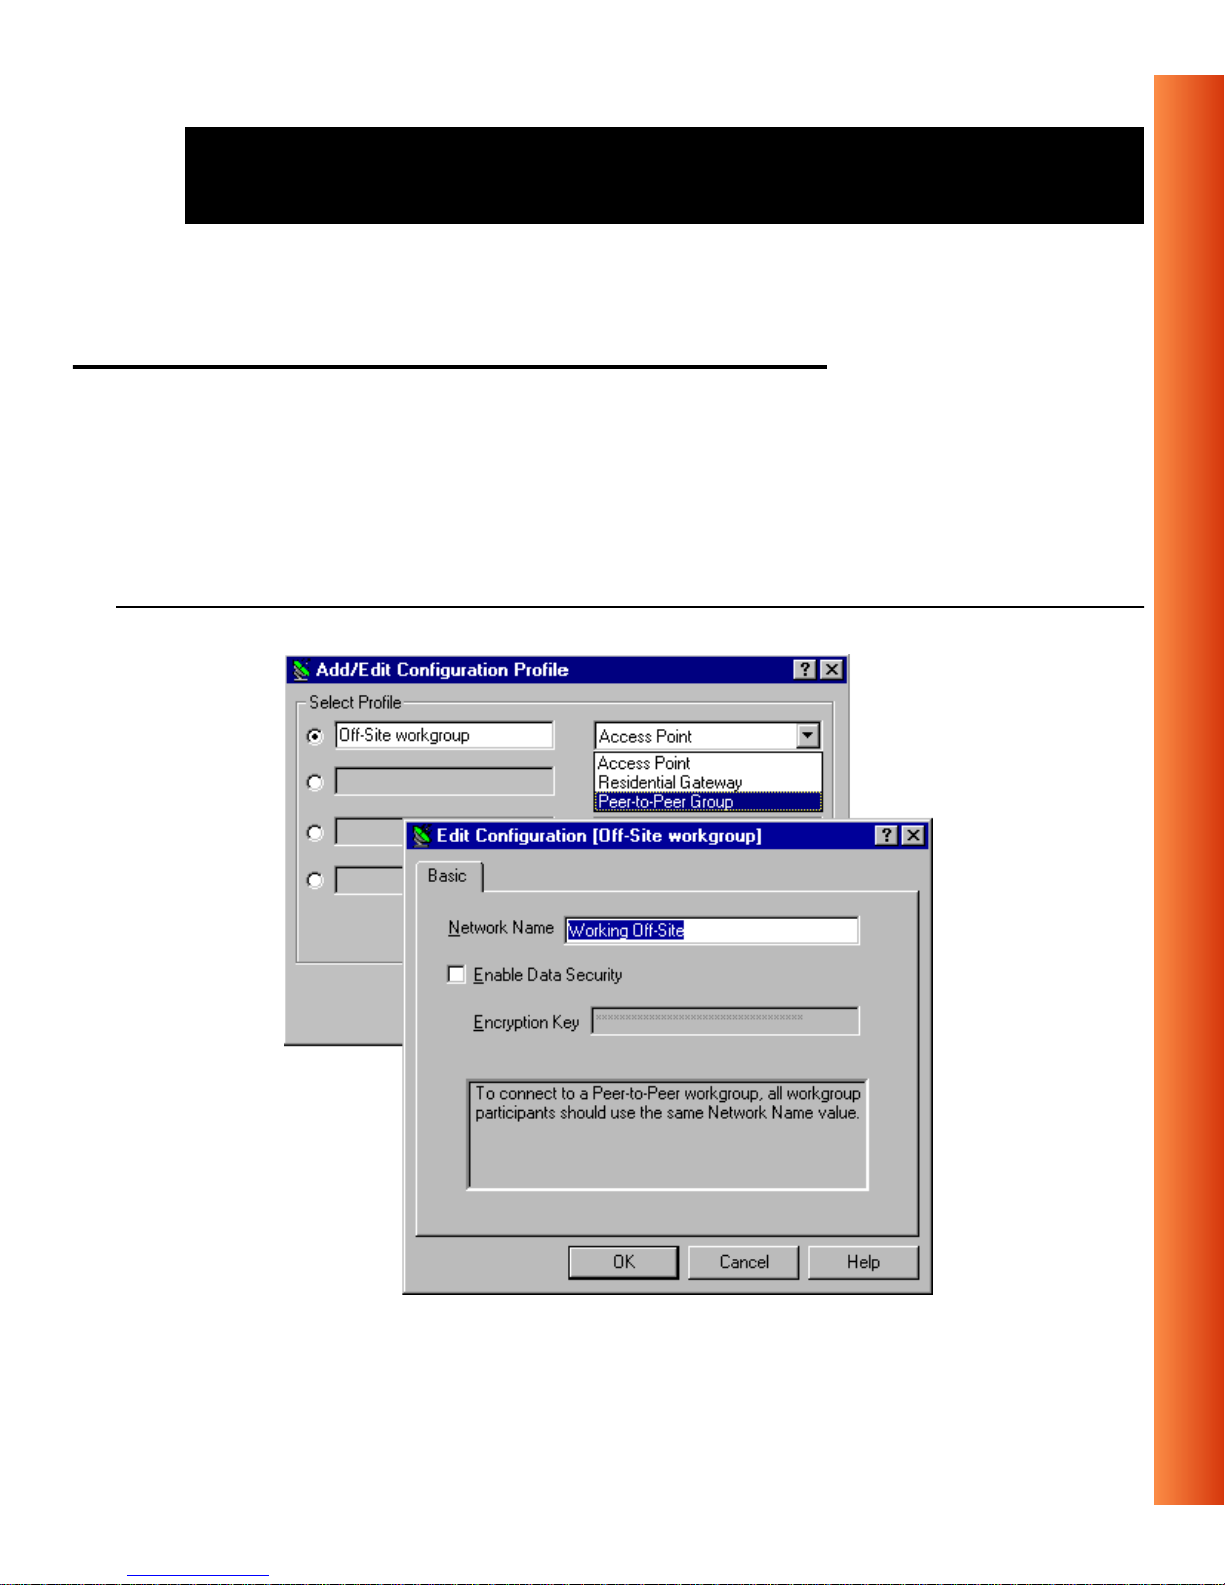
Basic Settings for Peer-to-Peer
Workgroups 2
If you wish to connect to a Peer-to-Peer workgroup, use the Add/Edit
Configuration Profile window to:
■ Select to connect to a Peer-to-P eer Wo rkgroup.
■ Set the correct Network Name and Encryption Key.
Figure 2-7 Edit Configuration window: Peer-to-Peer
ORiNOCO PC Card - Getting Started
2-17
Page 41

Installati on for Wi ndows - Set Basi c Parame ters
1. In the field Network Name define the name of the wireless network to
which you want to connect.
TheNetworkNamecanbeanyalphanumericstringintherangeof“a”to
“z”, “A” to “Z” and “0” to “9” with a maximum of 32 characters
(case-sensitive).
■ If there is already a Peer-to-Peer group with this name available
your computer will automatically connect to this workgroup.
■ If there is not yet such a group available, your computer will
automatically start one with this name.
2. Click
OK to confirm and return to the Add/Edit Configuration Profile
window.
3. Click
OK again to proceed with the installation.
Continue with “Finish the Installation” on page 2-19 to complete the
installation procedure.
2-18
ORiNOCO PC Card - Getting Started
Page 42

Installation for Windows - Finish the Installation
Finish the Installation 2
Whenyouhavefinished“SetBasicParameters”,clicktheOK button to close
the Add/Edit Configuration window and to proceed with the installation
process. Windows will finish building the driver configuration database and
copy some files to your computer’s hard disk.
■ If the Windows operating system prompts you to identify the location of
the Windows files, specify the drive and directory of the Windows
Installation CD-ROM or diskettes.
When you had a PC Card installed on your computer before, most of
thesefilesarealreadyavailableonyourharddiskdrive.Ifyoudonot
have the Windows CD-ROM available, you may try replacing the
proposed path in the Copy Files From dialog box with:
“C:\Windows\System” or “C:\Windows\”
■ If the Windows operating system prompts you to identify the location of
the ORiNOCO driver files (typically file names s tarting with the
characters wv*.v) specify the drive and director y of the ORiNOCO
Software:
— if installing from the ORiNOCO CD-ROM specify the drive in one of
the following directories on the ORiNOCO Software CD-ROM.
Windows 95:D:\Drivers\Win_95
Windows 98:D:\Drivers\Win_98
Windows 2000:D:\Drivers\Win_2000
— if installing files that you downloaded from the Internet, point to the
disk drive or directory where you saved the downloaded files.
ORiNOCO PC Card - Getting Started
2-19
Page 43
Installation for Windows - Finish the Installation
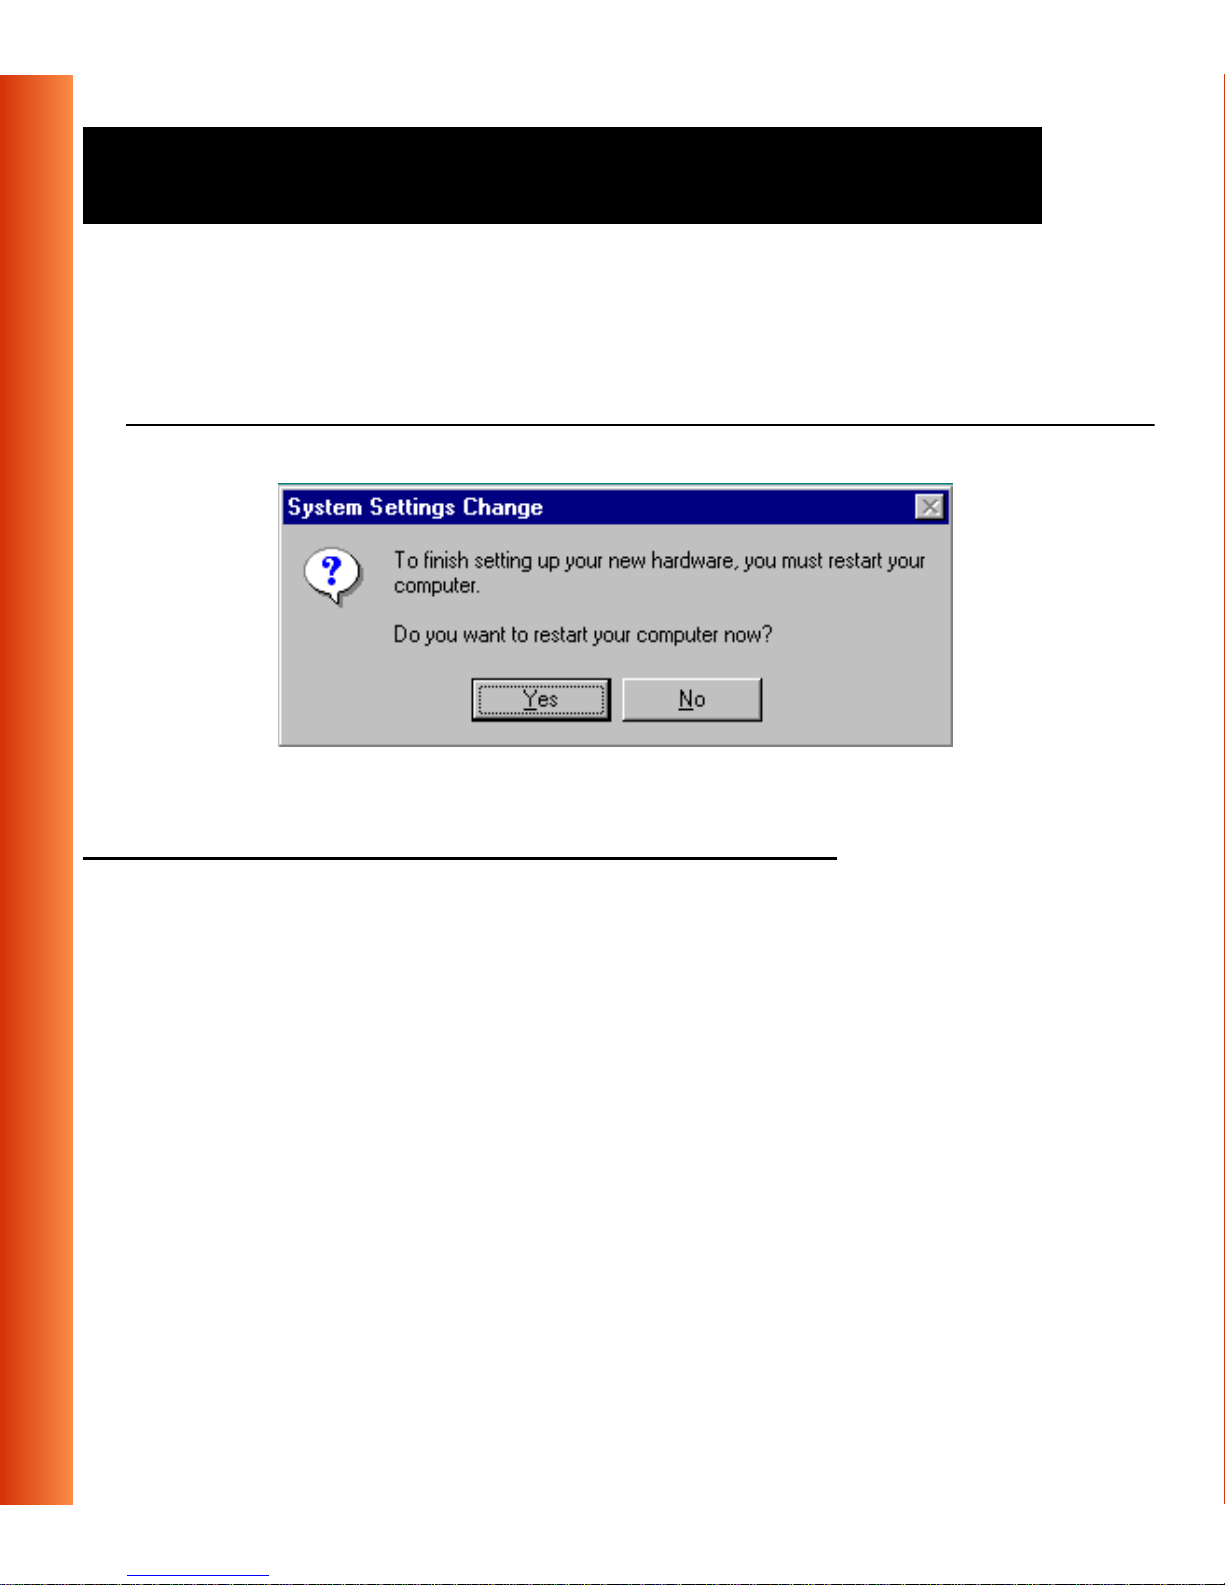
When Windows has finished t he copying of files, it will prompt you to restart
your computer (see Figure 2-8). Click the
OK button to restart your
computer.
Figure 2-8 Finished Setting up the Hardware
After Restarting Your C ompu ter 2
2-20
After you have restarted your computer, the Windows operating system will
detect the ORiNOCO PC Card (you can hear the two-tone sound of the
PC Card Socket Controller).
Load the ORiNOCO dr iver, in a dialog box enter a Windows user name and
password.
ThepasswordyouenterherewillbetheoneusedtologintotheWindows
Network Neighborhood.
ORiNOCO PC Card - Getting Started
Page 44
Installation for Windows - Finish the Installation
Verifying installation 2
To verify if the i nstallation of the drivers was completed successfully:
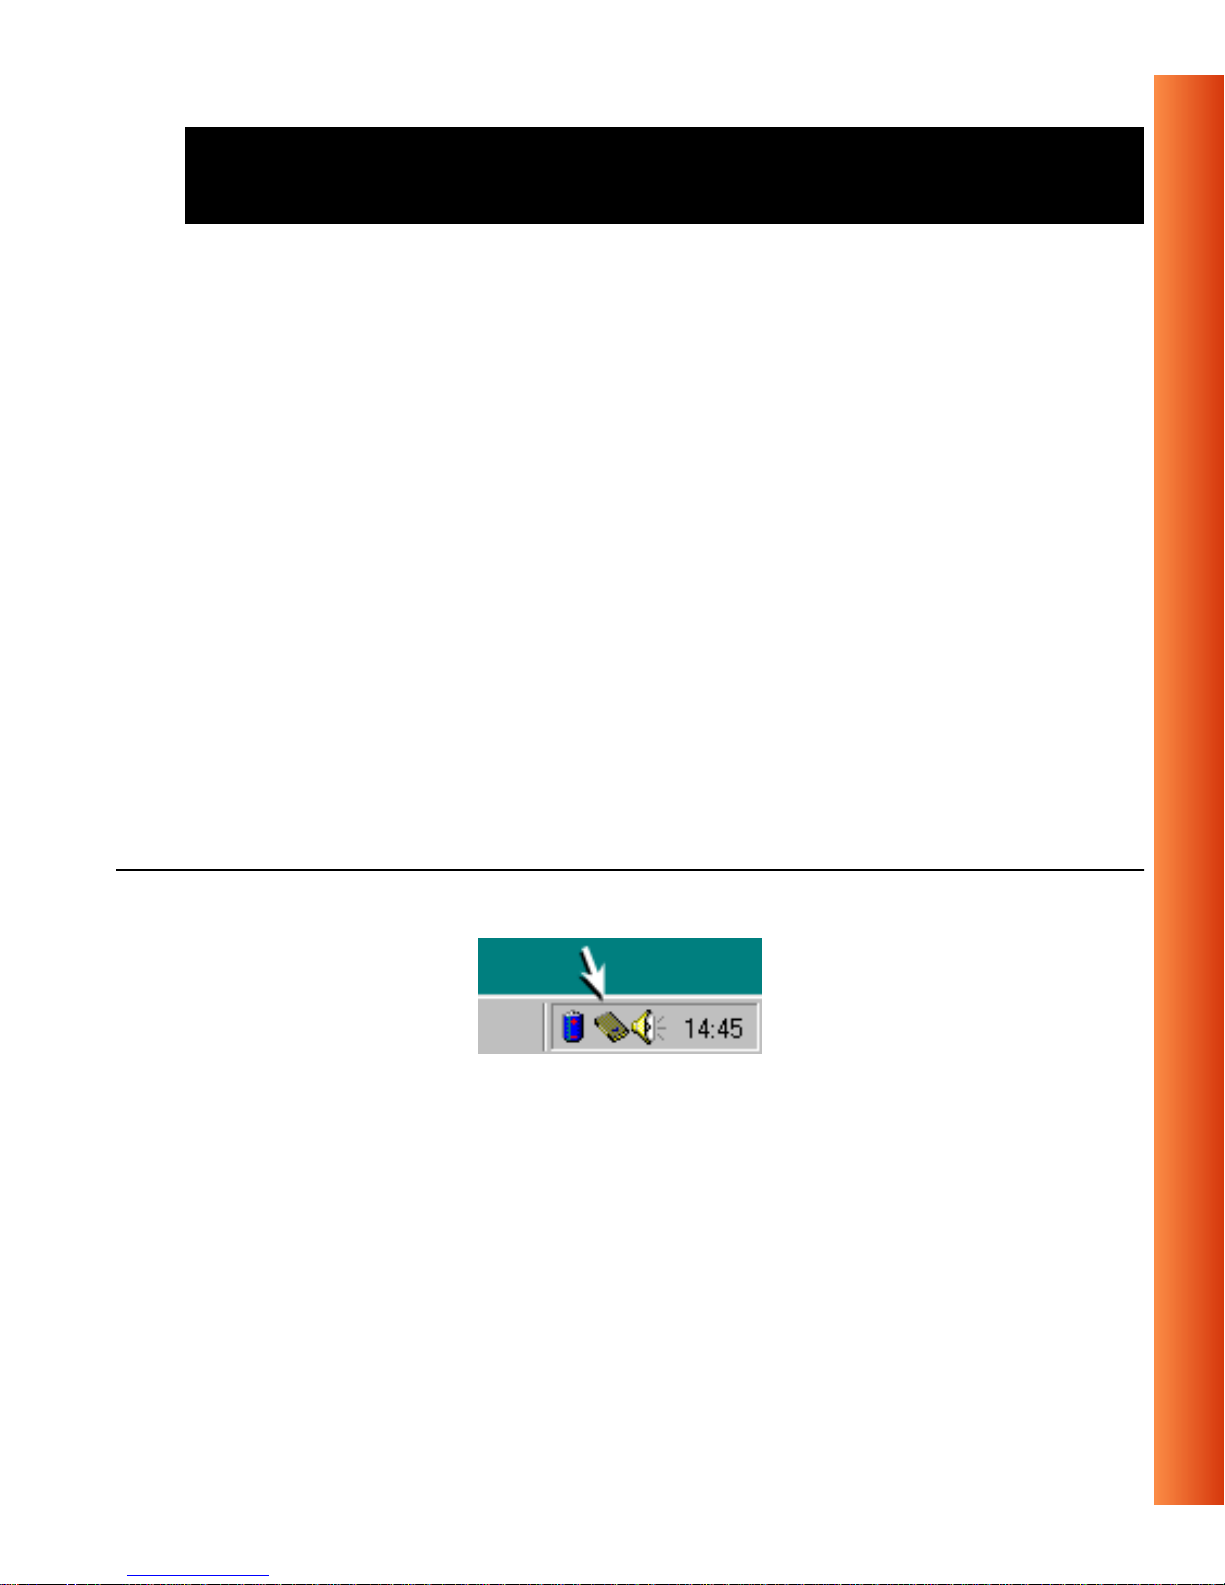
■ Check if the PC Card icon on the Windows task bar is visible as pictured
in Figure 2-9.
■ Check the LEDs on your PC Card. The following should be visible:
— A steady green Power LED to indicate the PC Card is active.
— A flickering green Transmit/Receive LED to indicate wireless activity
while transmitting data.
For other LED behavior see Appendix B.
■ (Optional) To check the quality of the networ k connection, install the
ORiNOCO Client Manager program as described in “Installing the
Client Manager Software”.
Figure 2-9 PC Card icon on the Windows task bar
ORiNOCO PC Card - Getting Started
2-21
Page 45

Page 46

Working with ORiNOCO and
Win do ws
3
Introduction 3
This chapter provides general information about:
■ Using your PC Card
■ View Other Computers
■ View Wireless Link Quali ty
■ View/Modify PC Card Settings
■ Finding M ore Information
ORiNOCO PC Card - Getting Started
3-1
Page 47

Working with ORiNOCO and Windows - Using your PC Card
Using your PC Card 3
Radio Antenn as 3
The built-in radio and antennas of your ORiNOCO PC Card perform best in
an open environment with a s few obstacles as possible.
■ To achieve the maximum range for wireless com munications do not
cover the card with objects such as books or thick stacks of paper.
■ If you are using the card inside a desktop computer you may consider
the pur chase of the optional Range Extender Antenna.
3-2
Removing the PC Card 3
If you do not need the wireless connectivity of your ORiNOCO PC Card, you
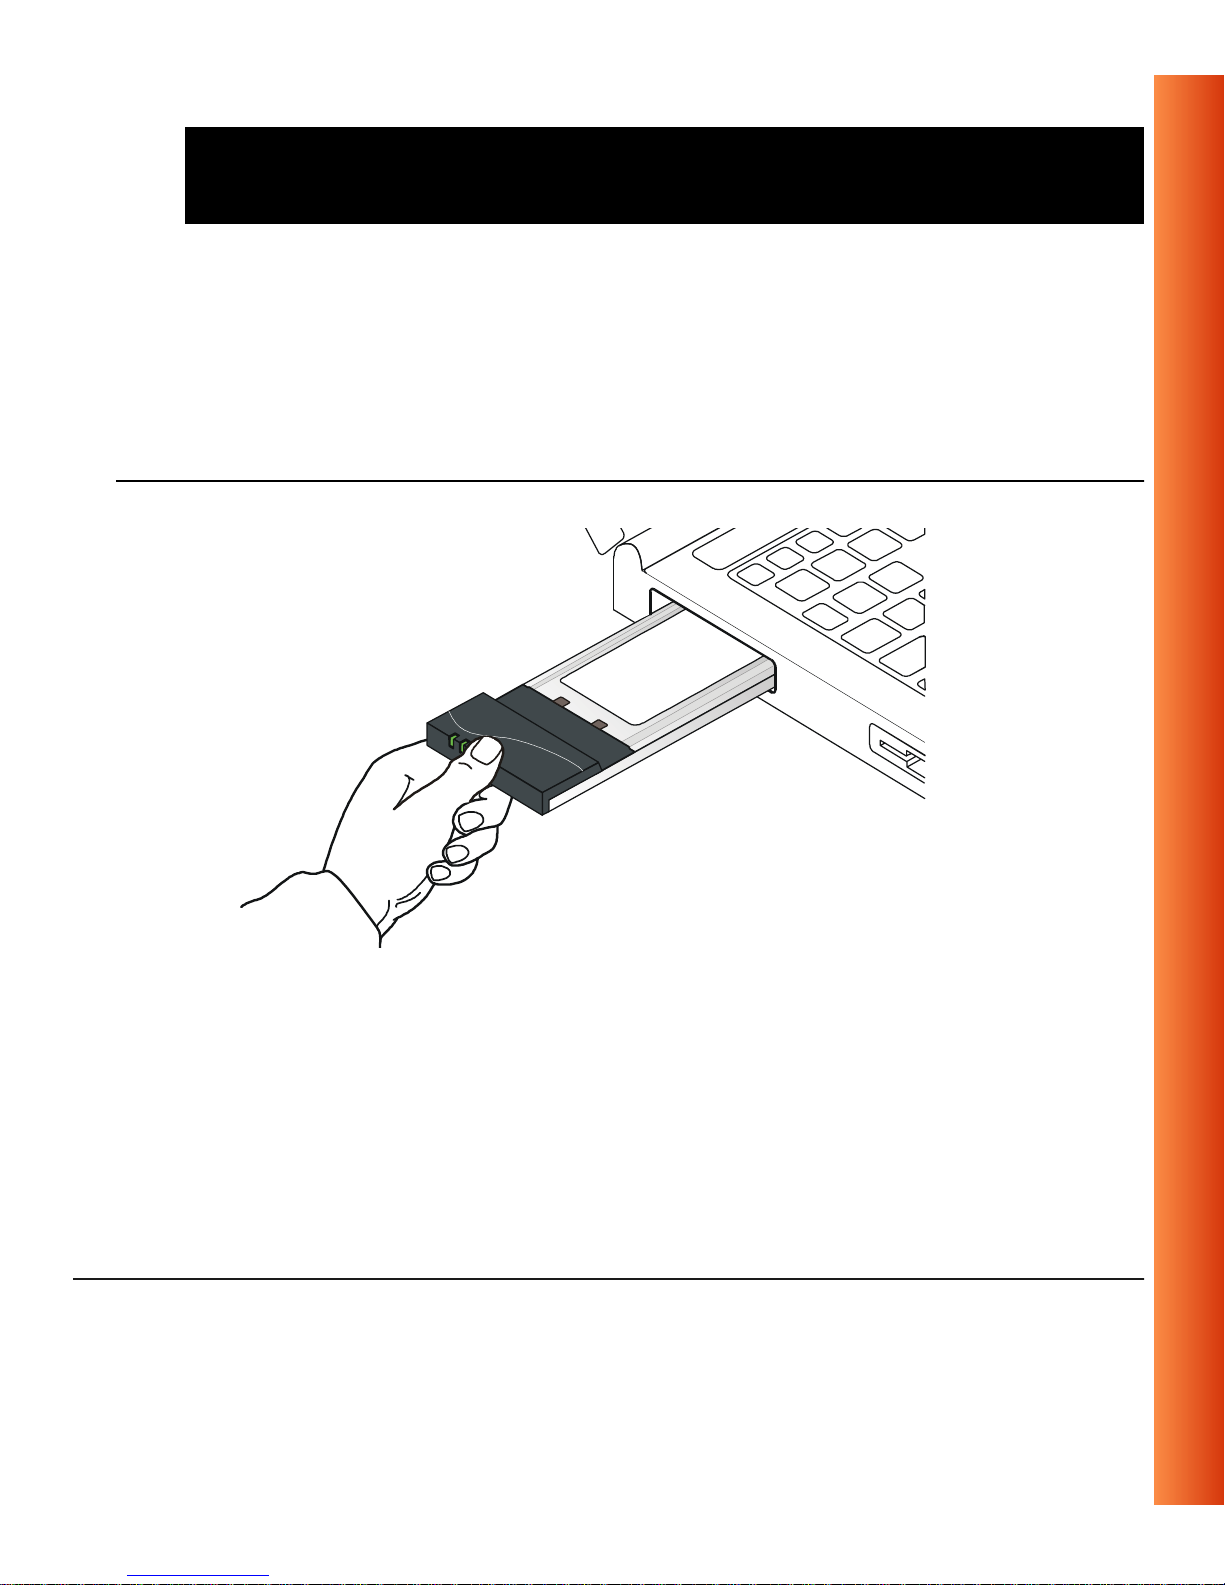
canremovethePCCardfromitsslotaspicturedinFigure3-1.
!
YouareadvisedtoalwaysdisablethePCCardprior to removing the card
from the PC Card slot. This will allow the Windows operating system to:
CAUTION:
When removing the ORiNOCO PC Card you will lose your
connection to the n etwork. Prior to removing the PC Card, make
sure you have closed all files and network applications (such as email).
ORiNOCO PC Card - Getting Started
Page 48
Working with ORiNOCO and Windows - Us ing your PC C ard
■ Log off from the network server
■ Disable the OR iNOCO P C Card driver
■ Disconnect power to the PC Card slot (which will extend battery life for
mobile computers).
Figure 3-1 Removing the PC Card
To stop using the ORiNOCO P C Card:
1. Click once on the PC Card icon on the right side of the Windows task
bar.
2. Select the option
Stop ORiNOCO PC Card
3. Wait a few seconds until the operating systems displays a pop-up
message to indicate you can safely remove the PC Card.
1 Alternatively, disable the PC Card via the PC Card icon on the Control Panel menu.
1
.
ORiNOCO PC Card - Getting Started
3-3
Page 49

Working with ORiNOCO and Windows - Using your PC Card
Maintenance of your PC Card 3
If you are not using the ORiNOCO PC Ca rd for wireless communications,
extend its life by storing it inside the transparent plastic casing that was
shipped with the product.
To clean the PC Ca rd, g ently wipe it with a soft (damp) cloth.
!
CAUTION:
To avoid damage to the PC Card do not use abrasive materials, o r
rinse the card with liquids.
3-4
ORiNOCO PC Card - Getting Started
Page 50

Working with ORiNOCO and W indows - View O ther Com puters
View Other Computers 3
When mul tiple ORiNOCO stations are up-and-running in your wireless
network, you can use the procedure described below to display the other
computers:
1. Start Windows Explorer.
2. Scroll down the list of files and folders to look for the item
Neighborhood
3. Double-click the
.
Network Neighborhood item to display all stations in
Network
your Microsoft Networking Group.
4. To display other workgroups in the network environment, double-click the
Entire Network icon.
If you c annot find other (ORiNOCO) networked computers, verify whether
the other ORiNOCO computers are:
■ Powered up and logged on to the network.
■ Configured to operate with identical Microsoft Netwo rk settings
concerning:
— Networking Protocol.
— Wireless Network Name
— Workgroup Name
ORiNOCO PC Card - Getting Started
3-5
Page 51

Working with ORiNOCO and Windows - View Other Comput ers
To view or modify the Station N ame or Workgroup of your computer,
proceed as follows:
1. Click the button from the Windows task bar.
2. Click on Settings, and then on Control Panel.
3. In the Control Panel window, double-click the
Network icon.
4. In the Network Settings window, select the Identification tab.
You can verify and change the
Station Name or Workgroup parameters.
NOTE:
You have to restart your computer before changes to the Network
Settings will be effected.
To verify the radio connection with other stationsrefer to “View Wireless Link
Quality” on page 3-7.
3-6
ORiNOCO PC Card - Getting Started
Page 52

WorkingwithORiNOCOandWindows-Usingthe
Using the Client Manager 3
If you installed the ORiNOCO Client Manager as described in “Installing the
Client Manager Software” on page 2-3, you can use the Client Manager to:
■ Verify the quality of your wirel ess connection to the network.
■ View/Modify the configura tion settings of your wireless PC Card.
The Client Manager will star t automatically every time you power up your
computer.
The Client Manager icon is displayed in the “System Tray” of your
Windows task bar at the right-side on the bottom of your screen,
indicating t hat the Client Manager program is running.
■ Clicktheicononcewithyourleft mousebuttontoretrieveamore
detailed s tatus overview.
■ Clicktheicononcewithyourright mousebuttontodisplayamenuwith
more options.
View Wireless Link Quality 3
You c an u se the Client Manager icon on the Windows task bar to verify the
link quality of your network connection.
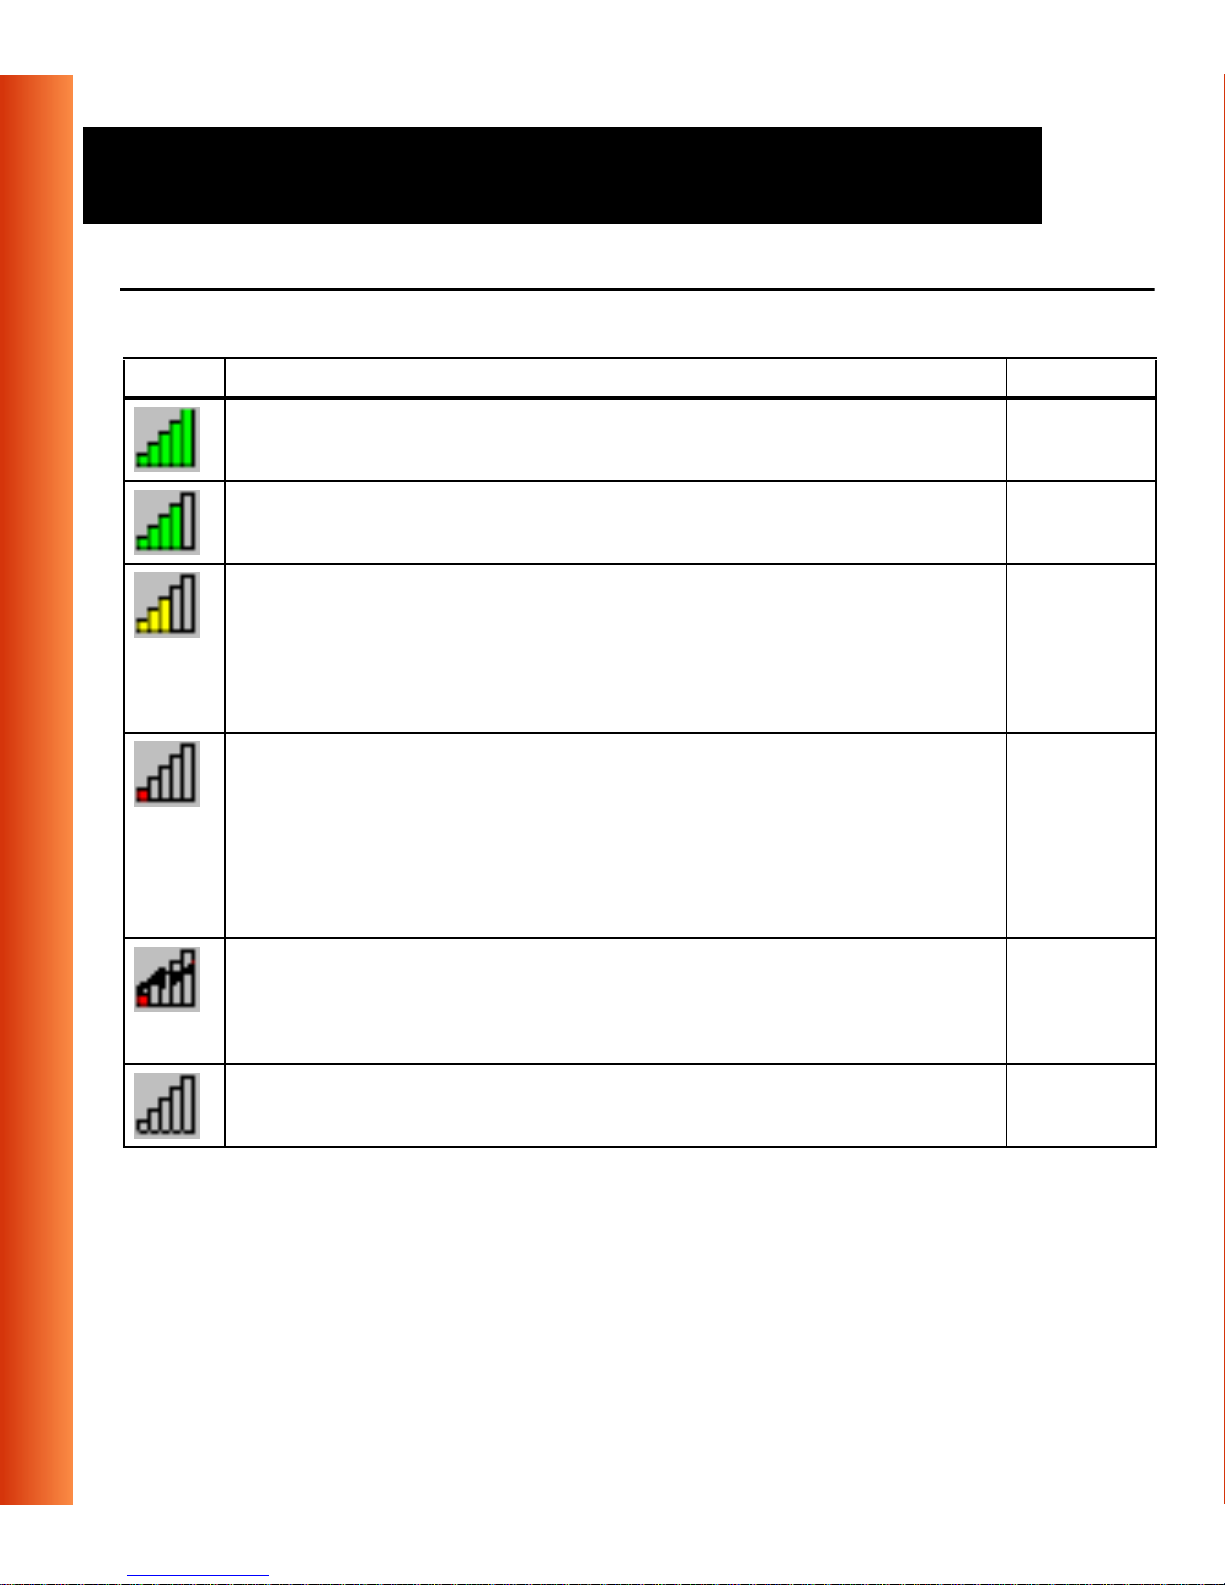
An overview of all possible icons is given in Table 3-1. When the
Client Manager icon is not indicating excellent or good radio connection, act
as described in Table 3-1.
ORiNOCO PC Card - Getting Started
3-7
Page 53
Working with ORiNOCO and Windows - Using the
Table 3-1 Client Manager Icon
Icon Description Color
Excellent radio connection Green
Good radio connection Green
Marginal radio connection:
Yellow
The radio signal is weak. Move closer to the:
■ ORiNOCO WavePOINT-II AP, or
■ ORiNOCO Base Station
Poor radio connection:
Red
The radio signal is very weak. Save your files and move
closer to the:
■ ORiNOCO WavePOINT-II AP, or
■ ORiNOCO Base Station
No radio connection because:
■ Looking for initial connection, or
■ You have mov ed out of range of the network.
Red
Peer-to-Peer network connection Blank
3-8
ORiNOCO PC Card - Getting Started
Page 54
WorkingwithORiNOCOandWindows-Usingthe
View/Modify PC Card Settings 3
If you would like to view or modify ORiNO CO parameters, for example
because you would like to connect to another network or type of network,
proceed as follows:
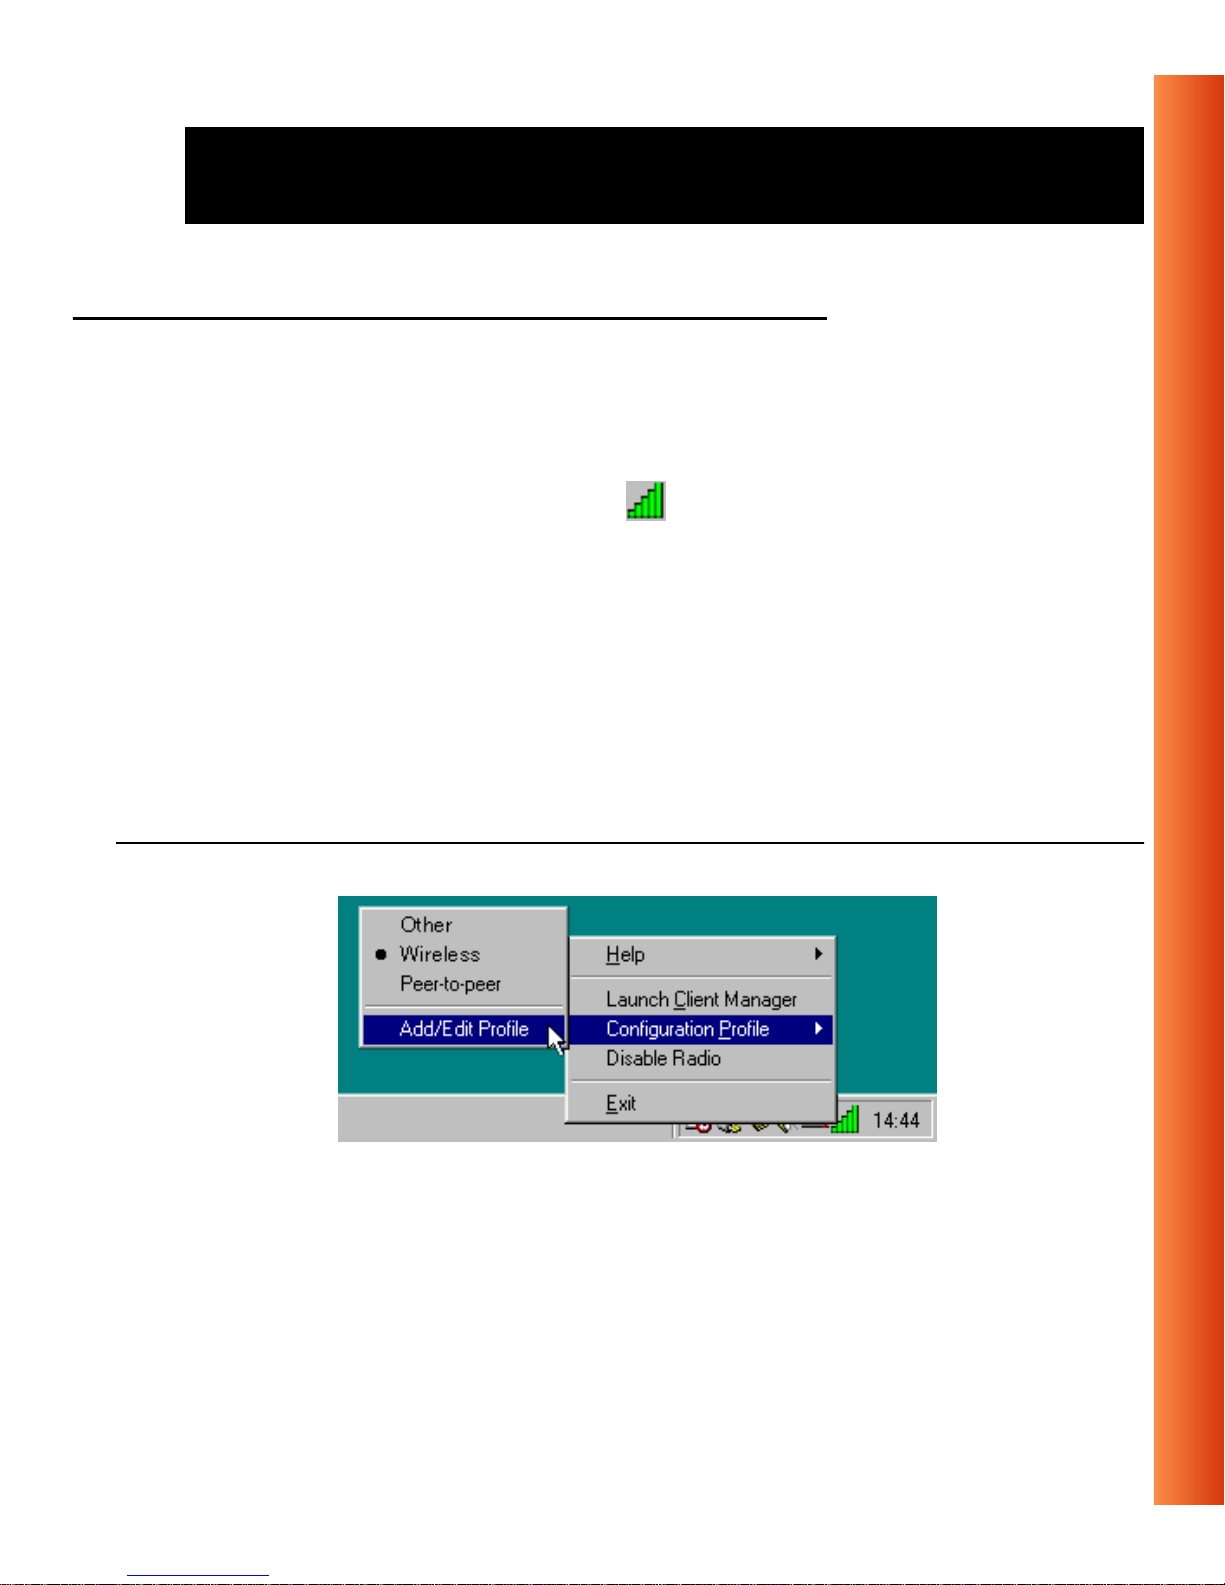
1. Right-click on the Client Manager icon on the Windows task bar.
2. From the menu, select
■ Add/Edit Profile to add a new profile or to modify an existing profile.
■ One of the existing profiles (if present) to select a profile without
Configuration Profile (see Figure 3-2) and select:
viewing or modifying the settings.
After selecting and another prof ile, the PC Card will use the sel ected
profile to connect to the wireless network.
Figure 3-2 Edit Wireless Configuration Settings
ORiNOCO PC Card - Getting Started
3-9
Page 55

Working with ORiNOCO and Windows - Using the
If your Client Manager icon is not visible, you have to start the
Client Manager program again:
1. Click the button from the Windows task bar.
2. Select Programs, and then select the ORiNOCO workgroup.
3. Next select
Client Manager to start the Client Manager program.
Alternatively you can to change the PC Card configuration via the Control
Panel:
1. Click the button from the Windows task bar.
2. Click on
3. In the Control Panel window, double-click the
Settings, and then on Control Panel.
ORiNOCO PC Card icon.
4. (Optional) Change the parameters you would like to modify, and click
■ the OK button to confirm your changes, or
■ the Cancel button to ignore your modifications.
3-10
ORiNOCO PC Card - Getting Started
Page 56

Working with ORiNOCO and Windows - Finding More
Finding More Information 3
If you are looking for more information than contained in this ORI NOCO PC
Card - Getting Started guide please consult one o f the following options:
■ The online “ORINOCO PC Ca rd - User’s Guide” - for more information
about the Client Manager program and for information about installing
the ORiNOCO PC Card in other operating systems, such as:
— MS Windows NT
— MS Windows CE
—MSDOS
— Apple Macintosh
The online “ORINOCO PC Card - User’s Guide ” canbefoundonthe
ORiNOCO Software CD-ROM that came with your PC Card kit.
■ The on-line hel p system of your ORiNOCO wireless system - for
information about software and driver function ality.
To view the on-line help system click the
Help button or press the
F1
function key on your keyboard in any ORiNOCO window, or
■ The “ORiNOCO Manager Suite User’s Guide” - a reference gui de for
LAN Administrators that need to setup, monitor and manage corporate
LANs.
ORiNOCO PC Card - Getting Started
3-11
Page 57

Page 58
Card Spec ifications
A
Physical Specifications A
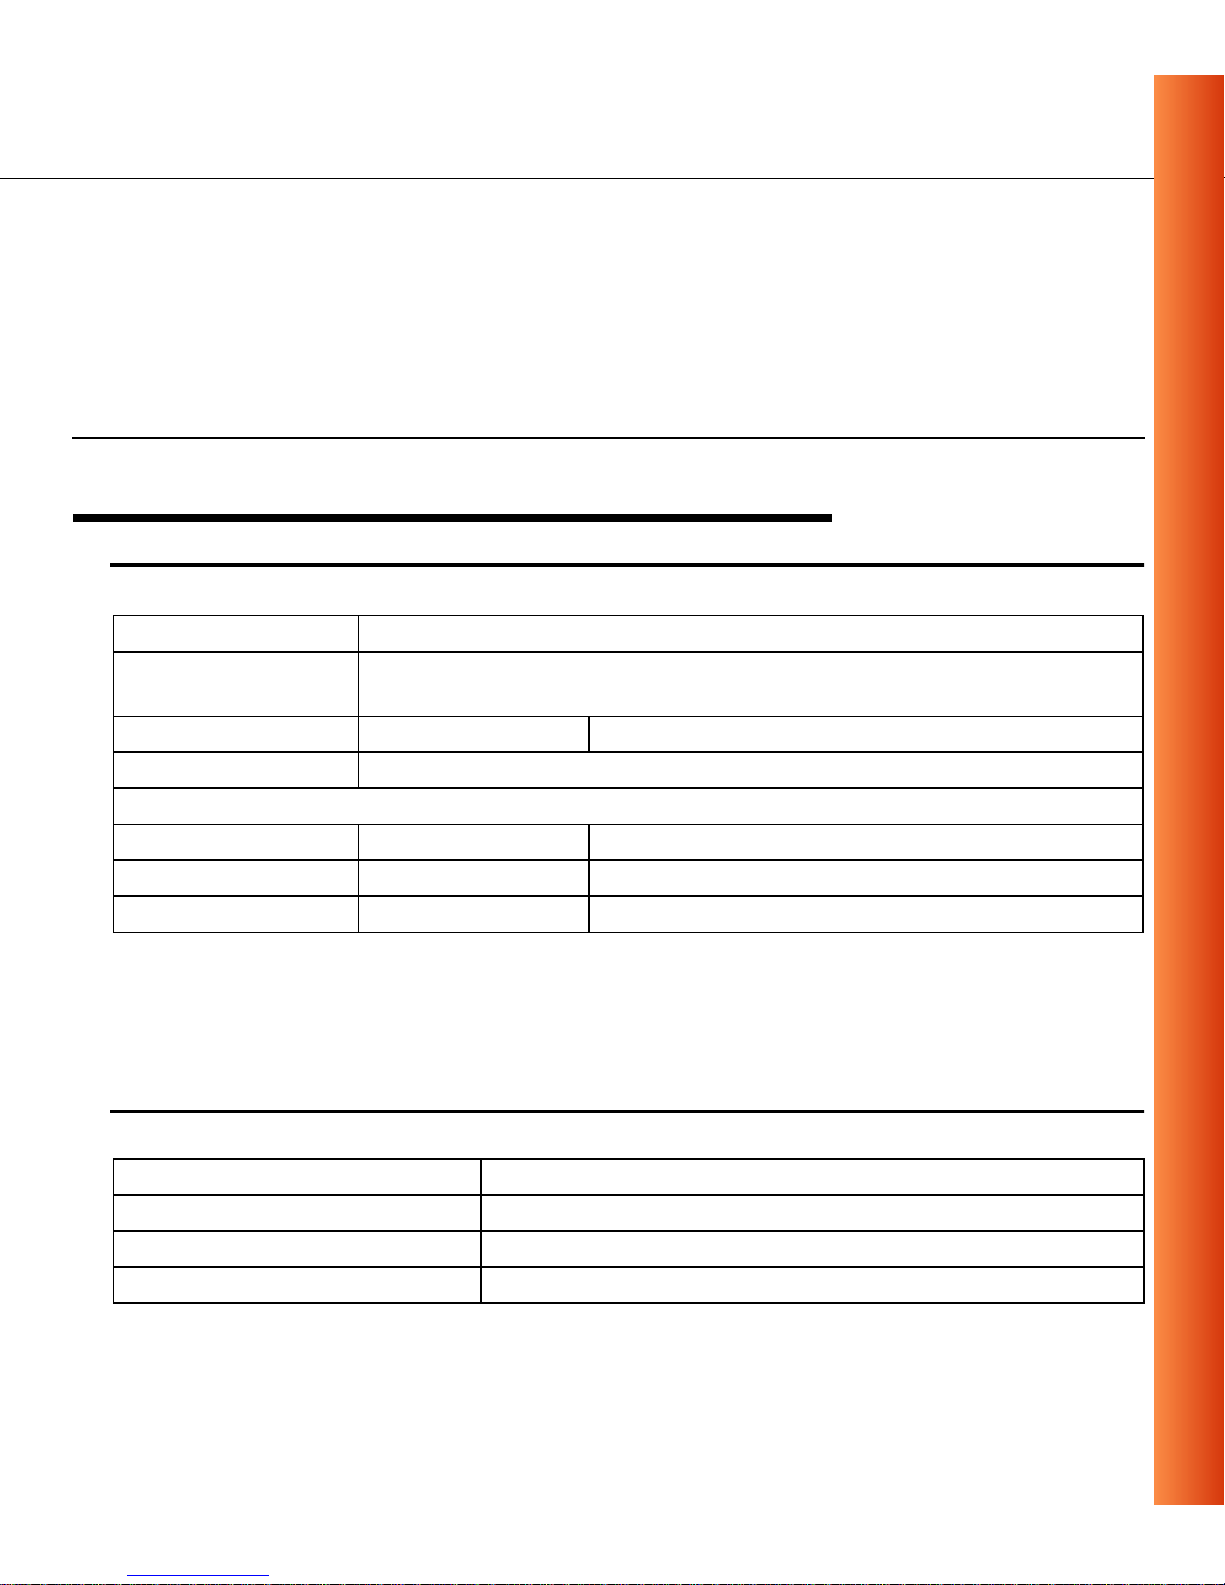
Ta ble A-1 Physical Specifications
Form Factor
Color
Dimensions
Weight
Temperature & Humidity
Operation
Transit
Storage
1 Color of the Range Extender Antenna is related to the Radio Characteristics
2 A lthough the PC Card may still operate in the range of -20° to 70°C, operation
Table A-2 Power Characteristics
Doze Mode
Receive Mode
Transmit Mode
Power Supply
1
described on page A-3
outside the range of 0° to 55° C may no longer be according to specifications.
PC Card Type-II Extended
■ Black for ORiNOCO PC Card (both Gold and Silver Label)
■ Red for IEEE Fixed WirelessPC Cards
(LxWxH) 117.8 x 53.95 x 8.7 mm
45 gram (PC Card)
0° to 55° C
-20° to 70° C 15 to 95% (no condensation allowed)
-10° to 60° C 10 to 90% (no condensation allowed)
2
10 mA
180 mA
280 mA
5V
maximum humidity 95%
ORiNOCO PC Card - Getting Started
A-1
Page 59
Card Specifications
Networking Characteristics A
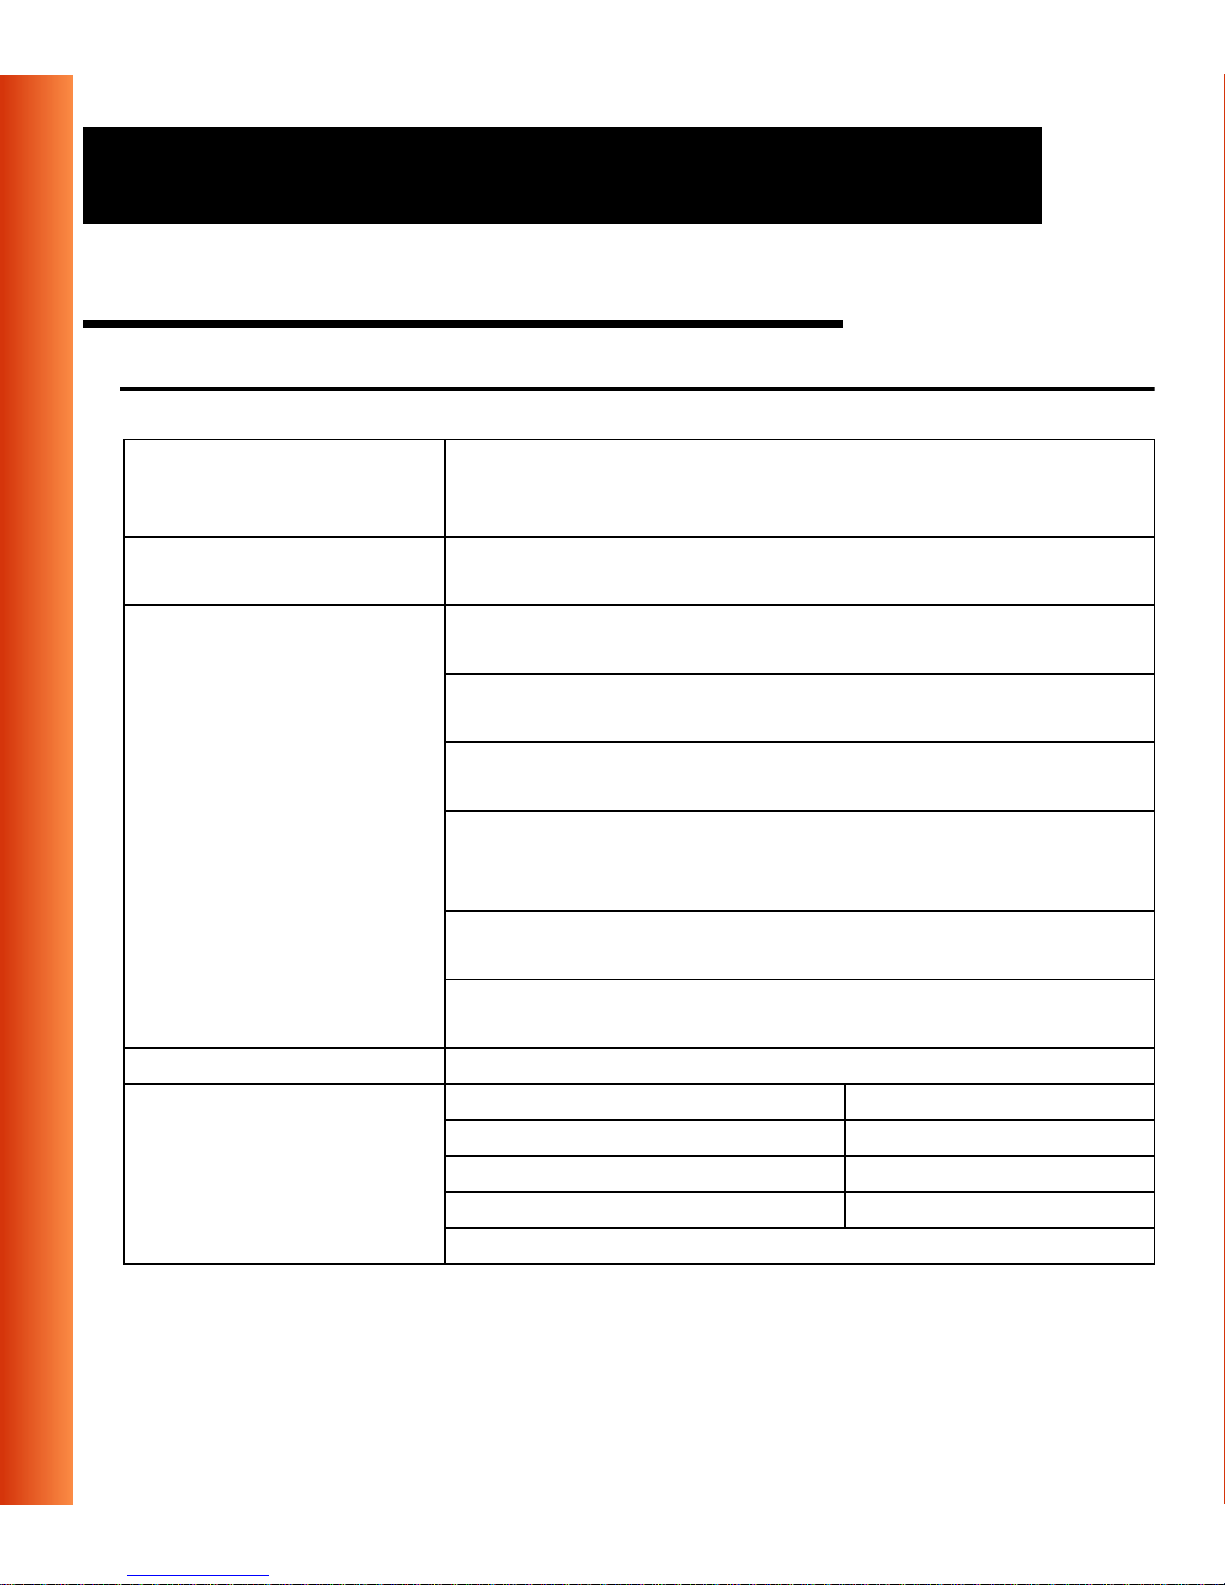
Table A-3 Networking Characteristics
Compatibility ■ IEEE 802.11 Standard for Wireless LANS (DSSS)
■ Wi-Fi (Wireless Fidelity) certified by the Wireless Ethernet
Compatibility Alliance (WECA).
Network Operating
System
Host Operating System Microsoft Windows® 95:
MediaAccessProtocol CSMA/C A (Collision Avoidance) with Acknowledgment (ACK)
Data Rate ■ High 11 Mb/s
■ Novell® Client 3.x & 4.x
■ Microsoft Windows® Networking
■ NDIS3 Miniport Driver
Microsoft Windows® NT v4.0:
■ NDIS4 Miniport Driver
Microsoft Windows® 98 and 2000:
■ NDIS5 Miniport Driver
MS-DOS & Microsoft Windows 3.x:
■ DOS ODI Driver
■ Packet Driver
Windows CE
■ Windows CE v.2.0 & 2.11
Apple Macintosh Operating Systems:
■ Apple PowerBook G3
A-2
■ Medium 5.5 Mb/s
■ Standard 2 Mb/s
■ Low 1 Mb/s
The cards use an automatic Transmit Rate Select mechanism.
ORiNOCO PC Card - Getting Started
Page 60

Card Specificat ions
Radio Characteristics A
Radio Characteristic s of OR iNOCO PC Cards may vary:
■ According to the c ountry where the product was purchased.
■ According to the type of product that was purchas ed.
Wireless communication is often subject to local radio re gulations. Although
ORiNOCO wireless networking products have been designed for operation
in the license-free 2.4 GHz band, local radio regulations may impose a
number of l imitations to the use of wireless communication equipment.
NOTE:
Refer to the flyer “Information to the User” for regulatory information
that may apply in your country.
To comply with such regulations, ORiNOCO PC Cards are marketed with
dedicated channel-sets with a number of factory-programmed chan nels
identified by the following acronyms:
■ ETS for countr ies that adhere to the regulations as defined by the
European Telecommunications Standards Institute (ETSI).
■ FCC for countries that adhere to the regulations a s defined by the US
Federal Communications Commission (FCC).
■ FR for France, and
■ JP for Japan.
ORiNOCO PC Card - Getting Started
A-3
Page 61

Card Specifications
The acronym of the channel-set supported by your card is p rinted on a label
on the back-side of your ORiNOCO PC Card (see Table A-6 on page A-9 for
a detailed list of channels).
If you plan to ins tall and use ORiNOCO PC Cards to connect a
WavePOINT -II AP or other c omputing device to an out door antenna
installation, additional regulations may apply.
To comply with such regulations Lucent Technologies offers two types of
ORiNOCO PC Cards:
■ In countries that adhere to the FCC regulations, you can use the
standard black-colored ORiNOCO PC Card.
■ In countries that adhere to the ETSI regulations, including France and
A-4
Japan, you must select the card-type based upon the ante nna that will
be used:
■ You can use the black-colored ORiNOCO PC Card when
connecting the device to standard Lucent Technologies omnidirectional antennas.
■ You
must
use the red-colored IEEE Fixed Wireless PC Card when
connecting the device to the standard Lucent Technologies 14 dBi
directional antenna for outdoor use.
ORiNOCO PC Card - Getting Started
Page 62

Card Specificat ions
When you ordered the ORiNOCO Outdoor Router kit1for outdoor antenna
installations, your kit includes the correct card type that complies with the
regulations that apply in your country.
!
WARNING:
At all times, it will be the responsibility of the end-userto ensure that
an outdoor antenna installation complies with local radio regulations.
The end-user must verify that:
■
■
The antenna installer is aware of these regulations.
The correct typ e of WaveLAN card is used to connect the host
device to the outdoor antenna installation.
Lucent Technologies and its resellers or distributors are notliable for
any damage or violation of government regulations that may arise
from failing to c omply with these guidelines.
1 Formerly identified as the WaveLAN Office Router, WaveACCESS LINK WP-II, or
WaveLAN IEEE PTP Kit
ORiNOCO PC Card - Getting Started
A-5
Page 63
Card Specifications
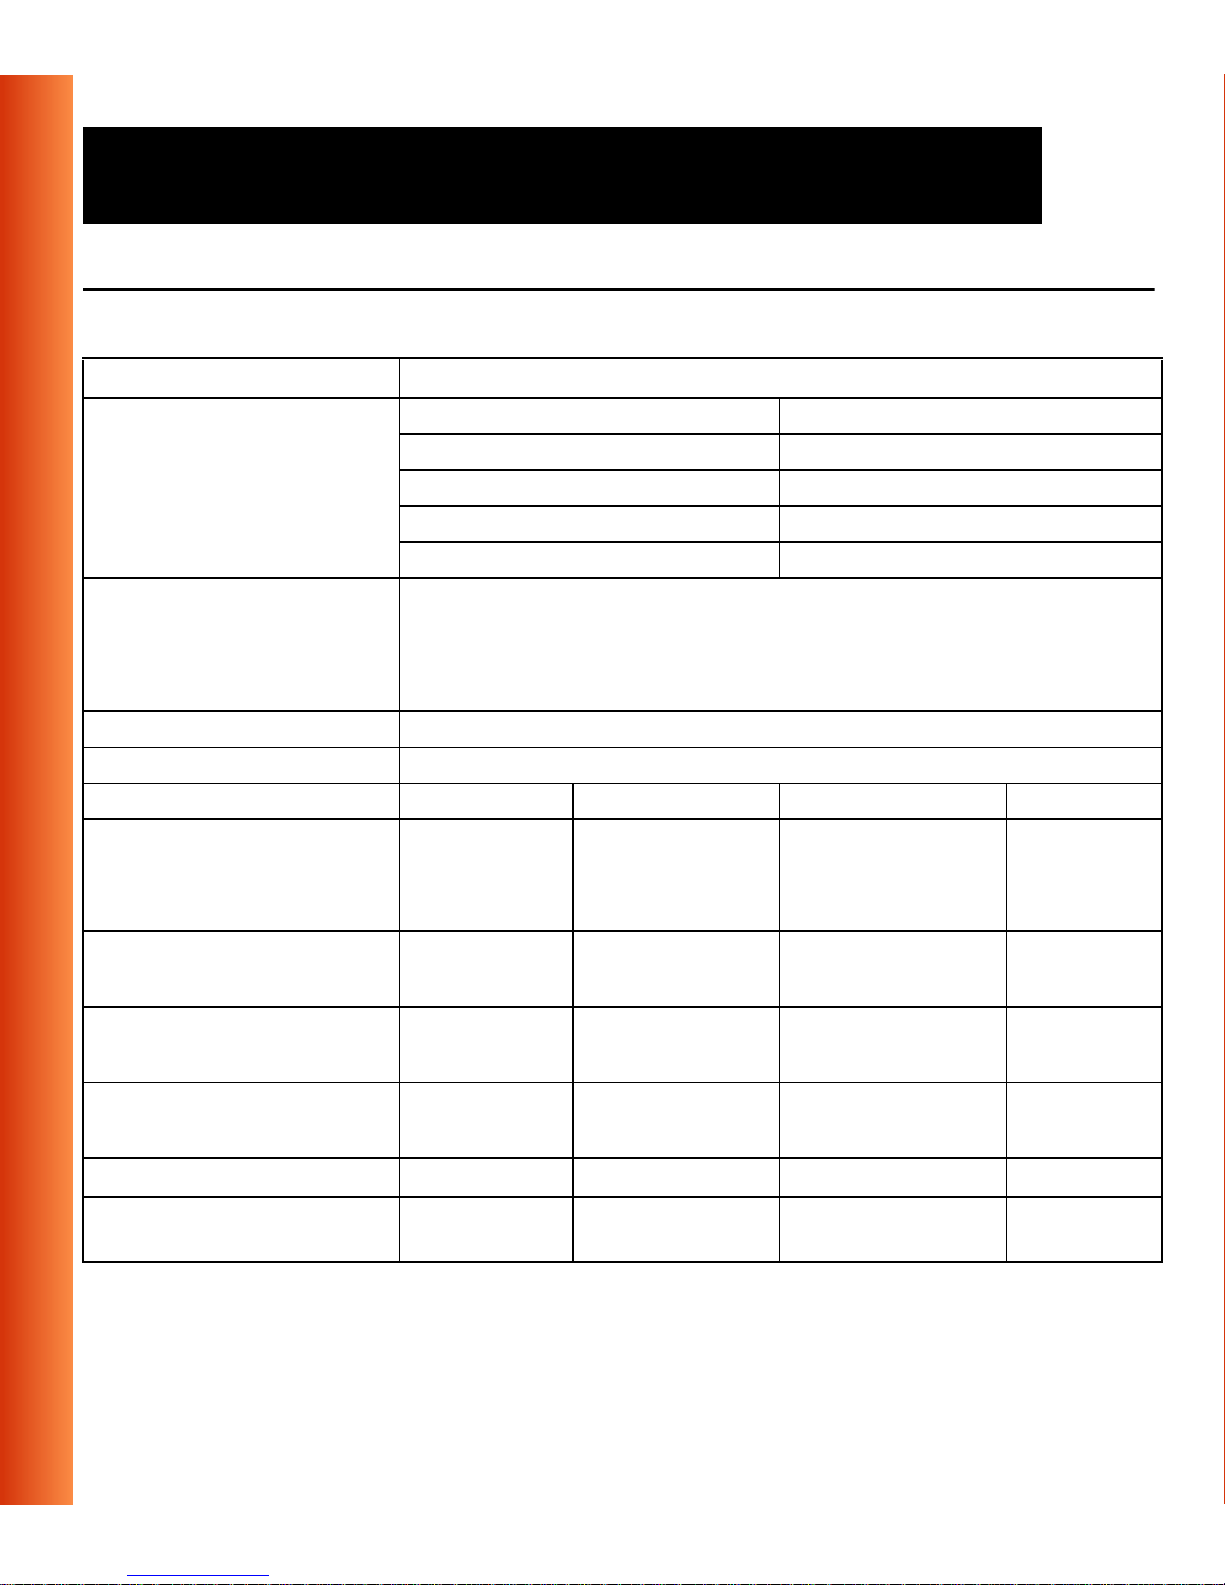
Table A-4 Radio Characteristics
R-F Frequency Band 2.4 GHz (2400-2500 MHz)
Number of selectable
sub-channels
Modulation Technique Direct Sequence Spread Spectrum
Spreading 11-chip Barker Sequence
Bit Error Rate (BER) Better than 10
Nominal Output Power 15 dBm
Range (100bytes User
Data) / Transmit Rate
Open Office Environment
North America (FCC) 11
Europe (ETS) 13
France (FR) 4
Japan (JP) 1
Other Countries: FCC 11, ETS 13
■ CCK for High & Medium Transmit Rate
■ DQPSK for Standard Transmit Rate
■ DBPSK for Low Transmit Rate
-5
High Speed
11 Mb/s
160 m
(525 ft.)
Medium Speed
5.5 Mb/s
270 m
(885 ft.)
Standard Speed
2Mb/s
400 m
(1300 ft.)
Low
Speed
1Mb/s
550 m
(1750 ft.)
Semi-Open Office
Environment
Closed Office
Receiver Sensitivity
Delay Spread
(at FER of <1%)
A-6
50 m
(165 ft.)
25 m
(80 ft.)
70 m
(230 ft.)
35 m
(115 ft.)
90 m
(300 ft.)
40 m
(130 ft.)
115 m
(375 ft.)
50 m
(165 ft.)
-83 dBm -87 dBm -91 dBm -94 dBm
65 ns 225 ns 400 ns 500 ns
ORiNOCO PC Card - Getting Started
Page 64

Card Specificat ions
The range of the wir eless signal is related to the Transmit Rate of the
wireless communication. Communications at lower Transmit range may
travel larger distances.
NOTE:
The range values listed in Table A-4 on page A-6 are typical
distances as measured at the Lucent Technologies ORiNOCO
laboratories. These values may provide a rule of thumb and may
vary according to the actual radio conditions at the location where
the ORiNOCO product will be installed.
■ The range of your wireless devices can be affected when the
antennas are placed near metal surfaces and solid high-density
materials.
■ Range is also impacted due to “obstacles” in the signal path of
the radio that may either absorb or reflect the radio signal.
Table A-4 lists the typical ranges when used indoors in “office environments”
that can be described as follows:
■ In Open Office environments, antennas can “see” each other, i.e. there
are no physical obstructions between them.
■ In Semi-open Office environments, work space is divided by shoulder-
height, hollow wall elements; antennas are at desktop level.
■ In Closed Office environments, work space is separated by floor-to-
ceiling brick walls.
ORiNOCO PC Card - Getting Started
A-7
Page 65

Card Specifications
If you intend using the ORiNOCO PC Card as part of an outdoo r antenna
installation, the range of the outdoor antenna installations w ill be related to:
■ Ty pe of outdoor antennas connected to the ORiNOCO PC Card.
■ Length of antenna cables.
■ Cl earance of the radio signal path.
For more information please consult the “ORiNOCO Outdoor Antenna
Installation Guide”
Table A-5 ORiNOCO Fixed Wireless PC Card
R-F Frequency Ban d 2.4 GHz (2400-2500 MHz)
Number of selectable
sub-channels:
Modulation Technique: Direct Sequence Spread Spectrum
Spreading 11-chip Barker Sequence
Bit Error Rate (BER) Better than 10
Nominal Output Power: 8 dBm
Range Consult the “ORiNOCO Outdoor Antenna Installation
1 The Fixed Wireless PC Card is not available in FCC regulated countries.
2 This card is designed for outdoor antenna installations in countries that adhere to radio
regulations as defined by the ETSI.
Europe (ETS) 13
France (FR) 4
Japan (JP) 14
Other Countries (ETS)
■ CCK for High & Medium Transmit Rate
■ DQPSK for Standard Transmit Rate
■ DBPSK for Low Transmit Rate
-5
Guide”
2
1
13
A-8
ORiNOCO PC Card - Getting Started
Page 66

Card Specificat ions
Supported Frequency Sub-bands A
Subject to the radio regulations that apply in your country, your ORiNOCO
PC Card may support a different set of 2.4 GHz channels (see Table A -6).
Consult your Authorized ORiNOCO Reseller or Lu cent Technologies Sales
office for information about the radio regulations that apply in your country.
Table A-6 ORiNOCO IEEE 802.11 Channels Sets
Frequency Range 2400-2500 MHz
1
Channel ID FCC ETSI France Japan
1
2
3
4
5
6
7
8
9
10
11
12
13
2412 2412 - 2412
2417 2417 - 2417
2422 2422 -2422
2427 2427 - 2427
2432 2432 - 2432
2437 2437 - 2437
2442 2442 - 2442
2447 2447 - 2447
2452 2452 - 2452
2457 2457 2457 2457
2462 2462 2462 2462
- 2467 2467 2467
- 2472 2472 2472
14
1 printed in bold are the factory-set default channels
---2484
ORiNOCO PC Card - Getting Started
A-9
Page 67

Card Specifications
When installing ORiNOCO PC Cards the channel configuration is managed
as follows:
■ For wireless clients that operate in an ORiNOCO Infrastructure, the
ORiNO CO PC Card will aut omatically start operation at the channel
identified by the WavePOINT-II APs. When roaming between different
access points the station can dynamically switch to another channel if
required.
■ For ORiNOCO PC Cards installed into wireless clients that operate in a n
“Peer-to-Peer” mode, the PC Card will default use cha nnel 10.
■ Wh en inserted into a WavePOINT-II AP, the ORiNOCO PC Card will use
the factory-set default channel (printed in bold), unless the LAN
Administrator selected a different channel when confi guring the
A-10
WavePOINT-II AP device.
ORiNOCO PC Card - Getting Started
Page 68

Troubleshooting
B
LED Activity B
If you encounter difficulty using and/or installing your ORiNOCO product, the
error may be related to various causes:
■ Out-of range s ituation, which prevents the ORiNOCO PC Card from
establishing a wireless connection with the network.
■ Configuration mismatch, which prevents the ORiNOCO PC Card from
establishing a wireless connection with the (correct) networ k.
■ Absence of, or conflict of the ORiNOCO Driver.
■ A problem or conflict with the PC Card slot which prevents the PC Card
from powering on.
■ A conflict of the ORiNOCO hardware with another device.
The starting po int to troubleshoot problems with your ORiNOCO PC Card is
looking at the LED activity of the ORiNOCO PC Card.
Table B-1 on page B- 3 provides an overview of th e various modes of
operation and the associated LED activity. Table B-1 also includes a number
of troubleshooting hints, if required, that may help you solve the problem.
ORiNOCO PC Card - Getting Started
B-1
Page 69

Troubleshooting
Table B-1 L ED Activity Table
Power LED Transmit
Description/Action
Receive LED
Continuous
Green
Flicker Flicker Power Management mode:
Both LEDs blink once every
10 seconds
Blinking Standard operational mode.
■ Card is p owered on.
■ Sensing/transmitting wireless data.
Off ■ Card is p owered on.
■ No wireless activity.
No action is required.
■ Card is powered on, but set to power saving mode, to conserve
battery life.
■ Flashes indicates that the card wakes up at regular intervals to
verify if there is wireless data addressed to your computer.
The PC Card works fine, but did not yet succeed establishing a
wireless connection with the wireless Infrastructure.
Actions:
■ Contact the LAN Administrator to verify the ORiNOCO Network
Name assigned to the wireless infrastructure.
■ Contact the LAN Administrator to verify the correct value(s) of
the encryption keys.
■ Contact the LAN Administrator to verify whether the network
infrastructure has been closed
■ Change the configuration of your ORiNOCO PC Card to enter
the correct Network Name
■ If there are no WavePOINT-II AP devices available, change the
configuration of your ORiNOCO PC Card to run in “Peer-toPeer” mode.
1
.
B-2
ORiNOCO PC Card - Getting Started
Page 70

Table B-1 LED Activity Table—Continued
Troubleshooting
PowerLED Transmit
Description/Action
Receive LED
Off Off Card is not powered on, so it can not transmit/receive data.
The cause may either be:
■ No Driver loaded/installed
■ Card - Driver mismatch which prevented the driver from loading
■ Device conflict which prevented the driver from loading
Actions:
■ Verify if a driver has been installed, if not install the driver.
■ Verify the device settings of the PC Card to determine the
occurrence of a conflict with another device. If so, change the
settings of either your PC Card or the conflicting device to
resolve the problem.
■ Verify the versions of the driver, and the embedded software in
the PC Card (also referred to as Station firmware).
■ Consult the ORiNOCO website at:
orinoco
upgrade both the embedded software and driver to the latest
available version.
to see if newer versions are available and if so,
http://www.lucent.com/
1 Only for networks that include ORiNOCO WavePOINT-II APs.
Can Not Connect To The Network B
If your PC Card seems to be working fine, but you are not able to connect to
the network, this error might be due to a configuration mismatch.
For example if both LEDs of your PC Card blink o nce every ten seconds, the
problem is likely to be caused by a configuration mismatych of:
ORiNOCO PC Card - Getting Started
B-3
Page 71

Troubleshooting
■ Network Name
■ Encryptionn Key
The ORiNOCO Network Name is case-sensitive.
On MS-DOS systems the Network Name should be entered between
quotation marks. I f you omit th e quotation marks, the driver will inter pret the
value as all upper-case e.g. 12CAFE instead of "12Cafe".
If your WavePOINT-I I APs have been configured with both lower- and uppercase characters, the driver will not be able to establish a radio connection.
LEDs Work But Can’t Connect to Network B
If you can not co nnect to the networ k while the LEDs indicate that the
network is working properly (Power LED is on,Transmit Receive LED blinks)
probably the TCP/IP settings of your ne twork are not properly set.
NOTE:
Some older versions of the Windows 95 operating system will not
automatically install the necessary TCP/IP network protocol.
Changing TCP/IP Settings
Consult your LAN Administrator for your the values of your TCP/IP settings.
To ch ange the TCP/IP Settings:
1. On the Windows task bar click the
Start button
B-4
ORiNOCO PC Card - Getting Started
Page 72

Troubleshooting
2. Select Settings and then select Control Panel.
3. On the Control Panel window, double click on the Network icon to view
the
Network Properties.
4. From the list of installed components, check if the
PC Card
■ If thisprotocol is not yet installed, click the Add button and select the
protocol is installed.
TCP/IP -> ORiNOCO
TCP/IP protocol from the list. Refer to the Windows Help for more
information.
■ If this protocol is installed, select this protocol and click the
Properties button. Check if the parameters resem ble the setti ngs
provided by your LAN Administrator. Make Changes if necessary,
and click
OK when you’re done.
5. When prompted, restart your computer.
For more detailed Troubleshooting hints, and/or information about upgrading
the ORiNOCO drivers, please consult the “ORINOCO PC Card - User’s
Guide” provided on th e CD-ROM.
ORiNOCO PC Card - Getting Started
B-5
Page 73

Page 74

Warranty Repair Card
W
About Warranty and Repair W
In case your ORiNOCO product is not working properly, you are advised to
consult Appendix B ”Troubleshooting” prior to contacting ORiNOCO
Technical Support.
In case this does not help you solving the problem, contact ORiNOCO
Technical Support as descr ibed on the last pages of this document.
If it appears that your unit need s a rpair or replacement retrun to your Dealer/
Distributor in its or iginal packaging
Warranty Repairs: W
When returning a defective product for Warranty, always incl ude the
following documents:
■ Problem Report Form (an electronic copy i s available on the CD-ROM
(
report.txt).
■ The Warranty Repai r card, and
■ A copy of th e invoice/proof of purchase
ORINOCO PC Card - Getting Started
W-1
Page 75

Warranty Repair Card
All other Repairs: W
When returning a defective product for Repair, always include the the
Warranty Repair card.
You are advised to read the Information about “Limited Warranty” as
described on the following page.
Limited Warranty W
Lucent Technologies extends a limited warranty from date of purchase of:
■ Thirty-six (36) months for ORiNOCO hardware products
■ Twelve (12) months for WavePOINT-II AP
■ Twelve (12) m onths for the media on which the software is furnished and
the reproduction o f the software on the media .
W-2
ORINOCO PC Card - Getting Started
Page 76

Warranty R epair Card
Upon proof-of-purchase Lucent Technologies shall at its option, re pair or
replace the defective item at no cost to the buyer.
Defective items shall be returned to the dealer/distributor:
■ Freight prepaid.
■ Accompanied by a copy of proof-of-purchase.
■ Accompanied by a filled out Warranty/Repair card.
This warranty is con tingent upon proper use in the application for which the
products are intended and does not cover products which have been
modified without the seller’s approval or which have been subjected to
unusual physical or electrical demands or damaged in any way.
This Warranty co n sti tu tes the sole and exclusive remedy of any buyer or
seller’s eq uip men t and the sole and exclusive liability of
Lucent Technologies in co n nection w i th the products and is in lieu of all
other warranties, express, implied or statutory, including, but not limited to,
any implied warranty of merchantability of fitness for a particular use and
all o th er oblig ation s or liabilities of Lucent Technologies.
In no event will Lucent Technologies Inc. or any other party o r person be
liable to you or an yone else for any damages, including lo s t profits, lost
savings or other incidental o r consequential damag es, or inability to use
the software provided on the software media even if Lucent Technologies
or the other party person has been advised of the possibility of such
damages.
ORINOCO PC Card - Getting Started
W-3
Page 77
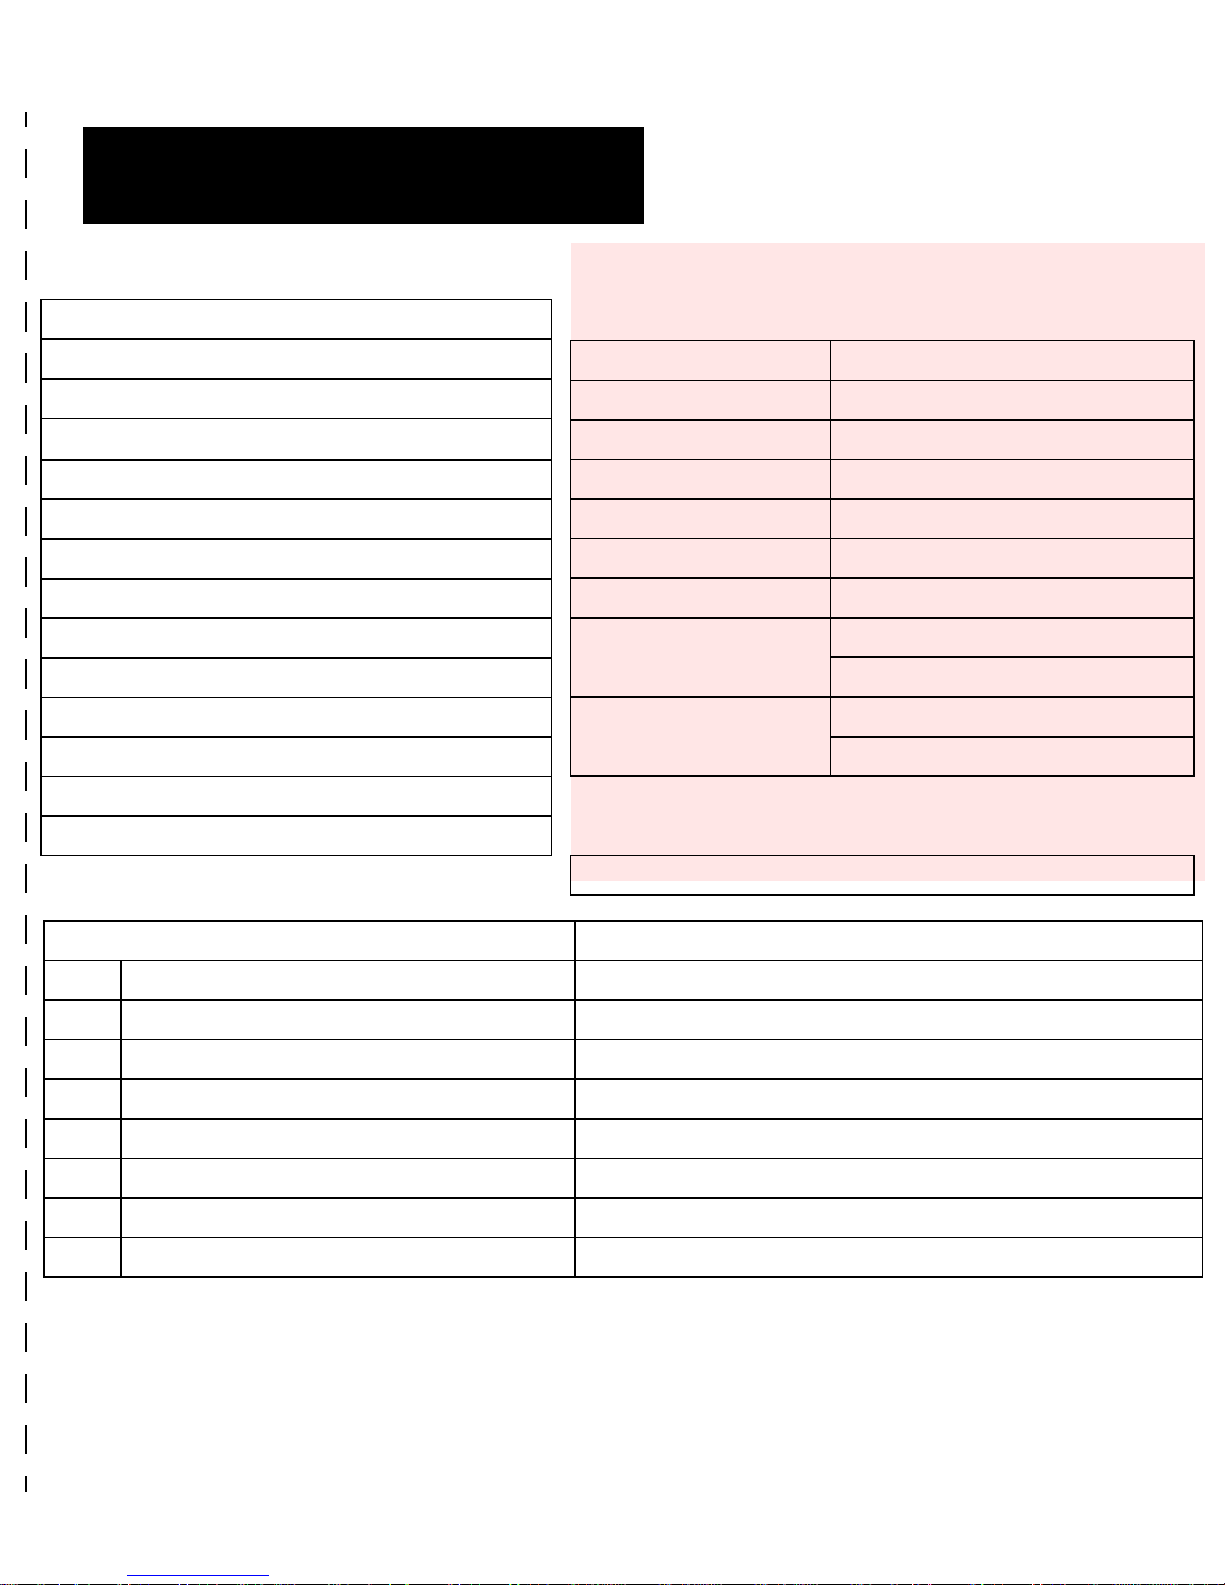
Warranty Repair Card
To be filled out by the User: 0
Product Description:
COMCODE (Product ID):
Serial Nu mb er:
Invoice Date:
Name:
Title:
Company:
Address:
City/State/Zipcode:
Country:
Telephone:
Fax:
Email:
(dd/mm/yyyy)
To be filled out by the Dealer/
Distributor: 0
Dealer Name:
Address:
City/State/Zipcode:
Country:
Telephone:
Fax:
Warranty Comment
❑ Yes
❑ No
Return Approval Reference
: 0
Reported Problem: Problem Description:
❑
❑
Out-of-Box Failure
Other
ORINOCO PC Card - Getting Started
-4
Page 78

Technical Support
If you encounter problems when installing or using this product, please
consult the ORiNOCO website at:
■ the latest software, user documentation and product updates
■ the Frequently Asked Questions (FAQ)
http://www.lucent.com/orinoco for:
Alternatively please c ontact your local authorized ORiNOCO reseller for
Technical Support.
Help us helping you by completing the OR iNOCO p roblem report form and
include it with your e-mail or fax when contacting Technical Suppor t.
You can find the problem report form (
■ the ORiNOCO CD-ROM, and
■ the support pages of the ORiNOCO website.
report.txt)on:
Addresses of authorized ORiNOCO resellers are listed in the “Contact &
Ordering” section of the ORiNOCO website.
ORINOCO PC Card - User’s Guide
Page 79

 Loading...