

Page 1
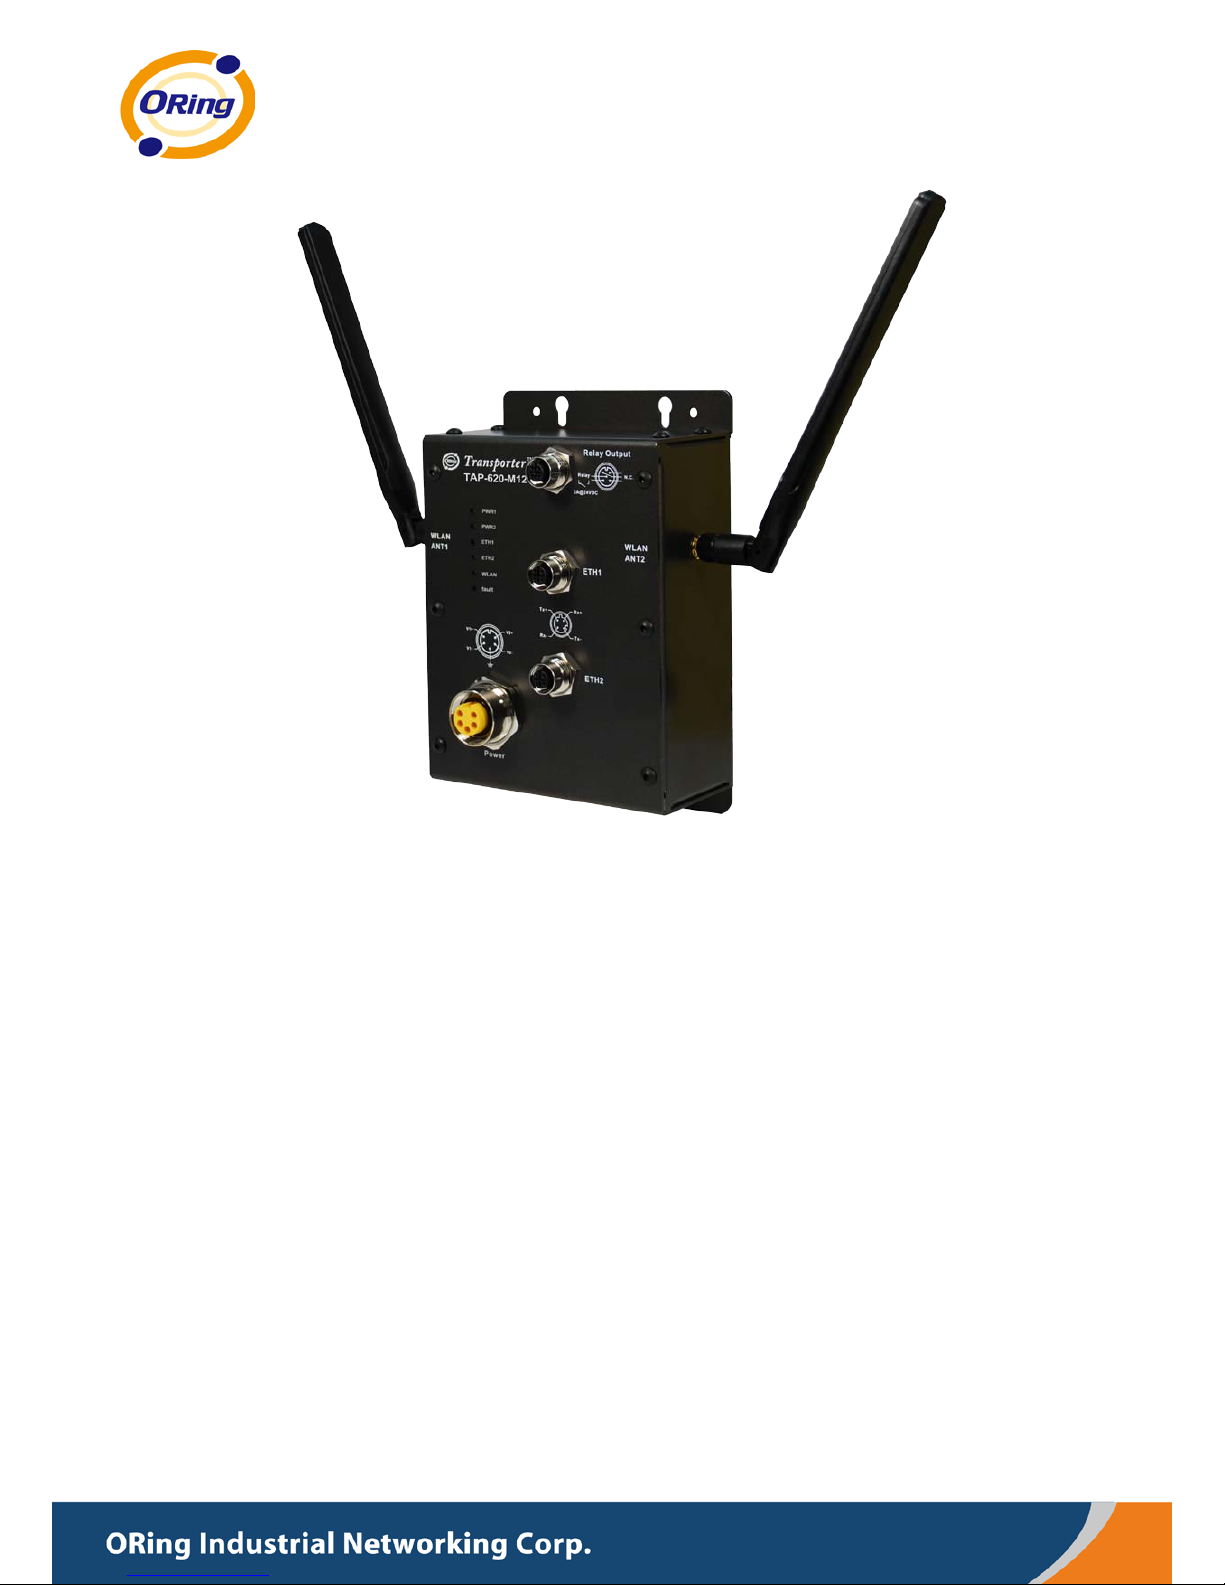
TTAAPP--662200--MM1122
EENN5500115555 IIEEEEEE 880022..1111 aa//bb//gg//nn AAcccceessss PPooiinntt
UUsseerr’’ss M
Maannuuaall
VVeerrssiioonn 11..00
JJuullyy,, 22001122
wwwwww..oorriinngg--nneettwwoorrkkiinngg..ccoomm
Page 2

COPYRIGHT NOTICE
Copyright © 2011 ORing Industrial Networking Corp.
All rights reserved.
No part of this publication may be reproduced in any form without the prior written consent of
ORing Industrial Networking Corp.
TRADEMARKS
is a registered tr adem ar k of ORing I ndustr ial Networking Corp.
All other trademar ks belong to their respective owners.
REGULATORY CO MPLIANCE STATEMENT
Product(s) associated with this publication com plies/comply with all applicable regulations.
Please refer to the Technical Specifications section for more details.
WARRANTY
ORing warrants that all ORing products are free from defects in material and workmanship
for a specified warranty per iod from the invoice date (5 years for m ost products). O Ring will
repair or replace products f ound by ORing to be defective within this warranty period, wi th
shipment expenses apportioned by ORing and the distributor. This warranty does not cov er
product modifications or repairs done by persons other than ORing-approved personnel, and
this warranty does not apply to ORing products that are misused, abused, improperly
installed, or damaged by accidents.
Please refer to the Technical Specifications section for the actual warranty period(s) of the
product(s) associat ed with this publicati on.
DISCLAIMER
Information in this publication is intended t o be accurate. O Ring shal l not be responsible for
its use or infringements on thir d-parties as a result of its use. There may occasionally be
unintentional errors on this publication. ORing reserves the right to revise the contents of this
publication without notice.
CONTACT INFORMATION
ORing Industrial Networking Corp.
3F., No.542-2, Zhongzheng Rd., Xindi an Dist., New Taipei City 23148, Taiwan (R.O.C.)
Tel : + 886-2-2218-1066 // Fax: +886-2-2218-1014
Website:
www.oring-networking.com
Technical Suppor t
E-mail:
Sales Contact
E-mail:
Page 3

Table of Content
Getting to Know Y our Access Point ............................................................ 1
1.1 About the ORing Access Point ...................................................................................... 1
1.2 Software Features ......................................................................................................... 1
1.3 Hardware Features ........................................................................................................ 1
Hardware Installation .................................................................................... 2
2.1 Wall Mounting Installation ............................................................................................. 2
Hardware Overview ....................................................................................... 3
3.1 Front Panel ..................................................................................................................... 3
3.2 Front Panel LEDs .......................................................................................................... 5
Cables and Antenna ...................................................................................... 5
4.1 Ethernet Cabl es ............................................................................................................. 6
4.2 100Base-T(X)/10Base-T Pin Assignments .................................................................. 6
4.3 Wireless Antenna ........................................................................................................... 7
Management Interface .................................................................................. 8
5.1 Explore T AP-620-M12 ................................................................................................... 8
5.1.1 Open-Vision_Commander ............................................................................................ 8
5.2 UPnP Equipment ........................................................................................................... 9
5.3 Configuration by Web Browser ................................................................................... 10
5.4 About Web-Based Managem ent................................................................................. 10
5.5 Main Interface .............................................................................................................. 11
5.5.1 Basic Setting .............................................................................................................. 12
Setting Operation Mode ...................................................................................................... 12
Setting WDS (Bridge Mode) ............................................................................................... 13
Setting Wireless .................................................................................................................. 16
Client .................................................................................................................................. 21
LAN Setting ....................................................................................................................... 22
Setting DHCP Server .......................................................................................................... 23
5.5.2 Advan ced S etting ....................................................................................................... 24
Wireless .............................................................................................................................. 24
X-Roaming ......................................................................................................................... 26
Page 4

MAC Filter ......................................................................................................................... 26
System Event ...................................................................................................................... 27
Email Settings ..................................................................................................................... 28
SNMP Settings.................................................................................................................... 29
Syslog Server Settings ......................................................................................................... 30
5.5.3 System Tools ............................................................................................................. 30
Administrator ...................................................................................................................... 30
Date & Time ....................................................................................................................... 32
Configuration ...................................................................................................................... 33
Firmware Upgrade .............................................................................................................. 33
Miscellaneous ..................................................................................................................... 34
5.5.4 System Status............................................................................................................. 35
System In fo ........................................................................................................................ 35
System Log ......................................................................................................................... 36
Traffic Statistics .................................................................................................................. 36
5.5.5 Online Help ............................................................................................................... 37
Technical Specifications ............................................................................ 38
Compliance .................................................................................................. 40
Page 5

Page 6
TAP-620-M12 User’s Manual
1 ORing Industrial Networking Corp.
Getting to K now Your Ac cess Poi nt
1.1 About the ORing Access Point
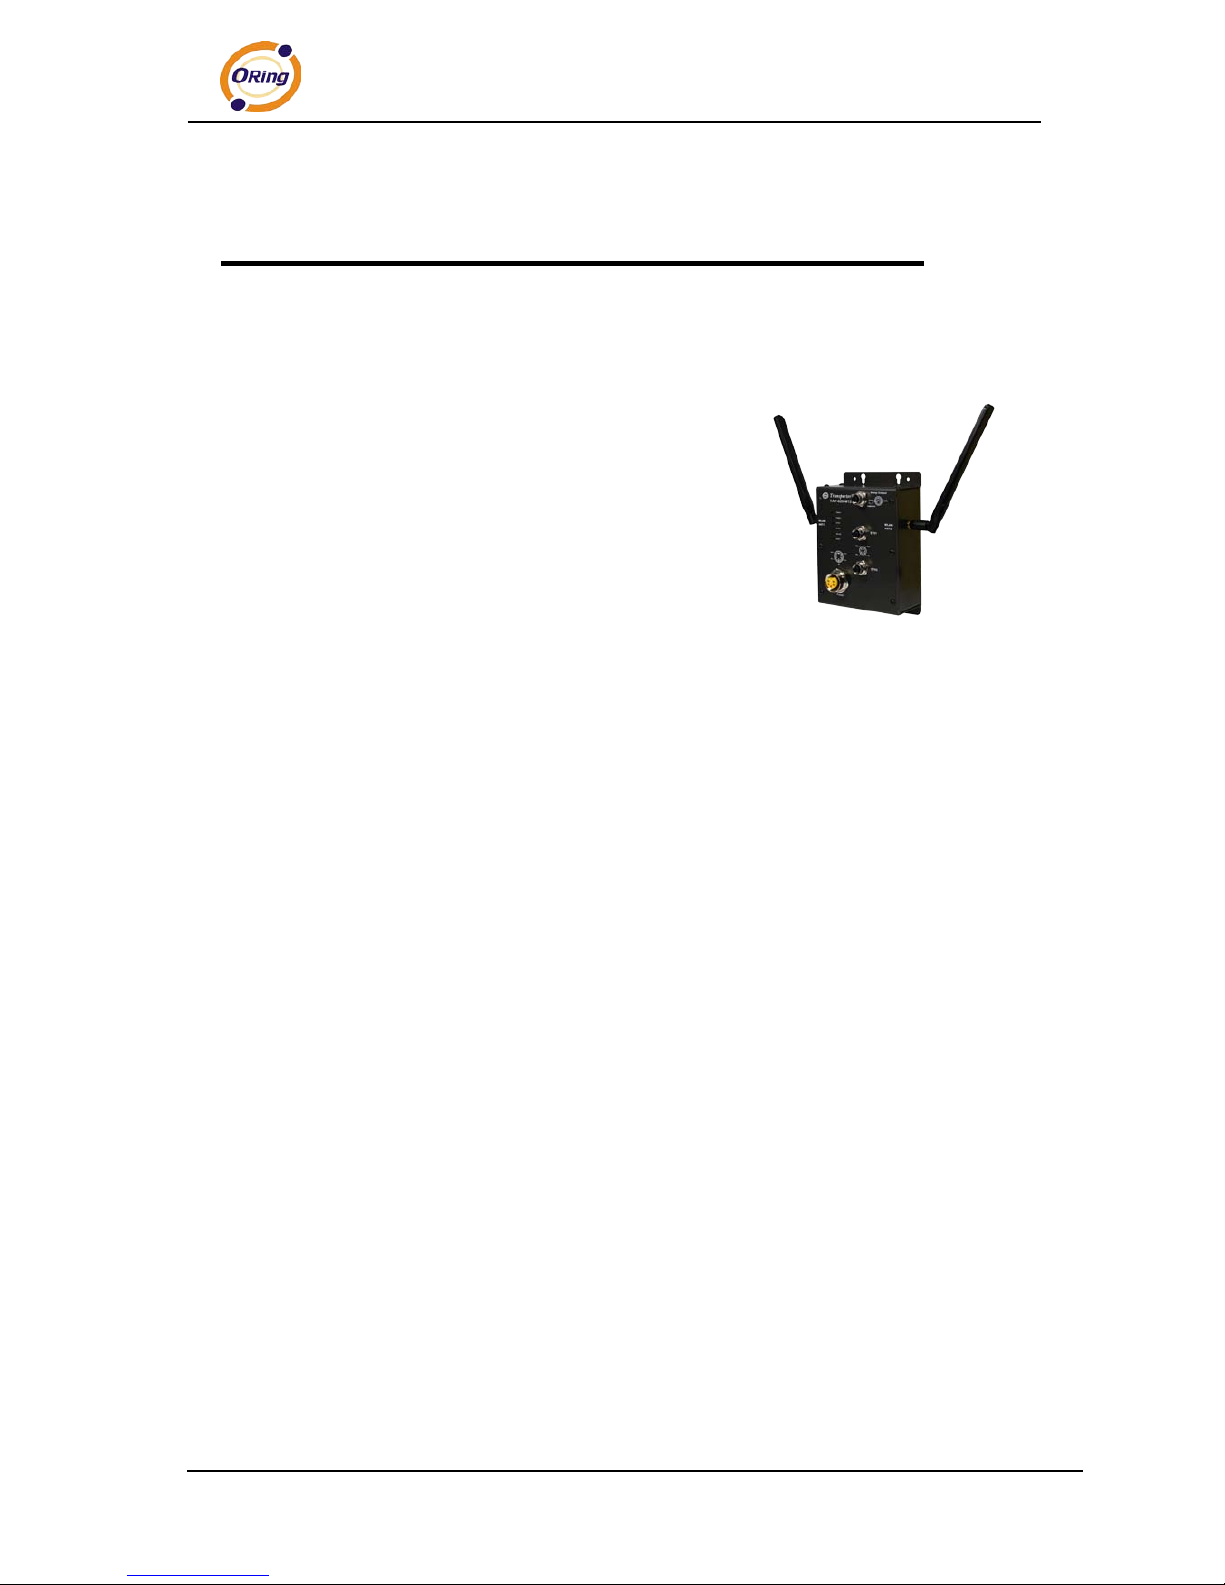
TAP-620-M12 is reliable IEEE802.11a/b/g/n WLAN
with 2 ports LAN Access Point. It can be configured to
operate in AP/Client/Bridge mode. You can configure
TAP-620-M12 by Window Utility or WEB interfaces via LAN
port or WLAN interface. TAP-620-M12 provides dual
Ethernet ports in switch m ode, so you can use Daisy Chain
to reduce the usage of Ethernet switch ports. T her efore,
TAP-620-M12 is one of the best communication solutions
for wireless appli ca tion.
1.2 Software Features
Hi gh S peed Ai r Connectivity: WLAN interf ace support up t o 300Mbps link speed
connection
Hi ghly Security Capability: W EP/WP A/WPA2/Radius/TKIP supported
Support AP/Client/Bridge/AP-Client Mode
Swit ch M ode S uppor ted: Daisy Chain support to reduce usage of switch por ts
Secured M anagement by HTTPS
Event Warning by Syslog, Email, SNMP Trap, Relay and Beeper
1.3 Hardware Fe at ures
Redundant P ower Inputs: Dual 12~48 VDC on M23 connector
10/100Base-T(X) Et her net port
Casing: IP-40
Dim ensi ons(W x D x H) : 125mm(W) x 65mm(D) x 196mm(H)
Operating Temperature: -20 to 70
o
C
Storage T e mperature: -40 to 85
o
C
Oper ating Humidity: 5% to 95%, non-condensing
Page 7

TAP-620-M12 User’s Manual
ORing Industrial Networking Corp. 2
Hardware Installation
2.1 Wall Mounting Installation
Each AP has another installation method to fix the AP. The following steps show how
to mount the AP on the wall:
Step 1: Use screws that ca n be found in the package to combine the wall mount
TAP-620-M12.
The screws specification shows in the following two pictur es. In order to prevent the
AP from any damage, the screws should not larger than the size that used in
TAP-620-M12.
Step 2: Mount the combined AP on the wall.
Page 8
TAP-620-M12 User’s Manual
3 ORing Industrial Networking Corp.
Hardware Ove rview
3.1 Front Panel
The following tabl e describes the labels that stick on the TAP-620-M12.
Port Description
10/100 Base-T(X) fast
Ethernet ports on
M12 connector
(D-coding)
2 10/100Base-T(X) fast Ether net ports support auto-negotiation.
Default Setting :
Speed: auto
Relay Output on M12
(A-coding) connector
Relay output to car ry capacity of 3A at 24VDC
Redundant power
inputs on M23
connector
Dual Power Inputs. 12~48 VDC on M23 connector
Page 9

TAP-620-M12 User’s Manual
ORing Industrial Networking Corp. 4
TAP-620-M12
1. 2.4/5 GHz antenna with typical 3.0 dBi antenna for 5GHz and 2 dBi f or 2.4GHz.
2. LED for PWR1 and system status. When the PWR1 links, the green LED will be light
on.
3. LED for PWR2 and system status. When the PWR2 links, the green LED will be light
on.
4. LED for Ethernet port 1 status.
5. LED for Ethernet port 2 status.
6. LED for WLAN link status.
7. LED for Fault Relay. When the fault occurs, the red LED will be light on.
8. Power Input port on M23 connector
9. Ethernet port 1 on M12(D-coding) connector
Page 10

TAP-620-M12 User’s Manual
5 ORing Industrial Networking Corp.
10. E thernet port2 on M12(D-coding) connector
11. Relay output on M12(A-coding) co nnector
3.2 Front Panel LEDs
LED Color Status Description
PWR1 Green/Red
Green On DC power 1 activated.
Green blinking Device been located
Red blinking
Indicates an IP conflict, or
DHCP or BOOTP server did
not respond properly
PWR2
Green/Red
Green On
DC power 2 activated.
Green blinking Device been located
Red blinking
Indicates an IP conflict, or
DHCP or BOOTP server did
not respond properly
ETH1
Amber
On Port link up at 10Mbps.
Blinking Data transmitted.
Green
On Port link up at 100Mbps.
Blinking Data transmitted.
ETH2
Amber
On Port link up at 10Mbps.
Blinking Data transmitted.
Green
On Port link up at 100Mbps.
Blinking Data transmitted.
WLAN
Green
On WLAN1 activated.
Blinking WLAN1 Data transmitted.
Red
On WLAN2 activated.
Blinking WLAN2 Data transmitted.
Fault Red On
Fault relay. Power failure or
Port down/fail.
Cables and Antenna
Page 11
TAP-620-M12 User’s Manual
ORing Industrial Networking Corp. 6
4.1 Ethernet Cables
The TAP-620-M12 WLAN AP has two 10/100Base-T(X) Ethernet ports. According to
the link type, the AP use CAT 3, 4, 5,5e UTP cables to connect to any other network device
(PCs, servers, switches, r outers, or hubs). Please refer t o the following table for cable
specifications.
Cable Types and Specifications
Cable Type Max. Length Connector
10Base-T Cat. 3, 4, 5 100-ohm UTP 100 m (328 ft) M12(D-codng)
100Base-T(X) Cat. 5 100-o hm UTP UTP 100 m (328 ft) M12(D-coding)
4.2 100Base-T(X)/10Base-T Pin Assignments
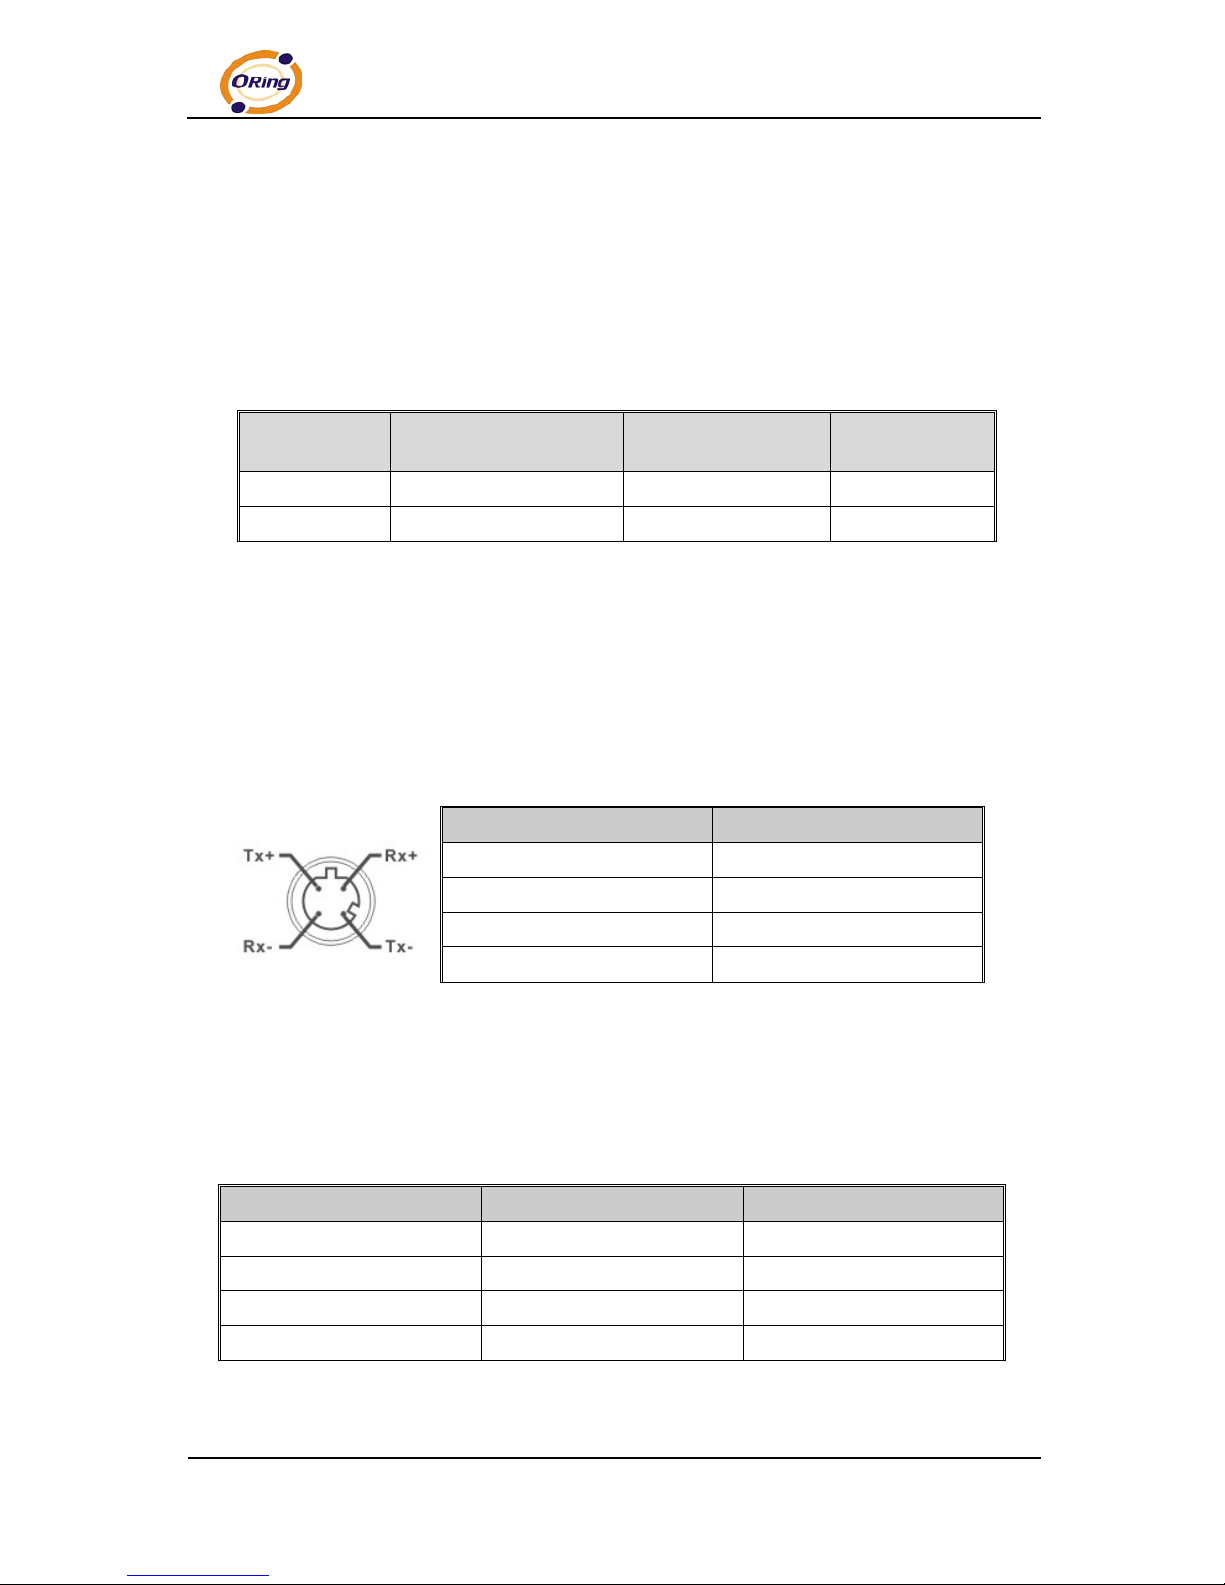
With 100Base-T(X)/10Base-T cable, pins 1 and 2 are used for transmitting data, and
pins 3 and 6 are used for receiving data.
M12(4-pin, D-coding) Pin Assignments
Pin Number Assignment
1 RD+
2 TD+
3 RD4 TD-
The TAP-620-M12 supports auto MDI/ MDI-X operation. You can use a str aight-through
cable to connect PC and AP. The following table below shows the 10Base-T/
100Base-T(X) MDI and MDI-X port pin outs.
MDI/MDI-X pins assignment
Pin Number MDI port MDI-X port
1 RD+(receive) TD+(transmit)
2 TD+(transmit) RD+(receive)
3 RD-(receive) TD-(transmit)
4 TD-(transmit) RD-(receive)
Note: “+” and “-” signs represent the polarity of the wires that make up each wir e pair.
Page 12
TAP-620-M12 User’s Manual
7 ORing Industrial Networking Corp.
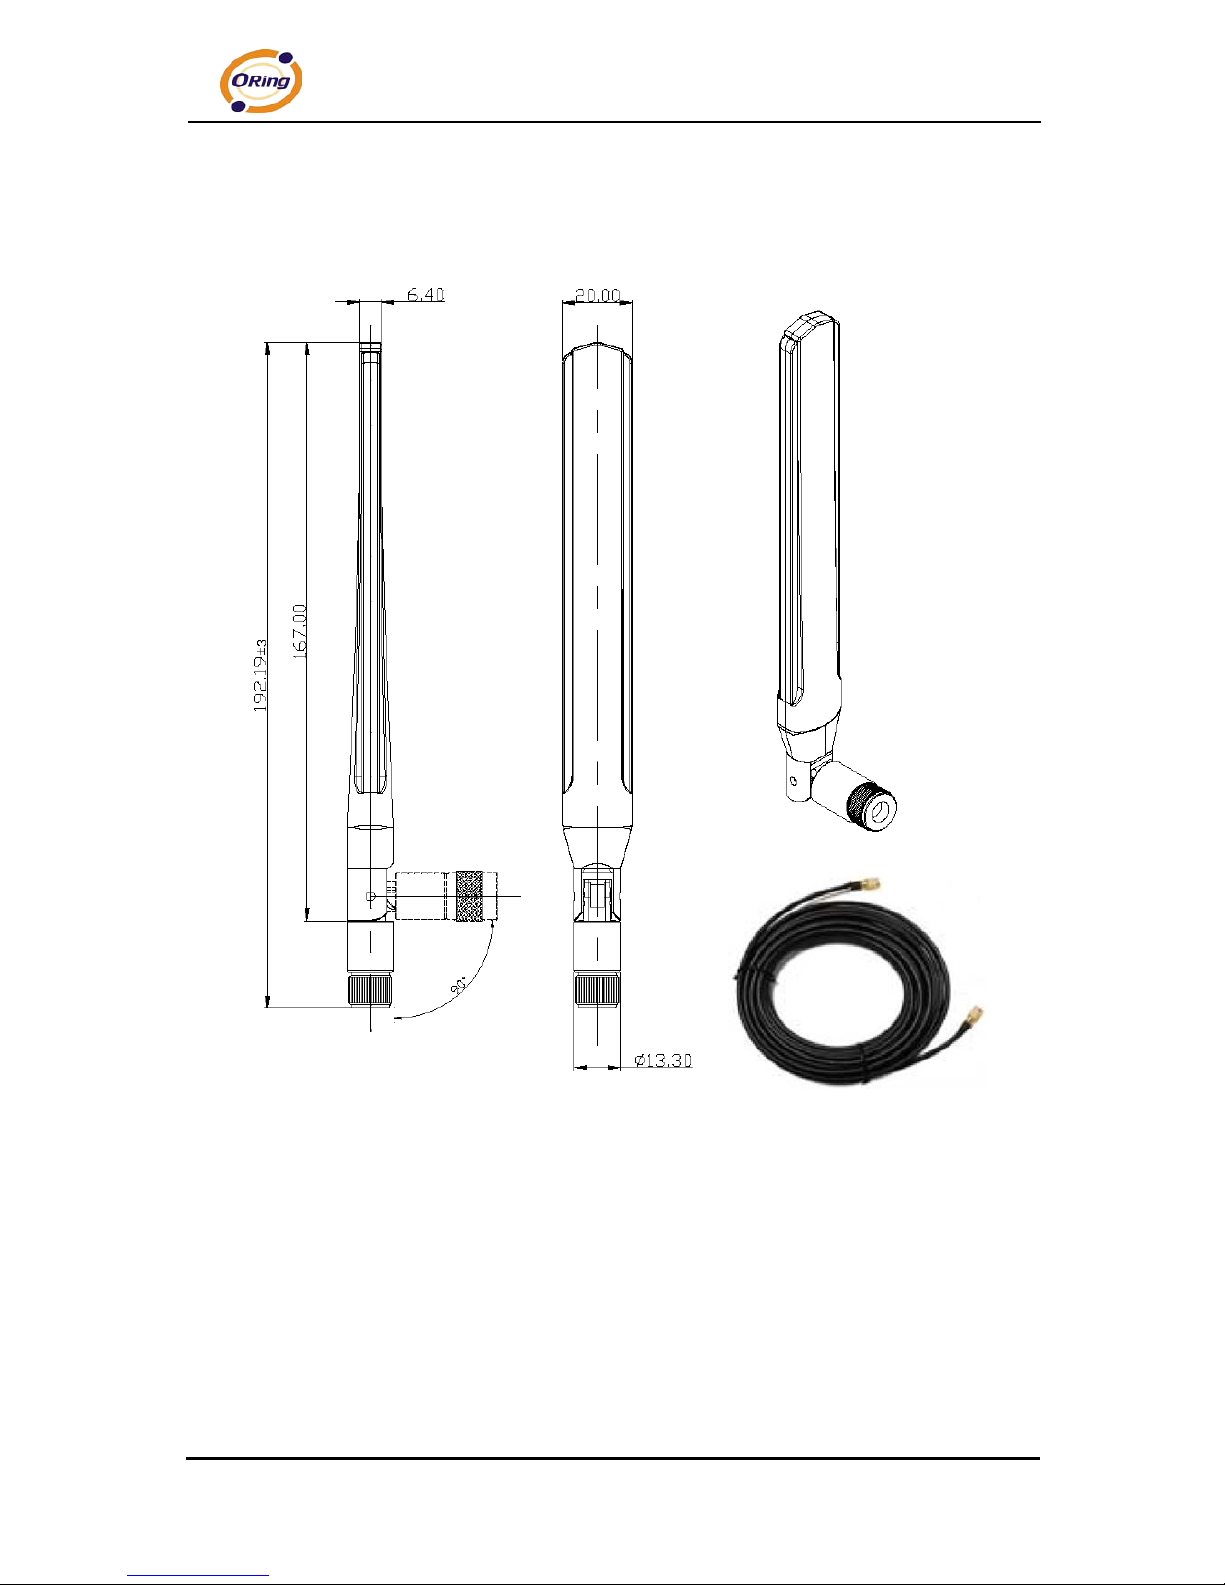
4.3 Wireless Antenna
2.4GHz/5GHz antenna is used for TAP-620-M12 and connected with a reversed SMA
connector. External RF cable and antenna also can be applied wit h this connect or.
Page 13
TAP-620-M12 User’s Manual
ORing Industrial Networking Corp. 8
Management Interface
5.1 Explore TAP-620-M12
5.1.1 Open-Vision_Commander
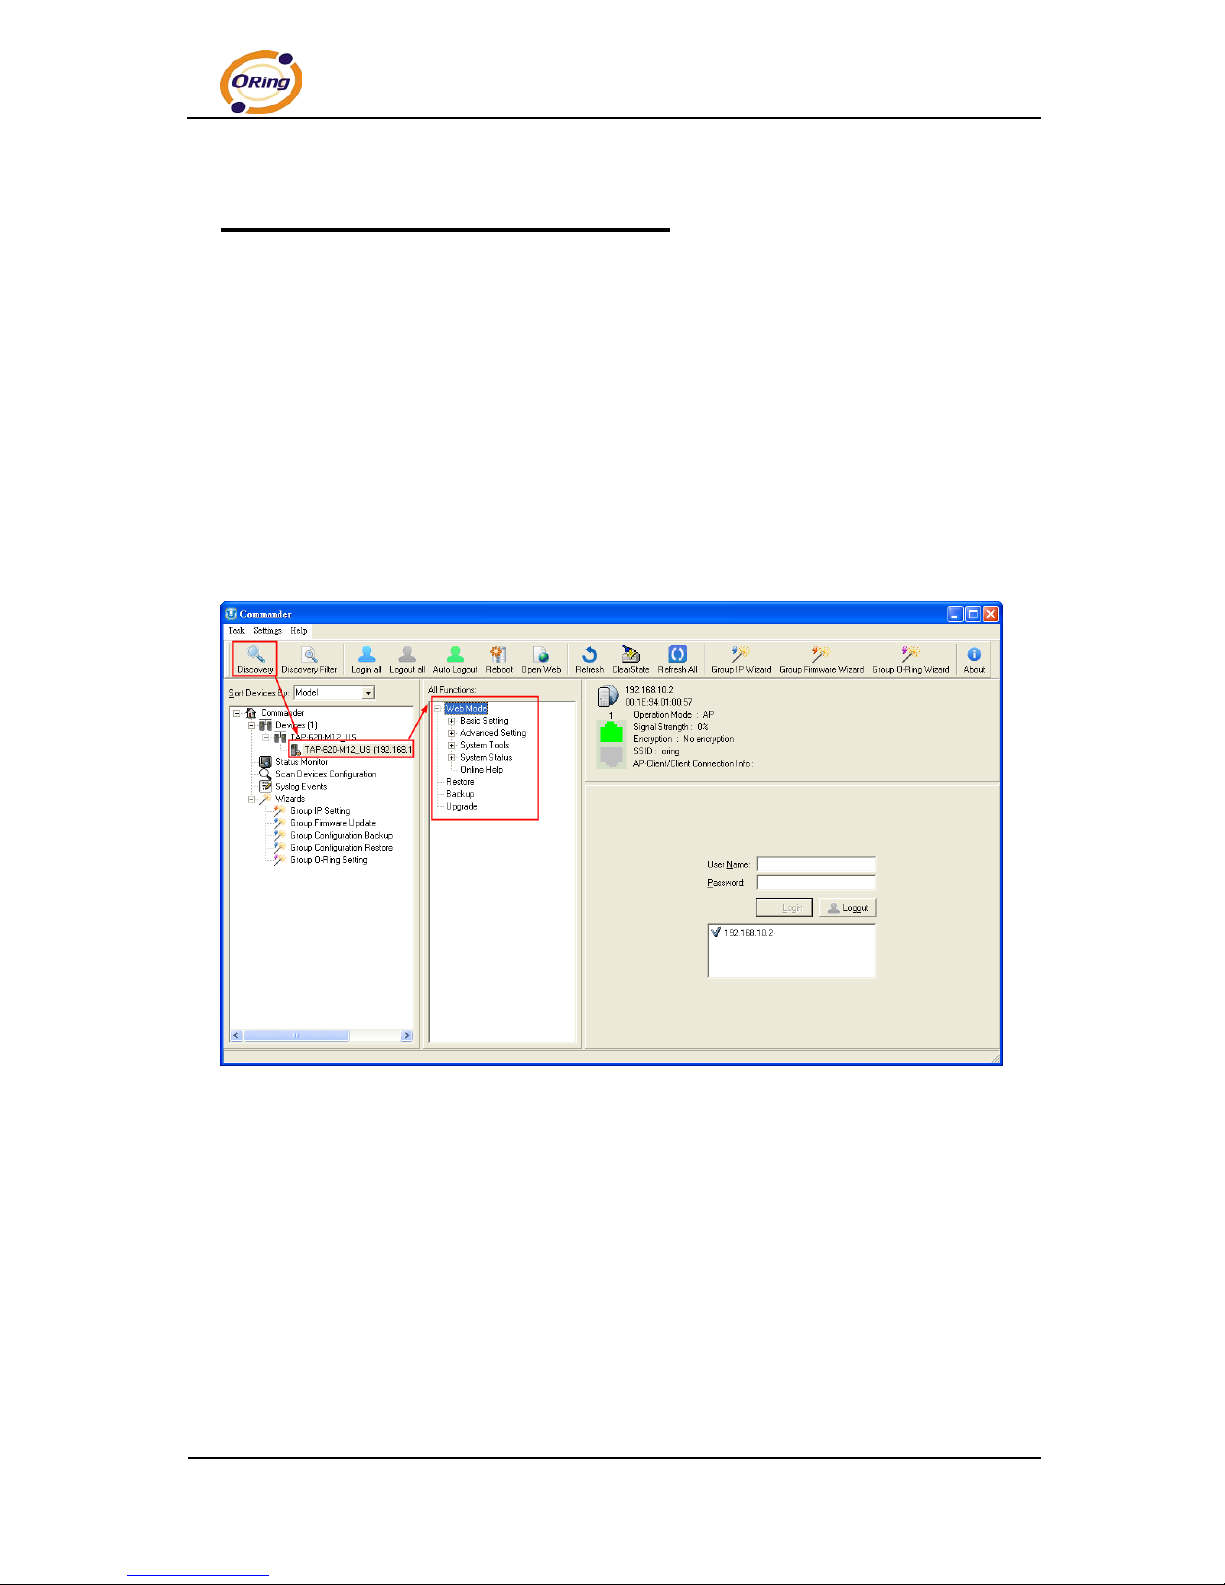
TAP-620-M12 can also be confi gur e through Oring’s win dow utility Open-Vision
Step 1: Open the commander and click “Discover”, the AP devices will show on the li st.
Step 2: Choose your access point, and it will show the AP function tree. Simultaneity,
you can login and then set the AP.
User interface of commander
Page 14
TAP-620-M12 User’s Manual
9 ORing Industrial Networking Corp.
5.2 UPnP Equipment
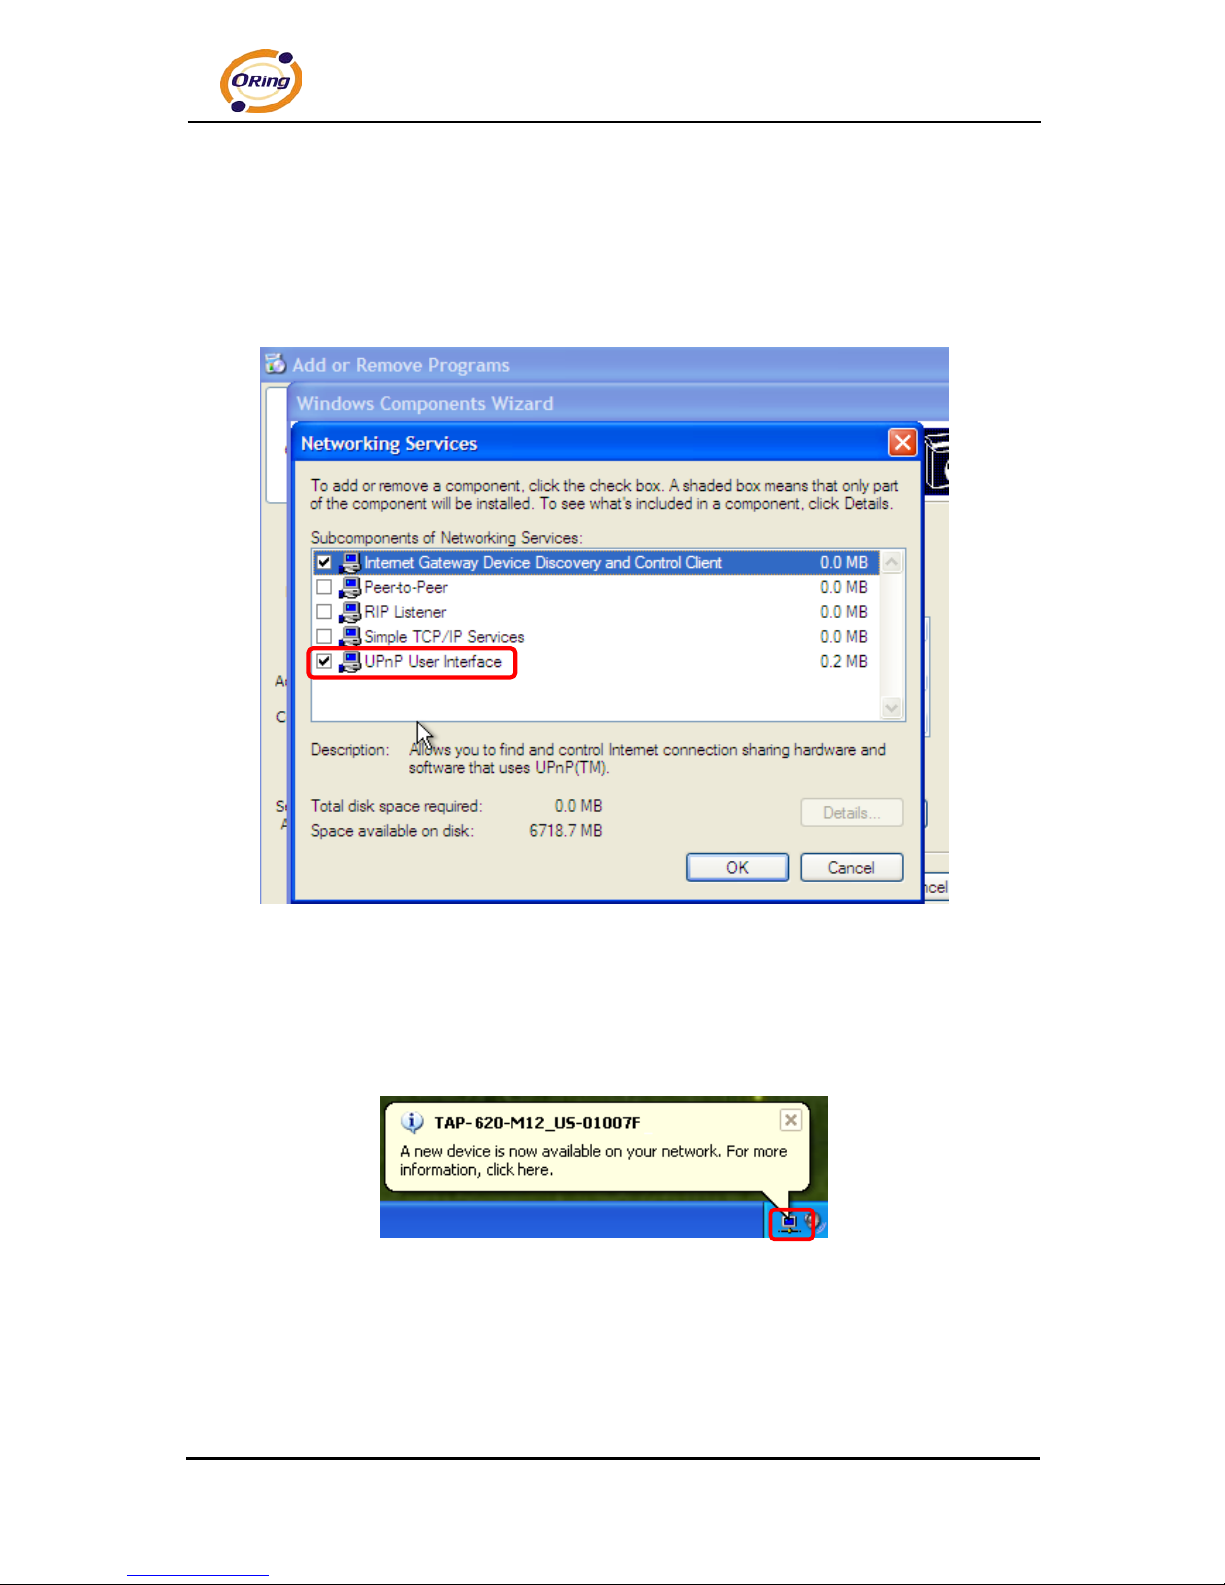
Step 1: To check whether the UPnP UI of the computer is connected t o the TAP-620-M12,
go to Control Panel > Add or Remove Programs > Windows Components Wizard >
Networking Servers > UPnP User Interface and pitch on the UP nP User Interf ace.
UPnP configuration page
Step 2: At the right-below corner of the computer, you will find a sign of t he UP nP
equipment.
Page 15
TAP-620-M12 User’s Manual
ORing Industrial Networking Corp. 10
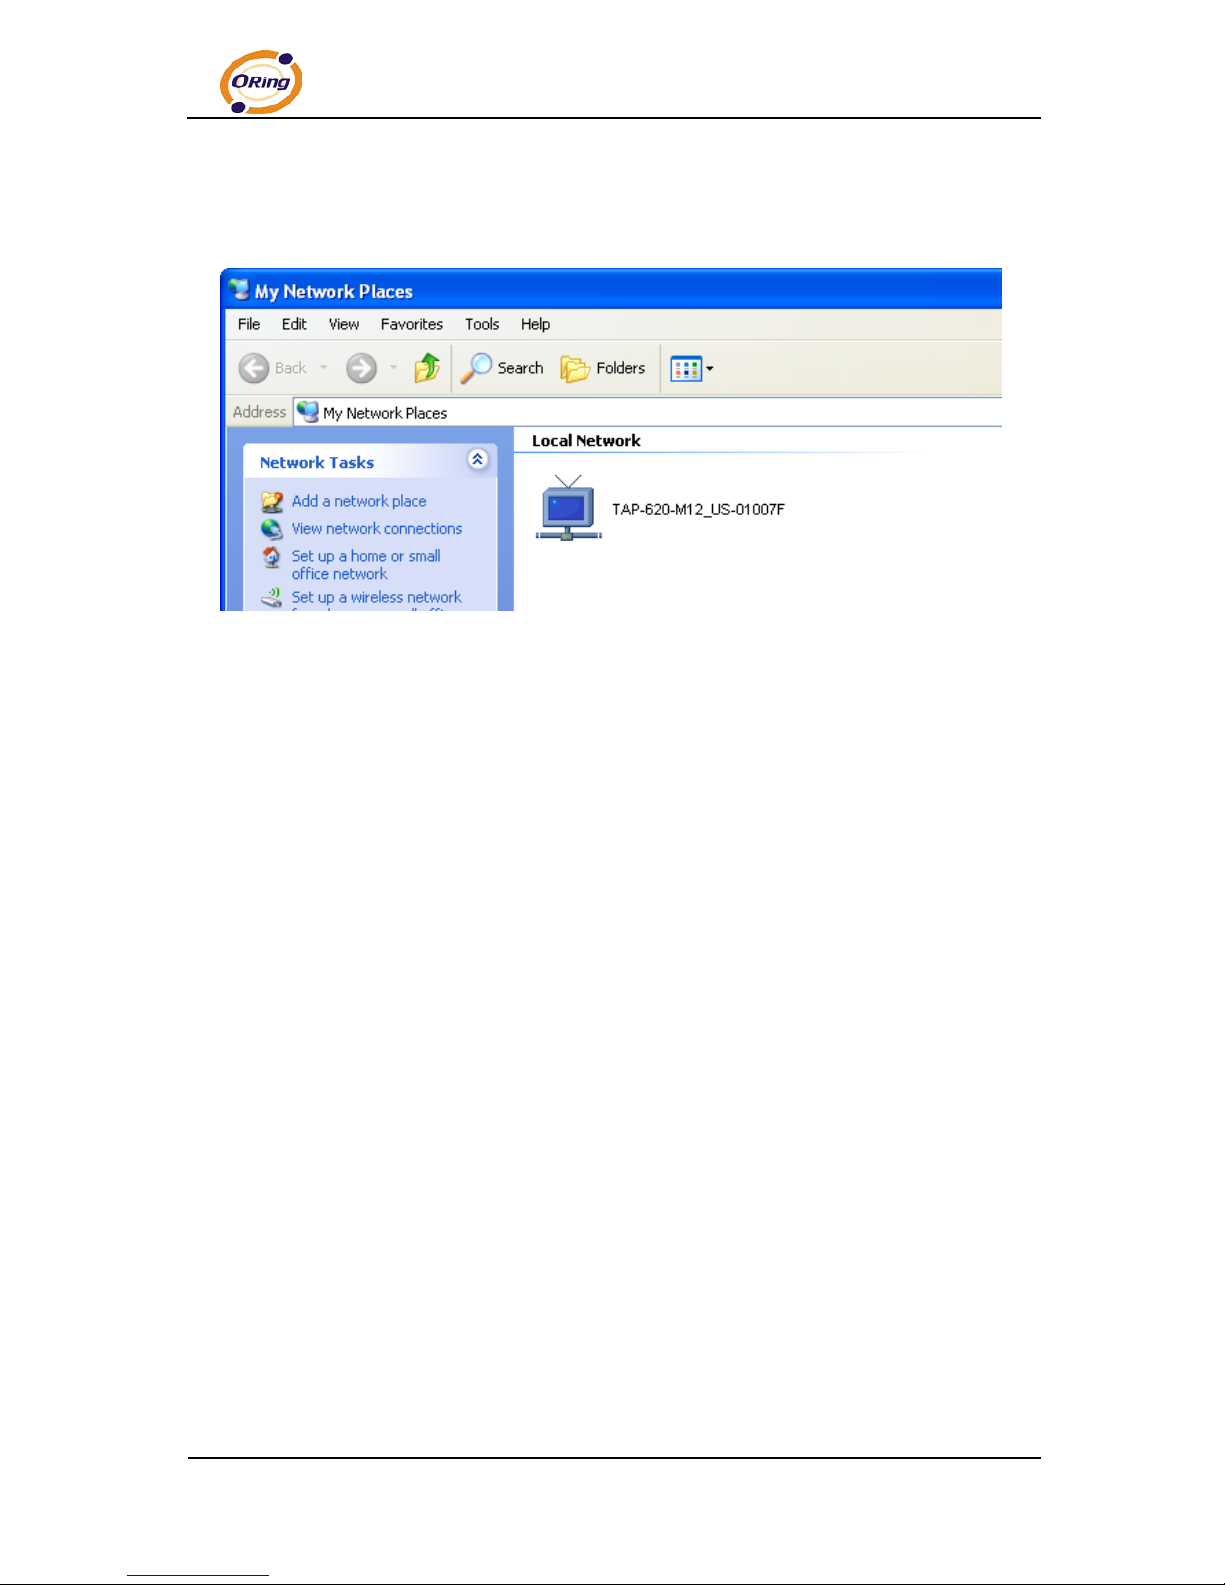
Step 3: Click the sign of the UPnP equipment, then you will find the UPnP equipment in the
network neighborhood.
Step 4: Right click the UPnP equipment to choose “Properties”, it will show as the following
pictures:
Step 5: Right click the UPnP equipment or double click the UPnP equipment to transfer; it
will go to the web page.
5.3 Configuration by Web Browser
This section int r oduce s the co nfiguration by Web browser.
5.4 About Web-Based Management
An embedded HTML web site resides in flash memory in the system. It contains
advanced m anagement feat ures and allows you to manage t he AP f rom anywhere on the
network through a standard web browser such as Microsoft Internet Ex plor er.
The Web-Based Management function supports Internet Explorer 5.0 or later. It is based
on Java Applets with an aim to reduce network bandwidth consumption, enhance access
speed and present an easy viewing screen.
Note: By d efault, IE5.0 or lat er ver s i on do es n ot all ow J av a Applets to open sock ets . You need to exp lic i t l y m odify
the browser setting in order to enable Java Applets to use network por t s.
Page 16
TAP-620-M12 User’s Manual
11 ORing Industrial Networking Corp.
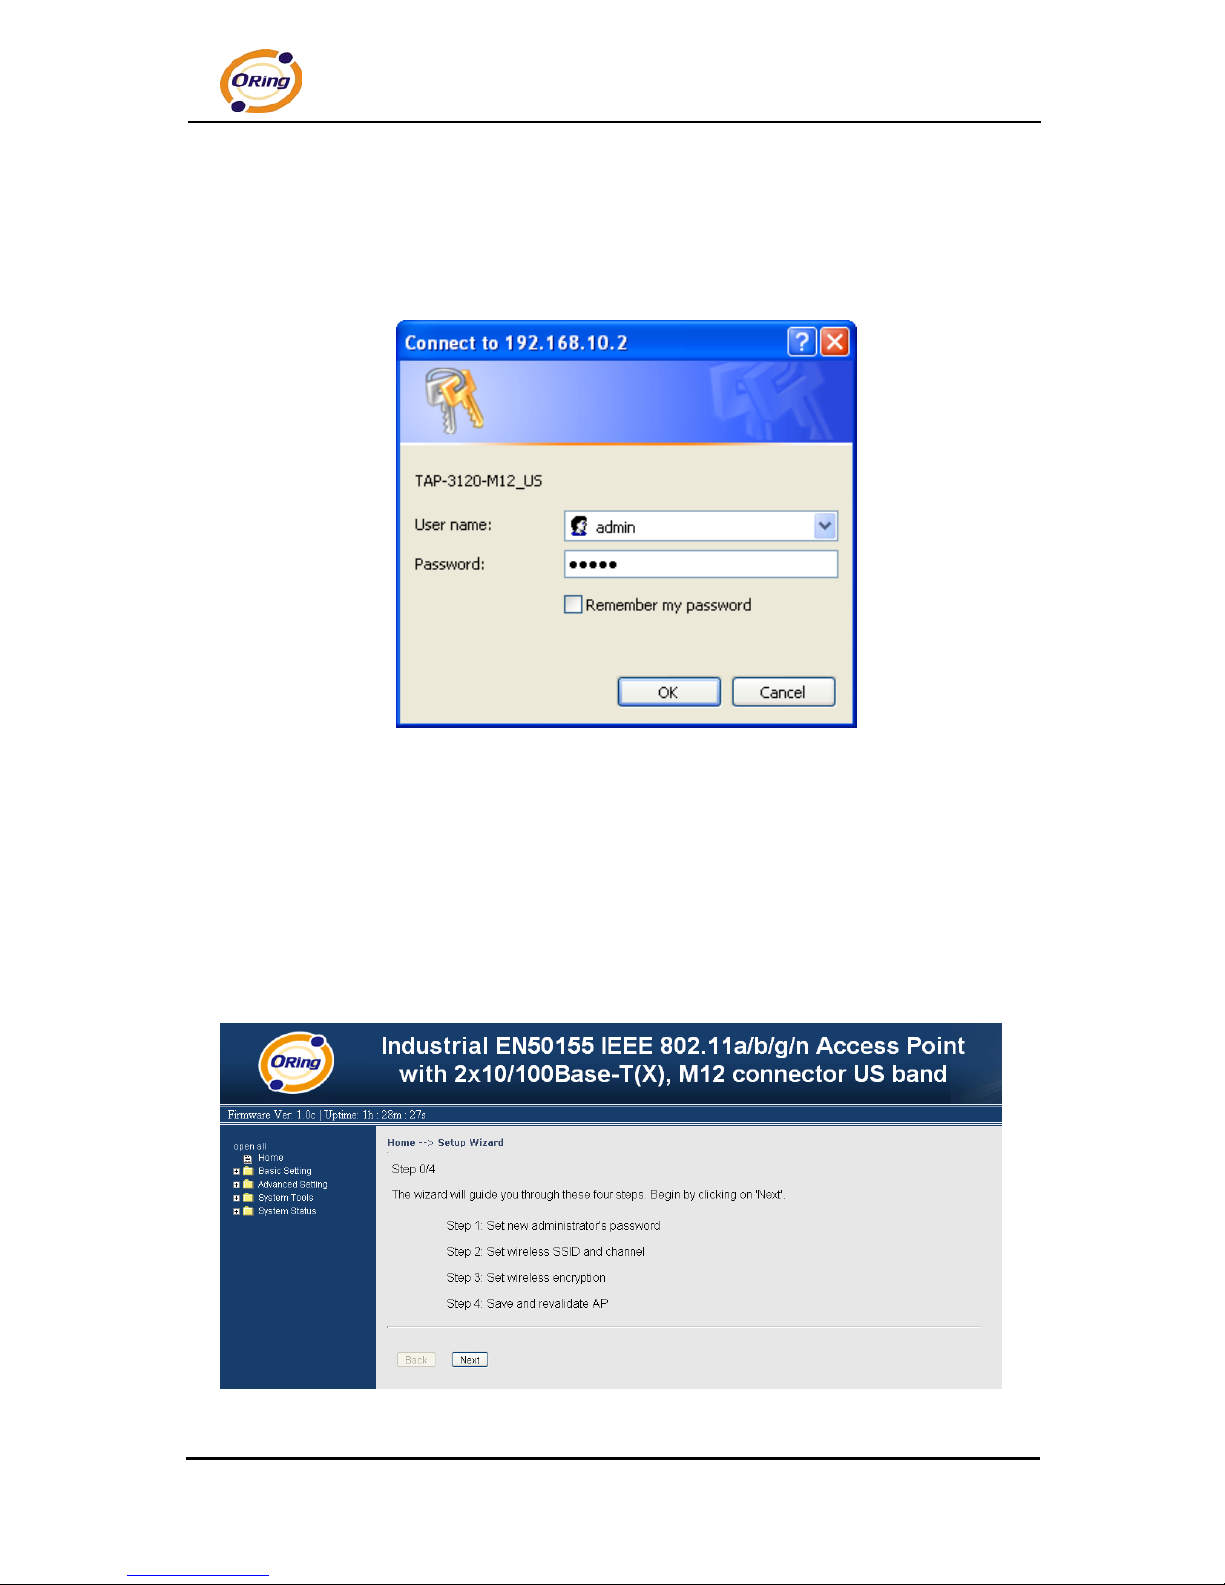
Through the front section’s information, you will see as f ollows, enter yo ur user name
(admin) and your password (admin), and then click OK to continue.
Login screen
For security reasons, we strongly sugge st yo u ch ange the password. Click on System
Tools > Administrator and modify the password.
5.5 Main Interface
The Home screen will appear. Please click “Run Wizard” to go to the Home > Setup
Wizard page to quick install the AP.
Main interface
Page 17
TAP-620-M12 User’s Manual
ORing Industrial Networking Corp. 12
5.5.1 Basic Setting
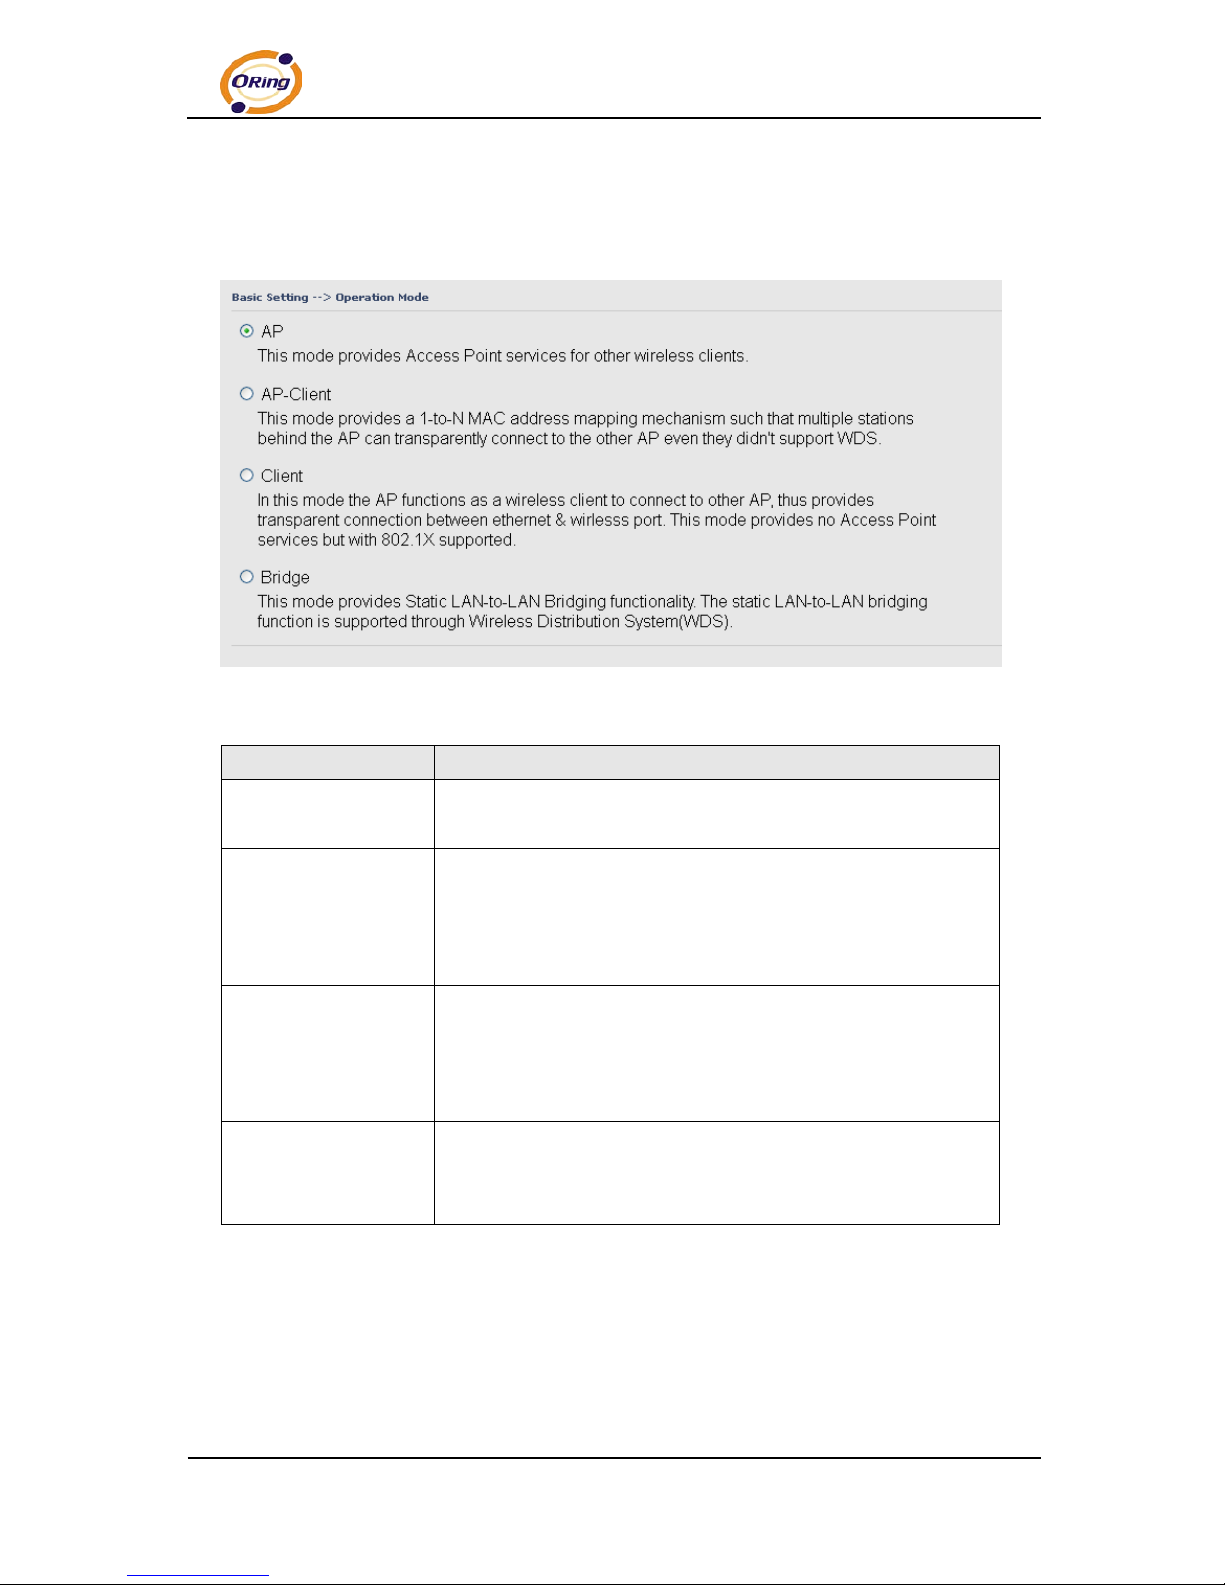
Setting Operation Mode
Operation mode interface
The following tabl e describes the labels in this screen.
Label Description
AP This mode provides Access P oint services for other wirel ess
clients.
AP-Client The AP-Client function provides a 1-to-N MAC address mapping
mechanism such that multiple stations behind the AP can
transparently co nnect to the other AP even they didn’t support
WDS.
Client In this mode the AP functions as a wireless client to connect to
other AP, thus provides transparent connection between Ethernet
& wireless port. This mode pr ov ides no Access Point service s but
with 802.1X supported.
Bridge This mode provides Static LAN-to-LAN Bridging functionality.
The static LAN-to-LAN bridging function is supported thr ough
Wireless Distri bution System (WDS).
In each mode, the TAP-620-M12 forwards packet between its Ether net interface and
wireless interface for wired hosts on the Ethernet side, and wireless hosts on the wirel ess
side.
Page 18
TAP-620-M12 User’s Manual
13 ORing Industrial Networking Corp.
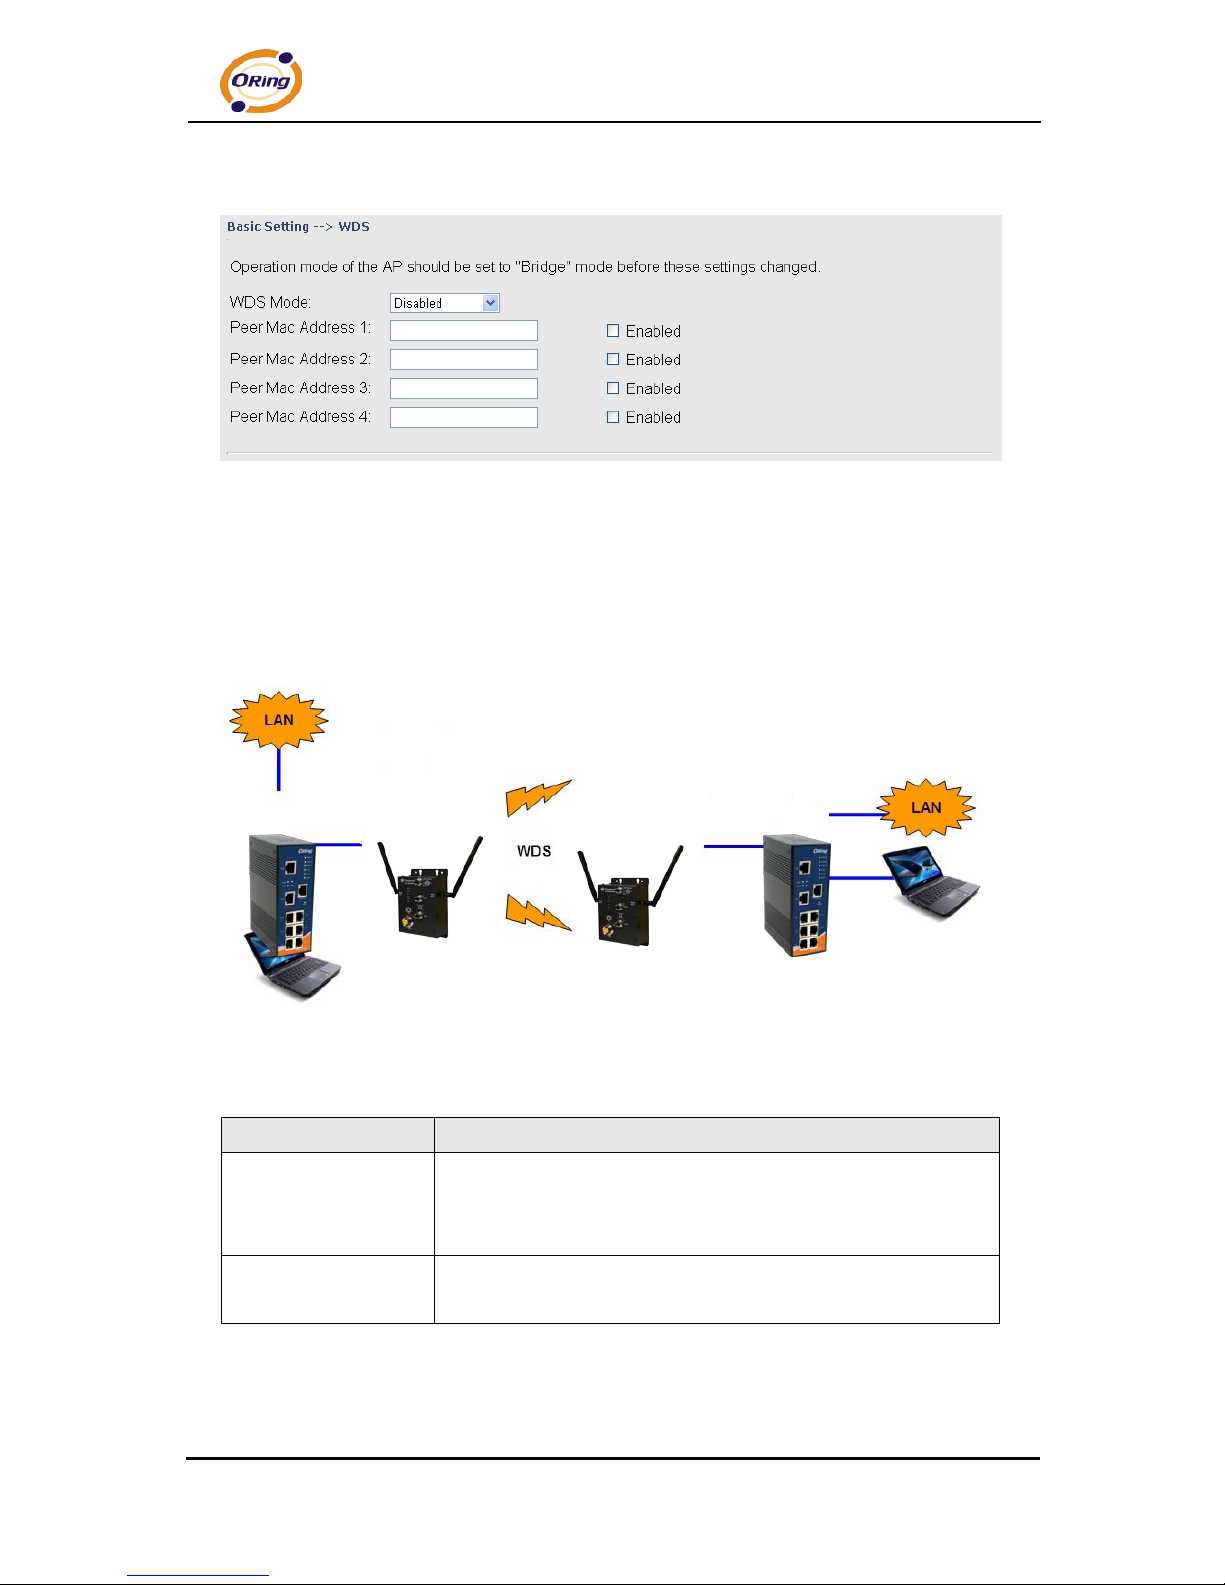
Setting WDS (Bridge Mode)
WDS setting interface
This type of wirel ess link is established between two IEEE 802.11 access points.
Wireless packets transmitted along the WDS link comply with the IEEE 802.11 WDS
(Wireless Distribution System) format at the link laye r.
Point-to-Point WDS Link
The following tabl e describes the labels in this screen.
Label Description
WDS Mode This mode provides Static LAN-to-LAN Bridging functionality.
The static LAN-to-LAN bridging function is supported through
Wireless Distri bution System (WDS).
Peer MAC Address Set the Mac address of other access point(s). Simultaneity,
choose on “Enable”.
First of all, if APs link with WDS mode, it should obey the following rules:
1. LAN IP Address should set different IP in the same network.
Page 19
TAP-620-M12 User’s Manual
ORing Industrial Networking Corp. 14
2. All AP’s DHCP Server should set shutdown.
3. WDS should set Enable.
4. Each AP should have the same setting except ‘Peer Mac Address’ set to the other’s
Mac address
5. At wireless web setting S ecu ri ty and Channel should be the same,
6. AP’s distance should be limited within a certaint y area.
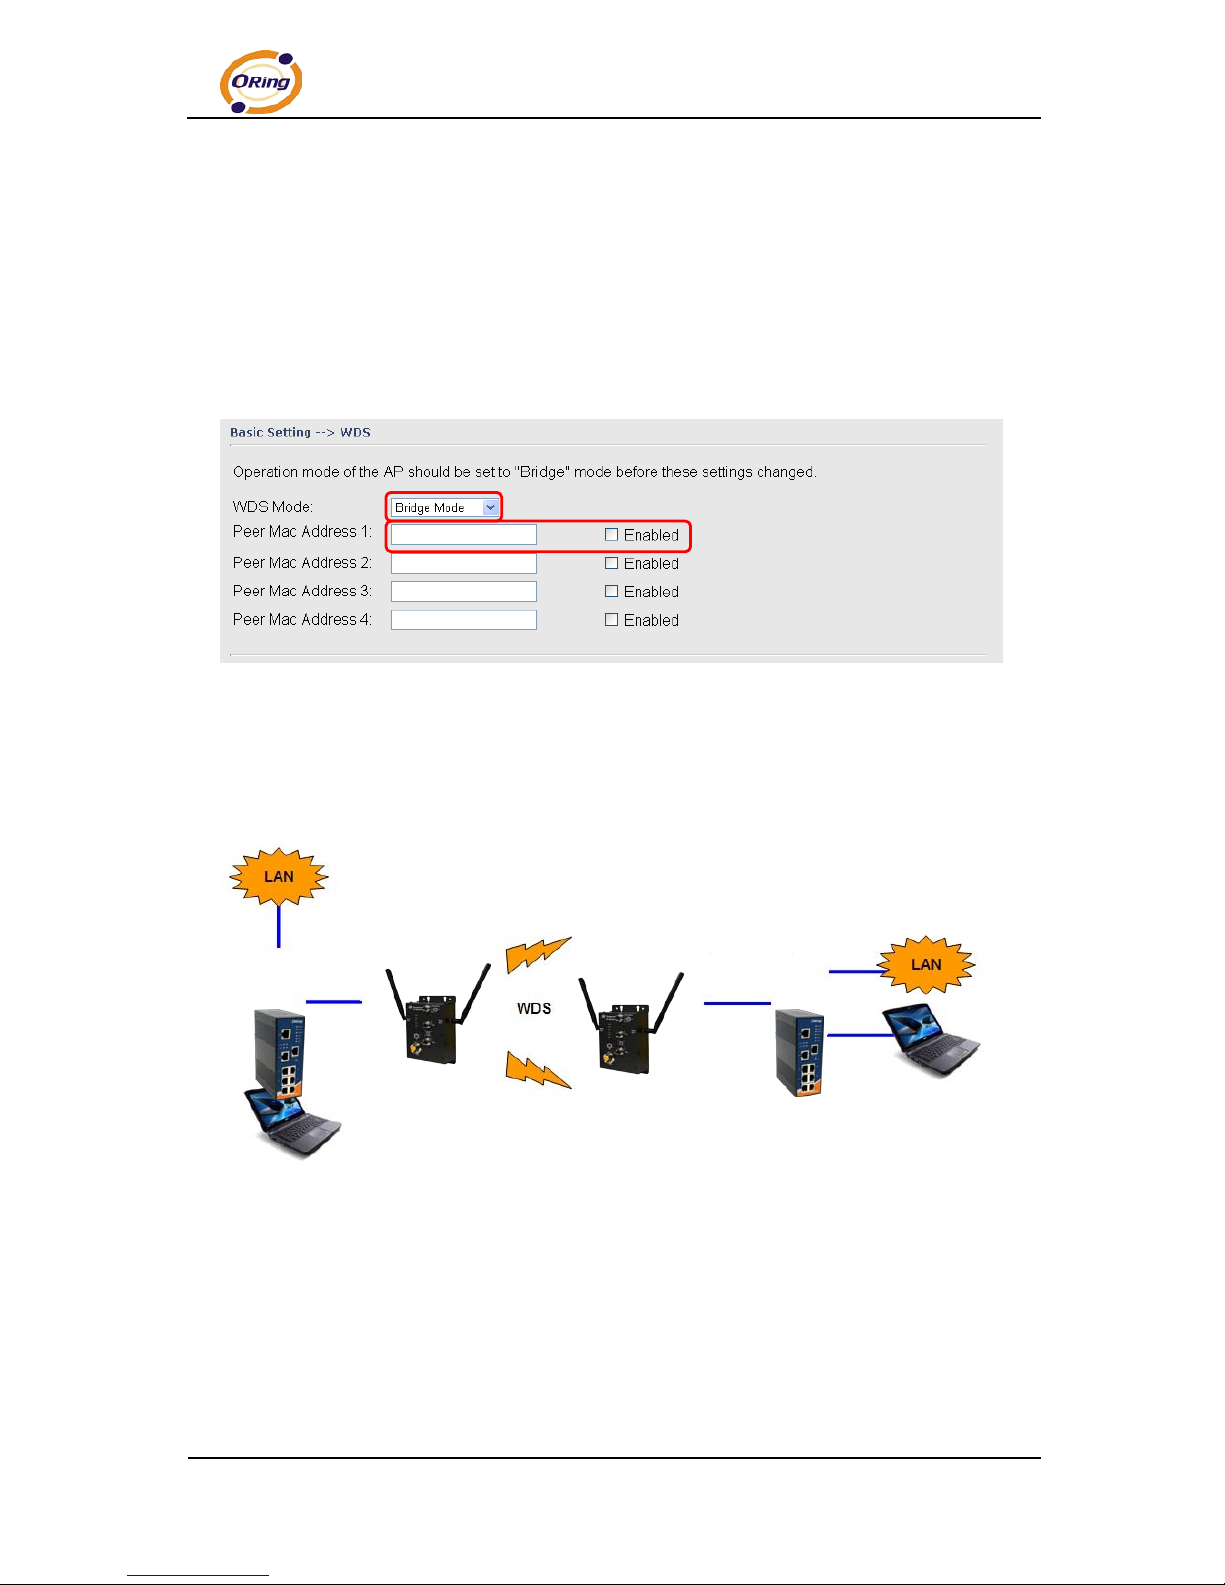
WDS –Bridge Mode
The peer WDS APs are according to the MAC address l isted in "Peer Mac Address"
fields.
The working princi ple of Bridge Mode as follows:
In the figure, the AP behaves as a standard bridge that forwards traffic between WDS links
(links that connect t o other AP/wireless bridges) and an E thernet port. As a standard bridge,
the AP learns MAC addresses of up to 64 wi reless or 128 total wired and wireless network
devices, which are connect ed to thei r respectiv e Ethernet ports to limit t he amount of data t o
be forwarded. Only data destined for stations which are known to reside on the peer Ethernet
link, multi ca st data or data wit h unkn own destinations need to be forwarded to the peer AP via
the WDS link.
Page 20
TAP-620-M12 User’s Manual
15 ORing Industrial Networking Corp.
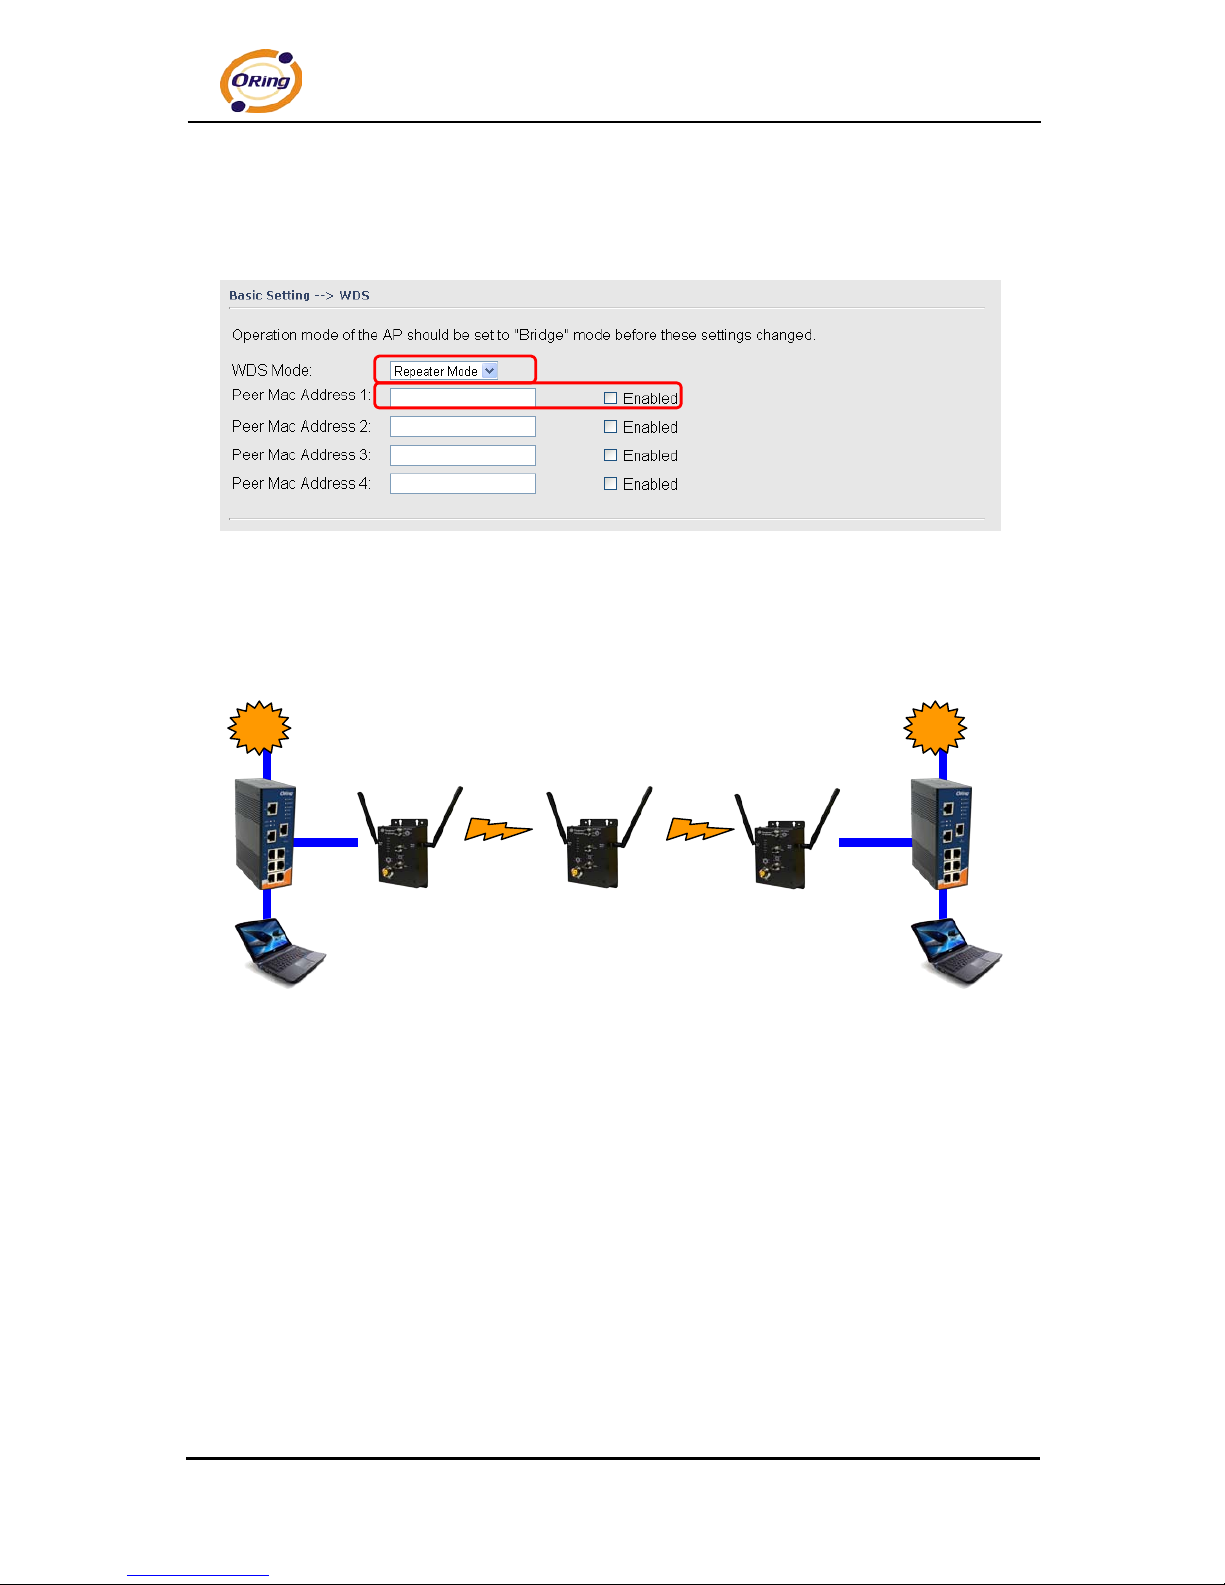
WDS –Repeater Mode
The peer WDS APs are according to the MAC address listed in "Peer Mac Address"
fields.
The working princi ple of Repeater Mode as follows:
In the figure, Repeater is used to extend the range of the wireless infr astr ucture by
forwarding t r affic bet ween associated wireless stations and another repeater or AP
connected to the wir ed LA N.
LAN
WDS
LAN
WDS
Page 21
TAP-620-M12 User’s Manual
ORing Industrial Networking Corp. 16
Setting Wireless
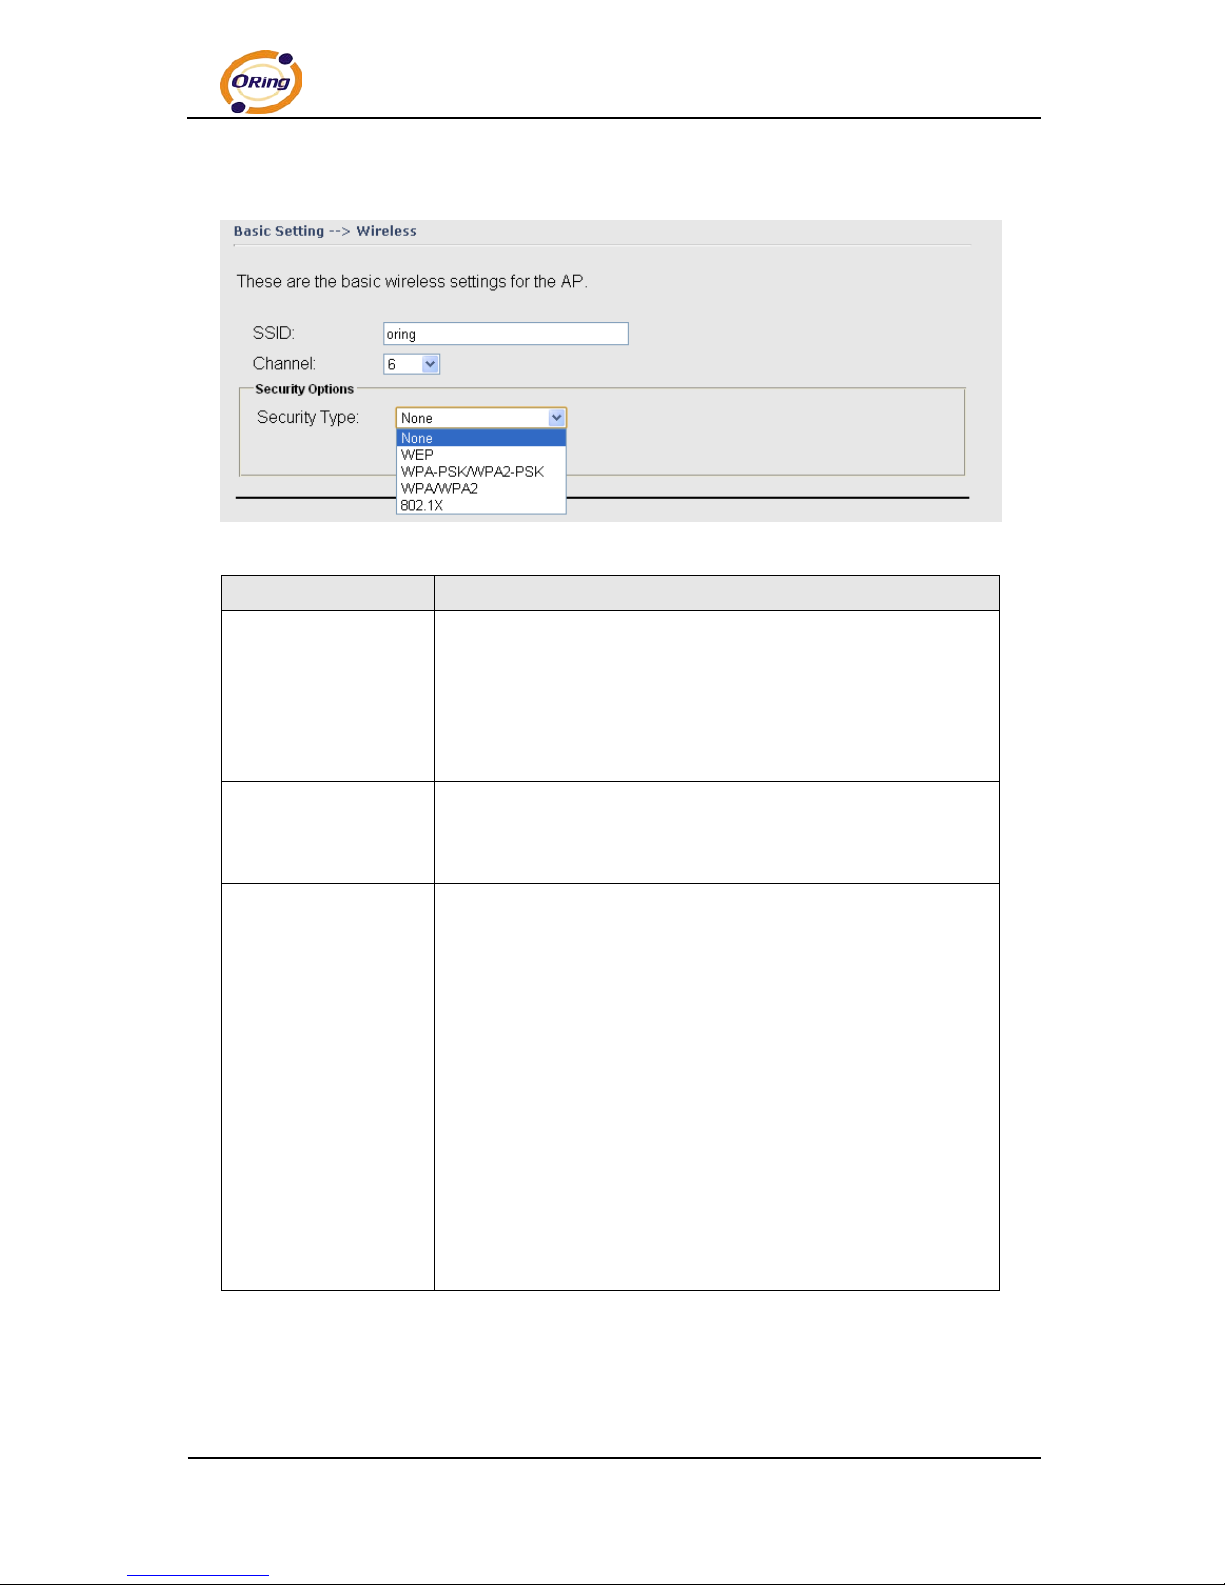
The following tabl e describes the labels in this screen.
Label Description
SSID
Service Set Identif ier Default is the default setting. The SSID is
a unique name that identifies a network. All devices on the
network must share the same SSID name in order to
communicat e on the network. If you change t he SSID from the
default setti ng, input your new SSID name in this field.
Channel
Channel 6 is the default channel , input a new number if you want
to change the default setti ng. All devices on the network must
be set to the same channel to comm unica te on the network.
Security options
Select the type of security for your wireless network at Security
Type:
None: Select f or no security.
WEP: Select for security WEP.
WPA-PSK/WPA2-PSK: Select for security WPA-PSK or
WPA2-PSK without a RADIUS server.
WPA/WPA2: Select for WP A or WPA2 (Wi-Fi Protected Access )
authentication in conjunction with a RADIUS server.
802.1x: Authentication through RADIUS serv er
Page 22
TAP-620-M12 User’s Manual
17 ORing Industrial Networking Corp.
Security Type – None
No security prot ection on your wireless LAN access.
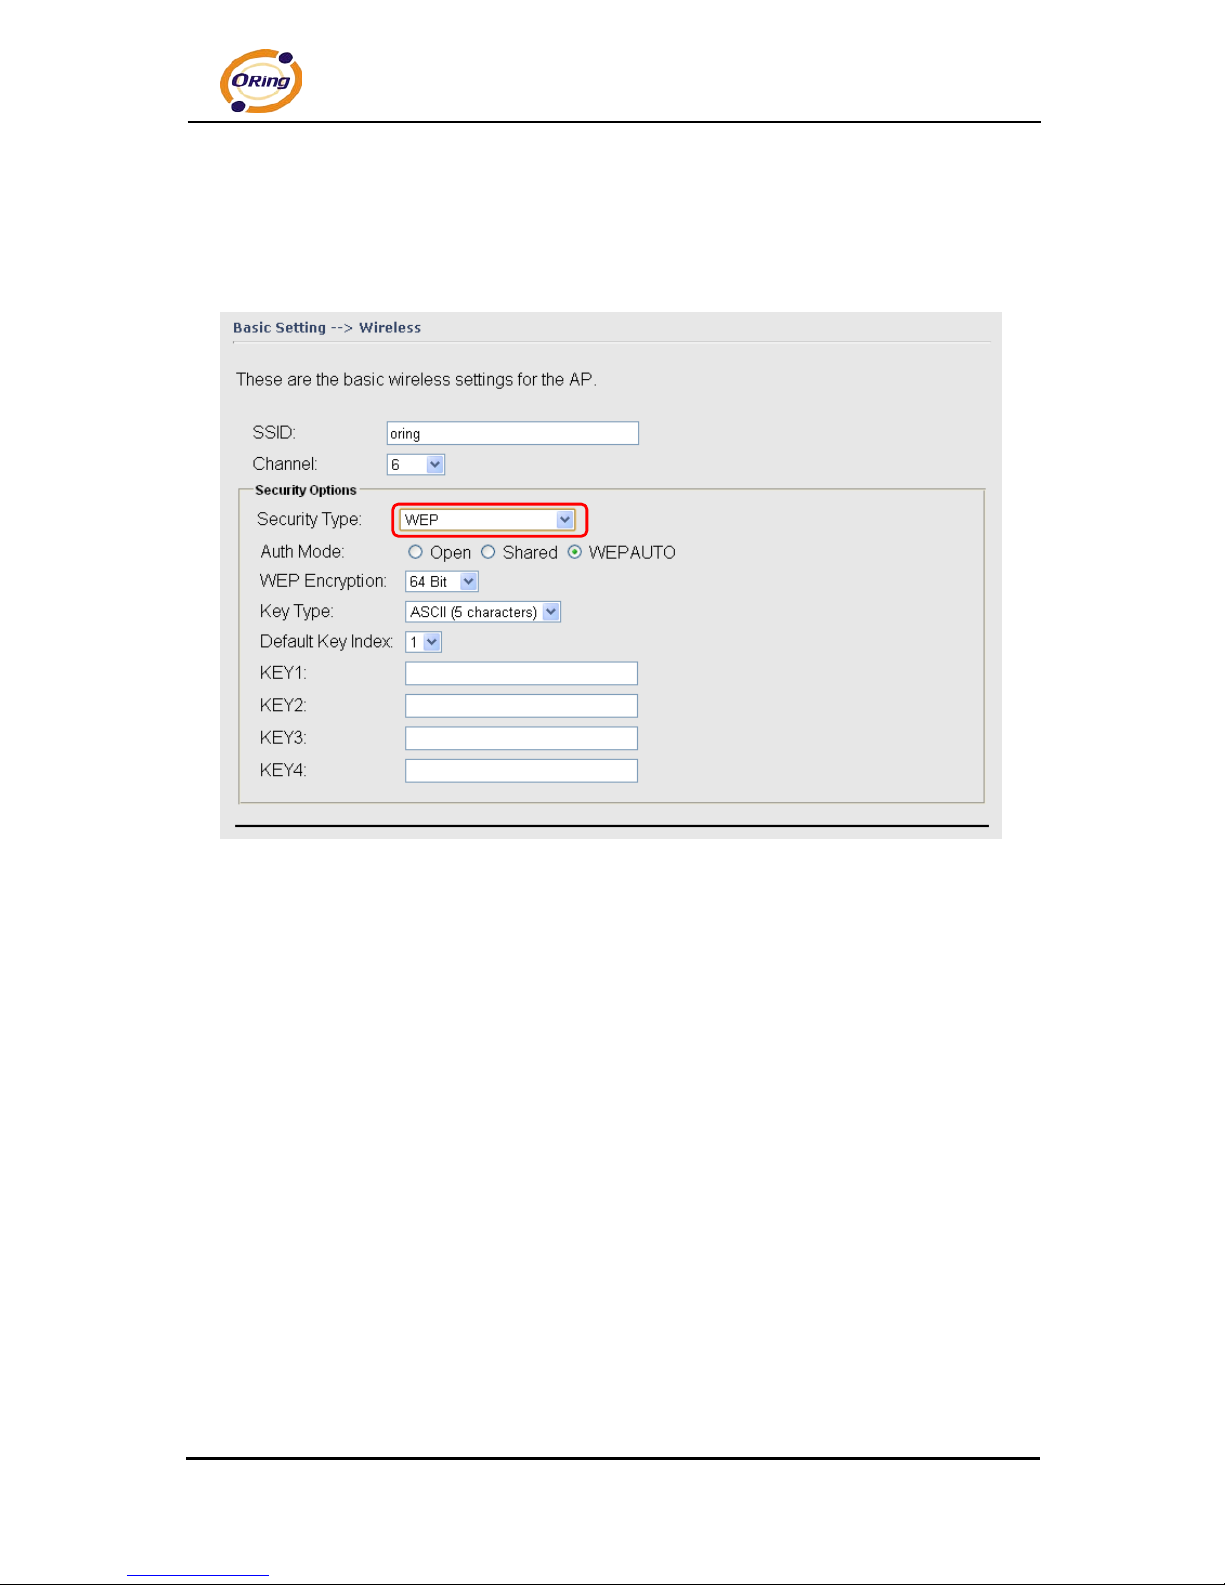
Security Type – WEP
1. Secu rity T ype: Select WEP
2. WEP Encryption: Select 64 Bit or 128 Bit WEP encryption.
3. Key Type: Select ASCII or Hex key type.
4. Default Key Index: Select one of the keys to be the active key.
5. Key 1-4: Input up to four encryption keys.
ASCII (American Standard Code for Information Interchange) is a code for representing
English lett er s as number s fr om 0-127. Hex digits consist of the numbers 0-9 and the
letters A-F.
Page 23
TAP-620-M12 User’s Manual
ORing Industrial Networking Corp. 18
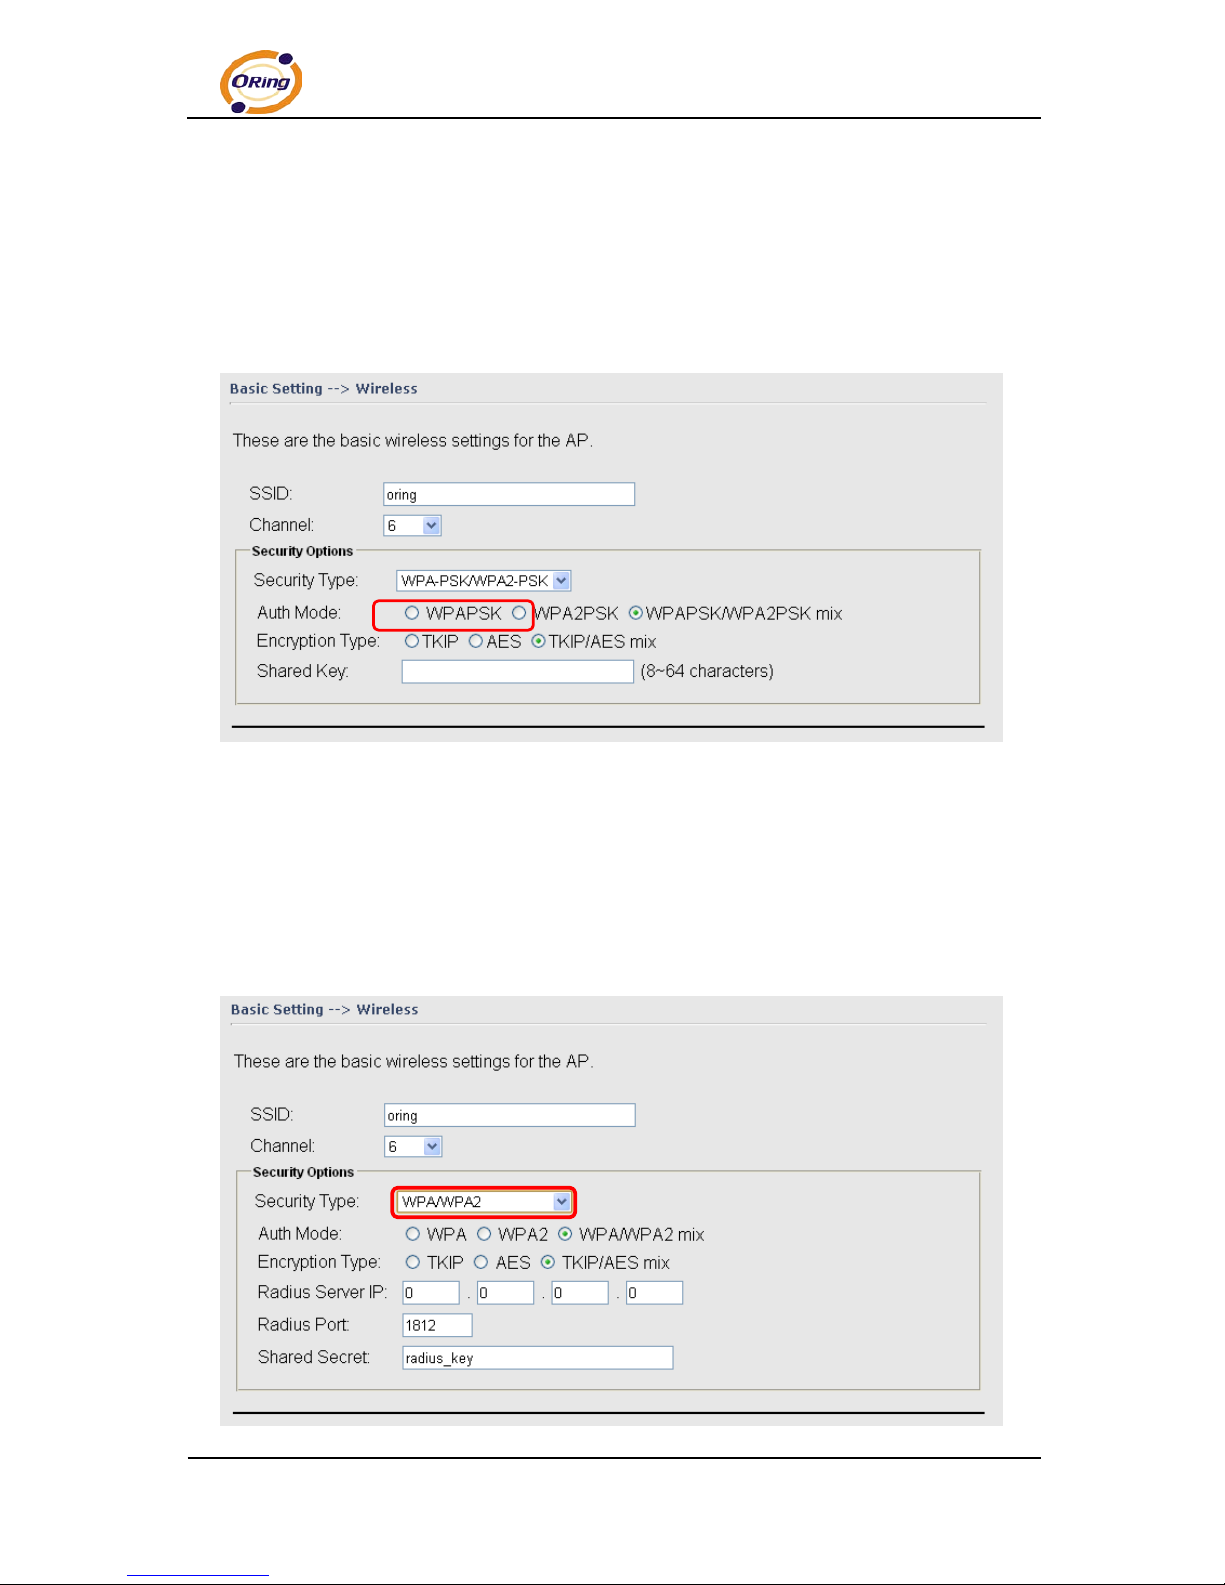
Security Type – WPA-PSK/WPA2-PSK
1. Security Type : Select WPA-PSK/WPA2-PSK.
2. Encryption Type: Select TKIP or AES encryption.
3. Share Key: Enter your password. The password can be between 8 and 64
characters.
Security Type – WPA /WPA2
Page 24
TAP-620-M12 User’s Manual
19 ORing Industrial Networking Corp.
1. Security Type : Select WPA/WPA2
2. Radius Server IP: Enter the IP address of the RADIUS Server.
3. Port: Enter the RADI US port (1812 i s default).
4. Shared Secret: Ent er the RADIUS password or key.
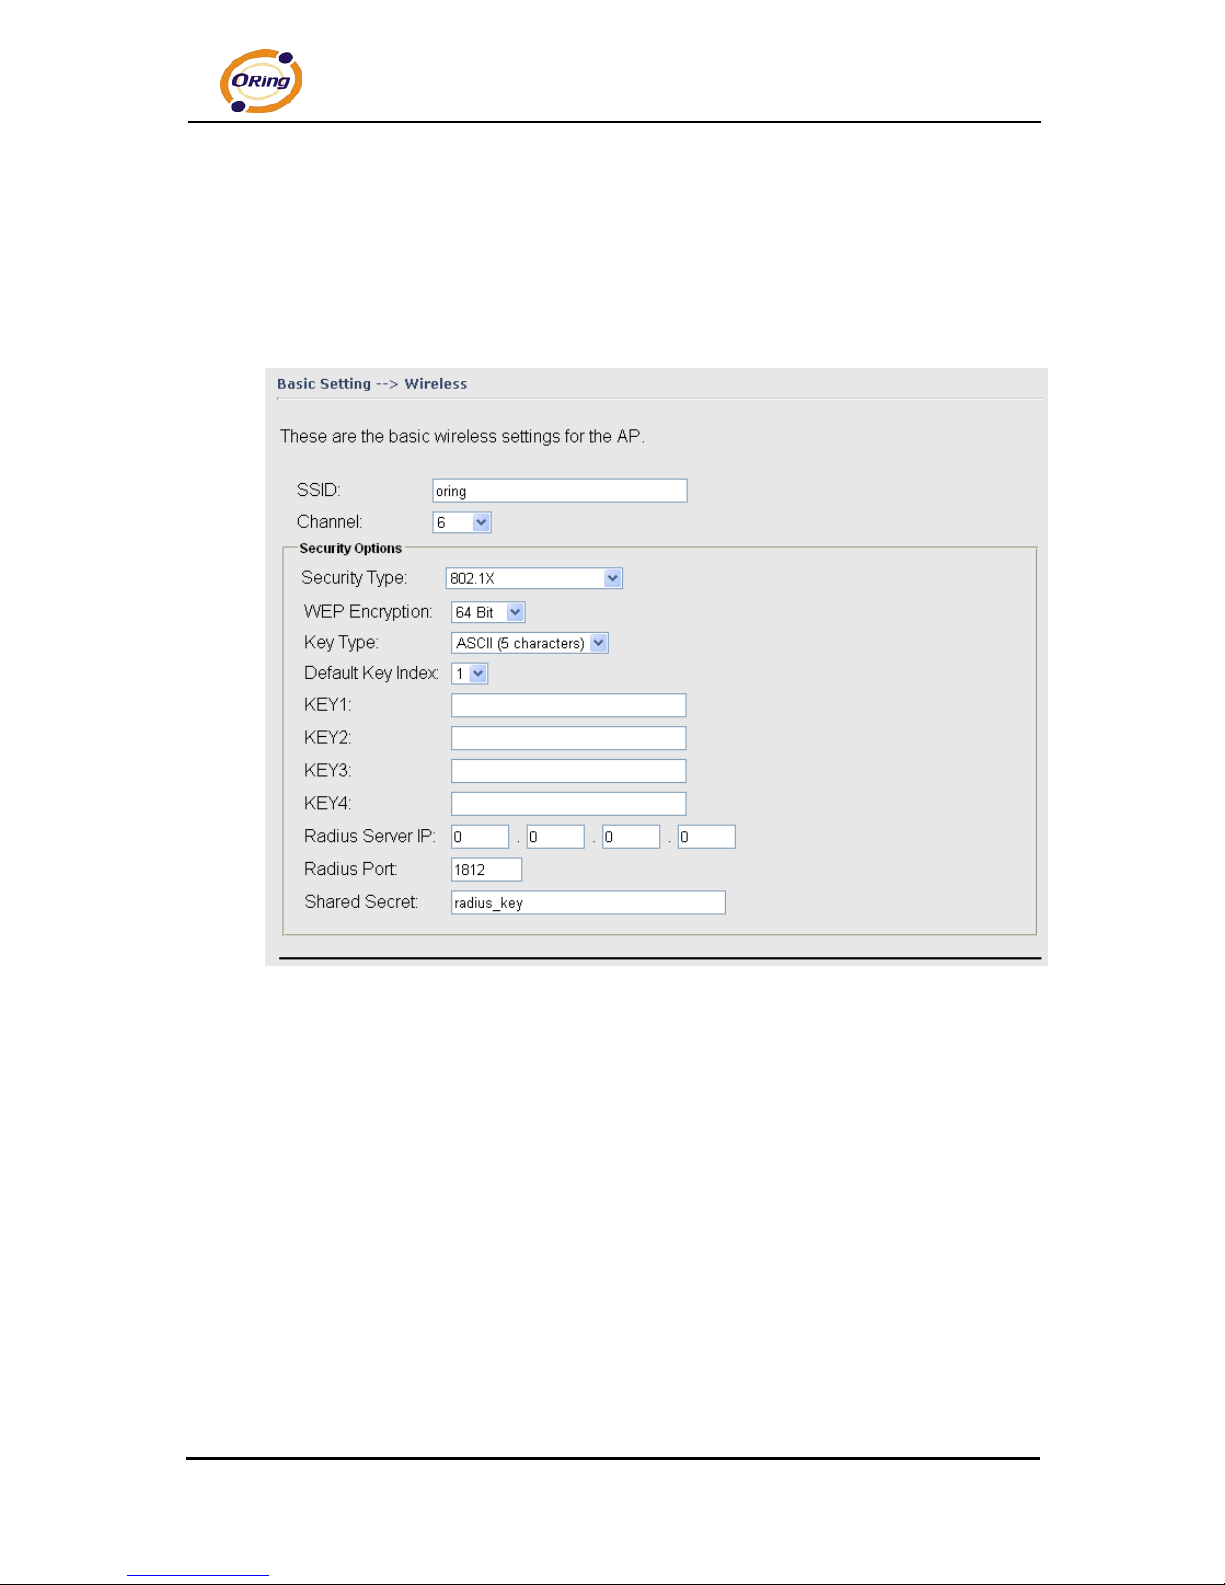
Security Type – 802.1x
1. Security Type : Select 802.1x
2. WEP Encryption: Select 64 Bit or 128 Bit WEP encryption.
3. Key Type: Select ASCII or Hex key type.
4. Default Key Index: S elect one of the keys t o be the active key.
5. Key 1-4: Input up to four encryption keys.
6. Radius Server IP: Enter the IP address of the RADIUS Server.
7. Port: Enter the RADI US port (1812 i s default).
8. Shared Secret: Ent er the RADIUS password or key.
Page 25
TAP-620-M12 User’s Manual
ORing Industrial Networking Corp. 20
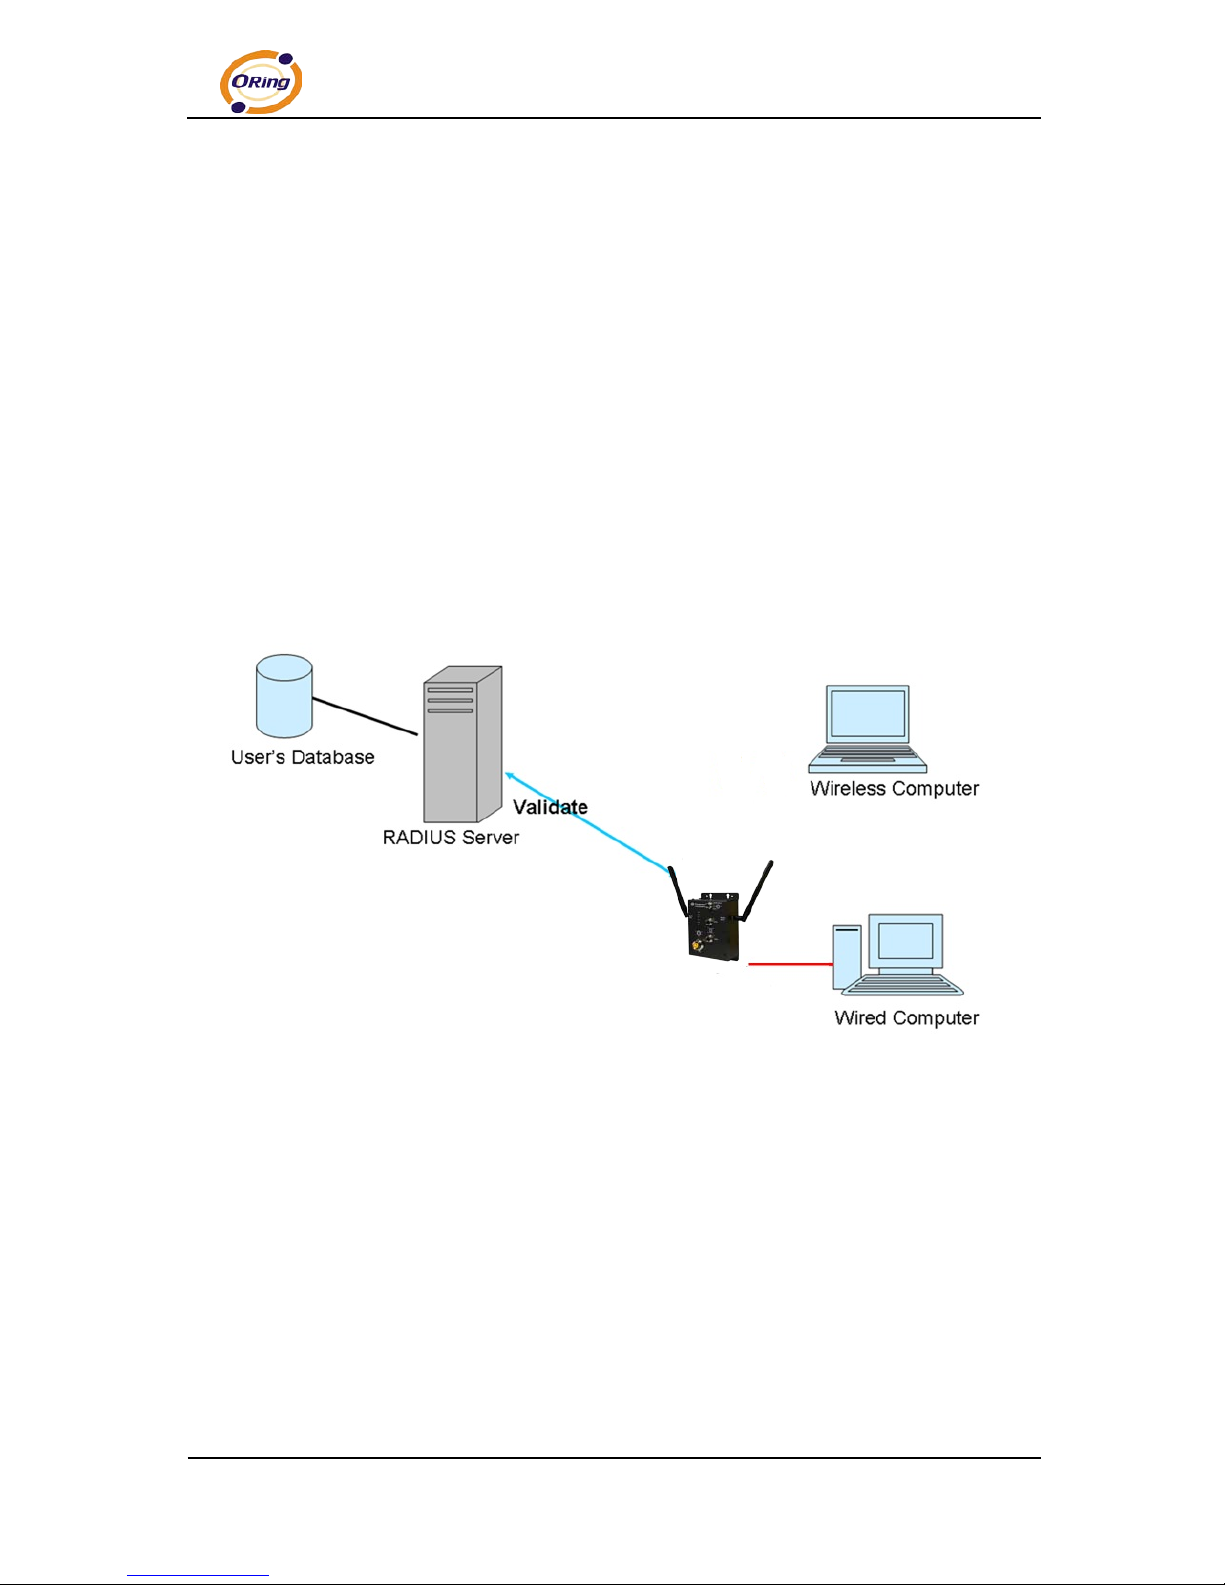
RADIUS (Remote Authentication Dial-in User Service) is the industrial standard
agreement, and it is used to pr ovide an identify verification. The Radius custom er (is
usually a dial-in server, VPN server or wireless point) send your proof and the
conjunction parameter to the Radius server by Radius news. The Radius server
validates the request of the Radius customer, and return Radius news to back.
Radius serv er validates your proof, also carry on the authorization. So the Radius
server receiv ed by ISA server responded (point out the custom er carries proof to be not
granted) and it means that the Radius server did not authorize you to carry. Even if the
proof has already passed an ident ify verifi cation, the ISA server may also refuse you to
carry a claim accor ding to t he authorization strategy of the Radius server.
The principle of the Radius server shows in the following pi ctures:
Page 26
TAP-620-M12 User’s Manual
21 ORing Industrial Networking Corp.
Client
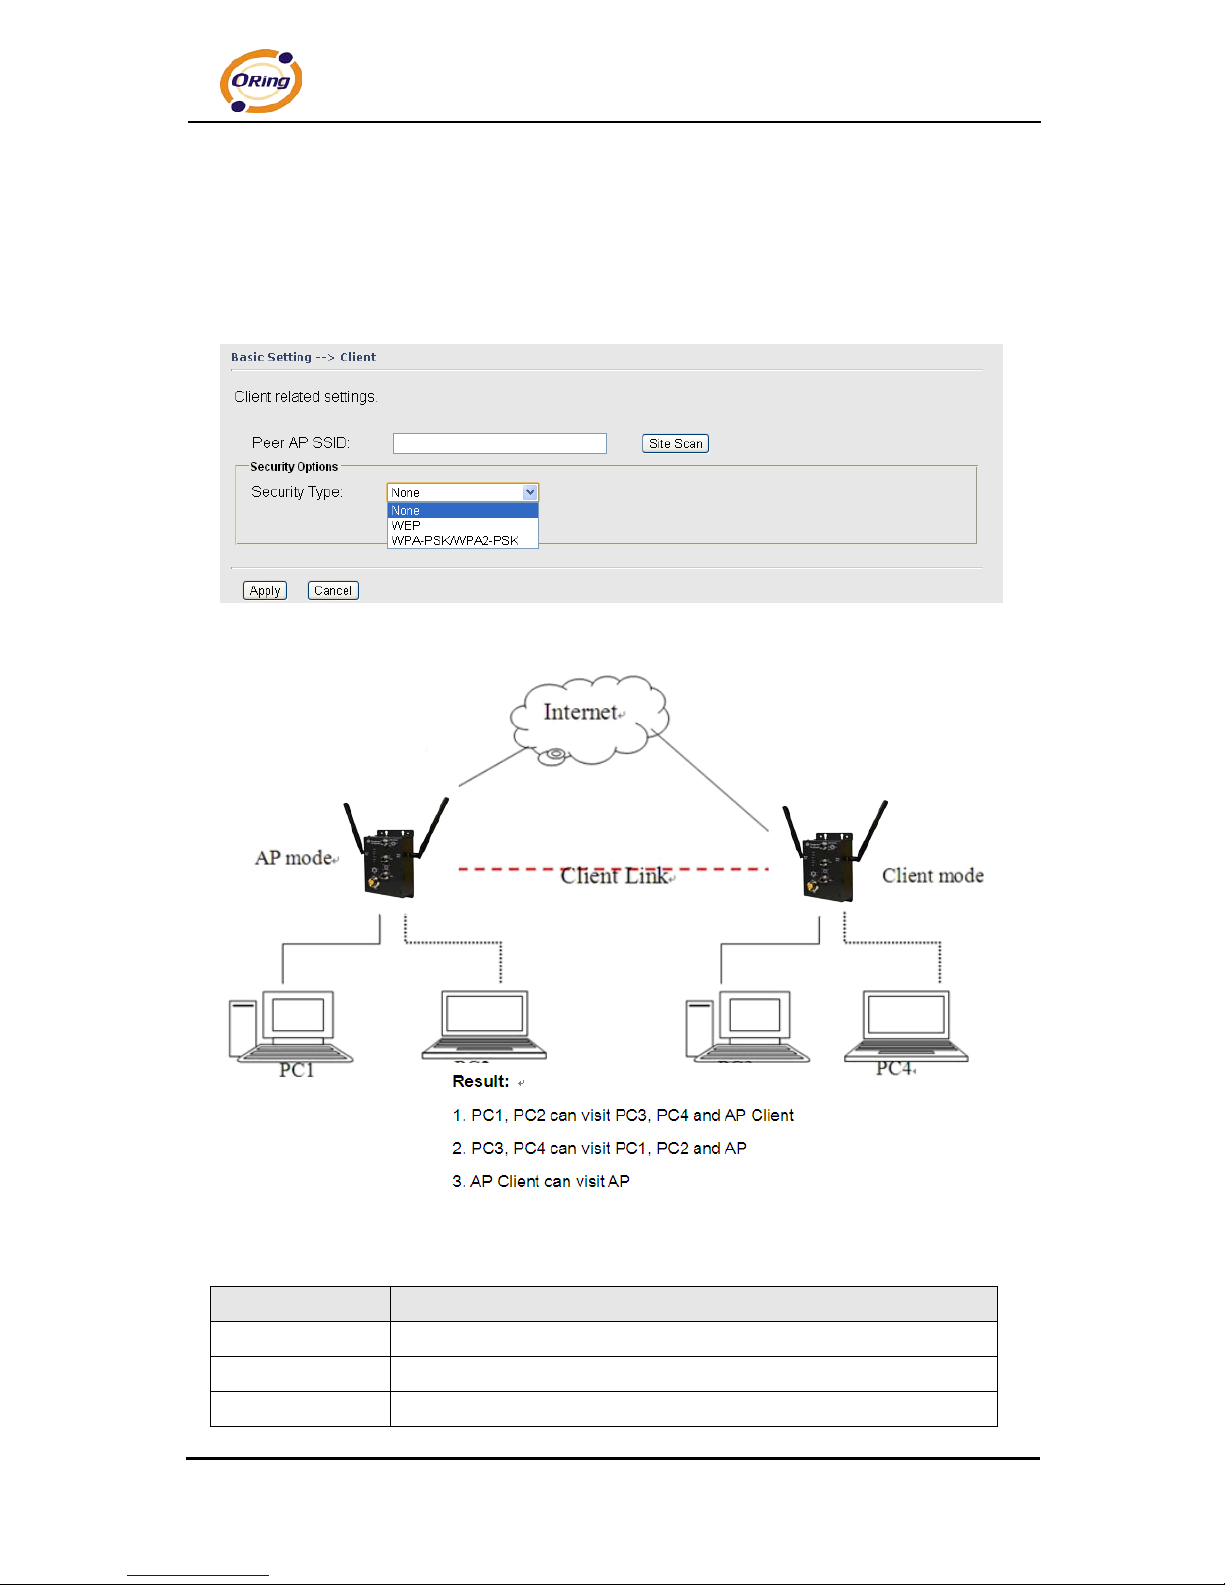
The Basic setting—> Client page is mainly set the client which through the SSID and
Security to connect to ot her AP. In this mode, the Securi ty Type shoul d be the same with the
AP Server.
The principle of the AP-Client/Client mode shows in the following pictur es:
The following tabl e describes the labels in this screen.
Label Description
Peer AP SSID
Enter the other AP which used for AP mode.
Site Scan
You ca n scan t he APs which used for AP mode in the certainty area
Security Type
Set the same securit y with the AP which you want to connect.
Page 27
TAP-620-M12 User’s Manual
ORing Industrial Networking Corp. 22
LAN Setting
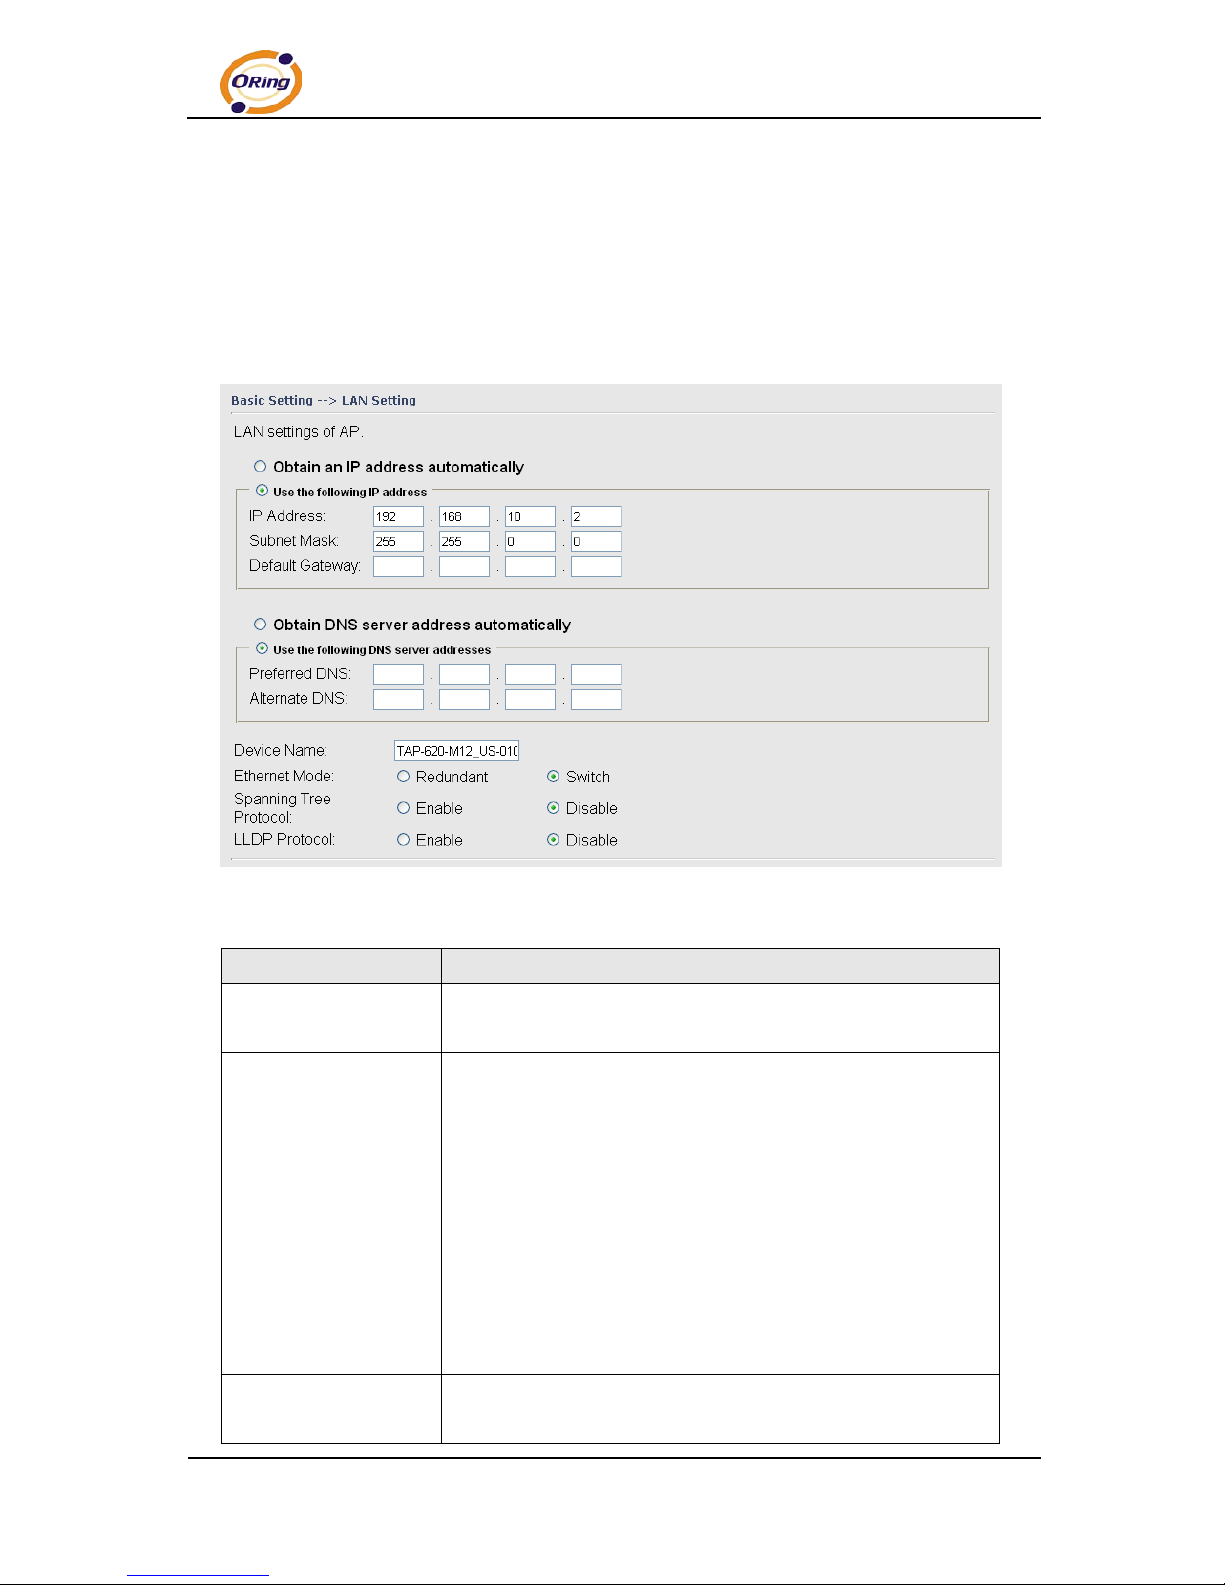
The Basic Setting > LAN Setting page is mainly set IP address for LAN interface. To
access the AP normally, a valid IP address of your LAN should be specified to the LAN
interface. The default IP setting is DHCP server (Obtain an IP address automatically).
The following tabl e describes the labels in this screen.
Label Description
Obtain an IP address
automatically
Select this option if you would like to obtain an IP address
automaticall y assigned by DHCP serv er in yo ur network
Use the following IP
address
Select this opti on if you ar e m anually assigning an IP address.
IP Address: There is a default IP address in t he AP, and you can
input a new IP address.
Subnet Mask: 255.255.255.0 is the default Subnet Mask. All
devices on the network must have the same subnet mask to
communicat e on the net work.
Default Gateway: Enter the IP address of the router in your
network.
Obtain DNS server
address automatically
This option is selected by DHCP server.
Page 28
TAP-620-M12 User’s Manual
23 ORing Industrial Networking Corp.
Use the following DNS
server addresses
This option is selected by manually set
Preferred DNS: There is a default DNS serv er, and you can
input another new DNS serv er.
Alternate DNS: There is a default DNS server, and you can input
another new DNS server.
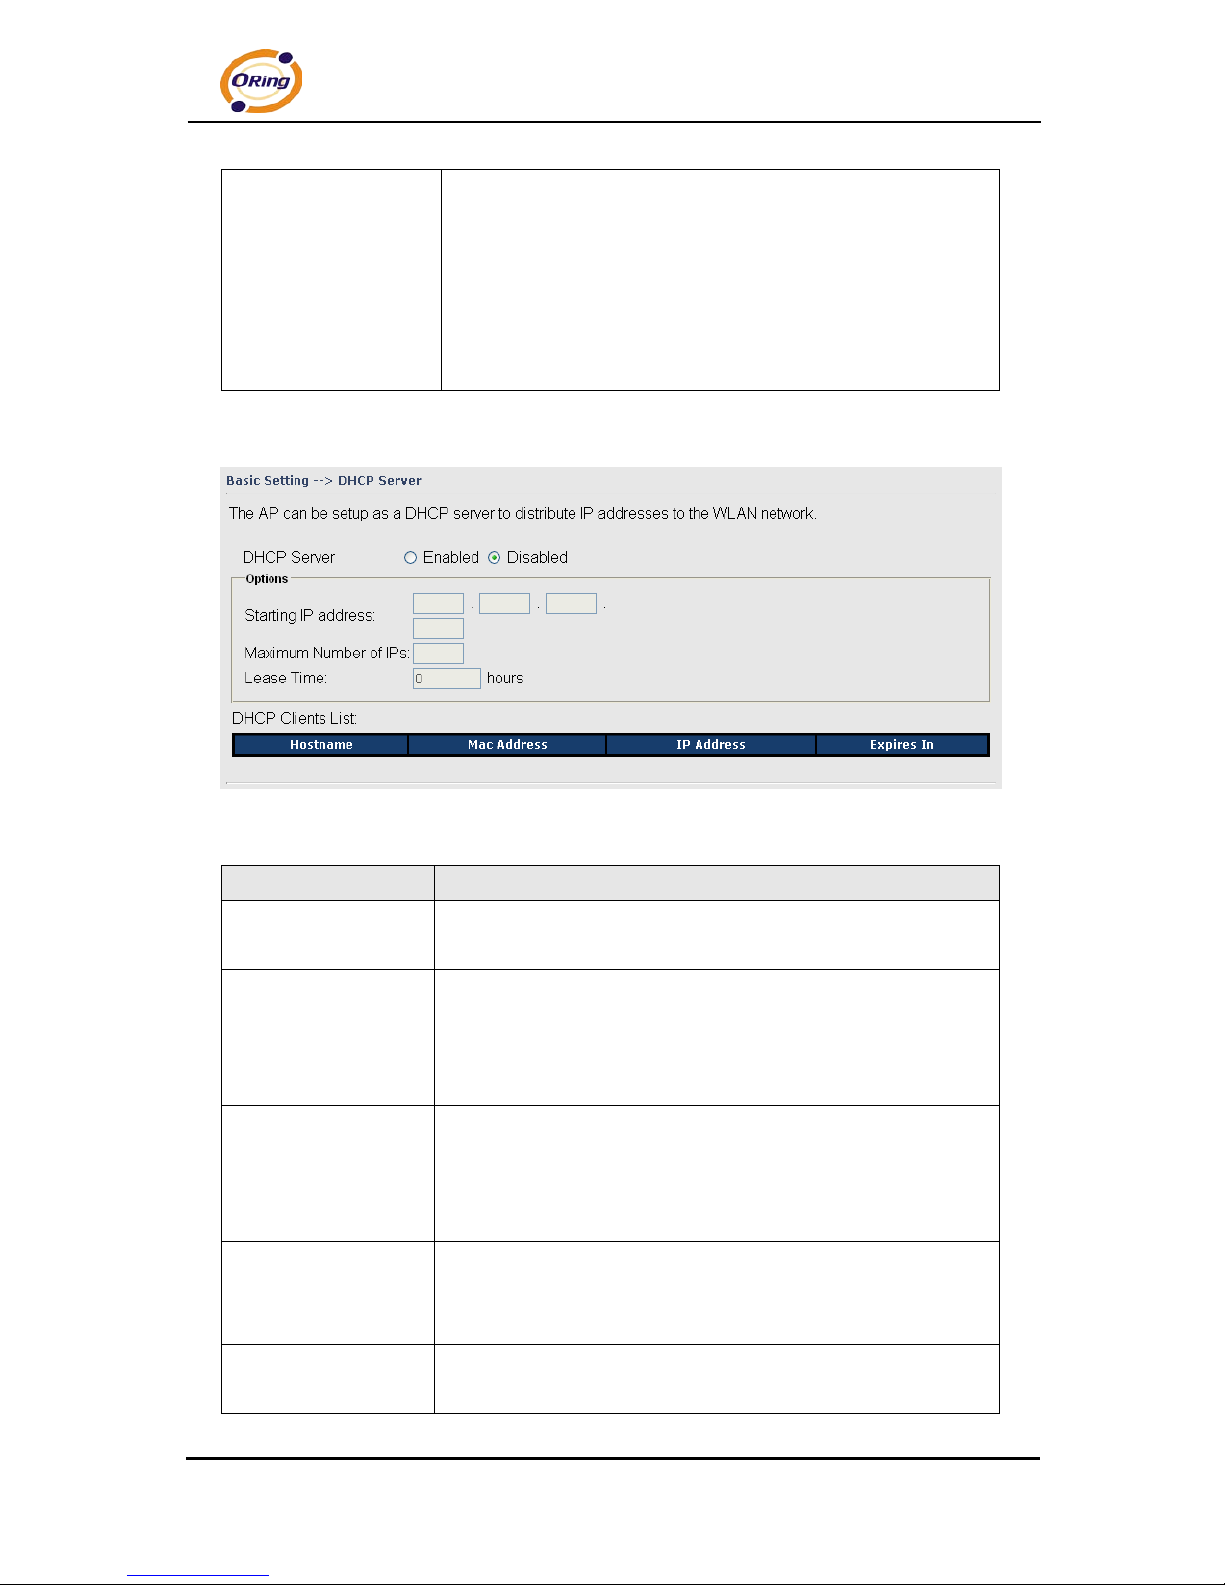
Setting DHCP Server
The following tabl e describes the labels in this screen.
Label Description
DHCP Server Enable or Disable the DHCP Server functi on. Enable – the AP
will be the DHCP server on your local net work
Start IP Address The dynamic IP assign range. Low IP address is the beginni ng
of the dynamic IP assigns range. For example: dynamic IP
assign range is from 192.168.1.100 to 192.168.1.200.
192.168.1.100 wil l be the Start IP address.
Maximum Number of
IPs
The dynamic IP assign range. Hi gh IP address is the end of t he
dynamic IP assigns range. For example: dynamic IP assign
range is from 192.168.1.100 to 192.168.1.200. 100 will be
entering into textbox.
Lease Time (Hour) It is the time period that system will reset the dynamic IP
assignment to ensure the dynamic IP will not been occupied for a
long time or the serv er doesn’t know that the dynamic IP is idle.
DHCP Clients List List the devices on your network that are receiving dynamic IP
addresses from the TAP-620-M12.
Page 29
TAP-620-M12 User’s Manual
ORing Industrial Networking Corp. 24
5.5.2 Advanced Setting
Wireless
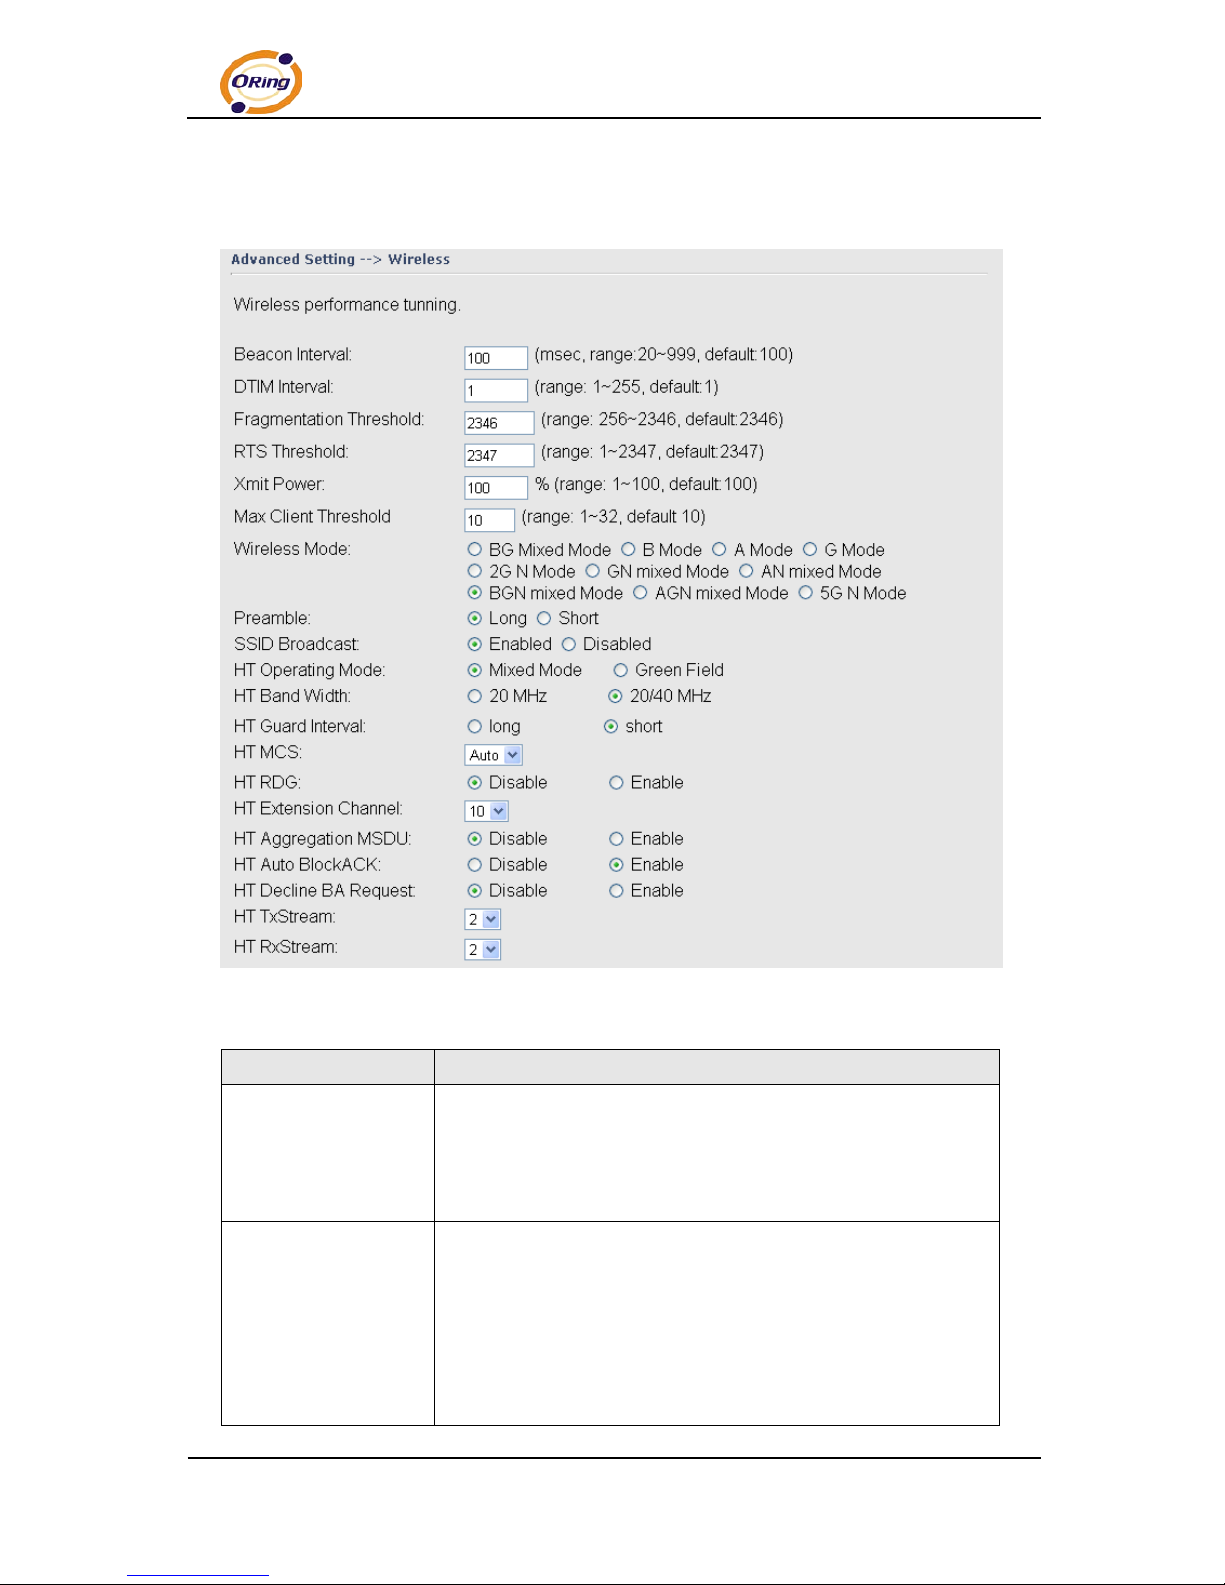
The following tabl e describes the labels in this screen.
Label Description
Beacon Interval The default value is 100. The Beacon Interval value indicates
the frequency int erval of the beacon. A beacon is a packet
broadcast by the AP to synchronize the wireless network. 50 is
recommended in poor r ece ption.
DTIM Interval The default value is 1. This value, between 1 and 255
milliseconds, i ndicates the interval of the Delivery Traffic
Indication M essage (DTI M ) . A DTIM field is a countdown field
informing clients of t he nex t window for listening to broadcast and
multicast messages. When the AP has buffered broadcast or
multicast messages f or associated clients, it sends the next DTIM
Page 30

TAP-620-M12 User’s Manual
25 ORing Industrial Networking Corp.
with a DTIM Interval value. Its clients hear the beacons and
awaken to receiv e the broadca st and m ulticast messages.
Fragmentation
Threshold
This value should remain at its default setting of 2346. The
range is 256-2346 bytes. It specifies the maximum size for a
packet before data is fragment ed into multiple packets. If yo u
experience a hi gh packet error r ate, you may sli ghtly increase the
Fragmentation Threshold. Setting the Fragmentation Threshold
too low may result in poor network performance. Only minor
modificati ons of this value are recommended.
RTS Threshold This value should remain at its default setting of 2347. The
range is 0-2347 bytes. Should you encounter inco nsi stent data
flow, only minor modifications are recommended. If a network
packet is smaller than the preset RTS threshold size , the
RTS/CTS mechanism will not be enabled. The AP sends
Request to Send (RTS) frames to a particular r eceiving station
and negotiates the sending of a data frame. After receiving an
RTS, the wireless station responds with a Clear to Send (CTS)
frame to acknowledge the right to begin transmission.
Xmit Power This value ranges fr om 1 - 100 percent, default value is 100
percent. A safe increase of up to 60 percent would be suitable
for most users. Higher power settings are not recommended for
users due to excess heat generated by the radio chipset, which
can affect the life of the AP.
Wireless Network
Mode
You ca n sel ect 802.11 a/b/g/n wireless mode mix or single
Transmission Rate The default setting is Auto. The range is from 1 to 300Mbps.
The rate of data transmission should be set depending on the
speed of your wirel ess network. You can select from a range of
transmission speeds, or ke ep the default setting, Auto, to have
the AP automatically use the fastest possible data rate and enable
the Auto-Fallback feature. Auto-Fallback will negotiate the best
possible connect ion speed between the AP and a wireless client.
Preamble Values are Long and Short, default value is Long. If your
wireless device supports the short preamble and you are having
trouble getti ng it t o communica te with other 802.11b devices,
make sure that it is set to use the long pream ble
SSID Broadcast When wireless clients survey the local area for wireless networks
Page 31
TAP-620-M12 User’s Manual
ORing Industrial Networking Corp. 26
to associate with, they will detect the SSID broadcast by the AP.
To broadcast the AP SSID, keep the default setting, Enable. If
you do not want to broadcast the AP SSID, then select Disable.
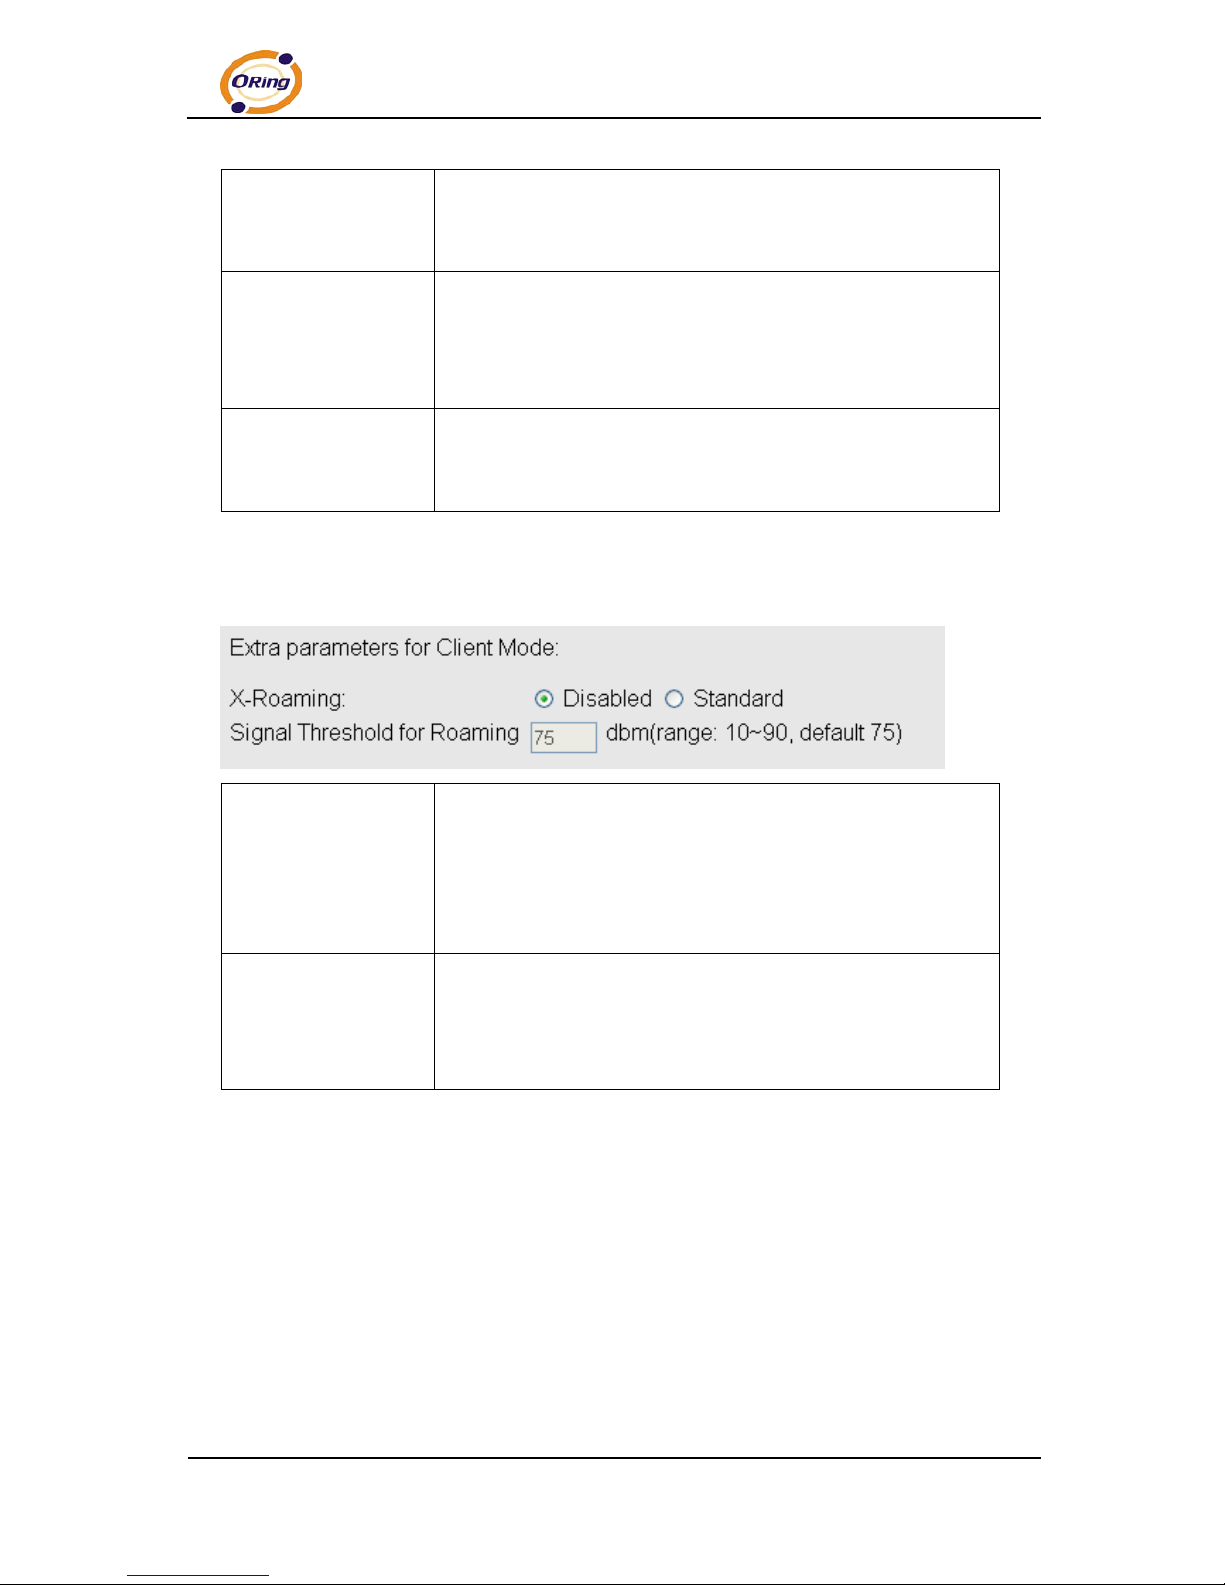
Signal Thre shold for
Roaming
Roaming signal threshol d setting. When signal below this value
AP will roaming to another client target which the same SSID,
security option and si gnal strongest within the environment.(This
value just effect on cli ent-mode equipment)
Max Client Threshold Max number of client equipment setting. When client number over
this value AP will reject roaming equipm ent connection.(Thi s
value just effect on AP-mode equipment)
X-Roaming
X-Roaming Disable: Disable X-Roaming protocol.
Standard: Roaming group does not require the same wireless
channel, but sl ower to switch than the “fixed channel” mode
Fixed channel: Roaming group must be required the same
wireless channel, but faster to switch than the “Standard” mode
Roaming Signal
Threshold
Roaming signal threshol d setting. When signal below this value
AP will roaming to another client target which the same SS ID,
security option and si gnal strongest within the environment.(This
value just effect on cli ent-mode equipment)
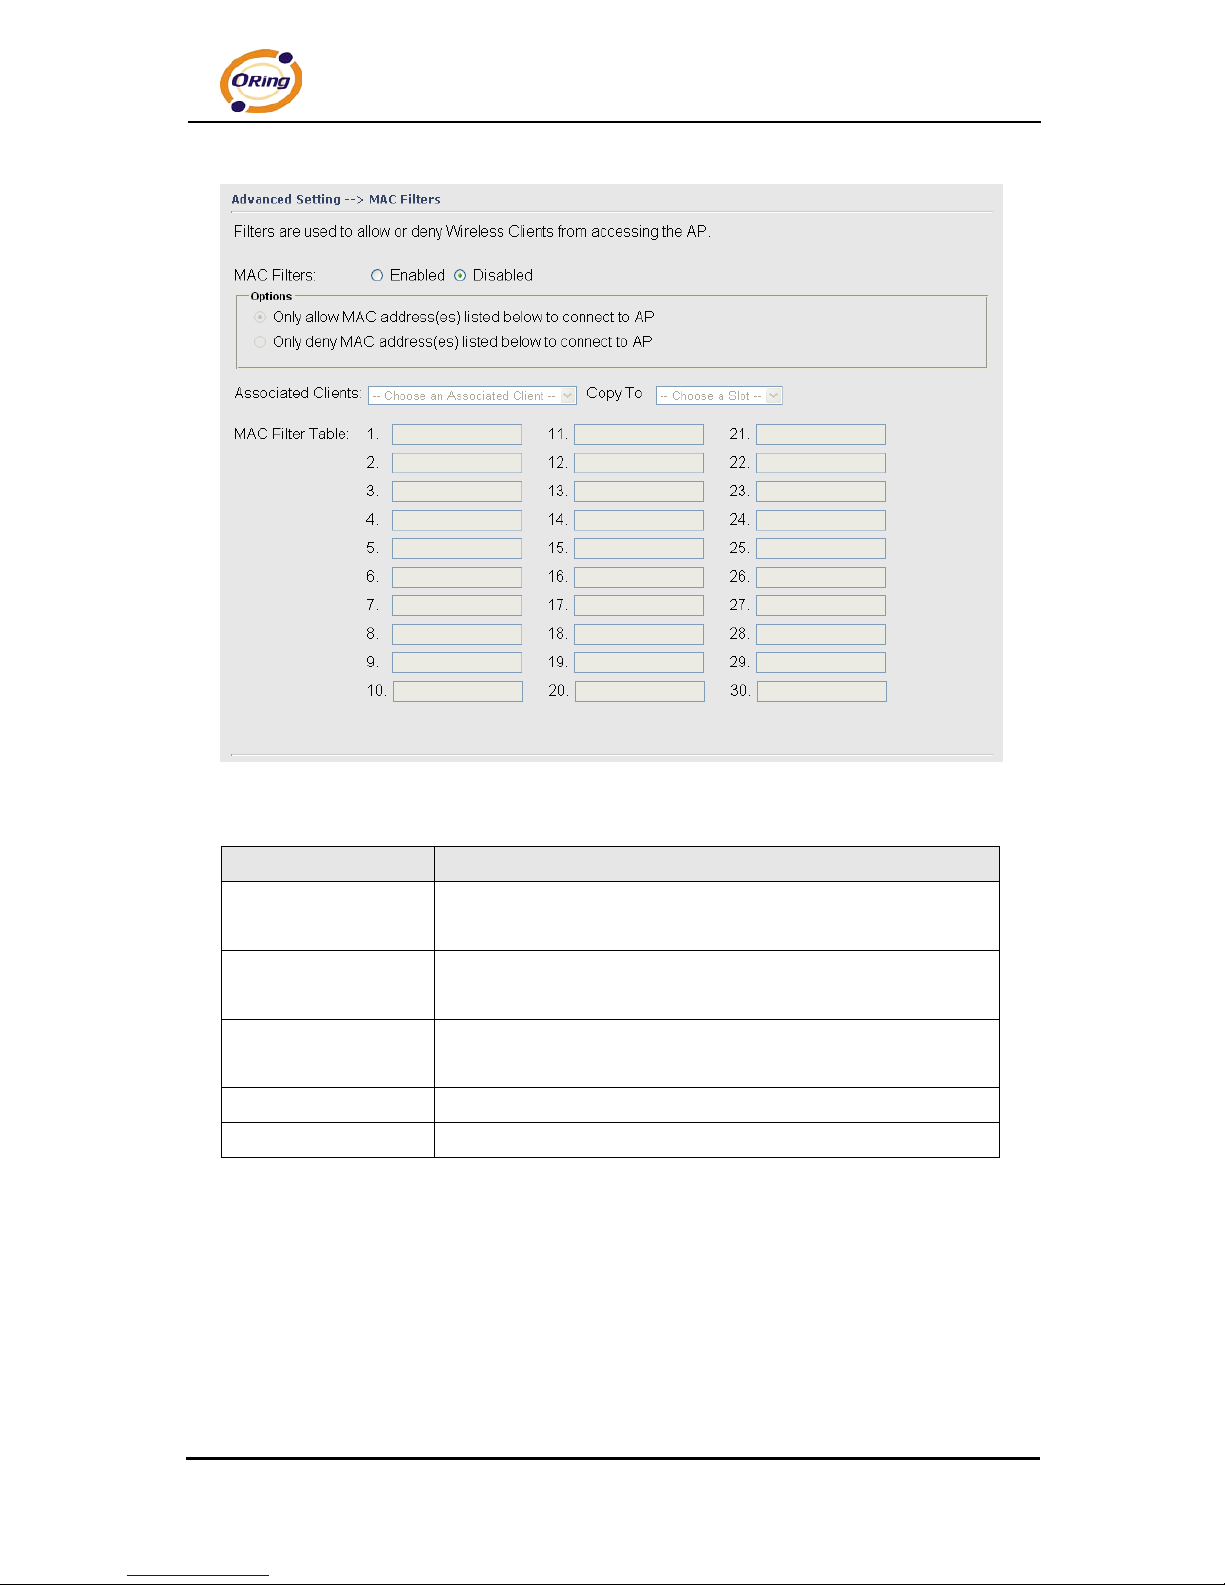
MAC Filter
Use Advanced Settin g > MAC Filters to allow or deny wireless clients, by thei r MAC
addresses, from accessing t he TAP-620-M12. You can manually add a MAC address
or select the MAC address fr om Conn ect ed Clients that are currently connected to the
AP.
Page 32
TAP-620-M12 User’s Manual
27 ORing Industrial Networking Corp.
The following tabl e describes the labels in this screen.
Label Description
MAC Filter Enable or disable the function of MAC filter. MAC address
allowed or denied opti on is selected by you.
MAC Filter Lis t T his list will display the MAC addresses that are in the selected
filter.
Connected Clients This list will di spl ay the wir eless MAC addresses that linked with
AP.
MAC Address MAC addresses need to be added to or clear from MAC filter list.
Apply Click Apply to set the configurations.
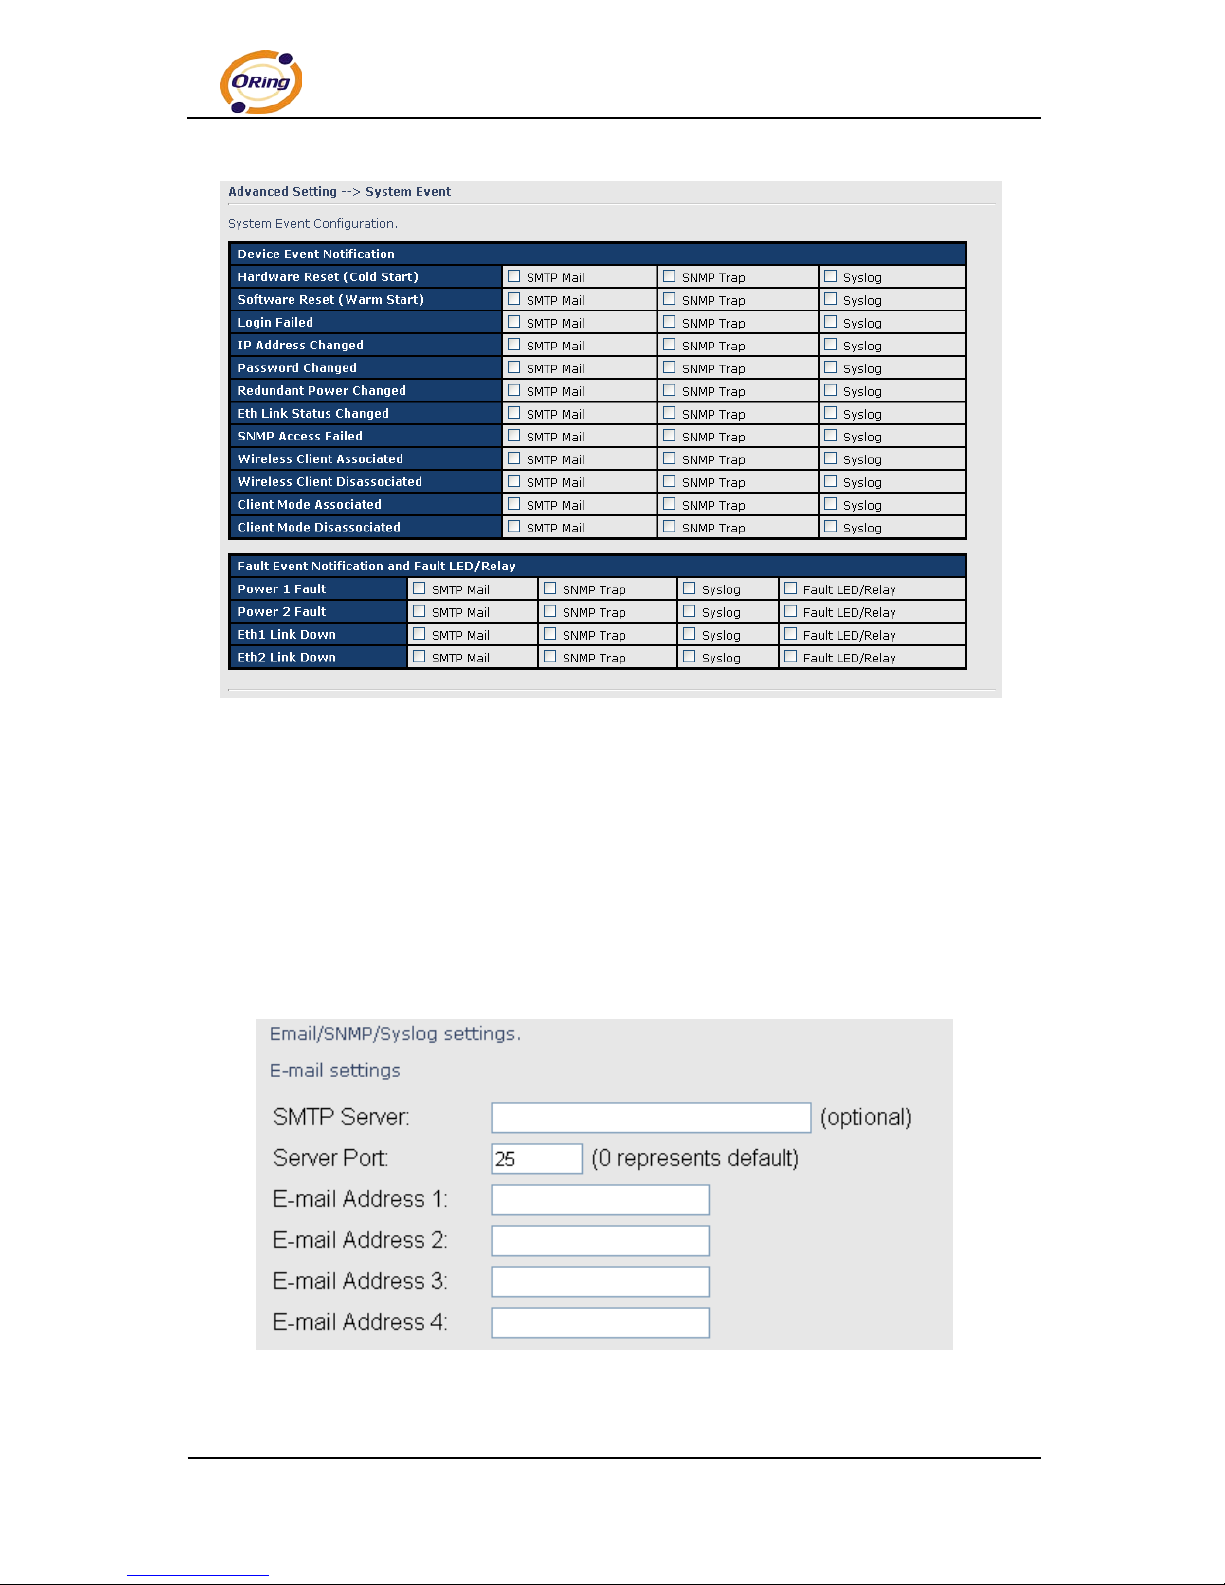
System Event
When the AP event triggered, the notification procedure will be performed accordi ng to
the type of the event. Which notifica tion would be performed depends on the select ion
of corresponding option in the Advanced Setting > System Event page.
Page 33
TAP-620-M12 User’s Manual
ORing Industrial Networking Corp. 28
System events record the activities of the AP system. When the setting ch anges or
action perf orm s, the event will be sent to administrator by email. A trap will also be sent
to SNMP server. The Syslog will record the event locally and m ay send the log remotely to
a Syslog server. If serious event occurred, such as the power failure or link down, t he
fault LED will be switched on as warning.
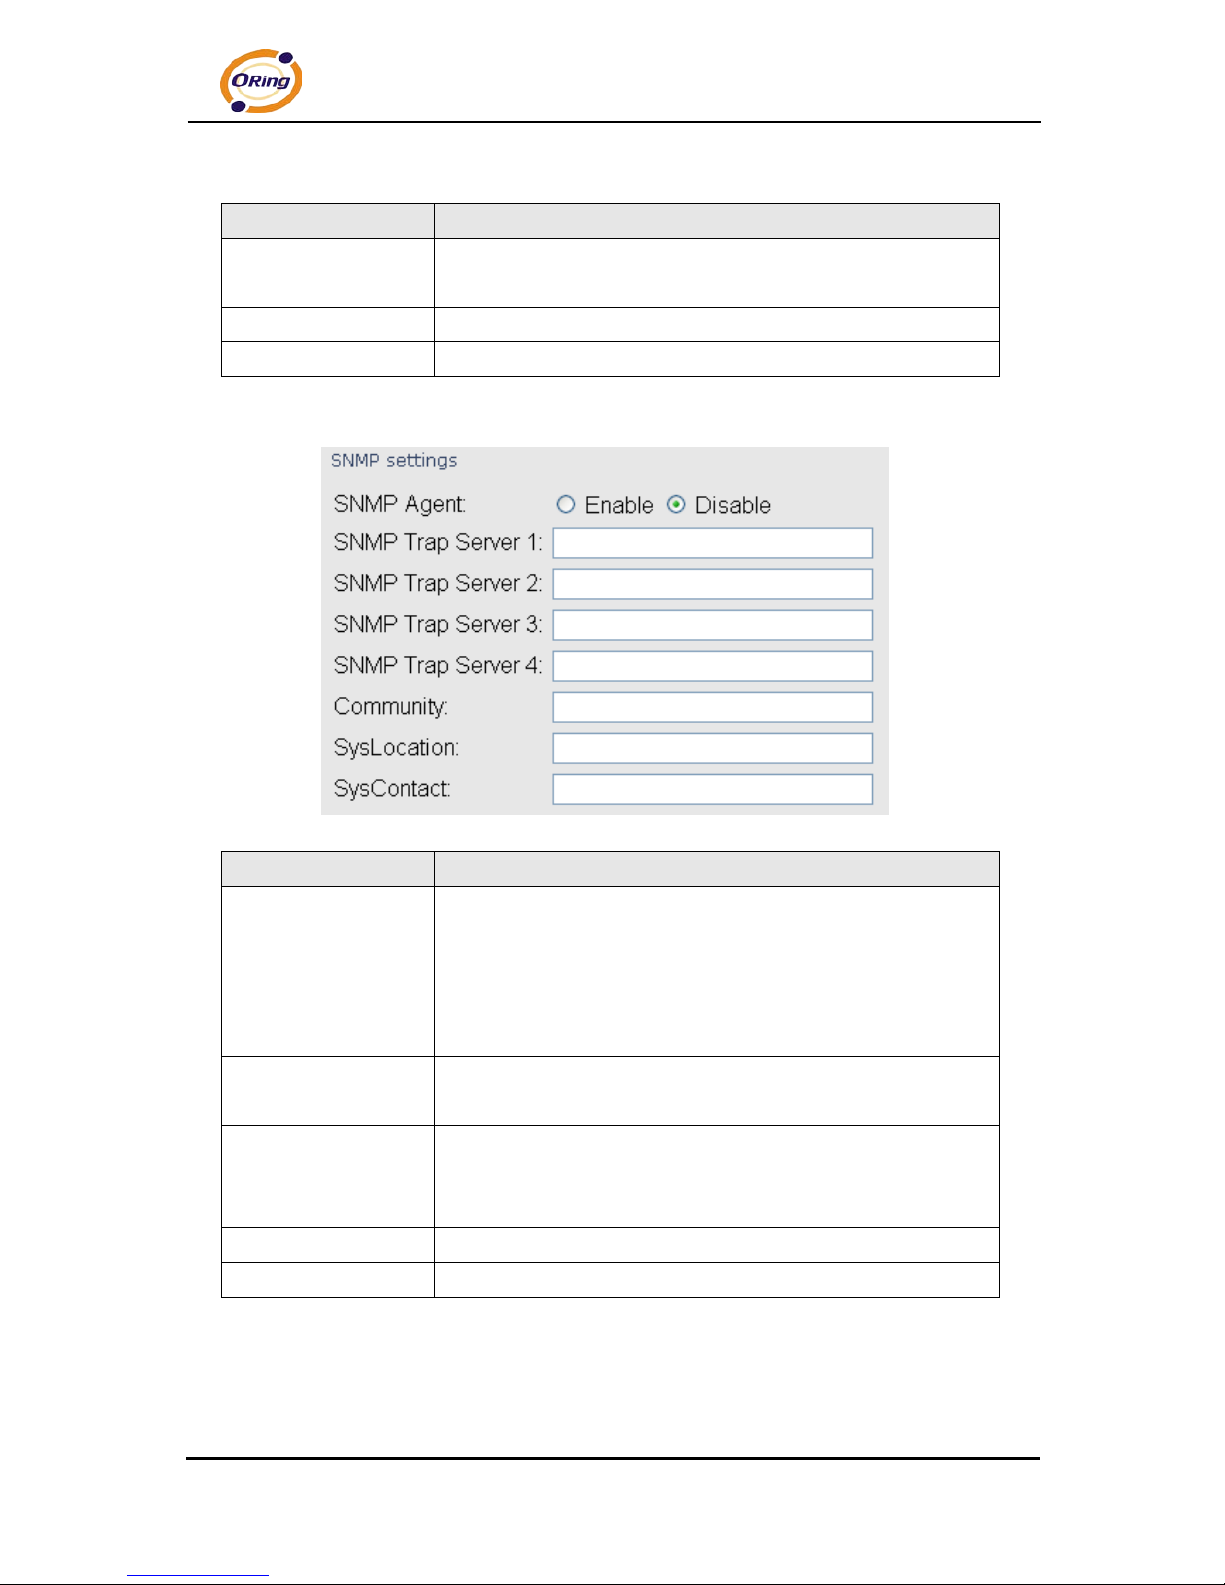
Email Settings
Page 34
TAP-620-M12 User’s Manual
29 ORing Industrial Networking Corp.
The following tabl e describes the labels in this screen.
Label Description
SMTP Server Simple Message Transfer Protocol, enter the backup host to use
if primary host is unavailable while sending mail by SMTP server.
Server Port Specify the port where MTA can be contacted via SMTP server.
E-mail Address 1-4 Inputs specify the desti nation mail address.
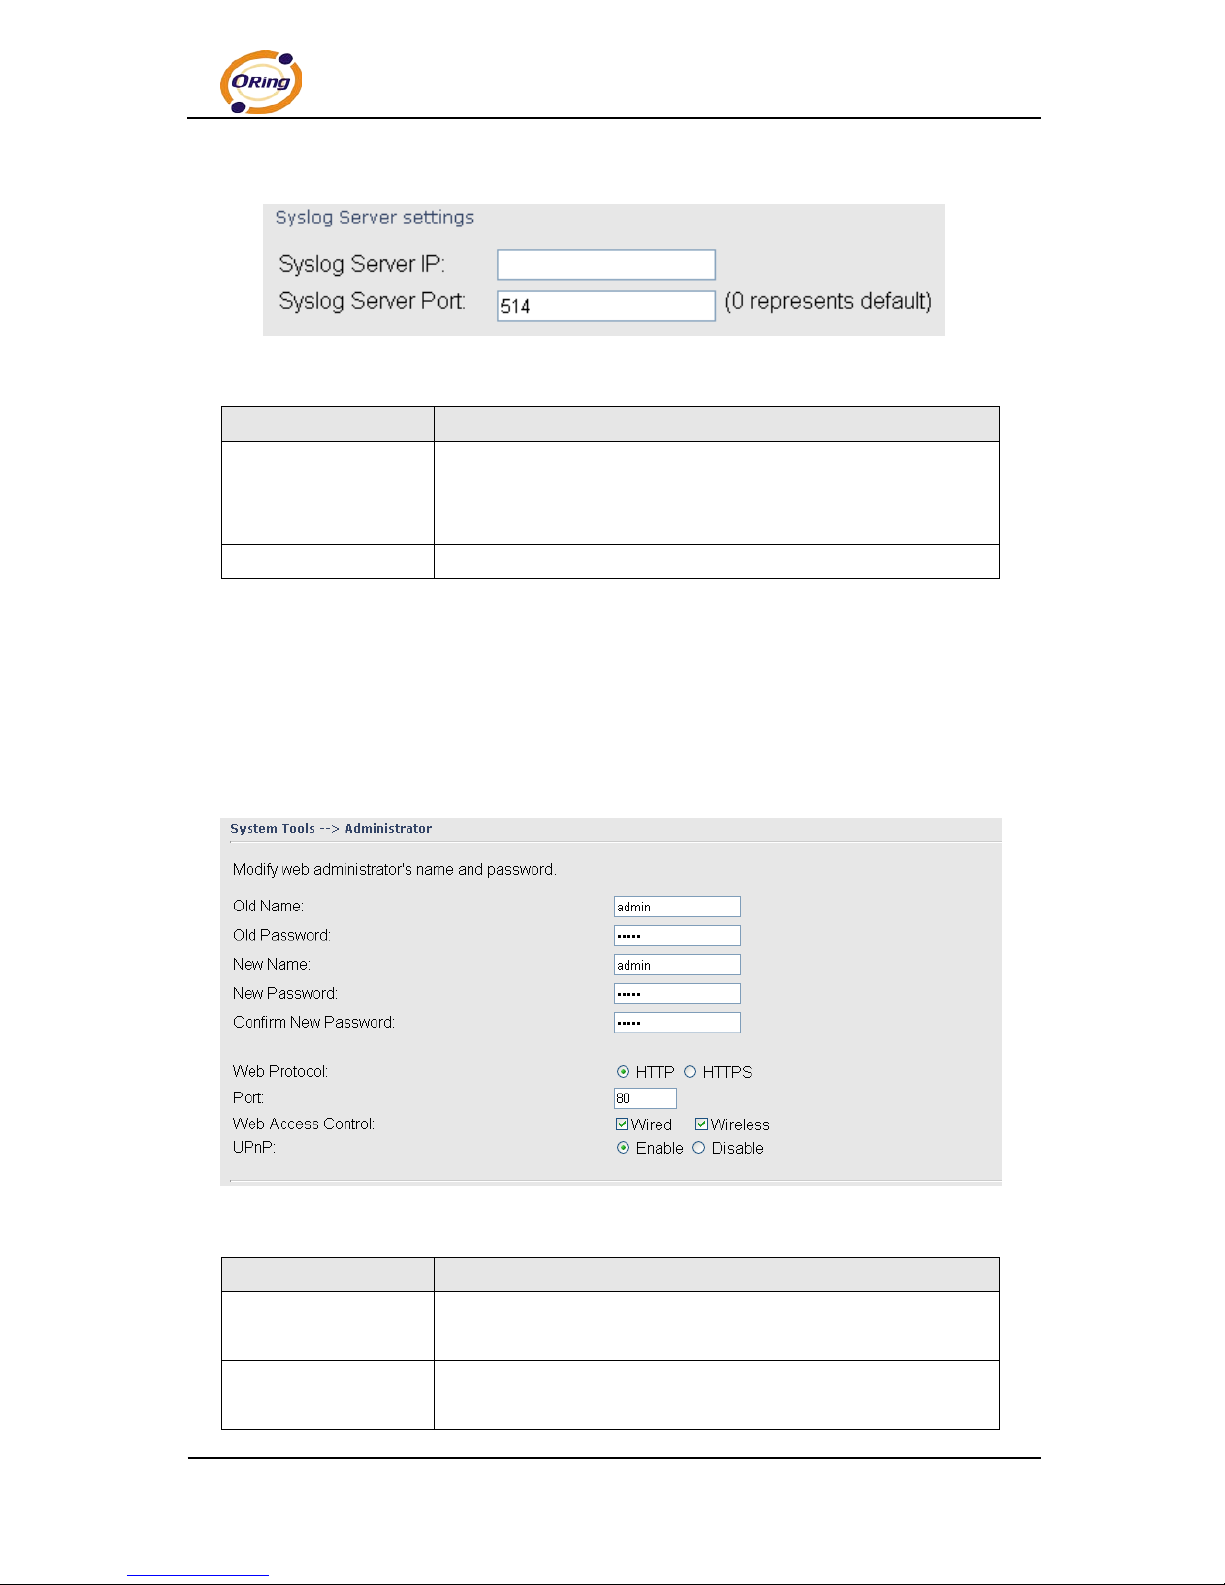
SNMP Settings
The following tabl e describes the labels in this screen.
Label Description
SNMP Agent SNMP (Simple Network Management Protocol) Agent is a service
program that runs on the access point. The agent provides
management inf ormation to the NMS by keeping track of various
operational aspects of the AP system. Turn on to open thi s
service and off to shutdown it.
SNMP Trap Server
1-4
Specify the IP of trap server, which is the address to whi ch it will
send traps AP generates.
Community Community is essentially password to establish trust between
managers and agents. Normally "public" is used for read-write
community.
SysLocation Specify sysLocation string.
SysContact Specify sysContact string.
Page 35
TAP-620-M12 User’s Manual
ORing Industrial Networking Corp. 30
Syslog Server Settings
The following tabl e describes the labels in this screen.
Label Description
Syslog Server IP Not only the syslog keeps the logs locally, it can also log to remote
server. Specify the IP of remote server. Leave it blank to
disable logging remotely.
Syslog Server Port Specif y the port of rem ote logging. Default port is 514.
5.5.3 System Tools
Administrator
In this page, you can change the usernam e and password. The new password must
be typed twice to confirm (the default Name and Password is “admin” and “”).
The following tabl e describes the labels in this screen.
Label Description
Old Name This field displays the old login nam e. It's read only. The default
value of login name is "admin".
Old Password Before making a new setting, you should provide the old
password for a verify check. Acceptable inputs of this field
Page 36

TAP-620-M12 User’s Manual
31 ORing Industrial Networking Corp.
contains '0-9', 'a-z', 'A-Z' and must be between 0 to 15 characters
in length. The factory default value of login password is null .
New Name Enter a new login name. Acceptable inputs of this field contains
'0-9', 'a-z', 'A-Z' and must be between 1 to 15 characters in length.
This field can not accept null input.
New Password Enter a new logi n password. Acceptable inputs of this field
contains '0-9', 'a-z', 'A-Z' and must be between 0 to 15 characters
in length.
Confirm New
Password
Retype the password to confirm it. Acceptable inputs of this field
contains '0-9', 'a-z', 'A-Z' and must be between 0 to 15 characters
in length.
Web Protocol Choose on the protocol f or web. The default value is HTTP, if
you want the web pages’ security is better, choose the HTTPS
protocol.
Port Corresponding to the Web protocol, there is a default port (HTTP:
80, HTTPS: 443). And you can enter another number which
should be in range of 1-65535.
Web Access Control Choose the checkbox of the Wired and Wireless; you can visit the
web page through the mode you choose.
UPnP Pitch on “Enabl e”, and the UPnP will di spl ay i n the right-behind
corner.
HTTPS (HTTP over SSL) is a Web protocol developed by Netscape and buil t into its
browser that encrypts and decrypts user page requests as well as the pages that are
returned by the Web server.
Page 37
TAP-620-M12 User’s Manual
ORing Industrial Networking Corp. 32
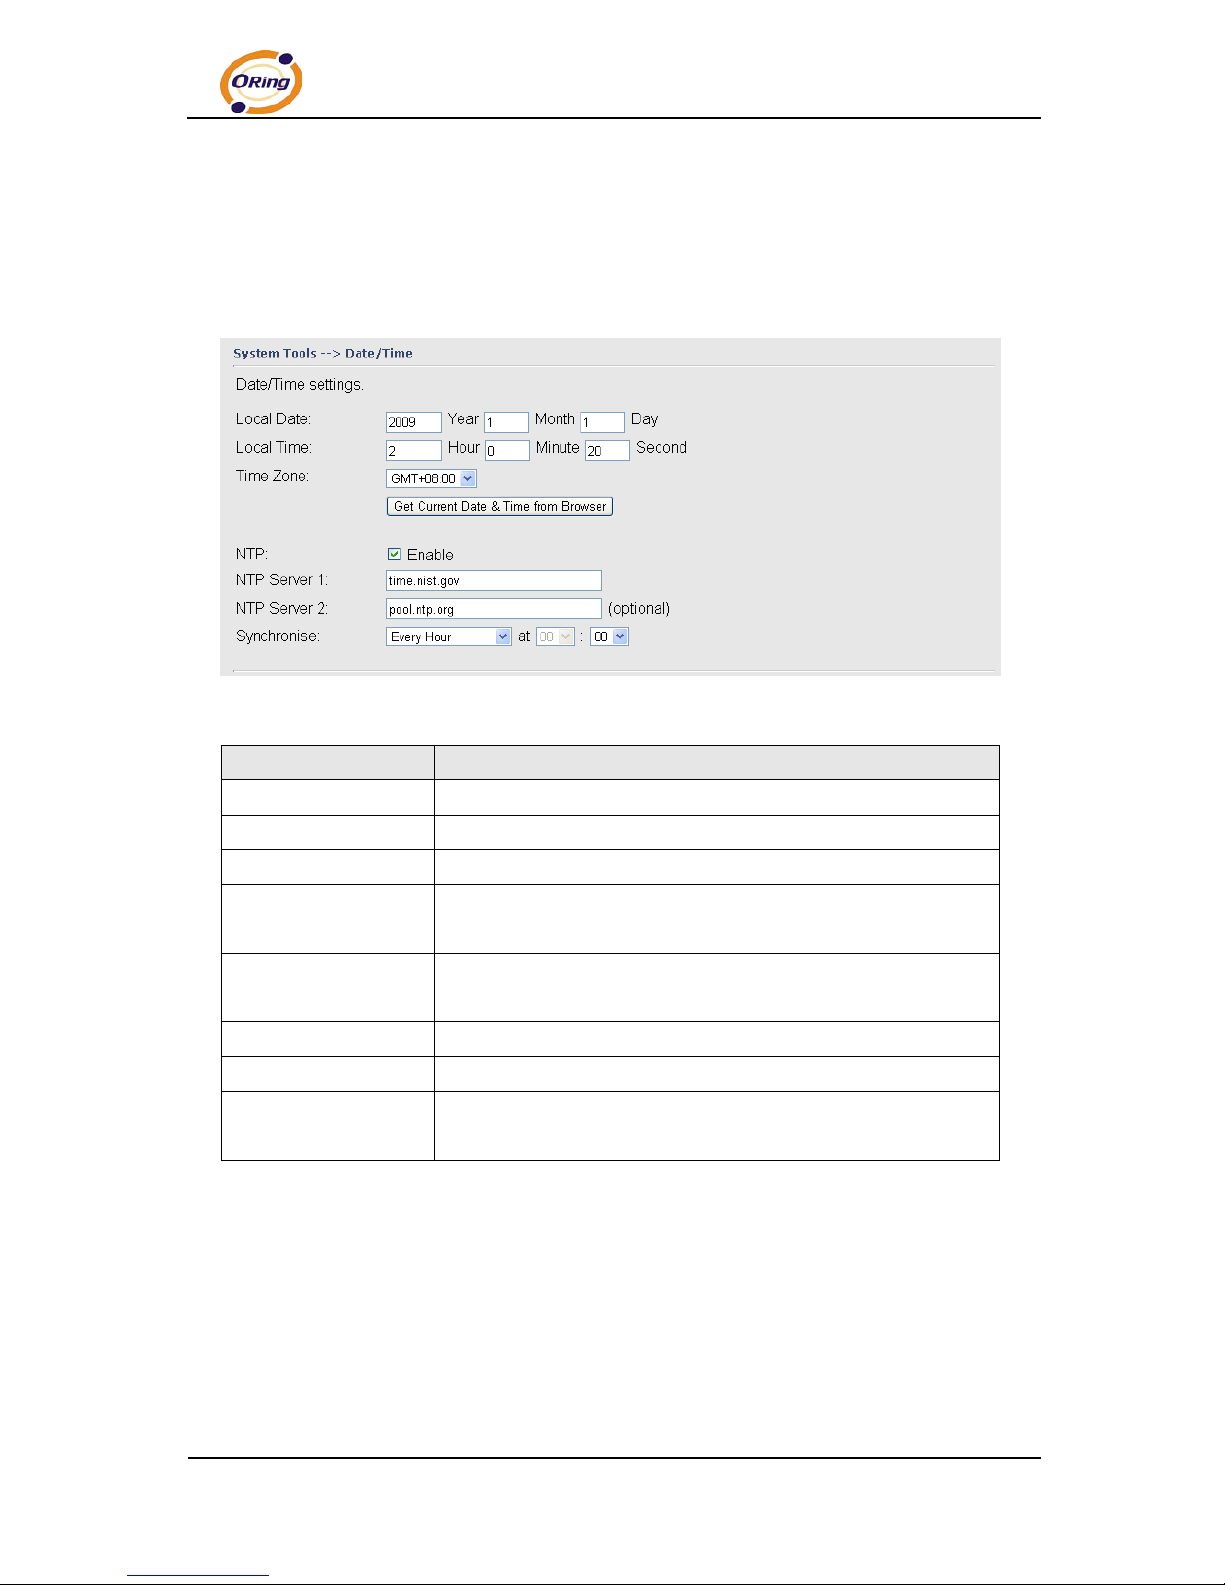
Date & Time
In this page, set the date & time of the device . The correct date & time will be helpful
for logging of system ev ents. A NTP (Network Time Protocol) client can be used to
synchronize date & time with NTP server.
The following tabl e describes the labels in this screen.
Label Description
Local Date Set local date manually.
Local Tim e Set local time manually.
Time Zone Select the time zone manually
Get Current Date &
Time from Browser
Click this button, you can set the time from br owser.
NTP Enable or disabl e NTP function to get the time from the NTP
server.
NTP Server 1 The initial choice about NTP Server.
NTP Server 2 The second choice about NT P Server.
Synchronize Set the time, and the AP’s time synchronize with the NTP Server
at the time
Page 38
TAP-620-M12 User’s Manual
33 ORing Industrial Networking Corp.
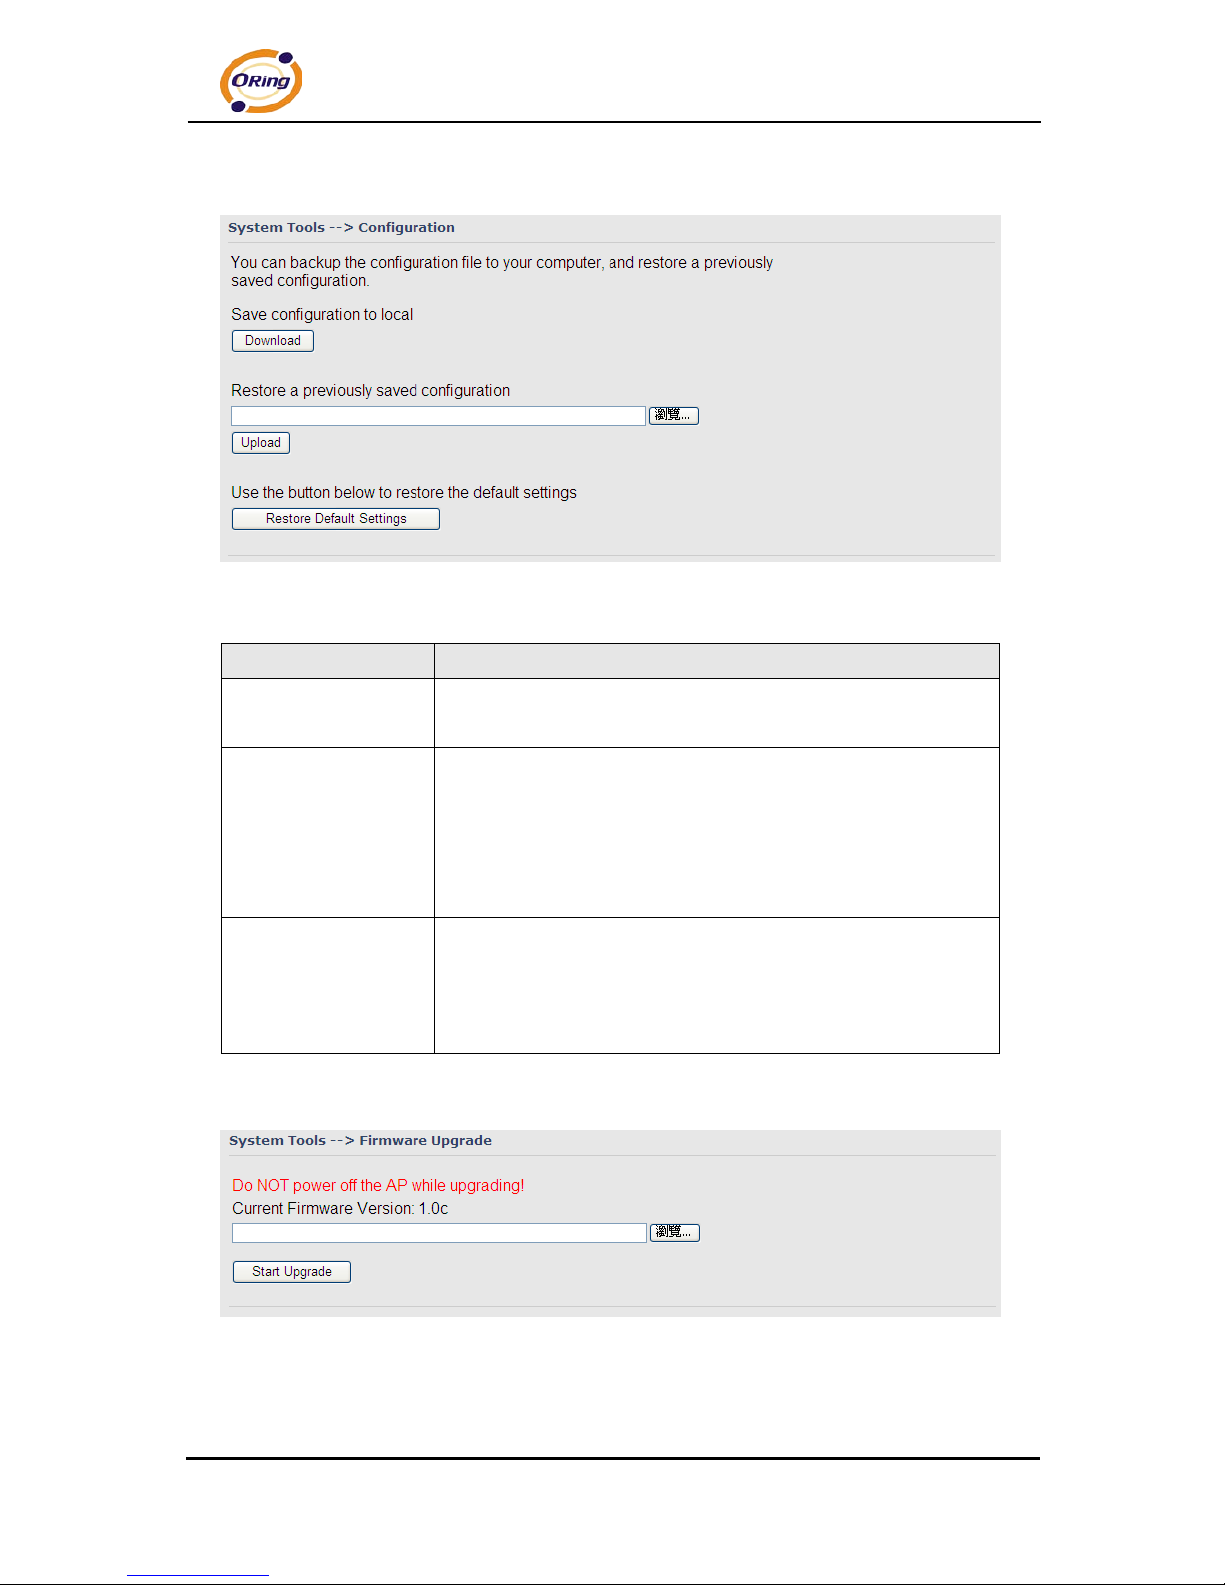
Configuration
The following tabl e describes the labels in this screen.
Label Description
Download
configuration
The current system sett ings can be saved as a file onto the local
hard drive.
Upload configuration The saved file or any other sav ed setting file can be uploaded
back on the AP. To reload a system settings fil e, click on
Browse to browse the local har d drive and locate the system file
to be used. Click Upload when you have selected the file to be
loaded back onto the AP.
Restore Default
Settings
You may also reset the IAP-120 / 120+ back to factory settings by
clicking on Restore Default Settings. Make sure to save the
unit’s settings befor e cli cking on this button. You will lose your
current settings when you click this button.
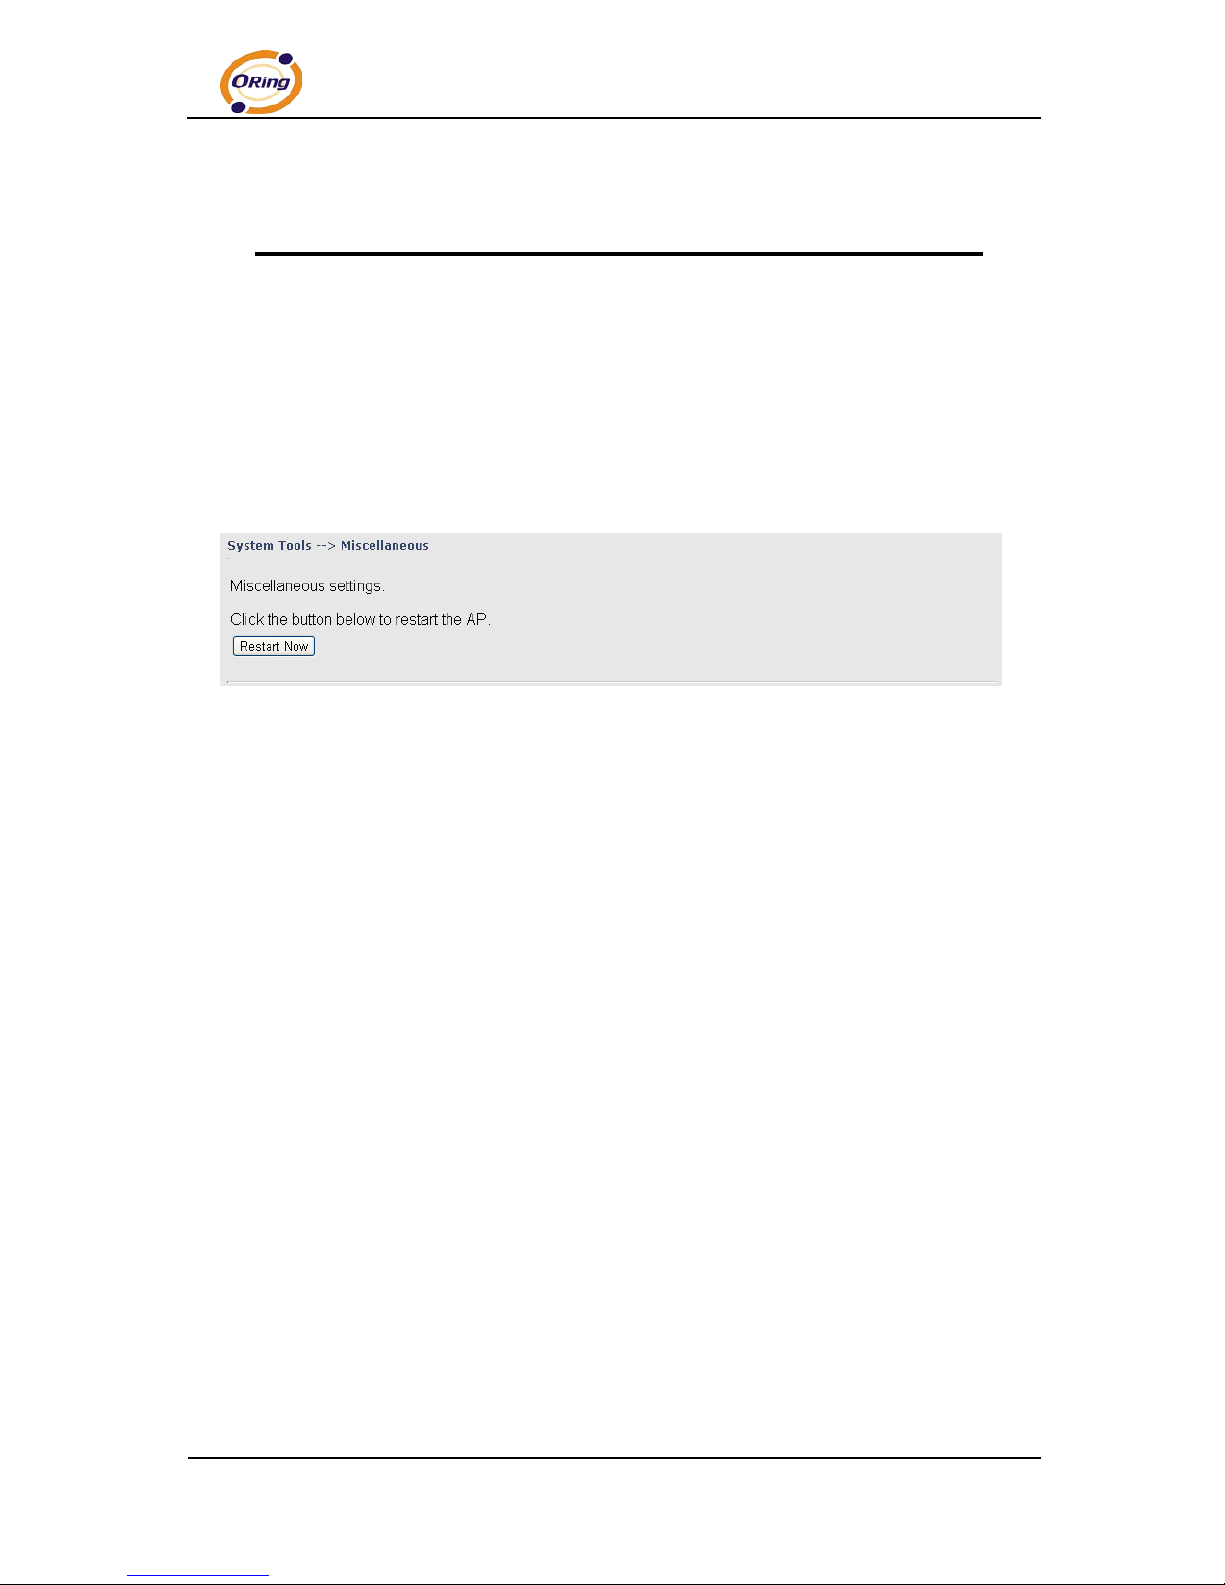
Firmware Upgrade
New firmware may provi de bett er performance, bug fixes or more functi ons. To
upgrade, you need a firmware file correspond to this AP model. It will take sev er al
minutes to upload and upgrade t he firmware. After the upgrade is done successfully,
Page 39
TAP-620-M12 User’s Manual
ORing Industrial Networking Corp. 34
the access point will r eboot and get revalidated.
Notice: DO NOT POWER OFF THE AP OR PRES S THE RESET BUTTON WHILE THE
FIRMWARE IS BEING UPGRADED.
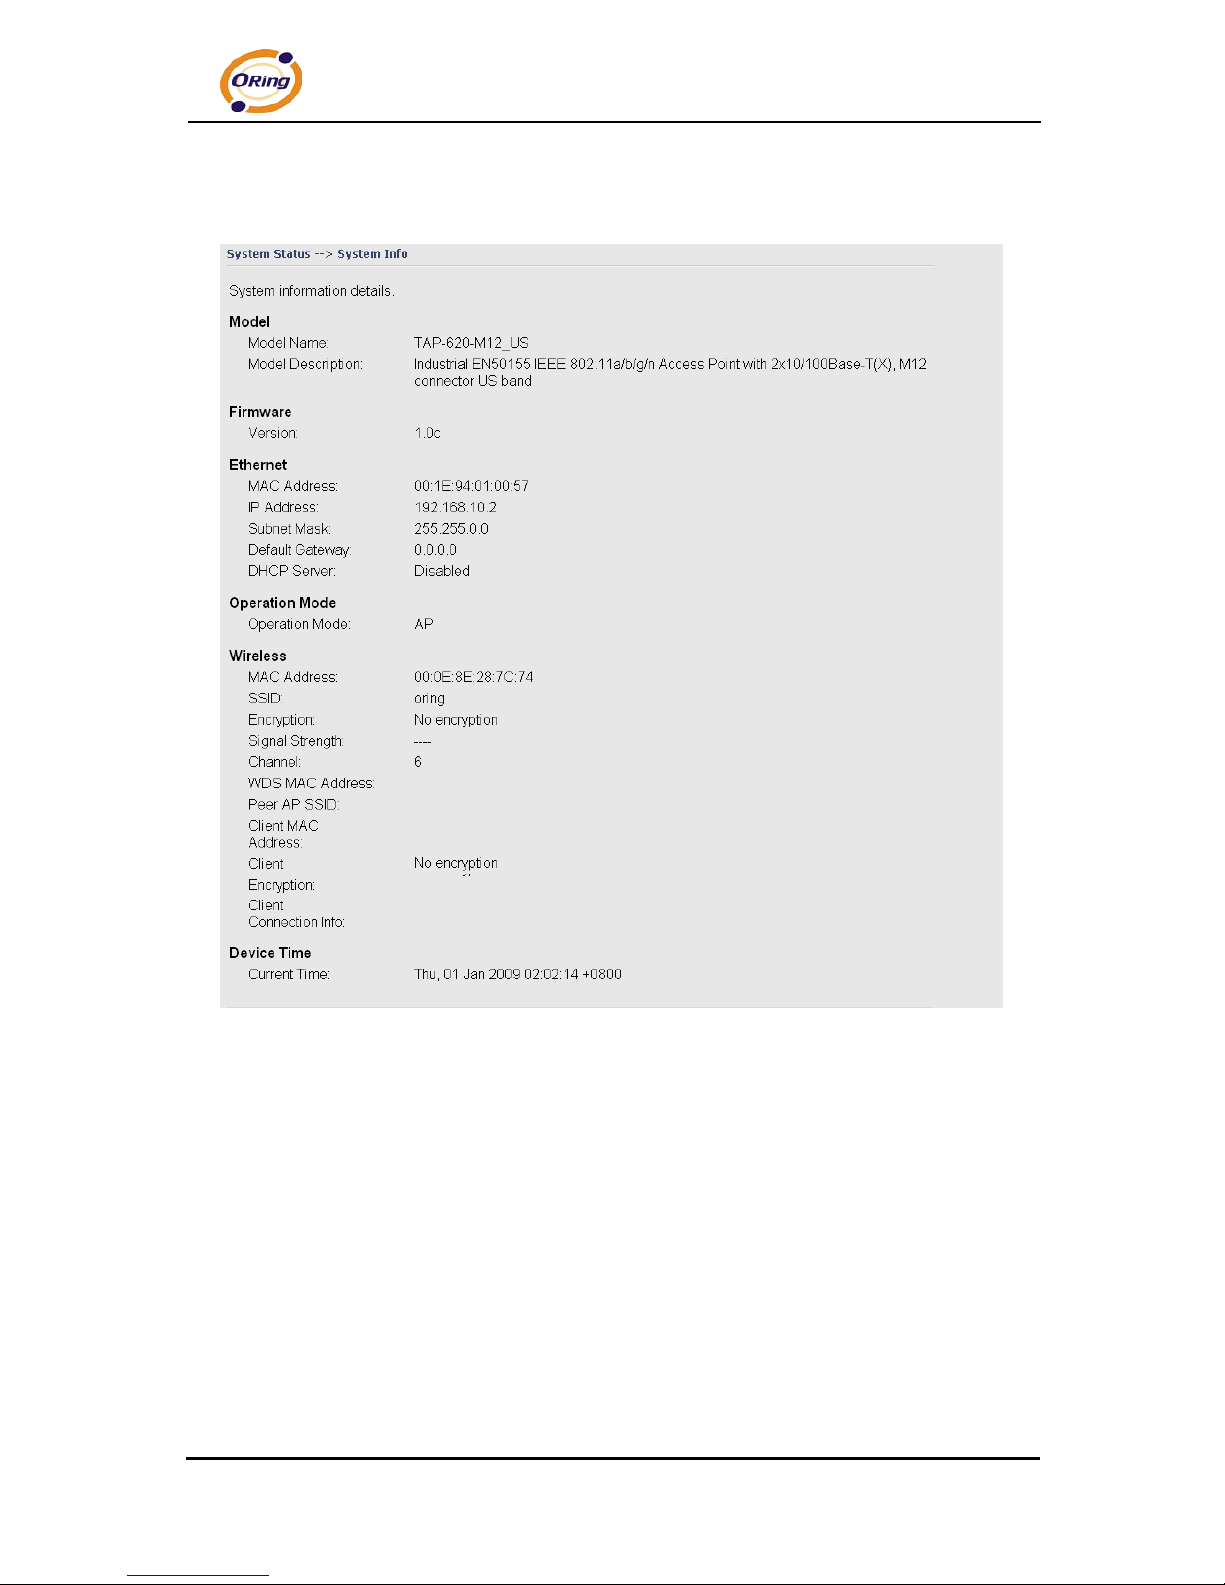
Miscellaneous
If you want restart the access point t hr ough the Warm Reset, click Restart Now to
restart the AP.
Page 40
TAP-620-M12 User’s Manual
35 ORing Industrial Networking Corp.
5.5.4 System Status
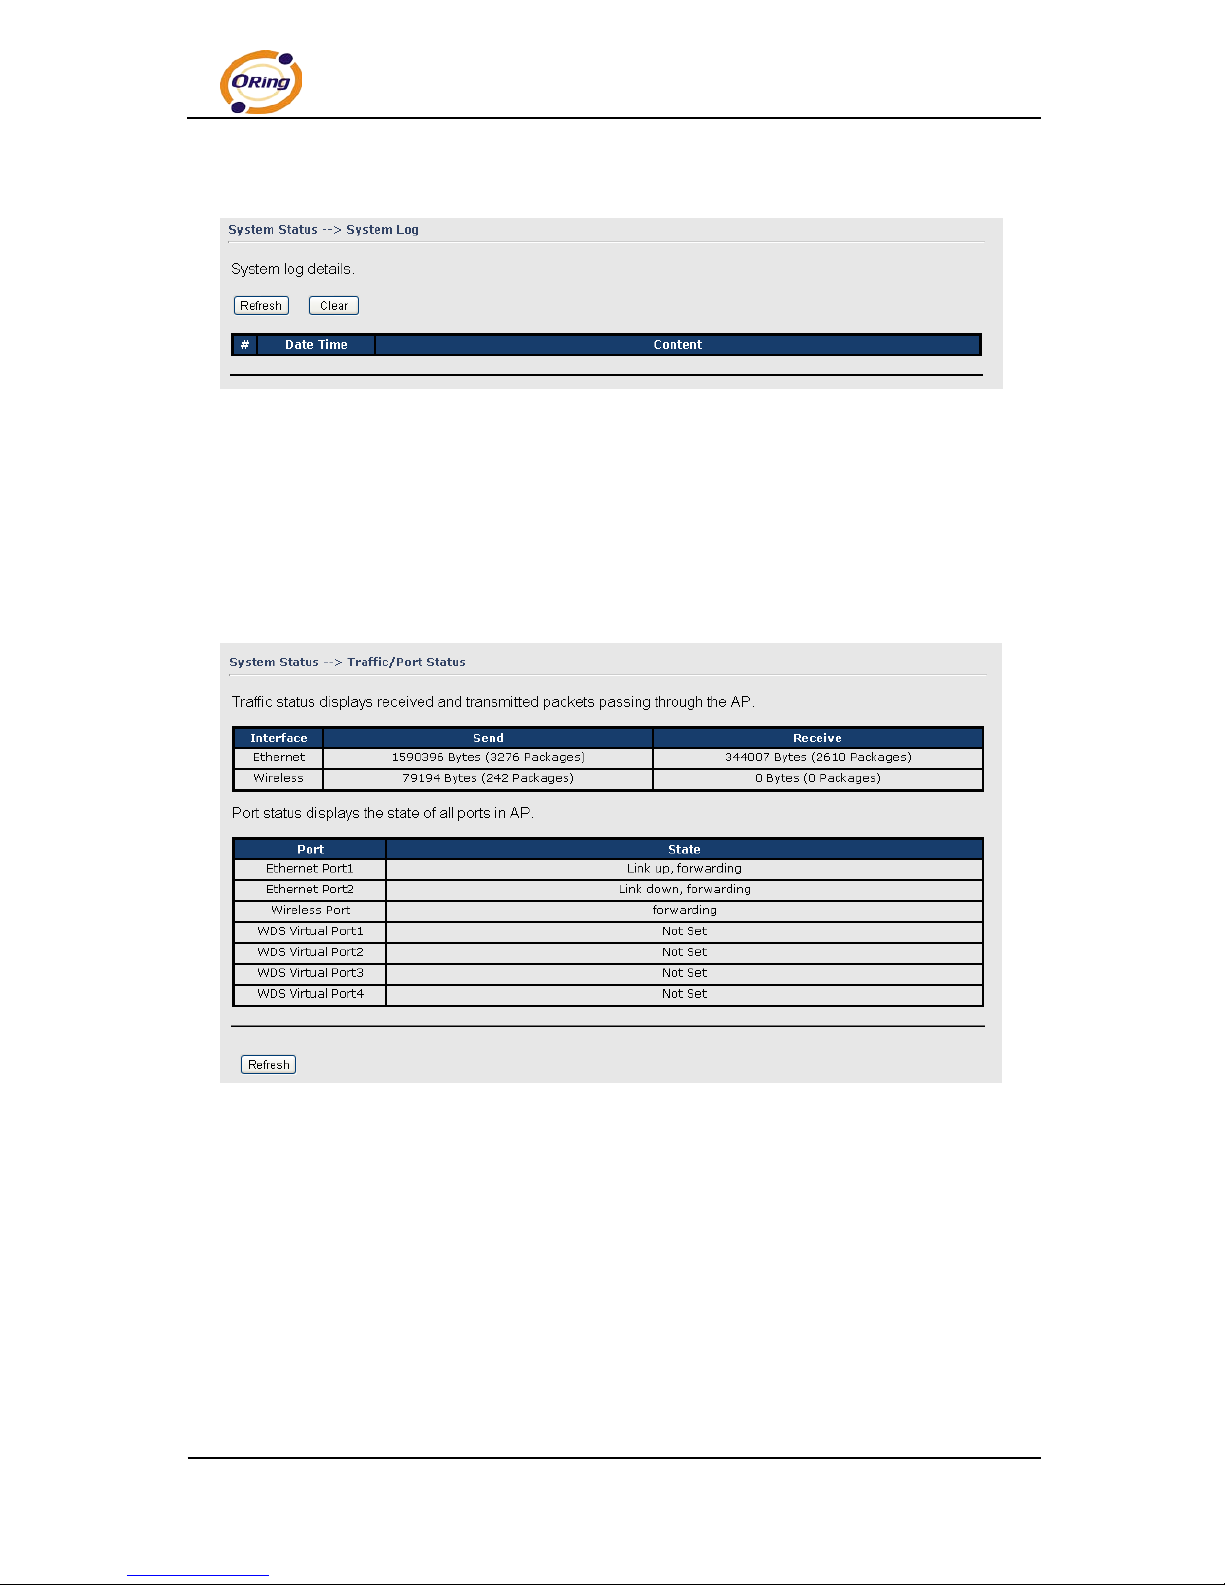
System Info
This page displays the current information for the TAP-620-M12. It will display model
name, as well as firm ware versi on, Ethernet, Wireless inf o and devi ce time.
Page 41
TAP-620-M12 User’s Manual
ORing Industrial Networking Corp. 36
System Log
The system log tracks the important ev ents and setting changes of the AP. If the AP is
rebooted, the logs are automatically cleared.
Click the button 'Refresh' to refresh the page; Click the button 'Clear' to clear log entries.
Traffic Statistics
This page displays the network traffi c statistics for both received and transmitted
packets through the Ethernet port and wireless connections associated with the AP.
Simultaneity, the traffic counter will reset by the device rebooting.
Page 42
TAP-620-M12 User’s Manual
37 ORing Industrial Networking Corp.
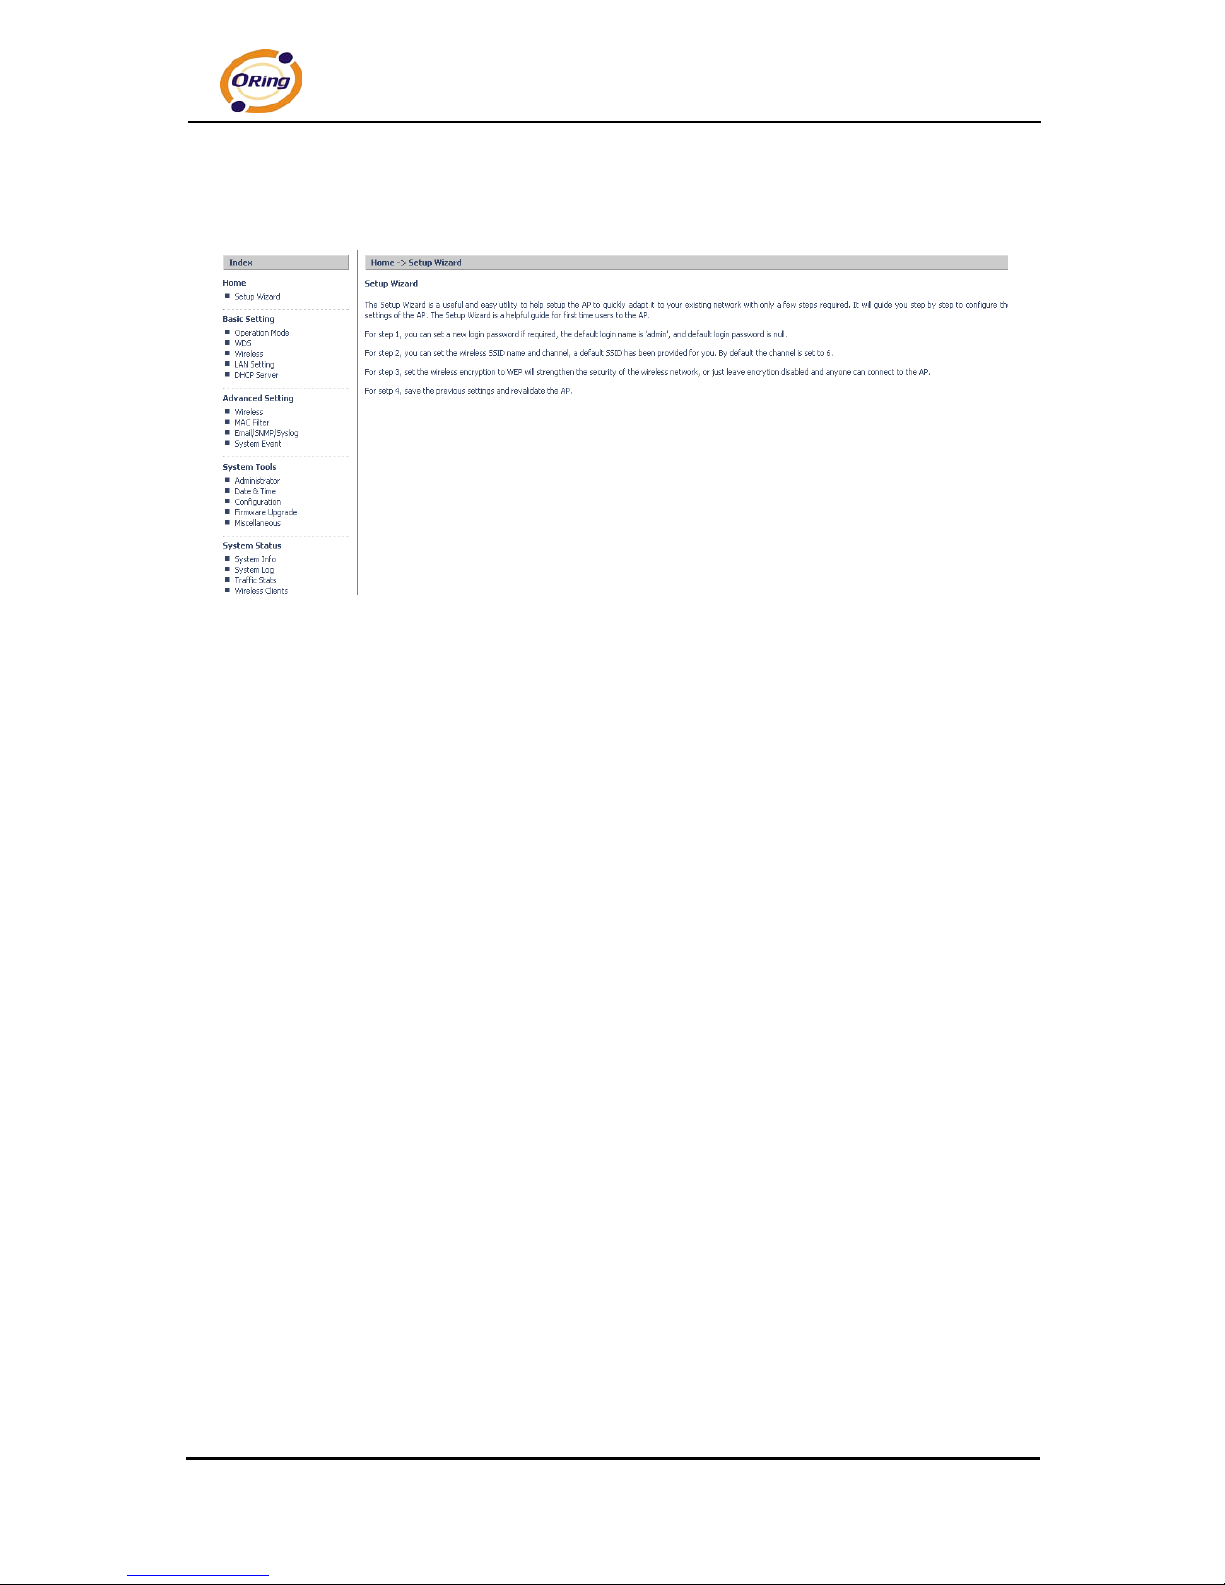
5.5.5 Online Help
Click on any item in the Online Help screen for more information.
Page 43

TAP-620-M12 User’s Manual
ORing Industrial Networking Corp. 38
Technical Specifications
LAN Interface
Ethernet Ports in M12 connector
(4-pin, D-coding)
2 x 10/100Base-T(X), Auto MDI/MDI-X
Protocols IP, TCP, UDP, DHCP, BOOTP, ARP/RARP, DNS,
SNMP MIB II, HTTPS, SNMPV1/V2 , Trap, Private
MIB
WLAN Interface
Operating Mode AP/ Client /Bridge/ AP-Client
Antenna and Connector 2 antennas with 3dBi for 5GHz and 2dBi for 2.4GHz
in reverse SMA connector
Radio Frequency Type DSSS, OFD M, Greenfield
Modulation IEEE802.11a/n: OFDM with BPSK, QPSK, 16QAM,
64QAM
IEEE802.11b: CCK, DQPSK, DBPSK
IEEE802.11g/n: OFDM with BPSK, QPSK, 16QAM,
64QAM
Frequency Band America / FCC:
2.412~2.462 GHz (11 channels )
5.180~5.240 GHz & 5.745~5.825 GHz ( 9 channels )
Europe CE / ETSI:
2.412~2.472 GHz ( 13 channels )
5.180~5.240 GHz ( 4 channels )
Japan(JP):
2.412~2.484 GHz ( 13 channels )
5.180~5.240 GHz ( 4 channels )
Transmission Rate 802.11b: 1/2/5.5/11 Mbps
802.11a/g: 6/9/12/18/24/36/48/54 Mbps
802.11n(40MHz): UP to 300 Mbps
Transmit Power 802.11a:13dBm ±1.5dBm@54Mbps
802.11b:16dBm ±1.5dBm@11Mbps
802.11g:14dBm ±1.5dBm@54Mbps
802.11n(2.4G@20MHz):13dBm ±1.5dBm
802.11n(2.4G@40MHz):12dBm ±1.5dBm
802.11n(5G@20MHz):12dBm ±1.5dBm
Page 44

TAP-620-M12 User’s Manual
39 ORing Industrial Networking Corp.
802.11n(5G@40MHz):12dBm ±1.5dBm
Receiver Sensitivity 802.11a: -68dBm ±2dBm@54Mbps
802.11b: -82dBm ±2dBm@11Mbps
802.11g: -68dBm ±2dBm@54Mbps
802.11n(2.4G@20MHz, MCS15): -64dBm ±2dBm
802.11n(2.4G@40MHz, MCS15): -60dBm ±2dBm
802.11n(5G@20MHz, MCS15): -64dBm ±2dBm
802.11n(5G@40MHz, MCS15): -60dBm ±2dBm
Encryption Securi ty WEP: (64-bit, 128-bi t key support ed)
WPA/WPA2:802.11i (WEP and AES encryption)
WPA-PSK (256-bit key pre-shared key support ed)
TKIP encryption
Wireless Security SSID broadcast di sabl e
LED Indicators PWR 1(2) / Ready:
1) Red On: Power is on and booting up.
2) Green On: Power is on and functioning
normally.
ETH1(2) Link / ACT:
Orange ON/Blinki ng: 10 Mbps Ethernet
Green ON/Blinki ng: 100 Mbps Ethernet
WLAN Link/ACT: Green for WLAN 1 and Red for
WLAN 2
Fault indicator:
Red On: Ethernet link down or power down
Power Requirements
Power Input Voltage Dual power inputs PWR1/2: 12 ~ 48VDC in M23
connector
Reverse Polarity Protection Present
Power Consumpti on 8.3 Watts
Environmental
Operating Temperature -10 to 60oC
Storage Temperature -40 to 85oC
Operating Humi dity 5% to 95%, non-condensing
Mechanical
Dimensions(W x D x H) 125mm(W) x 65mm(D) x 196mm(H)
Casing IP-40 protection
Regulatory Approvals
Page 45

TAP-620-M12 User’s Manual
ORing Industrial Networking Corp. 40
EMI
FCC Part 15, CISPR (EN55022) class A, EN50155
(EN50121-3-2)
EMS
EN61000-4-2 (ESD), EN61000-4-3 (RS),
EN61000-4-4 (EFT), EN61000-4-5 (Surge) ,
EN61000-4-6 (CS), EN61000-4-8, EN61000-4-11
Shock IEC60068-2-27, EN61373
Free Fall IEC60068-2-32
Vibration IEC60068-2-6, EN61373
Rail T r a f fic EN50155
Cooling EN60068-2-1
Dry Heat EN60068-2-2
Safety EN60950-1
Compliance
FCC
This device complies with Part 15 of the FCC Rules. Operation is subject to the following two
conditions:
(1) this device may not cause harmful interference and (2) t his device must accept any
interference received, including interference that may cause
undesired operation
Industry Canada Statement
This device complies with Industry Canada licence-ex em pt RSS standard(s). Oper ation is
subject to the following two conditions: (1) thi s device m ay not ca use i nterference, and (2) this
device must accept any interference, including interference that may cause undesired
operation of the device .
Le présent appareil est conforme aux CNR d'Industrie Canada applica bles aux appareils radio
exempts de licence. L'exploitation est autorisée aux deux condi tions suivantes : (1) l'appareil
ne doit pas produire de brouill age, et (2) l'utilisateur de l'apparei l doit accepter tout brouillage
radioélectrique subi, même si le brouillage est susceptible d'en compromett r e le
fonctionnement.
Page 46

TAP-620-M12 User’s Manual
41 ORing Industrial Networking Corp.
Industry Canada - Class B This digital apparatus does not exce ed the Class B limits for radio
noise emissions from digital apparatus as set out in the interference-causing equipment
standard entitled “ Digital Appar atus,” ICES-003 of Industry Canada.
Cet appareil numérique r espect e les limites de bruits radioélectr iques applicables aux
appareils numériques de Classe B pr escrites dans la norme sur le matérial brouilleur:
“Appareils Numéri ques,” NM B-003 édictée par l’Industrie.
Operation is subject to the following two conditions: (1) this device may not cause interference,
and (2) this device must accept any interference, including interference that may cause
undesired operation of the device.
L'opération est soum ise aux deux conditions suivant es: ( 1) ce t appareil ne peut causer
d'interfér ence s,et (2) cet appareil doit accepter tout e interférence, y compris celles
susceptibles de provoquer fonctionnement du dispositif.
To reduce potential radio interference to other users, the antenna type and its gain should be
so chosen that the equivalent isotropically radiated power (e.i.r.p.) is not more than that
permitted for successful communication.
Afin de réduire les i nterférences radio potentielles pour les autres utilisateurs, le type
d'antenne et son gain doivent être choisie que la puissance isotrope rayonnée équivalente
(PIRE) est pas plus que celle premise pour une com munication réussie
RF exposure warning: The equipment complies with RF exposure limits set forth for an
uncontrolled environment. The antenna(s) used for this transmitter must not be co-located or
operating i n conj unction with any other antenna or transmitter.
Avertissement d'ex posi tion RF: L'équipement est conforme aux limites d'exposition aux RF
établies pour un incontrôlés environnement. L'ant enne ( s) ut ilisée pour ce transmet teur ne
doit pas être co-localisés ou fonctionner en conjonction avec toute autre antenne ou
transmetteur.
 Loading...