

Page 1

IIAAPP--442200//--442200++ SSeerriieess
IInndduussttrriiaall IIEEEEEE 880022..1111 bb//gg//nn
WWiirreelleessss AAcccceessss PPooiinntt
UUsseerr M
Maannuuaall
VVeerrssiioonn 11..11
SSeepptteemmbbeerr,, 22001144
wwwwww..oorriinngg--nneettwwoorrkkiinngg..ccoomm
Page 2

IAP-420/420+ User Manual
ORing Industrial Networking Corp. 1
COPYRIGHT NOTICE
Copyright © 2012 ORing Industrial Networking Corp.
All rights reserved.
No part of this publication may be reproduced in any form without the prior written
consent of ORing Industrial Networking Corp.
TRADEMARKS
is a registered trademark of ORing Industrial Networking Corp.
All other trademarks belong to their respective owners.
REGULATORY COMPLIANCE STATEMENT
Product(s) associated with this publication complies/comply with all applicable
regulations. Please refer to the Technical Specifications section for more details.
WARRANTY
ORing warrants that all ORing products are free from defects in material and
workmanship for a specified warranty period from the invoice date (5 years for most
products). ORing will repair or replace products found by ORing to be defective within
this warranty period, with shipment expenses apportioned by ORing and the distributor.
This warranty does not cover product modifications or repairs done by persons other
than ORing-approved personnel, and this warranty does not apply to ORing products
that are misused, abused, improperly installed, or damaged by accidents.
Please refer to the Technical Specifications section for the actual warranty period(s) of
the product(s) associated with this publication.
DISCLAIMER
Information in this publication is intended to be accurate. ORing shall not be responsible
for its use or infringements on third-parties as a result of its use. There may occasionally
be unintentional errors on this publication. ORing reserves the right to revise the
contents of this publication without notice.
CONTACT INFORMATION
ORing Industrial Networking Corp.
3F., NO.542-2, Jhongjheng Rd., Sindian District, New Taipei City 231, Taiwan, R.O.C.
Tel: + 886 2 2218 1066 // Fax: + 886 2 2218 1014
Website: www.oring-networking.com
Technical Support
E-mail: [email protected]
Sales Contact
E-mail: [email protected] (Headquarters)
[email protected] (China)
Page 3

IAP-420/420+ User Manual
ORing Industrial Networking Corp. 2
Tables of Content
Getting Started ................................................................................................. 3
1.1 About the IAP-420/-420+ Series ..................................................................................... 3
1.2 Software Features ........................................................................................................... 3
1.3 Hardware Features .......................................................................................................... 3
Hardware Overview ......................................................................................... 4
2.1 Front Panel ....................................................................................................................... 4
2.1.1 Ports and Connectors ......................................................................................... 4
2.2 Front Panel LEDs ............................................................................................................ 5
2.3 Rear Panel ....................................................................................................................... 5
2.4 Top Panel ......................................................................................................................... 6
Hardware Installation ...................................................................................... 7
3.1 DIN-rail Installation .......................................................................................................... 7
3.2 Wall Mounting .................................................................................................................. 8
3.3 Wiring ............................................................................................................................... 9
3.3.1 Grounding ........................................................................................................................ 9
3.3.2 Dual Power Inputs ........................................................................................................... 9
4.1 Ethernet Cables ................................................................................................ ............. 11
4.2 RJ-45 Pin Assignment ................................................................................................... 11
4.3 Wireless Antenna ................................ ........................................................................... 11
Management .................................................................................................. 13
5.1 Open-Vision Configuration ............................................................................................ 13
5.2 UPnP Equipment ................................ ........................................................................... 13
5.3 Web Browser Management .......................................................................................... 15
5.4 Configuration .................................................................................................................. 16
5.4.1 Overview .......................................................................................................... 16
System Info ................................................................ .......................................................... 16
LAN Info .............................................................................................................................. 17
Wireless Info ........................................................................................................................ 17
5.4.2 Basic Setting .................................................................................................... 17
System Info Settings ............................................................................................................. 17
LAN Setting ......................................................................................................................... 18
Time Setting ................................ ......................................................................................... 20
5.4.3 Wireless Settings ............................................................................................. 21
Wireless Settings .................................................................................................................. 21
Client Mode .......................................................................................................................... 28
Bridge Mode ......................................................................................................................... 30
Wireless Options ................................................................................................................... 33
5.4.4 Advanced Settings ........................................................................................... 35
Page 4

IAP-420/420+ User Manual
ORing Industrial Networking Corp. 3
Filters ................................................................................................................................... 35
Misc. Settings ....................................................................................................................... 36
5.4.5 Event Warning Settings ................................................................ .................... 37
System Log........................................................................................................................... 37
E-mail .................................................................................................................................. 38
SNMP .................................................................................................................................. 40
5.4.6 System Status .................................................................................................. 41
Wireless Link List ................................................................................................................. 41
DHCP Client List .................................................................................................................. 41
Traffic/Port Status ................................................................................................................. 41
System Log........................................................................................................................... 42
5.4.7 Administrator .................................................................................................... 42
Password .............................................................................................................................. 42
Configuration ....................................................................................................................... 43
Firmware Upgrade ................................................................................................................ 43
Load Factory Default ............................................................................................................ 44
Restart .................................................................................................................................. 44
Technical Specifications ............................................................................... 46
Compliance ................................ .................................................................... 48
Page 5

IAP-410(+) User Manual
ORing Industrial Networking Corp. 3
Getting Started
1.1 About the IAP-420/-420+ Series
The IAP-420/IAP-420+ series is a reliable 802.11b/g/n access point with two LAN ports. The
series supports 802.1X and MAC filters for security control and can operate in
AP/bridge/repeater/AP-client modes. You can configure the device using a WEB interface via
wired or wireless connections. The second Ethernet port of the IAP-420+ is P.D. enabled,
fully compliant with IEEE802.3af PoE standard
1.2 Software Features
High speed air connectivity: WLAN interface supports up to 150 Mbps
Provides high security via WEP/WPA/WPA-PSK(TKIP,AES)/
WPA2/WPA2-PSK(TKIP,AES)/802.1X authentication
Supports X-Roaming < 100 ms
Supports AP/client/bridge/AP-client modes
Dual redundant Ethernet ports (Recovery time < 10ms)
Secured management by HTTPs
Wireless connection status monitoring
Event warning by Syslog, e-mail, SNMP trap, relay, and beeper
1.3 Hardware Features
Two 10/100Base-T(X) Ethernet ports
Fully compliant with IEEE802.3af (ETH2 port of IAP-420+)
Redundant power inputs: 12~48 VDC on terminal block
Operating temperature: -10 to 60oC
Storage temperature: -40 to 85oC
Operating humidity: 5% to 95%, non-condensing
Casing: IP-30
Dimensions (W x D x H): 41(W)x81(D)x95(H) mm
Page 6

IAP-420/420+ User Manual
ORing Industrial Networking Corp. 4
Hardware Overview
2.1 Front Panel
2.1.1 Ports and Connectors
The device is equipped with the following ports and features on the front panel.
Port
Description
10/100Base-T(X
) Fast Ethernet
Ports
10/100Base-T(X) RJ-45 fast Ethernet ports supporting auto-negotiation.
Default setting including
Speed: auto
Duplex: auto
The ETH1 port of IAP-420+ is PoE-enabled
ANT.
1 x reversed SMA connector for Wi-Fi antennal
*Note: For PoE Ethernet switch options, please refer to information on the ORing IPS series.
IAP-420+ IAP-420
Page 7
IAP-420/420+ User Manual
ORing Industrial Networking Corp. 5
2.2 Front Panel LEDs
LED
Color
Status
Description
PWR1
Green
On
DC power 1 activated
PWR2
Green
On
DC power 2 activated
PoE
Green
On
Power is supplied over Ethernet cable
ETH1
Green
On
Port is linked and running at 100Mbps
Blinking
Data being transmitted
ETH2
Green
On
Port is linked and running at 100Mbps
Blinking
Data being transmitted
WLAN
Green
On
WLAN is activated
2.3 Rear Panel
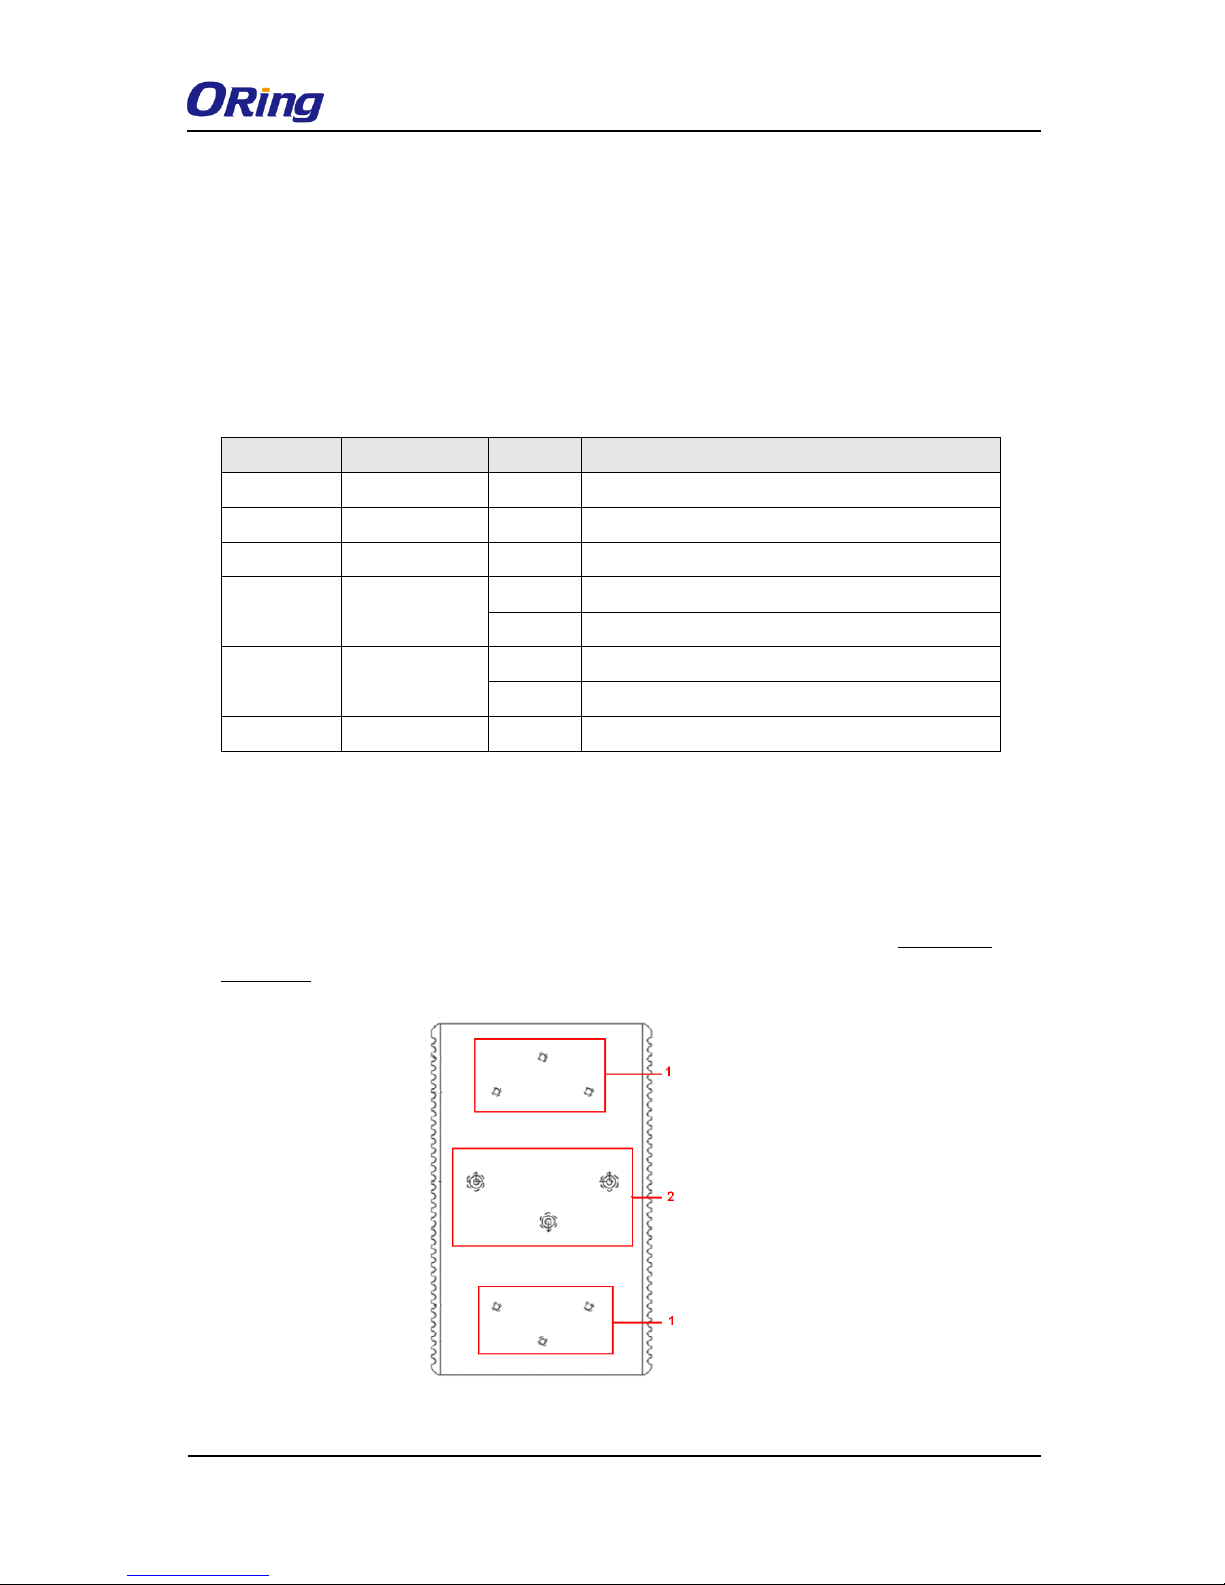
On the rear panel of the device sit three sets of screw holes. The two sets placed in
triangular patterns on both ends of the rear panel are used for wall-mounting (red boxes in
the figure below) and the set of four holes in the middle are used for Din-rail installation (blue
box in the figure below). For more information on installation, please refer to 3.1 Din-rail
Installation.
1. Power 1 LED
2. 1st LAN port LED
3. Power 2 LED
4. 2nd LAN port LED
5. Wi-Fi status LED
6. Reset button
7. Ethernet ports (ETH1 with PoE function)
8. Wi-Fi antenna connector
9. PoE indicator
1. Wall-mount screw holes
2. Din-rail screw holes
Page 8
IAP-420/420+ User Manual
ORing Industrial Networking Corp. 6
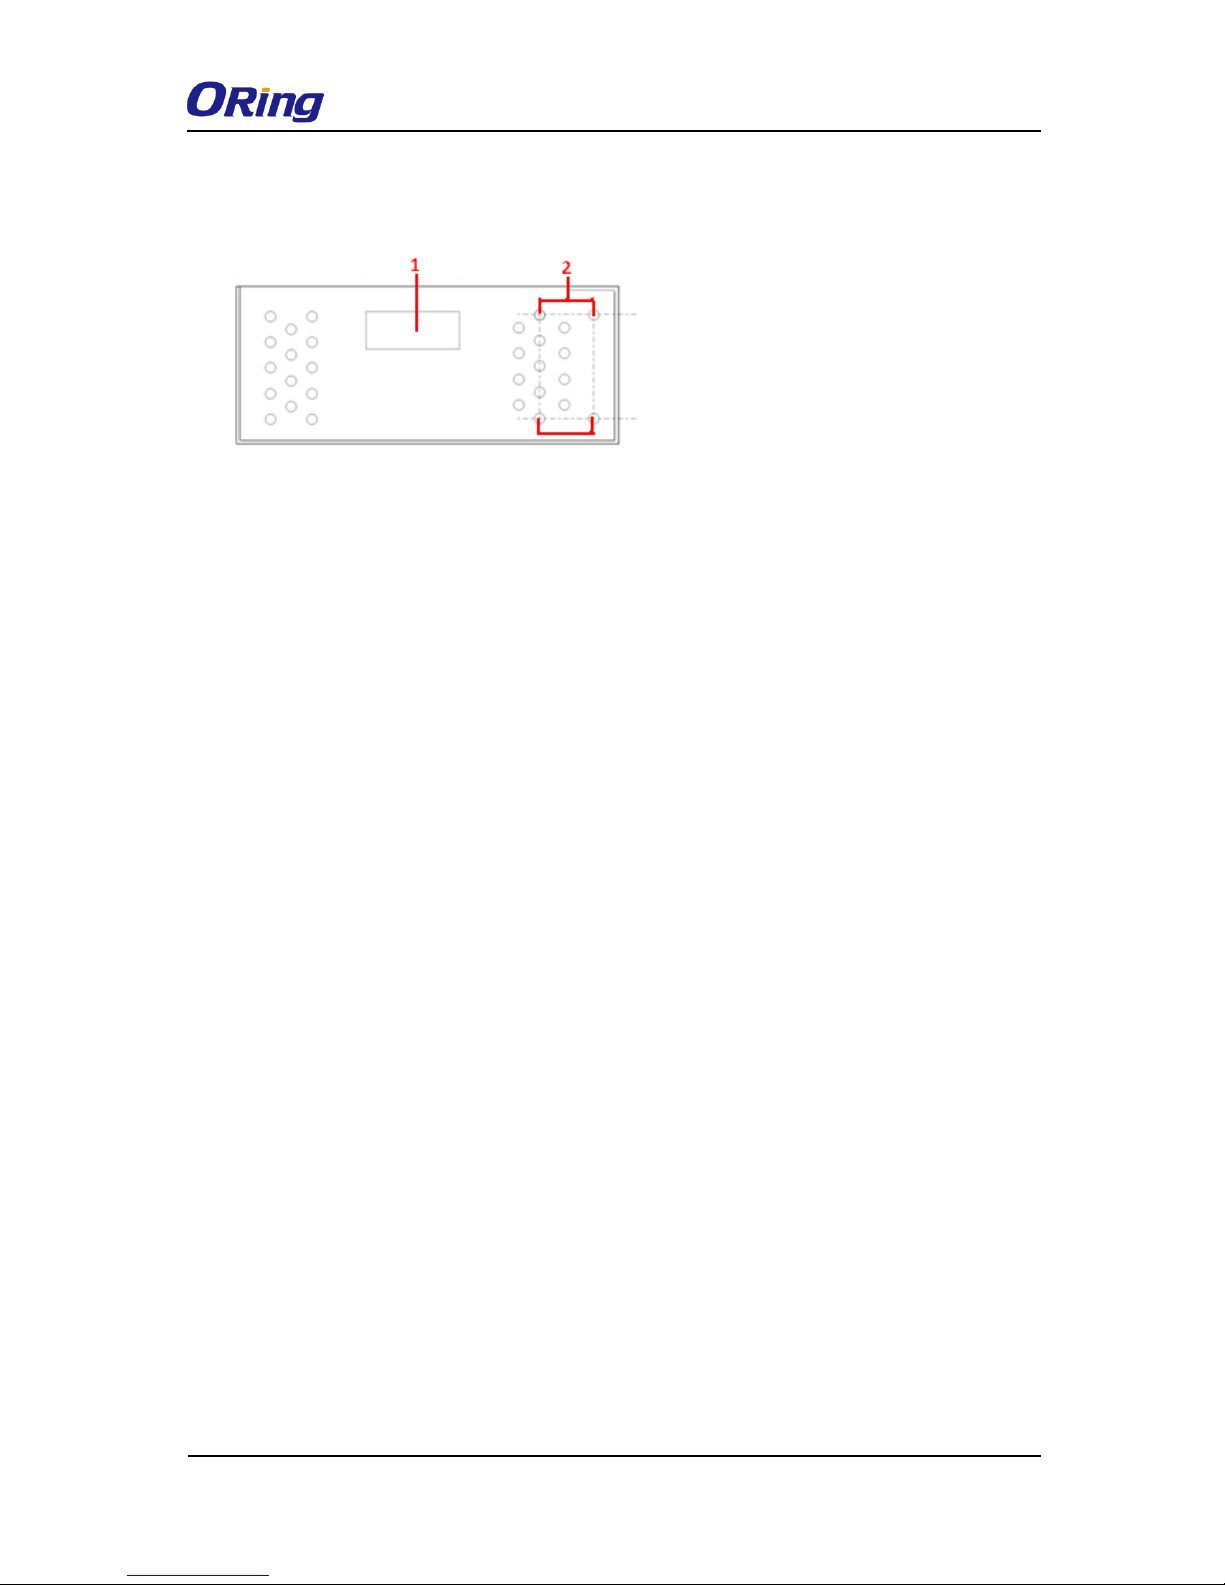
2.4 Top Panel
1. Terminal block
2. Wall-mount screw holes
Page 9
IAP-420/420+ User Manual
ORing Industrial Networking Corp. 7
Hardware Installation
3.1 DIN-rail Installation
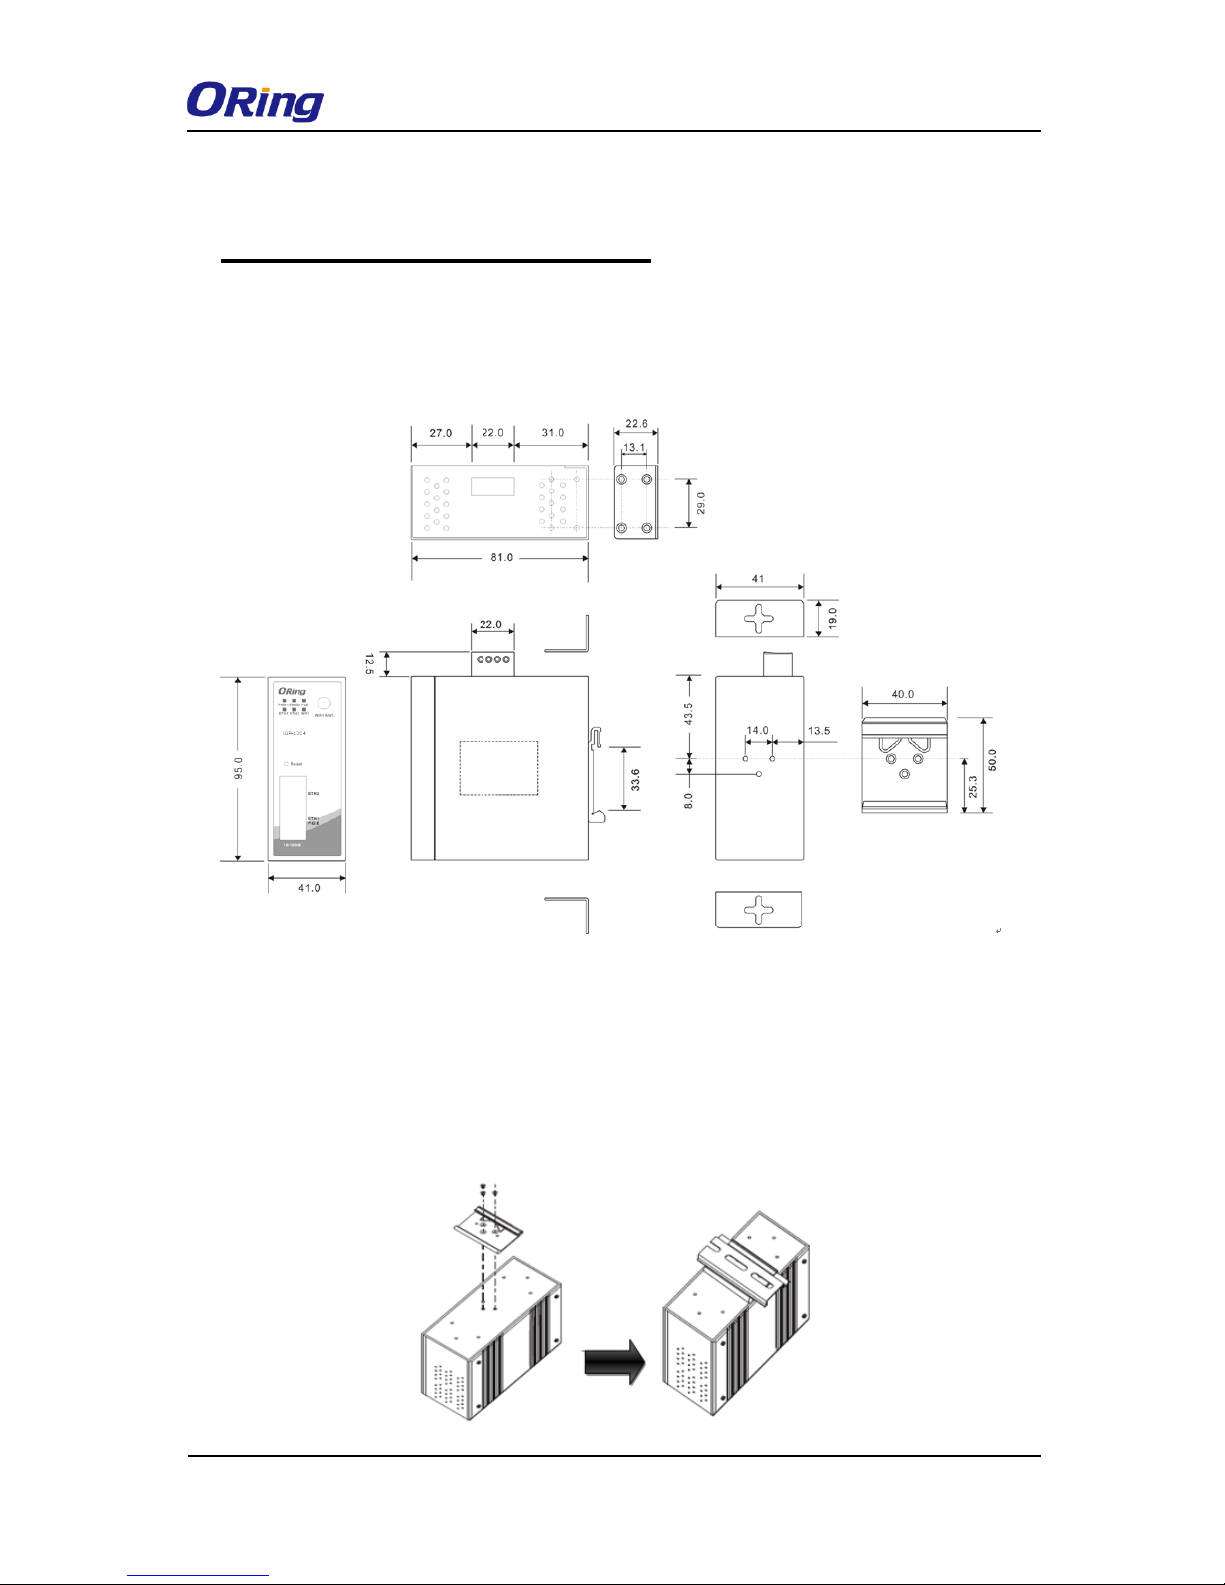
The device comes with a DIN-rail kit to allow you to fasten it to a DIN-rail in any
environments.
DIN-rail Kit Measurement (Unit = mm)
Step 1: Slant the device and screw the Din-rail kit onto the back of the device, right in the
middle of the back panel.
Step 2: Slide the device onto a DIN-rail from the Din-rail kit and make sure the device clicks
into the rail firmly.
Page 10

IAP-420/420+ User Manual
ORing Industrial Networking Corp. 8
3.2 Wall Mounting
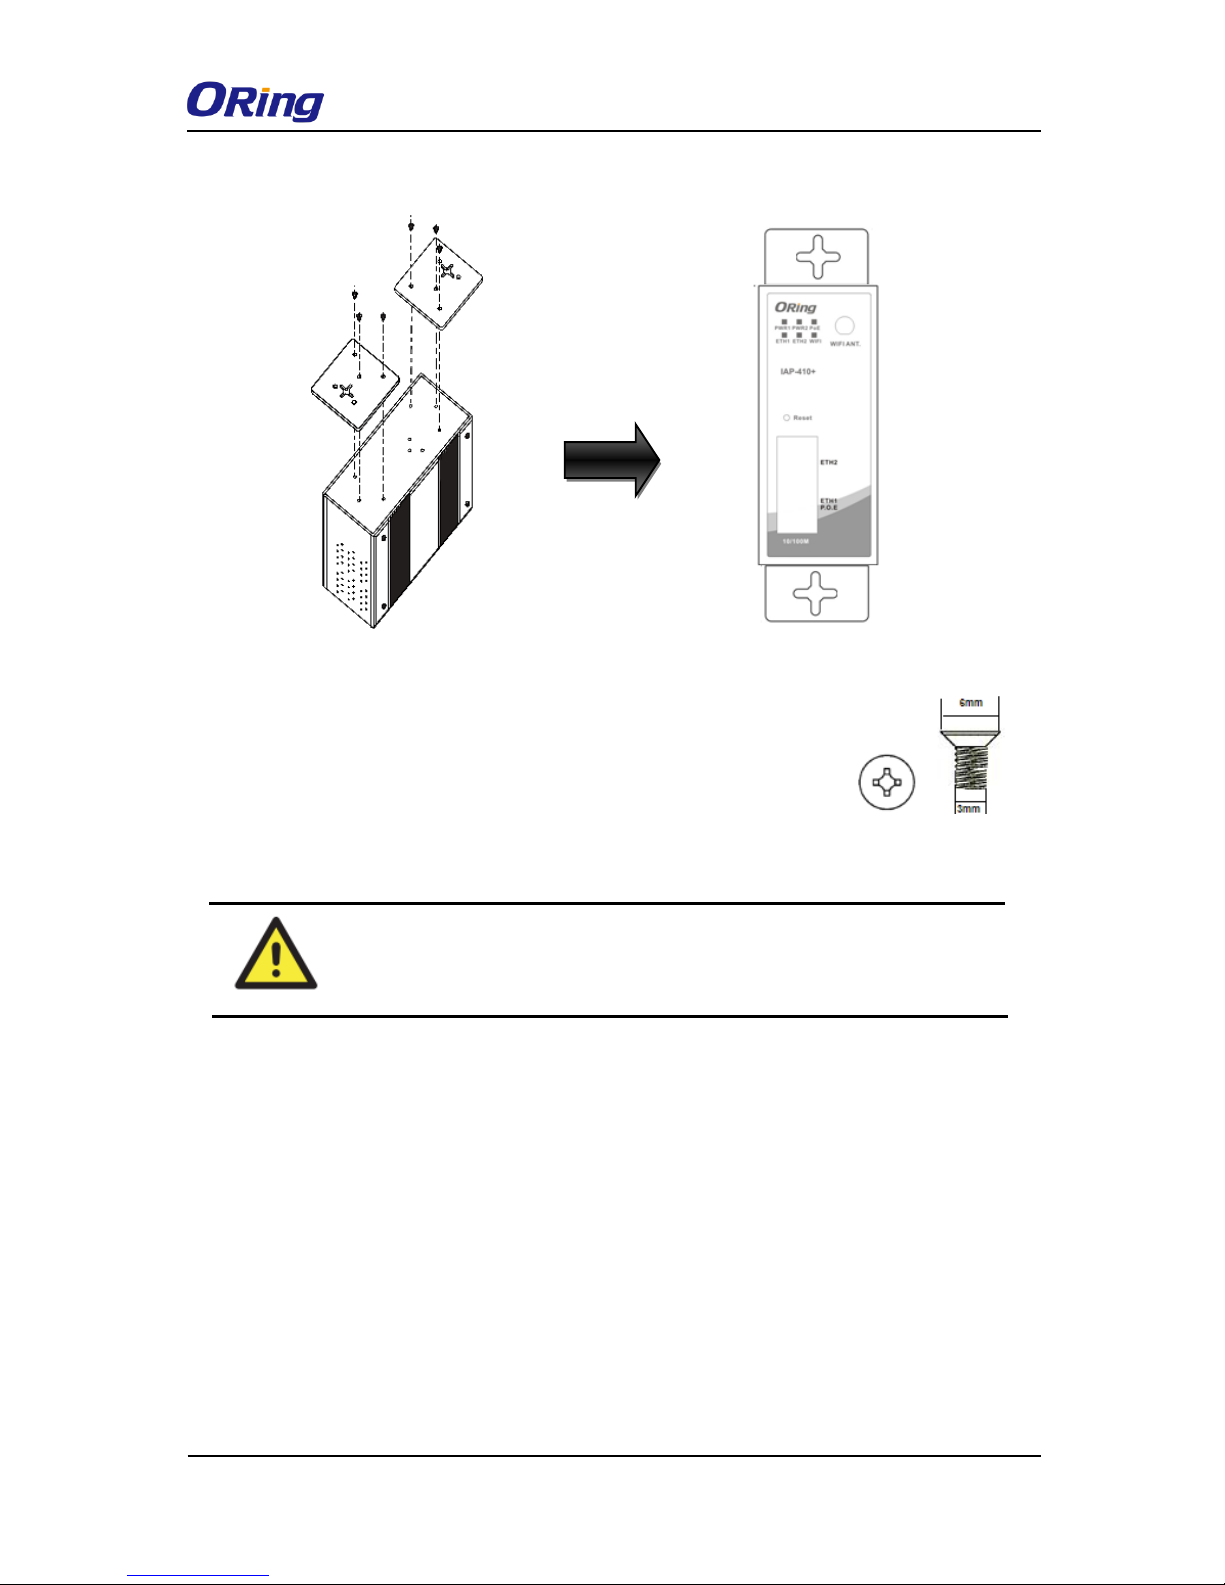
Besides Din-rail, the device can be fixed to the wall via a wall mount panel, which can be
found in the package.
Wall-Mount Kit Measurement (Unit = mm)
To mount the device onto the wall, follow the steps:
Step 1: Screw the two pieces of wall-mount kits onto both ends of the rear panel of the device.
A total of six screws are required, as shown below.
Step 2: Use the device, with wall mount plates attached, as a guide to mark the correct
locations of the four screws.
Step 3: Insert four screw heads through the large parts of the keyhole-shaped apertures, and
then slide the device downwards. Tighten the four screws for added stability.
Page 11
IAP-420/420+ User Manual
ORing Industrial Networking Corp. 9
The screws should be 6mm diameter head x 3mm diameter thread, as shown
below. Note that the screws should not be larger than the size used in the
device to prevent damaging the device.
3.3 Wiring
WARNING
Be sure to switch off the power and make sure the area is not hazardous
before disconnecting modules or wires. The devices may only be connected to
the supply voltage shown on the type plate.
3.3.1 Grounding
Grounding and wire routing help limit the effects of noise due to electromagnetic interference
(EMI). Run the ground connection from the ground screw to the grounding surface prior to
connecting devices.
3.3.2 Dual Power Inputs
The device has two sets of power inputs, power input 1 and power input 2, on a 4-pin terminal
block connector on the top panel. Follow the steps below to wire redundant power inputs.
Step 1: insert the negative/positive DC wires into the V-/V+ terminals, respectively.
Step 2: to keep the DC wires from pulling loose, use a small flat-blade screwdriver to tighten
the wire-clamp screws on the front of the terminal block connector.
Page 12

IAP-420/420+ User Manual
ORing Industrial Networking Corp. 10
Besides power input, the device can also be powered by a PoE PSE such as switch via its
PoE-enabled port (ETH2 port).
ATTENTION
1. Be sure to disconnect the power cord before installing and/or wiring the
device.
2. Calculate the maximum possible current in each power wire and
common wire. Observe all electrical codes dictating the maximum
current allowable for each wire size.
3. If the current goes above the maximum ratings, the wiring could
overheat, causing serious damage to your equipment.
4. Use separate paths to route wiring for power and devices. If power
wiring and device wiring paths must cross, make sure the wires are
perpendicular at the intersection point.
5. Do not run signal or communications wiring and power wiring through
the same wire conduit. To avoid interference, wires with different signal
characteristics should be routed separately.
6. You can use the type of signal transmitted through a wire to determine
which wires should be kept separate. The rule of thumb is that wiring
sharing similar electrical characteristics can be bundled together
7. You should separate input wiring from output wiring
8. It is advised to label the wiring to all devices in the system
Page 13
IAP-420/420+ User Manual
ORing Industrial Networking Corp. 11
Cables and Antenna
4.1 Ethernet Cables
The device has two 10/100Base-T(X) Ethernet ports. According to the link type, the AP uses
CAT 3, 4, 5, 5e, 6 UTP cables to connect to any other network device (PCs, servers, switches,
routers, or hubs). Please refer to the following table for cable specifications.
Cable
Type
Max. Length
Connector
10Base-T
Cat. 3, 4, 5 100-ohm
UTP 100 m (328 ft)
RJ45
100Base-T(X)
Cat. 5 100-ohm UTP
UTP 100 m (328 ft)
RJ45
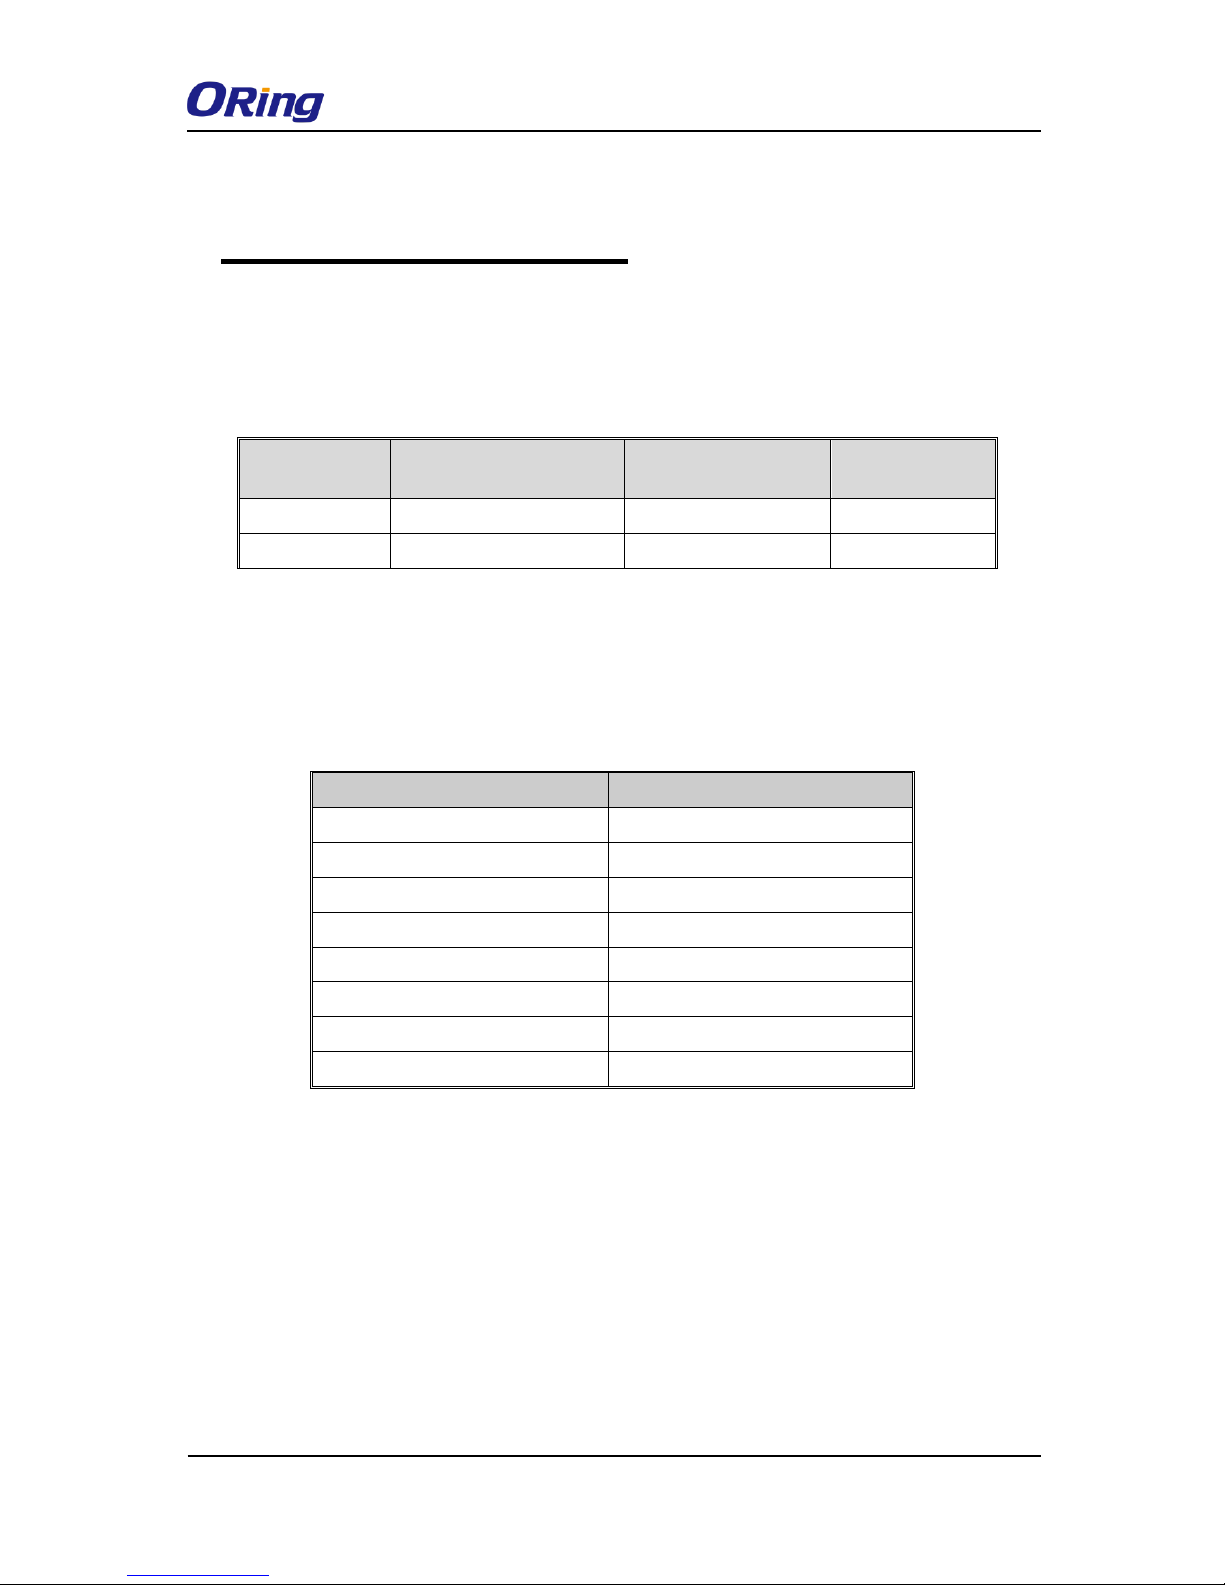
4.2 RJ-45 Pin Assignment
With 10/100Base-T(X) cables, pins 1 and 2 are used for transmitting data, and pins 3 and 6
are used for receiving data.
10/100 Base-T(X) RJ-45 Pin Assignments :
The device also supports auto MDI/MDI-X operation. You can use a straight-through cable
to connect PC and the device. The following table below shows the 10/100BASE-T(X) MDI
and MDI-X port pin outs.
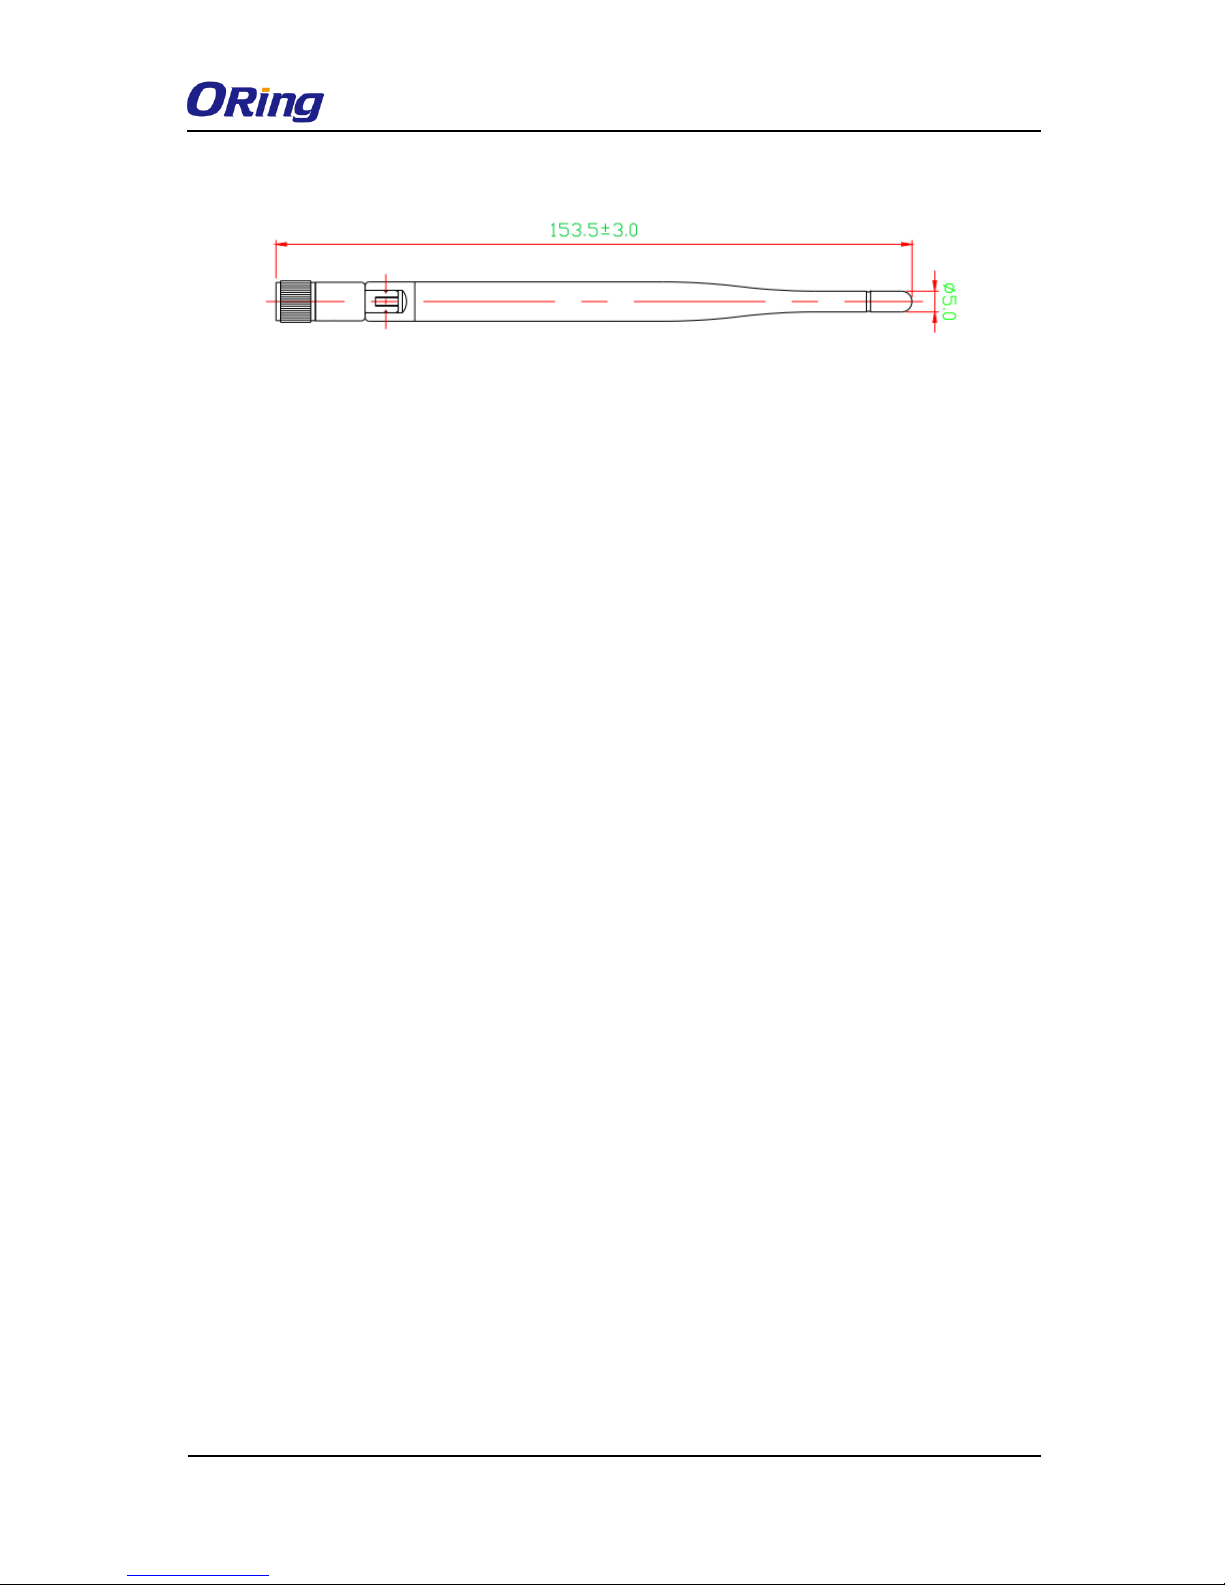
4.3 Wireless Antenna
The device uses one reversed SMA connector for 2.4GHz antennas. You can also use external
RF cables and antennas with the connectors.
Pin Number
Assignment
1
TD+( P.O.E. power input +)
2
TD-( P.O.E. power input +)
3
RD+( P.O.E. power input -)
4
P.O.E. power input +
5
P.O.E. power input +
6
RD-( P.O.E. power input -)
7
P.O.E. power input -
8
P.O.E. power input -
Page 14
IAP-420/420+ User Manual
ORing Industrial Networking Corp. 12
Page 15
IAP-420/420+ User Manual
ORing Industrial Networking Corp. 13
Management
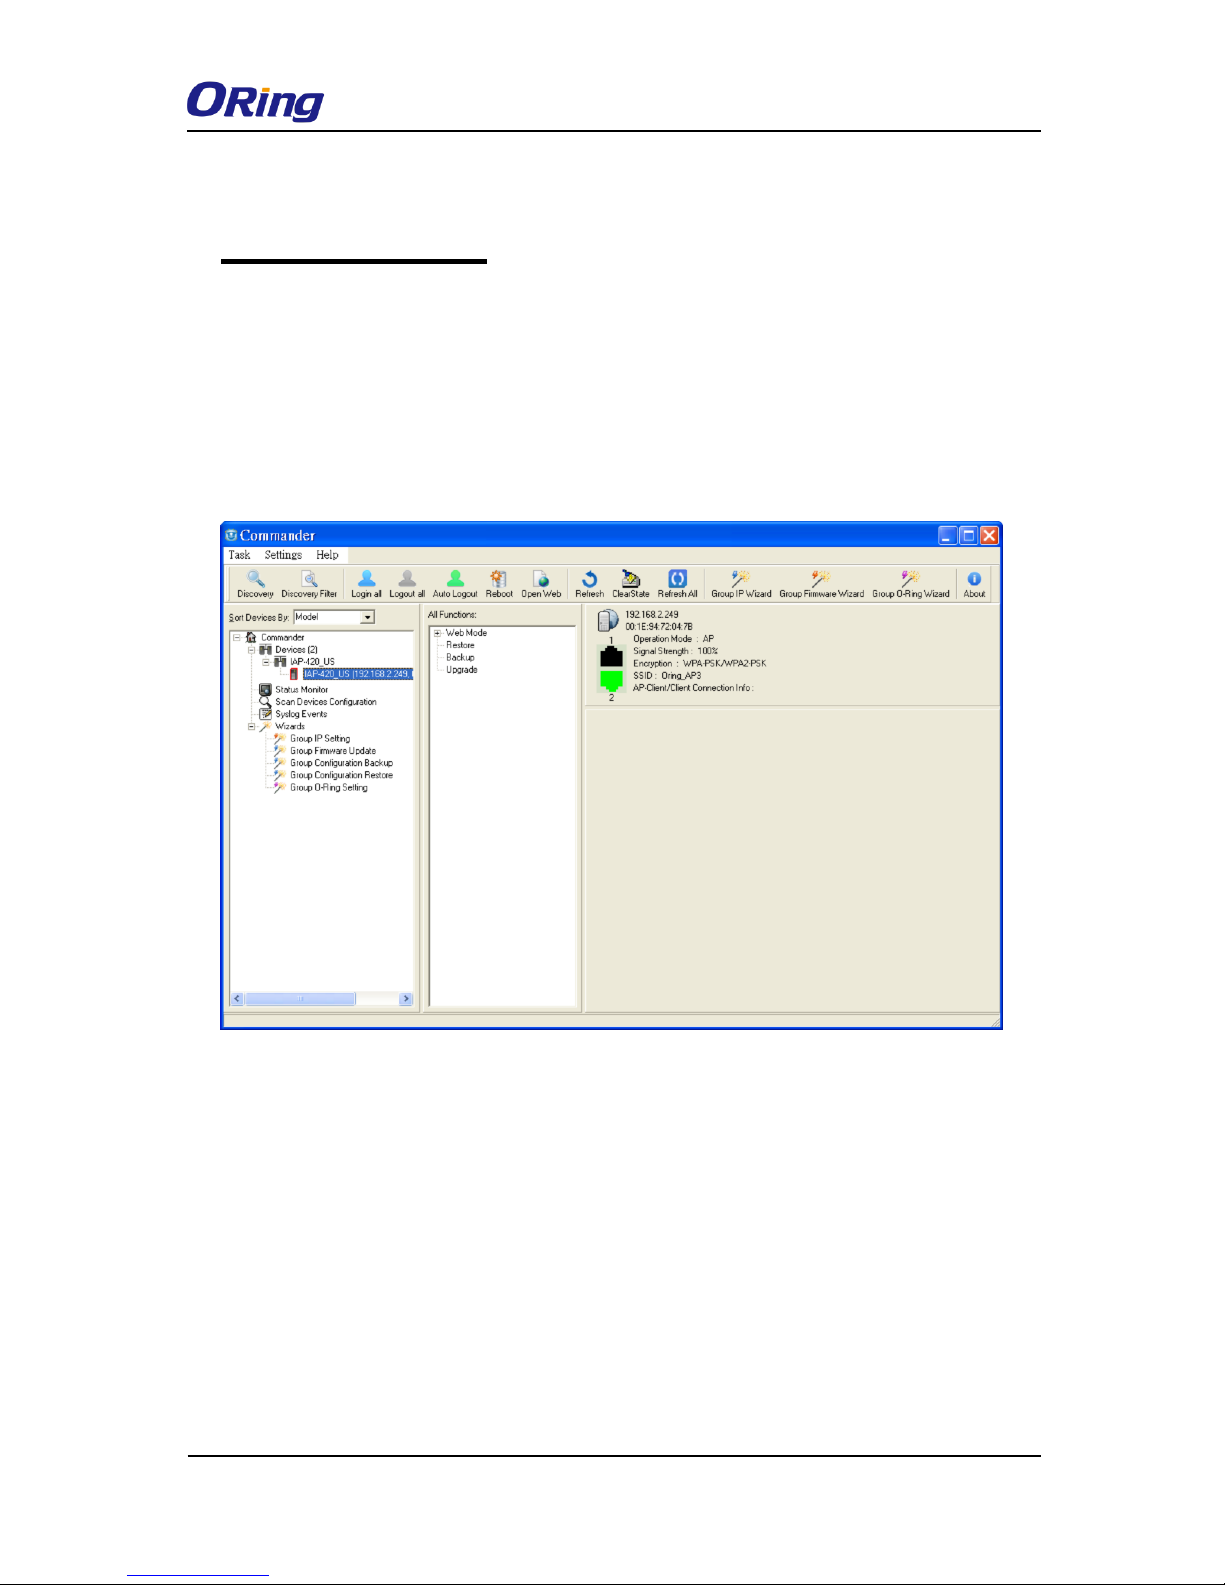
5.1 Open-Vision Configuration
The device can be configured using ORing’s proprietary Windows utility Open-Vision. Follow
the steps below to set up the device in Open-Vision.
Step 1: Open the commander and click Discover, a list of AP devices will be shown.
Step 2: Choose your access point. The functions of the AP will be shown in a tree structure.
Step 3: Type in the username and password to log in to setup the AP.
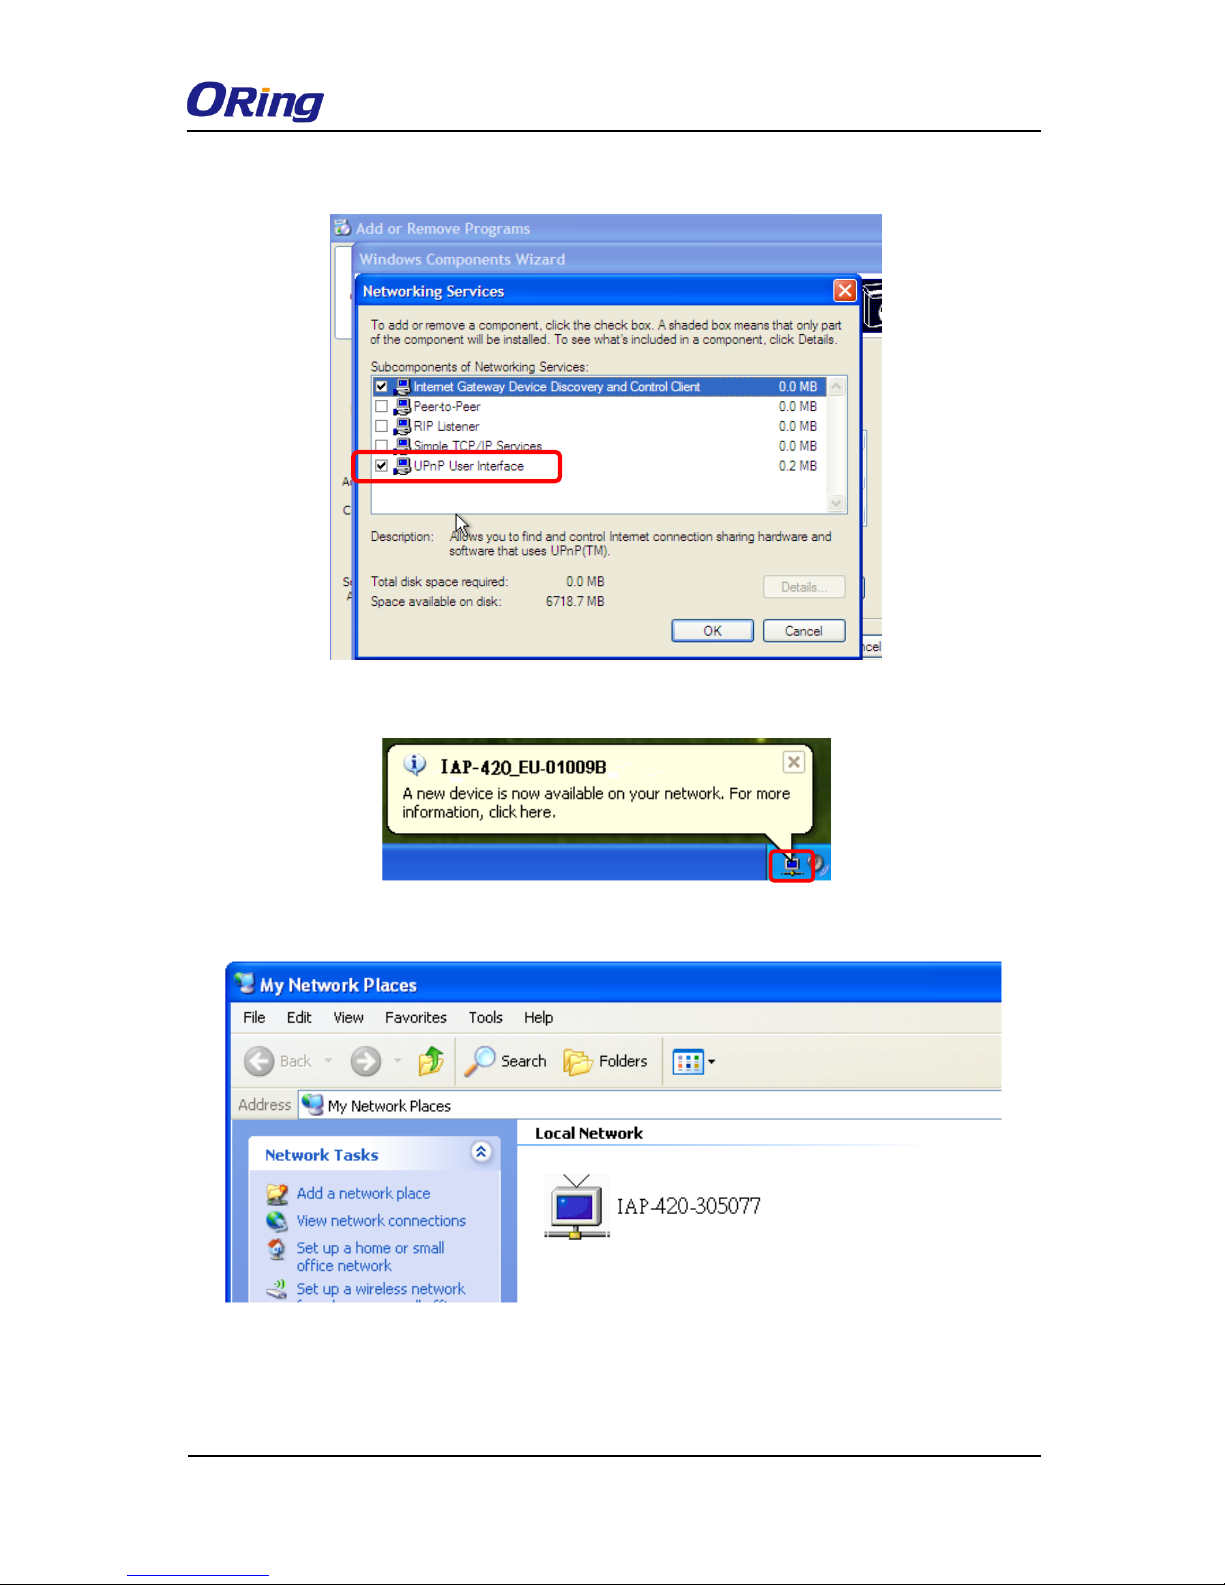
5.2 UPnP Equipment
The device supports UPnP; therefore, when you connect the device to the PC, it will discover
the presence of the device automatically. To check the connection of the device to you PC,
follow the steps below.
Step 1: Go to Control Panel > Add or Remove Programs > Windows Components
Wizard > Networking Servers > UPnP User Interface and pitch on the UPnP User
Interface.
Page 16
IAP-420/420+ User Manual
ORing Industrial Networking Corp. 14
Step 2: At the right-below corner of the computer, you will find an UPnP icon of the device.
Step 3: Click on the icon and you will find the UPnP device in My Network Places.
Step 4: Right click the UPnP device and choose Properties, the following picture will be
shown.
Step 5: Double click the device icon will lead you to the management web page.
Page 17

IAP-420/420+ User Manual
ORing Industrial Networking Corp. 15
5.3 Web Browser Management
An embedded HTML web site resides in the flash memory of the device. It contains advanced
management features which you can manage from anywhere on the network through a
standard web browser such as Microsoft Internet Explorer (Internet Explorer 5.0 or later
versions). It is based on Java Applets which can reduce network bandwidth consumption,
enhance access speed, and provide user-friendly viewing windows.
Note: By default, IE5.0 or later version does not allow Java Applets to open sockets. You need to explicitly modify
browser settings in order to enable Java Applets to use network ports.
Open a web browser on your computer and type http://192.168.10.2 (default gateway IP of
the device) in the address box to access the webpage. A login window will pop up where you
can enter the default login name admin and password admin. For security reasons, we
strongly recommend you to change the password. Click on Administrator > Password after
logging in to change the password.
After you log in successfully, a Web interface will appear, as shown below. On the left hand
side of the interface is a list of functions where you can configure the settings. The details of
the configurations will be shown on the right screen.
Page 18

IAP-420/420+ User Manual
ORing Industrial Networking Corp. 16
5.4 Configuration
The Home screen will appear with a short description of the device. You can lick Run Wizard
on the page for quick configurations of a new password, wireless SSID and channel, and
encryption.
On top of the Home screen shows information about the firmware version and uptime.
Label
Description
Firmware
Shows the current firmware version
Uptime
Shows the elapsed time since the AP is started
5.4.1 Overview
System Info
This page will show the basic information of the device based on the settings you input in
Basic Settings/System Info Settings. The information includes model name, device name,
location, description, and firmware version.
Page 19

IAP-420/420+ User Manual
ORing Industrial Networking Corp. 17
LAN Info
This page will show the LAN information of the device based on the settings you input in
Basic Settings/LAN Setting. The information includes including MAC address, IP address,
subnet mask, and gateway.
Wireless Info
This page will show the wireless information of the device based on the settings you input in
Wireless Settings. The information includes MAC address, SSID, peer AP SSID, encryption
type, channel number, operation mode, and RF type.
5.4.2 Basic Setting
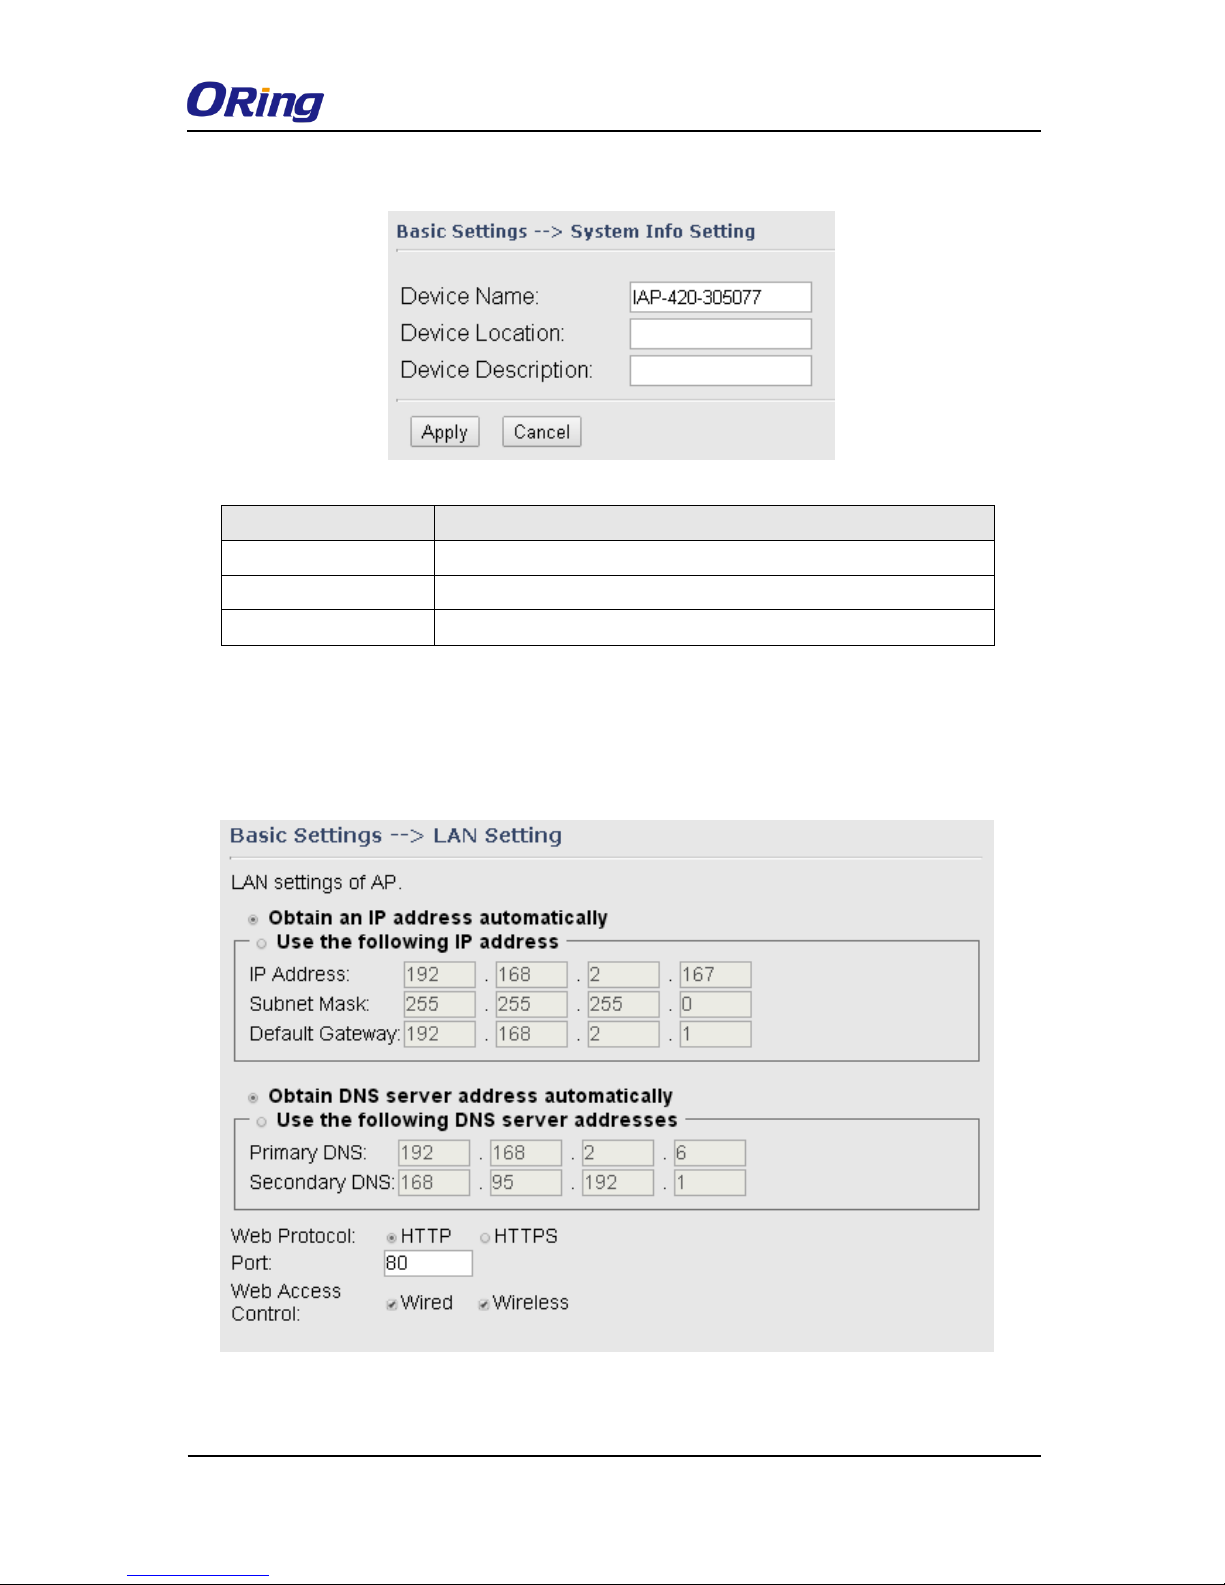
System Info Settings
This section allows you to input the basic information for the device.
Page 20
IAP-420/420+ User Manual
ORing Industrial Networking Corp. 18
Label
Description
Device Name
Enter the name for the device
Device Location
Enter the place where the device is located
Device Description
Enter a description for the device
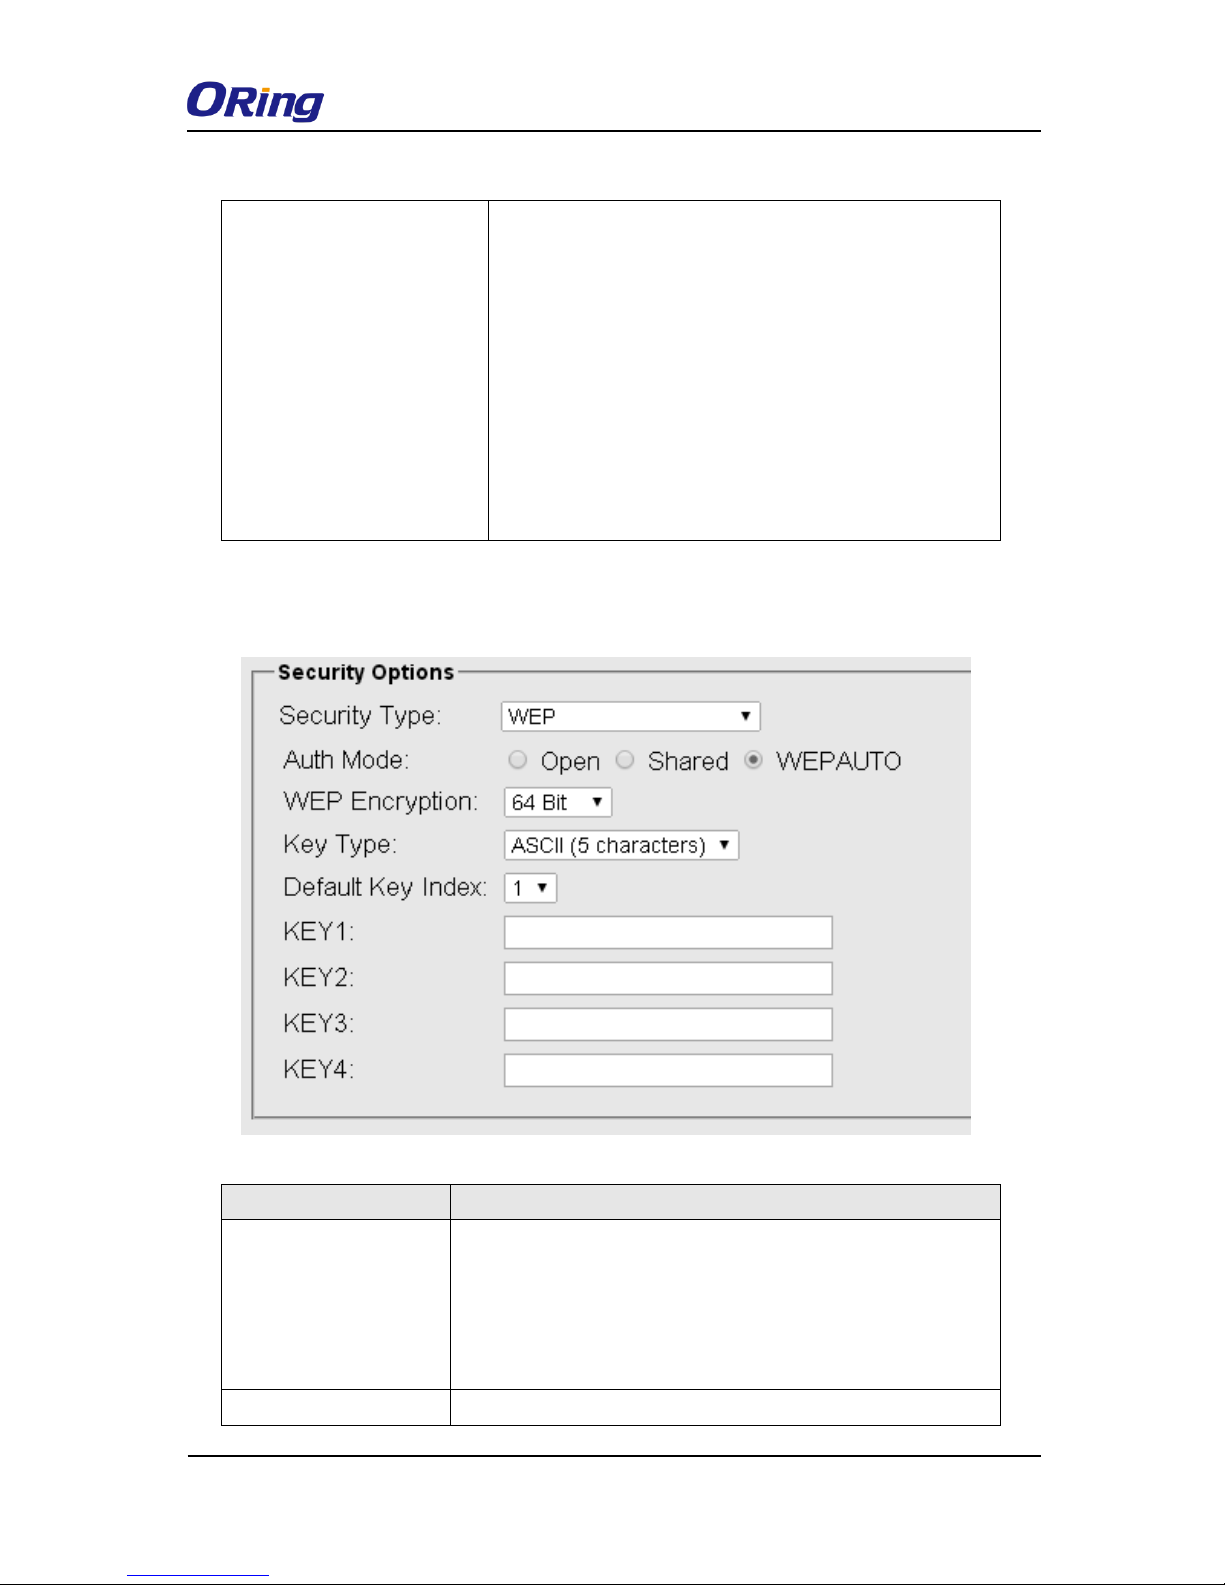
LAN Setting
This page allows you to configure the IP settings of the LAN port for the device. To access the
AP normally, a valid IP address of your LAN should be designated to the LAN interface. The
default IP setting is DHCP server which will obtain an IP address automatically.
Page 21

IAP-420/420+ User Manual
ORing Industrial Networking Corp. 19
Label
Description
Obtain an IP address
automatically
Select this option if you want the IP address to be assigned
automatically by the DHCP server in your network.
Use the following IP
address
Select this option if you want to assign an IP address to the
device manually. You should set up IP address, subnet mask,
and default gateway for the device.
IP Address: The device comes with default IP address, but you
can also input a new IP address.
Subnet Mask: 255.255.255.0 is the default value. All devices on
the network must have the same subnet mask to communicate
on the network.
Default Gateway: Enter the IP address of the device in your
network.
Obtain DNS server
address
automatically
Obtains a DNS server address from a DHCP server. If you have
chosen to obtain an IP address automatically, this option will be
selected accordingly.
Use the following
DNS server
addresses
Specifies a DNS server address manually. You can enter two
addresses as the primary and secondary options.
Web Protocol
You can choose to use HTTP or HTTPS protocols. The latter has
a higher security level.
Preferred DNS
Input the IP address of the DNS server you prefer to use
Secondary DNS
Input the IP address of another DNS server
Page 22

IAP-420/420+ User Manual
ORing Industrial Networking Corp. 20
Web Access Control
Choose Wired if you want to connect to the device via wired
networks. Choose Wireless if you want to access the network via
wireless connections.
Time Setting
In this page, you can set the date & time of the device. A correct date and time will help the
system log events. You can set up a NTP (Network Time Protocol) client to synchronize date
& time to a NTP server on the Internet.
Label
Description
NTP
Enables or disables NTP function
NTP Server 1
The primary NTP server
Time Zone
Select the time zone you are located in
Synchronize
Specify the scheduled time for synchronization
Local Date
Set a local date manually
Local Time
Set a local time manually
Get Current Date &
Time from Browser
Click this button, you can set the time from browser.
Page 23

IAP-420/420+ User Manual
ORing Industrial Networking Corp. 21
5.4.3 Wireless Settings
Wireless Settings
In each mode, the device will forward packets between its Ethernet interface and wireless
interfaces for wired hosts on the Ethernet side, and wireless hosts on the wireless side.
Label
Description
AP
You can set the device to work in AP mode. This is the most common
mode for all wireless APs. In this mode, the AP will act as a central
connection point which other wireless clients can connect to.
AP-Client
This mode provides a one-to-many MAC address mapping mechanism
such that multiple stations behind the AP can transparently connect to the
other AP even if they don’t support WDS
Client
In this mode, the AP functions as a wireless client to connect your wired
devices to a wireless network. This mode provides no access point
services but supports 802.1X.
Bridge
This mode provides static LAN-to-LAN bridging functionality. The static
LAN-to-LAN bridging function is supported through Wireless Distribution
System (WDS).
Page 24

IAP-420/420+ User Manual
ORing Industrial Networking Corp. 22
AP Mode
Label
Description
SSID
SSID (Service Set Identifier) is a unique name that
identifies a network. All devices on the network must be set
with the same SSID in order to communicate with each
other. Fill in a new SSID in this field if you do not want to
use the default value.
Channel
Specify a channel to be used. Channel 6 is the default
channel. You can also select a new number from the
dropdown list. All devices on the network must be set to the
same channel to communicate on the network. (Wireless
channel must be the same as the other device in the
group)
Security Options
You can choose the security type for your WLAN
connection from the following options:
None: no encryption
WEP: WEP (Wired Equivalent Privacy) is a wireless
security protocol for WLAN. WEP will encrypt data
Page 25
IAP-420/420+ User Manual
ORing Industrial Networking Corp. 23
transmitted on the WLAN.
WPA/WPA2 Personal: this will encrypt the link without
additional RADIUS server, only an access point and client
station that supports WPA-PSK is required.
WPA/WPA2 Enterprise: Authentication is achieved via
WPA RADIUS Server. You need a RADIUS or other
authentication server on the network.
802.1x: Authentication through RADIUS server
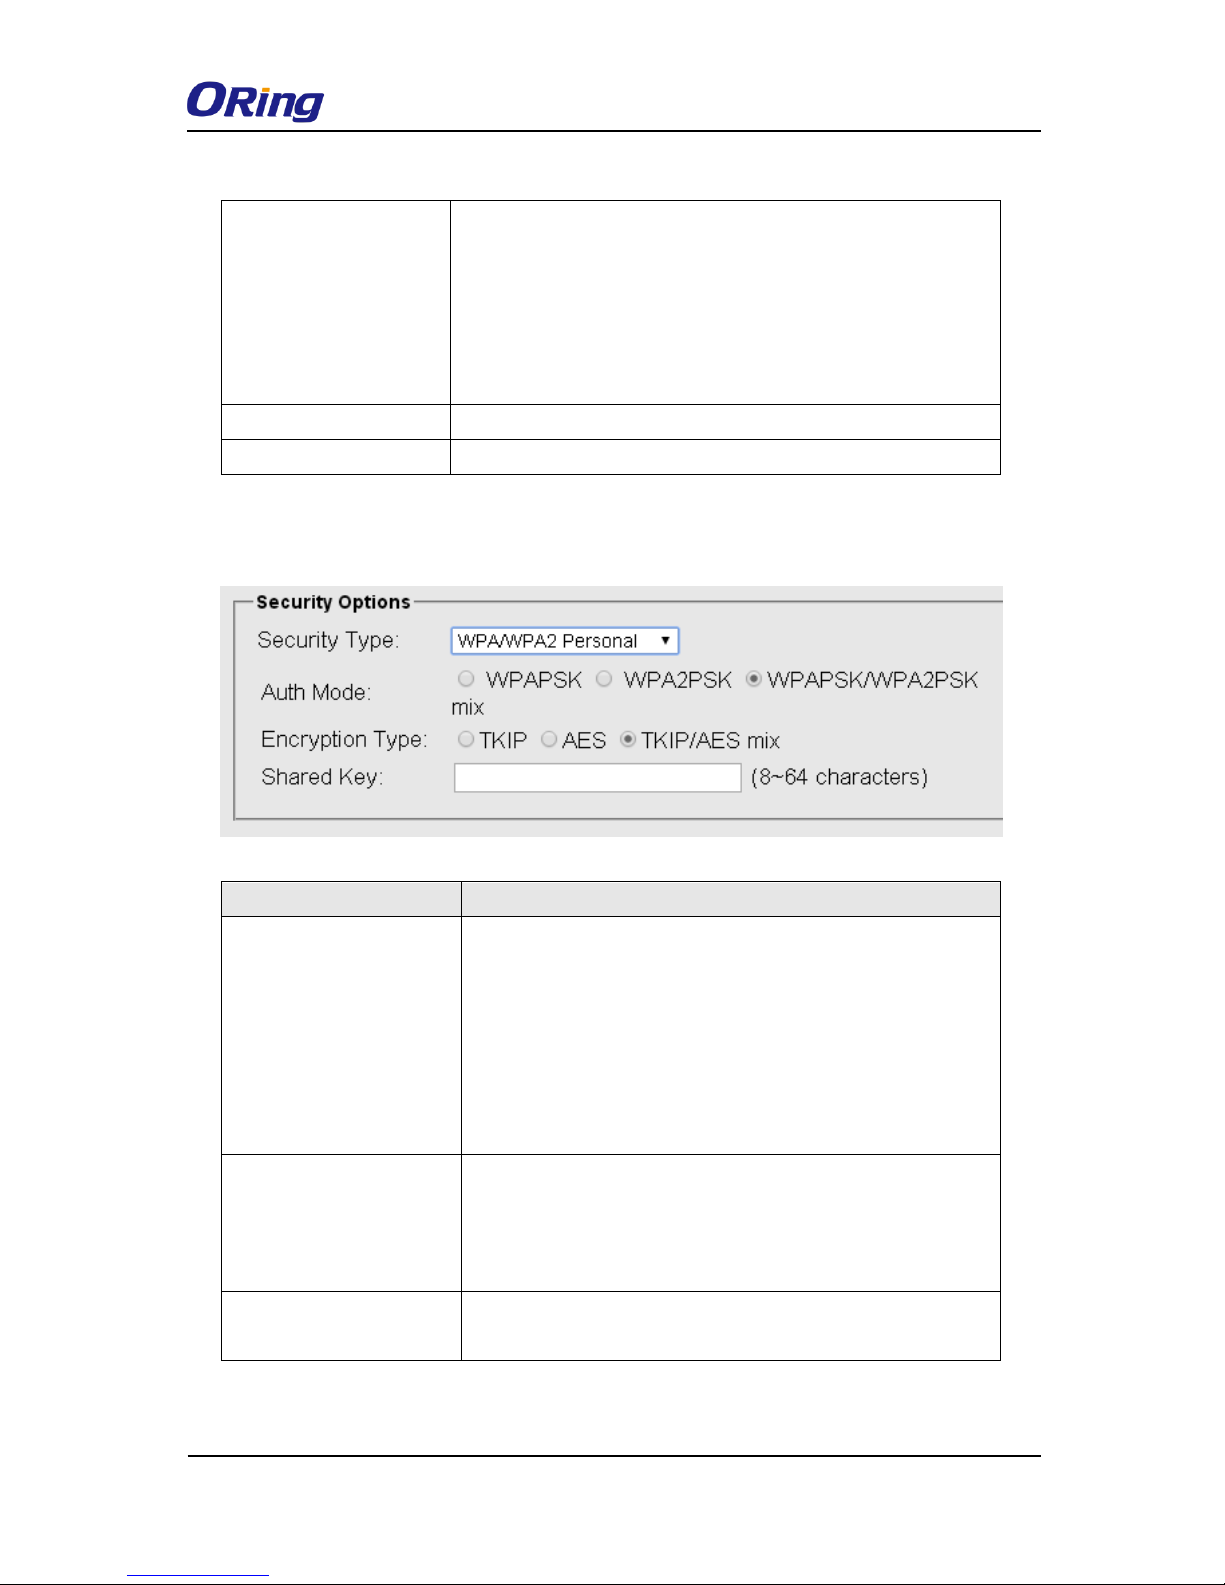
When you set security type as WEP, the following fields will appear to allow you to configure
individual settings.
Label
Description
Auth Mode
Available values include Open, Shared, and WEPAUTO. When
choosing Open or Shared, all of the clients must select the
same authentication to associate this AP. If select WEPAUTO,
the clients do not have to use the same Open or Shared
authentication. They can choose any one to authenticate.
WEP Encryption
You can select 64 Bit or 128 Bit.
Page 26
IAP-420/420+ User Manual
ORing Industrial Networking Corp. 24
Key Type
Available values include ASCII and Hex Key Type. ASCII
(American Standard Code for Information Interchange) is a
code for representing English characters as numbers in the
range from 0 to 127. Hex digits uses 0–9 to represent values
zero to nine, and characters A-F to represent values ten to
fifteen.
Default Key Index
Select one of the keys to be the active key
Key 1 to 4
You can input up to four encryption keys.
When you set security type as WPA/WPA2 Personal, the following fields will appear to allow
you to configure individual settings.
Label
Description
Auth Mode
Available values include WPAPSK, WPA2PSK, and
WPAPSK/WPA2PSK mix. WPAPSK and WPA2PSK will
encrypt the link without additional RADIUS server, only an
access point and client station that supports WPA-PSK is
required. For WPA/WPA2, authentication is achieved via WPA
RADIUS Server. You need a RADIUS or other authentication
server on the network.
Encryption Type
Available values include TKIP, AES, and TKIP/AES mix.
WPA-PSK uses TKIP encryption, and WPA2-PSK uses AES
encryption. TKIP/AES provides the most reliable security, and
is easiest to implement.
Shared Key
Enter a pass phrase in this field. The value must be within 8 to
64 characters
When you set security type as WPA/WPA2 Enterprise, the following fields will appear to allow
Page 27

IAP-420/420+ User Manual
ORing Industrial Networking Corp. 25
you to configure individual settings.
Label
Description
Auth Mode
Available values include WPAPSK, WPA2PSK, and
WPAPSK/WPA2PSK mix. WPAPSK and WPA2PSK will encrypt
the link without additional RADIUS server, only an access point and
client station that supports WPA-PSK is required. For WPA/WPA2,
authentication is achieved via WPA RADIUS Server. You need a
RADIUS or other authentication server on the network.
Encryption Type
Available values include TKIP, AES, and TKIP/AES mix.
WPA-PSK uses TKIP encryption, and WPA2-PSK uses AES
encryption. TKIP/AES provides the most reliable security, and is
easiest to implement.
Radius Server IP
Enter the IP address of the RADIUS server
Radius Port
Enter the RADIUS port (default is 1812)
Shared Secret
Enter the RADIUS password or key
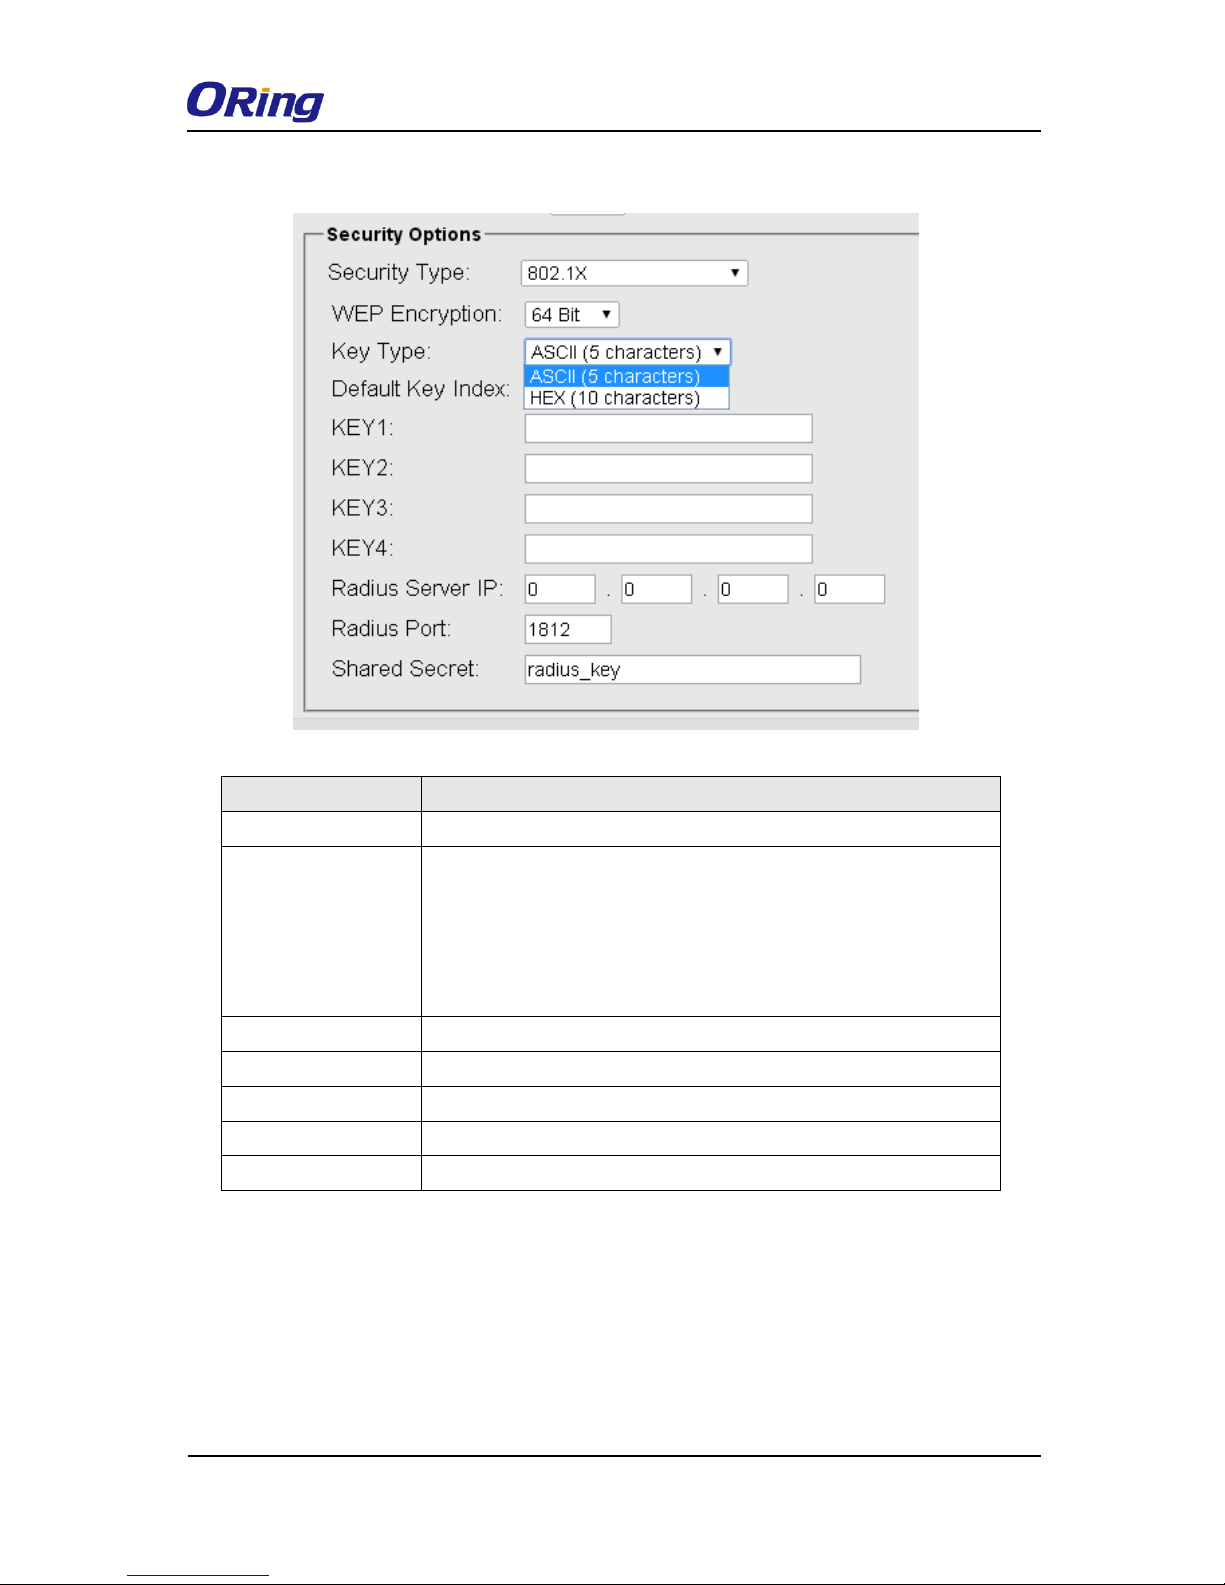
When you set security type as 802.1x, the following fields will appear to allow you to configure
individual settings.
Page 28
IAP-420/420+ User Manual
ORing Industrial Networking Corp. 26
Label
Description
WEP Encryption
You can select 64 Bit or 128 Bit.
Key Type
Available values include ASCII and Hex Key Type. ASCII
(American Standard Code for Information Interchange) is a code for
representing English characters as numbers in the range from 0 to
127. Hex digits uses 0–9 to represent values zero to nine, and
characters A-F to represent values ten to fifteen.
Default Key Index
Select one of the keys to be the active key
Key 1 to 4
Input up to four encryption keys
Radius Server IP
Enter the IP address of the RADIUS server
Radius Port
Enter the RADIUS port (default is 1812)
Shared Secret
Enter the RADIUS password or key
RADIUS (Remote Authentication Dial-In User Service) is a widely deployed protocol that
enables companies to authenticate and authorize remote users’ access to a system or
service from a central network server.
When you configure the remote access server for RADIUS authentication, the credentials of
the connection request are passed to the RADIUS server for authentication and authorization.
If the request is both authenticated and authorized, the RADIUS server sends an accept
Page 29

IAP-420/420+ User Manual
ORing Industrial Networking Corp. 27
message back to the remote access server and the connection attempt is accepted. If the
request is either not authenticated or not authorized, the RADIUS server sends a reject
message back to the remote access server and the connection attempt is rejected.
The principle of the Radius server is shown in the following pictures:
AP-Client Mode
This mode provides a one-to-many MAC address mapping mechanism such that multiple
stations behind the AP can transparently connect to the other AP even if they don’t support
WDS.
Page 30

IAP-420/420+ User Manual
ORing Industrial Networking Corp. 28
Label
Description
SSID
SSID (Service Set Identifier) is a unique name that identifies a
network. All devices on the network must be set with the same
SSID in order to communicate with each other. Fill in a new SSID
in this field if you do not want to use the default value.
Channel
Specify a channel to be used. Channel 6 is the default channel.
You can also select a new number from the dropdown list. All
devices on the network must be set to the same channel to
communicate on the network. (Wireless channel must be the
same as the other device in the group)
Security options
You can choose the security type for your WLAN connection from
the following options:
None: no encryption
WEP: WEP (Wired Equivalent Privacy) is a wireless security
protocol for WLAN. WEP will encrypt data transmitted on the
WLAN.
WPA/WPA2 Personal: uses a pre-shared key for authentication.
This pre-shared key is then dynamically sent between the AP and
clients. Each authorized computer is given the same pass phrase.
Peer AP SSID
Enter the SSID of the AP you want to connect as a client
Peer AP BSSID
Enter the BSSID (Wireless MAC address) to limit client target
Site Scan
You can scan APs on the network using this mode.
Security Type
Select the security type used by the client you want to connect
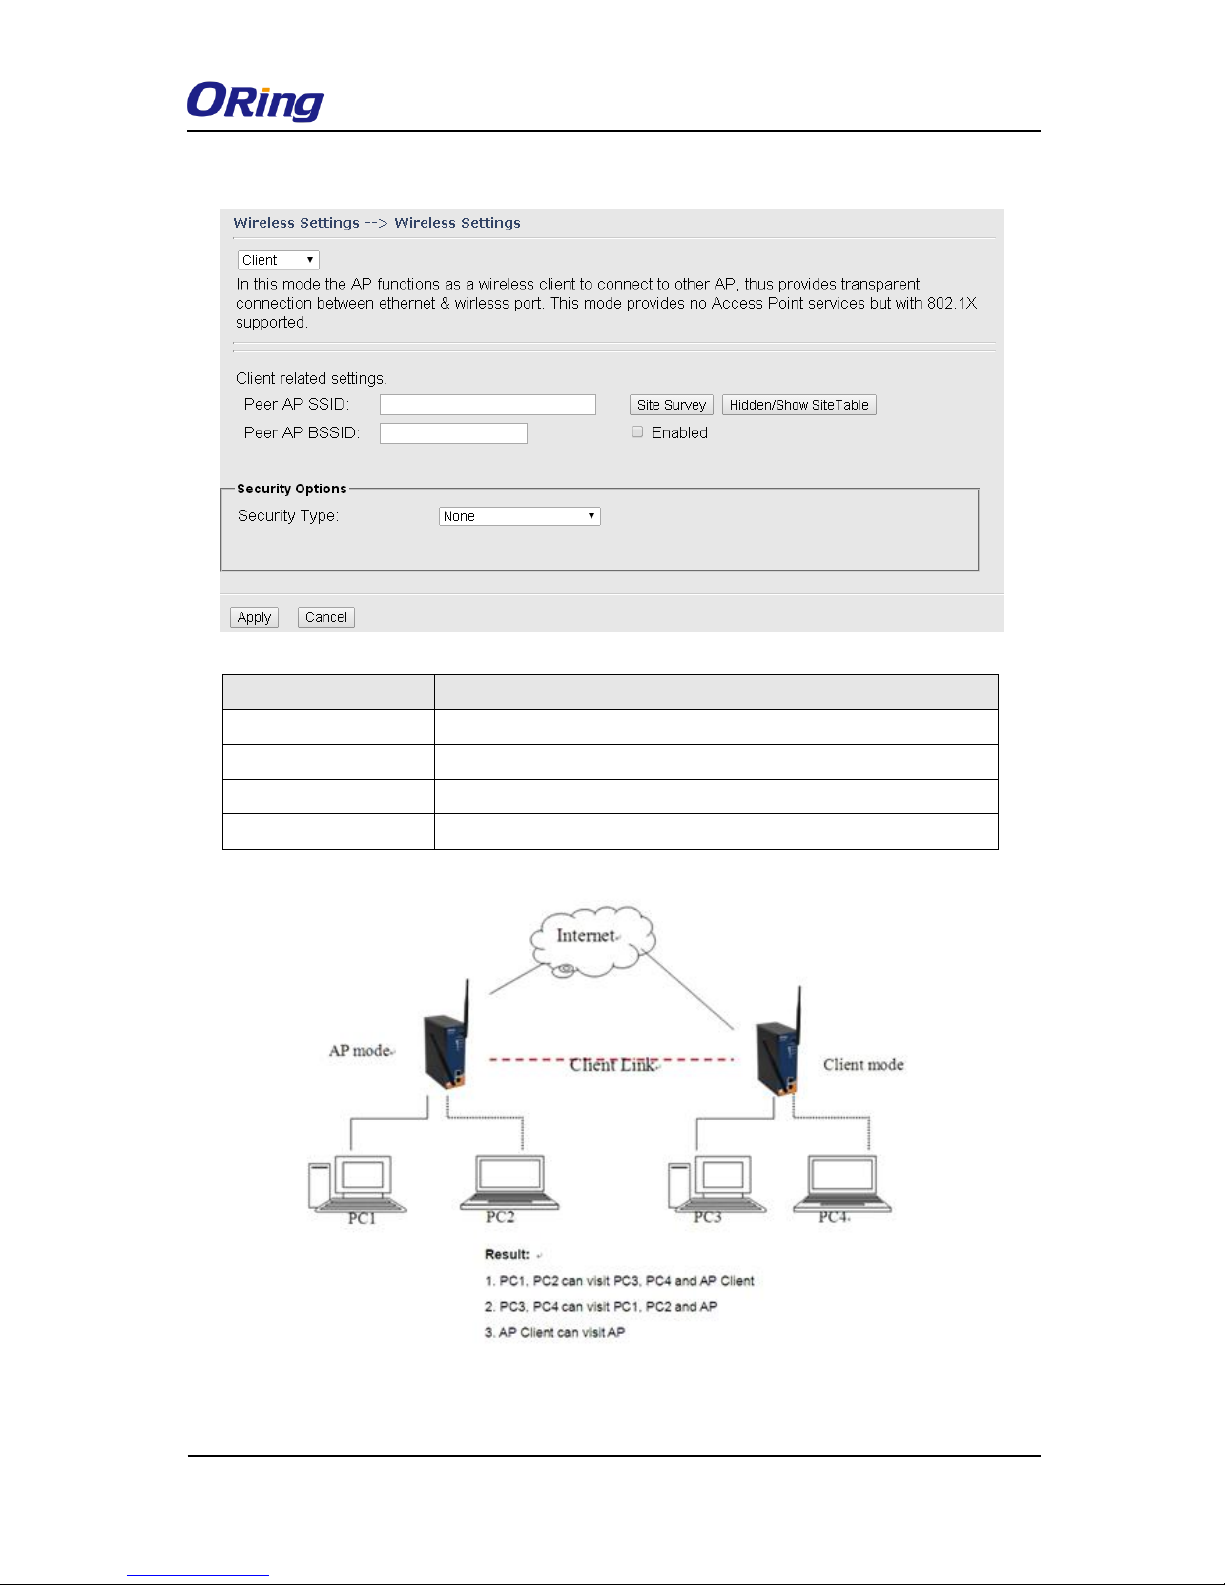
Client Mode
In this mode, the AP functions as a wireless client to connect your wired devices to a wireless
network. This mode provides no access point services but supports 802.1X.
Page 31
IAP-420/420+ User Manual
ORing Industrial Networking Corp. 29
Label
Description
Peer AP SSID
Enter the SSID of the AP you want to connect as a client
Peer AP BSSID
Enter the BSSID (Wireless MAC address) to limit client target
Site Scan
Enables or disables slave mode
Security Type
Select the security type used by the client you want to connect
Page 32
IAP-420/420+ User Manual
ORing Industrial Networking Corp. 30
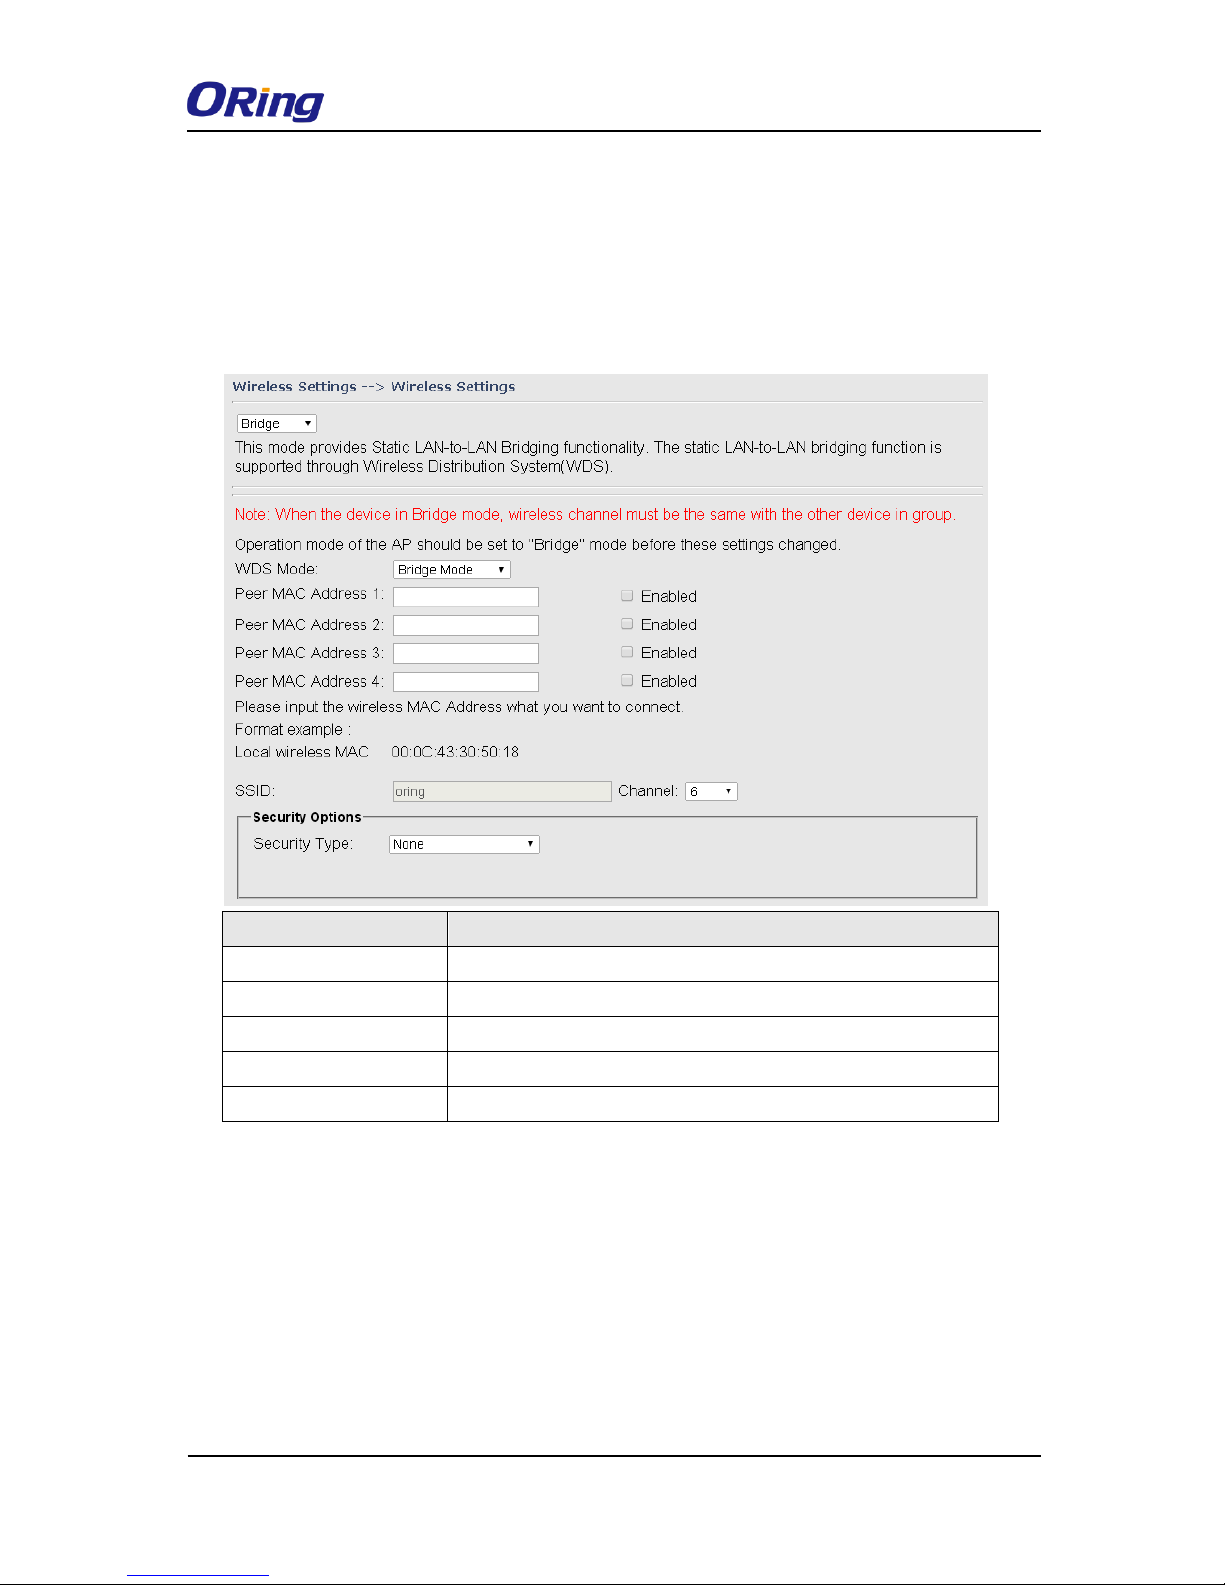
Bridge Mode
The Bridge mode will turn the device into a wireless bridge. When configured as a bridge, the
device will link a wireless network to a wired network allowing you to bridge two networks with
different infrastructure. Wireless clients will not be able to connect to the access point in this
mode.
Label
Description
WDS Mode
Enter the SSID of the AP you want to connect as a client
Peer MAC Address 1-4
Enter the MAC address of the peer WLAN Bridge
SSID
Enables or disables slave mode
Channel
Choose a fixed channel from the drop-down list
Security Type
Select the security type used by the client you want to connect
Note: the channel and the security settings (security type & password) should be identical
on the two access points.
Set WDS as Bridge Mode
In the mode, the AP acts as a standard bridge that forwards traffic between WDS links (links
connected to other AP/wireless bridges) and an Ethernet port. As a standard bridge, the AP
learns MAC addresses of up to 64 wireless or 128 wired and wireless network devices, which
are connected to their respective Ethernet ports to limit the amount of forwarded data. Only
data destined for stations which are known to reside on the peer Ethernet link, multicast data
Page 33

IAP-420/420+ User Manual
ORing Industrial Networking Corp. 31
or data with unknown destinations need to be forwarded to the peer AP via the WDS link. The
peer WDS APs are based on the MAC addresses listed in Peer Mac Address.
Bear in mind the following principles when setting the WDS mode to bridge mode:
1. LAN IP address should use a different IP in the same network.
2. Shut down all DHCP server functions of the AP.
3. Enable WDS.
4. Each AP should have the same setting, except Peer Mac Address should be set to the
other’s Mac address.
5. The settings of security and channel must be the same.
6. The distance of the AP should be limited within a certainty area.
Set WDS as Repeater Mode
In this mode, repeater is used to extend the range of the wireless infrastructure by forwarding
traffic between associated wireless stations and another repeater or AP connected to the wired
LAN. The peer WDS APs are based on the MAC addresses listed in Peer Mac Address.
Page 34

IAP-420/420+ User Manual
ORing Industrial Networking Corp. 32
Page 35
IAP-420/420+ User Manual
ORing Industrial Networking Corp. 33
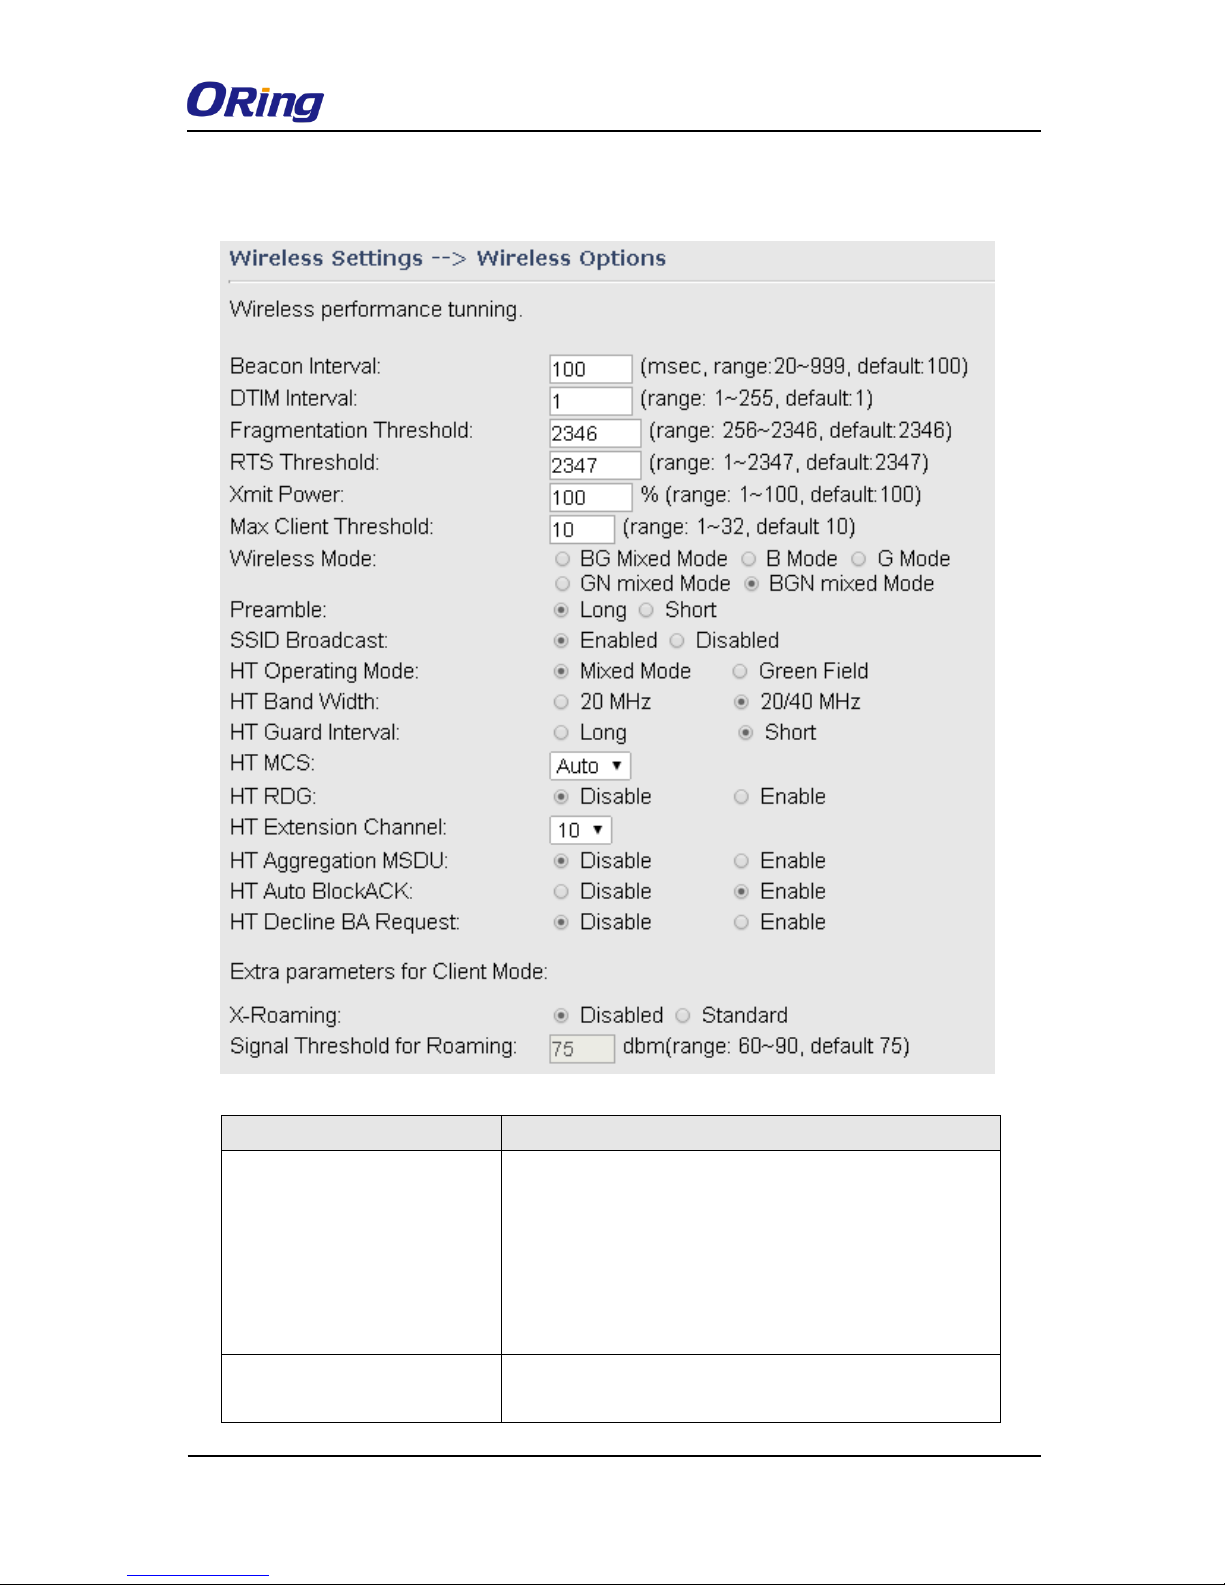
Wireless Options
Label
Description
Beacon Interval
A beacon is a packet sent by a wireless access point to
synchronize wireless devices. The beacon interval value
indicates the frequency interval of the beacon. Increasing
the beacon interval reduces the number of beacons and
the overhead associated with them. The default value is
100, but 50 is recommended when reception is poor.
DTIM Interval
The default value is 1. This value, between 1 and 255
milliseconds, indicates the interval of the Delivery Traffic
Page 36

IAP-420/420+ User Manual
ORing Industrial Networking Corp. 34
Indication Message (DTIM). A DTIM field is a
countdown field informing clients of the next window for
listening to broadcast and multicast messages. When
the AP has buffered broadcast or multicast messages for
associated clients, it sends the next DTIM with a DTIM
Interval value. Its clients hear the beacons and awaken
to receive the broadcast and multicast messages.
Fragmentation Threshold
The value specifies the maximum size for a packet before
data is fragmented into multiple packets. The value
should remain at the default 2346 (the range is 256 2346 bytes). If you experience a high packet error rate,
you may slightly increase the value. Setting the value too
low may result in poor network performance. Only minor
modifications of this value are recommended.
RTS Threshold
The RTS (Request to Send) Threshold is the amount of
time a wireless device, attempting to send, will wait for a
recipient to acknowledge that it is ready. Normally, the AP
sends a RTS frame to a station and negotiates the
sending of data. After receiving the RTS, the station
responds with a CTS (Clear to Send) frame to
acknowledge the right to begin transmission. To ensure
communication, the maximum value should be used,
which is the default value 2347 (the range is 0-2347
bytes). If a network packet is smaller than the preset RTS
threshold size, the RTS/CTS mechanism will not be
enabled.
Xmit Power
Xmit Power allows you to change the power output level.
This value ranges from 1 - 100 percent, default value is
100 percent. A safe increase of up to 60 percent would
be suitable for most users. Higher power settings are
not recommended for users due to excess heat
generated by the radio chipset, which can affect the life of
the AP.
Max Client Threshold
This is the maximum number of clients for an AP. When
the number of clients exceeds the value, the AP will reject
the roaming connection. This value is only used on
Page 37

IAP-420/420+ User Manual
ORing Industrial Networking Corp. 35
AP-mode equipment.
Wireless Mode
You can select single or mixed wireless modes. In mixed
mode, the device is able to offer various WiFi network
types (B, G and N) at the same time from a single 2.4GHz
radio. 802.11n transmission is always embedded in an
802.11a, for 5GHz radios, or 802.11g for 2.4GHz radio
transmissions. This is called Mixed Mode Format
protection (also known as L-SIG TXOP Protection).
Preamble
Values include Long and Short, and the default value is
Long. If your wireless device supports the short
preamble and you are having trouble getting it to
communicate with other 802.11b devices, make sure that
it is set to use the long preamble
SSID Broadcast
When wireless clients survey the local area for wireless
networks to associate with, they will detect the SSID
broadcasted by the AP. Click Enable if you want to
broadcast the AP SSID, otherwise click Disable to
inactivate the function.
X-Roaming
Disable: Disable X-Roaming protocol.
Standard: Roaming group does not require the same
wireless channel, but the speed is slower than using the
“fixed channel” mode.
Signal Threshold for
Roaming
When signal is lower than the designated value, the AP
will roam to another client target with the same SSID,
security option and signal strongest within the
environment.(This value is only effective on client-mode
equipment)
5.4.4 Advanced Settings
Filters
This page allows you to set up MAC filters to allow or deny wireless clients to connect to the
AP. You can manually add a MAC address or select a MAC address from the Associated
Clients list currently associated with the AP.
Page 38

IAP-420/420+ User Manual
ORing Industrial Networking Corp. 36
Label
Description
MAC Filter
Select Enabled or Disabled to activate or deactivate MAC
filters
Options
Select one of the options to allow or deny the MAC address in
the list
Associated Clients
Shows the wireless MAC addresses associated with the device
MAC Filter Table
You can edit up to MAC addresses in these fields
Misc. Settings
Page 39

IAP-420/420+ User Manual
ORing Industrial Networking Corp. 37
Label
Description
UPnP
If enabled, you can connect the device via UPnP.
LLDP Protocol
Enable or disable LLDP protocol
5.4.5 Event Warning Settings
System Log
When an error occurs, the device will notify you through system log, e-mail, SNMP, and relay.
You can choose the system to issue a notification when specific events occur by checking the
box next to the event.
This page shows the recorded events and setting changes of the AP. Rebooting the device
will clear the list.
Page 40
IAP-420/420+ User Manual
ORing Industrial Networking Corp. 38
Label
Description
Syslog Server IP
Enter the IP address of a remote server if you want the logs to be
stored remotely. Leave it blank will disable remote syslog.
Syslog Server Port
Specifies the port to be logged remotely. Default port is 514.
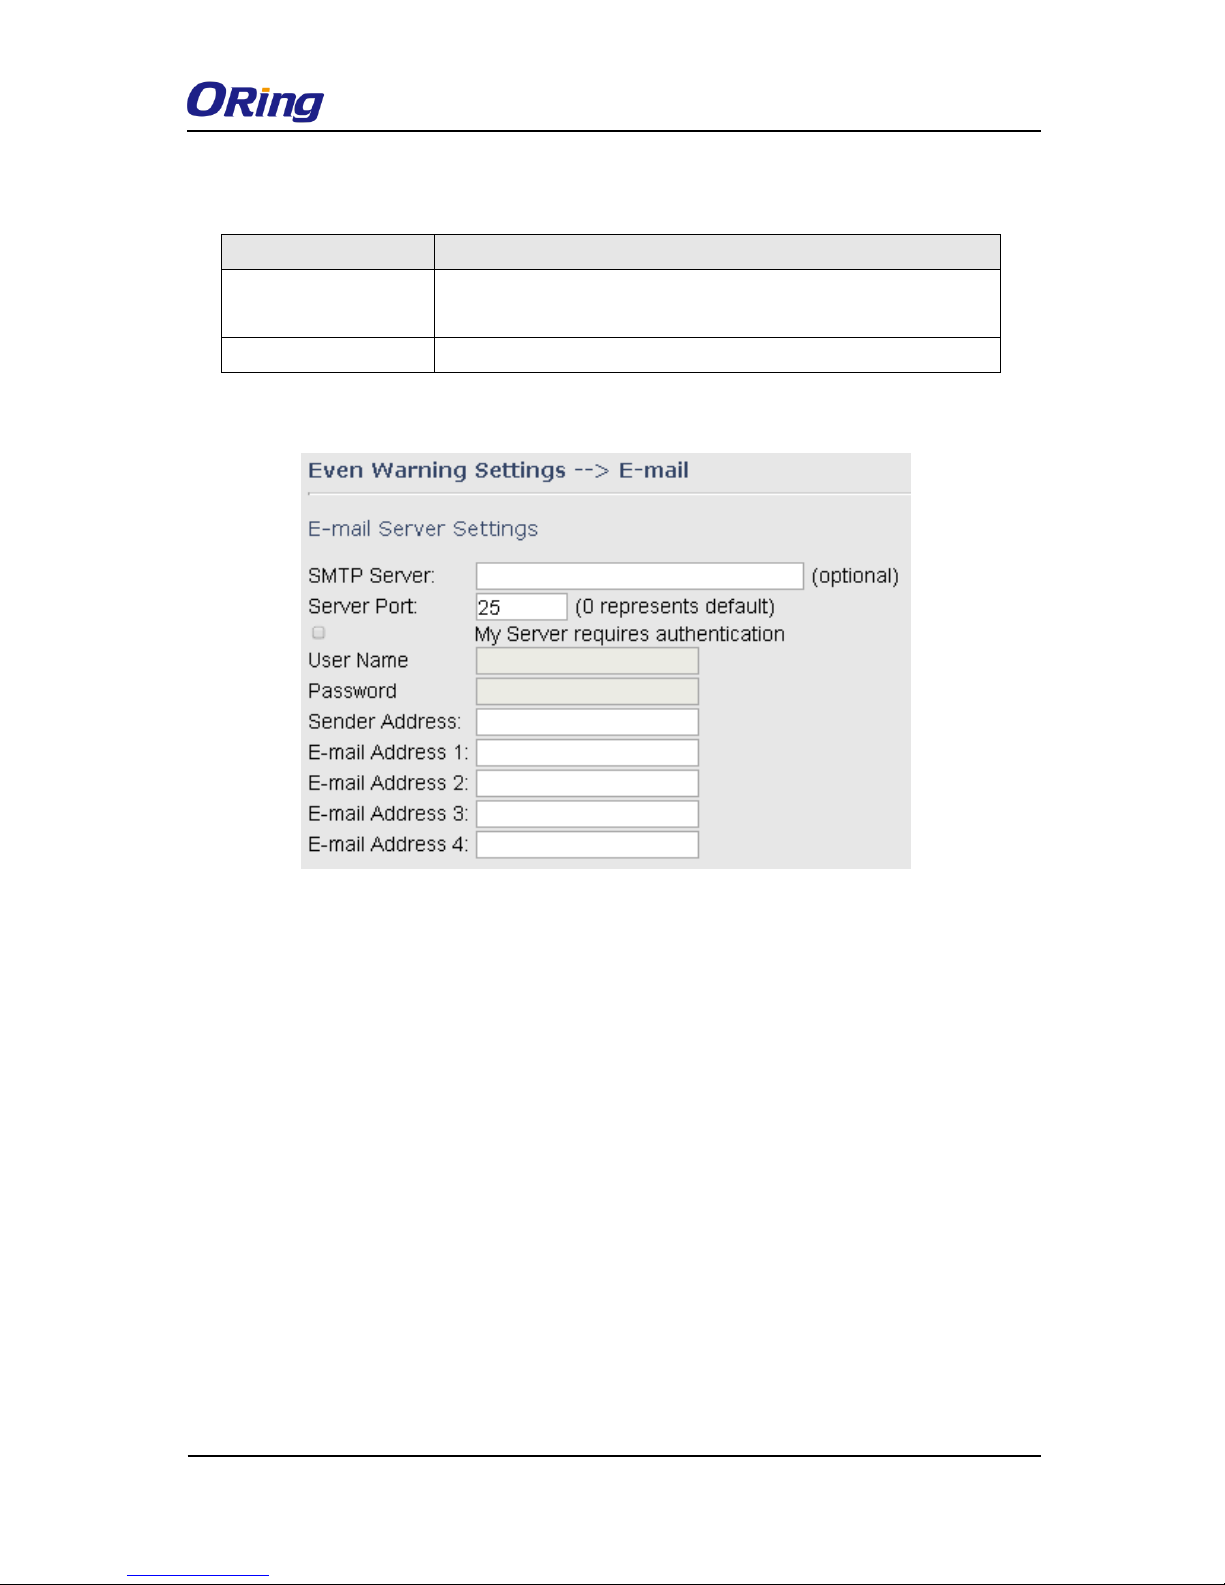
E-mail
Page 41

IAP-420/420+ User Manual
ORing Industrial Networking Corp. 39
Label
Description
SMTP Server
Enter a backup host to be used when the primary host is unavailable.
Server Port
Specifies the port where MTA can be contacted via SMTP server
E-mail
Address 1-4
Enter the mail address that will receive notifications
Page 42
IAP-420/420+ User Manual
ORing Industrial Networking Corp. 40
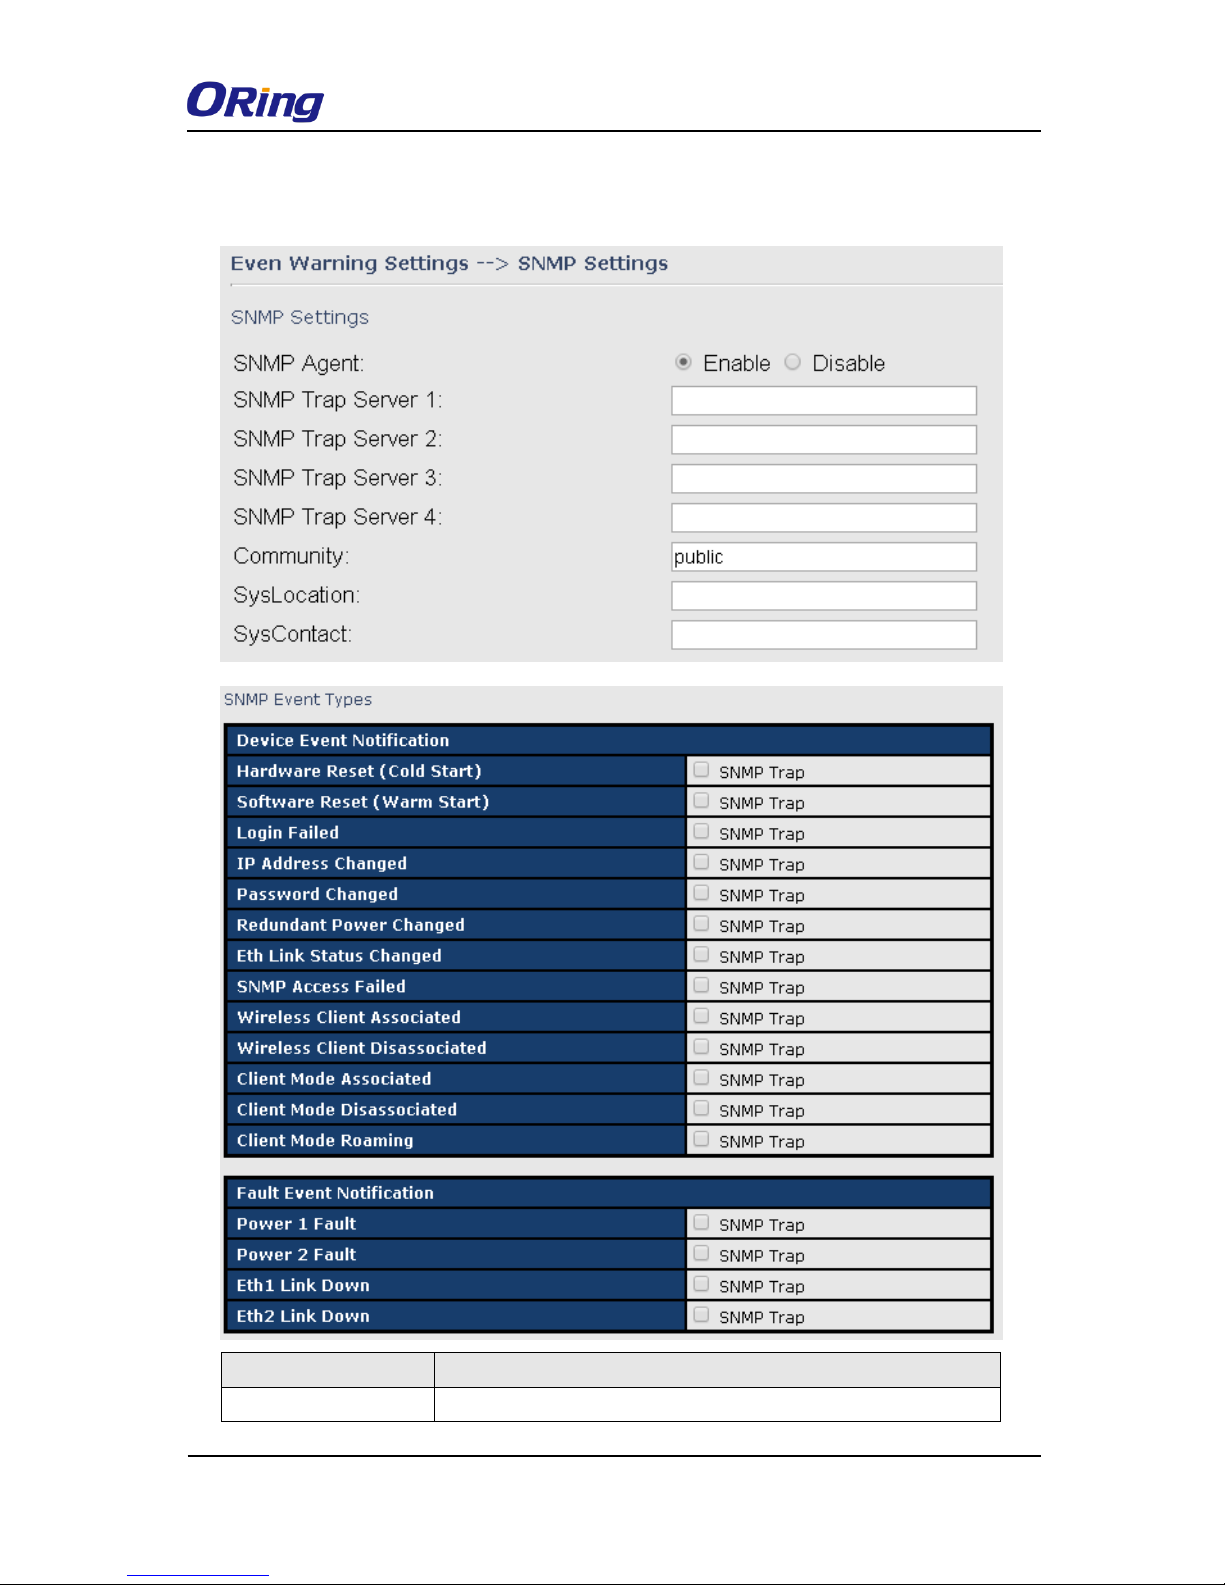
SNMP
Label
Description
SNMP Agent
SNMP (Simple Network Management Protocol) Agent is a service
Page 43
IAP-420/420+ User Manual
ORing Industrial Networking Corp. 41
program that runs on the access point. The agent provides
management information to the NMS by keeping track of various
operational aspects of the AP system. You can enable or disable
the function.
SNMP Trap Server
1-4
Enter the IP address of the SNMP server which will send out traps
generated by the AP.
Community
Community is a password to establish trust between managers
and agents. Normally, public is used for read-write community.
SysLocation
Specifies sysLocation string
SysContact
Specifies sysContact string
5.4.6 System Status
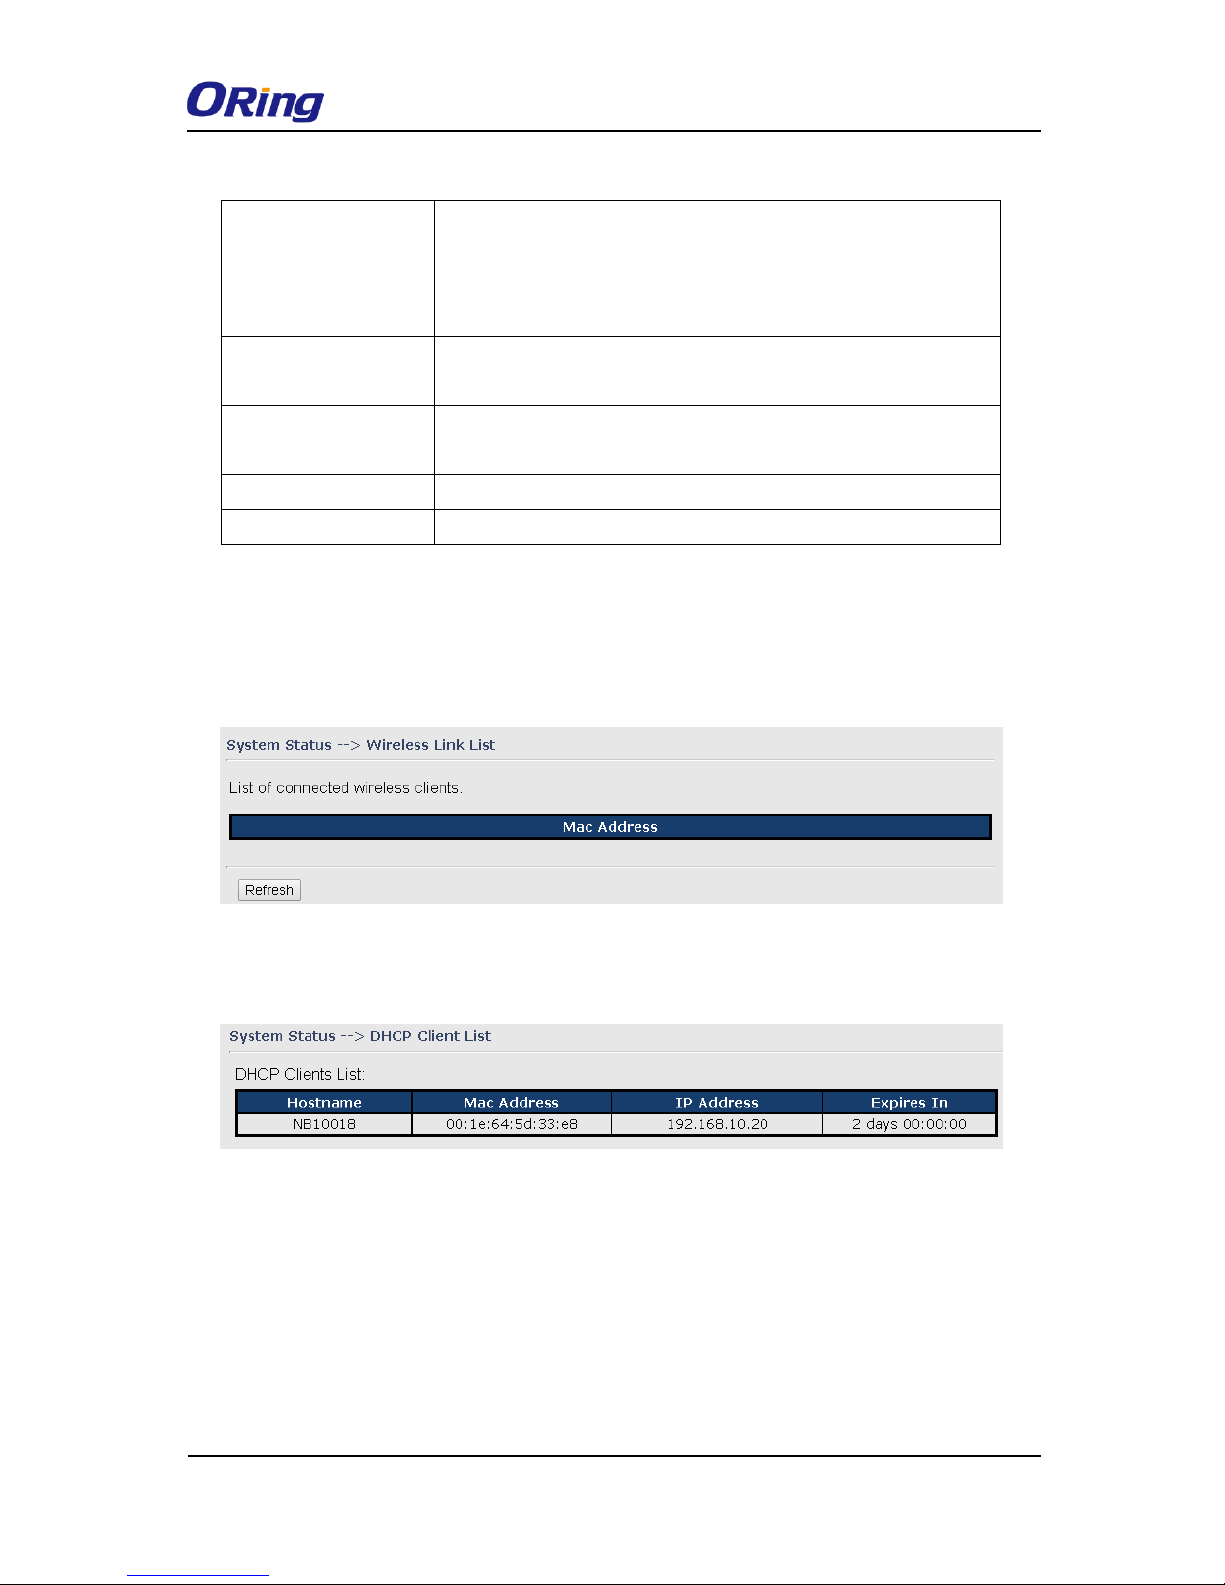
Wireless Link List
This page displays the information of the wireless clients connected to the device, including
their MAC address, data rate, and link types.
DHCP Client List
This page lists the devices on your network that are receiving dynamic IP addresses from the
device.
Traffic/Port Status
This page displays the network traffic statistics for both received and transmitted packets
through the Ethernet port and wireless connections associated with the AP. Note that the
traffic counter will reset when the device is rebooted.
Page 44

IAP-420/420+ User Manual
ORing Industrial Networking Corp. 42
System Log
The device will constantly log events and activities in System Log and provide the file for you
to review. You can click Refresh to renew the page or Clear to clear all or certain log entries.
5.4.7 Administrator
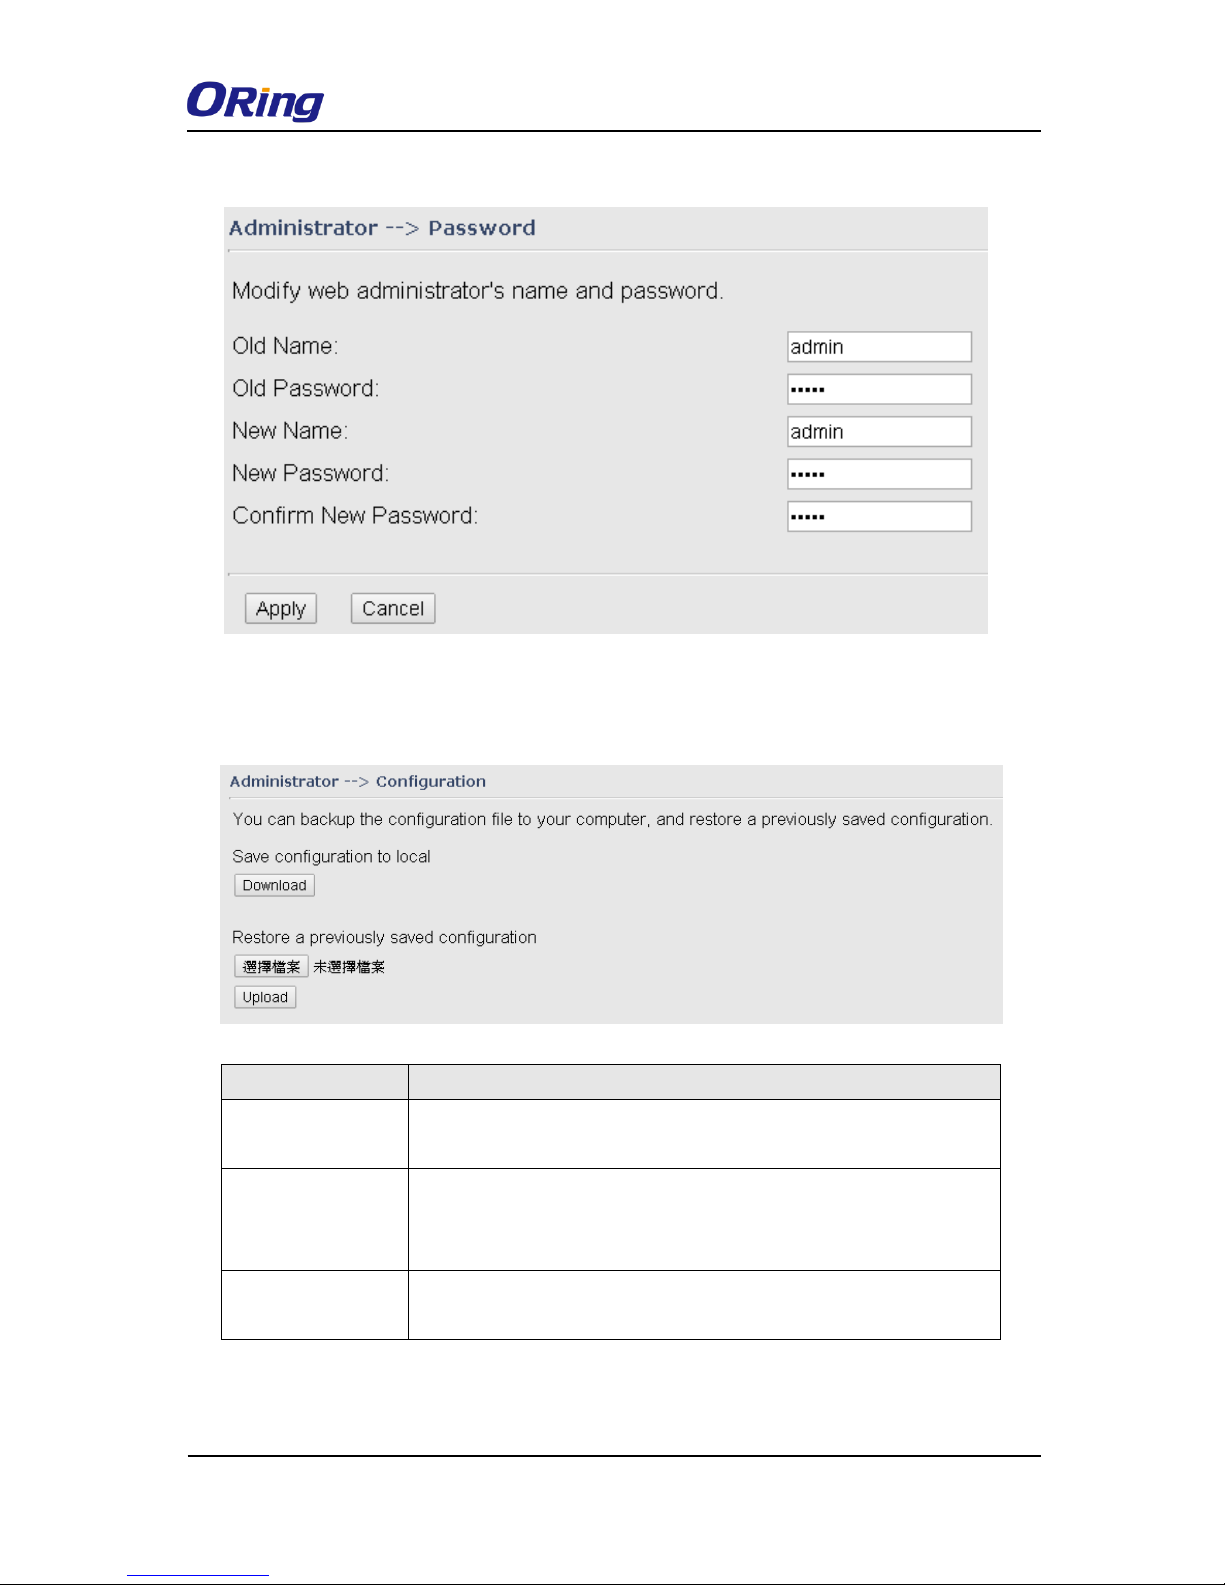
Password
This page allows you to change the username and password. You must type in the new
password twice to confirm (the default username and password are admin).
Page 45
IAP-420/420+ User Manual
ORing Industrial Networking Corp. 43
Configuration
This page allows you to save existing configurations as a backup file or return the device to
previous settings.
Label
Description
Download
Click to save the current system settings as a file stored in the local
hard drive.
Upload
You can restore configurations to previous status by installing a
previous configuration file. To do this, click on Browse to locate the
file you want to upload in the local hard drive and click Upload.
Restore Default
Settings
Click to reset the device to the factory settings. The device will reboot
to validate the default settings.
Firmware Upgrade
ORing launches new firmware constantly to enhance performance and functions. To upgrade
Page 46

IAP-420/420+ User Manual
ORing Industrial Networking Corp. 44
firmware, download new firmware from ORing’s website to your PC and install it via Web
upgrade. Make sure the firmware file matches the model of your device. It will take several
minutes to upload and update the firmware. After upgrade completes successfully, reboot the
device.
During firmware upgrading, do not turn off the power of the device or press the
reset button.
Load Factory Default
You can use this page to restore the device to factory default settings. Make sure to save the
device settings before clicking on this button. All current settings will be lost after you click
this button.
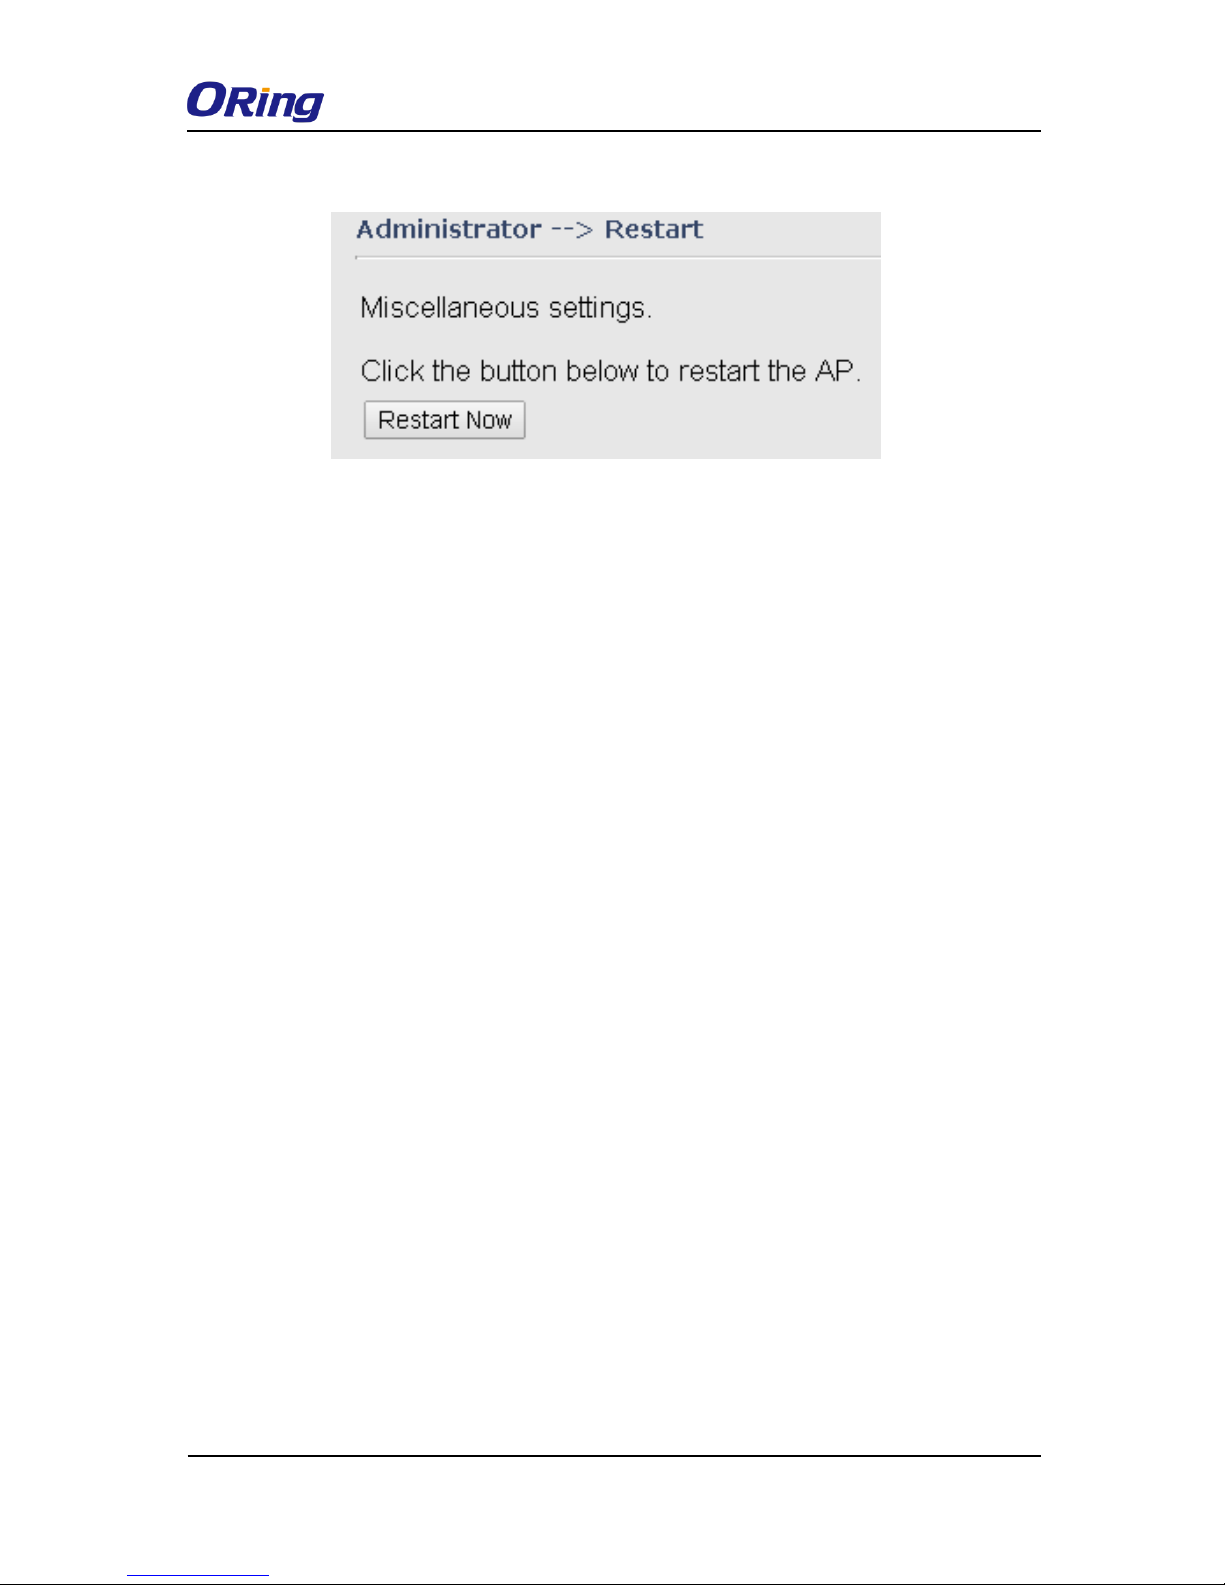
Restart
Click the button in this page to restart the device through warm reset.
Page 47
IAP-420/420+ User Manual
ORing Industrial Networking Corp. 45
Page 48
IAP-420/420+ User Manual
ORing Industrial Networking Corp. 46
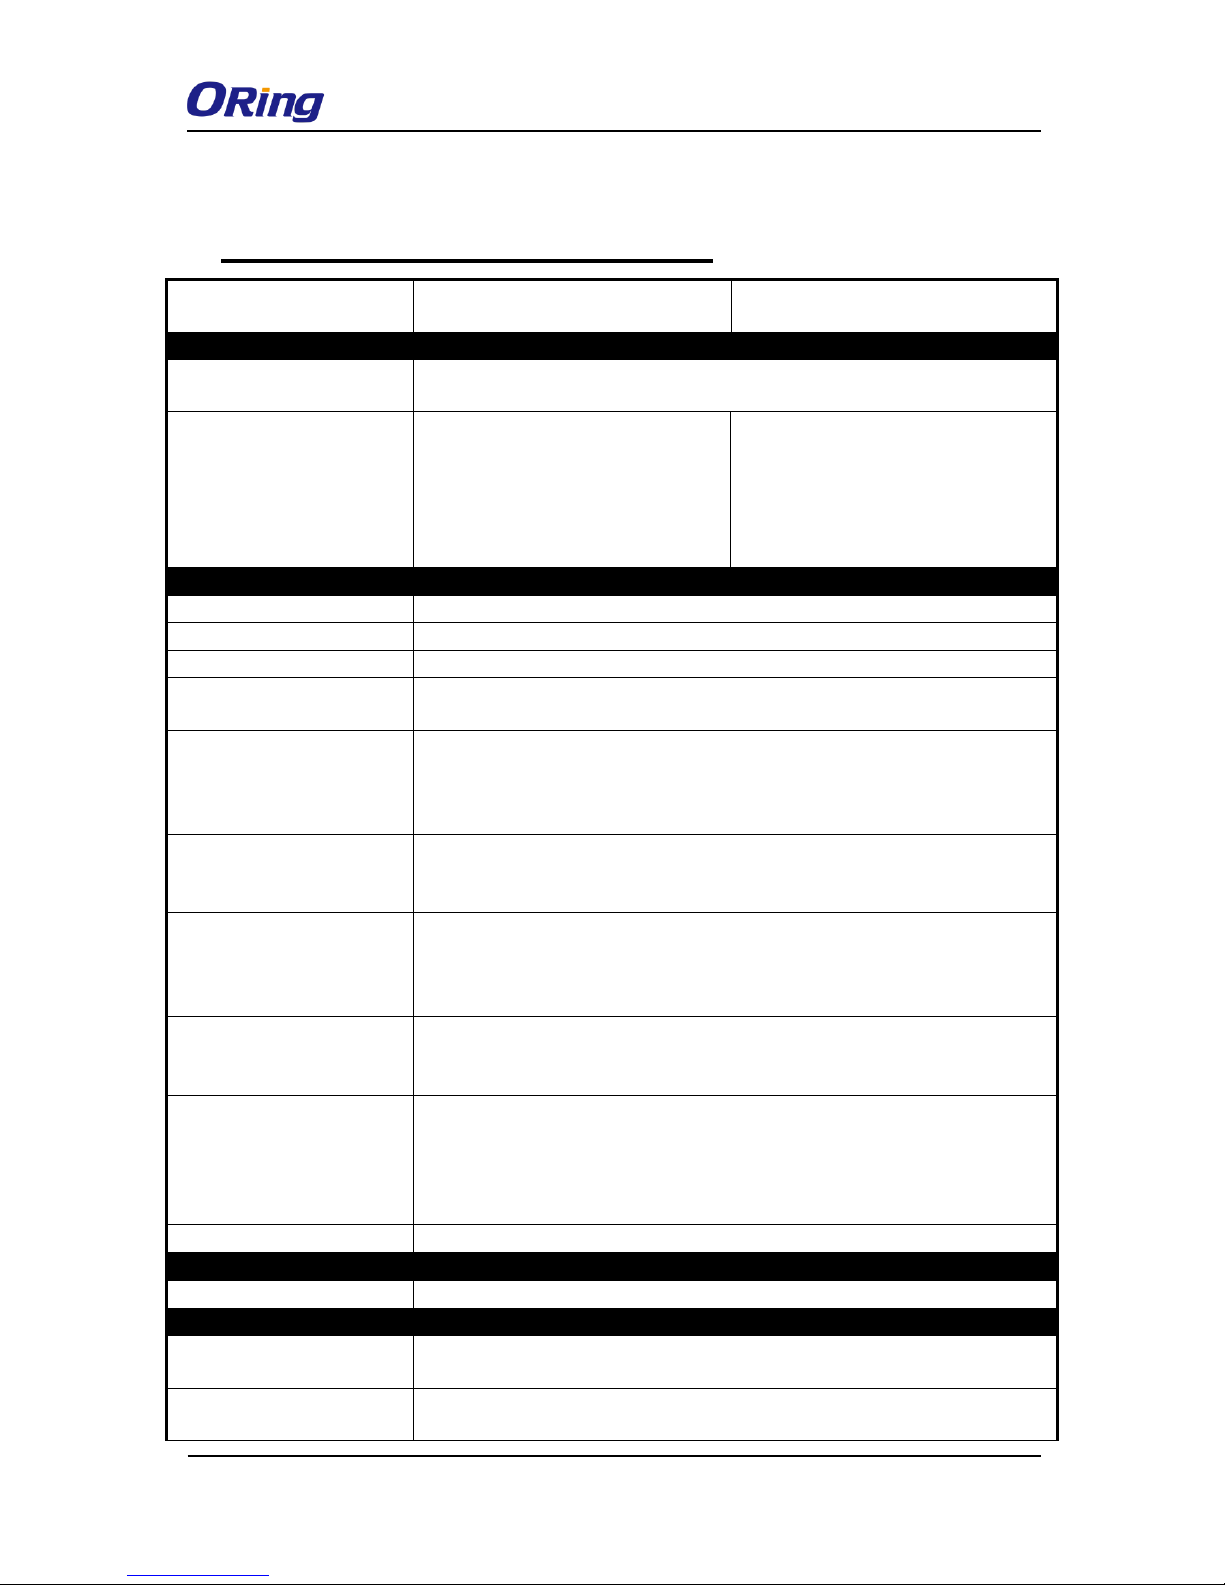
Technical Specifications
ORing WLAN Access Point
Model
IAP-420
IAP-420+
Physical Ports
10/100 Base-T(X) Ports in
RJ45 Auto MDI/MDIX
2
PoE P.D. port
-
Present at ETH
Fully compliant with IEEE 802.3af
Power Device specification
Over load & short circuit protection
Isolation Voltage: 1000 VDC min.
Isolation Resistance : 10
8
ohms min
WLAN interface
Operating Mode
AP/Bridge/AP-Client
Antenna Connector
1 x External reverse SMA-type antenna connector
Radio Frequency Type
DSSS, OFDM
Modulation
IEEE802.11b: CCK, DQPSK, DBPSK
IEEE802.11g/n: OFDM with BPSK, QPSK, 16QAM, 64QAM
Frequency Band
America / FCC:
2.412~2.462 GHz (11 channels )
Europe CE / ETSI:
2.412~2.472 GHz ( 13 channels )
Transmission Rate
802.11b: 1/2/5.5/11 Mbps
802.11g: 6/9/12/18/24/36/48/54 Mbps
802.11n(40MHz): UP to 150 Mbps
Transmit Power
802.11b: 13.5dBm ± 1.5dBm
802.11g: 13.5dBm ± 1.5dBm
802.11n(2.4G@20MHz): 13.5dBm ± 1.5dBm
802.11n(2.4G@40MHz): 13.5dBm ± 1.5dBm
Receiver Sensitivity
802.11b: -90dBm ± 2dBm@1Mbps
802.11g: -72dBm ± 2dBm@54Mbps
802.11n(2.4G@40MHz,MCS7): -68dBm ± 2dBm
Encryption Security
WEP: (64-bit, 128-bit key supported)
WPA/WPA2:802.11i (WEP and AES encryption)
WPA-PSK (256-bit key pre-shared key supported)
802.1X Authentication supported
TKIP encryption
Wireless Security
SSID broadcast disable and enable
Protocol Support
Protocol
ARP,BOOTP, DHCP, DNS, HTTP, IP, ICMP, SNTP, TCP, UDP, 802.1X, SNMP, STP
LED indicators
Power indicator
LED x 3, PWR 1, 2, (PoE):
Green On: Power is on and functioning Normally.
10/100Base-T(X) RJ45 port
indicator
LED x 2 , Green for port Link/Act at 100Mbps.
Page 49
IAP-420/420+ User Manual
ORing Industrial Networking Corp. 47
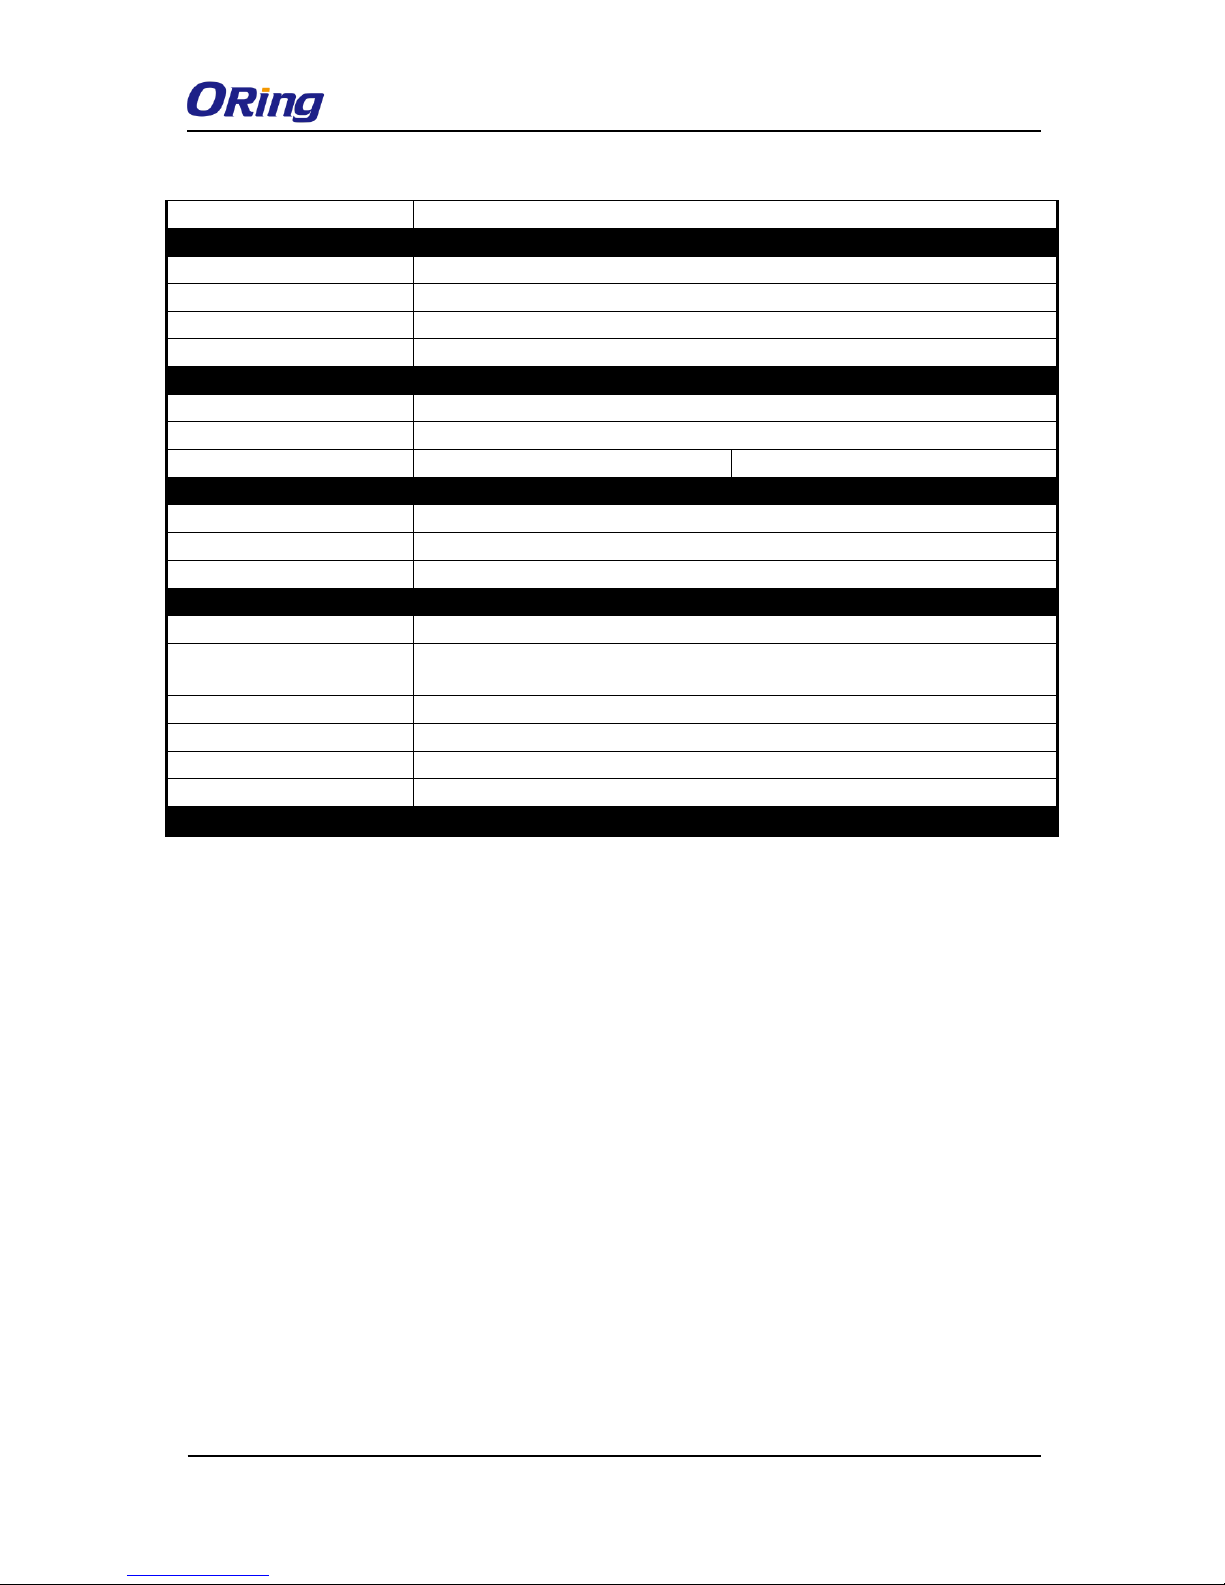
WLAN LEDs
WLAN Link /ACT: Green: Blinking
Power
Redundant Input power
Dual DC inputs. 12~48VDC on 4-pin terminal block
Power consumption (Typ.)
4watts
Overload current protection
Present
Reverse polarity protection
Present
Physical Characteristic
Enclosure
IP-30
Dimension (W x D x H)
41(W)x81(D)x95(H) mm
Weight (g)
292
297
Environmental
Storage Temperature
-40 to 85oC (-40 to 185oF)
Operating Temperature
-10 to 60oC (14 to 140oF)
Operating Humidity
5% to 95% Non-condensing
Regulatory approvals
EMI
FCC Part 15, CISPR (EN55022) class A
EMS
EN61000-4-2 (ESD), EN61000-4-3 (RS), EN61000-4-4 (EFT), EN61000-4-5
(Surge), EN61000-4-6 (CS), EN61000-4-8, EN61000-4-11
Shock
IEC60068-2-27
Free Fall
IEC60068-2-32
Vibration
IEC60068-2-6
Safety
EN60950-1
Warranty
3 years
Page 50

IAP-420/420+ User Manual
ORing Industrial Networking Corp. 48
Compliance
FCC Statement
This device complies with Part 15 of the FCC Rules. Operation is subject to the
following two conditions:
(1) this device may not cause harmful interference and (2) this device must accept any
interference received, including interference that may cause undesired operation.
RF exposure warning: The equipment complies with RF exposure limits set forth for an
uncontrolled environment. The antenna(s) used for this transmitter must not be
co-located or operating in conjunction with any other antenna or transmitter.
You are cautioned that changes or modifications not expressly approved by the party
responsible for compliance could void your authority to operate the equipment. This
device should be operated with minimum distance 20cm between the device and all
persons. Operations in the 5.15-5.25GHz band are restricted to indoor usage only.
Industry Canada Statement
This device complies with Industry Canada licence-exempt RSS standard(s). Operation
is subject to the following two conditions: (1) this device may not cause interference,
and (2) this device must accept any interference, including interference that may cause
undesired operation of the device.
Le présent appareil est conforme aux CNR d'Industrie Canada applicables aux appareils
radio exempts de licence. L'exploitation est autorisée aux deux conditions suivantes :
(1) l'appareil ne doit pas produire de brouillage, et (2) l'utilisateur de l'appareil doit
accepter tout brouillage radioélectrique subi, même si le brouillage est susceptible d'en
compromettre le fonctionnement.
Industry Canada - Class B This digital apparatus does not exceed the Class B limits for
radio noise emissions from digital apparatus as set out in the interference-causing
equipment standard entitled “Digital Apparatus,” ICES-003 of Industry Canada.
Cet appareil numérique respecte les limites de bruits radioélectriques applicables aux
appareils numériques de Classe B prescrites dans la norme sur le matérial brouilleur:
“Appareils Numériques,” NMB-003 édictée par l’Industrie.
Page 51

IAP-420/420+ User Manual
ORing Industrial Networking Corp. 49
Operation is subject to the following two conditions: (1) this device may not cause
interference,
and (2) this device must accept any interference, including interference that may cause
undesired operation of the device.
L'opération est soumise aux deux conditions suivantes: (1) cet appareil ne peut causer
d'interférences,et (2) cet appareil doit accepter toute interférence, y compris celles
susceptibles de provoquer fonctionnement du dispositif.
To reduce potential radio interference to other users, the antenna type and its gain
should be so chosen that the equivalent isotropically radiated power (e.i.r.p.) is not
more than that permitted for successful communication.
Afin de réduire les interférences radio potentielles pour les autres utilisateurs, le type
d'antenne et son gain doivent être choisie que la puissance isotrope rayonnée
équivalente (PIRE) est pas plus que celle premise pour une communication réussie
RF exposure warning: The equipment complies with RF exposure limits set forth for
an uncontrolled environment. The antenna(s) used for this transmitter must not be
co-located or operating in conjunction with any other antenna or transmitter.
Avertissement d'exposition RF: L'équipement est conforme aux limites d'exposition
aux RF établies pour un incontrôlés environnement. L'antenne (s) utilisée pour ce
transmetteur ne doit pas être co-localisés ou fonctionner en conjonction avec toute
autre antenne ou transmetteur.
 Loading...