

Orientalmotor CSK243-ATA, CSK243-BTA, CSK244-ATA, CSK244-BTA, CSK245-ATA Operating Manual
...Page 1

HP-7443-3
2-Phase Stepping Motor Unit
CSK Series
OPERATING MANUAL
Thank you for purchasing an Oriental Motor product.
This operating manual describes product handling procedures and safety precautions.
• Please read it thoroughly to ensure safe operation.
• Always keep the manual where it is readily available.
Table of contents
1
Introduction .................................. 2
2 Safety precautions ....................... 5
3 Precautions for use ...................... 8
4 Preparation................................. 10
4.1 Checking the product ................10
4.2 Combinations of motors and
drivers .......................................10
4.3 Names and functions of driver ..12
5 Installation.................................. 15
5.1 Location for installation .............15
5.2 Installing the motor.................... 15
5.3 Installing a load ......................... 17
5.4 Permissible overhung load and
permissible thrust load .............. 18
5.5 Installing the driver....................19
5.6 Installing and wiring in compliance
with EMC Directive.................... 20
6 Connection..................................23
6.1 Connection of CSD2109-T,
CSD2112-T, CSD2120-T........... 23
6.2 Connection of CSD2140T,
CSD2145T ................................ 26
6.3 About input/output .................... 28
6.4 Timing chart.............................. 32
7 Setting.........................................33
7.1 Automatic current cutback
function..................................... 33
7.2 Step angle ................................ 34
7.3 Pulse input mode...................... 34
7.4 Power supply voltage ............... 35
7.5 Motor currents .......................... 35
8 Inspection....................................44
9 Troubleshooting and remedial
actions ........................................45
Page 2

1 Introduction
−2−
1 Introduction
Before use
Only qualified personnel should work with the product.
Use the product correctly after thoroughly reading the section “Safety precautions”.
The product described in this manual has been designed and manufactured for use in
general industrial machinery, and must not be used for any other purpose. Oriental
Motor Co., Ltd. is not responsible for any damage caused through failure to observe
this warning.
Overview of the product
The CSK series 2-phase stepping motor is a unit product consisting of a driver of the
open-chassis type, photocoupler I/O specification and a 2-phase stepping motor.
We offer the standard type with a base motor step angle of 1.8°, and the high
resolution type with a 0.9° step angle. A geared type is also available.
Main features
•
Compact driver
The CSK series adopts a compact driver using DC power supply input, making it
ideal for use as an internal component in general industrial equipment.
•
Two step angle settings
Either full step or half step can be selected as the step angle setting for the motor.
•
Adjustable motor driving currents
The operating current and standstill current of the motor can be adjusted
individually.
•
High torque geared motor
The geared type adopts a directly coupled gearhead designed to withstand high
torque.
Page 3
1 Introduction
−3−
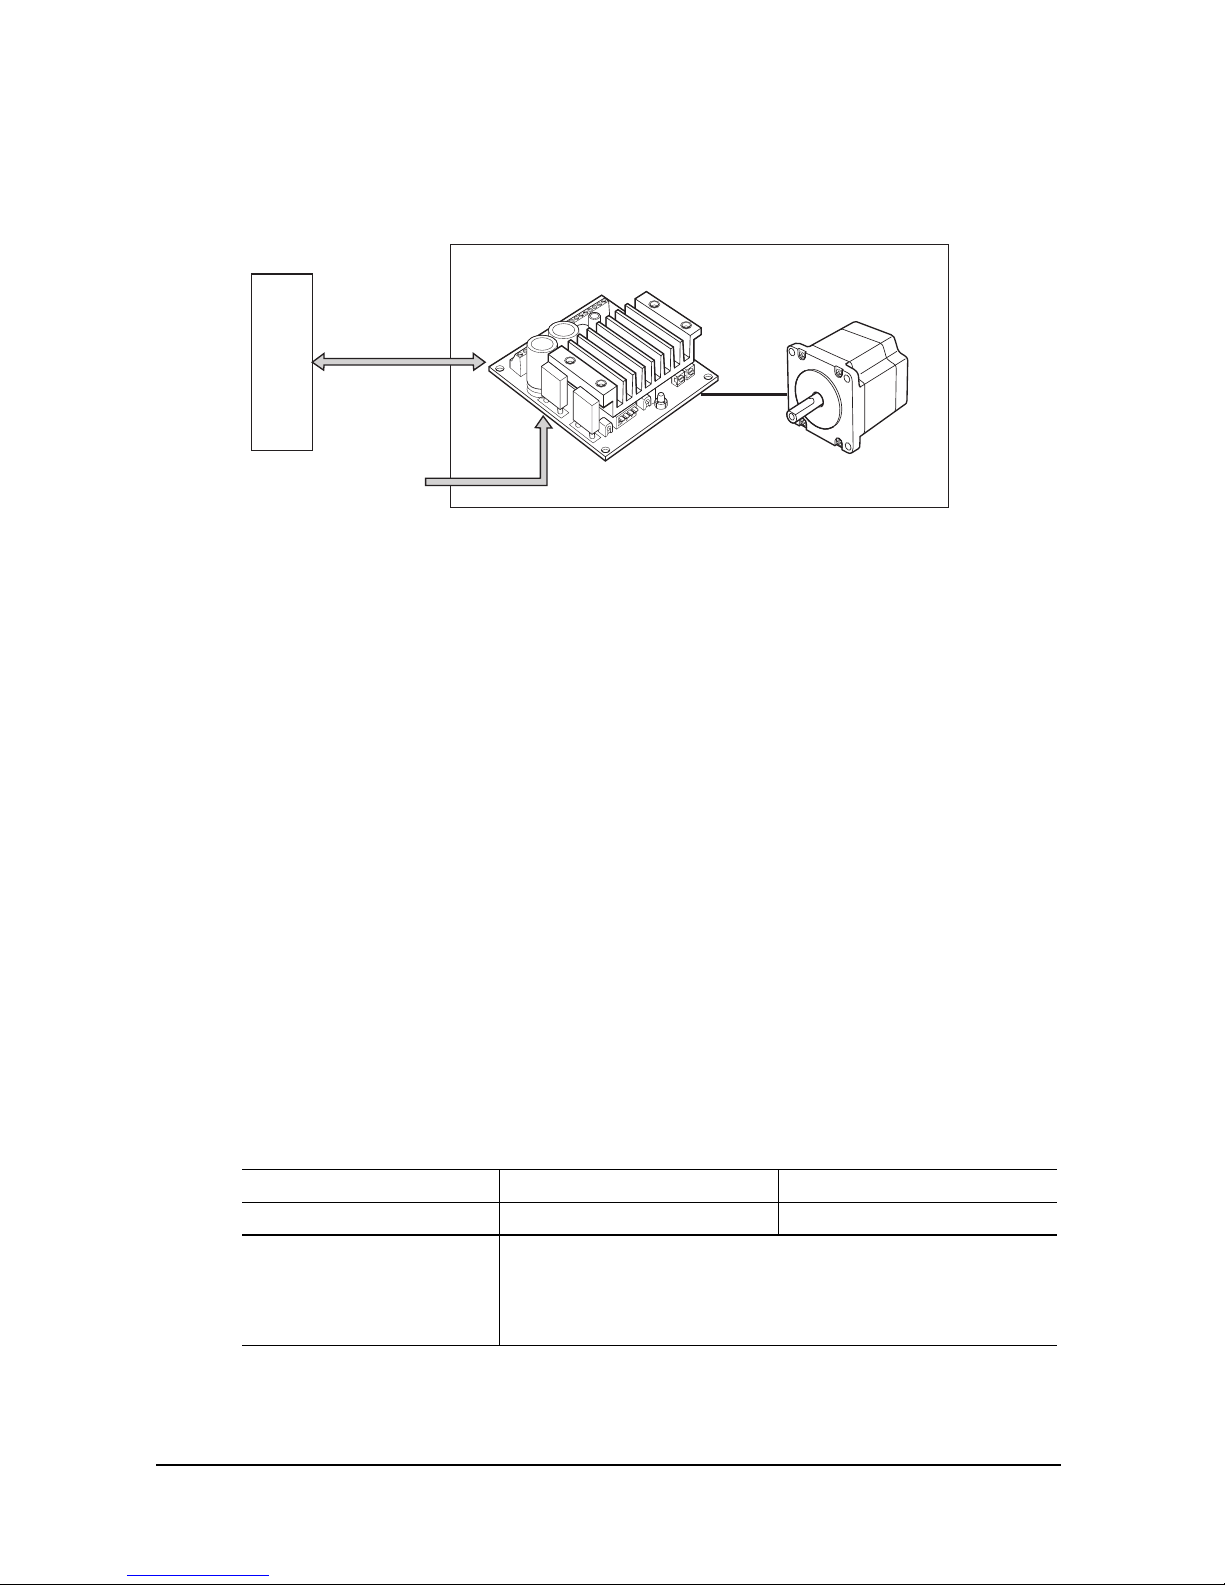
System configuration
Operating the CSK series requires a controller equipped with a pulse output
function.
DC power input
Controller
Digital I/O
Motor
Driver
As for the voltage supply to the driver, use an EMC-compliant DC power supply
with reinforced insulation on both the primary and secondary sides.
Compliance with the EC Directives
If compliance with the European Low Voltage Directive and EMC Directive is
required, the user is advised to take full responsibility for the following measures:
The installation conditions that must be satisfied to meet the above directives are as
follows:
• Install the motor and driver inside an enclosure.
• Use an EMC compliant DC power supply with reinforced insulation on both the
primary and secondary sides.
• Provide protective earthing for the DC power supply.
• Use shielded cable for I/O cables.
• Use a mains filter.
•
For Low Voltage Directive (73/23/EEC)
The CSK series motors and drivers are not subject to the Low Voltage Directive,
since their input power supply voltage is 36 VDC or below. However, the product
must satisfy the following conditions with regard to installation and connection:
• Use the product in a protected environment within an enclosure.
• As for the driver’s and digital I/O signal’s power supply, use a DC power supply
with reinforced insulation on both the primary and secondary sides.
Motor Driver
Degree of protection IP20 IP00
Installation conditions Built-in component
Overvoltage category: I
Pollution degree: 2
Protection against electric shock: Class III equipment
Page 4

1 Introduction
−4−
•
For EMC Directive (89/336/EEC, 92/31/EEC)
This product has received EMC measures under the conditions specified in
“Example of motor and driver installation and wiring” on page 22.
Be sure to conduct EMC measures with the product assembled in your equipment by
referring to 5.6 “Installing and wiring in compliance with EMC Directive” on page
20.
Hazardous substances
RoHS (Directive 2002/95/EC 27Jan.2003) compliant
Page 5
2 Safety precautions
−5−
2 Safety precautions
The precautions described below are intended to prevent danger or injury to the user
and other personnel through safe, correct use of the product. Use the product only
after carefully reading and fully understanding these instructions.
Warning
Handling the product without observing the instructions that
accompany a “Warning” symbol may result in serious injury or
death.
Caution
Handling the product without observing the instructions that
accompany a “Caution” symbol may result in injury or property
damage.
Note
Note
The items under this heading contain important handling
instructions that the user should observe to ensure safe use of
the product.
Warning
General
• Do not use the product in explosive or corrosive environments, in the presence of
flammable gases, locations subjected to splashing water, or near combustibles.
Doing so may result in fire or injury.
• Assign qualified personnel the task of installing, wiring, operating/controlling,
inspecting and troubleshooting the product. Failure to do so may result in fire or
injury.
• Provide a means to hold the moving parts in place for applications involving
vertical travel. The motor loses holding torque when the power is shut off,
allowing the moving parts to fall and possibly cause injury or damage to
equipment.
Installation
• Install the motor and driver in their enclosures in order to prevent injury.
Connection
• Keep the driver’s input power voltage within the specified range to avoid fire and
electric shock.
• For the driver’s power supply use a DC power supply with reinforced insulation
on its primary and secondary sides. Failure to do so may result in electric shock.
• The digital I/O part does not have reinforced insulation. For the digital I/O, use a
DC power supply with reinforced insulation provided on the primary and
secondary sides. Failure to do so may result in electric shock.
• Connect the cables securely according to the wiring diagram in order to prevent
fire.
• Do not forcibly bend, pull or pinch the cable. Doing so may fire.
Page 6

2 Safety precautions
−6−
Operation
• Turn off the driver power in the event of a power failure, or the motor may
suddenly start when the power is restored and may cause injury or damage to
equipment.
• Do not turn the C.OFF (all windings off) input to “ON” while the motor is
operating. The motor will stop and lose its holding ability, which may result in
injury or damage to equipment.
Repair, disassembly and modification
• Do not disassemble or modify the motor or driver. This may cause fire, electric
shock or injury.
Caution
General
• Do not use the motor and driver beyond their specifications, or injury or damage
to equipment may result.
• Keep your fingers and objects out of the openings in the motor and driver, or fire
or injury.
• Do not touch the motor or driver during operation or immediately after stopping.
The surfaces are hot and may cause a burn.
• If the power supply cable or motor cable connected the driver are forcibly bent or
pulled, the driver will receive stress and may suffer damage.
Transportation
• Do not hold the motor output shaft or motor cable. This may cause injury.
Installation
• Keep the area around the motor and driver free of combustible materials in order
to prevent fire or a burn.
• To prevent the risk of damage to equipment, leave nothing around the motor and
driver that would obstruct ventilation.
• Provide a cover over the rotating parts (output shaft) of the motor to prevent
injury.
Operation
• Use a motor and driver only in the specified combination. An incorrect
combination may cause a fire.
• Provide an emergency stop device or emergency stop circuit external to the
equipment so that the entire equipment will operate safely in the event of a system
failure or malfunction. Failure to do so may result in injury.
• Before supplying power to the driver, turn all control inputs to the driver to
“OFF.” Otherwise, the motor may start suddenly and cause injury or damage to
equipment.
• Before moving the motor directly (as in the case of manual positioning), confirm
that the driver C.OFF (all windings off) input is “ON” to prevent injury.
Page 7

2 Safety precautions
−7−
• To prevent bodily injury, do not touch the rotating parts (output shaft) of the motor
during operation.
• Immediately when trouble has occurred, stop running and turn off the driver
power. Failure to do so may result in fire, electric shock or injury.
Disposal
• To dispose of the motor or driver, disassemble it into parts and components as
much as possible and dispose of individual parts/components as industrial waste.
Page 8

3 Precautions for use
−8−
3 Precautions for use
This section covers limitations and requirements the user should consider when
using the CSK series.
•
Do not apply an overhung load and thrust load in excess of the
specified permissible limit.
Be sure to operate the motor within the specified permissible limit of overhung load
and thrust load. Operating it under an excessive overhung load and thrust load may
damage the motor bearings (ball bearings). See page 18 for details.
•
Motor case temperature
When operating the motor, keep the motor’s case temperature to 100 °C (212 °F) or
below. If that temperature exceeds 100 °C (212 °F) due to operating conditions
(ambient temperature, operating speed, duty, etc.), the motor coil may be burned or
the life of the bearing shortened.
•
Driver’s heatsink temperature
When operating the motor, keep the driver’s heatsink temperature to 80 °C (176 °F)
or below. If the temperature exceeds 80 °C (176 °F), the driver may be damaged.
•
Provide a measure to retain the position of the equipment’s movable
part when this unit is used in an vertical application.
The motor loses its holding brake force when the power is cut off. Therefore,
provide a measure to retain the position of the equipment’s movable part when this
unit is used in an vertical application such as a lifter.
•
Conduct the insulation resistance measurement or withstand voltage
test separately on the motor and the driver.
Conducting the insulation resistance measurement or withstand voltage test with the
motor and driver connected may result in injury or damage to equipment.
•
Preventing electrical noise
See 5.6 ”Installing and wiring in compliance with EMC Directive” on page 20 for
measures with regard to noise.
•
Check the colors of motor leads and connect them correctly and
securely.
Wrong connection of leads or poor contact may damage the driver.
•
Regeneration
When a large inertial load is operated at high speed, regenerative energy will
generate and increase the power supply voltage, which can damage the driver.
Review the operating condition and make sure regenerative voltage will not
generate.
Page 9

3 Precautions for use
−9−
•
Maximum static torque at excitation
The maximum static torque at excitation represents the torque when the motor is
excited at the rated current. If the motor is combined with a dedicated driver, the
automatic current cutback function reduces the maximum static torque at excitation
to around 40%. (The specific value varies, depending on the motor standstill current
that is set.) Once started, the motor can be accelerated or operated at the maximum
static torque at excitation. However, the holding torque drops to around 40% while
the motor is at a standstill. Therefore, when selecting a motor consider the reduced
holding torque at motor standstill of around 40% of the maximum static torque at
excitation.
•
Geared type motors
Allowable torque
Operate the motor by making sure the sum of the acceleration/deceleration torque at
the starting/stopping of the motor and the load (friction) torque doesn’t exceed the
allowable torque. Operating the motor in excess of the allowable torque may result
in a damaged gear.
Allowable speed range
Operate the motor at speeds within the allowable range.
Operating the motor at a speed outside the allowable range may result in a shorter
gear life.
Backlash
The gear output shaft is subject to backlash of 1° to 2°. Backlash refers to the
looseness at the gear output shaft, as generated when the input side of the gear is
fixed. To reduce the effect of backlash, perform positioning operations from one
direction only either from the CW direction or the CCW direction.
Rotating direction of the gear output shaft
The relationship between the rotating direction of the motor shaft and that of the
gear output shaft changes as follows, depending on the gear type and gear ratio.
Gear ratio Rotating direction
3.6:1, 7.2:1, 9:1, 10:1 Same direction
18:1, 36:1 Opposite direction
Grease of geared motor
On rare occasions, a small amount of grease may ooze out from the geared motor. If
there is concern over possible environmental damage resulting from the leakage of
grease, check for grease stains during regular inspections. Alternatively, install an oil
pen or other device to prevent leakage from causing further damage. Oil leakage
may lead to problems in the customer’s equipment or products.
Page 10

4 Preparation
−10−
4 Preparation
This section covers the points to be checked along with the names and functions of
respective parts.
4.1 Checking the product
Upon opening the package, verify that the items listed below are included.
Report any missing or damaged items to the branch or sales office from which you
purchased the product. Verify the model number of the purchased unit against the
number shown on the package label. Check the model number of the motor and
driver against the number shown on the nameplate. The unit models and
corresponding motor/driver combinations are listed on below.
• Motor.................................................................. 1 unit
• Driver ................................................................. 1 unit
• OPERATING MANUAL.................................... 1 copy
• Motor mounting screws (geared type only)........ 4 pcs.
No.4-40 UNC Cross recessed screw
No.8-32 UNC Hexagonal socket head screw
Note
When removing the driver from the conductive protection bag, make sure
your hands are not charged with static electricity. This is to prevent
damage to the driver due to static electricity.
4.2 Combinations of motors and drivers
Standard type
Unit model Motor model Driver model
CSK243-ATA PK243-01AA
CSK243-BTA PK243-01BA
CSD2109-T
CSK244-ATA PK244-01AA
CSK244-BTA PK244-01BA
CSK245-ATA PK245-01AA
CSK245-BTA PK245-01BA
CSD2112-T
CSK264-AT PK264-02A
CSK264-BT PK264-02B
CSK266-AT PK266-02A
CSK266-BT PK266-02B
CSK268-AT PK268-02A
CSK268-BT PK268-02B
CSD2120-T
Page 11

4 Preparation
−11−
Unit model Motor model Driver model
CSK296-ATA PK296-03AA
CSK296-BTA PK296-03BA
CSK299-ATA PK299-03AA
CSK299-BTA PK299-03BA
CSD2145T
CSK2913-ATA PK2913-02AA
CSK2913-BTA PK2913-02BA
CSD2140T
High resolution type
Unit model Motor model Driver model
CSK243MATA PK243MAA
CSK243MBTA PK243MBA
CSD2109-T
CSK244MATA PK244MAA
CSK244MBTA PK244MBA
CSK245MATA PK245MAA
CSK245MBTA PK245MBA
CSD2112-T
CSK264MAT PK264MA
CSK264MBT PK264MB
CSK266MAT PK266MA
CSK266MBT PK266MB
CSK268MAT PK268MA
CSK268MBT PK268MB
CSD2120-T
Geared type
Unit model∗
Motor model Driver model
CSK243ATA-SG□ PK243A1A-SG□
CSK243BTA-SG□ PK243B1A-SG□
CSD2109-T
CSK264ATA-SG□ PK264A2A-SG□
CSK264BTA-SG□ PK264B2A-SG□
CSD2120-T
∗ The blank square in the model will contain a number indicating the gear ratio.
Gear ratio: 3.6, 7.2, 9, 10, 18 or 36.
Page 12
4 Preparation
−12−
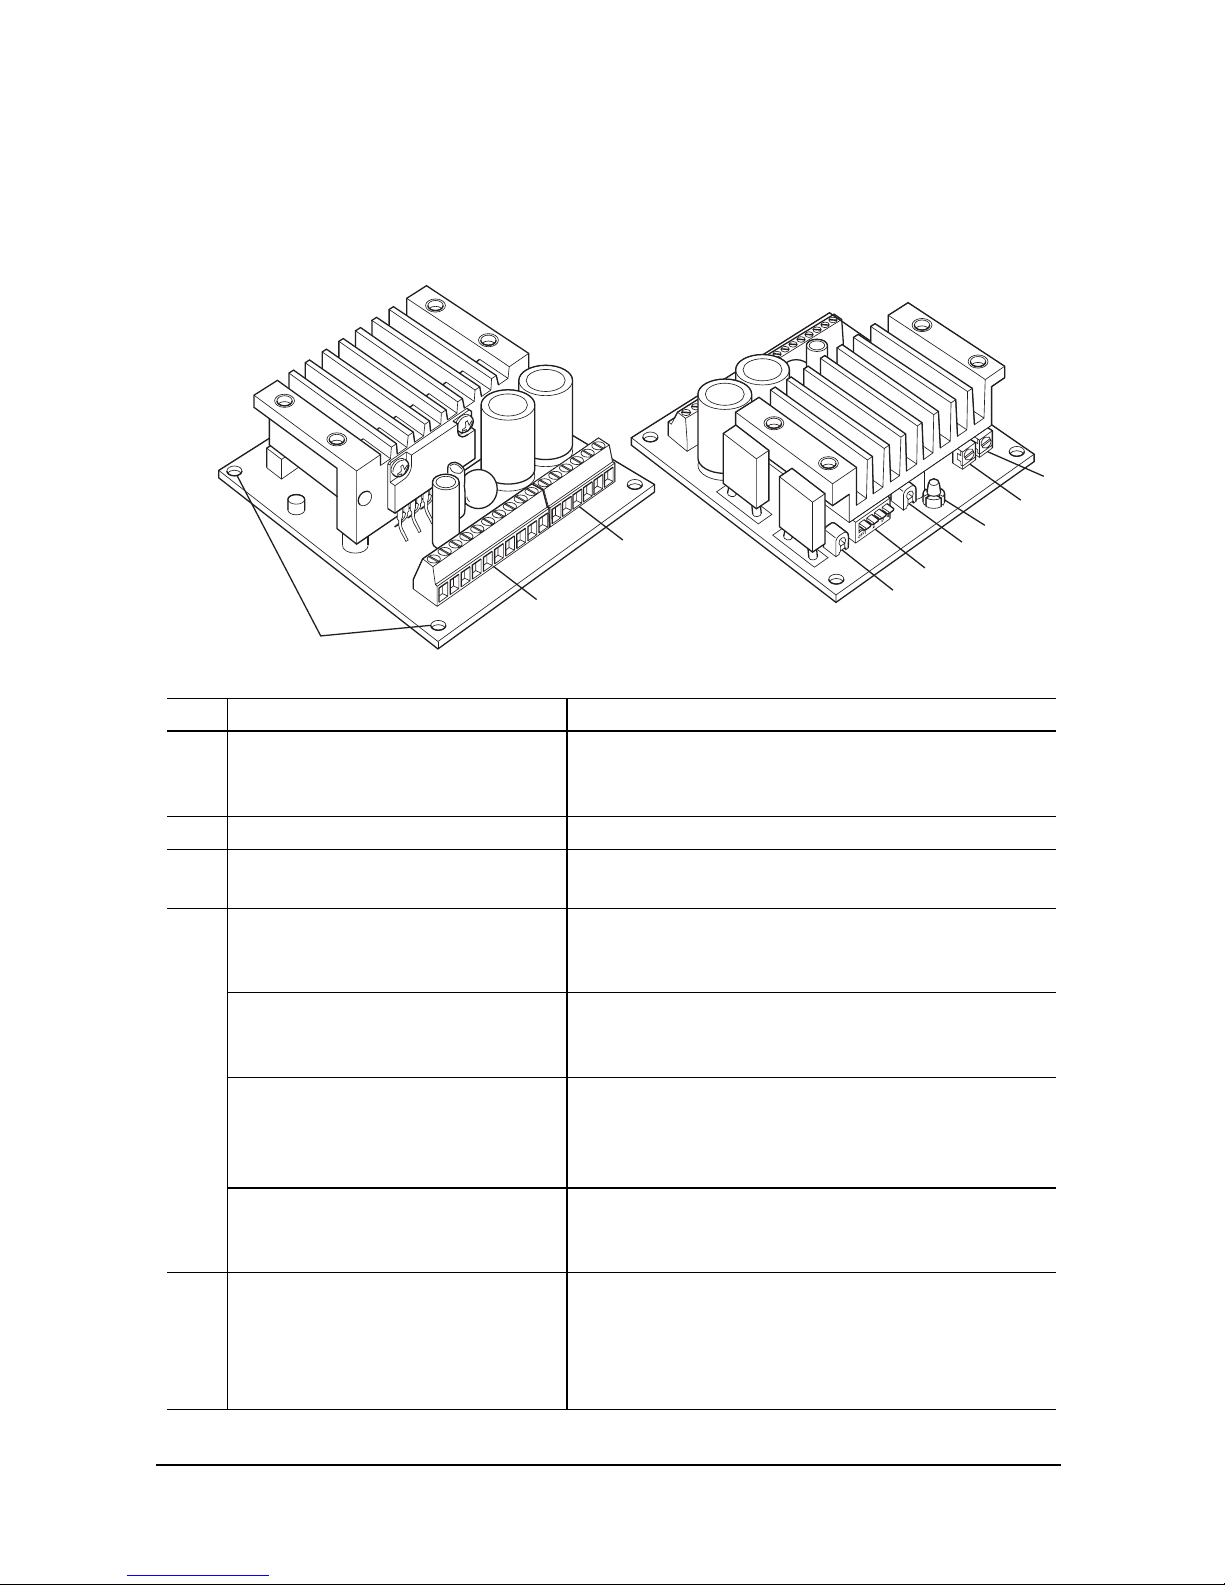
4.3 Names and functions of driver
This section covers the names and functions of parts in the driver.
CSD2109-T, CSD2112-T, CSD2120-T
1
5
2
3
8
7
4
Mounting
holes
6
No. Name Description
1 I/O and power supply terminal
blocks (TB1)
Connected to I/O signals and a 24 VDC or
36 VDC power supply. (36 VDC is only for
CSD2109-T, CSD2112-T, CSD2120-T.)
2 Motor terminal blocks (TB2) Connected to motor leads.
3 Power supply input indicator
LED (POWER)
Remains lit while current is supplied (green).
Automatic current cutback
function switch (ACD)
This switch enables or disables the automatic
current cutback function.
Factory setting: [ON] (enable)
Step angle switch (F/H) This switch sets the motor’s step angle (full
step/half step).
Factory setting: [ON] (full step)
Pulse-input mode switch
(1P/2P)
Set to 1-pulse input mode or 2-pulse input
mode according to the pulse output mode of
the positioning controller.
Factory setting: [ON] (1-pulse input mode)
4
Power supply voltage switch
(24/36V)
Set to 24 V or 36 V, according to the driver’s
power supply voltage.
Factory setting: [ON] (24 V)
5 Potentiometer for adjusting the
motor operating current
(RUN VR)
This potentiometer sets the operating current
of the motor. If there is sufficient torque, the
current setting can be reduced to suppress
increases in motor/driver temperatures.
Factory setting: the rated current
Page 13

4 Preparation
−13−
No. Name Description
6 Potentiometer for adjusting the
motor standstill current
(STOP VR)
This potentiometer sets the current when the
motor is at a standstill (in the current cutback
state).
Factory setting: 40% of the rated current
7 Positive check terminal for
motor operating current (C.C.+)
This terminal is used to check the motor
operating current.
8 Negative check terminal for
motor operating current (C.C.−)
This terminal is used to check the motor
operating current.
CSD2140T, CSD2145T
2
3
1
4
5
6
7
Heat sink
Mounting holes
Mounting holes
Mounting
holes
No. Name Description
1 Power supply terminal blocks
(TB1)
Connected to 24 VDC power supply.
2 Motor terminal blocks (TB2) Connected to motor leads.
3 I/O terminal blocks (TB3) Connected to I/O signals.
4 Potentiometer for adjusting the
motor operating current
(RUN VR)
This potentiometer sets the operating current
of the motor. If there is sufficient torque, the
current setting can be reduced to suppress
increases in motor/driver temperatures.
Factory setting: the rated current
5 Potentiometer for adjusting the
motor standstill current
(STOP VR)
This potentiometer sets the current when the
motor is at a standstill (in the current cutback
state).
Factory setting: 40% of the rated current
6 Automatic current cutback
function jumper socket
(C.C./A.C.D.)
This switch enables or disables the automatic
current cutback function.
Factory setting: [A.C.D.] (enable)
Page 14

4 Preparation
−14−
No. Name Description
7 Step angle jumper socket
(FULL/HALF)
This switch sets the motor’s step angle (full
step/half step).
Factory setting: [FULL] (full step)
Page 15

5 Installation
−15−
5 Installation
This chapter explains the installation location and installation methods of the motor
and driver, as well as how to install a load. The installation and wiring methods in
compliance with the EMC Directive are also explained.
5.1 Location for installation
The motor and driver are designed and manufactured for installation in equipment.
Install them in a well-ventilated location that provides easy access for inspection.
The location must also satisfy the following conditions:
• Inside an enclosure that is installed indoors (provide vent holes)
• Operating ambient temperature
Motor: −10 to +50 °C (+14 to +122 °F) (non-freezing)
Driver: 0 to +40 °C (+32 to +104 °F) (non-freezing)
• Operating ambient humidity 85% or less (non-condensing)
• Area that is free from an explosive nature or toxic gas (such as sulfuric gas) or
liquid
• Area free of excessive amount dust, iron particles or the like
• Area not subject to splashing water (storms, water droplets), oil (oil droplets) or
other liquids
• Area not exposed to direct sun
• Area free of excessive salt
• Area not subject to continuous vibration or excessive shocks
• Area free of excessive electromagnetic noise (from welders, power machinery,
etc.)
• Area free of radioactive materials, magnetic fields or vacuum
5.2 Installing the motor
Installation direction
The motor can be installed in any direction.
Installation method
Install the motor onto an appropriate flat metal plate having excellent vibration
resistance and heat conductivity.
When installing the motor, secure it with four bolts (supplied for geared types only)
through the four mounting holes provided. Do not leave a gap between the motor
and metal plate.
Note
• Insert the pilot located on the motor’s installation surface into the
mounting plate’s countersunk or through hole.
• Do not loosen the gearhead attaching screws (4 pcs.)
Page 16

5 Installation
−16−
• Installation method A
Pilot holder
Metal plate
Mounting hole
• Installation method B
Pilot holder
Metal plate
Mounting hole
• Installation method C
Pilot holder
Metal plate
Cross-recessed pan
head screw (supplied)
Mounting hole
• Installation method D
Metal plate
Pilot holder
Mounting hole
Gearheadattaching screw
Hexagonal socket head
screw (supplied)
Motor type Nominal size
Tightening
torque
[N·m (oz-in)]
Effective
depth of bolt
[mm (in.)]
Installation
method
PK24
No.4-40 UNC 1 (142) 4.5 (0.18) A
PK26
No.8-32 UNC 2 (280)
-
B
Standard type
PK29
No.10-24 UNC 3 (420)
-
B
PK24M
No.4-40 UNC 1 (142) 4.5 (0.18) A
High
resolution type
PK26M
No.8-32 UNC 2 (280)
-
B
PK24SG
No.4-40 UNC 1 (142) 7 (0.28) C
Geared type
PK26SG
No.8-32 UNC 2 (280) 8 (0.31) D
Page 17

5 Installation
−17−
5.3 Installing a load
When connecting a load to the motor, align the centers of the motor’s output shaft
and load shaft. Also, keep the overhang load and thrust load to the permissible
values or below.
•
Using a coupling
Align the centers of the motor’s output shaft and load shaft in a straight line.
•
Using a belt drive
Align the motor’s output shaft and load shaft in parallel with each other, and
position both pulleys so that the line connecting their centers is at a right angle to the
shafts.
•
Using a gear drive
Align the motor’s output shaft and gear shaft in parallel with each other, and let the
gears mesh at the center of the tooth widths.
Note
• When coupling the load to the motor, pay attention to the centering of
the shafts, belt tension, parallelism of the pulleys, and so on. Securely
tighten the coupling and pulley set screws.
• Be careful not to damage the output shaft or bearings when installing a
coupling or pulley to the motor’s output shaft.
• Do not modify or machine the motor’s output shaft. Doing so may
damage the bearings and destroy the motor.
Page 18

5 Installation
−18−
5.4 Permissible overhung load and permissible
thrust load
The overhung load on the motor’s output shaft or gear output shaft must be kept
within the permissible values listed below.
Note
Failure due to fatigue may occur if the motor’s bearings and output shaft
are subject to repeated loading by an overhung or thrust load that is in
excess of the permissible limit.
Permissible overhung load [N (lb.)]
Distance from the tip of
motor’s output shaft [mm (in.)]
Motor type
0
(0) 5 (0.20)
10
(0.39)
15
(0.59)
20
(0.79)
Permissible
thrust load
[N (lb.)]
PK243
0.21 (0.46)
∗
PK244
0.27 (0.59)
∗
PK245
20
(4.5)
25
(5.6)
34
(7.6)
52
(11.7)
−
0.35 (0.77)
∗
PK264
0.45 (0.99)
∗
PK266
0.7 (1.54)
∗
PK268
54
(12.1)
67
(15)
89
(20)
130
(29)
−
1 (2.2)
∗
PK296
1.7 (3.7)
PK299
2.8 (6.2)
Standard type
PK2913
260
(58)
290
(65)
340
(76)
390
(87)
480
(108)
3.8 (8.4)
PK243M
0.24 (0.53)
∗
PK244M
0.3 (0.66)
∗
PK245M
20
(4.5)
25
(5.6)
34
(7.6)
52
(11.7)
−
0.37 (0.81)
∗
PK264M
0.45 (0.99)
∗
PK266M
0.7 (1.54)
∗
High-resolution
type
PK268M
54
(12.1)
67
(15)
89
(20)
130
(29)
−
1 (2.2)
∗
PK243SG
10
(2.2)
15
(3.3)
20
(4.5)
30
(6.7)
− 15 (3.3)
PK264SG
(gear ratio:
3.6 to 10)
30
(6.7)
40
(9)
50
(11.2)
60
(13.5)
70
(15.7)
Geared type
PK264SG
(gear ratio:
18 to 36)
80
(18)
100
(22)
120
(27)
140
(31)
160
(36)
30 (6.7)
∗ indicated the motor’s mass [kg (lb.)]. The thrust load should not exceed the motor’s mass.
Page 19

5 Installation
−19−
5.5 Installing the driver
When installing the driver in an enclosure, be sure to follow the diagram illustrated.
Provide a minimum clearance of 25 mm (1 in.) in the horizontal direction or 50 mm
(2 in.) in the vertical direction between the driver and enclosure or other equipment
within the enclosure. When installing two or more drivers side by side, provide a
minimum clearance of 20 mm (0.79 in.) between drivers.
Note
• Do not install any equipment that generates a large amount of heat near
the driver.
• Check ventilation if the ambient temperature of the driver exceeds 40 °C
(104 °F).
CSD2109-T, CSD2112-T, CSD2120-T
Mount the printed circuit board or heat sink to the mounting plate. (Screws and
spacers are not supplied.)
•
Mounting the heat sink
Mount the heat sink to the mounting
plate using M3 screws.
M3
Spring washer
Mounting plate
M3
Effective depth:
5 mm (0.2 in.)
M3 screws
•
Mounting the printed circuit board
Mount the printed circuit board to the mounting plate using No.4-40 UNC screws.
Insert a spacer [5 mm (0.2 in.) or thicker] between the printed circuit board and the
mounting plate.
• Horizontal installation
Spacer
(insulation material)
Mounting
plate
No.4-40 UNC
screw
• Vertical installation
Install the driver so
that the connector
is positioned on
the bottom side.
Mounting
plate
No.4-40 UNC screw
Spacer
(insulation material)
Page 20

5 Installation
−20−
CSD2140T, CSD2145T
Mount the driver to the mounting plate using No.4-40 UNC screws.
• Horizontal installation
Mounting
plate
No.4-40 UNC
screw
• Vertical installation
Mounting
plate
No.4-40 UNC
screw
5.6 Installing and wiring in compliance with EMC
Directive
Effective measures must be taken against the EMI that the CSK series may give to
adjacent control-system equipment, as well as the EMS of the CSK series itself, in
order to prevent a serious functional impediment in the machinery. The use of the
following installation and wiring methods will enable the CSK series to be
compliant with the EMC Directive (the aforementioned compliance standards).
The compliance of the final machinery with the EMC Directive will depend on such
factors as the configuration, wiring, layout and risk involved in the control-system
equipment and electrical parts. It therefore must be verified through EMC measures
by the customer of the machinery.
Applicable standards
EMI Emission Tests
Radiated Emission Test
EN 61000-6-4
EN 55011
EMS Immunity Tests
Radiation Field Immunity Test
Fast Transient / Burst Immunity Test
Conductive Noise Immunity Test
EN 61000-6-2
IEC 61000-4-3
IEC 61000-4-4
IEC 61000-4-6
•
About power supply
The CSK series products are of the DC power supply input specification. Use a DC
power supply that is optimally compliant with the EMC Directive.
Page 21

5 Installation
−21−
•
Connecting mains filter for power supply line
Connect a mains filter in the AC input line to prevent the noise generated in the
driver from propagating externally through the power supply line.
Use a mains filter or equivalent as below table.
Manufacture Product number
Tyco Electronics CORCOM 10ESK1
TDK Corporation ZAG2210-11S
• Install the mains filter as close to the driver as possible, and use cable clamps and
other means to secure the input and output cables firmly to the surface of the
enclosure.
• Connect the ground terminal of the mains filter to the grounding point, using as
thick and short a wire as possible.
• Do not place the AC input cable (AWG18) parallel with the mains filter output
cable (AWG18). Parallel placement will reduce mains filter effectiveness if the
enclosure’s internal noise is directly coupled to the power supply cable by means
of stray capacitance.
•
How to ground
The cable used to ground the driver and mains filter must be as thick and short as
possible so that no potential difference is generated. Choose a large, thick and
uniformly conductive surface for the grounding point.
•
Wiring the power supply cable and signal cable
Use a shielded cable of AWG18 or more in diameter for the driver power supply
cable, and keep it as short as possible. Use a shielded cable of AWG24 to AWG22 in
diameter for the driver signal cable, and keep it as short as possible.
To ground a shielded cable, use a metal clamp or
similar device that will maintain contact with the
entire circumference of the shielded cable. Attach a
cable clamp as close to the end of the cable as
possible, and connect it as shown in the figure.
Cable
clamp
Shielded
cable
•
Notes about installation and wiring
• Connect the driver and other peripheral control equipment directly to the
grounding point so as to prevent a potential difference from developing between
grounds.
• When relays or electromagnetic switches are used together with the system, use
mains filters and CR circuits to suppress surges generated by them.
• Keep cables as short as possible without coiling and bundling extra lengths.
• Place the power cables such as the motor and power supply cables as far apart
[100 to 200 mm (3.93 to 7.87 in.)] as possible from the signal cables. If they have
to cross, cross them at a right angle. Place the AC input cable and output cable of
a mains filter separately from each other.
Page 22

5 Installation
−22−
•
Example of motor and driver installation and wiring
Motor
Driver
User
controller
FG
FG FG
FG
FG
PE PE
Mains
filter
DC power
supply
(Shielded cable)
(Shielded cable)
I/O cable
[2 m (6.6 in.)]
Ground panel
Cable
clamp
Cable
clamp
Cable
clamp
Power supply
cable
[1.6 m (5.2 ft.)]
Motor cable
[2 m (6.6 in.)]
Precautions about static electricity
Static electricity may cause the driver to malfunction or suffer damage. Be careful
when handling the driver with the power on.
Always use an insulated screwdriver when adjusting the motor current using the
control on the driver.
Note
Do not come close to or touch the driver while the power is on.
Page 23

6 Connection
−23−
6 Connection
This section covers the methods and examples of connecting and grounding the
driver, motor, power and controller, as well as the control input/output.
6.1 Connection of CSD2109-T, CSD2112-T,
CSD2120-T
Connection example
Either 24 VDC or 36 VDC is selected as a driver’s power supply.
Be sure to check the setting of the power supply voltage switch. Refer to page 35.
R
2
R
1
R
1
R
1
220 Ω
220 Ω
220 Ω
TB2
Driver
TB1
TB1
A.W.OFF
DIR./CCW
PULSE/CW
TIMING
Controller
NPN type
Controller
PNP type
Yellow
White
Black
Green
Red
Blue
+5 V+5 V
+5 V+5 V
0 V 0 V
0 V 0 V
0 V
0 V
+24 V or +36 V
GND
2-phase stepping motor
+
-
+
-
-
+
-
+
-
+
Page 24

6 Connection
−24−
Note
• Be certain the control input/output cable that connects the driver and
controller is as short as possible. The maximum input frequency will
decrease as the cable length increases.
• When a large inertial load is operated at high speed, regenerative
energy will generate and increase the power supply voltage, which can
damage the driver. When performing the operation described above,
change the operating conditions so that any temporary rise in supply
voltage due to regenerative energy will not exceed 6 V.
Connecting the I/O and power supply
Connecting the I/O power supply wires into the driver’s I/O and power supply
terminal blocks (TB1). Screw terminals are used. Remove the insulation from the
core, then insert the core into the terminal and tighten with terminal screws.
Strip 5 mm (0.2 in.) of insulation. Tighten the terminal screw to the specified
tightening torque.
• Use a cable of AWG 22 to 18 for the power supply line.
Tightening torque: 0.22 to 0.25 N·m (1.95 to 2.2 lb-in)
• Use a cable of AWG 24 to 20 for the I/O line.
Tightening torque: 0.22 to 0.25 N·m (1.95 to 2.2 lb-in)
Be sure to check the setting of the power supply voltage switch. Refer to page 35.
•
Power supply voltage
Use a power supply that can supply the following current capacity.
Driver model
CSD2109-T CSD2112-T CSD2120-T
Power supply
input voltage
24 VDC±10% or 36 VDC±10%
Power supply
current capacity
1.4 A or more 1.6 A or more 2.8 A or more
Note
• Pay attention to polarity when connecting the power supply. Connecting
the power supply in reverse polarity may damage the driver.
• Do not wire the driver’s power supply cable in the same conduit in which
another power line or the motor cable is wired.
• After turning off the power supply, wait at least 5 seconds before turning
it on again.
Page 25

6 Connection
−25−
•
Terminal blocks pin assignments (TB1)
Signal name Description
POWER+ DC power supply input
POWER− GND
TIMING+ output
TIMING− output
Excitation timing output
A.W.OFF+ input
A.W.OFF− input
All windings off input
DIR./CCW+ input
DIR./CCW− input
Rotation direction (CCW pulse) input
∗
PULSE/CW+ input
PULSE/CW− input
Pulse (CW pulse) input
∗
∗ When 1-pulse input mode, the inputs are the pulse and the rotation direction.
When 2-pulse input mode, the inputs are CW pulse and CCW pulse.
Connecting the motor
Connecting the motor leads into the driver’s motor terminal blocks (TB2).
•
Terminal blocks pin assignments (TB2)
Signal name Description
YELLOW Connect the yellow motor lead.
WHITE Connect the white motor lead.
BLACK Connect the black motor lead.
GREEN Connect the green motor lead.
RED Connect the red motor lead.
BLUE Connect the blue motor lead.
Note
Check the colors of motor leads and connect them correctly and securely.
Wrong connection of leads or poor contact may damage the driver.
Page 26

6 Connection
−26−
6.2 Connection of CSD2140T, CSD2145T
Connection example
The driver’s power supply voltage should be 24 VDC.
R
2
R
1
R
1
R
1
220 Ω
220 Ω
220 Ω
TB2
TB1
Driver
TB3
PLS+
PLS
-
DIR+
DIR
-
AWO+
AWO
-
TIM+
TIM
-
Controller
NPN type
Controller
PNP type
Red
Blue
Green
Black
Yellow
White
+5 V+5 V
+5 V+5 V
0 V 0 V
0 V 0 V
0 V
0 V
+24 V
GND
2-phase
stepping motor
2
1
1
1
2
3
4
5
6
2
3
4
5
6
7
8
Note
• Be certain the control input/output cable that connects the driver and
controller is as short as possible. The maximum input frequency will
decrease as the cable length increases.
• When a large inertial load is operated at high speed, regenerative
energy will generate and increase the power supply voltage, which can
damage the driver. When performing the operation described above,
change the operating conditions so that any temporary rise in supply
voltage due to regenerative energy will not exceed 6 V.
Page 27

6 Connection
−27−
Connecting the power supply
Connecting the power supply wires into the driver’s power supply terminal blocks
(TB1). Screw terminals are used. Remove the insulation from the core, then insert
the core into the terminal and tighten with terminal screws. Strip 5 mm (0.2 in.) of
insulation. Tighten the terminal screw to the specified tightening torque.
Use a cable of AWG 22 to 18 for the power supply line.
Tightening torque: 0.22 to 0.25 N·m (1.95 to 2.2 lb-in)
•
Power supply voltage
Use a power supply that can supply the following current capacity.
Driver model
CSD2140T CSD2145T
Power supply input voltage 24 VDC±10%
Power supply current capacity 5 A or more 5.5 A or more
•
Terminal blocks pin assignments (TB1)
No. Signal name Description
1 POWER+ DC power supply input
2 POWER− GND
Note
• Pay attention to polarity when connecting the power supply. Connecting
the power supply in reverse polarity may damage the driver.
• Do not wire the driver’s power supply cable in the same conduit in which
another power line or the motor cable is wired.
• After turning off the power supply, wait at least 5 seconds before turning
it on again.
Connecting the motor
Connecting the motor leads into the driver’s motor terminal blocks (TB2).
•
Terminal blocks pin assignments (TB2)
No.
Signal name Description
1 RED Connect the red motor lead.
2 BLUE Connect the blue motor lead.
3 GREEN Connect the green motor lead.
4 BLACK Connect the black motor lead.
5 YELLOW Connect the yellow motor lead.
6 WHITE Connect the white motor lead.
Page 28

6 Connection
−28−
Connecting the I/O
Connecting the I/O signal wires into the driver’s I/O terminal blocks (TB3). Screw
terminals are used. Remove the insulation from the core, then insert the core into the
terminal and tighten with terminal screws. Strip 5 mm (0.2 in.) of insulation. Tighten
the terminal screw to the specified tightening torque.
Use a cable of AWG 24 to 20 for the I/O line.
Tightening torque: 0.22 to 0.25 N·m (1.95 to 2.2 lb-in)
•
Terminal blocks pin assignments (TB3)
No. Signal name Description
1 PLS+ input
2 PLS− input
CW pulse input
3 DIR+ input
4 DIR− input
Rotation direction input
5 AWO+ input
6 AWO− input
All windings off input
7 TIM+ input
8 TIM− input
Timing output
9 NC Not use
6.3 About input/output
Input signals
All input signals of the driver are photocoupler inputs.
The signal state represents the “ON: Carrying current” or “OFF: Not carrying
current” state of the internal photocoupler rather than the voltage level of the signal.
PLS (CW)
DIR (CCW)
AWO
R
1
Controller output Driver internal circuits
+
-
220 Ω
10 to 20 mA
0 V
V
0
Use 5 VDC as the input signal voltage. When the input signal voltage V0 is equal to
5 VDC, the external resistances R
1 is not necessary. When V0 is above 5 VDC,
connect R
1 to keep the input current 10 to 20 mA.
V
0
20 mA
R
1
=
-
220 [Ω]
Page 29

6 Connection
−29−
•
PLS (CW pulse) input and DIR (CCW pulse) input
CSD2109-T, CSD2112-T and CSD2120-T can select either 1-pulse input mode or
2-pulse input mode as the pulse input mode to match the controller used. For details
on how to set the pulse input mode, see 7.3 “Pulse input mode” on page 34.
The direction of rotation indicates the direction in which the motor’s output shaft
rotates, as viewed from the motor mounting surface. The output shaft of the geared
type rotates in the direction opposite the motor’s rotation when the gear ratio is 18:1
or 36:1.
1-pulse input mode (factory setting)
The controller pulses are connected to the PLS+ input or the PLS− input, and the
rotation direction is connected to the DIR+ input or DIR− input.
• When the DIR input is ON, a fall of the PLS input from ON to OFF will rotate the
motor one step in the CW direction.
• When the DIR input is OFF, a fall of the PLS input from ON to OFF will rotate
the motor one step in the CCW direction.
Use an input pulse signal with a waveform having a sharp rise and fall, as shown in
the figure:
90%
10%
5 µs or
more
50 (25) µs
or more
∗
2 µs or less2 µs or less
DIR input CWCCW
ON
OFF
ON
OFF
PLS input
100 µs
or more
ON: 4.5 to 5 V
OFF: 0 to 1 V
∗ ( ) indicates the CSD2140T and CSD2145T.
Note
The interval for switching the motor direction represents the response time
of the circuit. Set this interval to an appropriate time after which the motor
will respond.
Page 30

6 Connection
−30−
2-pulse input mode
The controller’s CW pulses are connected to the CW+ or the CW−, while the CCW
pulses are connected to the CCW+ or the CCW−.
• When the CW pulse input changes from the ON to OFF, the motor will rotate one
step in the CW direction.
• When the CCW pulse input changes from the ON to OFF, the motor will rotate
one step in the CCW direction.
Use an input pulse signal with a waveform having a sharp rise and fall, as shown in
the figure:
90%
10%
5 µs or
more
50 (25) µs
or more
∗
2 µs or less2 µs or less
DIR input
ON
OFF
ON
OFF
PLS input
100 µs
or more
ON: 4.5 to 5 V
OFF: 0 to 1 V
∗ ( ) indicates the CSD2140T and CSD2145T.
Note
• The interval for switching the motor direction represents the response
time of the circuit. Set this interval to an appropriate time after which the
motor will respond.
• Always set the photocoupler to OFF when not inputting pulse signals.
• Do not input CW pulse input and CCW pulse input at the same time. If
one of these pulses is input when the other is ON the motor will not run
properly.
•
AWO (All windings off) input
Use the signal only when the motor’s output shaft must be rotated manually for
position adjustment (ON: 4.5 to 5 V, OFF: 0 to 1 V.)
• When the AWO input is turned ON, the driver stops supplying current to the
motor and the motor’s holding torque is lost. You to adjust the load position
manually.
• When the AWO input is turned OFF, the current supply to the motor resumes,
thereby restoring the motor’s holding torque.
Page 31

6 Connection
−31−
Output signals
Driver output signals are photocoupler/open-collector output. The signal state
represents the “ON: Carrying current” or “OFF: Not carrying current” state of the
internal photocoupler rather than the voltage level of the signal.
TIMING
R
2
Controller output Driver internal circuits
0 V
V
0
10 mA or less
+
-
Use an output signal voltage of 5 VDC minimum and 24 VDC maximum, and use
output signal current of 10 mA max. If the output signal current is greater than
10 mA, connect external resistor R
2.
V
0
10 mA
R
2
=
[Ω]
•
TIM (Excitation timing) output
When the motor-excitation state (combined phases of current flowing) is the
excitation home position (step 0), the driver switches on the timing output. The
motor excitation state is reset to the excitation home position when the power supply
is switched on.
When the motor has a base step angle of 1.8°/step, the TIM output turns ON with a
rotation of every 7.2° from the excitation home position in synchronization with a
pulse input. The TIM output behaves differently depending on the combined motor
and number of divisions.
Example of TIM output
Step angle
Motor type
Full step Half step
TIM output
Motor with 1.8°/step base step angle
1.8° 0.45° Every 7.2°
Motor with 0.9°/step base step angle
0.9° 0.225° Every 3.6°
Geared motor with 18 :1 gear ratio 0.1° 0.025° Every 0.4°
Also, when detecting the mechanical home position for a mechanical device, by
making an AND circuit for the mechanical home position sensor and the TIM output,
the variation in the motor stop position within the mechanical home position sensor
can be reduced and the mechanical home position made more precise.
Page 32

6 Connection
−32−
Note
• When using the TIM output, stop the motor’s output shaft at an integer
multiple of 7.2°.
• When switching the step angle, do this with the motor stopped and the
TIM output ON.
• When the power is turned ON, the excitation sequence is reset to STEP
0 and the timing signal is output.
6.4 Timing chart
5 s or more∗3∗4
ON
OFF
ON
OFF
ON
OFF
ON
OFF
ON
OFF
ON
OFF
CW input
DIR input
CCW input
PLS input
AWO input
Motor operation
Power source input
100 µs or more
0.5 s or more
300 µs or more
100 µs or more
∗2
2-pulse input mode
1-pulse input mode
∗5
100 µs or more
∗1
∗1 ∗1
CW
CCW
The section indicates that the photocoupler diode is emitting light.
∗1 “100 µs or more” indicated in connection with the direction-signal select time (1-pulse
input mode) or CW/CCW pulse select time (2-pulse input mode) indicates a circuit
response time. Set it to the time required for the motor to respond to the applicable pulse
input.
∗2 The specific duration varies depending on the load inertial moment, load torque,
self-starting frequency, etc.
∗3 Do not input pulse signals immediately after switching the AWO input to OFF, given that it
will affect the motor’s starting characteristics.
∗4 After turning off the power supply, wait at least 5 seconds before turning the power supply
back on.
∗5 The CSD2140T, CSD2145T supports a 1-pulse input mode only.
Note
The CSD2109-T, CSD2112-T, and CSD2120-T respond up to 10 kHz with
a pulse duty of 50%. When using it at higher speeds, narrow the pulse
width (shorten the photocoupler’s ON time).
Page 33

7 Setting
−33−
7 Setting
This section covers the selection and settings of driver functions.
Note
• Be sure to shut off the power before using the resolution select switch.
The new resolution takes effect when the power is turned on again.
• The driver may malfunction or become damaged due to the effects of
static electricity. While the driver is receiving current, handle the driver
carefully and do not come near or touch the driver.
• When operating a function switch, jumper socket or current adjustment
potentiometer, be sure to use an insulated screwdriver.
7.1 Automatic current cutback function
Set the automatic current cutback function using the automatic current cutback
function switch (jumper socket).
When the automatic current cutback function is ON, the motor current will
automatically drop to the standstill current in approx. 0.1 second after the stopping
of pulse output. This mechanism suppresses heat generation from the motor or driver
while the motor is at standstill.
Keep the automatic current cutback function ON in normal conditions of use.
CSD2109-T, CSD2112-T, CSD2120-T CSD2140T, CSD2145T
Automatic current cutback function switch
(ACD)
Factory setting: ON (enable)
Automatic current cutback function jumper
socket (C.C./A.C.D.)
Factory setting: A.C.D. (enable)
• Set this switch to ON to enable the
automatic current cutback function.
• Set this switch to OFF to disable the
automatic current cutback function.
Change the jumper sockets.
• Set the jumper socket to A.C.D. to
enable the automatic current cutback
function.
• Set the jumper socket to C.C. to disable
the automatic current cutback function.
ON
OFF
ON: enable
OFF: disable
ACD
Jumpe
r
socket
Page 34

7 Setting
−34−
7.2 Step angle
Set the step angle of the motor using the step angle switch (jumper socket).
CSD2109-T, CSD2112-T, CSD2120-T CSD2140T, CSD2145T
Step angle switch (F/H)
Factory setting: ON (full step)
Step angle jumper socket (FULL /HALF)
Factory setting: FULL (full step)
• Set this switch to ON to use the full step
setting.
• Set this switch to OFF to use the half
step setting.
Change the jumper sockets.
• Set the jumper socket to FULL to use
the full step setting.
• Set the jumper socket to HALF to use
the half step setting.
ON: full step
OFF: half step
ON
OFF
F/H
Jumper
socket
Setting the step angle
Motor type Full step (base step angle) Half step
Standard type 1.8°/step 0.9°/step
High resolution type 0.9°/step 0.45°/step
The step angle of the geared type varies, depending on the gear ratio.
7.3 Pulse input mode
(Only for CSD2109-T, CSD2112-T, CSD2120-T)
Set the pulse-input mode using the pulse-input
mode switch (1P/2P).
Factory setting: ON (1-pulse input mode)
• Set the switch to ON to control the motor using
the pulse input and the rotation direction input
indicating the direction of motor rotation.
• Set the switch to OFF to control the motor using
two pulse inputs of CW and CCW.
ON: 1-pulse input mode
OFF: 2-pulse input mode
ON
OFF
1P/2P
Page 35

7 Setting
−35−
7.4 Power supply voltage
(Only for CSD2109-T, CSD2112-T, CSD2120-T)
Be sure to set the power supply voltage switch
(24/36V) according to the driver’s power supply
input voltage.
Factory setting: 24V
• Set the switch to ON when the power supply
voltage is 24 VDC.
• Set the switch to OFF when the power supply
voltage is 36 VDC.
ON: 24 V
OFF: 36 V
ON
OFF
24/36V
7.5 Motor currents
Set the motor currents during operation and in the current cutback state.
Motor operation current
Factory setting: Motor’s rated current
If the load is small and there is sufficient torque, the operating current can be
reduced to suppress vibration and temperature rise of the motor.
Motor standstill current
Factory setting: 40% of motor operating current
Note
• Setting the motor operating current too low may affect the motor’s
starting characteristics and position retention performance.
• Be sure to adjust the current within the rated current of the motor/driver.
Failure to do so may damage the motor/driver.
• When setting the current at motor standstill, be sure to do so after
setting the motor’s operating current and turning off the power supply to
the driver.
Page 36

7 Setting
−36−
Setting method for CSD2109-T, CSD2112-T, CSD2120-T
An ammeter or tester is needed to set the motor current. Note that a tester is required
only for the CSD2109-T, CSD2112-T and CSD2120-T.
•
Connecting an ammeter or tester
Connecting an ammeter:
Connect the driver, motor and DC ammeter.
Motor leads color
2-phase stepping motor
Driver TB2
Yellow
White
Black
Green
Red
Blue
YELLOW
WHITE
BLACK
GREEN
RED
BLUE
Connecting a tester:
Connect the driver and motor.
Motor leads color
2-phase stepping motor
Driver TB2
YELLOW
WHITE
BLACK
GREEN
RED
BLUE
Yellow
White
Black
Green
Red
Blue
Insert the tester probes [approx. 2.1 mm (0.08 in.) in diameter] into the motor
current check terminals (C.C.+, C.C.−). Set the tester to the voltage measuring
range.
C.C.+
C.C.
-
Page 37

7 Setting
−37−
•
Adjusting the motor operating current
1. Set the step angle switch (F/H) to
ON (full step).
ON: full step
OFF: half step
ON
OFF
F/H
2. Set the automatic current cutback
function switch (ACD) to OFF
(disable).
3. Turn on the power supply.
Wait until the motor reaches its
operating current.
ON
OFF
ON: enable
OFF: disable
ACD
4. Using an insulated screwdriver,
manipulate the potentiometer for
adjusting the motor operating
current (RUN VR).
Be sure to adjust the current to the
motor’s rated current or below.
RUN VR
STOP VR
The sum of two DC ammeter
readings indicates the current per
motor phase.
Example:
DC ammeter reading 0.5 A, 0.45 A
Output current per phase 0.95 A
When a tester is used, the voltage
shown on the tester corresponds to
the current per motor phase.
Example:
Tester reading 0.95 V
Output current per phase 0.95 A
5. Turn off the power supply.
6. Set the automatic current cutback function switch (ACD) to ON again.
This completes the adjustment of the motor operating current.
Page 38

7 Setting
−38−
•
Adjusting the motor standstill current
1. Set the step angle switch (F/H) to
ON (full step).
ON: full step
OFF: half step
ON
OFF
F/H
2. Set the automatic current cutback
function switch (ACD) to ON
(enable).
3. Turn on the power supply.
Wait until the motor reaches its
standstill current.
ON
OFF
ON: enable
OFF: disable
ACD
4. Using an insulated screwdriver,
manipulate the potentiometer for
adjusting the motor standstill
current (STOP VR).
Be sure to adjust the current to 40%
of the motor’s rated current or below.
The sum of two DC ammeter
readings indicates the current per
motor phase.
RUN VR
STOP VR
5. Turn off the power supply.
This completes the adjustment of the motor standstill current.
After about 0.1 second has passed since the pulse was stopped, the motor’s
operating current automatically decreases to the set value of current at motor
standstill.
Page 39

7 Setting
−39−
Setting method for CSD2140T, CSD2145T
•
Connecting an ammeter
Connect the driver, motor and DC ammeter.
Motor leads color
2-phase stepping motor
Driver TB2
RED
BLUE
GREEN
BLACK
YELLOW
WHITE
Red
Blue
Green
Black
Yellow
White
•
Adjusting the motor operating current
1. Set the jumper socket for the step angle switch
(FULL/HALF) to FULL.
2. Set the jumper socket for automatic current
cutback function (C.C./A.C.D.) to C.C.
3. Turn on the power supply.
Wait until the motor reaches its operating current.
4. Using an insulated screwdriver, manipulate the
potentiometer for adjusting the motor operating
current (RUN VR).
Be sure to adjust the current to the motor’s rated
current or below.
The sum of two DC ammeter readings indicates the
current per motor phase.
5. Turn off the power supply.
RUN VR
6. Set the jumper socket for automatic current
cutback function (C.C./A.C.D.) to A.C.D. again.
This completes the adjustment of the motor operating
current.
Page 40

7 Setting
−40−
•
Adjusting the motor standstill current
1. Set the jumper socket for the step angle switch
(FULL/HALF) to FULL.
2. Set the jumper socket for automatic current
cutback function (C.C./A.C.D.) to A.C.D.
3. Turn on the power supply.
Wait until the motor reaches its standstill current.
4. Using an insulated screwdriver, manipulate the
potentiometer for adjusting the motor standstill
current (STOP VR).
Be sure to adjust the current to 40% of the motor’s
rated current or below.
The sum of two DC ammeter readings indicates the
current per motor phase.
STOP VR
5. Turn off the power supply.
This completes the adjustment of the motor standstill current.
After about 0.1 second has passed since the pulse was stopped, the motor’s
operating current automatically decreases to the set value of current at motor
standstill.
Current adjusting potentiometer and current values
• The characteristic of motor operating current indicates the output current
corresponding to the setting of the potentiometer for adjusting the motor operating
current.
• The characteristic of motor standstill current indicates the current cutback ratio
corresponding to the setting of the potentiometer for adjusting the motor standstill
current. The current cutback ratio changes according to the set motor operating
current.
Current-cutback ratio (%) = × 100
Motor standstill current (A/ phase)
Motor operating current (A/ phase)
Note
Be sure to adjust the current within the rated current of the motor/driver.
Failure to do so may damage the motor/driver.
Page 41

7 Setting
−41−
•
Current adjusting potentiometer
The scale values are not displayed on the control.
CSD2109-T, CSD2112-T, CSD2120-T CSD2140T, CSD2145T
4
2
0
100
5
CSK243
CSK243SG
CSK243M
0
Setting of the RUN potentiometer
Output current [A/Phase]
Characteristic of motor operating current
(representative value)
Setting of the STOP potentiometer
Current-cutback ratio [%]
Characteristic of motor standstill current
(representative value)
0.2
0
0
20
40
60
80
100
10
30
50
70
90
01234
1234
0.4
0.6
0.8
1
0.95 A/Phase
0.5 A/Phase
0.3 A/Phase
CSK244
CSK244M
0
Setting of the STOP potentiometer
Current-cutback ratio [%]
Characteristic of motor standstill current
(representative value)
0
20
40
60
80
100
10
30
50
70
90
1234
1.2 A/Phase
0.6 A/Phase
0.3 A/Phase
Setting of the RUN potentiometer
Output current [A/Phase]
Characteristic of motor operating current
(representative value)
0.2
0
01234
0.4
0.6
0.8
1
1.2
CSK245
CSK245M
0
Setting of the STOP potentiometer
Current-cutback ratio [%]
Characteristic of motor standstill current
(representative value)
0
20
40
60
80
100
10
30
50
70
90
1234
1.2 A/Phase
0.6 A/Phase
0.3 A/Phase
Setting of the RUN potentiometer
Output current [A/Phase]
Characteristic of motor operating current
(representative value)
0.2
0
01234
0.4
0.6
0.8
1
1.2
Page 42

7 Setting
−42−
CSK264
CSK264SG
CSK264M
Setting of the RUN potentiometer
Output current [A/Phase]
Characteristic of motor operating current
(representative value)
0.5
0
01234
1
1.5
2
0
Setting of the STOP potentiometer
Current-cutback ratio [%]
Characteristic of motor standstill current
(representative value)
0
20
40
60
80
100
10
30
50
70
90
1234
2.0 A/Phase
1.0 A/Phase
0.5 A/Phase
CSK266
CSK266M
Setting of the RUN potentiometer
Output current [A/Phase]
Characteristic of motor operating current
(representative value)
0.5
0
01234
1
1.5
2
0
Setting of the STOP potentiometer
Current-cutback ratio [%]
Characteristic of motor standstill current
(representative value)
0
20
40
60
80
100
10
30
50
70
90
1234
2.0 A/Phase
1.0 A/Phase
0.5 A/Phase
CSK268
CSK268M
Setting of the RUN potentiometer
Output current [A/Phase]
Characteristic of motor operating current
(representative value)
0.5
0
01234
1
1.5
2
0
Setting of the STOP potentiometer
Current-cutback ratio [%]
Characteristic of motor standstill current
(representative value)
0
20
40
60
80
100
10
30
50
70
90
1234
2.0 A/Phase
1.0 A/Phase
0.5 A/Phase
CSK296
0
Setting of the STOP potentiometer
Current-cutback ratio [%]
Characteristic of motor standstill current
(representative value)
0
20
40
60
80
100
10
30
50
70
90
12345678910
4.5 A/Phase
2.3 A/Phase
1.2 A/Phase
Setting of the RUN potentiometer
Output current [A/Phase]
Characteristic of motor operating current
(representative value)
012345678
0
1
2
3
4
Page 43

7 Setting
−43−
CSK299
0
Current-cutback ratio [%]
Characteristic of motor standstill current
(representative value)
0
20
40
60
80
100
10
30
50
70
90
12345678910
4.5 A/Phase
2.3 A/Phase
1.2 A/Phase
Setting of the RUN potentiometer
Output current [A/Phase]
Characteristic of motor operating current
(representative value)
012345678
0
1
2
3
4
CSK2913
0
Current-cutback ratio [%]
Characteristic of motor standstill current
(representative value)
0
20
40
60
80
100
10
30
50
70
90
12345678910
4.0 A/Phase
2.0 A/Phase
1.2 A/Phase
Setting of the RUN potentiometer
Output current [A/Phase]
Characteristic of motor operating current
(representative value)
012345678
0
1
2
3
4
Page 44

8 Inspection
−44−
8 Inspection
It is recommended that periodic inspections be conducted for the items listed below
after each operation of the motor. If an abnormal condition is noted, discontinue any
use and contact your nearest office.
During inspection
• Are any of the motor mounting screws loose?
• Check for any unusual noises in the motor’s bearings (ball bearings) or other
moving parts.
• Are the motor’s output shaft (or gear output shaft) and load shaft out of
alignment?
• Are there any scratches, signs of stress or loose driver connections in the motor
cable?
• Is there any foreign deposit on the driver?
• Are any of the driver mounting screws or connectors loose?
• Are there any strange smells or other abnormalities at the driver?
Note
The driver uses semiconductor elements, so be extremely careful when
handling them. Static electricity may damage the driver.
Page 45

9 Troubleshooting and remedial actions
−45−
9 Troubleshooting and remedial
actions
During motor operation, the motor or driver may fail to function properly due to an
improper speed setting or wiring. When the motor cannot be operated correctly, refer
to the contents provided in this section and take appropriate action. If the problem
persists, contact your nearest office.
Phenomenon Possible cause Remedial action
Connection error in the motor
or power supply.
Check that the connections
between the driver, motor and
power supply are correct.
Current potentiometer
incorrectly set. If the setting is
too low, the motor torque will
also be too low and operation
will be unstable.
Return the current
potentiometer to its factory
setting and check.
• The motor is not
energized.
• The motor’s output
shaft can be turned
easily by hand.
The all windings off input is
set to ON.
Switch the all windings off
input to OFF and confirm that
the motor is excited.
Pulse input line connection
error.
• Check the controller and
driver connections.
• Check the pulse input
specifications (voltage and
width).
The motor does not
run.
The CW input and the CCW
input came ON at the same
time.
Input either the CW input or
the CCW input, and always
switch the other terminal to
OFF.
The motor rotates in
the direction opposite
that which is
specified.
The CW input and the CCW
input are connected in
reverse.
Connect the CW pulses to the
CW pulse input (pin No.1 and
2), and connect the CCW
pulses to the CCW pulse input
(pin No.3 and 4).
Motor connection error. Check that the driver and
motor connections are correct.
Motor operation is
unstable.
Current potentiometer
incorrectly set. If the setting is
too low, the motor torque will
also be too low and operation
will be unstable.
Return the current
potentiometer to its factory
setting and check.
Page 46

9 Troubleshooting and remedial actions
−46−
Phenomenon Possible cause Remedial action
The centers of the motor’
output shaft and load shaft are
not aligned.
Check the connection
condition of the motor output
shaft and load shaft.
The load or load fluctuation is
too high.
Check for large load
fluctuations during motor
operation. If adjusting the
motor’s operating speed to
low and high torque eliminates
the problem, it is necessary to
review the load conditions.
The speed of the starting
pulse is too high.
Lower the speed of the
starting pulse.
The acceleration
(deceleration) time is too
short.
Lengthen the acceleration
(deceleration) time.
Loss of
synchronization
during acceleration or
running.
Electrical noise Check running with only the
motor, driver and required
controller. If the impact of
noise is recognized, take
countermeasures, such as
rewiring for greater distance
from the noise source,
changing the signal cables to
shielded wire, or mounting a
ferrite core.
Wrong step angle settings. Check the settings of the step
angle setting switches.
Motor does not move
the set amount.
Pulse output count is too low
or too high.
Check whether or not the
number of pulses required for
operation at the set step angle
are being output.
Current does not drop
when the motor stops.
The all windings off input is
set to ON.
Switch all windings off input to
OFF.
Page 47

9 Troubleshooting and remedial actions
−47−
Phenomenon Possible cause Remedial action
The centers of the motor’s
output shaft and load shaft are
not aligned.
Check the connection
condition of the motor output
shaft and load shaft.
Motor resonating If the vibration decreases
when the operating pulse
speed is changed, it means
the motor is resonating.
Change the operating pulse
speed setting or install a clean
damper (sold separately) to
suppress vibration.
Motor vibration too
great.
Load too small. Turn the motor operating
current setting switch slightly
in the counterclockwise
direction in order to lower the
current. Vibration will increase
if the motor’s output torque is
too large for the load.
Long continuous operation
time of the motor.
Decrease the operation time
of the motor per session or
increase the standstill time.
Make sure that the motor case
temperature will not exceed
100 °C (212 °F).
The all windings off input is
set to ON.
Switch all windings off input to
OFF.
Motor too hot.
Motor standstill current
adjustment too high.
Lower the motor standstill
current.
Page 48

• Unauthorized reproduction or copying of all or part of this Operating Manual is prohibited.
If a new copy is required to replace an original manual that has been damaged or lost,
please contact your nearest Oriental Motor branch or sales office.
• Characteristics, specifications and dimensions are subject to change without notice.
• While we make every effort to offer accurate information in the manual, we welcome
your input. Should you find unclear descriptions, errors or omissions, please contact the
nearest office.
• is a registered trademark or trademark of Oriental Motor Co., Ltd., in
Japan and other countries.
Other product names and company names mentioned in this manual may be trademarks or
registered trademarks of their respective companies and are hereby acknowledged. The
third-party products mentioned in this manual are recommended products, and references
to their names shall not be construed as any form of performance guarantee. Oriental
Motor is not liable whatsoever for the performance of these third-party products.
© Copyright ORIENTALMOTOR CO., LTD. 2008
Printed on Recycled Pape
r
Technical Support Tel:(800)468-3982
8:30
A.M.
to 5:00
P. M .
, P.S.T. (M-F)
7:30
A.M.
to 5:00
P. M .
, C.S.T. (M-F)
E-mail: techsupport@orientalmotor.com
www.orientalmotor.com
Headquarters Tokyo, Japan
Tel:(03)3835-0684 Fax:(03)3835-1890
• Please contact your nearest Oriental Motor office for further information.
 Loading...