

Page 1
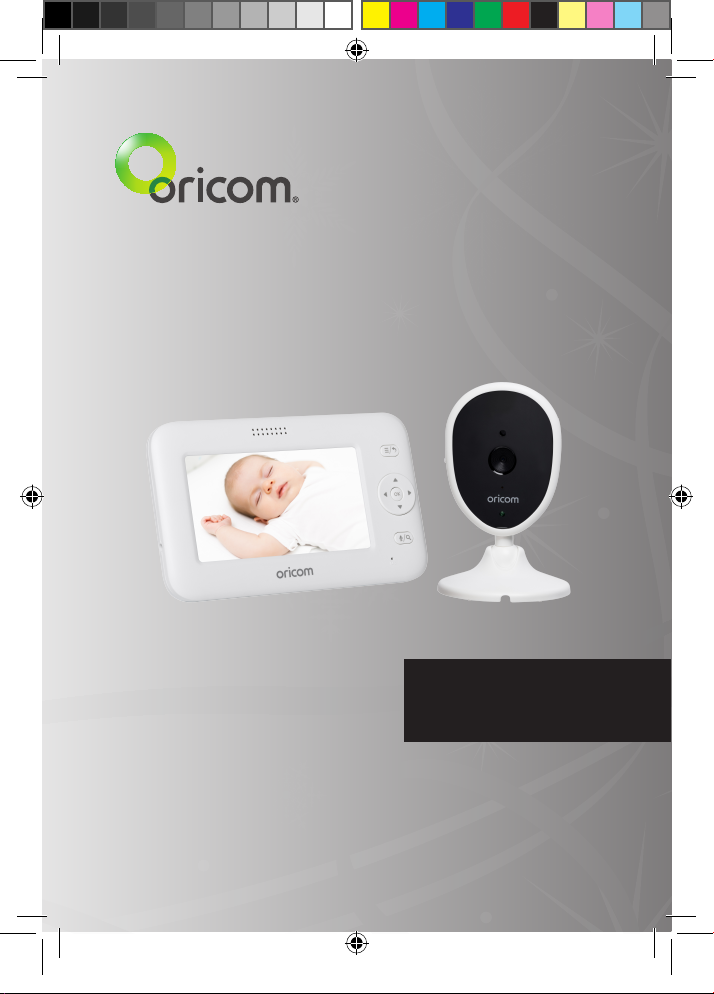
Video Baby Monitor
Secure740
User Guide
KEEP THIS USER GUIDE FOR FUTURE REFERENCE
OR017650 - SC740 User Guide_05-10-19.indd 1 2019/5/10 13:05:36
Always retain your proof of purchase in case of warranty service.
AUSTRALIA: www.oricom.com.au
NEW ZEALAND: www.oricom.co.nz
Page 2

taBLe of ContentS
Safety InformatIon 1
oVerVIeW of fUnCtIonaL
ComPonent PoSItIonS 4
SettIng UP yoUr VIdeo BaBy
monItor 6
BaSIC oPeratIon of the keyS 11
menU oPtIonS and fUnCtIonS 12
SettIngS 19
CUStomer SUPPort 29
troUBLeShootIng 30
eXPreSS Warranty 32
WARNING: Rechargeable Lithium Ion batteries are potentially
hazardous and can present a serious re hazard if damaged,
defective or improperly used. Do not leave your product
unattended whilst charging the battery. Do not leave your
child unattended with this product.
Need Help?
If you need assistance setting up or using your Oricom
product now or in the future, call Oricom Support.
Australia 1300 889 785 or 02 4574 8888
www.oricom.com.au
Mon-Fri 8am – 6pm AEST
New Zealand 0800 67 42 66
www.oricom.co.nz
Mon-Fri 10am – 8pm NZST
OR017650 - SC740 User Guide_05-10-19.indd 2 2019/5/10 13:05:36
Page 3

1Safety InformatIon
Important Safety Information
• It is very important that you read the User Guide
carefully as it contains detailed information you
will need to get the most from your Oricom baby
monitor. If you have any issues setting up or using
your Oricom baby monitor, please call our Customer
Support team.
• Your Oricom baby monitor is designed to be an
aid and should not be used as a substitute for
responsible and proper adult supervision of a child.
• The baby monitor has been designed to provide
some added reassurance in the form of sound
and video transmission for those times when you
are not in the same room as your baby, provided
you always stay within hearing range of the baby
monitor during use.
• Your baby monitor is not a medical device, nor a
device to prevent cases of Sudden Infant Death
Syndrome (SIDS) or "cot death", and you should not
rely on it for your baby's wellbeing. It is important
that you regularly check on your baby personally.
• Make sure the baby unit, parent unit and mains
adaptor cables are kept out of reach of your baby
and other young children at all times, at least one
metre away.
• Never place the baby unit or parent unit inside your
baby’s cot, bed or playpen.
OR017650 - SC740 User Guide_05-10-19.indd 1 2019/5/10 13:05:36
Page 4
2 Safety InformatIon
• Never cover the parent or baby units with clothes,
towels, blankets or any other item. Never use or
place your parent or baby unit in or near moisture or
water (e.g. near bath or pool). Immersing in water
could cause electric shock and even death.
• The installation location plays an important role in
ensuring proper operation. Therefore, maintain a
distance of at least one metre from other electronic
equipment, such as microwave ovens or hi−fi
devices, otherwise they could cause interference.
During continual use, the baby unit power adaptors
may become warm to the touch. This is normal and
should not be a concern.
Warning
Risk of suffocation!
!
Keep all packaging materials and protective foils
out of reach of children.
WARNING: Rechargeable Lithium Ion batteries are
potentially hazardous and can present a serious fire
hazard if damaged, defective or improperly used. Do
not leave your product unattended whilst charging the
battery. Do not leave your child unattended with this
product.
OR017650 - SC740 User Guide_05-10-19.indd 2 2019/5/10 13:05:36
Page 5

Safety InformatIon
3
Battery safety
• Batteries represent a hazard to health and the
environment!
• They contain toxic, ecologically hazardous heavy
metals. Do not dispose of batteries in a re as they
may explode. Dispose of batteries according to local
regulations, never in your household rubbish.
• Do not dismantle, cut, open, crush, bend, puncture,
or shred cells of the batteries. If a battery leaks, do
not let the battery liquid touch skin or eyes. If this
happens, immediately ush the affected areas with
water, and seek medical assistance.
• Do not modify, remanufacture, attempt to insert
foreign objects into the battery, or immerse or
expose it to water or other liquids. Batteries may
explode if damaged.
• Use only the battery supplied with the product.
Improper use, or use of unapproved batteries, may
present a risk of re, explosion, or other hazard, and
may invalidate any approval or warranty.
• If you believe the battery is damaged, remove
product from the charger and stop using the
product. Contact Oricom for assistance. Never use
a damaged battery.
OR017650 - SC740 User Guide_05-10-19.indd 3 2019/5/10 13:05:36
Page 6
oVerVIeW of fUnCtIonaL
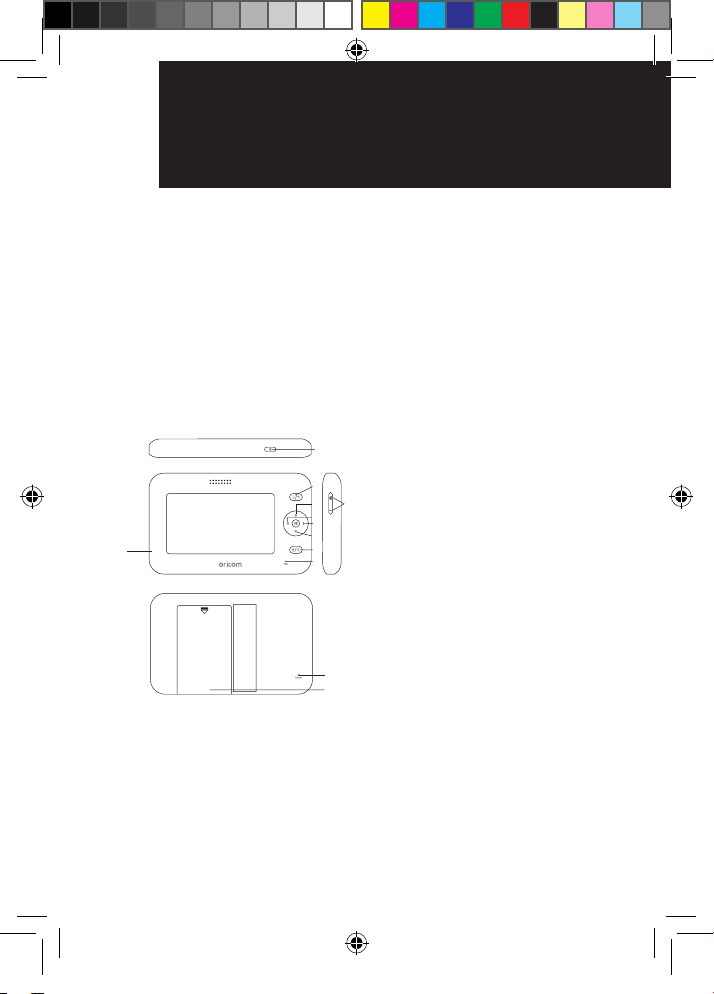
ComPonent PoSItIonS
ི
ཷ
ཹ
oVerVIeW of fUnCtIonaL
4
ComPonent PoSItIonS
Disposal
Always dispose of your products at the end of their
life in accordance with your local waste disposal
requirements.
Packaging materials including cardboard and paper
packaging, should be recycled in accordance with
your local council waste regulations.
Parent Unit
OR017650 - SC740 User Guide_05-10-19.indd 4 2019/5/10 13:05:36
ཱ
ཱི
ུ
ུ
ཱི
ཱུ
ྲྀ
ླྀ
ON/OFF BUTTON
1
MENU AND BACK
2
VOLUME + / -
3
UP / DOWN BUTTONS
4
LEFT/RIGHT BUTTONS
5
TALK AND ZOOM
6
MICROPHONE
7
CHARGING SOCKET
8
RESET
9
BATTERY DOOR
Page 7

oVerVIeW of fUnCtIonaL
ི
ComPonent PoSItIonS
5
Camera Unit
POWER
1
ཱ
ADAPTOR PORT
ON/OFF SWITCH
2
PAIR BUTTON
3
Check pack contents:
1 Baby unit (camera)
1 AC adaptor for the baby unit
1 Parent unit
1 Li-ion Polymer rechargeable battery pack for the
parent unit
1 AC adaptor for the parent unit
1 User guide
If any items are missing, contact Oricom customer
support.
WARNING: Rechargeable Lithium Ion batteries are
potentially hazardous and can present a serious re
hazard if damaged, defective or improperly used. Do
not leave your product unattended whilst charging the
battery. Do not leave your child unattended with this
product.
OR017650 - SC740 User Guide_05-10-19.indd 5 2019/5/10 13:05:36
Page 8
SettIng UP yoUr VIdeo
SettIng UP yoUr VIdeo
6
BaBy monItor
1. Setting up your Video Baby Monitor
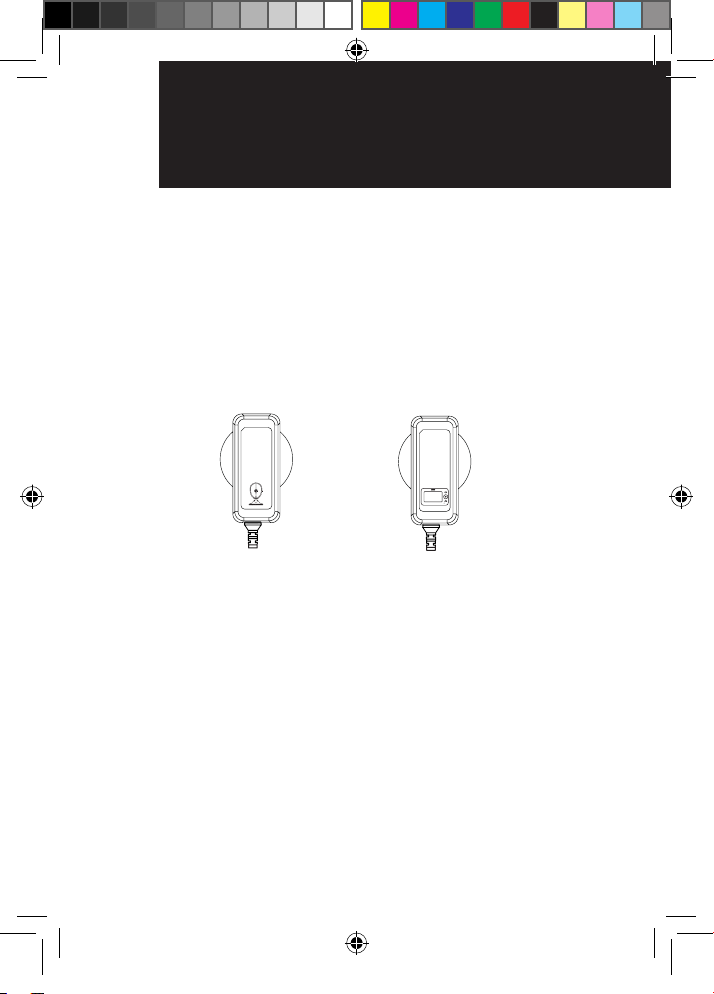
Power adaptor markings
Please ensure you connect the correct power adaptor
to parent and baby units. Each power adaptor is
marked with a drawing showing the parent unit or
camera unit as follows:
Baby Unit Power
Adaptor Marking
Parent Unit Power
Adaptor Marking
OR017650 - SC740 User Guide_05-10-19.indd 6 2019/5/10 13:05:37
Page 9
SettIng UP yoUr VIdeo
BaBy monItor
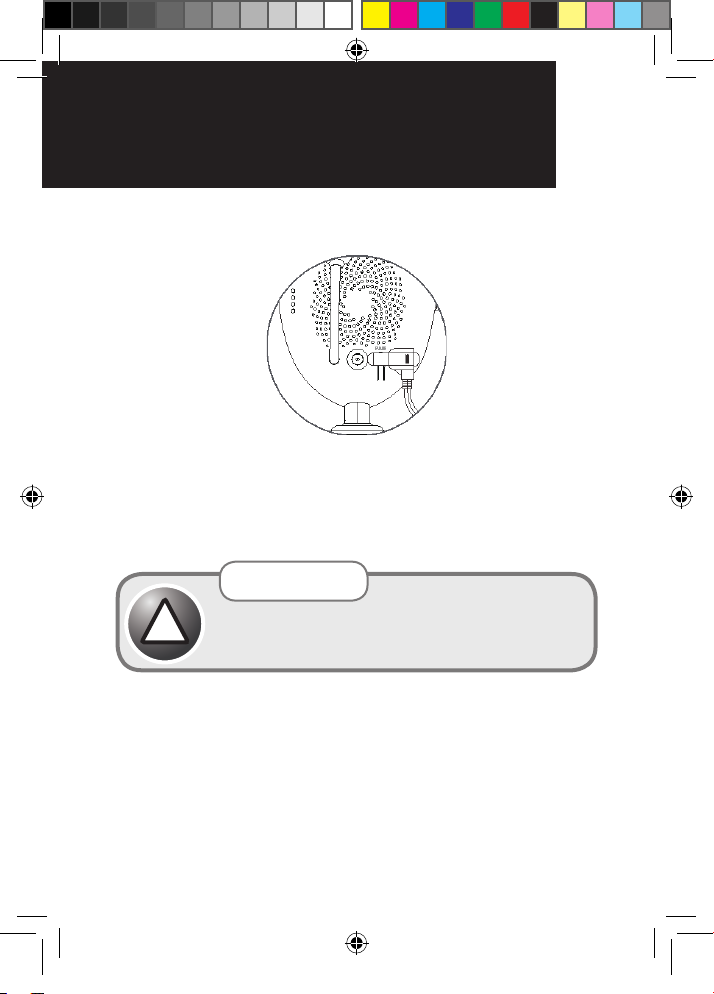
1.1. Connecting the power adaptor for the
baby unit
• Connect the small plug of the adaptor to the back
of the Baby Unit and the other end into the power
socket.
• Only use the included adaptor (5V DC/1A)
7
Warning
Do not place the AC Adaptor cable in a high
!
"wear and tear" location. Never use a frayed or
compromised cord.
Strangulation Hazard: Children have been
STRANGLED with cords. Keep this cord out of the
reach of children (more than 1 metre away).
OR017650 - SC740 User Guide_05-10-19.indd 7 2019/5/10 13:05:37
Page 10
SettIng UP yoUr VIdeo
SettIng UP yoUr VIdeo
8
BaBy monItor
1.2 Aligning the baby unit
For optimal performance, place your baby unit
between one and two metres away from your baby.
Point the baby unit towards the baby. Check that the
baby is suitably displayed on the parent unit screen.
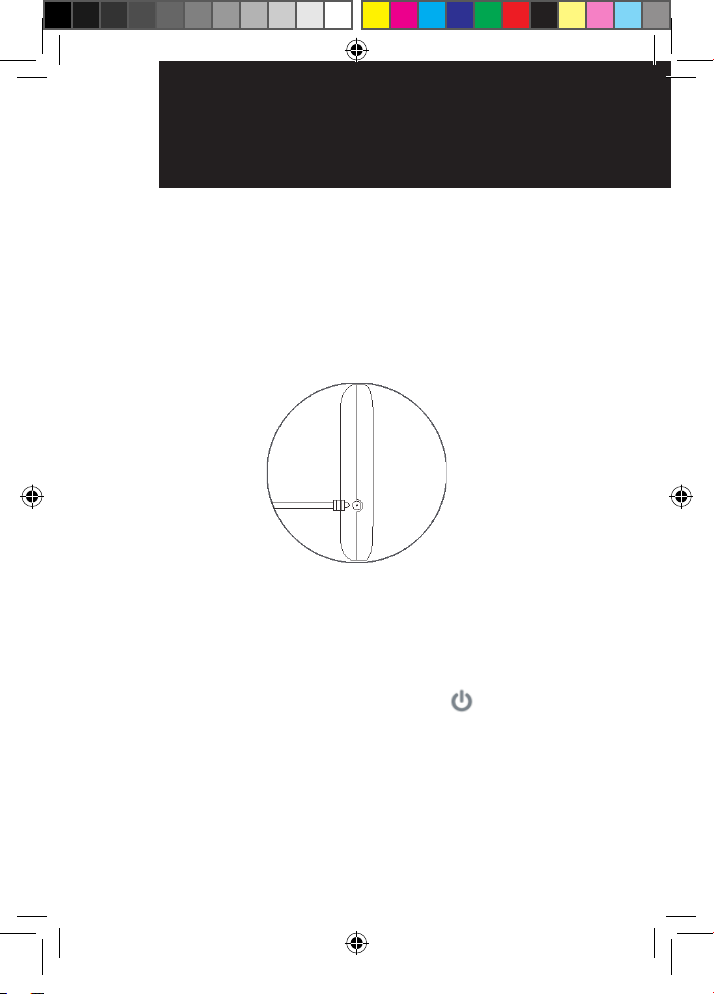
1.3. Connecting the power adaptor for the Parent
Unit
• Connect the small plug of the adaptor to the Parent
Unit and the other end to the power socket.
• Only use the included adaptor (5V DC/1.5A).
• Recommended charging time of at least 16 hours
before rst use.
• Press and hold the POWER button
unit to turn it ON.
on the parent
OR017650 - SC740 User Guide_05-10-19.indd 8 2019/5/10 13:05:37
Page 11
SettIng UP yoUr VIdeo
BaBy monItor
9
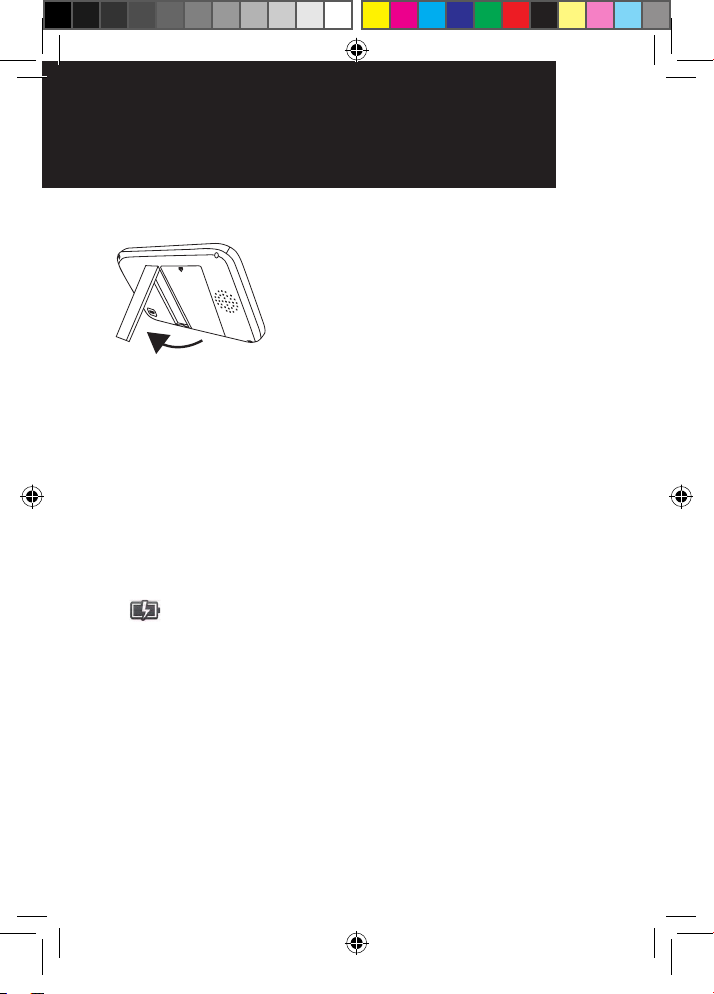
Desk stand
In-use time and battery charging
Depending on the usage, the parent unit will work for
up to 8 hours on a fully charged battery with power
save turned ON.
When the battery charge becomes low on the parent
unit, the battery icon will turn red. At this point, you
need to charge the parent unit.
When charging, the battery status indicator on the
parent unit screen will change to the charging icon
<
>.
To speed up the charging process, turn the parent unit
off when charging if it is not being used.
You can continue to use your parent unit to monitor
your baby even when the battery is low, provided the
power adaptor is plugged in to recharge the battery.
OR017650 - SC740 User Guide_05-10-19.indd 9 2019/5/10 13:05:38
Page 12

SettIng UP yoUr VIdeo
10
BaBy monItor
NOTE:
• The parent unit can be kept on charge even if it is
fully charged.
• When the parent unit is being used whilst on
charge, the charging time will be extended.
• We recommend that you TURN OFF the parent
unit when it is not in-use, to conserve battery
power.
Battery Life
The rechargeable battery pack (supplied) can be
charged and discharged hundreds of times, however
it will eventually wear out and lose its ability to hold a
full charge. When the in-use time becomes noticeably
shorter than normal, it is time to purchase a new
battery pack.
How to purchase spare parts
You can purchase battery packs (Part number:
2B0103) and extra camera units from Oricom
www.oricom.com.au
OR017650 - SC740 User Guide_05-10-19.indd 10 2019/5/10 13:05:38
Page 13
BaSIC oPerat Ion
of the keyS
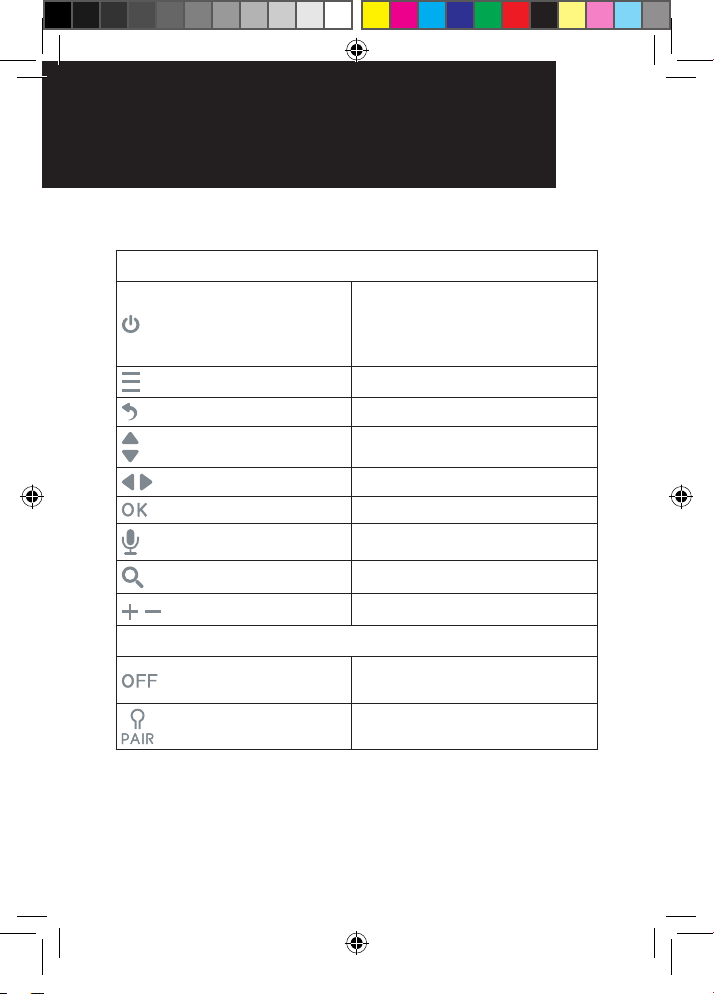
2. Basic operation of the keys
PARENT UNIT
Switch ON/OFF – Press and
ON/OFF BUTTON
MENU BUTTON Press to access the menu
BACK KEY Press to return to previous option
UP/DOWN BUTTONS Display brightness “+” & “-”
LEFT/RIGHT BUTTONS Navigation keys
OK BUTTON Press to conrm a selection
TALK BUTTON Press and hold to talk
ZOOM BUTTON Press to digitally zoom
ON/OFF switch
PAIR button
hold for 3 seconds
Screen Sleep/Wake – Briey
press
Press to adjust volume level
BABY UNIT
Switch to turn the Baby Unit
ON/OFF
Press and hold to pair to the
Parent Unit
11
OR017650 - SC740 User Guide_05-10-19.indd 11 2019/5/10 13:05:38
Page 14
menU oPtIonS
12
and fUnCtIonS
3. MENU options and functions
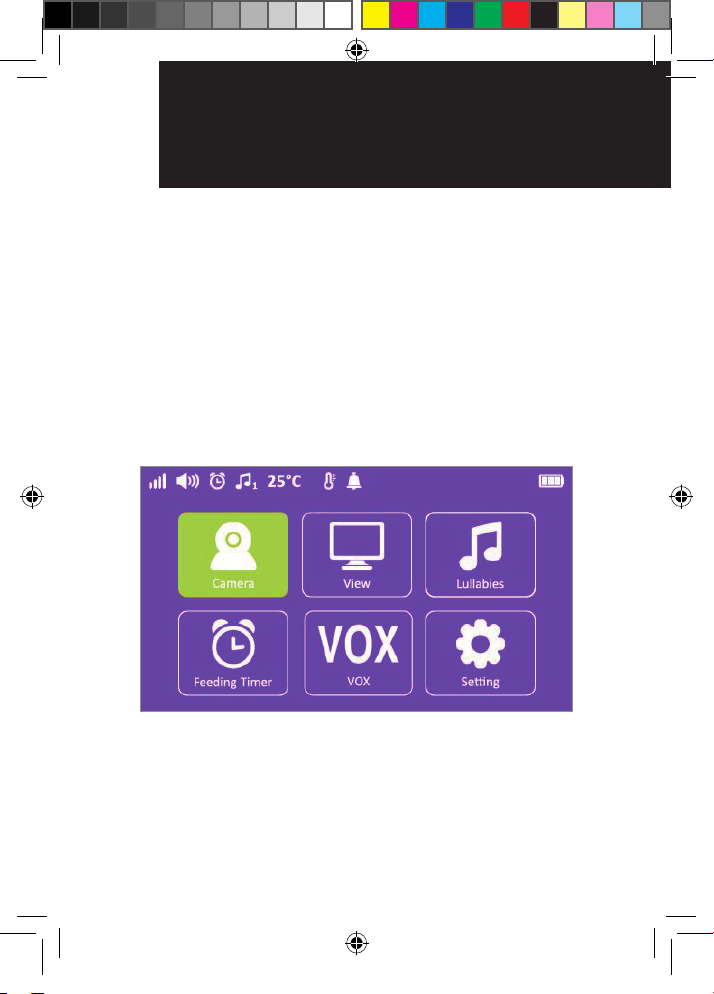
Camera
Press MENU button.
1) Select Camera icon. Press “OK” button to conrm
the selection.
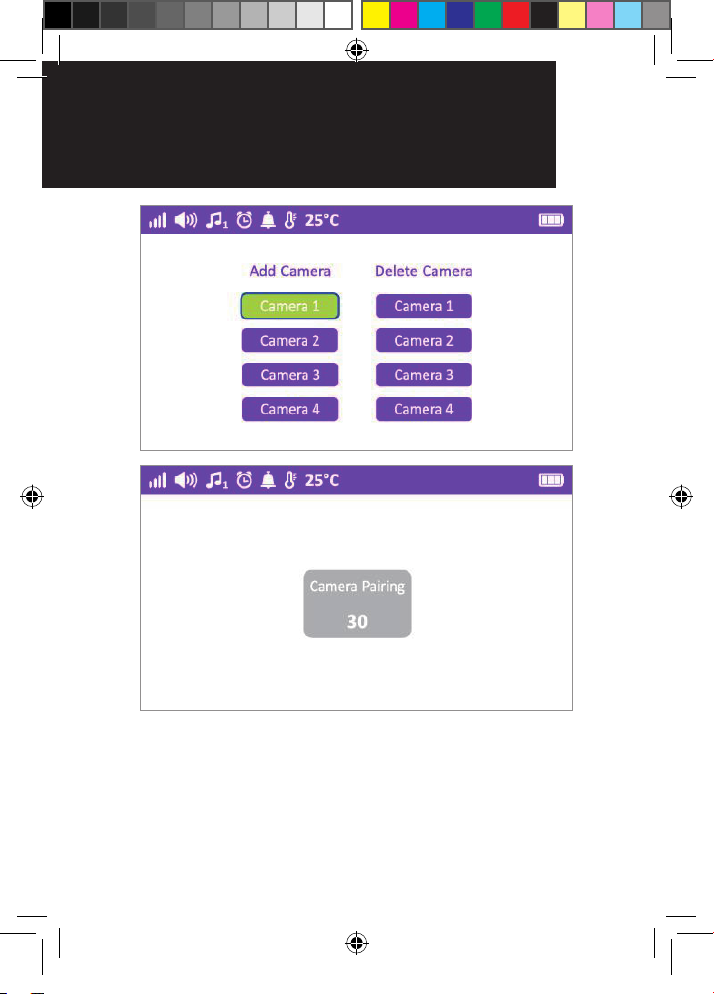
2) Press add camera (SC740 supports up to 4
cameras). Press OK button to conrm the selection.
3) Press the “Pair” button on the camera to pair within
30 seconds.
OR017650 - SC740 User Guide_05-10-19.indd 12 2019/5/10 13:05:38
Page 15
menU oPtIonS
and fUnCtIonS
13
OR017650 - SC740 User Guide_05-10-19.indd 13 2019/5/10 13:05:38
Page 16
menU oPtIonS
14
and fUnCtIonS
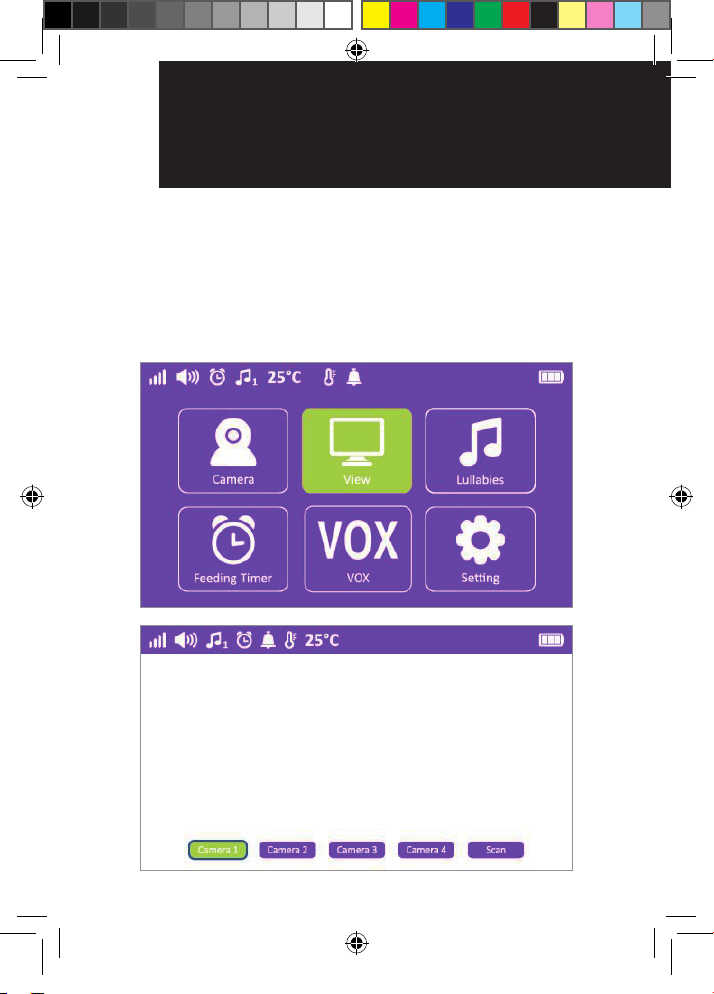
View (multiple camera mode)
Press MENU button:
1) Select the view icon for multiple camera options.
Press “OK” button to conrm the selection.
2) Choose camera 1/ camera 2/ camera 3/camera 4 or
choose to scan between the connected cameras.
OR017650 - SC740 User Guide_05-10-19.indd 14 2019/5/10 13:05:38
Page 17
menU oPtIonS
and fUnCtIonS
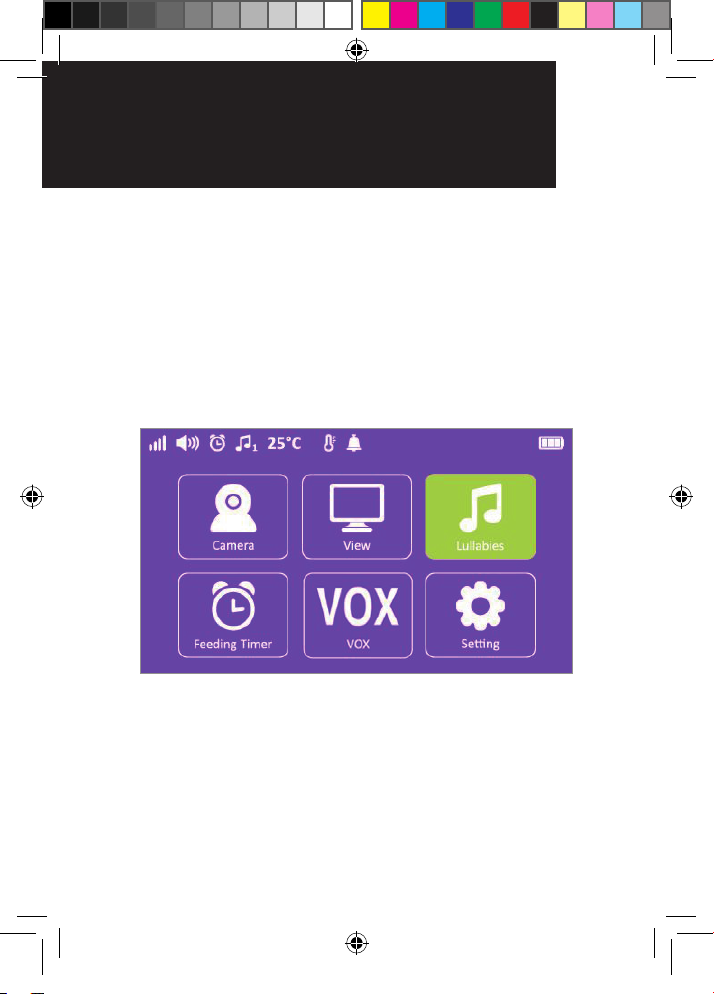
Lullabies
Press MENU button:
1) Select the Lullabies icon. Press “OK” button to conrm
the selection.
2) Choose the lullaby to play from the lullabies list.
Your monitor will automatically replay the chosen
lullaby.
3) Note: Select all to play all the lullabies. Select the
VOL icon to adjust lullaby volume.
15
OR017650 - SC740 User Guide_05-10-19.indd 15 2019/5/10 13:05:38
Page 18
menU oPtIonS
16
and fUnCtIonS
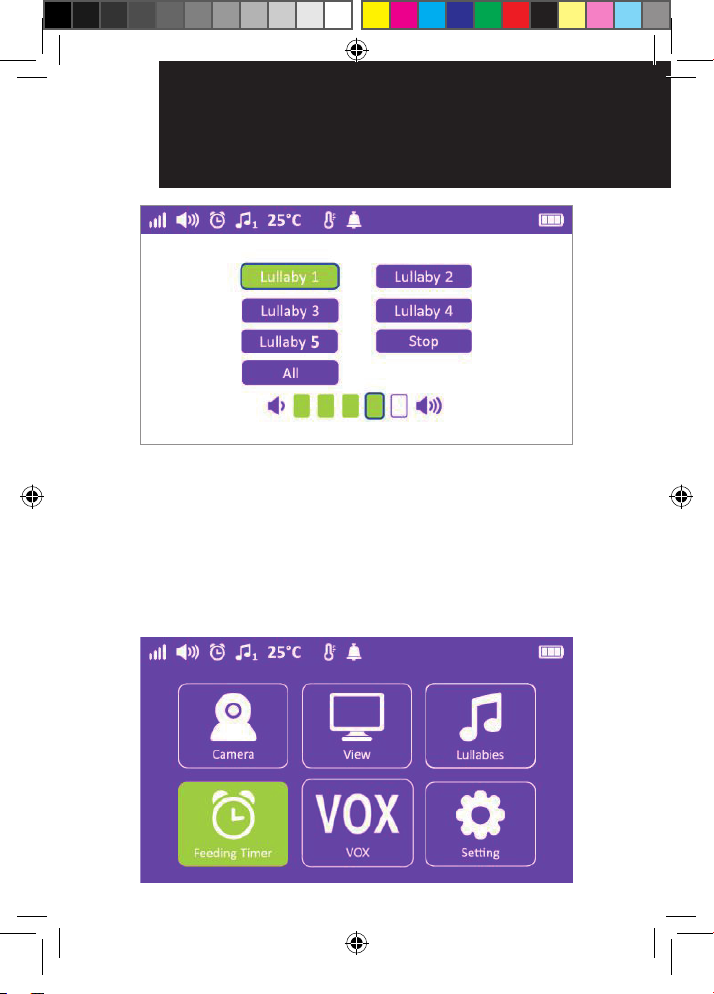
Feeding Timer
Press MENU button
1) Select Feeding Timer icon. Press “OK” button to
conrm the selection.
2) Choose your preferred feeding reminder time. Once
selected, a countdown will appear when monitor
is in viewing mode. When the predened time has
elapsed, monitor will alarm for 5 seconds.
OR017650 - SC740 User Guide_05-10-19.indd 16 2019/5/10 13:05:39
Page 19
menU oPtIonS
and fUnCtIonS
17
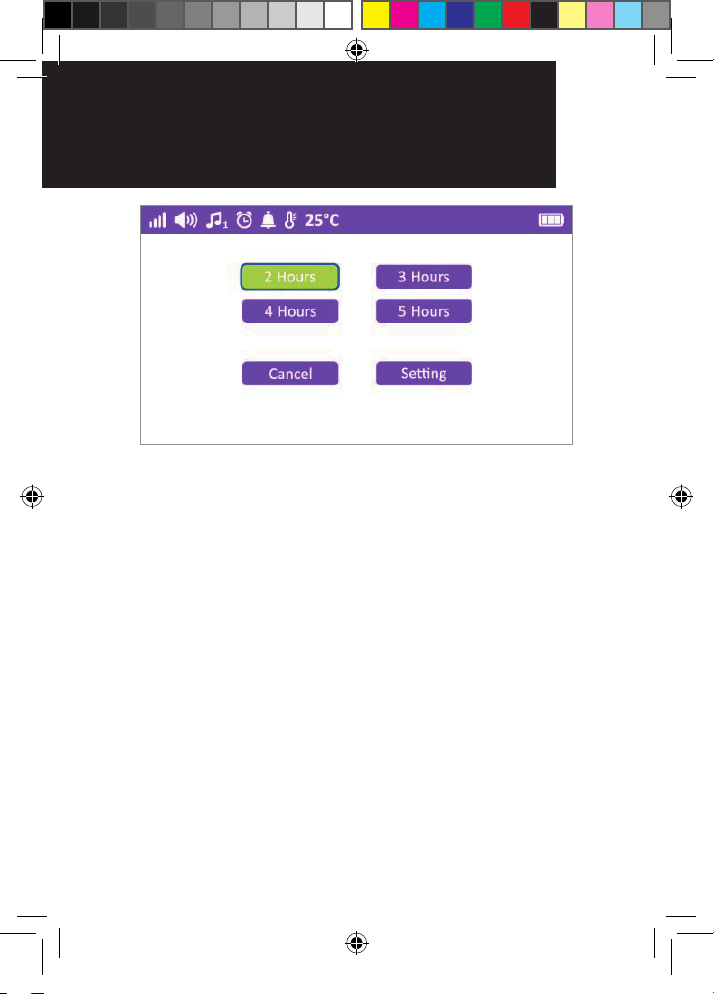
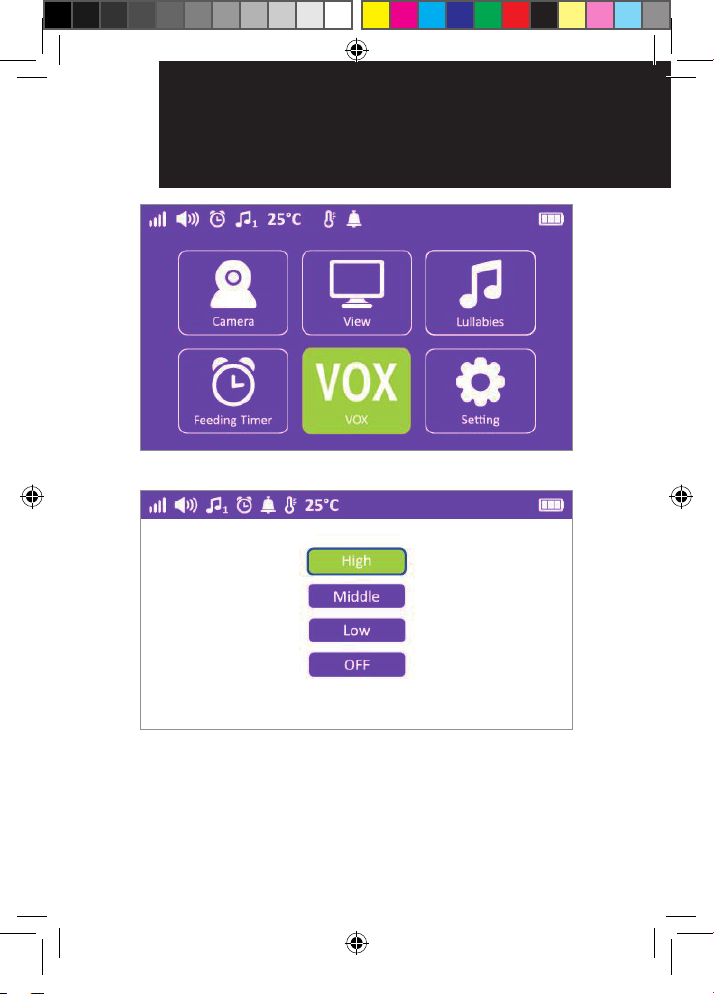
VOX
Press MENU button
1) Select VOX icon. Press “OK” button to conrm the
selection, when VOX is turned on, the screen and
sound are muted.
2) Choose your preferred alarm sensitivity level. When
this feature is turned on, your baby monitor will
wake the screen, open the audio and sound an
alarm when the noise level coming from the baby
unit reaches the VOX threshold. You have the
option to turn off the audible alarm alert by selecting
"OFF" when prompted after the sensitivity selection.
OR017650 - SC740 User Guide_05-10-19.indd 17 2019/5/10 13:05:39
Page 20
menU oPtIonS
18
and fUnCtIonS
OR017650 - SC740 User Guide_05-10-19.indd 18 2019/5/10 13:05:39
Page 21
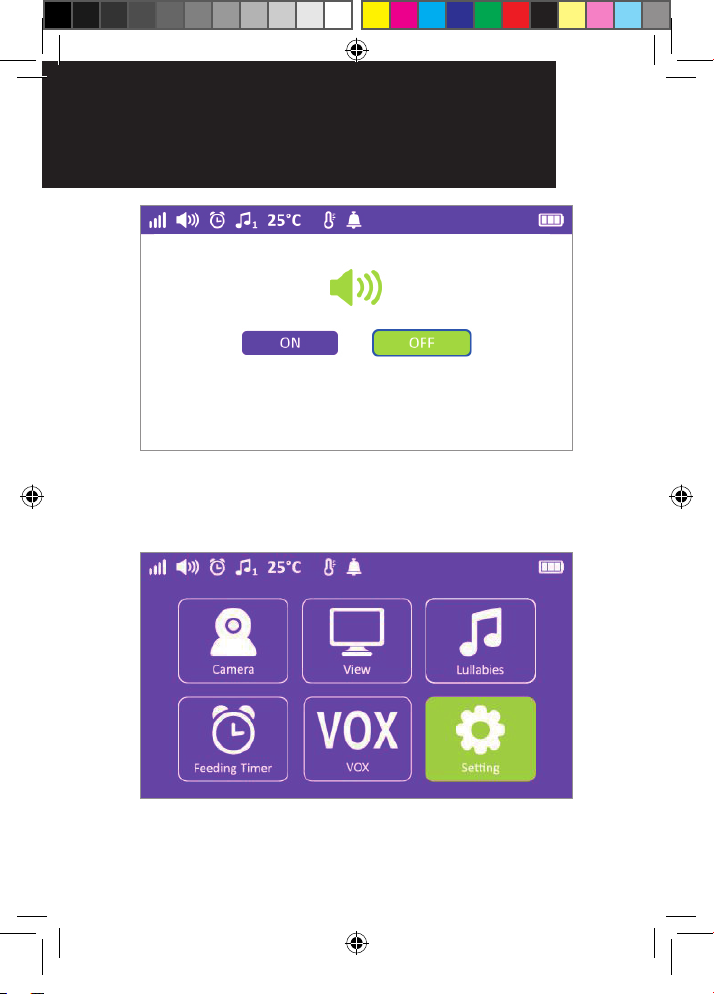
4. Settings
19SettIngS
OR017650 - SC740 User Guide_05-10-19.indd 19 2019/5/10 13:05:39
Page 22
20 SettIngS
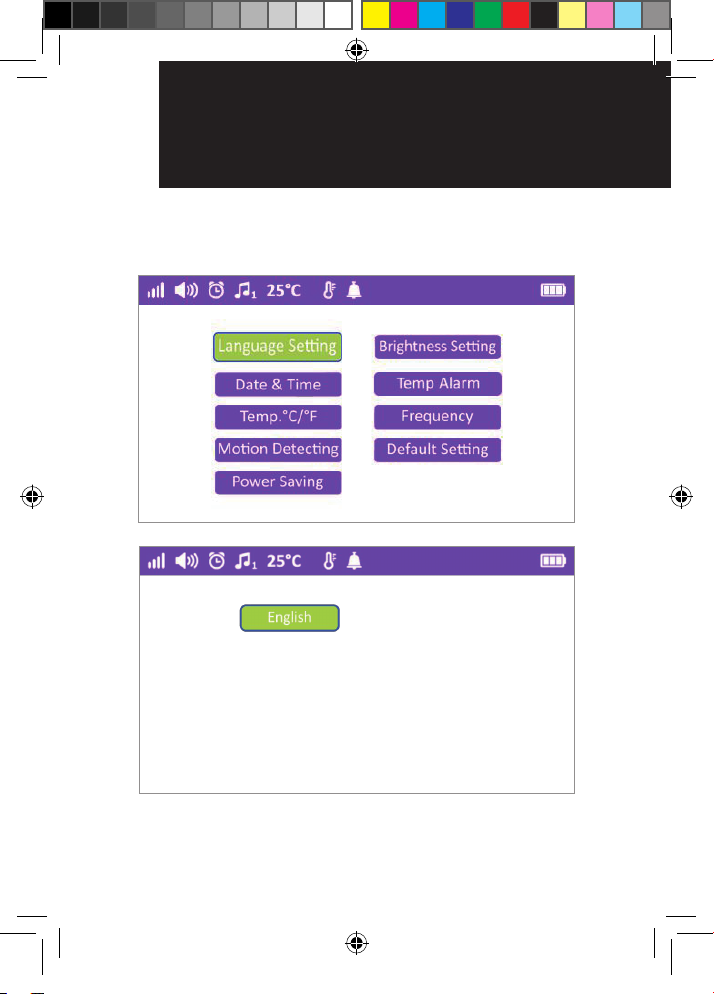
4.1 Language Setting
You can select the language in the settings menu.
OR017650 - SC740 User Guide_05-10-19.indd 20 2019/5/10 13:05:40
Page 23
SettIngS
21
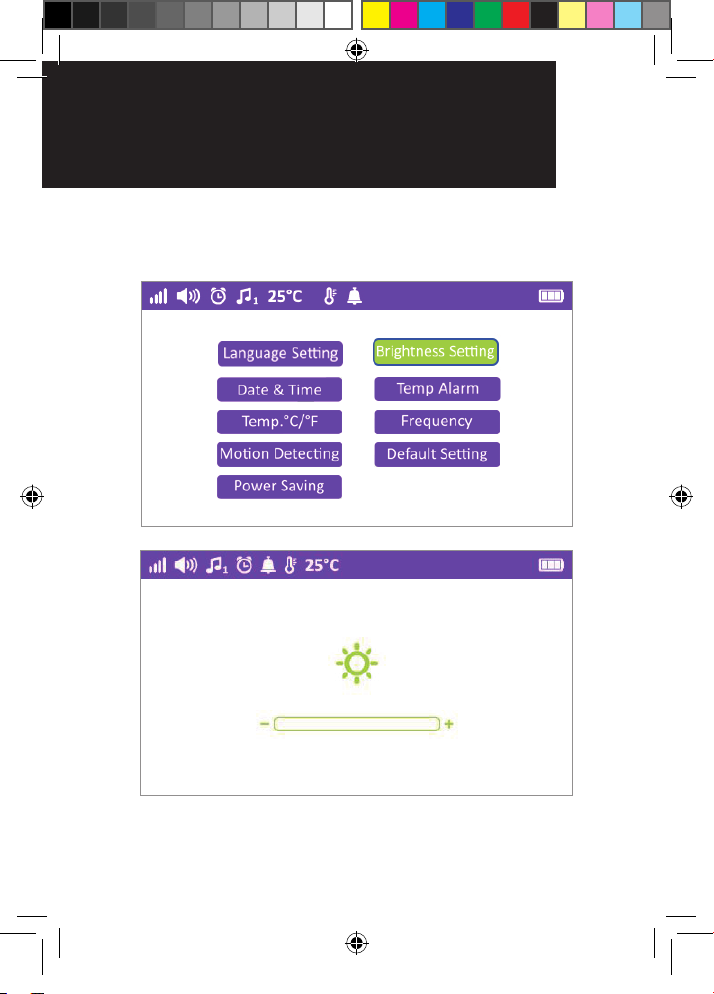
4.2 Brightness Setting
You can set the brightness level in the settings menu.
OR017650 - SC740 User Guide_05-10-19.indd 21 2019/5/10 13:05:40
Page 24
22 SettIngS
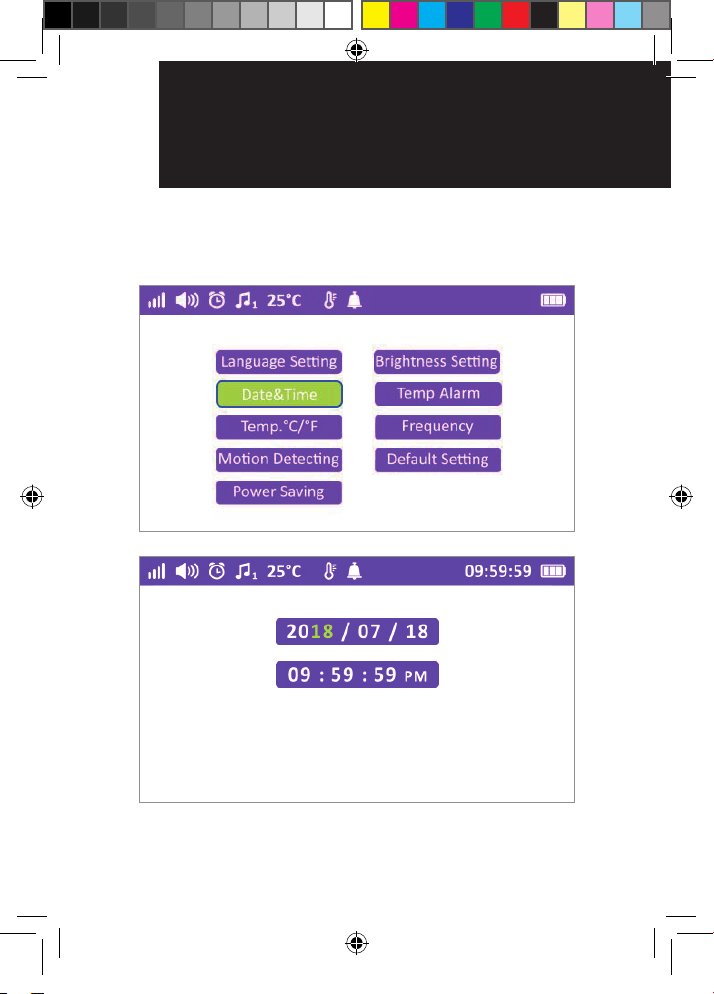
4.3 Date & Time Setting
You can set the date and time in the settings menu.
OR017650 - SC740 User Guide_05-10-19.indd 22 2019/5/10 13:05:40
Page 25
SettIngS
23
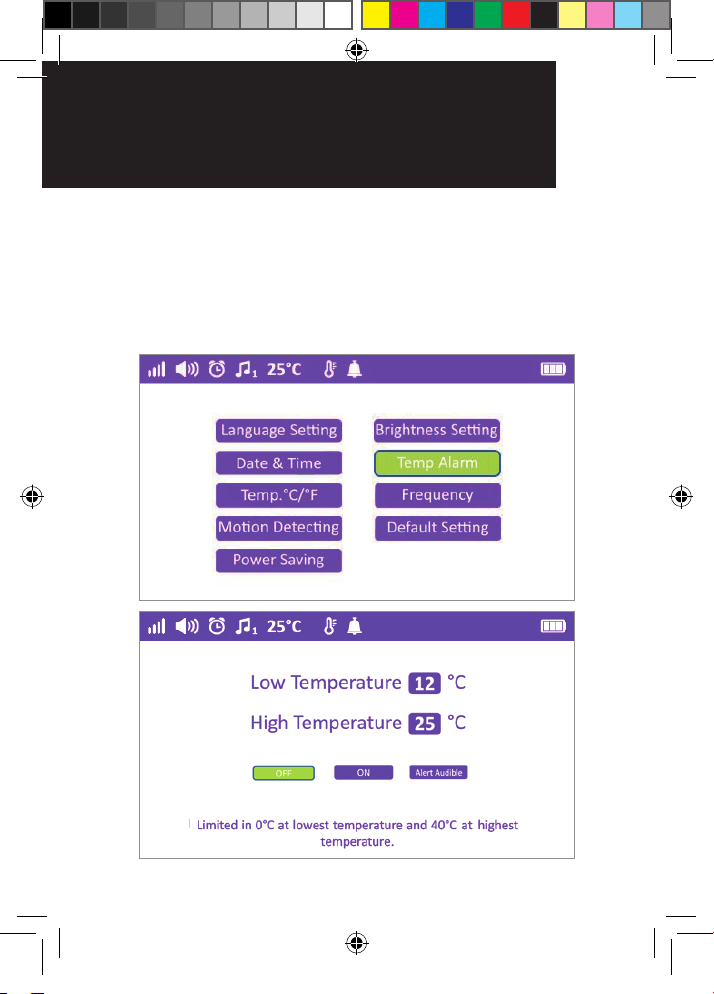
4.4 High-low Temperature alarm
setting
You can adjust the high and low temperature Alerts.
When room temperature exceeds the limits set, parent
unit will sound an alarm.
OR017650 - SC740 User Guide_05-10-19.indd 23 2019/5/10 13:05:40
Page 26
24 SettIngS
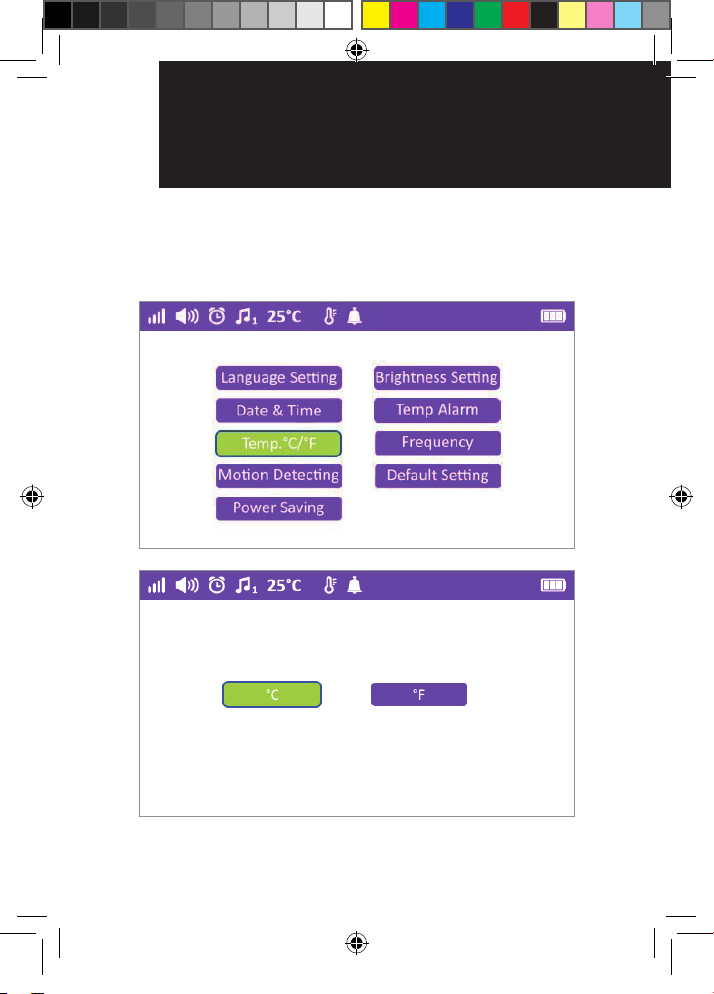
4.5 Temperature °C/°F switch
You can switch between °C & °F in the Temp °C/°F
setting.
OR017650 - SC740 User Guide_05-10-19.indd 24 2019/5/10 13:05:41
Page 27
SettIngS
25
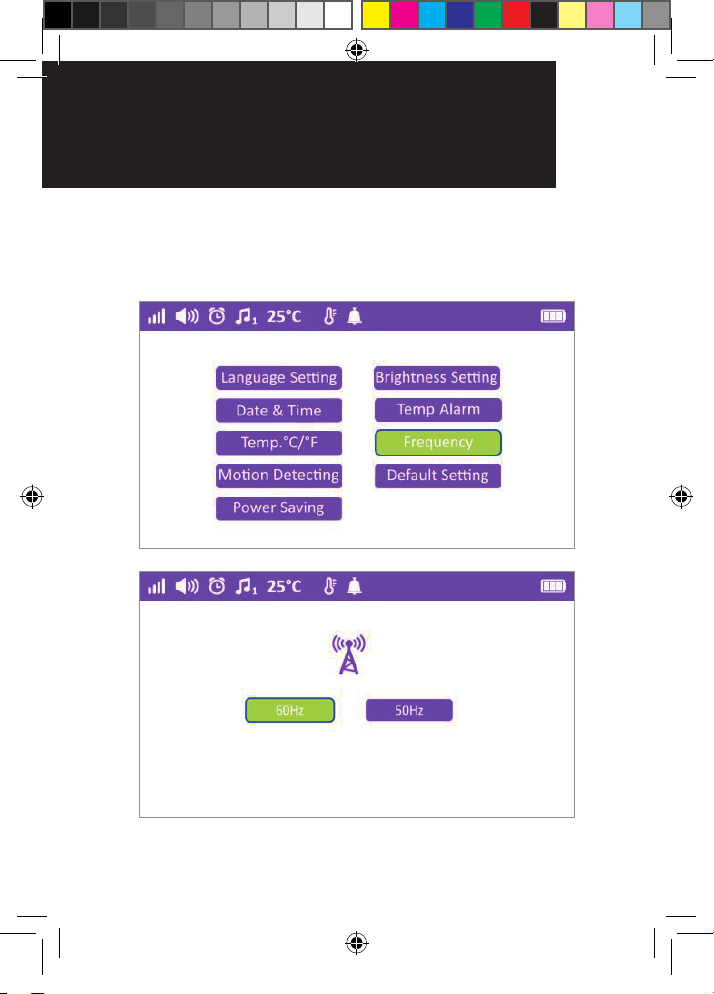
4.6 Frequency
You can switch between 60Hz & 50Hz in the Frequency
setting.
OR017650 - SC740 User Guide_05-10-19.indd 25 2019/5/10 13:05:41
Page 28
26 SettIngS
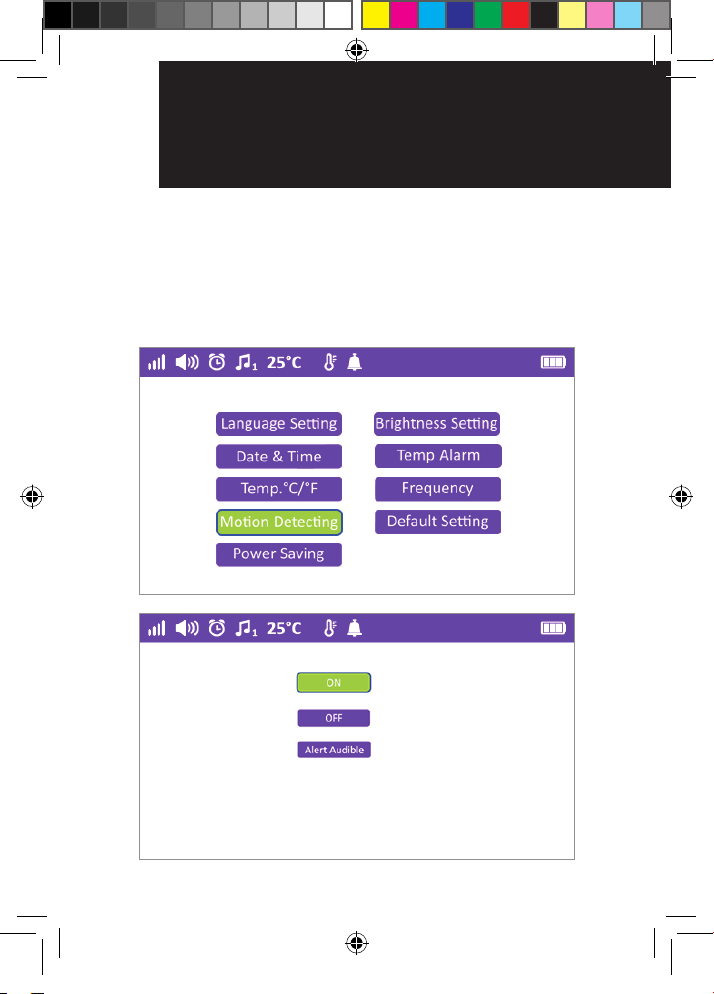
4.7 Motion Detecting
This feature will sound an audible alarm when motion
is detected by the baby unit. You have the option
to turn on an audible alarm alert by selecting "Alert
Audible" or display alert only by selecting "ON".
OR017650 - SC740 User Guide_05-10-19.indd 26 2019/5/10 13:05:41
Page 29
SettIngS
27
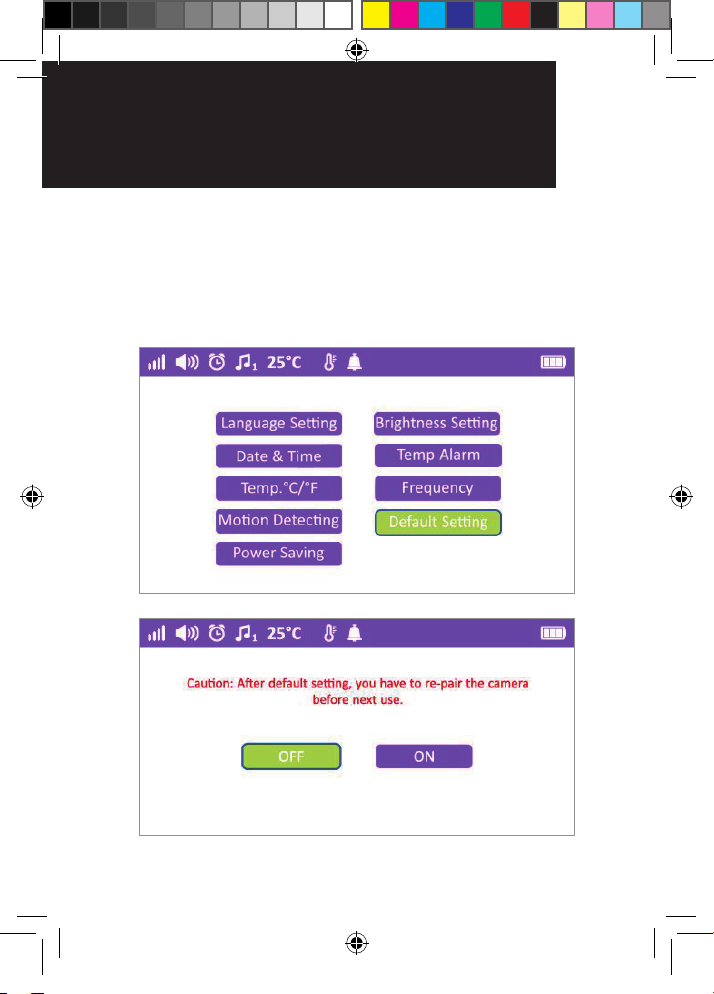
4.8 Default Setting
You can restore your monitor to its default factory
settings with this option.
Please note: System will lose all linked cameras and
settings.
OR017650 - SC740 User Guide_05-10-19.indd 27 2019/5/10 13:05:41
Page 30
28
SettIngS
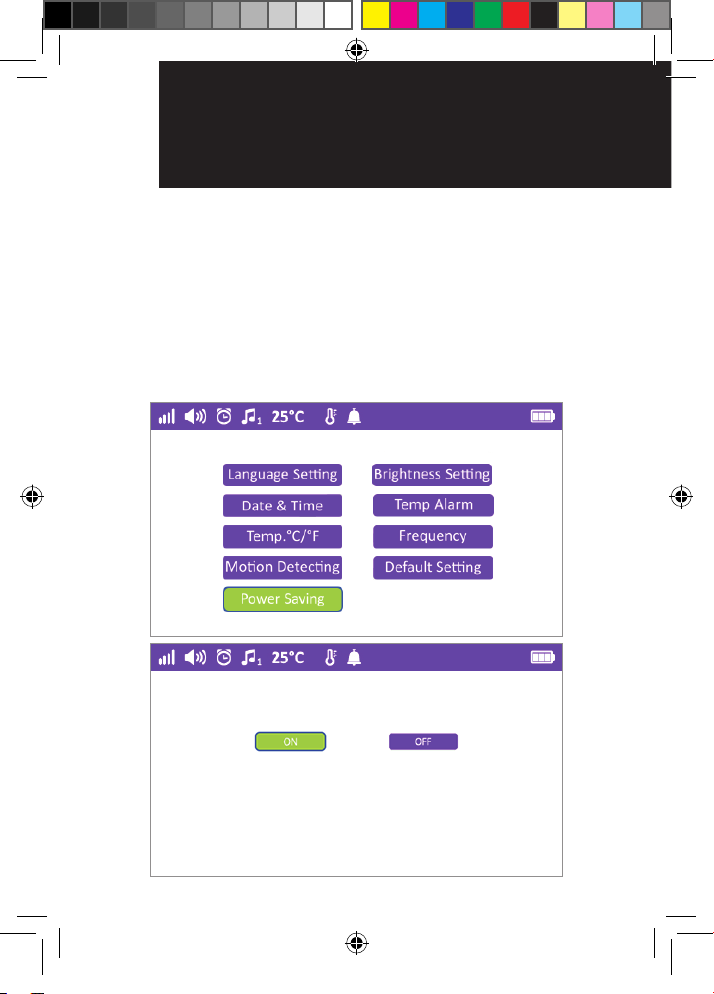
4.9 Power saving
By turning this function ON, the monitor will enter
power save mode within 10 seconds, The screen will
be in sleep mode, and will only wake by briey pressing
the power button. Turn power saving ON when you
turn on VOX or Motion detection. The VOX or Motion
detection alert will turn the display on for approx.
15 seconds.
OR017650 - SC740 User Guide_05-10-19.indd 28 2019/5/10 13:05:42
Page 31

29CUStomer SUPPort
Customer Support
Should you experience difficulties operating your
SC740, please refer to the troubleshooting guide
below. If you still experience difficulties, please
contact Oricom Customer Support on 1300 889 785
for assistance.
Troubleshooting
Problems Solutions
Equipment does
not function
− Check both parent unit and
baby unit are turned on.
Check parent unit is charged or
placed on charge.
Check baby unit is connected to
power.
OR017650 - SC740 User Guide_05-10-19.indd 29 2019/5/10 13:05:42
Page 32
30 troUBLeShootIng
No Link
displaying on
parent unit
Reception
interference
− Move the parent unit closer to
the baby unit.
Try resetting your monitor to
avoid busy channels:
1. Turn both camera and parent
units off and remove the battery
in the parent unit. Leave
unplugged for 20 seconds.
2. If you have Wi-Fi in the home,
make it busy by streaming a
video on YouTube or similar.
3. Turn the camera back on wait
for 30 seconds.
4. Plug the battery into the parent
unit and turn on.
If the display is still showing
“Link Lost”, please delete and
re-pair the camera as instructed
on page 12. When pairing it is
best to keep the camera and
parent units close together
(within 1m) and keep clear of
all other electronic devices
including mobile phones, tablets
or computers.
− Move the parent unit closer to
the baby unit.
Reposition the baby unit slightly.
Check for interference from
other electronic devices such as
Wi-Fi.
OR017650 - SC740 User Guide_05-10-19.indd 30 2019/5/10 13:05:42
Page 33

troUBLeShootIng
31
High pitched
noise from
parent unit Feedback
Picture but no
sound
Picture is in
black and white
Picture on
parent unit
not displaying
correctly
Battery not
charging
Parent unit
beeping
No picture after
10 seconds
Picture changes
every 10
seconds
− Increase the distance between
the parent unit and baby unit.
Reduce the volume on the
parent unit.
− Increase the volume on the
parent unit.
− Night function is active.
Increase the light level in the
baby’s room if required.
− Switch off parent unit then
camera unit. Wait 10 seconds.
Switch on the camera unit then
parent unit (in that order).
− Check the battery is connected
to the battery connection in the
battery compartment.
− After a period of time, the
battery may need to be replaced
due to everyday usage. Please
visit www.oricom.com.au to
purchase replacement batteries.
Move the parent unit closer
to the baby unit until they are
within range.
VOX function is activated. Turn
off VOX if required.
Scan function is on. Turn off the
scan function.
OR017650 - SC740 User Guide_05-10-19.indd 31 2019/5/10 13:05:42
Page 34

32
eXPreSS Warranty
Express Warranty (Australia)
This Express Warranty is provided by Oricom
International Pty Ltd ABN 46 086 116 369, Unit 1, 4
Sovereign Place, South Windsor NSW 2756, herein
after referred to as “Oricom”.
Oricom products come with guarantees that cannot
be excluded under the Australian Consumer Law. You
are entitled to a replacement or refund for a major
failure and compensation for any other reasonably
foreseeable loss or damage. You are also entitled to
have the goods repaired or replaced if the goods fail
to be of acceptable quality and the failure does not
amount to a major failure.
Oricom warrants that the product is free from defects
in materials or workmanship during the Express
Warranty Period. This Express Warranty does not
extend to any product from which the serial number
has been removed or was purchased outside of
Australia.
Nothing in this Express Warranty excludes, restricts or
modifies any condition, warranty, guarantee, implied
term, right or remedy pursuant to the Australian
Consumer Law and which may not be so excluded,
restricted or modified. For such conditions, terms,
guarantees and warranties that cannot be excluded,
restricted or modified, Oricom limits the remedies
available to extent permitted in the relevant legislation.
The Express Warranty Period will be 3 years from
OR017650 - SC740 User Guide_05-10-19.indd 32 2019/5/10 13:05:42
Page 35

eXPreSS Warranty
the date of purchase of the product evidenced by
your dated sales receipt. You are required to provide
proof of purchase as a condition of receiving Express
Warranty services.
You are entitled to a replacement product or repair
of the product at our discretion according to the
terms and conditions of this document if your product
is found to be faulty within the Express Warranty
Period. This Express Warranty extends to the original
purchaser only and is not transferable.
Products distributed by Oricom are manufactured
using new materials or new and used materials
equivalent to new in performance and reliability. Spare
parts may be new or equivalent to new. Spare parts
are warranted to be free from defects in material or
workmanship for thirty (30) days or for the remainder
of the Express Warranty Period of the Oricom branded
product in which they are installed, whichever is
longer. During the Express Warranty Period, Oricom
will where possible repair and if not replace the faulty
product or part thereof. All component parts removed
under this Express Warranty become the property of
Oricom. In the unlikely event that your Oricom product
has a recurring failure, Oricom may always, subject
to the Competition and Consumer Act 2010, at its
discretion, elect to provide you with a replacement
product of its choosing that is at least equivalent to
your product in performance.
33
OR017650 - SC740 User Guide_05-10-19.indd 33 2019/5/10 13:05:42
Page 36

34
eXPreSS Warranty
No change to the conditions of this Express Warranty
is valid unless it is made in writing and signed by an
authorised representative of Oricom.
Oricom will not be liable under this Express Warranty,
and to the extent permitted by law will not be liable for
any defect, loss, damage or injury arising out of or in
connection with a:
1. f ailure by you to adhere to the warnings and follow
the instructions set out in this user guide for the
proper installation and use of the product;
2. wilful misconduct or deliberate misuse by you of the
product;
3. any external cause beyond our control, including but
not limited to power failure, lightning or over voltage;
or
4. modification to the product or services carried out
on the product by anyone other than Oricom or
Oricom’s authorised service provider.
OR017650 - SC740 User Guide_05-10-19.indd 34 2019/5/10 13:05:42
Page 37

eXPreSS Warranty
35
How to make a claim under your Express
Warranty in Australia
Oricom has a simple warranty process for you to
follow:
• Please call or email our Customer Support Team,
1300 889 785 or [email protected].
• A Customer Support Team member will verify after
troubleshooting with you if your product qualifies
under warranty. If so, they will give you a Product
Return Authorisation number.
• We will then email or fax a Return Authorisation
form and a Repair Notice (if necessary), together
with instructions on how to return the goods for
warranty service.
Please note that if a Customer Support Team member
advises that your product does not qualify for return,
this warranty does not apply to your product. Products
that are authorised to be returned to Oricom in
Australia must include all of the following:
• A completed Return Authorisation form
• A copy of your Proof of Purchase (please keep your
original copy)
• The faulty product, including all accessories.
OR017650 - SC740 User Guide_05-10-19.indd 35 2019/5/10 13:05:42
Page 38

36
eXPreSS Warranty
Send the approved returns to:
Oricom International Pty Ltd
Locked Bag 658
South Windsor NSW 2756 Australia
Please note that this Express Warranty excludes
expenses incurred by you in returning any faulty
product to us. You must arrange and pay any
expenses incurred (including postage, delivery, freight,
transportation or insurance of the product) to return
the faulty product to us, however, we will arrange
delivery of the repaired or replaced faulty product to
you.
Important Information
Repair Notice
Please be aware that the repair of your goods may
result in the loss of any user-generated data (such as
stored telephone numbers, text messages and contact
information). Please ensure that you have made a
copy of any data saved on your goods before sending
for repair. Please also be aware that goods presented
for repair may be replaced by refurbished goods or
parts of the same type rather than being repaired.
OR017650 - SC740 User Guide_05-10-19.indd 36 2019/5/10 13:05:42
Page 39

OR017650 - SC740 User Guide_05-10-19.indd 37 2019/5/10 13:05:42
Page 40

ORICOM CUSTOMER SUPPORT
Oricom have a trained and dedicated team of
Customer Support Representatives, each with the
knowledge and resources to assist in answering your
questions quickly and efciently.
Oricom Support - Australia
For all product enquiries, troubleshooting or to discuss
the range of Oricom products, feel free to contact
Oricom or visit our website for answers to frequently
asked questions.
1300 889 785
Monday - Friday 8am – 6pm AEST
Email: [email protected]
www.oricom.com.au
Oricom Support - New Zealand
0800 674 266
Monday - Friday 10am - 8pm NZST
Email: [email protected]
www.oricom.co.nz
OR017650 - SC740 User Guide_05-10-19.indd 38 2019/5/10 13:05:42
Ref: 10052019
 Loading...