

Page 1
KEEP THIS USER GUIDE FOR FUTURE REFERENCE
Always retain your proof of purchase in case of warranty service.
AUSTRALIA: www.oricom.com.au NEW ZEALAND: www.oricom.co.nz
User Guide
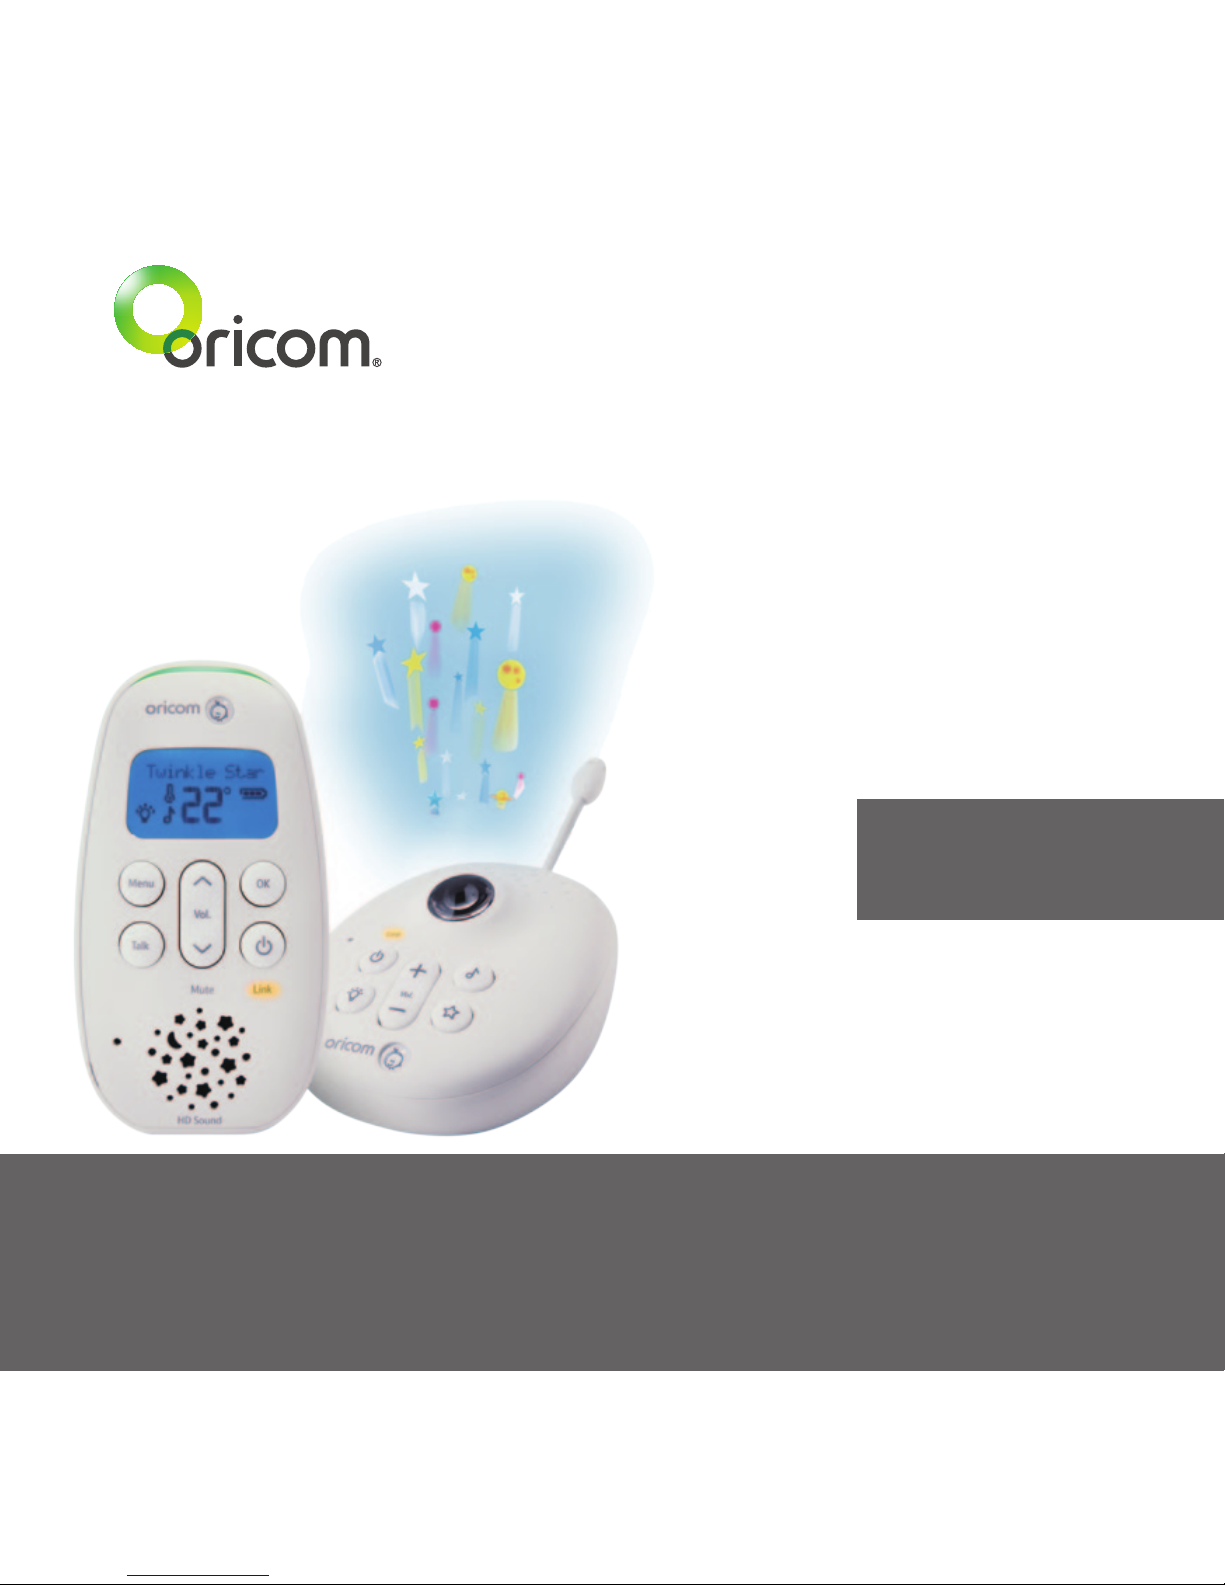
Oricom Audio Baby
Monitor Secure 530
with Lightshow
Page 2
2
Need some help? Call 1300 889 785 or go to www.oricom.com.au
Welcome
Thanks for buying an Oricom Baby Monitor. You'll
soon be able to relax knowing you can listen for
your baby's every gurgle, snufe or cry.
But rst things rst. To get set up, just follow
the steps from page 9. Set-up only takes a few
minutes.
Then, you can learn all about your monitor and
how to use it from page 13.
Page 3

3
Need some help? Call 1300 889 785 or go to www.oricom.com.au
Welcome
1. Your baby monitor is designed as an aid. It
is not a substitute for responsible and proper
adult supervision.
2. Make sure all cables and units are out of your
baby’s reach – at least one metre away.
3. Never cover either unit, or put them in moist
places or inside the cot, bed or playpen.
4. If you travel abroad, check the voltage on
your unit’s plugs match the local power
output.
5. Only use the battery supplied for the Parent
unit. If you need to replace it, contact our
Sales or Support Team.
6. Do not take the product apart. If you need
repairs, get in touch with our Sales or Support
Team.
7. The Baby unit might get warm after it’s been
on for a while. Don’t worry – this is normal,
and it’s perfectly safe.
Important safety information
Inside the box
• Baby unit
• Parent unit
• 2 x AA NiMH 1300mAh
rechargeable batteries (Part
number: 2B0076) for Parent
unit (pre-installed)
• 2 x power adaptors
Warning
Risk of suffocation!
Keep all packaging materials
and protective foils out of
reach of children.
Page 4

4
Need some help? Call 1300 889 785 or go to www.oricom.com.au
Contents
Your SC530 Baby Monitor
Parent unit ..................................... 6
Baby unit........................................ 7
Parent unit menu map ................... 8
Setting up
Parent unit ..................................... 9
Baby unit...................................... 10
Switching on and linking the
Parent and Baby units ................. 11
Deciding where to put your units ... 11
Using your SC530 Baby Monitor
Switching the Baby unit on/off ..... 13
Switching the Parent unit on/off ... 13
Changing your Baby unit settings
using the Parent unit menu.......... 14
Checking or changing the
loudspeaker volume on your Parent
unit ............................................... 14
Changing the loudspeaker volume
on your Baby unit......................... 15
Lightshow .................................... 15
Switch lightshow on/off
using the Baby unit ...................... 15
Switch lightshow on/off
using the Parent unit.................... 16
Setting the lightshow timer .......... 16
Talkback ...................................... 17
Nightlight...................................... 17
Switching nightlight on/off
using the Baby unit ...................... 17
Switching nightlight on/off
using the Parent unit.................... 18
Selecting the nightlight brightness
level through the Parent unit........ 18
Setting the nightlight timer ........... 18
Playing music from the
Baby unit...................................... 19
Turning music on/off using the
Baby unit...................................... 19
Turning music on/off using the
Parent unit ................................... 20
Choosing a song to play using
the Parent unit ............................. 20
Page 5

5
Need some help? Call 1300 889 785 or go to www.oricom.com.au
Contents
Changing a song currently
playing using the Baby unit.......... 21
Setting a play time for music ....... 21
Feed timer ................................... 22
Starting the feed timer
countdown ................................... 22
Setting how often you want to
get feed timer alerts ..................... 23
Cancelling the feed timer
countdown ................................... 24
Switching the timer repeat
option on or off............................. 24
Temperature monitor ................... 25
Changing the temperature
format .......................................... 25
Adjusting the monitor’s
temperature ................................. 26
Resetting the temperature
on your monitor............................ 26
Backlight ..........................................
List of tones ................................. 28
Resetting the units ....................... 29
Oricom Help ............................... 30
General information
Cleaning ...................................... 32
Express Warranty (Australia)....... 32
Page 6
6
Need some help? Call 1300 889 785 or go to www.oricom.com.au
Your SC530 Baby Monitor
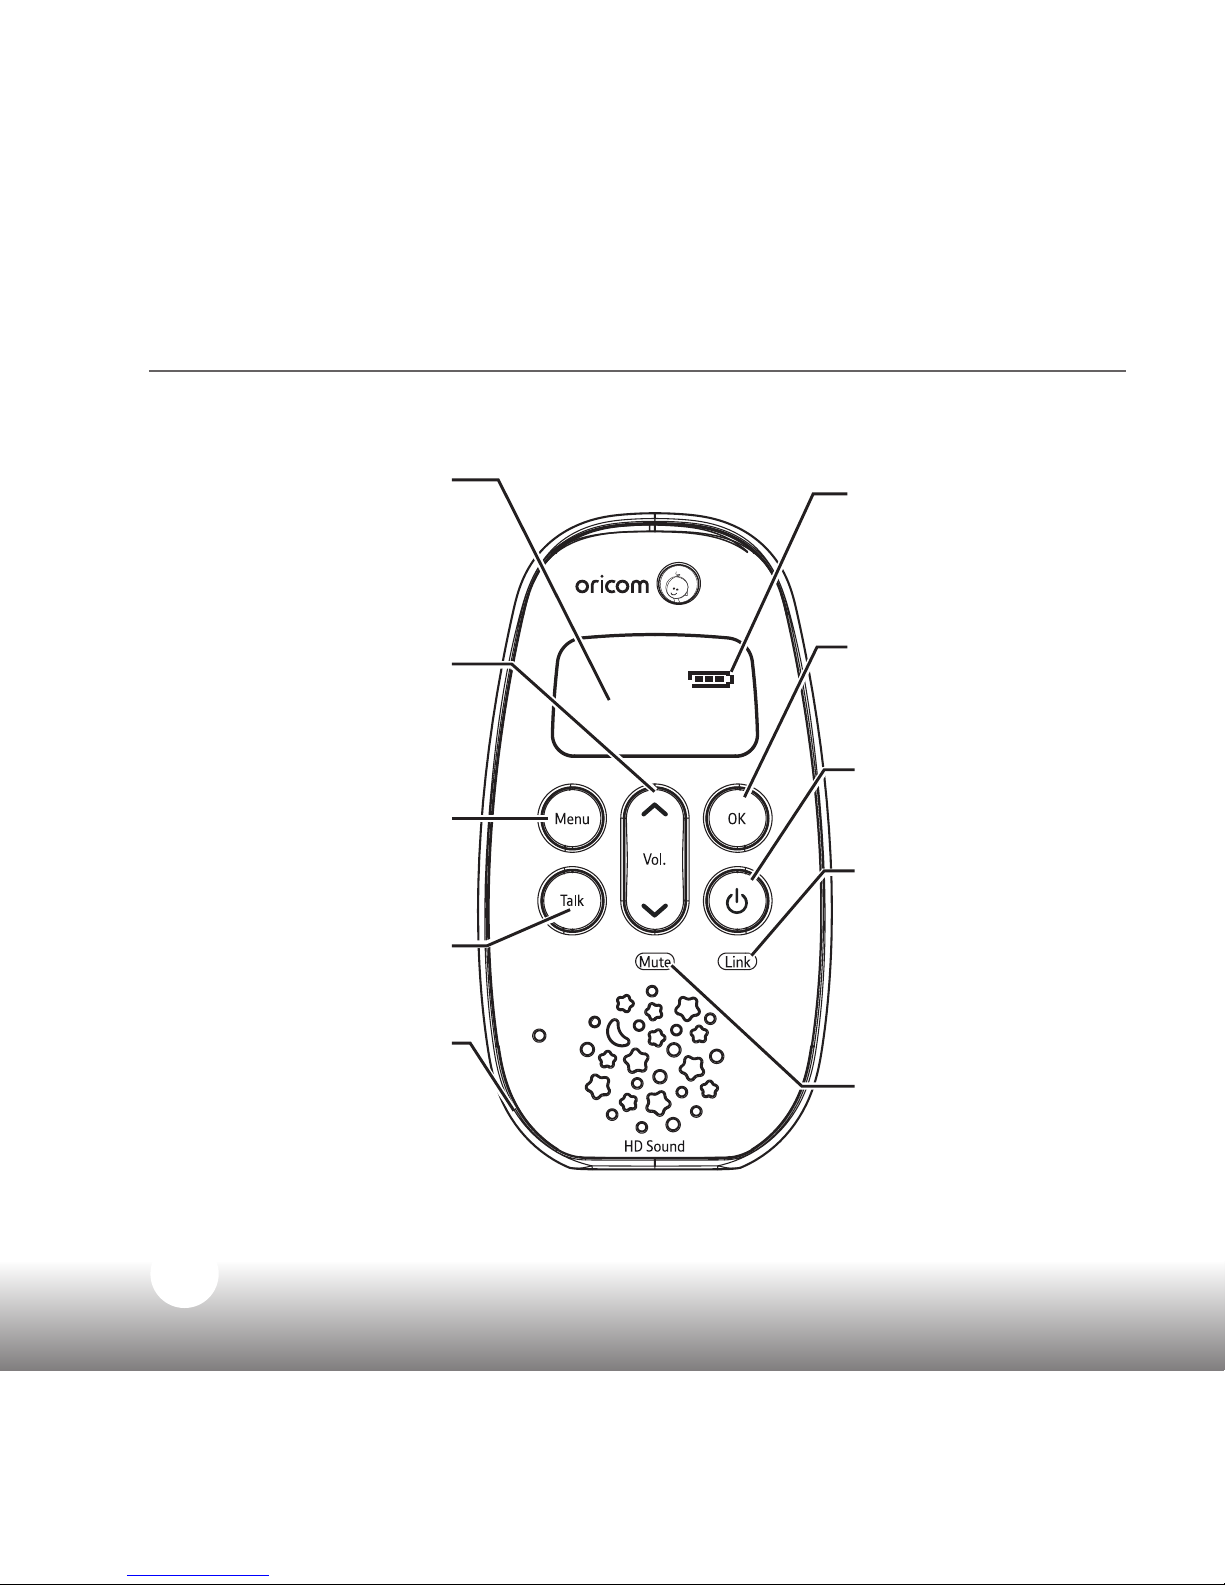
Parent unit
LCD display and backlight
The screen backlight comes
on whenever you press a
button.
It switches off again after
15 seconds.
Battery icon on LCD
screen
Tells you how much
battery life your unit has
left.
OK
Press to conrm when
you’re scrolling through
the main menu.
Power
Press and hold to turn
the unit on or off.
Link light
Flashes when your
monitor is trying to nd a
link. Remains solid when
the Parent and Baby
units are linked to each
other.
Mute light
Remains on when your
Parent unit is on mute.
Volume up/down
Turns the speaker volume
up or down and lets you
scroll through the main
menu.
Menu
Opens the main menu.
Press again to exit the
main menu.
Talk
Press and hold down to
talk to your baby.
Power socket
(on the back)
For connecting to the
mains power socket using
the power adaptor cable
supplied.
Page 7
7
Need some help? Call 1300 889 785 or go to www.oricom.com.au
Your SC530 Baby Monitor
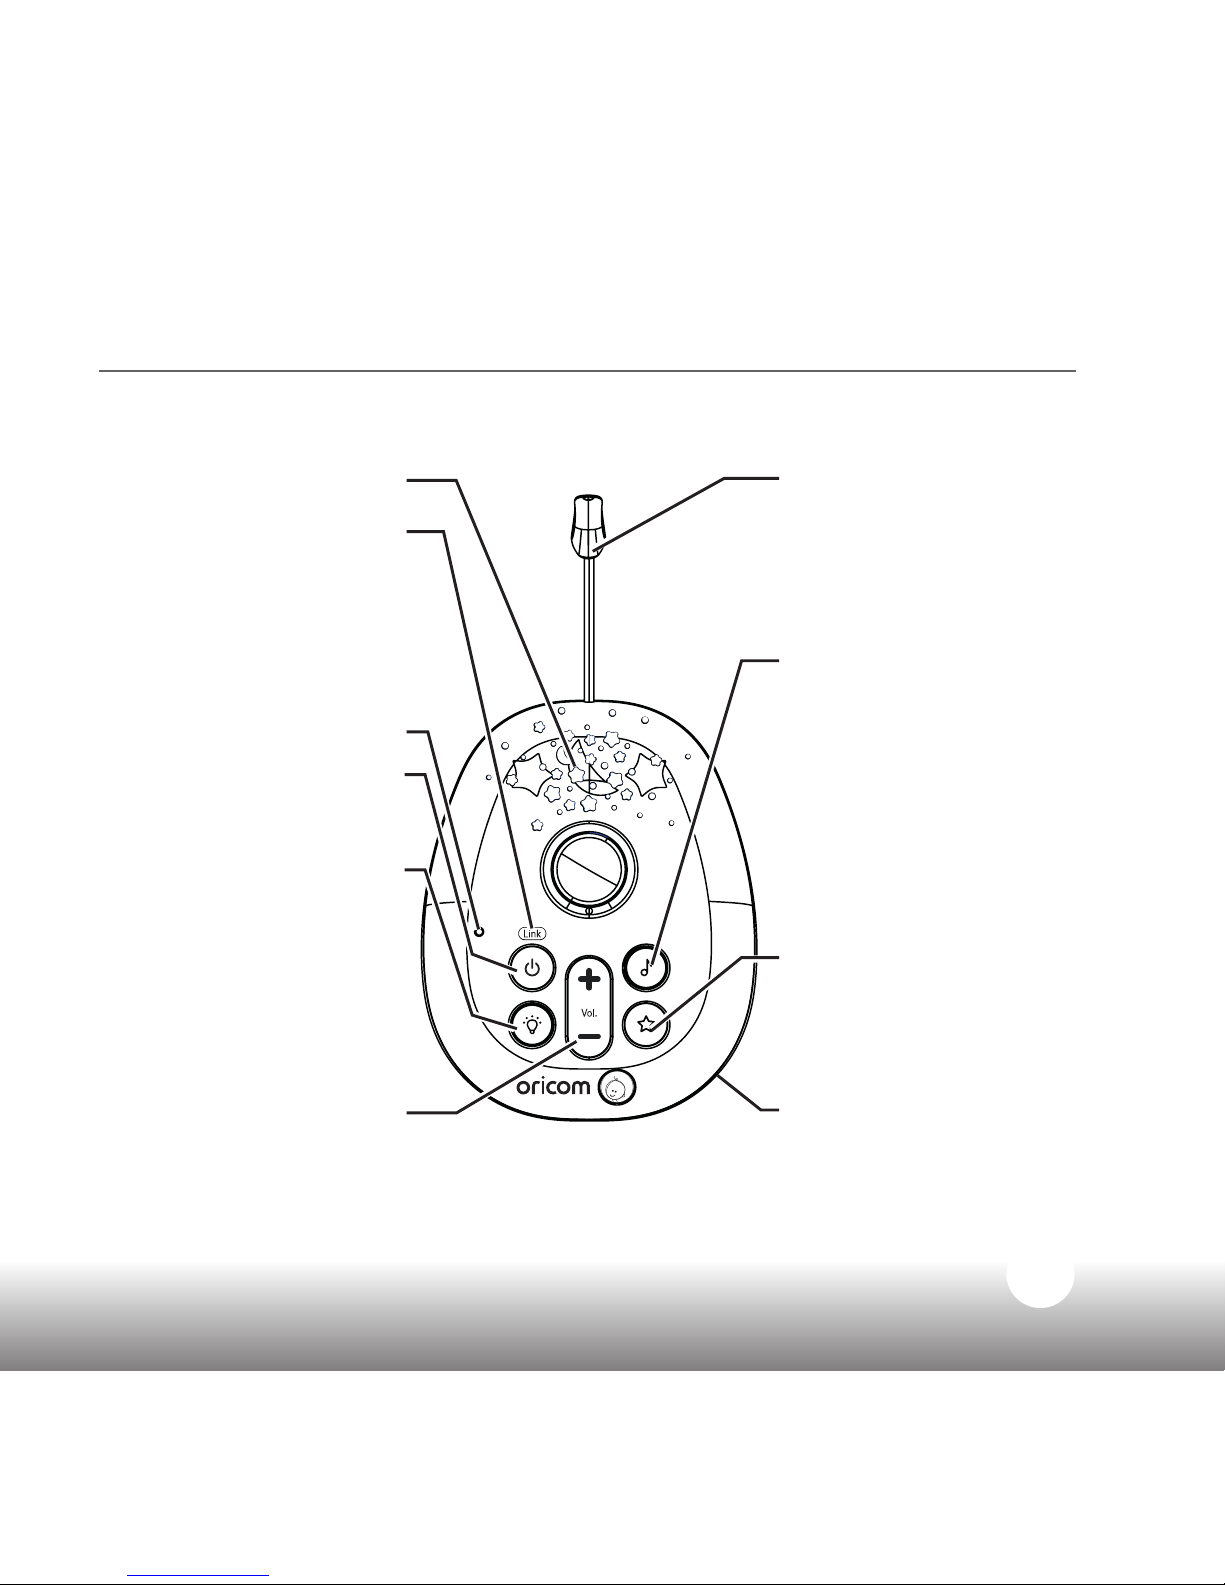
Soft nightlight
Link indicator
Flashes orange when your
monitor is trying to nd a
link. Remains solid when
the Parent and Baby units
are linked to each other.
Microphone
Power on/off
Press and hold to switch the
power on or off.
Nightlight
The star/moon/star
shapes illuminate around
the top of the unit.
Press to switch the nightlight
on, keep pressing to cycle
from low, medium, high
brightness, then off.
Volume +/–
Turns the loudspeaker
volume up or down when
playing music or using
talkback.
Temperature sensor
Make sure the sensor has
space around it and isn’t in
contact with any surfaces
to make sure it’s working at
its best.
Music
Switches the music on at
the Baby unit. (It’ll be the
same music and will play
for the same duration that
you last set on the Parent
unit.) Press the button
again to switch the music
off.
Lightshow
Press to switch the
Lightshow on or off.
Power socket
(on the back)
For connecting to the
mains power socket using
the power adaptor cable
supplied.
Baby unit
Page 8
8
Need some help? Call 1300 889 785 or go to www.oricom.com.au
Your SC530 Baby Monitor
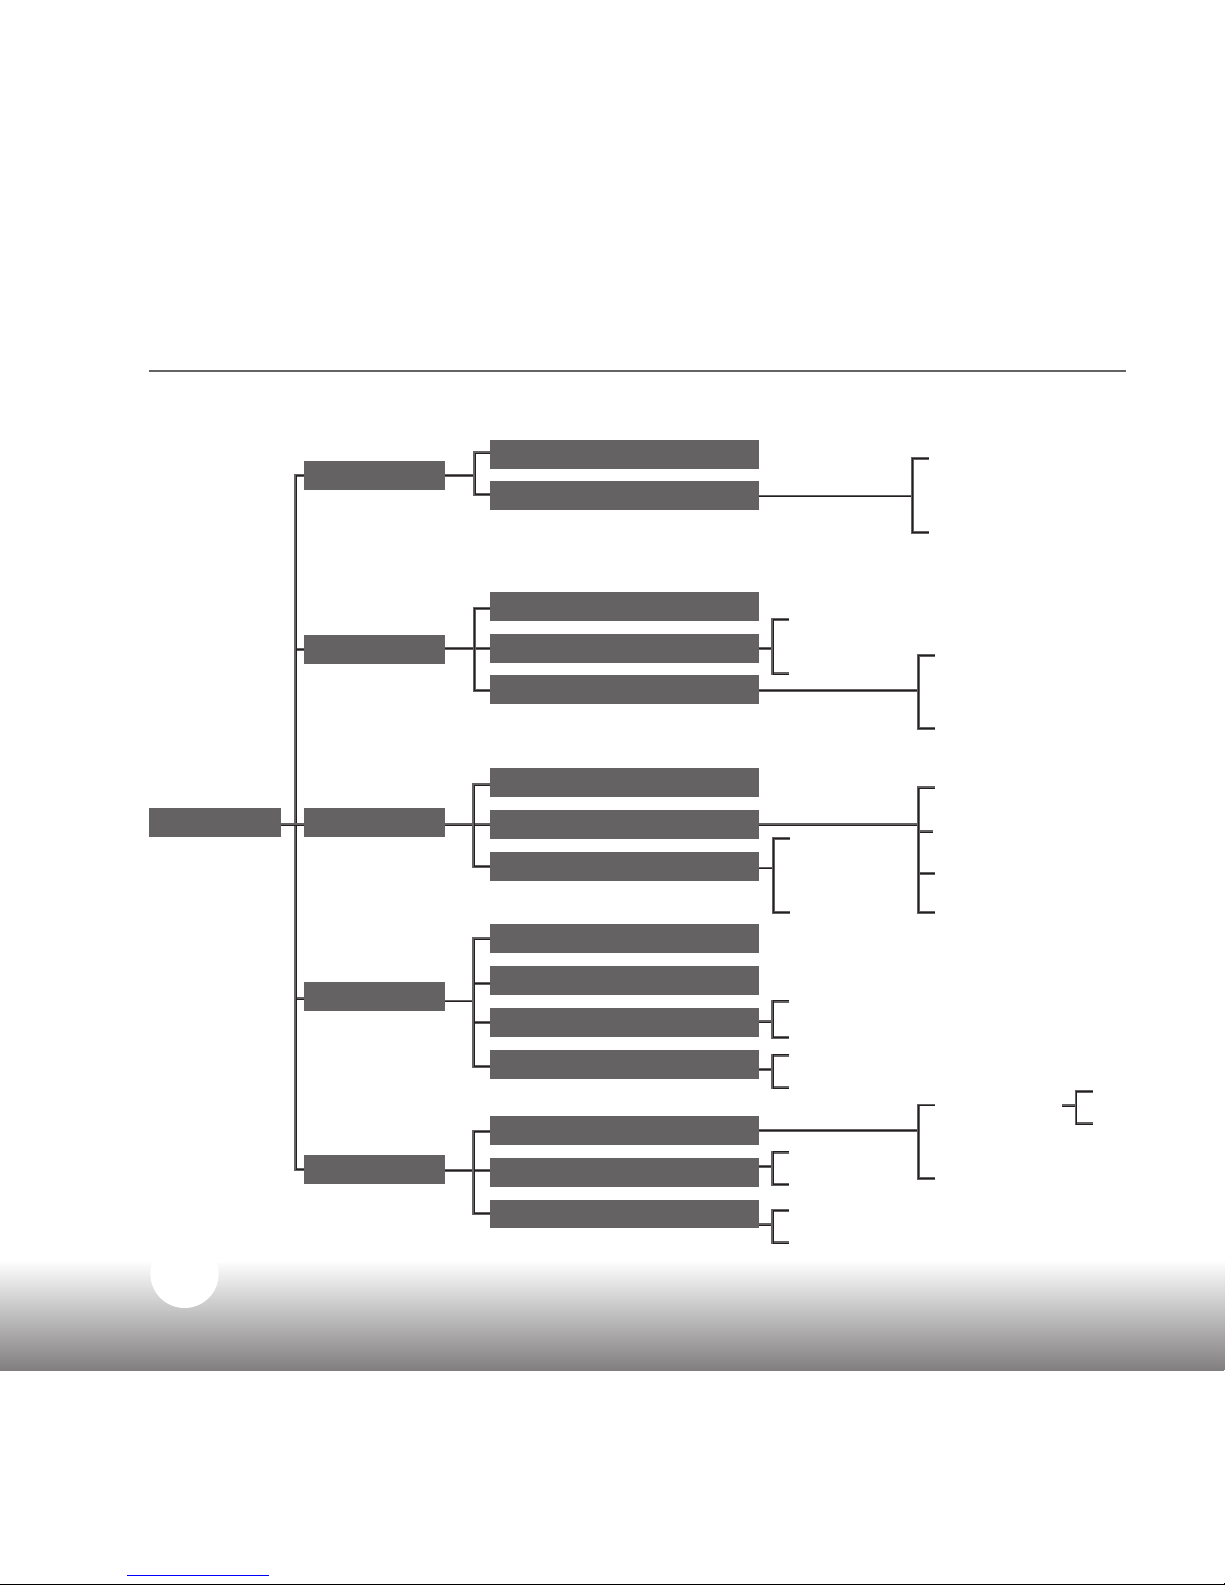
Parent unit menu map
Menu
Play/Stop?
Turn on/off?
Timer
Timer
Crying Alert
Backlight
Turn on/off?
Timer
Brightness
Choose song
Start Timer/Stop Timer
Timer repeat
Timer Alert
Duration
Temperature
Lightshow
Nightlight
Music
Feed Timer
Setup
5 min
5 min
5 min
Lullabies
Temp Format
°C
Repeat On
Beep
10 min
10 min
15 min
Nature
Temp Alert
°F
Repeat Off
Screen Only
High
Medium
Low
15 min
15 min
60 min
Classical
Adjust Temp
Beep
On w alerts
Constant
Constant
Constant
White noise
Reset Temp
Screen Only
Off w alerts
Page 9
9
Need some help? Call 1300 889 785 or go to www.oricom.com.au
Setting up
Parent unit
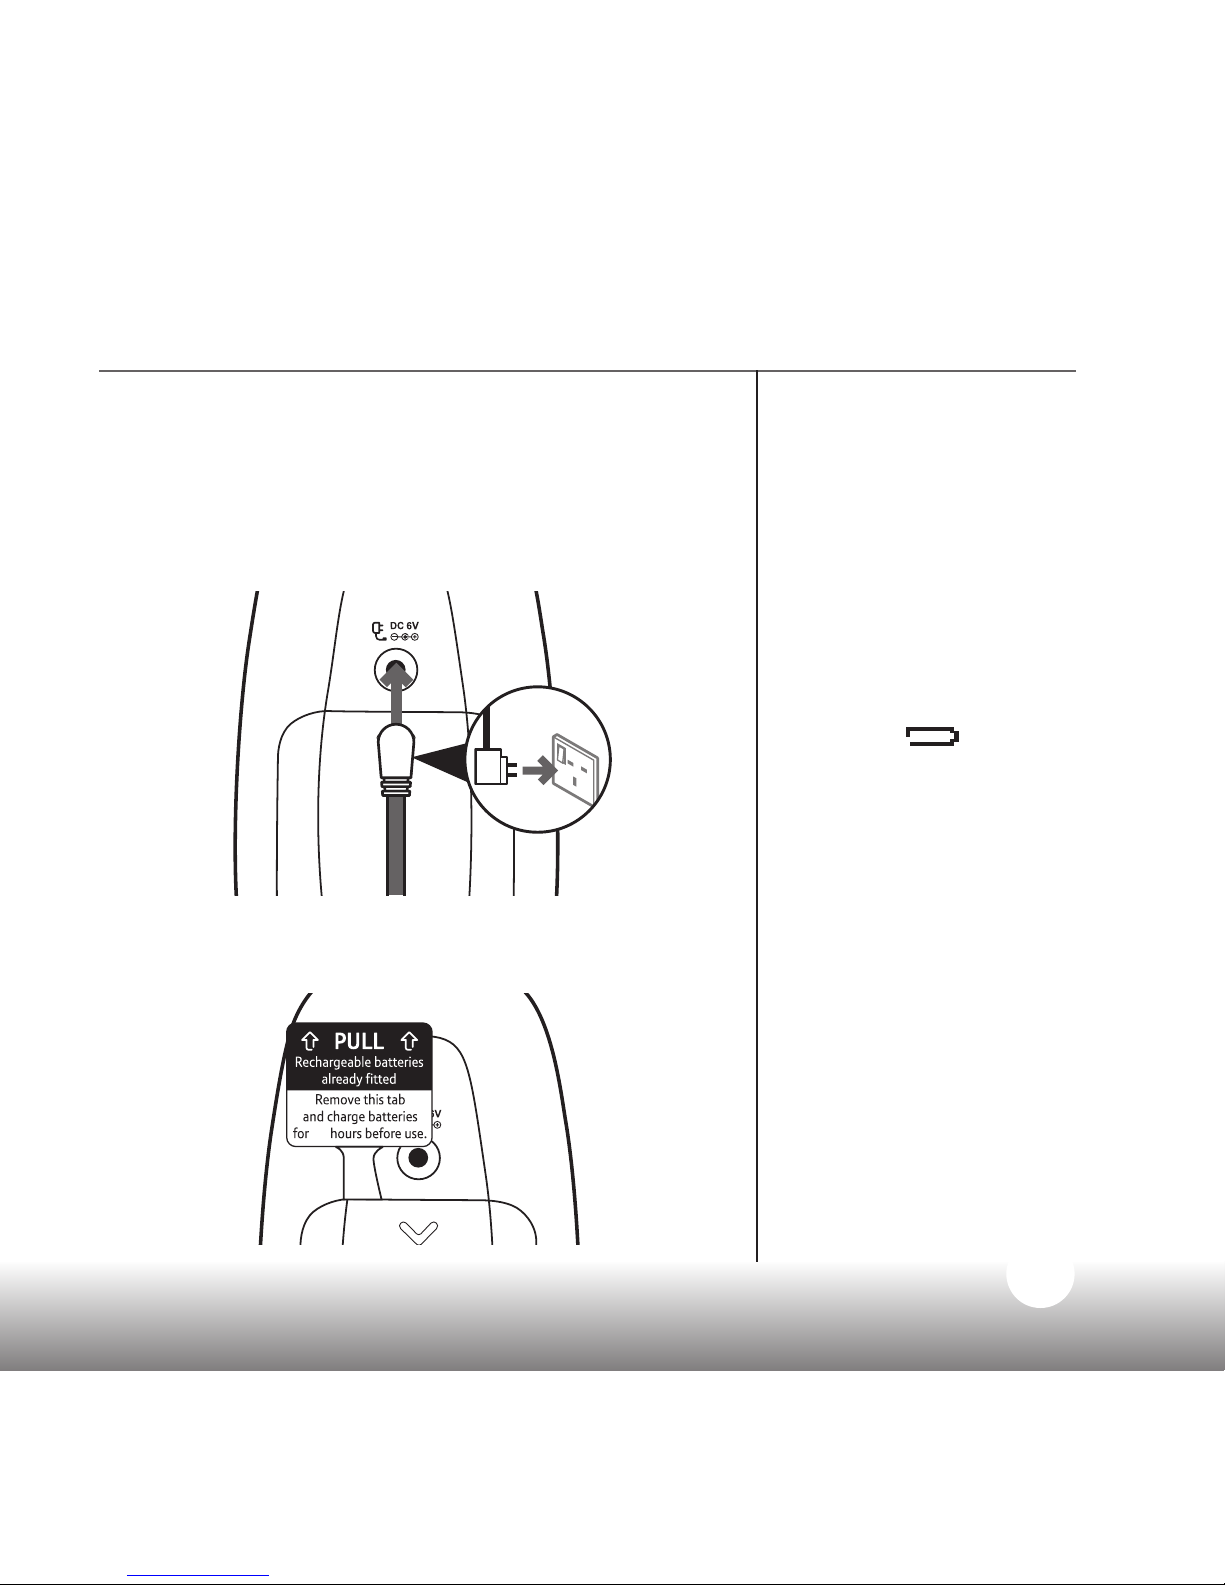
1. Plug one of the power cables into the socket on
the back of the Parent unit.
2. Plug the other end of the cable into your mains
wall socket and switch it on.
3. Activate the batteries by pulling the plastic tab
away from the back of the Parent unit.
16
Warning
Only use the power adaptors
supplied. Using incorrect
power adaptors may
permanently damage your
product.
Battery low alert on
Parent unit
When the batteries on your
Parent unit are running out,
an alert will sound and the
battery icon
on your
display screen will ash.
When this happens, you'll
need to charge the batteries.
Warning
Always use rechargeable
batteries in the Parent unit.
Only use the type we’ve
recommended – 2 x AA
NiMH 1300mAh batteries
(Part number: 2B0076).
Charge the batteries as
instructed in this user guide.
The Parent unit can still be
used when it's charging.
Page 10
10
Need some help? Call 1300 889 785 or go to www.oricom.com.au
Setting up
Taking out the batteries
If you ever need to remove
the batteries, slide open the
battery compartment cover
and use the ribbon to pull
them out.
4. Leave the batteries to charge for 16 hours to
reach maximum charge. When they are fully
charged the battery icon on the display will show
full charge .
Baby unit
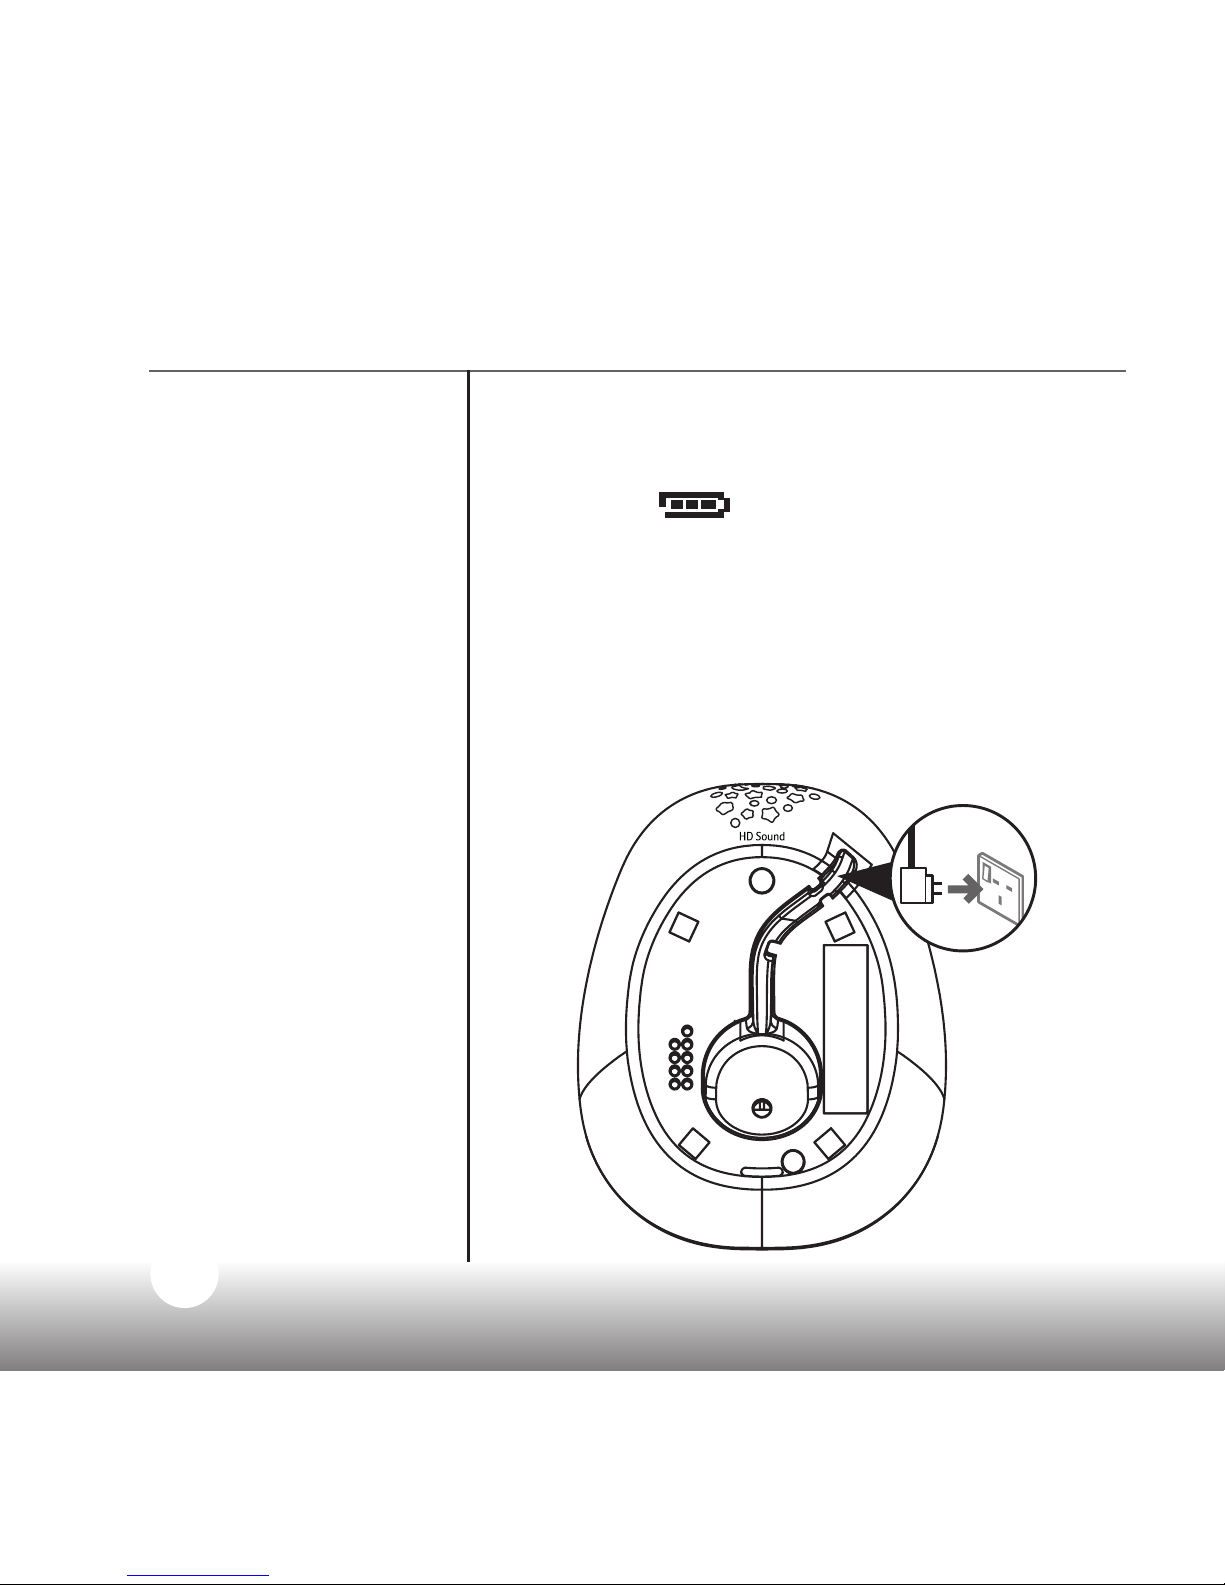
1. Plug the remaining power cable into the socket
on the back of the Baby unit.
2. Plug the other end of the cable into your mains
wall socket and switch it on.
Page 11

11
Need some help? Call 1300 889 785 or go to www.oricom.com.au
Setting up
Switching on and linking the Parent and
Baby units
Before switching on, make sure the Parent and
Baby unit are at least one metre from each
other. Any closer and you might get audio
feedback sounds.
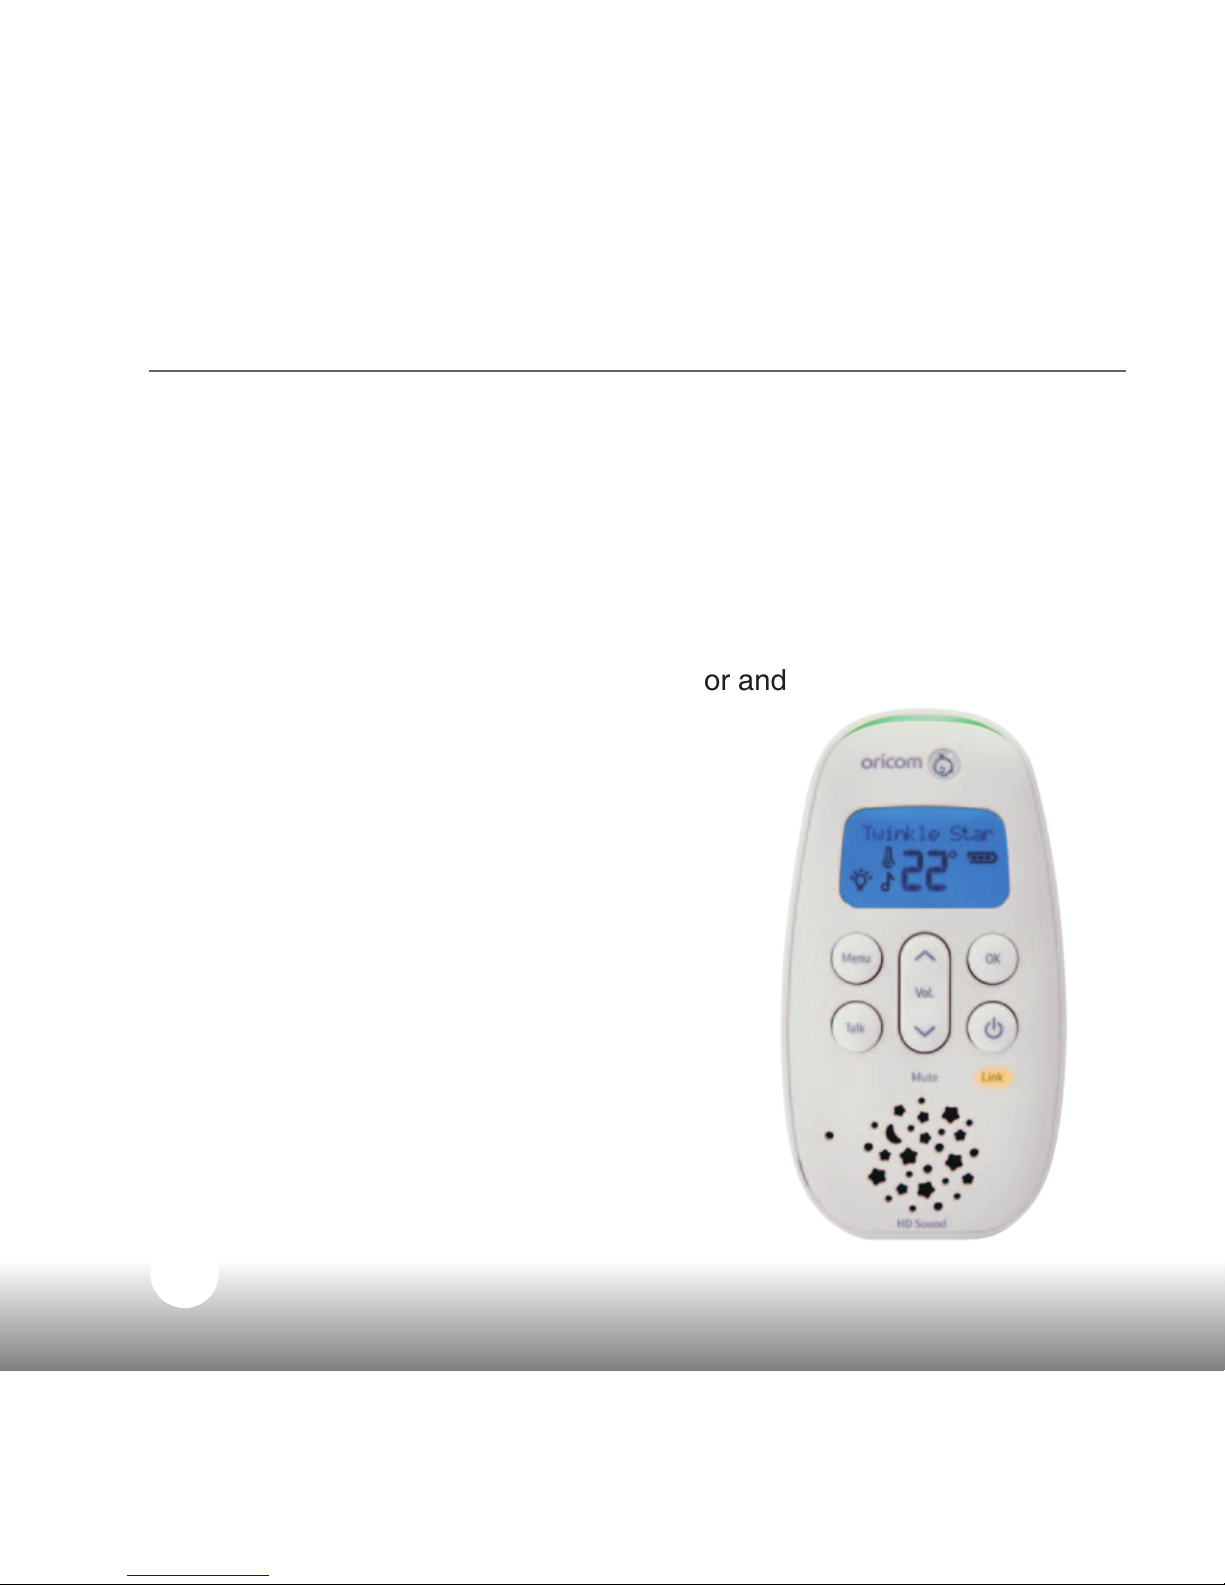
1. Press and hold the
button on the Baby unit
until the orange Link indicator ashes.
2. Press and hold the
button on the Parent unit
until all the LEDs on the unit briey light up. The
orange Link indicator will ash and the display
will show
I’m Linking…
3. When the units are linked, the orange Link
indicator lights on the Parent and Baby units will
stop ashing. When the lights stay steady, your
monitor is ready to use.
Deciding where to put your units
The Baby unit should ideally be within 1 to 2
metres of your baby. Make sure both the Baby
unit and mains power cable are connected
securely and they’re out of baby’s reach.
If the Parent and Baby units are too close
together, you’ll hear a high-pitched noise. That’s
because the units are designed to be put at a
distance from one another, such as in separate
rooms.
Page 12

12
Need some help? Call 1300 889 785 or go to www.oricom.com.au
Setting up
Important
The two units will need to be linked before you
can start using them. If the link between the
units is broken, the Link indicator lights will ash
while they try to look for each other. The Parent
unit will show
I’m Linking...
After 30 seconds, if the link is still broken, the
Link indicator lights will ash red. The Parent unit
display will show
Not Linked
and you’ll hear an
alert.
If the link is broken, check that:
• the mains power is plugged in and switched on
at the Baby unit
• both units are switched on
• the batteries are charged in the Parent unit
• the Parent and Baby units are within range of
each other (in ideal conditions, that’s up to 300
metres outdoors and 50 metres indoors).
Page 13

13
Need some help? Call 1300 889 785 or go to www.oricom.com.au
Using your SC530 Baby Monitor
Switching on/off
Switching the Baby unit on
1. To switch on, press and hold the
button until
the nightlight briey illuminates and the orange
Link light ashes. When it’s nished linking, it’ll
stop ashing and remain steady.
2. To switch off, press and hold the
button
again.
Switching the Parent unit on
1. To switch on, press and hold the
button on
your Parent unit. The LED screen will come on
and the green light at the top will illuminate. The
Link light will also ash on and off while the units
are linking.
I’m Linking...
will show on the
screen. When the units have found each other,
your Parent unit will go back to its idle screen.
2. To switch off, press and hold the
button
again. The screen will go blank and all the lights
will switch off.
Page 14

14
Need some help? Call 1300 889 785 or go to www.oricom.com.au
Using your SC530 Baby Monitor
Changing your Baby unit settings
using the Parent unit menu
You can use the button on the Parent unit
to change settings on the Baby unit without
having to disturb your baby.
1. Press
and then or to scroll through the
menu options. Press
when the option you
want appears on the screen.
2. You’ll be taken to the submenu. Press
or
to scroll through the options. Press
when the
option you want shows on the screen.
3. You can then press
briey to step back one
menu level at a time, or press and hold to go
back to the idle screen. If you don’t press any
buttons for ten seconds, your Parent unit will go
back to the idle screen automatically.
Checking or changing the loudspeaker
volume on your Parent unit
You can change the volume on either of the
units using the
and buttons. When you
press the or volume button, the current
volume will be shown on your display screen.
If you’ve muted the sound
Volume off
will
show on the display screen.
Page 15

15
Need some help? Call 1300 889 785 or go to www.oricom.com.au
Using your SC530 Baby Monitor
Changing the loudspeaker volume on your
Baby unit
There are two different ways to change the
volume on the Baby unit.
1. When music is playing or you’re using talkback,
you can press the
or buttons to adjust the
volume.
2. If no music is playing and you’re not using
talkback, pressing the
or buttons will
change the volume.
Lightshow
The Baby unit has a lightshow that projects
a starry image onto the ceiling of your baby’s
room. Using the Parent unit menu, you can
set when you want the lightshow to start.
Switch lightshow on/off using the Baby
unit
1. To switch on, press the
button. The lightshow
will slowly fade in.
2. To switch off, press
again. The lightshow will
fade out.
Each unit has ve volume
levels.
If you try to set the volume
higher or lower than those,
you’ll hear a beep.
Page 16
16
Need some help? Call 1300 889 785 or go to www.oricom.com.au
Using your SC530 Baby Monitor
Switch lightshow on/off on the Parent unit
1. Press
.
Lightshow
will show on the screen.
Press
.
2. Press
or , to get to either,
Turn On?
or
Turn Off?
and press
.
Setting the lightshow timer
1. Press
.
Lightshow
will show on the screen.
Press
.
2.
Turn On/Off?
will appear on the screen. Press
until
Timer
is displayed and press .
3. Press
or to choose 5
min, 10 min, 15 min
or
Constant
. When you’ve got to the option you
want, press
.
4.
Saved
will show on your screen and you’ll hear
the conrmation tone.
The Baby unit must be
switched on for the lightshow
to work but doesn’t need
to be linked to the Parent
unit. Its default setting is
Constant.
Page 17

17
Need some help? Call 1300 889 785 or go to www.oricom.com.au
Using your SC530 Baby Monitor
Talkback
Your Parent unit comes with one-way talkback,
which lets you comfort and reassure your baby.
When you speak into the Parent unit, your voice
will come through on the Baby unit.
Setting the lightshow timer
1. Press and hold down the
button on the
Parent unit to speak to your baby. While you’re
pressing the button,
Talk
will show on the
display screen of the Parent unit.
Nightlight
You can set a comforting nightlight on the
Baby unit. There are three brightness levels to
choose from: low, medium and high. And you
can set when you want the light to shine.
Switching nightlight on/off using the Baby
unit
1. To turn on or off, press the
until you get to
the setting you want.
TIP: When you’re using
talkback, you won’t be able
to hear your baby through
the Parent unit until you
release the
button.
Don’t press the
button
when the Baby unit and
Parent unit are in the same
room. You’ll hear a highpitched noise if you press
the button when the units
are within three metres of
each other. When using
talkback, hold the Parent
unit about 30 centimetres in
front of your mouth.
The Baby unit must be
switched on for the nightlight
to work, but need not be
linked to the Parent unit. To
adjust the brightness level or
set the nightlight timer, take
a look at page 18.
Page 18
18
Need some help? Call 1300 889 785 or go to www.oricom.com.au
Using your SC530 Baby Monitor
Switching nightlight on/off using the
Parent unit
1. Press
and then until you get to
Nightlight
.
Press
.
2. Press
or to display either
Turn On?
or
Turn Off?
, and press
when you’ve got to
the option you want.
Selecting the nightlight brightness level
through the Parent unit
1. Press
and then until you see
Nightlight
.
Press
.
2. Turn
On/Off?
will show on the screen.
Press the arrow buttons to scroll through to
Brightness
and then press
.
3. Use the arrow buttons again to choose
Low
,
Medium
or
High
. When you’ve got to the
option you want, press
.
Saved
will show
on your screen.
Setting the nightlight timer
1. Press
and use the arrow buttons to get to
Nightlight
. Press
.
2. Press the arrow buttons to scroll through to
Timer
, then press
again.
Page 19
19
Need some help? Call 1300 889 785 or go to www.oricom.com.au
Using your SC530 Baby Monitor
3. Press
or to choose 5
min, 15 min, 60 min
or
Constant
. When you’ve got to the option you
want, press
to save it.
Playing music from the Baby unit
The Baby unit has 18 songs that can be
played to gently soothe your baby, organised
into four categories: Lullabies, Nature,
Classical and White Noise.
You can select one song to play repeatedly
or select the Play All option for a medley of
the songs from your selected category. The
songs can be set to play in a loop for 5, 10
or 15 minutes or you can leave them playing
constantly.
Turning music on/off using the Baby unit
1. To turn the music on, press
. The most
recently chosen song will start playing at the
time you last set on the Parent unit.
2. To turn the music back off, press the
button
again.
The default music setting
is to Play All of the lullaby
songs for 5 minutes. When
you switch the Baby unit on,
there might be a small delay
before it’s ready to play
music. Adjust the volume of
the music using the
or
buttons on the Baby unit.
Page 20

20
Need some help? Call 1300 889 785 or go to www.oricom.com.au
Using your SC530 Baby Monitor
Turning music on/off using the Parent unit
1. Press
and then use the arrow buttons to get
to
Music
. Press
.
2. When
Play?
or
Stop?
is displayed, press
to select the one you want.
Choosing a song to play using the Parent
unit
1. Press
and then use the arrow buttons until
you see
Music
. Press
.
2. Press
again until you see
Choose song
.
Press
.
3. Use the arrow buttons to choose between the
different song categories:
Lullabies, Nature
,
Classical
or
White Noise
. Press
to select
the one you want.
4. Use the arrow buttons to scroll through the song
titles and press
when you get to the option
you want. Or you can select
Play All
to play all
of the songs from your chosen category.
Page 21
21
Need some help? Call 1300 889 785 or go to www.oricom.com.au
Using your SC530 Baby Monitor
Changing a song currently playing using
the Baby unit
1. Press and hold down the
button until the
song changes. You’ll need to turn the music on
before choosing a song.
Setting a play time for music
1. Press
and then scroll through to
Music
.
Press
.
2. Use the arrow buttons again to get to
Timer
.
Press
.
3. Press
and to choose how long you want
the music to play. You can choose 5
min
,
10 min, 15 min
or
Constant
.
4. Press
when the option you want shows on
the screen.
Page 22

22
Need some help? Call 1300 889 785 or go to www.oricom.com.au
Using your SC530 Baby Monitor
Feed timer
Your new baby monitor can give you handy
reminders of when to feed your baby, using
the feed timer. You can set a time through the
Parent unit of the monitor.
Starting the feed timer countdown
1. Press
and use the arrow buttons to scroll
through to
Feed Timer
.
2. Press
. If your Feed Timer is already switched
on, you’ll see
Stop Timer
. If it isn’t you’ll see
Start Timer
. You’ll then have two options.
a. To restart the timer if it’s already switched on,
press
when you see
Stop Timer
. And then
again when
Start Timer
appears on the display
screen.
b. To start the timer if it’s currently switched off,
just press
when you see
Start Timer
on the
screen.
3. You’ll be sent back to the idle screen, which
will switch between showing
Timer on
and the
length of time you have before you get your next
feed alert.
Page 23

23
Need some help? Call 1300 889 785 or go to www.oricom.com.au
Using your SC530 Baby Monitor
Setting how often you want to get feed
timer alerts
1. Press
and scroll through to
Feed Timer
,
using the arrow buttons. Press
.
2. Use the arrow buttons again to scroll through to
Duration
and press
.
3. Your display screen will show what the timer is
currently set at, with the default being
02h:00m
.
Use the arrow buttons to change each digit to
match the time you want to get reminders and
press
. When you return to the idle screen,
the feed timer icon
will show on the display.
You can set your timer from 1 minute to a
maximum of 9 hours 59 minutes. If your Parent
unit is switched off, the alert will be cancelled.
It’ll start playing the alert again when you turn
the unit back on.
Page 24

24
Need some help? Call 1300 889 785 or go to www.oricom.com.au
Using your SC530 Baby Monitor
Cancelling the feed timer countdown
1. Open the menu and then use the arrow buttons
to get to
Feed Timer
. Press
.
2.
Stop Timer
will show on the display screen.
Press
.
Timer Off
will show on the screen
and the timer will disappear from the idle screen.
Switching the timer repeat option on or off
You can set your monitor to repeat feed time
alerts for your chosen amount of time.
1. Press
and then use the arrow buttons to get
to
Feed Timer
.
2. Press
. Use the arrow buttons to get to
Timer
Repeat
. Press
.
3. Use the arrow buttons to choose
Repeat On
or
Repeat Off
and press
.
When you set
Repeat On
,
the feed timer countdown
will start again once the alert
has sounded (if the alert isn’t
switched off). The default
setting is for the timer to
repeat.
Page 25
25
Need some help? Call 1300 889 785 or go to www.oricom.com.au
Using your SC530 Baby Monitor
Temperature monitor
Your new monitor comes with a sensor on
the Baby unit, which lets you keep an eye
on the temperature of your baby’s room. If it
gets too hot or too cold, the unit will tell you
by sounding an alert tone and showing the
temperature on the display screen. You can
display the temperature in °C or °F.
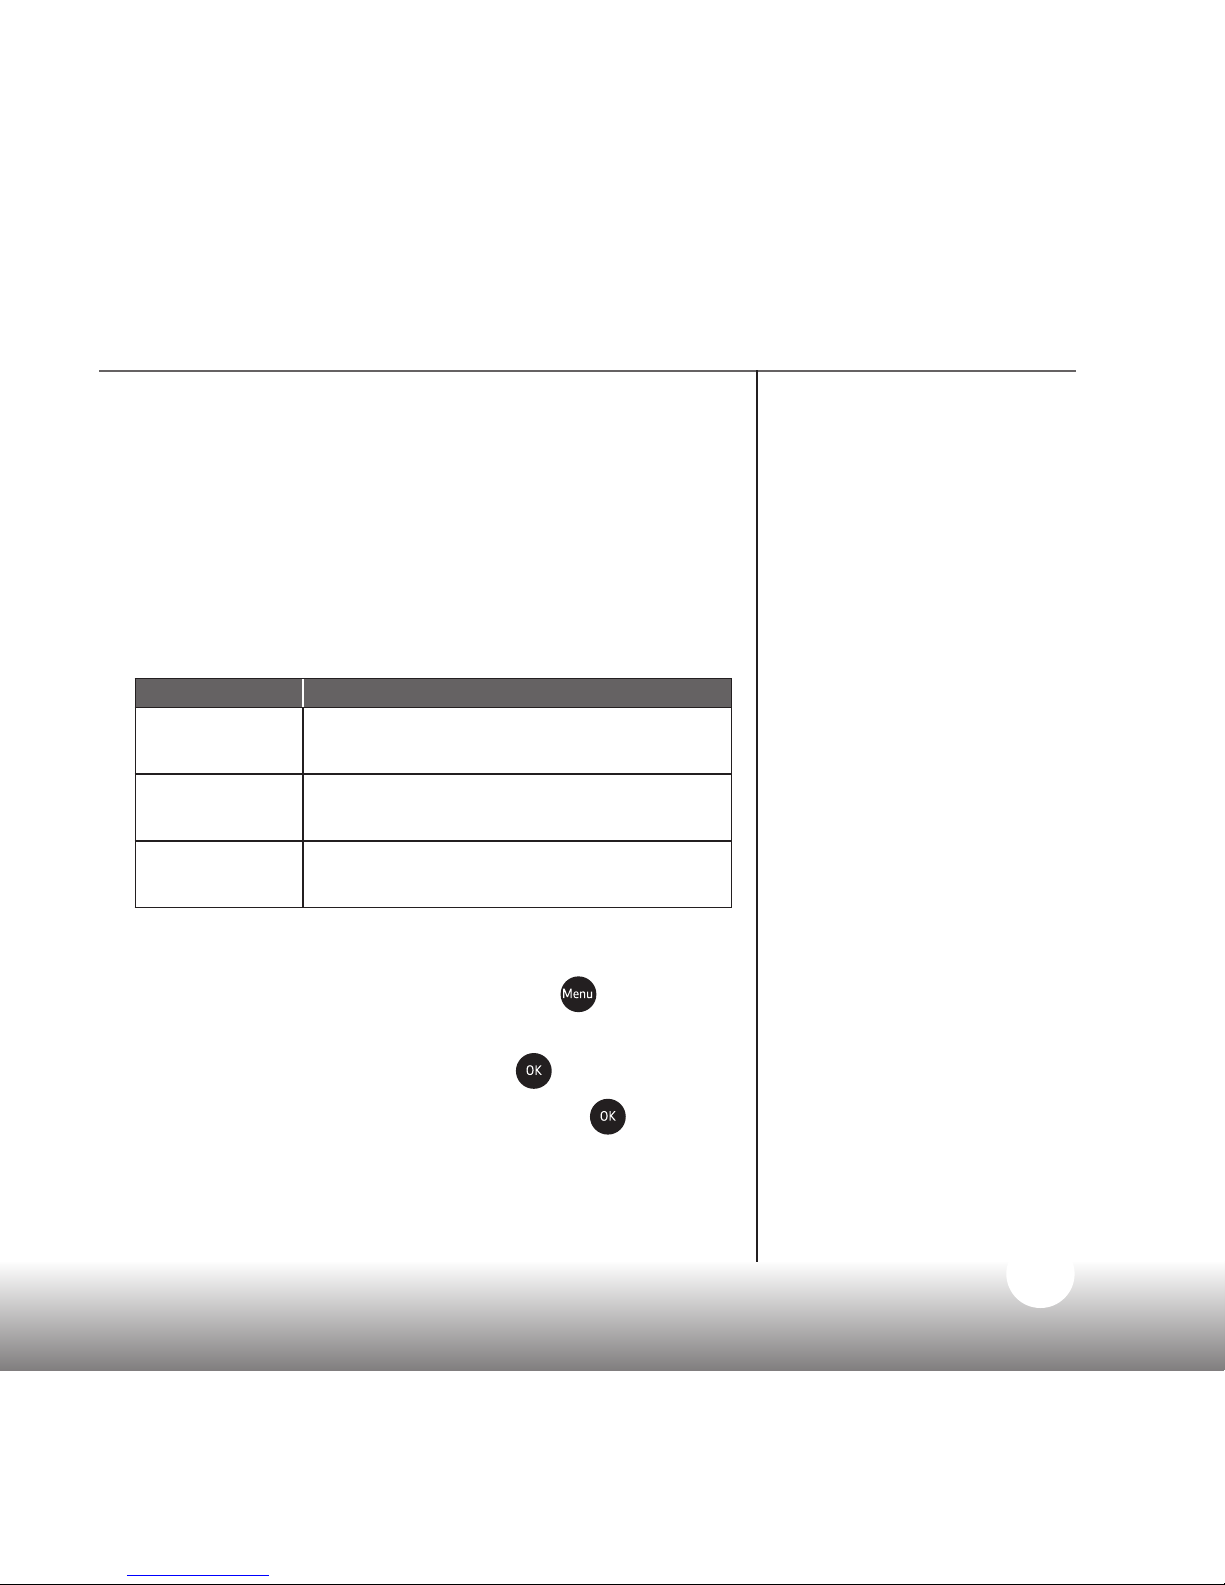
Temperature On the Parent unit
Below 16°C Display shows the temperature and
Too Cold
16 – 24°C Display shows the temperature, no
warnings will be displayed.
Over 24°C Display shows the temperature and
Too Hot
Changing the temperature format
1. To switch between °C or °F, press
on the
Parent unit and then use the arrow buttons to
scroll through to
Setup
. Press
.
2. When you see
Temperature
, press
again.
Important
Use the temperature sensor
only as a rough guide to the
temperature of your baby’s
bedroom. What’s displayed
might depend on where
you put the Baby unit in the
room.
It shouldn’t be used in place
of medical devices, which
may be more accurate.
Please note that your own
temperature reference
e.g. your central heating
thermostat may not be as
accurate, possibly due to
tolerances and positioning of
the thermostat in relation to
your baby monitor.
Healthcare professionals
advise that the ideal
temperature for your baby’s
room is between 16°C and
24°C.
Page 26

26
Need some help? Call 1300 889 785 or go to www.oricom.com.au
Using your SC530 Baby Monitor
Pre-set temperature alert
range
The Baby unit comes with
pre-set maximum and
minimum temperatures. The
UK Department of Health
has recommended these
temperatures to help reduce
the risk of cot death.
If the temperature falls below
or goes above the set range,
an alert will sound on the
Parent unit and the display
will show Too Cold or Too
Hot.
3. Use the arrow buttons to navigate to
Temp
Format
and press
.
4. Press
or to choose °C or °F and press .
Adjusting the monitor’s temperature
If you nd the temperature displayed on the
Parent unit is slightly different on another
thermometer or thermostat in your house, you
can adjust the one on your monitor to match.
1. On your Parent unit, press
, then use the
arrow buttons to get to
Setup
. Press .
2. When you see
Temperature
, press
.
3. Press
until
Adjust temp?
shows on the
screen and press
.
4. Then use the arrow buttons to add the
temperature you want to change to and press
to save.
Resetting the temperature on your monitor
If you’ve adjusted the temperature on your
monitor, you can reset it through the Parent
unit.
1. Go into the main menu and press
until you
get to
Setup
. Then press
.
Page 27
27
Need some help? Call 1300 889 785 or go to www.oricom.com.au
Using your SC530 Baby Monitor
2. When you see
Temperature
, press
.
3. Use the arrow buttons again to scroll through to
Reset Temp
. Press
.
Saved
will be displayed
and you’ll hear a conrmation beep.
Backlight
You can select whether the backlight comes
on when you get an alert on your Parent unit.
The default setting is On and the screen will
remain lit up for 15 seconds.
1. Press
and then use the arrow buttons to
scroll through to
Setup
. Press
.
2. Press
to get to
Backlight
and press .
3. Use the
and buttons to choose between
On w alerts
or
Off w alerts
, then press
to
save your choice.
Page 28

28
Need some help? Call 1300 889 785 or go to www.oricom.com.au
Using your SC530 Baby Monitor
List of tones
Your Audio Baby Monitor Secure 530 can
produce various tones. They have the
following meaning:
Tone Meaning
Single tone Conrmation (for example, saving a
setting)
Fast double
tone
Error (for example, trying to change the
volume but already reached maximum)
Slow double
tone
User alert (for example, time to feed
your baby.
Fast triple tone System alert (for example, link lost or
battery low)
You can turn off user alert tones by pressing
any button on the Parent unit.
To switch off system alerts for ve-minutes,
press any button on the Parent unit.
Page 29

29
Need some help? Call 1300 889 785 or go to www.oricom.com.au
Using your SC530 Baby Monitor
Resetting the units
Resetting either units means they’ll return to
the settings they came with.
1. Make sure the unit you're resetting is switched
on.
2. Parent unit – hold down
for 10 seconds or
until the Parent unit displays the word
Reset
.
3. Baby unit – hold down
for 10 seconds or until
the link light ashes, nightlight illuminates and
you hear a conrmation beep.
You should only reset if you’re having problems
with your monitor.
Page 30

30
Need some help? Call 1300 889 785 or go to www.oricom.com.au
Oricom Help
If you have any problems setting up or using your baby monitor, see if
these common questions can help.
Why is the Parent unit beeping?
Take a look at page 28 for a list of the tones the Parent unit makes. It
could be beeping for a few different reasons.
• The link has been lost between your units. Check that the Baby unit
Link indicator is illuminated. If not, make sure the power adaptor is still
connected.
• The feed timer has been set. See page 22.
• The temperature alert has been triggered. See pages 25-27.
• The batteries are low. See page 9.
If the Parent unit still beeps after this, try switching the Baby unit off at
the mains power socket and removing the batteries for around 5 minutes.
Make sure the Parent unit is clean by wiping with a damp cloth. If this
doesn’t work, call the Helpline for advice.
Why isn’t the Link light coming on?
• Check that both units are switched on.
• Check the batteries in the Parent unit are installed properly and charged.
• Check that the mains power is plugged in and switched on at the Baby unit.
• Check that the units are within range of each other.
Page 31

31
Need some help? Call 1300 889 785 or go to www.oricom.com.au
Oricom Help
Why aren’t the units linking?
• Make sure the units are within range of one another.
• Check if both units are turned on.
What do I do if the battery is showing as low on the Parent unit?
• Plug the unit into a wall power socket to charge it. It’s best to leave the
unit plugged in whenever you can, to make sure the batteries are always
charged.
• To fully charge the batteries, the Parent unit should be on charge for about
16 hours if switched off and 24 hours if switched on.
• To speed things up, turn the Parent unit off when charging if it’s not being
used.
Why is my Parent unit very quiet?
• You may have set the volume too low. See 14.
• You may have switched Mute on. Take a look at 14.
Why is there a high-pitched noise coming out of one of the units?
• The units might be too close to each other.
• The volume setting might be too high.
Why isn’t talkback working
• Check that the volume is loud enough at the Baby unit. See 15.
• Check the units are linked. Take a look at 11 for more on how to do that.
Still stuck?
Try 1300 889 785 or go to www.oricom.com.au
Page 32

32
Need some help? Call 1300 889 785 or go to www.oricom.com.au
General information
Cleaning
To clean, wipe with a damp cloth.
Express Warranty (Australia)
This Express Warranty is provided by Oricom International Pty Ltd ABN 46
086 116 369, Unit 1, 4 Sovereign Place, South Windsor NSW 2756, herein
after referred to as “Oricom”.
Oricom products come with guarantees that cannot be excluded under the
Australian Consumer Law.
You are entitled to a replacement or refund for a major failure and
compensation for any other reasonably foreseeable loss or damage. You
are also entitled to have the goods repaired or replaced if the goods fail
to be of acceptable quality and the failure does not amount to a major
failure. Oricom warrants that the product is free from defects in materials or
workmanship during the Express Warranty Period. This Express Warranty
does not extend to any product from which the serial number has been
removed or was purchased outside of Australia.
Nothing in this Express Warranty excludes, restricts or modies any
condition, warranty, guarantee, implied term, right or remedy pursuant to
the Australian Consumer Law and which may not be so excluded, restricted
or modied. For such conditions, terms, guarantees and warranties that
cannot be excluded, restricted or modied, Oricom limits the remedies
available to extent permitted in the relevant legislation.
Page 33

33
Need some help? Call 1300 889 785 or go to www.oricom.com.au
General information
The Express Warranty Period will be 3 years from the date of purchase
of the product evidenced by your dated sales receipt. You are required to
provide proof of purchase as a condition of receiving Express Warranty
services.
You are entitled to a replacement product or repair of the product at our
discretion according to the terms and conditions of this document if your
product is found to be faulty within the Express Warranty Period.
This Express Warranty extends to the original purchaser only and is not
transferable.
Products distributed by Oricom are manufactured using new materials or
new and used materials equivalent to new in performance and reliability.
Spare parts may be new or equivalent to new. Spare parts are warranted
to be free from defects in material or workmanship for thirty (30) days or
for the remainder of the Express Warranty Period of the Oricom branded
product in which they are installed, whichever is longer.
During the Express Warranty Period, Oricom will where possible repair
and if not replace the faulty product or part thereof. All component parts
removed under this Express Warranty become the property of Oricom. In
the unlikely event that your Oricom product has a recurring failure, Oricom
may always, subject to the Competition and Consumer Act 2010, at its
discretion, elect to provide you with a replacement product of its choosing
that is at least equivalent to your product in performance.
Page 34

34
Need some help? Call 1300 889 785 or go to www.oricom.com.au
General information
No change to the conditions of this Express Warranty is valid unless it is
made in writing and signed by an authorised representative of Oricom.
Oricom will not be liable under this Express Warranty, and to the extent
permitted by law will not be liable for any defect, loss, damage or injury
arising out of or in connection with a:
1. Failure by you to adhere to the warnings and follow the instructions set
out in this user guide for the proper installation and use of the product;
2. Wilful misconduct or deliberate misuse by you of the product;
3. Any external cause beyond our control, including but not limited to power
failure, lightning or over voltage; or
4. Modication to the product or services carried out on the product by
anyone other than Oricom or Oricom’s authorised service provider.
Page 35

Page 36

ORICOM CUSTOMER SUPPORT
Oricom have a trained and dedicated team of Customer Support
Representatives, each with the knowledge and resources to assist in
answering your questions quickly and efciently.
Oricom Support - Australia
For all product enquiries, troubleshooting or to discuss the range of Oricom
products, feel free to contact Oricom or visit our website for answers to
frequently asked questions.
1300 889 785
Monday - Friday 8am – 6pm AEST
Email: [email protected]
www.oricom.com.au
Oricom Support - New Zealand
0800 674 266
Monday - Friday 11am - 7pm NZST
Email: [email protected]
www.oricom.co.nz
Ref: 22052018
 Loading...