

Page 1
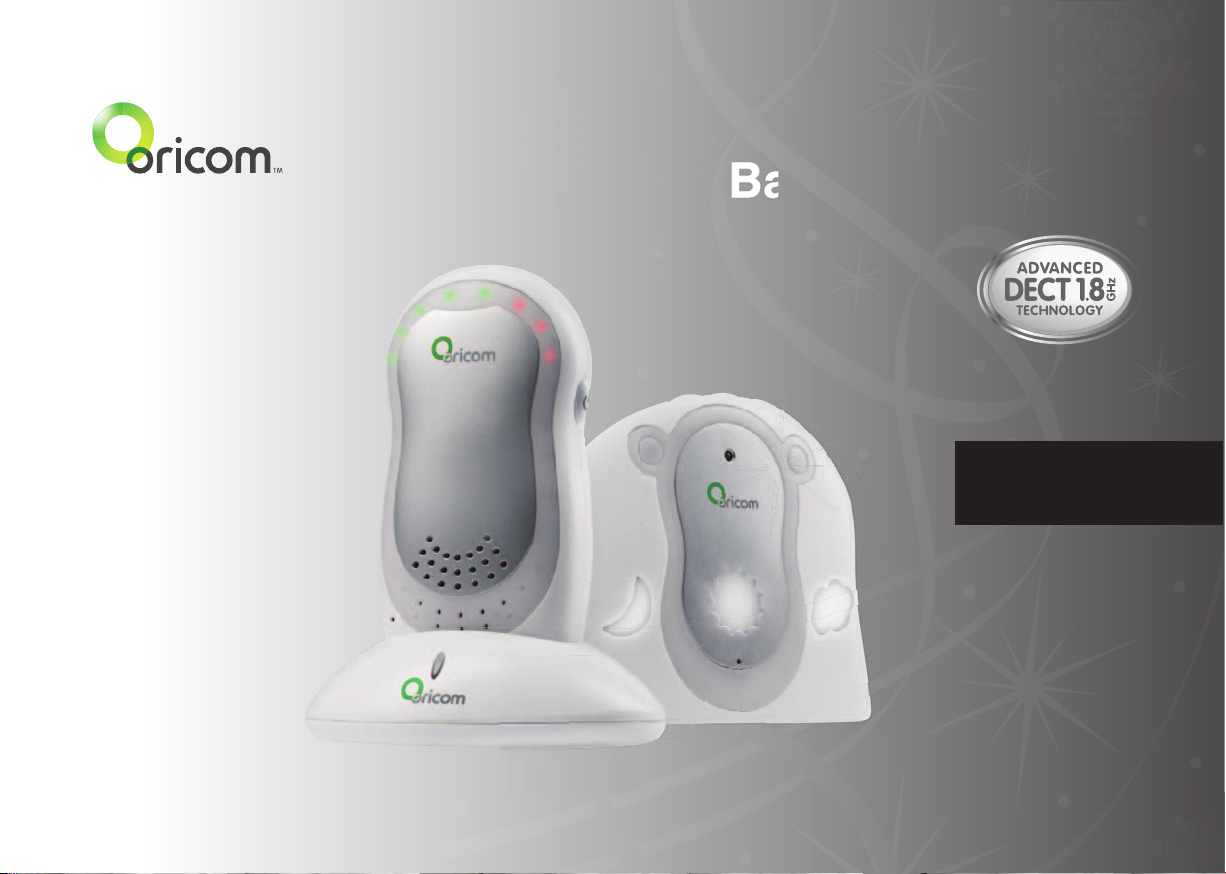
Baby Monitor
Secure 50
User Guide
Page 2

TABLE OF CONTENTS
WARNINGS AND SAFETY INFORMATION 1
GETTING STARTED 3
YOUR BABY MONITOR 5
BASIC OPERATION 8
TROUBLESHOOTING 11
PRODUCT SPECIFICATIONS 12
GUARANTEE 13
Page 3
1WARNINGS AND SAFETY INFORMATION
IMPORTANT
Please read this user guide thoroughly before use.
Your ORICOM Baby Monitor is designed to be an aid and
should not be used as a substitute for responsible and
proper adult supervision of a child.
The Baby Monitor has been designed to provide some
added reassurance in the form of sound transmission
for those times when you are not in the same room as
your baby provided you always stay within hearing range
of the baby monitor during use. Your Baby Monitor is
not a medical device, nor a device to prevent cases of
Sudden Infant Death Syndrome (SID'S) or "cot death",
and you should not rely on it for your baby's wellbeing. It is
important that you regularly check on your baby personally.
Make sure the Baby unit, Parent unit and mains adaptor
cables are kept out of reach of your baby and other young
children within the house at all times, at least one metre
away from the baby's cot.
Never place the baby unit inside your baby's cot, bed or
playpen.
Never cover the Parent or baby units with clothes, towels
or blankets or any other item.
Do not place the cord in a high "wear and tear" location.
Never use a frayed or compromised cord.
Never use or place your Parent or Baby units in or near
moisture or water (e.g. near bath or pool). Immersing in
water can cause electric shock and even death.
Power requirements
In Australia this product requires an electrical supply of
220-240 volts, single phase/alternating current.
CAUTION
!
If you plan to use your Baby monitor whilst travelling
overseas, make sure that the voltage shown on the mains
power adaptor is the same as the local mains power before
connecting to the power supply. Do not use any voltage
converter with the monitor.
Use only the mains power adaptors supplied with this
equipment. Incorrect adaptor polarity or voltage can
seriously damage the unit and/or cause physical harm
and even death. The adaptors may become warm during
use, please take care when handling.
AC Adaptor (Baby unit) AC Adaptor (Parent unit)
Input: 240VAC 50Hz Input: 240VAC 50Hz
Output: 6V
200mA Output: 6VDC 200mA
DC
Page 4

2 WARNINGS AND SAFETY INFORMATION
Battery requirements
Each parent unit requires two rechargeable Ni-MH
batteries, size AAA 1.2V 800mAh (HR10/44).
• Do not dispose of the batteries in a fi re, as they can
explode.
• Do not open, unscrew or temper with any of your
baby monitor units or battery. Always carry out repairs
through your authorised ORICOM representative or
other duly qualifi ed tradesperson.
• Released electrolyte from the battery is corrosive
and can cause damage to the eyes or skin. It can
be toxic and fatal if swallowed. If there is any sign of
poisoning, immediately call emergency 000.
• When your Baby Monitor is not in use, it is recommended that you disconnect it from the mains supply
and remove the batteries.
• Observe the proper polarity, or direction, of any
battery. Reverse insertion of the battery cell can
result in leakage or explosion and in turn harm or
even death.
• The Ni-MH batteries supplied with this product may be
able to be recycled once they are unable to recharge
during normal operation. Always observe your local
Council /State regulations regarding the disposal of
your packaging materials, exhausted batteries, and old
equipment.
• Always recycle where possible. Do not use your baby
monitor in an explosive hazard area such as where
there is gas leaking.
• As there is a slight chance that the product could be
damaged by an electrical storm, it is recommended that
users unplug from the mains supply during an electrical
storm.
Cleaning and care
The surface of the case can be cleaned with a dry, soft,
lint-free cloth. Never use cleaning agents, particularly
aggressive solvents. Apart from occasional cleaning of the
case, no other care is necessary.
Page 5
GETTING STARTED
3
Thank you for choosing this monitor from Oricom.
Your Secure 50 Baby Monitor offers the best Digital
Technology.
INTERFERENCE
FREE
DECT (Digital Enhanced Cordless Telecommunications) is the
most widely used worldwide digital cordless technology, offering
amazingly clear sound, long range and maximum voice security.
DECT operates on the 1.8Ghz frequency which eliminates potential
interference from other common wireless devices such as cordless
telephones, wireless networks (Wi-Fi), Bluetooth and cordless
computer devices.
FREQUENCY
Pack Contents
• Parent unit (receiver)
• Baby unit (sender)
• Mains adaptor with charger pod
• 2 x NiMH rechargeable batteries (type AAA, 800mAh)
• Mains adaptor with power cord
Installation
For the Parent Unit
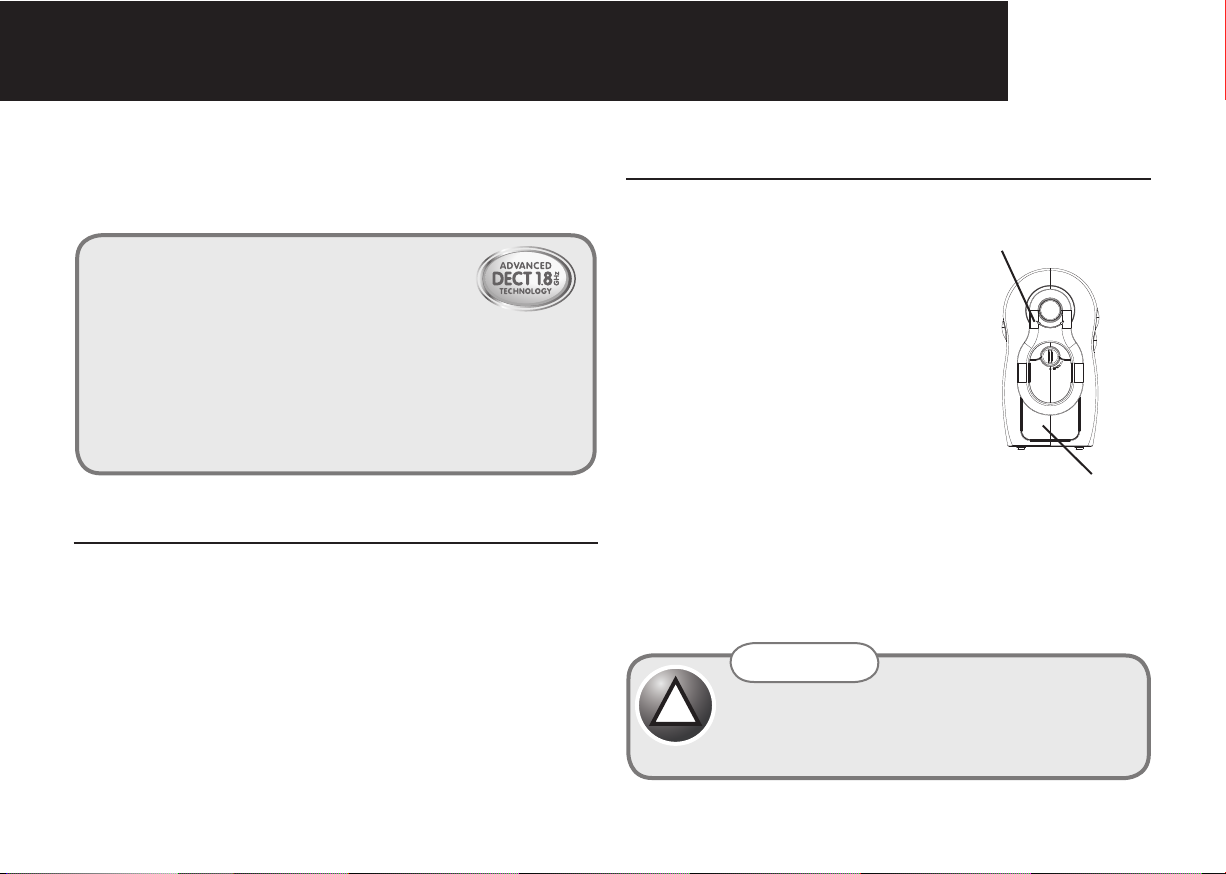
1 Remove the Belt Clip by lifting
the clip at the top and sliding it
downwards.
2 Then remove the battery cover
on the back of the Parent Unit
by switching the OPEN switch.
Insert the rechargeable batteries
(supplied) as marked on the unit
and close the cover again.
3 Place the Parent Unit into the
Charger Pod.
4 Plug the mains adaptor into a
mains power socket.
The red charger light on the charger pod will illuminate
indicating that the Parent Unit is charging.
(the light will remain on to ensure optimum charge is
maintained).
WARNING
!
DO NOT USE STANDARD/ALKALINE BATTERIES
IN THE PARENT UNIT, AS THERE IS A RISK OF
EXPLOSION AND/OR INJURY. USE ONLY Ni-MH
RECHARGEABLE BATTERIES AS SUPPLIED.
clip
battery cover
Page 6
4
GETTING STARTED
5 Press [ ] to turn the Parent Unit on.
• Before fi rst use, or if it has been out of use for a long
time, the Parent Unit will need to be charged for 15-16
hours. During this time, the Parent Unit will operate
from the Charger pod when switched on. Note that the
Parent Unit cannot be used without batteries, even if it
is placed in the charger.
For the Baby Unit
1 In the event of a power failure, your Baby Monitor can
switch to battery power. It is therefore recommended that
you insert non-rechargeable batteries in the Baby Unit.
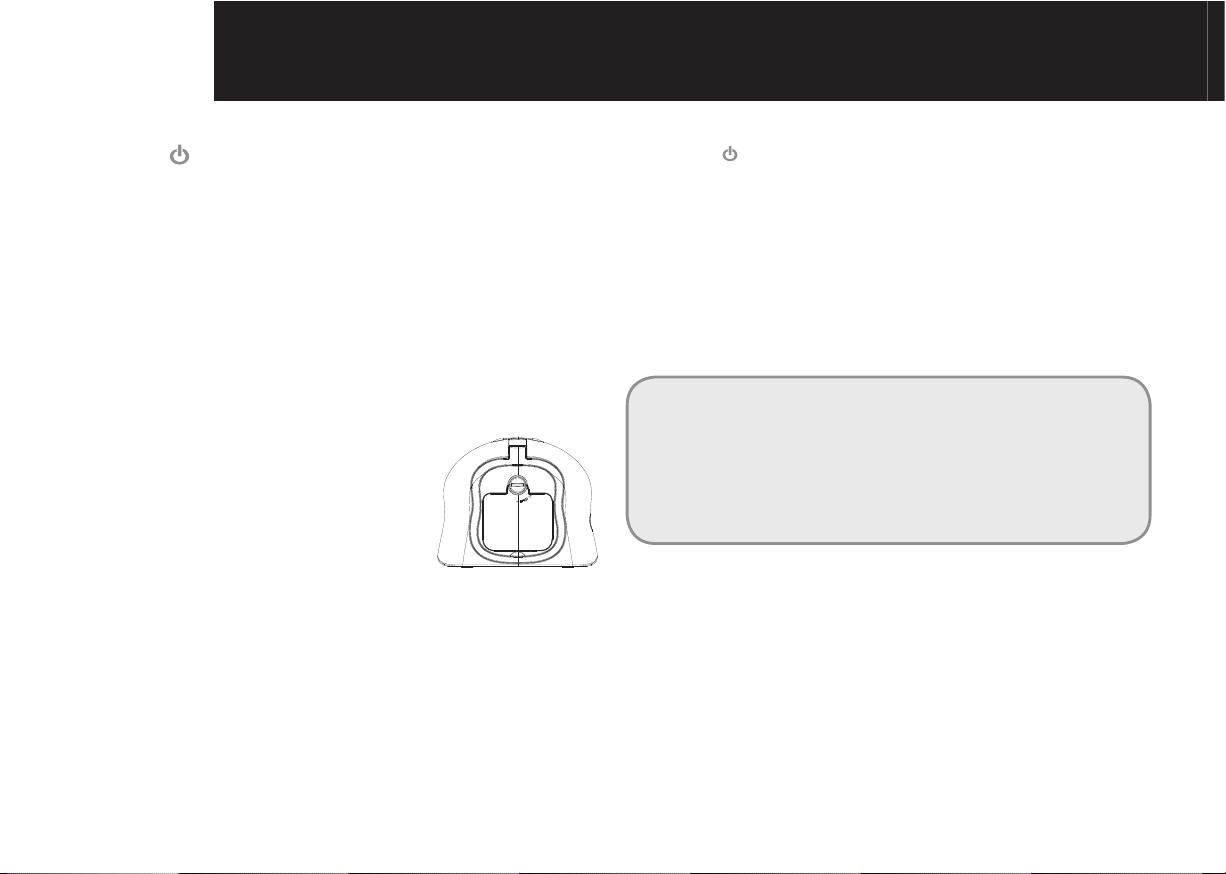
2 Remove the battery cover on the
back of the Baby Unit by switching
the OPEN switch. Insert 3 alkaline
batteries of the type AA (not
provided) as marked on the unit
and close the cover again. Do not
use rechargeable batteries in the
Baby Unit.
3 Plug the power cord into the power input at the side of
the Baby Unit and plug the adaptor plug into a mains
power socket.
4 Press [ ] to turn on the Baby Unit.
• The Baby Unit should be placed about 1 metre
to 1.5 metres away from the baby's cot on a flat
surface. Never place the Baby Unit inside the cot,
bed or playpen. Make sure the unit, cords and mains
adaptor are out of reach of the baby and other
young children. Never place either Unit on antique
or polished surfaces (as slippage or scuffing may
occur). The unit may cause harm if it falls onto baby
or other young children.
Note:
If you place the Parent and Baby units too close together
you will hear a high pitched noise called "feedback", this is
normal. The units are designed to be located in separate
rooms.
To prevent feedback, do not take the parent unit into the
nursery/baby's room.
Page 7
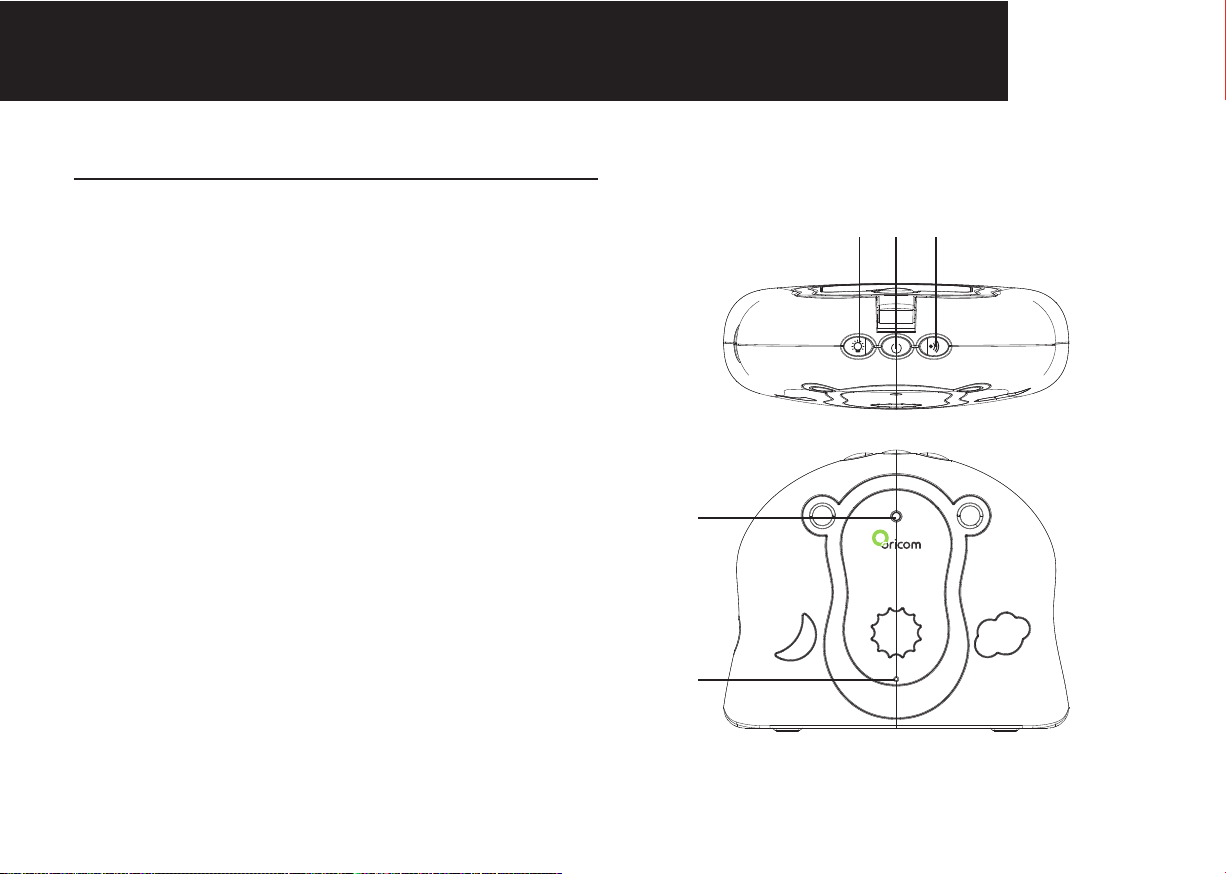
Baby unit (Sender)
1 Night light Key
Press to turn On the night light. Press again to turn off
the Light.
2 Power On/Off Key
Press to turn the Unit ON.
Press and hold to turn the Unit OFF.
3 Page Key
Press and hold this key, Parent unit makes an audible
alert.
Useful to call for assistance or to locate a missing
Parent Unit.
4 Power light
Red light glows when the power is On. A slow fl ashing
light indicates batteries are low.
5 Microphone
Picks up the sounds from your baby's room.
5YOUR BABY MONITOR
1 2 3
4
5
Page 8
6 YOUR BABY MONITOR
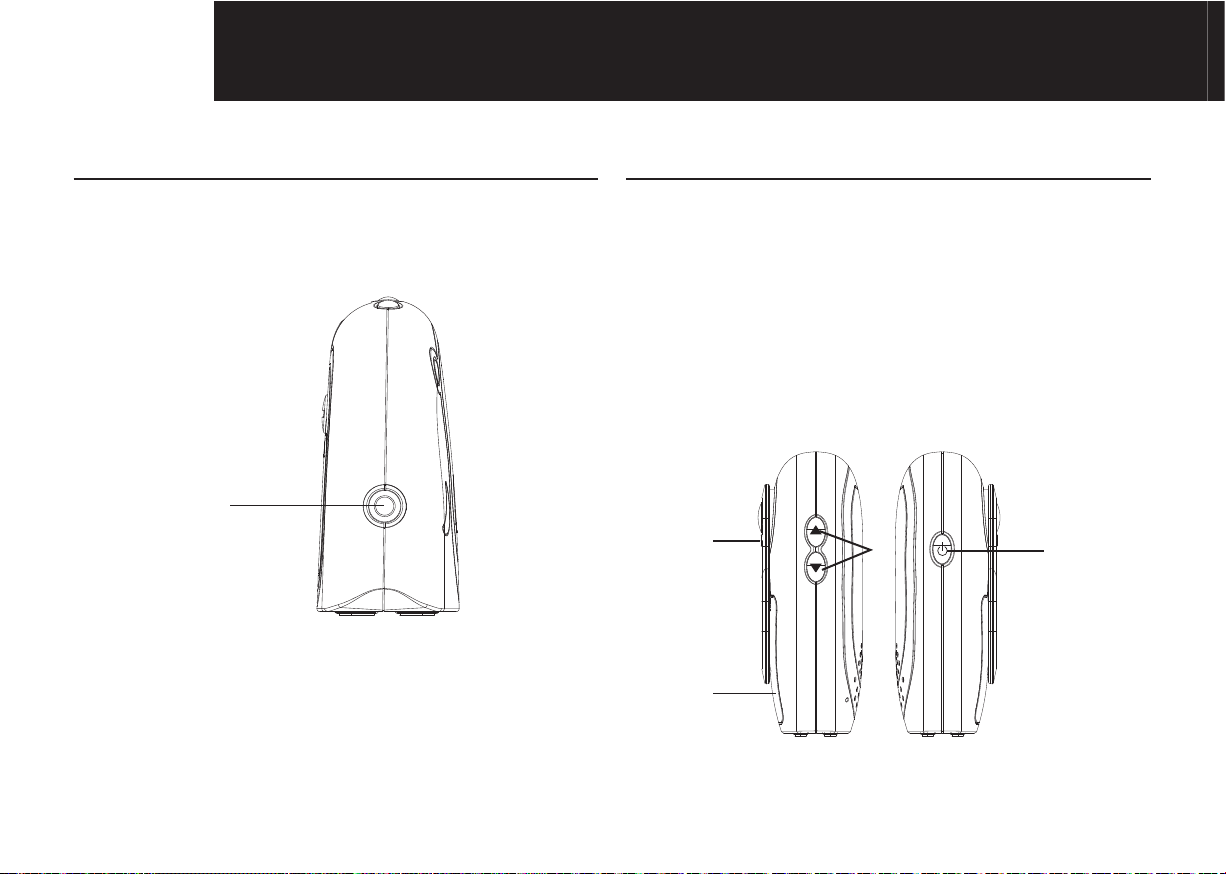
Left view of baby unit
6 DC 6V input
Connecting to Power Adaptor.
6
Parent unit (Receiver)
7 Battery Cover
Rechargeable batteries.
8 Belt Clip
9 Volume Up/Down Keys
Adjust the Volume at which you hear the sounds in your
baby's room.
10 Power Key
Press and release to turn it ON.
Press and hold to turn it OFF.
8
9
10
7
Page 9
YOUR BABY MONITOR
7
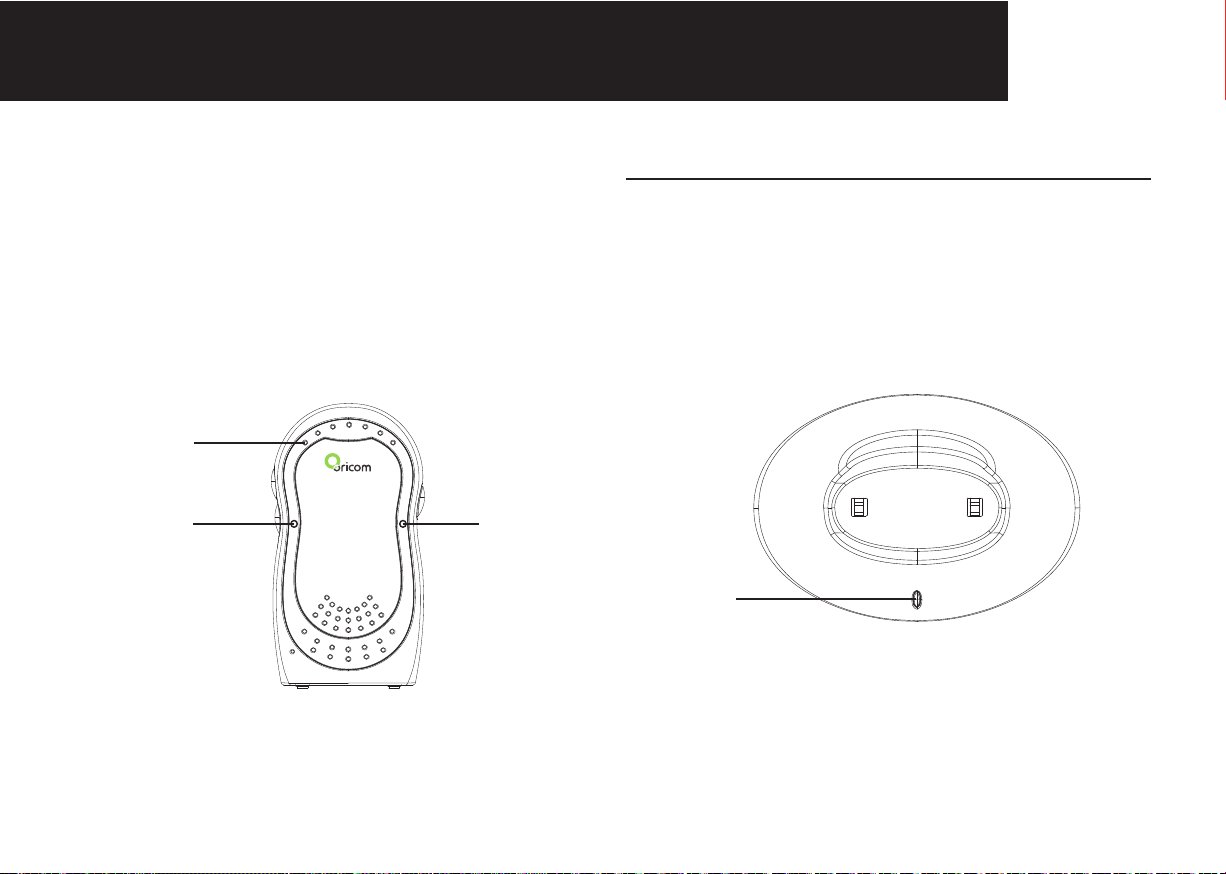
11 Power Light
Red light when the power is ON.
Flashing light indicates rechargeable batteries need
recharging.
12 Battery/Noise Level Indicators
Indicates the battery level or Noise level
13 Link Light
Green light ON indicates “Linked” to Baby Unit. Flashing
light indicates “Link” is lost.
12
11
13
Charger Pod
14 Charging Light
When Parent unit is placed in the Charger Pod, the
red charger light comes ON to indicate the batteries
are charging. Light will remain ON to ensure optimum
charge is maintained.
14
Page 10
8 BASIC OPERATION
Once you have set up your Baby Monitor, you will be able
to hear the sounds in your baby's room through the Parent
Unit. And also see the green and red sensor lights around
the top of the Parent Unit rise and fall with the sound levels.
Note:
If the connection between the Parent and Baby Units is
broken at any time the green Link light on the Parent Unit
will fl ash slowly, the parent unit will beep to alter you that
the link has been lost and the green and red sensor lights
will cease to react to any sounds. Move closer to the baby
unit or follow the directions in "Troubleshooting" chapter to
re-establish the link.
Power On/Off
Once connected to the power supply,
• Press [ ] on each Unit to turn on the power.
• To switch off, press and hold the [ ].
Monitoring
• Position the baby unit accordingly. It should be
placed 1 metre to 1.5 metres away from the baby's
cot on a fl at surface.
• Take the parent unit to monitor.
• Audio picked up by the baby unit microphone is
depicted on the 8 lights on the parent unit (5 green
and 3 red). The more audio is picked up, the more
lights will be lit. When no audio is picked up, all 8
lights will be off.
• If the volume of the Parent Unit is turned off, an alert
will sound when the audio reaches the second red
led.
Note:
Do not position the baby unit and the parent unit close to
each other as feedback may be generated.
Adjusting Volume
You can adjust the volume at which you hear your baby.
There are 5 volume levels and an Off setting on the
Parent Unit.
Press [ ] to increase the volume and [ ] to decrease
the volume. When adjusting the volume, the 5 green sound
sensor lights will illuminate to indicate the volume level.
Paging
If the Parent Unit is misplaced, you can use [ ] button on
the Baby Unit to locate the Parent Unit.
• Press and hold [ ] on the Baby Unit. The Parent Unit will
automatically reset to mid volume and the paging alert will
sound.
Page 11

9BASIC OPERATION
• To stop the Page alert, press any button on the
Parent Unit, or press [
Note:
If no button is pressed, the paging tone will stop after 30
seconds.
If the Parent Unit volume is off, the Parent Unit volume will
reset to mid volume.
] again on the Baby Unit.
Night light
The Baby Unit has a one touch night light which emits a
soft starry glow, providing comfort and reassurance for your
baby and allowing you to see them in a darkened room.
Press [
on gently. Press again and the light will fade away.
] on the top of the baby unit. A soft light will turn
Out of Range
When the baby and parent units have no link with each
other (eg. Out of range, parent unit or Baby unit is not
powered on), the green Link light flashes. The link break
alert will be heard from the Parent Unit once only. When
the units are linked, the green Link light will be steadily lit.
Low Battery
Baby Unit
When the battery power is low, the power light will fl ash.
Parent Unit
When the batteries are low, the red power light will fl ash.
And also the battery low warning beep will be heard. The
unit still can be used for 30 minutes. You should put the
parent unit on the charger pod to recharge the batteries.
Note:
Low battery alert can be suppressed by pressing any
button.
Charging the Battery
The Parent Unit will work for up to 10 hours with fully
charged batteries. If a battery low warning beep is heard
and the red Power light on the Parent Unit is fl ashing, you
should put the parent unit on the Charger Pod to recharge
the batteries. You can still use your Parent Unit from the
Charger Pod. When charging, the red power light on the
charger will light steadily.
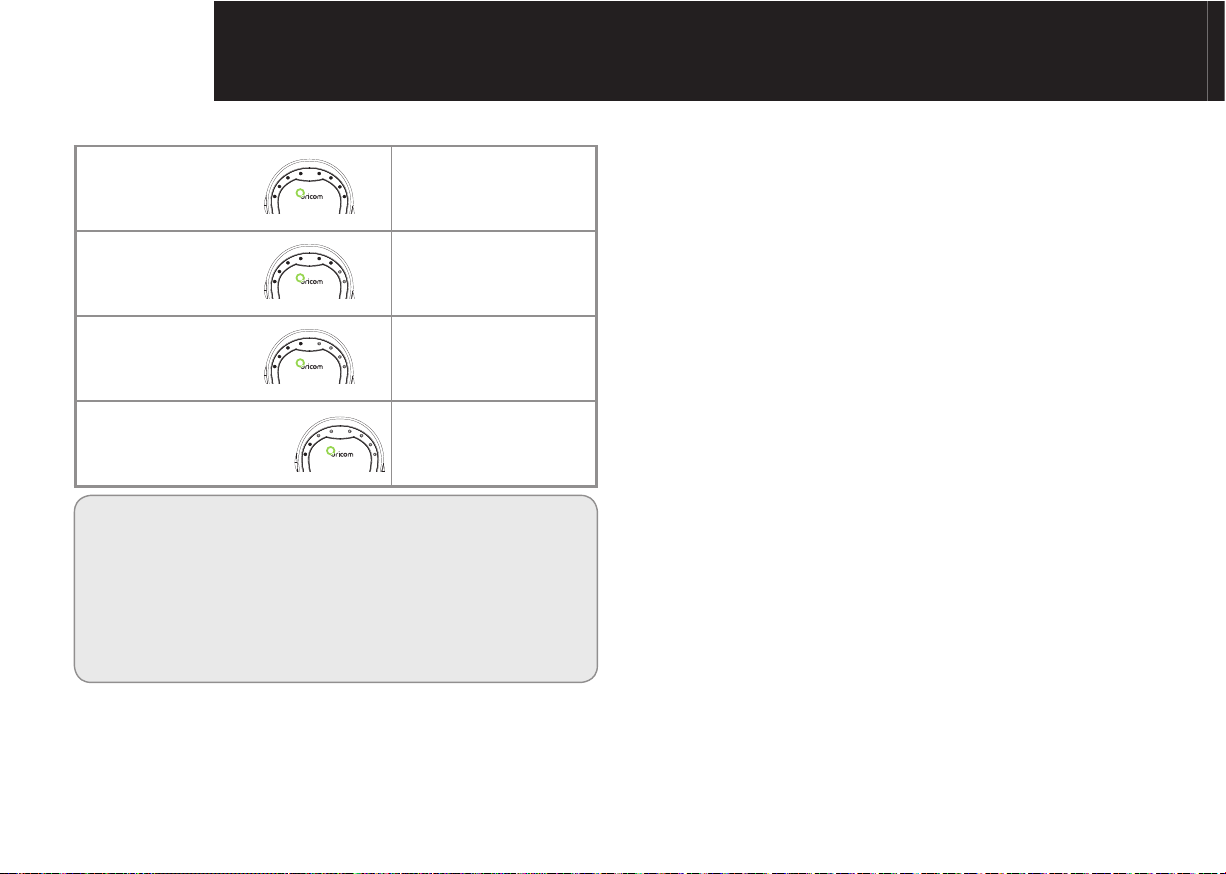
When you switch on your Parent Unit, the green and red
sensor lights will briefl y indicate the current charge level of
the batteries in the following way:
Page 12
10 BASIC OPERATION
8 lights illuminated fully charged
6 lights illuminated half charged
4 lights illuminated
battery is running
low
Rechargeable batteries in the Parent unit give up to 10
hours continuous usage. Please note however, that new
batteries do not reach full capacity until they have been in
normal use for several days.
Running rechargeable batteries right down at least once a
week will help them last as long as possible. The charge
capacity of rechargeable batteries will reduce with time as
they age, so reducing the performance time of the parent
unit. Eventually they will need to be replaced.
2 lights illuminated
(alarm beep sounds)
Note:
The parent unit can be used on or off the charger pod.
When on the charger pod, the batteries will be recharged
at the same time. However, the time it takes to charge the
batteries to full will be longer when the unit is charged and
used at the same time.
The Parent Unit can't be operated on the charging cradle
without batteries.
batteries need
recharging
Page 13
Problem Possible cause(s)
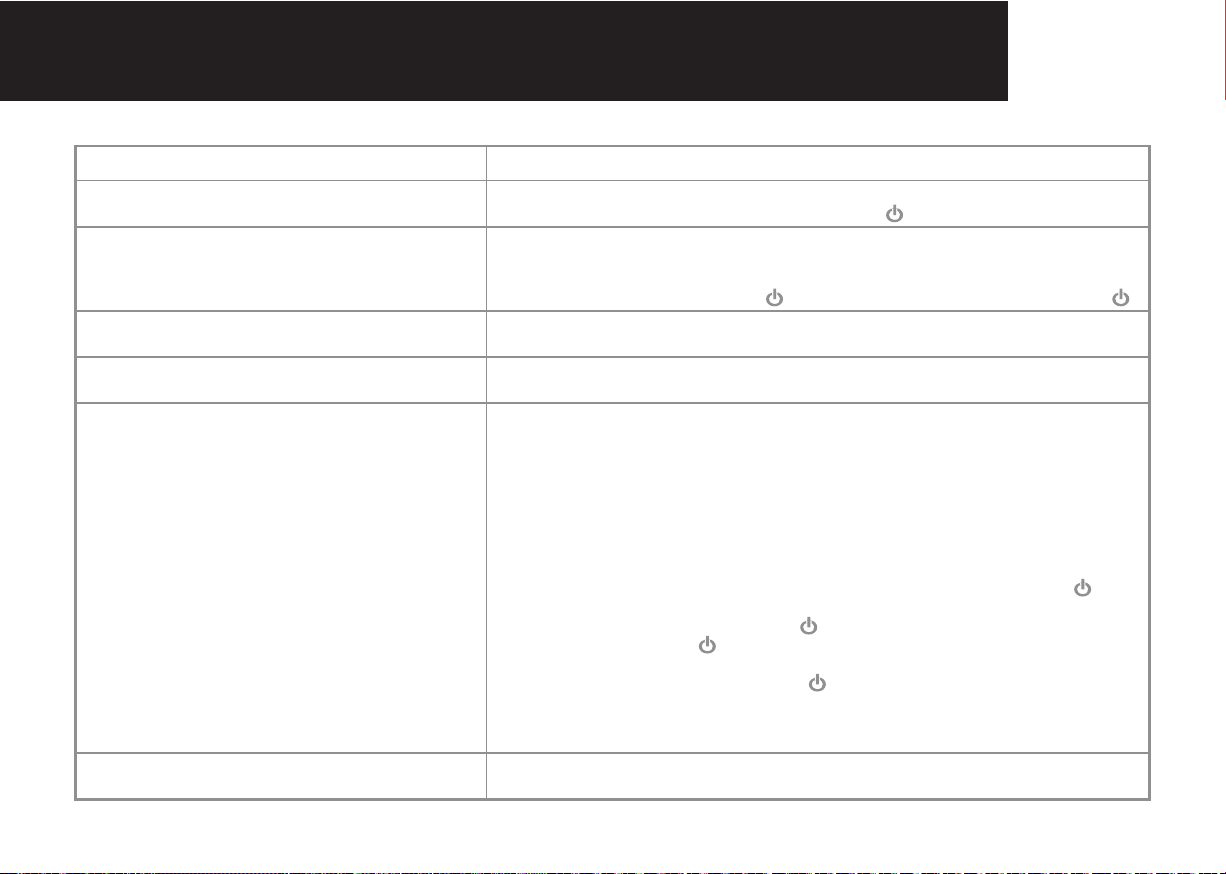
The red power lights do not turn on when you plug
in the power.
The green Link light on the Parent Unit is fl ashing
and cannot hear the sounds from your baby's
room.
Can't hear your baby on the Parent Unit but the
Link light is still glowing steadily.
The Red Power light is fl ashing on the Parent Unit
Two bars fl ash on the parent unit.
A high pitched ear piercing noise will be heard
from the units (feedback).
11TROUBLESHOOTING
1. Check if the units are properly connected to the power supply.
2. Check if the power is turned on. If not, Press [
1. You may have moved out of range. Move closer to the Baby Unit and wait 5
seconds for the Link to establish.
2. You may need to re−establish the Link between the two units. Turn both units
off by pressing and holding the [
Check if the volume is turned up on the Parent Unit.
Your re-chargeable batteries are running low. Return the Parent Unit to the
Charger Pod to recharge them.
1. The batteries in the parent unit are not fully charged. Charge the parent unit for
14 hours before use.
2. The power to the baby unit may be turned off or disconnected, and or the Baby
unit may be turned off. Reconnect the AC power adaptor to the baby unit and
or turn on the baby unit.
3. You may have to re-establish the link between the two units. You will need to
remove the batteries from the parent unit and register the parent unit back to
the baby unit by following the instructions below:
A. Ensure batteries are removed from the Parent unit (and baby unit if fi tted) and the
AC power plug is disconnected from the Baby unit). Press and hold the [
the BABY unit then plug in the AC power plug, after 2 seconds, when the baby
unit night-lights fl ash release the [
B. Press and hold the [
2 seconds, the parent unit will sound an alert and the level indication red
LED’s will fl ash, then release the [
C. After a few seconds, the PARENT unit will give a confi rmation tone and the
units will be re-linked and ready to use.
NOTE: Steps A and B need to be performed within 50 secs.
Check if the Parent and Baby Units are too close together. Move them further apart.
] on the PARENT unit then insert the batteries, after
] and then turn on again by pressing the [ ].
] button;
] button;
] to turn on the power.
] on
Page 14

12 PRODUCT SPECIFICATIONS
Feature Specifi cations
Operating Frequency DECT 1.8 GHz
Up to 300m under optimum conditions. The range is
Range
reduced in buildings (up to 50m) as a result of walls, doors
etc.
Power supply (baby unit)
Non rechargeable batteries (baby unit)
(not included in the package contents)
Input: 240 V
Output: 6 VDC, 200 mA,
Type: AA, 1.5 V Alkaline
50Hz
AC
Transmitting power Average: 10 mW Maximum: 250 mW
Power supply (parent unit)
Rechargeable batteries (parent unit)
(included in the package contents)
Input: 240 V
Output: 6 V
Type: AAA, 1.2 V, 800 mAh NiMH
, 50Hz
AC
, 200 mA
DC
Operating time with charged battery Approx. 10 hours
Page 15

Warranty Information (Australia)
13GUARANTEE
Oricom makes no other warranties or conditions, express or implied, including
as to merchantability and fi tness for a particular purpose, except as stated in
this Warranty. Any implied warranties that may be imposed by law are limited
in duration to the Warranty Period.
Oricom warrants that the product is free from defects in materials or
workmanship during the Warranty Period. This Warranty in no way affects
your statutory warranty rights under the Trade Practices Act 1974 or any
other similar legislation. This Warranty does not extend to any product from
which the serial number has been removed, was purchased outside of
Australia or that has been damaged or rendered defective:
1. as a result of lightning, over voltage, accident, misuse, abuse or other
external causes;
2. the operation outside the normal use of the product;
3. by the use of parts not manufactured or sold by Oricom; or
4. by modifi cation or service by anyone other than:
(a) Oricom; or (b) an Oricom authorised service provider.
The Warranty Period will be 36 months from the date of purchase of the
product evidenced by your dated sales receipt. You are required to provide
proof of purchase as a condition of receiving warranty services. You are
entitled to a replacement or repair according to the terms and conditions of
this document if your product is found to be faulty within the Warranty Period.
This Warranty extends to the original purchaser only and is not transferable.
Batteries (if supplied) with this product are covered under this warranty for a
period of 90 days. Oricom products are manufactured using new materials
or new and used materials equivalent to new in performance and reliability.
Spare parts may be new or equivalent to new. Spare parts are warranted to
be free from defects in material or workmanship for thirty (30) days or for the
remainder of the Warranty Period of the Oricom branded product in which
they are installed, whichever is longer.
During the Warranty Period, Oricom will replace and where possible repair
the defective product. All component parts removed under this Warranty
become the property of Oricom.
In the unlikely event that your Oricom product has a recurring failure, Oricom,
at its discretion, may elect to provide you with a replacement product of its
choosing that is at least equivalent to your product in performance.
Oricom does not warrant that the operation of the product will be
uninterrupted or error free. Oricom is not responsible for damage that occurs
as a result of your failure to follow the instructions that came with the product.
These terms and conditions together with any specifi c terms and conditions
contained in the user guide to the product purchased constitute the complete
and exclusive agreement between you and Oricom regarding the product. No
change to the conditions of this Warranty is valid unless it is made in writing
and signed by an authorised representative of Oricom.
Oricom is not liable for any damages caused by the product or the failure
of the product to perform, including any lost profits or savings or special,
incidental or consequential damages. Oricom is not liable for any claim made
by a third party or made by you on behalf of a third party.
This limitation of liability applies whether damages are sought, or a claim
made, under this Warranty or as a tort claim (including negligence and strict
product liability), a contract claim or any other claim. However, this limitation
of liability will not apply to claims for personal injury.
Nothing in this Warranty excludes, restricts or modifies any condition,
warranty, right or remedy which pursuant to the Trade Practices Act 1974
applies to this Warranty and which may not be so excluded, restricted or
modified. For warranties that cannot be excluded, restricted or modified,
Oricom limits the remedies available to those specified in the relevant
legislation.
Page 16

Customer Support
If you suspect your product is not functioning to specifi cation, before making a warranty claim please use the following
resources.
- Troubleshooting Guide in this user guide
- Online Frequently Asked Questions - www.oricom.com.au
- Email our customer support team on [email protected]
- Contact Oricom Customer Support team on 1300 889 785 or 02 4574 8888 (Monday to Friday 9am to 5pm EST)
Please retain your purchase receipt and attach to the back page of this user guide.
Visit www.oricom.com.au to register your product online
Australia
Oricom International Pty Ltd
Locked Bag 658
South Windsor, NSW 2756
Customer Support
Email: [email protected]
Web: www.oricom.com.au
Phone: 1300 889 785
Fax: (02) 4574 8898
 Loading...