

Page 1

MIDILECTOR S & SR
Midi file reader / recorder on SD card
User manual (complete kit)
Introduction
Midilector S is a Midi file reader (and recorder for Midilector-SR) on SD card
intended to drive a midi decoder (as Midi_2org_64 for example). He can obviously
pilot any midi electronic instrument (piano, synthesizer, etc.)
It is delivered , without any case. It has been designed to be the most compact
possible and to be integrated into an organ panel or any other automatic music
instrument. The buyer is thus considered for having the technical knowledge
necessary for this.
Midilector is based on the Simon Lehmayr's open source project, Mr Midi:
www.mikrocontroler.net
Main features
• Play any standard midi files (format 0) from an SD Memory card. Files
may be organised into folders able to contain 255 songs each.
• Support any standard SD card from 128Mb up to 2 GO. A 128Mb card can
contain more than 2000 standard midifiles.
• Multi tracks 16 channel
• Board size: 116*52 mm
• 24*2 LCD screen with back light (optional button to switch off the light
Page 2
and save battery).
• Tempo variations (+ or - 5%) while playing with 2 buttons
• Transpose while playing (+ or – semi-tone).
• Possibility of synchronisation: crank rotation can drive song start, tempo
and stop.
• Lyrics on screen when present in the file (Karaoke)
• Designed to be fitted into any musical instrument panel or case.
• Powered by any DC current 8 up to 18 volts
Midilector-SR is the version with recording capabilities. It comes with a second midi
socket for input midi datas, and a button for recording option.
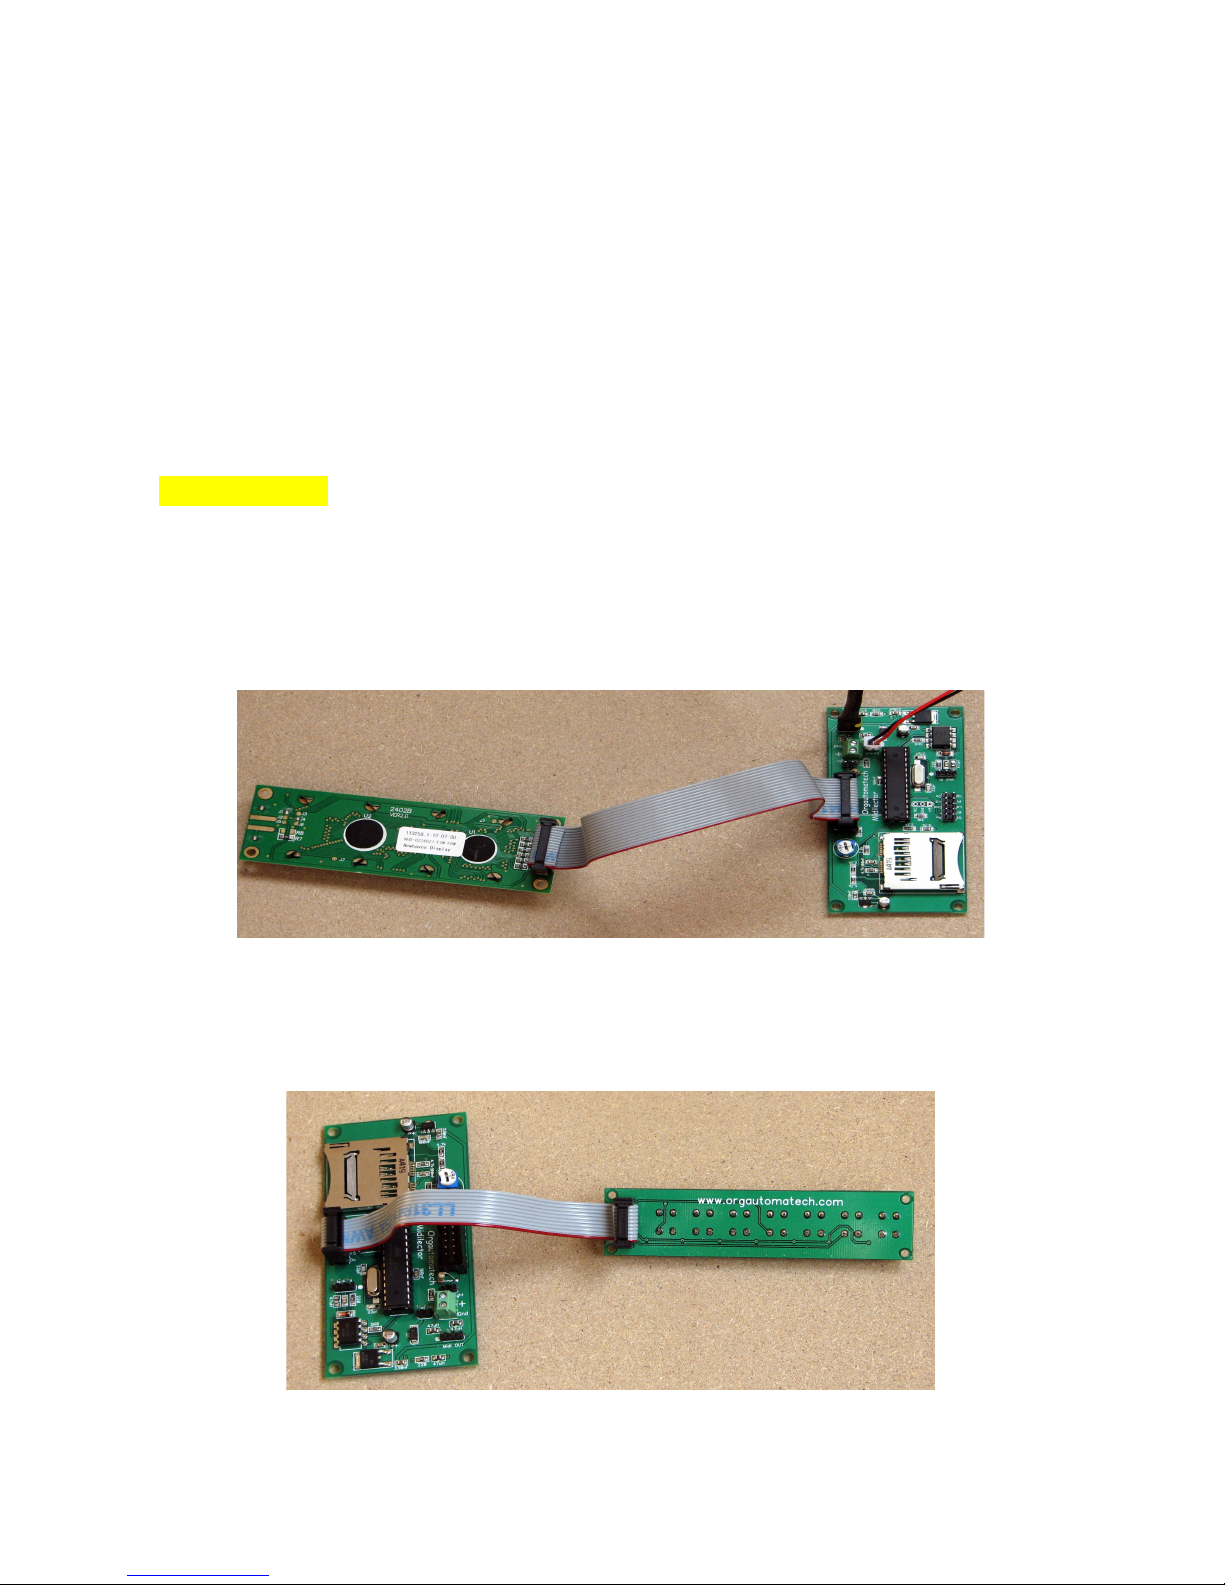
Electric wiring
Very easy: + and – are marked on the boards. Don't worry, there is a polarity
protection. You can use either 9 volt battery or any DC power source from 8 up to
24 volts.
Here the way to link screen and main PCB :
You can adjust the contrast with the small potentiometer near the display connector.
Wire the keyboard this way only :
Page 3
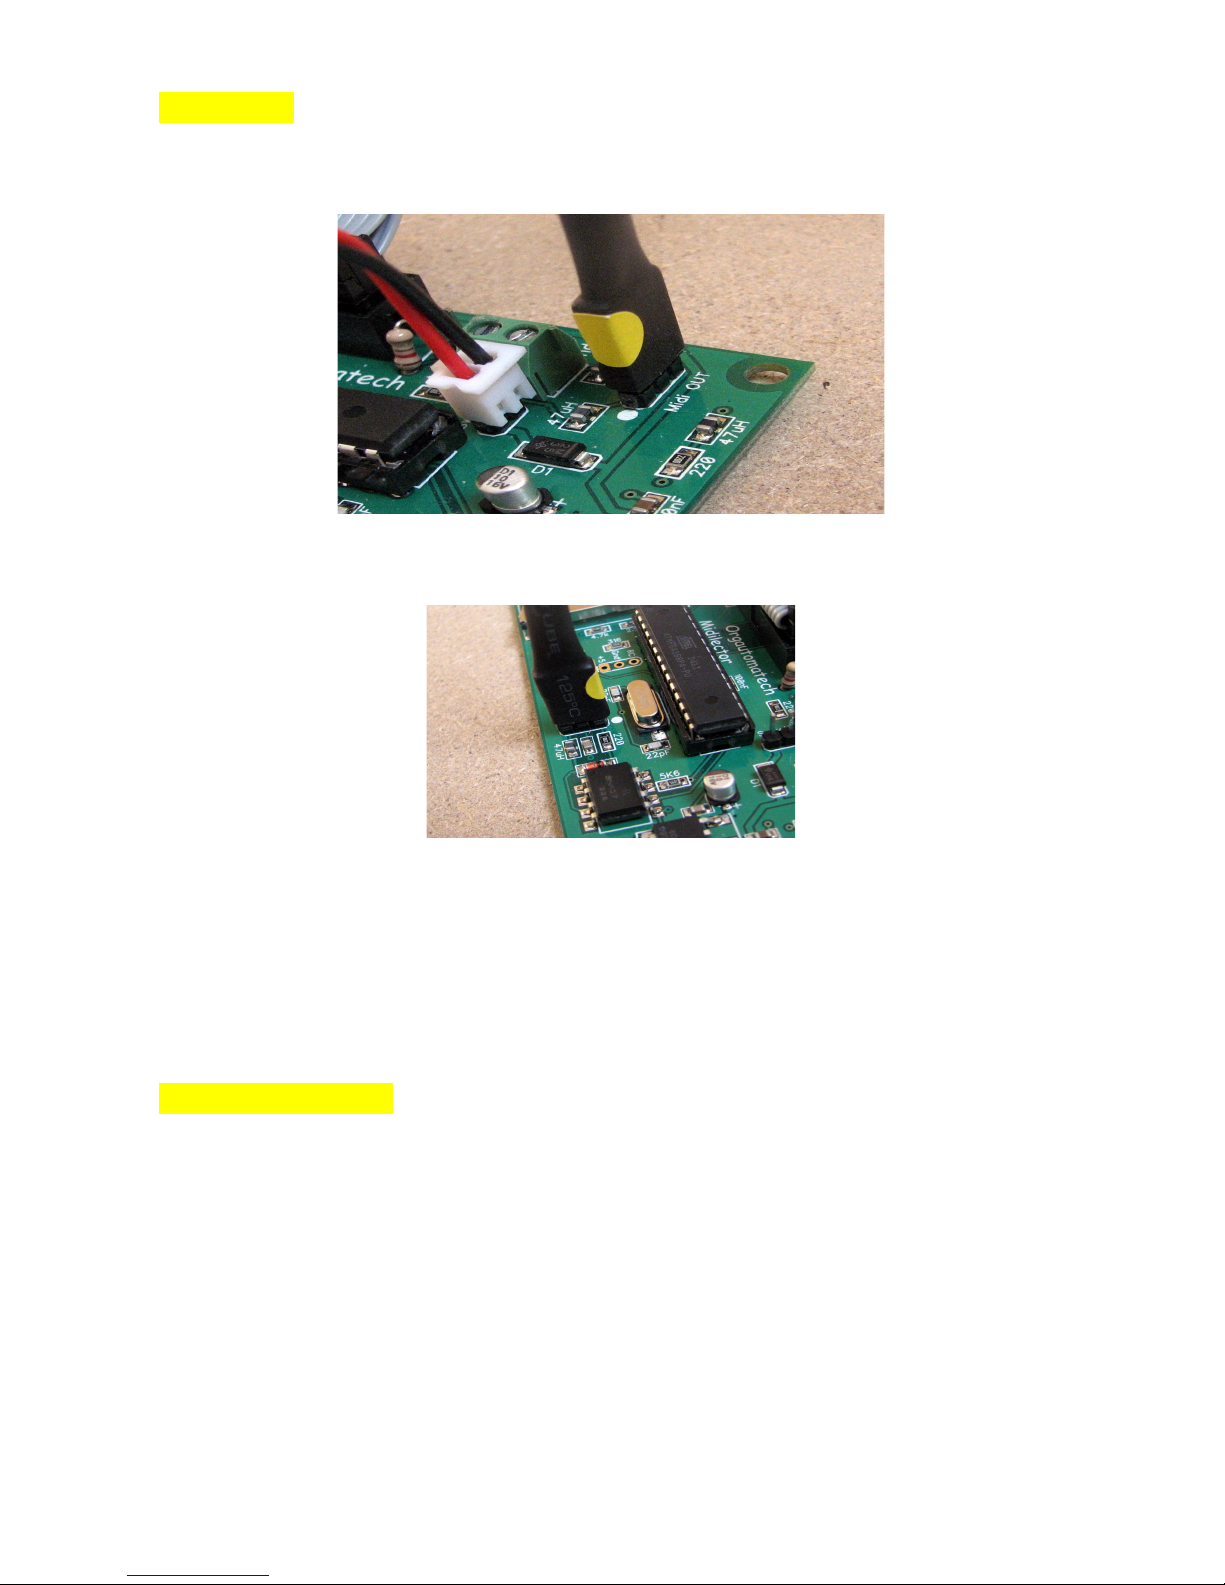
Midi wiring
Here is the right way to wire the Midi OUT external socket.
And the Midi IN external socket (Midilector SR)
The Midi sockets are to be fixed onto your instrument panel.
Wire a 5 pin DIN cable (midi standard) between your Midilector midi output and
your decoder board or electronic instrument MIDI IN socket
To record, you need to wire a midi cable between the Midi out of your Midi
keyboard or any other instrument and the Midi In of Midilector SR. There is no Midi
Thru, the entering datas are not displayed on Midi Out.
SD card preparation
Midilector S/SR arrives with a Sd card ready for use.
If you want to use another card (maxi 2 GO), you must first prepare it. On your
computer make sure it is formatted in FAT 16
One suppose the midi files has been adapted to your instrument. They must be saved
in format Midi 0. You can find on the internet freeware able to change any midi
format to another.
Transfer your files to the card. Just remember Midilector will read them in the order
they have been recorded.
Page 4

The good way to insert the card into the reader!
Functioning
If you switch on Midilector before inserting SD card you see this screen:
So, insert a card and toggle the power switch. The connector is a «push - push» like
on your camera. If you have prepared your card as said before, you should see the
first file or folder:
«DIR» indicates a folder. Change folder with «UP» and «DOWN», enter with
«RIGHT»
Second line indicates number of files/folders (here folder #5 on 5) et the size: 0000
indicates a empty folder
By entering a folder you can discover files. Change file with «UP» or «DOWN».
This file is the #2 on 46
Push the «PLAY» button:
Page 5

Song starts: On second line you have:
• Tempo : 100% = normal
• Transposition : unused except if you have added the « REC » button (see
further in this document)
• Time in minutes and seconds from start
To increase tempo use the « RIGHT » key:
To decrease tempo use « LEFT » key:
To decrease tempo use « LEFT » key: se.
To stop, push on « STOP » button. At this moment, Midilector send a « all note off »
(CC123) and a « all sound off » on all the 16 channels to be sure everything is
stopped. Be sure you decoder board is up-to-date with these controls, that's not
always the case for some old models.
If you have lyrics in your file and have allowed them, here is what you can see:
Please, note to not switch off before to stop the song.
Page 6

Set-up:
By pushing on « UP » and « DOWN » simultaneously you come in the menu: there
are 10 pages, here is the #1
Here you can set the midi channel for drums, not important, you can leave it. Only
used if you want to use the transpose function.
• # 2 :
Switch on with « RIGHT » button if you want to allow the lyrics on the screen.
Your file must be prepared first. You can transform any karaoke file into a midi one.
Just change the .kar in .mid.
• # 3
You can mute one or more channels. Mute with “RIGHT”, un-mute with “LEFT”,
selection by “UP or “DOWN”. No need to change any thing here is your files are
well prepared in advance.
• #°4
Repetition: OFF means the player reads the song and stops. It can also repeat the
song (SONG), all the folder songs once (DIR once), all the song on the card (ALL)
or random (RANDOM) . Select by « RIGHT » or « LEFT ».
Let the #5 and #-6 page as there are.
Page 7

• #7
Speed control. Let it Off if you don't have installed any sensor on your crank. If you
set ON, when you'll press the “PLAY” button, Midilector will wait for the
impulsions from the crank sensor. The tempo will follow the speed of the crank. The
song will stop if you stop cranking. In you set “PA”, the song will start when you
turn and stop when you stop turning but wont follow the speed of crank.
• #8
Signal frequency from the crank sensor in BPM. Set here your “normal” speed. If
you turn faster, the tempo will increase, if you slow down, tempo will decrease. Let
it as it is if you don't use synchronisation.
• #9
That's the minimum speed under which the song stops. Let it if you don't use
synchronisation
• #10
Numbers of pulsations from the crank sensor before starting. Needed for fulling the
reservoir. Let it if you don't use the synchronisation.
Leave the menu by « STOP ». Midilector has got a good memory, it will remember
your set-up even after a night sleeping !
Back light
The screen is normally back-lit. To save your battery, you can install a switch to
switch off it when it is useless, outside for example. Just connect 2 threads from the
switch to the marked " back light " pins on the board
Page 8

If you don't have got switch, that exists as optional at Orgautomatech's, with the
cable and the adapted connector.
Synchronisation
For synchronisation you just need a reed relay like this one:
This tiny thing is sensitive to magnetic field, so, if you approach a magnet close to
it, it will switch on. If you manage to install it near your crank organ and glue on this
one a small magnet, the relay will send an impulse on each crank turn. You have to
wire the two ends of the relay to the “RC”pin and the “Gnd” pin on the PCB, (no
polarity) and set the synchronisation menu (#7 to #10) at your need.
For better speed stability, you can put to magnet on your crank but think to double
the BPM in the menu #8.
Recording
Midilector-SR version gives you the ability of recording midi datas.
After pressing “RECORD” , “ready for Rec” will appear. Recording starts with the
first midi event. Then, the recording time is displayed too.
To end and save the recording, press “STOP”
To abort and throw away the recording, press “RECORD” again.
The file will be saved with the name: MM001.mid. The number will count up, no
files are over writen.
Please note Midilector-R saves the files at the root of the SD card. If you want to
edit and put the files in folders, use your computer.
Remember the order the files will be read is the order they have been recorded.
Transposition
You can transpose the music while playing by pressing “REC” and “UP” or
“DOWN”.
Off course, your instrument is supposed to support this transposition....
Guarantee
Midilector as all Orgautomatech board is guaranteed 1 year against any
manufacturing defect. Every board is tested before sending. The SD card connector
is of professional quality and the electronic is "ad hoc". We tested numerous SD
cards including certain bought in supermarket, with no problem at all. I know a very
few may have problem, so I advise you to use rather a good brand card to assure
compatibility.
Page 9

Quick repair guide
This message means there is no SD card or non-recognized card.
Insert another SD card, good brand preferably and toggle power.
If a song refuses to start, it's probably because it's not a format Midi 0. Try « midi
converter » in Google.
If you have to push twice on “PLAY” to start the song, and are not able to control
the speed with “Right” and “Left” buttons, set the speed control (menu #7) to OFF
by pressing as many times as needed the “LEFT” button.
Midilector does't like to be switched off while playing a midifile. When this
happens, you'll perhaps have to re-set up the menus #4 (repeat) and #7
(Synchronisation).
Have fun !
Christian Blanchard
Orgautomatech
113 rue Champommier
79000 Niort
FRANCE
33(0)9 63 45 61 45
chris@orgautomatech.fr
SIRET 399 479 138 00022
 Loading...