

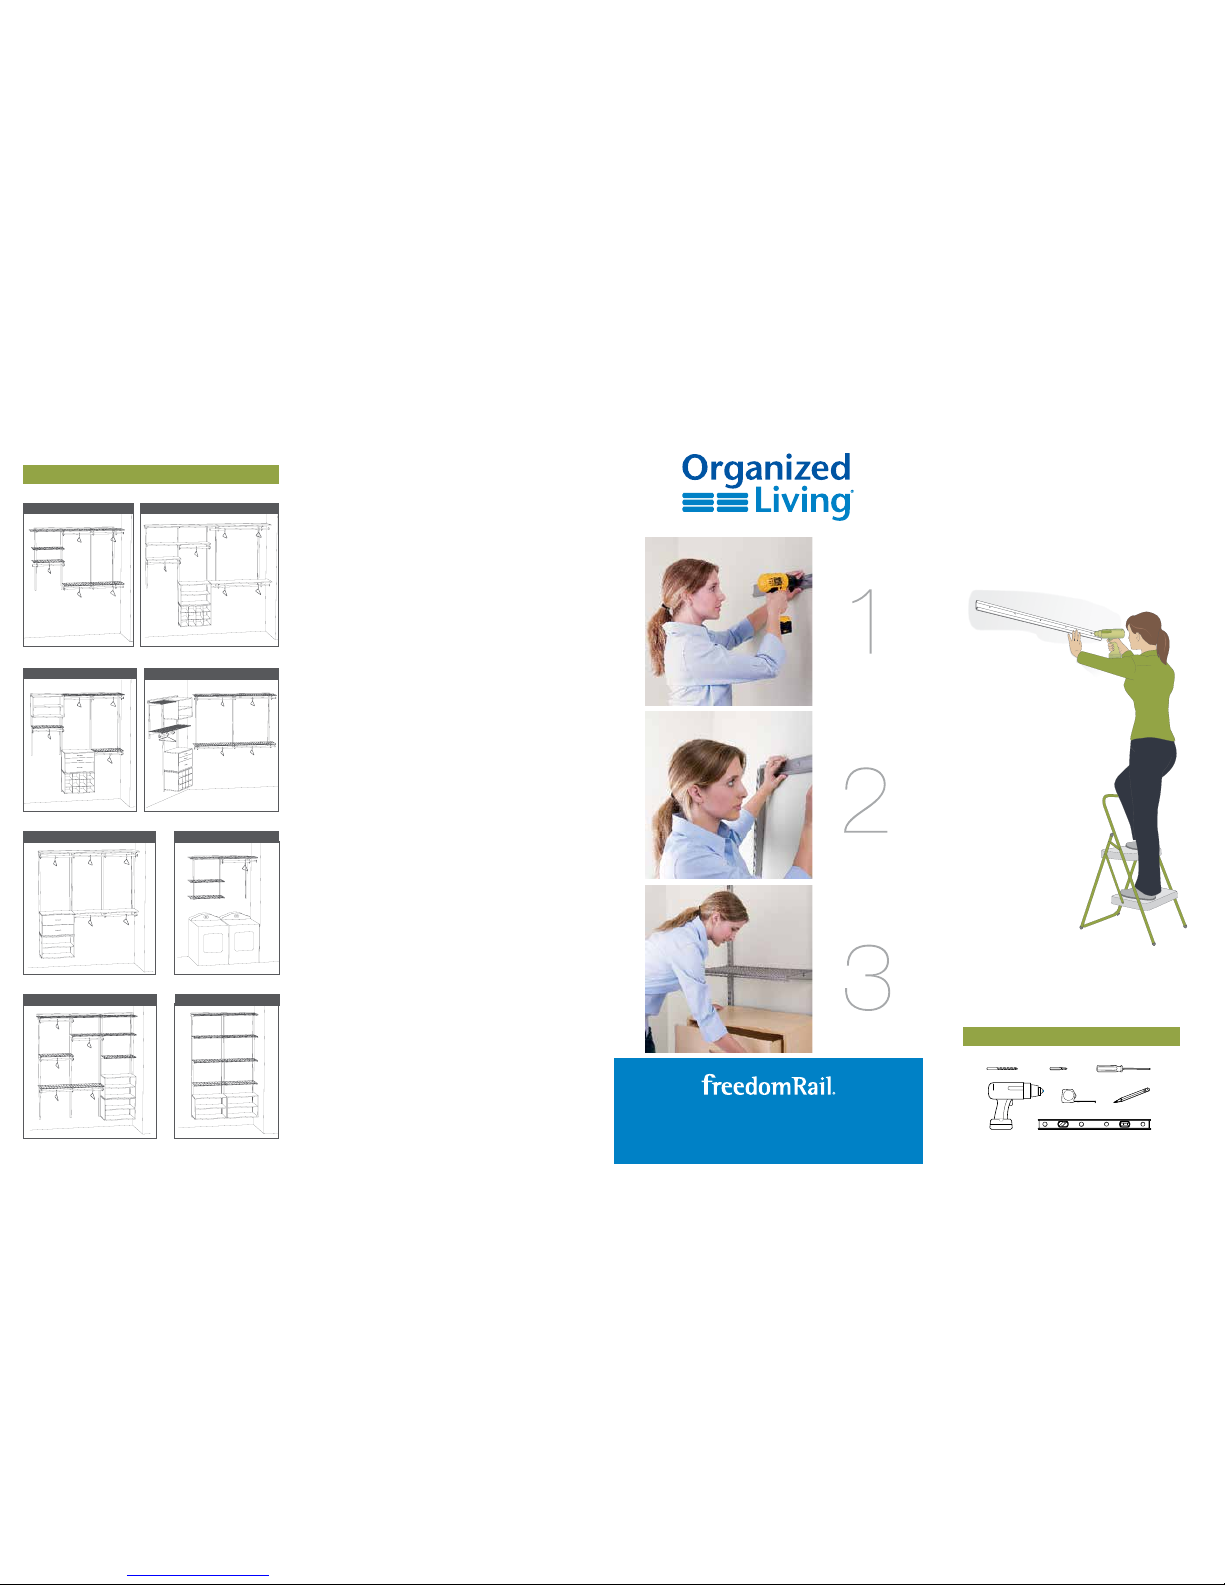
Organized Living freedom Rail Installation Manual
freedomRail® is the most innovative concept in home storage and organization.
It provides all the benets of a custom closet
while being easy to install, easy to adjust and
easy to upgrade.
Once you experience the amazing ease of
freedomRail installation, you’ll feel condent
to tackle every closet in your home!
Easy to Install
Using a level and a drill
attach the Rail to the wall. After
that, all other components simply
snap into place. No complicated
instructions and no confusing parts
and pieces. You’ll be astonished at
how quickly freedomRail installs!
Easy to Adjust
All components are designed
for a lifetime of use. Reposition
shelves to t a growing child
or move pantry shelves to
accommodate a blender.
Changes are a snap!
Easy to Upgrade
Place a Rail in every closet of
your home and then choose from a
variety of options to customize that storage
space. Shelving can be ventilated or wood.
O-Boxes® can be added to any closet for enclosed
storage. Make your storage work for you.
Tools Required
Power Drill
5/16" Bit
Level
Pencil
Phillips Driver
Tape Measure
Phillips Screwdriver
Closet Ideas
CLOSET PLANNING
& INSTALLATION GUIDE
WOMAN’S CLOSET - 6’ REACH-IN - 8’
WOMAN’S CLOSET - 6’ WALK-IN CLOSET - 5’x6’
MAN’S CLOSET - 6’ LAUNDRY - 4’
CHILD’S CLOSET - 6’ LINEN OR PANTRY - 4’
Planning Guidelines
Rails: The primary support component of the system.
• Measure wall and subtract 1” to establish Rail length.
Allow 1/2” on either side of Rail.
• You may combine smaller size Rails or you may cut a
long Rail to fit your measurement.
Rail Hardware: Patented Anchor system—no
need to locate studs.
• The Rail installs using Screws and Strong-Loc™ Anchors
every 8”.
• Each Hardware package provides 6 Screws and Anchors.
• Each size Rail has the number of holes shown below.
Uprights: Slotted channels provide a multitude of
adjustability options.
• Vertical options:
78” - maximum exibility, best long-term choice.
48” - supports 2 rows of short hang.
30” - supports 1 row of long hang.
• Horizontal spacing:
36” apart for shelving only.
30” apart for Big O-Boxes.
24” apart for O-Boxes.
Shelving: Several styles for easy customized solutions.
• Heavy duty Ventilated Shelving in 9”, 12”, 16” or 20” depths.
• 14” deep Wood Shelving for a custom closet appeal.
• All shelving comes in 24”, 30”, 36”, 48”, 72” and 96” cut lengths.
• Shelves may extend up to 9” beyond Uprights.
Brackets and Rod Clips: Heavy-duty
construction for a lifetime of use and adjustability.
• Choose Ventilated or Wood Brackets depending on the
type of Shelf used.
• Rod Clips provide a secure connection between the
Bracket and Clothes Rod and do not interfere with
hangers sliding along the Clothes Rod.
Clothes Rods and Rod Stops: Durable
chrome or nickel plated nish; hangers slide eortlessly.
• Clothes Rods may be mounted under any Shelf.
O-Boxes® customize any freedomRail closet!
• O-Boxes are 24” or 30” wide and are supported by Uprights.
• May be mounted at any height along the Uprights, from
the top to the bottom.
• Offered in a variety of styles and sizes, each packaged
with all necessary hardware.
30"
48"
2 Rows
78" Maximum Flexibility
24 - 36"
84"
Long
Hang
Short
Hang
68"
42"
42"
Long
Hang
Short
Hang
Short
Hang
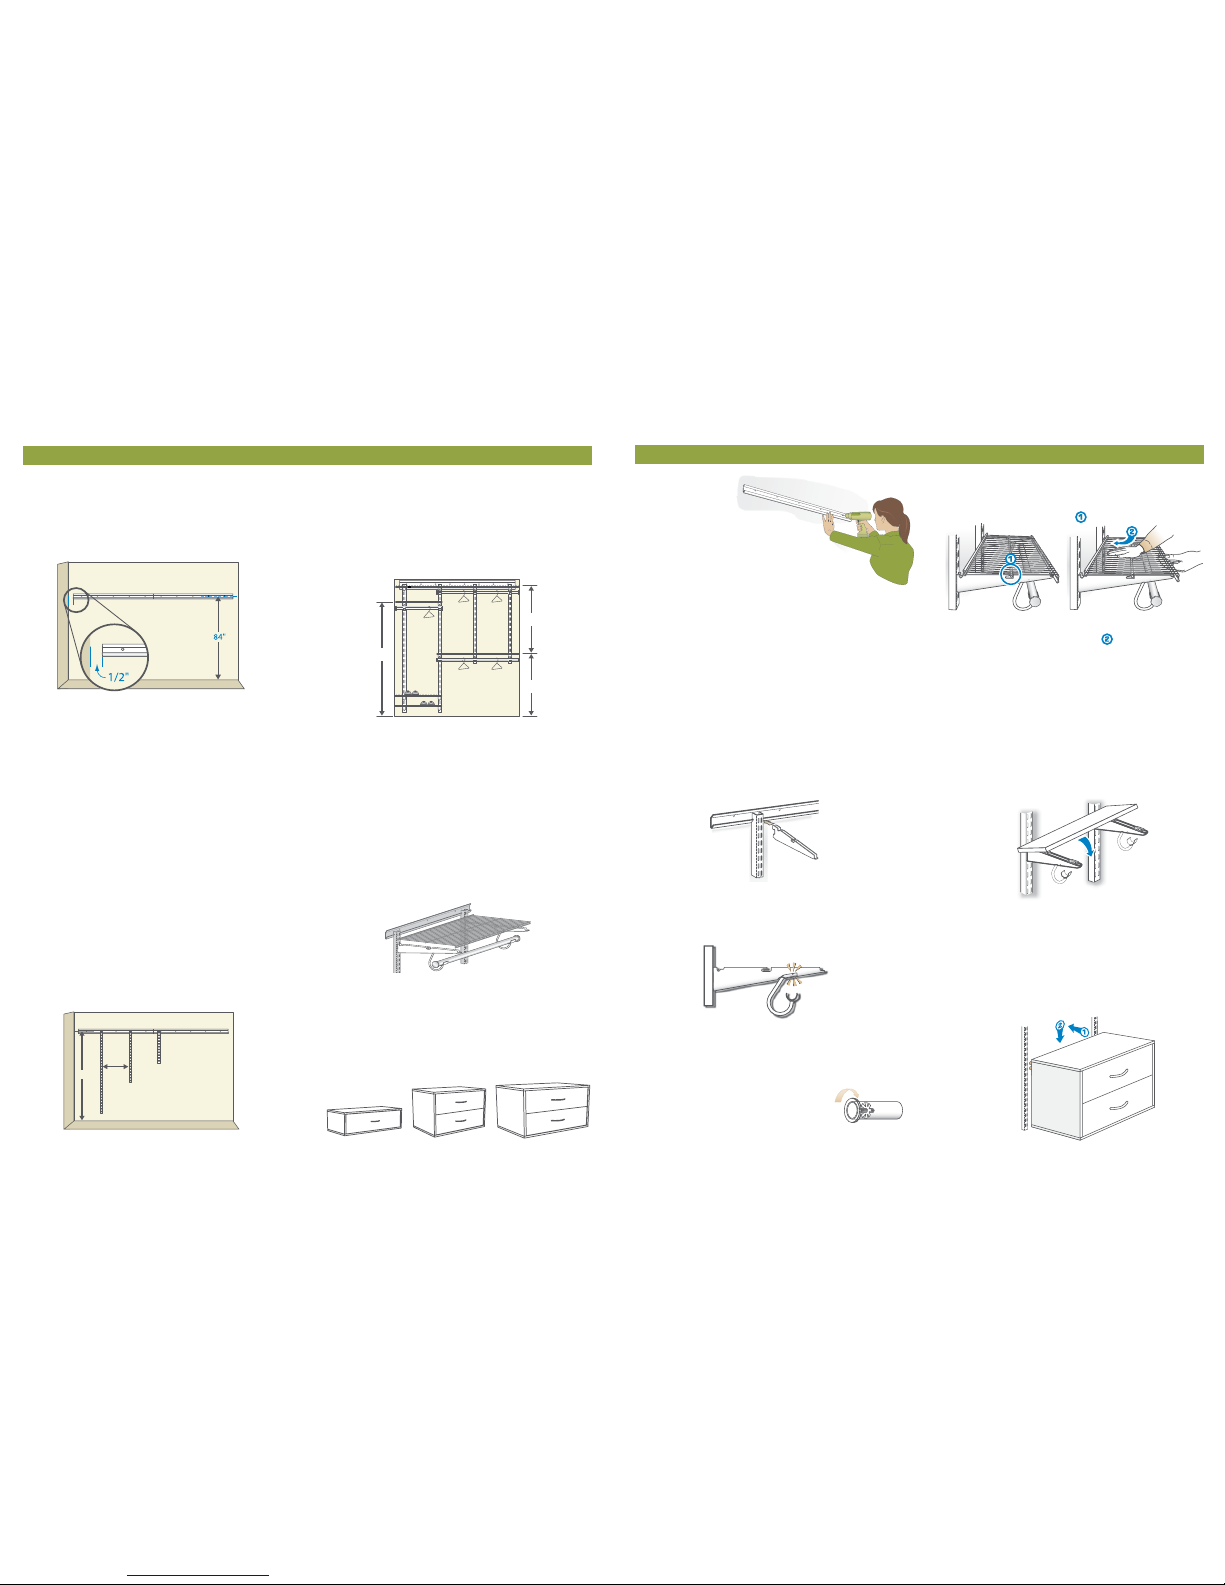
Installation Guidelines
The Rail:
• Measure 84” from the oor.
Use a Level to draw a level line at
this height.
• Place the Rail on the wall so this line is
visible through the mounting holes. Make a
circle at each hole. No need to align holes with studs.
• Drill each mounting hole with a 5/16” drill bit. If you do
hit studs, use 5/32” drill bit to make a pilot hole. In this case,
you will use the Screw only - no Anchor.
• Tap plastic Anchors into 5/16” holes.
• Place Rail over Anchors, twist in several screws to hold Rail.
• Insert and tighten all screws with a power drill. IMPORTANT:
Allow screw to turn 6-8 full rotations after it is ush with the
Rail so the Anchor tightens into a ball behind the drywall.
• Place Cover Stickers over each screw head.
Uprights and Brackets
• I nsert Uprights onto the Rail at appropriate spacing intervals
(see Planning Guidelines).
• Insert Brackets into Uprights at appropriate shelf heights
(see Planning Guidelines).
Rod Clips
• Rod Clips are placed into brackets prior to installing shelves.
• Insert Rod Clips into the Bracket and pull downward until
you feel it snap into place.
Clothes Rod and Rod Stops
• Spin the ange on the Rod Stop until it is halfway up
threaded shaft.
• Push Rod Stop into Rod; then twist the Stop until it tightens.
• Place completed Rods onto Rod Clips. Pull
downward until they snap into place.
Ventilated Shelving
• Lay Shelf onto Brackets with center Shelf rod positioned
over center bracket notch.
• Push down on center Shelf rod. Then lift the front
edge and slide the Shelf back.
• Shelves may be cut to fit exact measurements using
a pipe cutter. Apply Ventilated End Caps to edges.
Wood Shelving
• Shelf Locators attach Shelves to Wood Brackets.
• Place two Shelf Locators into each bracket. Remove double
stick tape.
• Place Shelf onto Bracket in desired position and press to
adhere to Locators.
• An optional Screw is provided with Shelf Locators if a xed
connection is desired.
O-Boxes®
• Uprights are spaced 24” or 30” apart for O-Boxes or
Big O-Boxes. Insert the O-Box bracket into the
inside slot of each Upright.
• If installing a stack of O-Boxes, install bottom O-Box rst.
• If installing O-Boxes side-by-side, each O-Box will
need its own set of Uprights.
* Rails are typically mounted at 94” when incorporating a Double-Hang O-Box.
Rail 24” 30” 36” 40” 64” 80”
Holes 3 4 4 5 7 9
 Loading...