

Page 1
3651 N Highway 89 • Chino Valley, AZ 86323
(928) 636-7080 • www.p-a-g.net
OR-FAB DISPLAY RACK INSTALLATION INSTRUCTIONS
# 89000
CAUTION
Before you install this kit, read and understand all instructions, warnings, cautions, and notes.
1 DISPLAY RACK #89000
Page 2
2 DISPLAY RACK #89000
Page 3
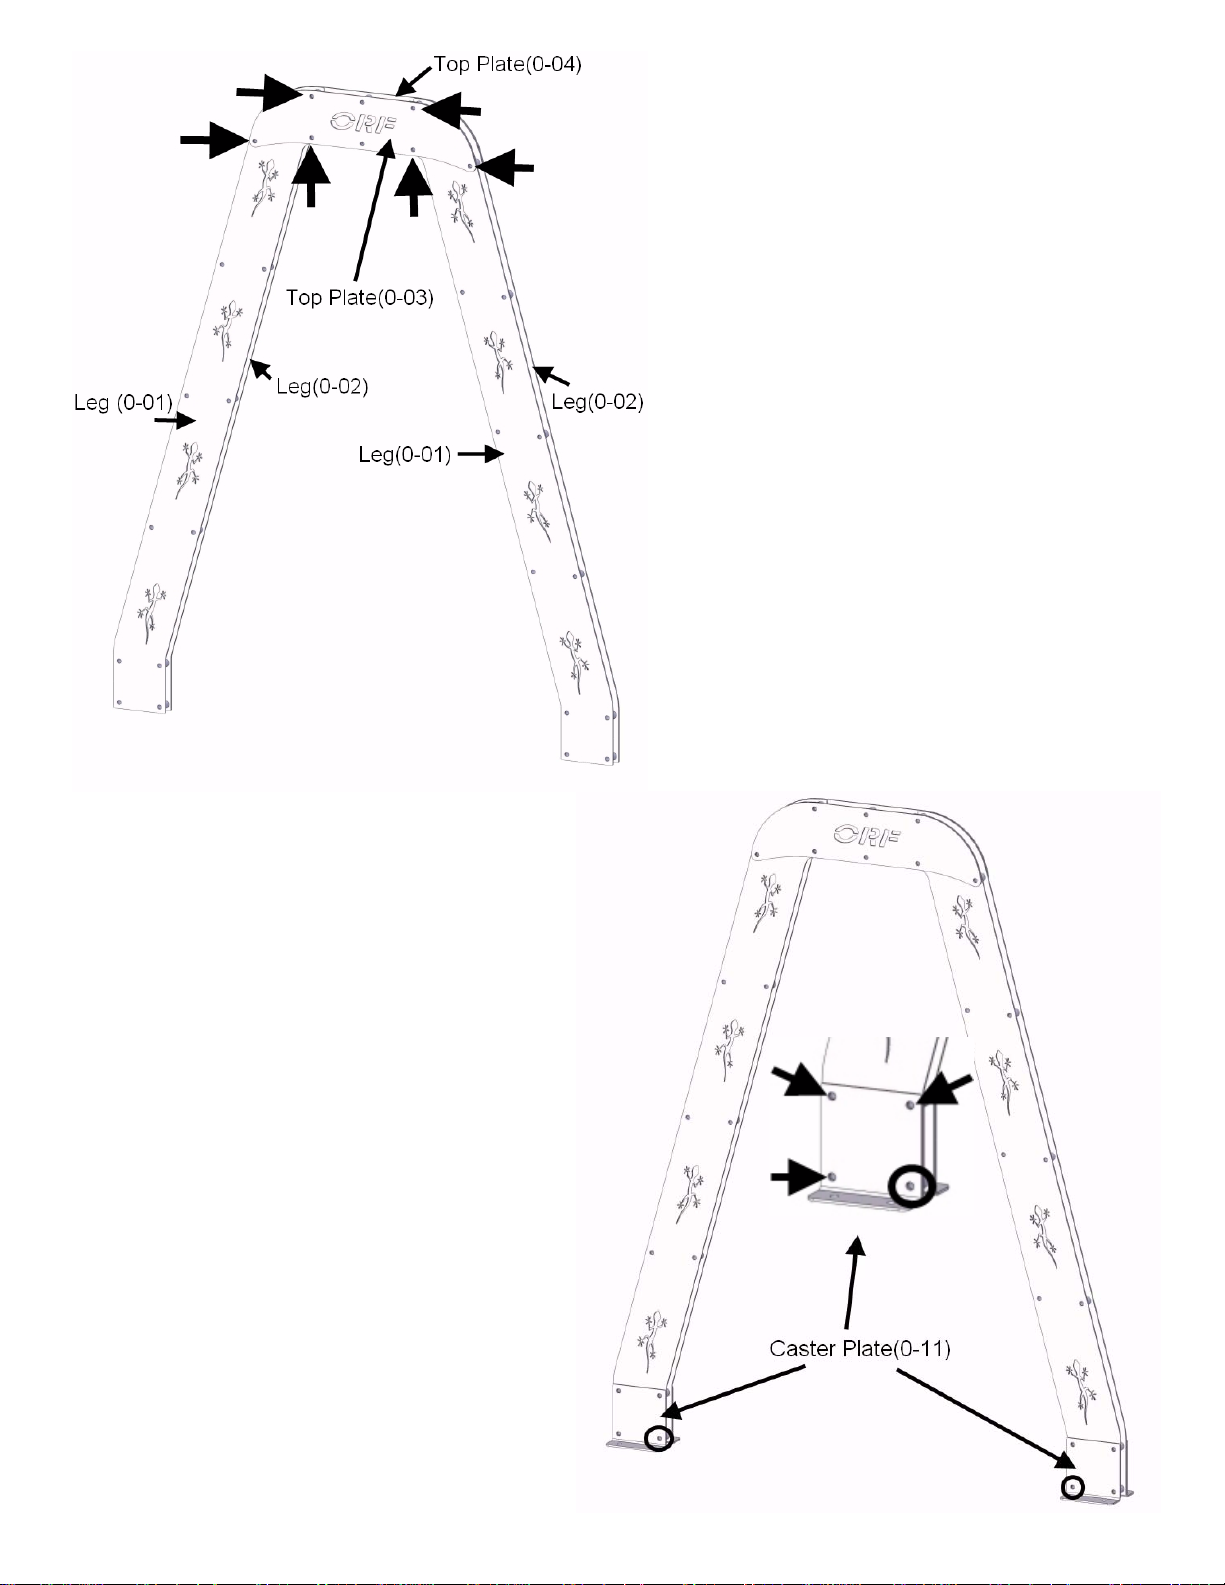
Step 1:
Locate 1 kit top plate (0-03) and 2 kit leg
(0-01).
Use 6 kit 3/8”x 2 1/4” bolts & washers through
both kit top plate (0-03) and 2 kit legs (0-01)
to assemble front side of display “A”-frame.
(Reference arrows for placement.)
Step 2:
Install 6 kit 1” sp acers tubes onto inside of kit
3/8” bolts and kit plates.
Locate 1 kit top plate (0-04) and 2 kit legs
(0-02).
Install 2 kit legs (0-02) on top of kit 1” spacer
tubes and through 3/8” bolts; then 1 kit top
plate (0-04) on top of 2 kit legs (0-02).
Use 6 kit 3/8” flange nuts to secure the
upper “A”-frame assembly. (Note: Do not
tighten kit hardware at this time.)
Step 3:
Locate 2 kit caster plate (0-11) for each
“A”-frame leg.
Use 3 kit 3/8”x 2 1/4” bolts, washers and 3 kit
1” spacer tubes through both kit legs (0-01)
& (0-02) to assemble bottom side of display
“A”-frame.
(Reference arrows for placement.)
Repeat process to each leg.
(Note: Do not install bolt or spacer in circled
area at this time. Kit 3/8” nut may be use to
hold assembly together temporarily.)
3 DISPLAY RACK #89000
Page 4
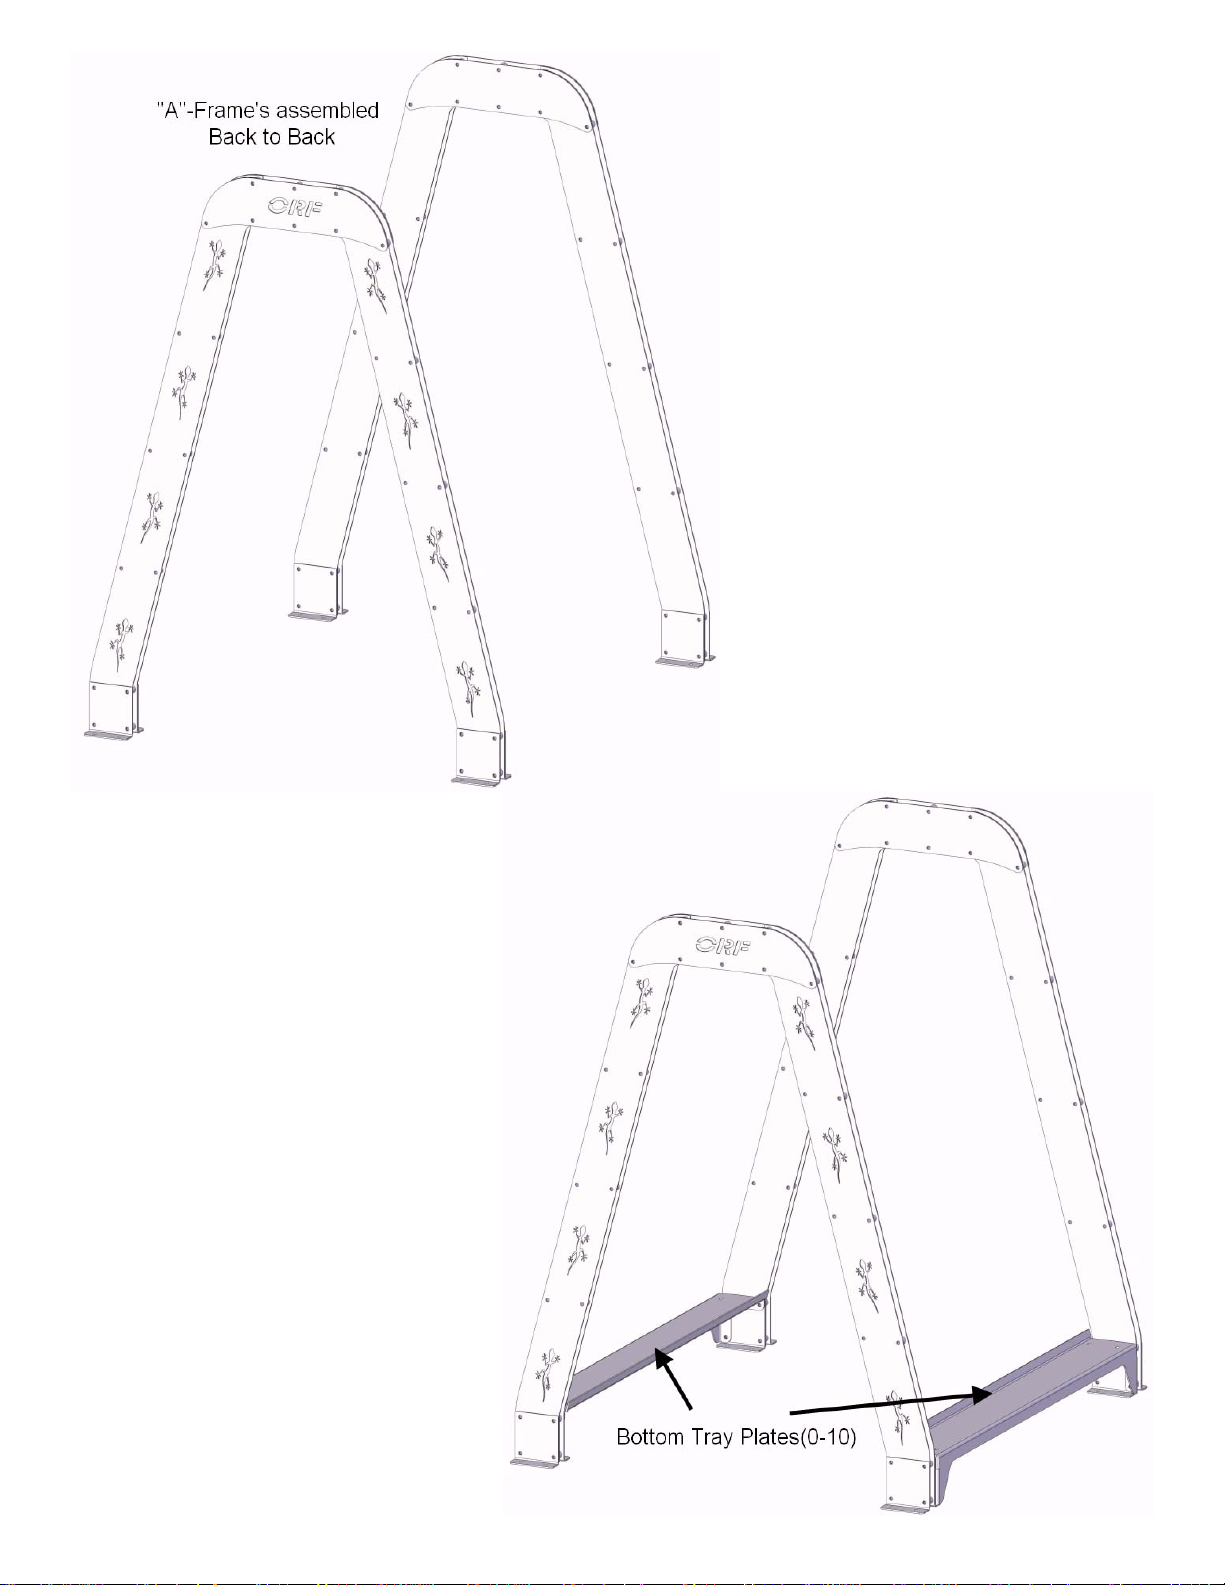
Step 4:
Repeat steps 1 - 3 to assemble
second “A”-frame assembly.
Step 5:
Stand both “A”-frame’s parallel to each
other with ORF facing outward and back
to back.
(Note: All kit 3/8” hardware should be
facing inward when installed.)
Step 6:
Locate both kit bottom tray plates
(0-10)
Align both “A”-frame assemblies with
both kit bottom tray plates(0-10)
aligned in between each “A”-frame
assembly.
Fasten lower assembly’s using existing
kit 3/8”x 2 1/4” bolts, washers & flange
nuts.(Note: Do not tighten
hardware.)
Repeat process until kit bottom tray
plates(0-10) are loosely fastened to
“A”-frame assembly.
4 DISPLAY RACK #89000
Page 5
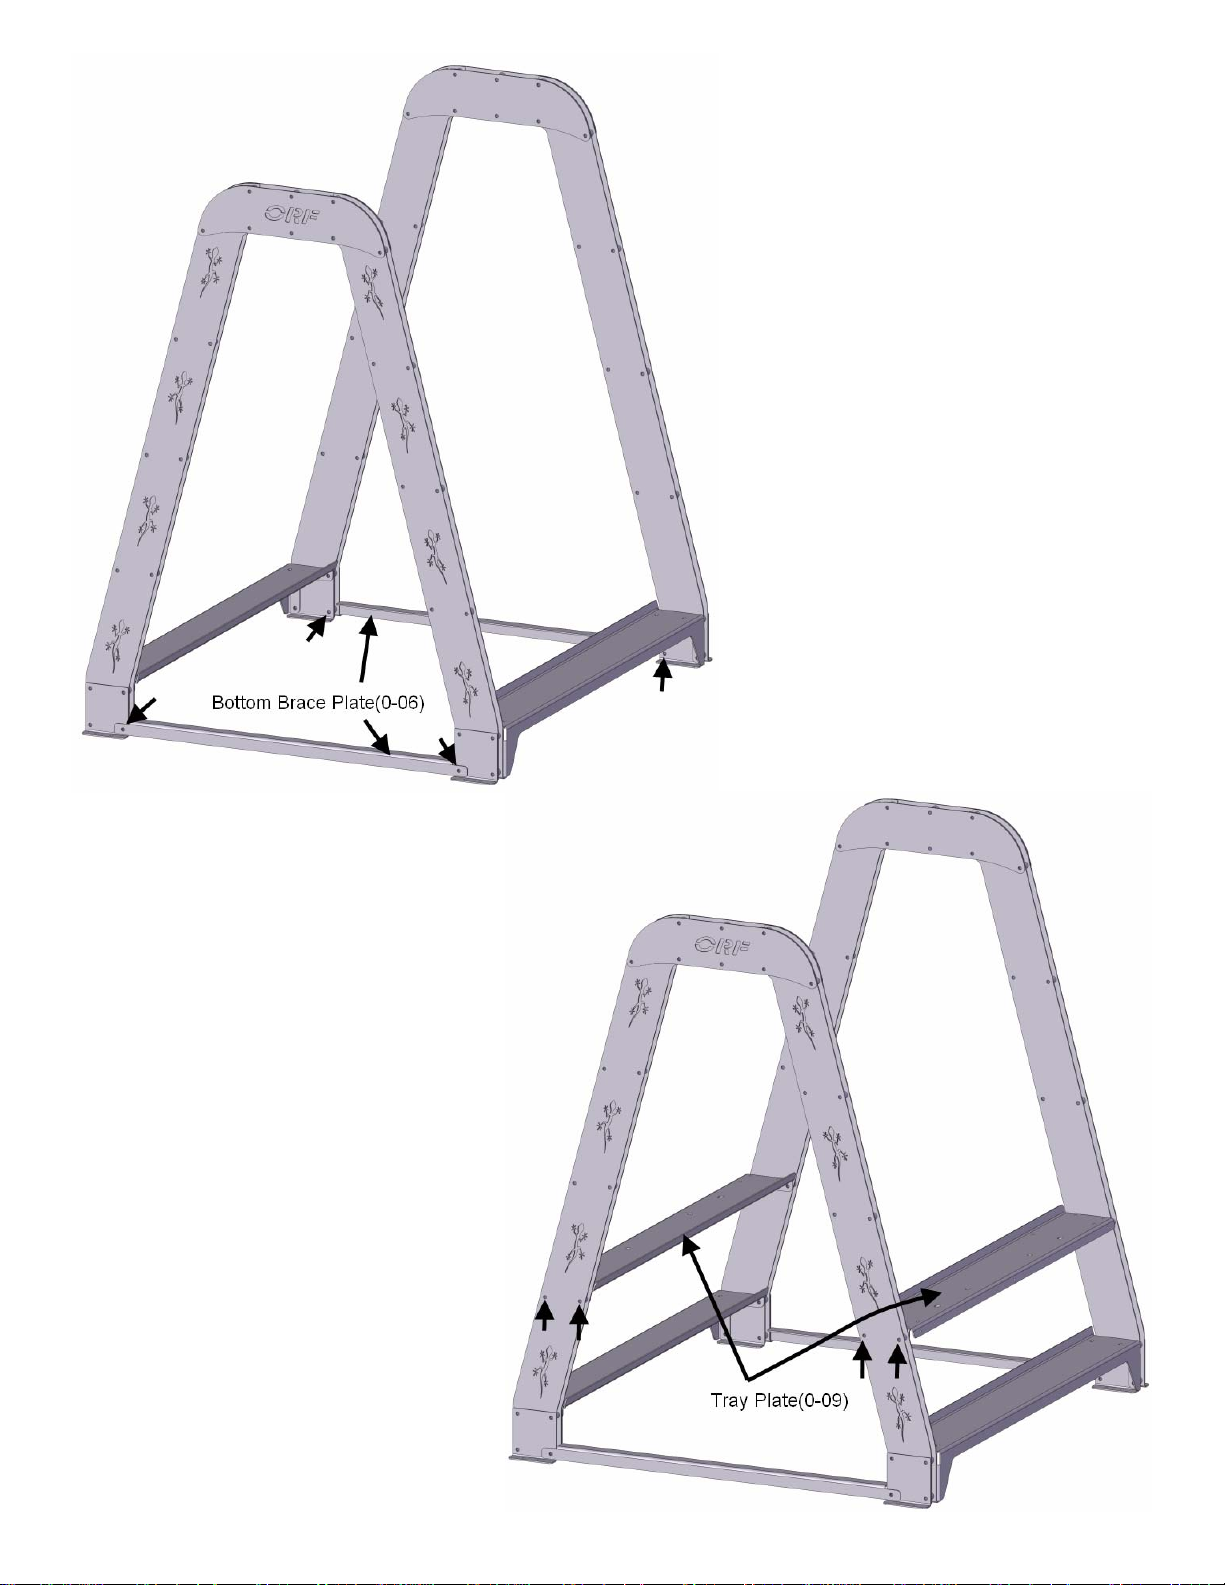
Step 7:
Locate both kit bottom brace plates
(0-06)
Step 8:
Use 2 kit 3/8”x 2 1/4” bolts, washers,
flange nuts and 2 kit 1” spacer tubes
(In-between legs) through both kit legs
(0-01) & (0-02) to assemble kit bottom
side plates onto the display
“A”-frame loosely.
(Reference arrows for placement.)
(Repeat steps to second brace.)
Step 9:
Locate two kit tray plates(0-09)
Step 10:
Use 4 kit 3/8”x 2” bolts, washers,
flange nuts and 2 kit 1” spacer tubes
(In-between legs) through both kit
legs (0-01) & (0-02) to assemble two
kit tray plates (0-09) onto the display
“A”-frame loosely.
(Reference arrows for placement.)
(Repeat steps to second tray.)
5 DISPLAY RACK #89000
Page 6
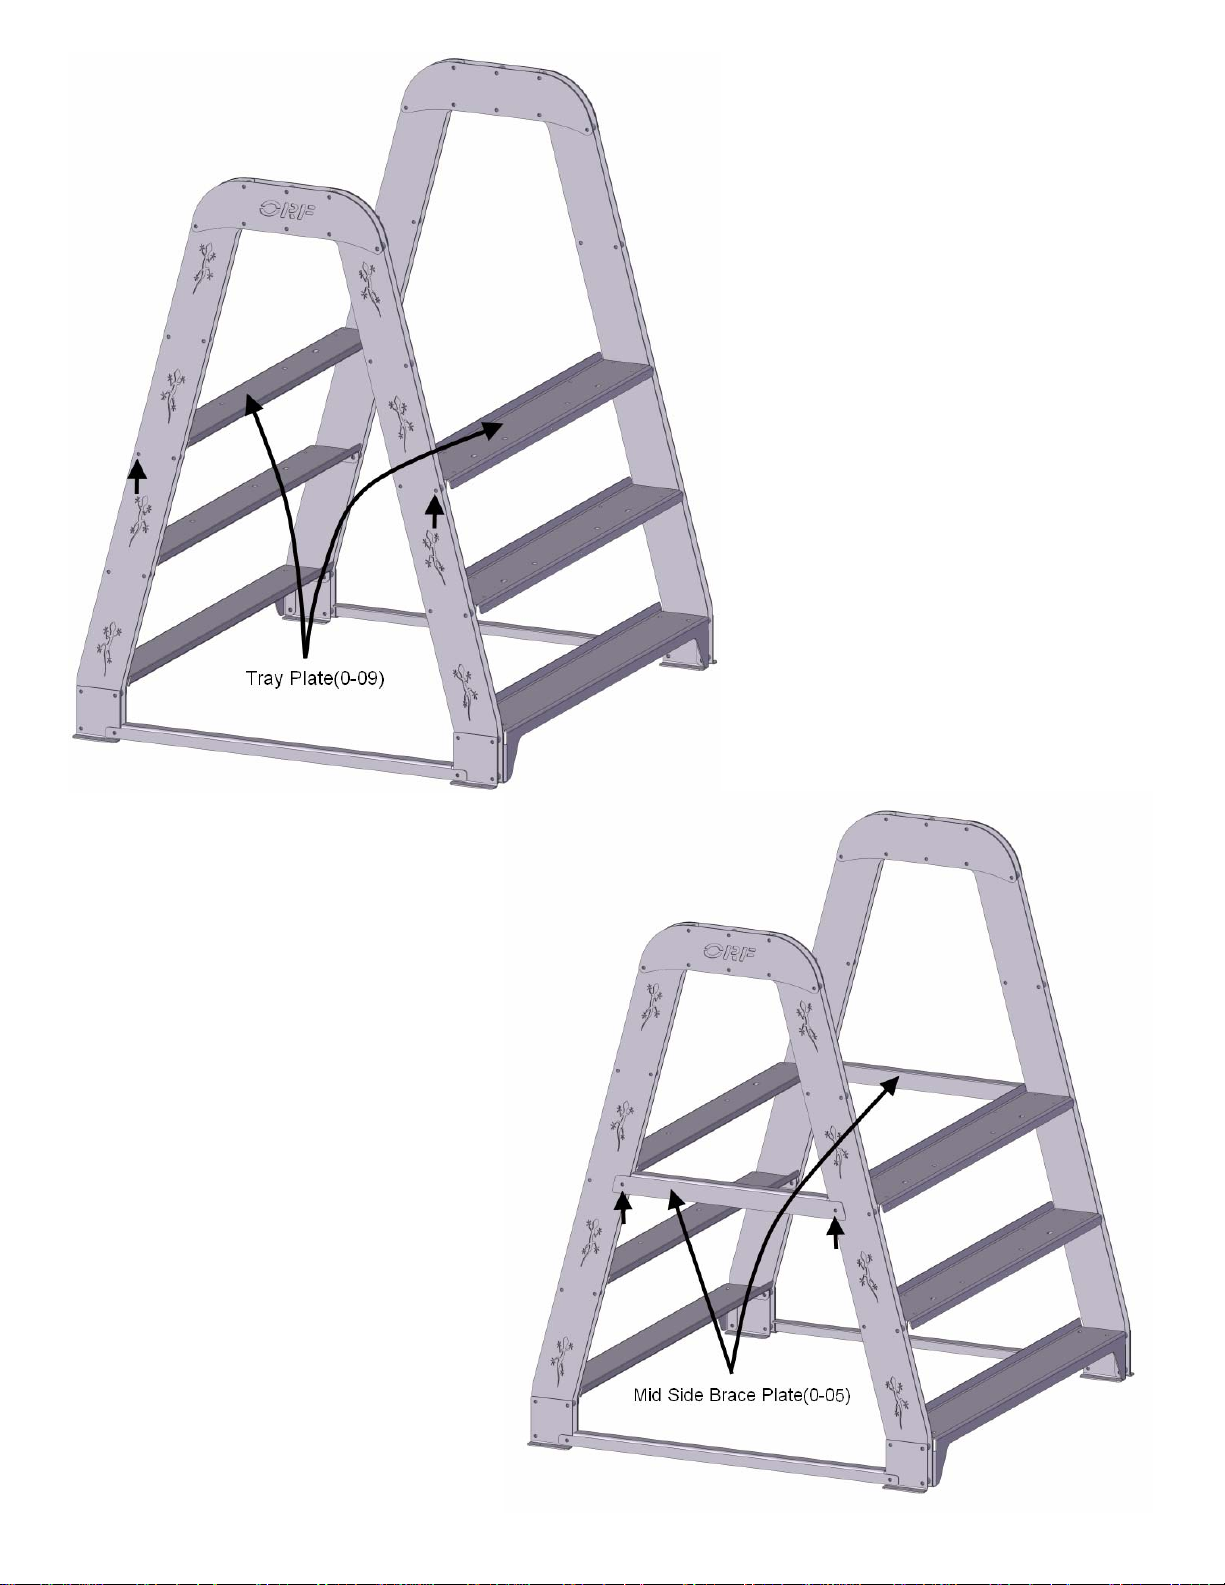
Step 11:
Locate two kit tray plates (0-09)
Step 12:
Use 2 kit 3/8”x 2” bolts, washers,
flange nuts and 2 kit 1” spacer tubes
(In-between legs) through both kit
legs (0-01) & (0-02) to assemble two
kit tray plates (0-09) onto the display
“A”-frame loosely.
(Reference arrows for placement.)
(Repeat steps to second tray.)
Step 13:
Locate both kit mid side plates (0-05)
Step 14:
Use 2 kit 3/8”x 2” bolts, washers,
flange nuts and 2 kit 1” spacer tubes
(In-between legs) through both kit
legs(0-01) & (0-02) to assemble kit
bottom side plates onto the display
“A”-frame loosely.
(Reference arrows for placement.)
(Repeat steps to second brace.)
6 DISPLAY RACK #89000
Page 7
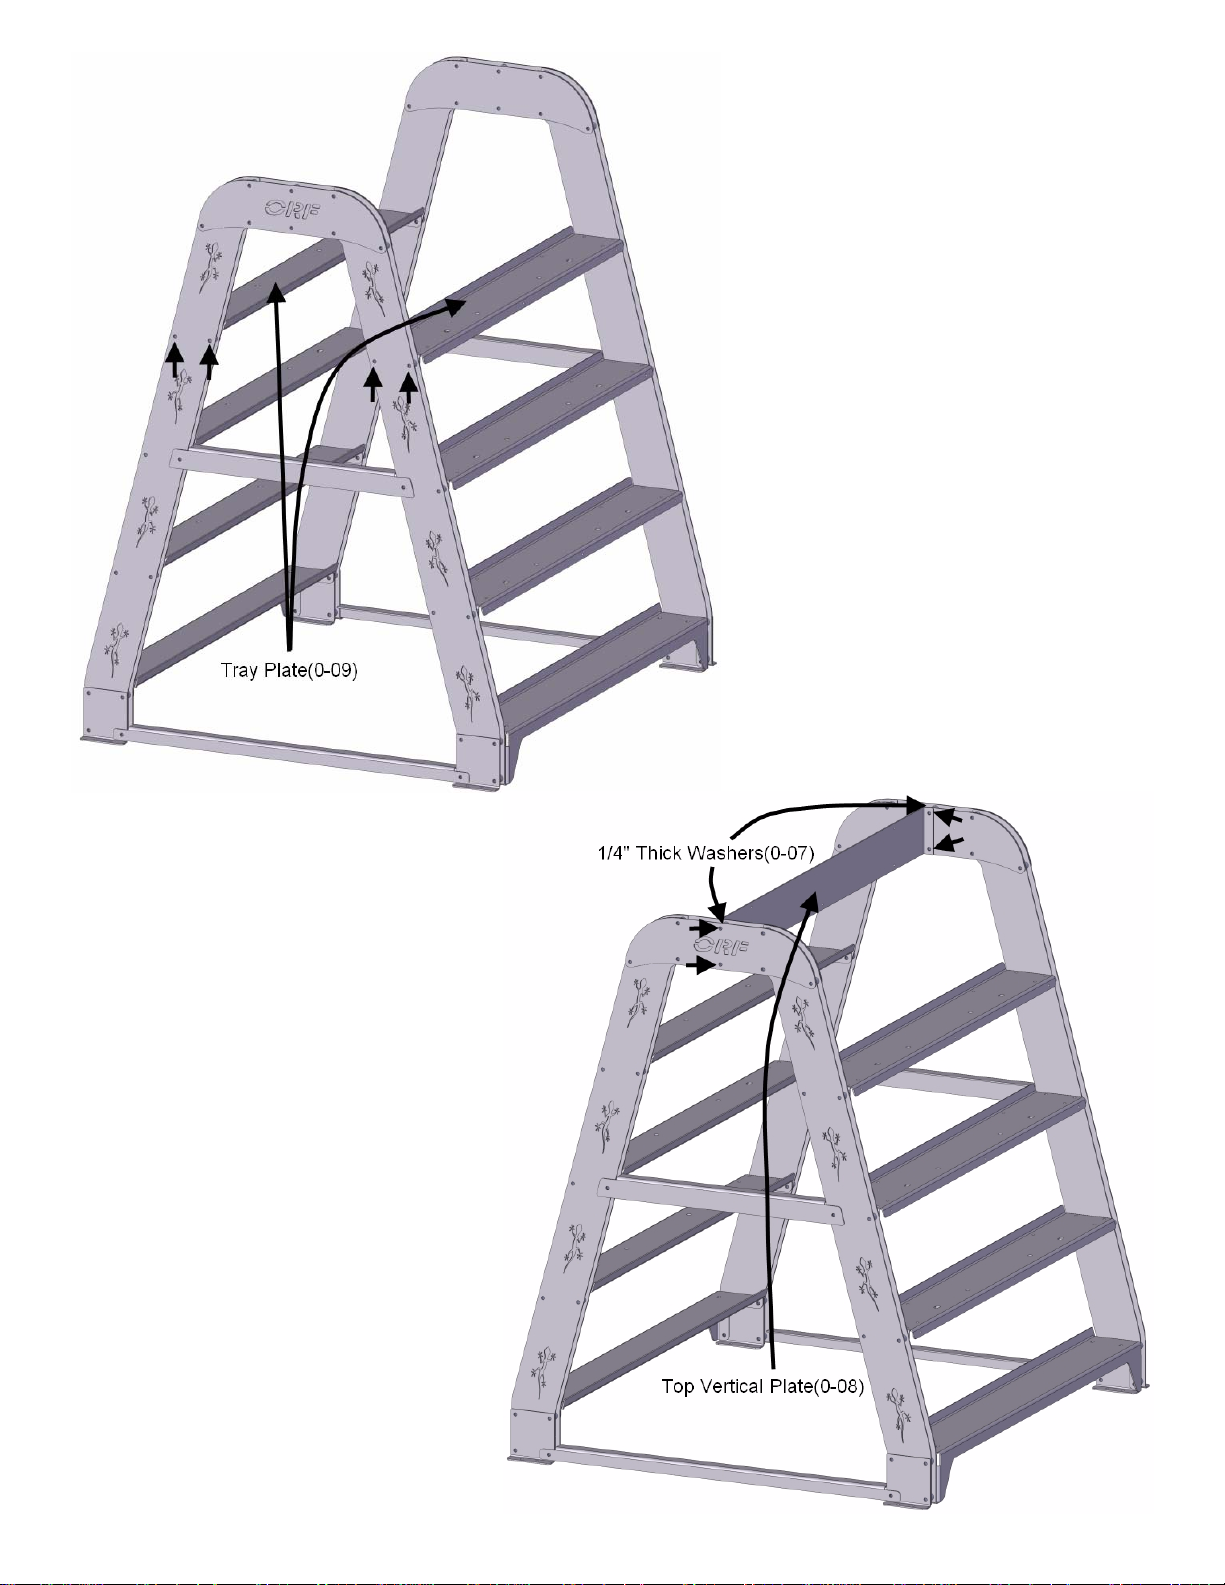
Step 15:
Locate two kit tray plates (0-09)
Step 16:
Use 4 kit 3/8”x 2” bolts, washers,
flange nuts and 4 kit 1” spacer tubes
(In-between legs) through both kit
legs (0-01) & (0-02) to assemble two
kit tray plates (0-09) onto the display
“A”-frame loosely.
(Reference arrows for placement.)
(Repeat steps to second tray.)
Step 17:
Locate two kit top vertical plates (0-08)
Step 18:
Use 4 kit 3/8”x 2 1/4” bolts, washers,
flange nuts and 4 kit 1” spacer tubes,
combined with 4 kit 1/4” spacers (wash-
ers) (0-07) (In-between top plate)
through both kit top plates (0-03 / 0-04)
to assemble kit top vertical plate (0-08)
onto the display “A”-frame loosely.
(Reference arrows for placement.)
7 DISPLAY RACK #89000
Page 8
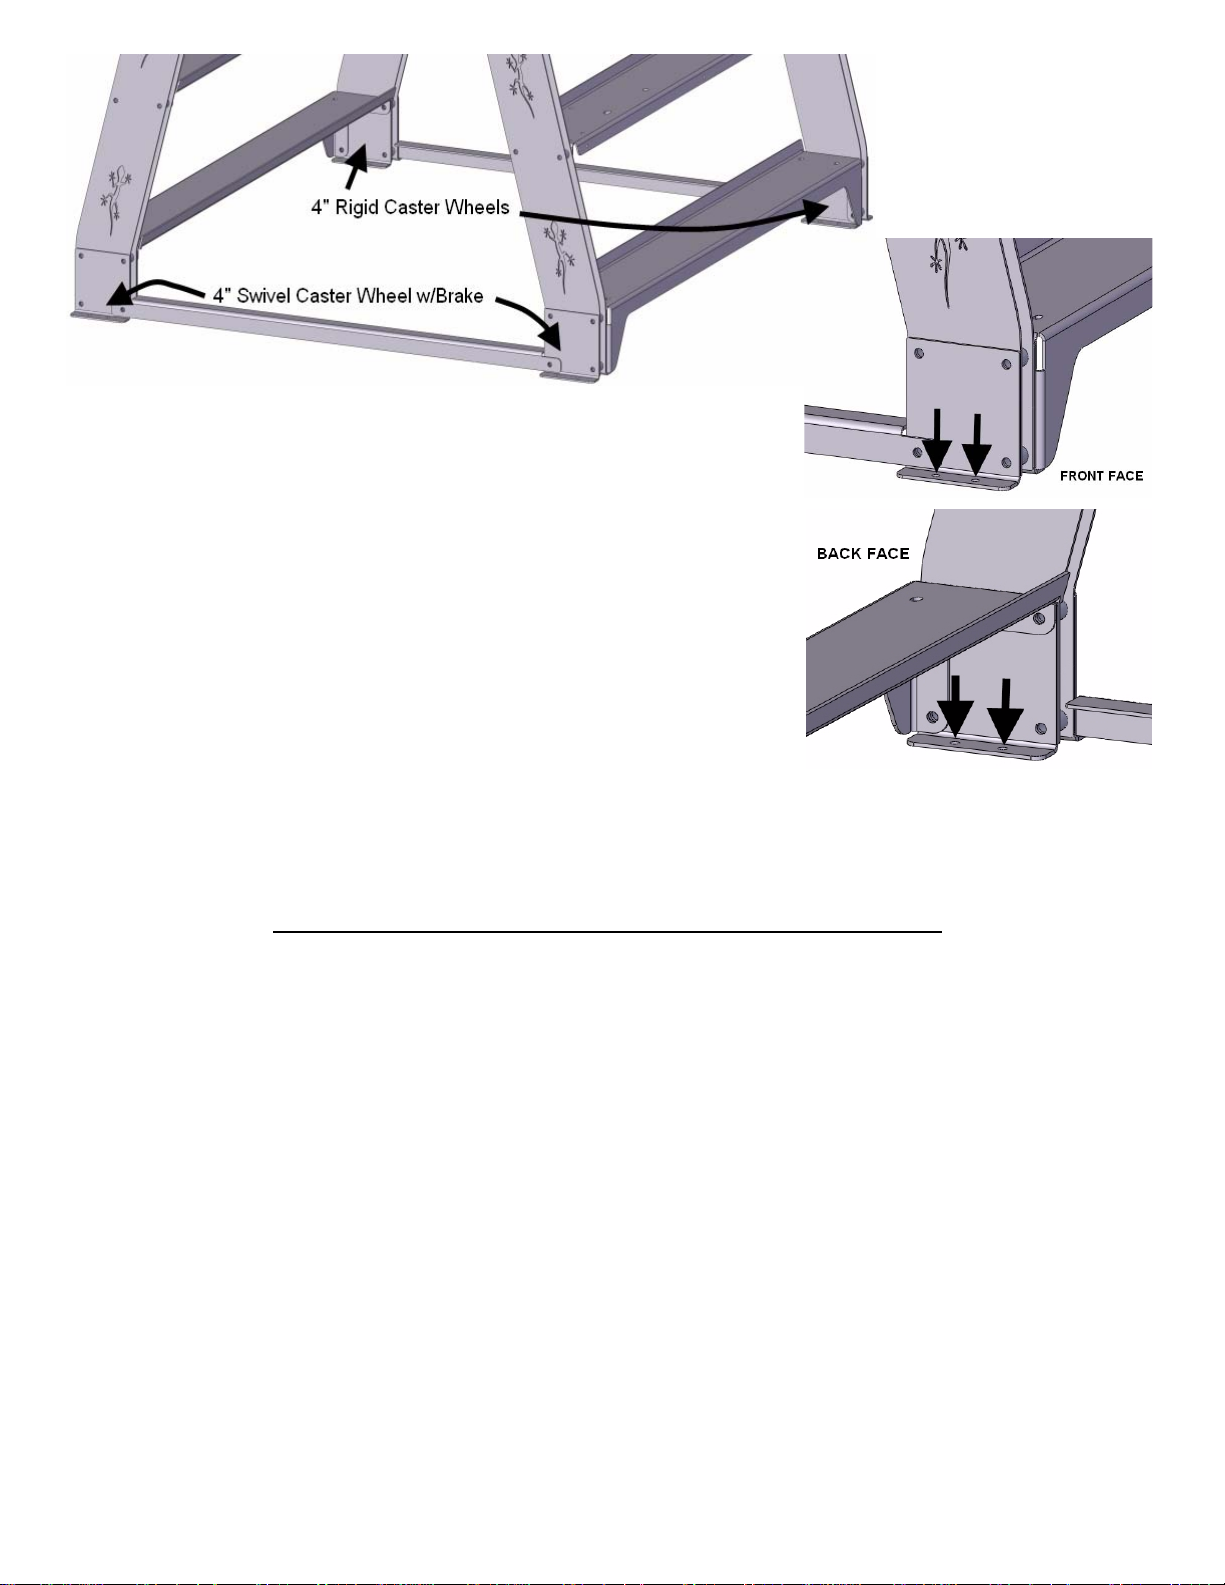
Step 19:
Install 4 kit 5/16”x 3/4” bolts, washers & flange nuts through two
kit caster wheel mount plate(0-11); continue through kit 4”
swivel caster wheel with brake as shown in image.
(Reference arrows for placement.)
(Repeat steps to all caster mount plates and casters.)
Step 20:
Install 4 kit 5/16”x 3/4” bolts, washers & flange nuts through
two kit caster wheel mount plate(0-11); continue through kit
4” rigid caster wheel as shown in image.
(Reference arrows for placement.)
(Repeat steps to all caster mount plates and casters.)
Step 21:
ALL KIT HARDWARE MAY BE TIGHTENED AT THIS STAGE
8 DISPLAY RACK #89000
Page 9
9 DISPLAY RACK #89000
Page 10
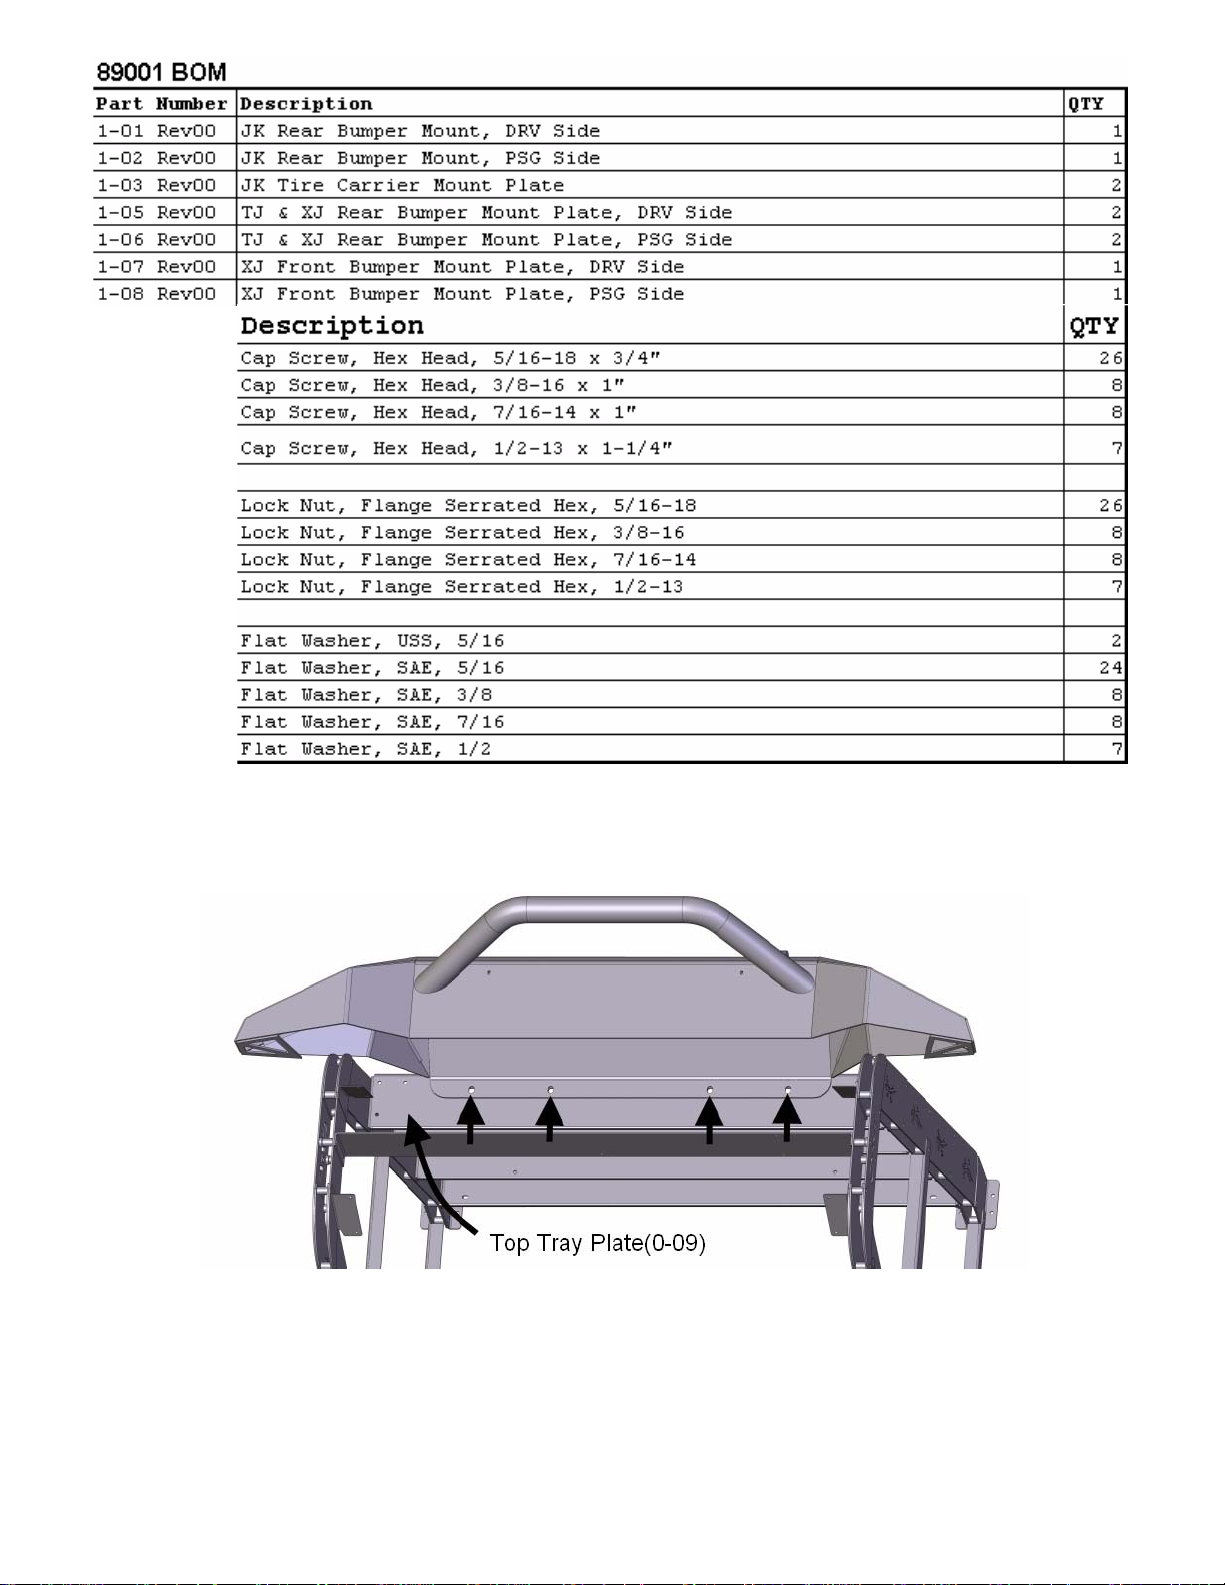
JK Front Bumper Installation
Step 1:
Locate JK Front Bumper
Step 2:
Use four kit 1/2” bolts, washers & flange nuts
to secure JK front bumper onto the top display
tray(0-09).
(Reference arrows for placement.)
10 DISPLAY RACK #89000
Page 11
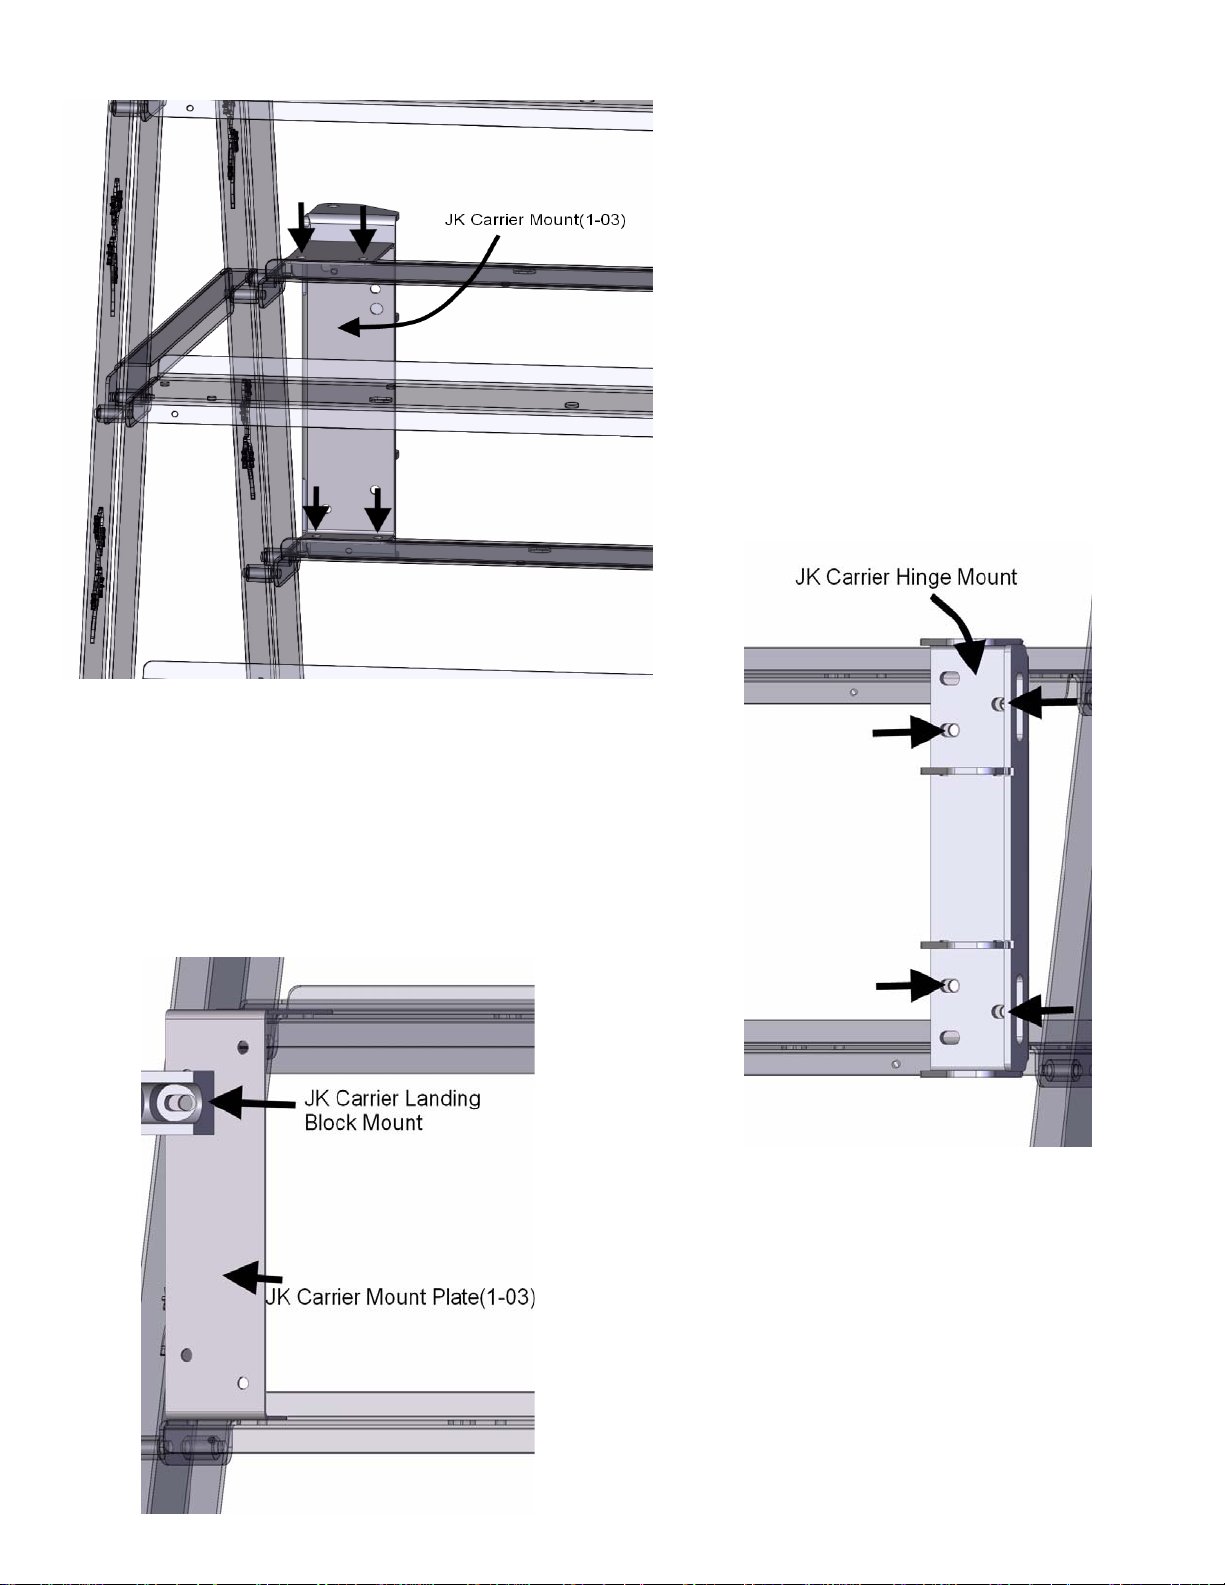
JK Tire Carrier Installation
Step 1:
Locate two kit carrier mount plates(1-03)
Step 2:
Use four kit 5/16” bolts, washers & flange
nuts to secure two kit carrier mount
plates(1-03) onto the two kit center & lower
display trays(0-09).
(Reference arrows for placement.)
(Repeat steps 1-2 to other side of display
trays)
Step 3:
Locate JK carrier hinge mount
Step 4:
Install four kit 3/8” bolts, nuts & washers through JK carrier
hinge mount and kit JK carrier mount plate(1-03); securing
JK carrier hinge mount onto right side of display rack, as
shown in image.
(Reference arrows for placement.)
Step 5:
Locate JK carrier landing block
Step 6:
Install one kit 1/2” bolt, nut & washer through JK
carrier landing block and kit JK carrier mount
plate(1-03); securing JK carrier landing block onto
left side of display rack mount as shown in image.
(Reference arrows for placement.)
11 DISPLAY RACK #89000
Page 12
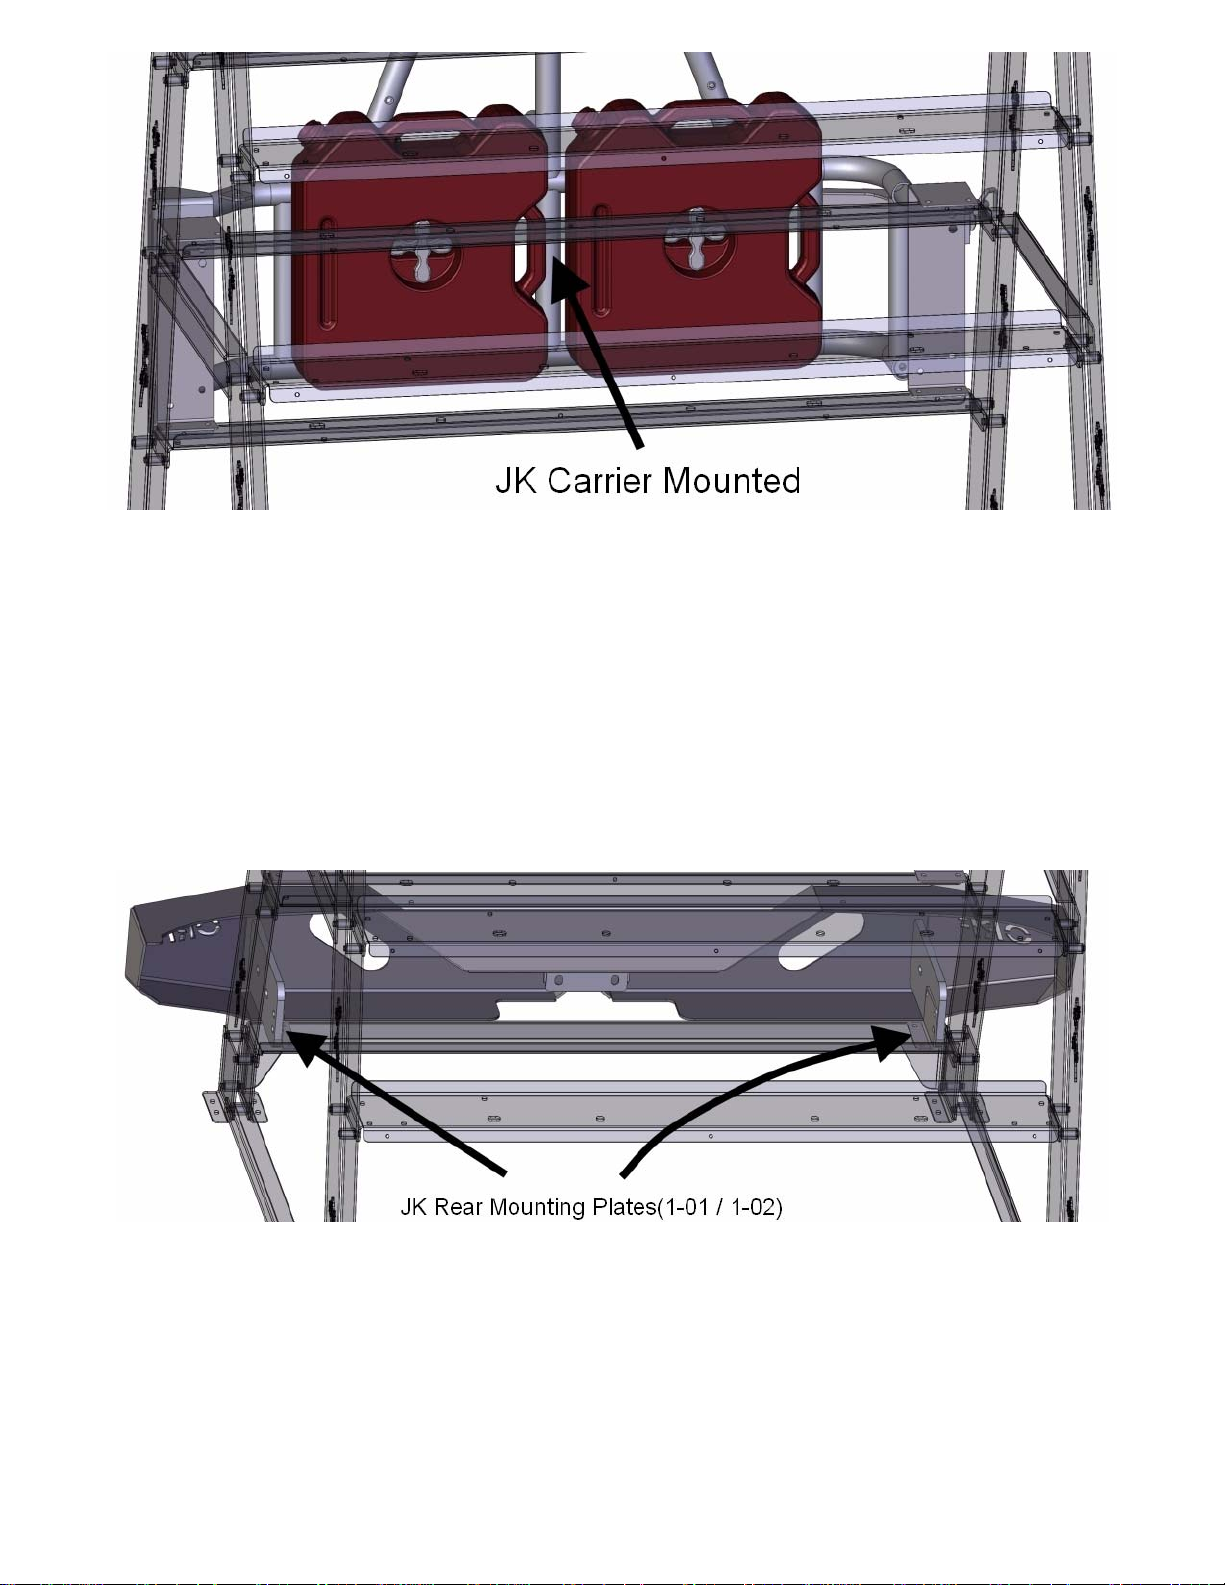
Step 7:
Locate JK Rear Tire Carrier Rack
Step 8:
Use JK tire carrier instructions to complete installation of JK tire carrier onto the JK landing block
and hinge bracket as shown in image.
(Reference carrier instructions for final assembly of carrier onto display rack.)
JK Rear Bumper Installation
Step 1:
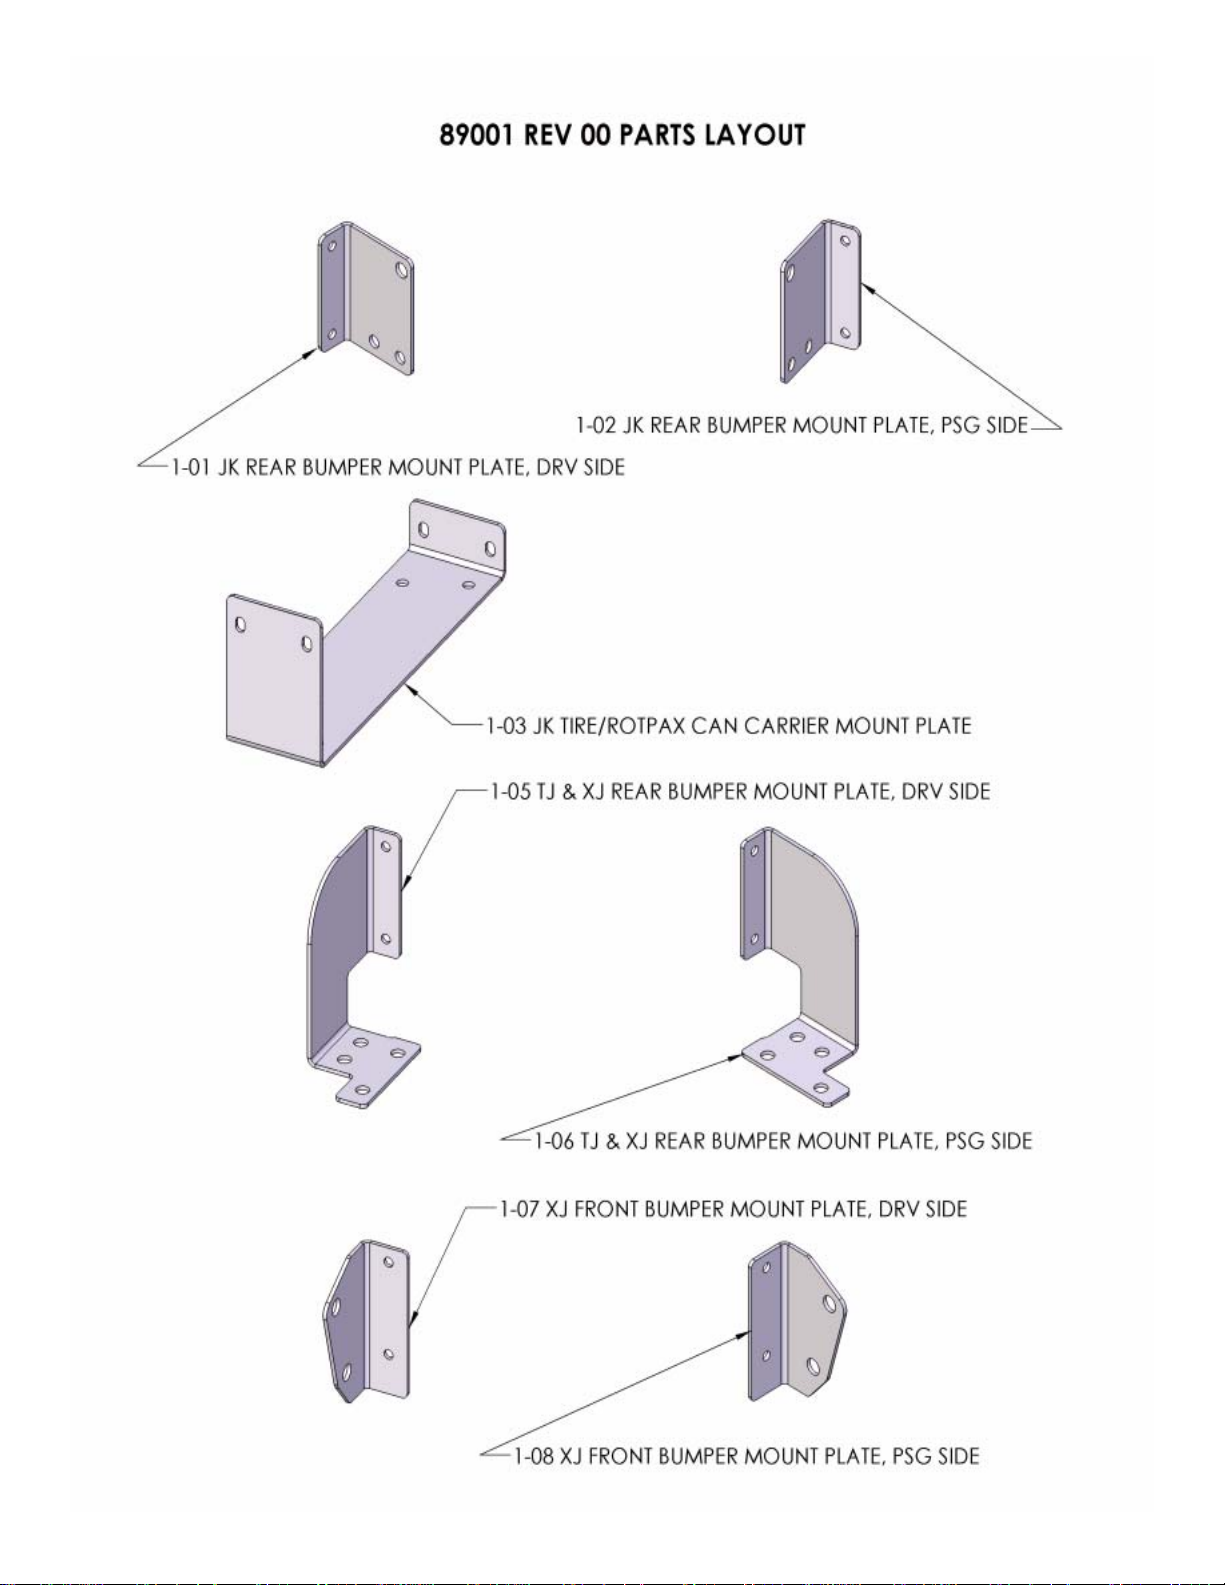
Locate JK Rear Bumper and two kit rear bumper mount plates(1-01 / 1-02)
Step 2:
Use four kit 5/16” bolts, washers & flange nuts to secure two kit rear bumper mount
plates (1-01 / 1-02) onto the kit bottom display tray(0-10) as shown in images.
(Reference arrows for placement.)
12 DISPLAY RACK #89000
Page 13
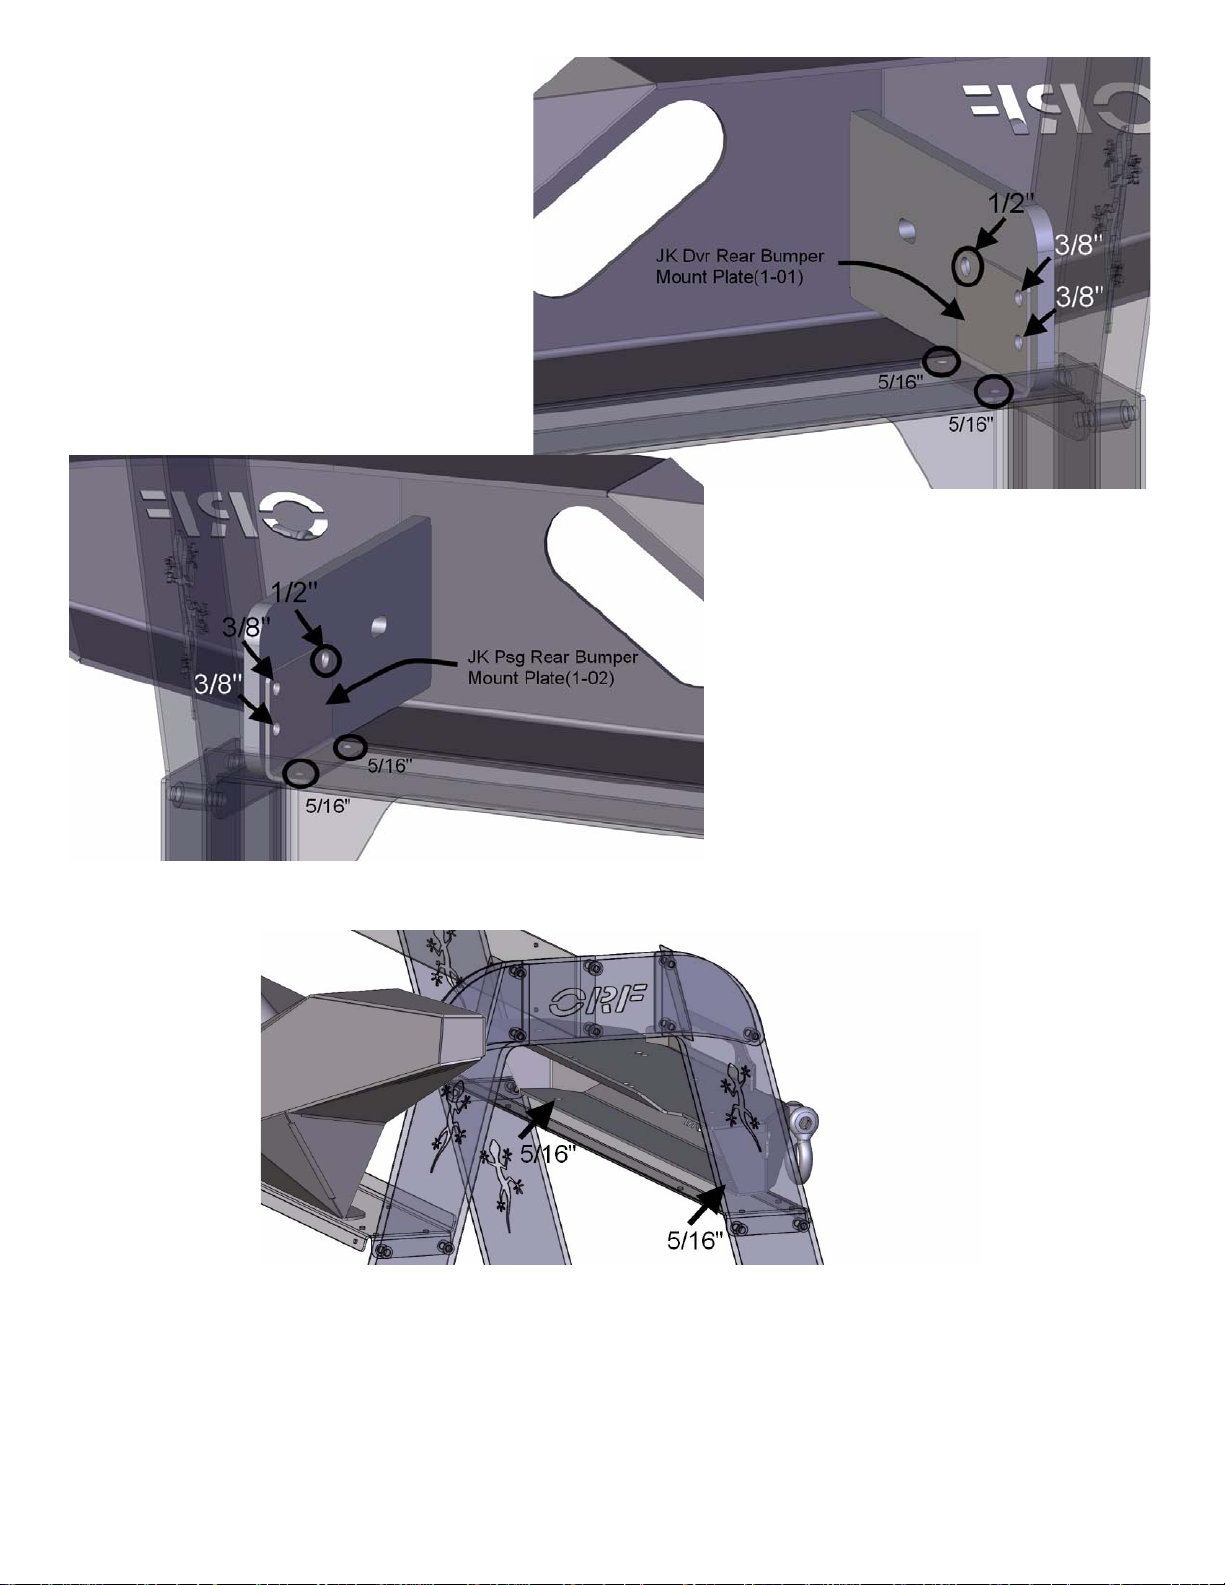
Step 3:
Locate JK Rear Bumper
Step 4:
Install one kit 1/2” and two kit 3/8” bolts,
nuts & washers through kit JK dvr. rear
bumper mount plate(1-01) and JK rear
bumper; securing JK bumper on left side of
display rack, as shown in image.
(Reference arrows for placement.)
Step 5:
Install one kit 1/2” and two kit 3/8” bolts,
nuts & washers through kit JK psg. rear
bumper mount plate(1-02) and JK rear
bumper; securing JK bumper on right side
of display rack, as shown in image.
(Reference arrows for placement.)
TJ Front Bumper Installation
Step 1:
Locate TJ Front Bumper
Step 2:
Use two kit 5/16” bolt s, washers(large), & flange nuts to
secure TJ front bumper onto the top display tray(0-09).
(Reference arrows for placement.)
(Repeat steps 1-2 to other side of display tray.)
13 DISPLAY RACK #89000
Page 14
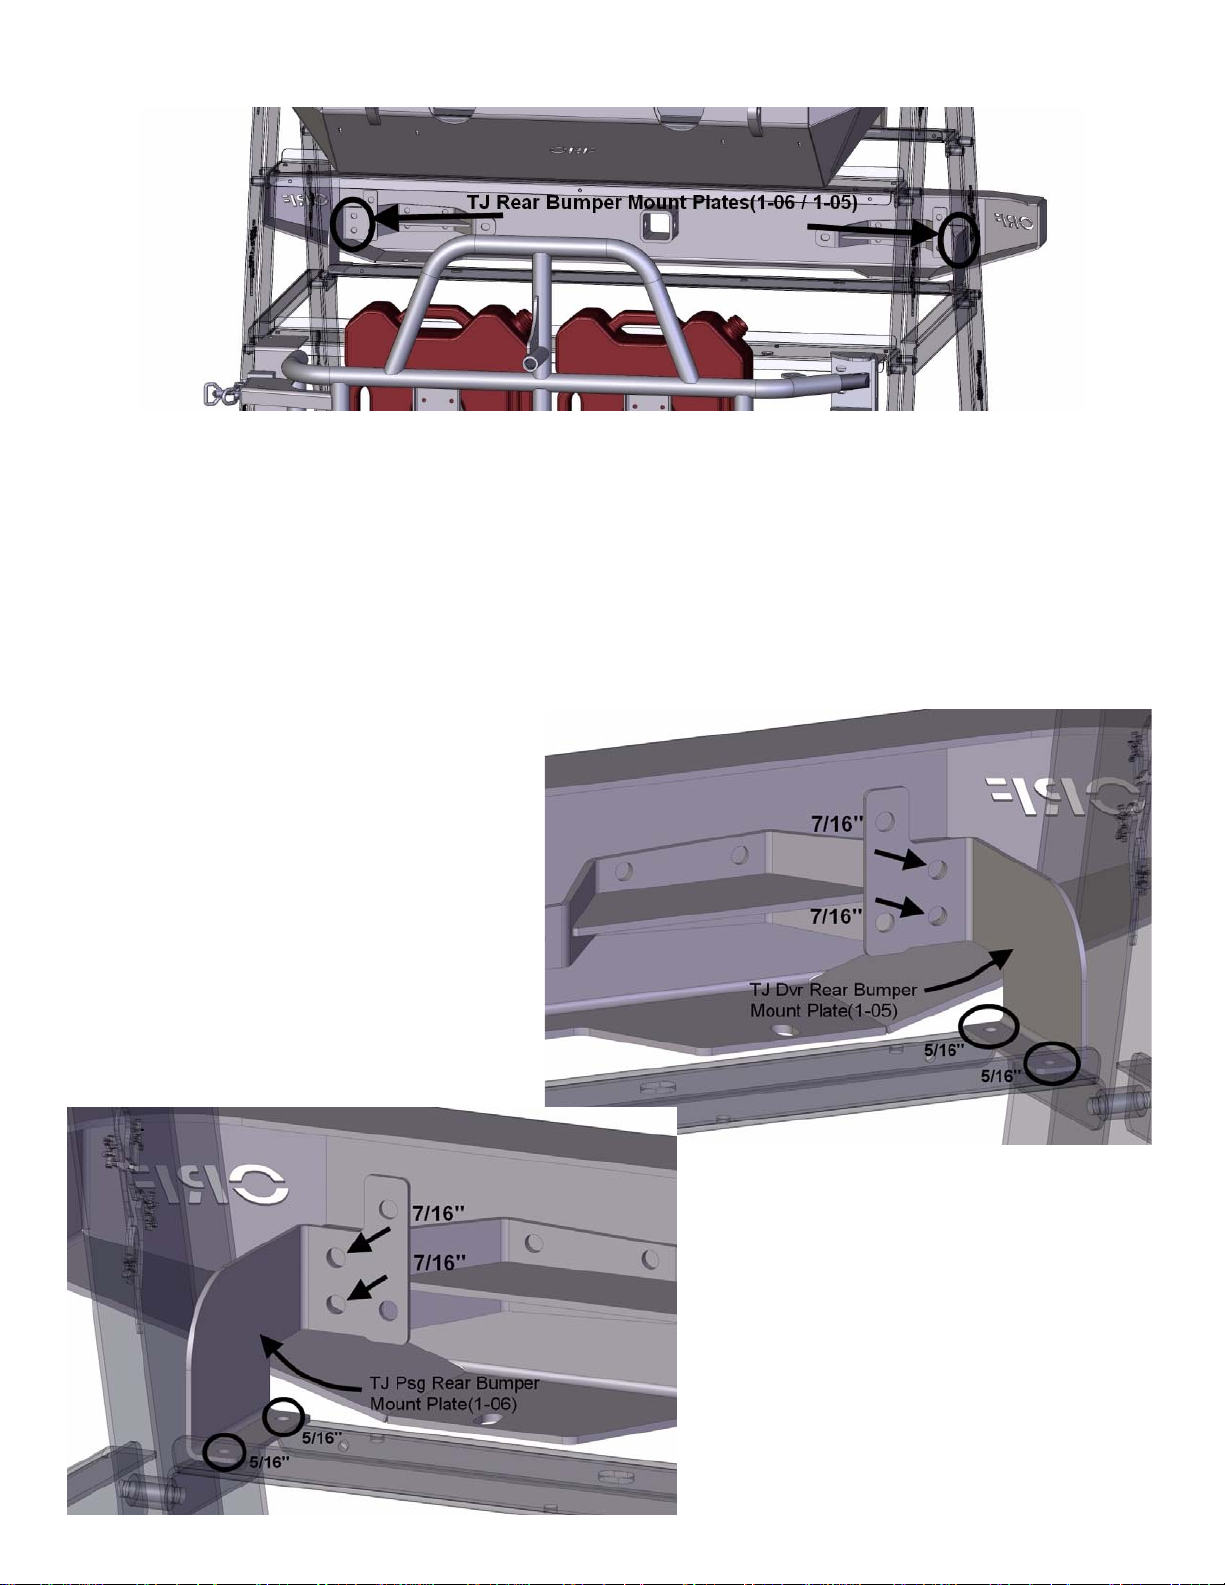
TJ Rear Bumper Installation
Step 1:
Locate TJ Rear Bumper and two kit rear bumper mount plates(1-05 / 1-06)
Step 2:
Use four kit 5/16” bolts, washers & flange nuts to secure two kit rear bumper mount
plates (1-05 / 1-06) onto the kit center display tray(0-09) as shown in images.
(Reference arrows for placement.)
Step 3:
Locate TJ Rear Bumper
Step 4:
Install one kit two kit 716” bolts, nuts &
washers through kit TJ dvr . rear bumper
mount plate(1-05) and TJ rear bumper;
securing TJ bumper on left side of display
rack, as shown in image.
(Reference arrows for placement.)
Step 5:
Install one kit two kit 716” bolts, nuts &
washers through kit TJ p sg. rear bumper
mount plate(1-06) and TJ rear bumper;
securing TJ bumper on right side of display
rack, as shown in image.
(Reference arrows for placement.)
14 DISPLAY RACK #89000
Page 15
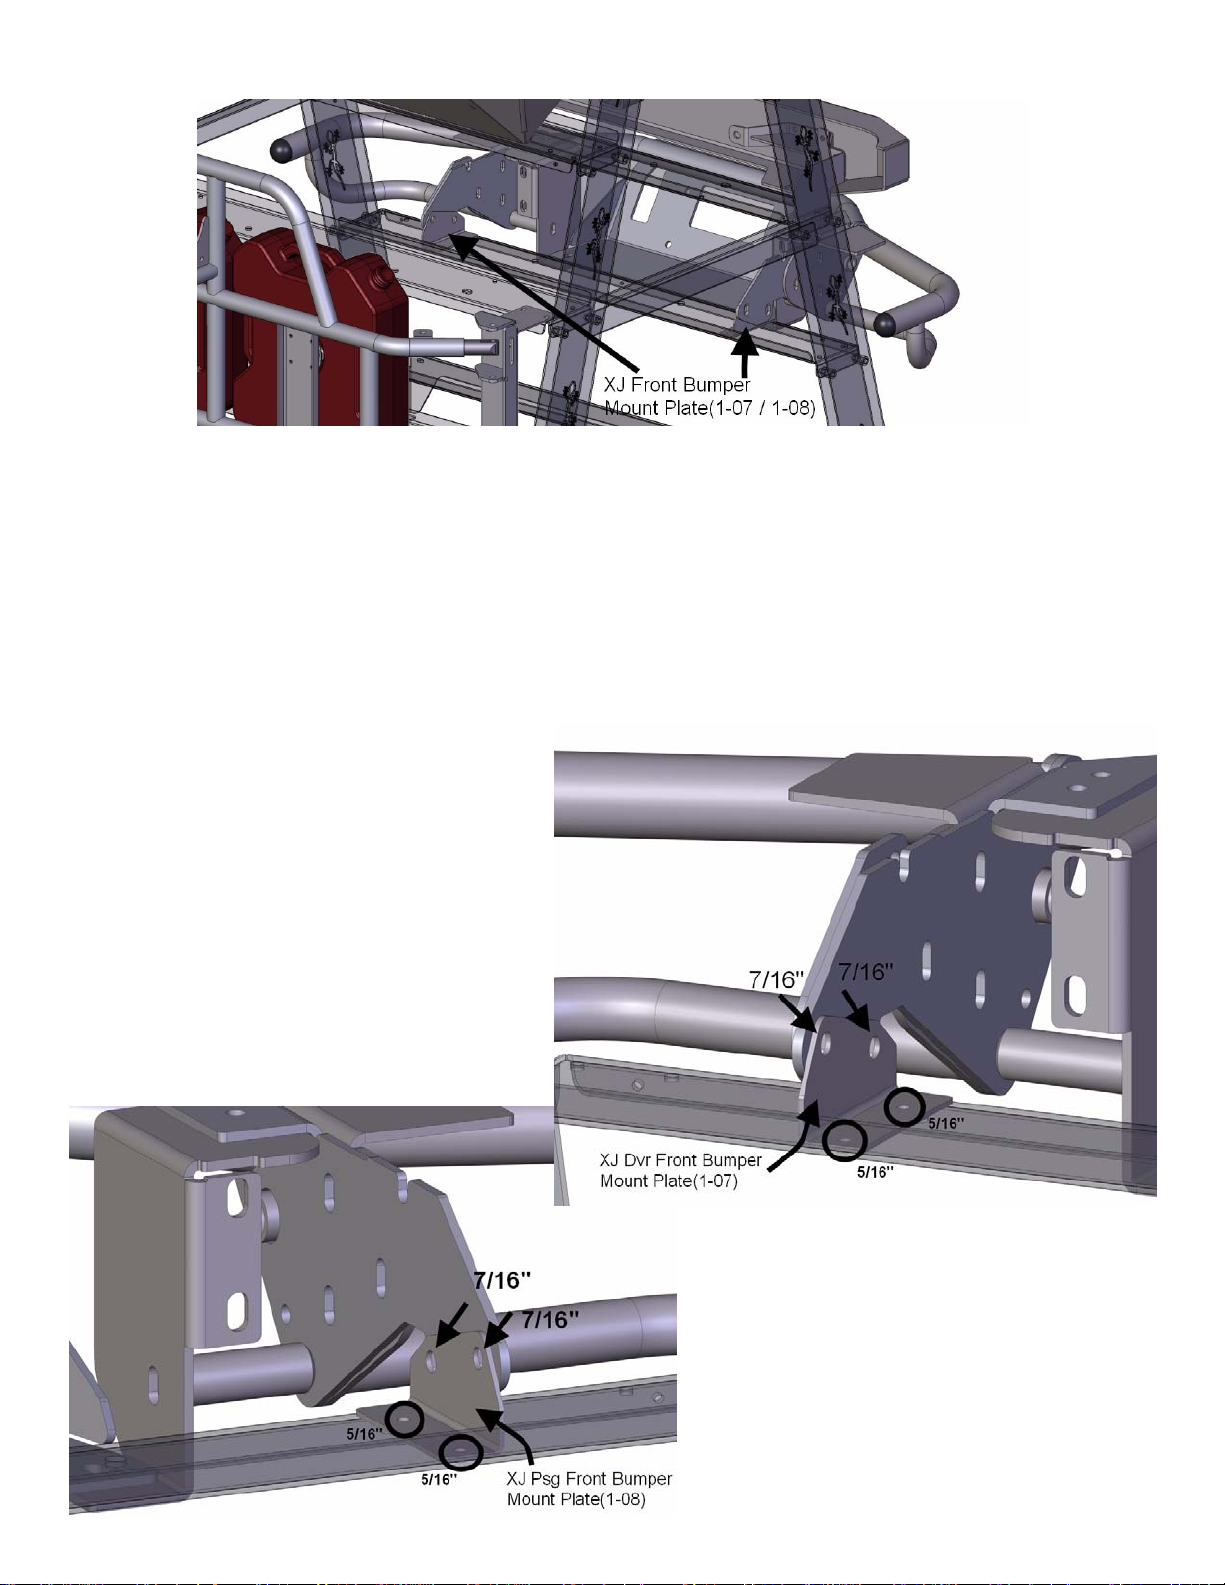
XJ Front Bumper Installation
Step 1:
Locate XJ Front Bumper and two kit front bumper mount plates(1-07 / 1-08)
Step 2:
Use XJ front bumper instructions and hardware to complete the assembly of the XJ front
bumper before installing it onto the kit brackets as shown in images.
Step 3:
Use four kit 5/16” bolts, washers & flange nuts to assemble two kit front bumper mount
plates (1-07 / 1-08) onto the kit lower display tray(0-09) as shown in images.
(Reference arrows for placement.)
Step 4:
Locate XJ Front Bumper
Step 5:
Install two kit 716” bolts, nuts & washers
through kit XJ dvr. front bumper mount
plate(1-07) and XJ front bumper; securing
XJ bumper on right side of display rack, as
shown in image.
(Reference arrows for placement.)
Step 6:
Install two kit 716” bolt s, nut s & washers
through kit XJ psg. front bumper mount
plate(1-08) and XJ front bumper; securing
XJ bumper on left side of display rack, as
shown in image.
(Reference arrows for placement.)
15 DISPLAY RACK #89000
Page 16
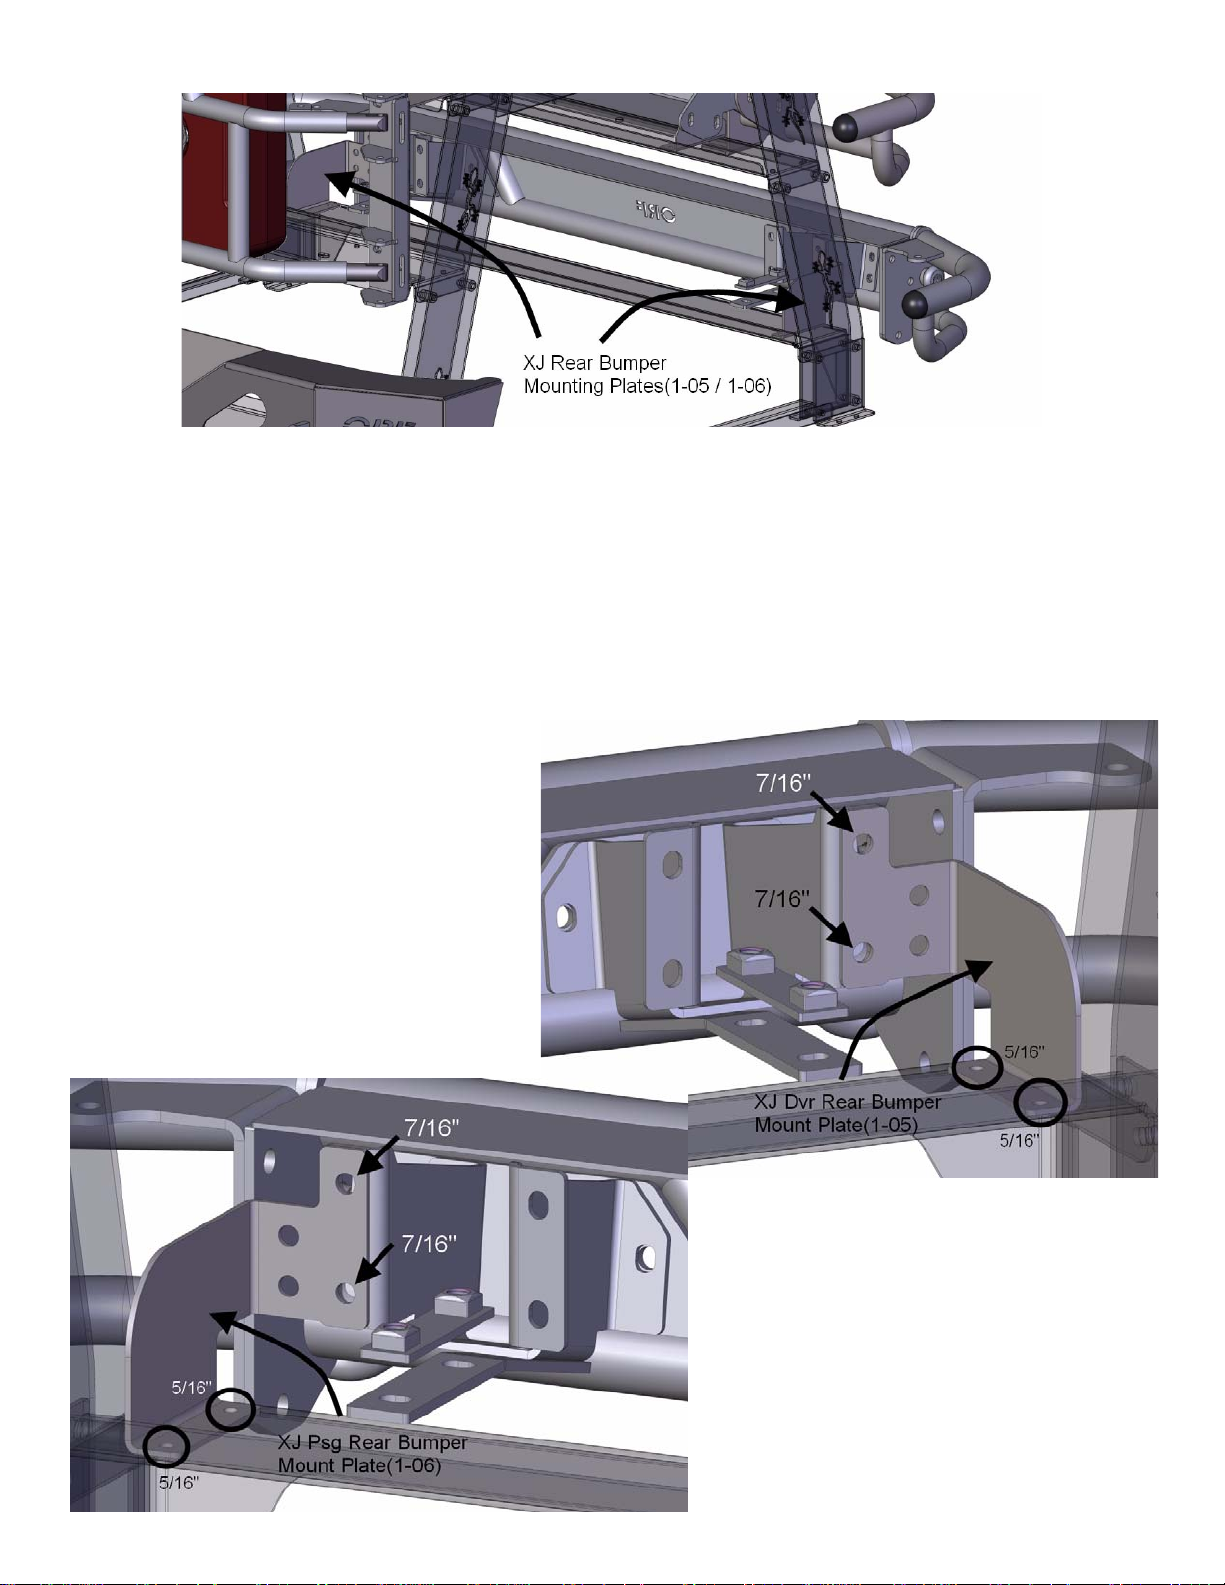
XJ Rear Bumper Installation
Step 1:
Locate XJ Rear Bumper and two kit rear bumper mount plates(1-05 / 1-06)
Step 2:
Use XJ rear bumper instructions and hardware to complete the assembly of the XJ rear
bumper, with rear body mount s, before installing it onto the kit brackets as shown in images.
Step 3:
Use four kit 5/16” bolts, washers & flange nut s to assemble two kit rear bumper mount
plates (1-05 / 1-06) onto the kit bottom display tray(0-10) as shown in images
(Reference arrows for placement.)
Step 4:
Locate XJ Rear Bumper
Step 5:
Install two kit 716” bolts, nuts & washers
through kit XJ dvr. rear bumper mount
plate(1-05) and XJ rear bumper; securing
XJ bumper on left side of display rack, as
shown in image.
(Reference arrows for placement.)
Step 6:
Install two kit 716” bolts, nuts & washers
through kit XJ psg. rear bumper mount
plate(1-06) and XJ rear bumper; securing
XJ bumper on right side of display rack, as
shown in image.
(Reference arrows for placement.)
16 DISPLAY RACK #89000
Page 17
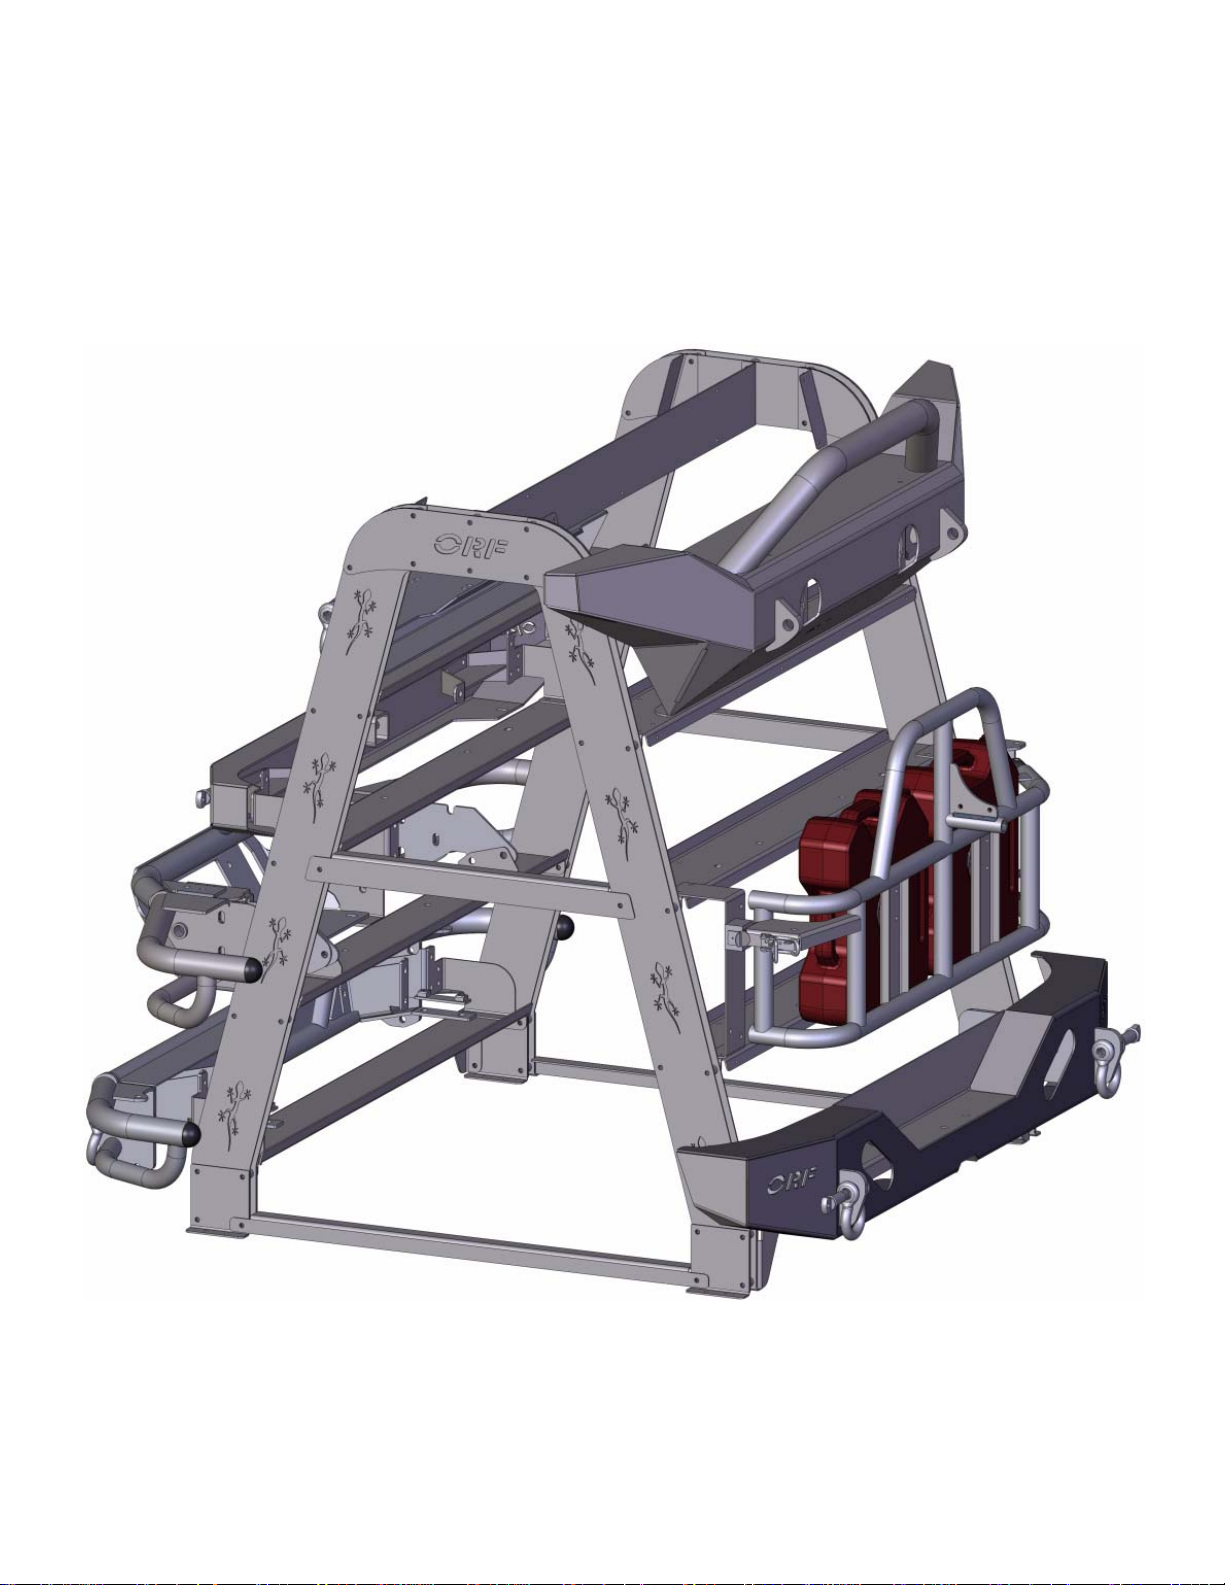
JEEP Wangler JK Display Side Assembled
17 DISPLAY RACK #89000
Page 18
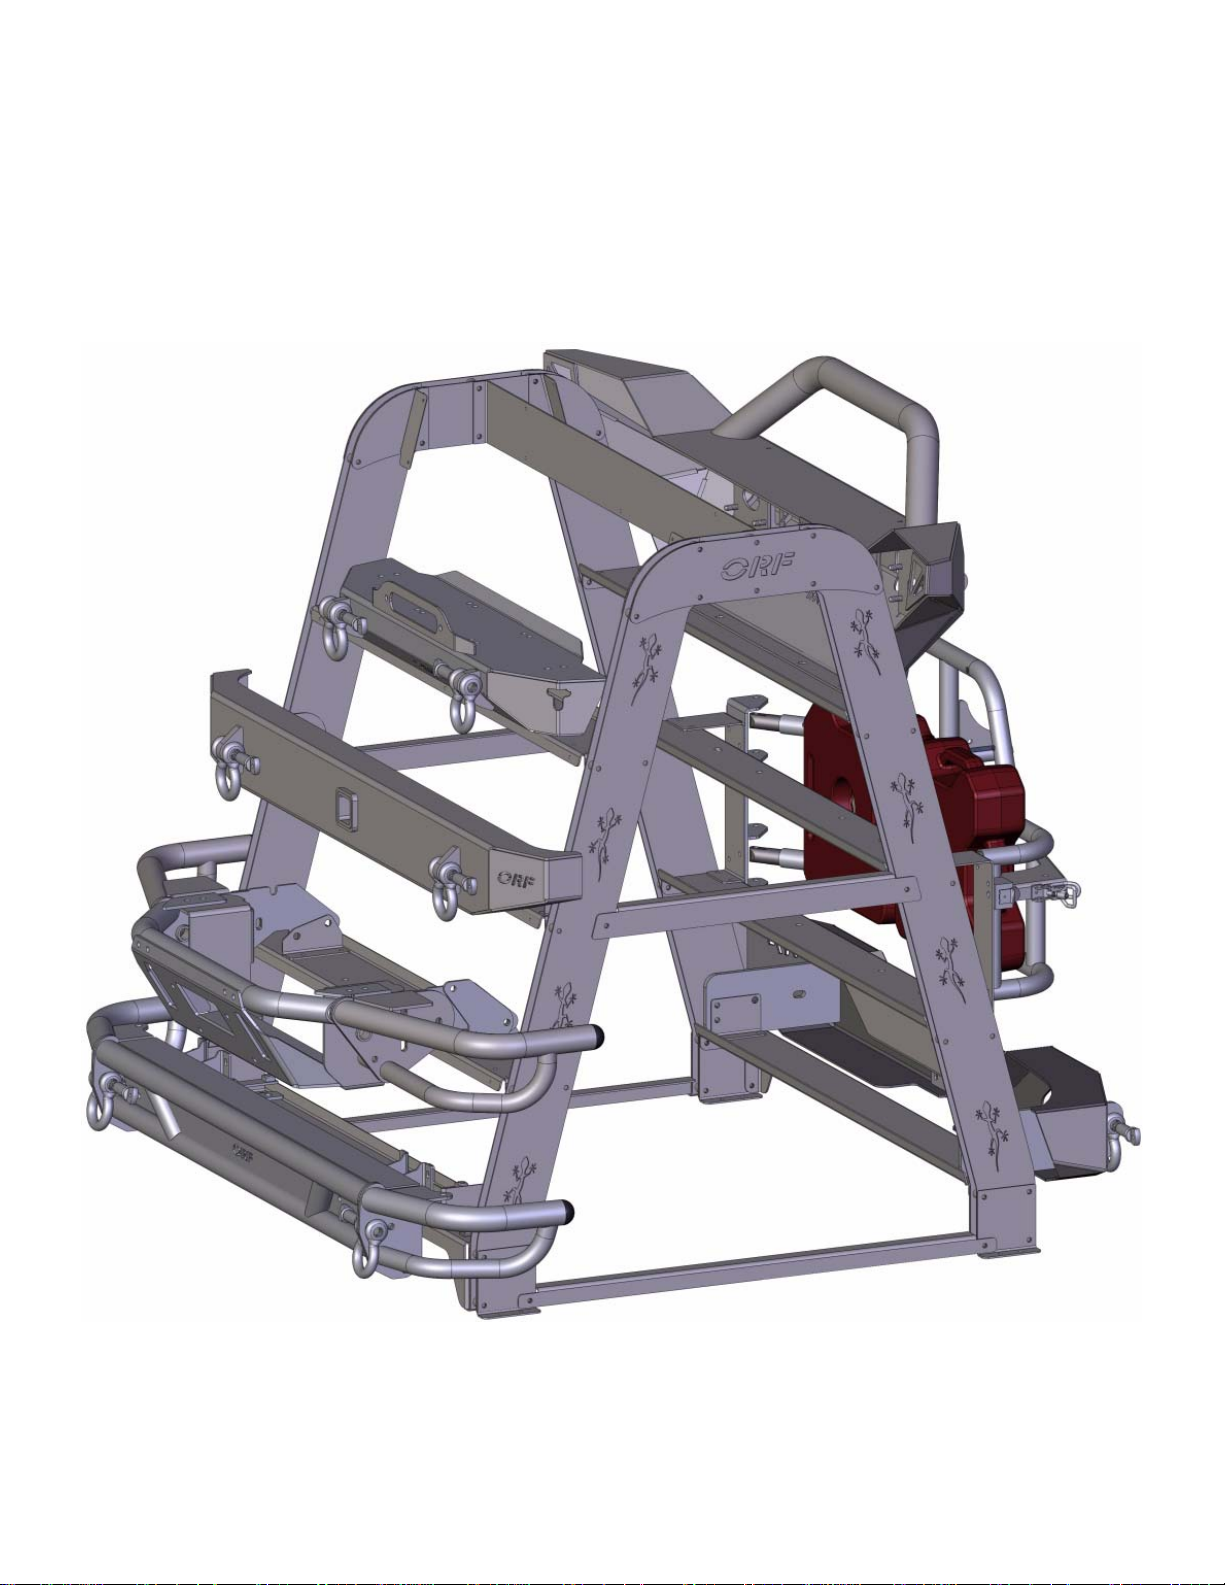
JEEP Wangler TJ & Cherokee XJ Display Side Assembled
18 DISPLAY RACK #89000
 Loading...